
SV10.8 SERIES CORDLESS PRUNING SAW
10.8V - BODY ONLY
MODEL NO: CP108VPSBO
Thank you for purchasing a Sealey product. Manufactured to a high standard, this product will, if used according to these instructions,
and properly maintained, give you years of trouble free performance.
IMPORTANT: PLEASE READ THESE INSTRUCTIONS CAREFULLY. NOTE THE SAFE OPERATIONAL REQUIREMENTS, WARNINGS & CAUTIONS. USE
THE PRODUCT CORRECTLY AND WITH CARE FOR THE PURPOSE FOR WHICH IT IS INTENDED. FAILURE TO DO SO MAY CAUSE DAMAGE AND/OR
PERSONAL INJURY AND WILL INVALIDATE THE WARRANTY. KEEP THESE INSTRUCTIONS SAFE FOR FUTURE USE.
1. SAFETY
NOTE:Seekprofessionaladviceandtrainingtoensuresafeandeectiveuseofthistool.
WARNING! Read all safety warnings, instructions, illustrations and specications provided with this tool. Failure to follow all
instructions listed below may result in electric shock, re and/or serious injury.
9 Save all warning and instructions for future reference.
WARNING! Disconnect the saw from the battery unit before changing accessories, servicing, performing any maintenance or storing.
1.1. WORK AREA SAFETY
9 Keep work area clean and well lit. Cluttered or dark area invites accidents
8 DO NOT operate power tools in explosive atmospheres, such as in the presence of ammable liquids, gases, or dust. Power tools
create sparks which may ignite the dust or fumes.
9 Keep children and bystanders away whilst operating a power tool. Distractions can cause you to lose control.
1.2. ELECTRICAL SAFETY
Avoid body contact with earthed or grounded surfaces, such as pipes, radiators, ranges, and refrigerators. There is an increased risk
of electric shock if your body is earthed or grounded.
8 DO NOT expose power tools to rain or wet conditions. Water entering a power tool will increase the risk of electric shock.
1.3. PERSONAL SAFETY
8 DO NOT use a power tool whilst you are tired or under the inuence of drugs, alcohol, or medication. A moment inattention whilst
operating power tools may result in serious injury.
8 DO NOT overreach. Keep proper footing and balance at all times. This enables better control of the power tool in unexpected
situations.
8 Dress properly. DO NOT wear loose clothing or jewellery. Keep your hair and clothing away from moving parts. Loose clothes,
jewellery or long hair can be caught in moving parts.
8 DO NOT let familiarity gained from frequent use of tools allow you to become complacent and ignore tool safety principles. A
careless action can cause severe injury within a fraction of a second.
9 Stay alert, watch what you are doing and use common sense when operating a power tool.
9 Use personal protective equipment. Always wear eye protection. Protective equipment such as dust mask, non-skid safety shoes,
hard hat or hearing protection use for appropriate conditions will reduce personal injuries.
9 Prevent unintentional starting. Ensure the switch is in the o position before connecting to power source and/or battery pack, picking
up or carrying the tool. Carrying power tools with your ngers on the switch or energising power tools that have the switch on invites
accidents.
9 Remove any adjusting key or wrench before turning the power tool on. A wrench or a key left attached to a rotating part of the power
tool may result in personal injury.
1.4. POWER TOOL USE AND CARE
8 DO NOT force the power tool. Use the correct power tool for your application. The correct power tool will do the job better and safer
at the rate for which it was designed.
8 DO NOT use the power tool if the switch does not turn it on and o. Any power tool that cannot be controlled with the switch is
dangerous and must be repaired.
9 Remove the battery pack, if detachable, from the power tool before making any adjustments, changing accessories, or storing power
tools. Such preventive safety measures reduce the risk of starting the power tool accidentally.
9 Store idle power tools out of the reach of children and DO NOT allow persons unfamiliar with these power tools or these instructions
to operate the power tool. Power tools are dangerous in the hands of untrained users.
9 Maintain power tools and accessories. Check for misalignment or binding of the moving parts, breakage of parts and any other
condition that may aect the power tool’s operation. If damaged, have the power tool repaired before use. Many accidents are
caused by poorly maintained power tools.
Refer to
instructions
Wear eye
protection
Wear protective
gloves
Original Language Version
© Jack Sealey Limited
CP108VPSBO Issue 3 18/02/25
Keep Dry Wear head
protection
Wear ear
protection
Wear protective
clothing
Wear safety
footwear
Wear face
shield
Beware of
Kickback
Keep bystanders
away
Use both hands Appropriate
Protection Foot-
leg, Hand-Arm
Avoid touching
tip to avoid
kickback

9 Keep cutting tools sharp and clean. Properly maintained cutting tools with sharp cutting edges are less likely to bind and are easier
to control.
9 Use the power tool, accessories, and tool bits etc, in accordance with these instructions, taking into account the working conditions
and the work to be performed.
9 Use of the power tool for operations dierent from those intended could result in a hazardous situation.
9 Keep handles and grasping surfaces dry, clean, and free from oil and grease. Slippery handles and grasping surfaces DO NOT
allow for safe handling and control of the tool in unexpected situations.
1.5. SERVICE
9 Have your power tool serviced by a qualied repair person using only identical replacement parts. This will ensure that the safety of
the power tool is maintained.
WARNING!: Never service damaged battery packs. Service of battery packs should only be performed by the manufacturer or
authorised service providers.
1.6. BATTERY TOOL USE AND CARE
8 DO NOT expose a battery pack or tool to re or excessive temperature. Exposure to re or temperature above 130°C may cause
explosion.
8 DO NOT use a battery pack or tool that is damaged or modied. Damaged or modied batteries may exhibit unpredictable
behaviour resulting in re, explosion, or risk of injury.
WARNING!: Before installing the battery cartridge into the tool, always check to see that the switch trigger actuates properly and
returns to the “OFF” position when released.
NOTE: The tool does not work with only one battery cartridge.
9 Ensure battery pack is correctly inserted into the tool handle and latched in place before attempting to switch it on.
9 Follow all charging instructions and DO NOT charge the battery pack or tool outside the temperature range specied in the
instructions. Charging improperly or at temperatures outside the specied range may damage the battery and increase the risk of
re.
9 Recharge only with the charger specied by the manufacturer. A charger that is suitable for one type of battery pack may create a
risk of re when used with another battery pack.
9 Use power tools only with specically designated battery packs. Use of any other battery packs may create a risk of injury and re.
9 When battery pack is not in use, keep it away from other metal objects, like paper clips, coins, keys, nails, screws, or other small
metal objects, that can make a connection from one terminal to another.
9 Shorting the battery terminals together may cause burns or a re.
9 Under abusive conditions, liquid may be ejected from the battery; avoid contact. If contact accidentally occurs, ush with water. If liquid
contacts eyes, additionally seek medical help. Liquid ejected from the battery may cause irritation or burns.
1.6.1. To remove the battery cartridge, slide it from the tool while sliding the button on the front of the cartridge.
1.6.2. To install the battery cartridge, align the tongue on the battery cartridge with the groove in the housing and slip it into place. Insert it
all the way until it locks in place with a little click.
1.6.3. WARNING!: Always install the battery cartridge fully. If not, it may accidentally fall out of the tool, causing injury to you or someone
around you.
8 DO NOT install the battery cartridge forcibly. If the cartridge does not slide in easily, it is not being inserted correctly.
1.7. CHAINSAW SAFETY WARNINGS
NOTE: This product is not suitable for tree felling.
WARNING!: Ensure the saw is switched o before installing the battery pack.
WARNING!: To prevent the switch trigger from being accidentally pulled, a lock-o lever is provided. To start the tool, depress the lock-
o lever and pull the switch trigger, push the front hand guard backwards with your nger at the same time. Tool speed is increased by
increasing pressure on the switch trigger. Release the switch trigger to stop.
8 DO NOT operate a chainsaw in a tree, on a ladder, from a rooftop, or any unstable support. Operation of a chainsaw in this manner
could result in serious personal injury.
9 Keep all parts of the body away from the saw chain when the chainsaw is operating.
9 Before you start the chainsaw, make sure the saw chain is not contacting anything.
9 A moment of inattention while operating chainsaws may cause entanglement of your clothing or body with the saw chain.
9 Always hold the chainsaw with your right hand on the rear handle and your left hand on the front handle. Holding the chainsaw with
a reversed hand conguration increases the risk of personal injury and should never be done.
9 Hold the chainsaw by insulated gripping surfaces only, because the saw chain may contact hidden wiring. Saw chains contacting a
live wire may make exposed metal parts of the chainsaw live’ and could give the operator an electric shock.
9 Wear eye protection. Further protective equipment for hearing, head, hands, legs, and feet is recommended. Adequate protective
equipment will reduce personal injury from ying debris or accidental contact with the saw chain.
9 Always keep proper footing and operate the chainsaw only when standing on xed, secure, and level surface. Slippery or unstable
surfaces may cause a loss of balance or control of the chainsaw.
9 When cutting a limb that is under tension, be alert for spring back. When the tension in the wood bres is released, the spring-
loaded limb may strike the operator and/or throw the chainsaw out of control.
9 Use extreme caution when cutting brush and saplings. The slender material may catch the saw chain and be whipped toward you
or pull you o balance.
9 Carry the chainsaw by the front handle with the chainsaw switched o and away from your body. NOTE: Mass is 3.5kg.
9 When transporting or storing the chainsaw, always t the guide bar cover.
9 Proper handling of the chainsaw will reduce the likelihood of accidental contact with the moving saw chain.
9 Follow instructions for lubricating, chain tensioning and changing the bar and chain. Improperly tensioned or lubricated chain may
either break or increase the chance for kickback.
9 Cut wood only. DO NOT use chainsaw for purposes not intended. For example: DO NOT use chainsaw for cutting metal, plastic,
masonry, or non-wood building materials.
9 Use of the chainsaw for operations dierent than intended could result in a hazardous situation.
9 Use of the chainsaw for operations dierent than intended could result in serious injury to the operator or bystanders.
9 Follow all instructions when clearing jammed material, storing, or servicing the chainsaw.
9 Make sure the switch is o and the battery pack is removed. Unexpected actuation of the chainsaw while clearing jammed material
or servicing may result in serious personal injury.
Original Language Version
© Jack Sealey Limited
CP108VPSBO Issue 3 18/02/25
9 Recommendation for rst-time users to, as a minimum, practise cutting logs on a saw-horse or cradle.
9 Maintain a rm grip, with thumbs and ngers encircling the chainsaw handles, with both hands on the saw and position your body and
arm to allow you to resist kickback forces. Kickback forces can be controlled by the operator if proper precautions are taken. DO NOT
let go of the chainsaw.
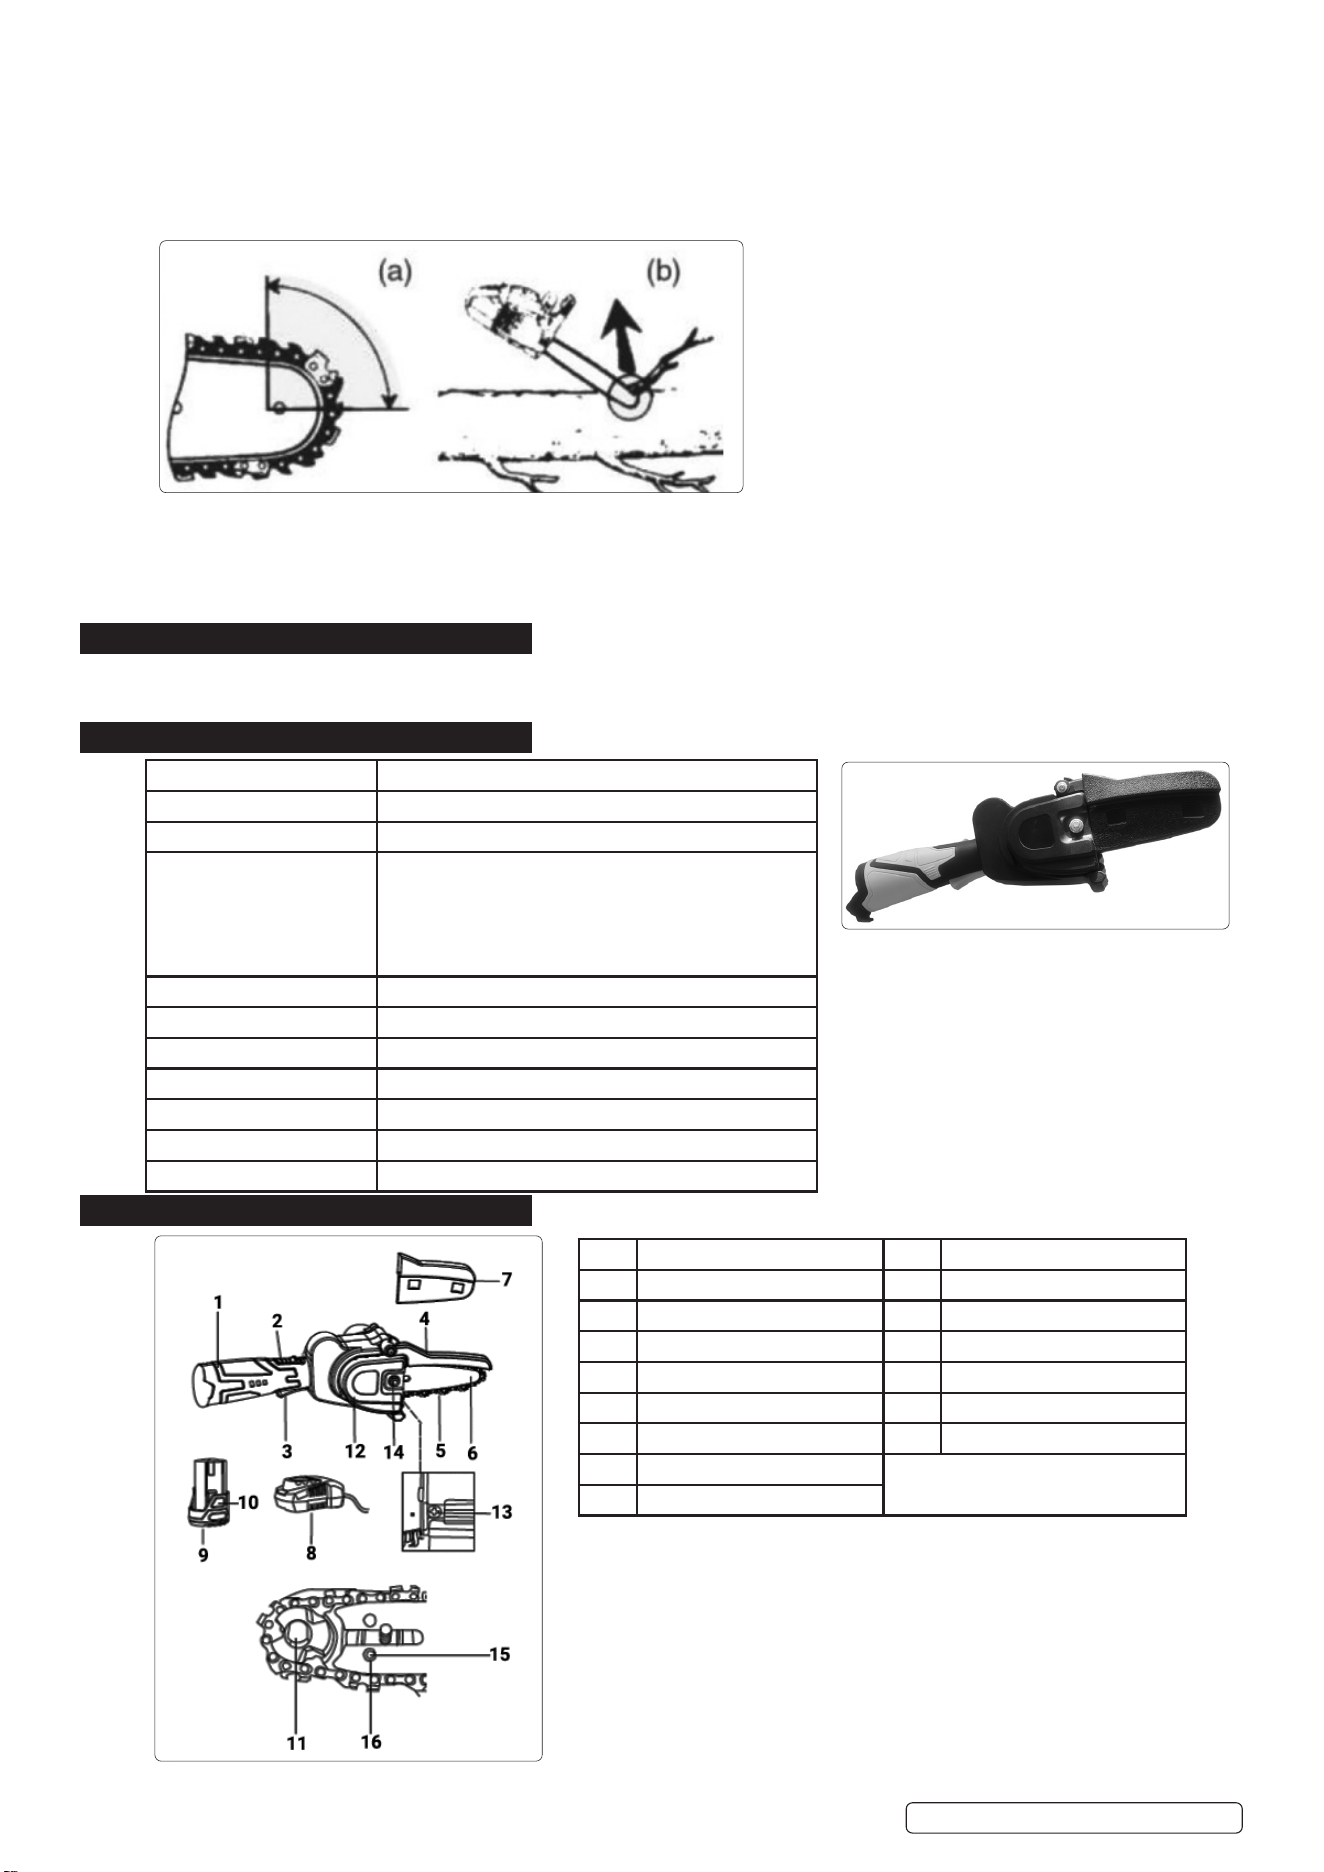
CAUSES AND OPERATOR PREVENTION OF KICKBACK
Beware of kickback! Be careful of kickback of the machine during work.
There is danger of injury here. You can avoid kickbacks by exercising caution and using a correct sawing technique.
9 DO NOT overreach and DO NOT cut above shoulder height. This helps prevent unintended tip contact and enables better control of
the chainsaw in unexpected situations.
WARNING: When sawing precut timber, use a safe support (saw horse or cradle). DO NOT steady the workpiece with your foot, and
do not allow anyone else to hold or steady it.
WARNING: Secure round pieces against rotation.
2. INTRODUCTION
Lightweight, cordless pruning saw makes gardening easy, clean and eective. Ideal for cutting and pruning branches, cutting up
garden waste and waste wood.
3. SPECIFICATION
4. OVERVIEW
Model No CP108VPSBO
Chain 4” CP108VPSBO-02
Chain speed 5 m/s
Consumable Parts CP108VBP - 2Ah Battery, CP108VBP4 - 4Ah
Battery
CP108VMC-Fast Charge Battery Charger 10.8V
CP108VMC2-Fast Charge Dual Battery Charger for
10.8V
Cutting Depth 95mm
Motor Power 200W
Nett Weight 0.92kg
Noise Power/Pressure 98/87dB(A)
No-Load Speed 3200rpm
Protection class IPX0
Vibration/Uncertainty: 1.586/1.5m/s²
1 Main handle 10 Release button
2 Switch lock 11 Chain sprocket
3 On/O switch 12 Sprocket cover
4 Front hand protection 13 The screw
5 Saw chain 14 Fixing nut
6 Chain bar 15 Chain tensioner pin
7 Protective cover 16 Hole
8 Charger (not included)
9 Battery pack (not included)
© Jack Sealey Limited
Original Language Version
CP108VPSBO Issue 3 18/02/25
Original Language Version
© Jack Sealey Limited
5. PREPARATION
NOTE: Always wear protective gloves when working with the chainsaw and employ only original parts. Risk of injury!
5.1. Switchothedeviceandremovethebatterybeforecarryingoutassembly.
WARNING! Switch o the device and remove the battery before carrying out any maintenance work.
NOTE: Before putting the Pruner saw into operation, you must:
- adjust the saw chain tension.
- lubricate the saw chain.
- charge and insert the battery.
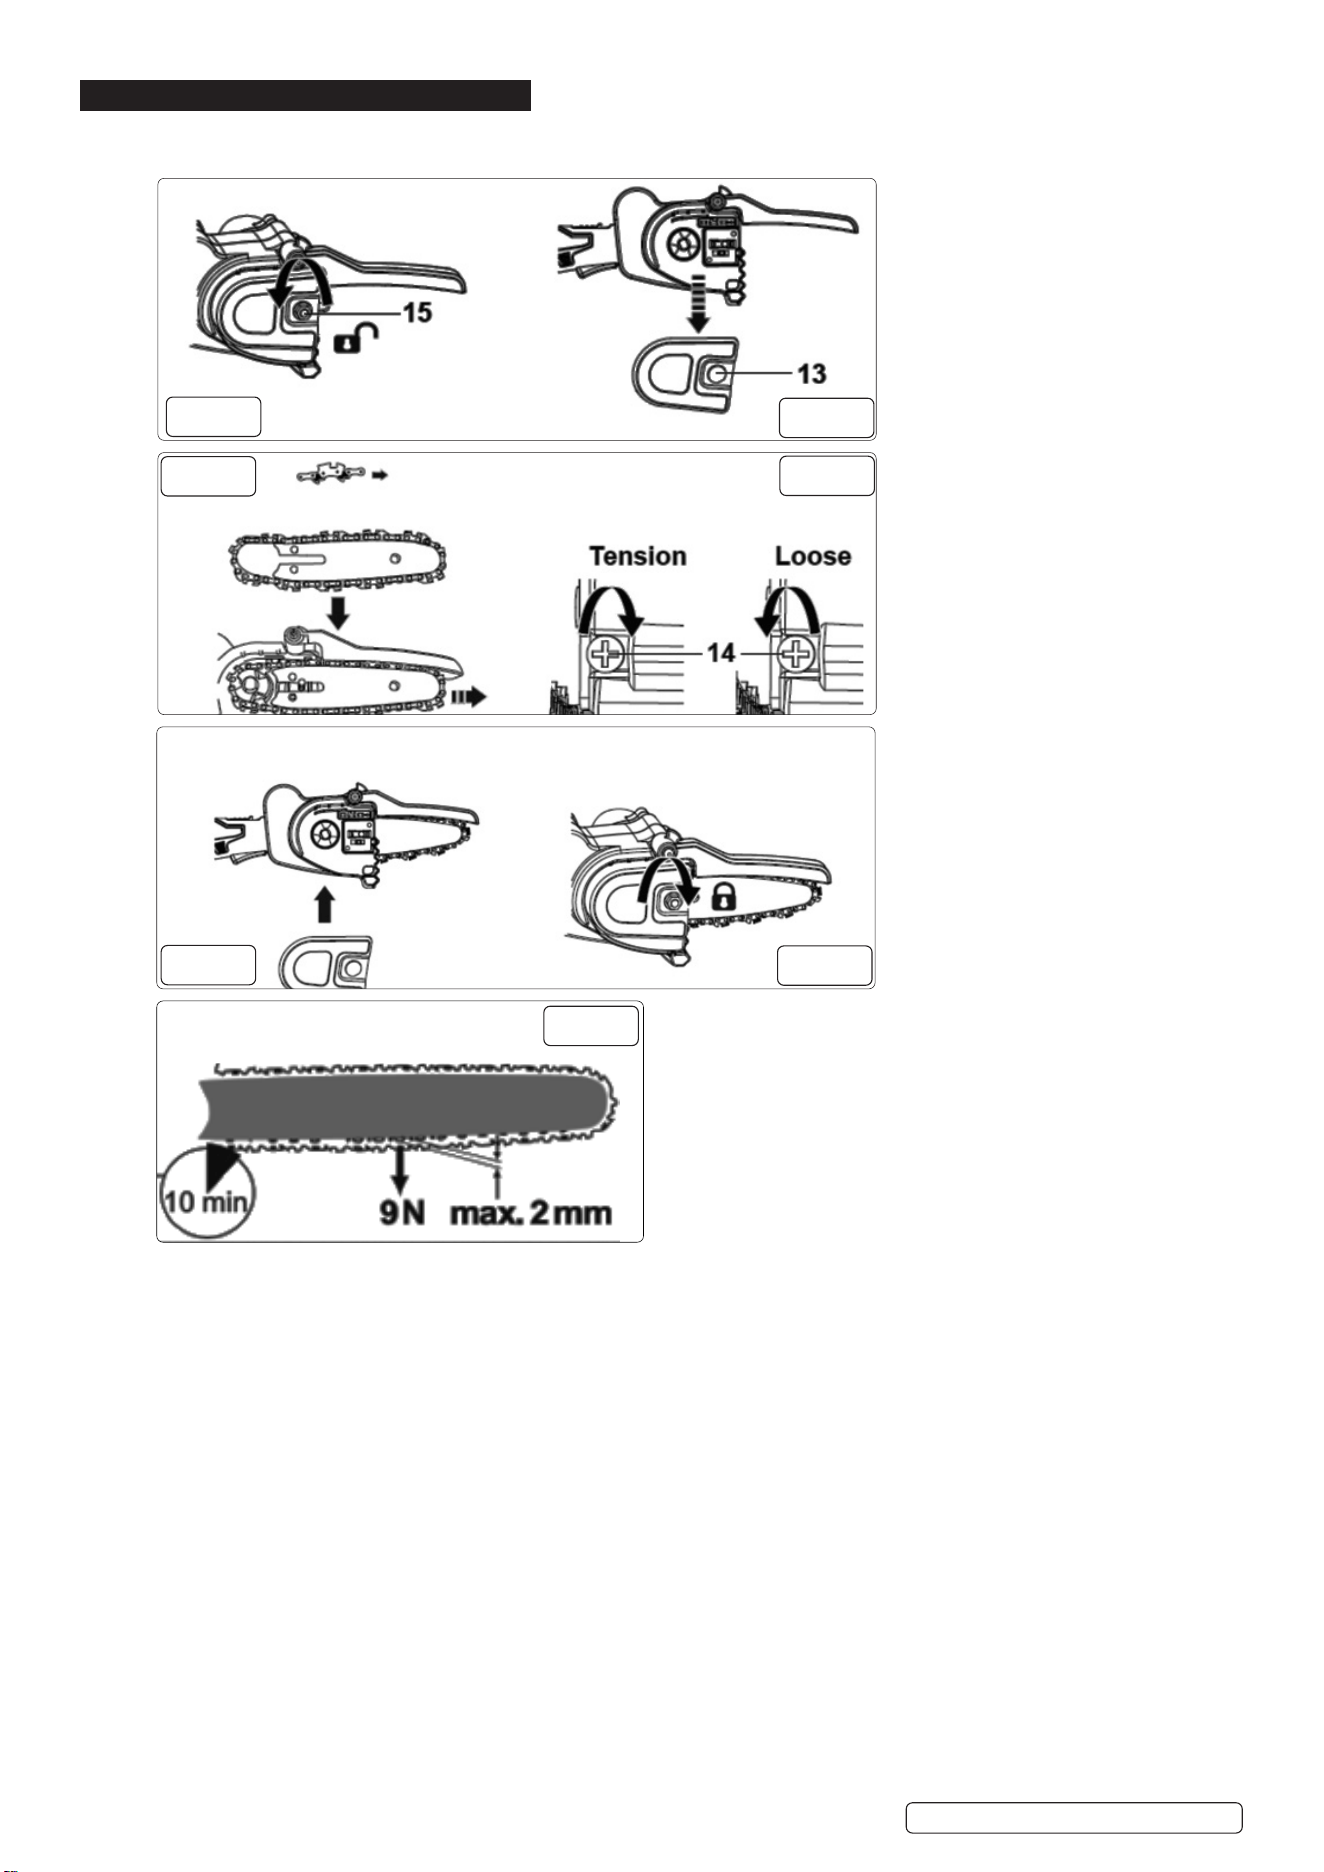
5.2. TENSIONING THE SAW CHAIN
5.3. Regularly tightening the saw chain provides safety for the user and reduces and/or prevents wear and chain damages. Before the
start of work and in approx. 10 minute intervals, we recommend the user to examine the chain tension and correct it, if necessary. The
chain warms up when working with the saw and thus expands slightly. These “expansions” can be expected especially from newer
chains.
8 DO NOT re-tighten or change the chain when it is hot because it shrinks slightly once it has cooled down. In case of non-observance,
this can lead to damages on the guide rail or the engine because now the chain is too taut on the blade. Chain tension and chain
lubrication have a signicant impact on the service life of the chain.
5.4. The chain is correctly tensioned if it does not sag at the rail underside and can be rotated completely around with the gloved hand.
When the saw chain is tensioned with 9 N (approx. 1 kg), the gap between the saw chain and the guide rail may not be more than
2 mm.
5.5. Switch o the device and remove the battery before carrying out any maintenance work.
5.6. Tensioning the saw chain (6) by turning the screw (14) clockwise.
5.7. The chain tension of a new saw chain must be readjusted after a maximum of 5 cuts
5.8. CHANGING THE CHAIN BAR AND SAW CHAIN
5.8.1. Place the device on a level surface.
5.8.2. Turning the xing nut (15) counter-clockwise (g.1 ).
5.8.3. Remove the sprocket cover (13) (g.2 ).
g.2
g.1
g.4
g.3
g.5
g.6
g.7
CP108VPSBO Issue 3 18/02/25
Original Language Version
© Jack Sealey Limited
5.8.4. Turning the screw (14) counter-clockwise to loosing the saw chain (6) (g.4).
5.8.5. Remove the old saw chain (6) and chain bar (7) (g.6).
5.8.6. Spread out the saw chain (6) in a loop so that the cutting edges are aligned in a clockwise direction. Use the graphical symbol above
the chain sprocket (12) as a guide to align the saw chain (6). Place the new saw chain (6) into the chain bar (7) groove (g.3).
Direction of travel of saw chain.
5.8.7. Place the saw chain (6) over the chain sprocket (12) (g.3 ).
5.8.8. Pull the chain bar (7) to the right, so that the chain tensioner pin (16) locks into the hole (17) on the chain bar (7) (g.3).
5.8.9. Turning the screw (14) clockwise to make the chain tensioner pin (16) to the correct position (g.4 ).
5.8.10. Put the sprocket cover (13) on (g.5 ).
5.8.11. Tighten the xing nut (15) (g.6).
CAUTION! The garden pruner can be prone to oil leaks.
NOTE: Prior to changing the saw chain, the groove of the guide rail must be cleaned of dirt because dirt deposits available can cause
the saw chain to break out of the rail. The deposits can also absorb the chain oil. So the consequence would be that the chain oil
would not or only a small part of it would reach the underside of the rail and the lubrication would be reduced.
6. OPERATION
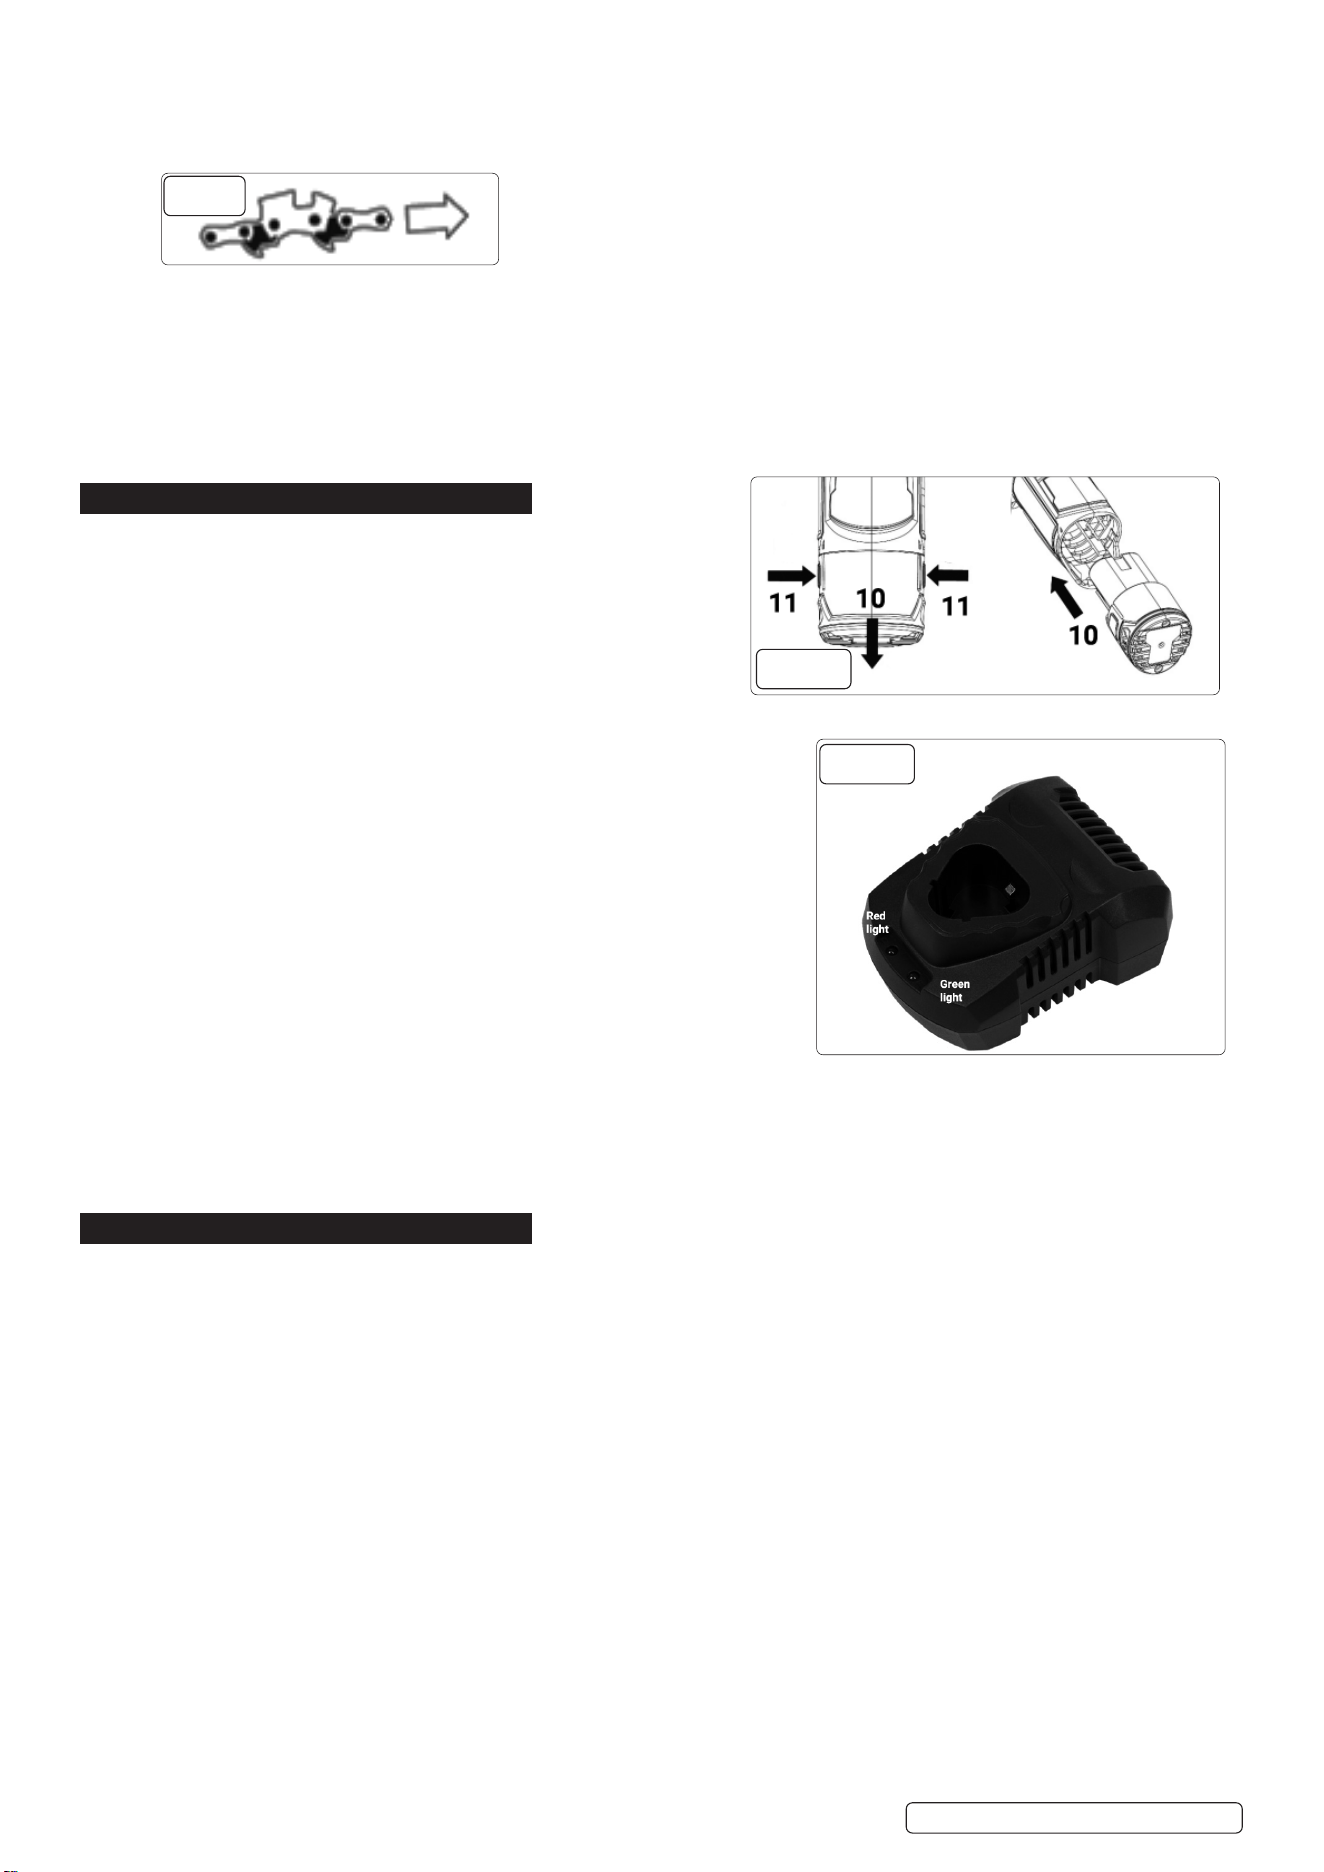
6.8.1. REMOVING/INSERTINGTHERECHARGEABLEBATTERY(g.8)
6.8.2. To insert the batteries (10) into the device, push the batteries
along the guide rails into the device. You will hear them click into place.
6.8.3. To remove the batteries (10) from the device, press the release button
(11) on the batteries and pull the batteries out.
6.1. BATTERYPACKCHARGING(FIG.9)
6.1.1. Before rst use, please fully charge the battery pack (10)
6.1.2. Connect the charger plug to the power supply, the green LED will light up.
6.1.3. Insert the battery pack (10) into the docking station of charger (9), the red LED will light up.
6.1.4. After the battery pack is fully charged, the Green LED will light up.
NOTE: The charger’s docking station does not automatically turn o after the
battery pack is fully charged.
NOTE: The charger may become warm when charging,
this is normal and does not indicate a fault with the charger.
The charging time is inuenced by factors such as the temperature
of the environment and the battery, as well as the mains voltage
applied, and may therefore deviate from the specied values.
6.1.5. Switch on the pruner saw only when chain bar, saw chain and sprocket
cover are correctly assembled.
6.1.6. Make sure you have a secure stance. Before starting, ensure that the
pruner saw is in contact with no objects.
6.1.7. Never operate the device without the front cut protection. Risk of injury!
6.1.8. Use cut-protection gloves when handling the chain or the chain bar. Risk of cuts!
6.2. SWITCHING ON
6.2.1. Place the battery (10 in overview) into the device (see “Inserting/removing the rechargeable battery”).
6.2.2. To turn on, push the switch lock (2) with your thumb and then press the on/o switch (3); the device will run at maximum speed.
Release the switch lock (2).
6.2.3. The device will switch o again when you release the on/o switch (3). The device cannot be switched to continuous operation.
WARNING! Switch o the device and remove the battery before carrying out any maintenance work.
7. MAINTENANCE
7.1. Maintenance and cleaning work must always be carried out with the motor switched o and the battery removed. Risk
of injury! Have any repair and maintenance work that is not described in this instruction manual carried out by our specialist
workshop. Only use original spare parts. Allow the device to cool o before undertaking any maintenance or cleaning work
there is a danger of burns!
7.2. Use cut-protection gloves when handling the chain or the chain bar. Risk of cuts!
7.3. CLEANING
7.4. Clean the machine thoroughly after every use. In this way, you extend the life of the machine and avoid accidents.
7.5. Keep the gripping handles free of petrol, oil or grease. Clean the gripping handles, where appropriate, with a moist cloth soaked in
soap. Use no solvents or petrol for cleaning!
7.6. Clean the saw chain after every use. Use a paint brush or wipe for that. DO NOT use any liquids to clean the chain.
7.7. After cleaning, oil the chain lightly with chain oil.
7.8. Clean the ventilation slots and the surfaces of the machine with a paint brush, whisk or dry cloth. DO NOT use any liquids for cleaning.
7.9. SAW CHAIN OILING
7.10. Remove the battery and use cut-resistant gloves when working with the chain or with the blade bar.
7.11. Clean and oil the chain regularly. This keeps the chain sharp and achieves optimum machine performance. Damage due to insucient
maintenance of the saw chain will invalidate the warranty.
7.12. The blade bar and chain must never be operated without oil. If the cordless garden pruner is used with too little oil, the cutting
performance and lifespan of the saw chain will decrease as the chain will become blunt more quickly. You can identify when there is
too little oil if smoke develops or the blade bar changes colour.
7.13. Oil the chain after cleaning, after 10 hours of use or at least once a week, whichever comes rst.
7.14. Before oiling, the blade bar, especially the teeth of the blade bar, must be thoroughly cleaned. Use a hand brush and a dry cloth for
this purpose.
7.15. Oil the individual chain links using an oil syringe with a needle tip (available from specialist dealers). Apply individual drops of oil on the
joints and on the tooth tips of the individual chain links.
g.7A
g.8
g.9
CP108VPSBO Issue 3 18/02/25

Sealey Group, Kempson Way, Suffolk Business Park, Bury St Edmunds, Suffolk. IP32 7AR
01284 757500 sales@sealey.co.uk www.sealey.co.uk
ENVIRONMENT PROTECTION
Recycle unwanted materials instead of disposing of them as waste. All tools, accessories and packaging should be sorted,
taken to a recycling centre and disposed of in a manner which is compatible with the environment. When the product
becomes completely unserviceable and requires disposal, drain any fluids (if applicable) into approved containers and
dispose of the product and fluids according to local regulations.
Note: It is our policy to continually improve products and as such we reserve the right to alter data, specifications and component parts without prior
notice.
Important: No Liability is accepted for incorrect use of this product.
Warranty: Guarantee is 12 months from purchase date, proof of which is required for any claim.
WEEE REGULATIONS
Dispose of this product at the end of its working life in compliance with the EU Directive on Waste Electrical and Electronic Equipment
(WEEE). When the product is no longer required, it must be disposed of in an environmentally protective way. Contact your local solid
waste authority for recycling information.
Original Language Version
© Jack Sealey Limited
WARNING! – Risk of Hand Arm Vibration Injury.
This tool may cause Hand Arm Vibration Syndrome if its use is not managed adequately.
This tool is subject to the vibration testing section of the Machinery Directive 2006/42/EC.
This tool is to be operated in accordance with these instructions.
Measuredvibrationemissionvalue(a):1.586m/s²
Uncertaintyvalue(k):1.5m/s²
Please note that the application of the tool to a sole specialist task may produce a different average vibration emission. We recommend
that a specific evaluation of the vibration emission is conducted prior to commencing with a specialist task.
A health and safety assessment by the user (or employer) will need to be carried out to determine the suitable duration of use for each
tool.
NB: Stated Vibration Emission values are type-test values and are intended to be typical.
Whilst in use, the actual value will vary considerably from and depend on many factors.
Such factors include; the operator, the task and the inserted tool or consumable.
NB: ensure that the length of leader hoses is sufficient to allow unrestricted use, as this also helps to reduce vibration.
The state of maintenance of the tool itself is also an important factor, a poorly maintained tool will also increase the risk of Hand Arm
Vibration Syndrome.
Health surveillance.
We recommend a programme of health surveillance to detect early symptoms of vibration injury so that management procedures can be
modified accordingly.
Personal protective equipment.
We are not aware of any personal protective equipment (PPE) that provides protection against vibration injury that may result from the
uncontrolled use of this tool. We recommend a sufficient supply of clothing (including gloves) to enable the operator to remain warm and
dry and maintain good blood circulation in fingers etc. Please note that the most effective protection is prevention, please refer to the
Correct Use and Maintenance section in these instructions. Guidance relating to the management of hand arm vibration can be found on
the HSC website
www.hse.gov.uk - Hand-Arm Vibration at Work.
REGISTER YOUR
PURCHASE HERE
CP108VPSBO Issue 3 18/02/25