Friendly Reminders:
1. Ensure a secure connection of the Type-C data cable to the device interface.
2. This product seamlessly supports all Type-C functions, including charging
and video, through a single integrated cable. In the event of screen power
issues or restart difficulties, kindly provide external power of 5V, 2A.
3. When using the PD interface to connect the product, please use the HDMI
To TYPE-C data cable included in the package and ensure external power is
supplied.
S3 USER’S GUIDE
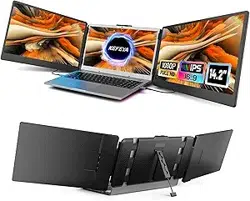
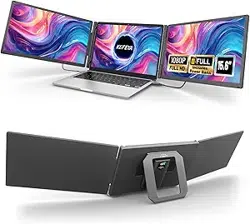
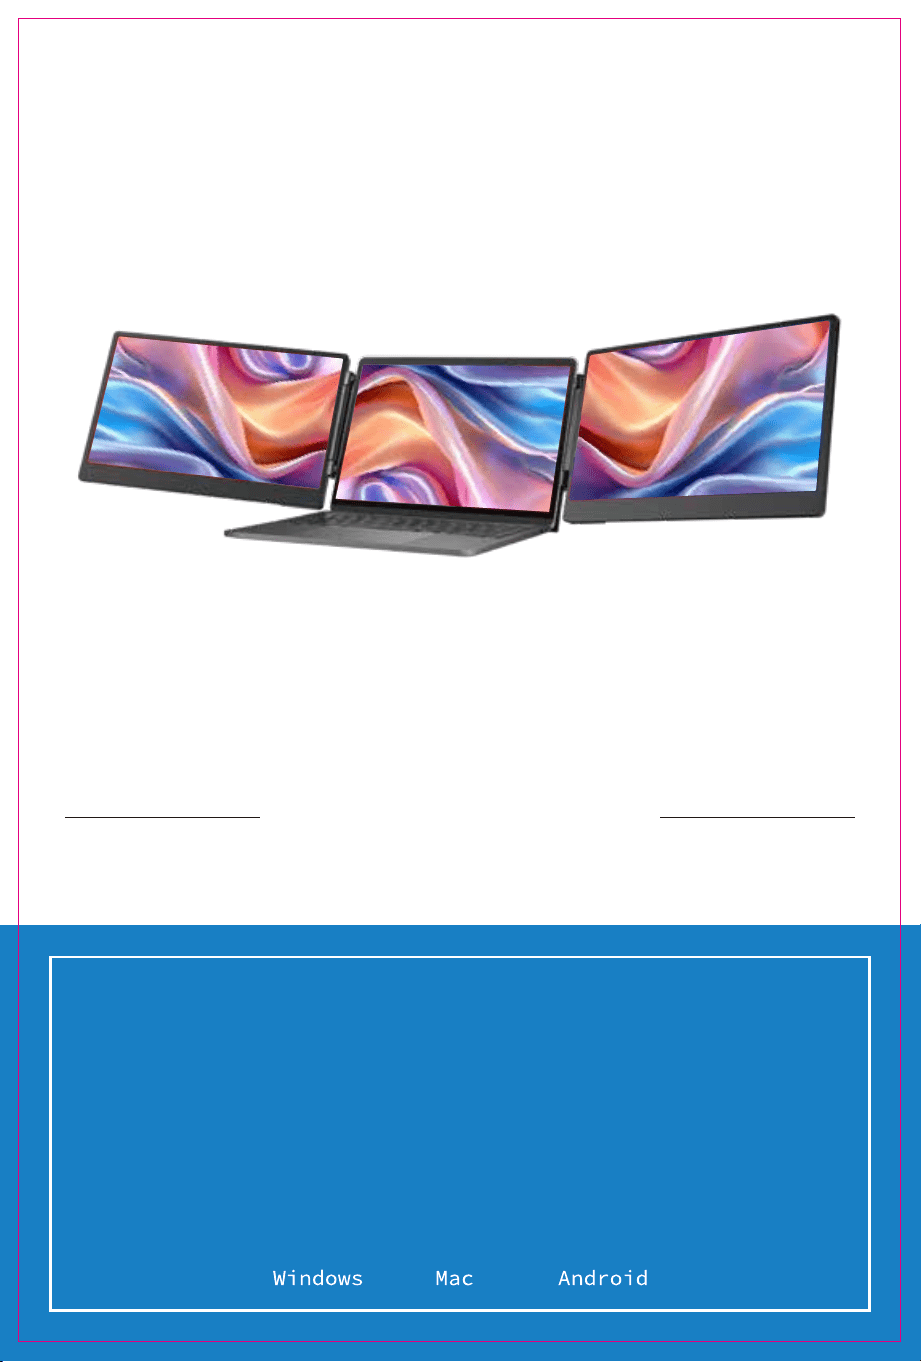
TRIPLE SCREEN
LAPTOP SCREEN EXTENDER


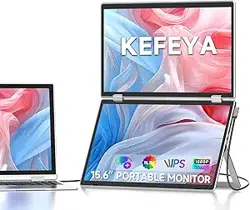
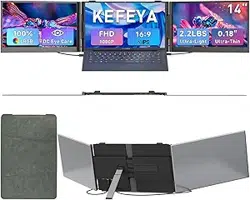
Product Introduction
S3 is a versatile plug-and-play dual-screen laptop monitor that's not only portable and foldable but
also a quick ticket to your own on-the-go mobile studio. It's the perfect solution for laptop users
looking for multi-screen sync or separate displays, boosting your work efficiency by up to 50% for
some serious multitasking mojo. It's got the chops to sync up with models from Samsung, Huawei,
and more. Plus, it's game for smartphone system computer mode, audio/video transmission—you
name it.
The S3 stand is Easy peasy. Just drop it on your work desk, cozy it up to your laptop screen, and you're
good to go. It's got your back for laptops ranging from 13 to 17.3 inches, with adjustable angles for
different situations. So whether you're a pro, an office whiz, a gamer, an entrepreneur, a coder, a
student, or a stock trader, it's all about tailoring your entertainment experience.
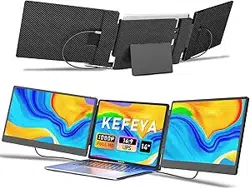
And the S3 screen It's the boss. Independently tweak brightness, sound, contrast—it's your show.
With HDMI/Type-C interfaces, you're in for versatile video and data expansion without the hassle of a
docking station. If your Type-C laptop packs both signal and power punch, seamless connection and
display are yours. Desktops, laptops, mini PCs, set-top boxes, gaming consoles with HDMI
outputs—they can all directly link up with this display. Just keep in mind, the screen needs a little
external power boost to shine (cue the custom HDMI To TYPE-C cable connecting the product to your
computer).
Last but not least, the S3 screen splitter is the cherry on top. With a complete 180-degree rotation on
a single screen, you're in control of your viewing experience. Choose your preferred angle and
immerse yourself in the ultimate visual feast.


Contents of Instruction
Product Attributes
1. Product host
2. Accessories
3. Parameters
Installation and Storage
1. Expand the monitor
2. Stretch the frame
3. Adjust the stand
4. Opening Sequence
5. Closing Sequence
Key Definitions
Connection Mode
1. Connect S3 with Laptop
2. Device power supply connection mode
Audio Settings
1. Change sound settings of Windows 10 / Windows 11
2. Change sound settings of MAC OS PC
Display Mode
1. Windows 10 / Windows 11 Display Settings
2. MacOS 13 Ventura Display Settings
Transportation, Storage and Safety Information
1
1
1
2
2
2
3
3
3
4
4
5
6
7
8
9
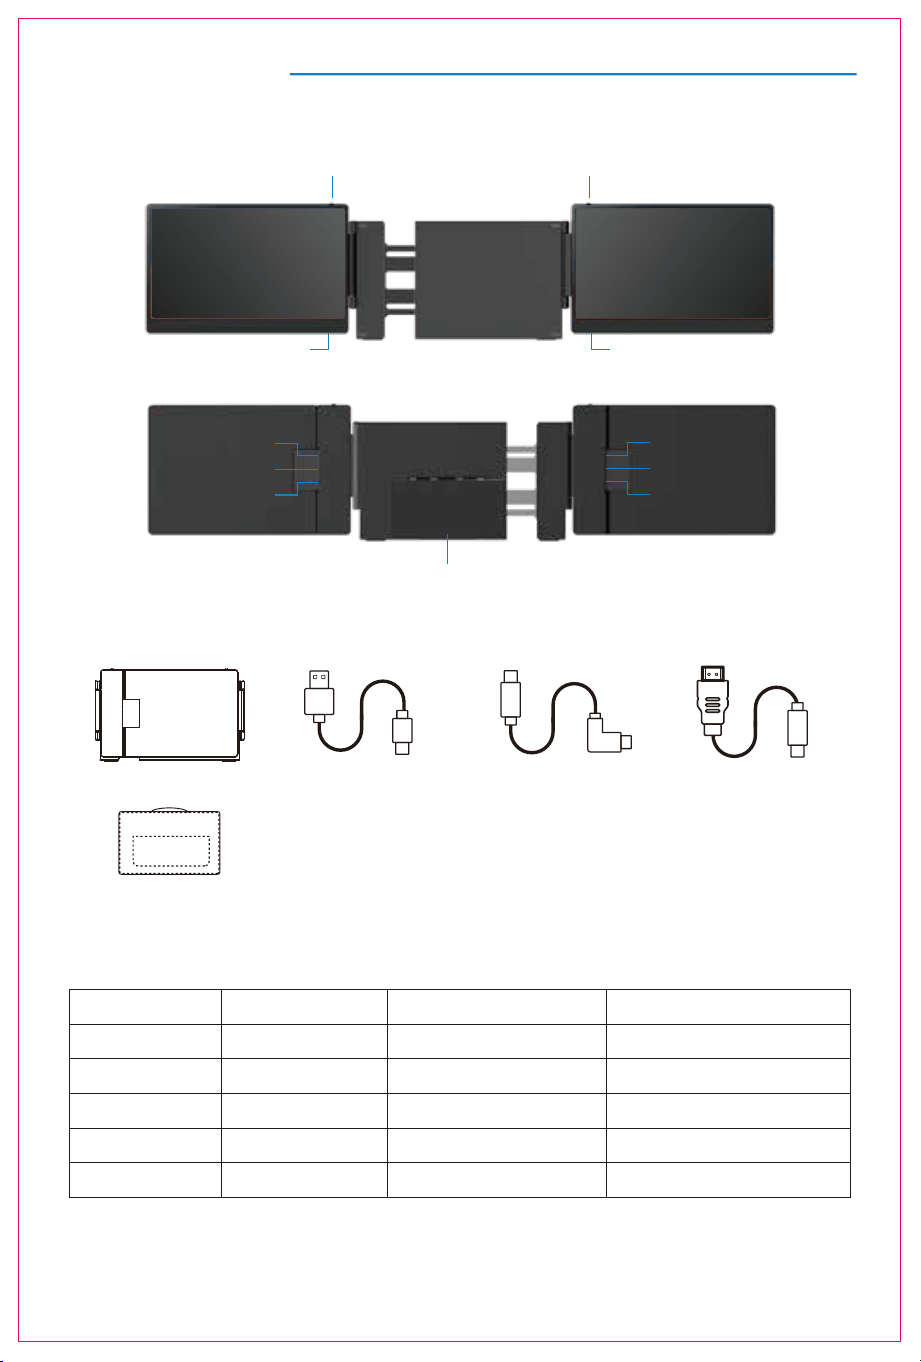
Product Attributes
HOST USB-A to USB-C *2 USB-C to USB-C *2 HDMI to TYPE-C *2
2. Accessories
1. Product host
3. Parameters
352x216x36.7mm
Weight: Screen Size:
Panel Type:
Average Brightness:
Type-C Input:
Type-C Output:
Ports:
2.15 Kg
16:9
60Hz
1920x1080 P
Aspect Ratio:
Size:
Refresh Rate:
Resolution:
Speakers:
14 Inches
IPS Wide Viewing Angle
5V-20V / 5A Max
5V-20V / 4.25A Max
Type-C x32
1
300CD/M
2
Multi-function buttonMulti-function button
Speaker
Speaker
BAG
Kickstand
TYPE-C
TYPE-C
TYPE-C (HDMI)
TYPE-C
TYPE-C
TYPE-C (HDMI)
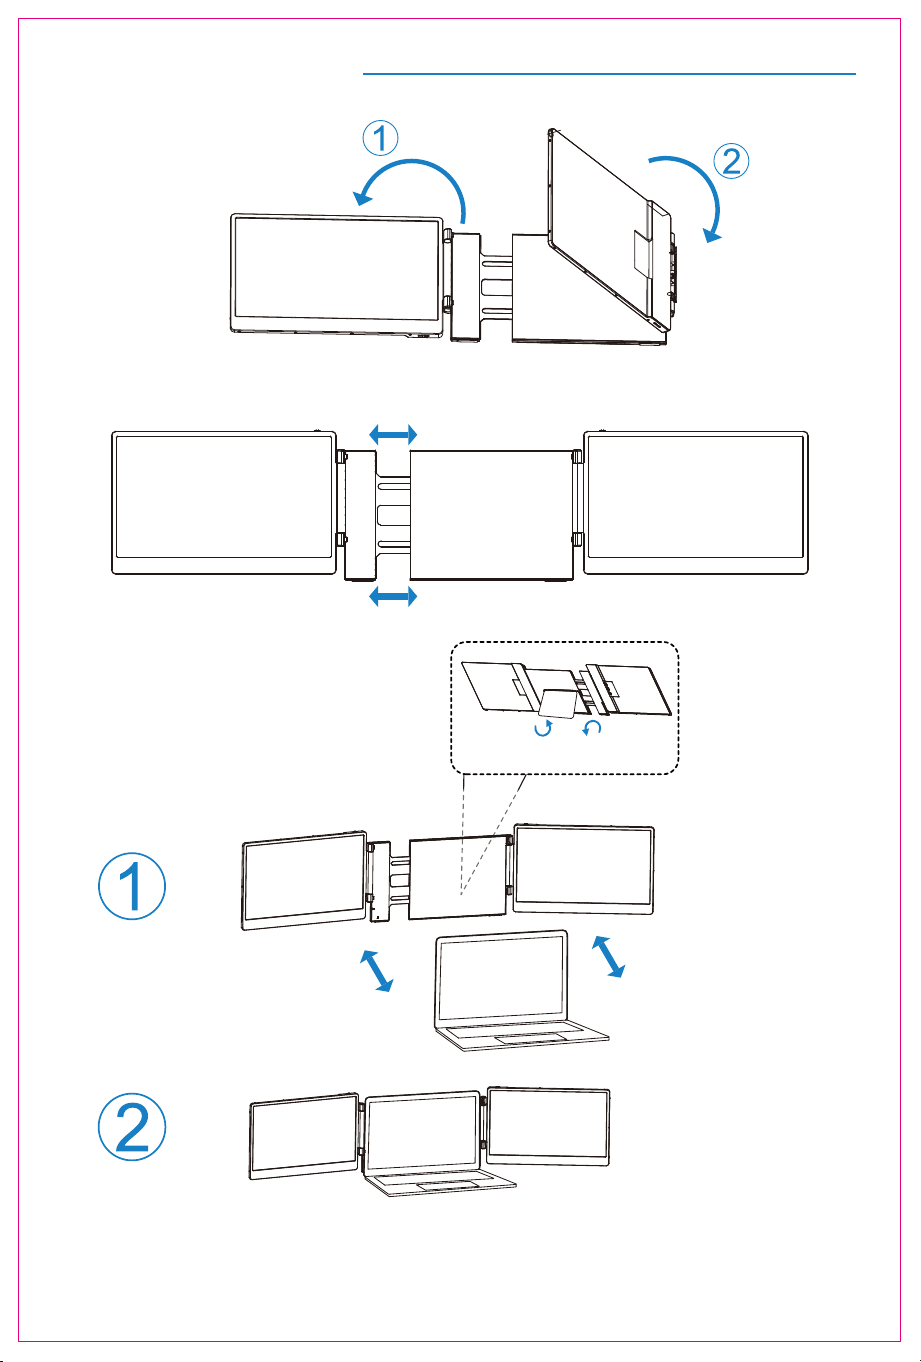
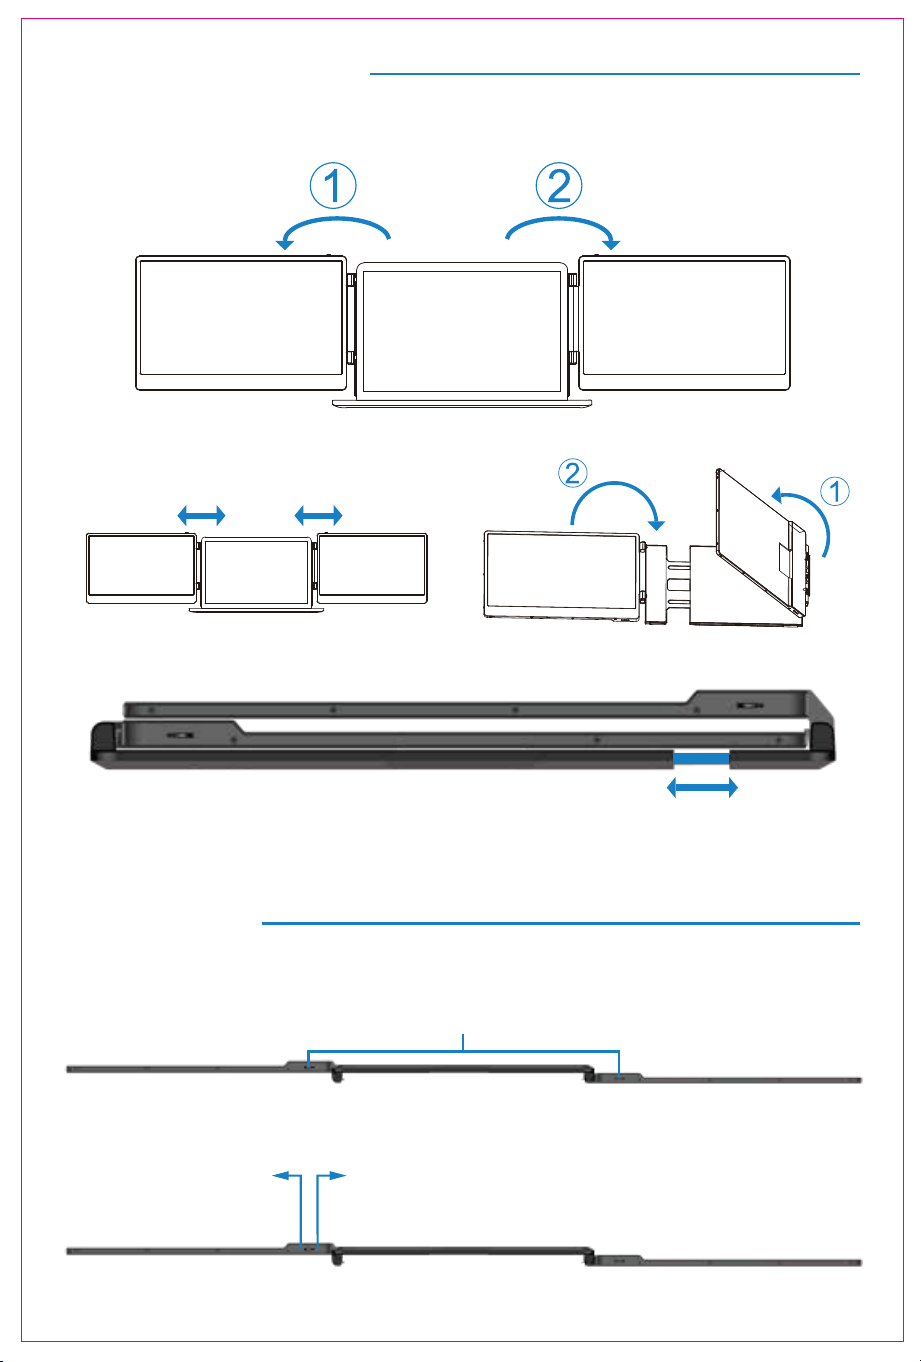
Installation and Storage
1. Expand the monitor
2. Stretch the frame
3. Adjust the stand
*Note:Open the stand, adjust it to the appropriate supporting angle, place it behind the computer
screen,and complete the installation of the dual-screen support.
2
*Note: Please expand the monitors in order to avoid damage.
The maximum folding Angle
of the support is 90 degrees.
FLIP TO OPEN FLIP TO CLOSE
Installation and Storage
4. Opening Sequence
5. Closing Sequence
Note: Please follow the sequence of opening and closing to avoid damage of the device.
Note: When folding the screen, pull the stand out to the appropriate position, then secure the
screen on the stand's limit buckle. Otherwise, forcing it closed may damage the screen!
3
Key Definitions
Menu/Selection/Confirmation Button
Press and hold for 2 seconds to return. Press and hold for 3 seconds to shut down
Toggle left "Minus”
Backlight Adustment
Toggle right "Plus”
Volume Adjustment
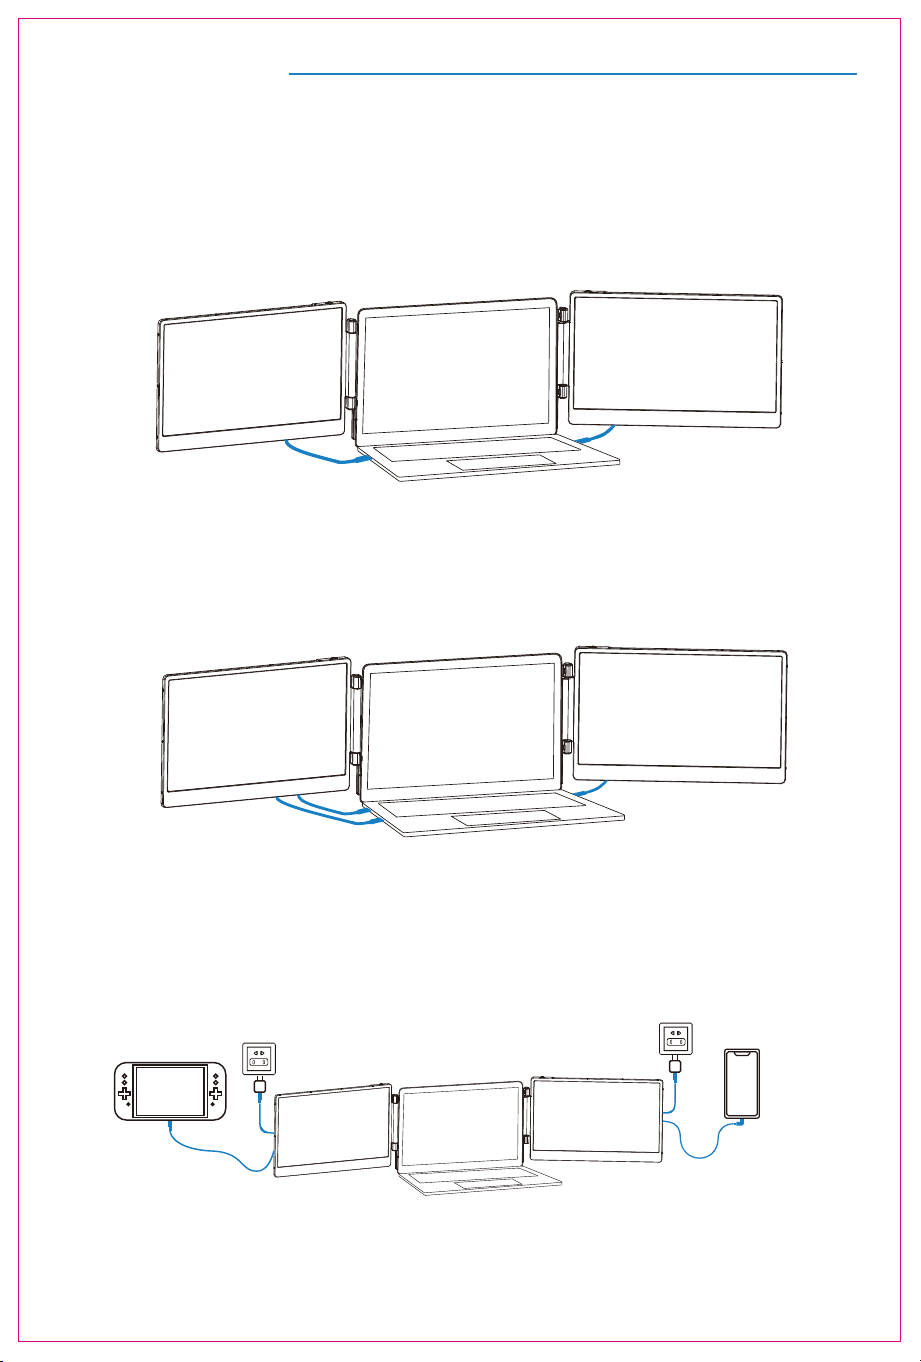
1. Connect S3 with Laptop
4
Connection Mode
TYPE-C & HDMI & USB-A Connection:
If your laptop has one full-featured Type-c port, one USB-A port and one HDMI port, please first
connect one monitor using the USB-C cable. Then connect the other monitor using the USB-A to
USB-C cable and the HDMI to Type-C cable.
TYPE-C Connection:
If your laptop has two full-featured Type-C ports, you can connect the S3 directly to your laptop with
two Type-C cables.
Notice:
If the display has no signal or the signal is unstable after connection, please connect an external
5V/2A power adapter to power the laptop
2. Connect S3 with Mobile Phone with Other Devices
Switch connection mode
(External power suply required)
Mobile phone connection mode
(External power supply required)
Audio Settings
5
S3
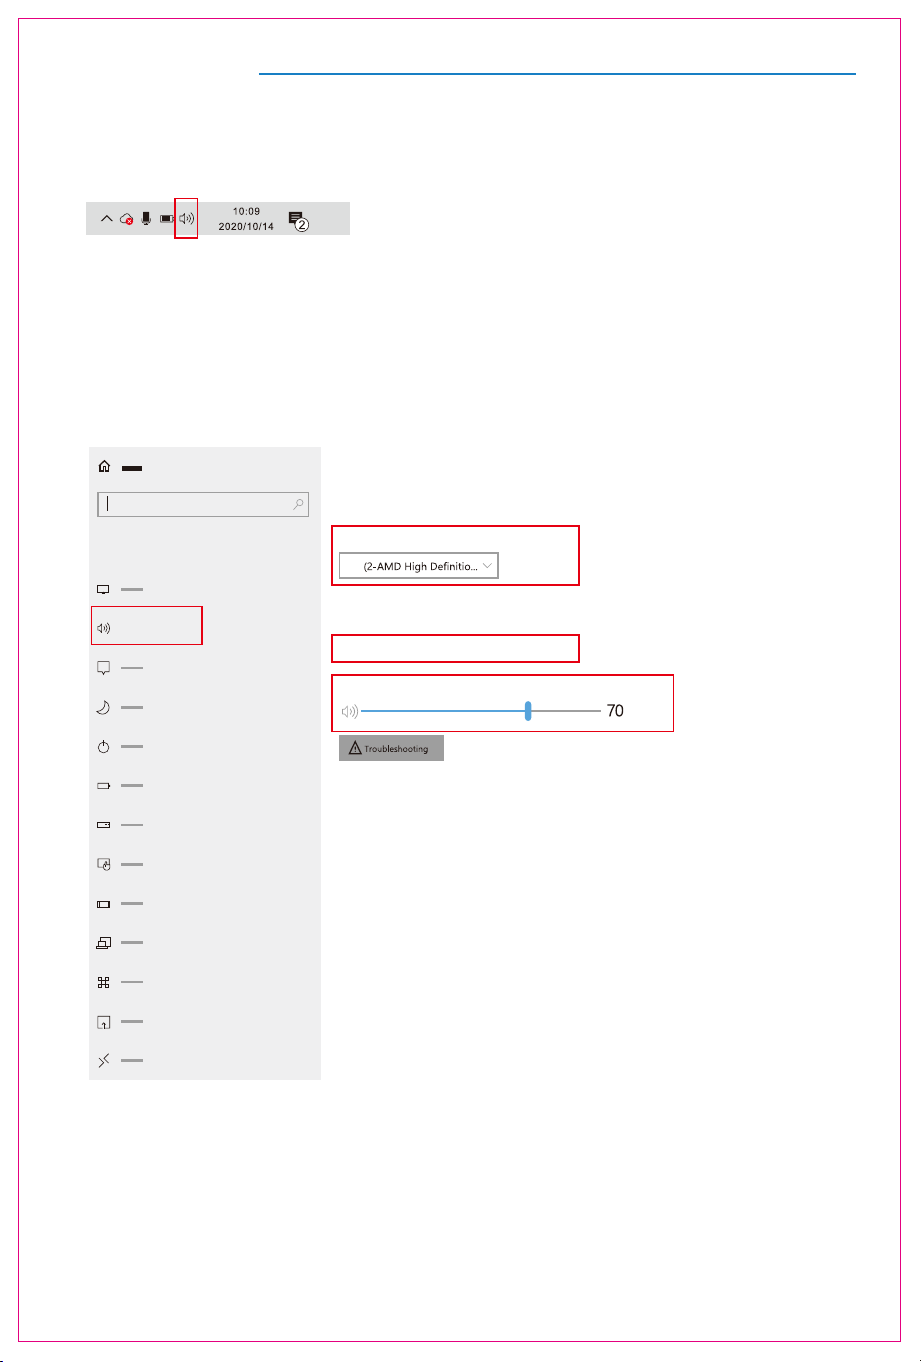
1. Change sound settings of Windows 10 / Windows 11
1.1 Right click the loudspeaker icon located in the bottom-right corner.
1.2 Select "switch on sound " in pop-up dialog box
1.3 Left click "turn on sound settings" and pop-up the box as provided, here users can set about sound
Here users can set about sound
1. Master volume;
2. Select output device: ( S3 / Speaker );
3. Device attributes.
Sound
Sound
output
System
Some apps can be set to use a different sound device than the one selected here.
Please customize the app volume and device in advanced sound selection.
Select output device
Device attribues
master volume
?
Audio Settings
6
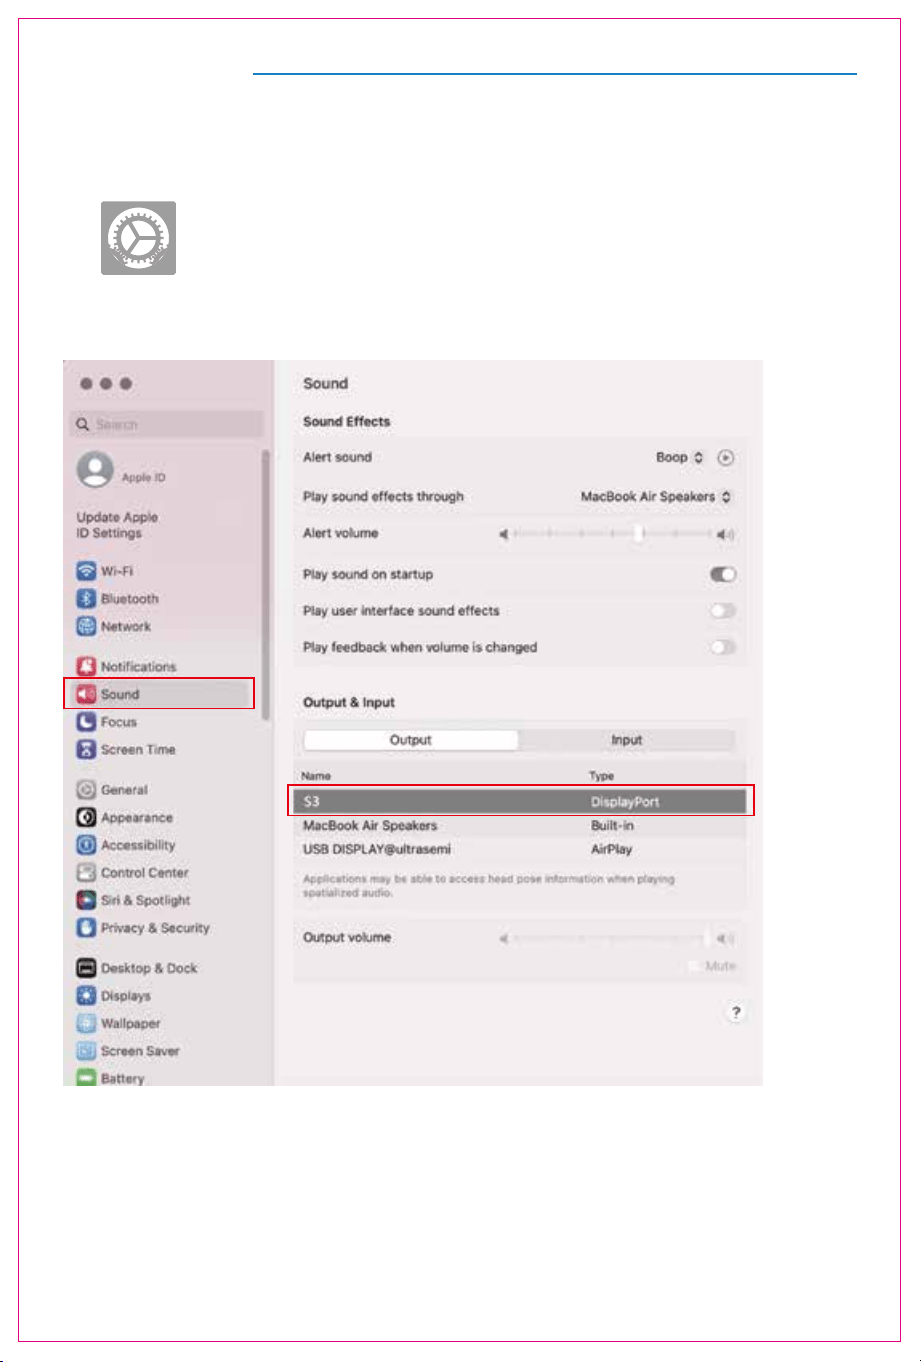
2. Change sound settings of MAC OS PC
2.1. Choose Apple menu > System Settings
2.2. Click "Output", then select the device you want use for the list of sound
output devices:( S3 / Speaker )
7
Display Mode
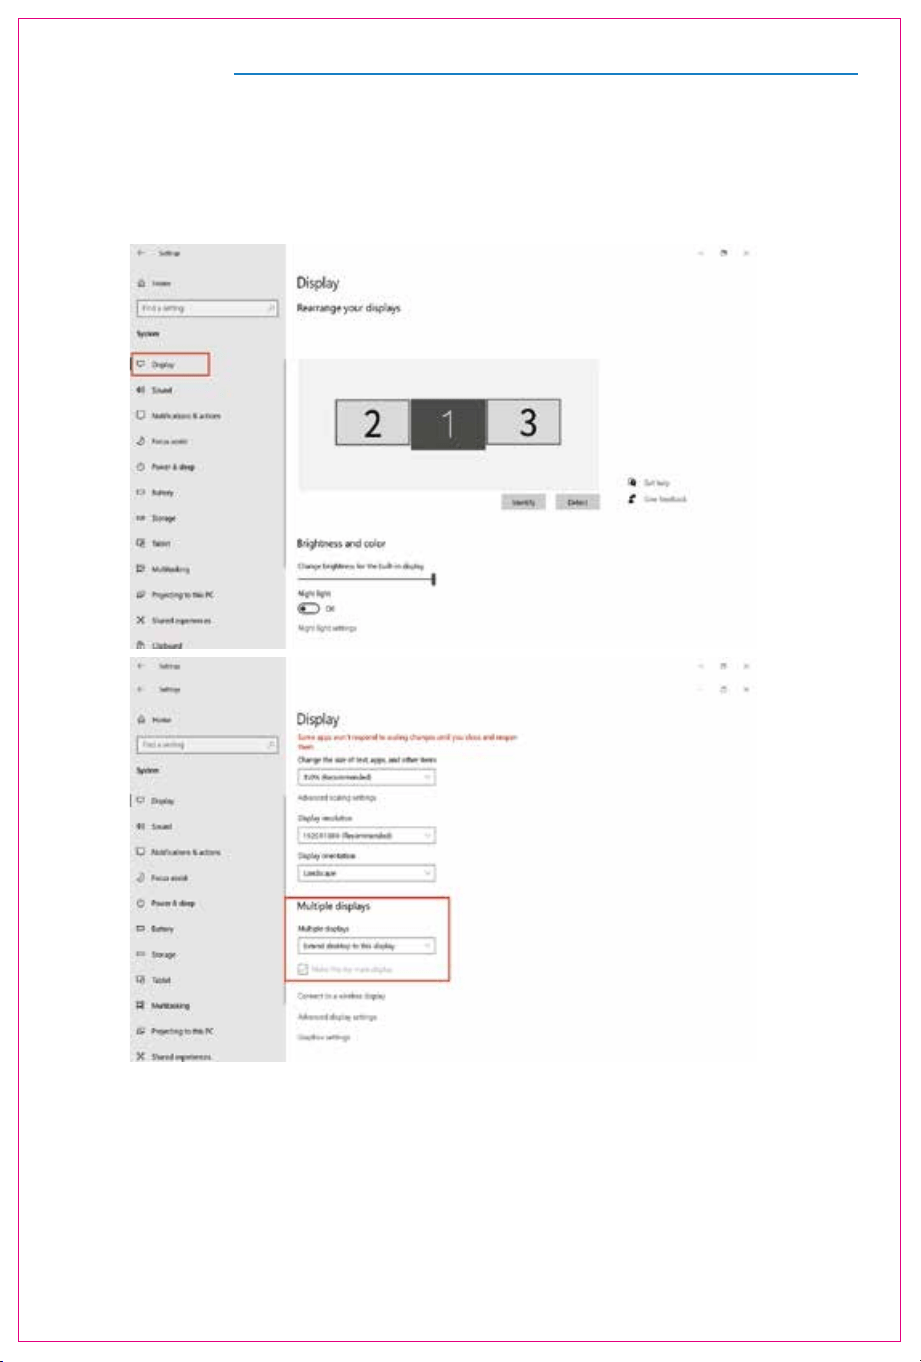
1.2 Under the "Rearrange displays" section, drag and drop each display to rearrange them according to their
physical layout of your desktop. Scroll down to the bottom of the page to further configure the display for
extended or mirrored mode.
1.1 Right-click a blank area of the desktop. Select 'Display Settings' from the pop-up dialogue box.
Left click "Display Settings" to open the settings dialogue box, shown in the figure:
Sleep better
Night light can help you get to sleep
by displaying warmer colors at night.
Select Night light settings to set things
up.
Help from the web
Setting up multiple monitors
Changing screen brightness
Fixing screen flickering
Adjusting font size
Select a display below to change the settings for it. Press and hold (or select) a display,
then drag to rearrange it.
1. Windows 10 / Windows 11 Display Settings
Display Mode
8
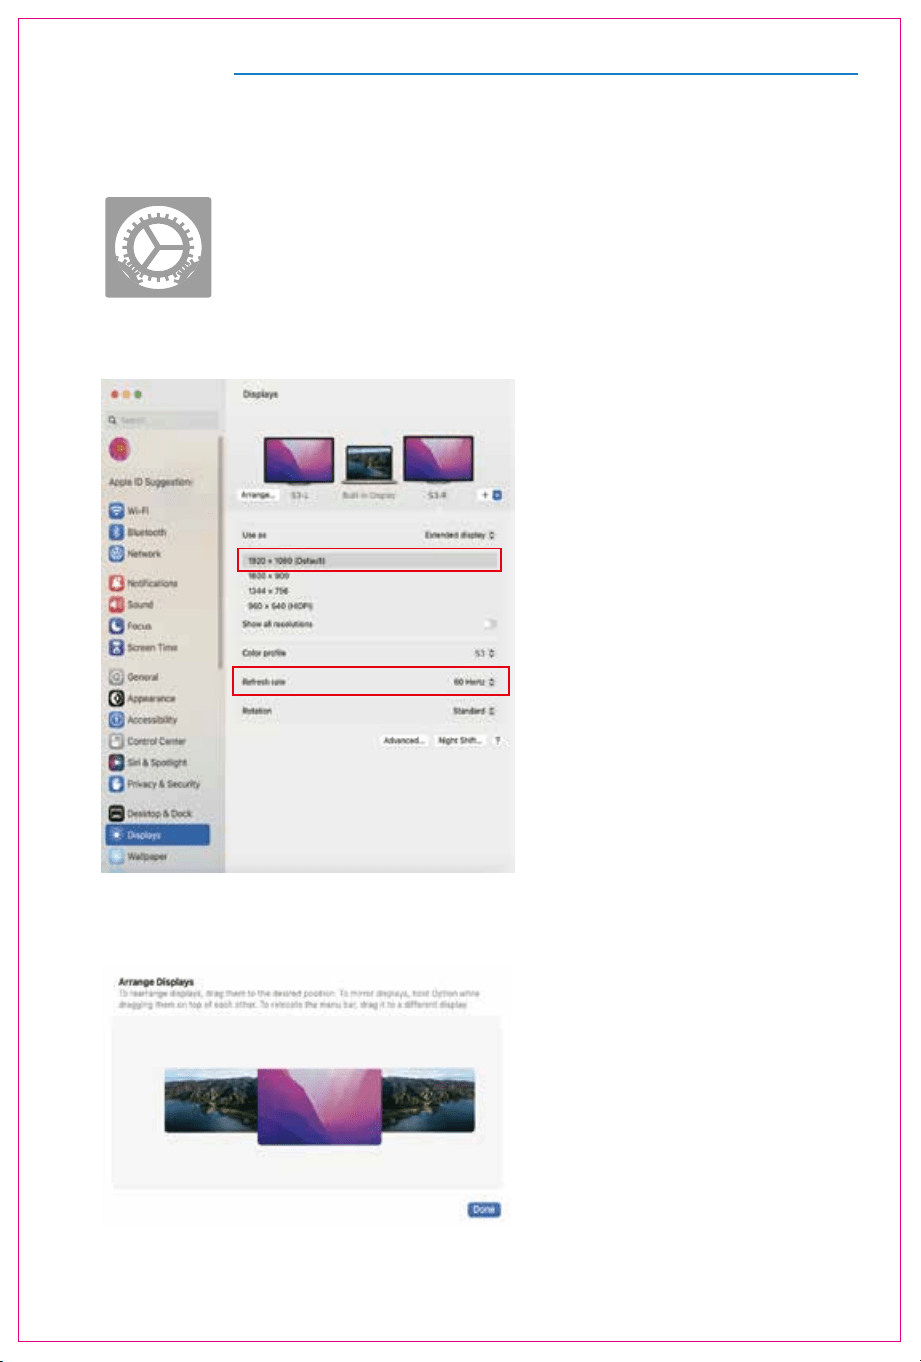
2.1 Enter the “System Preferences” menu
2.2 Configure your monitor
2.3 Arrange Displays
To rearrange displays, drag them to the desired position.
To mirror displays, hold Option key while dragging them on top of each other.
To relocate the menu bar, drag it to a different display.
In this menu, you can set the resolution and mirror/extend the display you want.
2. MacOS 13 Ventura Display Settings

Transportation, Storage And Safety Information
9
To ensure the safe and proper usage of this product and to prevent potential accidents such
as electric shock or fire, it is essential to thoroughly read and comprehend all usage
requirements and operational procedures before utilizing it. Kindly adhere strictly to the
following guidelines:
1. Before use, kindly remove the protective film covering the screen surface.
2. The DC power supply required for this product is an AC/DC power adapter. Ensure it is
positioned far away from heat sources and placed in a well-ventilated area. The AC power
socket and AC power line must be properly grounded and capable of handling the
necessary current demand.
3. The DC power input required for this product is 5V-20V±2V.
4. Take care to prevent excessive humidity and dust accumulation to avoid circuit corrosion
and potential failures.
5. Avoid subjecting the screen to external forces.
6. Refrain from using sharp tools that may damage the screen.
7. This product is suitable for general business and domestic use, with a recommended
ambient temperature ranging from -20°C to 60°C.
8. Remember to power off the device when not in use.