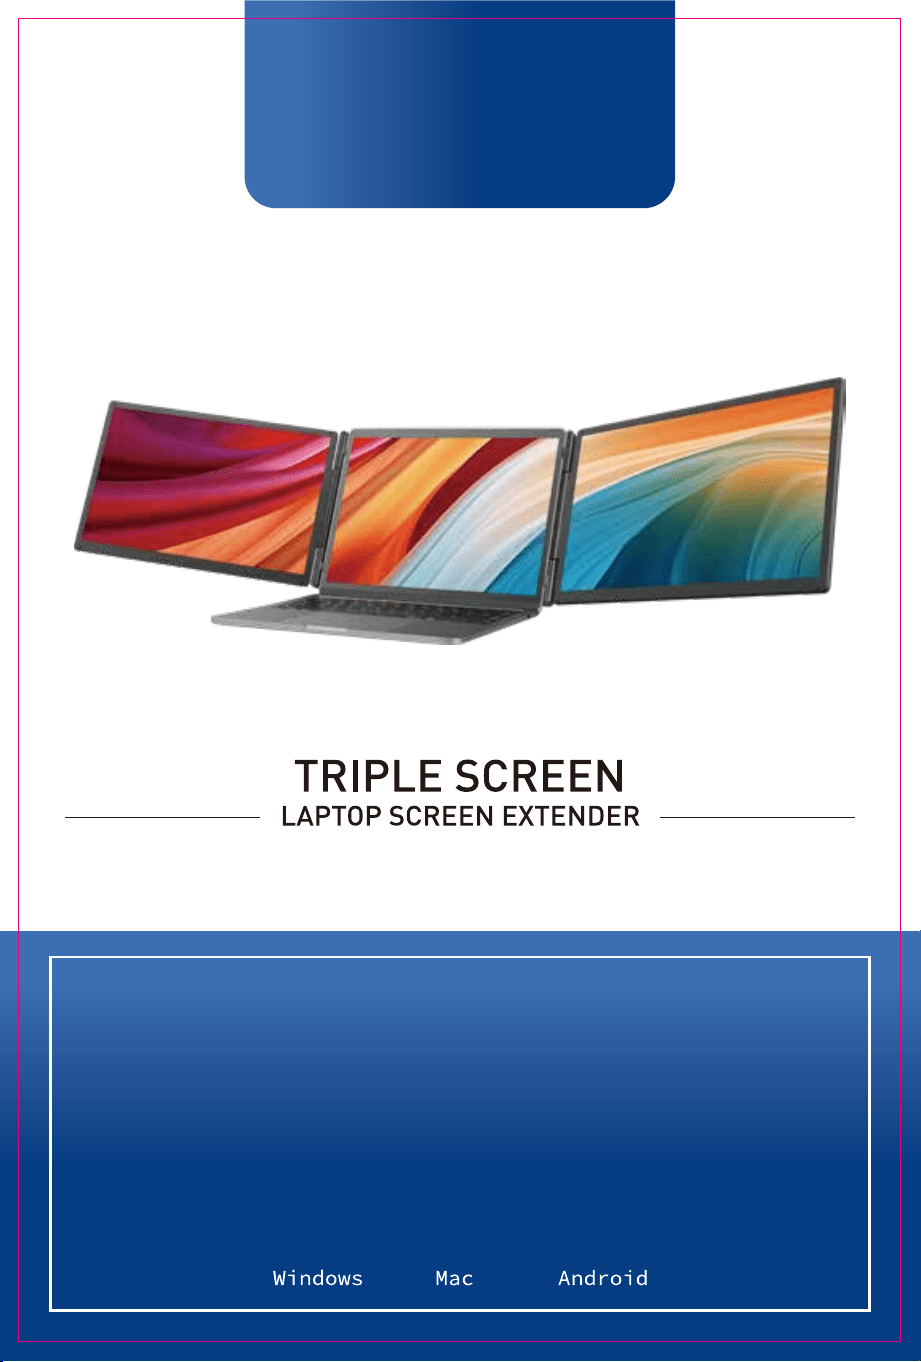
S5
USER MANUAL
Friendly Reminders:
1. Ensure a secure connection of the Type-C data cable to the device interface.
2. This product seamlessly supports all Type-C functions, including charging
and video, through a single integrated cable. In the event of screen power
issues or restart difficulties, kindly provide external power of 5V, 2A.
3. When using the DP interface to connect the product, please use the HDMI
To TYPE-C data cable included in the package and ensure external power is
supplied.

Contents of Instruction
Product Attributes
1. Product Host
2. Accessories
3. Parameters
Installation and Storage
1. Expand The Monitor
2. Stretch The Frame
3. Adjust The Stand
4. Opening Sequence
5. Closing Sequence
Key Definitions
Connection Mode
1. Connect S5 With Laptop
2. Device Power Supply Connection Mode
Power Bank Connection
1.Mobile Power Bank Parameters
2.Connecting The Mobile Power Bank to S5
Audio Settings
1. Change Sound Settings of Windows 10 / Windows 11
2. Change Sound Settings of MAC OS PC
Display Mode
1. Windows 10 / Windows 11 Display Settings
2. MacOS 13 Ventura Display Settings
Transportation, Storage and Safety Information
1
1
1
2
2
2
3
3
3
4
5
7
8
6
6
9
10
11
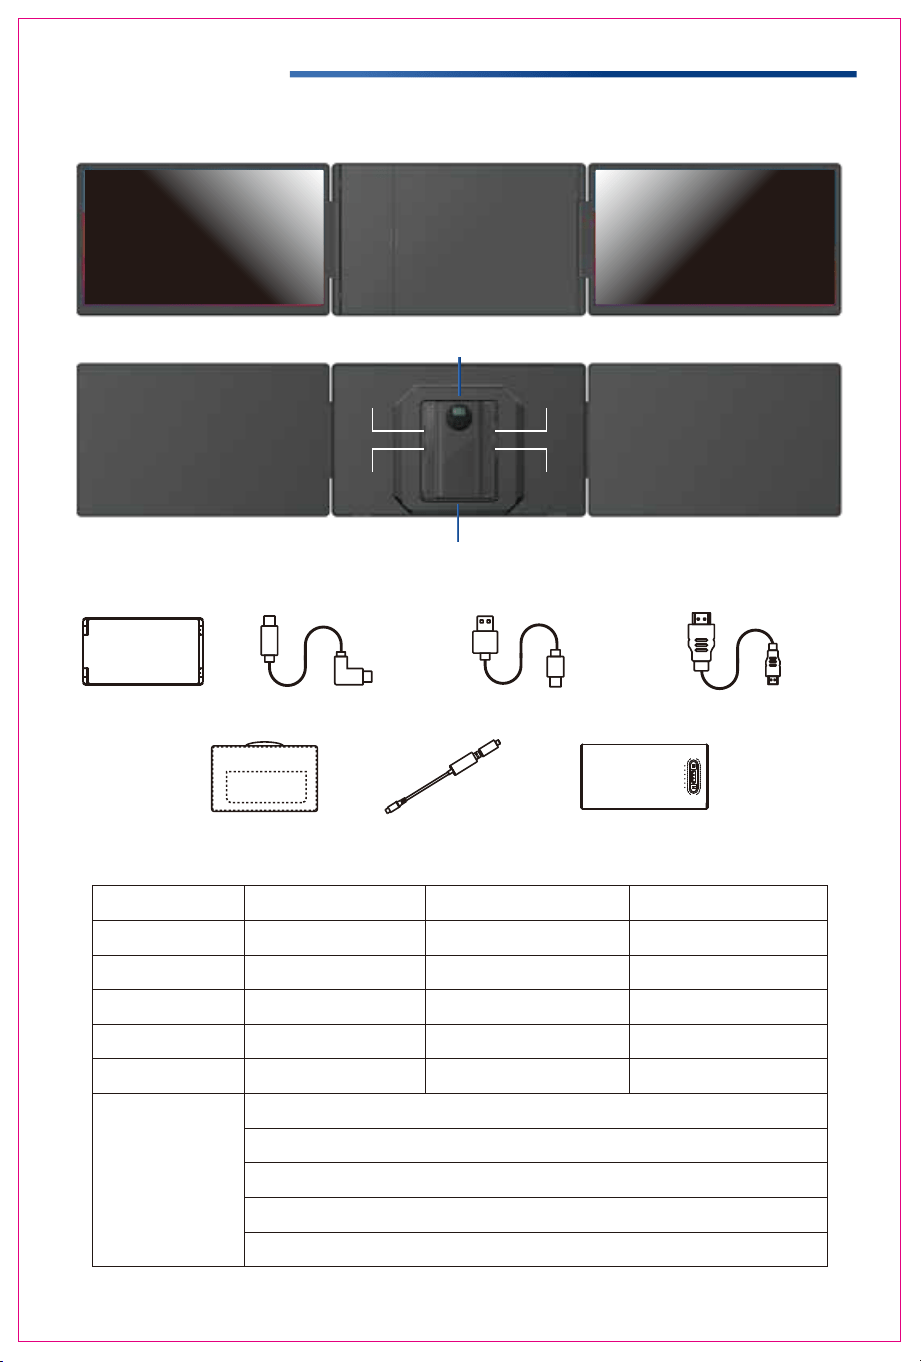
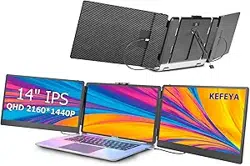
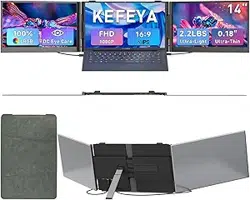
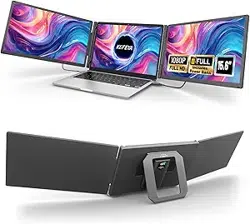
Product Attributes
2. Accessories
1. Product host
3. Parameters
1
Monitor
USB-A to USB-C *1
USB-C to USB-C *2
HDMI to USB-C *1
Power Bank
Bag
H5
Multi-function button
PD
Type-C2
Type-C1
Speaker
Kickstand
392.2x217.7x33.5mm
Weight: Screen Size:
Panel Type:
Average Brightness:
Type-C Input:
Type-C Output:
Ports:
2.35 Kg
16:9
60Hz
1920x1080 P
Aspect Ratio:
Item Size:
Refresh Rate:
Resolution:
Speakers:
15.6 Inches
IPS Wide Viewing Angle
5V-20V / 5A Max
5V-20V / 4.25A Max
Type-C x2+PD1
300CD/M
2
Power Bank:
Battery Rated Energy: 37Wh (10000mAh)
Type-C Input (MAX): 5V⎓3A,9V⎓2A,12V⎓1.5A
Type-C Output (MAX): 5V⎓3A,9V⎓2A,12V⎓1.5A
USB-A (Single Port): 5V⎓3A,9V⎓2A,12V⎓1.5A (22.5W Max)
Type-C+USB-A Total Simultaneous Outputs: 5V⎓3A
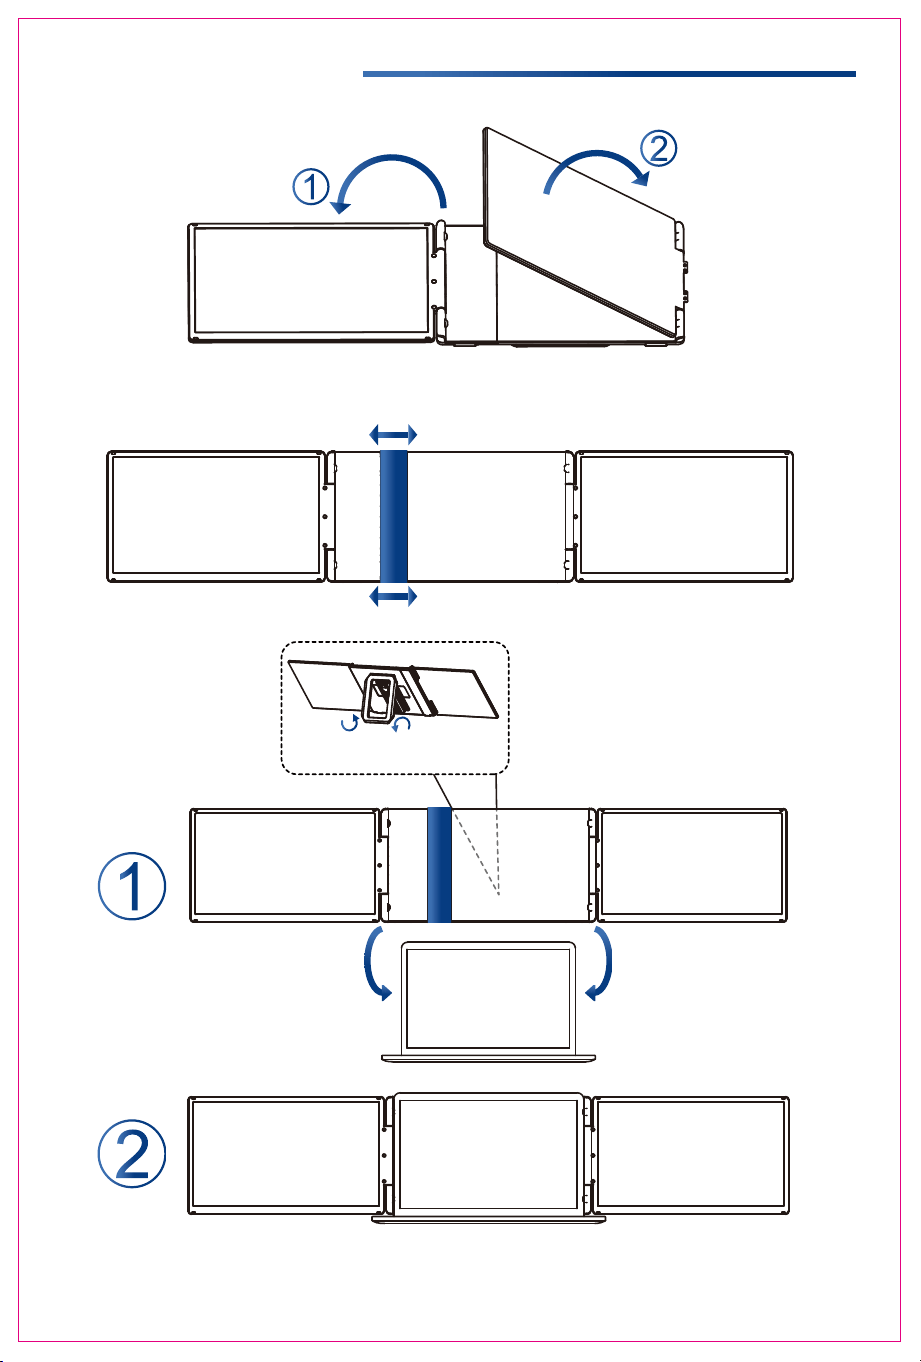
Installation and Storage
1. Expand the monitor
2. Stretch the frame
3. Adjust the stand
*Note:Open the stand, adjust it to the appropriate supporting angle, place it behind the computer
screen,and complete the installation of the dual-screen support.
2
*Note: Please expand the monitors in order to avoid damage.
The maximum folding angle
of the support is 90 degrees.
FLIP TO OPEN FLIP TO CLOSE
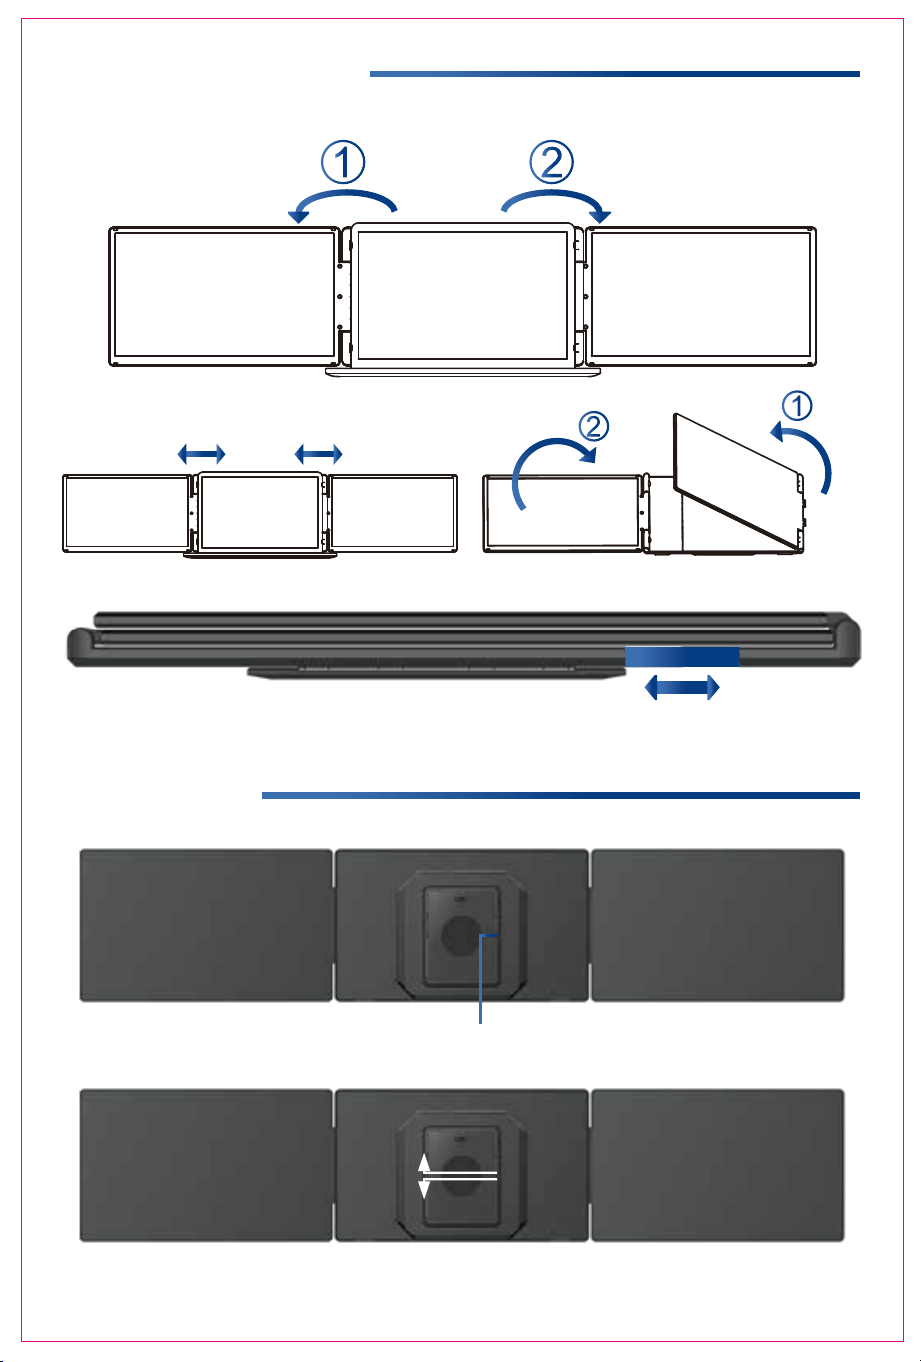
Installation and Storage
4. Opening Sequence
5. Closing Sequence
Note: Please follow the sequence of opening and closing to avoid damage of the device.
Note: When folding the screen, pull the stand out to the appropriate position, then secure the
screen on the stand's limit buckle. Otherwise, forcing it closed may damage the screen!
3
Key Definitions
Menu/Selection/Confirmation Button
Press and hold for 2 seconds to return. Press and hold for 3 seconds to shut down
Toggle left "Minus”
Backlight Adjustment
Toggle right "Plus”
Volume Adjustment
4
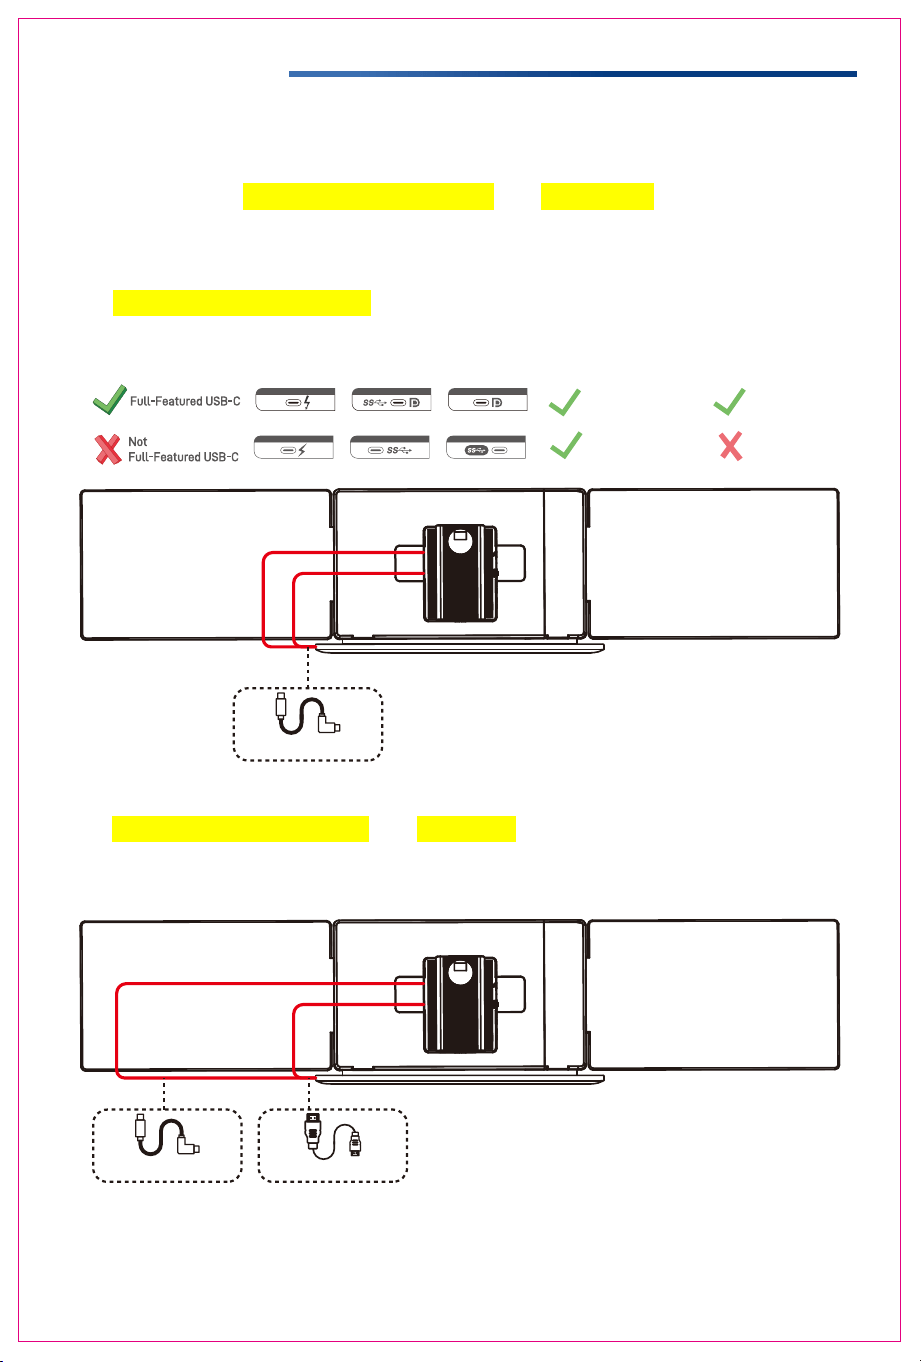
Connection Mode
1. Connect S5 with Laptop
To start, determine how many video output ports your laptop has. It is important
to note that only full-featured USB Type-C and HDMI ports are compatible with
this setup. Full-featured Type-C ports can transfer power, video, and data
simultaneously. Below are the available options based on your laptop’s ports:
1.1 Two Full-Featured Type-C Connection:
Please note that two USB-C to USB-C cables will be required.
1.2 One Full-Featured Type-C and One HDMI Connection:
Please note that you will need one USB-C to USB-C cable and one HDMI cable.
USB-C to USB-C*2
USB-C to USB-C
HDMI to USB-C
Power Output Video Output
Power Output Video Output
5
Switch connection mode
(External power supply required)
Mobile phone connection mode
(External power supply required)
Connection Mode
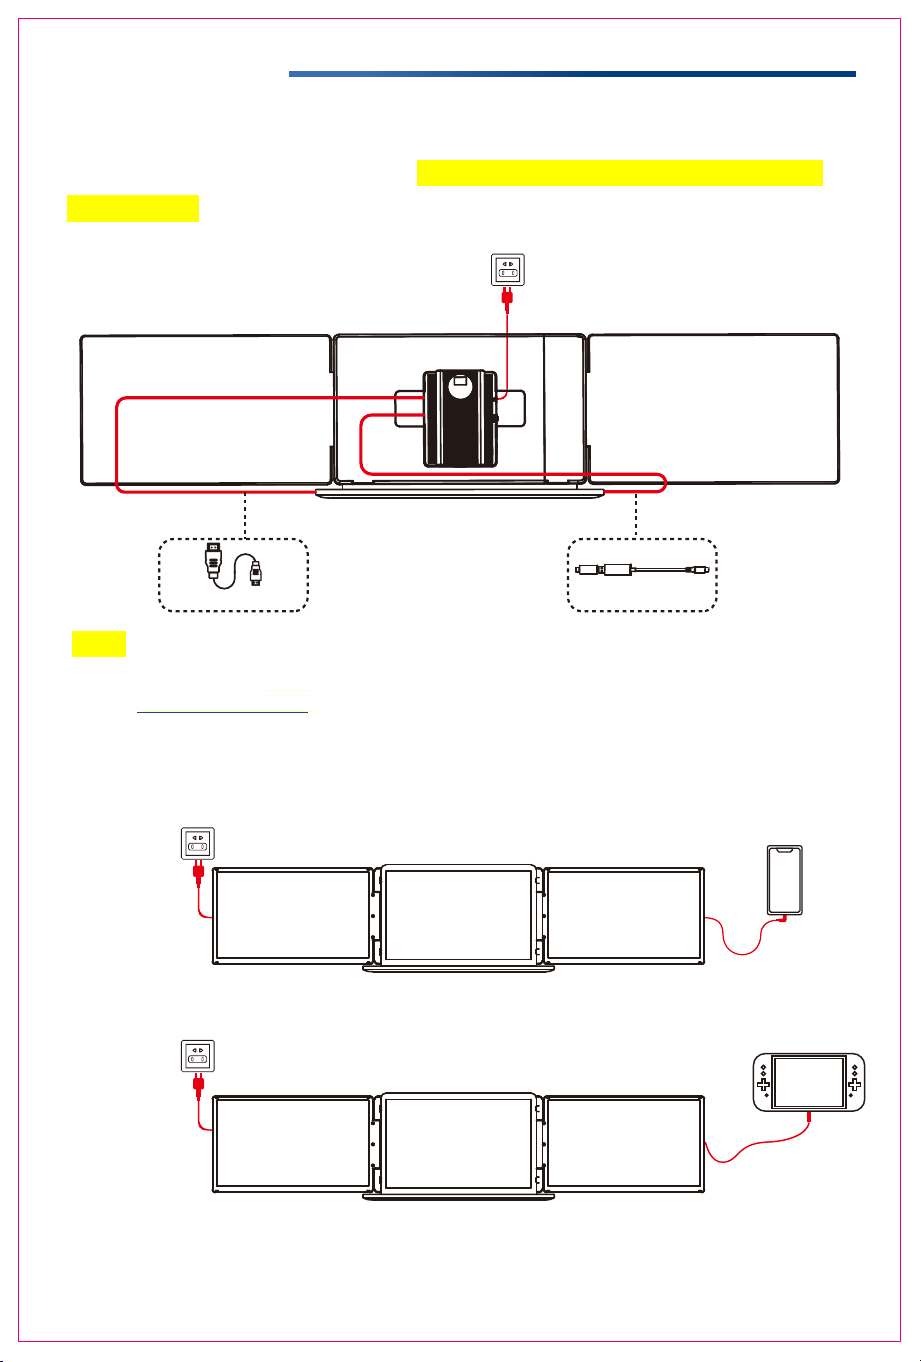
1.3 No Full-Featured Type-C Connection:
In this case, your laptop must have a USB-A port (or a standard USB-C port) and
an HDMI port. Please use a H5 conversion cable (Support USB to HDMI) along
with an HDMI cable for the connection.
HDMI to USB-C H5
Note:
1. If the display has no signal or the signal is unstable after connection, please connect an
external 5V/2A power adapter to power the laptop.
2. The above connection methods all need to place the power bank equipped with the extended
screen.
2. Connect S5 with Mobile Phone with Other Devices

6
Power Bank Connection
2. Connecting the Mobile Power Bank to S5
1. Mobile Power Bank Parameters
Align the POGO PIN connector with the
machine; Insert the POGO PIN female seat
into the installation hole.
Multi-function button
Type-C Input (MAX):
5V⎓3A,9V⎓2A,12V⎓1.5A
Type-C Output (MAX):
5V⎓3A,9V⎓2A,12V⎓1.5A
USB-A (Single Port):
5V⎓3A,9V⎓2A,12V⎓1.5A (22.5W Max)
POGO PIN Port
Battery Capacity Display
POGO PIN Port
Phone
Display driver
LaptopPanel
Laptop
Game
console
Phone
SWITCH
Display driver
How to use the mobile power button:
1. Double-click the button to disable the POGO PIN interface output.
2. Press the button once to enable the POGO PIN interface output.
Please remember to disconnect the power bank from the monitors when it is not in use.
*Note:
1. When installing the power bank, ensure that the POGO PIN male and female connectors are
perfectly aligned.
2. Connecting the product to the power bank provides a battery life of 5 to 6 hours.
Audio Settings
7
S5
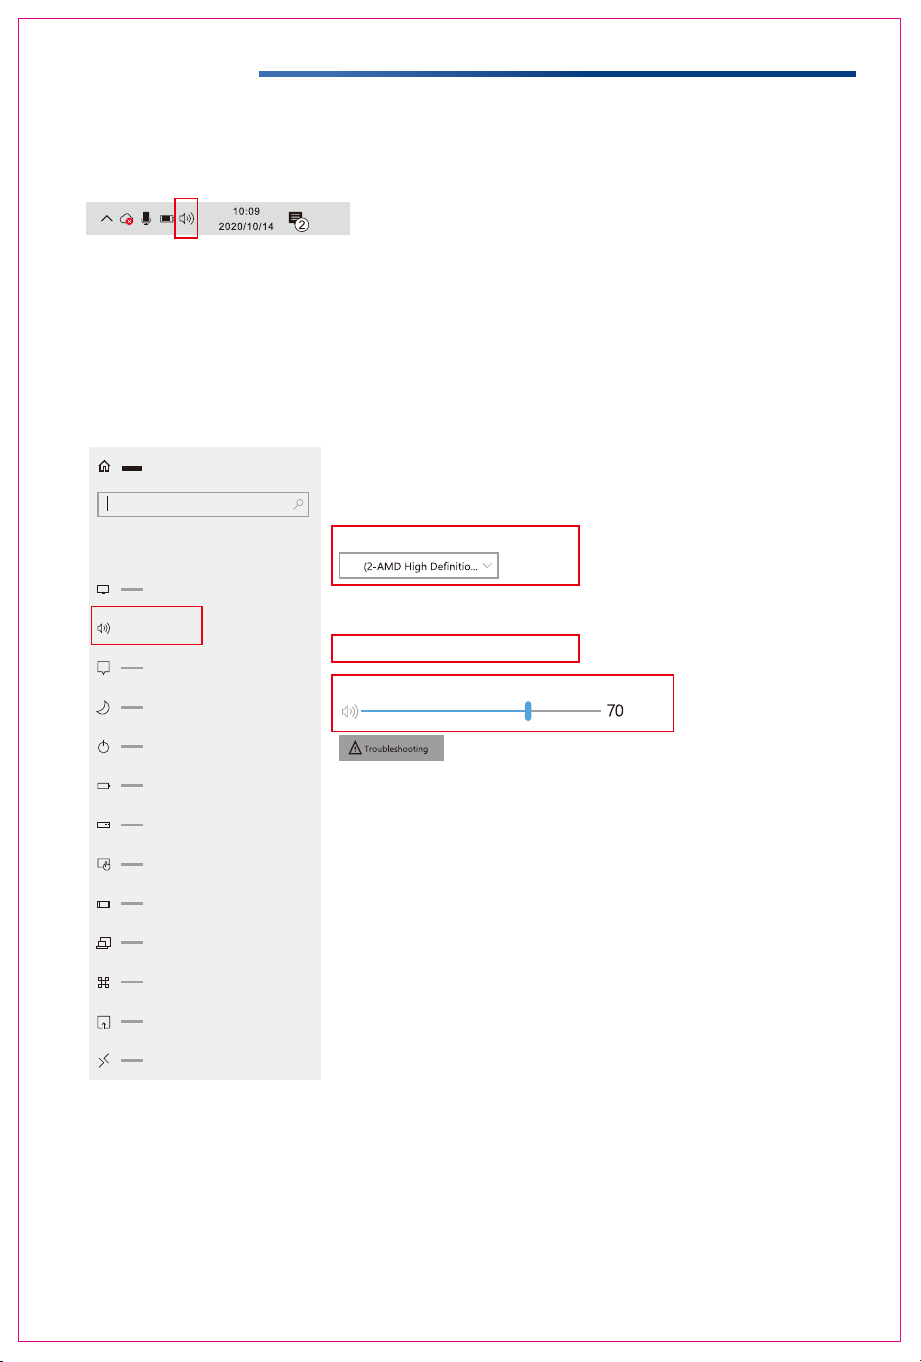
1. Change sound settings of Windows 10 / Windows 11
1.1 Right click the loudspeaker icon located in the bottom-right corner.
1.2 Select "switch on sound " in pop-up dialog box
1.3 Left click "turn on sound settings"
Users can adjust the sound settings here.
1. Select the output device: S5.
2. If necessary, adjust the volume in the device attributes section.
3. Modify the volume bar as desired.
Sound
Sound
output
System
Some apps can be set to use a different sound device than the one selected here.
Please customize the app volume and device in advanced sound selection.
Select output device
attributes
Modify volume
?
Audio Settings
8
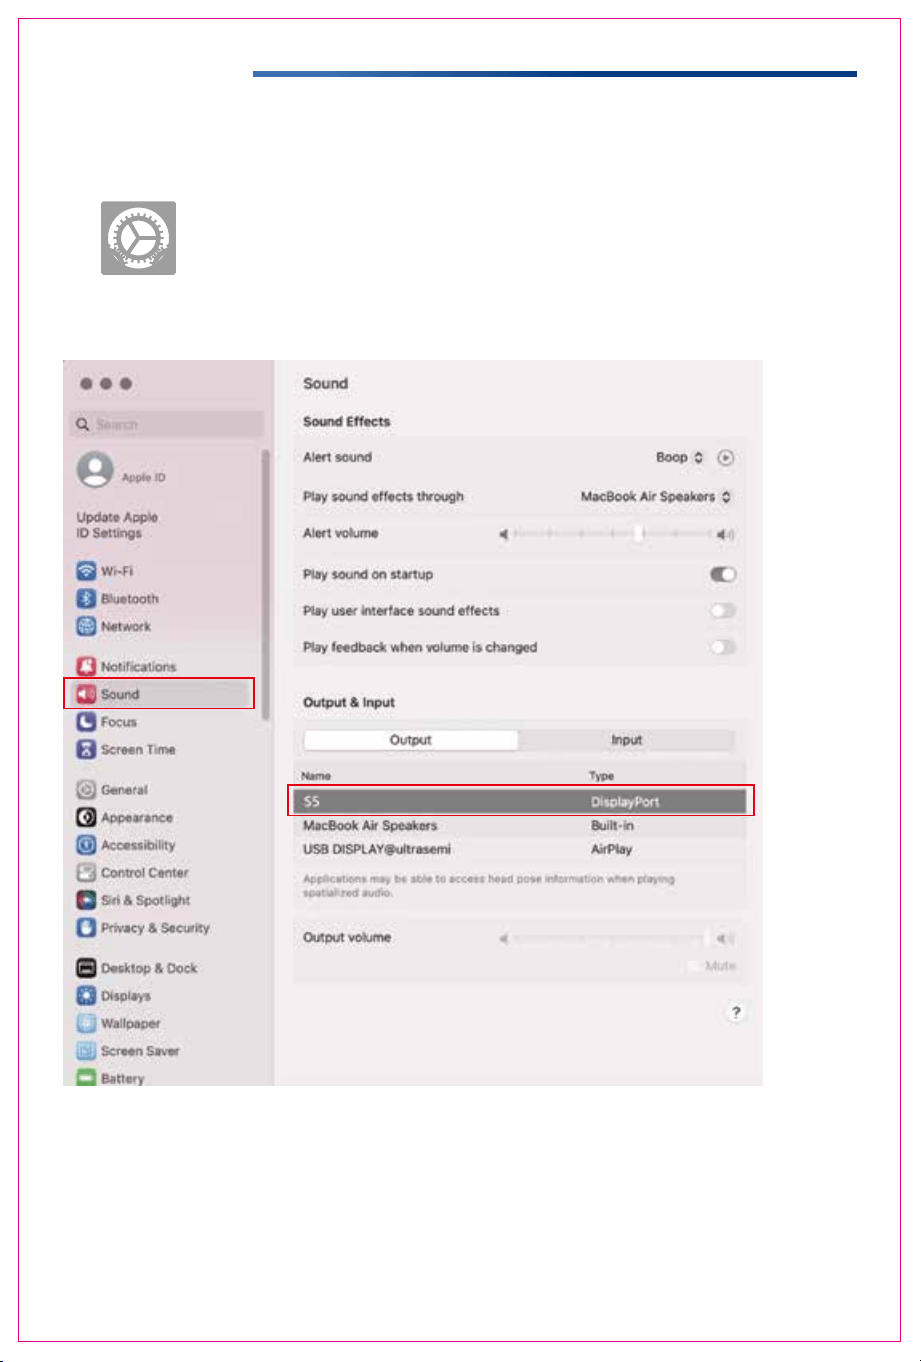
2. Change sound settings of MAC OS PC
2.1. Choose Apple menu > System Settings
2.2. Click "Output", then select the device you want use for the list of sound
output devices:( S5 / Speaker )
9
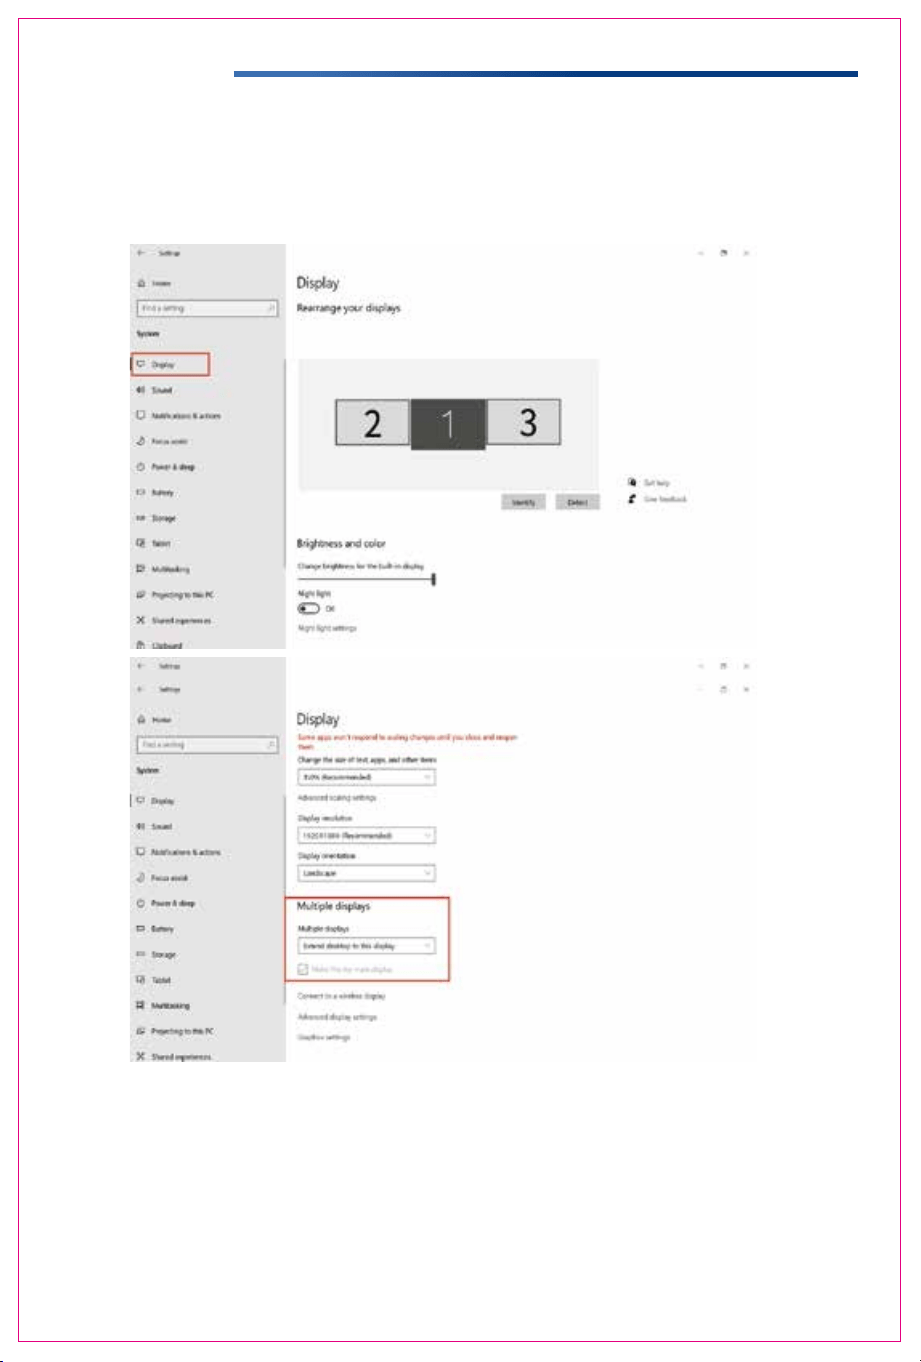
Display Mode
1.2 Under the "Rearrange displays" section, drag and drop each display to rearrange them according to their
physical layout of your desktop. Scroll down to the bottom of the page to further configure the display for
extended or mirrored mode.
1.1 Right-click a blank area of the desktop. Select 'Display Settings' from the pop-up dialogue box.
Left click "Display Settings" to open the settings dialogue box, shown in the figure:
Sleep better
Night light can help you get to sleep
by displaying warmer colors at night.
Select Night light settings to set things
up.
Help from the web
Setting up multiple monitors
Changing screen brightness
Fixing screen flickering
Adjusting font size
Select a display below to change the settings for it. Press and hold (or select) a display,
then drag to rearrange it.
1. Windows 10 / Windows 11 Display Settings
Display Mode
10
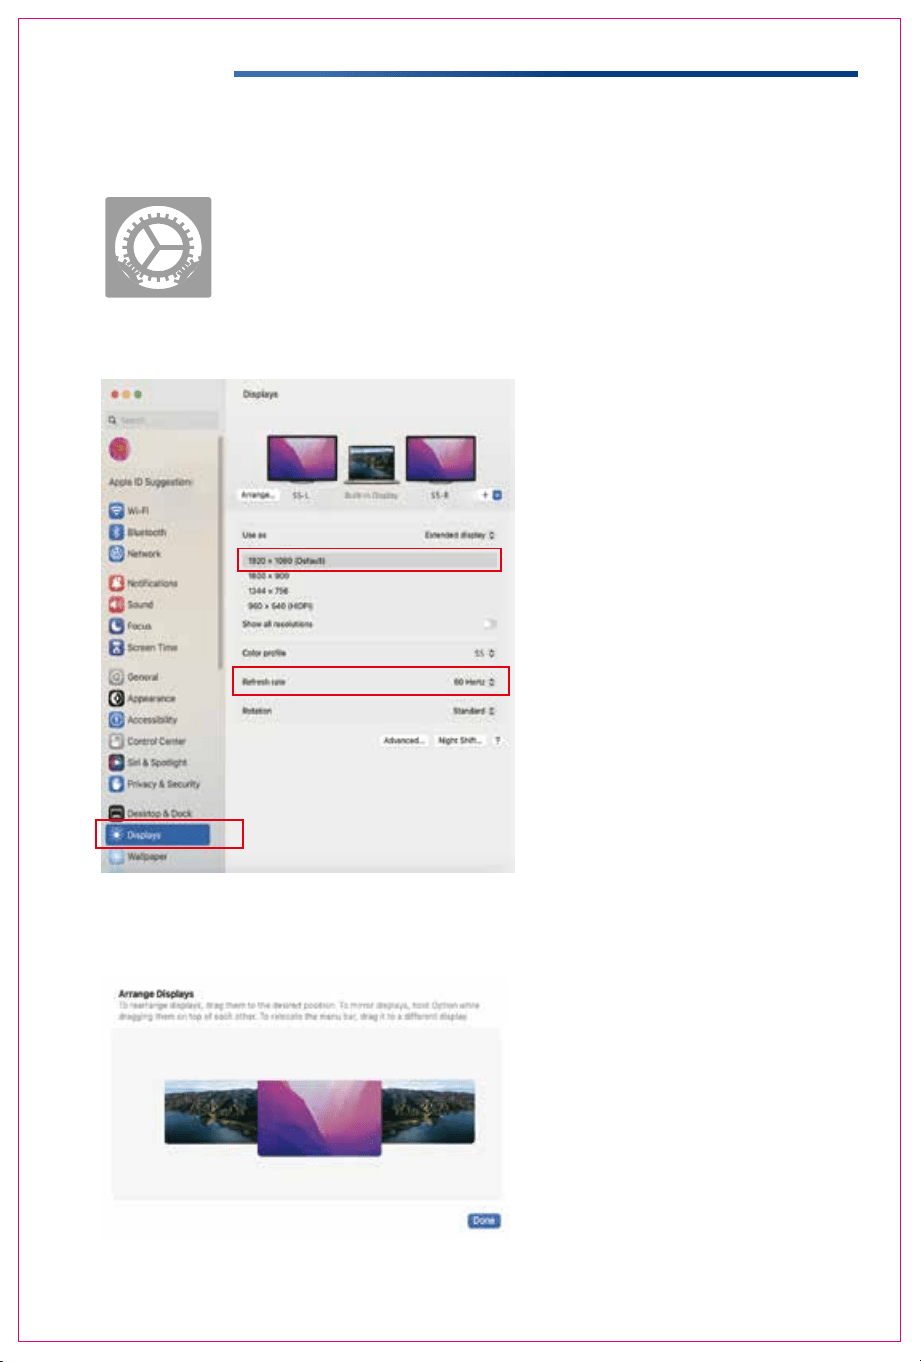
2.1 Enter the “System Preferences” menu
2.2 Configure your monitor
2.3 Arrange Displays
To rearrange displays, drag them to the desired position.
To mirror displays, hold Option key while dragging them on top of each other.
To relocate the menu bar, drag it to a different display.
In this menu, you can set the resolution and mirror/extend the display you want.
2. MacOS 13 Ventura Display Settings

Transportation, Storage And Safety Information
11
To ensure the safe and proper usage of this product and to prevent potential accidents such
as electric shock or fire, it is essential to thoroughly read and comprehend all usage
requirements and operational procedures before utilizing it. Kindly adhere strictly to the
following guidelines:
1. Before use, kindly remove the protective film covering the screen surface.
2. The DC power supply required for this product is an AC/DC power adapter. Ensure it is
positioned far away from heat sources and placed in a well-ventilated area. The AC power
socket and AC power line must be properly grounded and capable of handling the
necessary current demand.
3. The DC power input required for this product is 5V-20V±2V.
4. Take care to prevent excessive humidity and dust accumulation to avoid circuit corrosion
and potential failures.
5. Avoid subjecting the screen to external forces.
6. Refrain from using sharp tools that may damage the screen.
7. This product is suitable for general business and domestic use, with a recommended
ambient temperature ranging from -20°C to 60°C.
8. Remember to power off the device when not in use.
Um die sichere und ordnungsgemäße Verwendung dieses Produkts zu gewährleisten und
mögliche Unfälle wie Stromschläge oder Brände zu vermeiden, ist es wichtig, dass Sie vor
der Verwendung des Geräts alle Nutzungsanforderungen und Betriebsverfahren gründlich
lesen und verstehen. Bitte halten Sie sich streng an die folgenden Richtlinien:
1. Entfernen Sie vor dem Gebrauch die Schutzfolie von der Bildschirmoberfläche.
2. Die für dieses Produkt erforderliche Gleichstromversorgung ist ein AC/DC-Netzadapter. Bitte
stellen Sie sicher, dass es weit von Wärmequellen entfernt und in einem gut belüfteten Bereich
aufgestellt wird. Die Netzsteckdose und die Netzleitung müssen ordnungsgemäß geerdet und
für den erforderlichen Strombedarf ausgelegt sein.
3. Die für dieses Produkt erforderliche Gleichstromversorgung beträgt 5V-20V±2V.
4. Vermeiden Sie übermäßige Feuchtigkeit und Staubansammlungen, um Korrosion der
Schaltkreise und mögliche Ausfälle zu vermeiden.
5. Setzen Sie den Bildschirm keinen äußeren Kräften aus.
6. Verwenden Sie keine scharfen Werkzeuge, die den Bildschirm beschädigen könnten.
7. Dieses Produkt ist für den allgemeinen Geschäfts-und Hausgebrauch geeignet, mit einer
empfohlenen Umgebungstemperatur von -20°C bis 60°C.
8. Vergessen Sie nicht, das Gerät auszuschalten, wenn es nicht benutzt wird.