Warm tips:
1. Please ensure type-c data wire is connected well with device interface.
2. This product supports whole function of type-c (charging and video),
integrated one line. If screen cannot be powered on or restarted,
please supply external power of 5V, 2A.
3. The TYPE-C to DP/HDMI interface used to connect the product must
use the custom HDMI TO TYPE-C data cable included in the product
packaging and be externally powered.
KEFEYA S2 USER’S GUIDE
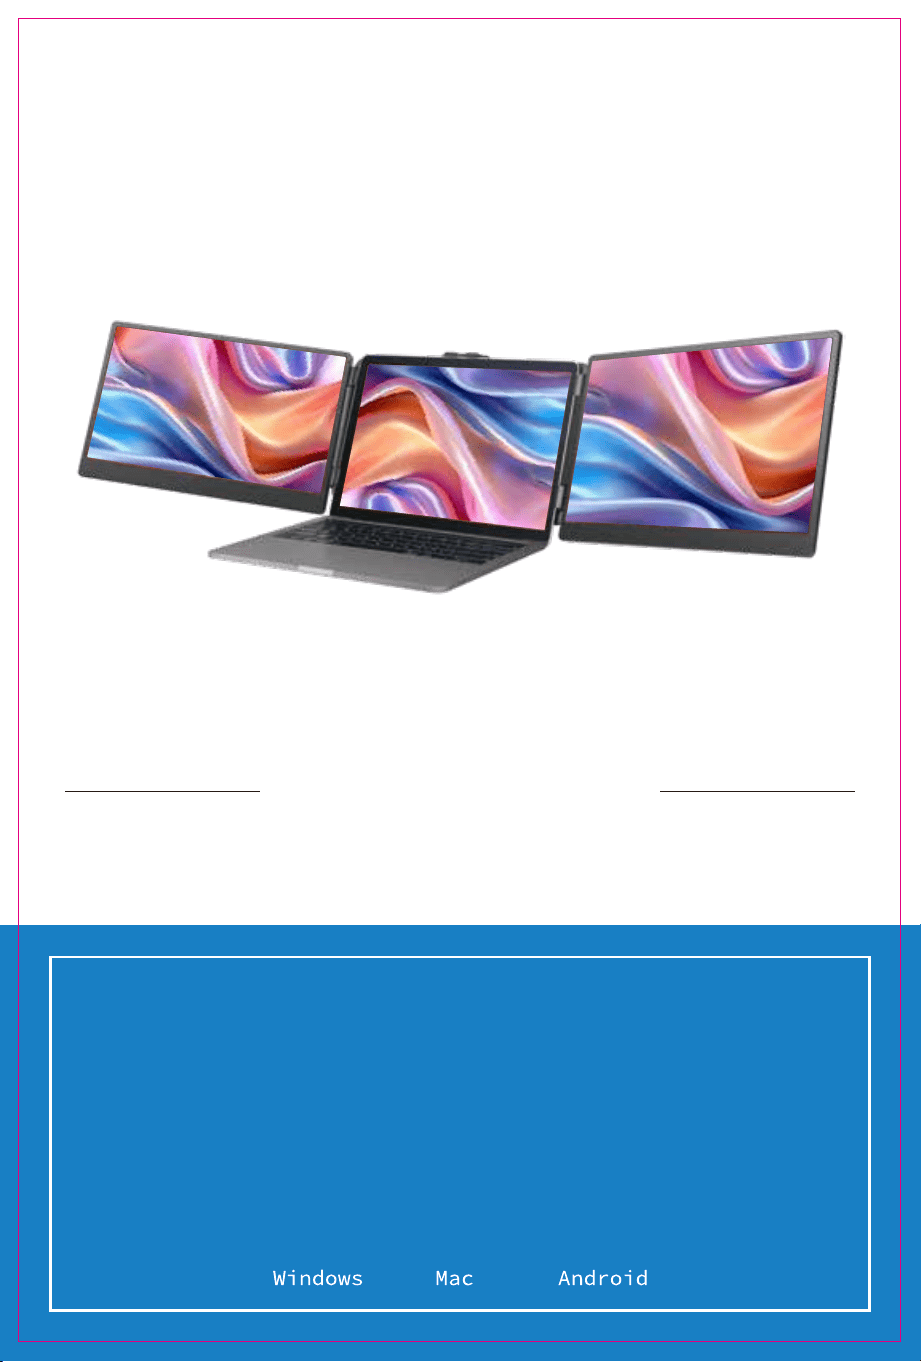
KEFEYA TRIPLE SCREEN
LAPTOP SCREEN EXTENDER

Product Introduction
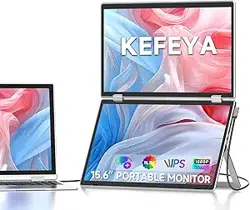
S2 is a multi-function plug and play dual-screen laptop monitor that is portable and foldable. It
can help quickly build a personal mobile studio. Provide a perfect solution for laptop users with
multi-screen synchronous display and multi-screen separate display, which can improve your work
efficiency by up to 50% and achieve efficient multi-tasking. It supports the same screen display of
some models of Samsung, Huawei and others. It also supports the computer mode of the smart
phone system as well as audio and video transmission, etc.
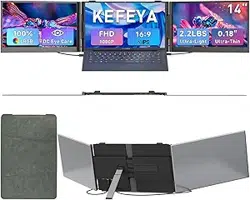
S2 holder is easy to use. Clamp the holder to the top of the computer screen, and it can be easily
fixed without falling off. It can support the case of laptop from 13 inches to 17.3 inches, and can be
removed and used as a single screen. The screen has its own support that can be adjusted for different
angles, providing different fun experience for professionals, office workers, gamers, stock traders,
entrepreneurs, programmers and students.
The S2 screen can independently adjust parameters such as brightness, sound, and contrast. It is
equipped with HDMI/Type-C interfaces, allowing for versatile video and data expansion without the
need for a docking station. As long as it is a Type-C laptop with combined signal and power
capabilities, you can achieve a seamless connection and display. Devices such as desktop computers,
laptops, mini PCs, set-top boxes, and gaming consoles with HDMI output interfaces can directly
connect to the display. However, the screen needs to be powered externally in order to light up (using
the custom HDMI TO TYPE-C cable to connect the product to the computer).
Finally, S2 screen splitter can provide a complete 180 degree rotation on a single screen. You can
choose your best view angle for the optimum visual experience.
Contents Of Instruction
1. Product host
Product Attributes
2. Accessories
3. Parameters
Installation and stowing Mode
1. Opening mode
2. Outrigger stretch
3. Fixing mode of device
4. Opening mode when it is working
5. Stowing of dual screen
Key De
fi
nitions
Connection Mode
1. Connect S2 with Laptop
3. Device power supply connection mode
1. Change sound settings of Windows 10 / Windows 11
2. Change sound settings of MAC OS PC
Display Mode
1. Windows 10 / Windows 11 Display Settings and Configuration
2. MacOS 13 Ventura Display Settings and Configuration
Transportation, Storage and Safety Information
1
1
1
2
2
2
3
3
3
9
10
11
12
13
Frequently Asked Questions
6
8
2.
4
4
5
Useful Tips
Common Troubleshooting / After-sales Help
Audio Settings
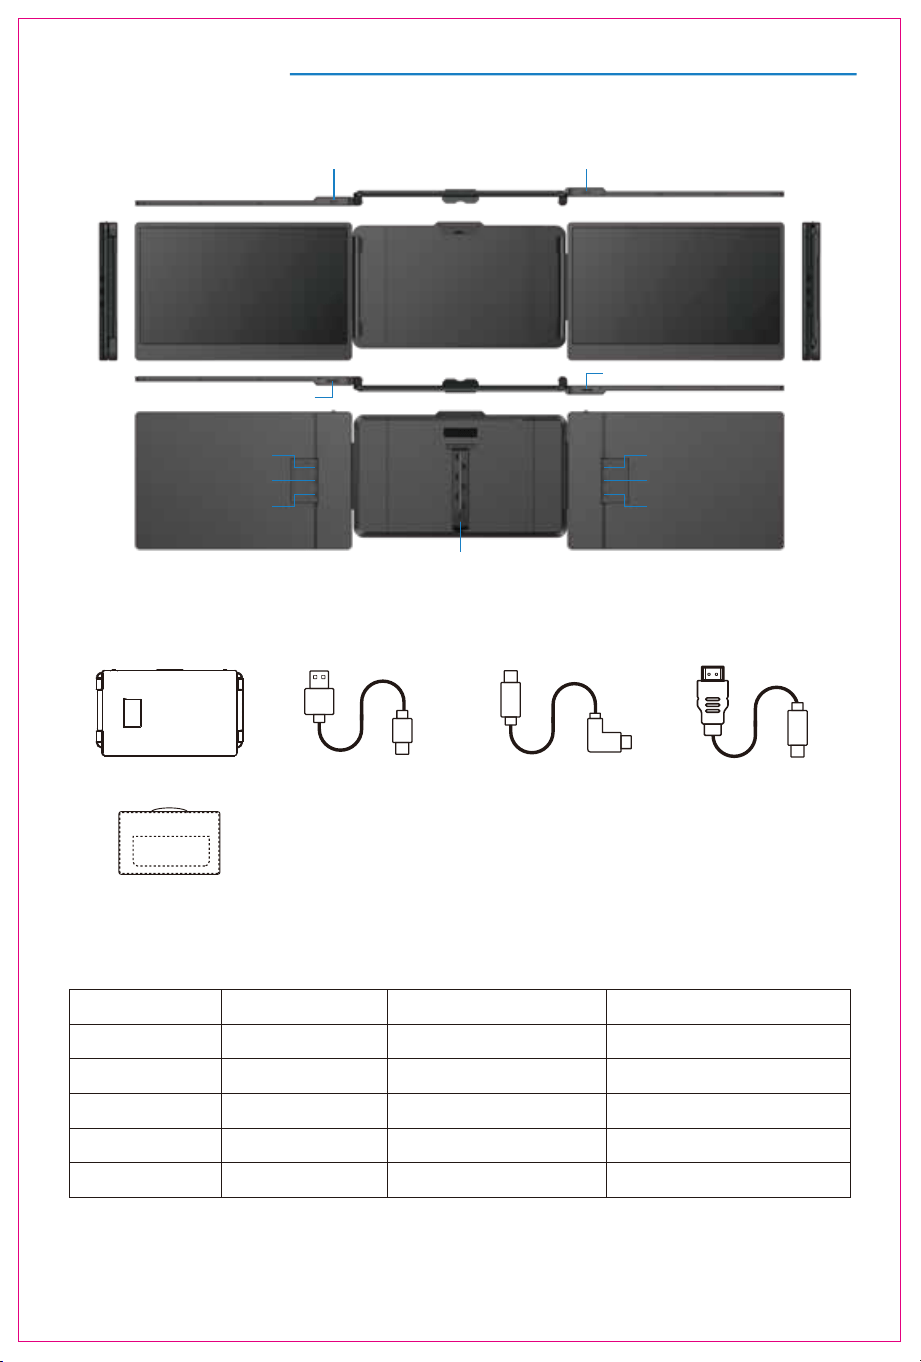
Product Attributes
HOST USB-A to USB-C *2 USB-C to USB-C *2 HDMI to TYPE-C *2
2. Accessories
1. Product host
3. Parameters
353x207x38.7mm
Weight: Screen Size:
Panel Type:
Average Brightness:
Type-C Input:
Type-C Output:
Ports:
1.62 Kg
16:9
60Hz
1920x1080 P
Aspect Ratio:
Size:
Refresh Rate:
Resolution:
Speaker:
14 Inches
IPS Wide Viewing Angle
5V-20V / 5A Max
5V-20V / 4.25A Max
Type-C x32
1
300CD/M
2
Multi-function button Multi-function button
Speaker
TYPE-C
TYPE-C
Kickstand
Speaker
TYPE-C
TYPE-C
TYPE-C
(for video only)
TYPE-C
(for video only)
BAG
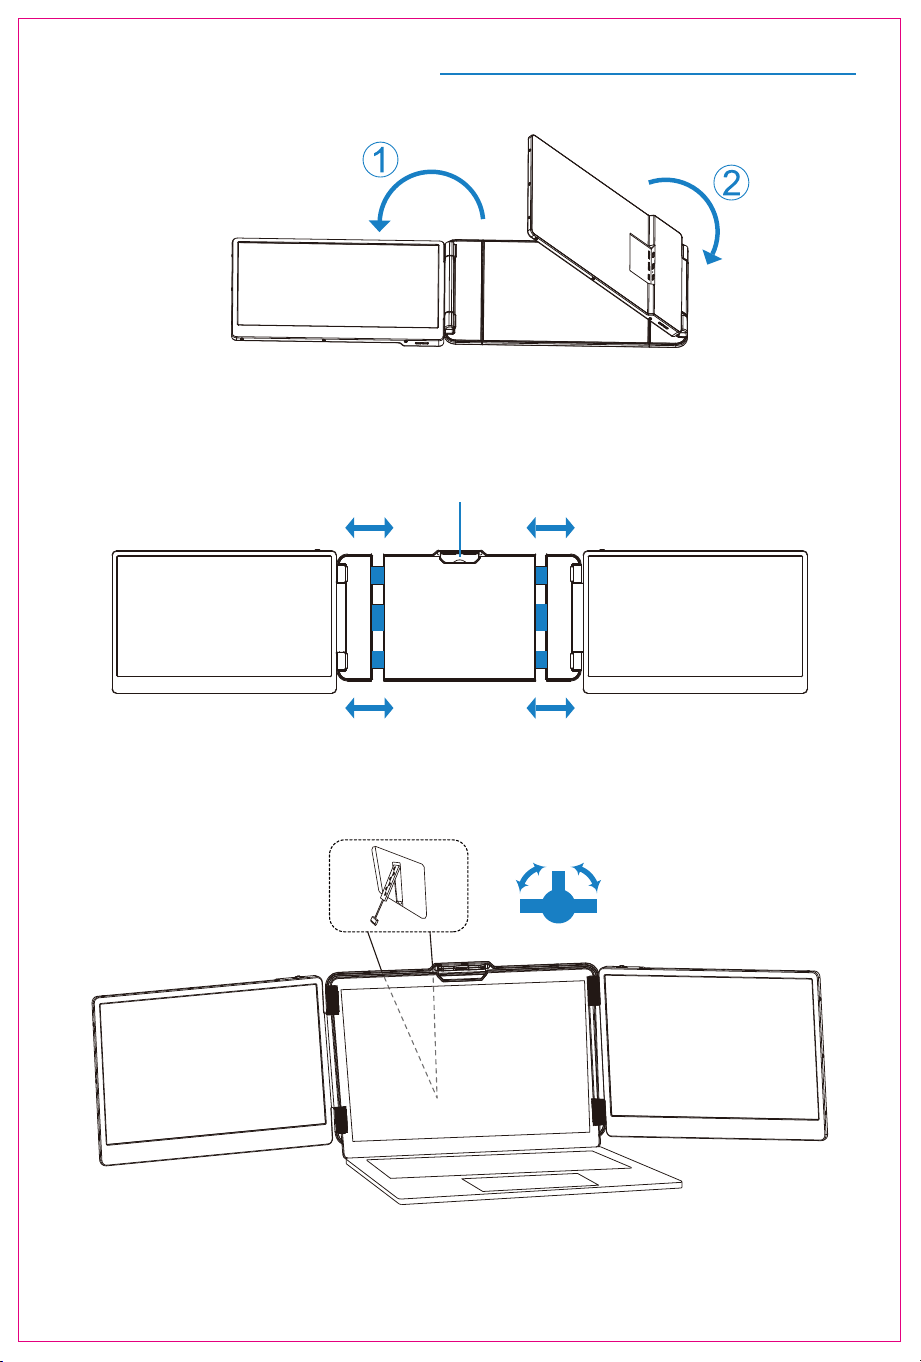
Installation And Stowing Mode
1. Opening mode
2. Outrigger stretch
Open the buckle
3. Fixing mode of device
*Note: sequence of open and close must be performed to avoid damage of device
2
Adjust the kickstand
TIGHT
TIGHT
LOOSE
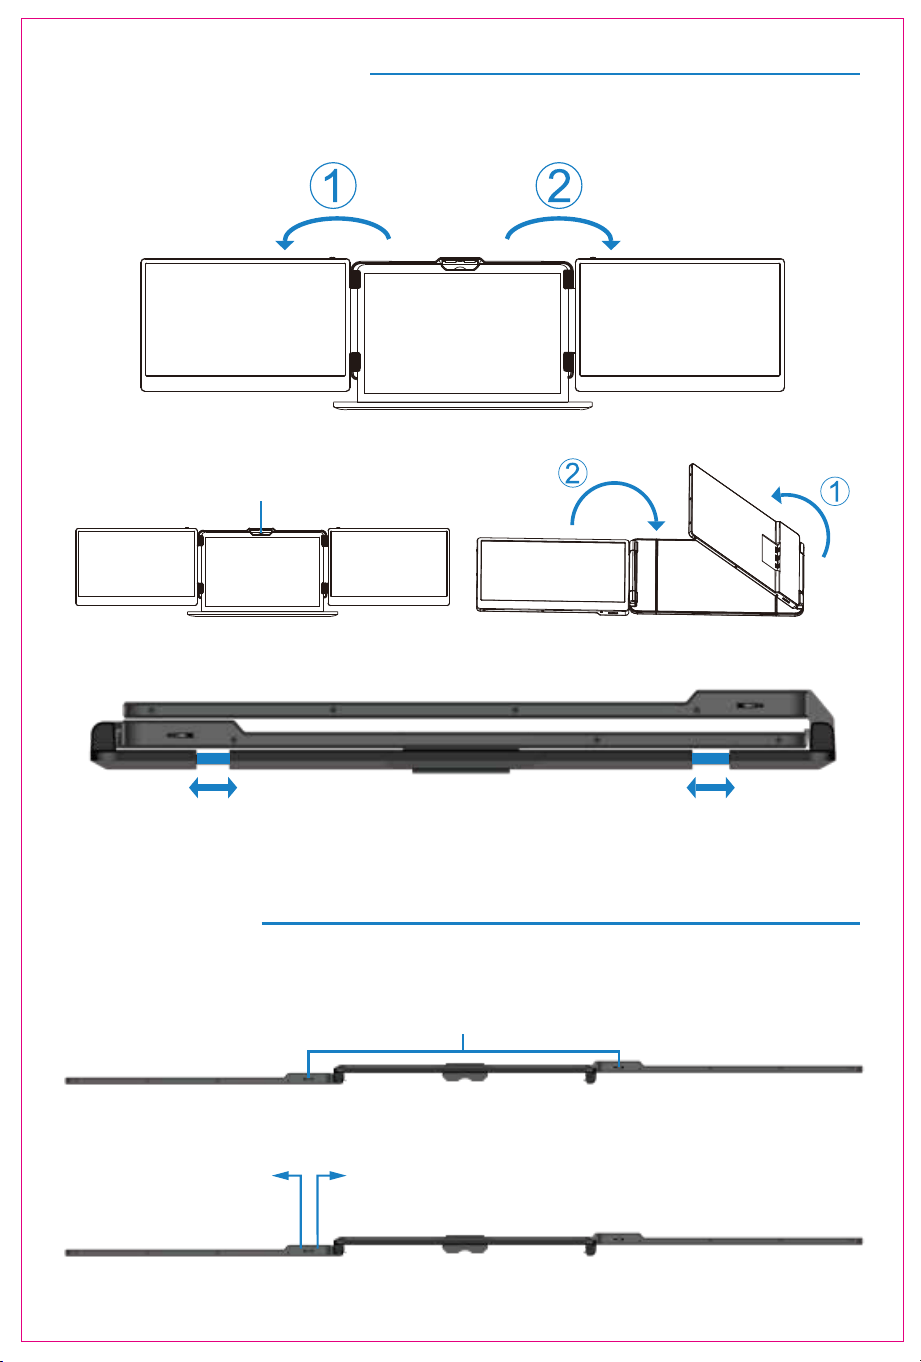
Installation and Storage
4. Opening Sequence
5. Closing Sequence
Note: Please follow the sequence of opening and closing to avoid damage of the device.
When folding the screen, pull the bracket out to the appropriate position, and fix the screen in
the silicone of the bracket. Otherwise forcibly closing it will damage the screen!
3
Key Definitions
Menu/Selection/Confirmation Button
Press and hold for 2 seconds to return. Press and hold for 3 seconds to shut down
Toggle left "Minus”
Backlight Adustment
Toggle right "Plus”
Volume Adjustment
Fold the top buckle
4
Connection Mode
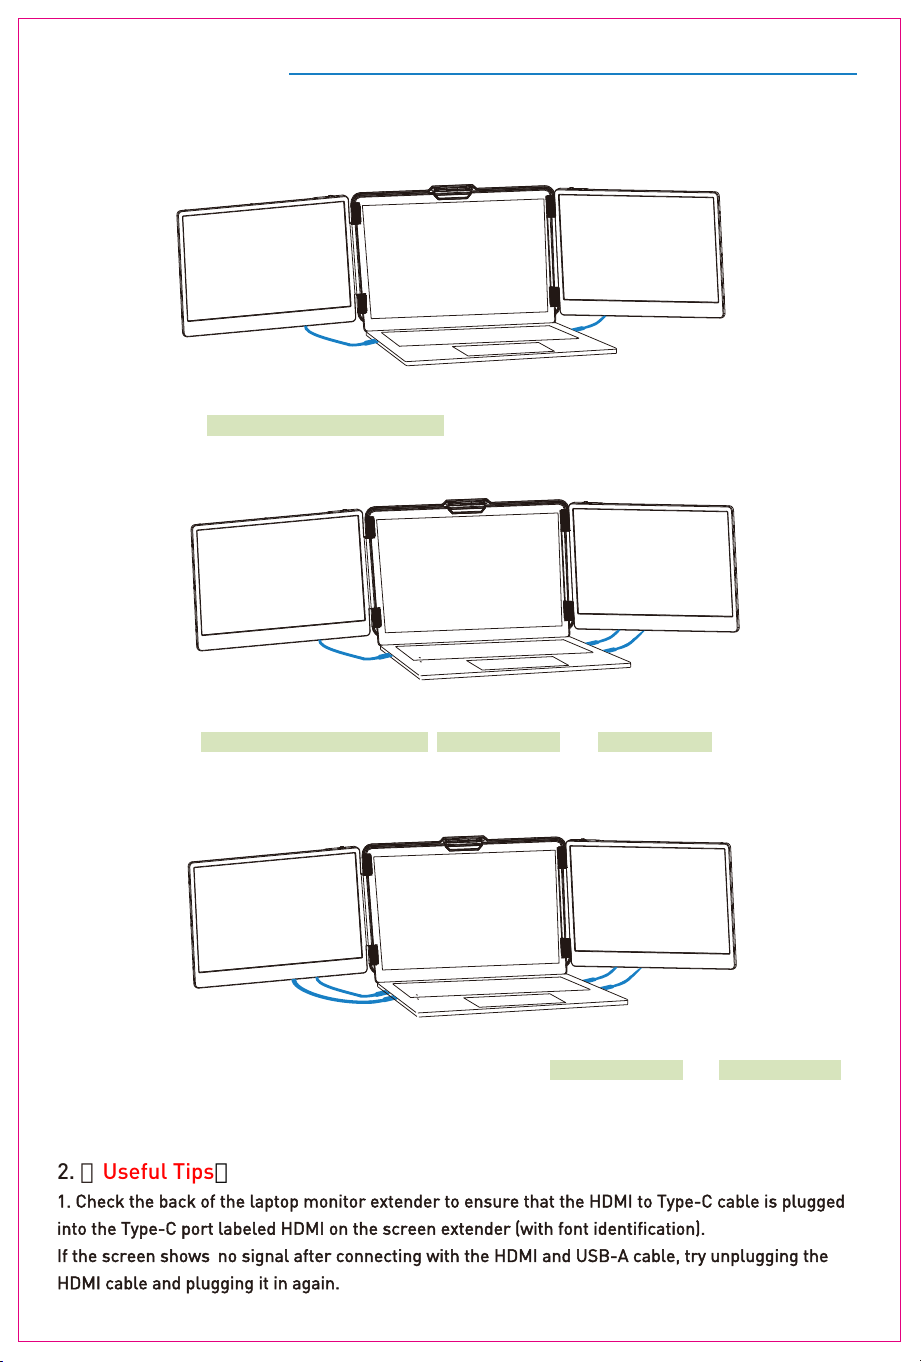
1. TYPE-C Connection:
If your laptop has two full-featured Type-C ports: you can connect the S2 directly to your laptop with
two Type-C to Type-C cables.
1. Connect S2 with Laptop
2. TYPE-C & HDMI & USB-A Connection:
If your laptop has one full-featured Type-c port, one USB-A port and one HDMI port:
Please first connect one monitor using the Type-C to Type-C cable. Then connect the other monitor
using the USB-A to Type-C cable and the HDMI to Type-C cable.
3. HDMI & USB-A Connection:
If your laptop does not have full-featured Type-c port, but has two USB-A ports and two HDMI ports:
Please use the USB-A to Type-C cable and HDMI to Type-C cable to connect one monitor, and then
continue to use the USB-A to USB-C cable and HDMI to Type-C cable to connect another monitor.
2. 【
Useful Tips】
1. Check the back of the laptop monitor extender to ensure that the HDMI to Type-C cable is plugged
into the Type-C port labeled HDMI on the screen extender (with font identification).
If the screen shows no signal after connecting with the HDMI and USB-A cable, try unplugging the
HDMI cable and plugging it in again.
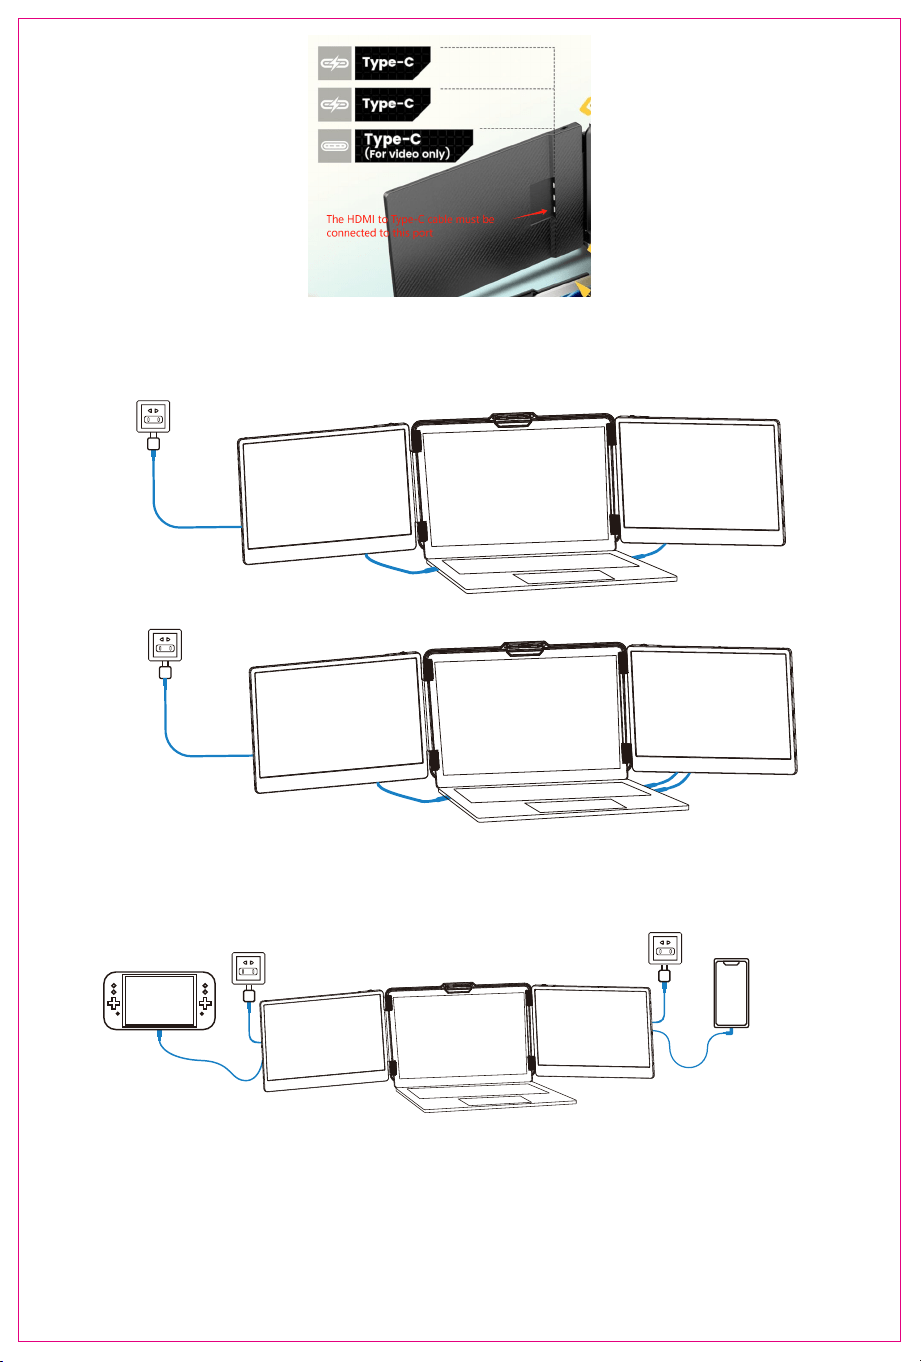
Switch connection mode
(External power suply required)
Mobile phone connection mode
(External power supply required)
5
2. If the monitor has no signal / unstable signal / power saving alert / flickering / black screen after
connection, please connect an external 5V/2A power adapter to supply power to the lapop.
e.g.
e.g.
3. Connect S2 with Mobile Phone with Other Devices
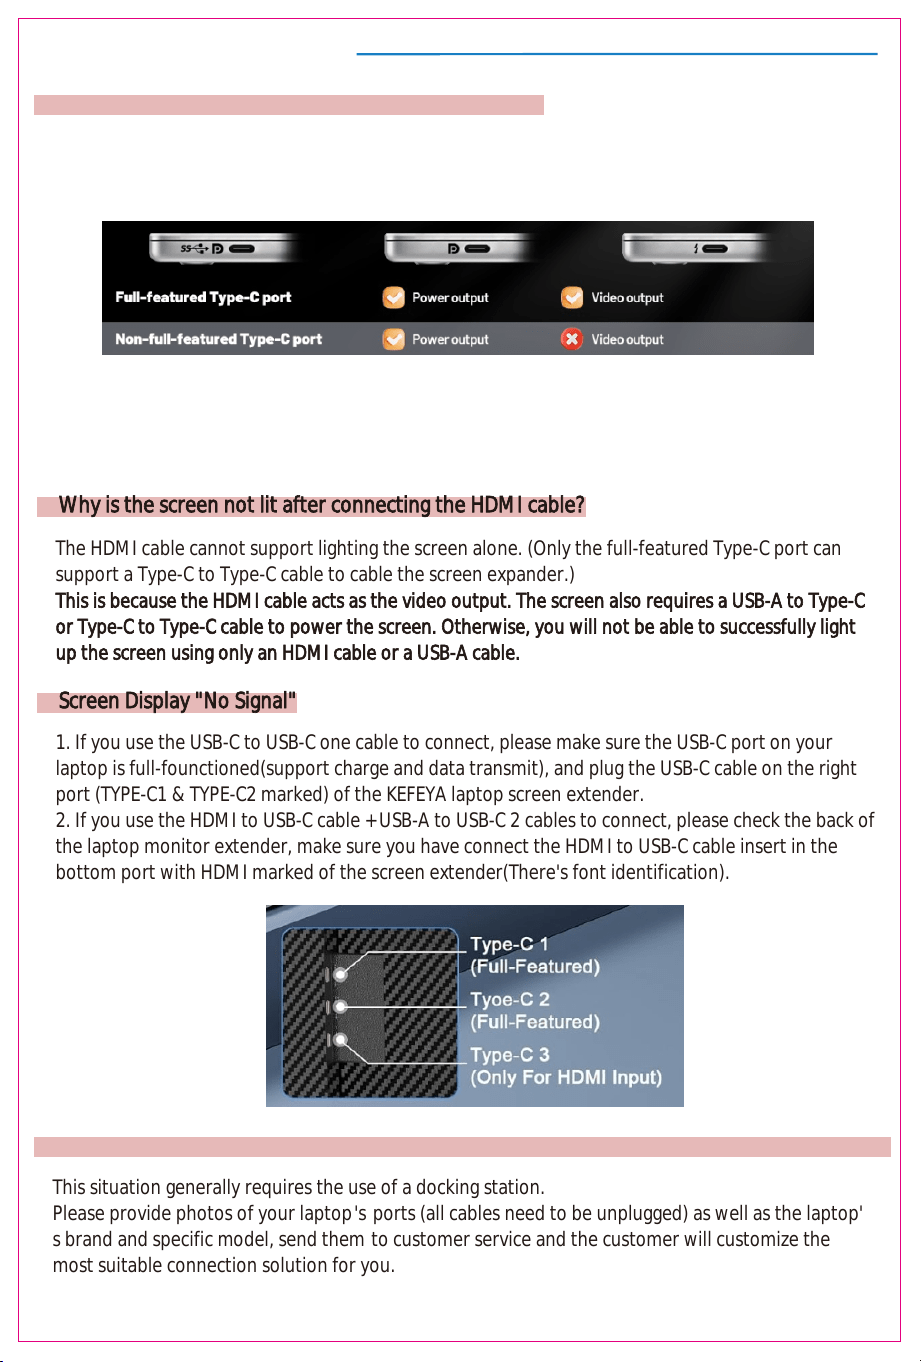
3. Screen Display "No Signal"
1. If you use the USB-C to USB-C one cable to connect, please make sure the USB-C port on your
laptop is full-founctioned(support charge and data transmit), and plug the USB-C cable on the right
port (TYPE-C1 & TYPE-C2 marked) of the KEFEYA laptop screen extender.
2. If you use the HDMI to USB-C cable + USB-A to USB-C 2 cables to connect, please check the back of
the laptop monitor extender, make sure you have connect the HDMI to USB-C cable insert in the
bottom port with HDMI marked of the screen extender(There's font identification).
6
Frequently Asked Questions
1. How to tell if a laptop's Type-C port is fully functional?
The HDMI cable cannot support lighting the screen alone. (Only the full-featured Type-C port can
support a Type-C to Type-C cable to cable the screen expander.)
This is because the HDMI cable acts as the video output. The screen also requires a USB-A to Type-C
or Type-C to Type-C cable to power the screen. Otherwise, you will not be able to successfully light
2.
The judgment method is as follows:
1. If the Type-C port has the following signs next to it, it means it is a full-featured Type-C port (with
the function of video output output + power output).
Why is the screen not lit after connecting the HDMI cable?
up the screen using only an HDMI cable or a USB-A cable.
4. My laptop doesn't have enough ports to connect to the expansion screen. What should I do?
This situation generally requires the use of a docking station.
Please provide photos of your laptop's ports (all cables need to be unplugged) as well as the laptop'
s brand and specific model, send them to customer service and the customer will customize the
most suitable connection solution for you.
2. Judge further by the port description given on the laptop's official website.
3. You can also contact our brand's customer service staff with a photo of your laptop's ports (all
cables need to be unplugged) as well as the brand and specific model of your laptop. Customer
service will help you determine and provide a compatible connection solution.

Frequently Asked Questions
5. Why does my MacBook have two fully functional C ports, but when I connect the screen
extender, one of the screens won't light up?
Please follow the steps below to check:
-----1. If your laptop uses the M1/M2/M3/M4/M4 Pro chips, then this is a display limitation issue
with the chips.
These chips can only support two screens lit up at the same time (including the laptop screen).
You'll need a port docking station that solves the display limitation issue with the chips.
An example is the H5-T cable sold by Kefeya.
You can contact the brand's customer service for a specific solution regarding this situation.
-----2. If your laptop is not using the M1/M2/M3/M4/M4 Pro chip, please provide the specific
model of your laptop to the customer for further assistance.
7
8
Common Troubleshooting / After-sales Help
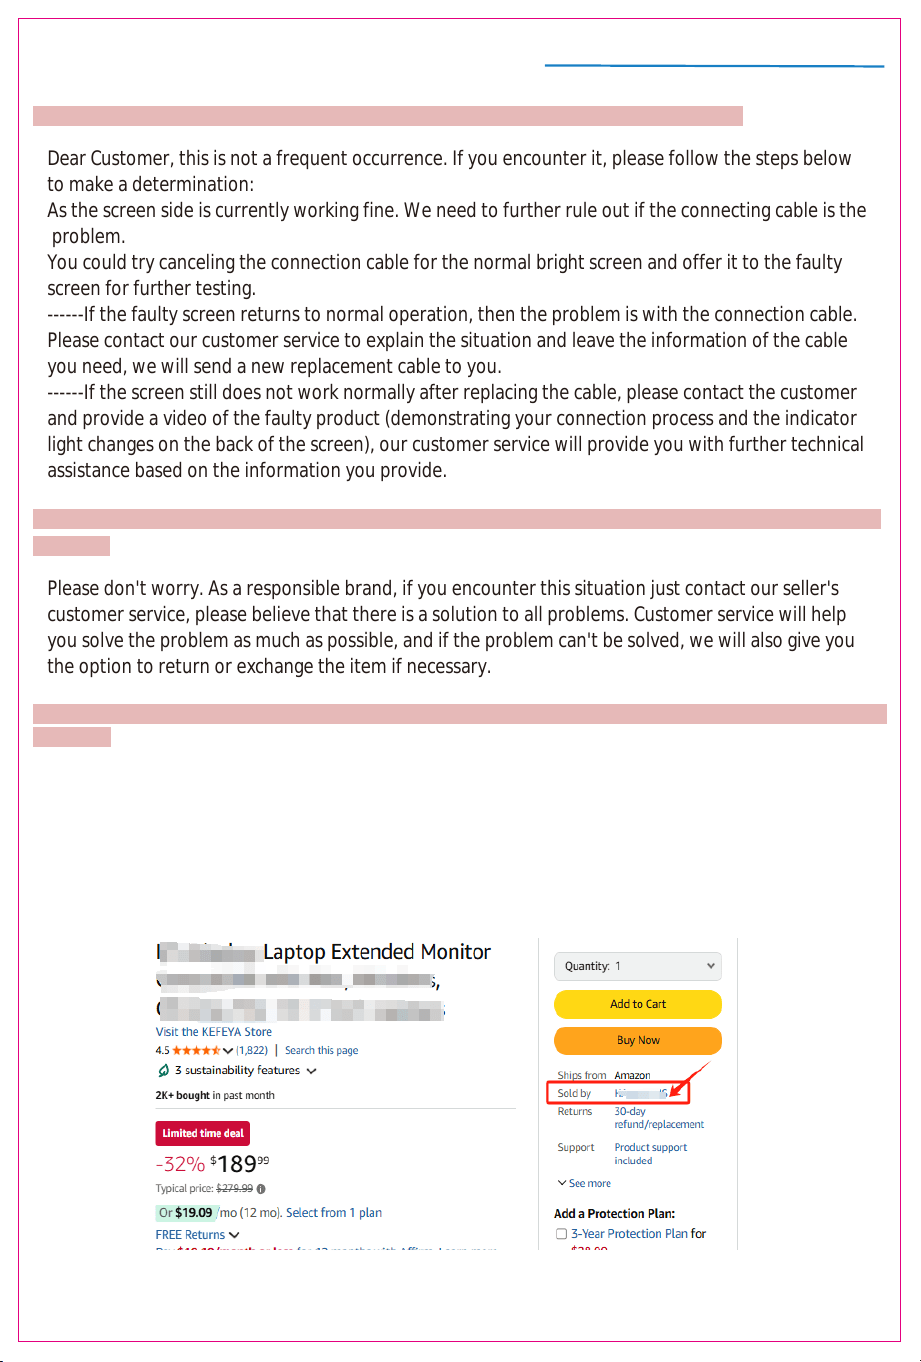
1. After using the product for a few months, suddenly one screen doesn't work
2. The return period for the platform has been exceeded, but encountered problems with the
Dear Customer, this is not a frequent occurrence. If you encounter it, please follow the steps below
to make a determination:
As the screen side is currently working fine. We need to further rule out if the connecting cable is the
problem.
You could try canceling the connection cable for the normal bright screen and offer it to the faulty
screen for further testing.
------If the faulty screen returns to normal operation, then the problem is with the connection cable.
Please contact our customer service to explain the situation and leave the information of the cable
you need, we will send a new replacement cable to you.
------If the screen still does not work normally after replacing the cable, please contact the customer
and provide a video of the faulty product (demonstrating your connection process and the indicator
light changes on the back of the screen), our customer service will provide you with further technical
assistance based on the information you provide.
product.
Please don't worry. As a responsible brand, if you encounter this situation just contact our seller's
customer service, please believe that there is a solution to all problems. Customer service will help
you solve the problem as much as possible, and if the problem can't be solved, we will also give you
the option to return or exchange the item if necessary.
3. Why I didn't get a reply when I contacted customer service? How to contact seller customer
service?
-------Contact methods are listed below:
Select the product page you purchased, click on the seller's name next to "Sold by" and you will be
taken to the seller's contact information in the "About Seller" area.
-------If there is a situation where you do not receive a reply after contacting us, it is possible that you
are contacting the wrong seller team. In this case, please be sure to make contact as described below:
Audio Settings
9
S2
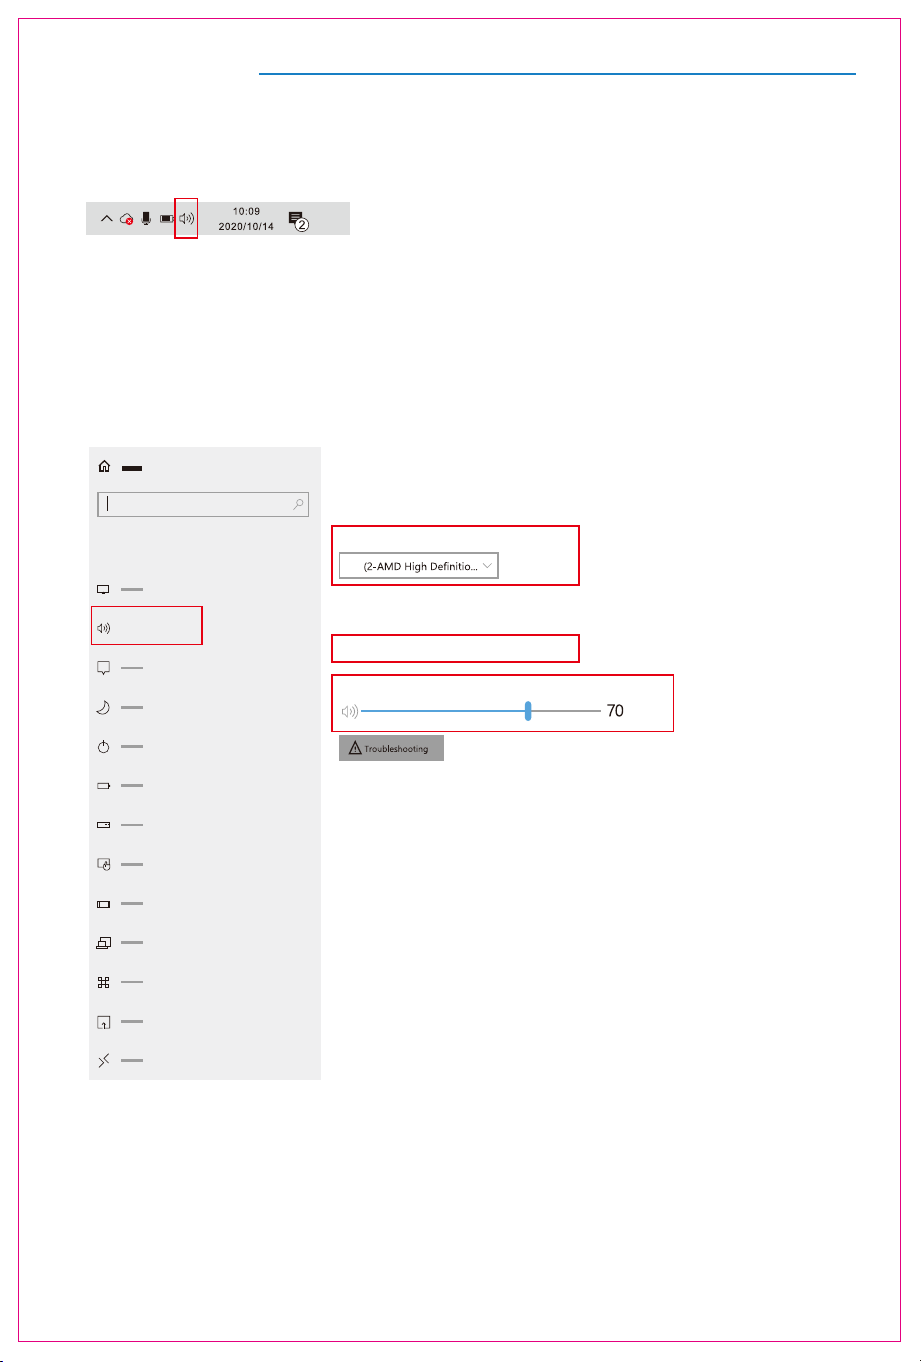
1. Change sound settings of Windows 10 / Windows 11
1.1 Right click the loudspeaker icon located in the bottom-right corner.
1.2 Select "switch on sound " in pop-up dialog box
1.3 Left click "turn on sound settings" and pop-up the box as provided
Here users can set about sound
1. Master volume;
2. Select output device: ( S2 / Speaker );
3. Device attributes.
Sound
Sound
output
System
Some apps can be set to use a different sound device than the one selected here.
Please customize the app volume and device in advanced sound selection.
Select output device
Device attribues
master volume

?
Audio Settings
10
2. Change sound settings of MAC OS PC
2.1. Choose Apple menu > System Settings
2.2. Click on "Output," and then choose the desired device from the list of available sound output options.
output devices:( S2 / Speaker )
11
Display Mode
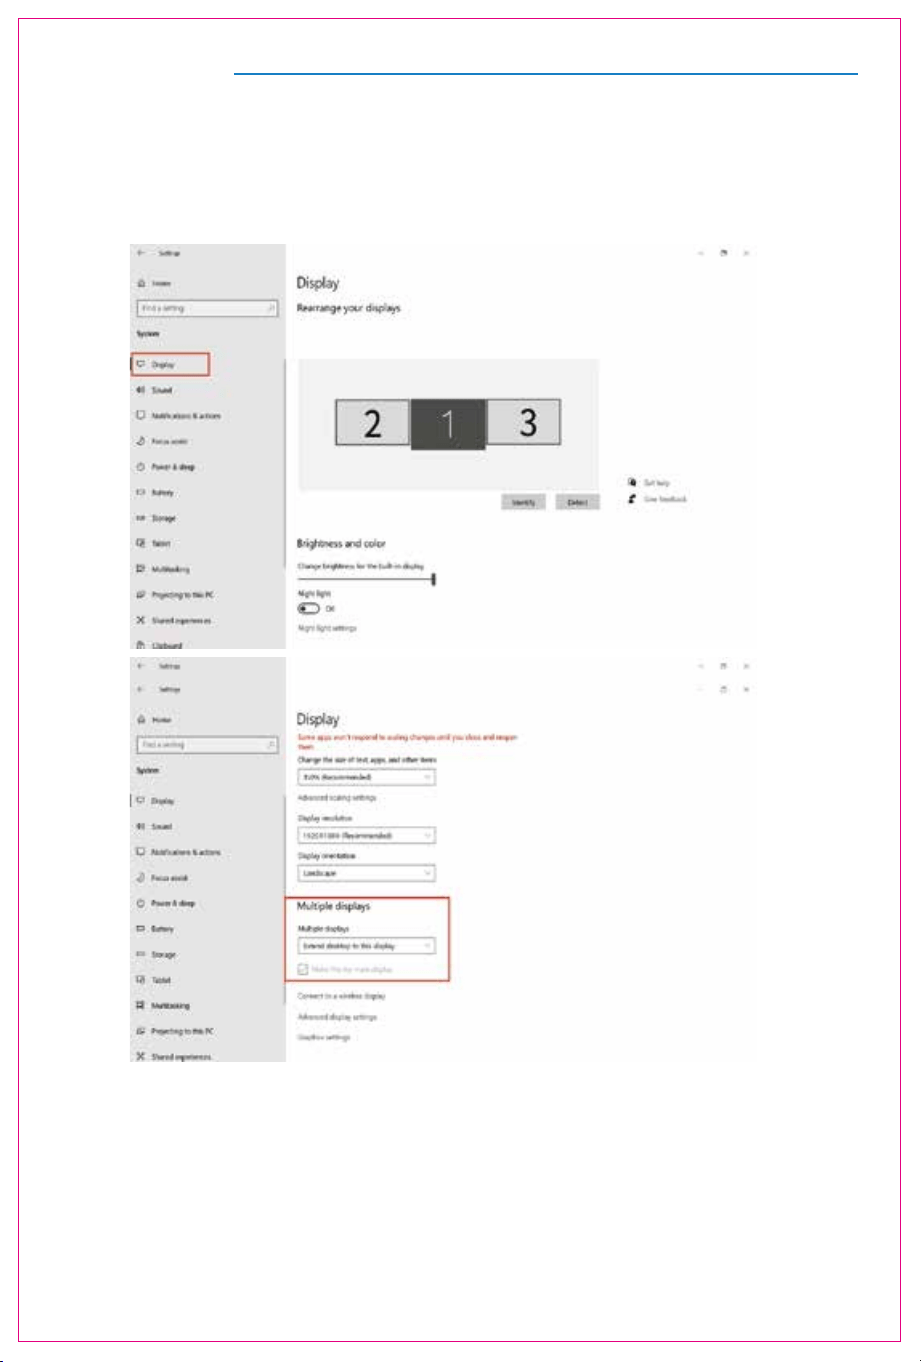
1.1 Right-click a blank area of the desktop. Select 'Display Settings' from the pop-up dialogue box.
1.2 Under the "Rearrange displays" section, drag and drop each display to rearrange them according to their
physical layout of your desktop. Scroll down to the bottom of the page to further configure the display for
extended or mirrored mode.
Left click "Display Settings" to open the settings dialogue box, shown in the figure:
Sleep better
by displaying warmer colors at night.
Select Night light settings to set things
up.
Help from the web
Setting up multiple monitors
Changing screen brightness
Fixing screen flickering
Adjusting font size
Select a display below to change the settings for it. Press and hold (or select) a display,
Night light can help you get to sleep
then drag to rearrange it.
1. Windows 10 / Windows 11 Display Settings

Display Mode
12
2.1 Enter the “System Preferences” menu
2.2 Configure your monitor
2.3 Arrange Displays
To rearrange displays, drag them to the desired position.
To mirror displays, hold Option key while dragging them on top of each other.
To relocate the menu bar, drag it to a different display.
In this menu, you can set the resolution and mirror/extend the display you want.
2. MacOS 13 Ventura Display Settings

Transportation, Storage And Safety Information
13
To ensure the safe and proper use of this product and prevent accidents such as electric shock or
fire, please read and understand all use requirements and operation procedures before using.
Please adhere strictly to the following guidelines:
1. Before use, remove the protective film from the screen surface.
2. This product requires a DC power supply through an AC/DC power adapter. Ensure that the adapter
is placed away from heat sources in a well-ventilated location. The AC power socket and AC power
line should be adequately grounded to handle the current demands.
3. The DC power input required for this product is 5V-20V ± 2V.
4. Take precautions to prevent excessive humidity and dust accumulation, as they can lead to circuit
corrosion and malfunction.
5. Avoid subjecting the screen surface to external forces or impacts.
6. Do not use sharp tools that may damage the screen surface.
7. This product is suitable for general business and domestic use, and it is recommended to operate
it within an ambient temperature range of -20°C to 60°C.Please turn off the power when you stop
using produce.
8. Remember to power off the device by disconnecting the power source when not in use.

Contact Us
If you need any support, please feel free to contact our customer service!
We will be happy to assist you and respond within 24 hours.