Knob Function Description
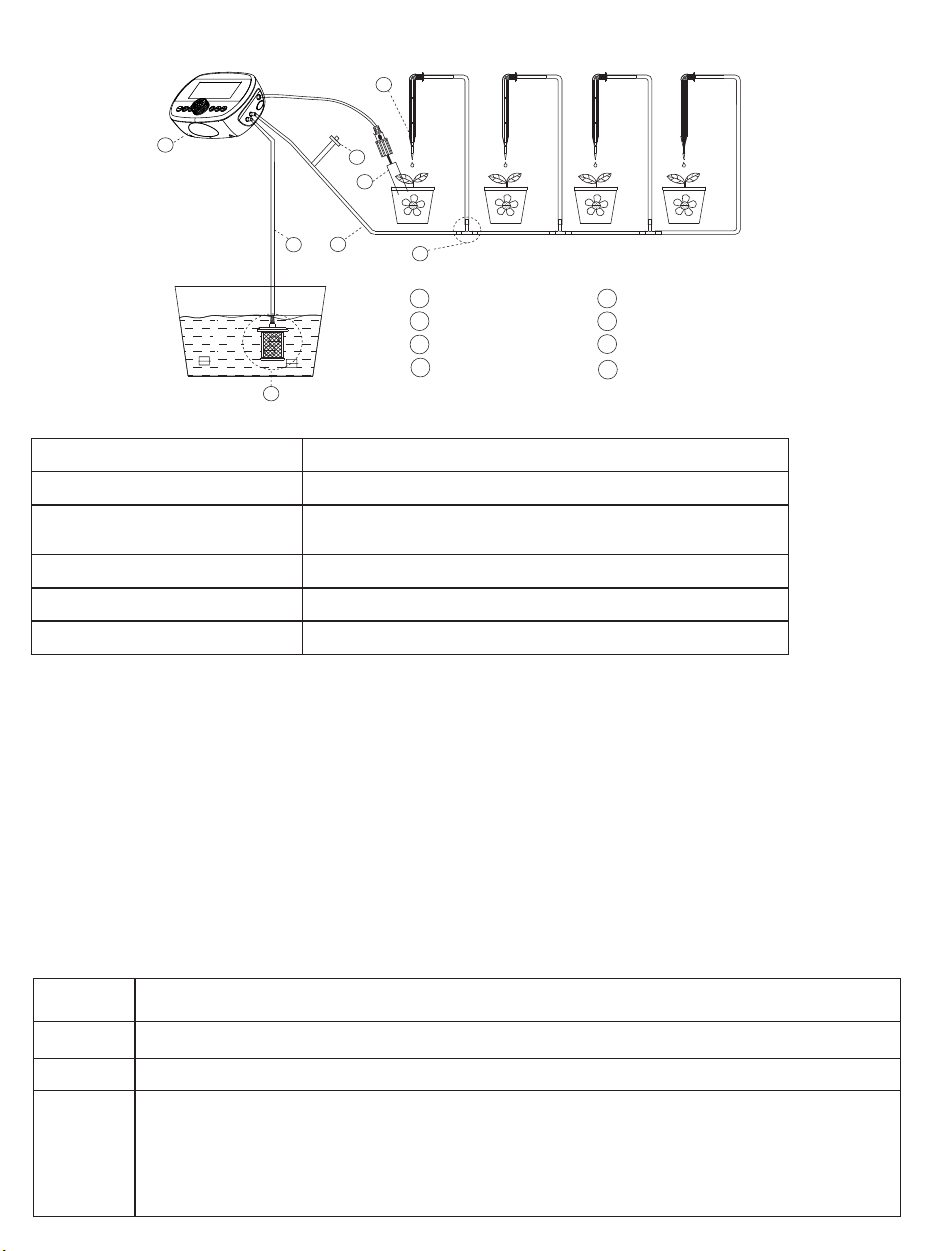
Installation Diagram
07
02
06
03
04
05
01
Controller x1
02
Filter x1
03
OUT Pipe x1
04
Tee x15
05
Dripper x15
06
07
08
IN Pipe x1
Humidity detectors x1
Anti-siphon x1
01
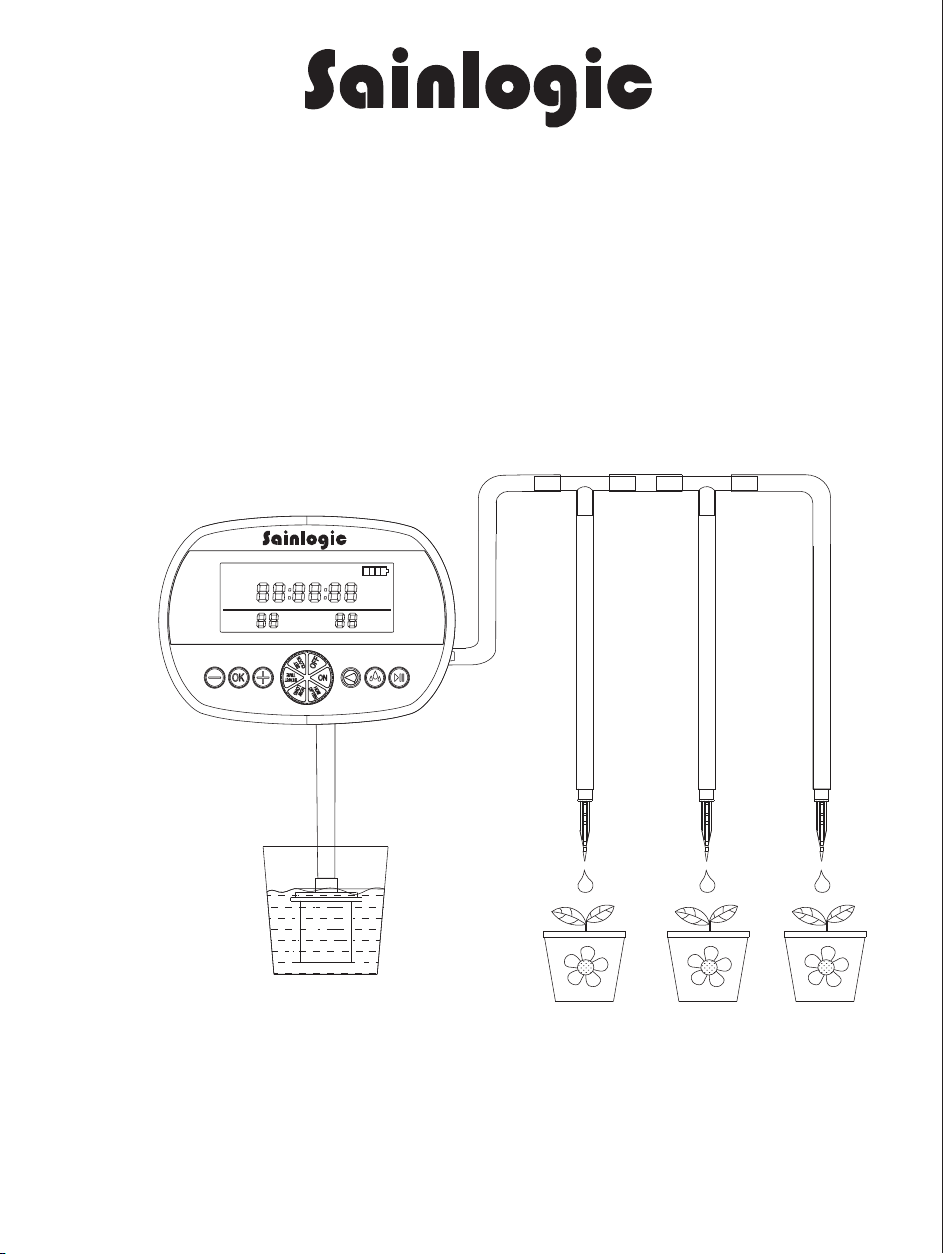
Automatic Drip Irrigation System
User Manual
Defini�on
Explaining
ON
Turn the device on
OFF
Turn the device off
HOW
LONG
This func�on helps to set the �me for every watering. The numbers on the “Watering”
posi�on are flashing. Press +/- to set and OK to confirm.
SET
CLOCK
This func�on helps to set the �me of the clock.The screen shows "CLOCK" on the top.
The numbers on the “hour” posi�on are flashing. Press +/- to set the hour, and press
OK to confirm. Then the numbers on the “minute” posi�on are flashing. Press +/- to set and
OK to confirm. Then the numbers on the “second” posi�on are flashing.
Press +/- to select and OK to confirm. Then the clock will start.
START
TIME
This func�on helps to set the �me for the 1st watering.The screen shows "1ST WATERING
TIME" on the top. The numbers on the “hour” posi�on are flashing. Press +/- to set the hour,
and press OK to confirm. Then the numbers on the “minute” posi�on are flashing. Press +/- to
set and OK to confirm. Then the numbers on the “second” posib�on are flashing. Press +/- to
select and OK to confirm. Then the clock will start.
HOW
OFTEN
This func�on helps to set the interval �me between 2 watering. The numbers on the
“Interval” posi�on are flashing. Press +/- to set and OK to confirm.
08
Steps to Set Watering Time
Other description
Explaining
Timing watering
mode
When selec�ng the �ming water mode, "TMING" lights up on the screen, then the device
will water at the se�ng watering �me and interval. The humidity sensor will be closed.
Backlight of
screen
When the knob or bu�on is ac�vated, the screen will light up for 30 seconds.
Charging
indicator
When charging, the ba�ery icon on the top right of the screen will flash growing.
A�er fully charged, the icon will stay on.
Low ba�ery
indicator
When the ba�ery is low, the last 1/4 parts of the icon will flash, and the pump will
be closed.
Humidity
watering
mode
1. When selec�ng humidity watering mode, "HUMIDITY" lights up on the screen, and
the watering �me is invalid, displaying "---".
2. The interval follows the se�ng, and the watering �me follows the soil humidity. If
the soil is wet, the device won’t water. If dry, it will water un�l the soil become wet,
and the screen will display “WET”.
3. The longest watering �me is 30 min in this mode.
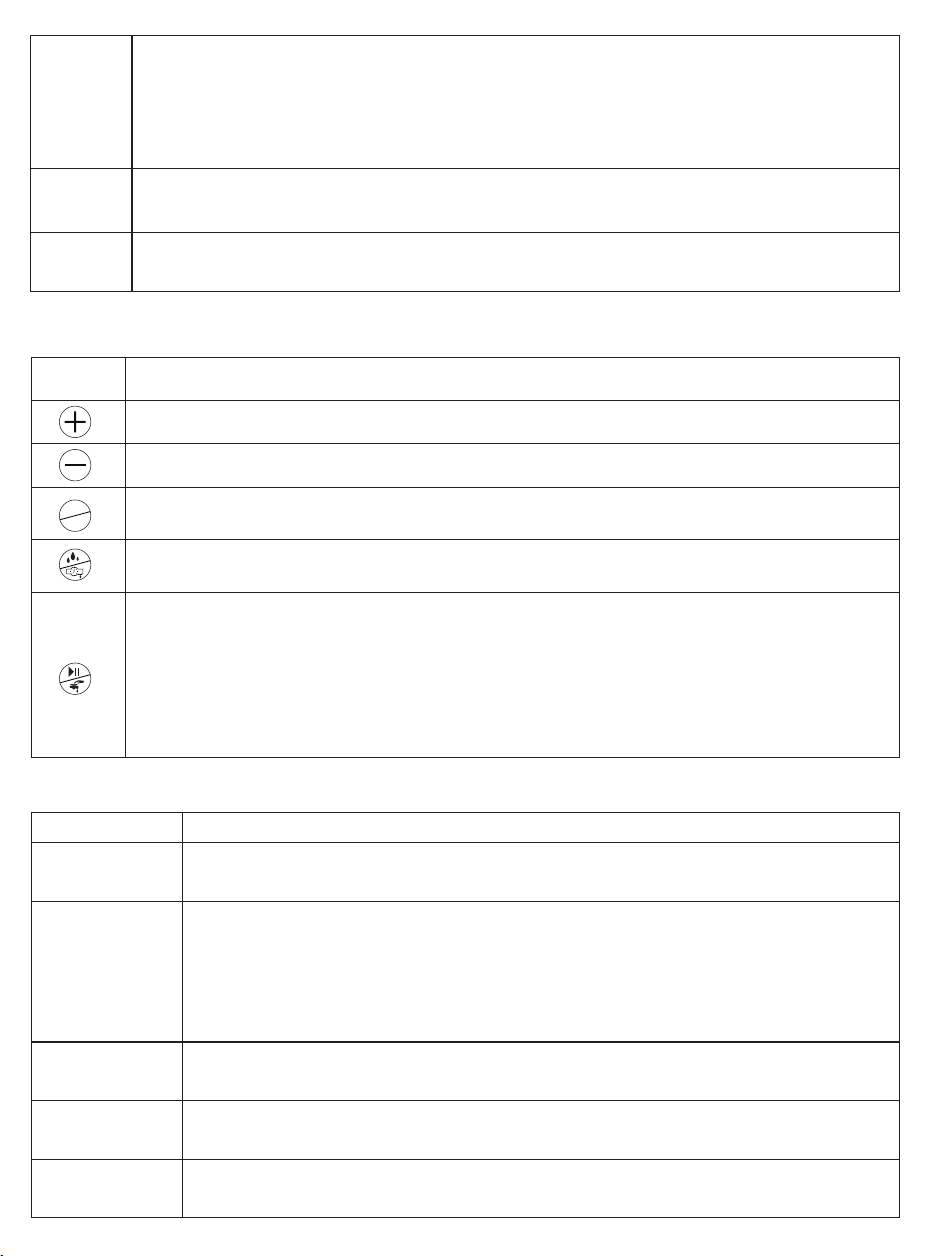
Press icon description
Icon
Defini�on
Press it to change the number.
Press it to change the number.
When se�ng, press it to confirm. When the knob is switched ON, press it to change the displayed
content, “clock” or “1st watering �me”.
Press it to select the watering mode. Timing mode: the device will water according to the �me
se�ng. Humidity mode: the device will water when the humidity sensor detects dry.
1. When the knob is switched ON, press it to water manually and “Manual” will be displayed on
the le� of the screen; press it again, the system will come back to the selected watering mode.
2. When the knob is switched ON,
a) Long press it for 3 seconds to suspend watering for a watering cycle, and “Suspend” will be
displayed on the right of the screen. The system will return the select watering mode next
watering cycle and the “Suspend” will disappear.
b) Long press it again to cancel “Suspend” to return the select watering mode.
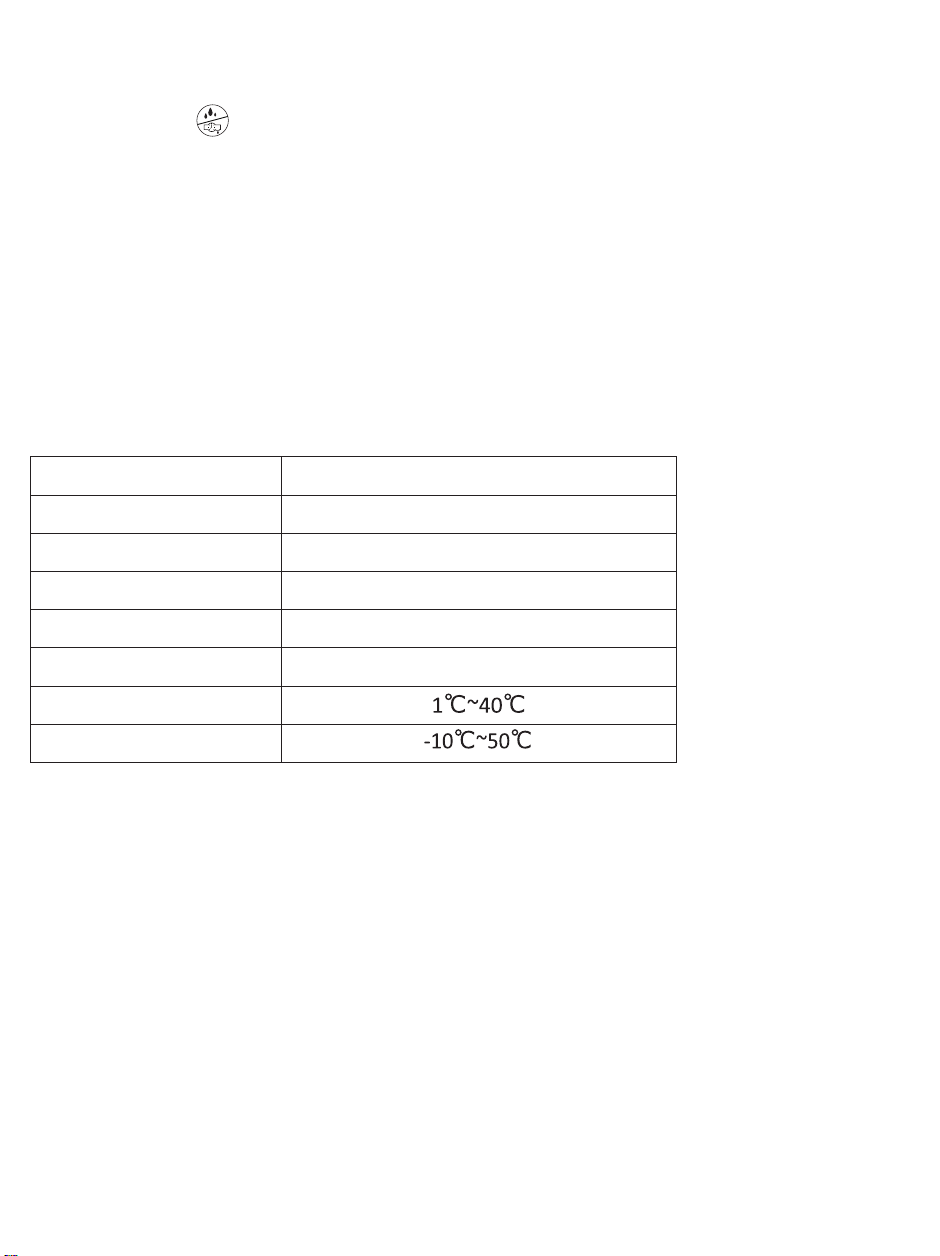
Specifications
Automatic Drip Irriga�on SystemItem Name
Model No.
BSV-IC205S
DC 5V 1ACharging
Ba�ery
3.7V / 2200mAh
1WPump
Maxi water flow
400mL/min
Opera�ng temperature
Storage temperature
Operation Instructions
1. Install the inlet water pipe, outlet water pipe, tees, drippers, filter, etc., according to the diagram.
2. Please select the number of drippers and watering se�ng according to the actual water demand of
the plants.
3. Depending on your needs, you can hang the hooks on the bucket and fence.
4. Please ensure the water level in the bucket is lower than the drip head to prevent overflow or leakage.
This will help maintain proper pressure and flow rate in the system, ensuring efficient opera�on of the
automa�c drip irriga�on device.
OK
C/S
1. Turn the "SET CLOCK" to set the �me on the clock.
2. Press the bu�on to select the watering mode.
3. Turn the "START TIME" to set the first watering �me, press the key +/- and OK to comfirm the �me.
4. Turn the "HOW LONG" to set the dura�on of each watering, press the key +/- and OK to set it.
5. Turn the "HOW OFTEN" to set the interval �me between 2 watering, press the key to set the interval.
(For example, if the watering �me is 01 min and the interval is 1 Hour, the device will water for 1 minute
every 1 hour.
If you select humidity watering mode, you don’t need to set the watering �me.)
6. Turn the "ON" to start automa�c watering according to the watering schedule you have set up.
Before se�ng up, please read the detailed descrip�ons of each bu�on and mode in the instruc�on manual.
Before star�ng, please check if all connec�ons are properly linked.
If you have any ques�ons during the setup or watering process,please contact us.
Manufacturer:
Sainlogic High Tech Innova�on Co.,LTD
10342 Cypress Lakes Dr,
Jacksonville, FL 32256
United State
BSV-IC205S
Contact us:
Website:www.sainlogic.com
Email: info@sainlogic.com
Skype:+15087580493 (Mon-Sat:10 a.m. - 2 p.m. EST)
Number of watering pots
Probe length
15 pots
16.4 feet (Needle Shape)
Watering Dura�on: 10 seconds to 30 minutes
Watering interval: 1 hour to 7 days
3.07x1.22 inches
IP64
Pipe (33 feet), Dripper (15 pcs), Tee (15pcs)
Timer mode
Screen size
Waterproof grade
Accessories
Knob Function Description
Installation Diagram
07
02
06
03
04
05
01
Controller x1
02
Filter x1
03
OUT Pipe x1
04
Tee x15
05
Dripper x15
06
07
08
IN Pipe x1
Humidity detectors x1
Anti-siphon x1
01
Automatic Drip Irrigation System
User Manual
Defini�on
Explaining
ON
Turn the device on
OFF
Turn the device off
HOW
LONG
This func�on helps to set the �me for every watering. The numbers on the “Watering”
posi�on are flashing. Press +/- to set and OK to confirm.
SET
CLOCK
This func�on helps to set the �me of the clock.The screen shows "CLOCK" on the top.
The numbers on the “hour” posi�on are flashing. Press +/- to set the hour, and press
OK to confirm. Then the numbers on the “minute” posi�on are flashing. Press +/- to set and
OK to confirm. Then the numbers on the “second” posi�on are flashing.
Press +/- to select and OK to confirm. Then the clock will start.
START
TIME
This func�on helps to set the �me for the 1st watering.The screen shows "1ST WATERING
TIME" on the top. The numbers on the “hour” posi�on are flashing. Press +/- to set the hour,
and press OK to confirm. Then the numbers on the “minute” posi�on are flashing. Press +/- to
set and OK to confirm. Then the numbers on the “second” posib�on are flashing. Press +/- to
select and OK to confirm. Then the clock will start.
HOW
OFTEN
This func�on helps to set the interval �me between 2 watering. The numbers on the
“Interval” posi�on are flashing. Press +/- to set and OK to confirm.
08
Steps to Set Watering Time
Other description
Explaining
Timing watering
mode
When selec�ng the �ming water mode, "TMING" lights up on the screen, then the device
will water at the se�ng watering �me and interval. The humidity sensor will be closed.
Backlight of
screen
When the knob or bu�on is ac�vated, the screen will light up for 30 seconds.
Charging
indicator
When charging, the ba�ery icon on the top right of the screen will flash growing.
A�er fully charged, the icon will stay on.
Low ba�ery
indicator
When the ba�ery is low, the last 1/4 parts of the icon will flash, and the pump will
be closed.
Humidity
watering
mode
1. When selec�ng humidity watering mode, "HUMIDITY" lights up on the screen, and
the watering �me is invalid, displaying "---".
2. The interval follows the se�ng, and the watering �me follows the soil humidity. If
the soil is wet, the device won’t water. If dry, it will water un�l the soil become wet,
and the screen will display “WET”.
3. The longest watering �me is 30 min in this mode.
Press icon description
Icon
Defini�on
Press it to change the number.
Press it to change the number.
When se�ng, press it to confirm. When the knob is switched ON, press it to change the displayed
content, “clock” or “1st watering �me”.
Press it to select the watering mode. Timing mode: the device will water according to the �me
se�ng. Humidity mode: the device will water when the humidity sensor detects dry.
1. When the knob is switched ON, press it to water manually and “Manual” will be displayed on
the le� of the screen; press it again, the system will come back to the selected watering mode.
2. When the knob is switched ON,
a) Long press it for 3 seconds to suspend watering for a watering cycle, and “Suspend” will be
displayed on the right of the screen. The system will return the select watering mode next
watering cycle and the “Suspend” will disappear.
b) Long press it again to cancel “Suspend” to return the select watering mode.
Specifications
Automatic Drip Irriga�on SystemItem Name
Model No.
BSV-IC205S
DC 5V 1ACharging
Ba�ery
3.7V / 2200mAh
1WPump
Maxi water flow
400mL/min
Opera�ng temperature
Storage temperature
Operation Instructions
1. Install the inlet water pipe, outlet water pipe, tees, drippers, filter, etc., according to the diagram.
2. Please select the number of drippers and watering se�ng according to the actual water demand of
the plants.
3. Depending on your needs, you can hang the hooks on the bucket and fence.
4. Please ensure the water level in the bucket is lower than the drip head to prevent overflow or leakage.
This will help maintain proper pressure and flow rate in the system, ensuring efficient opera�on of the
automa�c drip irriga�on device.
OK
C/S
1. Turn the "SET CLOCK" to set the �me on the clock.
2. Press the bu�on to select the watering mode.
3. Turn the "START TIME" to set the first watering �me, press the key +/- and OK to comfirm the �me.
4. Turn the "HOW LONG" to set the dura�on of each watering, press the key +/- and OK to set it.
5. Turn the "HOW OFTEN" to set the interval �me between 2 watering, press the key to set the interval.
(For example, if the watering �me is 01 min and the interval is 1 Hour, the device will water for 1 minute
every 1 hour.
If you select humidity watering mode, you don’t need to set the watering �me.)
6. Turn the "ON" to start automa�c watering according to the watering schedule you have set up.
Before se�ng up, please read the detailed descrip�ons of each bu�on and mode in the instruc�on manual.
Before star�ng, please check if all connec�ons are properly linked.
If you have any ques�ons during the setup or watering process,please contact us.
Manufacturer:
Sainlogic High Tech Innova�on Co.,LTD
10342 Cypress Lakes Dr,
Jacksonville, FL 32256
United State
BSV-IC205S
Contact us:
Website:www.sainlogic.com
Email: [email protected]
Skype:+15087580493 (Mon-Sat:10 a.m. - 2 p.m. EST)
Number of watering pots
Probe length
15 pots
16.4 feet (Needle Shape)
Watering Dura�on: 10 seconds to 30 minutes
Watering interval: 1 hour to 7 days
3.07x1.22 inches
IP64
Pipe (33 feet), Dripper (15 pcs), Tee (15pcs)
Timer mode
Screen size
Waterproof grade
Accessories