

Technical Support and E-Warranty Certificate
www.vevor.com/support
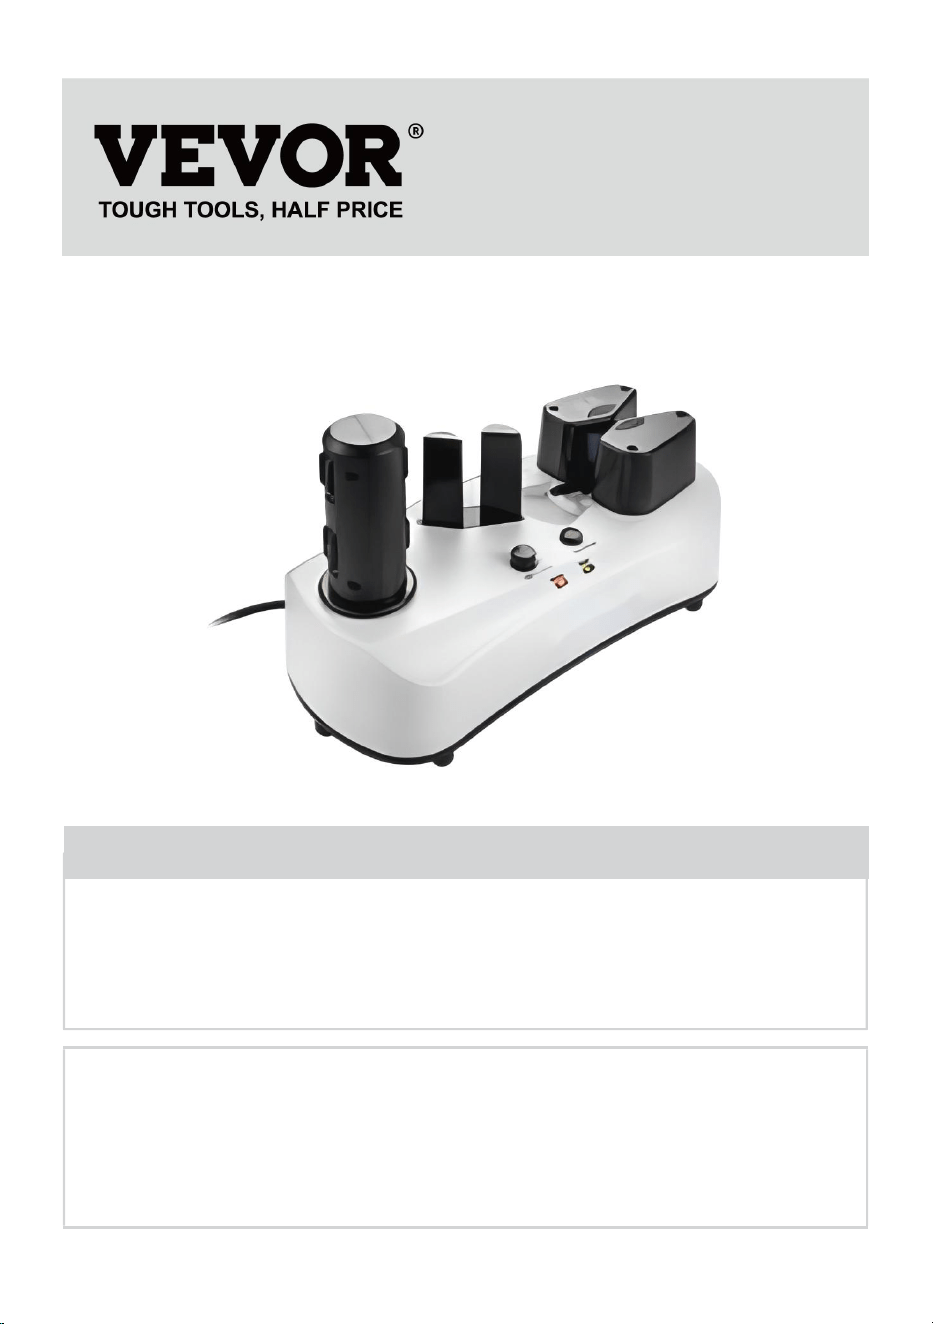
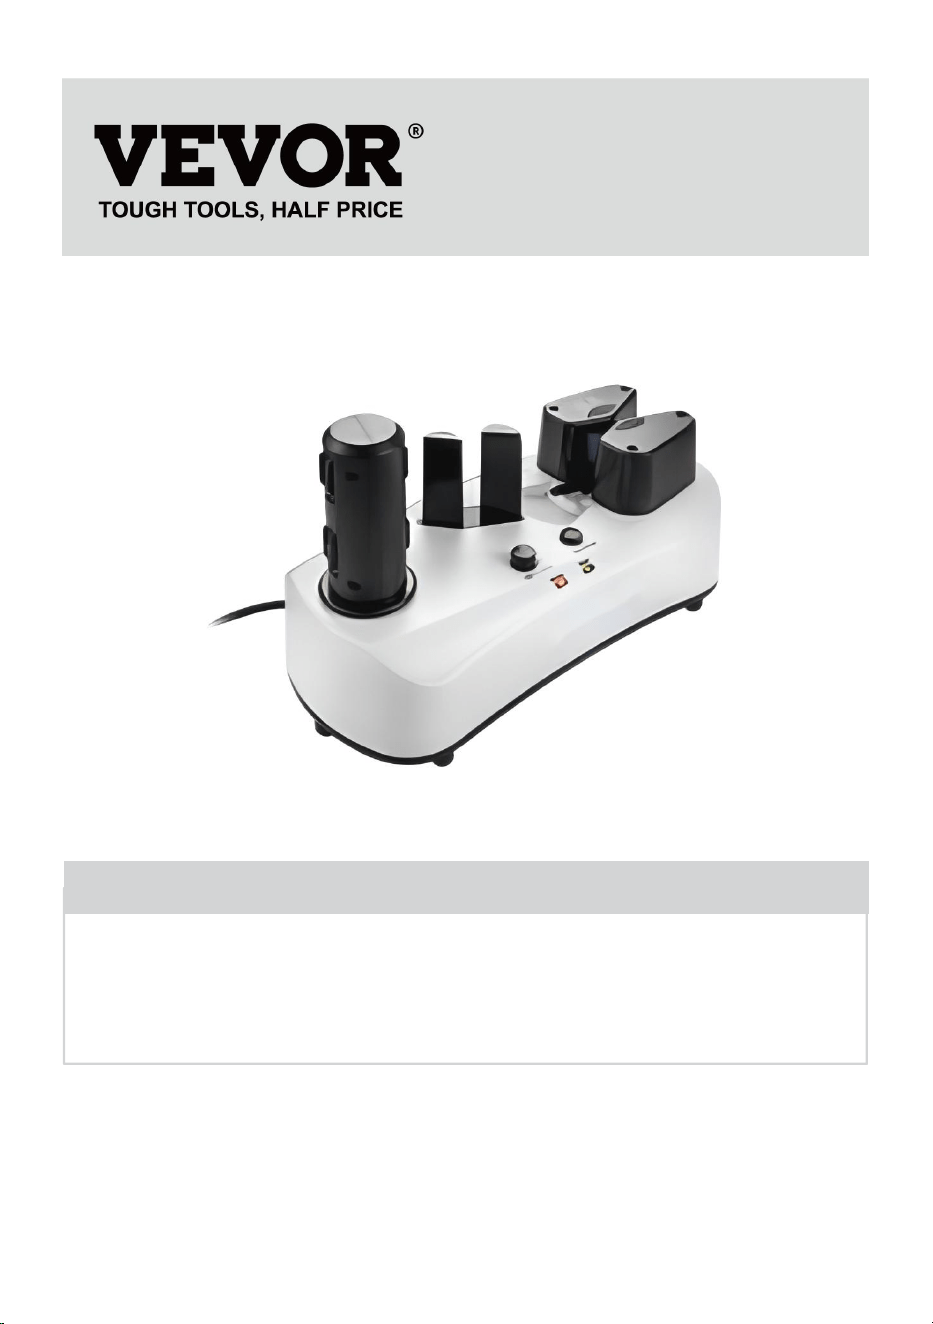
AIR CUSHION MACHINE
USER MANUAL
MODEL: YE300
We continue to be committed to provide you tools with competitive price.
"Save Half", "Half Price" or any other similar expressions used by us only represents an
estimate of savings you might benefit from buying certain tools with us compared to the major
top brands and does not necessarily mean to cover all categories of tools offered by us. You
are kindly reminded to verify carefully when you are placing an order with us if you are
actually saving half in comparison with the top major brands.

- 1 -
Model: YE300
Note: The actual product you receive determines its look.
Have product questions? Need technical support? Please feel free to
contact us:
Technical Support and E-Warranty Certificate
www.vevor.com/support
NEED HELP? CONTACT US!
This is the original instruction, please read all manual instructions
carefully before operating. VEVOR reserves a clear interpretation of our
user manual. The appearance of the product shall be subject to the
product you received. Please forgive us that we won't inform you again if
there are any technology or software updates on our product.
AIR CUSHION
MACHINE
- 2 -
air
blower
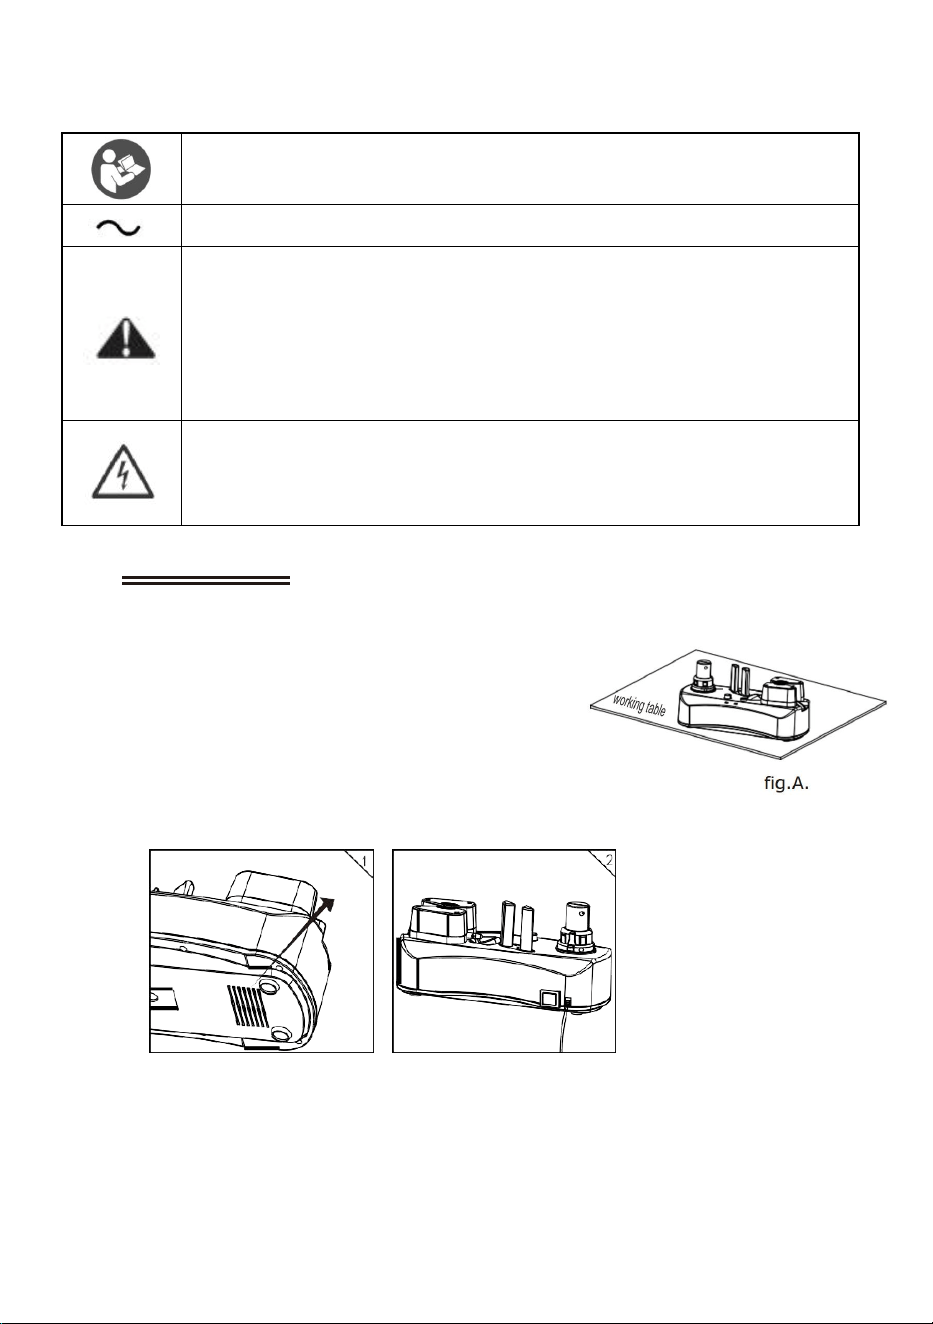
IMPORTANT SAFETY INSTRUCTIONS
Warning - To reduce the risk of injury, user must read instructions
manual carefully.
Alternating current
This symbol, placed before a safety comment, indicates a kind of
precaution, warning, or danger. Ignoring this warning may lead to
an accident. To reduce the risk of injury, fire, or electrocution,
please always follow the recommendations shown below.
Danger!
Risk of personal injury or environmental damage! Risk of electric
shock! Risk of personal injury by electric shock!
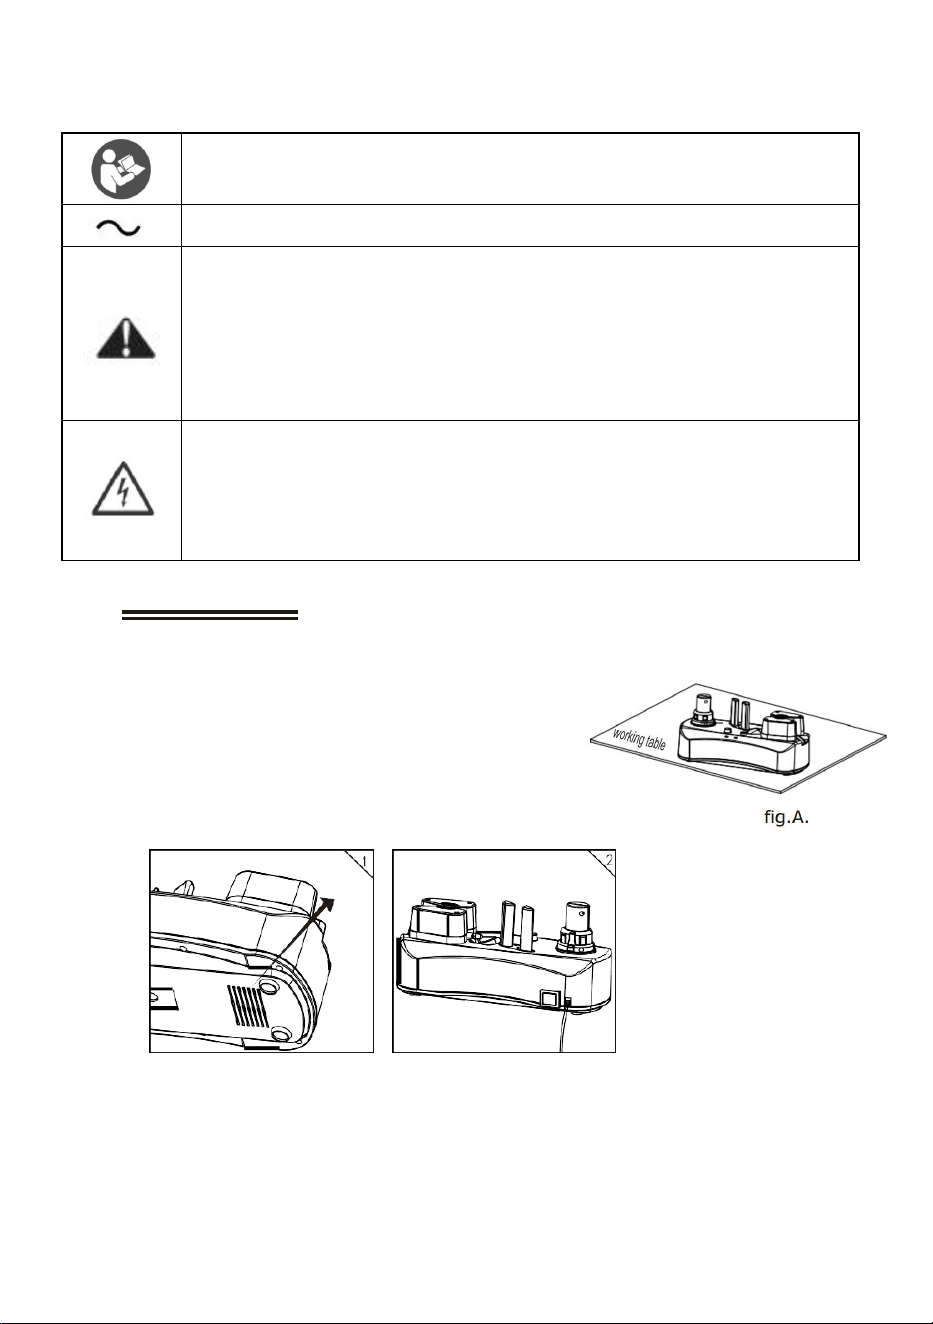
1. Caution
Please read carefully before use.
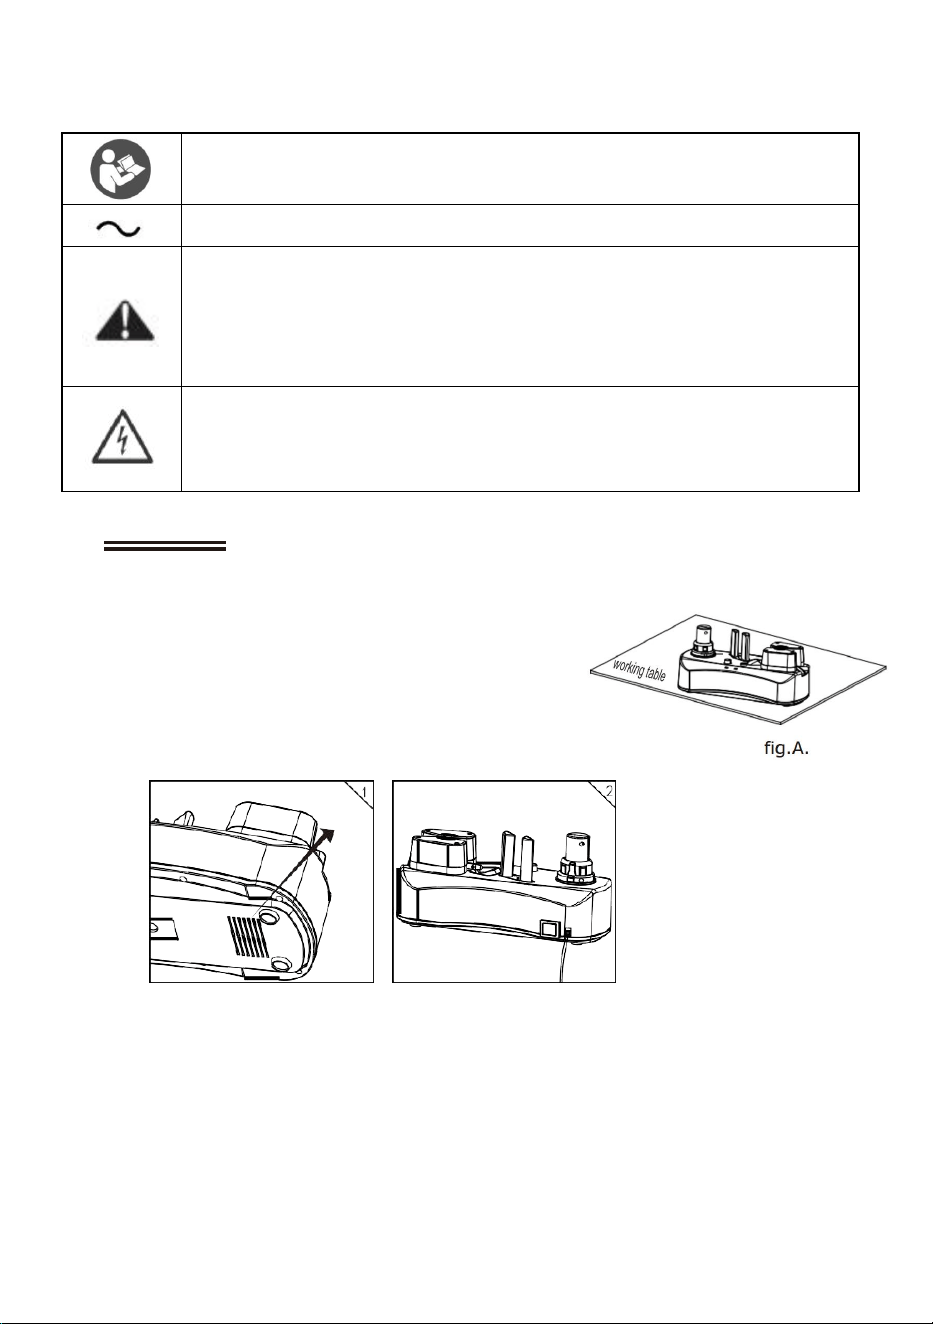
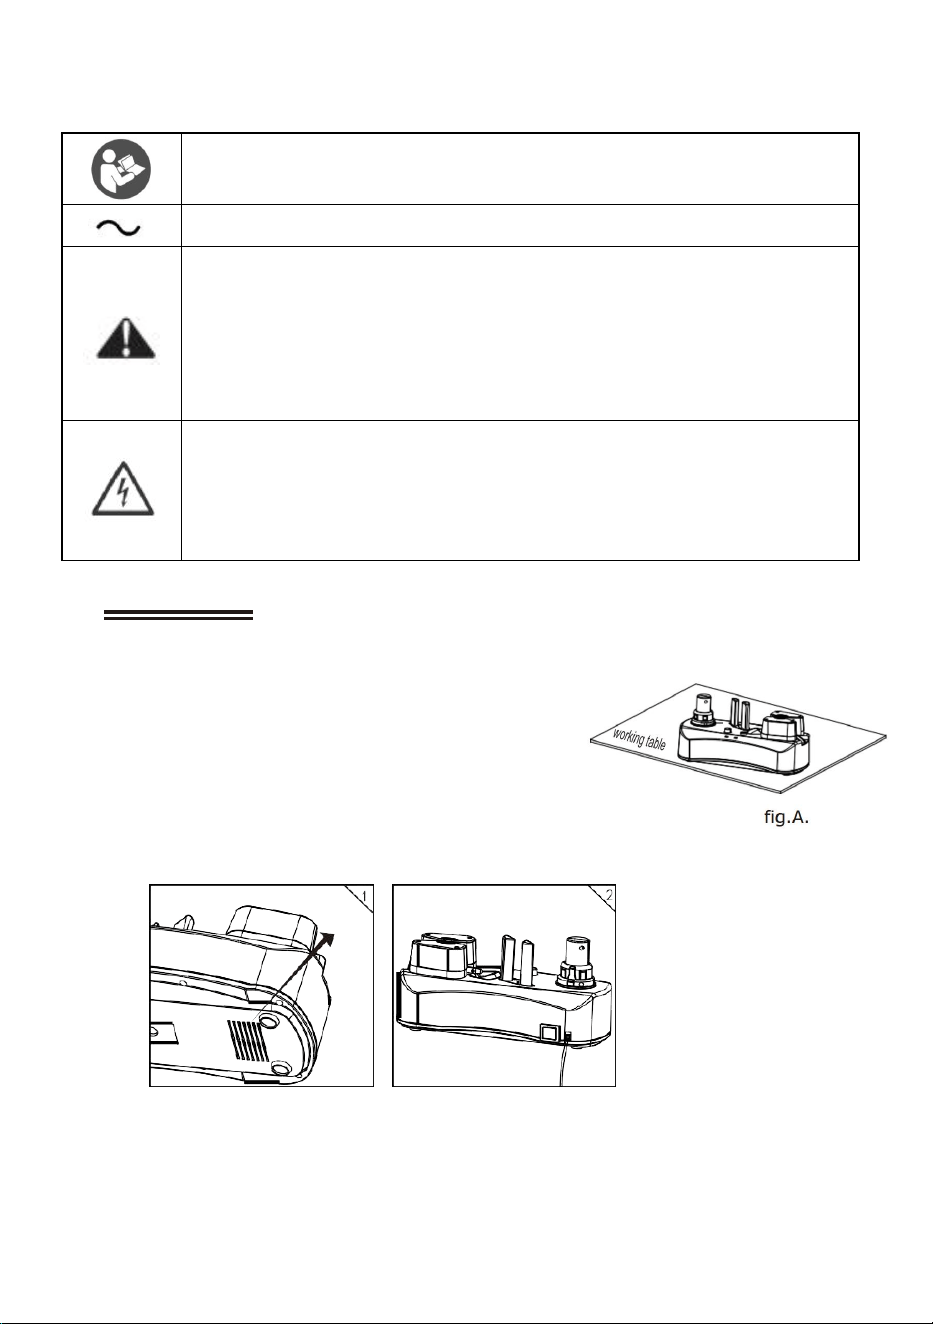
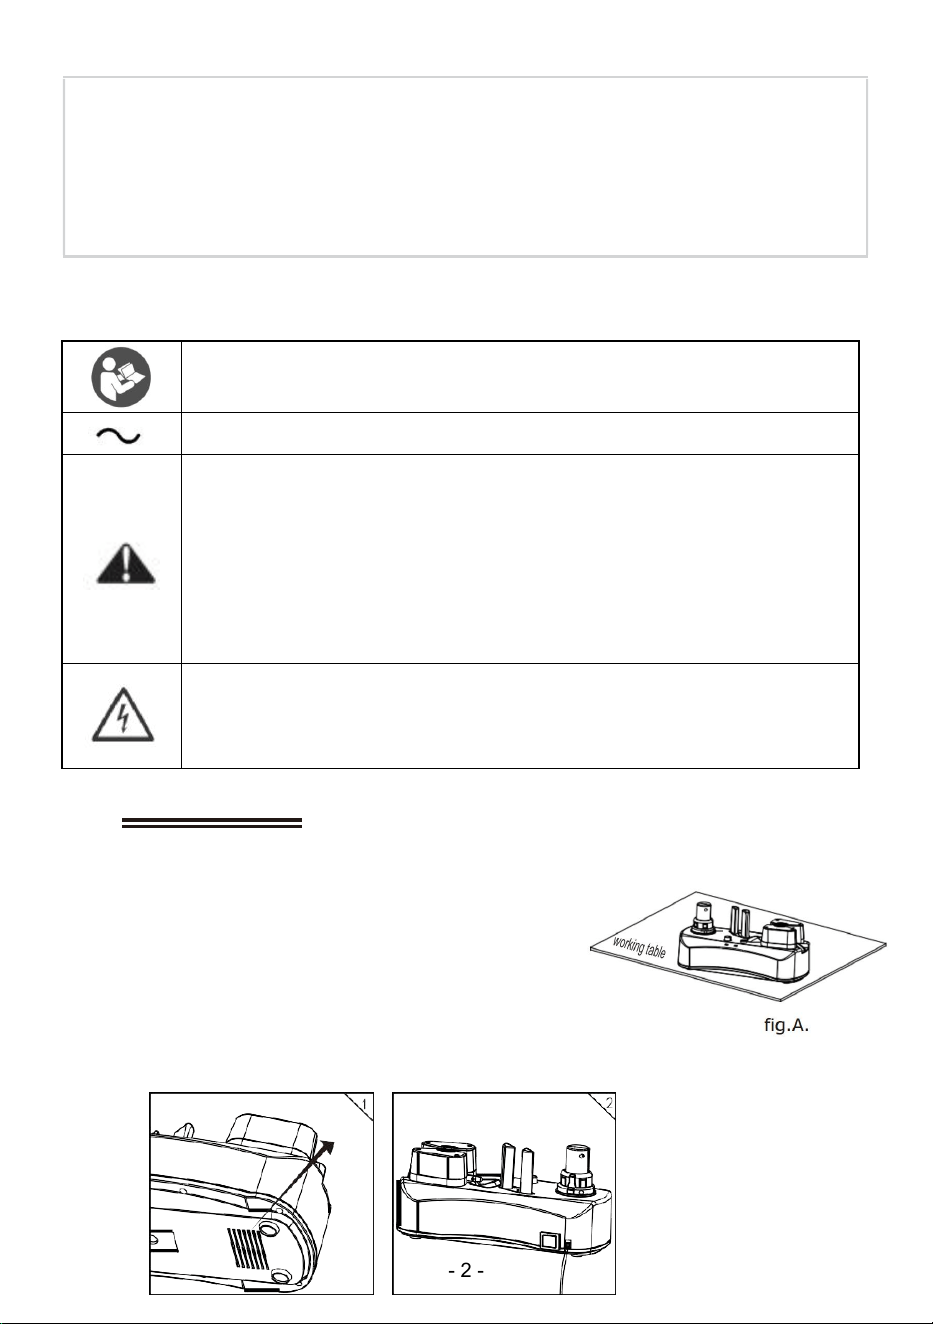
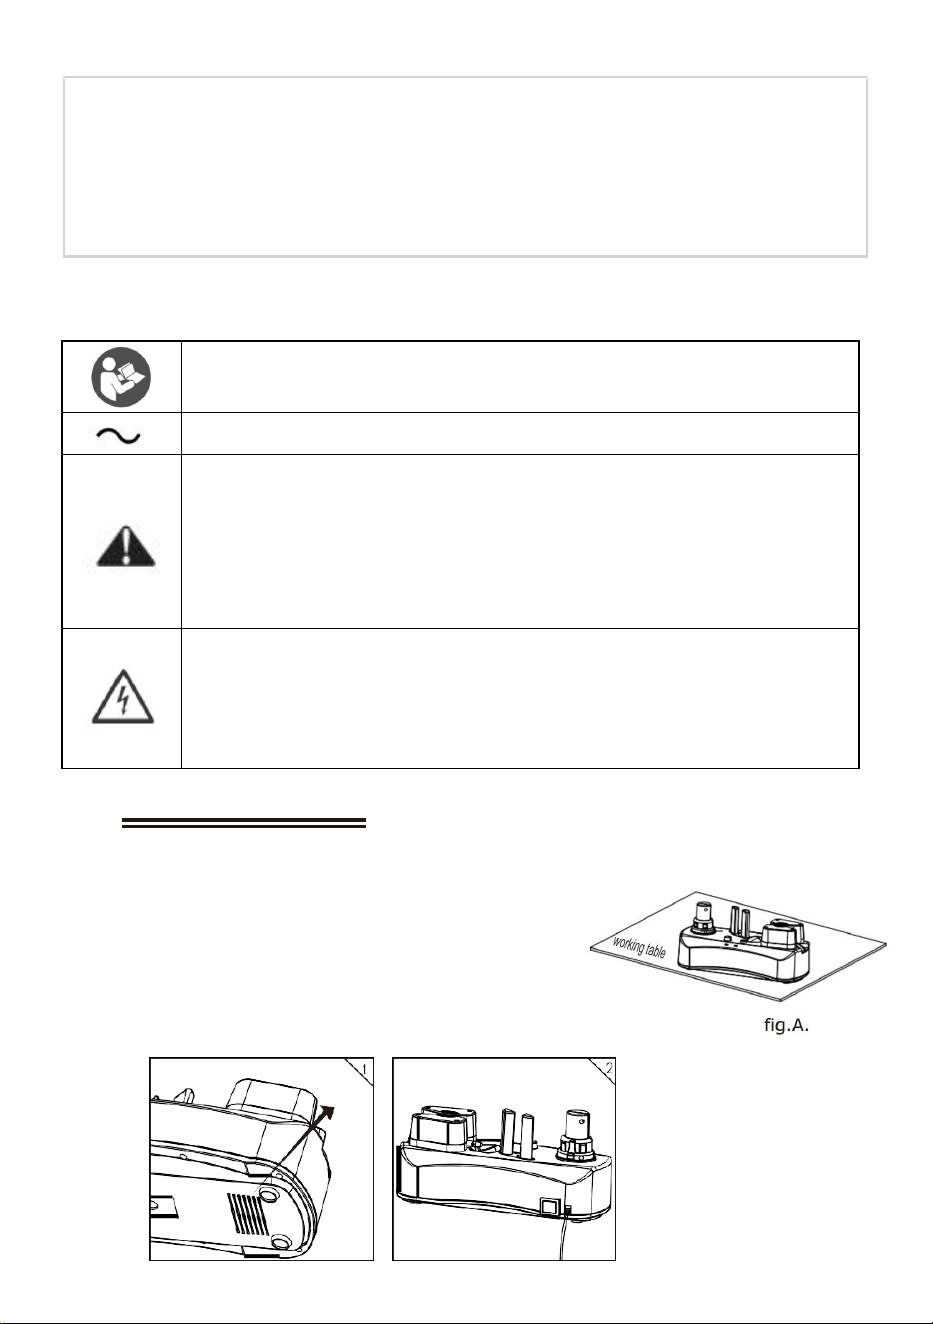
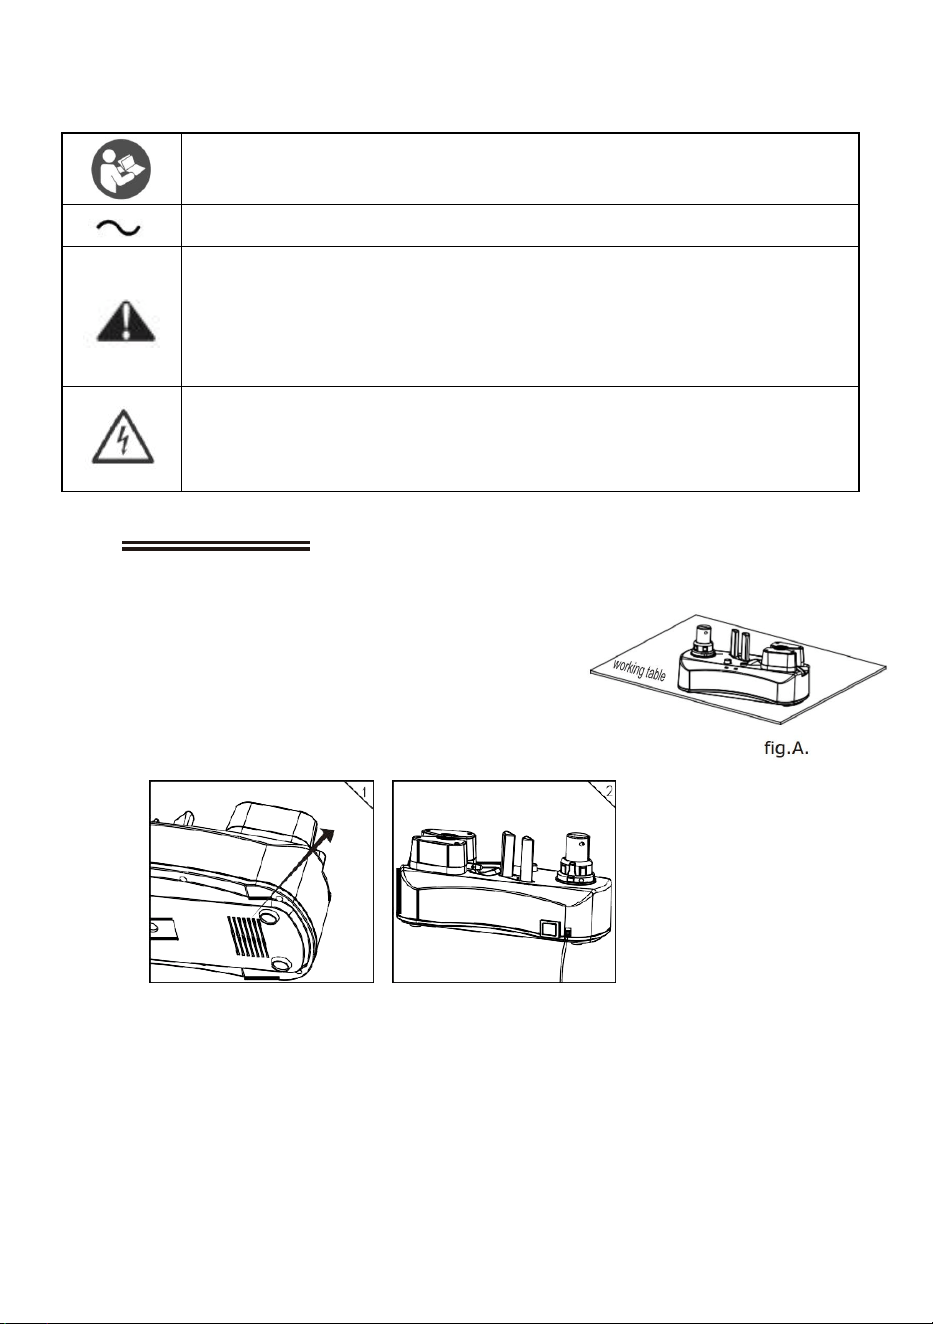
1.1 Remove the machine from the package box carefully.
1.2 Put the machine in the clean and flat working table,
Refer fig.A.
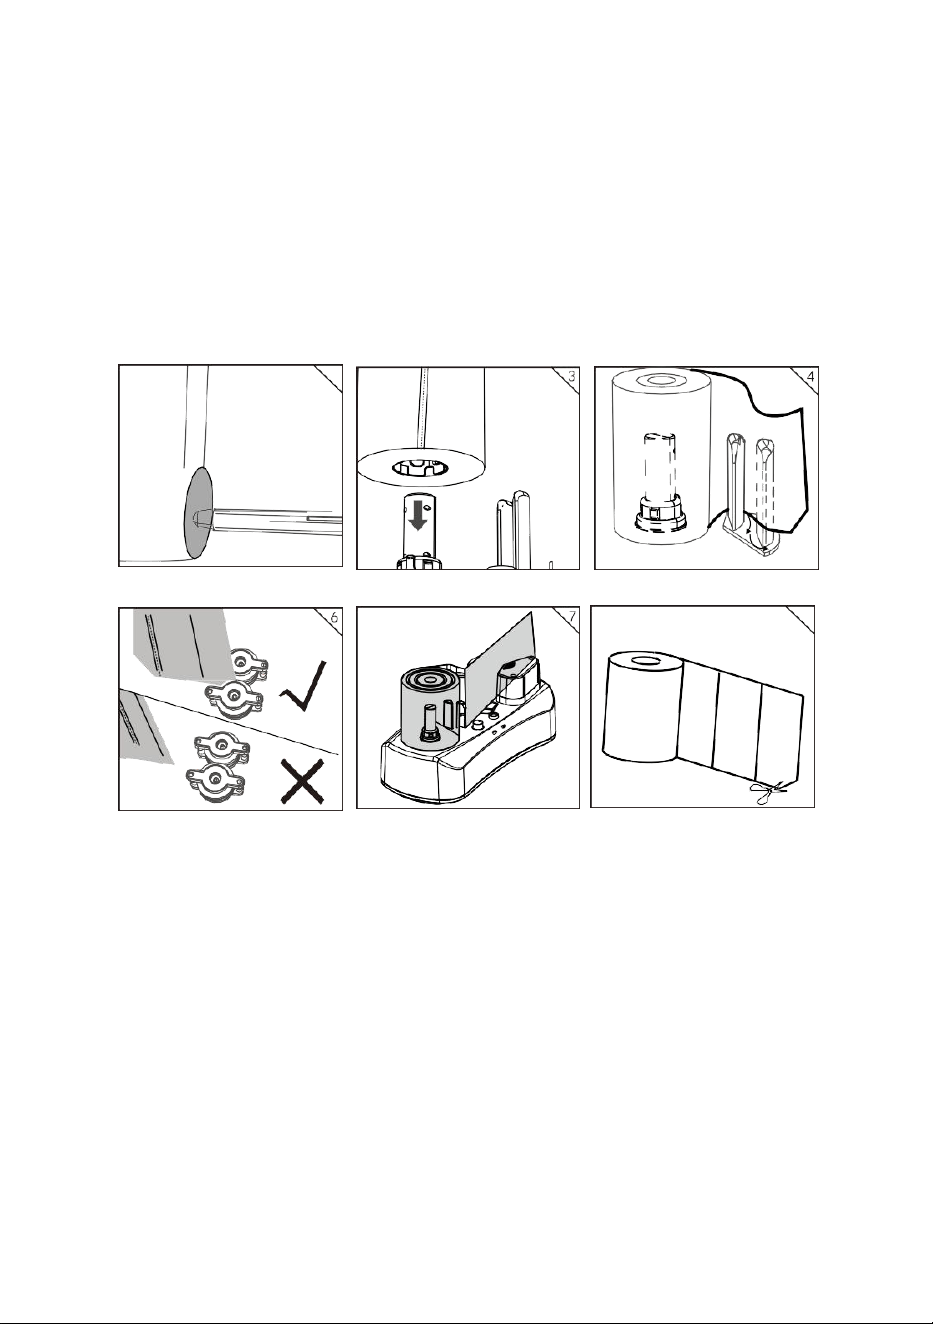
1.3 Ensure the air blower is no jammed and refer fig 1.
1.4 Avoid the dust to run into the machine and air blower.
2. Operation
2.1 Connect the correct electrical power. Refer fig.2.
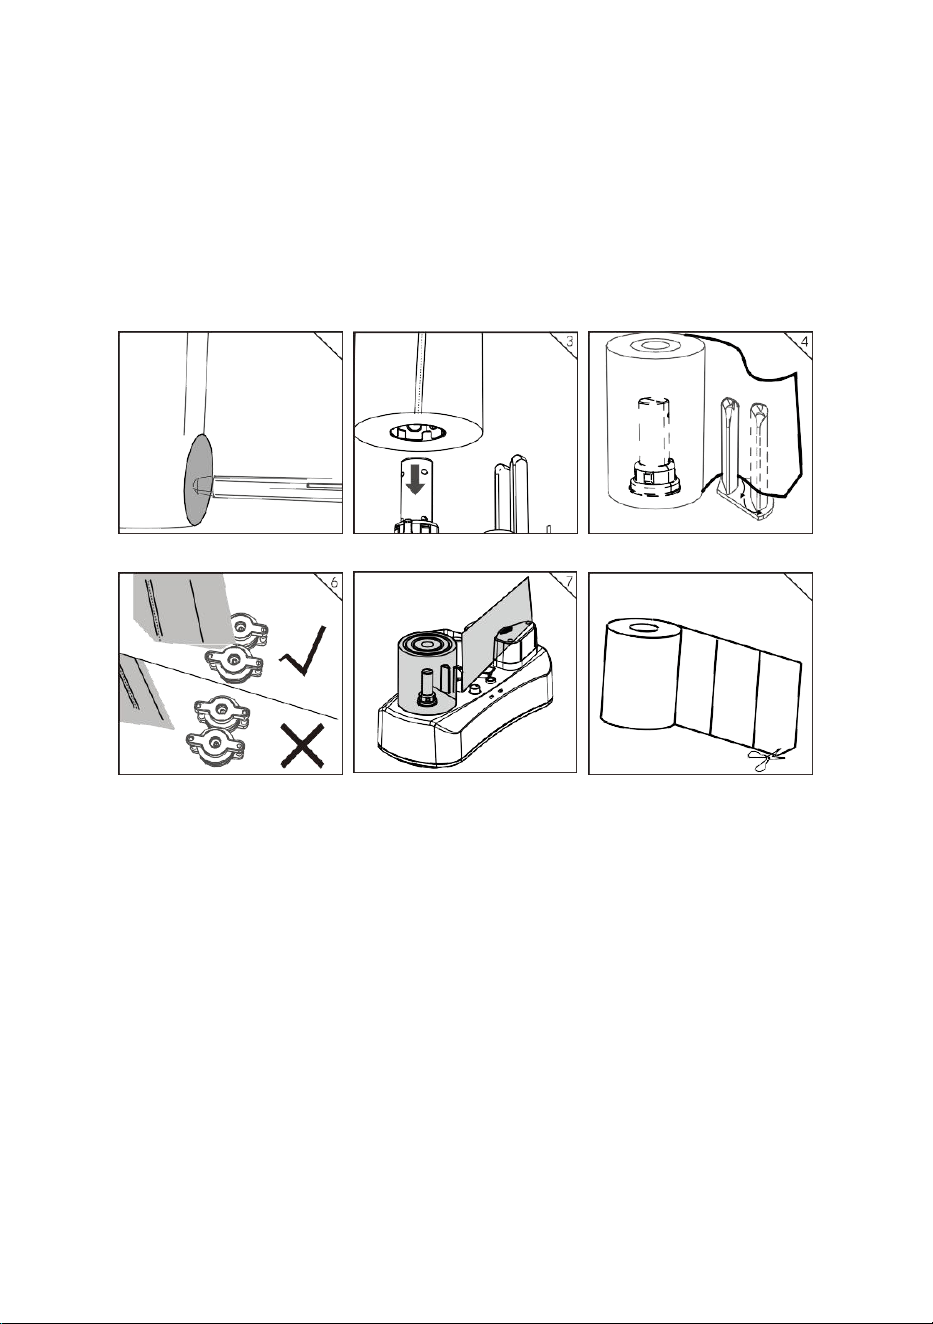
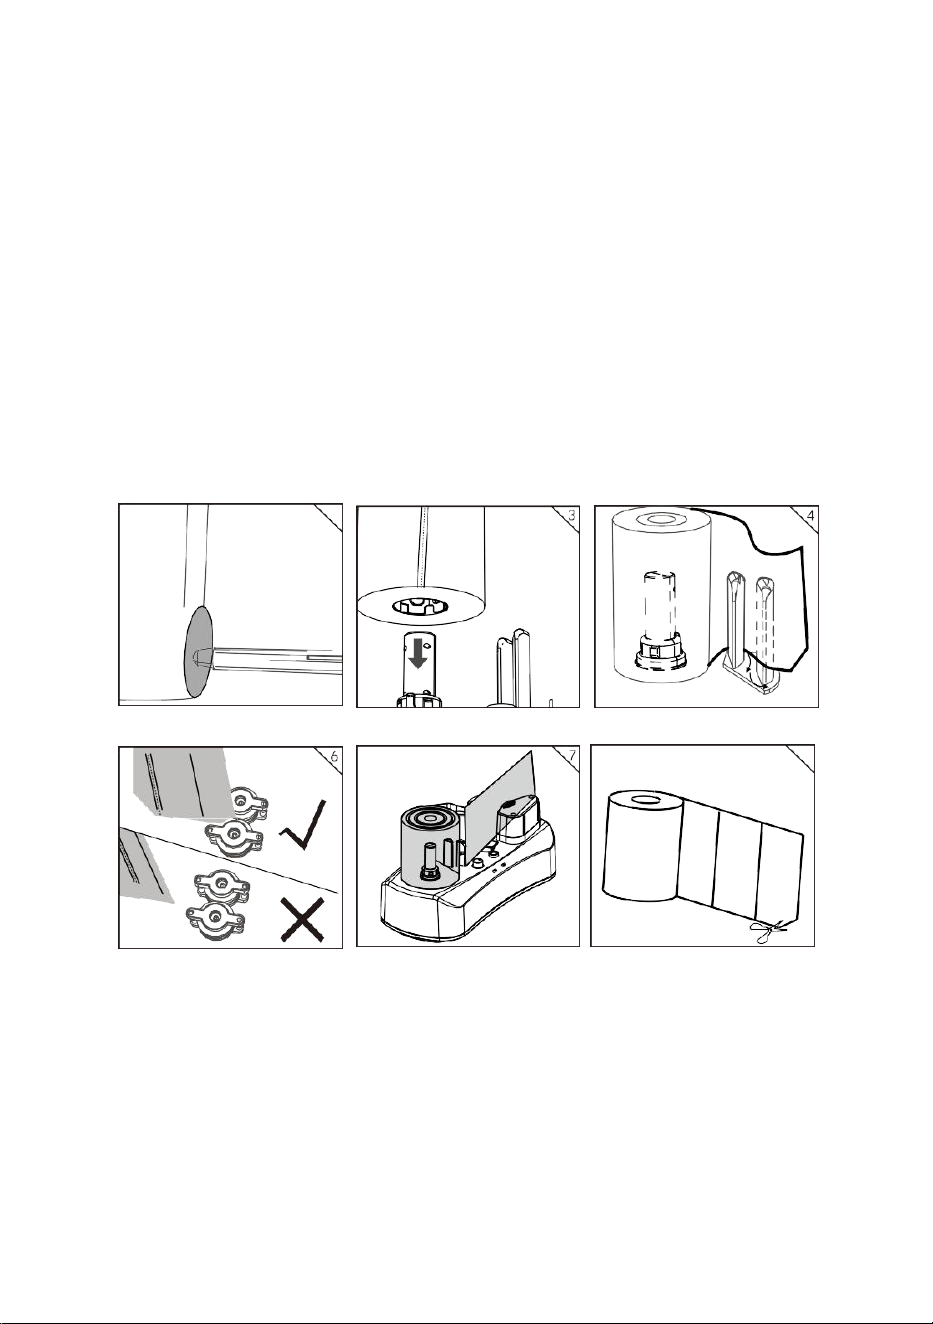
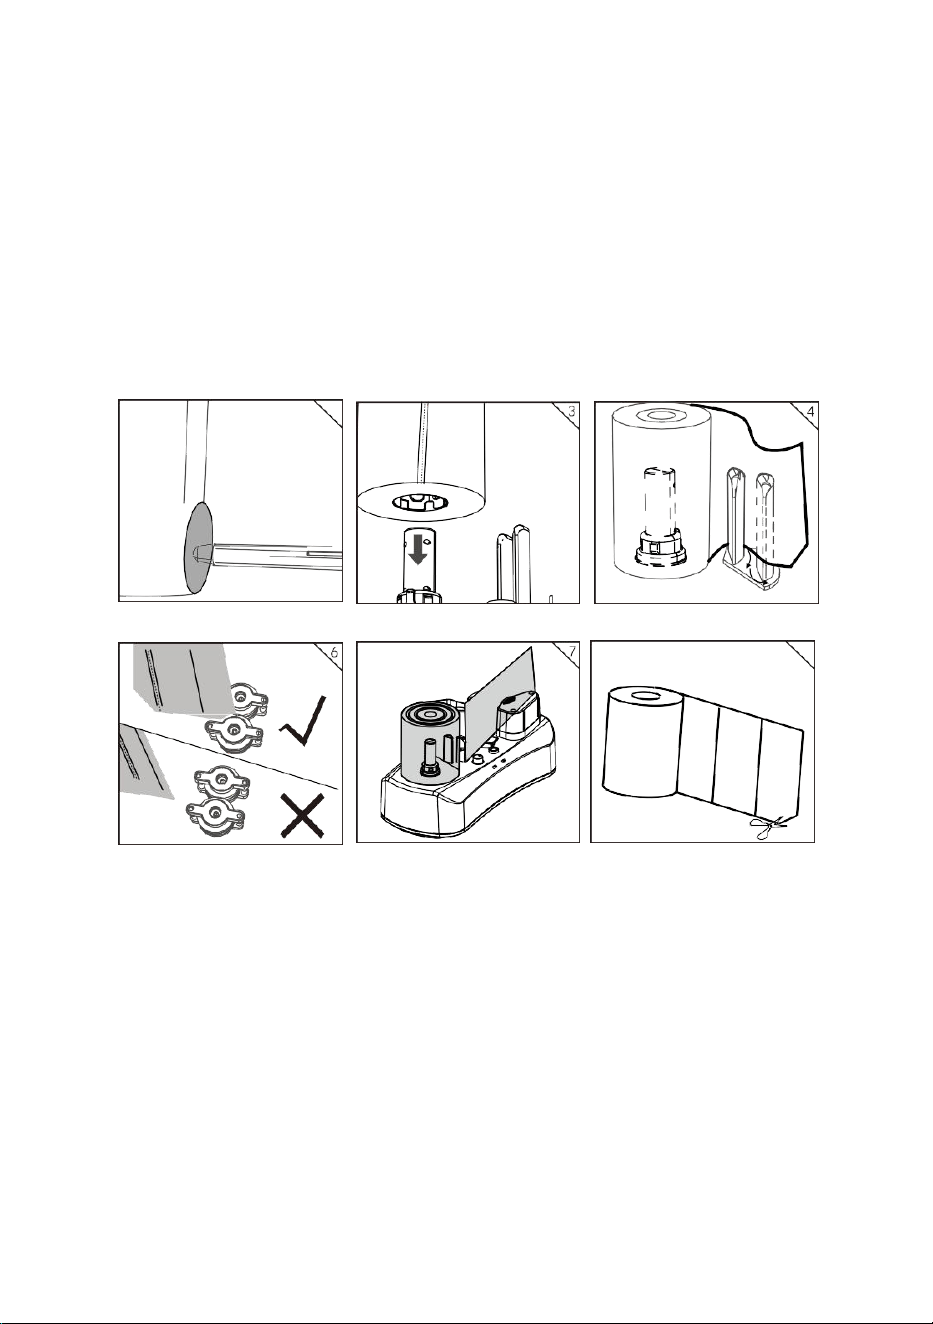
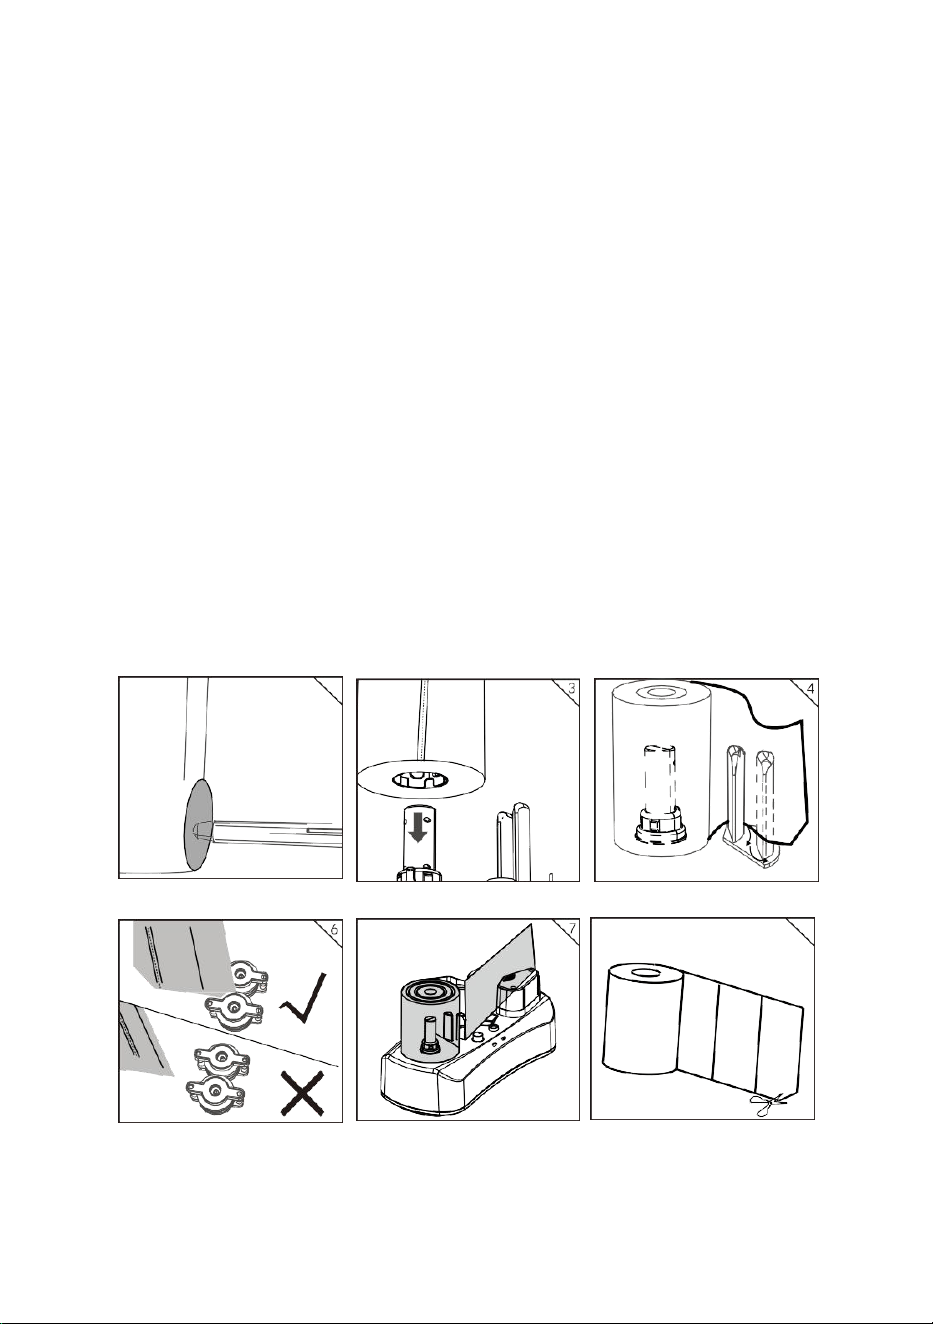
2.2 Installation of film foll.
2.2.1 Put the roll film on the feeding roller properly. There is a groove in theroll
film. That should align to the feeding roller protruding part. Refer fig.3.
2.2.2 The roll film follows the arrow direction to pass through the tension
column, Refer fig.4. ,then the roller film pass through the nozzle guide post.
- 3 -
Refer fig.5.
2.2.3 Pulling the roll film to close enough and touch just right between the hot
sealing wheels to ensure when push start button, the machine can pull out
film till reach the front pulling wheels, and start making air cushion smoothly.
Refer fig.6,7.
2.2.4 for better film blowing, please use scissors to cut the corner of the film
extry mouth before use. Refer fig.12
5
12
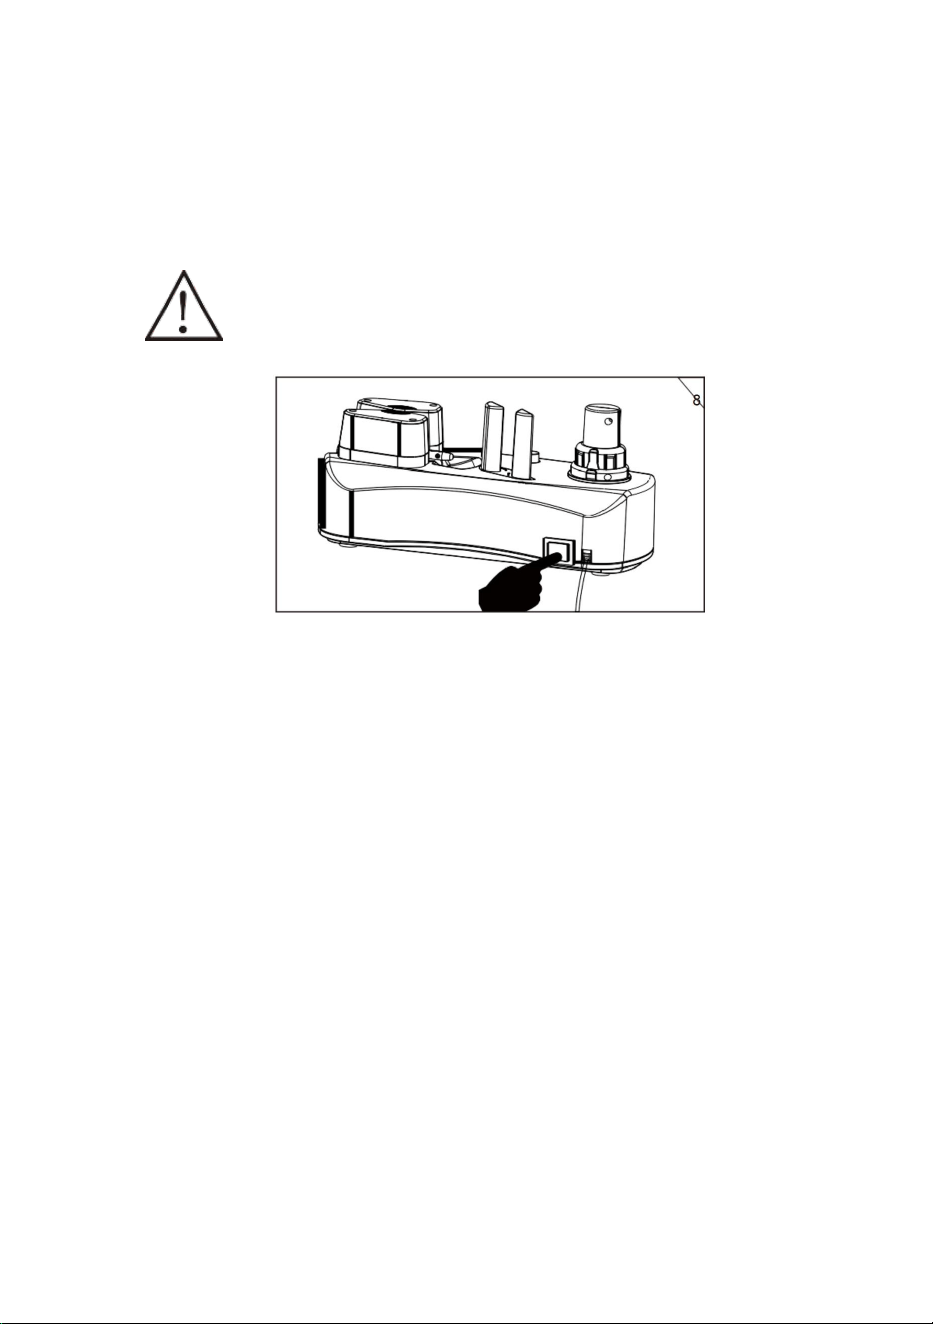
2.3 Operation
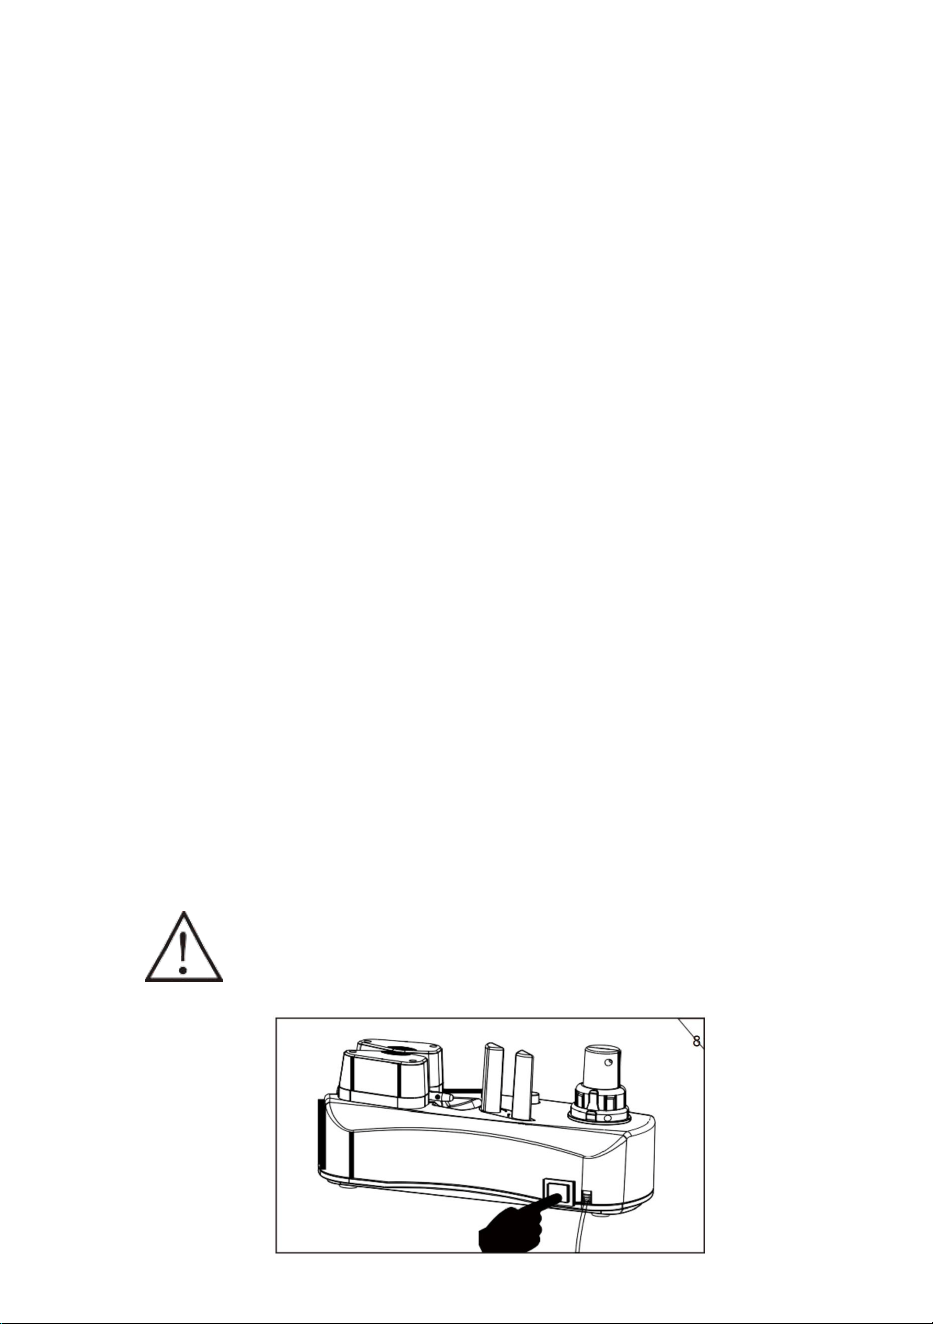
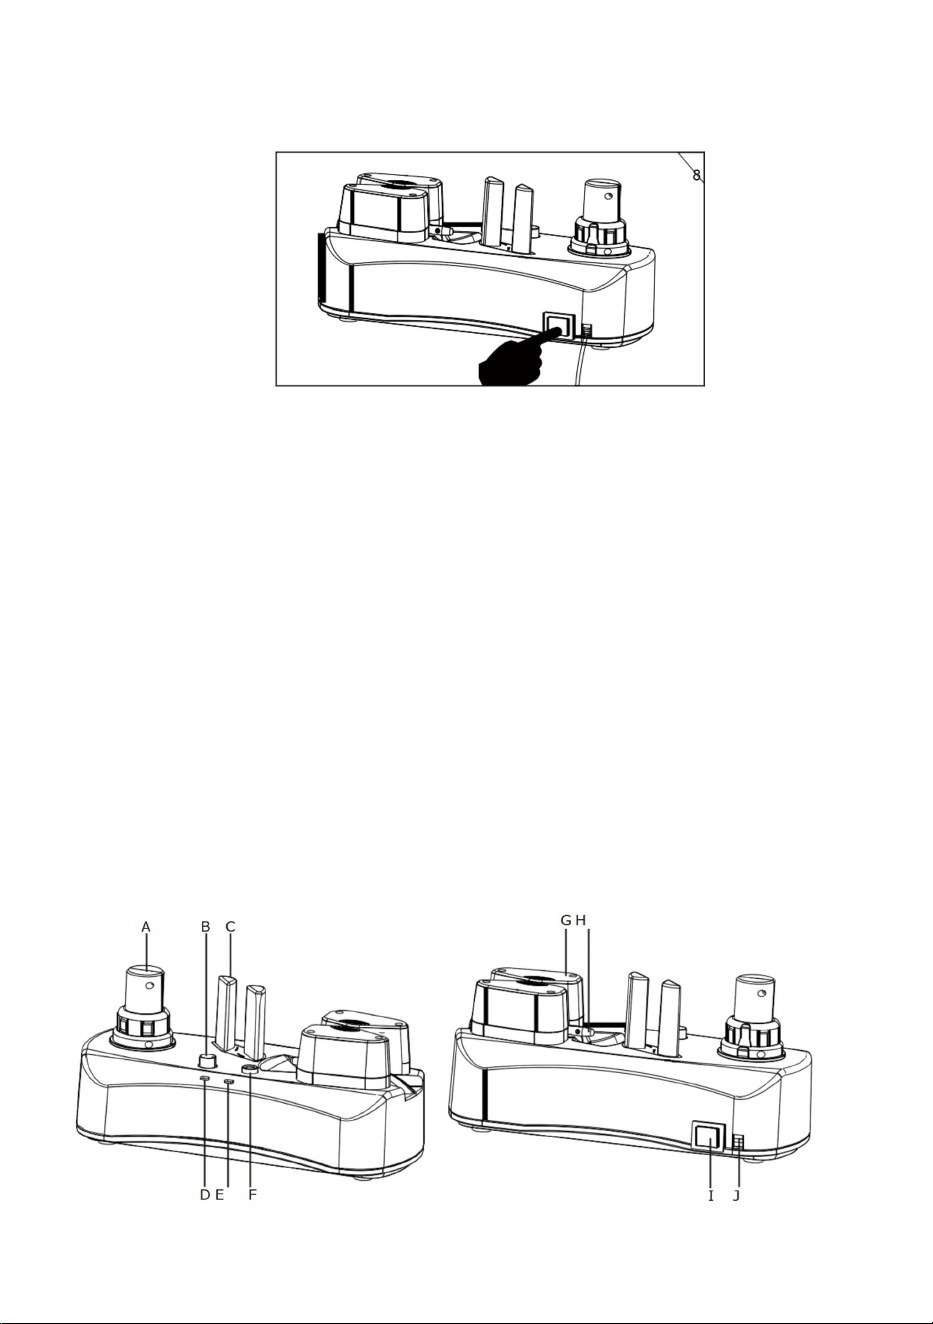
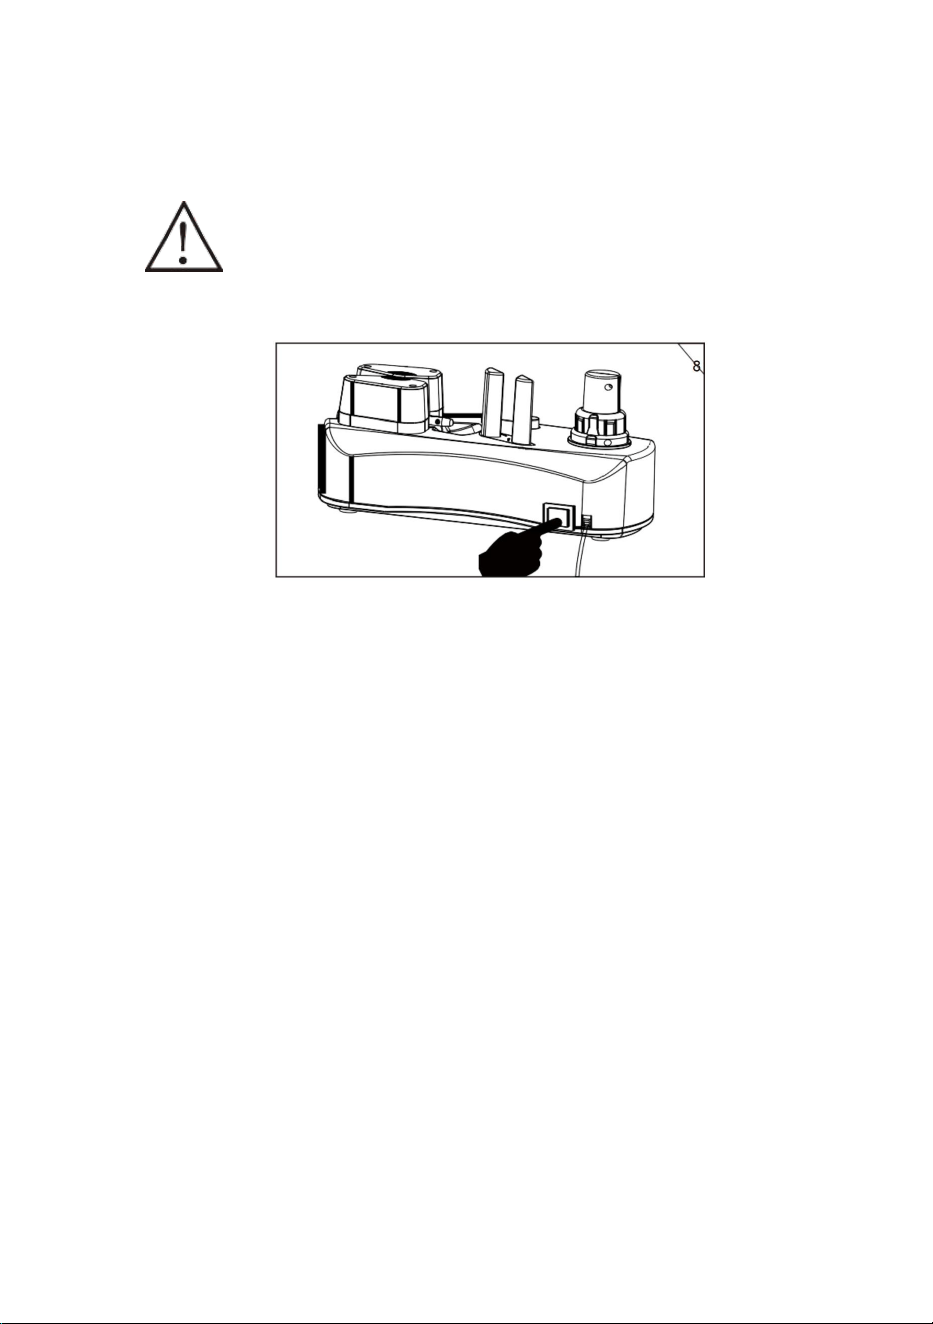
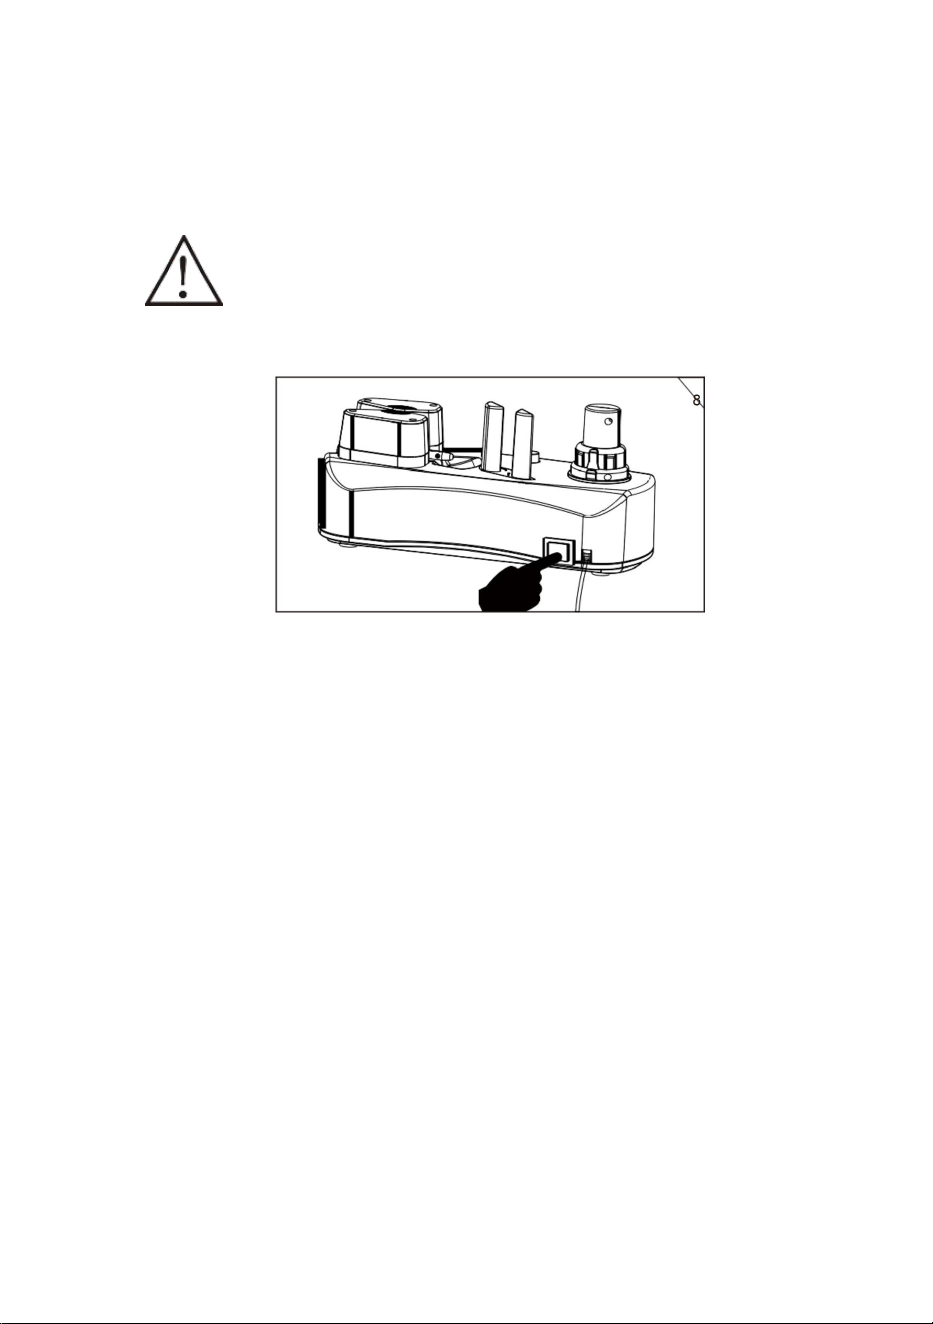
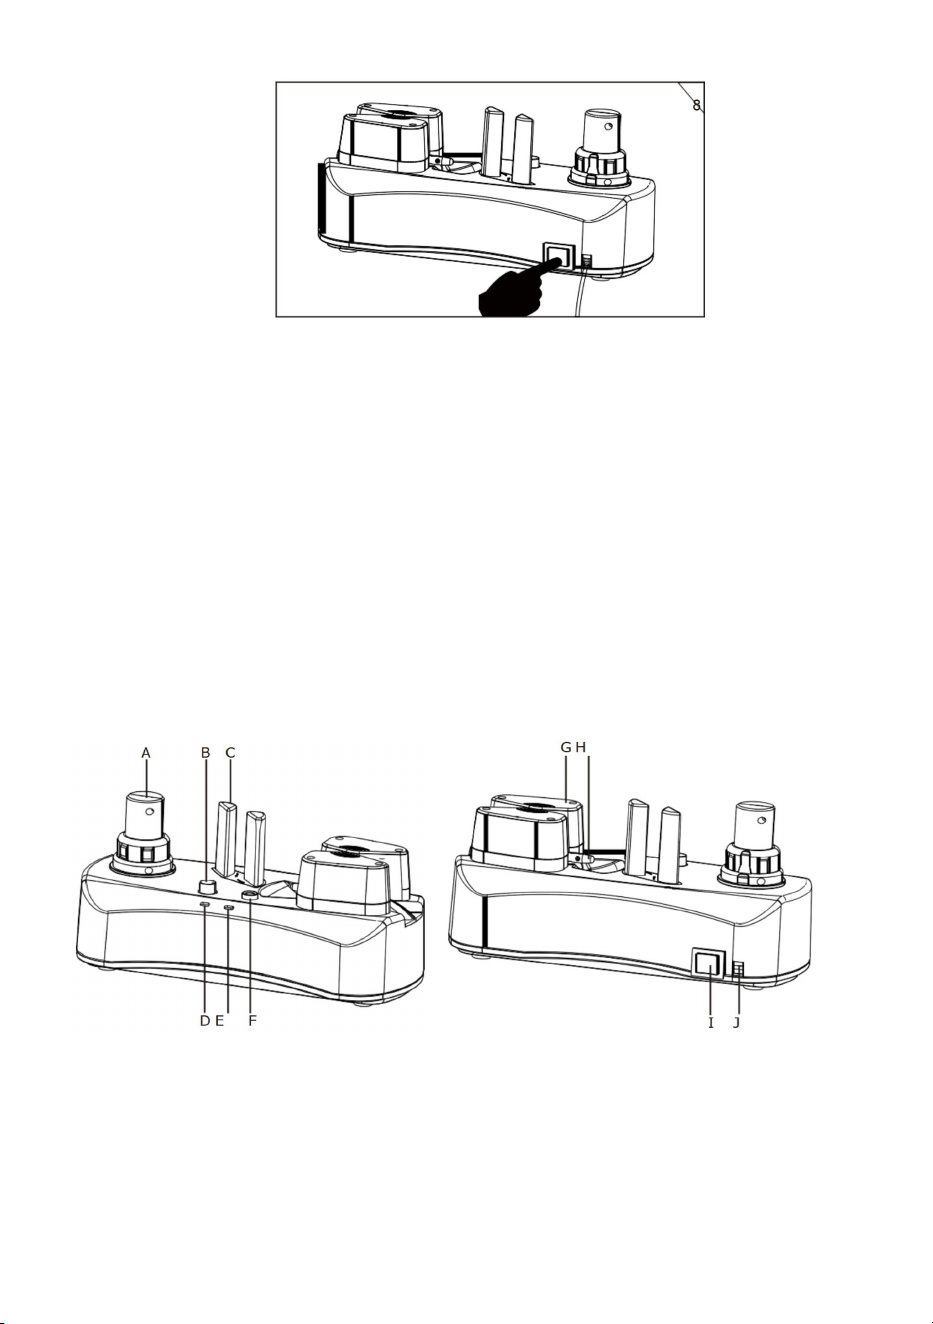
2.3.1 Connecting the electrical power , and press the power switch ,
Refer fig.8. After power on the machine, the power indicator red light will
go on and green light start to flash, the machine is under heating
processing(The warm up time around 4 minutes).
2.3.2 When green light is solid, which means the machine is ready to
make air cushion, press the start/stop button to start; rotate the Fan
Control knob to adjust the air density.
2.3.3 When finishing making air cushion, press the start/stop button
again, machine will stop immediately. There is a perforation line on the
film to tear off the necessary length for user’srequirement.(If no need
change the film roll , please tear off the cushion film at the end side of
machine; If need change the film roller, please tear off the cushion film
- 4 -
before the heating roller, then making the air cushion of the film which is
kept after the heating roller.)
2.3.4 If continue to use the machine, press the start/stop button when
machine indicator is in solid on condition. Pause for more than 30 secs
may cause film within hot rollers in a hot spot break. This is a normal
condition as the hot roller always is in a heating process.
2.3.5 If want to power off, please make sure power indicator is in solid
on condition, tear off the film perforation ahead the air nozzle, and push
start/stop button to eject the film completely , and push the start/stop
button again to stop the machine, then you can turn off the power
switch.
2.4 Hibernation Function
After continuing working 90 minutes or non-use of 30 minutes,
machine will go into a hibernation status. Each hibernation
countdown is trigged by pressing start/stop button, and each
pressing will resets the previous countdown and start for next 2
hours cycle or non-use of 30 minutes. During the hibernation
status,the power indicate red-light goes slow flashing , start/stop
green light off, and motor, air blower, heating system all stop
working. By pressing start/stop button again, it will wake up the
machine, the red light goes on, green-light flashes. After 4 minutes
warm up time till the green light is solid on, press start/stop button
to use the machine normally.
Caution: The machine need to warm up around 4
minutes for every cold start. We suggest to install the roll
film right after turning on the power switch.
- 5 -
3. Electric Safety
3.1 Place the machine close to powersocket.
3.2 Make sure the voltage meets mach ine 's electricity requirements.
3.3 Any extension cord used should meet the power rating of the machine.
3.4 Do not operate if the power cord is damaged.
3.5 Repair and service should be done by a qualified service technician.
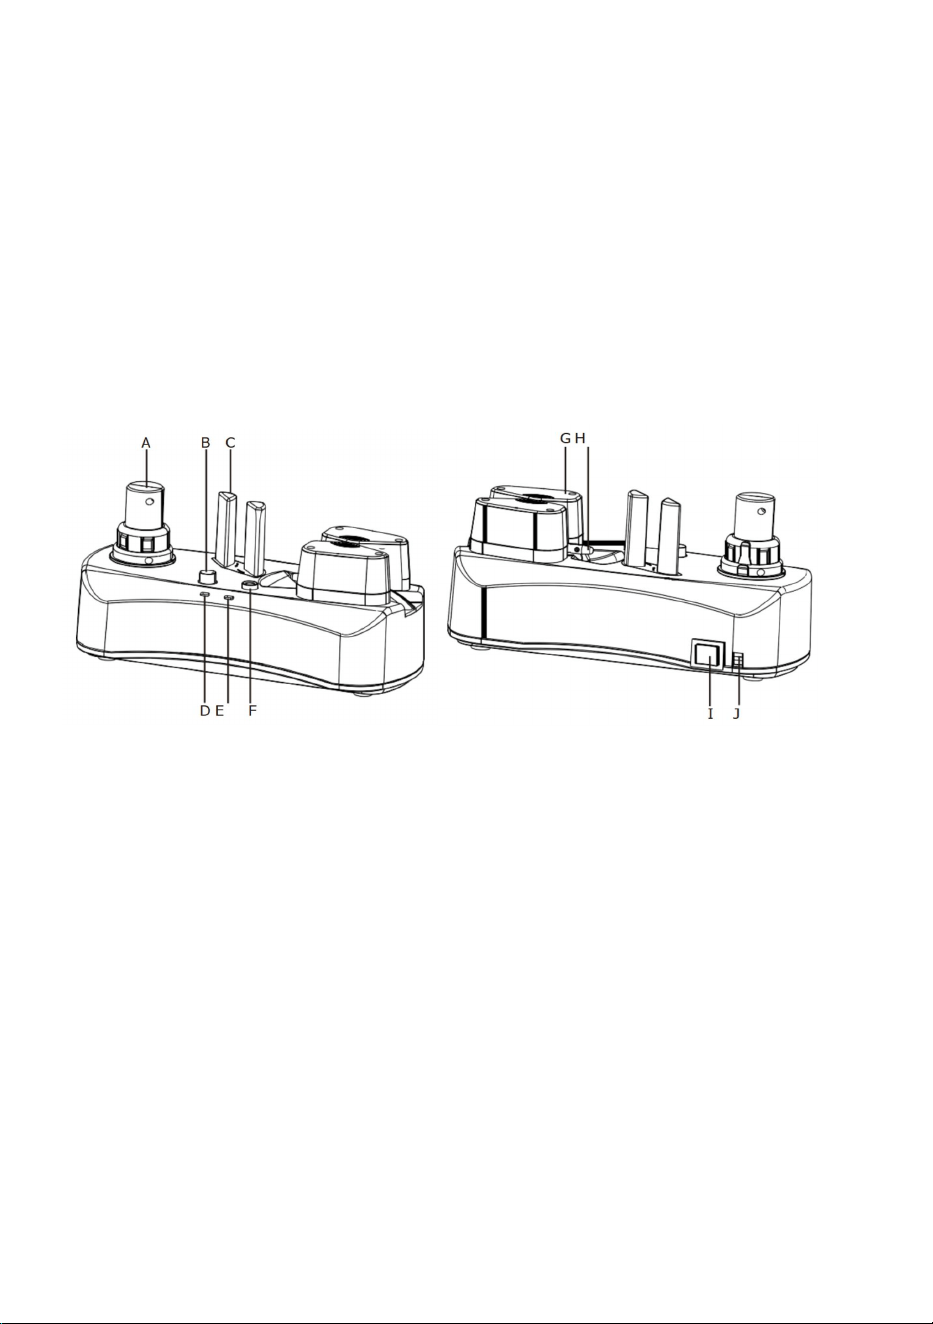
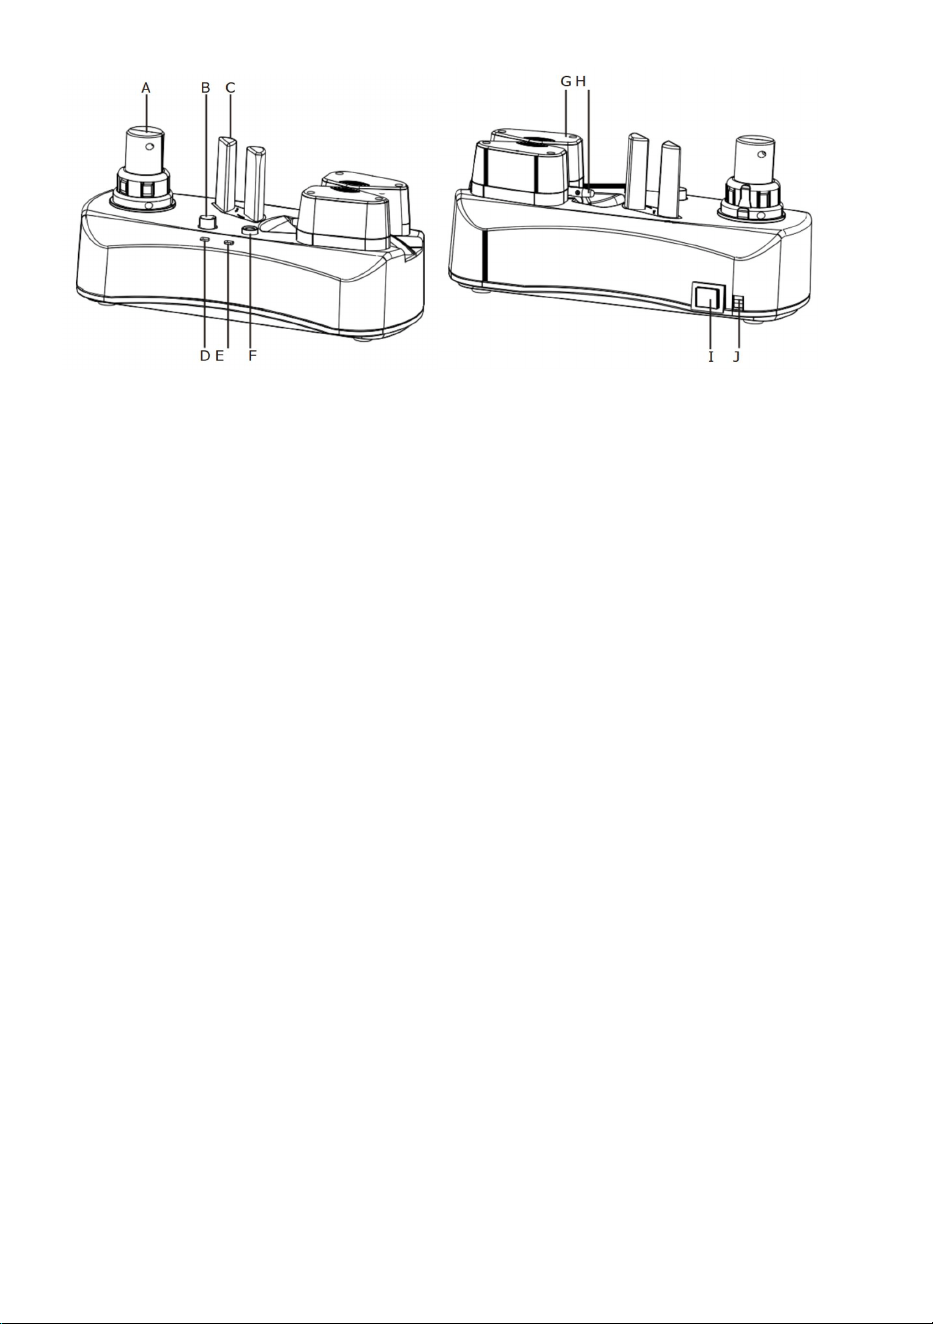
4. Product structure
A.Feeding Roller B.Air Density setting knob C.Tension Column
D.Power Indicator(Red Indicator) E.Starter/stop Indicator(green Indicator)
F.Starter/stop button G.Heating Roller H.Air Nozzel
I.Power Switch J.Power Line
5. Main parameters
1. Product Name: Air Cushion Machine
2. Model:YE300
3. Rating(s): AC120V 60Hz 120W
4. Rating(s): AC120V 60Hz 120W
5. Sealing Speed: 2-2.2m/min
Warm-Up Time: 4min
- 6 -
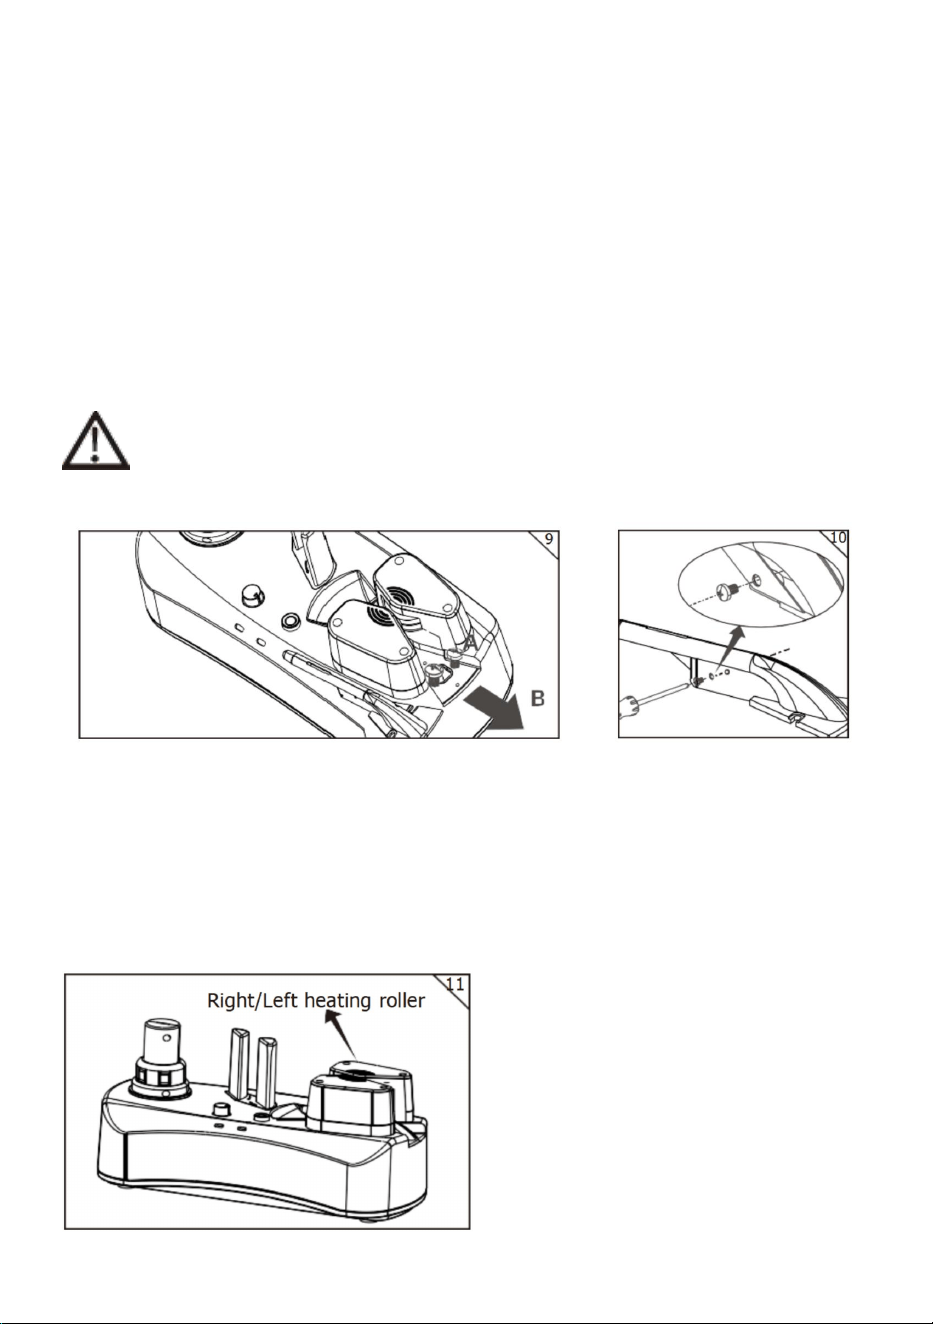
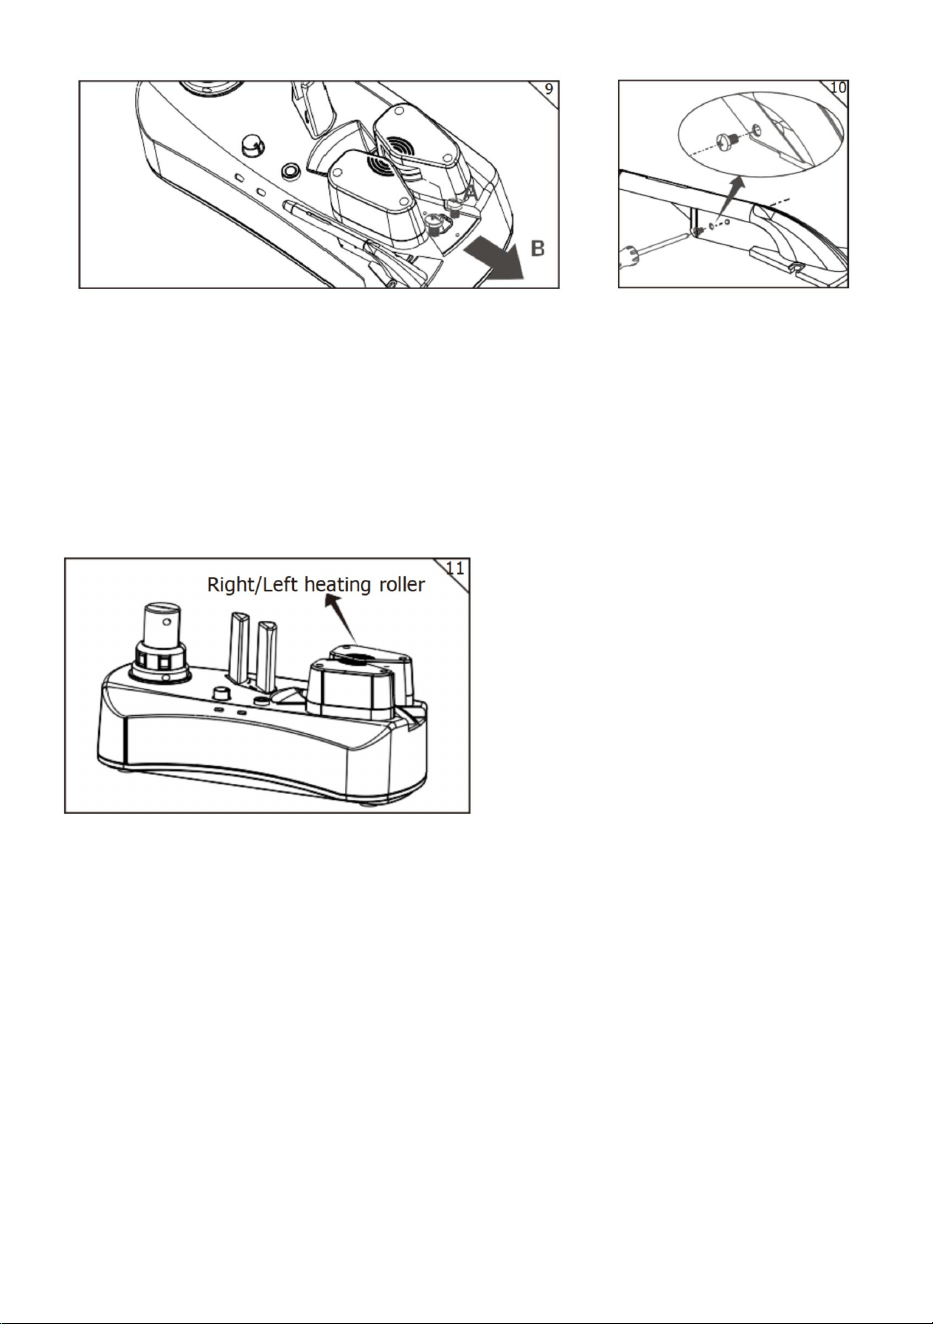
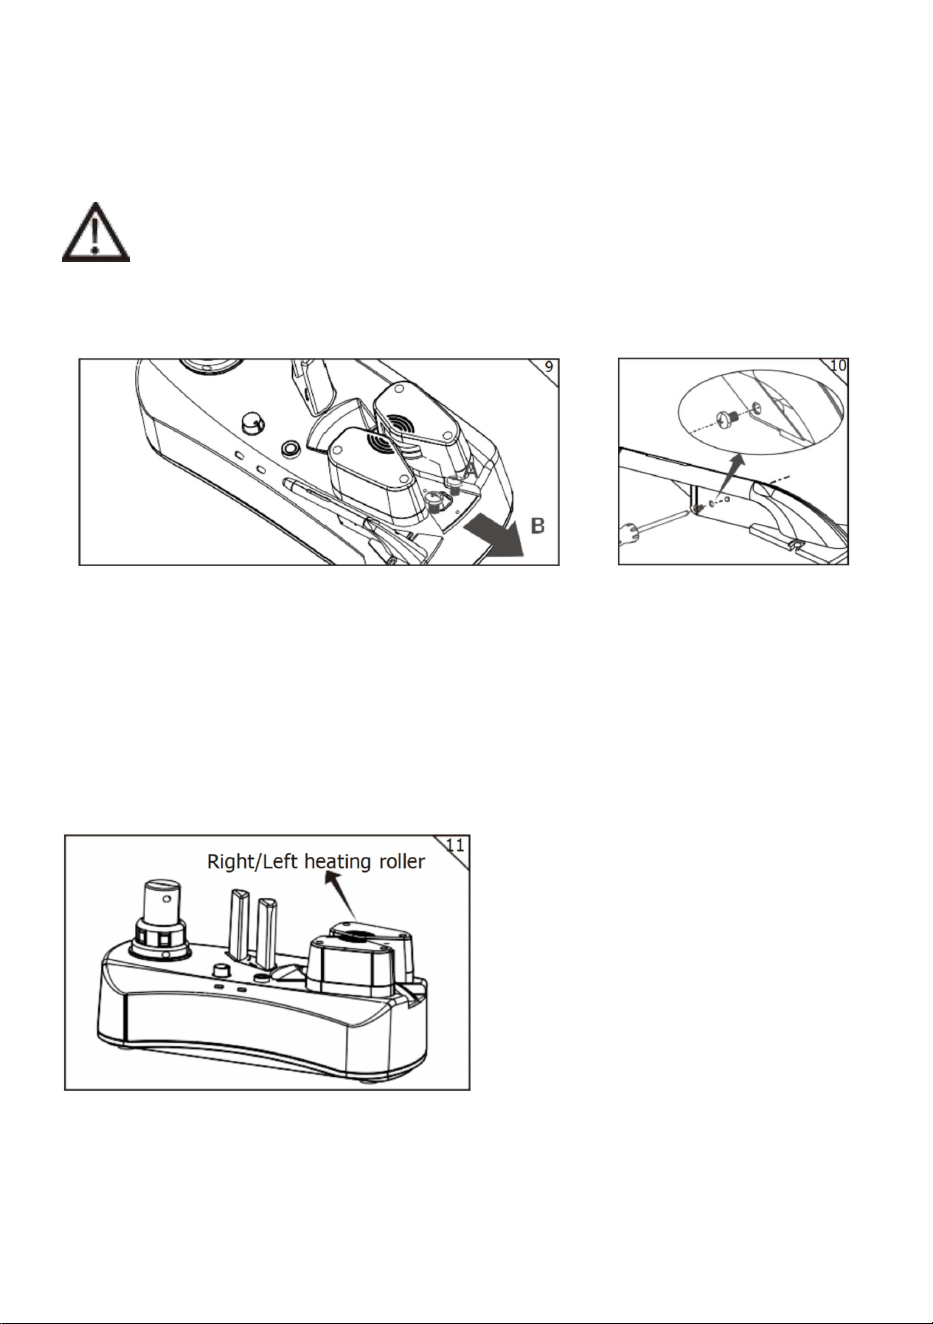
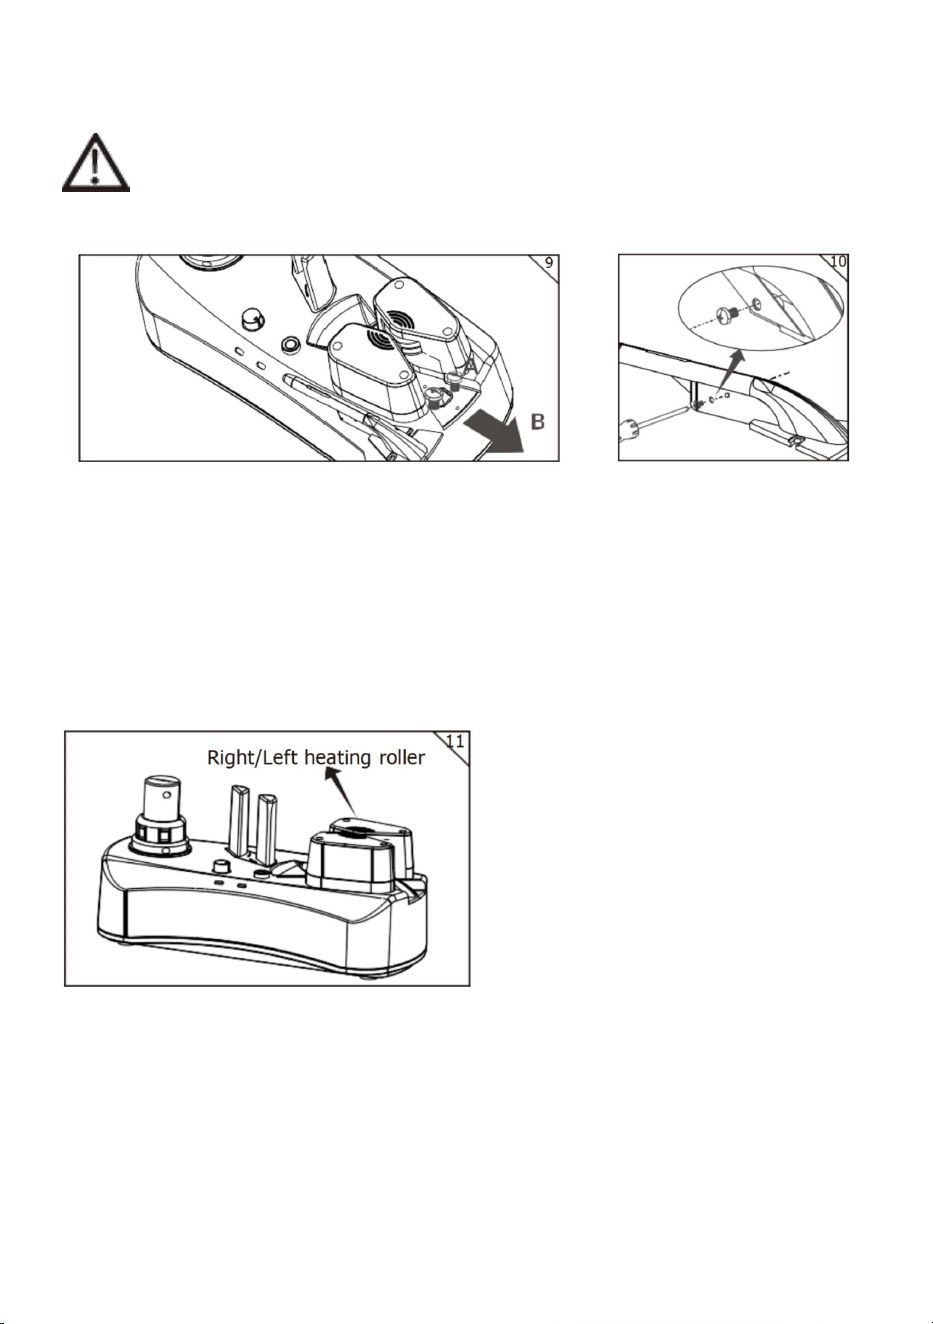
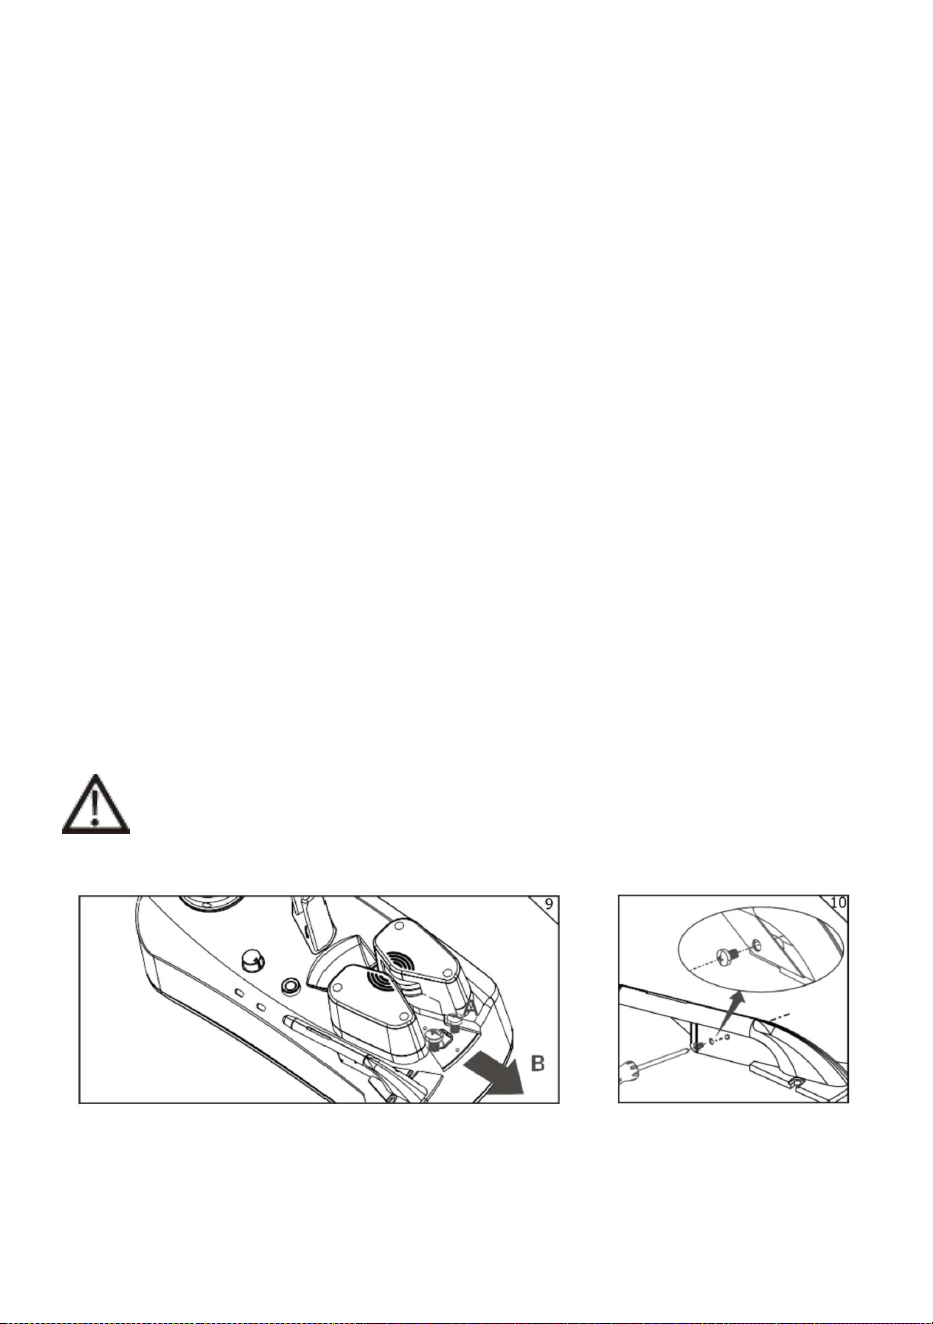
6. Cutter replacement
Air nozzle cutter blade replacement steps
6.1Use the screw driver to remove the fix air nozzle screws. Refer fig. 9A.
6.2Pulling out the air nozzle. Refer fig. 9B.
6.3Remove the air nozzle fix screws. Refer fig. 10.
6.4Renew the new cutter blade(Caution: Just be careful in case sharp blade may
cut your fingers).
6.5Put the air nozzle back and user the screw driver to fix tightly of the 2 fix-screws.
Refer fig. 9,10.
Caution: Be renewed the cutter blade when long time use, in order to
make sure the blade can cut off the film properly.
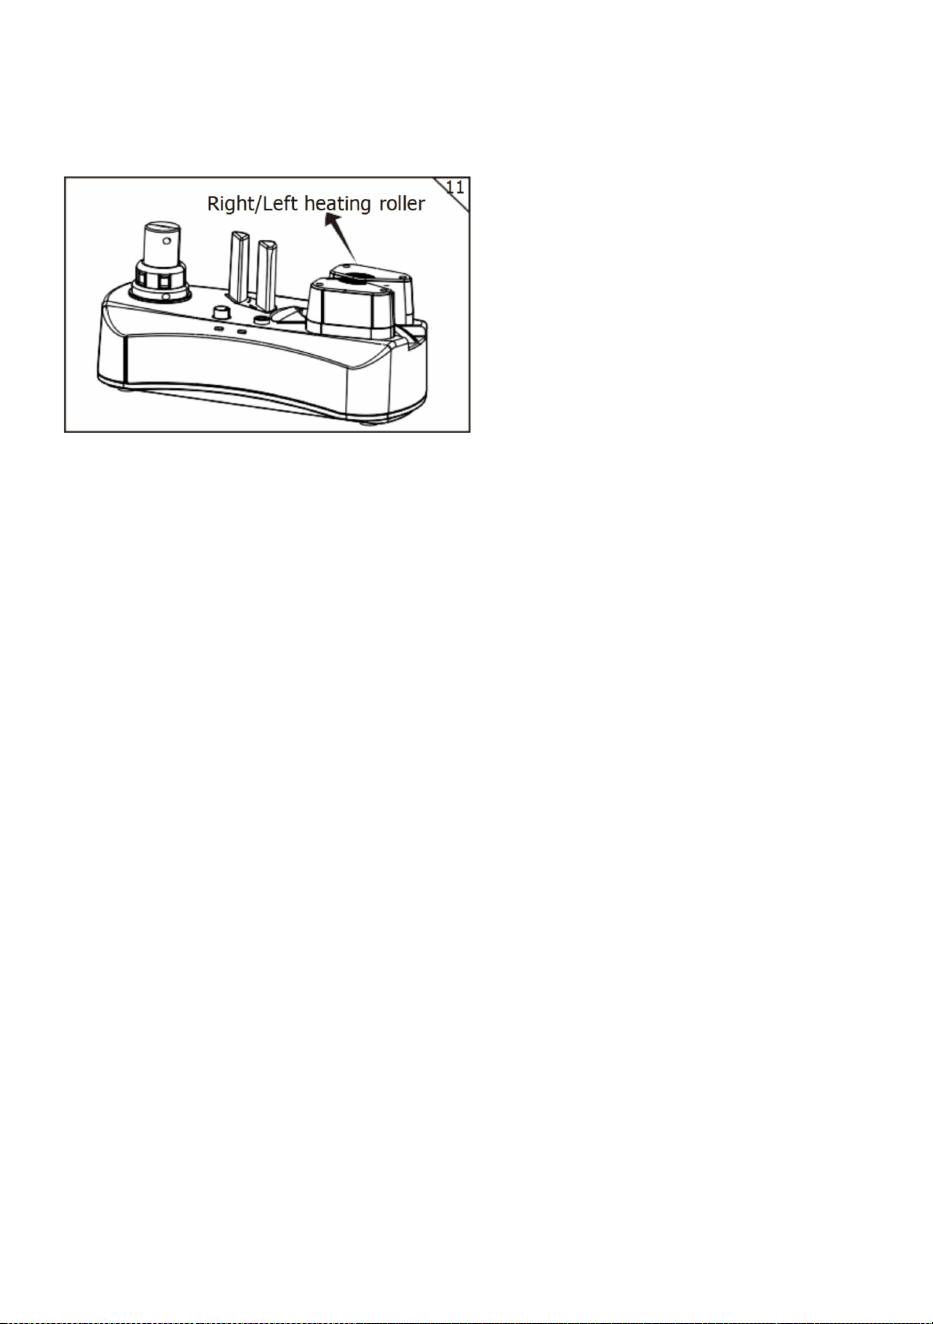
7. Maintain
6.1 Unplug the power plug during maintenance
6.2 Clean hot seals and rollers regularly. Refer fig 11.
6.3 Ensure there is no jammed film and dirty at the air nozzle or cutter blade
6.5 Clean the air nozzle ree when blade is not sharp.


- 2 -
Assistance technique et certificat de garantie électronique
www.vevor.com/support
MACHINE À COUSSIN D'AIR
MANUEL D'UTILISATION
MODÈLE: YE300
We continue to be committed to provide you tools with competitive price.
"Save Half", "Half Price" or any other similar expressions used by us only represents an
estimate of savings you might benefit from buying certain tools with us compared to the major
top brands and does not necessarily mean to cover all categories of tools offered by us. You
are kindly reminded to verify carefully when you are placing an order with us if you are
actually saving half in comparison with the top major brands.
- 1 -
Modèle: YE300
Remarque : le produit réel que vous recevez détermine son apparence.
Have product questions? Need technical support? Please feel free to
contact us:
Technical Support and E-Warranty Certificate
www.vevor.com/support
NEED HELP? CONTACT US!
This is the original instruction, please read all manual instructions
carefully before operating. VEVOR reserves a clear interpretation of our
user manual. The appearance of the product shall be subject to the
product you received. Please forgive us that we won't inform you again if
there are any technology or software updates on our product.
AIR CUSHION
MACHINE
- 2 -
air
blower
CONSIGNES DE SÉCURITÉ IMPORTANTES
Avertissement - Pour réduire le risque de blessure, l'utilisateur doit
lire attentivement le manuel d'instructions.
Courant alternatif
Ce symbole, placé avant un commentaire de sécurité, indique un
type de précaution, d'avertissement ou de danger. Ignorer cet
avertissement peut entraîner un accident. Pour réduire le risque de
blessure, d'incendie ou d'électrocution, veuillez toujours suivre les
recommandations ci -dessous.
Danger!
Risque de blessures corporelles ou de dommages
environnementaux ! Risque de choc électrique ! Risque de
blessures corporelles par choc électrique !
8. Prudence
Veuillez lire attentivement avant utilisation.
1.1 Retirez soigneusement la machine du carton d’emballage.
1.2 Placez la machine sur une table de travail propre et plate,
Voir la fig.A.
1.3 Assurez-vous que le ventilateur d'air n'est pas bloqué et reportez-vous à la
figure 1.
1.4 Évitez que la poussière ne pénètre dans la machine et le souffleur d'air.
9. Opération
2.1 Raccorder l'alimentation électrique adéquate. Voir fig.2.
2.2 Pose du film foll.
2.2.1 Placez correctement le film en rouleau sur le rouleau d'alimentation. Il y
- 3 -
a une rainure dans le film en rouleau. Celle-ci doit s'aligner sur la partie
saillante du rouleau d'alimentation. Voir la fig. 3.
2.2.2 Le film en rouleau suit le sens de la flèche pour passer à travers la
colonne de tension, voir la fig. 4., puis le film en rouleau passe à travers le
poteau de guidage de la buse. Voir la fig. 5.
2.2.3 Tirer le film en rouleau suffisamment près et le placer juste entre les
roues de scellage à chaud pour garantir que lorsque vous appuyez sur le
bouton de démarrage, la machine peut tirer le film jusqu'à atteindre les roues
de traction avant et commencer à fabriquer un coussin d'air en douceur. Voir
les figures 6 et 7.
2.2.4 Pour un meilleur soufflage du film, veuillez utiliser des ciseaux pour
couper le coin de l'ouverture extérieure du film avant utilisation. Voir la fig.12
5
12
2.3 Fonctionnement
2.3.1 Branchez l'alimentation électrique et appuyez sur l'interrupteur
d'alimentation. Reportez-vous à la figure 8. Une fois la machine sous
tension, le voyant d'alimentation rouge s'allume et le voyant vert
commence à clignoter. La machine est en cours de chauffage (le temps
de préchauffage est d'environ 4 minutes).
2.3.2 Lorsque le voyant vert est fixe, ce qui signifie que la machine est
prête à fabriquer des coussins d'air, appuyez sur le bouton

- 4 -
marche/arrêt pour démarrer ; tournez le bouton de commande du
ventilateur pour régler la densité de l'air.
2.3.3 Une fois la fabrication du coussin d'air terminée, appuyez à
nouveau sur le bouton marche/arrêt, la machine s'arrêtera
immédiatement. Il y a une ligne de perforation sur le film pour déchirer
la longueur nécessaire selon les besoins de l'utilisateur. (Si vous n'avez
pas besoin de changer le rouleau de film, veuillez déchirer le film
coussin à l'extrémité de la machine ; si vous avez besoin de changer le
rouleau de film, veuillez déchirer le film coussin avant le rouleau
chauffant, puis fabriquez le coussin d'air du film qui est conservé après
le rouleau chauffant.)
2.3.4 Si vous continuez à utiliser la machine, appuyez sur le bouton
marche/arrêt lorsque le voyant de la machine est allumé en continu.
Une pause de plus de 30 secondes peut provoquer la rupture du film
dans les rouleaux chauffants d'un point chaud. Il s'agit d'une condition
normale car le rouleau chauffant est toujours en cours de chauffage.
2.3.5 Si vous souhaitez éteindre la machine, assurez-vous que
l'indicateur d'alimentation est allumé en continu, déchirez la perforation
du film devant la buse d'air et appuyez sur le bouton marche/arrêt pour
éjecter complètement le film, puis appuyez à nouveau sur le bouton
marche/arrêt pour arrêter la machine, puis vous pouvez éteindre
l'interrupteur d'alimentation.
2.4 Fonction d'hibernation
Après avoir continué à travailler pendant 90 minutes ou 30
minutes sans utilisation, la machine entrera en état d'hibernation.
Chaque compte à rebours d'hibernation est déclenché en
appuyant sur le bouton marche/arrêt, et chaque pression
réinitialise le compte à rebours précédent et démarre le cycle
suivant de 2 heures ou 30 minutes sans utilisation. Pendant l'état
d'hibernation, le voyant rouge d'alimentation clignote lentement, le
voyant vert marche/arrêt s'éteint et le moteur, le ventilateur d'air et
le système de chauffage cessent de fonctionner. En appuyant à
nouveau sur le bouton marche/arrêt, la machine se réveille, le

- 5 -
voyant rouge s'allume et le voyant vert clignote. Après 4 minutes
de préchauffage jusqu'à ce que le voyant vert soit allumé en
continu, appuyez sur le bouton marche/arrêt pour utiliser la
machine normalement.
Attention : la machine doit chauffer pendant environ 4
minutes à chaque démarrage à froid. Nous vous
suggérons d'installer le film en rouleau juste après avoir
allumé l'interrupteur d'alimentation.
10. Sécurité électrique
3.1 Placez la machine à proximité d'une prise de courant.
3.2 Assurez-vous que la tension répond aux besoins électriques de la machine.
3.3 Toute rallonge utilisée doit être conforme à la puissance nominale de la
machine.
3.4 Ne pas utiliser si le cordon d’alimentation est endommagé.
3.5 La réparation et l’entretien doivent être effectués par un technicien qualifié.
11. Structure du produit

- 6 -
A.Rouleau d'alimentation B.Bouton de réglage de la densité de l'air C.Colonne de
tension
D. Indicateur d'alimentation (indicateur rouge) E. Indicateur de démarrage/arrêt
(indicateur vert)
F. Bouton marche/arrêt G. Rouleau chauffant H. Buse d'air
I. Interrupteur d'alimentation J. Ligne électrique
12. Paramètres principaux
6. Nom du produit : Machine à coussin d'air
7. Modèle:YE300
8. Puissance nominale : AC 120 V 6 0 Hz 120 W
9. Puissance nominale : 120 V CA 60 Hz 120 W
10. Vitesse de scellage : 2-2,2 m/min
Temps d'échauffement : 4 min
13. Remplacement de la fraise
Étapes de remplacement de la lame de coupe de la buse d'air
6.1Utilisez le tournevis pour retirer les vis de fixation de la buse d'air. Voir la fig.
9A.
6.2Retrait de la buse d'air. Voir fig. 9B.
6.3Retirez les vis de fixation de la buse d'air. Voir la fig. 10.

- 7 -
6.4Remplacez la nouvelle lame de coupe (Attention : soyez prudent car la lame
tranchante pourrait vous couper les doigts).
6.5Remettez la buse d'air en place et utilisez le tournevis pour serrer fermement
les 2 vis de fixation. Voir fig. 9,10.
Prudence: Renouvelez la lame du coupeur après une utilisation
prolongée, afin de vous assurer que la lame peut couper correctement le film.
14. Maintenir
6.1 Débrancher la fiche d'alimentation pendant l'entretien
6.2 Nettoyer régulièrement les joints chauds et les rouleaux. Voir la figure 11.
6.3 Assurez-vous qu'il n'y a pas de film coincé ou de saleté au niveau de la buse
d'air ou de la lame de coupe
6.5 Nettoyez la buse d'air lorsque la lame n'est pas tranchante.


- 2 -
Technischer Support und E-Garantie-Zertifikat
www.vevor.com/support
LUFTKISSENMASCHINE
BENUTZERHANDBUCH
MODELL: YE300
We continue to be committed to provide you tools with competitive price.
"Save Half", "Half Price" or any other similar expressions used by us only represents an
estimate of savings you might benefit from buying certain tools with us compared to the major
top brands and does not necessarily mean to cover all categories of tools offered by us. You
are kindly reminded to verify carefully when you are placing an order with us if you are
actually saving half in comparison with the top major brands.

- 1 -
Modell: YE300
Hinweis: Das tatsächliche Produkt, das Sie erhalten, bestimmt sein Aussehen.
Have product questions? Need technical support? Please feel free to
contact us:
Technical Support and E-Warranty Certificate
www.vevor.com/support
NEED HELP? CONTACT US!
This is the original instruction, please read all manual instructions
carefully before operating. VEVOR reserves a clear interpretation of our
user manual. The appearance of the product shall be subject to the
product you received. Please forgive us that we won't inform you again if
there are any technology or software updates on our product.
AIR CUSHION
MACHINE

- 2 -
air
blower
WICHTIGE SICHERHEITSHINWEISE
Warnung – Um das Verletzungsrisiko zu verringern, muss der
Benutzer die Bedienungsanleitung sorgfältig lesen.
Wechselstrom
Dieses Symbol vor einem Sicherheitshinweis weist auf eine
Vorsichtsmaßnahme, Warnung oder Gefahr hin. Das Ignorieren
dieser Warnung kann zu einem Unfall führen. Um das Risiko von
Verletzungen, Bränden oder Stromschlägen zu verringern,
befolgen Sie bitte immer die unten aufgeführten Empfehlungen .
Gefahr!
Gefahr von Personen- oder Umweltschäden! Gefahr durch
Stromschlag! Gefahr von Personenschäden durch Stromschlag!
15. Vorsicht
Bitte vor Gebrauch sorgfältig lesen.
1.1 Nehmen Sie die Maschine vorsichtig aus der Verpackung.
1.2 Legen Sie die Maschine auf einen sauberen und ebenen Arbeitstisch.
Siehe Abb. A.
1.3 Stellen Sie sicher, dass das Luftgebläse nicht blockiert ist (siehe Abb. 1).
1.4 Vermeiden Sie, dass Staub in die Maschine und das Gebläse gelangt.
16. Betrieb
2.1 Schließen Sie die richtige Stromversorgung an. Siehe Abb. 2.
2.2 Montage der Folie fol.
2.2.1 Legen Sie den Rollenfilm richtig auf die Zuführrolle. Der Rollenfilm hat
eine Nut. Diese sollte mit dem hervorstehenden Teil der Zuführrolle
übereinstimmen. Siehe Abb. 3.
- 3 -
2.2.2 Der Rollfilm folgt der Pfeilrichtung, um durch die Spannungssäule zu
laufen (siehe Abb. 4). Anschließend läuft der Rollfilm durch den
Düsenführungspfosten (siehe Abb. 5).
2.2.3 Ziehen Sie die Filmrolle so weit heran, dass sie genau zwischen den
Heißsiegelrädern anliegt, damit die Maschine beim Drücken der Starttaste die
Folie bis zu den vorderen Ziehrädern herausziehen und gleichmäßig mit der
Bildung eines Luftkissens beginnen kann. Siehe Abb. 6, 7.
2.2.4 Um das Folienblasen zu verbessern, schneiden Sie vor der
Verwendung die Ecke der Folienöffnung mit einer Schere ab. Siehe Abb. 12
5
12
2.3 Bedienung
2.3.1 Schließen Sie die Maschine an den Strom an und drücken Sie den
Netzschalter, siehe Abb. 8. Nach dem Einschalten der Maschine
leuchtet die rote Betriebsanzeige auf und die grüne Anzeige beginnt zu
blinken. Die Maschine befindet sich im Aufwärmprozess (Aufwärmzeit
ca. 4 Minuten).
2.3.2 Wenn das grüne Licht durchgehend leuchtet, bedeutet dies,
dass die Maschine bereit ist, ein Luftkissen zu erzeugen. Drücken Sie
zum Starten die Start-/Stopp-Taste; drehen Sie den
Lüftersteuerungsknopf, um die Luftdichte anzupassen.
2.3.3 Wenn Sie mit der Herstellung des Luftkissens fertig sind, drücken

- 4 -
Sie die Start-/Stopp-Taste erneut. Die Maschine stoppt sofort. Auf der
Folie befindet sich eine Perforationslinie, damit der Benutzer die
erforderliche Länge abtrennen kann. (Wenn die Folienrolle nicht
gewechselt werden muss, reißen Sie die Polsterfolie bitte am Ende der
Maschine ab. Wenn Sie die Folienrolle wechseln müssen, reißen Sie
die Polsterfolie bitte vor der Heizwalze ab und stellen Sie dann das
Luftkissen der Folie her, das nach der Heizwalze erhalten bleibt.)
2.3.4 Wenn Sie die Maschine weiter verwenden, drücken Sie die
Start-/Stopp-Taste, wenn die Maschinenanzeige durchgehend leuchtet.
Eine Pause von mehr als 30 Sekunden kann zu einem Filmriss in den
heißen Walzen an einer heißen Stelle führen. Dies ist ein normaler
Zustand, da sich die heiße Walze immer im Aufheizprozess befindet.
2.3.5 Wenn Sie das Gerät ausschalten möchten, vergewissern Sie sich,
dass die Betriebsanzeige durchgehend leuchtet, reißen Sie die
Filmperforation vor der Luftdüse ab und drücken Sie die
Start-/Stopp-Taste, um den Film vollständig auszuwerfen. Drücken Sie
die Start-/Stopp-Taste erneut, um die Maschine anzuhalten.
Anschließend können Sie den Netzschalter ausschalten.
2.4 Ruhezustandsfunktion
Nach 90 Minuten Betrieb oder 30 Minuten Nichtgebrauch wechselt
die Maschine in den Ruhezustand. Jeder Countdown für den
Ruhezustand wird durch Drücken der Start-/Stopp-Taste ausgelöst.
Mit jedem Drücken wird der vorherige Countdown zurückgesetzt
und der nächste 2-Stunden-Zyklus oder 30 Minuten Nichtgebrauch
gestartet. Während des Ruhezustands blinkt die rote
Betriebsanzeige langsam, die grüne Start-/Stopp-Leuchte erlischt
und Motor, Luftgebläse und Heizsystem hören auf zu arbeiten.
Durch erneutes Drücken der Start-/Stopp-Taste wird die Maschine
geweckt, die rote Leuchte leuchtet auf und die grüne Leuchte
blinkt. Nach 4 Minuten Aufwärmzeit, bis die grüne Leuchte
durchgehend leuchtet, drücken Sie die Start-/Stopp-Taste, um die
Maschine normal zu verwenden.
Achtung: Bei jedem Kaltstart benötigt das Gerät eine
- 5 -
Aufwärmzeit von ca. 4 Minuten. Wir empfehlen, den Rollfilm
gleich nach dem Einschalten des Netzschalters einzulegen.
17. Elektrische Sicherheit
3.1 Stellen Sie die Maschine in die Nähe einer Steckdose.
3.2 Stellen Sie sicher, dass die Spannung den Stromanforderungen der Maschine
entspricht.
3.3 Alle verwendeten Verlängerungskabel müssen der Nennleistung der Maschine
entsprechen.
3.4 Nicht in Betrieb nehmen, wenn das Netzkabel beschädigt ist.
3.5 Reparaturen und Wartungsarbeiten sollten von einem qualifizierten
Servicetechniker durchgeführt werden.
18. Produktstruktur

- 6 -
A.Zuführrolle B.Luftdichte-Einstellknopf C.Spannungssäule
D.Betriebsanzeige (rote Anzeige) E.Starter-/Stopp-Anzeige (grüne Anzeige)
F.Starter-/Stopp-Taste G.Heizwalze H.Luftdüse
I.Netzschalter J.Stromleitung
19. Hauptparameter
11. Produktname: Luftkissenmaschine
12. Modell: YE300
13. Nennleistung(en) : AC 120 V 6 0Hz 120W
14. Bewertung(en): AC120V 60Hz 120W
15. Siegelgeschwindigkeit: 2–2,2 m/min
Aufwärmzeit: 4min
20. Fräserwechsel
Schritte zum Ersetzen der Luftdüsenschneidklinge
6.1 Entfernen Sie mit dem Schraubendreher die Befestigungsschrauben der
Luftdüse. Siehe Abb. 9A.
6.2 Luftdüse herausziehen. Siehe Abb. 9B.
6.3 Entfernen Sie die Befestigungsschrauben der Luftdüse. Siehe Abb. 10.
6.4 Setzen Sie die neue Schneidklinge ein (Achtung: Seien Sie vorsichtig, denn
die scharfe Klinge könnte Ihre Finger schneiden).
6.5 Setzen Sie die Luftdüse wieder ein und ziehen Sie die beiden
Befestigungsschrauben mit dem Schraubendreher fest an. Siehe Abb. 9,10.
Vorsicht: Ersetzen Sie die Schneidklinge nach längerem Gebrauch,
um sicherzustellen, dass die Klinge die Folie ordnungsgemäß abschneiden kann.
- 7 -
21. Pflegen
6.1 Bei Wartungsarbeiten Netzstecker ziehen
6.2 Heißdichtungen und Walzen regelmäßig reinigen. Siehe Abb. 11.
6.3 Stellen Sie sicher, dass sich kein Film an der Luftdüse oder der Schneidklinge
verklemmt oder verschmutzt
6.5 Reinigen Sie die Luftdüse, wenn die Klinge nicht mehr scharf ist.


- 2 -
Supporto tecnico e certificato di garanzia elettronica
www.vevor.com/support
MACCHINA A CUSCINO D'ARIA
MANUALE D'USO
MODELLO: YE300
We continue to be committed to provide you tools with competitive price.
"Save Half", "Half Price" or any other similar expressions used by us only represents an
estimate of savings you might benefit from buying certain tools with us compared to the major
top brands and does not necessarily mean to cover all categories of tools offered by us. You
are kindly reminded to verify carefully when you are placing an order with us if you are
actually saving half in comparison with the top major brands.

- 1 -
Modello: YE300
Nota: l'aspetto del prodotto che riceverai ne determina l'aspetto.
Have product questions? Need technical support? Please feel free to
contact us:
Technical Support and E-Warranty Certificate
www.vevor.com/support
NEED HELP? CONTACT US!
This is the original instruction, please read all manual instructions
carefully before operating. VEVOR reserves a clear interpretation of our
user manual. The appearance of the product shall be subject to the
product you received. Please forgive us that we won't inform you again if
there are any technology or software updates on our product.
AIR CUSHION
MACHINE
- 2 -
air
blower
IMPORTANTI ISTRUZIONI DI SICUREZZA
Attenzione - Per ridurre il rischio di lesioni, l'utente deve leggere
attentamente il manuale di istruzioni.
Corrente alternata
Questo simbolo, posto prima di un commento sulla sicurezza,
indica un tipo di precauzione, avviso o pericolo. Ignorare questo
avviso può causare un incidente. Per ridurre il rischio di lesioni,
incendi o folgorazione, seguire sempre le raccomandazioni
mostrate di seguito.
Pericolo!
Rischio di lesioni personali o danni ambientali! Rischio di scossa
elettrica! Rischio di lesioni personali da scossa elettrica!
22. Attenzione
Si prega di leggere attentamente prima dell'uso.
1.1 Estrarre con attenzione la macchina dall'imballo.
1.2 Posizionare la macchina sul tavolo di lavoro pulito e piano,
Vedere la figura A.
1.3 Assicurarsi che il ventilatore dell'aria non sia inceppato e fare riferimento alla
figura 1.
1.4 Evitare che la polvere penetri nella macchina e nel ventilatore dell'aria.
23. Operazione
2.1 Collegare la corretta alimentazione elettrica. Fare riferimento alla fig.2.
2.2 Installazione del film foll.
2.2.1 Posizionare correttamente il rotolo di pellicola sul rullo di alimentazione.
C'è una scanalatura nel rotolo di pellicola. Questa dovrebbe allinearsi

- 3 -
alla parte sporgente del rullo di alimentazione. Fare riferimento alla fig.
3.
2.2.2 Il film in rotolo segue la direzione della freccia per passare attraverso la
colonna di tensione, fare riferimento alla fig. 4., quindi il film in rotolo passa
attraverso il montante di guida dell'ugello. Fare riferimento alla fig. 5.
2.2.3 Tirare la pellicola in rotolo abbastanza vicino e toccare esattamente tra
le ruote di saldatura a caldo per garantire che quando si preme il pulsante di
avvio, la macchina possa estrarre la pellicola fino a raggiungere le ruote di
trazione anteriori e iniziare a creare un cuscino d'aria senza problemi. Fare
riferimento alle figure 6,7.
2.2.4 per un migliore soffiaggio della pellicola, utilizzare le forbici per tagliare
l'angolo della bocca esterna della pellicola prima dell'uso. Fare riferimento
alla fig. 12
5
12
2.3 Funzionamento
2.3.1 Collegare l'alimentazione elettrica e premere l'interruttore di
alimentazione, vedere fig. 8. Dopo aver acceso la macchina, la spia
rossa dell'indicatore di alimentazione si accenderà e la spia verde
inizierà a lampeggiare, la macchina è in fase di riscaldamento (il tempo
di riscaldamento è di circa 4 minuti).
2.3.2 Quando la luce verde è fissa, il che significa che la macchina è

- 4 -
pronta a creare un cuscino d'aria, premere il pulsante di avvio/arresto
per avviare; ruotare la manopola di controllo della ventola per regolare
la densità dell'aria.
2.3.3 Quando si termina di creare il cuscino d'aria, premere di nuovo il
pulsante di avvio/arresto, la macchina si fermerà immediatamente. C'è
una linea di perforazione sulla pellicola per strappare la lunghezza
necessaria per le esigenze dell'utente. (Se non è necessario cambiare
il rotolo di pellicola, strappare la pellicola del cuscino sul lato finale della
macchina; se è necessario cambiare il rullo della pellicola, strappare la
pellicola del cuscino prima del rullo riscaldante, quindi creare il cuscino
d'aria della pellicola che viene mantenuto dopo il rullo riscaldante.)
2.3.4 Se si continua a utilizzare la macchina, premere il pulsante di
avvio/arresto quando l'indicatore della macchina è acceso fisso. Una
pausa di oltre 30 secondi può causare la rottura della pellicola nei rulli
caldi in un punto caldo. Questa è una condizione normale poiché il rullo
caldo è sempre in un processo di riscaldamento.
2.3.5 Se si desidera spegnere la macchina, assicurarsi che la spia di
alimentazione sia accesa fissa, strappare la perforazione della pellicola
davanti all'ugello dell'aria e premere il pulsante di avvio/arresto per
espellere completamente la pellicola, quindi premere nuovamente il
pulsante di avvio/arresto per arrestare la macchina, quindi spegnere
l'interruttore di alimentazione.
2.4 Funzione di ibernazione
Dopo aver continuato a lavorare per 90 minuti o dopo 30 minuti di
inutilizzo, la macchina entrerà in stato di ibernazione. Ogni conto
alla rovescia per l'ibernazione viene attivato premendo il pulsante
di avvio/arresto e ogni pressione ripristina il conto alla rovescia
precedente e avvia il ciclo successivo di 2 ore o dopo 30 minuti di
inutilizzo. Durante lo stato di ibernazione, la luce rossa indicatrice
di alimentazione lampeggia lentamente, la luce verde di
avvio/arresto si spegne e il motore, il ventilatore dell'aria e il
sistema di riscaldamento smettono di funzionare. Premendo
nuovamente il pulsante di avvio/arresto, la macchina si riattiva, la

- 5 -
luce rossa si accende e la luce verde lampeggia. Dopo 4 minuti di
riscaldamento fino a quando la luce verde non è fissa, premere il
pulsante di avvio/arresto per utilizzare normalmente la macchina.
Attenzione: la macchina deve riscaldarsi per circa 4
minuti per ogni avvio a freddo. Si consiglia di installare la
pellicola in rotolo subito dopo aver acceso l'interruttore di
alimentazione.
24. Sicurezza elettrica
3.1 Posizionare la macchina vicino alla presa di corrente.
3.2 Assicurarsi che la tensione soddisfi i requisiti elettrici della macchina.
3.3 Qualsiasi prolunga utilizzata deve essere adatta alla potenza nominale della
macchina.
3.4 Non utilizzare l'apparecchio se il cavo di alimentazione è danneggiato.
3.5 La riparazione e l'assistenza devono essere eseguite da un tecnico qualificato.
25. Struttura del prodotto
- 6 -
A. Rullo di alimentazione B. Manopola di regolazione della densità dell'aria C.
Colonna di tensione
D. Indicatore di alimentazione (indicatore rosso) E. Indicatore di
avviamento/arresto (indicatore verde)
F.Pulsante di avvio/arresto G.Rullo riscaldante H.Ugello aria
I.Interruttore di alimentazione J.Linea di alimentazione
26. Parametri principali
16. Nome del prodotto: Macchina a cuscino d'aria
17. Modello:YE300
18. Valutazione(i) : AC 120 V 6 0Hz 120W
19. Valutazione(i): AC120V 60Hz 120W
20. Velocità di saldatura: 2-2,2 m/min
Tempo di riscaldamento: 4 min
27. Sostituzione della fresa
Fasi di sostituzione della lama del taglierino dell'ugello dell'aria
6.1Utilizzare il cacciavite per rimuovere le viti dell'ugello dell'aria di fissaggio. Fare
riferimento alla fig. 9A.
6.2Estrazione dell'ugello dell'aria. Vedere fig. 9B.
6.3Rimuovere le viti di fissaggio dell'ugello dell'aria. Fare riferimento alla fig. 10.

- 7 -
6.4Sostituisci la nuova lama del taglierino (attenzione: fai attenzione perché la
lama affilata potrebbe tagliarti le dita).
6.5Rimettere l'ugello dell'aria e utilizzare il cacciavite per fissare saldamente le 2
viti di fissaggio. Fare riferimento alle figure 9,10.
Attenzione: Dopo un uso prolungato, sostituire la lama del cutter per
assicurarsi che possa tagliare correttamente la pellicola.
28. Mantenere
6.1 Scollegare la spina di alimentazione durante la manutenzione
6.2 Pulire regolarmente le guarnizioni calde e i rulli. Fare riferimento alla figura 11.
6.3 Assicurarsi che non vi siano pellicole inceppate o sporche nell'ugello dell'aria o
nella lama di taglio
6.5 Pulire l'ugello dell'aria quando la lama non è più affilata.


- 2 -
Soporte técnico y certificado de garantía electrónica
www.vevor.com/support
MÁQUINA DE COLCHÓN DE AIRE
MANUAL DEL USUARIO
MODELO: YE300
We continue to be committed to provide you tools with competitive price.
"Save Half", "Half Price" or any other similar expressions used by us only represents an
estimate of savings you might benefit from buying certain tools with us compared to the major
top brands and does not necessarily mean to cover all categories of tools offered by us. You
are kindly reminded to verify carefully when you are placing an order with us if you are
actually saving half in comparison with the top major brands.

- 1 -
Modelo: YE300
Nota: El producto real que usted recibe determina su apariencia.
Have product questions? Need technical support? Please feel free to
contact us:
Technical Support and E-Warranty Certificate
www.vevor.com/support
NEED HELP? CONTACT US!
This is the original instruction, please read all manual instructions
carefully before operating. VEVOR reserves a clear interpretation of our
user manual. The appearance of the product shall be subject to the
product you received. Please forgive us that we won't inform you again if
there are any technology or software updates on our product.
AIR CUSHION
MACHINE
- 2 -
air
blower
INSTRUCCIONES DE SEGURIDAD IMPORTANTES
Advertencia: Para reducir el riesgo de lesiones, el usuario debe
leer atentamente el manual de instrucciones.
Corriente alterna
Este símbolo, colocado antes de un comentario de seguridad,
indica un tipo de precaución, advertencia o peligro. Ignorar esta
advertencia puede provocar un accidente. Para reducir el riesgo
de lesiones, incendios o electrocución, siga siempre las
recomendaciones que se muestran a continuación.
¡Peligro!
¡Riesgo de lesiones personales o daños ambientales! ¡Riesgo de
descarga eléctrica! ¡Riesgo de lesiones personales por descarga
eléctrica!
29. Precaución
Lea atentamente antes de usar.
1.1 Retire la máquina de la caja con cuidado.
1.2 Coloque la máquina en una mesa de trabajo limpia y plana,
Consulte la figura A.
1.3 Asegúrese de que el soplador de aire no esté atascado y consulte la figura 1.
1.4 Evite que entre polvo en la máquina y en el soplador de aire.
30. Operación
2.1 Conecte la alimentación eléctrica correcta. Consulte la figura 2.
2.2 Instalación del seguimiento de la película.
2.2.1 Coloque el rollo de película en el rodillo de alimentación correctamente.
Hay una ranura en el rollo de película que debe estar alineada con la

- 3 -
parte saliente del rodillo de alimentación. Consulte la figura 3.
2.2.2 La película en rollo sigue la dirección de la flecha para pasar a través de
la columna de tensión (consulte la figura 4). Luego, la película en rollo pasa a
través del poste guía de la boquilla (consulte la figura 5).
2.2.3 Tirar del rollo de película lo suficiente para que toque justo entre las
ruedas de sellado en caliente para asegurar que, al presionar el botón de
inicio, la máquina pueda sacar la película hasta llegar a las ruedas de
tracción delanteras y comenzar a fabricar el colchón de aire sin problemas.
Consulte las figuras 6 y 7.
2.2.4 Para un mejor soplado de la película, utilice tijeras para cortar la
esquina de la boca de salida de la película antes de usarla. Consulte la figura
12.
5
12
2.3 Operación
2.3.1 Conecte la alimentación eléctrica y presione el interruptor de
encendido. Consulte la figura 8. Después de encender la máquina, la
luz roja del indicador de encendido se encenderá y la luz verde
comenzará a parpadear. La máquina está en proceso de calentamiento
(el tiempo de calentamiento es de aproximadamente 4 minutos).
2.3.2 Cuando la luz verde esté fija, lo que significa que la máquina
está lista para hacer cojines de aire, presione el botón de

- 4 -
inicio/parada para comenzar; gire la perilla de control del ventilador
para ajustar la densidad del aire.
2.3.3 Al terminar de hacer el colchón de aire, presione el botón de
inicio/parada nuevamente, la máquina se detendrá inmediatamente.
Hay una línea de perforación en la película para cortar la longitud
necesaria según los requisitos del usuario. (Si no es necesario cambiar
el rollo de película, corte la película del colchón en el extremo de la
máquina; si es necesario cambiar el rodillo de película, corte la película
del colchón antes del rodillo de calentamiento, luego haga el colchón
de aire de la película que se mantiene después del rodillo de
calentamiento).
2.3.4 Si continúa utilizando la máquina, presione el botón de
inicio/parada cuando el indicador de la máquina esté encendido. Una
pausa de más de 30 segundos puede provocar que la película dentro
de los rodillos calientes se rompa en un punto caliente. Esta es una
condición normal ya que el rodillo caliente siempre está en un proceso
de calentamiento.
2.3.5 Si desea apagar, asegúrese de que el indicador de encendido
esté encendido, corte la perforación de la película frente a la boquilla
de aire y presione el botón de inicio/detención para expulsar la película
por completo, y presione el botón de inicio/detención nuevamente para
detener la máquina, luego puede apagar el interruptor de encendido.
2.4 Función de hibernación
Después de continuar trabajando 90 minutos o sin uso durante 30
minutos, la máquina entrará en un estado de hibernación. Cada
cuenta regresiva de hibernación se activa presionando el botón de
inicio/parada, y cada presión restablecerá la cuenta regresiva
anterior y comenzará para el siguiente ciclo de 2 horas o sin uso
durante 30 minutos. Durante el estado de hibernación, la luz roja
indicadora de energía parpadea lentamente, la luz verde de
inicio/parada se apaga y el motor, el soplador de aire y el sistema
de calefacción dejan de funcionar. Al presionar el botón de
inicio/parada nuevamente, activará la máquina, la luz roja se
- 5 -
enciende y la luz verde parpadea. Después de 4 minutos de
tiempo de calentamiento hasta que la luz verde esté fija, presione
el botón de inicio/parada para usar la máquina normalmente.
Precaución: La máquina necesita calentarse alrededor
de 4 minutos por cada arranque en frío. Sugerimos
instalar el rollo de película inmediatamente después de
encender el interruptor de alimentación.
31. Seguridad eléctrica
3.1 Coloque la máquina cerca de una toma de corriente.
3.2 Asegúrese de que el voltaje cumpla con los requisitos eléctricos de la
máquina.
3.3 Cualquier cable de extensión utilizado debe cumplir con la potencia nominal
de la máquina.
3.4 No utilice el dispositivo si el cable de alimentación está dañado.
3.5 La reparación y el servicio deben ser realizados por un técnico de servicio
calificado.
32. Estructura del producto

- 6 -
A. Rodillo de alimentación B. Perilla de ajuste de densidad del aire C. Columna de
tensión
D. Indicador de encendido (indicador rojo) E. Indicador de arranque/parada
(indicador verde)
F. Botón de arranque/parada G. Rodillo calefactor H. Boquilla de aire
I.Interruptor de encendido J.Línea de alimentación
33. Parámetros principales
21. Nombre del producto: Máquina de colchón de aire
22. Modelo: YE300
23. Clasificación(es) : CA 120 V 6 0 Hz 120 W
24. Clasificación(es): CA 120 V, 60 Hz, 120 W
25. Velocidad de sellado: 2-2,2 m/min
Tiempo de calentamiento: 4 min
34. Reemplazo de cortador
Pasos para reemplazar la cuchilla de corte de la boquilla de aire
6.1 Utilice el destornillador para quitar los tornillos de fijación de la boquilla de aire.
Consulte la figura 9A.
6.2 Extracción de la boquilla de aire. Consulte la figura 9B.
6.3 Retire los tornillos de fijación de la boquilla de aire. Consulte la figura 10.
- 7 -
6.4 Reemplace la nueva cuchilla de corte (Precaución: tenga cuidado en caso de
que la cuchilla afilada pueda cortarle los dedos).
6.5 Vuelva a colocar la boquilla de aire y utilice el destornillador para fijar
firmemente los 2 tornillos de fijación. Consulte las figuras 9 y 10.
Precaución: Renueve la cuchilla de corte después de un uso
prolongado, para asegurarse de que la cuchilla pueda cortar la película
correctamente.
35. Mantener
6.1 Desconecte el enchufe de alimentación durante el mantenimiento
6.2 Limpie periódicamente los sellos y rodillos calientes. Consulte la figura 11.
6.3 Asegúrese de que no haya película atascada ni suciedad en la boquilla de aire
o en la cuchilla de corte.
6.5 Limpie la boquilla de aire cuando la cuchilla no esté afilada.


- 2 -
Wsparcie techniczne i certyfikat e-gwarancji
www.vevor.com/support
MASZYNA DO PODUSZEK
POWIETRZNYCH
INSTRUKCJA OBSŁUGI
MODEL: YE300
We continue to be committed to provide you tools with competitive price.
"Save Half", "Half Price" or any other similar expressions used by us only represents an
estimate of savings you might benefit from buying certain tools with us compared to the major
top brands and does not necessarily mean to cover all categories of tools offered by us. You
are kindly reminded to verify carefully when you are placing an order with us if you are
actually saving half in comparison with the top major brands.
- 1 -
Model: YE300
Uwaga: Wygląd produktu, który otrzymasz, ma wpływ na jego ostateczny
wygląd.
Have product questions? Need technical support? Please feel free to
contact us:
Technical Support and E-Warranty Certificate
www.vevor.com/support
NEED HELP? CONTACT US!
AIR CUSHION
MACHINE
- 2 -
air
blower
This is the original instruction, please read all manual instructions
carefully before operating. VEVOR reserves a clear interpretation of our
user manual. The appearance of the product shall be subject to the
product you received. Please forgive us that we won't inform you again if
there are any technology or software updates on our product.
WAŻNE INSTRUKCJE BEZPIECZEŃSTWA
Ostrzeżenie - Aby zminimalizować ryzyko obrażeń, użytkownik
powinien uważnie przeczytać instrukcję obsługi.
Prąd przemienny
Ten symbol, umieszczony przed komentarzem dotyczącym
bezpieczeństwa, wskazuje na rodzaj ostrożności, ostrzeżenia lub
niebezpieczeństwa. Zignorowanie tego ostrzeżenia może
doprowadzić do wypadku. Aby zmniejszyć ryzyko obrażeń, pożaru
lub porażenia prądem, zawsze postępuj zgodnie z zaleceniami
podanymi poniżej.
Niebezpieczeństwo!
Ryzyko obrażeń ciała lub szkód środowiskowych! Ryzyko
porażenia prądem! Ryzyko obrażeń ciała przez porażenie prądem!
36. Ostrożność
Przed użyciem należy uważnie przeczytać instrukcję.
1.1 Ostrożnie wyjmij maszynę z opakowania.
1.2 Umieścić maszynę na czystym i płaskim stole roboczym,
Zobacz rys.A.
1.3 Upewnij się, że dmuchawa powietrza nie jest zablokowana i zapoznaj się z rys.
1.
1.4 Unikaj przedostawania się pyłu do maszyny i dmuchawy powietrza.
- 3 -
37. Działanie
2.1 Podłącz właściwe zasilanie elektryczne. Patrz rys.2.
2.2 Montaż folii ochronnej.
2.2.1 Umieść prawidłowo rolkę folii na rolce podającej. W rolce folii znajduje
się rowek. Powinien on być wyrównany z wystającą częścią rolki
podającej. Zobacz rys. 3.
2.2.2 Folia rolkowa podąża za kierunkiem strzałki, aby przejść przez kolumnę
napinającą, patrz rys. 4., a następnie folia rolkowa przechodzi przez
prowadnicę dyszy. Patrz rys. 5.
2.2.3 Naciągnij folię rolkową wystarczająco blisko i dotknij dokładnie między
gorącymi kołami uszczelniającymi, aby upewnić się, że po naciśnięciu
przycisku startu maszyna może wyciągnąć folię do przednich kół ciągnących i
płynnie rozpocząć tworzenie poduszki powietrznej. Zobacz rys. 6,7.
2.2.4 w celu lepszego nadmuchania filmu, przed użyciem należy odciąć
nożyczkami róg otworu zewnętrznego filmu. Patrz rys. 12
5
12
2.3 Działanie
2.3.1 Podłącz zasilanie elektryczne i naciśnij wyłącznik zasilania, patrz
rys. 8. Po włączeniu urządzenia, czerwona lampka kontrolna zasilania

- 4 -
zaświeci się, a zielona zacznie migać. Urządzenie jest w trakcie procesu
nagrzewania (czas nagrzewania wynosi około 4 minut).
2.3.2 Gdy zielone światło zacznie świecić światłem ciągłym, co
oznacza, że maszyna jest gotowa do wytworzenia poduszki
powietrznej, naciśnij przycisk start/stop, aby rozpocząć; obróć
pokrętło sterowania wentylatorem, aby dostosować gęstość
powietrza.
2.3.3 Po zakończeniu tworzenia poduszki powietrznej naciśnij
ponownie przycisk start/stop, maszyna natychmiast się zatrzyma. Na
folii znajduje się linia perforacji, aby oderwać potrzebną długość
zgodnie z wymaganiami użytkownika. (Jeśli nie ma potrzeby wymiany
rolki folii, oderwij folię amortyzującą na końcu maszyny; Jeśli trzeba
wymienić rolkę folii, oderwij folię amortyzującą przed wałkiem
grzewczym, a następnie utwórz poduszkę powietrzną z folii, która jest
przechowywana za wałkiem grzewczym.)
2.3.4 Jeśli nadal używasz maszyny, naciśnij przycisk start/stop, gdy
wskaźnik maszyny świeci ciągłym światłem. Przerwa na dłużej niż 30
sekund może spowodować pęknięcie folii w gorących wałkach w
gorącym punkcie. Jest to normalny stan, ponieważ gorący wałek
zawsze znajduje się w procesie nagrzewania.
2.3.5 Jeśli chcesz wyłączyć urządzenie, upewnij się, że kontrolka
zasilania świeci światłem ciągłym, oderwij perforację folii przed dyszą
powietrza i naciśnij przycisk start/stop, aby całkowicie wysunąć folię.
Ponownie naciśnij przycisk start/stop, aby zatrzymać urządzenie.
Następnie możesz wyłączyć urządzenie.
2.4 Funkcja hibernacji
Po 90 minutach ciągłej pracy lub 30 minutach nieużywania,
maszyna przejdzie w stan hibernacji. Każde odliczanie hibernacji
jest uruchamiane przez naciśnięcie przycisku start/stop, a każde
naciśnięcie resetuje poprzednie odliczanie i rozpoczyna następny
2-godzinny cykl lub 30 minut nieużywania. W stanie hibernacji,
czerwone światło wskaźnika zasilania miga powoli, zielone światło
start/stop gaśnie, a silnik, dmuchawa powietrza, system grzewczy
- 5 -
przestają działać. Ponowne naciśnięcie przycisku start/stop
wybudzi maszynę, czerwone światło zapala się, zielone światło
miga. Po 4 minutach nagrzewania, aż zielone światło zacznie
świecić światłem ciągłym, naciśnij przycisk start/stop, aby
normalnie korzystać z maszyny.
Uwaga: Maszyna musi się nagrzewać przez około 4
minuty po każdym zimnym starcie. Zalecamy instalację
folii rolkowej zaraz po włączeniu zasilania.
38. Bezpieczeństwo elektryczne
3.1 Ustaw maszynę w pobliżu gniazdka elektrycznego.
3.2 Upewnij się, że napięcie spełnia wymagania elektryczne maszyny.
3.3. Stosowany przedłużacz powinien być dostosowany do mocy znamionowej
urządzenia.
3.4 Nie należy korzystać z urządzenia, jeżeli przewód zasilający jest uszkodzony.
3.5 Naprawy i serwisowanie powinny być wykonywane przez wykwalifikowanego
technika serwisowego.
39. Struktura produktu

- 6 -
A. Rolka podająca B. Pokrętło ustawienia gęstości powietrza C. Kolumna
naprężająca
D. Wskaźnik zasilania (czerwony wskaźnik) E. Wskaźnik rozrusznika/zatrzymania
(zielony wskaźnik)
F.Przycisk start/stop G.Wałek grzewczy.Dysza powietrzna
I.Wyłącznik zasilania J.Linia zasilania
40. Główne parametry
26. Nazwa produktu: Maszyna do poduszek powietrznych
27. Model:YE300
28. Moc znamionowa : AC 120 V 6 0 Hz 120 W
29. Moc znamionowa: AC120V 60Hz 120W
30. Prędkość zgrzewania: 2-2,2 m/min
Czas rozgrzewki: 4 min
41. Wymiana noża
Wymiana ostrza dyszy powietrznej – etapy
6.1 Za pomocą śrubokręta odkręć śruby mocujące dyszę powietrza. Patrz rys. 9A.
6.2 Wyciąganie dyszy powietrza. Patrz rys. 9B.
6.3 Odkręć śruby mocujące dyszę powietrza. Patrz rys. 10.
6.4 Wymień ostrze tnące na nowe (Uwaga: zachowaj ostrożność, gdyż ostre
ostrze może przeciąć palce).
- 7 -
6.5 Załóż dyszę powietrza z powrotem i użyj śrubokręta, aby mocno dokręcić 2
śruby mocujące. Patrz rys. 9,10.
Ostrożność: Po dłuższym użytkowaniu należy wymienić ostrze tnące,
aby mieć pewność, że będzie ono prawidłowo przecinać folię.
42. Utrzymywać
6.1 Podczas konserwacji odłączaj wtyczkę zasilającą
6.2 Regularnie czyść uszczelki i rolki na gorąco. Patrz rys. 11.
6.3 Upewnij się, że nie ma zaciętej folii ani zanieczyszczeń w dyszy powietrznej
lub ostrzu tnącym
6.5 Wyczyść dyszę powietrza, jeśli ostrze nie jest ostre.


- 2 -
Technische ondersteuning en e-garantiecertificaat
www.vevor.com/support
LUCHTKUSSENMACHINE
GEBRUIKERSHANDLEIDING
MODEL: YE300
We continue to be committed to provide you tools with competitive price.
"Save Half", "Half Price" or any other similar expressions used by us only represents an
estimate of savings you might benefit from buying certain tools with us compared to the major
top brands and does not necessarily mean to cover all categories of tools offered by us. You
are kindly reminded to verify carefully when you are placing an order with us if you are
actually saving half in comparison with the top major brands.

- 1 -
Model: YE300
Let op: het uiterlijk van het product is afhankelijk van het daadwerkelijke product
dat u ontvangt.
Have product questions? Need technical support? Please feel free to
contact us:
Technical Support and E-Warranty Certificate
www.vevor.com/support
NEED HELP? CONTACT US!
AIR CUSHION
MACHINE
- 2 -
air
blower
This is the original instruction, please read all manual instructions
carefully before operating. VEVOR reserves a clear interpretation of our
user manual. The appearance of the product shall be subject to the
product you received. Please forgive us that we won't inform you again if
there are any technology or software updates on our product.
BELANGRIJKE VEILIGHEIDSINSTRUCTIES
Waarschuwing - Om het risico op letsel te verkleinen, dient de
gebruiker de gebruiksaanwijzing zorgvuldig te lezen.
Wisselstroom
Dit symbool, geplaatst voor een veiligheidsopmerking, geeft een
soort voorzorgsmaatregel, waarschuwing of gevaar aan. Het
negeren van deze waarschuwing kan leiden tot een ongeluk. Om
het risico op letsel, brand of elektrocutie te verminderen, dient u
altijd de onderstaande aanbevelingen op te volgen.
Gevaar!
Gevaar voor persoonlijk letsel of milieuschade! Gevaar voor
elektrische schok! Gevaar voor persoonlijk letsel door elektrische
schok!
43. Voorzichtigheid
Lees dit aandachtig door voor gebruik.
1.1 Haal het apparaat voorzichtig uit de verpakking.
1.2 Plaats de machine op de schone en vlakke werktafel,
Zie figuur A.
1.3 Controleer of de luchtblazer niet vastzit en zie figuur 1.
1.4 Zorg dat er geen stof in de machine en de luchtblazer terechtkomt.

- 3 -
44. Bediening
2.1 Sluit de juiste elektrische voeding aan. Zie figuur 2.
2.2 Installatie van de folie
2.2.1 Plaats de rolfilm op de juiste manier op de invoerrol. Er zit een groef in
de rolfilm. Die moet uitgelijnd zijn met het uitstekende deel van de
invoerrol. Zie fig.3.
2.2.2 De rolfilm volgt de pijlrichting om door de spanningskolom te gaan, zie
fig. 4. Vervolgens gaat de rolfilm door de geleidingspaal van de spuitmond.
Zie fig. 5.
2.2.3 Trek de rolfolie dicht genoeg en laat deze precies tussen de hete
sealwielen raken om ervoor te zorgen dat wanneer u op de startknop drukt,
de machine de folie kan uittrekken tot aan de voorste trekwielen en soepel
luchtkussens kan maken. Zie fig. 6,7.
2.2.4 voor een betere filmblazing, gebruik een schaar om de hoek van de
filmuitlaatmond te knippen voor gebruik. Zie fig.12
5
12
2.3 Werking
2.3.1 Sluit de elektrische voeding aan en druk op de aan/uit-schakelaar,
zie figuur 8. Nadat u de machine hebt ingeschakeld, gaat het rode
lampje van de aan/uit-indicator branden en begint het groene lampje te

- 4 -
knipperen. De machine is bezig met verwarmen (de opwarmtijd
bedraagt ongeveer 4 minuten).
2.3.2 Wanneer het groene lampje continu brandt, betekent dit dat de
machine klaar is om luchtkussens te maken. Druk op de
start/stopknop om te starten. Draai aan de ventilatorregelknop om de
luchtdichtheid aan te passen.
2.3.3 Wanneer u klaar bent met het maken van het luchtkussen, drukt u
nogmaals op de start/stop-knop, de machine stopt onmiddellijk. Er is
een perforatielijn op de film om de benodigde lengte af te scheuren
voor de vereisten van de gebruiker. (Als u de filmrol niet hoeft te
vervangen, scheurt u de kussenfilm af aan het uiteinde van de machine;
als u de filmrol moet vervangen, scheurt u de kussenfilm af voor de
verwarmingsrol en maakt u vervolgens het luchtkussen van de film die
na de verwarmingsrol wordt gehouden.)
2.3.4 Als u de machine blijft gebruiken, drukt u op de start/stop-knop
wanneer de machine-indicator continu brandt. Een pauze van meer
dan 30 seconden kan ertoe leiden dat de film in de hete rollen in een
hete plek breekt. Dit is een normale toestand, aangezien de hete rol
altijd in een verwarmingsproces zit.
2.3.5 Als u het apparaat wilt uitschakelen, controleer dan of de
stroomindicator continu brandt. Scheur de folieperforatie voor het
luchtmondstuk af en druk op de start-/stopknop om de folie volledig uit
te werpen. Druk nogmaals op de start-/stopknop om het apparaat te
stoppen. Vervolgens kunt u de stroomschakelaar uitschakelen.
2.4 Slaapstandfunctie
Na 90 minuten continu werken of 30 minuten niet gebruiken, gaat
de machine in een slaapstand. Elke slaapstand-aftelling wordt
geactiveerd door op de start/stop-knop te drukken, en elke keer
dat u drukt, wordt de vorige aftelling gereset en start de volgende
cyclus van 2 uur of 30 minuten niet gebruiken. Tijdens de
slaapstand knippert het rode lampje langzaam, gaat het groene
start/stop-lampje uit en stoppen de motor, luchtblazer en het
verwarmingssysteem allemaal met werken. Door nogmaals op de
- 5 -
start/stop-knop te drukken, wordt de machine gewekt, gaat het
rode lampje branden en knippert het groene lampje. Na 4 minuten
opwarmtijd totdat het groene lampje constant brandt, drukt u op de
start/stop-knop om de machine normaal te gebruiken.
Let op: De machine moet ongeveer 4 minuten
opwarmen voor elke koude start. Wij raden aan om de
rolfilm direct te installeren nadat u de aan/uit-schakelaar
hebt aangezet.
45. Elektrische veiligheid
3.1 Plaats het apparaat dicht bij het stopcontact.
3.2 Zorg ervoor dat de spanning voldoet aan de elektriciteitsvereisten van de
machine.
3.3 Elk verlengsnoer dat u gebruikt, moet voldoen aan het vermogen van het
apparaat.
3.4 Gebruik het apparaat niet als het netsnoer beschadigd is.
3.5 Reparaties en onderhoud dienen te worden uitgevoerd door een
gekwalificeerde servicetechnicus.
46. Productstructuur

- 6 -
A. Toevoerrol B. Luchtdichtheidsinstelknop C. Spanningskolom
D. Stroomindicator (rode indicator) E. Starter/stopindicator (groene indicator)
F.Start-/stopknop G.Verwarmingsrol H.Luchtsproeier
I. Stroomschakelaar J. Stroomleiding
47. Belangrijkste parameters
31. Productnaam: Luchtkussenmachine
32. Model:YE300
33. Nominale waarde(n) : AC 120 V 6,0 Hz 120 W
34. Nominale waarde(n): AC120V 60Hz 120W
35. Afdichtingssnelheid: 2-2,2 m/min
Opwarmtijd: 4 min
48. Vervanging van de snijder
Stappen voor het vervangen van het snijblad van de luchtsproeier
6.1 Gebruik de schroevendraaier om de schroeven van de vaste luchtsproeier te
verwijderen. Zie fig. 9A.
6.2 Luchtmondstuk eruit trekken. Zie fig. 9B.
6.3 Verwijder de bevestigingsschroeven van het luchtmondstuk. Zie fig. 10.
6.4 Vervang het snijblad door een nieuw mesje (let op: wees voorzichtig, want het
scherpe mesje kan uw vingers snijden).

- 7 -
6.5 Plaats het luchtmondstuk terug en gebruik de schroevendraaier om de 2
bevestigingsschroeven stevig vast te draaien. Zie fig. 9,10.
Voorzichtigheid: Vervang het snijblad bij langdurig gebruik, zodat
het mes de folie goed kan afsnijden.
49. Behouden
6.1 Haal de stekker uit het stopcontact tijdens onderhoud
6.2 Reinig hete afdichtingen en rollen regelmatig. Zie figuur 11.
6.3 Zorg ervoor dat er geen vastgelopen folie of vuil bij het luchtmondstuk of
snijblad zit
6.5 Maak het luchtmondstuk schoon als het mes niet meer scherp is.


- 2 -
Teknisk support och e-garanticertifikat
www.vevor.com/support
LUFTKUDDEMASKIN
ANVÄNDARMANUAL
MODELL: YE300
We continue to be committed to provide you tools with competitive price.
"Save Half", "Half Price" or any other similar expressions used by us only represents an
estimate of savings you might benefit from buying certain tools with us compared to the major
top brands and does not necessarily mean to cover all categories of tools offered by us. You
are kindly reminded to verify carefully when you are placing an order with us if you are
actually saving half in comparison with the top major brands.

- 1 -
Modell: YE300
Obs: Den faktiska produkten du får avgör dess utseende.
Have product questions? Need technical support? Please feel free to
contact us:
Technical Support and E-Warranty Certificate
www.vevor.com/support
NEED HELP? CONTACT US!
This is the original instruction, please read all manual instructions
carefully before operating. VEVOR reserves a clear interpretation of our
user manual. The appearance of the product shall be subject to the
product you received. Please forgive us that we won't inform you again if
there are any technology or software updates on our product.
AIR CUSHION
MACHINE
- 2 -
air
blower
VIKTIGA SÄKERHETSINSTRUKTIONER
Varning - För att minska risken för skada måste användaren läsa
bruksanvisningen noggrant.
Växelström
Denna symbol, placerad före en säkerhetskommentar, indikerar en
slags försiktighetsåtgärd, varning eller fara. Att ignorera denna
varning kan leda till en olycka. För att minska risken för skada,
brand eller elstöt, följ alltid rekommendationerna nedan .
Fara!
Risk för personskador eller miljöskador! Risk för elektriska stötar!
Risk för personskada genom elektriska stötar!
50. Försiktighet
Läs noga före användning.
1.1 Ta försiktigt ut maskinen ur förpackningen.
1.2 Ställ maskinen i det rena och platta arbetsbordet,
Se fig.A.
1.3 Se till att luftfläkten inte har fastnat och se fig 1.
1.4 Undvik att damm rinner in i maskinen och luftfläkten.
51. Drift
2.1 Anslut rätt ström. Se fig.2.
2.2 Installation av film foll.
2.2.1 Lägg rullfilmen på matningsvalsen ordentligt. Det finns ett spår i
rullfilmen. Den ska vara i linje med den utskjutande delen av
matarvalsen. Se fig.3.
2.2.2 Rullfilmen följer pilens riktning för att passera genom
- 3 -
spänningskolonnen, Se fig.4. , sedan passerar rullfilmen genom munstyckets
styrstolpe. Se fig.5.
2.2.3 Om du drar rullfilmen så att den är tillräckligt nära och rör precis mellan
de varma tätningshjulen för att säkerställa att när du trycker på startknappen,
kan maskinen dra ut filmen tills den når de främre draghjulen och börja göra
luftkudde smidigt. Se fig.6,7.
2.2.4 för bättre filmblåsning, använd en sax för att klippa av hörnet på filmens
extrymun innan användning. Se fig.12
5
12
2.3 Drift
2.3.1 Ansluta strömmen och tryck på strömbrytaren, Se fig.8. Efter att
maskinen har slagits på tänds den röda lampan för strömindikatorn och
den gröna lampan börjar blinka, maskinen är under uppvärmning
(uppvärmningstiden cirka 4 minuter).
2.3.2 När grönt ljus lyser med fast sken, vilket betyder att maskinen är
redo att tillverka luftkudde, tryck på start/stopp-knappen för att starta;
vrid fläktkontrollen för att justera luftdensiteten.
2.3.3 När du är klar med att göra luftkudde, tryck på
start/stopp-knappen igen, maskinen stannar omedelbart. Det finns en
perforeringslinje på filmen för att riva av den nödvändiga längden för
användarens krav. (Om du inte behöver byta filmrullen, vänligen riv av

- 4 -
kuddfilmen på maskinens ändsida; Byt filmrullen om det behövs, riva ta
bort kuddfilmen före uppvärmningsvalsen och gör sedan luftkudden av
filmen som hålls efter uppvärmningsvalsen.)
2.3.4 Om du fortsätter att använda maskinen, tryck på
start/stopp-knappen när maskinindikatorn lyser med fast sken. Paus i
mer än 30 sekunder kan orsaka film i heta valsar i ett hot spot-brott.
Detta är ett normalt tillstånd eftersom varmvalsen alltid befinner sig i en
uppvärmningsprocess.
2.3.5 Om du vill stänga av, se till att strömindikatorn lyser med fast sken,
riv av filmperforeringen framför luftmunstycket och tryck på
start/stopp-knappen för att mata ut filmen helt och tryck på
start/stopp-knappen igen för att stoppa maskinen kan du stänga av
strömbrytaren.
2.4 Vilolägesfunktion
Efter att ha fortsatt arbeta i 90 minuter eller utebliven användning i
30 minuter, går maskinen in i viloläge. Varje vilolägesnedräkning
utlöses genom att trycka på start/stopp-knappen, och varje
tryckning återställer föregående nedräkning och startar för nästa 2
timmars cykel eller utebliven användning på 30 minuter. Under
viloläget blinkar den röda lampan långsamt, start/stopp grönt ljus
släckt och motor, luftfläkt, värmesystem slutar fungera. Genom att
trycka på start/stopp-knappen igen kommer den att väcka
maskinen, den röda lampan tänds, grön lampa blinkar. Efter 4
minuters uppvärmningstid tills den gröna lampan lyser med fast
sken, tryck på start/stopp-knappen för att använda maskinen
normalt.
Varning: Maskinen behöver värmas upp cirka 4 minuter
för varje kallstart. Vi föreslår att du installerar rullfilmen
direkt efter att du har slagit på strömbrytaren.
- 5 -
52. Elsäkerhet
3.1 Placera maskinen nära eluttaget.
3.2 Se till att spänningen uppfyller maskinens elkrav.
3.3 Alla förlängningssladdar som används bör uppfylla maskinens märkeffekt.
3.4 Använd inte om nätsladden är skadad.
3.5 Reparation och service bör utföras av en kvalificerad servicetekniker.
53. Produktstruktur
A. Matningsrulle B. Inställningsratt för luftdensitet C. Spänningspelare
D. Strömindikator (röd indikator) E. Start-/stoppindikator (grön indikator)
F.Start-/stoppknapp G.Värmevals H.Luftmunstycke
I.Power Switch J.Power Line
- 6 -
54. Huvudparametrar
36. Produktnamn: Air Cushion Machine
37. Modell: YE300
38. Värde(n) : AC 120 V 6 0Hz 120W
39. Värde(n): AC120V 60Hz 120W
40. Tätningshastighet: 2-2,2m/min
Uppvärmningstid: 4min
55. Byte av fräs
Steg för byte av luftmunstyckesskärblad
6.1 Använd skruvmejseln för att ta bort skruvarna för fixeringsmunstycket. Se fig.
9A.
6.2 Dra ut luftmunstycket. Se fig. 9B.
6.3 Ta bort luftmunstyckets fixeringsskruvar. Se fig. 10.
6.4 Förnya det nya skärbladet (Varning: Var bara försiktig om ett vasst blad kan
skära dina fingrar).
6.5 Sätt tillbaka luftmunstycket och använd skruvmejseln för att skruva fast de två
fixeringsskruvarna. Se fig. 9,10.
Försiktighet: Förnya skärbladet vid långvarig användning, för att
säkerställa att bladet kan skära av filmen ordentligt.
56. Upprätthålla
6.1 Dra ur nätkontakten under underhåll
6.2 Rengör varma tätningar och rullar regelbundet. Se fig 11.
- 7 -
6.3 Se till att det inte finns någon film som har fastnat och att det inte finns smuts
vid luftmunstycket eller skärbladet
6.5 Rengör luftmunstycket när bladet inte är vasst.

