
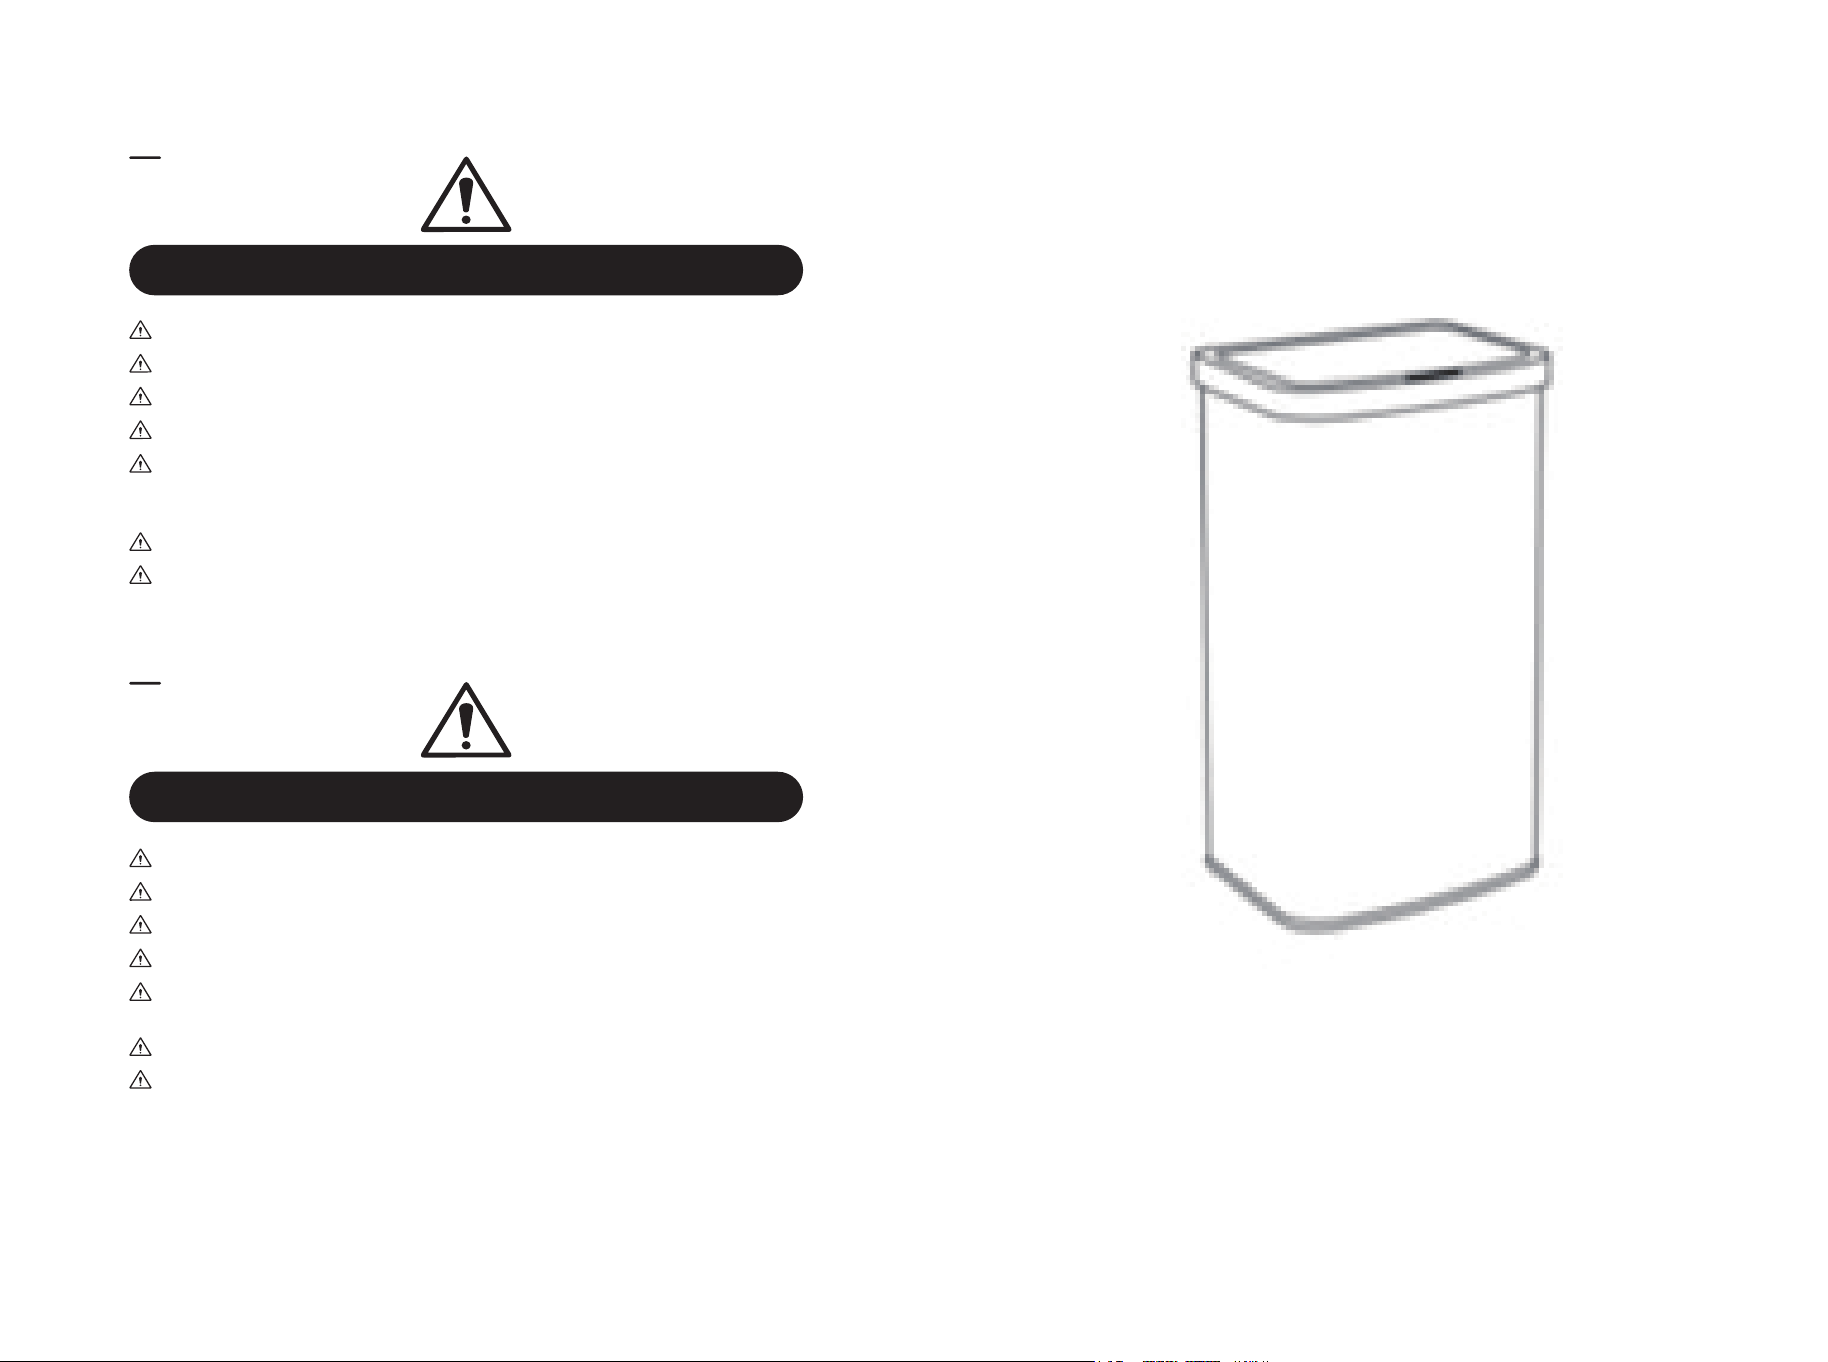
50L Stainless Steel Rectangular Motion Can
50L Edelstahl Rechteckiger Kanister Motion
50 L Poubelle à Capteur en Acier Inoxydable Rectangulaire
Basurero de Inducción Rectangular de Acero Inoxidable de 50L
50L Pattumiera Rettangolare in Acciaio Inox con Sensore
Automatyczny kosz na śmieci 50 l ze stali nierdzewnej
If you're having difficulty, our friendly
customer team is always here to help.
AUS:cs.au@costway.com
FRA:cs.fr@costway.com
DEU:cs.de@costway.com
ITA:cs.it@costway.com ESP:cs.es@costway.com
POL:sklep@costway.com
GBR:cs.uk@costway.com
DEU office: FDS GmbH, Neuer Höltigbaum 36, 22143 Hamburg, Deutschland
ITA office: Milano
FRA office: Saint Vigor d'Ymonville
POL office: GdańskGBR office: IpswichAUS office: TruganinaUSA office: Fontana
THIS INSTRUCTION BOOKLET CONTAINS IMPORTANT SAFETY INFORMATION. PLEASE READ AND KEEP FOR FUTURE REFERENCE.
GY10010
Before You Start
Please read all instructions carefully.
Retain instructions for future reference.
Separate and count all parts and hardware.
Read through each step carefully and follow the proper order.
We recommend that, where possible, all items are assembled near to the area in
which they will be placed in use, to avoid moving the product unnecessarily once
assembled.
Always place the product on a flat, steady and stable surface.
Keep all small parts and packaging materials for this product away from babies
and children as they potentially pose a serious choking hazard.
EN
DE
Bitte lesen Sie alle Anweisungen sorgfältig durch.
Bewahren Sie die Anweisungen zum zukünftigen Verwendung auf.
Überprüfen Sie, ob alle Teile und Zubehörteile vorhanden sind.
Lesen Sie jeden Schritt sorgfältig durch und befolgen Sie die richtige Reihenfolge.
Wir empfehlen, alle Teile möglichst in der Nähe des Aufstellungsortes zu
montieren, um unnötige Bewegungen nach der Montage zu vermeiden.
Stellen Sie den Artikel immer auf eine ebene, feste und stabile Fläche.
Halten Sie alle kleinen Teile und Verpackungsmaterialien fern von Babys und
Kindern, ansonsten besteht Erstickungsgefahr.
Vor dem Beginnen
FR
Veuillez lire attentivement toutes les instructions.
Conservez les instructions pour vous y référer ultérieurement.
Vérifiez toutes les pièces et les accessoires.
Lisez attentivement chaque étape et suivez l'ordre correct.
Nous recommandons que, dans la mesure du possible, tous les produits soient
assemblés à proximité de la zone où ils seront utilisés, afin d'éviter tout
déplacement inutile du produit une fois assemblé.
Placez toujours le produit sur une surface plane et stable.
Conservez toutes les petites pièces de ce produit et les matériaux d'emballage
hors de portée des bébés et des enfants, car ils pourraient présenter un risque
d'étouffement.
Lea atentamente todas las instrucciones.
Conserve las instrucciones para futuras consultas.
Separe y cuente todas las piezas y los accesorios.
Lea detenidamente cada paso y siga el orden correcto.
Recomendamos que, siempre que sea posible, todos los elementos se monten
cerca de la zona en la que se van a utilizar, para evitar mover el producto
innecesariamente una vez montado.
Coloque siempre el producto sobre una superficie plana, estable y firme.
Mantenga todas las piezas pequeñas y los materiales de embalaje de este
producto lejos de los bebés y los niños, ya que pueden representar un grave
riesgo de asfixia.
ES
Avant de Commencer
Antes de Empezar
02 03
Si prega di leggere attentamente tutte le istruzioni.
Conservare le istruzioni per riferimento futuro.
Separare e contare tutte le parti e gli accessori.
Leggere attentamente ogni passo e seguire l'ordine corretto.
Si consiglia, ove possibile, di assemblare tutti gli articoli vicino alla zona in cui
verranno posti in uso, per evitare di spostare inutilmente il prodotto una volta
assemblato.
Posizionare sempre il prodotto su una superficie piana, stabile.
Tenere tutte le piccole parti e i materiali di imballaggio di questo prodotto lontano
dalla portata di neonati e bambini, in quanto possono costituire un serio pericolo
di soffocamento.
Zapoznaj się z instrukcją.
Zachowaj instrukcję do wglądu.
Posortuj części i upewnij się, że zestaw jest kompletny.
Zapoznaj się ze sposobem montażu i postępuj zgodnie z instrukcją.
Zalecamy, aby montaż odbywał się możliwie najbliżej miejsca docelowego
położenia produktu, aby uniknąć niepotrzebnego przesuwania.
Upewnij się, że produkt znajdzie się na płaskiej i stabilnej po wierzchni.
Upewnij się, że materiały wykorzystane podczas pakowania produktu oraz jego
elementy znajdują się poza zasięgiem dzieci, gdyż stwarzają potencjalne ryzyko
zadławienia.
IT
PL
Prima di Iniziare
Zanim Zaczniesz
04 05
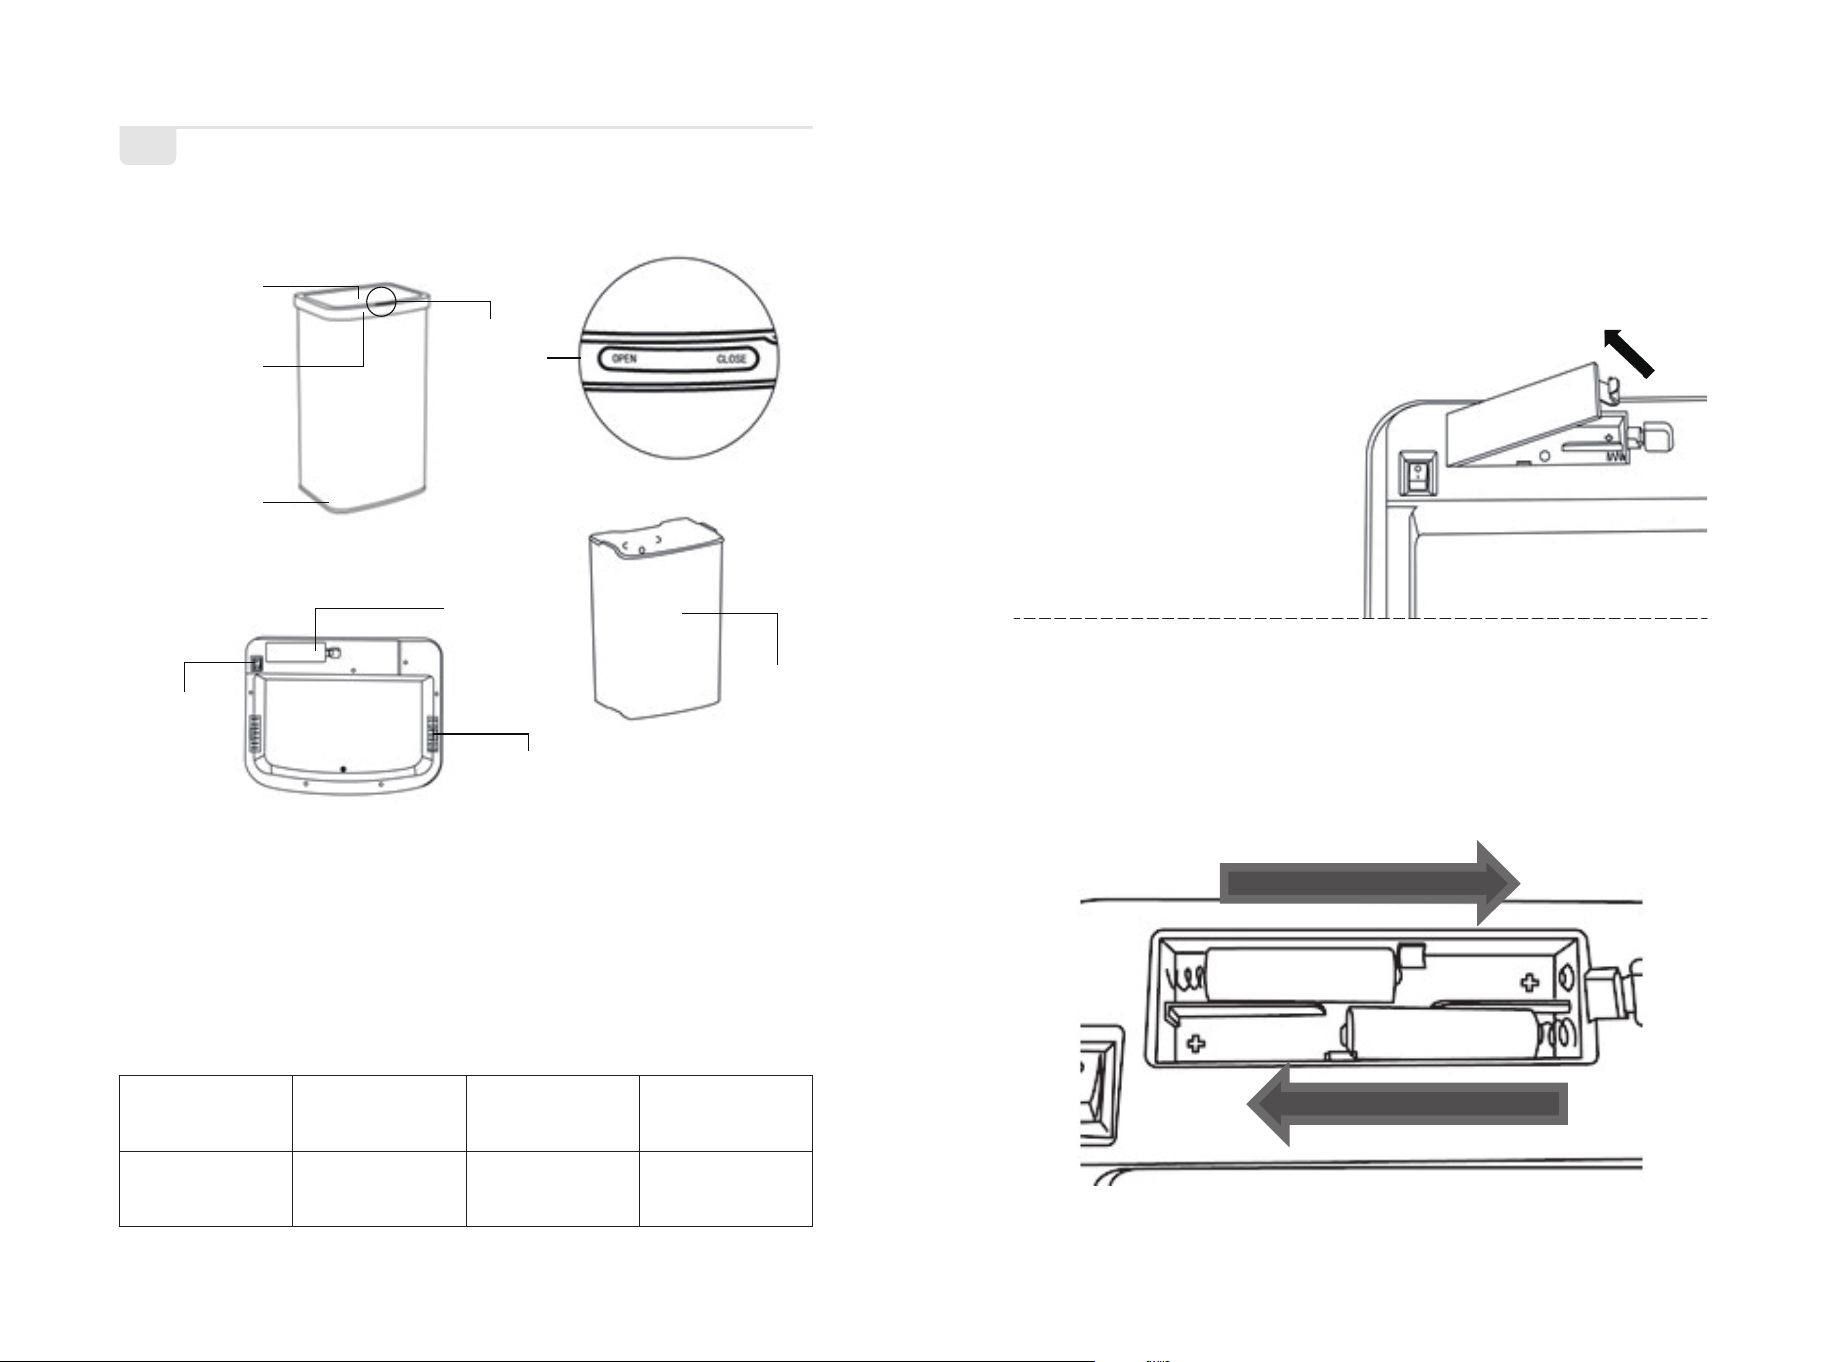
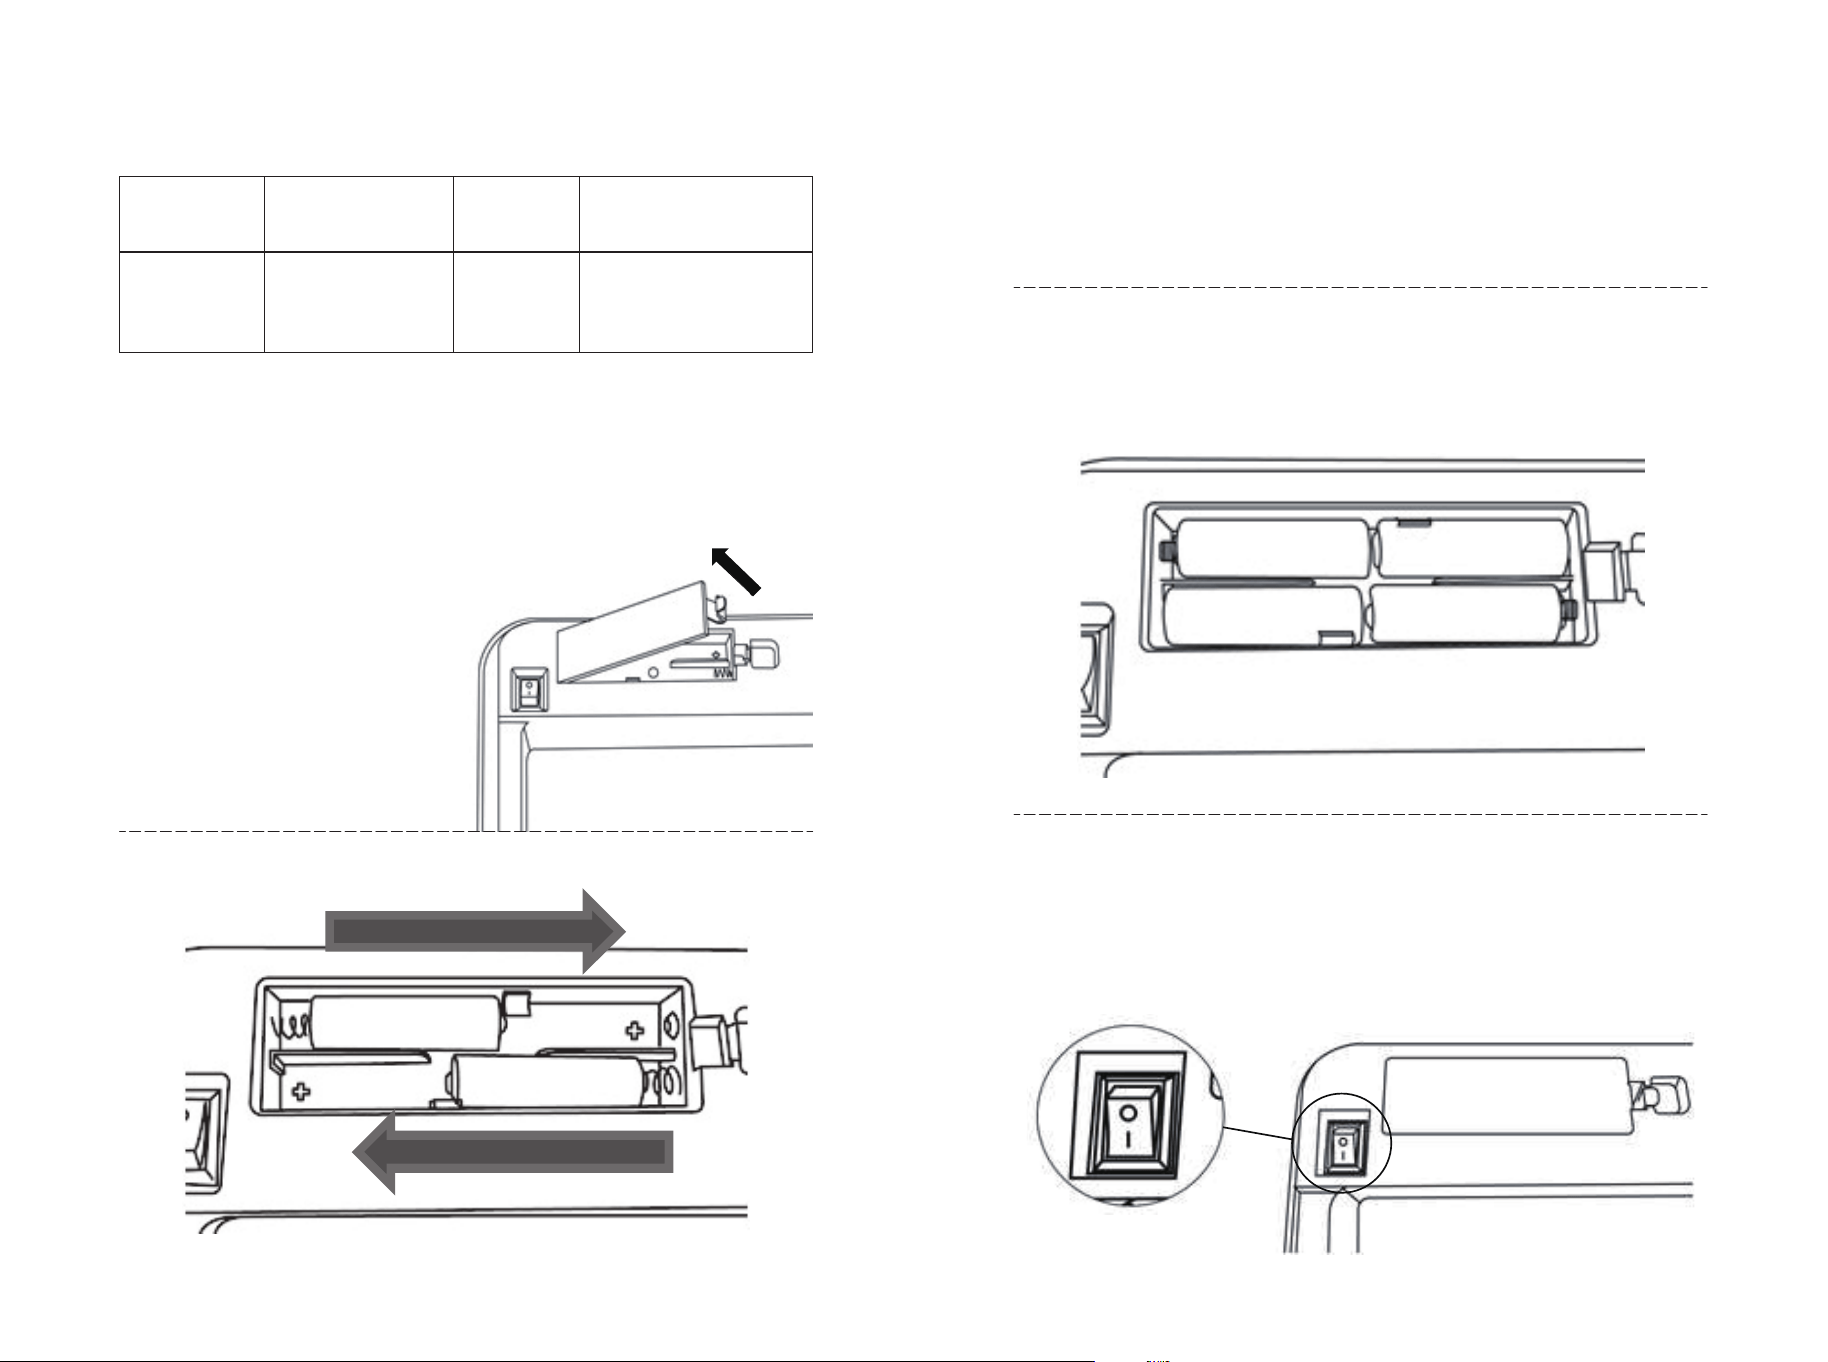
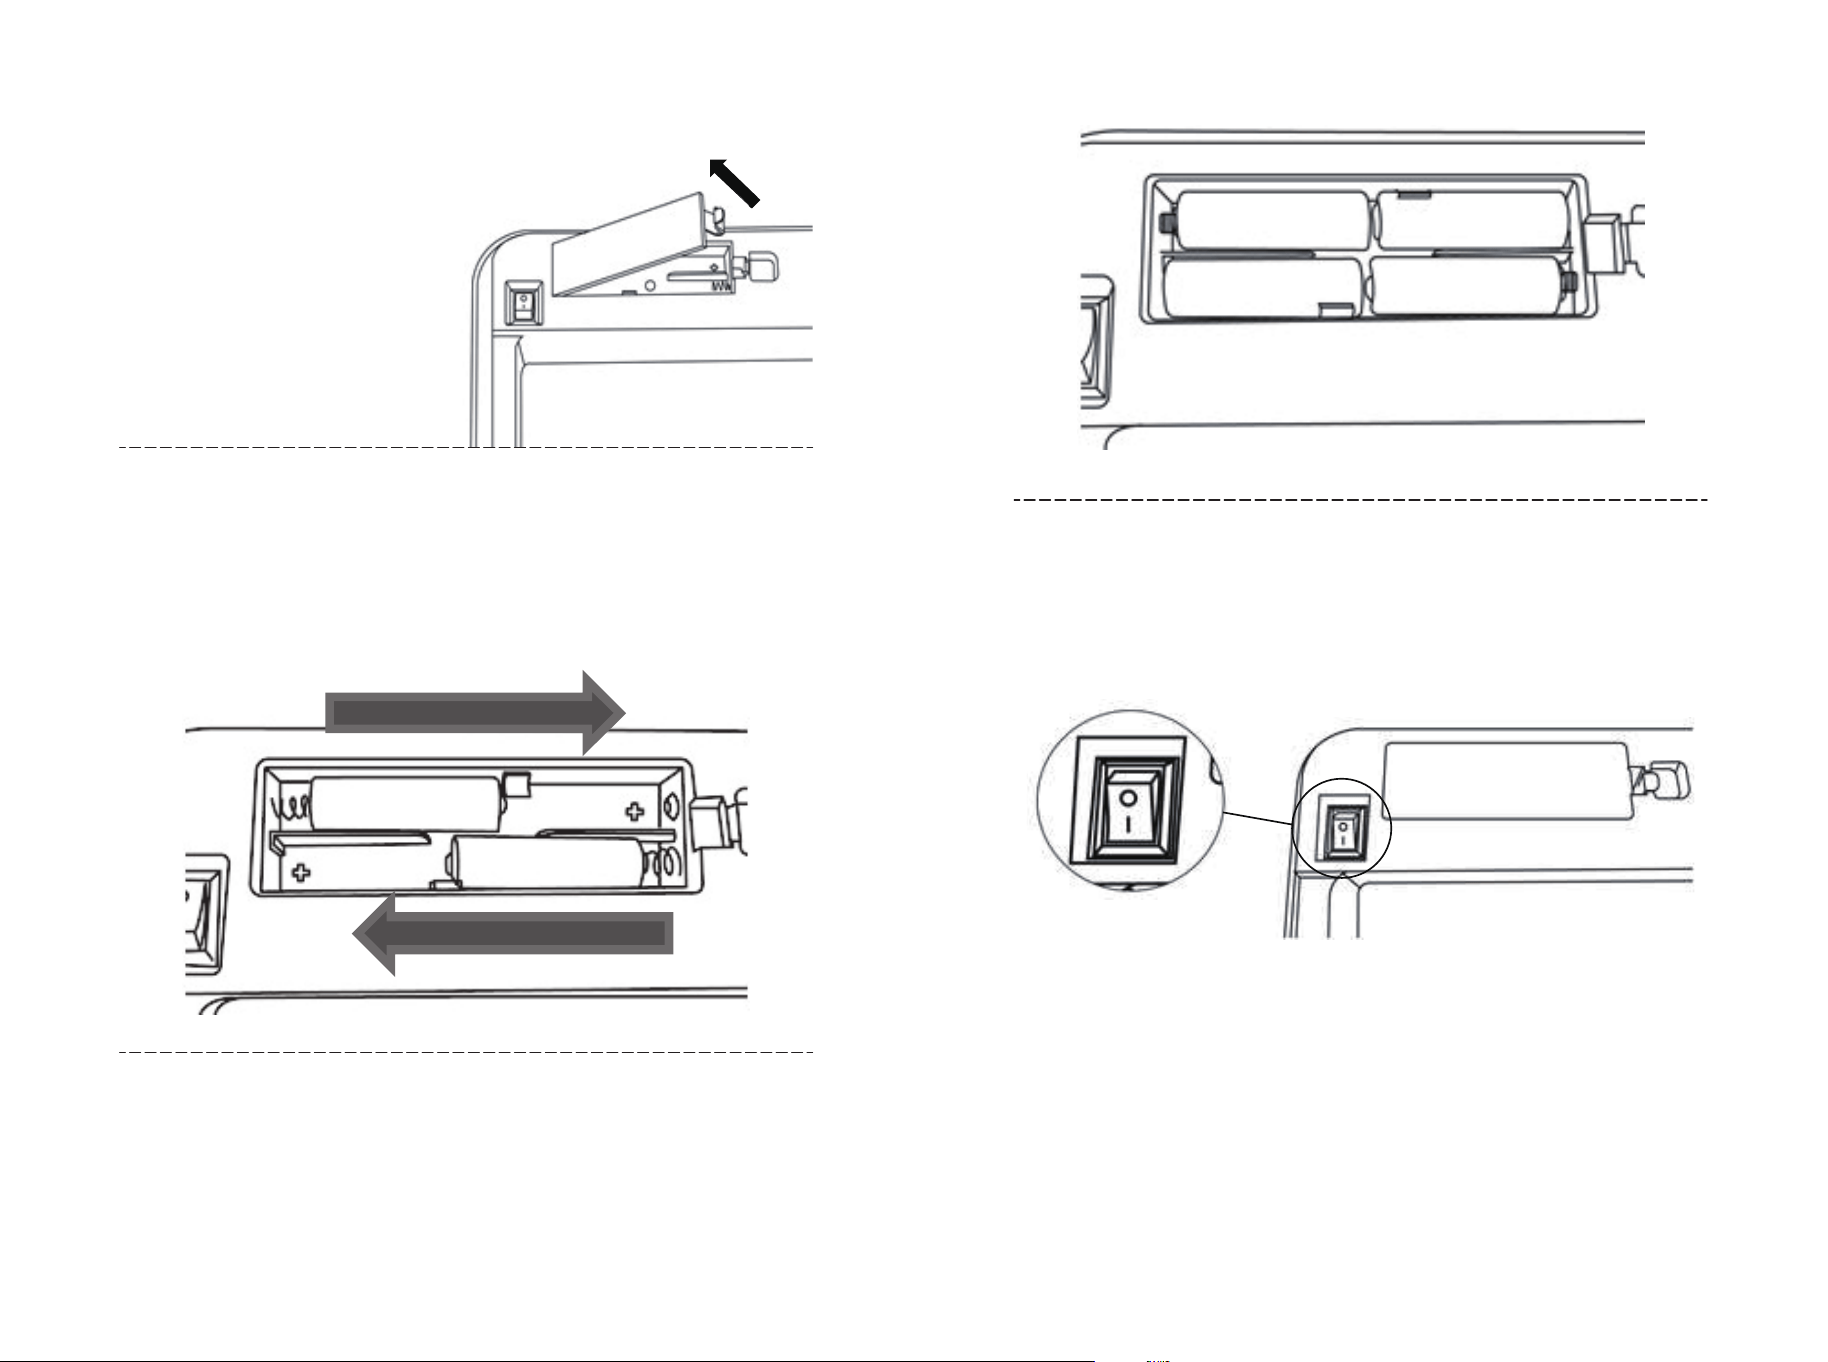
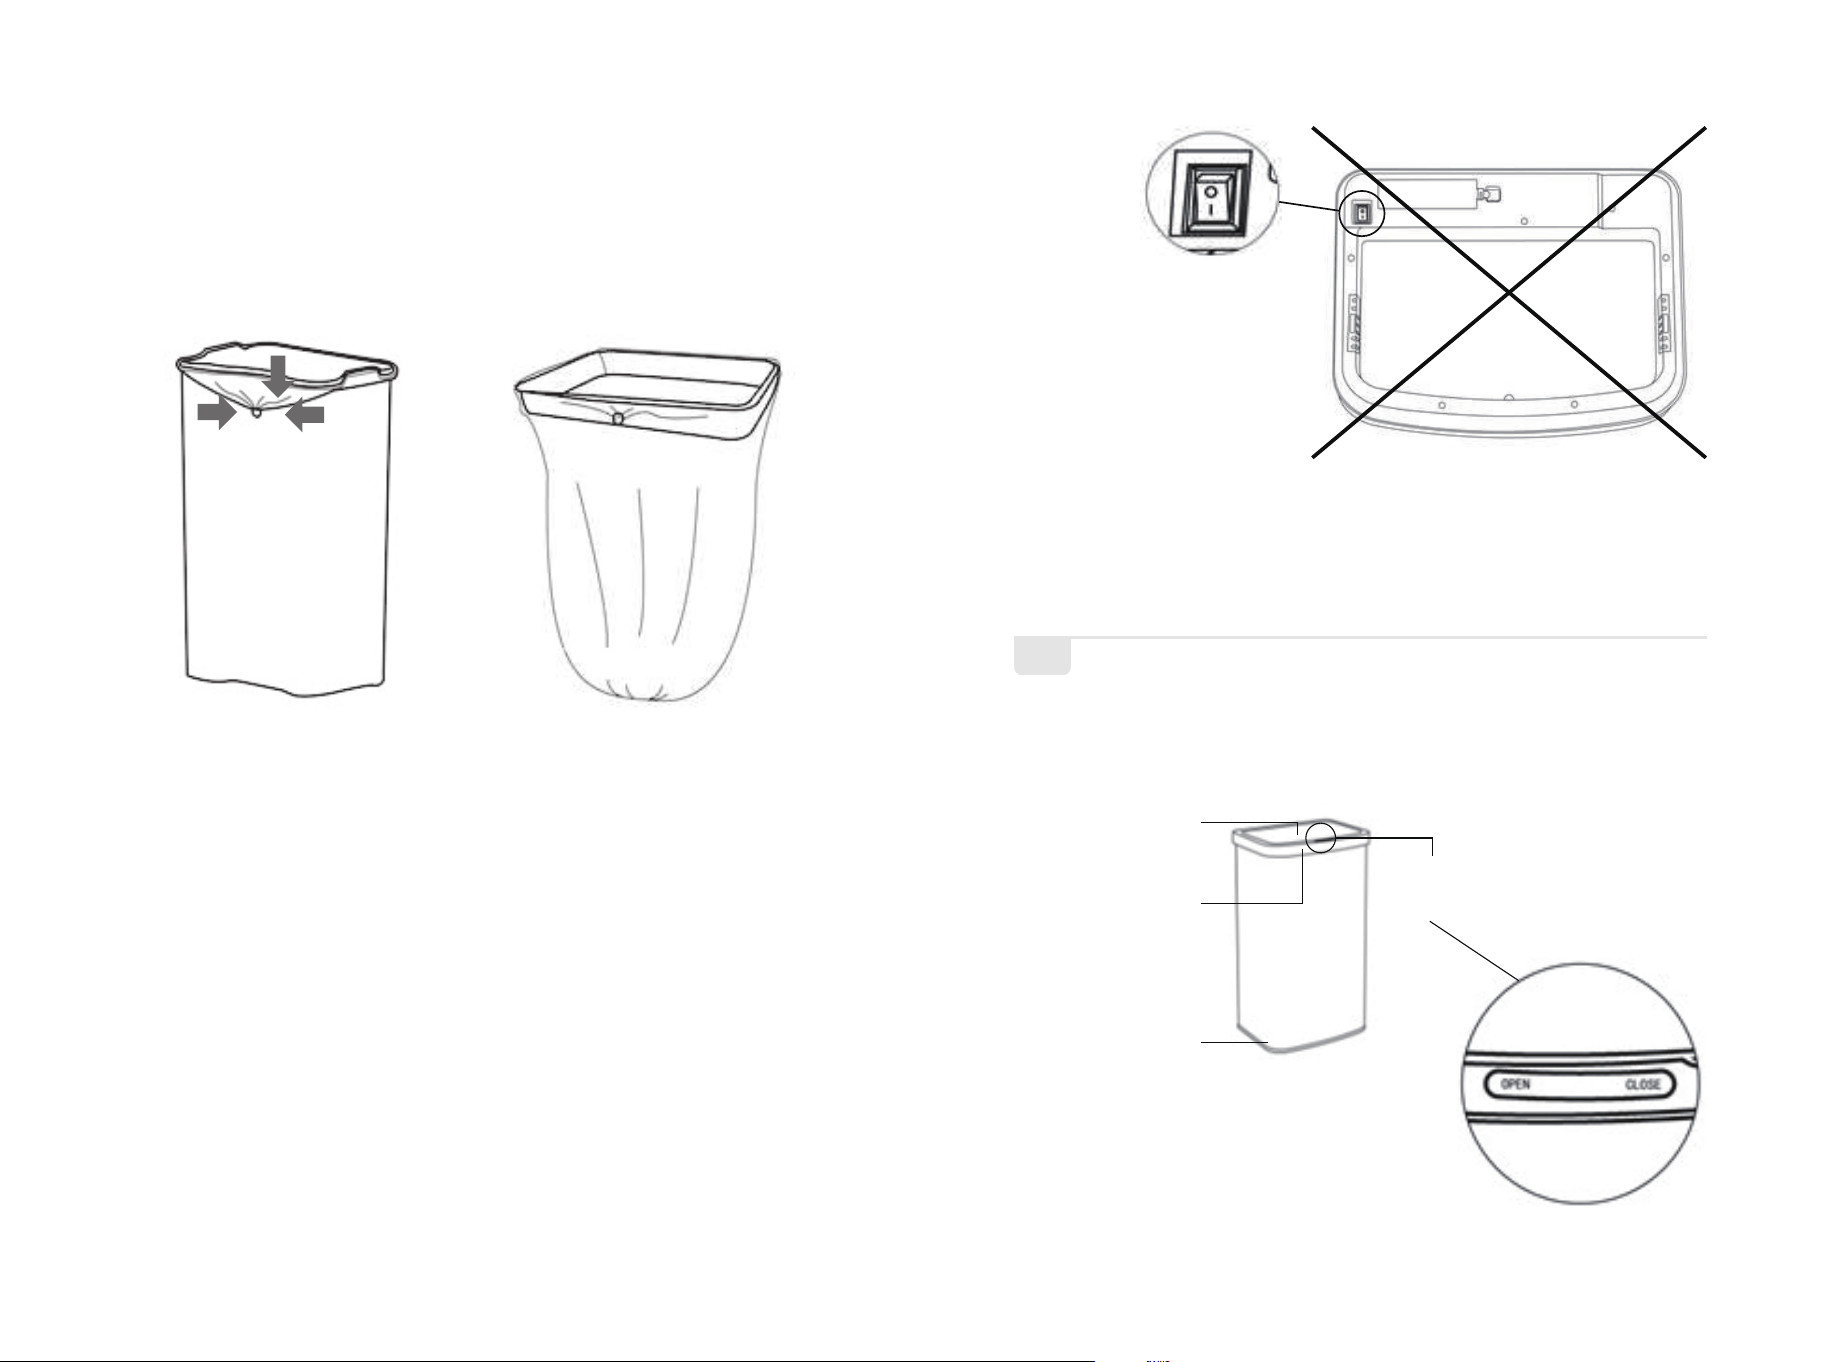
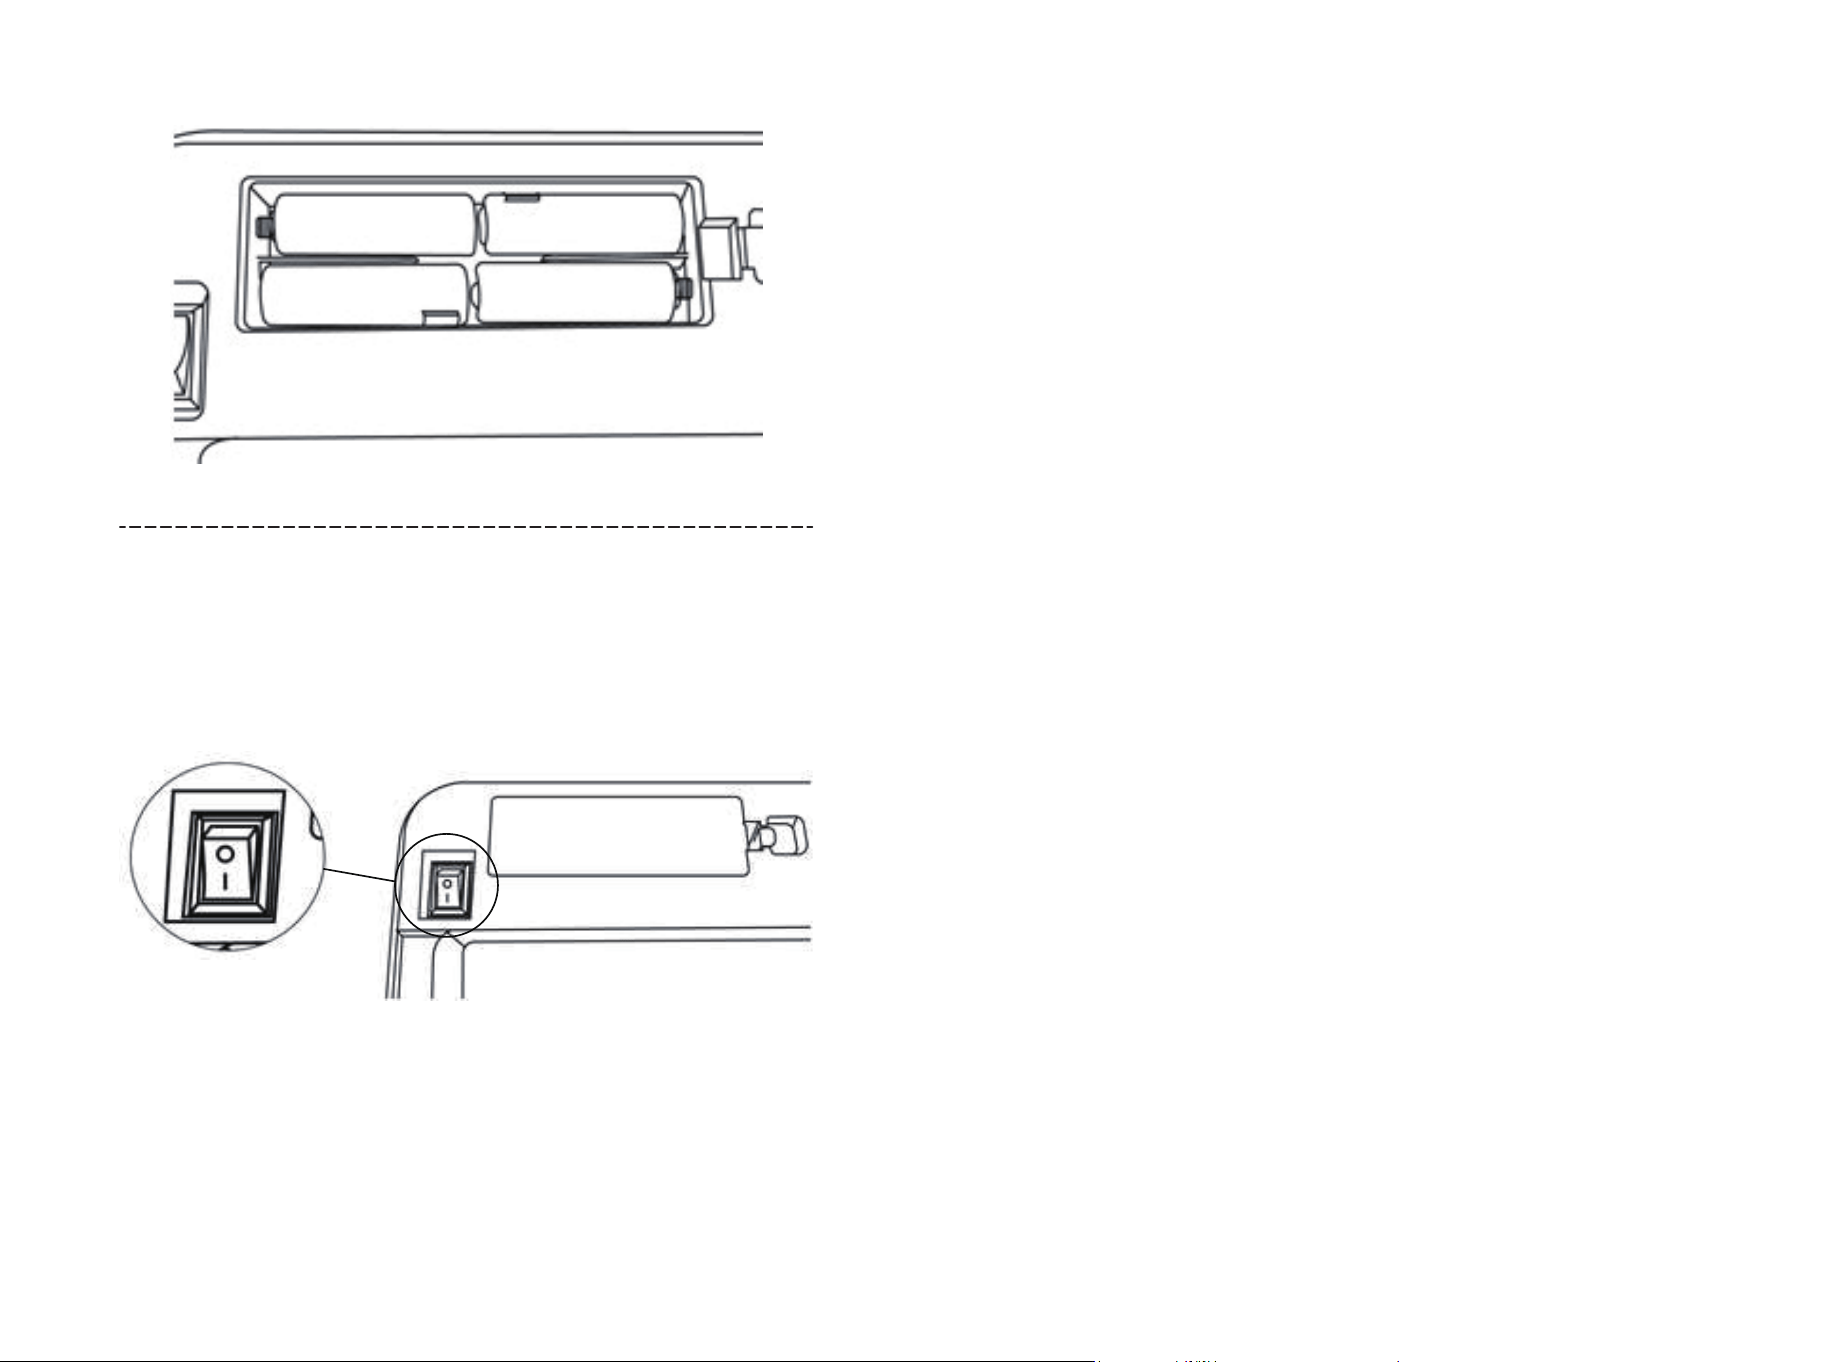
Push right
Push left
- AA +
+ AA -
Note: if the above parameters are changed , please take the real
object as the standard.
Battery installation
Step 1:
Open the battery cover.
Step 2:
First install a No. 5 battery (AA battery) in the upper and lower
battery compartments according to the requirements of positive
and negative poles, and then push the battery to the bottom of the
positive pole of the battery compartment.
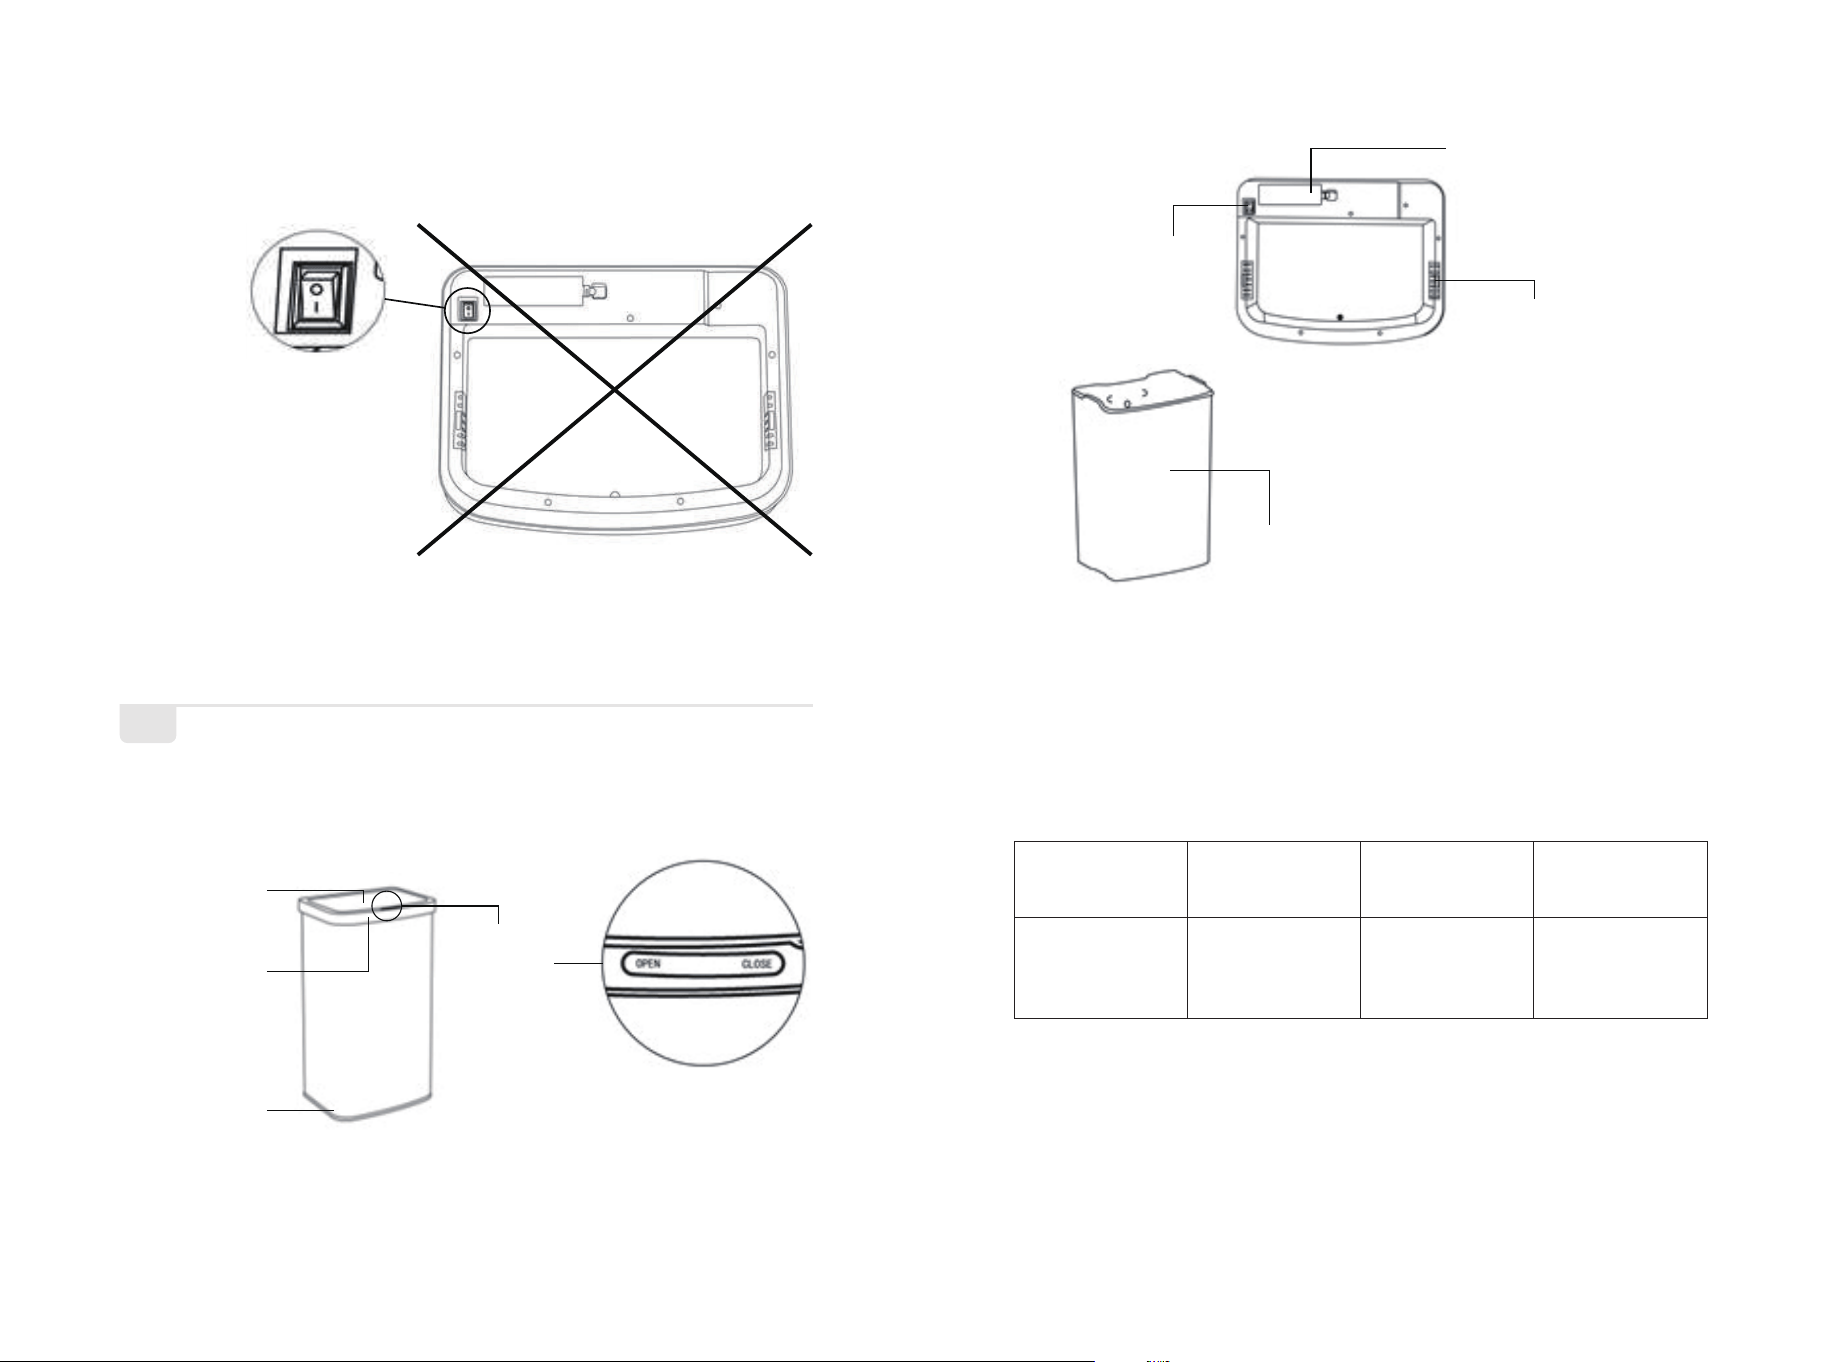
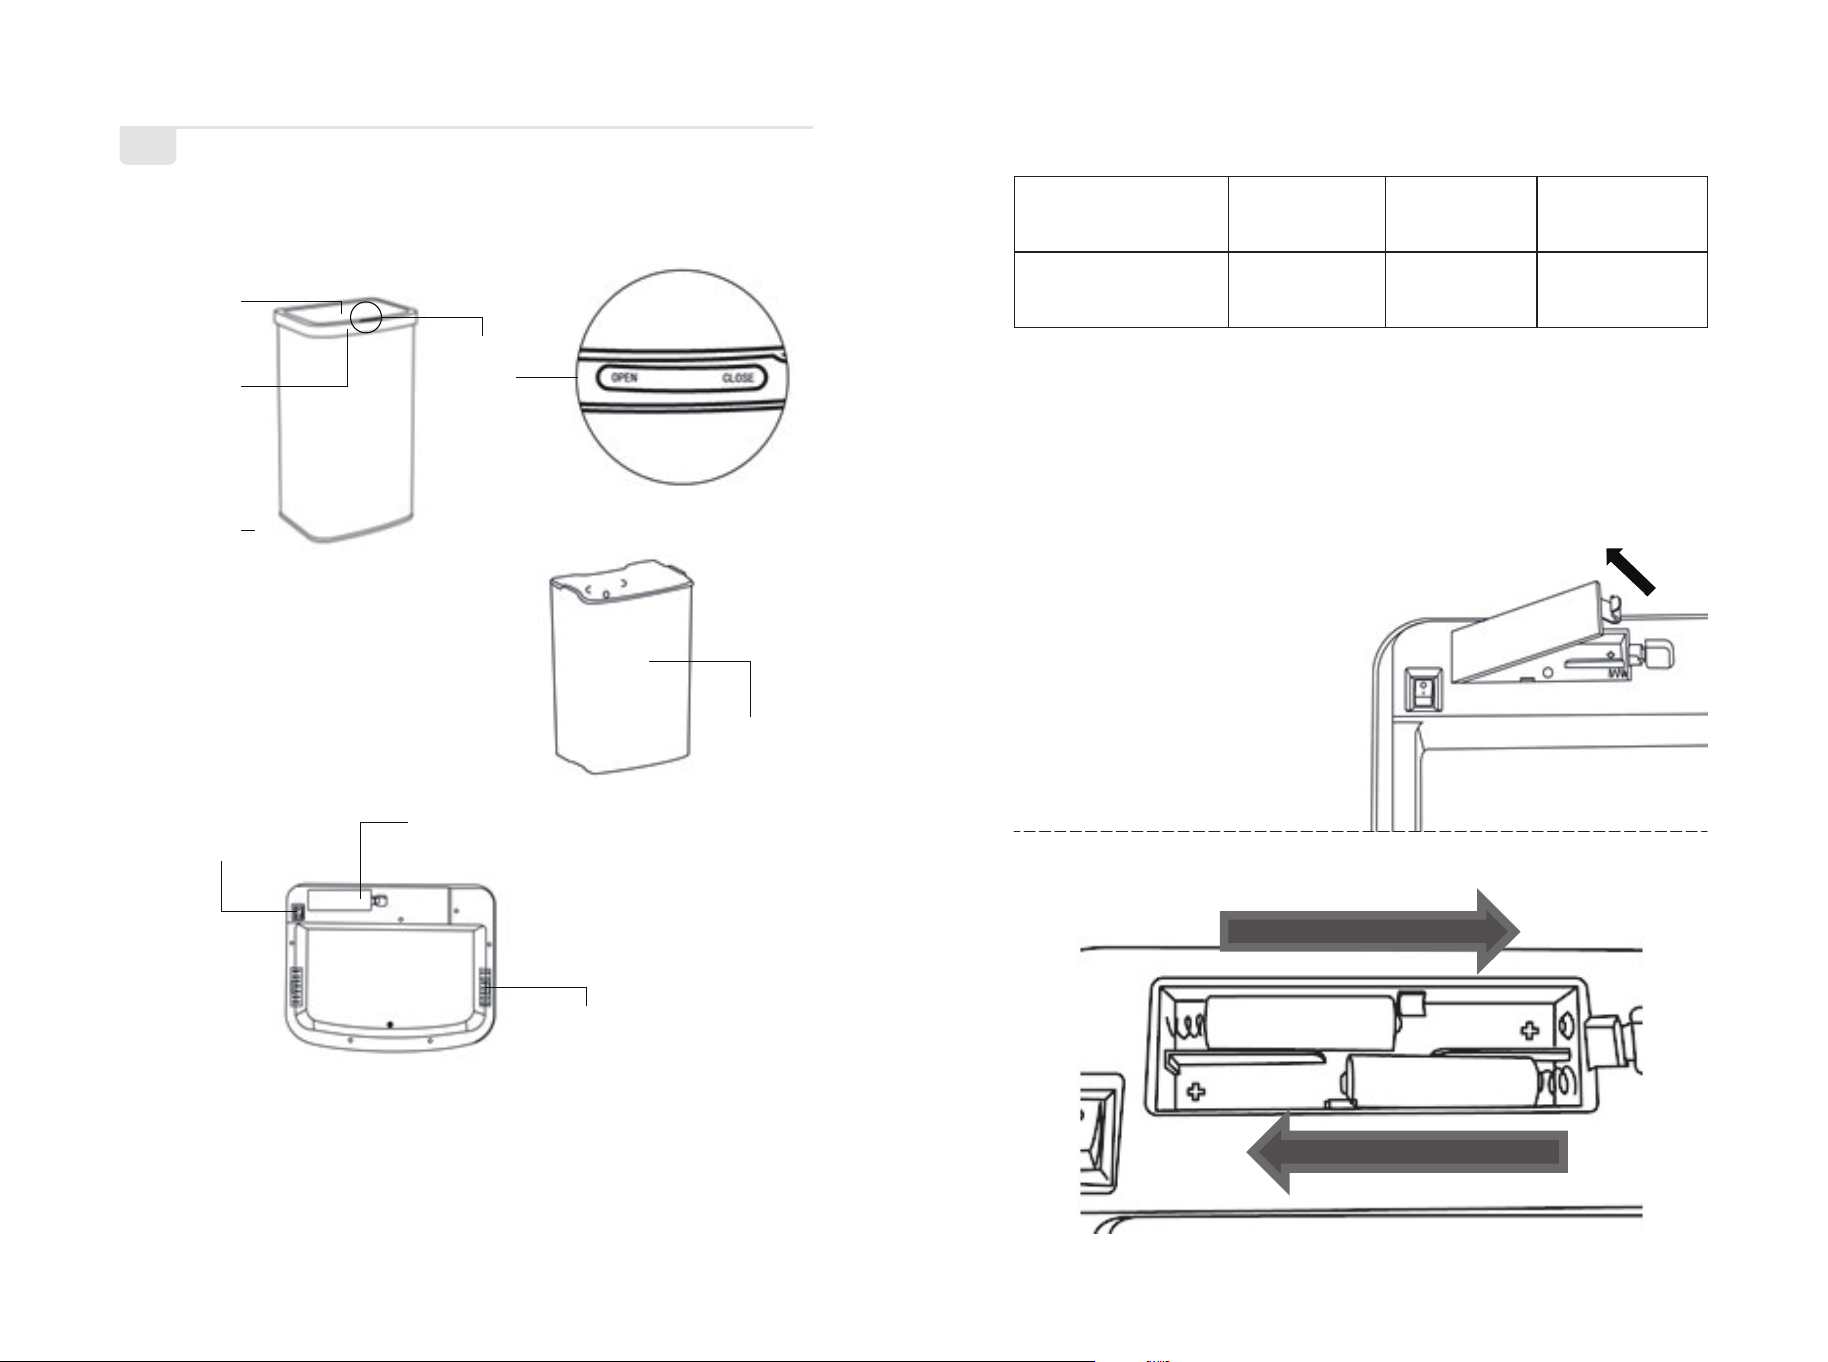
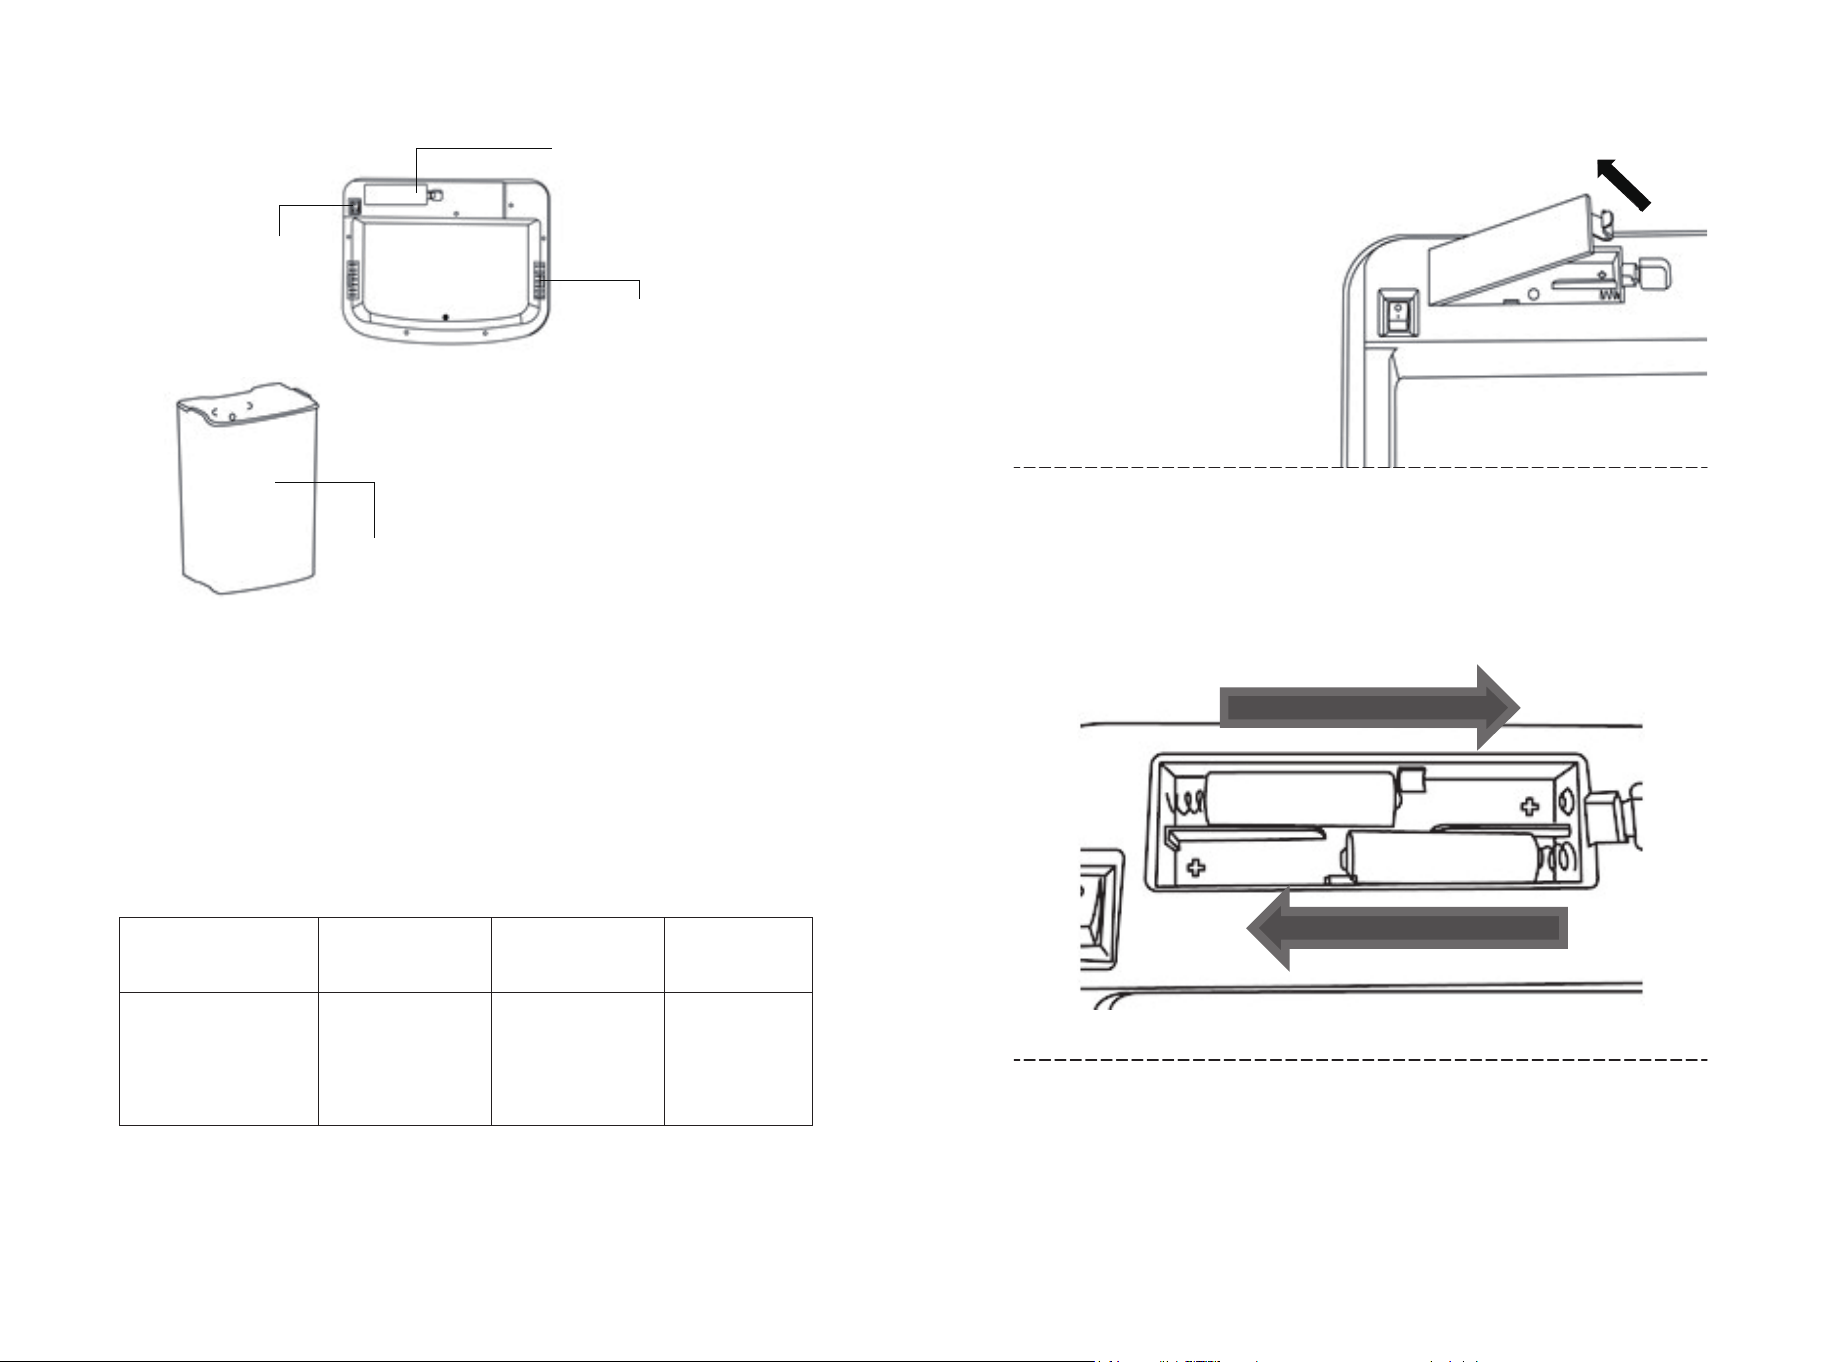
COMPONENT NAME
EN
Note: if the product structure diagram changes without notice,
please take the real object as the standard.
LID
SENSOR
BOTTOM
BASE
CONTROL
PANEL
INNER
BUCKET
POWER
SWITCH
BATTERY
HOLDER
ACTIVATED
CARBON
COTTON BOX
SPECIFICATION PARAMETERS
Item no.
Rated
voltage
volume
Sensing
distance
40/50/60L
Sensor Bin
6V
40/50/60L
≤30cm
06 07
1. This product uses infrared induction technology to control the
opening and closing of the barrel cover. When the product is
powered on, the blue indicator light will be on for 2 seconds. After
the indicator light is off, there will be an automatic cover closing
action, that is, it will enter the standby state.
2. Normal sensing function: the sensing area is about 30cm above
the sensing panel. When an object or hand is placed in the
sensing area, the barrel cover will automatically open. At this time,
the indicator light flashes. After 5 seconds, the barrel cover will
automatically close. At this time, the indicator light goes out and
the product enters the standby state.
3. Touch opening and closing function: when the product is in
standby mode, press the open key on the panel by hand, the
barrel cover will open automatically, and the indicator will flash
once every 5 seconds. At this time, the sensing function does not
work. You need to press the close key on the panel by hand to
close the cover, or wait for 10 minutes, the barrel cover will close
automatically, and the product will enter standby mode again.
Function introduction
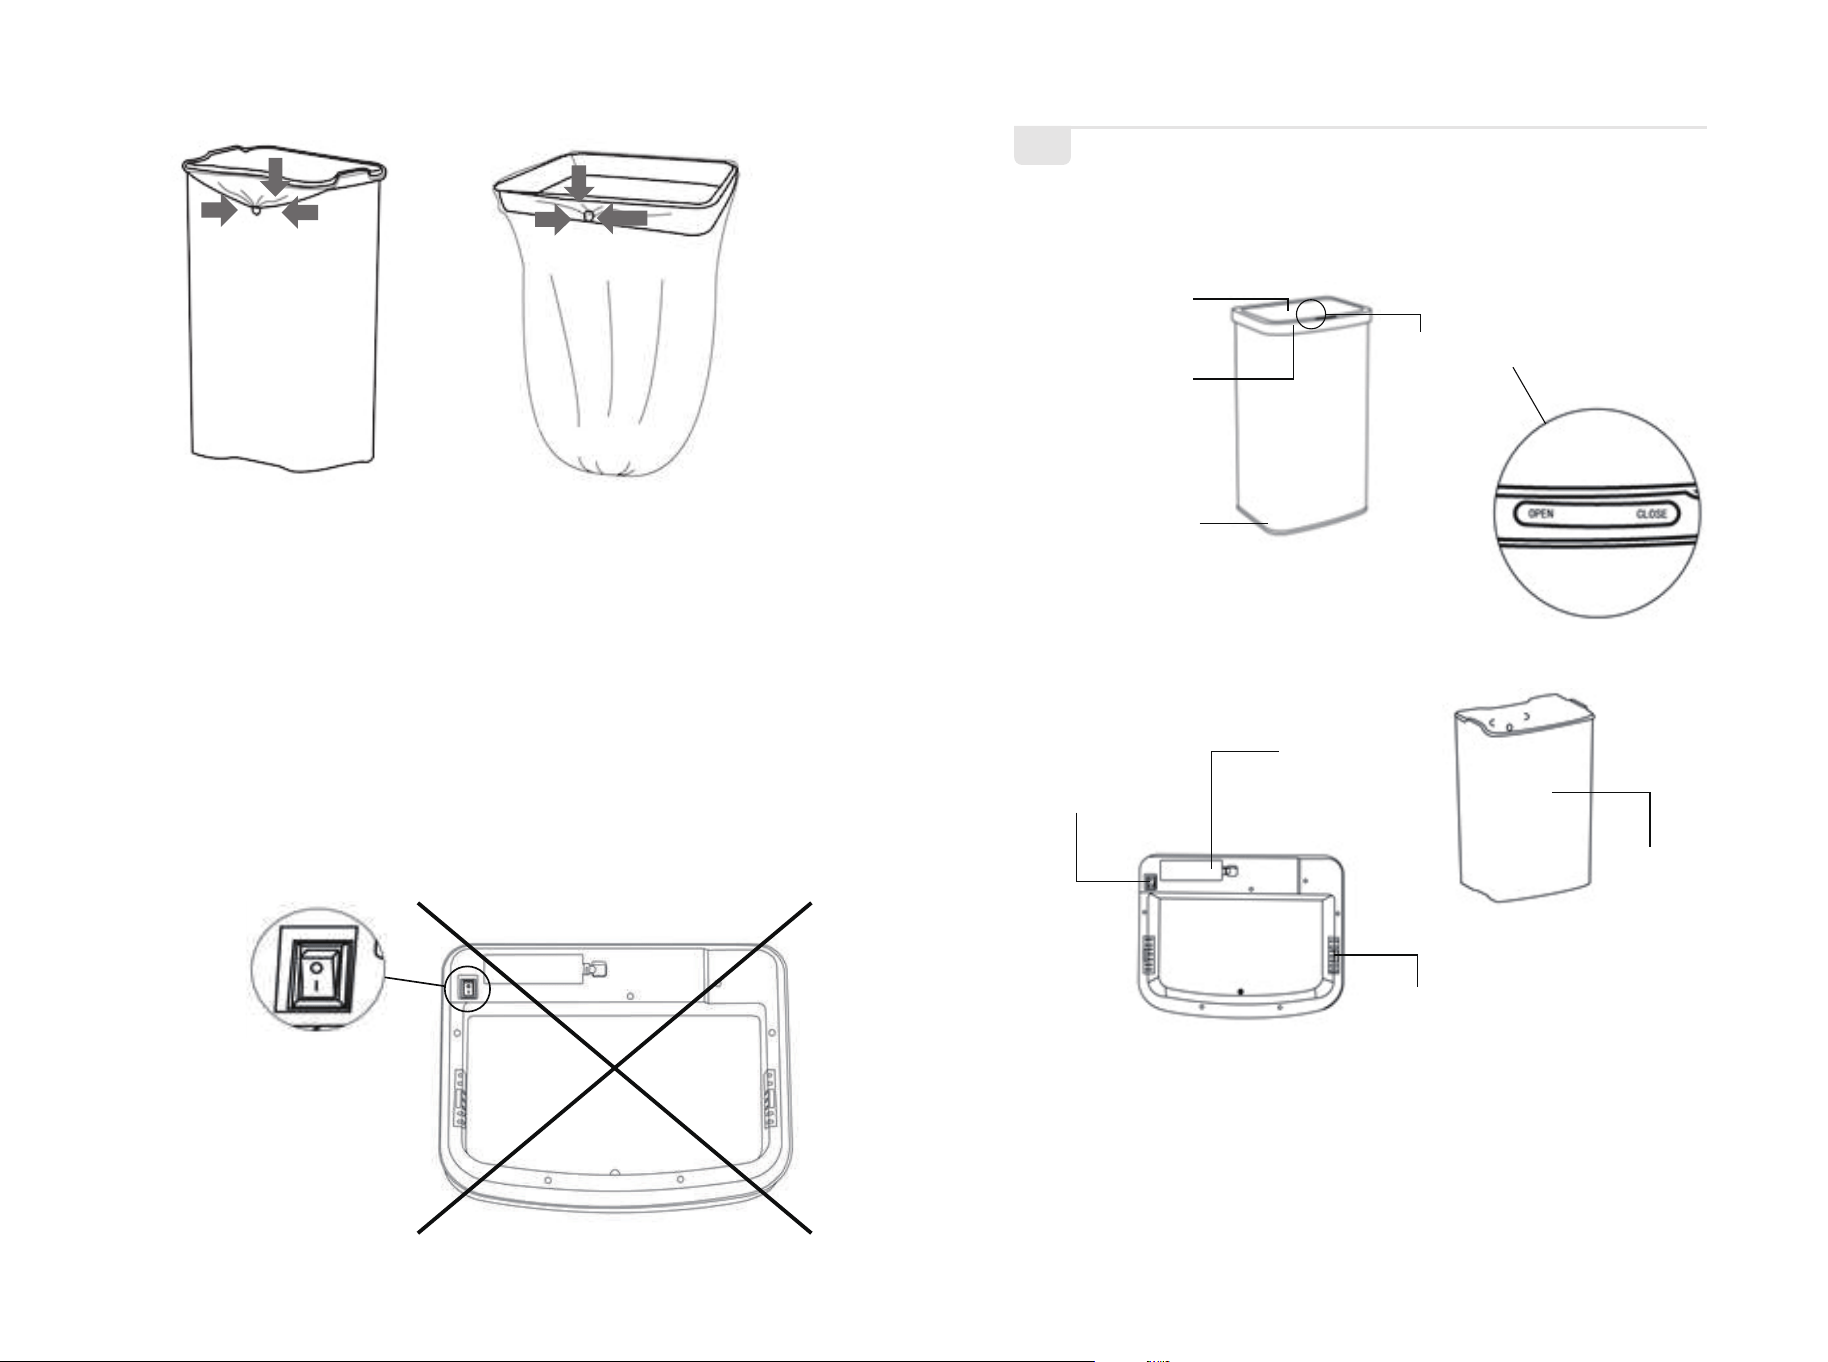
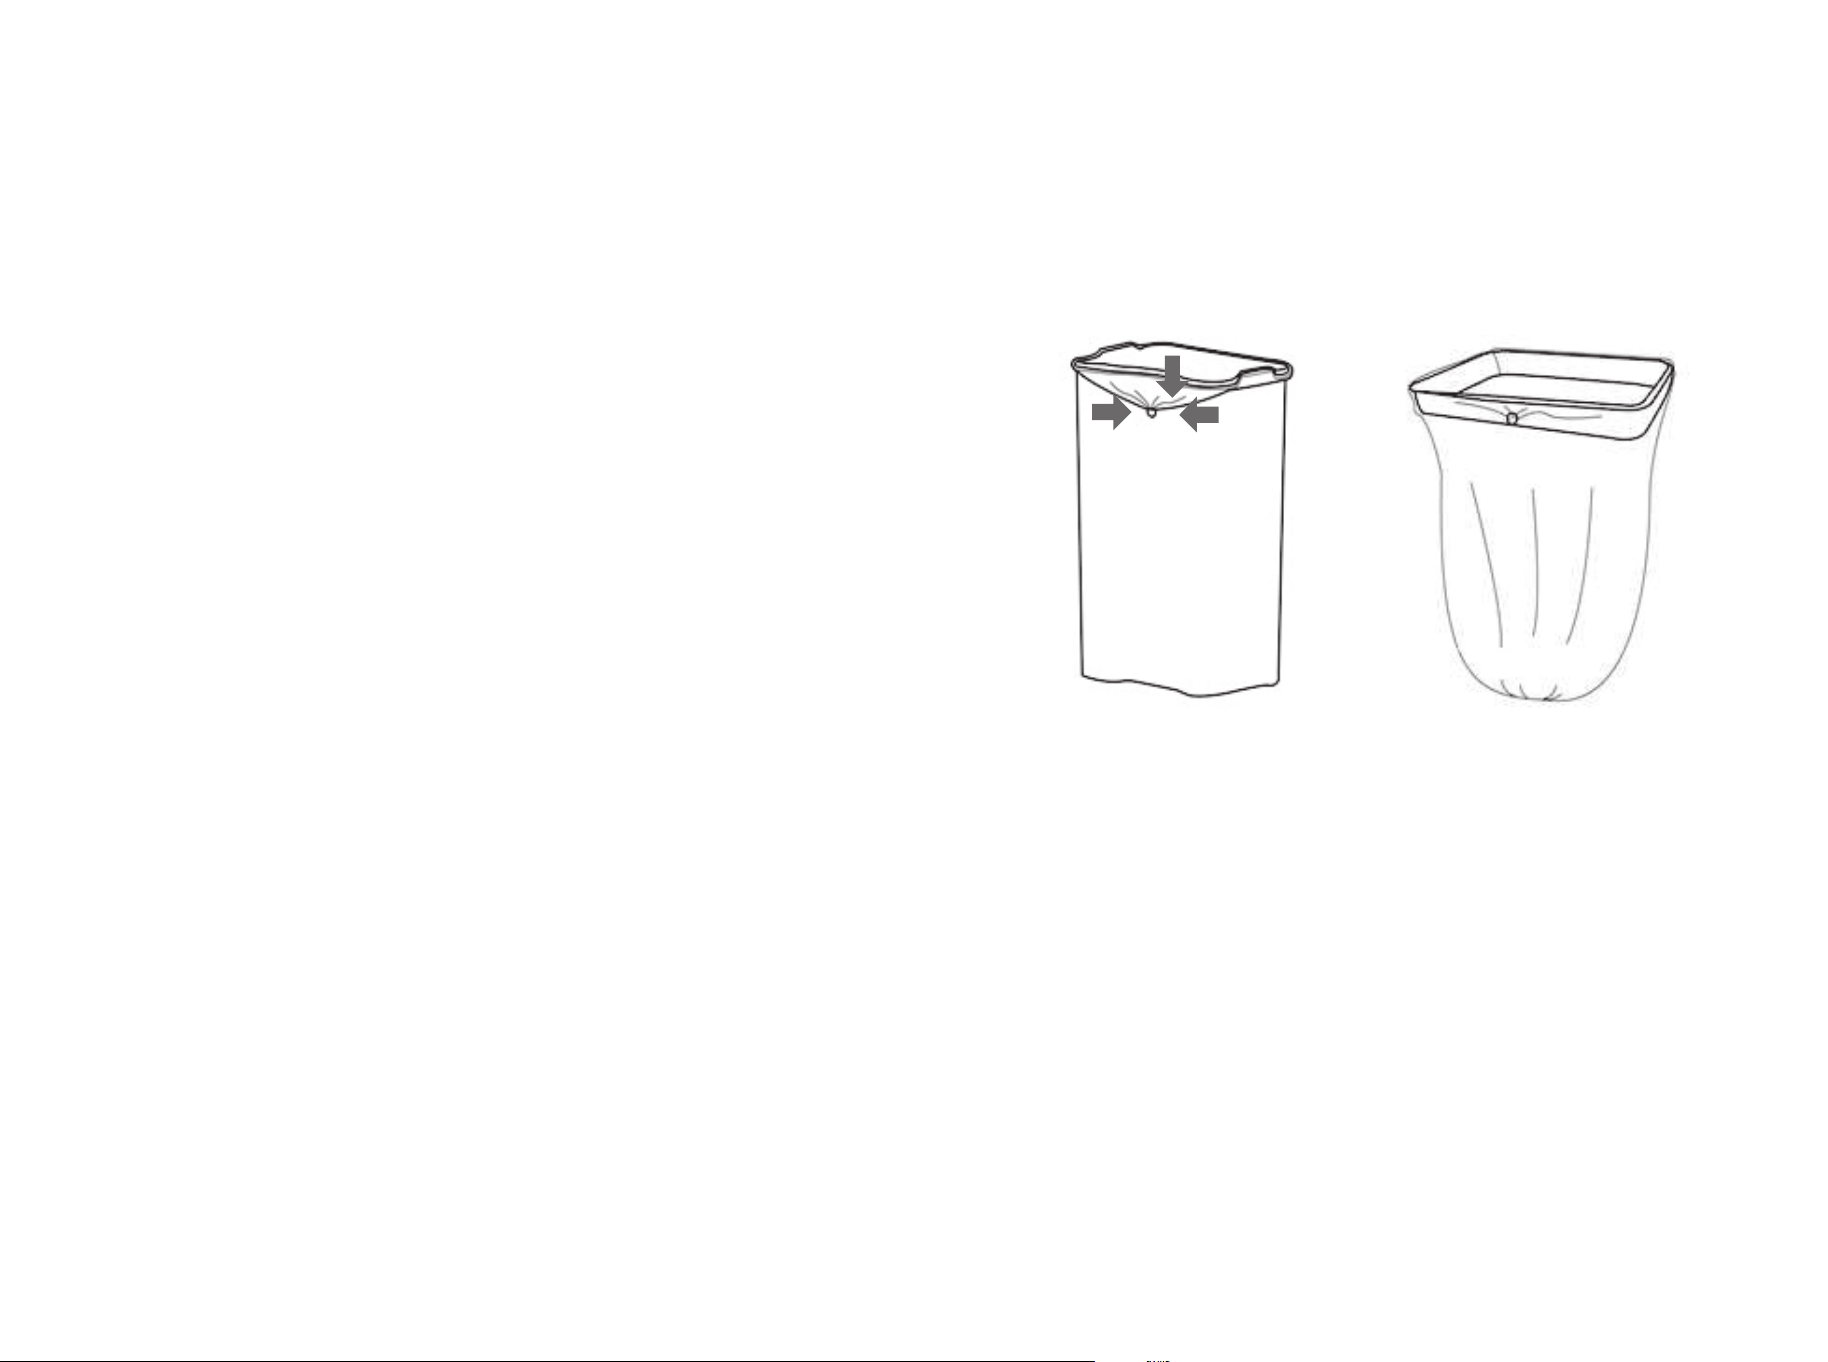
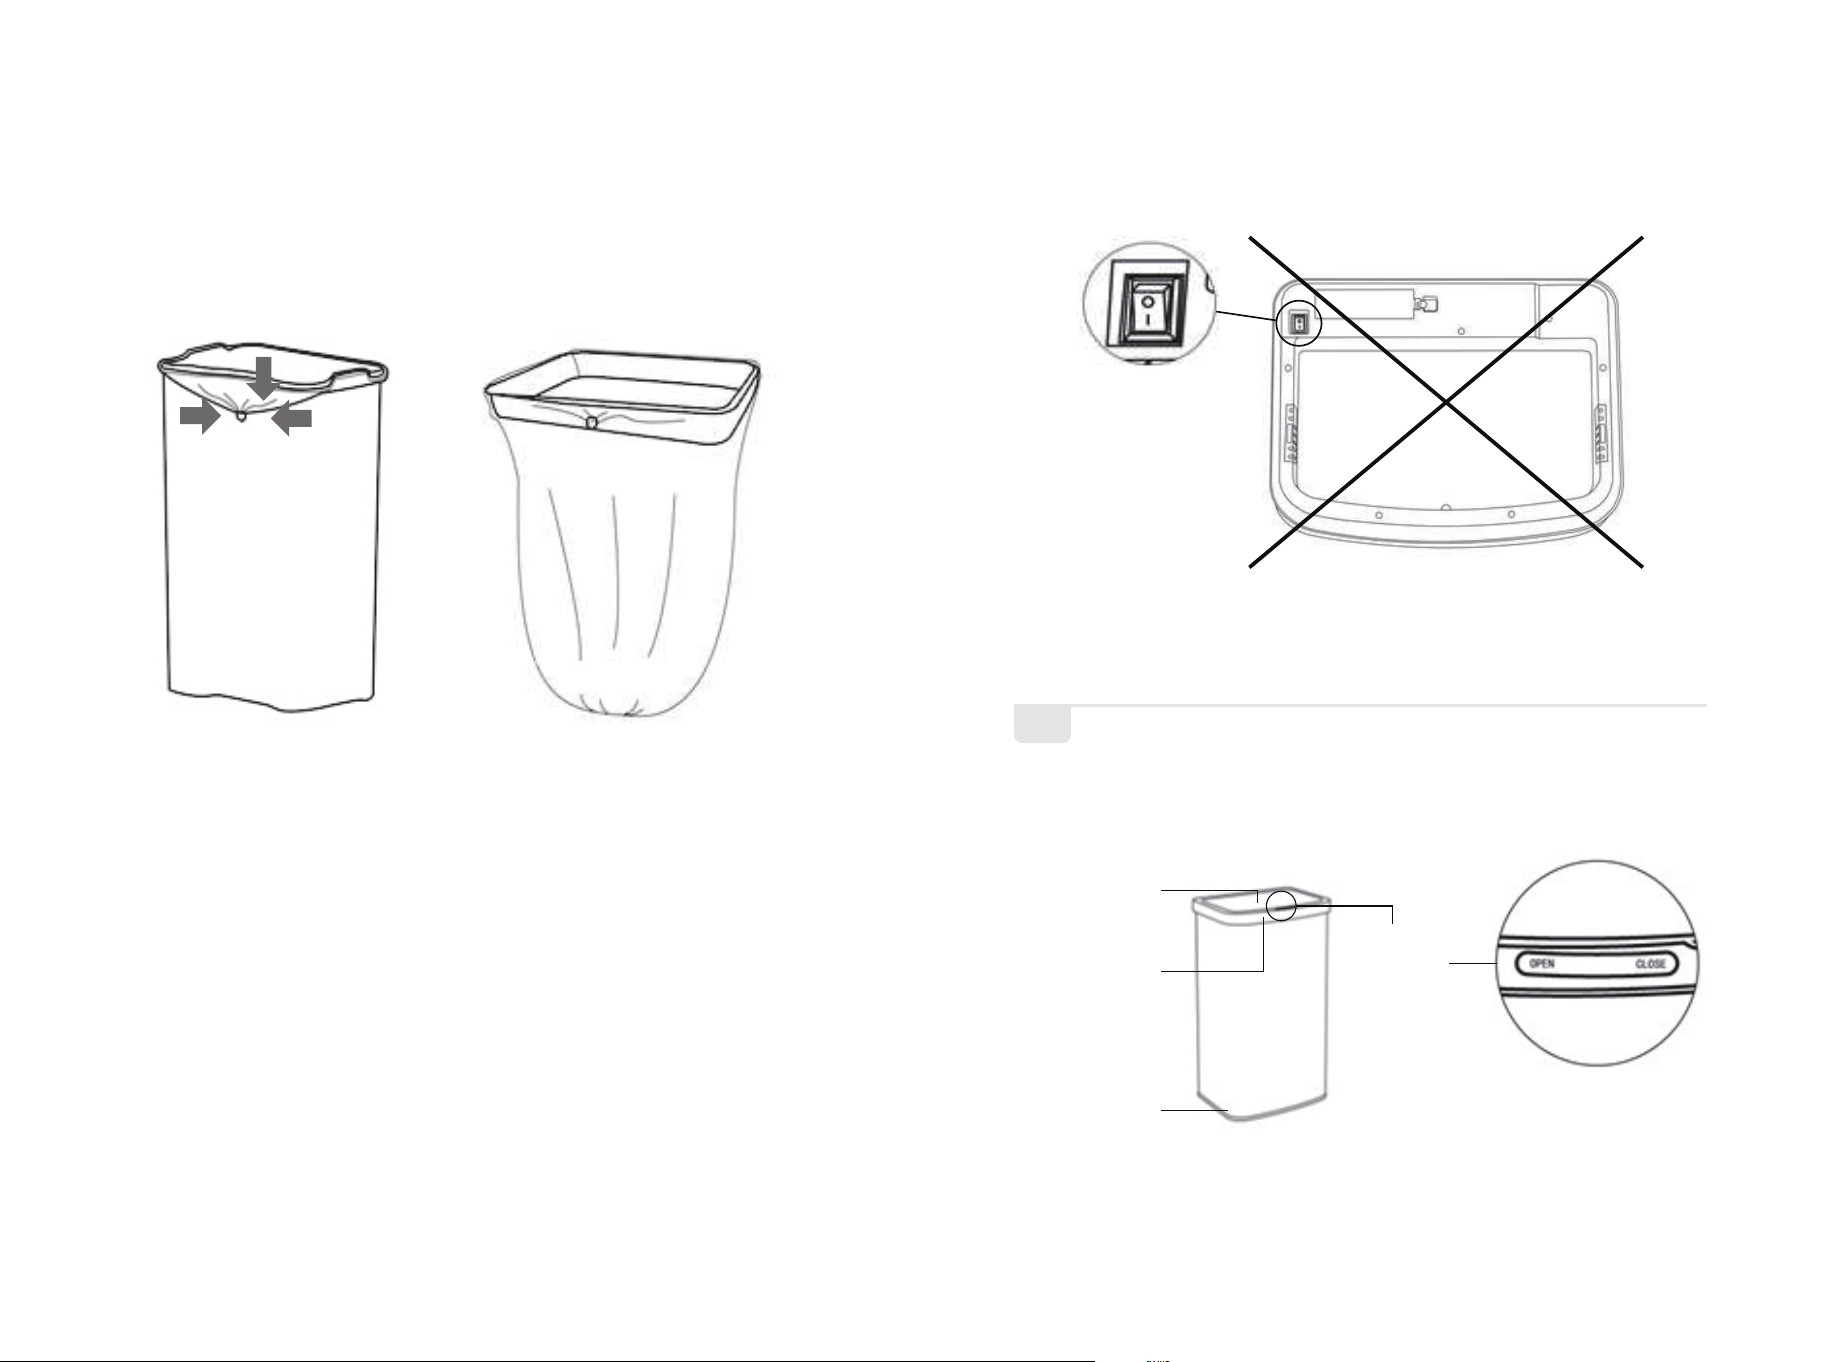
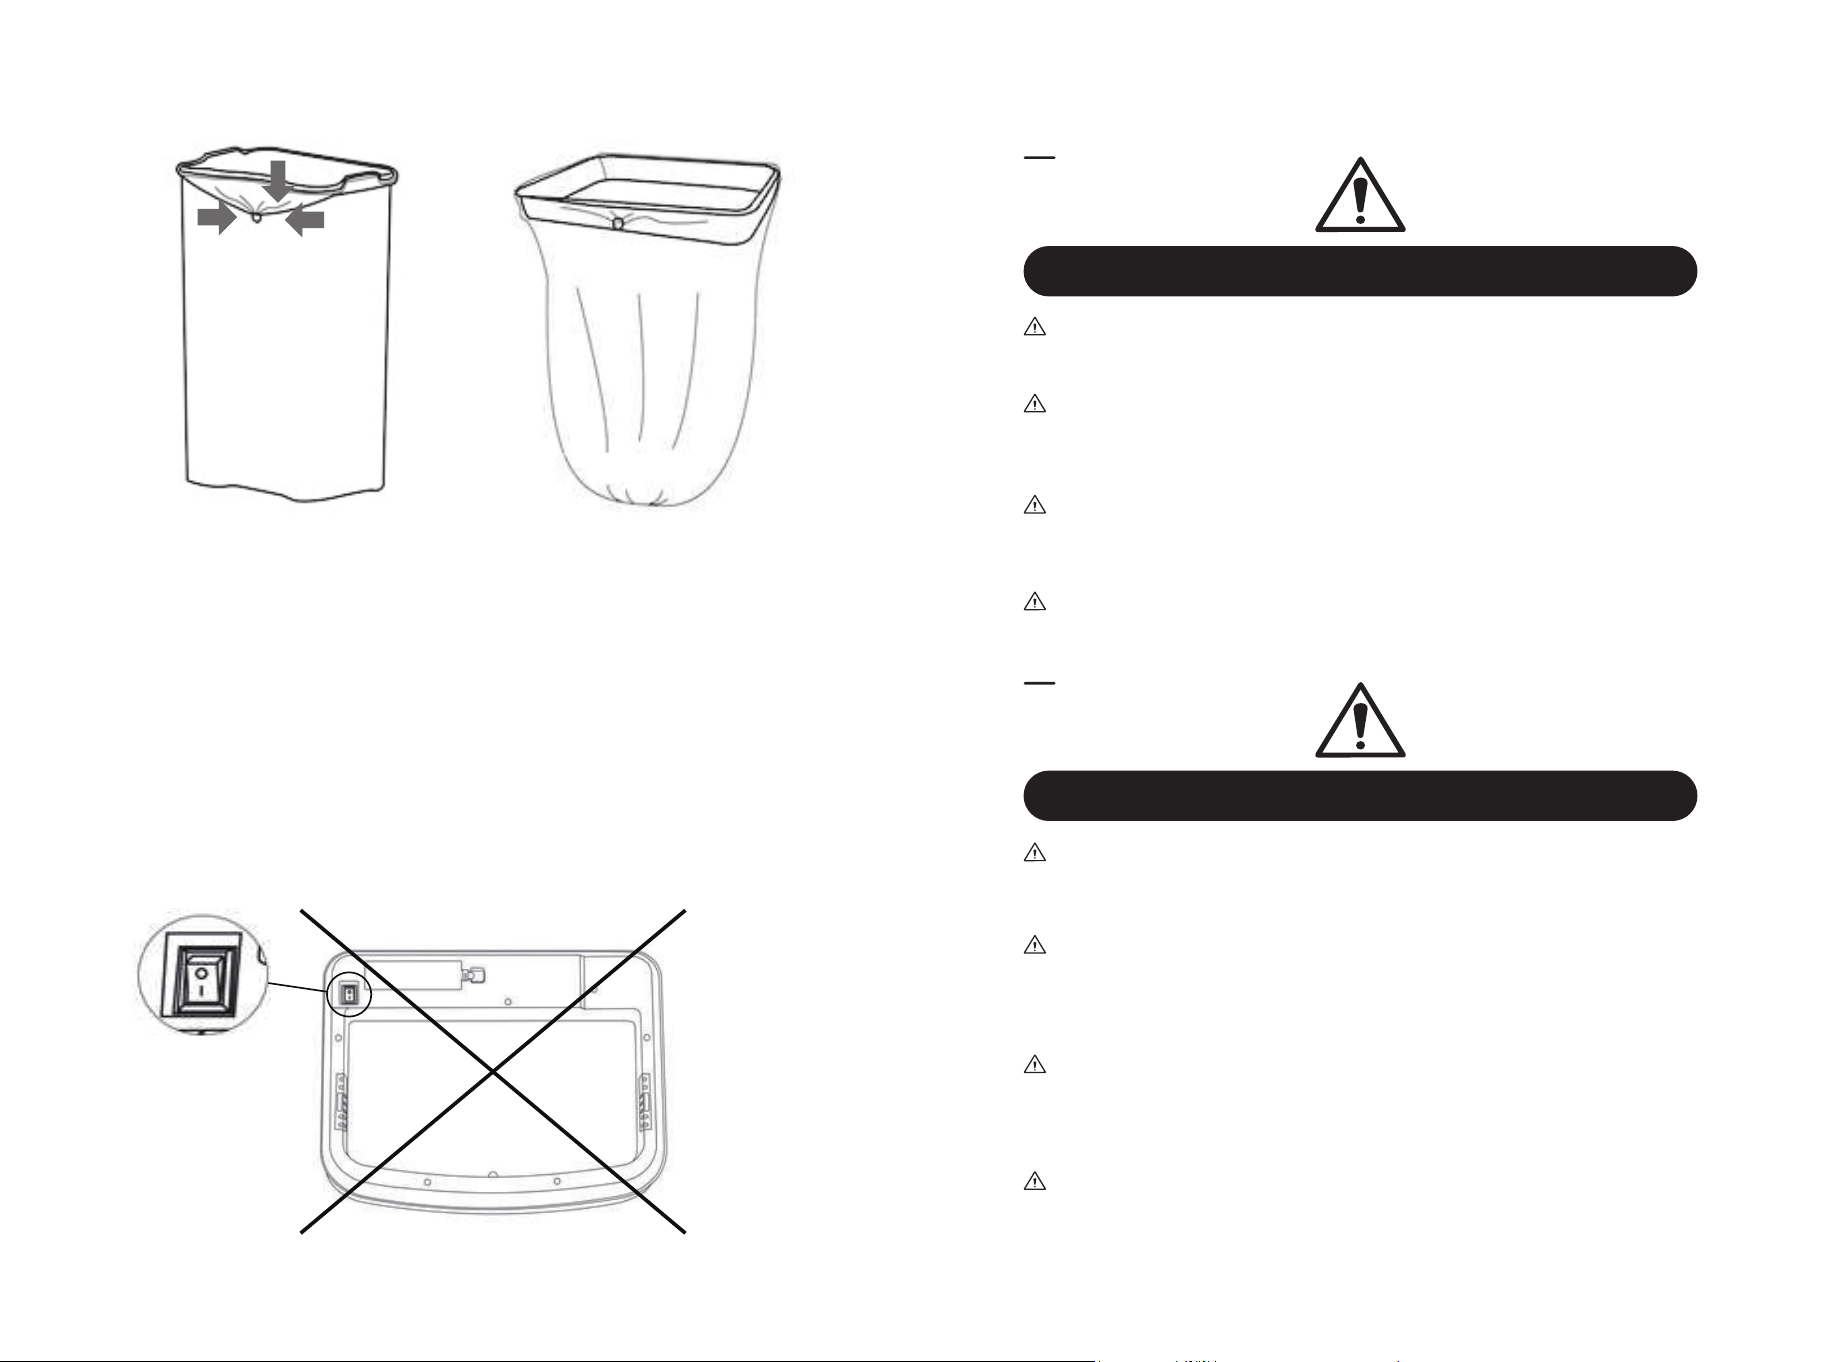
First remove the bucket head of the product, take out the inner
bucket / middle ring, open the garbage bag and put it into the inner
bucket / middle ring, roll the bag mouth to the outside of the inner
bucket mouth / middle ring, tighten and roll up the garbage bag,
plug it into the storage ring of the inner bucket / middle ring, and
then put the inner bucket / middle ring back into the bucket body.
Use of inner bucket and garbage bag
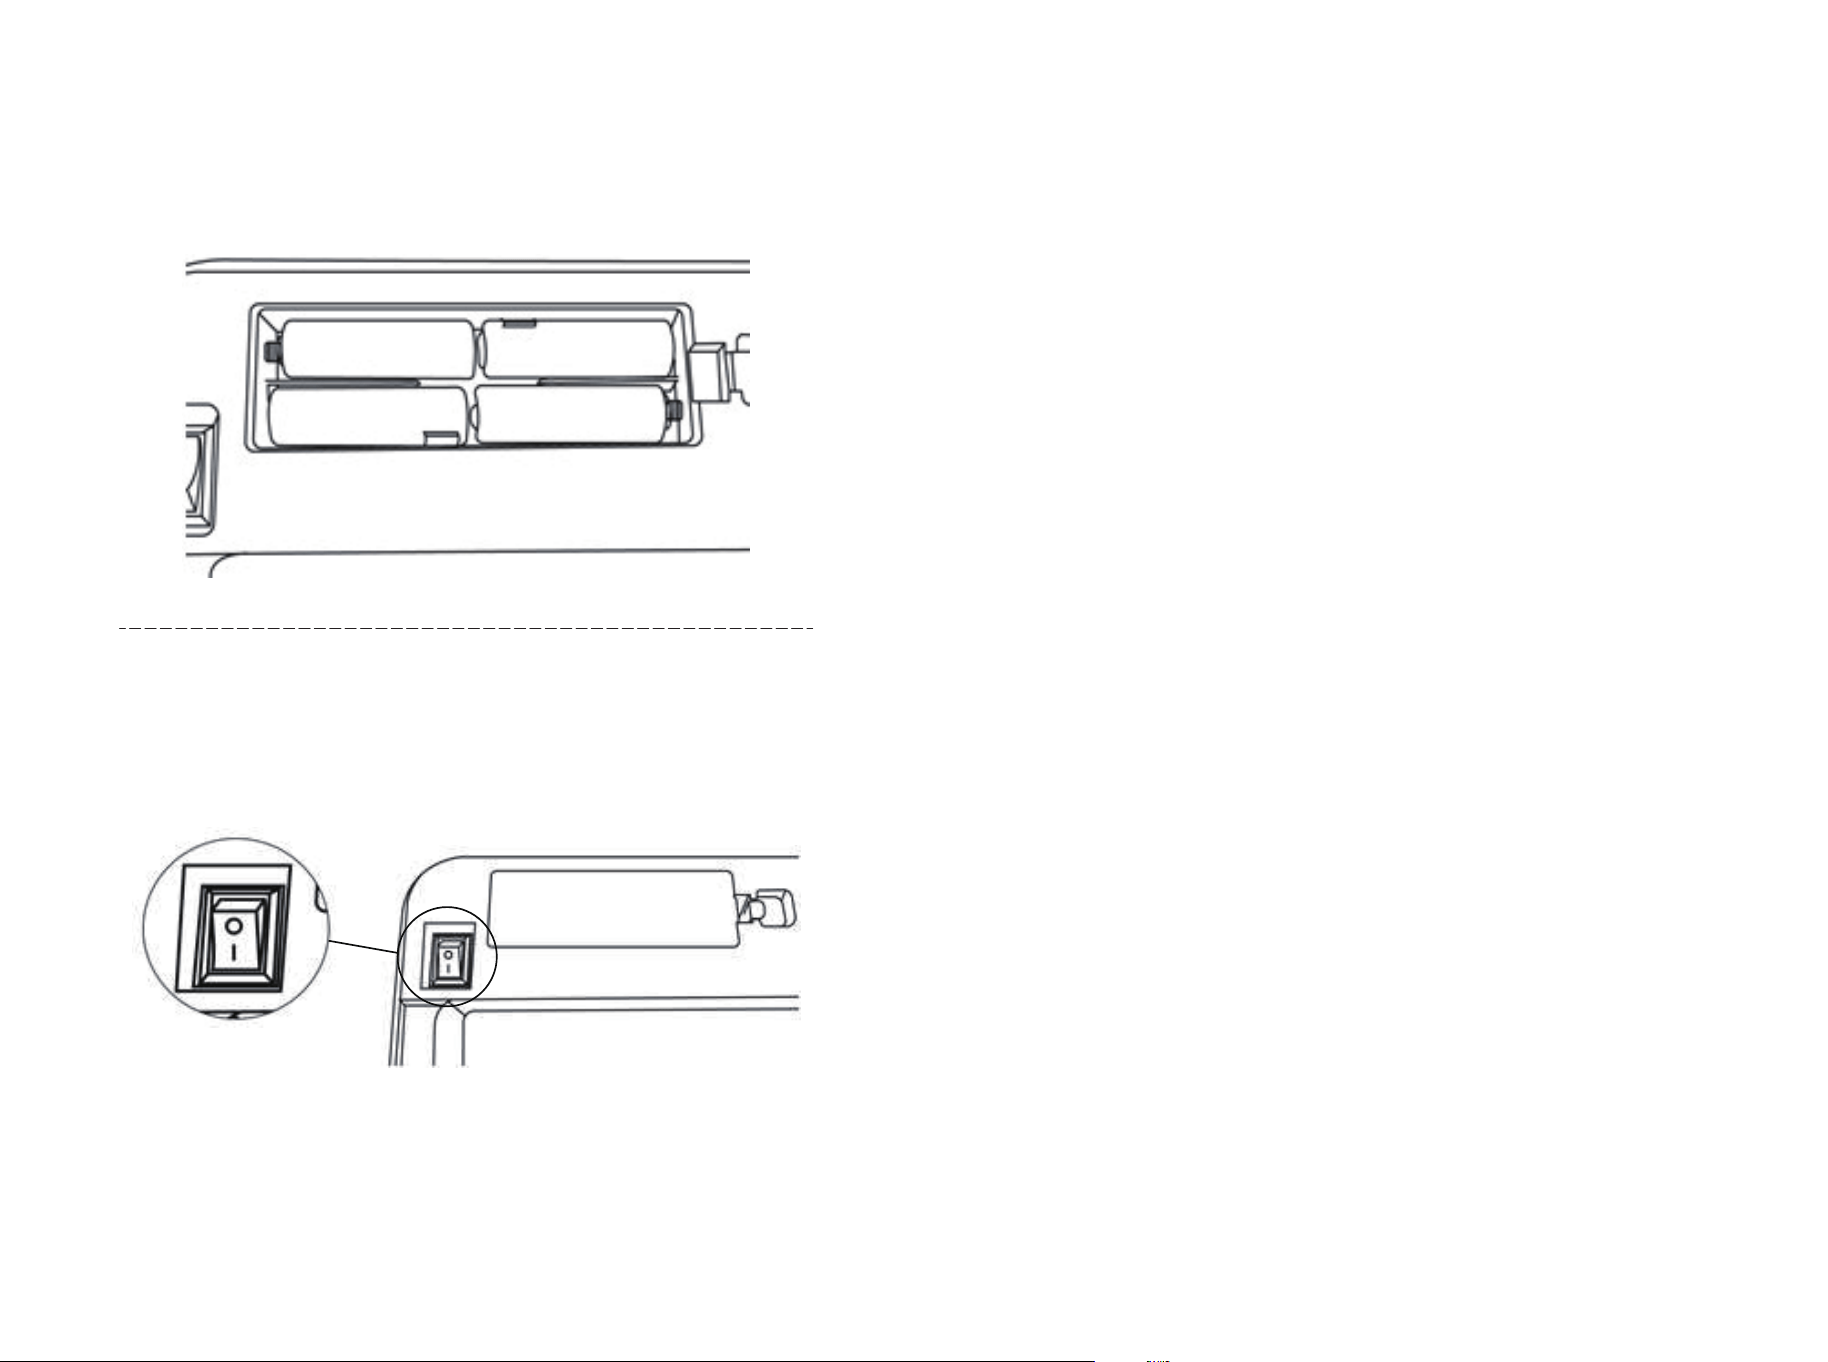
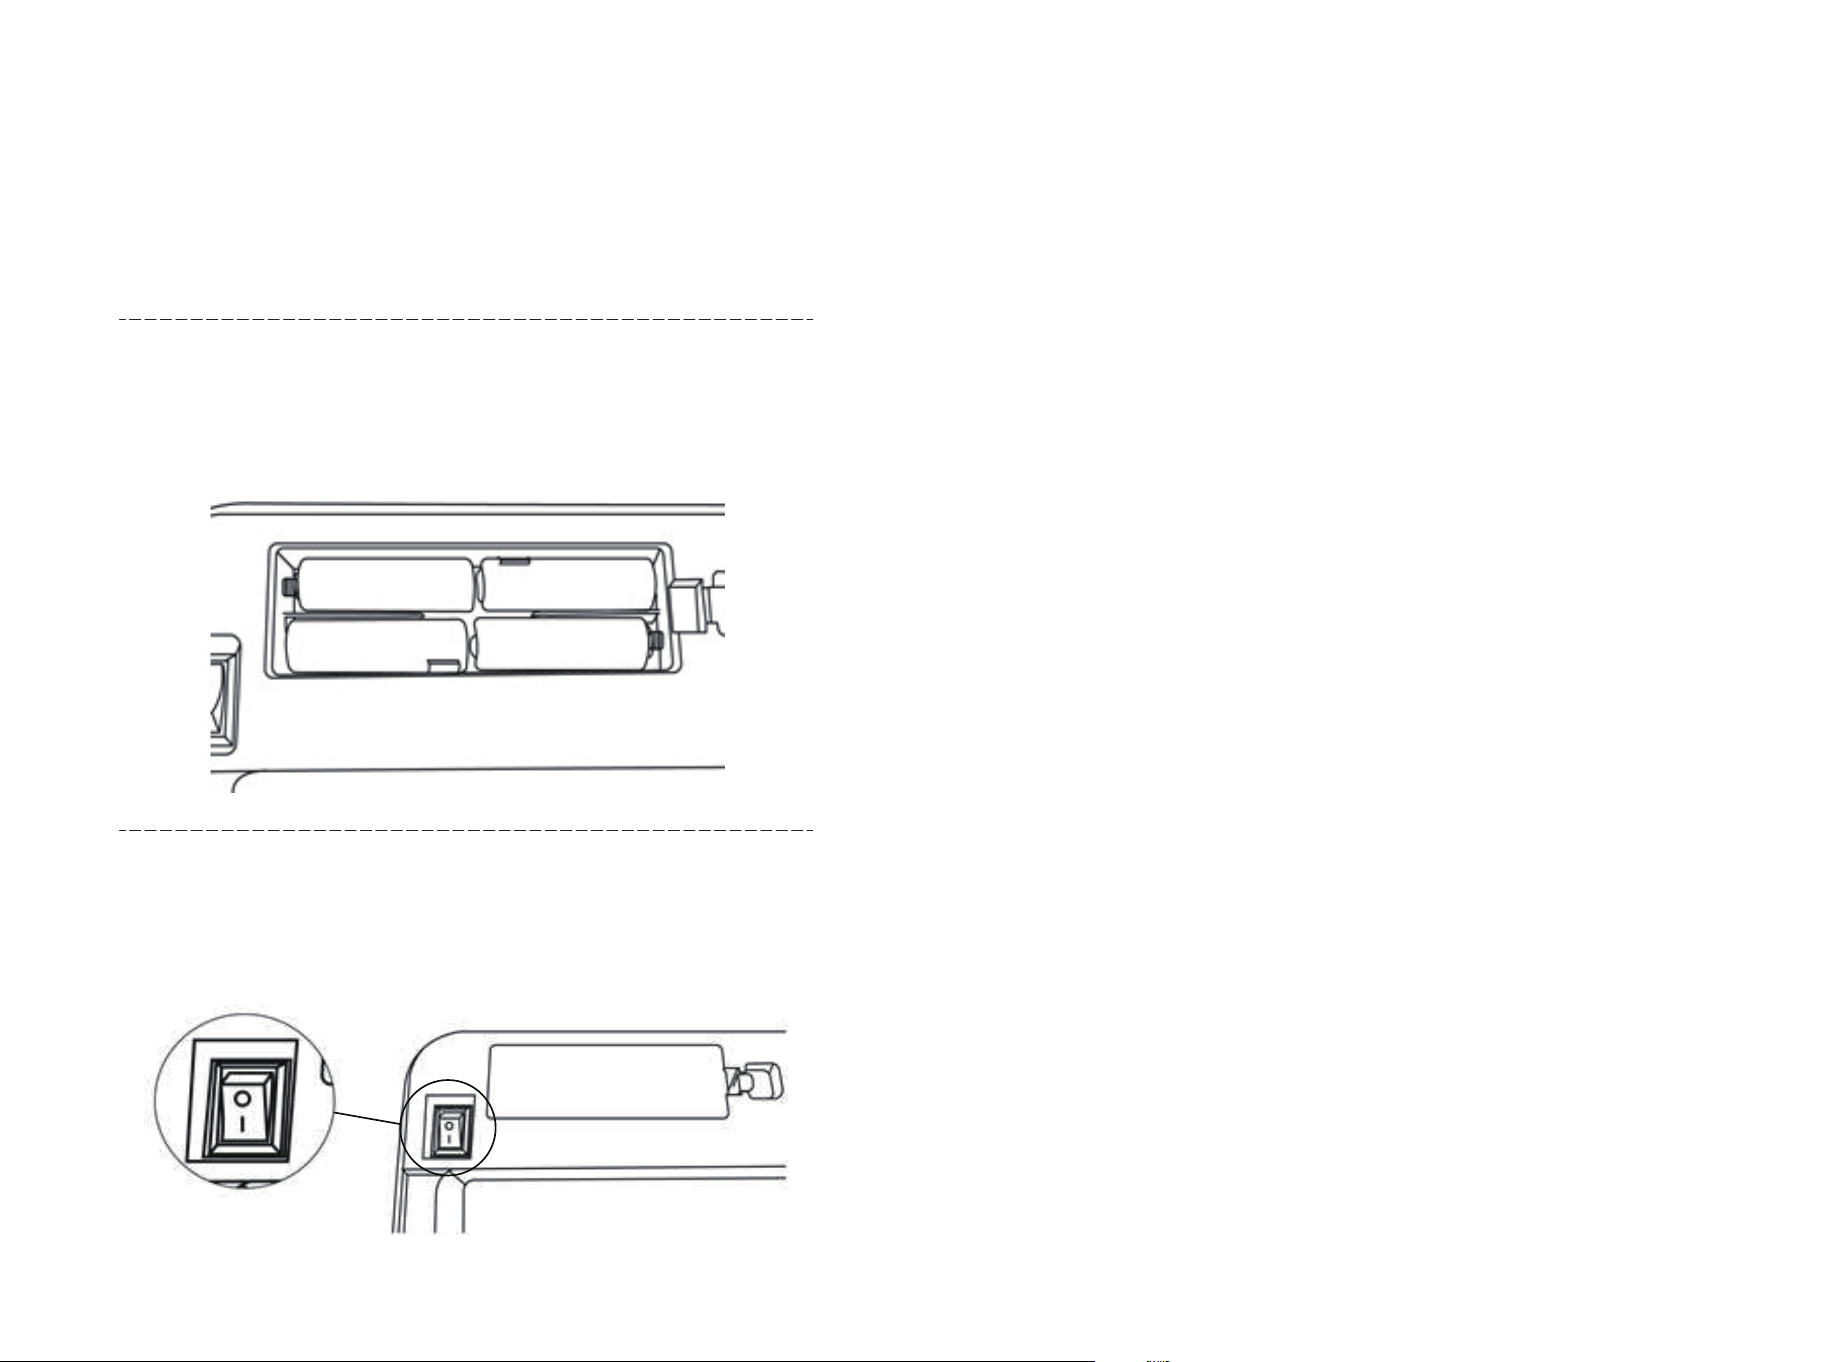
Step 3:
Then install a No. 5 battery (AA battery) into the empty space of
the upper and lower battery bins to fill the battery bin.
Step 4:
Cover the battery cover, turn the power switch to the "I" position,
and the blue indicator light will be on for 2 seconds to work
normally.
- AA +
- AA +
+ AA -+ AA -
08 09
KOMPONENTEN NAME
DE
Hinweis: Wenn sich das Produktstrukturdiagramm ohne
Ankündigung ändert, nehmen Sie bitte das reale Objekt als
Standard.
KOMPONENTEN
NAME
SENSOR
UNTERE
BASIS
BEDIENUNGSFELD
INNERER
EIMER
NETZSCHALTER
BATTERIE
HALTER
AKTIVKOHLE
BAUMWOLLE BOX
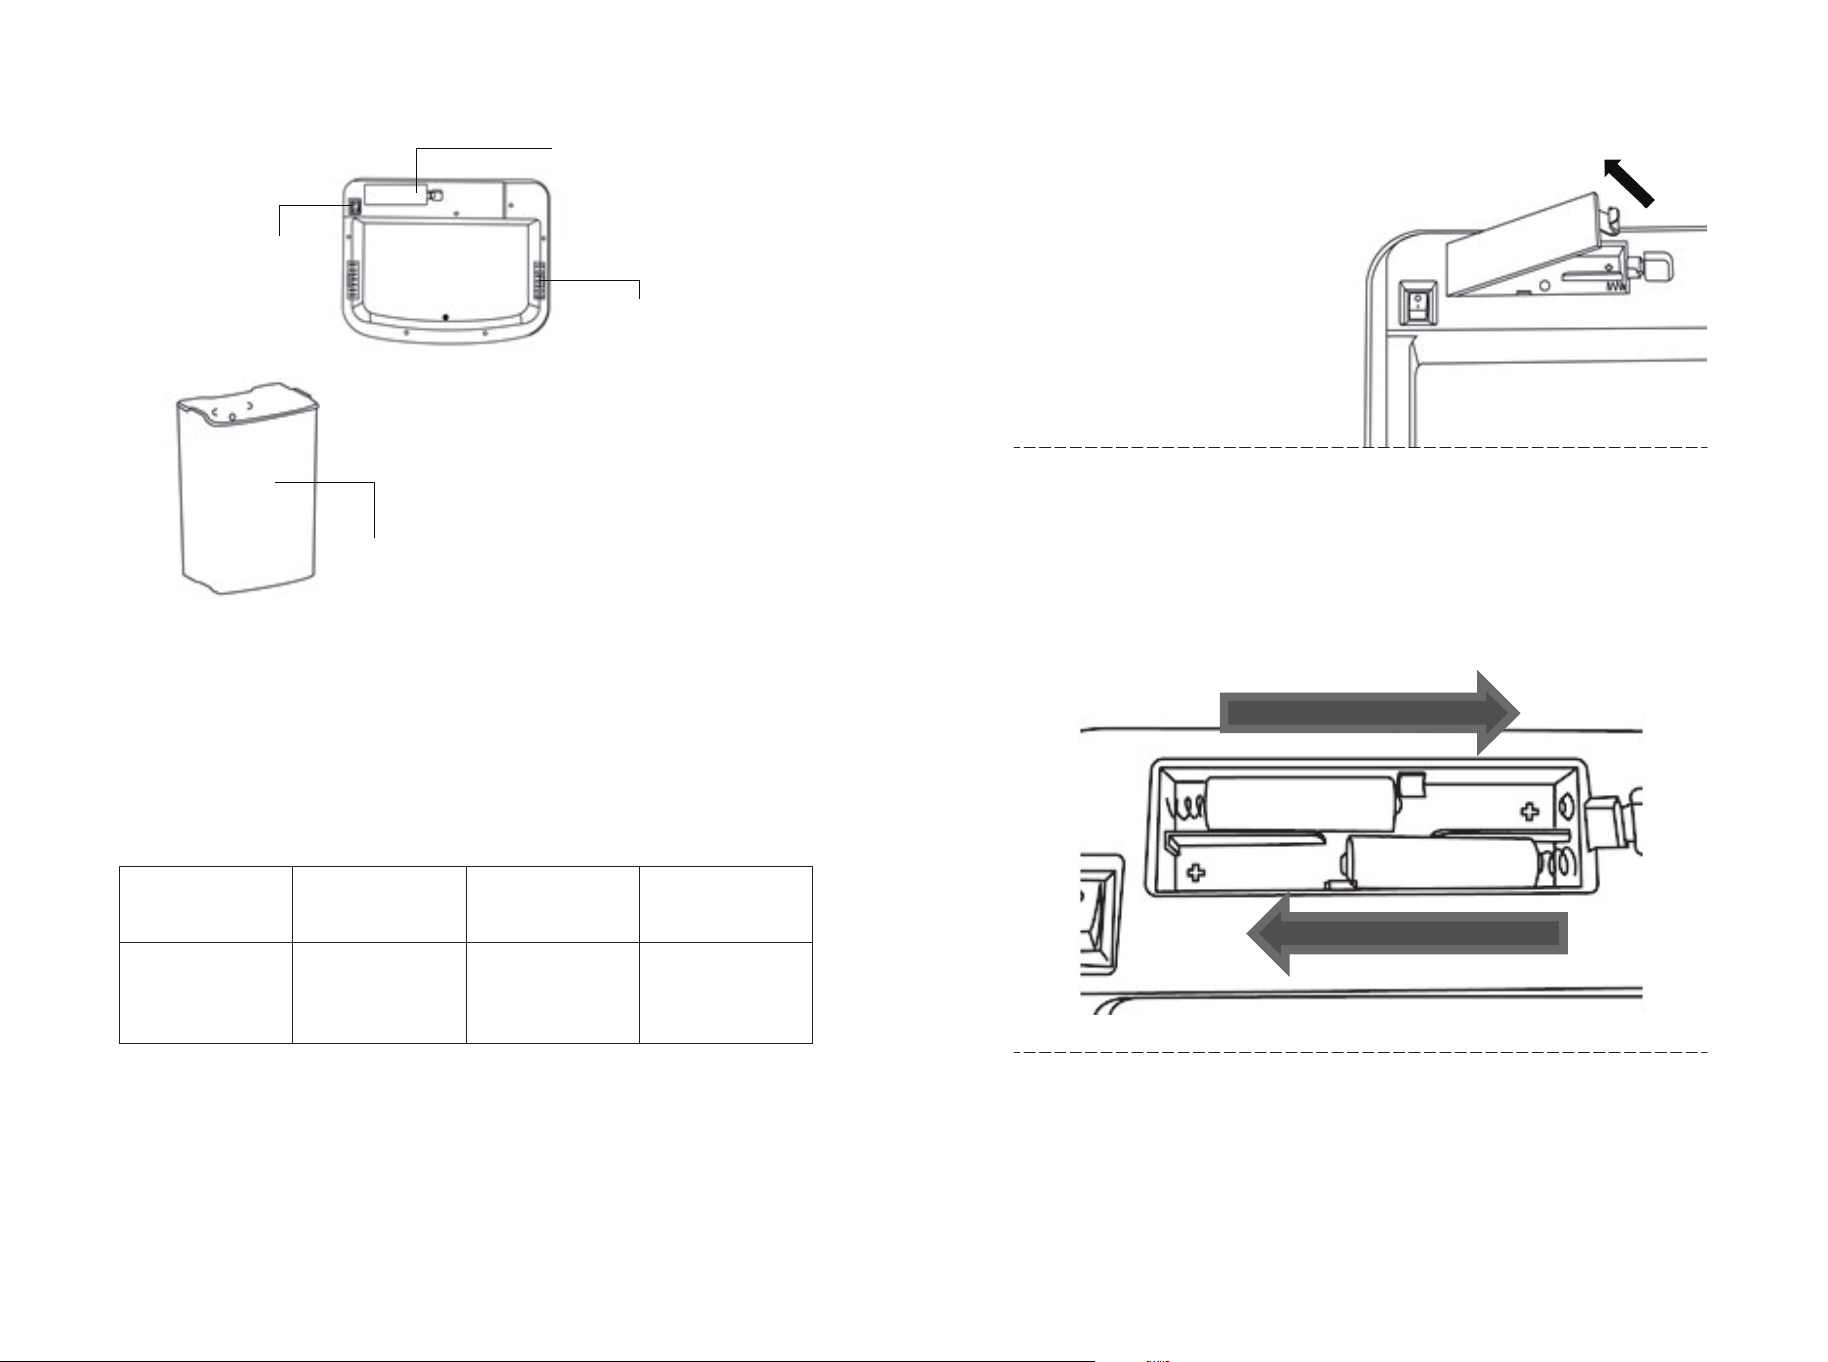
Before changing the garbage bag, the power must be turned off
before taking out the inductive bucket head; Without turning off the
power, It is prohibited to put the induction barrel head upside down
on the table or the ground, so as to avoid the damage to internal
parts caused by the continuous operation of this product, which
will cause the product to be unable to use normally.
Attention
Collection
ring
With inner
bucket
Collection
ring
Without inner
bucket
When the power switch is
turned on, it is forbidden to
turn the inductive barrel
head upside down.
10 11
Legen Sie zunächst eine Nr. 5-Batterie (AA-Batterie) in das obere
und untere Batteriefach entsprechend den Anforderungen an Plus-
und Minuspol ein, und schieben Sie die Batterie dann an den
Boden des Pluspols des Batteriefachs.
Schritt 3:
Legen Sie dann eine Batterie Nr. 5 (AA-Batterie) in den leeren
Raum des oberen und unteren Batteriefachs ein, um das
Batteriefach zu füllen.
Schritt 4:
Decken Sie die Batterieabdeckung ab, drehen Sie den
Netzschalter in die Position "I", und die blaue Kontrollleuchte
leuchtet 2 Sekunden lang auf, um normal zu funktionieren.
- AA +
- AA +
+ AA -+ AA -
SPEZIFIKATIONSPARAMETER
Artikel Nr.
Nennspannung
Volumen
Erfassungsabstand
40/50/60L
Sensor
Behälter
6V
40/50/60L
≤30cm
Hinweis: Wenn die oben genannten Parameter geändert werden,
nehmen Sie bitte das reale Objekt als Standard.
Installation der Batterie
Schritt 1:
Öffnen Sie die
Batterieabdeckung.
Nach rechts drücken
Nach links drücken
- AA +
+ AA -
Schritt 2:
12 13
rollen Sie die Beutelöffnung nach außen der inneren Eimeröffnung
/ des mittleren Rings, ziehen Sie den Müllsack fest und rollen Sie
ihn auf, stecken Sie ihn in den Aufbewahrungsring des inneren
Eimers / mittleren Rings, und setzen Sie dann den inneren Eimer /
mittleren Ring wieder in den Schaufelkörper ein.
Vor dem Auswechseln des Müllbeutels muss der Strom
abgeschaltet werden, bevor der Induktionseimerkopf
herausgenommen wird. Ohne Ausschalten des Stroms ist es
verboten, den Induktionseimer kopfüber auf den Tisch oder den
Boden zu stellen, um Schäden an den inneren Teilen zu
vermeiden, die durch den kontinuierlichen Betrieb dieses Produkts
verursacht werden, was dazu führt, dass das Produkt nicht normal
verwendet werden kann.
Vorsicht
Sammlungsring
Mit inneren
Eimer
Sammlungsring
Ohne inneren
Eimer
Einführung in die Funktion
1.Dieses Produkt verwendet Infrarot-Induktionstechnologie, um
das Öffnen und Schließen des Fassdeckels zu steuern. Wenn das
Produkt eingeschaltet wird, leuchtet die blaue Kontrollleuchte für 2
Sekunden. Nachdem die Kontrollleuchte erloschen ist, wird der
Deckel automatisch geschlossen, d. h. er geht in den
Standby-Modus über.
2.Normale Erfassungsfunktion: Der Erfassungsbereich befindet
sich ca. 30 cm über dem Erfassungsfeld. Wenn ein Objekt oder
eine Hand in den Erfassungsbereich gelegt wird, öffnet sich die
Laufabdeckung automatisch. Zu diesem Zeitpunkt blinkt die
Kontrollleuchte. Nach 5 Sekunden schließt sich der Laufdeckel
automatisch. Zu diesem Zeitpunkt erlischt die Kontrollleuchte und
das Produkt wechselt in den Standby-Zustand.
3.Öffnungs- und Schließfunktion durch Berühren: Wenn sich das
Produkt im Standby-Modus befindet, drücken Sie die
Öffnungstaste auf dem Bedienfeld von Hand, die Fassabdeckung
öffnet sich automatisch und die Anzeige blinkt alle 5 Sekunden
einmal. Zu diesem Zeitpunkt funktioniert die Erfassungsfunktion
nicht. Sie müssen die Schließen-Taste auf der Platte von Hand
drücken, um die Abdeckung zu schließen, oder 10 Minuten warten,
die Zylinderabdeckung schließt sich automatisch und das Produkt
wechselt wieder in den Standby-Modus.
Entfernen Sie zuerst den Eimerkopf des Produkts, nehmen Sie
den inneren Eimer / mittleren Ring heraus, öffnen Sie den
Müllsack und legen Sie ihn in den inneren Eimer / mittleren Ring,
Verwendung von Inneneimer und
Abfallsack
14 15
Remarque: si le diagramme de la structure du produit change sans
préavis, veuillez prendre l’objet réel comme norme.
Remarque: si les paramètres ci-dessus sont modifiés, veuillez
prendre l’objet réel comme norme.
SEAU
INTÉRIEUR
INTERRUPTEUR
D'ALIMENTATION
COUVERCLE
DE BATTERIE
BOÎTE EN
COTON
CHARBON ACTIF
PARAMÈTRES DE SPÉCIFICATION
Numéro
d'article
Tension
nominale
Volume
Distance
de détection
40/50/60 L
Corbeille à
capteurs
6V
40/50/60L
≤30cm
NOM DES COMPOSANTS
FR
COUVERCLE
CAPTEUR
BASE
INFÉRIEURE
PANNEAU
DE
CONTRÔLE
Wenn der Netzschalter eingeschaltet ist, ist es verboten, den
Induktionszylinder auf den Kopf zu stellen.
Wenn der Netzschalter
eingeschaltet ist, ist es
verboten, den induktiven
Zylinderkopf auf den Kopf
zu stellen.
16 17
Étape 4 :
Couvrez le couvercle de la batterie, tournez l’interrupteur
d’alimentation sur la position « I » et le voyant bleu sera allumé
pendant 2 secondes pour fonctionner normalement.
- AA +
- AA +
+ AA -+ AA -
1. Ce produit utilise la technologie de l'induction infrarouge pour
contrôler l'ouverture et la fermeture du couvercle du baril. Lorsque
le produit est mis sous tension, le voyant bleu s'allume pendant 2
Introduction des Fonctions
Poussez vers la droite
Poussez vers la gauche
- AA +
+ AA -
Installation des Batteries
Étape 1 :
Ouvrez le couvercle de la
batterie
Étape 2 :
Installez d'abord une pile n° 5 (pile AA) dans les compartiments
supérieur et inférieur de la pile en respectant les exigences des
pôles positif et négatif, puis poussez la pile au fond du pôle positif
du compartiment de la pile.
Étape 3 :
Installez ensuite une pile n° 5 (pile AA) dans l'espace vide des
bacs à piles supérieur et inférieur pour remplir le bac à piles.
18 19
Avant de changer le sac à ordures, l’alimentation doit être coupée
avant de retirer la tête du seau à induction. Sans couper
l’alimentation, il est interdit de mettre la tête du seau à induction à
l’envers sur la table ou le sol, afin d’éviter les dommages aux
parties internes causés par le fonctionnement continu de ce
produit, ce qui empêchera l'utilisation normale de l'appareil.
Attention
Anneau de
collecte
Avec seau
intérieur
Anneau de
collecte
Sans seau
intérieur
secondes. Une fois le voyant éteint, le couvercle se ferme
automatiquement, c'est-à-dire qu'il entre en état de veille.
2. Fonction de détection normale : la zone de détection se situe à
environ 30 cm au-dessus du panneau de détection. Lorsqu'un
objet ou une main est placé dans la zone de détection, le
couvercle du tonneau s'ouvre automatiquement. À ce moment-là,
le voyant lumineux clignote. Après 5 secondes, le couvercle du
barillet se referme automatiquement. Le témoin lumineux s'éteint
alors et le produit entre en état de veille.
3. Fonction d’ouverture et de fermeture tactile : lorsque le produit
est en mode veille, appuyez manuellement sur la touche
d'ouverture du panneau, le couvercle du tonneau s'ouvre
automatiquement et le voyant clignote une fois toutes les 5
secondes. À ce moment-là, la fonction de détection ne fonctionne
pas. Vous devez appuyer manuellement sur la touche de
fermeture du panneau pour fermer le couvercle, ou attendre 10
minutes, le couvercle du barillet se fermera automatiquement et le
produit passera à nouveau en mode veille.
Retirez d’abord la tête de seau du produit, sortez le seau intérieur
/ anneau du milieu, ouvrez le sac à ordures et mettez-le dans le
seau intérieur / anneau du milieu, roulez la bouche du sac à
l’extérieur de la bouche intérieure du seau / anneau du milieu,
serrez et enroulez le sac à ordures, branchez-le dans l’anneau de
stockage du seau intérieur / anneau du milieu, puis remettez le
seau intérieur / anneau du milieu dans le corps du godet.
Utilisation d’un seau intérieur et d’un
sac à ordures
Lorsque l’interrupteur
d’alimentation est allumé, il
est interdit de retourner le
seau d'inducteur.
20 21
PARÁMETROS DE ESPECIFICACIÓN
Número de
artículo
40/50/60L
Cubo del Sensor
Tensión
nominal
Volumen
Distancia
de sensor
6V
40/50/60L
≤30cm
Nota: si se cambian los parámetros anteriores, por favor tome el
objeto real como estándar.
Instalación de la Pila
Paso 1:
Abra la tapa de la pila.
Empuje hacia la derecha
Empuje hacia la izquierda.
- AA +
+ AA -
Paso 2:
NOMBRE DE LA PIEZA
ES
Nota: si el diagrama de la estructura del producto cambia sin
previo aviso, por favor tome el objeto real como estándar.
BASE
CUBIERTA
CUBIERTA
CON
SENSOR
PANEL
DE
CONTROL
CUBO
INTERIOR
INTERRUPTOR
DE
ALIMENTACIÓN
TAPA DE
LA PILA
CAJA DE
ALGODÓN DE
CARBÓN ACTIVADO
22 23
Introducción de Función
1. Este producto utiliza tecnología de inducción por infrarrojos
para controlar la apertura y cierre de la cubierta. Cuando se
enciende el producto, la luz indicadora azul estará encendida
durante 2 segundos. Después de que la luz indicadora se apague,
se producirá una acción de cierre automático de la tapa, es decir,
entrará en estado de espera.
2. Función de sensor normal: el área de detección se encuentra a
unos 30 cm por encima del panel de detección. Cuando se coloca
un objeto o una mano en el área de detección, la cubierta se
abrirá automáticamente. En ese momento, la luz indicadora
parpadea. Transcurridos 5 segundos, la cubierta se cerrará
automáticamente. En este momento, la luz indicadora se apaga y
el producto entra en el estado de espera.
3. Función de apertura y cierre táctil: cuando el producto está en
modo de espera, pulse la tecla de apertura del panel con la mano,
la cubierta se abrirá automáticamente y el indicador parpadeará
una vez cada 5 segundos. En este momento, la función de sensor
no funciona. Para cerrar la cubierta, pulse la tecla de cierre del
panel con la mano o espere 10 minutos; la cubierta se cerrará
automáticamente y el producto volverá al modo de espera.
En primer lugar, retire la cabeza del cubo del producto, saque el
cubo interior / anillo central, abra la bolsa de basura y colóquela
en el cubo interior / anillo central, enrolle la boca de la bolsa hacia
Uso de Cubo Interior y Bolsa de
Basura
En primer lugar, instale una pila Nº 5 (pila AA) en los
compartimentos superior e inferior de la pila de acuerdo con los
requisitos de los polos positivo y negativo y, a continuación,
empuje la pila hasta la parte inferior del polo positivo del
compartimento de la pila.
Paso 3:
A continuación, instale una pila Nº 5 (pila AA) en el espacio vacío
de los compartimentos superior e inferior de las pilas para llenar el
compartimento de las pilas.
Paso 4:
Cubra la tapa de la pila, gire el interruptor de alimentación a la
posición "I", y la luz indicadora azul se encenderá durante 2
segundos para funcionar con normalidad.
- AA +
- AA +
+ AA -+ AA -
24 25
Cuando el interruptor de alimentación está encendido, está
prohibido dar la vuelta a la cabeza del cubo de inducción.
NOME DEL COMPONENTE
IT
COPERCHIO
SENSORE
BASE IN
FONDO
PANNELLO
DI
CONTROLLO
el exterior de la boca del cubo interior / anillo central, apriete y
enrolle la bolsa de basura, enchúfela en el anillo de
almacenamiento del cubo interior / anillo central y, a continuación,
vuelva a colocar el cubo interior / anillo central en el cuerpo del
cubo.
Antes de cambiar la bolsa de basura, se debe desconectar la
alimentación antes de sacar la cabeza del cubo de inducción; Sin
desconectar la alimentación, está prohibido poner la cabeza del
cubo de inducción boca abajo sobre la mesa o el suelo, para
evitar el daño de las piezas internas causado por el
funcionamiento continuo de este producto, lo que hará que el
producto no se pueda utilizar normalmente.
Atención
Anillo de
colección
Con cubo interior
Anillo de
colección
Sin cubo interior
26 27
Spingere a destra
Spingere a sinistra
- AA +
+ AA -
Installazione della batteria
Passo 1:
Aprire il coperchio della
batteria.
Passo 2:
Installare innanzitutto una batteria n. 5 (batteria AA) nei vani
batteria superiore e inferiore in base ai requisiti dei poli positivo e
negativo, quindi spingere la batteria in fondo al polo positivo del
vano batteria.
Passo 3:
Installare quindi una batteria n. 5 (batteria AA) nello spazio vuoto
degli alloggiamenti superiore e inferiore per riempire il contenitore
delle batterie.
Nota: Se il diagramma della struttura del prodotto cambia senza
preavviso, si prega di prendere l'oggetto reale come standard.
Nota: Se i parametri di cui sopra vengono modificati, si prega di
prendere l'oggetto reale come standard.
CESTINO
INTERNO
INTERRUTTORE
DI
ALIMENTAZIONE
COPERCHIO
DELLA BATTERIA
SCATOLA DI
COTONE A
CARBONE ATTIVO
PARAMETRI DI SPECIFICA
N. art.
Tensione
nominale
Volume
Distanza di
rilevamento
40/50/60L
Cestino con
sensore
6V
40/50/60L
≤30cm
28 29
Quando il prodotto è acceso, la spia blu rimane accesa per 2
secondi. Dopo lo spegnimento della spia, si verifica un'azione di
chiusura automatica del coperchio, ovvero si passa allo stato di
standby.
2. Funzione di rilevamento normale: l'area di rilevamento si trova a
circa 30 cm sopra il pannello di rilevamento. Quando un oggetto o
una mano vengono posizionati nell'area di rilevamento, il
coperchio del cilindro si apre automaticamente. A questo punto, la
spia lampeggia. Dopo 5 secondi, il coperchio del cilindro si chiude
automaticamente. A questo punto, la spia si spegne e il prodotto
entra nello stato di standby.
3. Funzione di apertura e chiusura a sfioramento: quando il
prodotto è in modalità standby, premere manualmente il tasto di
apertura sul pannello, il coperchio del barile si aprirà
automaticamente e l'indicatore lampeggerà una volta ogni 5
secondi. In questo momento, la funzione di rilevamento non
funziona. Per chiudere il coperchio è necessario premere
manualmente il tasto di chiusura sul pannello, oppure attendere 10
minuti; il coperchio si chiuderà automaticamente e il prodotto
tornerà in modalità standby.
Per prima cosa rimuovere la testa del cestino del prodotto,
estrarre il cestino interno/anello centrale, aprire il sacco
dell'immondizia e inserirlo nel cestino interno/anello centrale,
Utilizzo del cestino interno e di un
sacco per i rifiuti
Passo 4:
Coprire il coperchio della batteria, portare l'interruttore di
alimentazione in posizione "I" e la spia blu si accenderà per 2
secondi per funzionare normalmente.
- AA +
- AA +
+ AA -+ AA -
1. Questo prodotto utilizza la tecnologia a induzione a infrarossi
per controllare l'apertura e la chiusura del coperchio della canna.
Introduzione alla funzione
30 31
OPIS ELEMENTÓW
PL
POKRYWA
INTERAKTYWNA
CZUJNIK
PODCZERWIENI
OBUDOWA
PANEL
STERUJĄCY
arrotolare la bocca del sacco all'esterno della bocca del cestino
interno/anello centrale, stringere e arrotolare il sacco
dell'immondizia, inserirlo nell'anello di stoccaggio del cestino
interno/anello centrale, quindi reinserire il cestino interno/anello
centrale nel corpo del cestino.
Prima di sostituire il sacco dell'immondizia, è necessario spegnere
l'alimentazione prima di estrarre la testa del cesto con sensore;
spegnere l'alimentazione, è vietato appoggiare la testa del cesto
con sensore a testa in giù sul tavolo o a terra, per evitare di
danneggiare le parti interne a causa del funzionamento continuo
del prodotto, che ne comprometterebbe il normale utilizzo.
ATTENZIONE
Anello di
raccolta
Col cestino
Anello di
raccolta
Senza cestino
Quando l'interruttore di
alimentazione è acceso, è
vietato capovolgere la
testa del estino con
sensore.
32 33
Pchnij w prawo
Pchnij w lewo
- AA +
+ AA -
Instalacja baterii
Krok 1:
Otwórz komorę baterii.
Krok 2:
Włóż dwie baterie 1,5 V typu AA do górnej i dolnej komory zgodnie
z oznaczeniami biegunów (+ i -), a następnie przesuń je w stronę
dodatniego styku (+).
Krok 3:
Włóż pozostałe dwie baterie 1,5 V typu AA w wolne miejsca w
komorach.
Producent zastrzega sobie prawo zmian w budowie produktu bez
powiadamiania użytkowników. Jeśli rysunki różnią się od
rzeczywistego wyglądu kosza, bierz pod uwagę jego rzeczywisty
wygląd.
Uwaga: Jeśli powyższe parametry różnią się od rzeczywistych,
bierz pod uwagę rzeczywiste parametry kosza.
KUBEŁEK WEWNĘTRZNY
WŁĄCZNIK
KOMORA BATERII
POJEMNIK NA
WĘGIEL AKTYWNY
SPECYFIKACJA
Nazwa
Napięcie
znamionowe
Pojemność
Zasięg
czujnika
Automatyczny
kosz na śmieci
ze stali
nierdzewnej
6v-
40/50/60L
≤30cm
34 35
Zdejmij interaktywną pokrywę, wyjmij kubełek wewnętrzny/opaskę
mocującą. Otwórz worek i włóż go do kubełka/opaski, a następnie
wywiń jego górny brzeg od wewnątrz do zewnątrz na brzeg
kubełka/opaski. Naciągnij brzeg worka i wepnij go w zaczep, a
następnie umieść kubełek/opaskę w obudowie kosza.
Zakładanie worka
1.Kosz wykorzystuje czujnik podczerwieni, kontrolujący
automatyczne otwieranie i zamykanie pokrywy. Po włączeniu
zasilania niebieska dioda będzie świecić przez dwie sekundy. Jej
zgaśnięcie oznacza, że kosz przeszedł w tryb gotowości.
2.Funkcja otwierania zbliżeniowego: Maksymalny zasięg czujnika
wynosi około 30 cm ponad panelem sterującym. Kiedy w polu jego
działania znajdzie się przedmiot lub dłoń, dioda zacznie migać, a
pokrywa otworzy się automatycznie. Po 5 sekundach pokrywa
zamknie się, dioda zgaśnie, a kosz przejdzie w tryb gotowości.
3.Funkcja otwierania dotykowego: Kiedy kosz znajduje się w trybie
gotowości, dotknij przycisku otwierania znajdującego się na
panelu sterującym. Pokrywa otworzy się automatycznie, a dioda
będzie migać co 5 sekund. W tym momencie czujnik podczerwieni
jest nieaktywny. Aby zamknąć pokrywę, ponownie dotknij
przycisku. Pokrywa zamknie się automatycznie dopiero po 10
minutach i kosz przejdzie w tryb gotowości.
Opis funkcji
Krok 4:
Zamknij komorę baterii, a następnie przestaw włącznik w pozycję
„I”. Na dwie sekundy zapali się niebieska dioda i kosz przejdzie w
tryb gotowości.
- AA +
- AA +
+ AA -+ AA -
36 37
In case a return is required, the item must be returned in original box. Without this
your return will not be accepted.
DO NOT discard the box / original packaging.
Take a photo of the box markings.
Take a photo of the damaged part (if applicable).
Send us an email with the images requested.
A photo of the markings (text) on the side of the box is required in case a part is
needed for replacement. This helps our staff identify your product number to
ensure you receive the correct parts.
A photo of the damage is always required to file a claim and get your replacement
or refund processed quickly. Please make sure you have the box even if it is
damaged.
Email us directly from marketplace where your item was purchased with the
attached images and a description of your claim.
Falls eine Rücksendung erforderlich ist, muss der Artikel in der
Originalverpackung zurückgeschickt werden. Andernfalls wird Ihre Rücksendung
nicht angenommen.
Werfen Sie den Karton / die Originalverpackung NICHT weg.
Machen Sie ein Foto von der Beschriftung des Kartons.
Machen Sie ein Foto des beschädigten Teils (falls zutreffend).
Schicken Sie uns eine E-Mail mit dem gewünschten Foto.
Für den Fall, dass ein Ersatzteil benötigt wird, benötigen wir ein Foto der
Beschriftung (Text) auf der Seite des Kartons. So können unsere Mitarbeiter Ihre
Artikelnummer identifizieren und sicherstellen, dass Sie die richtigen Teile
erhalten.
Ein Foto des beschädigten Teils ist immer erforderlich, um eine Reklamation
einzureichen und eine schnelle Bearbeitung Ihres Ersatzteils oder Ihrer
Rückerstattung zu gewährleisten. Bitte stellen Sie sicher, dass Sie den Karton
haben, auch wenn er beschädigt ist.
Schicken Sie uns eine E-Mail direkt vom Marktplatz, auf dem Sie den Artikel
gekauft haben, mit den angehängten Fotos und einer Beschreibung Ihrer
Reklamation.
EN
DE
Return / Damage Claim Instructions
Rücksendung / Beschädigung Anweisungen
Przed zdjęciem pokrywy interaktywnej w celu wymiany worka
wyłącz jej zasilanie. W przypadku pozostawienia włączonej
pokrywy pod żadnym pozorem nie kładź jej do góry nogami.
Spowoduje to nieustanne działanie czujnika, co może doprowadzić
do nieodwracalnego uszkodzenia komponentów elektronicznych.
Uwaga
Zaczep worka
Z kubełkiem
wewnętrznym
Zaczep worka
Bez kubełka
wewnętrznego
38 39
Instructions De Retour / Réclamation De Dommages
Dans le cas où un retour est requis, l'article doit être retourné dans sa boîte
d'origine. Sans cela, votre retour ne sera pas accepté.
NE PAS jeter la boîte/l'emballage d'origine.
Prenez une photo des marquages de la boîte.
Prenez une photo des dommages (le cas échéant).
Envoyez-nous un e-mail avec les images demandées.
Une photo des marquages (texte) sur le côté de la boîte est requise au cas où une
pièce serait nécessaire pour le remplacement. Cela aide notre personnel à
identifier votre numéro de produit pour s'assurer que vous recevez les bonnes
pièces.
Une photo des dommages est toujours requise pour déposer une réclamation et
obtenir rapidement votre remplacement ou votre remboursement. Assurez-vous
d'avoir la boîte même si elle est endommagée.
Envoyez-nous un e-mail directement depuis le marché où votre article a été
acheté avec les images ci-jointes et une description de votre réclamation.
Instrucciones de Devolución / Reclamación de Daños
En caso de que se requiera una devolución, el artículo debe ser devuelto en la
caja original. Sin esto su devolución no será aceptada.
NO deseche la caja/embalaje original.
Tome una foto de las marcas de la caja.
Tome una foto de las piezas dañadas (si procede).
Envíenos un correo electrónico con las imágenes solicitadas.
Se requiere una foto de las marcas (texto) en el lado de la caja en caso de que se
necesite una pieza para reemplazarla. Esto ayuda a nuestro personal a identificar
su número de producto para asegurarse de que recibe las piezas correctas.
Una foto de los daños es siempre necesaria para presentar una reclamación y
conseguir que su reemplazo o reembolso sea procesado rápidamente. Por favor,
asegúrese de tener la caja aunque esté dañada.
Envíenos un correo electrónico directamente desde el mercado donde se compró
su artículo con las imágenes adjuntas y una descripción de su reclamación.
FR
ES
Nel caso in cui sia richiesto un reso, l'articolo deve essere restituito nella scatola
originale. Senza la scatola originale il tuo reso non sarà accettato.
NON scartare la scatola / confezione originale.
Fare una foto dei contrassegni sulla scatola.
Fare una foto di Danno (se è applicabile).
Inviarci una mail con le immagini richieste.
È necessaria una foto dei contrassegni (testo) sul lato della scatola nel caso in
cui la parte debba essere sostituita. Questo aiuta il nostro staff a identificare il
numero del tuo prodotto per assicurarti di ricevere le parti corrette.
Una foto del danno è sempre necessaria per presentare un reclamo e ottenere
rapidamente la sostituzione o il rimborso. Assicurati di avere la scatola anche se
è danneggiata.
Inviarci un'e-mail direttamente dal mercato in cui è stato acquistato il tuo articolo
con le immagini allegate e una descrizione del tuo reclamo.
Jeśli chcesz zwrócić produkt, musi znajdować się on w oryginalnym opakowaniu.
Towar zwrócony w nieoryginalnym opakowaniu nie zostanie przyjęty.
Nie wyrzucaj oryginalnego opakowania.
Zrób zdjęcie oznaczeń na opakowaniu.
Zrób zdjęcie uszkodzonej części (jeśli dotyczy).
Skontaktuj się z nami.
Jeśli jakakolwiek część wymaga wymiany, zrób zdjęcie oznaczeń kodu produktu,
który znajduje się na opakowaniu. Pozwoli nam to zidentyfikować produkt i
dostarczyć ci właściwą część.
Jeśli chcesz złożyć reklamację, zrób zdjęcie uszkodzonej części. Pozwoli nam to
zatwierdzić reklamację i zlecić zwrot środków na twoje konto. Do złożenia
reklamacji potrzebne będzie oryginalne opakowanie.
Skontaktuj się z nami telefonicznie, mailowo lub poprzez formularz kontaktowy.
Załącz zdjęcia produktu i opis roszczenia.
IT
PL
Istruzioni Per La Restituzione / Reclamo Per Danni
Zwroty i reklamacje
40 41
