Window Cleaning Robot
INSTRUCTION MANUAL
▪ Technical Support
▪ Package is NOT in perfect condition
▪ Parts missing
▪ Any other quality issues
Please contact us if you need any help as following:
Please keep properly and check the manual carefully
before using the machine.
Model: CHYW201
01
04
05
06
06
07
10
10
11
12
23
CONTENTS
IMPORTANT SAFETY INSTRUCTIONS
ACCESSORIES LIST
PRODUCT INSTRUCTIONS
INDICATOR LIGHT GUIDE
REMOTE CONTROL INSTRUCTIONS
ACCESSORY INSTALLATION
CLEANING AND MAINTENANCE
PRODUCT SPECIFICATIONS
TROUBLESHOOTING GUIDE
DE
FR

01 02 03 04 05 06 07 08 09 10 11
12 13 14 15 16 17 18 19 20 21 22
23 24 25 26 27 28 29 30 31 32 33
IMPORTANT SAFETY INSTRUCTIONS
Before using this product, please carefully read the following safety
instructions and follow all standard safety precautions.
Caution:
• Please read the user manual thoroughly. Any operation that does not
comply with the manual may result in product damage.
• Please keep the user manual for future reference.
1. Please Do not let people with mental or sensory impairments and other people
who lack common knowledge of home appliances use the product;
2. Please Do not let children play, operate, or clean the robot to avoid injury;
3. Ensure that only authorized technicians can disassemble the product, and users
are strictly prohibited from disassembling the product by themselves;
4. Only use the battery, power adapter and other accessories recommended or sold
by the manufacturer, otherwise the product may be damaged;
5. Please ensure that the power supply voltage conforms to the voltage marked on
the power adapter;
6. Please Do not drag the power cord or lift the product, the power cord should be
avoided to be caught by the glass window;
7. Please Do not charge the product in a humid environment, or near an flame area
or other household appliances to avoid loss;
8. Please Do not place the product near areas with containing cigarette butts,
lighters or other open flames;
9. Please Do not use the product on uneven glass to avoid glass damage and
product drop;
10.Please Do not use the product on a large area of wet or oily glass, and avoid to
put the product in water or other liquids strictly;
11.Please Do not place the product to where it may fall or sink, or in water or other
liquids strictly;
12.Please Do not use the product when the power socket is damaged, the power
cord or the product is damaged, and contact the manufacturer for repairs in
time;
13.Please Do not touch wires, sockets and power adapters when your hands are
wet;
14.Please Do not let any people, animals or valuables under the product when it is
working, and ensure that someone is here and providing assistance to the
product if necessary;
15.The ambient temperature of the product is 0°C-40°C, please do not charging and
using the product once beyond this temperature range;
16.This product is a household product for indoor and outdoor environments
protected by guardrails. Please Do not use it in commercial and industrial
scenarios;
01 02 03 04 05 06 07 08 09 10 11
12 13 14 15 16 17 18 19 20 21 22
23 24 25 26 27 28 29 30 31 32 33
This appliance can to be used by children aged from 8 years and above and persons
with reduced physical, sensory olmental capabilities or lack ofexperience and
knowledge, if they have been given supervision or instruction concerninguse of the
appliance in a safe way and understand the hazards involved , Children should not
play with the appliance.Cleaning and user maintenance should not be made by
children without supervision.
1. Please do not disassemble the inbuilt battery of the product by yourself. If you
need to replace it, please contact customer service for professional services.
2. Do not crush, hit or dispose of the battery in fire to avoid battery explosion.
3. Be sure to remove the battery after turning off the power before discarding the
product, and properly handle the battery in accordance with relevant regulations.
Warning:
Battery safety warning
1. Please keep the product powered on when the product is working. The inbuilt
backup battery is only suitable for using the product to maintain the adsorption
state in case of a sudden power failure, and cannot be used as a normal working
power supply;
2. Before maintaining or cleaning the product, the plug must be pulled out from the
power socket to avoid pulling the power cord;
3. Please use the product in accordance with the instructions in this manual. The
company is not responsible for any loss or injury caused by improper use.
4. For the purposes of recharging the battery, only use the detachable supply unit
(model: BZ065-240300-E2 ) provided with this appliance;
5. The battery must be removed from the product before it is scrapped;
6. The appliance must be disconnected from the supply mains when removing the
battery;
7. The battery is to be disposed of safety;
8. This appliance contains batteries that are only replaceable by skilled persons.
Robot battery warning
Battery Disposal Instructions
Relevant marks on the battery, instructions and packaging paper have clearly
stated that the battery should not be used together with other home appliances.
The battery mark contains the chemical symbols Hg, Gd or pB to indicate that the
battery contains mercury, cadmium and other related heavy metal elements that
exceed the relevant standards of EC Directive 2006/6. If you need to discard the
battery, please handle this product and the battery properly according to the
relevant waste recycling instructions.
Attention:
Please do not use batteries of other products, otherwise the robot may be damaged.
01 02 03 04 05 06 07 08 09 10 11
12 13 14 15 16 17 18 19 20 21 22
23 24 25 26 27 28 29 30 31 32 33
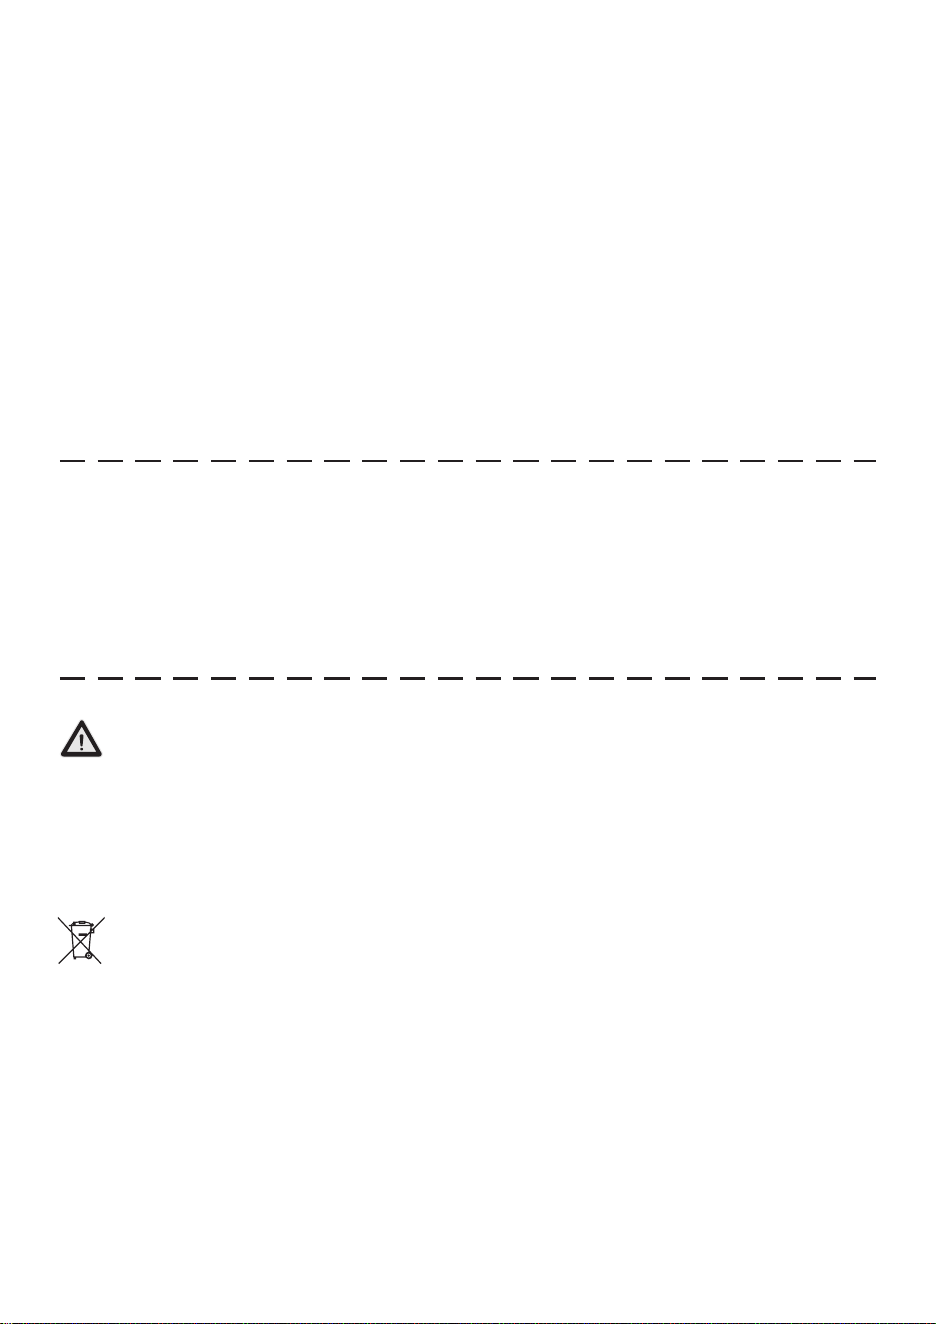
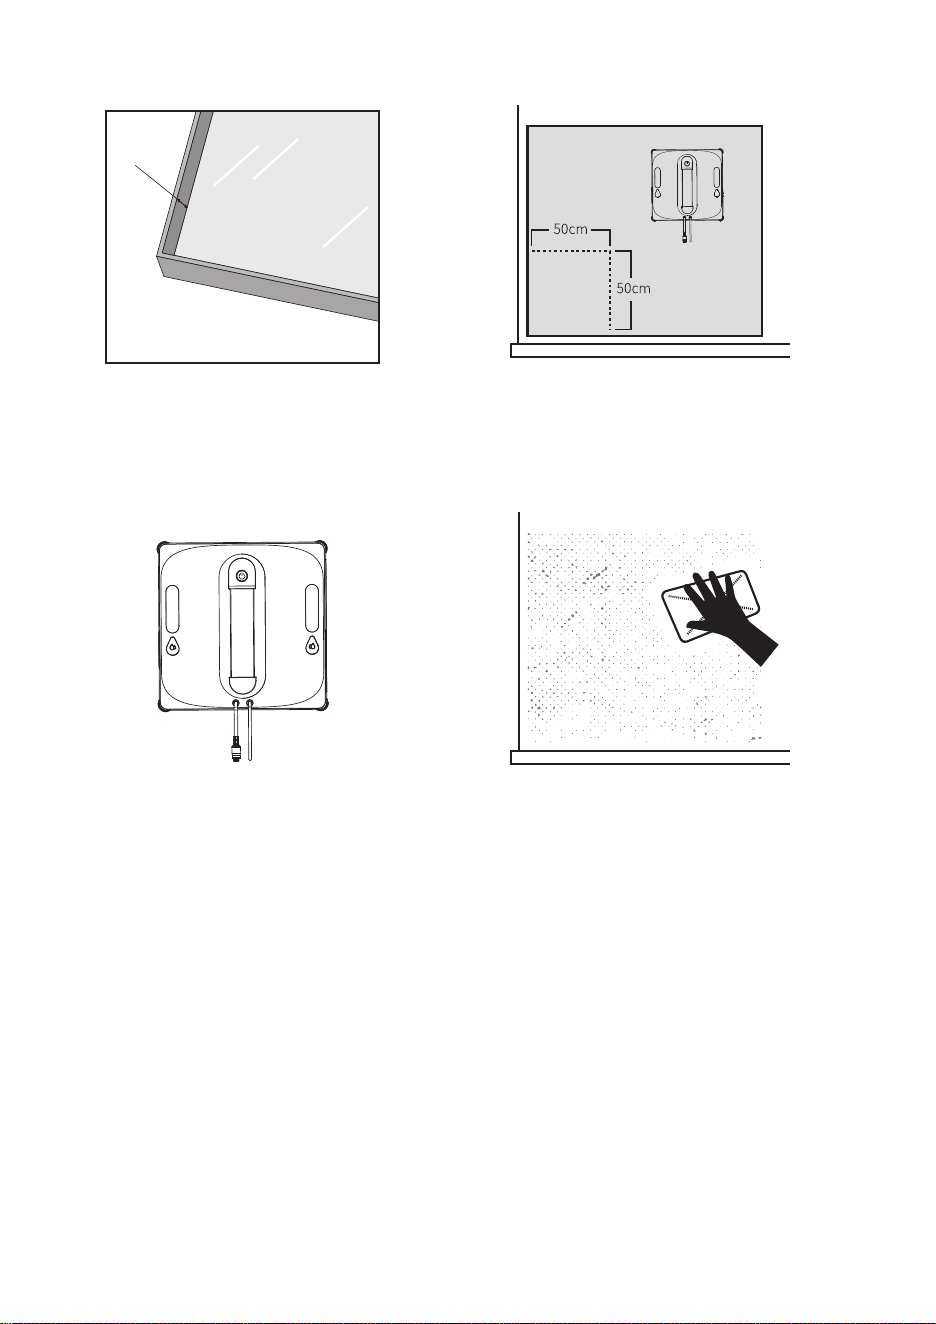
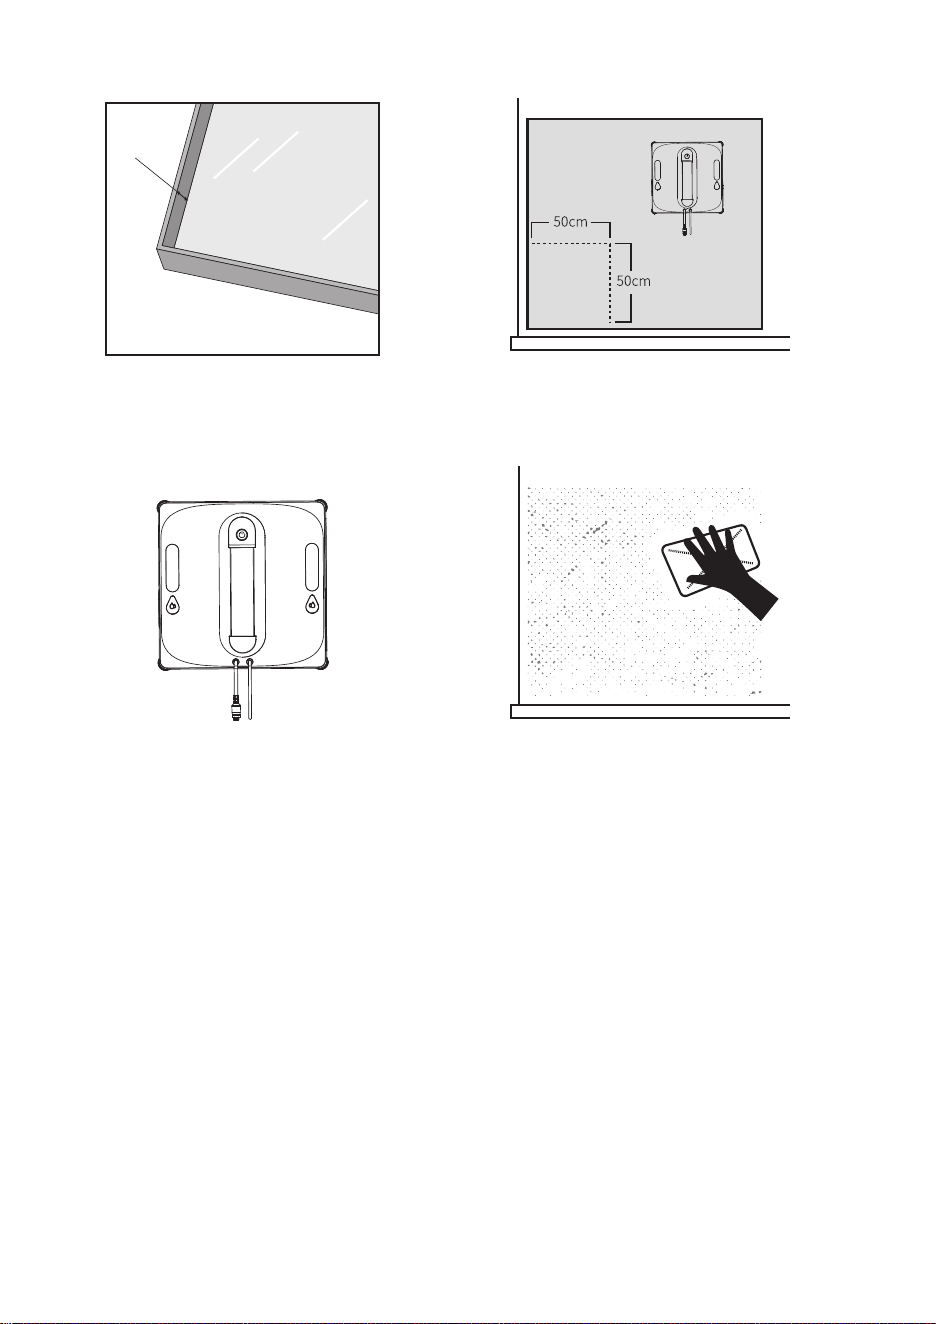
Precautions
Please use the product on framed
glass with a border height of ≥5mm.
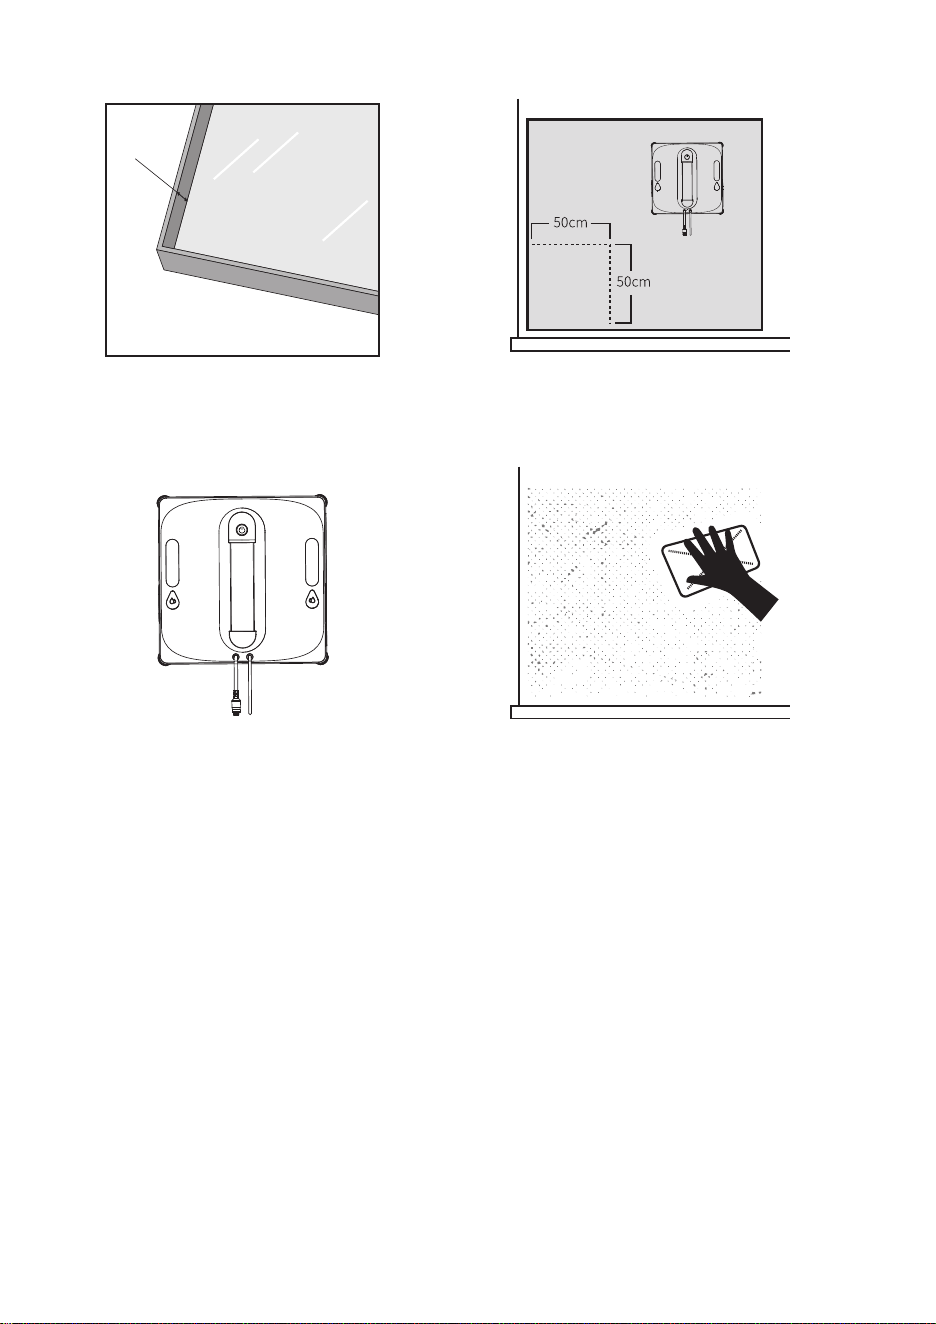
Please use on glass surfaces with an
area of ≥50cm × 50cm.
Border height ≥ 5mm
≥ 5mm
Ensure the product is used with
sufficient battery power.
If the glass surface has excessive dust,
please first clean an area the same size
as the machine before use.
• If there are immovable obstacles in front of the window (such as railings or furniture),
ensure that the gap between the window and the obstacle is greater than 13cm
before using the machine.
• When the machine is in operation, use the remote control to control it.
• The machine may not function properly on non-vertical windows; assist the machine
if necessary.
• Ensure the machine is in the correct position and avoid using it in an upside-down
state.
Notice:
01 02 03 04 05 06 07 08 09 10 11
12 13 14 15 16 17 18 19 20 21 22
23 24 25 26 27 28 29 30 31 32 33
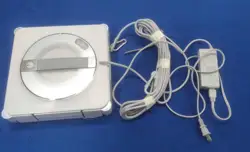
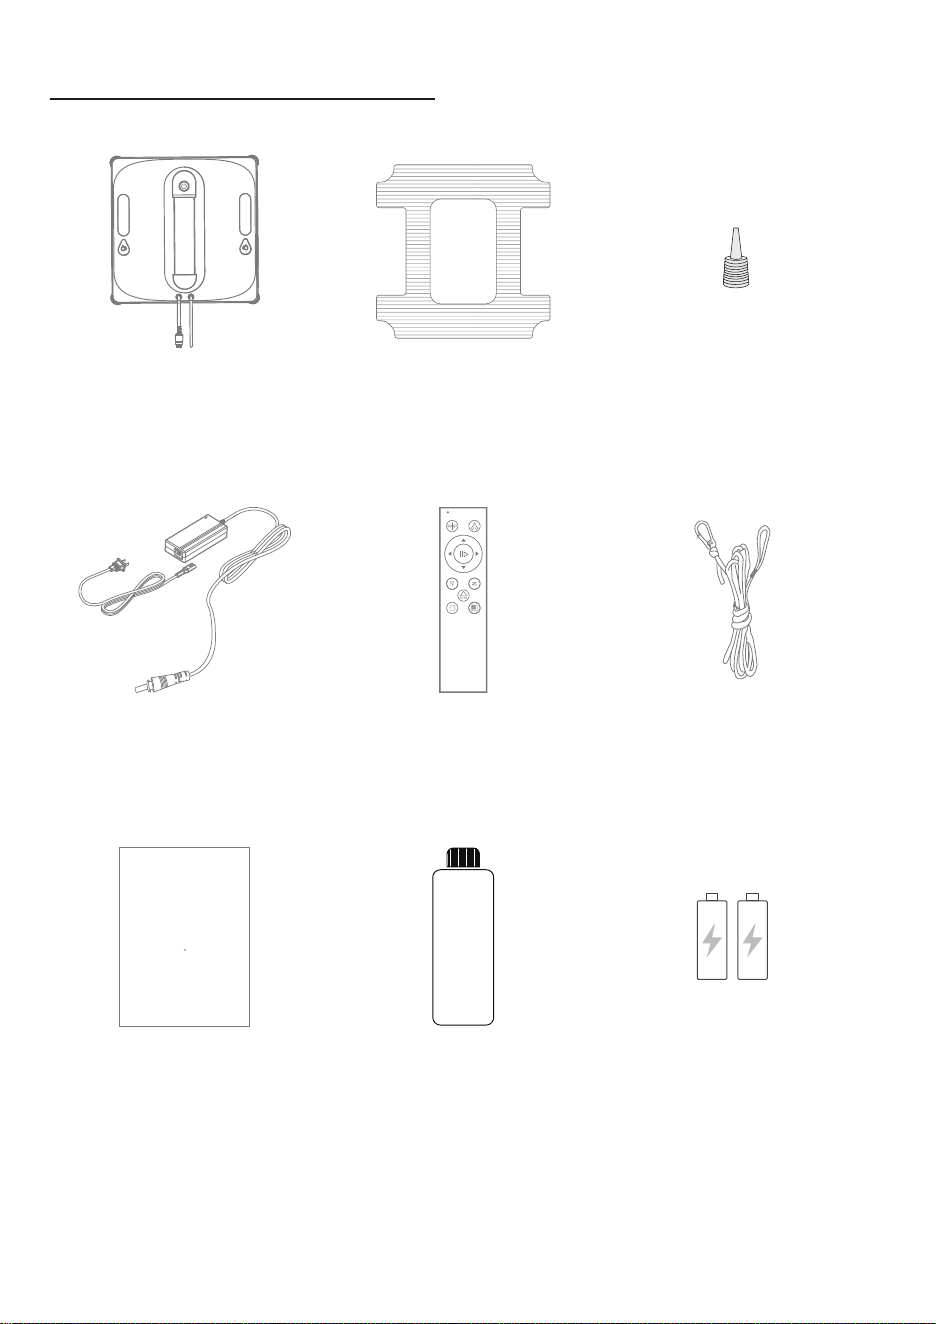
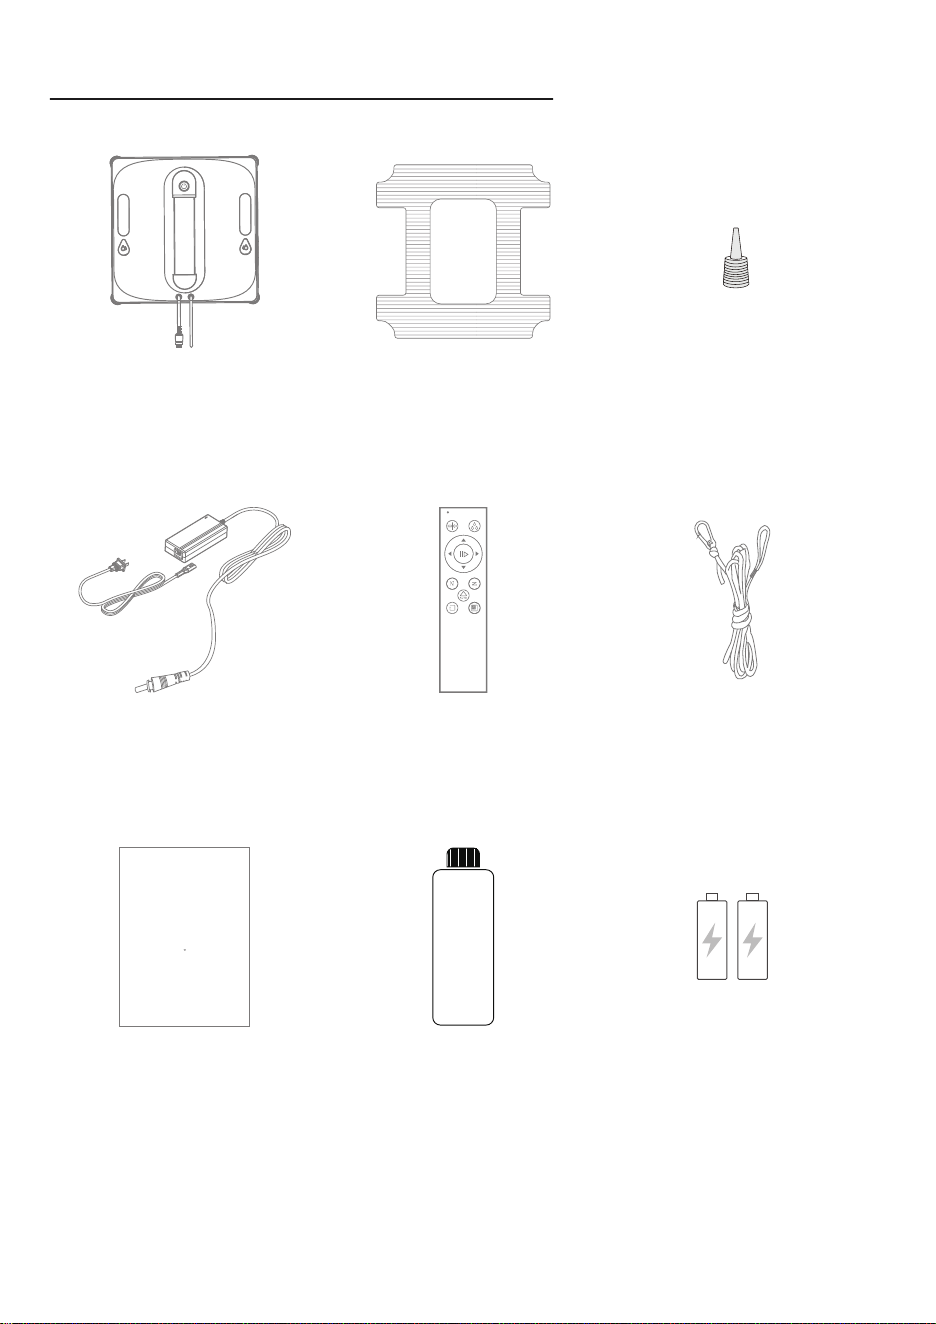
ACCESSORIES LIST
Water InletCleaning ClothMain Unit
Safety Rope AssemblyPower Cable Remote Control
Remote Control BatteryUser Manual Water Bottle
01 02 03 04 05 06 07 08 09 10 11
12 13 14 15 16 17 18 19 20 21 22
23 24 25 26 27 28 29 30 31 32 33
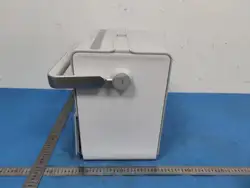
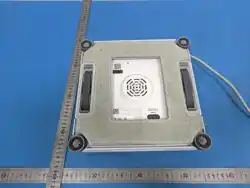
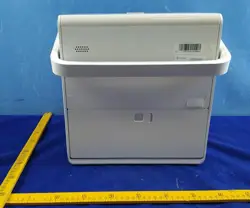
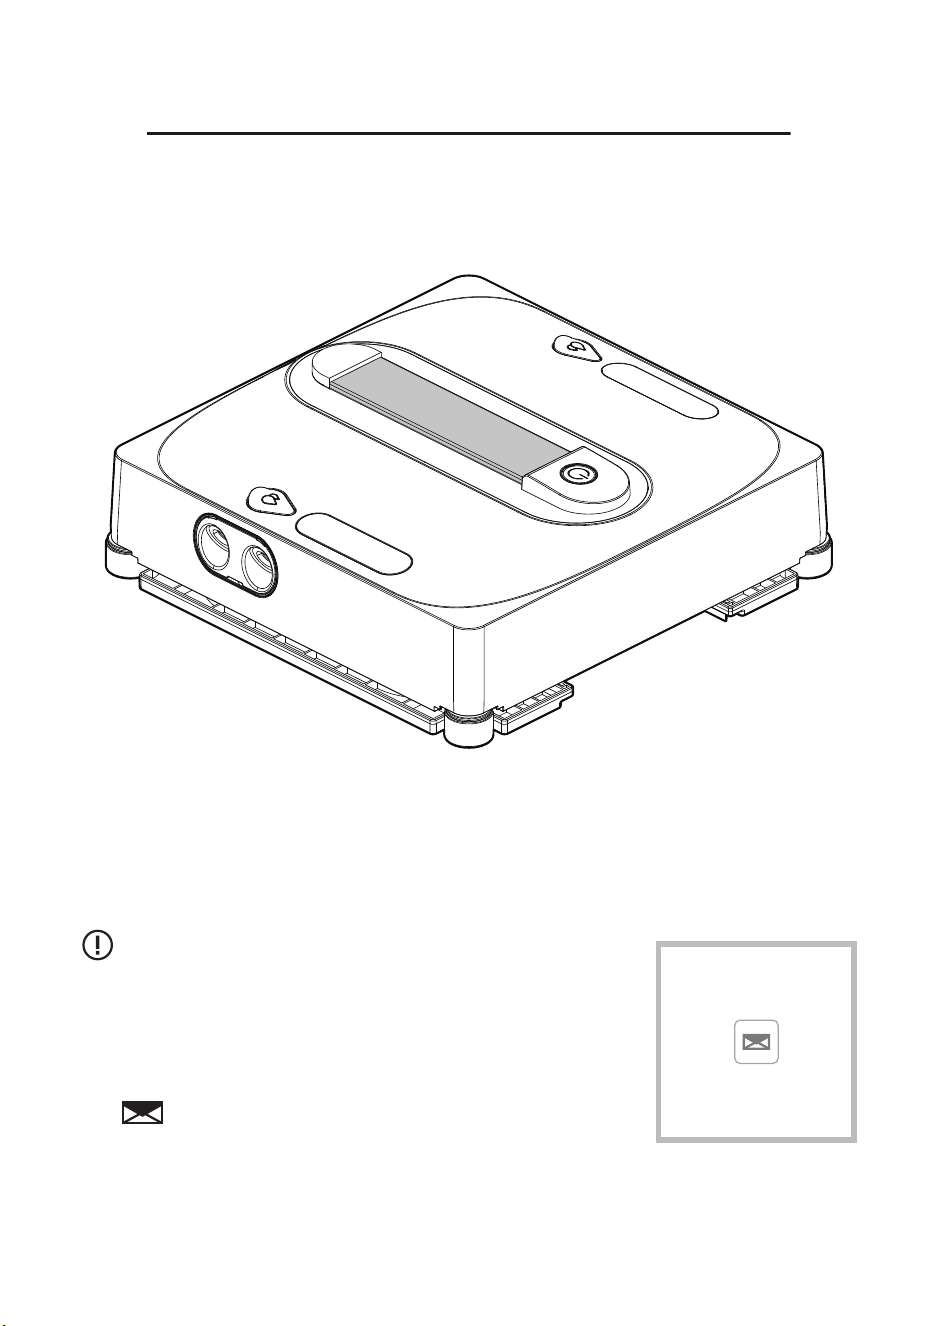
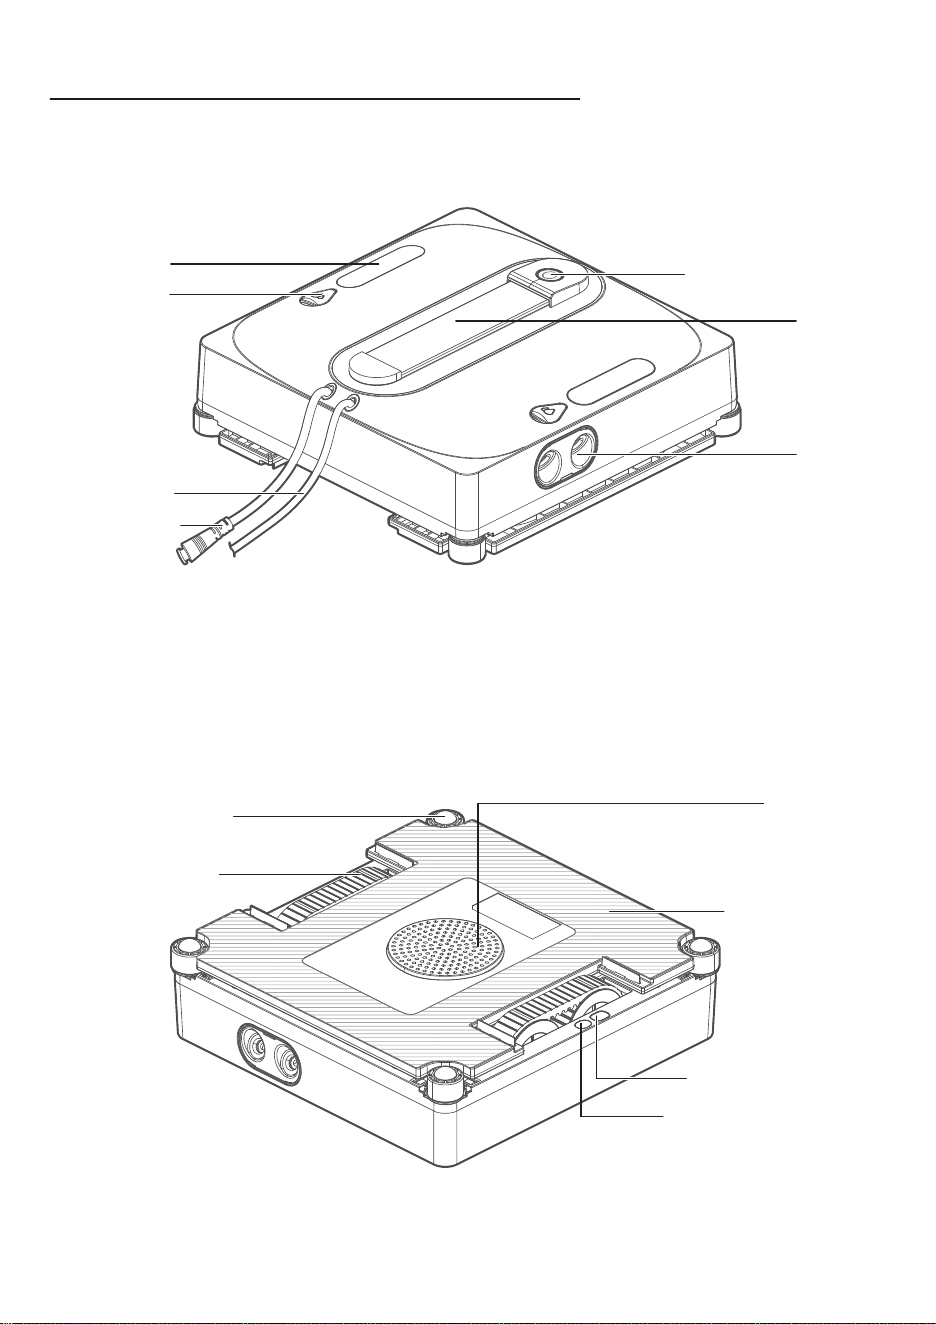
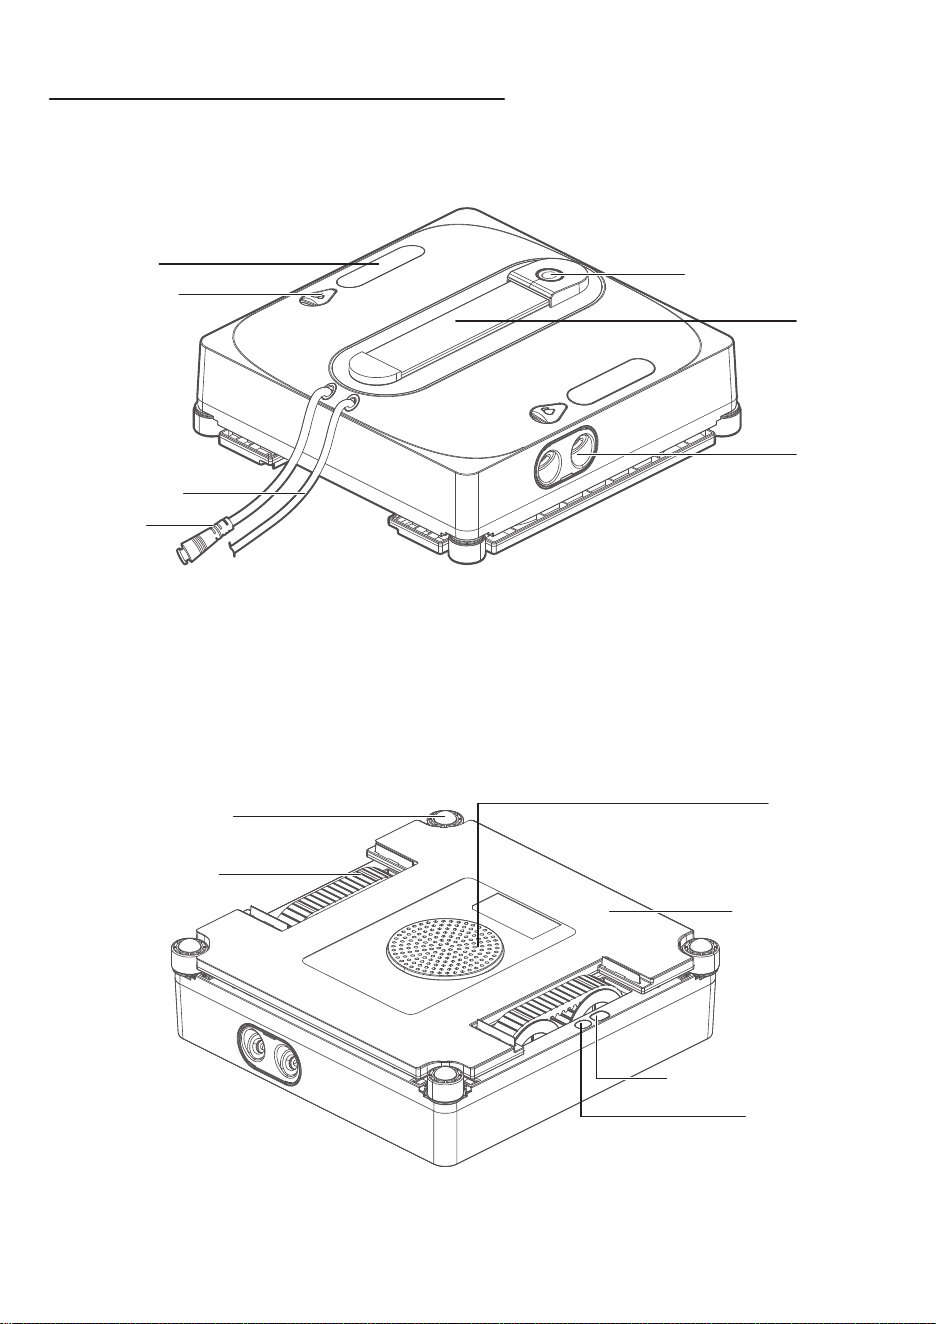
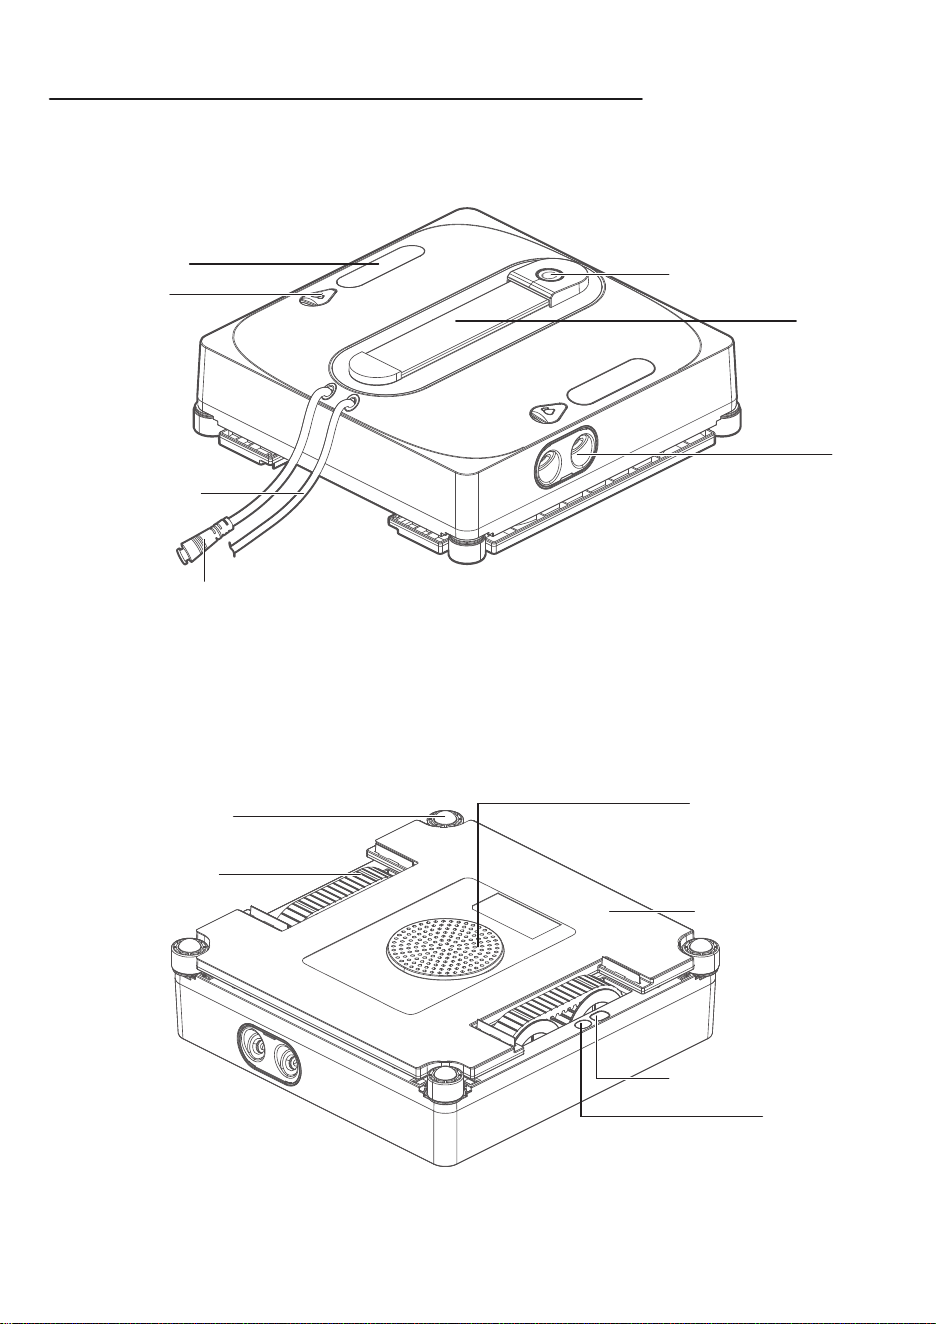
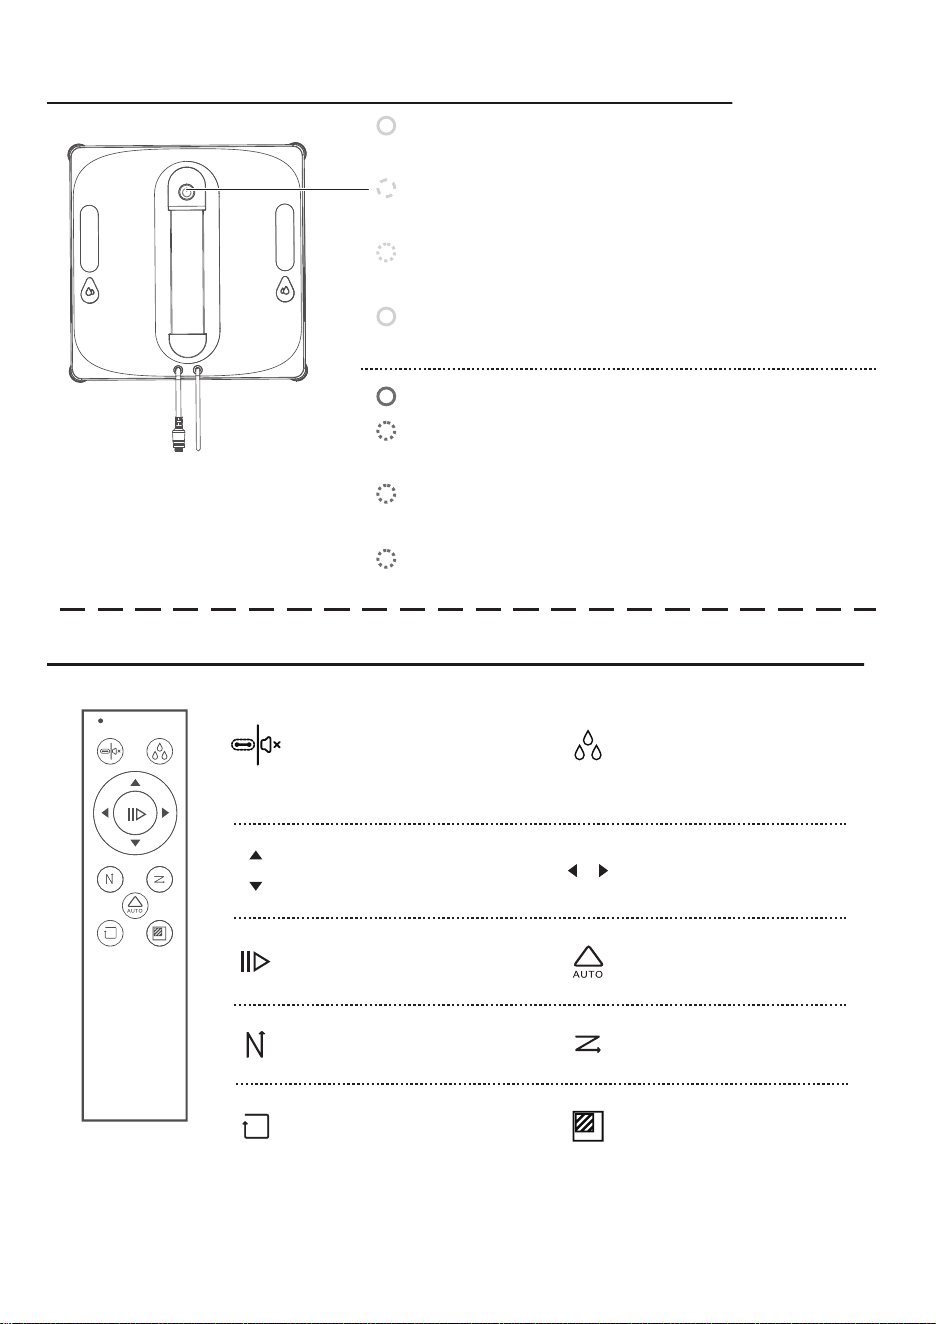
PRODUCT INSTRUCTIONS
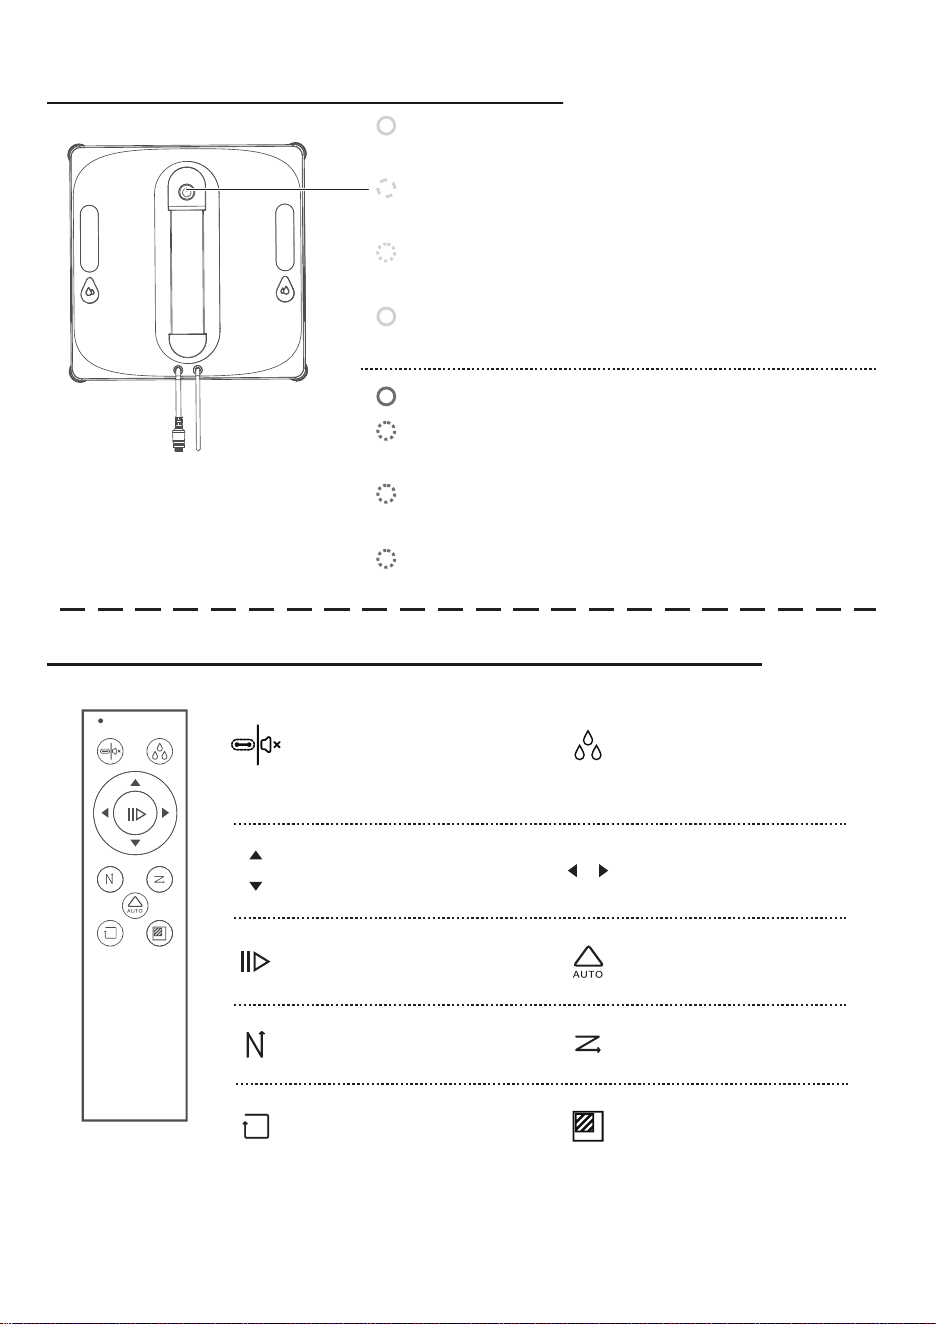
Front of the Main Unit
Back of the Main Unit
Start/Pause Button
Water Tank
Nozzle
Water Inlet
Handle
Power Cable
Safety Rope
Anti-Drop Sensor
Wheel Assembly
Status Indicator Light
Programming Port
Fan Motor
Cleaning Cloth
01 02 03 04 05 06 07 08 09 10 11
12 13 14 15 16 17 18 19 20 21 22
23 24 25 26 27 28 29 30 31 32 33
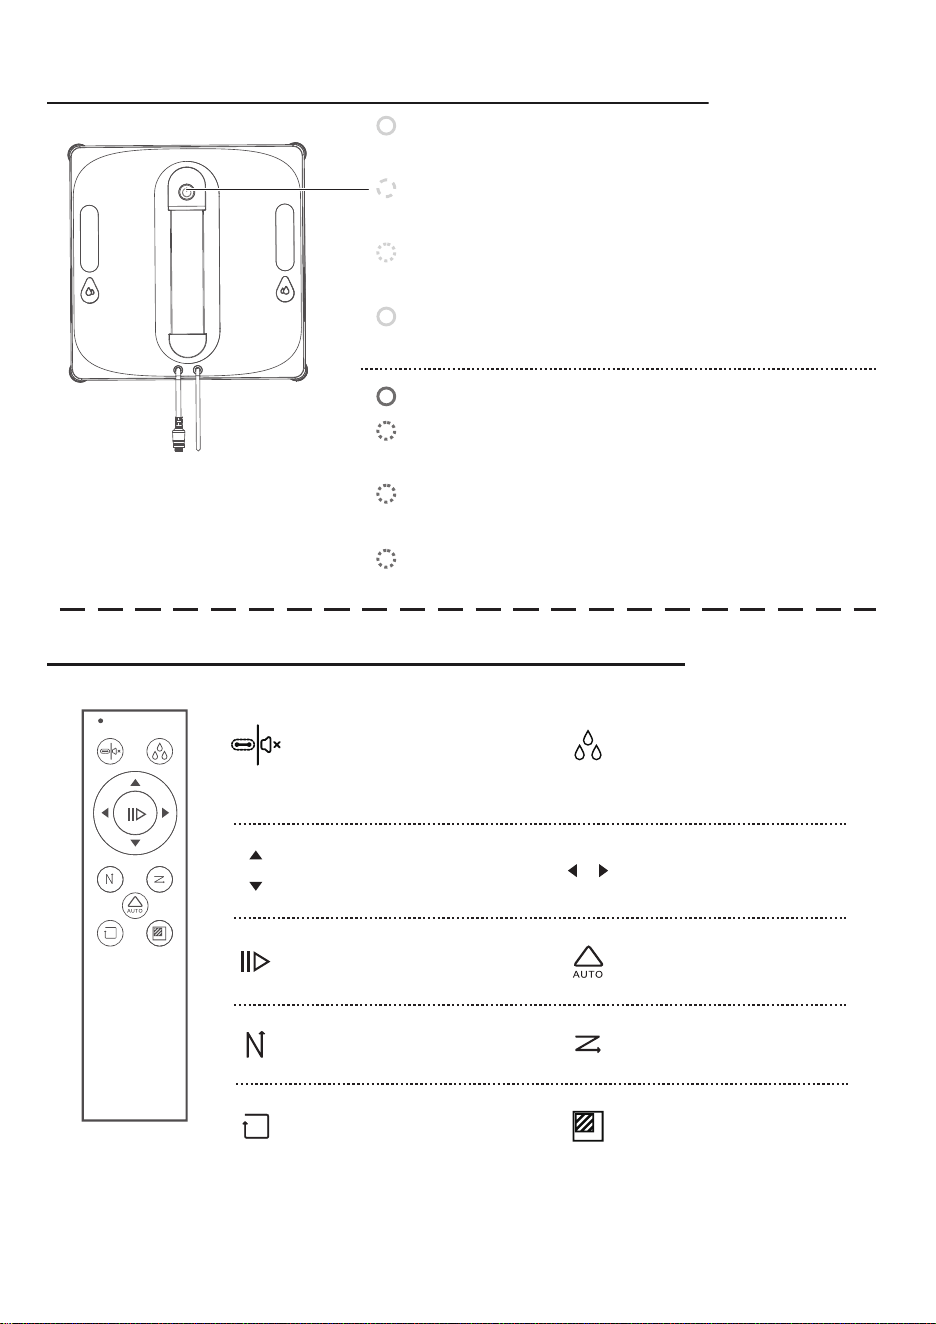
INDICATOR LIGHT GUIDE
REMOTE CONTROL INSTRUCTIONS
Blue Light Steady:
Standby / In Operation / Charging Complete
Red Light Steady: Stopped
Red Light Flashing + Intermittent Voice Alert:
Wheel Overload
Red Light Flashing + Intermittent Voice Alert:
Insufficient Air Pressure
Red Light Flashing + Intermittent Voice Alert:
Power Cable Disconnected
Blue Light Breathing (Fading In & Out):
Charging
Blue Light Flashing + Single Beep:
Powering On
Blue Light Steady + Intermittent Voice Alert:
Cleaning Completed
Before use, please install the battery in the remote control. If the remote control is
not used for an extended period, remove the battery to prevent leakage or damage.
Notice:
During suction:
Voice control on/off
When removing the
machine: Wheel cleaning
Manual spray
Move left / Move rightMove up / Move down
Adaptive Z/N modeStart/Pause
Z-mode cleaningN-mode cleaning
Spot cleaningEdge cleaning

01 02 03 04 05 06 07 08 09 10 11
12 13 14 15 16 17 18 19 20 21 22
23 24 25 26 27 28 29 30 31 32 33
ACCESSORY INSTALLATION
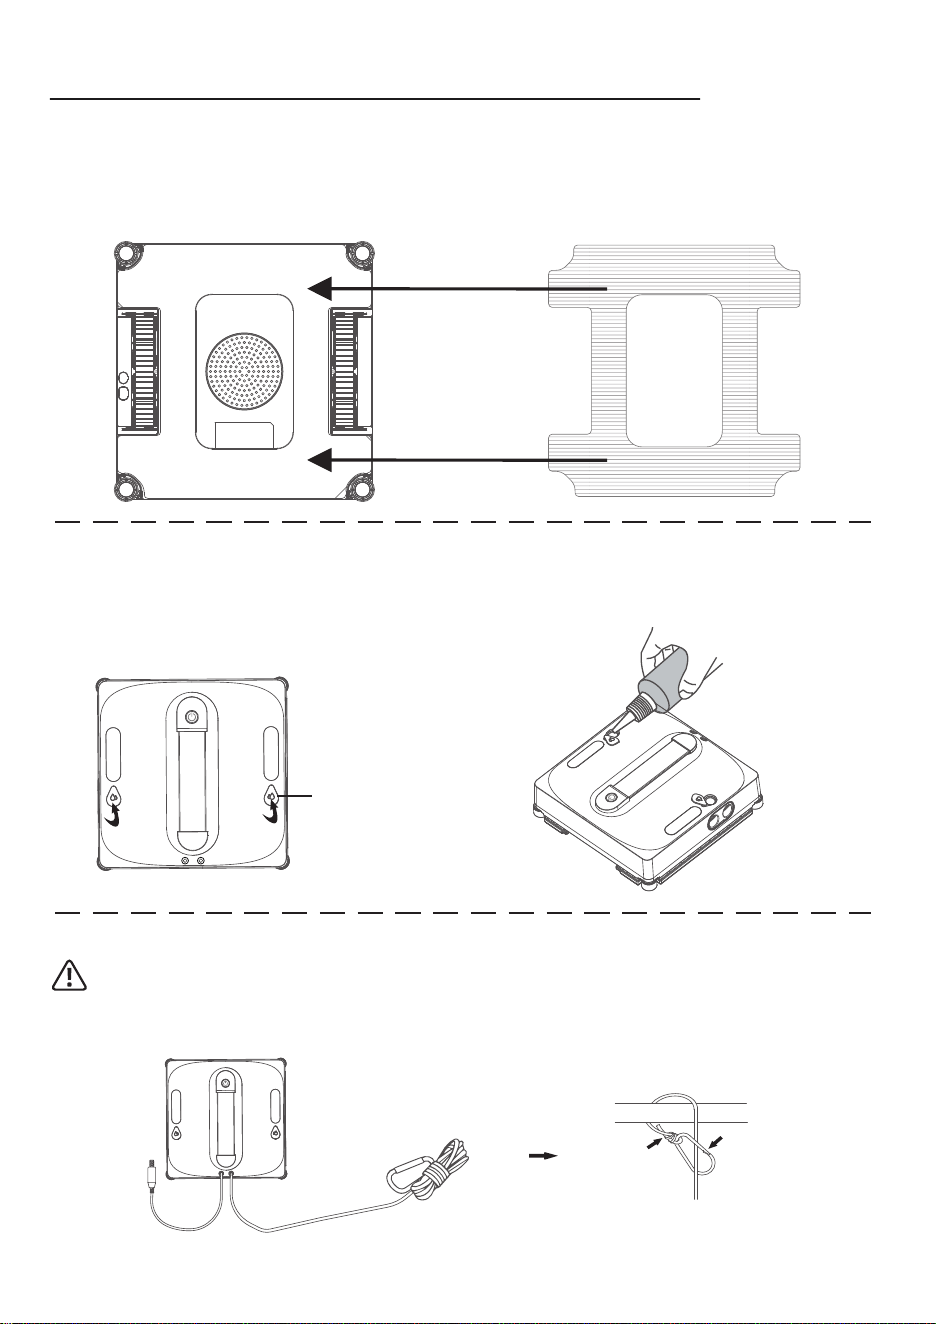
Attach the cleaning cloth to the window cleaning board in the direction shown in the
diagram below. Ensure the cloth is applied flat and does not cover the four corners of
the anti-drop sensors, the wheel surface, or the inner compartment.
Installing the Cleaning Cloth
Add clean water or specialized glass cleaner
Open the water
tank lid
Please add clean water or glass cleaner to the water tank. Do not add high-foam
cleaning liquid, and do not overfill the tank.
Warning:
Before use, be sure to secure the safety rope properly. It can be wrapped around an indoor
object to ensure it is firmly fastened and will not come loose.
Secure the safety rope buckle (to prevent falling)
01 02 03 04 05 06 07 08 09 10 11
12 13 14 15 16 17 18 19 20 21 22
23 24 25 26 27 28 29 30 31 32 33
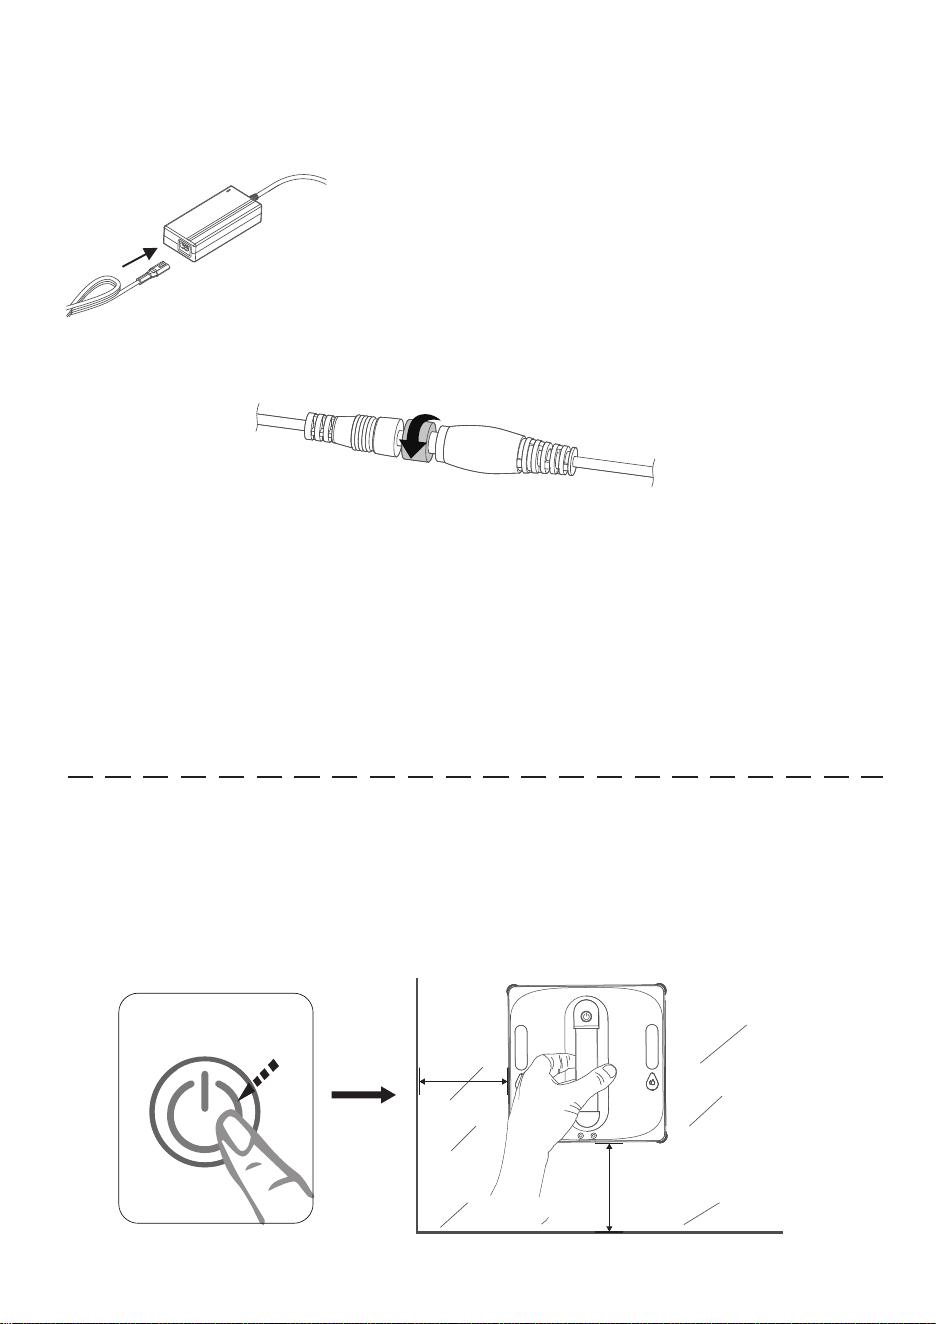
Follow the diagram to connect the power cable, ensuring all connections are secure
and tightly fitted.
• Please fix the safety buckle at an appropriate position on the inside of the glass.
• When cleaning outdoor glass windows (such as those with a balcony or railing
protection), ensure the window is closed, leaving only a small gap for the safety
rope (do not exceed the diameter of the safety buckle).
• Do not disconnect the power while the machine is operating, as this may cause it
to fall.
• Keep the fan away from hair and small objects to prevent blockage, which could
affect the machine's performance.
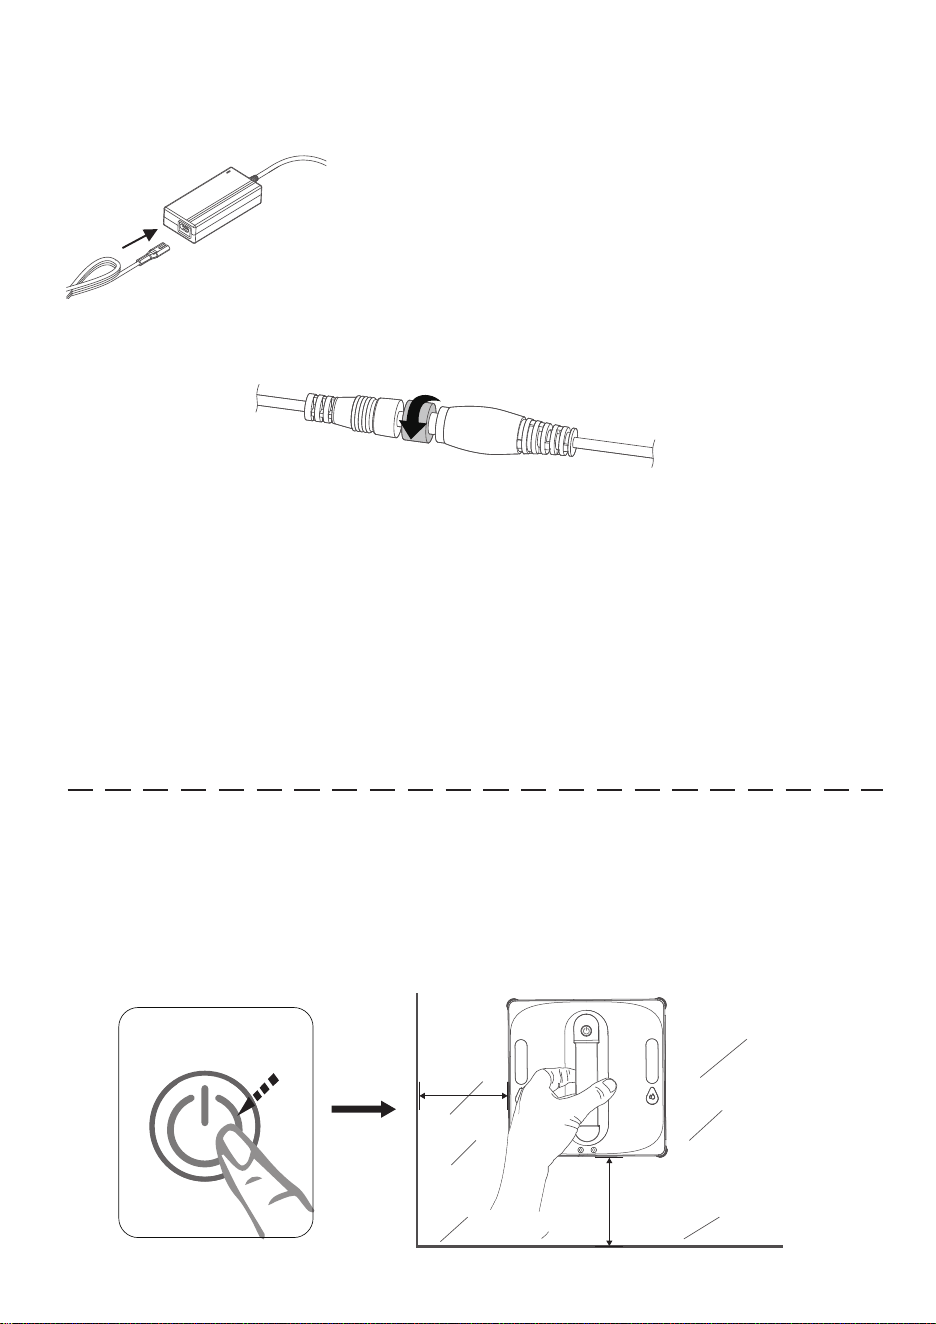
Avoid hanging the power adapter in the air. Ensure
it is placed on a stable surface to prevent damage.
Connecting the Power Cable
Notice:
Notice:
Insert the connected power cable into the machine's power port and tighten the
fixing knob at the port.
Place the machine against the glass. (Note: Keep a distance of at least 10 cm
from the edges of the glass. Do not start the machine near the glass edge or
gaps.) Press the main unit button to start the machine. A flashing blue light
indicates the suction process, and a steady blue light means successful suction.
Press the main unit button again to begin automatic cleaning.
10CM
10CM
Start Cleaning

01 02 03 04 05 06 07 08 09 10 11
12 13 14 15 16 17 18 19 20 21 22
23 24 25 26 27 28 29 30 31 32 33
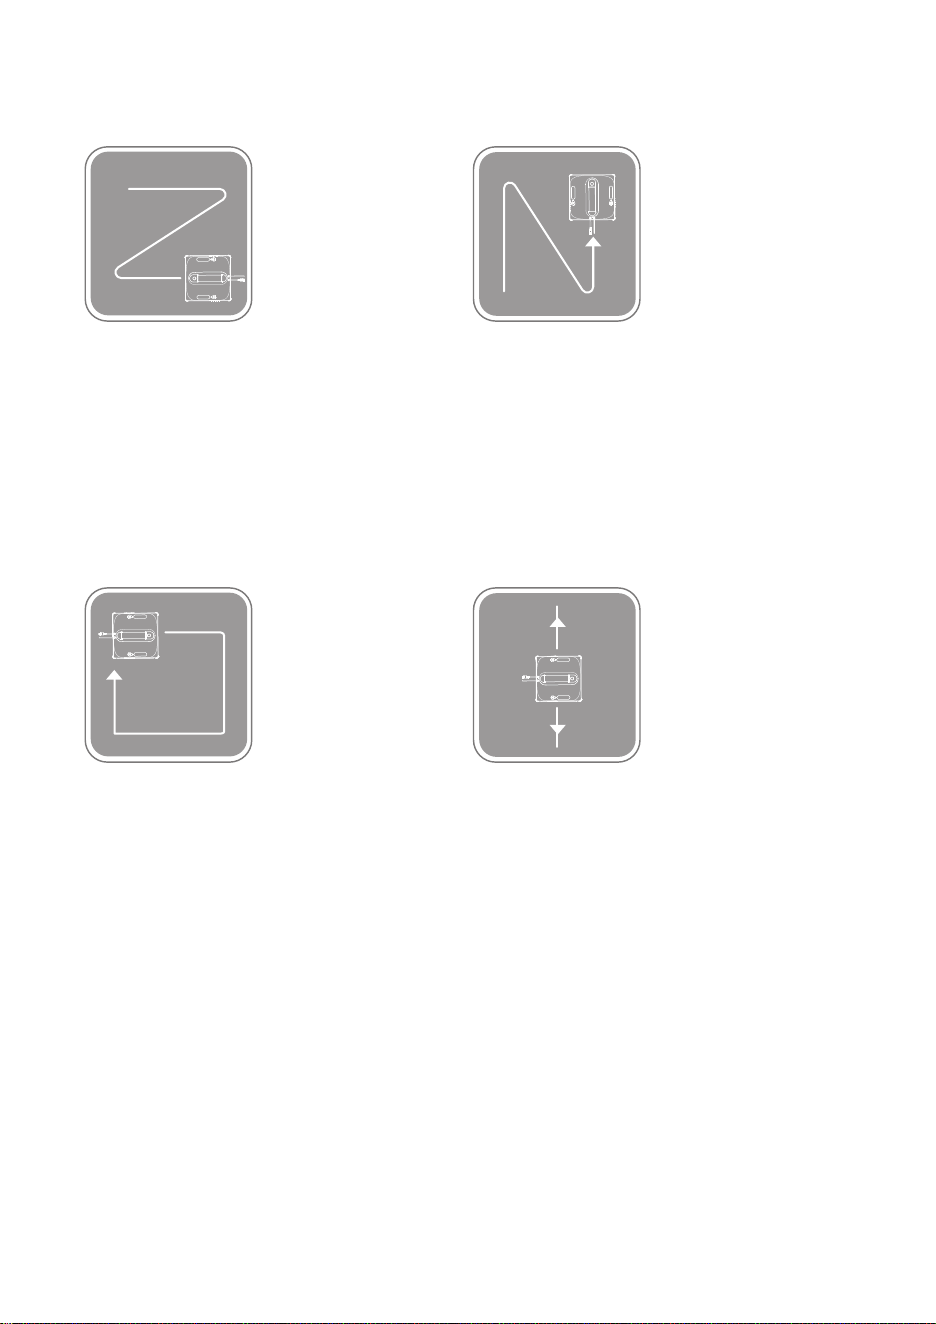
Cleaning Modes
“Z” Pattern Cleaning
Function: Suitable for wide glass
surfaces, cleans in a Z-shaped route.
Operation: Press the “Z” Cleaning
button on the remote control.
Edge Cleaning
Function: Cleans along the edges
of the glass.
Operation: Press the Edge Cleaning
button on the remote control.
Spot Cleaning
Function: Repeatedly cleans a
specific area back and forth.
Operation: Press the Spot Cleaning
button on the remote control.
“N” Pattern Cleaning
Function: Suitable for narrow glass
surfaces, cleans in an N-shaped route.
Operation: Press the “N” Cleaning
button on the remote control.
01 02 03 04 05 06 07 08 09 10 11
12 13 14 15 16 17 18 19 20 21 22
23 24 25 26 27 28 29 30 31 32 33
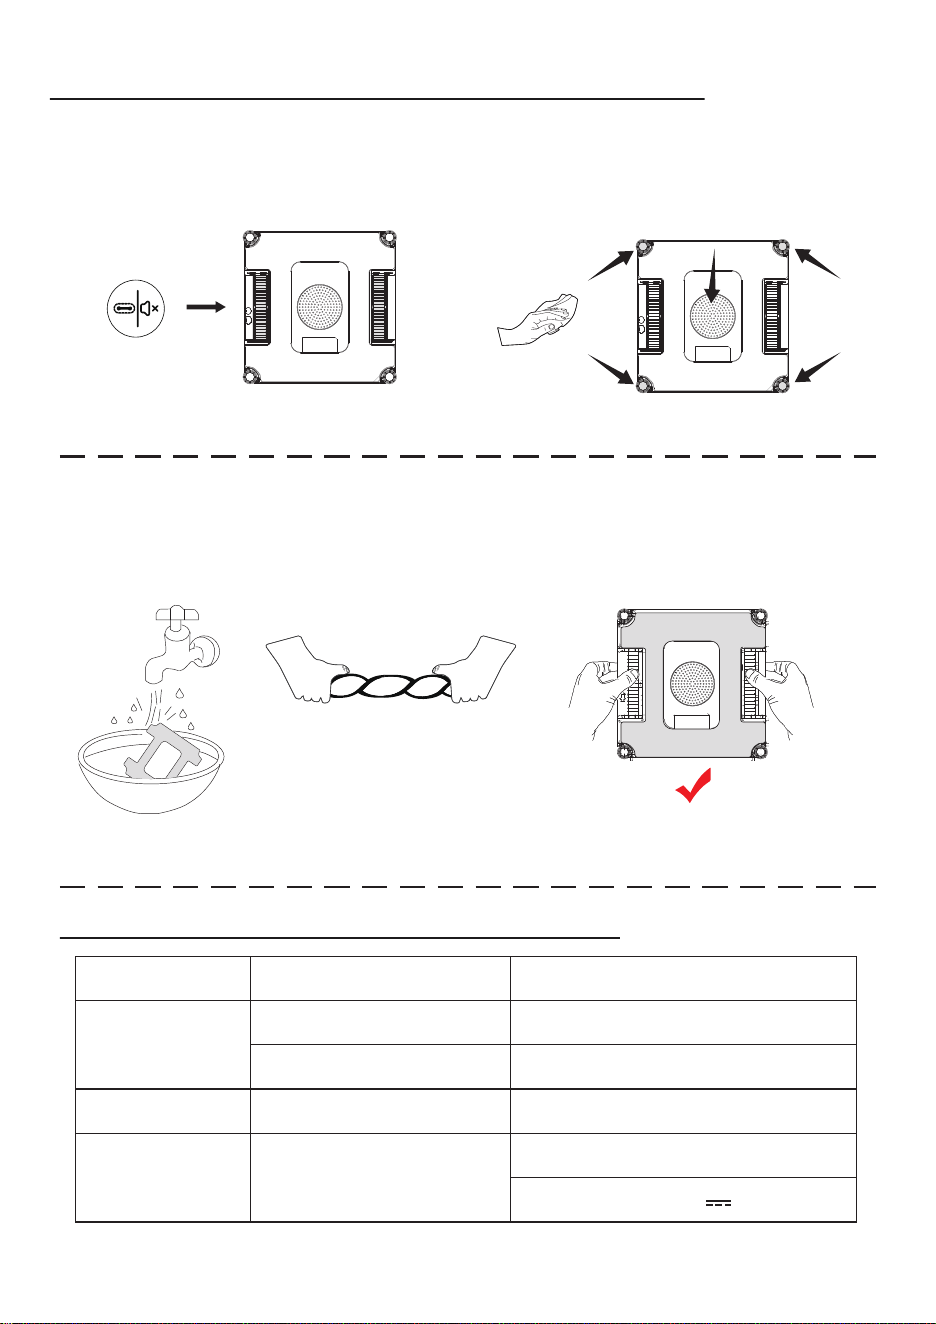
CLEANING AND MAINTENANCE
Remove the cleaning cloth and soak it in clean water for 2 minutes, then gently
hand wash it. Wring it out thoroughly until no water drips, then lay it flat on the
machine before use. Ensuring the cloth is properly wrung out prevents the
machine from slipping.
Remote Controls
Note: The cleaning cloth is correctly installed only when the tracks are exposed.
Note: Turn off the power before cleaning the cloth and bottom components.
Wipe the spherical sensor, fan, and two tracks on the bottom of the machine with
a dry cloth to prevent suction loss and maintain sensor sensitivity for optimal
cleaning performance.
PRODUCT SPECIFICATIONS
Components Specifications Specifications
24V
≤72W
3V
Input: 100-240V~ 50/60Hz, 1.5A Max
Output: 24V 3.0A
Operating Voltage (V)
Rated Power (W)
Rated Output Voltage (V)
Model: BZ065-240300-E2
Main Unit
Remote Control
Power Adapter
01 02 03 04 05 06 07 08 09 10 11
12 13 14 15 16 17 18 19 20 21 22
23 24 25 26 27 28 29 30 31 32 33
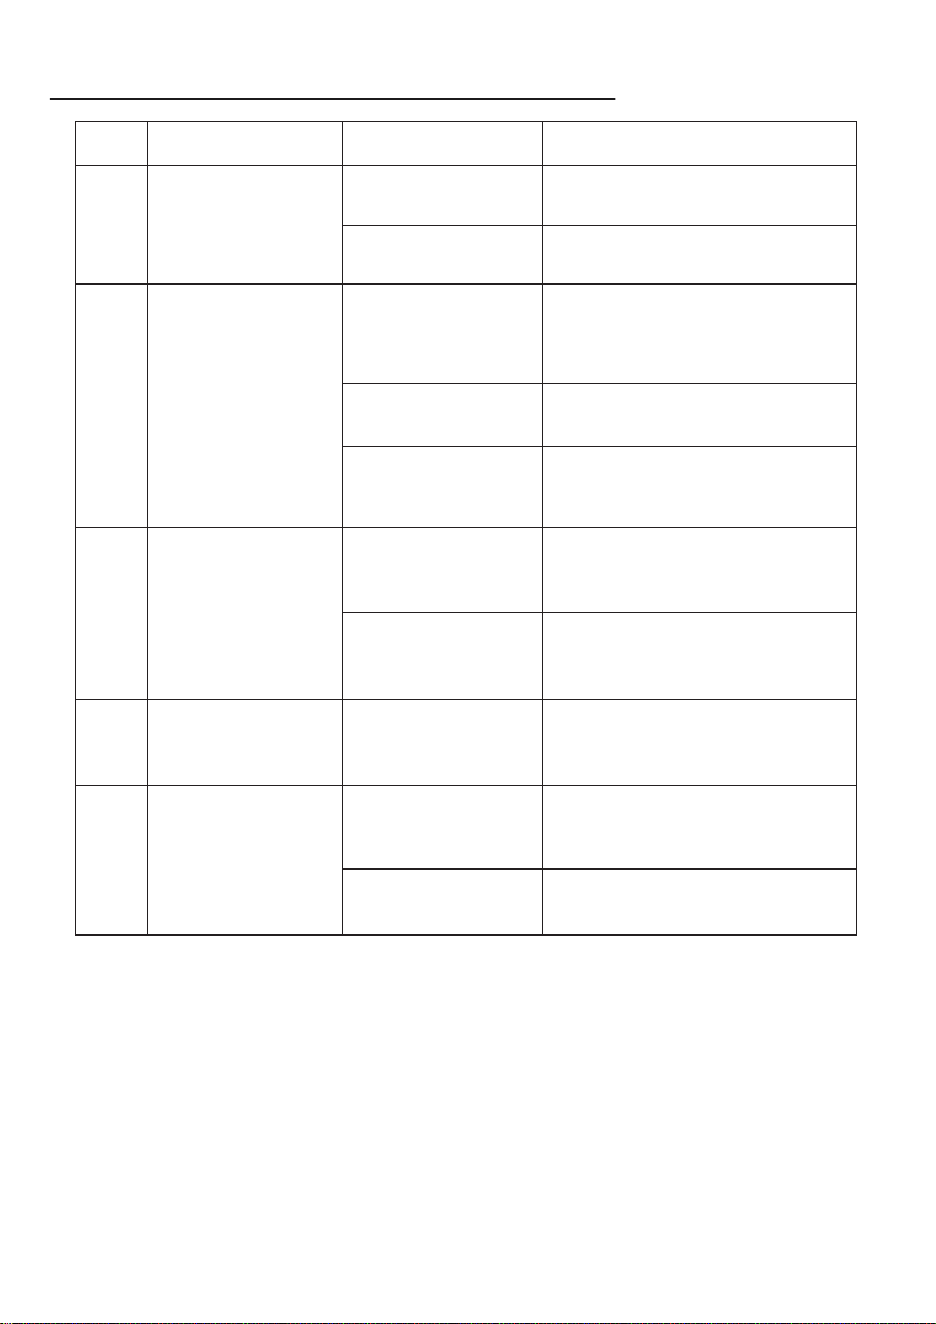
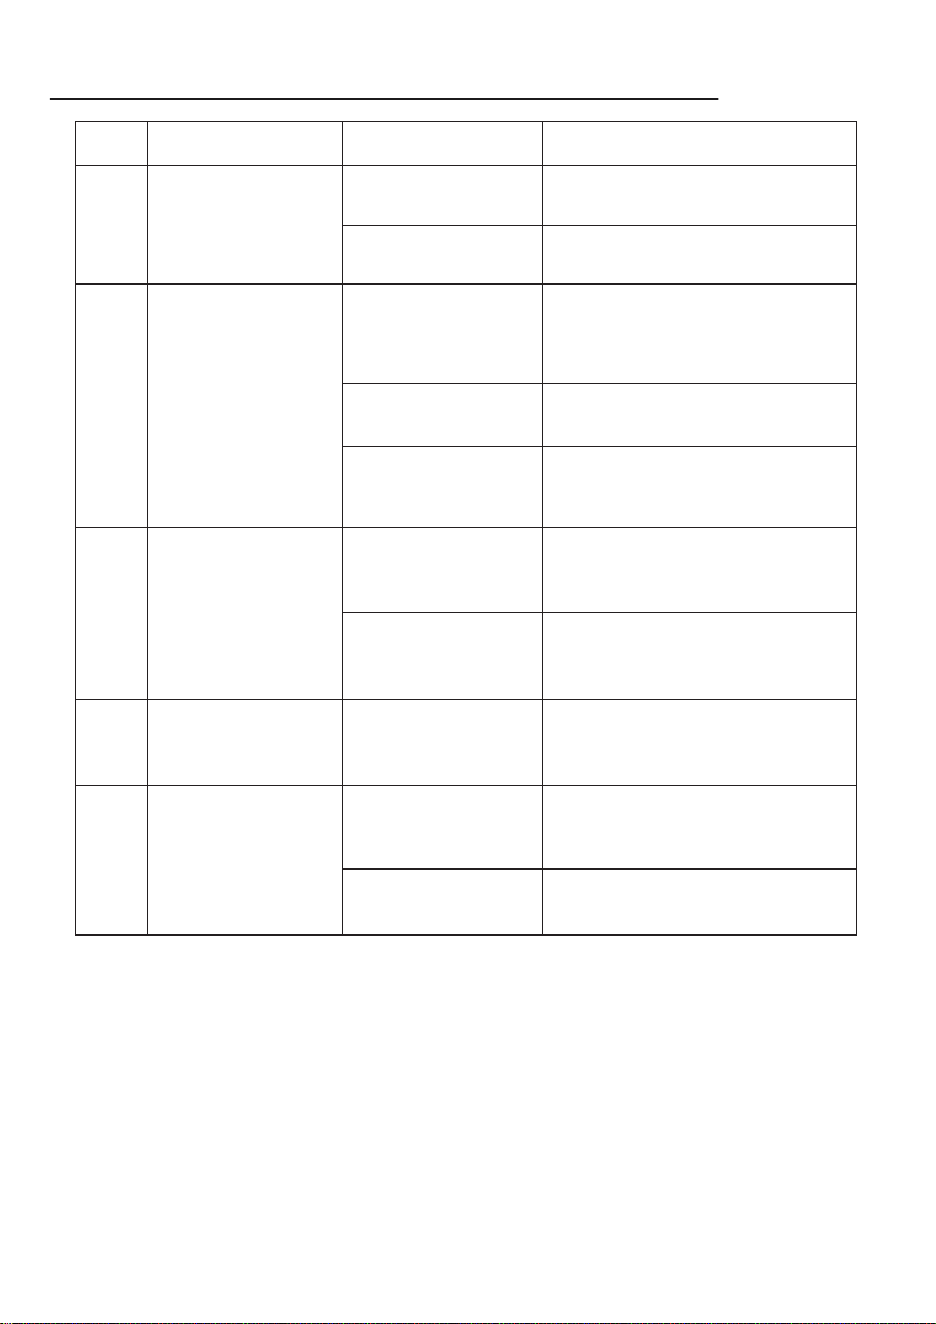
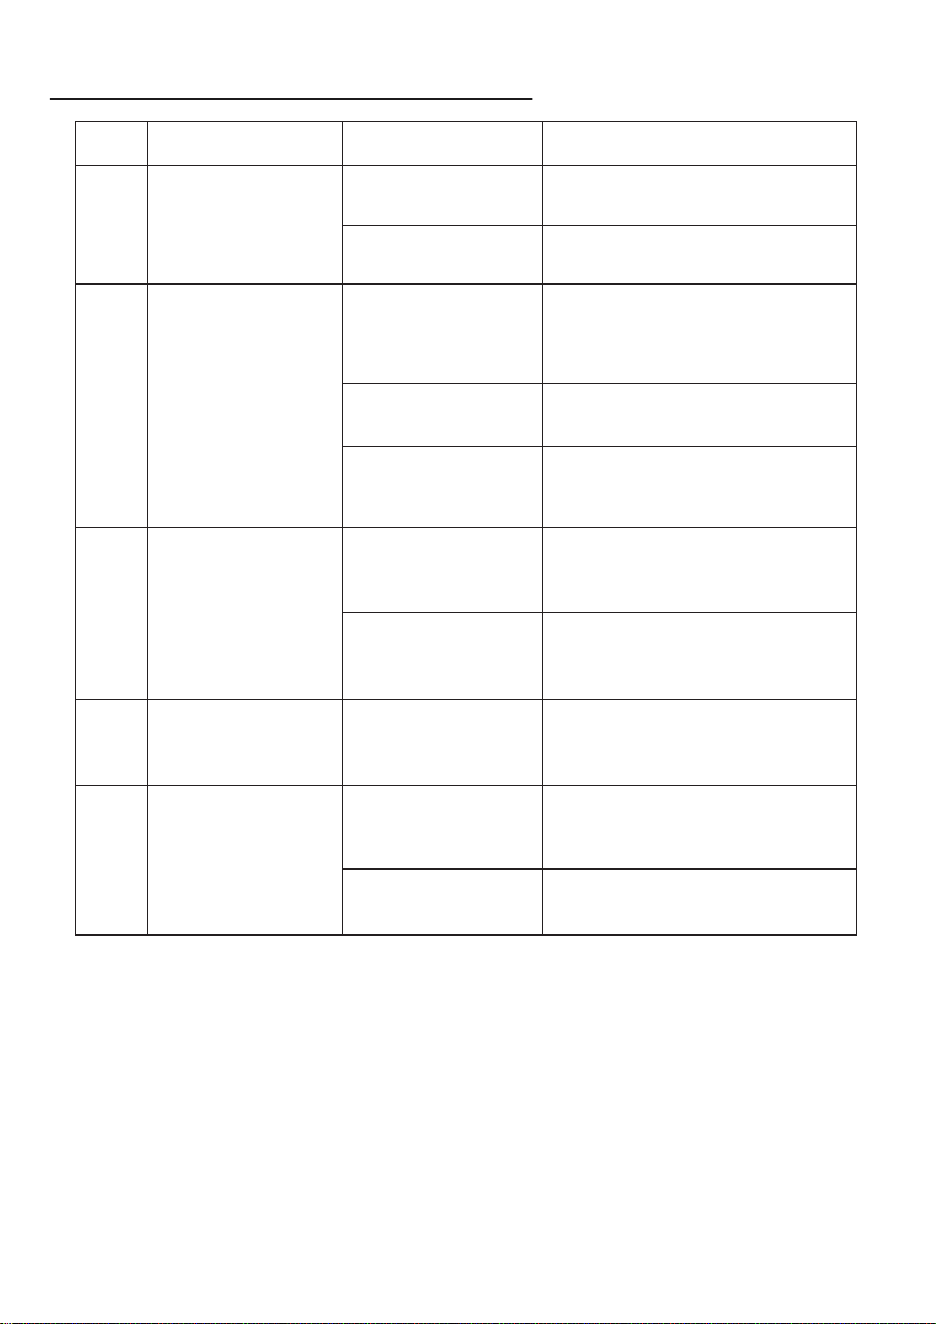
TROUBLESHOOTING GUIDE
No. Issue Possible Cause Solution
1
2
3
4
5
Machine is attached to
the glass, but the blue
light keeps flashing.
Red light flashing alarm.
Machine in operation,
pink light stays on.
Machine drive wheels
spinning idle, abnormal
movement path.
Glass surface too dirty.
a. Wipe the drive wheels.
b. Replace the cleaning cloth.
Remote control not
working.
During machine
operation, only the
"Start/Pause"
button is functional.
Remote control is not
paired or pairing has
failed.
Pause the machine first, then try using
other buttons on the remote control.
If the issue persists, contact customer
service.
Incorrect power
connection.
Insufficient
vacuum suction.
Anti-drop sensor
malfunction.
Collision sensor
malfunction.
Wheel overload.
Cleaning cloth is not
installed correctly.
Remove the cleaning cloth and
reattach it properly.
Glass surface is too dirty.
Wipe a clean area to ensure the
machine attaches successfully.
Press the "Start/Pause" button to pause
the machine, then use the remote
control arrow keys to move the machine
to an easily accessible position and
remove it. Reconnect the power cable.
Use the remote control arrow keys to
move the machine back to a safe
position as needed.
Ensure the machine is in a safe position,
then press the "Z" button on the remote
control followed by the "N" button to
restore normal operation.
Check if the anti-drop sensor is loose or
faulty, and wipe off any dust or stains. If
the issue persists, contact customer
service.
Check if the collision sensor is stuck or
malfunctioning, and try gently shaking
it. If the issue persists, contact customer
service.

01 02 03 04 05 06 07 08 09 10 11
12 13 14 15 16 17 18 19 20 21 22
23 24 25 26 27 28 29 30 31 32 33
WICHTIGE SICHERHEITSHINWEISE
Bitte lesen Sie vor der Verwendung dieses Produkts die folgenden
Sicherheitshinweise sorgfältig durch und befolgen Sie alle
standardmäßigen Sicherheitsvorkehrungen.
Vorsicht:
• Lesen Sie das Benutzerhandbuch gründlich durch. Jeder Betrieb, der nicht mit
dem Handbuch übereinstimmt, kann zu Schäden am Produkt führen.
• Bitte bewahren Sie das Benutzerhandbuch für zukünftige Referenzzwecke auf.
1. Lassen Sie bitte keine Personen mit geistigen oder sensorischen Beeinträchtigungen
oder Personen, die über kein grundlegendes Wissen über Haushaltsgeräte verfü-
gen, das Produkt benutzen.
2. Lassen Sie Kinder nicht mit dem Roboter spielen, ihn bedienen oder reinigen, um
Verletzungen zu vermeiden.
3. Stellen Sie sicher, dass nur autorisierte Techniker das Produkt zerlegen dürfen. Es ist
Benutzern strengstens untersagt, das Produkt selbst zu zerlegen.
4. Verwenden Sie nur vom Hersteller empfohlene oder verkaufte Batterien, Netzadapt-
er und weiteres Zubehör, da das Produkt andernfalls beschädigt werden könnte.
5. Stellen Sie sicher, dass die Versorgungsspannung mit der auf dem Netzadapter
angegebenen Spannung übereinstimmt.
6. Ziehen oder heben Sie das Produkt nicht am Netzkabel. Vermeiden Sie, dass das
Kabel von Fensterscheiben eingeklemmt wird.
7. Laden Sie das Produkt nicht in feuchter Umgebung, in der Nähe von offenen
Flammen oder anderen Haushaltsgeräten, um Schäden zu vermeiden.
8. Stellen Sie das Produkt nicht in die Nähe von Zigarettenstummeln, Feuerzeugen
oder anderen offenen Flammen.
9. Verwenden Sie das Produkt nicht auf unebenem Glas, um Glasbruch und ein
Herabfallen des Produkts zu vermeiden.
10. Verwenden Sie das Produkt nicht auf großflächig nassem oder öligem Glas und
setzen Sie es keinesfalls Wasser oder anderen Flüssigkeiten aus.
11. Stellen Sie das Produkt nicht an Stellen auf, wo es herunterfallen, versinken oder in
Wasser geraten könnte.
12. Verwenden Sie das Produkt nicht, wenn die Steckdose, das Netzkabel oder das
Produkt beschädigt sind. Kontaktieren Sie in diesem Fall rechtzeitig den Hersteller
für Reparaturen.
13. Berühren Sie keine Kabel, Steckdosen oder Netzadapter mit nassen Händen.
14. Lassen Sie beim Betrieb des Produkts keine Personen, Tiere oder Wertgegenstände
unter dem Gerät und stellen Sie sicher, dass jemand in der Nähe ist, um im Notfall
eingreifen zu können.
15. Die Umgebungstemperatur für den Betrieb des Produkts beträgt 0°C bis 40°C. Bei
Überschreitung dieser Temperaturen darf das Produkt weder geladen noch verwen-
det werden.
16. Dieses Produkt ist für den häuslichen Gebrauch in Innen- und Außenbereichen
vorgesehen, die durch Geländer geschützt sind. Es darf nicht in kommerziellen oder
industriellen Umgebungen verwendet werden.
01 02 03 04 05 06 07 08 09 10 11
12
13 14 15 16 17 18 19 20 21 22
23 24 25 26 27 28 29 30 31 32 33
Dieses Gerät kann von Kindern ab 8 Jahren sowie von Personen mit eingeschränkten
physischen, sensorischen oder geistigen Fähigkeiten oder mit mangelnder
Erfahrung und Wissen verwendet werden, sofern sie beaufsichtigt werden oder in
die sichere Verwendung des Geräts eingewiesen wurden und die damit verbun-
denen Gefahren verstehen. Kinder dürfen nicht mit dem Gerät spielen. Reinigung
und Benutzerwartung dürfen nicht von Kindern ohne Aufsicht durchgeführt werden.
Warnung:
1. Bitte zerlegen Sie die im Produkt eingebaute Batterie nicht selbst. Wenn ein
Austausch erforderlich ist, wenden Sie sich bitte an den Kundendienst für profes-
sionelle Dienstleistungen.
2. Zerdrücken, schlagen oder entsorgen Sie die Batterie nicht im Feuer, um eine
Explosion zu vermeiden.
3. Stellen Sie sicher, dass Sie die Batterie nach dem Ausschalten des Geräts
entfernen, bevor Sie das Produkt entsorgen, und entsorgen Sie die Batterie
ordnungsgemäß gemäß den geltenden Vorschriften.
Batteriesicherheitswarnung
Batteriewarnung für den Roboter
Anweisungen zur Batterieentsorgung
Die entsprechenden Kennzeichnungen auf der Batterie, in der Anleitung und auf
der Verpackung weisen klar darauf hin, dass die Batterie nicht zusammen mit
anderen Haushaltsabfällen entsorgt werden darf. Das Batteriesymbol kann die
chemischen Symbole Hg, Cd oder Pb enthalten, um anzuzeigen, dass die Batterie
Quecksilber, Cadmium oder andere Schwermetalle enthält, die die Grenzwerte der
EU-Richtlinie 2006/66 überschreiten. Wenn Sie die Batterie entsorgen müssen,
entsorgen Sie das Produkt und die Batterie bitte ordnungsgemäß gemäß den
geltenden Vorschriften zur Abfallentsorgung.
Achtung:
Bitte verwenden Sie keine Batterien von anderen Produkten, da der Roboter sonst
beschädigt werden könnte.
1. Halten Sie das Produkt während des Betriebs immer unter Strom. Die eingebaute
Notstrombatterie dient nur zur Aufrechterhaltung der Haftung bei plötzlichem
Stromausfall und ist nicht als normale Stromquelle vorgesehen.
2. Vor Wartung oder Reinigung muss der Stecker aus der Steckdose gezogen werden,
um ein Ziehen am Netzkabel zu vermeiden.
3. Verwenden Sie das Produkt nur gemäß den Anweisungen in dieser Bedienungsan-
leitung. Das Unternehmen haftet nicht für Verluste oder Verletzungen, die durch
unsachgemäße Verwendung verursacht werden.
4. Zum Aufladen der Batterie verwenden Sie nur das mit diesem Gerät mitgelieferte,
abnehmbare Netzteil (Modell: BZ065-240300-E2).
5. Die Batterie muss vor der Entsorgung des Produkts entfernt werden.
6. Das Gerät muss vom Stromnetz getrennt werden, bevor die Batterie entfernt wird.
7. Die Batterie ist ordnungsgemäß zu entsorgen.
8. Dieses Gerät enthält Batterien, die nur von qualifiziertem Fachpersonal ausgetaus-
cht werden dürfen.
01 02 03 04 05 06 07 08 09 10 11
12 13
14 15 16 17 18 19 20 21 22
23 24 25 26 27 28 29 30 31 32 33
Vorsichtsmaßnahmen
Bitte verwenden Sie das Produkt auf
verglasten Flächen mit einem Rahmen
und einer Mindesthöhe von ≥ 5 mm.
Verwenden Sie das Produkt auf
Glasflächen mit einer Mindestgröße
von ≥ 50 cm × 50 cm.
Rahmenhöhe ≥ 5 mm
≥ 5mm
Stellen Sie sicher, dass das
Produkt mit ausreichender
Akkuleistung betrieben wird.
Wenn die Glasfläche stark verstaubt ist,
reinigen Sie vor der Nutzung zunächst
eine Fläche in der Größe des Geräts.
• Wenn sich unbewegliche Hindernisse vor dem Fenster befinden (z. B. Geländer oder
Möbel), stellen Sie sicher, dass der Abstand zwischen dem Fenster und dem
Hindernis größer als 13 cm ist, bevor Sie das Gerät verwenden.
• Steuern Sie das Gerät während des Betriebs mit der Fernbedienung.
• Das Gerät funktioniert möglicherweise nicht ordnungsgemäß an nicht vertikalen
Fenstern; unterstützen Sie das Gerät gegebenenfalls.
• Stellen Sie sicher, dass sich das Gerät in der richtigen Position befindet, und
vermeiden Sie die Nutzung in einer auf dem Kopf stehenden Position.
Hinweis:

01 02 03 04 05 06 07 08 09 10 11
12 13 14
15 16 17 18 19 20 21 22
23 24 25 26 27 28 29 30 31 32 33
ZUBEHÖRLISTE
WassereinlassReinigungstuchHaupteinheit
SicherungsseilNetzkabel Fernbedienung
Batterie für die FernbedienungBenutzerhandbuch Wasserflasche
01 02 03 04 05 06 07 08 09 10 11
12 13 14 15
16 17 18 19 20 21 22
23 24 25 26 27 28 29 30 31 32 33
PRODUKTANLEITUNG
Vorderseite der Haupteinheit
Rückseite der Haupteinheit
Start/Pause-Taste
Wassertank
Düse
Wassereinlass
Griff
Netzkabel
Sicherungsseil
Anti-Sturz-Sensor
Radbaugruppe
Statusanzeige
Programmieranschluss
Lüftermotor
Reinigungstuch
01 02 03 04 05 06 07 08 09 10 11
12 13 14 15 16
17 18 19 20 21 22
23 24 25 26 27 28 29 30 31 32 33
ANZEIGELEUCHTEN-LEITFADEN
FERNBEDIENUNGSANLEITUNG
Stetiges blaues Licht:
Standby / In Betrieb / Laden abgeschlossen
Stetiges rotes Licht: Gestoppt
Rotes Licht blinkt + intermittierende Sprachansage:
Radüberlastung
Rotes Licht blinkt + intermittierende Sprachansage:
Unzureichender Luftdruck
Rotes Licht blinkt + intermittierende Sprachansage:
Netzkabel getrennt
Blaues Licht pulsierend (Ein- und Ausblenden):
Ladevorgang
Blaues Licht blinkt + einzelner Piepton:
Einschalten
Stetiges blaues Licht + intermittierende Sprachansage:
Reinigung abgeschlossen
Setzen Sie vor der Verwendung die Batterie in die Fernbedienung ein. Wenn die
Fernbedienung über einen längeren Zeitraum nicht verwendet wird, entfernen Sie
die Batterie, um Auslaufen oder Schäden zu vermeiden.
Hinweis:
Während des Saugvorgangs:
Sprachsteuerung ein/aus
Beim Entfernen des Geräts:
Radreinigung
Manuelles Sprühen
Nach links bewegen /
Nach rechts bewegen
Nach oben bewegen /
Nach unten bewegen
Adaptiver Z/N-ModusStart/Pause
Z-Modus ReinigungN-Modus Reinigung
Punktuelle ReinigungKantenreinigung
01 02 03 04 05 06 07 08 09 10 11
12 13 14 15 16 17
18 19 20 21 22
23 24 25 26 27 28 29 30 31 32 33
Öffnen Sie den
Deckel des
Wassertanks.
INSTALLATION DES ZUBEHÖRS
Befestigen Sie das Reinigungstuch an der Fensterreinigungsplatte in der im Diagramm
unten gezeigten Richtung. Stellen Sie sicher, dass das Tuch flach aufliegt und nicht die
vier Ecken der Anti-Sturz-Sensoren, die Radfläche oder das innere Fach bedeckt.
Reinigungstuch anbringen
Sauberes Wasser oder spezielles Glasreinigungsmittel hinzufügen
Warnung:
Stellen Sie vor der Verwendung sicher, dass das Sicherheitsseil ordnungsgemäß befestigt
ist. Es kann um ein stabiles Objekt im Innenbereich gewickelt werden, um sicherzustellen,
dass es fest sitzt und sich nicht löst.
Sicherheitsseil-Befestigung sichern (um ein Herunterfallen zu verhindern)
Füllen Sie sauberes Wasser oder Glasreiniger in den Wassertank. Verwenden Sie
keine stark schäumenden Reinigungsmittel und überfüllen Sie den Tank nicht.
01 02 03 04 05 06 07 08 09 10 11
12 13 14 15 16 17 18
19 20 21 22
23 24 25 26 27 28 29 30 31 32 33
10CM
10CM
Platzieren des Geräts auf dem Glas (Hinweis: Halten Sie einen Abstand von
mindestens 10 cm von den Rändern des Glases ein. Starten Sie das Gerät nicht in
der Nähe der Glaskante oder von Spalten.) Drücken Sie die Taste der Haupteinheit,
um das Gerät zu starten. Ein blinkendes blaues Licht zeigt den Saugvorgang an, ein
dauerhaft blaues Licht bedeutet, dass die Saugkraft erfolgreich ist. Drücken Sie die
Taste der Haupteinheit erneut, um die automatische Reinigung zu starten.
Folgen Sie dem Diagramm, um das Netzkabel anzuschließen, und stellen Sie sicher,
dass alle Verbindungen sicher und fest sitzen.
• Befestigen Sie die Sicherheitsöse an einer geeigneten Stelle auf der Innenseite
des Glases.
• Beim Reinigen von Außenfenstern (z. B. Fenstern mit Balkon- oder Geländer-
schutz) stellen Sie sicher, dass das Fenster geschlossen ist und nur eine kleine
Öffnung für das Sicherheitsseil bleibt (nicht größer als der Durchmesser der
Sicherheitsöse).
• Trennen Sie die Stromversorgung nicht, während das Gerät in Betrieb ist, da dies
zu einem Herunterfallen führen kann.
• Halten Sie den Lüfter von Haaren und kleinen Gegenständen fern, um Blockierun-
gen zu vermeiden, die die Leistung des Geräts beeinträchtigen könnten.
Vermeiden Sie es, den Netzadapter in der Luft
hängen zu lassen. Platzieren Sie ihn auf einer
stabilen Oberfläche, um Schäden zu vermeiden.
Anschließen des Netzkabels
Hinweis:
Hinweis:
Stecken Sie das angeschlossene Netzkabel in den Stromanschluss des Geräts
und ziehen Sie den Befestigungsknopf am Anschluss fest.
Reinigung starten
01 02 03 04 05 06 07 08 09 10 11
12 13 14 15 16 17 18 19
20 21 22
23 24 25 26 27 28 29 30 31 32 33
Reinigungsmodi
„Z“-Muster Reinigung
Funktion: Geeignet für breite
Glasflächen, reinigt in einer Z-förmi-
gen Route.
Bedienung: Drücken Sie die „Z“-Rein-
igungstaste auf der Fernbedienung.
Kantenreinigung
Funktion: Reinigt entlang der
Glaskanten.
Bedienung: Drücken Sie die
Kantenreinigungstaste auf der
Fernbedienung.
Punktuelle Reinigung
Funktion: Reinigt wiederholt einen
bestimmten Bereich vor und zurück.
Bedienung: Drücken Sie die Punktreini-
gungstaste auf der Fernbedienung.
„N“-Muster Reinigung
Funktion: Geeignet für schmale
Glasflächen, reinigt in einer N-förmi-
gen Route.
Bedienung: Drücken Sie die „N“-Reini-
gungstaste auf der Fernbedienung.

01 02 03 04 05 06 07 08 09 10 11
12 13 14 15 16 17 18 19 20
21 22
23 24 25 26 27 28 29 30 31 32 33
REINIGUNG UND WARTUNG
Entfernen Sie das Reinigungstuch und legen Sie es für 2 Minuten in sauberes
Wasser ein, dann waschen Sie es vorsichtig von Hand. Wringen Sie es gründlich
aus, bis kein Wasser mehr tropft, und legen Sie es dann flach auf das Gerät. Ein
gut ausgewrungenes Tuch verhindert, dass das Gerät abrutscht.
Fernbedienung
Hinweis: Das Reinigungstuch ist nur dann korrekt installiert, wenn die Schienen
freiliegen.
Hinweis: Schalten Sie das Gerät aus, bevor Sie das Reinigungstuch und die
unteren Komponenten reinigen.
Wischen Sie den kugelförmigen Sensor, den Lüfter und die beiden Schienen an
der Unterseite des Geräts mit einem trockenen Tuch ab, um Saugkraftverluste zu
vermeiden und die Sensorempfindlichkeit für eine optimale Reinigungsleistung zu
erhalten.
PRODUKTSPEZIFIKATIONEN
Komponenten Spezifikationen Technische Spezifikationen
24V
≤72W
3V
Eingang: 100-240V~ 50/60Hz, 1.5A Max
Ausgang: 24V 3.0A
Betriebsspannung (V)
Nennleistung (W)
Nennausgangsspannung (V)
Modell: BZ065-240300-E2
Haupteinheit
Fernbedienung
Netzadapter
01 02 03 04 05 06 07 08 09 10 11
12 13 14 15 16 17 18 19 20 21
22
23 24 25 26 27 28 29 30 31 32 33
FEHLERBEHEBUNGSHANDBUCH
Nr. Problem Mögliche Ursache Lösung
1
2
3
4
5
Das Gerät ist am
Glas befestigt, aber
das blaue Licht
blinkt ständig.
Das rote Licht blinkt,
Alarm.
Das Gerät ist in Betrieb,
das rosa Licht bleibt an.
Die Antriebsräder des
Geräts drehen sich im
Leerlauf, unnormaler
Bewegungsweg.
Die Glasoberfläche ist
zu schmutzig.
a. Wischen Sie die Antriebsräder ab.
b. Ersetzen Sie das Reinigungstuch.
Die Fernbedienung
funktioniert nicht.
Während des Betriebs
funktioniert nur die
„Start/Pause“-Taste.
Die Fernbedienung ist nicht
gekoppelt oder die Kopplung
ist fehlgeschlagen.
Halten Sie das Gerät an, und versuchen
Sie dann, andere Tasten auf der
Fernbedienung zu verwenden.
Wenn das Problem weiterhin besteht,
wenden Sie sich an den Kundendienst.
Falsche Stromver-
sorgung.
Unzureichende
Saugleistung.
Fehlfunktion des
Anti-Sturz-Sensors.
Fehlfunktion des
Kollision-Sensors.
Radüberlastung.
Das Reinigungstuch
ist nicht korrekt
angebracht.
Entfernen Sie das Reinigungstuch
und befestigen Sie es richtig.
Die Glasoberfläche ist
zu schmutzig.
Wischen Sie eine saubere Fläche ab, um
sicherzustellen, dass das Gerät
erfolgreich haftet.
Drücken Sie die „Start/Pause“-Taste,
um das Gerät anzuhalten, bewegen Sie
es mit den Pfeiltasten der Fernbedi-
enung in eine leicht zugängliche
Position und entfernen Sie es. Schließen
Sie das Netzkabel wieder an.
Verwenden Sie die Pfeiltasten der
Fernbedienung, um das Gerät bei Bedarf
in eine sichere Position zu bewegen.
Stellen Sie sicher, dass das Gerät in einer
sicheren Position ist, und drücken Sie dann
die „Z“-Taste auf der Fernbedienung,
gefolgt von der „N“-Taste, um den
normalen Betrieb wiederherzustellen.
Überprüfen Sie, ob der Anti-Sturz-Sensor
locker oder defekt ist, und wischen Sie
Staub oder Flecken ab. Wenn das Problem
weiterhin besteht, wenden Sie sich an den
Kundendienst.
Überprüfen Sie, ob der Kollision-Sensor
blockiert oder defekt ist, und schütteln Sie
ihn vorsichtig. Wenn das Problem
weiterhin besteht, wenden Sie sich an
den Kundendienst.

01 02 03 04 05 06 07 08 09 10 11
12 13 14 15 16 17 18 19 20 21 22
23 24 25 26 27 28 29 30 31 32 33
1. Ne laissez pas les personnes ayant des déficiences mentales ou sensorielles, ou
celles ne disposant pas de connaissances de base sur les appareils
électroménagers, utiliser ce produit.
2. Ne laissez pas les enfants jouer, utiliser ou nettoyer le robot afin d'éviter tout risque
de blessure.
3. Assurez-vous que seul du personnel technique agréé est autorisé à démonter le
produit. Il est strictement interdit aux utilisateurs de démonter l'appareil
eux-mêmes.
4. Utilisez uniquement la batterie, l’adaptateur secteur et les autres accessoires
recommandés ou vendus par le fabricant, sous peine d’endommager le produit.
5. Assurez-vous que la tension d'alimentation correspond à celle indiquée sur l'adap-
tateur secteur.
6. Ne tirez pas sur le cordon d'alimentation et ne soulevez pas le produit en le tenant
par le câble. Évitez que le câble soit coincé dans une fenêtre.
7. Ne rechargez pas le produit dans un environnement humide, près d'une flamme ou
d'autres appareils électroménagers, afin d'éviter tout dommage.
8. Ne placez pas le produit à proximité de zones contenant des mégots de cigarettes,
des briquets ou toute autre flamme nue.
9. N'utilisez pas le produit sur une surface vitrée inégale afin d'éviter d'endommager
le verre et de provoquer une chute du produit.
10. N'utilisez pas le produit sur de grandes surfaces de verre mouillé ou huileux, et ne
le plongez jamais dans l'eau ou tout autre liquide.
11. Ne placez jamais le produit dans des endroits où il pourrait tomber, couler ou être
immergé dans l'eau ou tout autre liquide.
12. N'utilisez pas le produit si la prise, le cordon d'alimentation ou le produit lui-même
est endommagé ; contactez immédiatement le fabricant pour toute réparation.
13. Ne touchez pas les fils, les prises ou les adaptateurs secteur avec les mains
mouillées.
14. Ne laissez aucune personne, animal ou objet de valeur sous le produit lorsqu'il est
en fonctionnement. Assurez-vous que quelqu'un soit présent pour surveiller et
prêter assistance si nécessaire.
15. La température ambiante pour l'utilisation du produit est comprise entre 0°C et
40°C. Ne chargez ni n’utilisez le produit en dehors de cette plage de température.
16. Ce produit est destiné à un usage domestique, en intérieur et en extérieur dans des
environnements protégés par des garde-corps. Ne l’utilisez pas dans des
environnements commerciaux ou industriels.
INSTRUCTIONS DE SÉCURITÉ IMPORTANTES
Avant d'utiliser ce produit, veuillez lire attentivement les instructions de
sécurité suivantes et suivre toutes les précautions de sécurité standard.
Attention :
• Veuillez lire attentivement le manuel d'utilisation. Toute utilisation
non conforme au manuel peut entraîner des dommages au produit.
• Veuillez conserver le manuel d'utilisation pour référence future.
01 02 03 04 05 06 07 08 09 10 11
12 13 14 15 16 17 18 19 20 21 22
23
24 25 26 27 28 29 30 31 32 33
Attention :
Veuillez ne pas utiliser de batteries provenant d'autres produits, sous peine
d'endommager le robot.
1. Veuillez ne pas démonter la batterie intégrée du produit par vous-même. Si vous
devez la remplacer, veuillez contacter le service client pour une intervention
professionnelle.
2. Ne jamais écraser, heurter ou jeter la batterie au feu, afin d’éviter tout risque
d’explosion.
3. Veillez à retirer la batterie après avoir éteint l'appareil avant de jeter le produit, et
éliminez la batterie conformément aux réglementations en vigueur.
Avertissement de sécurité de la batterie
Avertissement concernant la batterie du robot
Instructions pour la mise au rebut des batteries
Les marquages figurant sur la batterie, dans le manuel et sur l'emballage précis-
ent clairement que la batterie ne doit pas être éliminée avec d'autres déchets
ménagers. Le symbole de la batterie peut contenir les symboles chimiques Hg, Cd
ou Pb, indiquant que la batterie contient du mercure, du cadmium ou d'autres
métaux lourds dépassant les normes fixées par la Directive CE 2006/66. Si vous
devez jeter la batterie, veuillez éliminer ce produit et la batterie conformément aux
consignes de recyclage des déchets applicables.
Cet appareil peut être utilisé par des enfants âgés de 8 ans et plus ainsi que par des
personnes ayant des capacités physiques, sensorielles ou mentales réduites ou un
manque d'expérience et de connaissances, à condition qu'elles aient été surveillées
ou informées sur l'utilisation sécurisée de l'appareil et qu'elles comprennent les
dangers encourus. Les enfants ne doivent pas jouer avec l'appareil. Le nettoyage et
l'entretien par l'utilisateur ne doivent pas être effectués par des enfants sans
surveillance.
Avertissement :
1. Maintenez le produit sous tension lorsqu'il est en fonctionnement. La batterie de
secours intégrée sert uniquement à maintenir l’aspiration en cas de coupure de
courant et ne doit pas être utilisée comme source d’alimentation normale.
2. Avant toute opération de maintenance ou de nettoyage, débranchez impérative-
ment la prise secteur pour éviter de tirer sur le câble.
3. Utilisez le produit conformément aux instructions figurant dans ce manuel. La
société décline toute responsabilité en cas de perte ou de blessure résultant d’une
mauvaise utilisation.
4. Pour recharger la batterie, utilisez uniquement le bloc d'alimentation amovible
(modèle : BZ065-240300-E2) fourni avec cet appareil.
5. La batterie doit être retirée avant la mise au rebut du produit.
6. L'appareil doit être débranché du secteur avant de retirer la batterie.
7. La batterie doit être éliminée en toute sécurité.
8. Cet appareil contient des batteries qui ne peuvent être remplacées que par du
personnel qualifié.
01 02 03 04 05 06 07 08 09 10 11
12 13 14 15 16 17 18 19 20 21 22
23 24
25 26 27 28 29 30 31 32 33
Précautions
Veuillez utiliser le produit sur des
surfaces vitrées encadrées avec une
hauteur de cadre d’au moins ≥ 5 mm.
Utilisez le produit sur des surfaces vitrées
d’une taille minimale de ≥ 50 cm × 50 cm.
Hauteur du cadre ≥ 5 mm
≥ 5mm
Assurez-vous que le produit est
utilisé avec une charge de
batterie suffisante.
Si la surface vitrée est excessivement
poussiéreuse, nettoyez d’abord une
zone de la même taille que l’appareil
avant utilisation.
• Si des obstacles fixes se trouvent devant la fenêtre (comme des garde-corps ou des
meubles), assurez-vous que l’écart entre la fenêtre et l’obstacle est supérieur à 13 cm
avant d’utiliser l’appareil.
• Lorsque l’appareil est en fonctionnement, utilisez la télécommande pour le contrôler.
• L’appareil peut ne pas fonctionner correctement sur des fenêtres non verticales ;
assistez-le si nécessaire.
• Assurez-vous que l’appareil est en position correcte et évitez de l’utiliser en position
inversée.
Remarque :
01 02 03 04 05 06 07 08 09 10 11
12 13 14 15 16 17 18 19 20 21 22
23 24 25
26 27 28 29 30 31 32 33
LISTE DES ACCESSOIRES
Entrée d’eau
Chiffon de nettoyageUnité principale
Corde de sécuritéCâble d’alimentation Télécommande
Batterie pour télécommandeManuel d’utilisation Bouteille d’eau
01 02 03 04 05 06 07 08 09 10 11
12 13 14 15 16 17 18 19 20 21 22
23 24 25 26
27 28 29 30 31 32 33
INSTRUCTIONS DU PRODUIT
Avant de l’unité principale
Arrière de l’unité principale
Bouton Marche/Pause
Réservoir d’eau
Buse
Entrée d’eau
Poignée
Câble d’alimentation
Corde de sécurité
Capteur anti-chute
Ensemble de roues
Voyant d’état
Port de programmation
Moteur du ventilateur
Chiffon de nettoyage
01 02 03 04 05 06 07 08 09 10 11
12 13 14 15 16 17 18 19 20 21 22
23 24 25 26 27
28 29 30 31 32 33
GUIDE DES VOYANTS LUMINEUX
INSTRUCTIONS DE LA TÉLÉCOMMANDE
Voyant bleu fixe :
Veille / En fonctionnement / Charge terminée
Voyant rouge fixe : Arrêté
Voyant rouge clignotant + alerte vocale intermittente :
Surcharge des roues
Voyant rouge clignotant + alerte vocale intermittente :
Pression d’air insuffisante
Voyant rouge clignotant + alerte vocale intermittente :
Câble d’alimentation déconnecté
Voyant bleu respirant (atténuation progressive) :
En charge
Voyant bleu clignotant + bip unique :
Mise sous tension
Voyant bleu fixe + alerte vocale intermittente :
Nettoyage terminé
Avant utilisation, insérez la batterie dans la télécommande. Si la télécommande
n’est pas utilisée pendant une longue période, retirez la batterie pour éviter les
fuites ou les dommages.
Remarque :
Pendant l’aspiration :
Activation/désactivation du
contrôle vocal
Lors du retrait de l’appareil :
Nettoyage des roues
Pulvérisation manuelle
Déplacement vers la gauche /
vers la droite
Déplacement vers le haut /
vers le bas
Mode adaptatif Z/NDémarrer/Pause
Nettoyage en mode ZNettoyage en mode N
Nettoyage localiséNettoyage des bords

01 02 03 04 05 06 07 08 09 10 11
12 13 14 15 16 17 18 19 20 21 22
23 24 25 26 27 28
29 30 31 32 33
Ouvrez le
couvercle du
réservoir d’eau.
INSTALLATION DES ACCESSOIRES
Fixez le chiffon de nettoyage sur la plaque de nettoyage des vitres en suivant la
direction indiquée sur le schéma ci-dessous. Assurez-vous que le chiffon est bien
appliqué à plat et ne couvre pas les quatre coins des capteurs anti-chute, la surface
des roues ou le compartiment interne.
Installation du chiffon de nettoyage
Ajout d’eau propre ou de nettoyant pour vitres spécialisé
Avertissement :
Avant utilisation, assurez-vous que la corde de sécurité est correctement fixée. Elle peut être
enroulée autour d’un objet intérieur afin de garantir qu’elle est solidement attachée et ne se
détachera pas.
Fixation sécurisée de la corde de sécurité (pour éviter les chutes)
Ajoutez de l’eau propre ou un nettoyant pour vitres dans le réservoir d’eau.
N’ajoutez pas de liquide nettoyant moussant et ne remplissez pas trop le réservoir.

01 02 03 04 05 06 07 08 09 10 11
12 13 14 15 16 17 18 19 20 21 22
23 24 25 26 27 28 29
30 31 32 33
10CM
10CM
Placement de l’appareil sur le verre. (Remarque : Maintenez une distance d’au
moins 10 cm des bords du verre. Ne démarrez pas l’appareil près du bord du
verre ou des interstices.) Appuyez sur le bouton de l’unité principale pour démar-
rer l’appareil. Un voyant bleu clignotant indique le processus d’aspiration, tandis
qu’un voyant bleu fixe signifie que l’aspiration est réussie. Appuyez à nouveau sur
le bouton de l’unité principale pour commencer le nettoyage automatique.
Suivez le schéma pour connecter le câble d’alimentation et assurez-vous que toutes
les connexions sont bien sécurisées et solidement fixées.
• Fixez la boucle de sécurité à une position appropriée à l’intérieur du verre.
• Lors du nettoyage des vitres extérieures (comme celles avec un balcon ou une
rambarde de protection), assurez-vous que la fenêtre est fermée, en laissant
seulement un petit espace pour la corde de sécurité (ne dépassant pas le
diamètre de la boucle de sécurité).
• Ne débranchez pas l’alimentation pendant le fonctionnement de l’appareil, car
cela pourrait le faire tomber.
• Gardez le ventilateur éloigné des cheveux et des petits objets pour éviter tout
blocage susceptible d’affecter les performances de l’appareil.
Évitez de suspendre l’adaptateur secteur dans les
airs. Placez-le sur une surface stable pour éviter
tout dommage.
Connexion du câble d’alimentation
Remarque :
Remarque :
Insérez le câble d’alimentation connecté dans le port d’alimentation de l’appar-
eil et serrez le bouton de fixation au niveau du port.
Démarrer le nettoyage

01 02 03 04 05 06 07 08 09 10 11
12 13 14 15 16 17 18 19 20 21 22
23 24 25 26 27 28 29 30
31 32 33
Modes de nettoyage
Nettoyage en motif “Z”
Fonction : Convient aux grandes
surfaces vitrées, nettoie selon un
trajet en forme de Z.
Utilisation : Appuyez sur le bouton de
nettoyage “Z” sur la télécommande.
Nettoyage des bords
Fonction : Nettoie le long des bords
du verre.
Utilisation : Appuyez sur le bouton
de nettoyage des bords sur la
télécommande.
Nettoyage localisé
Fonction : Nettoie de manière répétée
une zone spécifique d’avant en arrière.
Utilisation : Appuyez sur le bouton de
nettoyage localisé sur la télécommande.
Nettoyage en motif “N”
Fonction : Convient aux surfaces vitrées
étroites, nettoie selon un trajet en
forme de N.
Utilisation : Appuyez sur le bouton de
nettoyage “N” sur la télécommande.

01 02 03 04 05 06 07 08 09 10 11
12 13 14 15 16 17 18 19 20 21 22
23 24 25 26 27 28 29 30 31
32 33
NETTOYAGE ET ENTRETIEN
Retirez le chiffon de nettoyage et faites-le tremper dans de l’eau propre pendant
2 minutes, puis lavez-le délicatement à la main. Essorez-le soigneusement
jusqu’à ce qu’il ne goutte plus, puis posez-le à plat sur l’appareil avant utilisa-
tion. Un chiffon bien essoré empêche l’appareil de glisser.
Télécommande
Remarque : Le chiffon de nettoyage est correctement installé uniquement
lorsque les rails sont exposés.
Remarque : Éteignez l’appareil avant de nettoyer le chiffon et les composants
inférieurs.
Essuyez le capteur sphérique, le ventilateur et les deux rails situés sous l’appareil
avec un chiffon sec afin d’éviter une perte d’aspiration et de maintenir la sensibil-
ité des capteurs pour des performances de nettoyage optimales.
SPÉCIFICATIONS DU PRODUIT
Composants Caractéristiques techniques Spécifications techniques
24V
≤72W
3V
Entrée : 100-240V~ 50/60Hz, 1.5A Max
Sortie : 24V 3.0A
Tension de fonctionnement (V)
Puissance nominale (W)
Tension de sortie nominale (V)
Modèle : BZ065-240300-E2
Unité principale
Télécommande
Adaptateur secteur
01 02 03 04 05 06 07 08 09 10 11
12 13 14 15 16 17 18 19 20 21 22
23 24 25 26 27 28 29 30 31 32
33
GUIDE DE DÉPANNAGE
N° Problème Cause possible Solution
1
2
3
4
5
L'appareil est fixé au
verre, mais la lumière
bleue clignote
constamment.
La lumière rouge
clignote, alarme.
L'appareil est en
fonctionnement,
la lumière rose
reste allumée.
Les roues motrices de
l'appareil tournent au
ralenti, trajectoire de
mouvement anormale.
La surface du verre
est trop sale.
a. Essuyez les roues d'entraînement.
b. Remplacez le chiffon de nettoyage.
La télécommande ne
fonctionne pas.
Pendant le fonctionne-
ment de l'appareil, seul
le bouton "Start/Pause"
fonctionne.
La télécommande
n'est pas appairée ou
l'appairage a échoué.
Arrêtez l'appareil d'abord, puis
essayez d'utiliser d'autres boutons
sur la télécommande.
Si le problème persiste, contactez le
service client.
Connexion d'alimenta-
tion incorrecte.
Aspiration
insuffisante.
Défaillance du
capteur anti-chute.
Défaillance du capteur
de collision.
Surcharge des roues.
Le chiffon de nettoyage
n'est pas installé
correctement.
Retirez le chiffon de nettoyage
et réinstallez-le correctement.
La surface du verre est
trop sale.
Essuyez une zone propre pour vous
assurer que l'appareil se fixe
correctement.
Appuyez sur le bouton "Start/Pause" pour
arrêter l'appareil, puis utilisez les touches
fléchées de la télécommande pour
déplacer l'appareil dans une position
facilement accessible et retirez-le.
Reconnectez le câble d'alimentation.
Utilisez les touches fléchées de la
télécommande pour déplacer l'appareil
dans une position sûre si nécessaire.
Assurez-vous que l'appareil est dans
une position sûre, puis appuyez sur le
bouton "Z" de la télécommande, suivi
du bouton "N" pour restaurer le
fonctionnement normal.
Vérifiez si le capteur anti-chute est
desserré ou défectueux et essuyez la
poussière ou les taches. Si le problème
persiste, contactez le service client.
Vérifiez si le capteur de collision est
bloqué ou défectueux, puis secouez-le
doucement. Si le problème persiste,
contactez le service client.
CUSTOMER SERVICE
Please contact us if you need any help as following:
▪ Technical Support
▪ Package is NOT in perfect condition
▪ Parts missing
▪ Any other quality issues
Email: [email protected]
Name: GAVIMOSACONSULTORIA,SOCIEDADLIMITADA
Address: CASTELLANA 9144, 28046 Madrid
Email: [email protected]
EC REP
UK REP
Name: Sea&Mew Accounting Ltd
Address: ElectricAvenueVision25,London,EnfieldEN37GD
Email: [email protected]
Manufacturer: Guangzhou Chuangyuan Robot Corporation Limited
Address: Floor A5, Building #4, No. 282, Caixin Road, Lanhe Town, NanshaDistrict,Guangzhou
City, P.R. CHINA