Loading ...
Loading ...
Loading ...

BPRZRD
Polaris RZR
Receiver Installation Kit
BPRZRD
Polaris RZR
Receiver Installation Kit
INSTALLATION MANUAL
INSTALLATION MANUAL
- 6 -
- 7 -
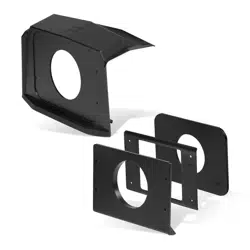
b) Lower install kit assembly
Depending on a BOSS Audio Systems source unit you have, installation method and kit may vary. Follow the
guideline below that applies to your source unit.
MGV550B source unit installation (lower dash mount)
1. Fasten both the lower dash mount panel and the metal brace plate to the lower dash pocket panel of your RZR
as 3-in-1 panel. Refer to “Before you start (lower dash mount)” on page 5.
Then use a proper tool to drill four holes through the lower dash pocket panel of your RZR, by using the four
drilled holes which are previously drilled on the lower dash mount panel (Refer to the “Lower dash mount
panel” image on page 5). The holes are used for screwing fastening.
2. Remove the trim plate from the front panel of the source unit, to access the four screw mounting holes.
3. Fix MGV550B source unit to the 3-in-1 panel by using four supplied bolts and ange threading nuts.
IMPORTANT! When threading the ange nut on the bolt, make sure the wide at face of the nut points
inward (toward the metal plate) to allow locking function.
For the MGV550B installation, the supplied adaptable mount panel and upper dash mount panel / rubber
feet are no need.
1
3
2
Trim plate
Source unit
(MGV550B)
3-in-1 panel (Lower dash mount
panel, lower dash pocket panel of
your RZR and metal brace plate are
fastened together)
Drill four holes through the RZR dash
MGV520B source unit installation (lower dash mount)
1. Fasten both the lower dash mount panel and the metal brace plate to the lower dash pocket panel of your RZR
as 3-in-1 panel. Refer to “Before you start (lower dash mount)” on page 5.
Then use a proper tool to drill four holes through the lower dash pocket panel of your RZR, by using the four
drilled holes which are previously drilled on the lower dash mount panel (Refer to the “Lower dash mount
panel” image on page 5). The holes are used for screw fastening.
2. Remove the trim plate from the front panel of the source unit, to access the four screw mounting holes.
3. Fix MGV520B source unit to the 3-in-1 panel by using four supplied bolts and ange threading nuts.
IMPORTANT! When threading the ange nut on the bolt, make sure the wide at face of the nut points
inward (toward the metal plate) to allow locking function.
For this source unit installation, the supplied adaptable mount panel and upper dash mount panel/rubber
feet are no need.
Loading ...
Loading ...
Loading ...