
BPRZRD
Polaris RZR
Receiver Installation Kit
BPRZRD
Polaris RZR
Receiver Installation Kit
INSTALLATION MANUAL
INSTALLATION MANUAL
- 2 -
- 1 -
Congratulations on your purchase of a POWERSPORTS product.
Table of Contents
Introduction .........................................................................................................................................................1
Package Contents ..............................................................................................................................................1
Specications .....................................................................................................................................................2
2019+ RZR XP1000 Upper Dash Mount Installation ..........................................................................................2
a) Before you start (upper dash mount) .......................................................................................................2
b) Upper install kit assembly ........................................................................................................................2
c) Final assembly (upper dash mount) .........................................................................................................5
2014-2018 RZR Lower Dash Mount Installation .................................................................................................5
a) Before you start (lower dash mount) ........................................................................................................5
b) Lower install kit assembly ........................................................................................................................6
c) Final assembly (lower dash mount) ........................................................................................................8
Introduction
This Polaris RZR receiver installation kit is designed to replace the factory upper or lower dash pocket, and thus
make possible the installation of a BOSS Audio Systems gauge radio on your Polaris RZR vehicle.This installation
kit ts all Polaris RZR 900, 1000, Turbo and 4-seat models from 2014 to current year (excluding Pro XP).
It is compatible with most BOSS Audio Systems marine gauge receivers with 3” ~ 3.5” (e.g. MGV550B,
MGV520B, MGR450B, MGR350B, MGR250B and MRG150B)
Please read this manual carefully so you will know how to install your product properly. After you have nished
reading this manual, store it in a safe place for future reference.
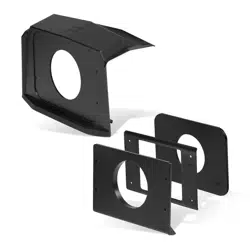
Package Contents
(1) (2) (3) (4)
1. Upper dash mount panel (x1)
2. Metal brace plate (x1)
3. Lower dash mount panel (x1)
4. Adaptable mount panel (x1)
5. Screw bag (x1)
(5)
M3x30mm (x4)
3.5x12mm (x4)
x4
(6)
6. Rubber foot (x2)
(for MGR450B use only)
BPRZRD
Polaris RZR
Receiver Installation Kit
BPRZRD
Polaris RZR
Receiver Installation Kit
INSTALLATION MANUAL
INSTALLATION MANUAL
- 2 -
- 3 -
Specications
Compatibility
• Source unit: Most BOSS Audio System marine gauge radios with 3”-3.5”
• Vehicle: all Polaris RZR 900, 1000, Turbo and 4-seat models from 2014 to current year (excluding Pro XP)
Materials
• ABS plastic (except the metal brace plate)
Specications are subject to change without notice.
2019+ RZR XP1000 Upper Dash Mount Installation
The upper dash mount is applicable to the 2019+ Polaris RZR XP1000 models (excluding Pro XP).
The installation kit is compatible with the following marine gauge source units:
MGV550B, MGV520B, MGR450B, MGR350B, MGR250B and MRG150B.
a) Before you start (upper dash mount)
• Remove the upper dash pocket from your RZR as follows:
Remove the push pins that secure the upper dash pocket (set aside the push pins for the nal assembly),
then remove the upper dash pocket by tilting it away from the dash.
The upper dash pocket will not be installed. Your source unit attached to the installation kit will take its place.
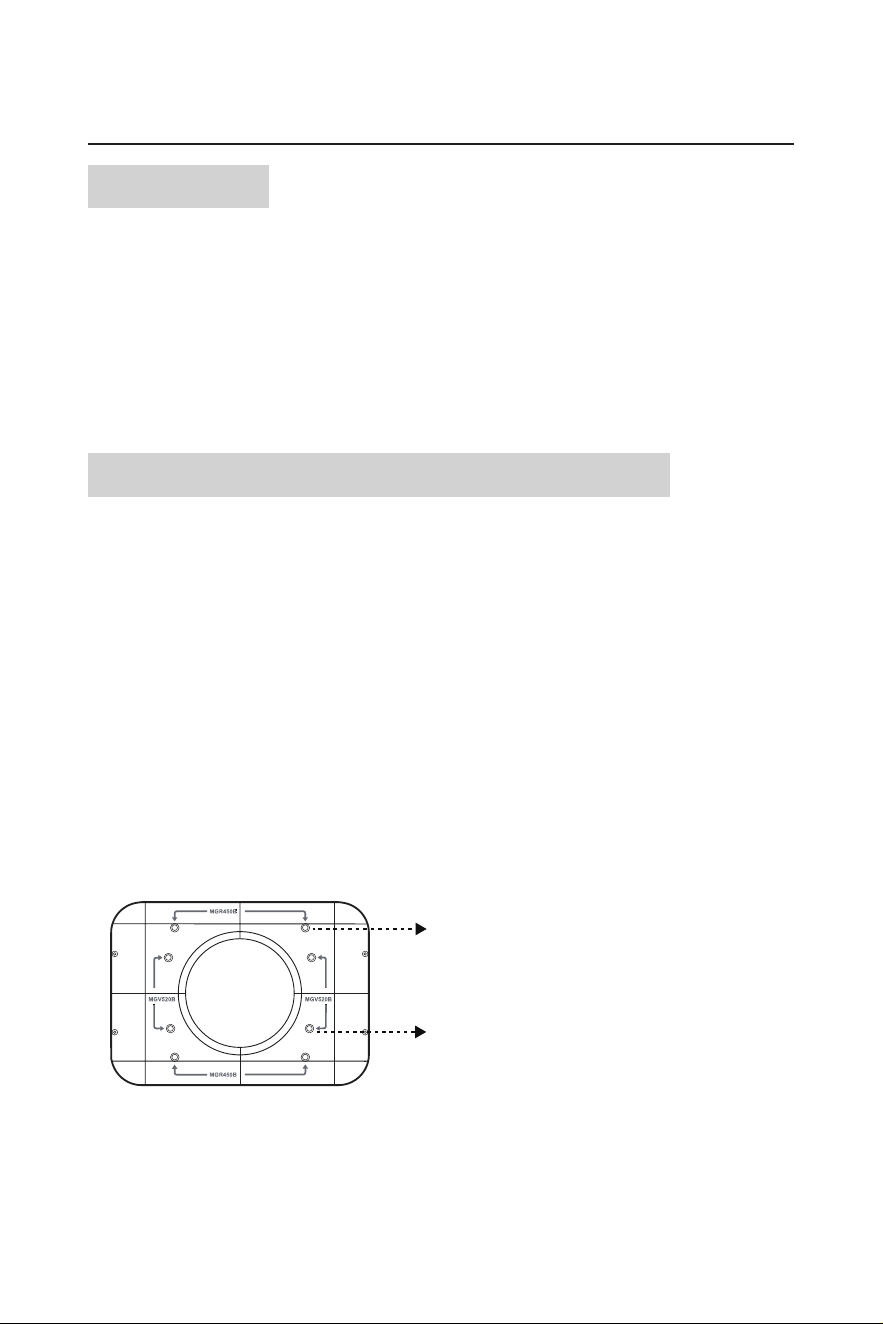
• The installation kit has an adaptable mount panel which is required for the upper dash mount of the
following source units: MGV520B, MGR450B, MGR250B and MGR150B. MGV550B does not require the
adaptable mount panel.
For MGV520B and MGR450B, use a proper tool to drill four screw bit size holes on the adaptable mount
panel.
To drill holes, locate the four hole marks indicated as “MGV520B” or “MGR450B” on the back side of the
adaptable mount panel.
For MGR450B source unit, drill four holes
indicated as “MGR450B” for screw fastening.
For MGV520B source unit, drill four holes
indicated as “MGV520B” for screw fastening.
Adaptable mount panel
b) Upper install kit assembly
Depending on a BOSS Audio Systems source unit you have, installation method and kit may vary. Follow the
guideline below that applies to your source unit.
BPRZRD
Polaris RZR
Receiver Installation Kit
BPRZRD
Polaris RZR
Receiver Installation Kit
INSTALLATION MANUAL
INSTALLATION MANUAL
- 2 -
- 3 -
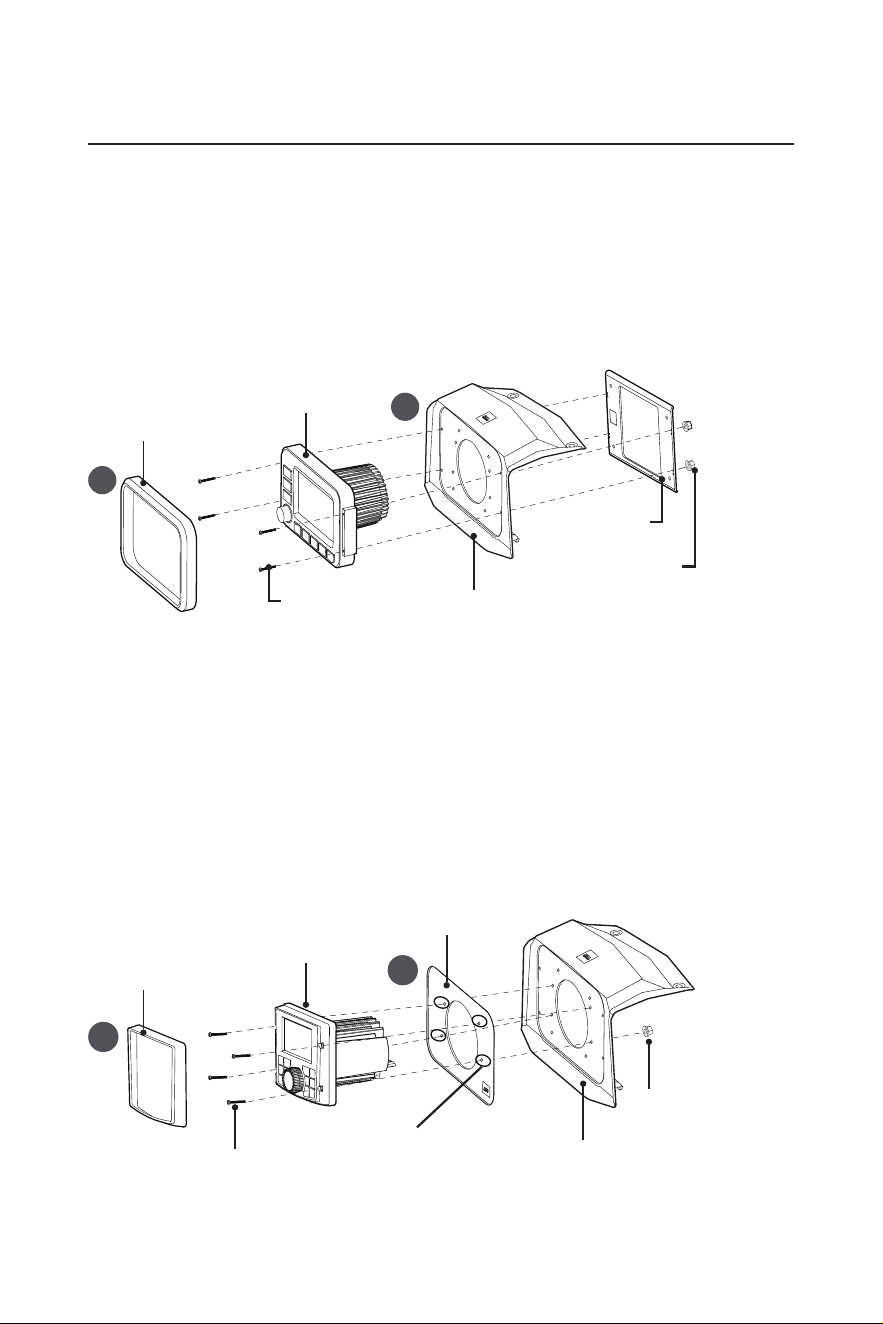
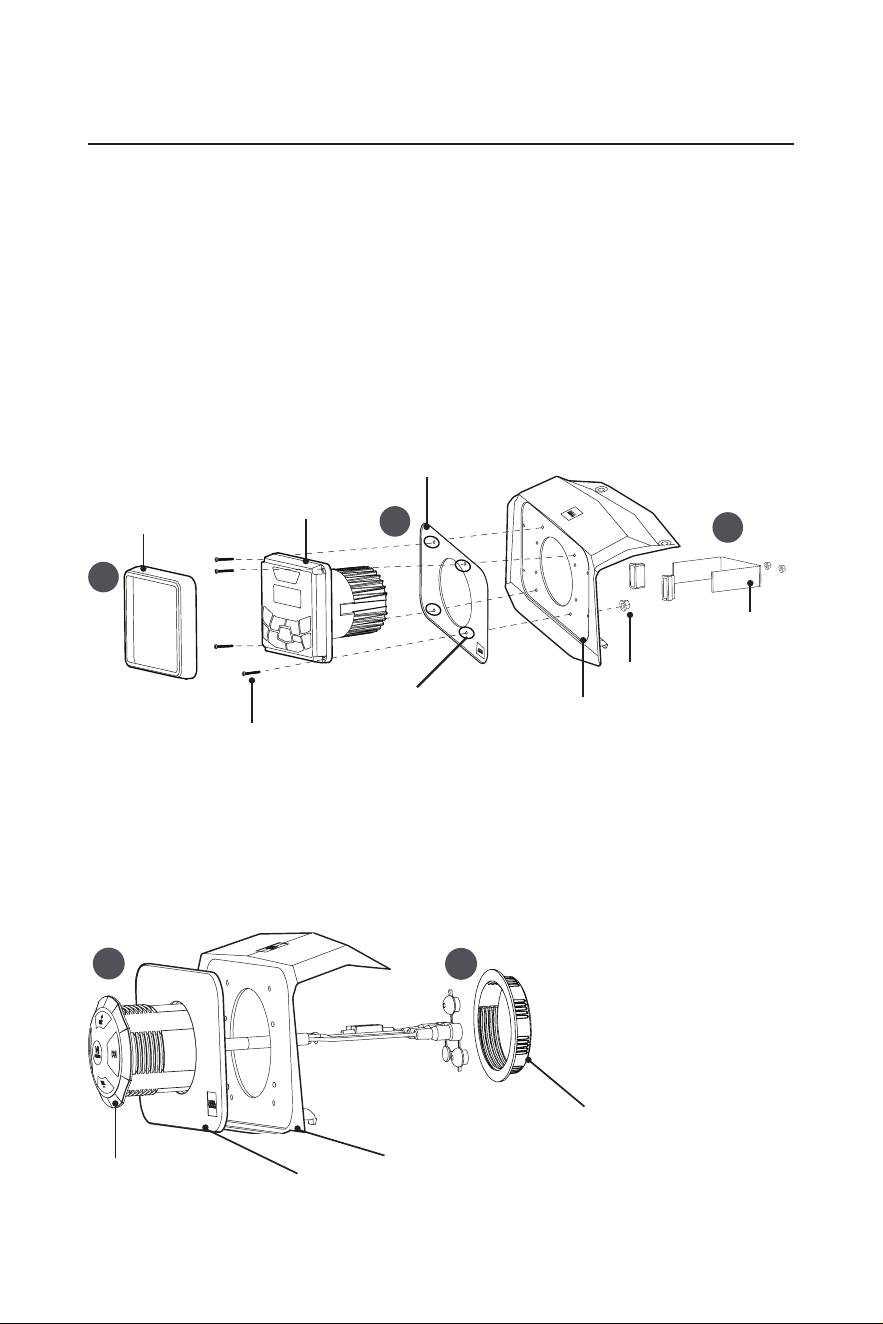
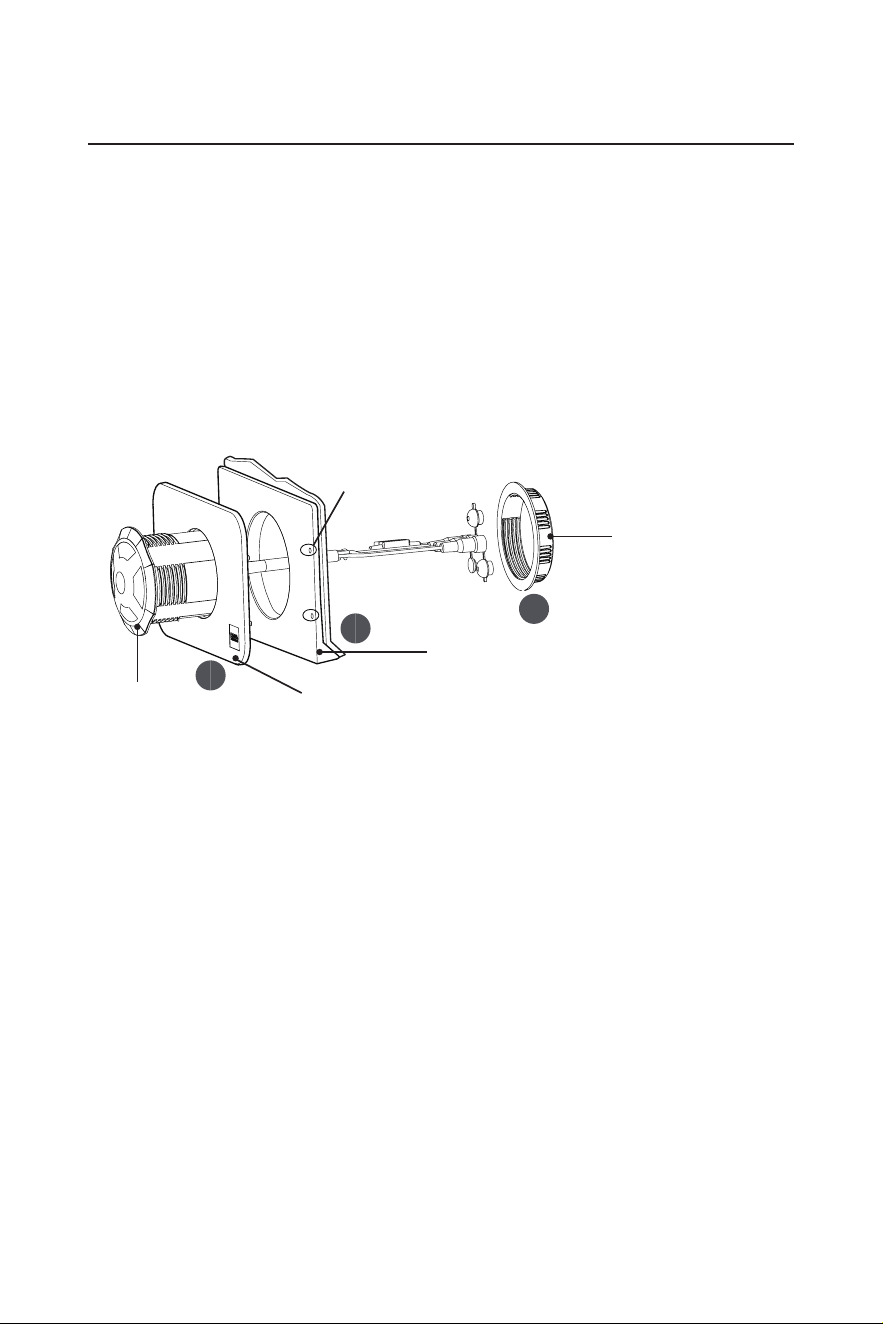
MGV550B source unit installation (upper dash mount)
1. Remove the trim plate from the front panel of the source unit, to access the four screw mounting holes.
2. Fix the source unit by using the supplied upper dash mount panel, metal brace plate, and four supplied bolts
and ange threading nuts.
IMPORTANT! When threading the ange nut on the bolt, make sure the wide at face of the nut points
inward (toward the metal plate) to allow locking function.
For the MGV550B installation, the supplied adaptable mount panel, lower dash mount panel and screws /
rubber feet are no need.
1
2
Trim plate
Source unit
(MGV550B)
Upper dash mount panel
Metal brace plate
Flange nut
Bolt
MGV520B source unit installation (upper dash mount)
1. Remove the trim plate from the front panel of the source unit, to access the four screw mounting holes.
2. Drill four screw holes on the back side of the adaptable mount panel for fastening of MGV520B source unit.
Refer to the “Adaptable Mount Panel” image on page 2.
3. Fix the source unit by using the supplied upper dash mount panel, adaptable mount panel and four supplied
bolts and ang threading nuts.
IMPORTANT! When threading the ange nut on the bolt, make sure the wide at face of the nut points
inward (toward the metal plate) to allow locking function.
For the MGV520B installation, the supplied metal brace plate, lower dash mount panel and screws / rubber
feet are no need.
1
2
Trim plate
Source unit
(MGV520B)
Upper dash mount panel
Flange nut
Bolt
Adaptable mount panel
Drill four screw holes
indicated by model number
on the back side
BPRZRD
Polaris RZR
Receiver Installation Kit
BPRZRD
Polaris RZR
Receiver Installation Kit
INSTALLATION MANUAL
INSTALLATION MANUAL
- 4 -
- 5 -
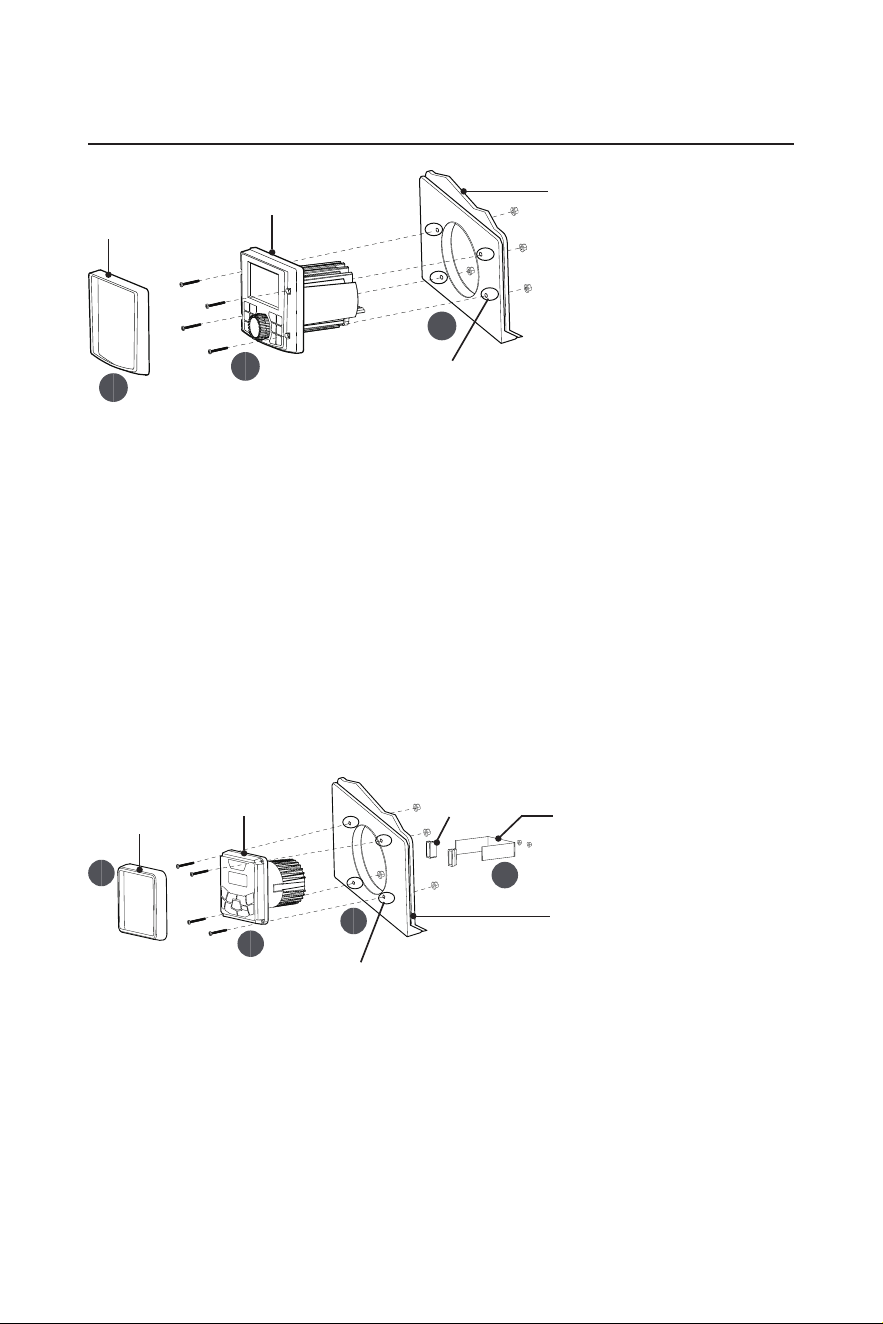
MGR450B source unit installation (upper dash mount)
1. Remove the trim plate from the front panel of the source unit, to access the four screw mounting holes.
2. Drill four screw holes on the back side of the adaptable mount panel for fastening of MGR450B source unit.
Refer to the “Adaptable Mount Panel” image on page 2.
3. Fix the source unit by using the supplied upper dash mount panel, adaptable mount panel and four supplied
bolts and ange threading nuts, nally xing with the U-shaped bracket of MGR450B source unit and two
supplied rubber feet.
IMPORTANT! When threading the ange nut on the bolt, make sure the wide at face of the nut points
inward (toward the metal plate) to allow locking function.
For the MGR450B installation, the supplied metal brace plate, lower dash mount panel and screws are no
need.
1
2
3
Trim plate
Source unit
(MGR450B)
Upper dash mount panel
Flange nut
Bolt
Adaptable mount panel
Drill four screw holes
indicated by model number
on the back side
U-shaped bracket
of MGR450B
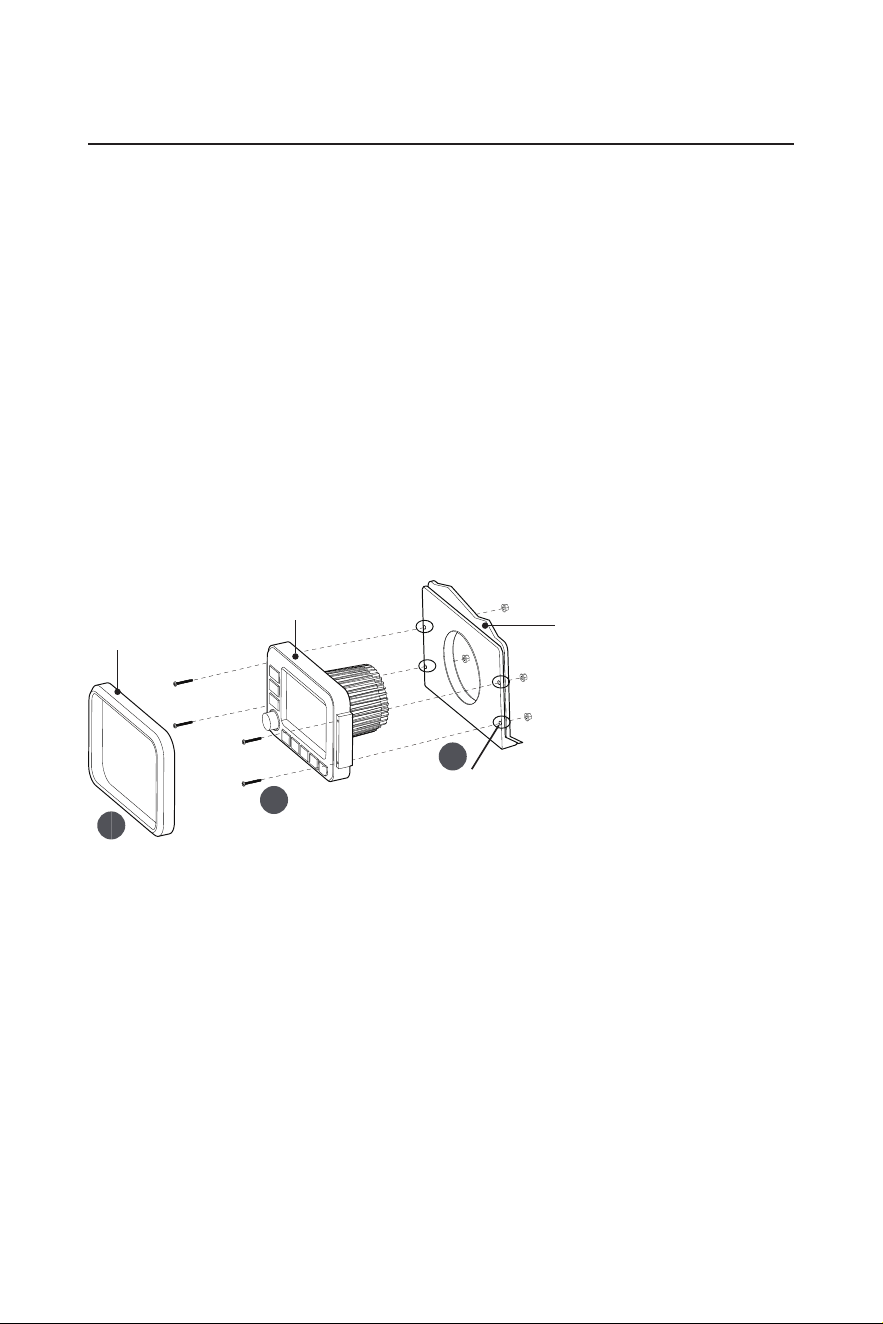
MGR250B/150B source unit installation (upper dash mount)
1. Fix the source unit by using the supplied upper dash mount, adaptable mount panel, and the plastic ring
fastener of MGR250B/150B source unit.
For this source unit installation, the supplied metal brace plate, lower dash mount panel and bolts/nuts/
screws/rubber feet are no need.
1
2
Source unit
(MGR250B/150B)
Adaptable mount panel
Upper dash mount panel
Plastic ring fastener of
MGR250B/150B
BPRZRD
Polaris RZR
Receiver Installation Kit
BPRZRD
Polaris RZR
Receiver Installation Kit
INSTALLATION MANUAL
INSTALLATION MANUAL
- 4 -
- 5 -
c) Final assembly (upper dash mount)
After your source unit is fastened to the upper dash mount panel, secure the upper dash mount panel in the
place where the previous upper dash pocket sits by using the push pins, and replace the trim plate.
2014-2018 RZR Lower Dash Mount Installation
The lower dash mount is applicable to the 2014-2018 Polaris RZR models.
The installation kit is compatible with the following marine gauge source units:
MGV550B, MGV520B, MGR450B, MGR350B, MGR250B and MRG150B.
a) Before you start (lower dash mount)
1. Locate the lower dash pocket and remove the lower dash pocket panel from your RZR. Some dash
disassembly may be required.
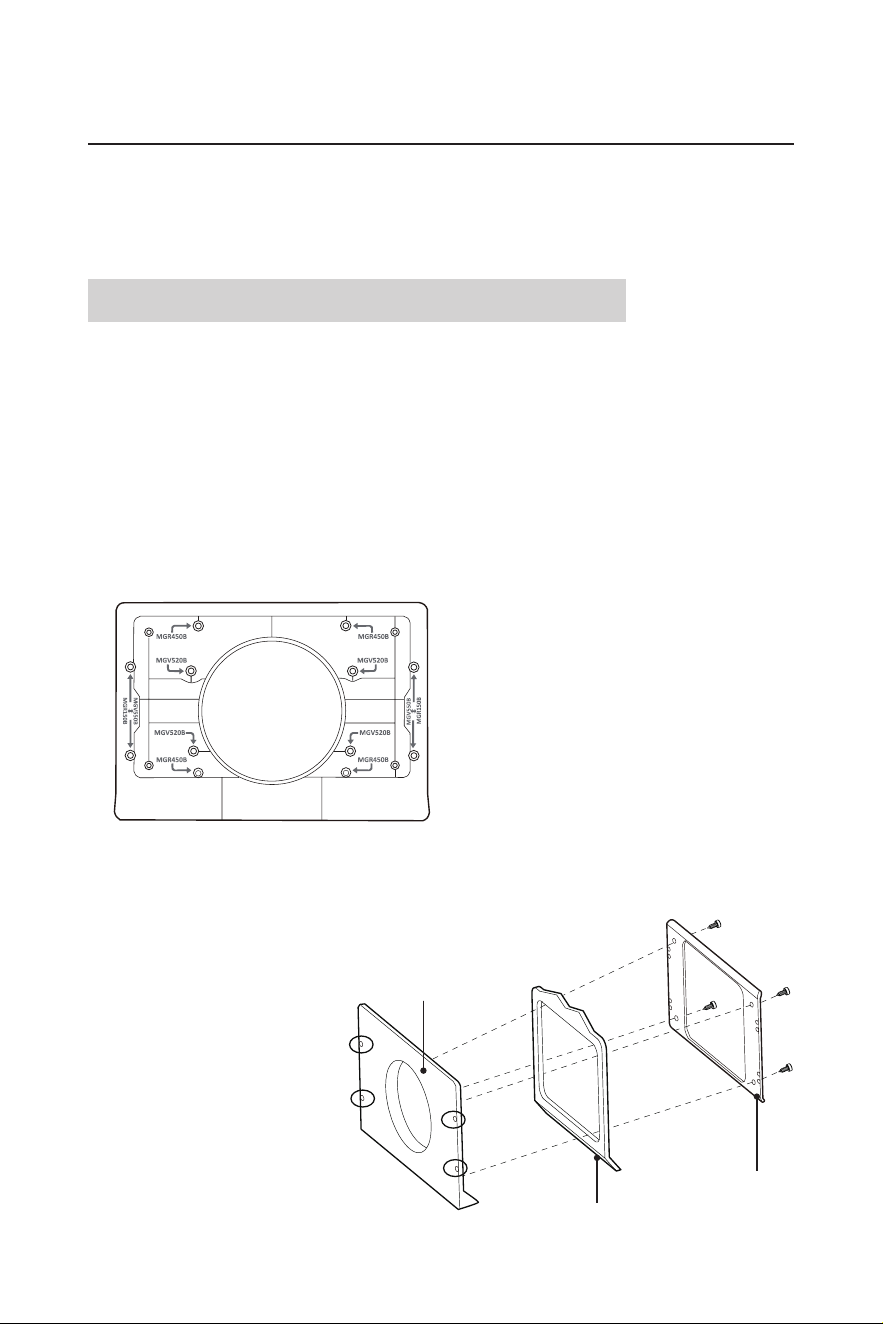
2. Find the lower dash mount panel from the supplied mounting kit. You need to drill four screw holes through
the lower dash mount panel. To drill holes, locate the four hole marks indicated for your source unit model
number on the back side of the lower dash mount panel.
Drill four holes indicated for the corresponding
source units. The drilled holes are used to fasten
your source unit.
MGV550B
MGV520B
MGR450B,
MGR250B/150B.
Lower dash mount panel
3. Fasten both the lower dash mount panel and the metal brace plate to the lower dash pocket panel of your RZR,
using the supplied four screws. Make sure the three pieces are correctly orientated before fastening.
Lower dash mount panel
RZR dash
Metal brace plate
Tip:
The drilled holes on the lower dash
mount panel shown in the illustration
is for reference.
The location of the drilled holes varies
according to different source units.
The drilled holes are used to fasten
the source unit only.
BPRZRD
Polaris RZR
Receiver Installation Kit
BPRZRD
Polaris RZR
Receiver Installation Kit
INSTALLATION MANUAL
INSTALLATION MANUAL
- 6 -
- 7 -
b) Lower install kit assembly
Depending on a BOSS Audio Systems source unit you have, installation method and kit may vary. Follow the
guideline below that applies to your source unit.
MGV550B source unit installation (lower dash mount)
1. Fasten both the lower dash mount panel and the metal brace plate to the lower dash pocket panel of your RZR
as 3-in-1 panel. Refer to “Before you start (lower dash mount)” on page 5.
Then use a proper tool to drill four holes through the lower dash pocket panel of your RZR, by using the four
drilled holes which are previously drilled on the lower dash mount panel (Refer to the “Lower dash mount
panel” image on page 5). The holes are used for screwing fastening.
2. Remove the trim plate from the front panel of the source unit, to access the four screw mounting holes.
3. Fix MGV550B source unit to the 3-in-1 panel by using four supplied bolts and ange threading nuts.
IMPORTANT! When threading the ange nut on the bolt, make sure the wide at face of the nut points
inward (toward the metal plate) to allow locking function.
For the MGV550B installation, the supplied adaptable mount panel and upper dash mount panel / rubber
feet are no need.
1
3
2
Trim plate
Source unit
(MGV550B)
3-in-1 panel (Lower dash mount
panel, lower dash pocket panel of
your RZR and metal brace plate are
fastened together)
Drill four holes through the RZR dash
MGV520B source unit installation (lower dash mount)
1. Fasten both the lower dash mount panel and the metal brace plate to the lower dash pocket panel of your RZR
as 3-in-1 panel. Refer to “Before you start (lower dash mount)” on page 5.
Then use a proper tool to drill four holes through the lower dash pocket panel of your RZR, by using the four
drilled holes which are previously drilled on the lower dash mount panel (Refer to the “Lower dash mount
panel” image on page 5). The holes are used for screw fastening.
2. Remove the trim plate from the front panel of the source unit, to access the four screw mounting holes.
3. Fix MGV520B source unit to the 3-in-1 panel by using four supplied bolts and ange threading nuts.
IMPORTANT! When threading the ange nut on the bolt, make sure the wide at face of the nut points
inward (toward the metal plate) to allow locking function.
For this source unit installation, the supplied adaptable mount panel and upper dash mount panel/rubber
feet are no need.
BPRZRD
Polaris RZR
Receiver Installation Kit
BPRZRD
Polaris RZR
Receiver Installation Kit
INSTALLATION MANUAL
INSTALLATION MANUAL
- 6 -
- 7 -
1
3
2
Trim plate
Source unit
(MGV520B)
3-in-1 panel (Lower dash mount
panel, lower dash pocket panel of
your RZR and metal brace plate are
fastened together)
Drill four holes through the RZR dash
MGR450B source unit installation (lower dash mount)
1. Fasten both the lower dash mount panel and the metal brace plate to the lower dash pocket panel of your RZR
as 3-in-1 panel. Refer to “Before you start (lower dash mount)” on page 5.
Then use a proper tool to drill four holes through the lower dash pocket panel of your RZR, by using the four
drilled holes which are previously drilled on the lower dash mount panel (Refer to the “Lower dash mount
panel” image on page 5). The holes are used for screwing fastening.
2. Remove the trim plate from the front panel of the source unit, to access the four screw mounting holes.
3. Attach MGR450B source unit to the 3-in-1 panel by using four supplied bolts, ange threading nuts, nally
x with the U-shaped bracket of MGR450B source unit and two supplied rubber feet.
IMPORTANT! When threading the ange nut on the bolt, make sure the wide at face of the nut points
inward (toward the metal plate) to allow locking function.
For the MGR450B installation, the supplied adaptable mount panel and upper dash mount panel are no
need.
1
4
3
2
Trim plate
Source unit
(MGR450B)
3-in-1 panel (Lower dash mount
panel, lower dash pocket panel of
your RZR and metal brace plate are
fastened together)
Drill four holes through the RZR dash
U-shaped bracket of MGR450B
source unit
Rubber feet
BPRZRD
Polaris RZR
Receiver Installation Kit
BPRZRD
Polaris RZR
Receiver Installation Kit
INSTALLATION MANUAL
INSTALLATION MANUAL
- 8 -
- 9 -
MGR250B/150B source unit installation (lower dash mount)
1. Make sure the four holes on the lower dash mount panel have been drilled (Refer to the “Lower dash mount
panel” image on page 5).
Then fasten both the lower dash mount panel and the metal brace plate to the lower dash pocket panel of
your RZR as 3-in-1 panel. Refer to “Before you start (lower dash mount)” on page 5.
2. Fix MGR250B/150B source unit to the 3-in-1 panel by using the supplied adaptable mount panel, and the
plastic ring fastener of MGR250B/150B source unit.
Make sure the adaptable mount panel correctly ts by aligning its tabs (on the back side) with the four drilled
holes on the lower dash mount panel.
For the MGR250B/150B installation, the supplied upper dash mount panel and bolts and nuts/rubber feet
are no need.
1
2
3
Source unit
(MGR250B/150B)
Adaptable mount panel
Align four drilled holes
with the tabs
Plastic ring fastener of
MGR250B/150B
3-in-1 panel (Lower dash mount
panel, lower dash pocket panel of
your RZR and metal brace plate are
fastened together)
c) Final assembly (lower dash mount)
After your source unit is xed, secure it in the place where the lower dash pocket sits and replace the trim plate.