Instructions For Use
HS210
V 6.0
www.holystone.com+1(855) 888-6699
[email protected] (USA)
[email protected] (CA)
[email protected] (EU)
[email protected] (JP)


Contents
1.0 Disclaimer & Warning .........................................................................
2.0 Safety Guidelines ..................................................................................
3.0 Maintenance ..........................................................................................
4.0 Packing Contents ..................................................................................
5.0 Drone Details ......................................................................................
6.0 Low Battery Warning .........................................................................
7.0 Transmitter Functions .........................................................................
8.0 Joystick Mode .......................................................................................
9.0 Installation ..........................................................................................
10.0 Charging ..............................................................................................
11.0 Flight
Pairing ......................................................................................................
Calibrate the Gyro ................................................................................
Auto Takeoff ..........................................................................................
One Key Landing .................................................................................
12.0 Functions Details
Altitude-Hold Function........................................................................
Trimmer ....................................................................................................
Speed Switch ..........................................................................................
Emergency Stop ...................................................................................
360 ° Flip .................................................................................................
Circle Fly ..................................................................................................
Auto-Rotation ........................................................................................
Headless Mode .....................................................................................
13.0 Specification ........................................................................................
14.0 Contact Us ...........................................................................................
15.0 General Information .........................................................................
1
1
5
6
7
7
8
9
10
11
12
13
14
15
15
16
17
17
18
19
19
20
21
22
23

-1-
1. Please read this Disclaimer & Warning and Safety Guidelines carefully
before using our product. This product is not recommended for people
under the age of 14. By using this product, you hereby agree to this
disclaimer and signify that you have read it fully. You agree that you are
responsible for your own conduct and any damages caused while
using this product, and its consequences. You agree to only use this
product for it's designed purposes and in accordance with local laws,
regulations and all applicable policies and guidelines that HolyStone
may provide.
2. When using this product, please be sure to strictly abide by the
specification requirements and safety guidelines stated in this
document. Any personal injury, property damage, legal disputes and all
other adverse events caused by the violation of any of the safety
instructions or due to any other factor, WILL NOT be HolyStone’s
responsibility.
1.0 DISCLAIMER & WARNING
2.0 SAFETY GUIDELINES
① This product is a high precision drone that integrates various
electronic stability and control mechanisms. Please be sure to config-
ure this drone carefully and correctly to ensure safe, accident-free
operation.
② Ensure that the batteries of the drone and transmitter are clean,
undamaged and fully charged before every use.
③ Ensure that all the propellers are undamaged and are installed in the
correct orientation.
2.1 Check Before Use
-2-
④ Ensure to do a thorough check of the product before each use.
Inspect the integrity of the parts, any signs of cracks and wear of the
propeller, battery power and effectiveness of the indicator, etc. If after
doing a complete check of the drone any problems are found, please
refrain from using it until the problem has been resolved.
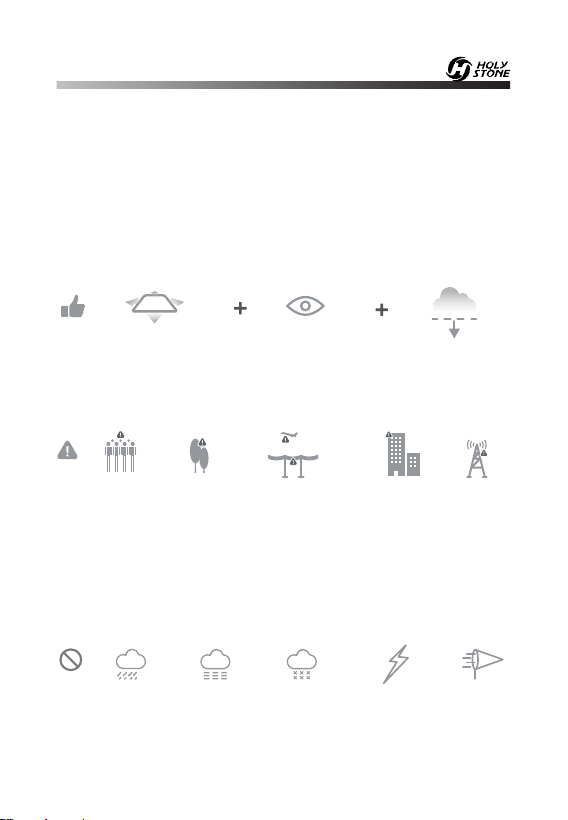
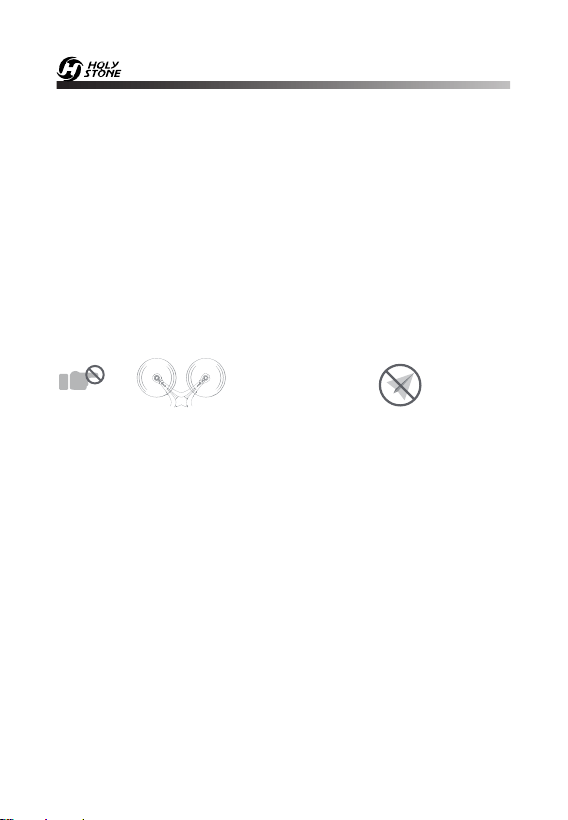
2.2 Flight Environment
Fly in Open Areas Maintain Line
of Sight
- - - - - - - - - - - - - - - - - - - - - - - - - - - - - - - - - - - - - - - - - - - - - - - - - - - - - - - - - - -
Avoid flying over or near obstacles, crowds, high voltage power lines,
trees, airports or bodies of water.
DO NOT fly near strong electromagnetic sources such as power lines
and base stations as it may affect the onboard compass.
- - - - - - - - - - - - - - - - - - - - - - - - - - - - - - - - - - - - - - - - - - - - - - - - - - - - - - - - - - -
DO NOT use this drone in adverse weather conditions such as rain,
snow, fog, and wind.
Fly Below
164 feet (50 m)
-3-
2.3 Operation Requirements
① DO NOT use this product to follow any moving vehicles.
② During the flight, turn off the motors only in case of an emergency.
③ Fly the drone back to you as soon as you are notified that the battery
is running low.
④ This product should not be used while drinking alcohol or consum-
ing drugs, if you are feeling fatigued, taking medicine, or feeling any
physical discomfort.
⑤ Be aware of the volume of noise that the drone produces. Please
ensure to keep your distance to avoid ear damage.
2.4 Use of Battery
① Please ensure batteries are fitted in the correct orientation as shown
in the instruction manual.
② Avoid short circuits by fitting the batteries correctly, and do not crush
or squeeze the batteries as this could cause the risk of a fire or explosion.
③ DO NOT mix new and old batteries as this can lead to a poor
performance of the product.
④ Please dispose of used batteries carefully, do not litter and recycle
where ever possible.
⑤ DO NOT expose dead batteries to heat or fire or they may explode.
⑥ If the device is not going to be used for an extended period of time,
⑥ Stay away from the rotating
propellers and motors.
⑦ DO NOT fly in any spaces
where drones are prohibited.
Please respect people's right to
privacy by not flying your drone
close to others.
-4-
please remove batteries to prevent potential damage from to the drone
battery leakage.
⑦ Only use the USB charging cable that comes with the drone to
charge the battery.
⑧ DO NOT connect the battery directly to wall outlets or car cigarette
-lighter sockets as this will damage your battery as they are a different
voltage.
⑨ DO NOT attempt to disassemble or modify the battery in any way
⑩ DO NOT use the battery if it gives off an odor, generates heat,
becomes discolored, deformed or appears abnormal in any way. If any
of these situations occur while the battery is in use or being charged,
remove it from the device or charger immediately and discontinue use.
DO NOT pierce the battery casing with a nail or any other sharp
object, break it open with a hammer, or step on it! Dispose or recycle
this battery as it may cause personal injury or damage to your drone.
Always charge the batteries on a fireproof surface and away from
combustible materials. DO NOT charge on surfaces that can catch fire.
This includes: wood, cloth, carpet, or on the application's device.
DO NOT immerse the battery in water or get it wet.
DO NOT solder battery terminal in any way.
Keep batteries out of reach of children or pets.
DO NOT short-circuit the battery by connecting wires or any other
metal object to the positive(+) and negative(-) terminals.
11
12
13
14
15
16
Li-Po Battery Disposal & Recycling
Waste Lithium-polymer batteries must not be placed with household trash.
Please contact local environmental or waste agency or the waste agency
or the supplier of your model or your nearest Li-Po battery recycling center.

-5-
3.0 MAINTENANCE
① Clean the product after each use with a clean, soft cloth.
② Avoid prolonged exposure to direct sunlight and avoid buildup of
heat on the drone or batteries.
③ This device is not waterproof and must not be submerged or
subjected in water under any circumstance. Failure to keep the device
completely dry will result in the failure and permanent damage to the
unit. Be aware that although it might be dry where you are, droplets of
rain or mist from a river or waterfall could be damaging your drone
where it is flying.
④ Frequently Check the charging plug and other accessories for signs
of damage. If any part of the device or cables are damaged, avoid use
or charging until the device can be serviced.
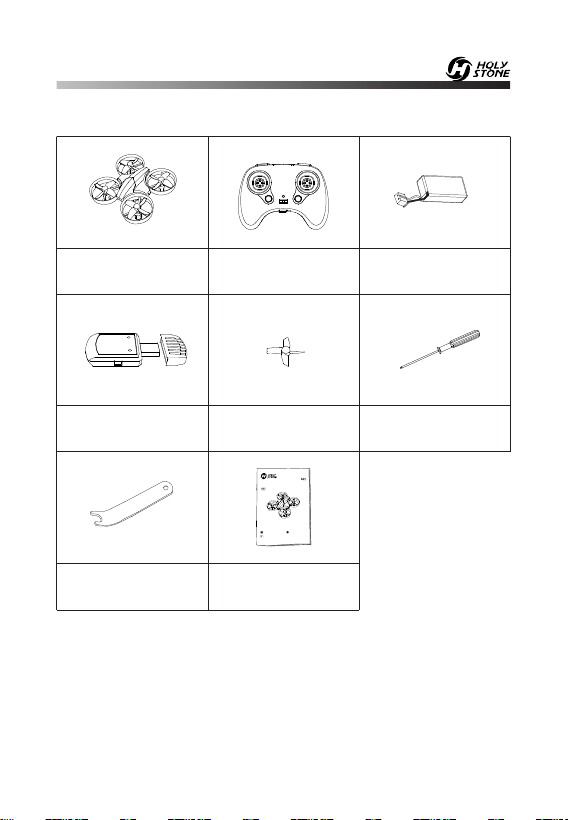
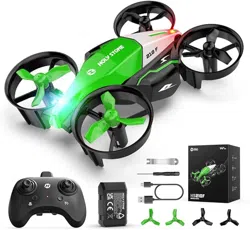
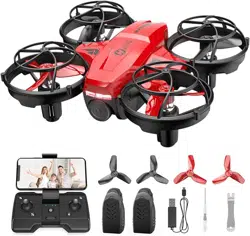
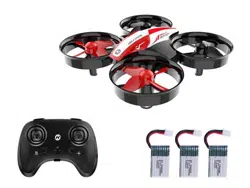
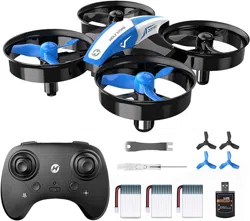
4.0 PACKAGE CONTENTS
Instructions For Use
HS210
V 6.0
www.holystone.com+1(855) 888-6699
[email protected] (USA)
[email protected] (CA)
[email protected] (EU)
[email protected] (JP)
Drone Transmitter Drone Battery
USB Charger
Screwdriver
Instructions For
Use
-6-
Propellers
Spanner
Spare Propellers
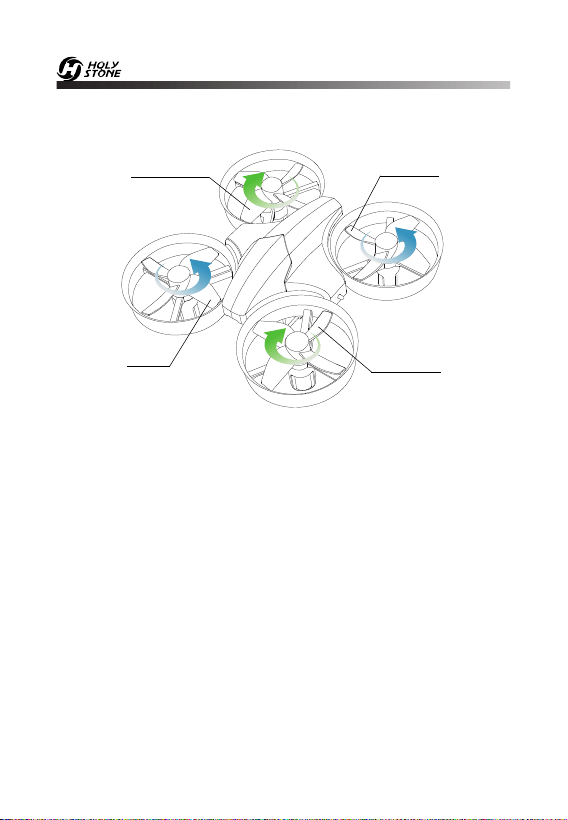
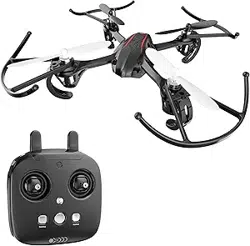
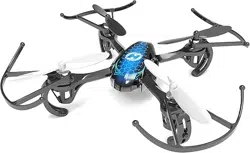
5.0 DRONE DETAILS
Propeller B
Propeller A
Propeller A
HEAD
TAIL
Propeller B
6.0 LOW BATTERY WARNING
① When the drone battery runs low, the indicator lights on the drone
will blink continuously. About 1 minute or so the drone will automati-
cally land on low electricity.
② When the transmitter battery runs low, the power indicator of the
transmitter will blink continuously and the transmitter will keep
beeping. When this happens, the pilot should change the new battery
for the transmitter.
-7-
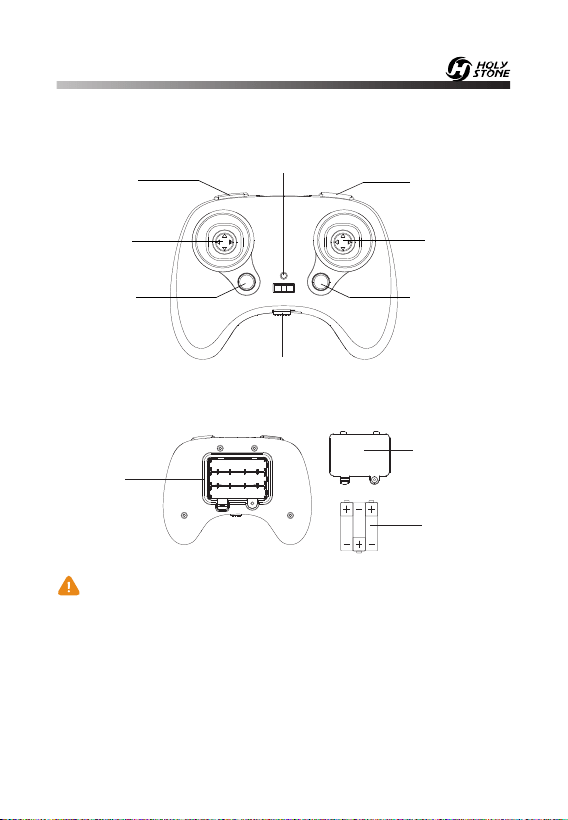
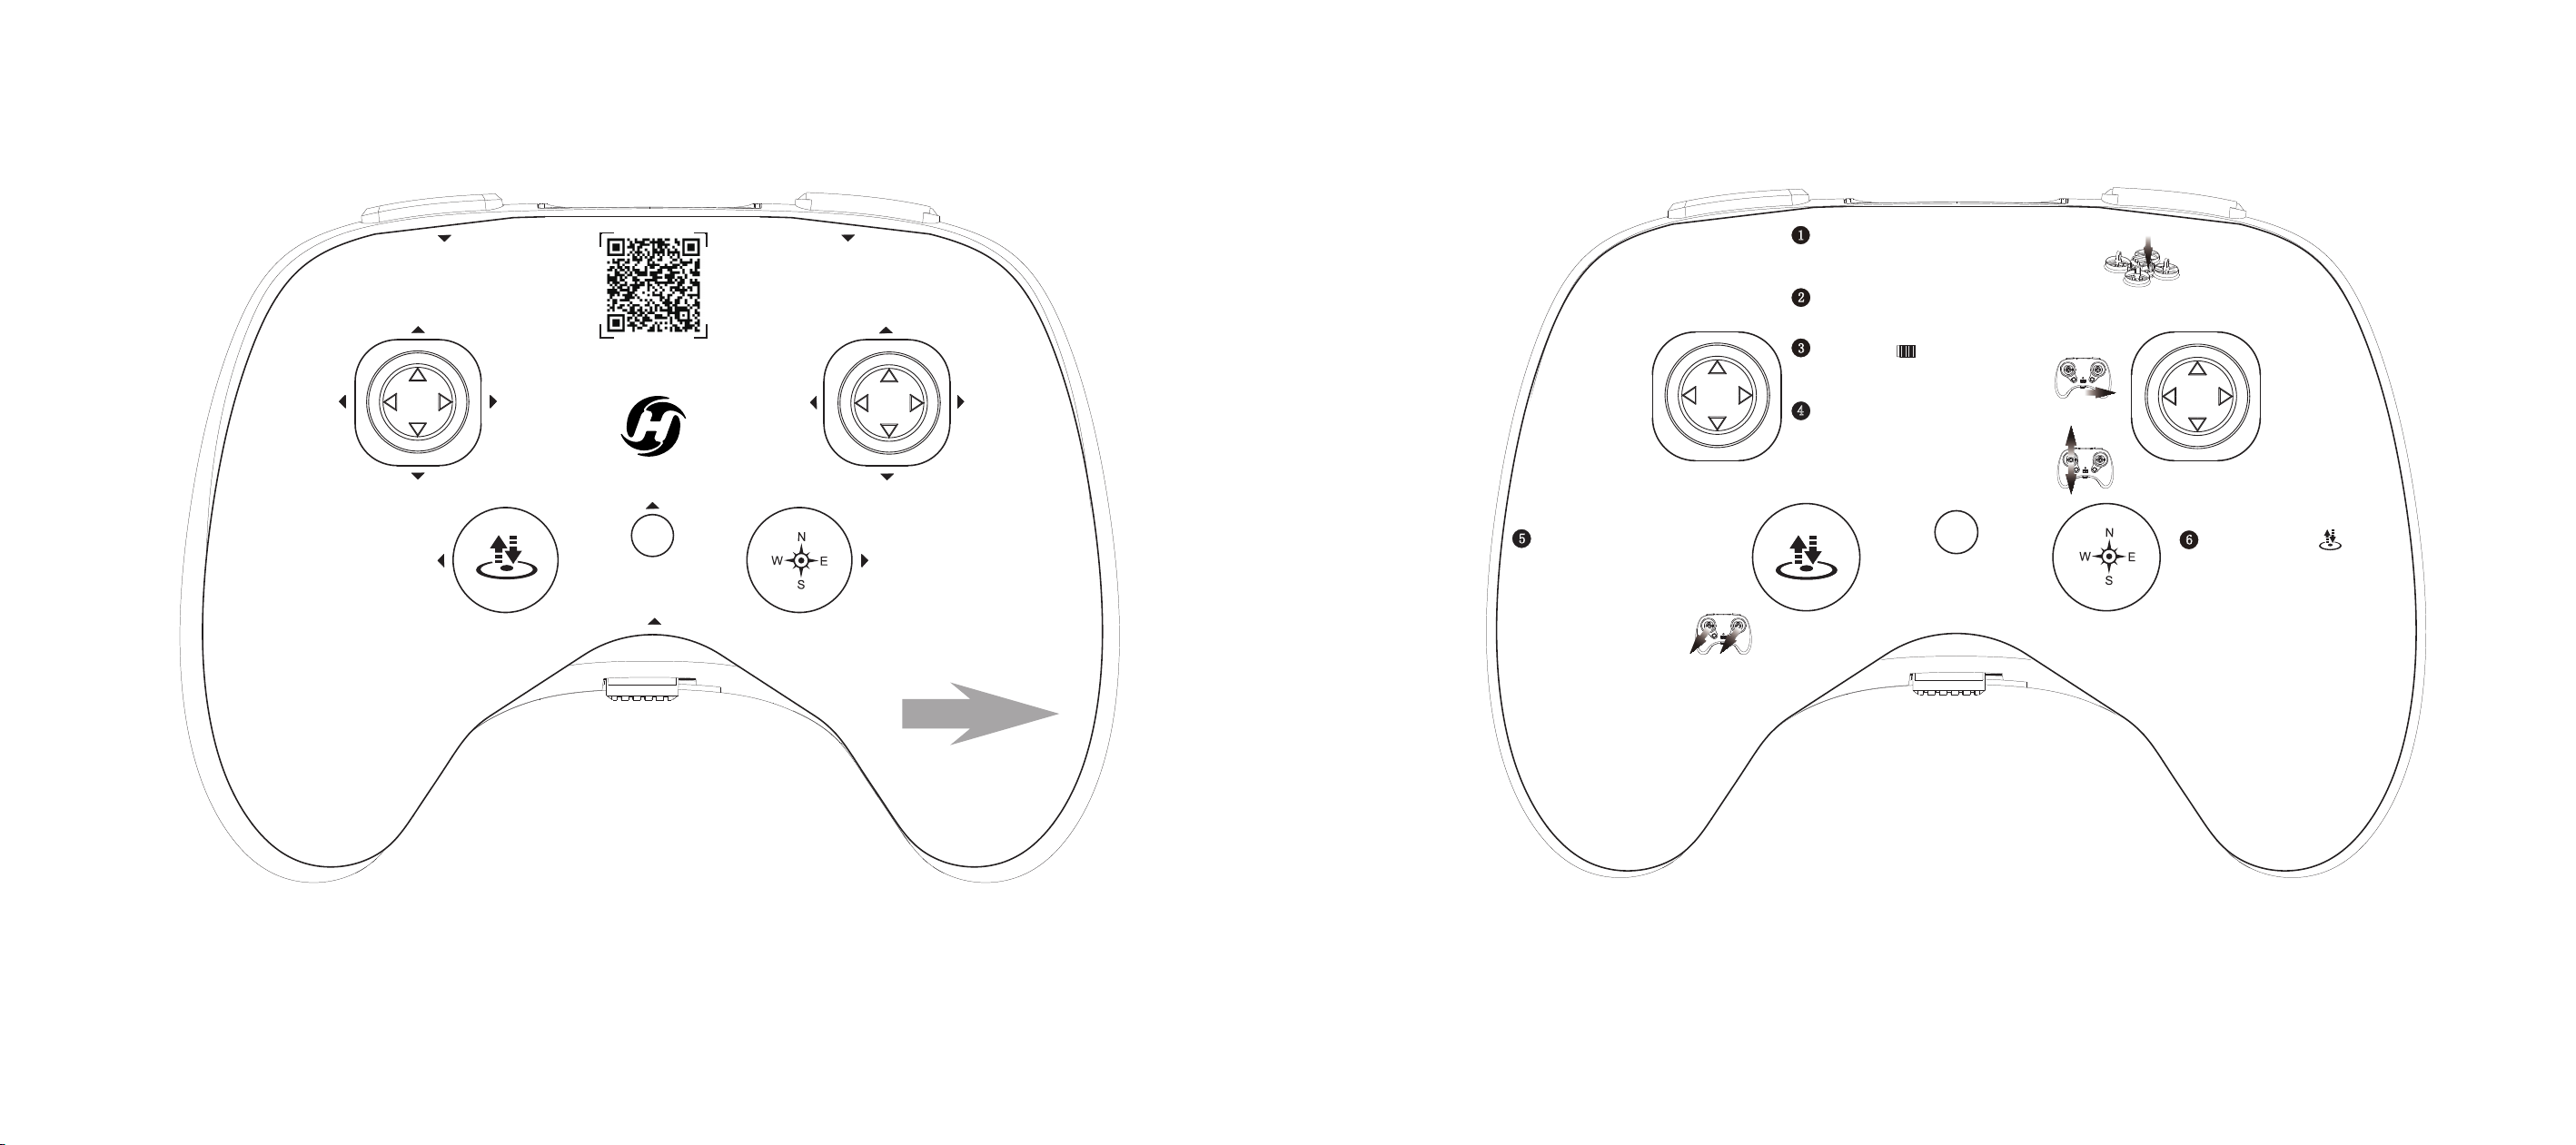
7.0
TRANSMITTER FUNCTIONS
Turn ON/OFF
Headless Mode
One Key Start/
Landing
Indicator Light
Left Joystick
Right Joystick
Speed Switch
(Short press) /
Circle Fly
(Long press)
360°Flip
(Short press)/
Auto-Rotation
(Long press)
If you want to install the batteries, please always pay close attention
to battery polarity to make sure they are inserted correctly.
AAA Batteries
(NOT included)
Battery
Compartment
Battery Cover
-8-
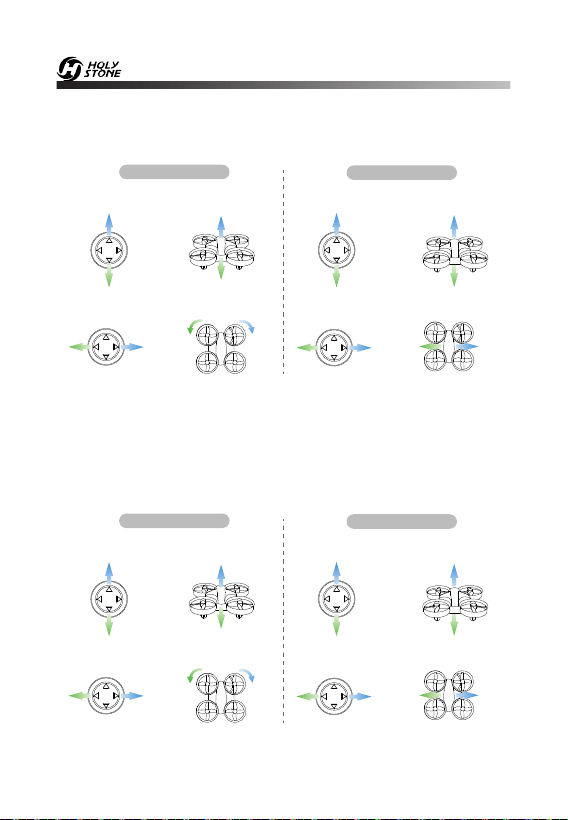
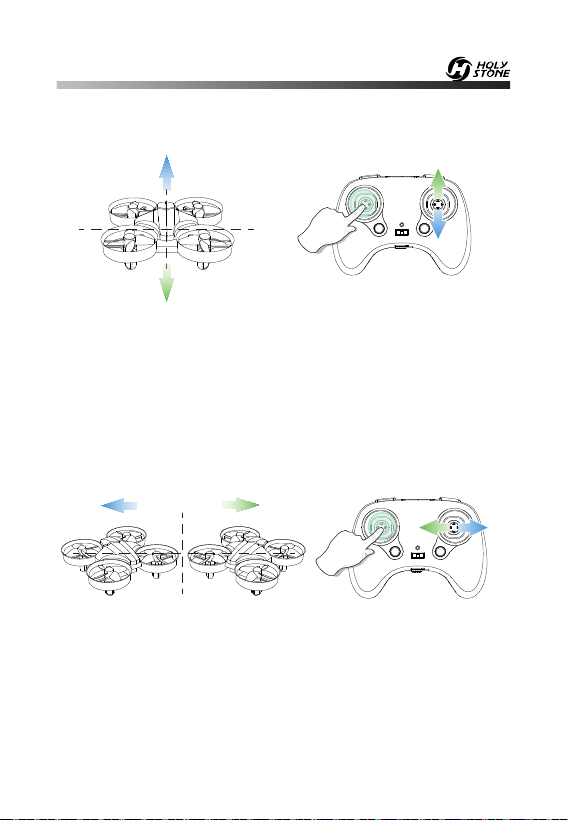
8.0 JOYSTICK MODE
8.1 MODE 2 (Default Setting)
Left Joystick Right Joystick
Ascend
Descend
Rotate
Left
Rotate
Right
Forward
Backward
Up
Left
Up
Down
Down
Left Right
Fly to
Right
Fly to
Left
Right
8.2 MODE 1
To enter MODE 1, turn on the transmitter while holding the “Speed
Switch” button. (Please do not release the “Speed Switch” button until
the transmitter is powered on.)
Left Joystick Right Joystick
Ascend
Descend
Forward
Backward
Up
Left
Up
DownDown
Left Right
Fly to
Right
Fly to
Left
Right
-9-
Rotate
Left
Rotate
Right
-10-
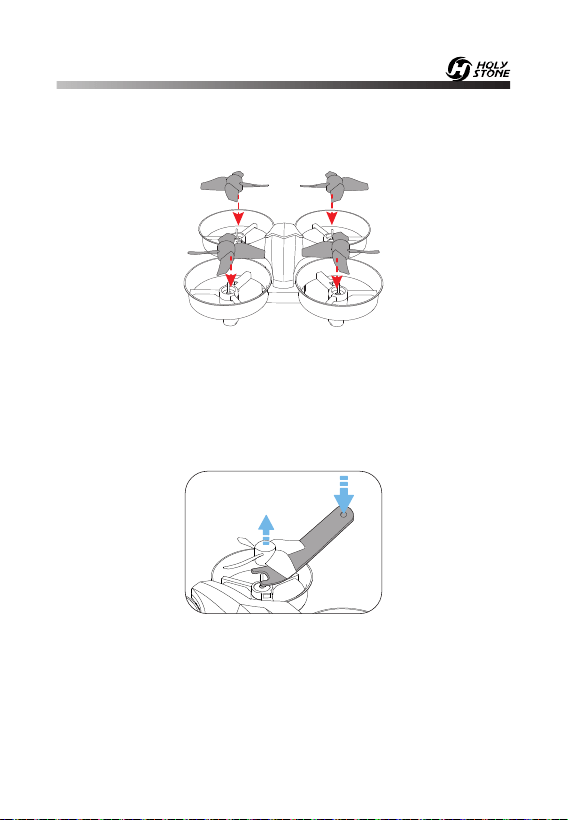
9.1 Propeller
Attention: The drone will not fly unless the correct propeller is installed
on the correct motor shaft.
See illustration above. An “A” or “B” is printed on each propeller. Install
the propeller to the motor shaft and press into place.
HEAD
Removal: Insert the propeller spanner between the propeller and the
motor. Be sure to hold the motor while detaching the propeller.
A
B
A
B
9.0 INSTALLATION
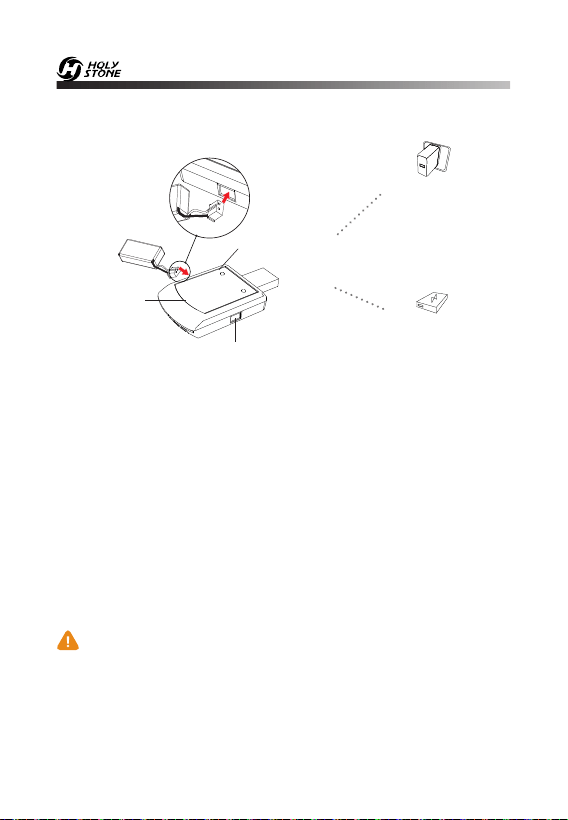
10.0 CHARGING
USB Adapter
(5V/2A)
Power Bank
① Connect the battery with the charger.
② Plug the charger into a USB charging port on power bank or USB
adapter (5V/2A).
③ Charging time: about 40-60 minutes.
④
a. While the battery is charging, the charging indicator light is
Red.
b. When the battery is full charged, the charging indicator
light will turn Green.
Before charging, please check the contents of the “ Use of Battery”
section of the “ Safety Guidelines” carefully!
Charging Indicator
Charging Port
USB Charger
-11-
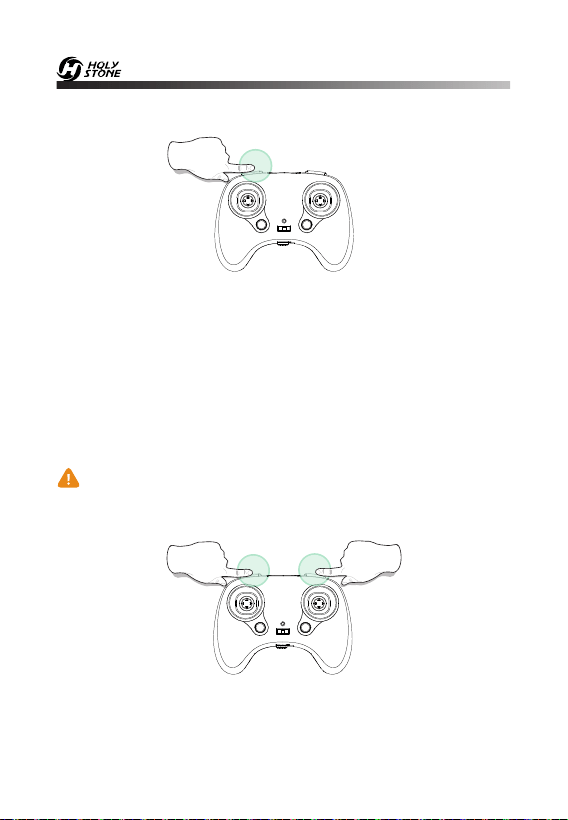
11.0 OPEARATION GUIDE
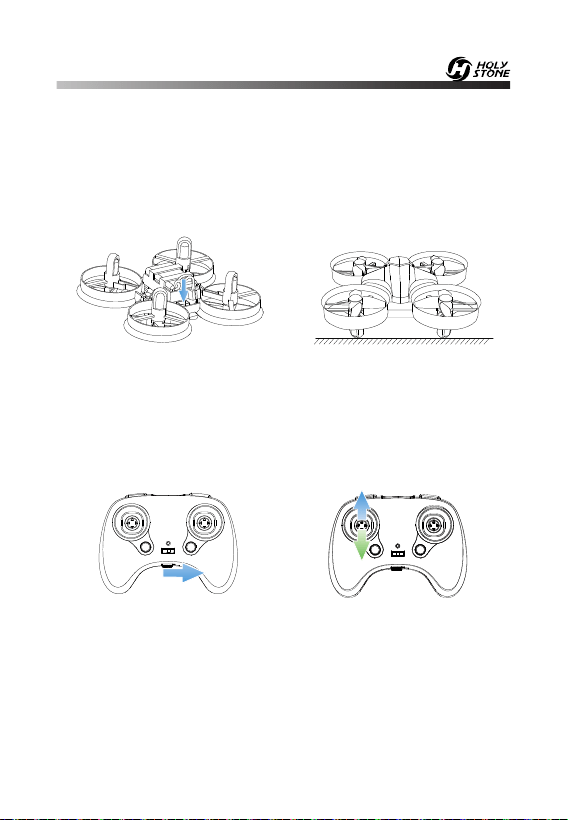
11.1 Pairing
① Connect the battery port access
to the fuselage power port.
③ Turn on the transmitter.
④ Push the throttle joystick up
then down to pair the drone with
the transmitter. The LED indicator
lights on the drone will turn solid if
the drone is paired successfully.
② Place the drone on a flat and
level surface with the head
forward and the tail towards the
pilot.
- - - - - - - - - - - - - - - - - - - - - - - - - - - - - - - - - - - - - - - - - - - - - - - - - - - - - - - - - - -
- - - - - - - - - - - - - - - - - - - - - - - - - - - - - - - - - - - - - - - - - - - - - - - - - - - - - - - - - - -
All of the operations shown in this manual are demonstrated using
MODE 2.
HEAD
TAIL
-12-

11.2 Calibrate the Gyro
Tip:
To ensure a stable flight, we suggest that the pilot calibrates
the gyro every time after pairing the drone and after a crash.
As shown in the diagram above, push the left and right joystick
simultaneously to the lower left corner
to calibrate the gyro. The
indicator lights on the drone will blink quickly and turn solid. When you
hear 2 beeps from the transmitter that indicates the calibration is
completed.
-13-
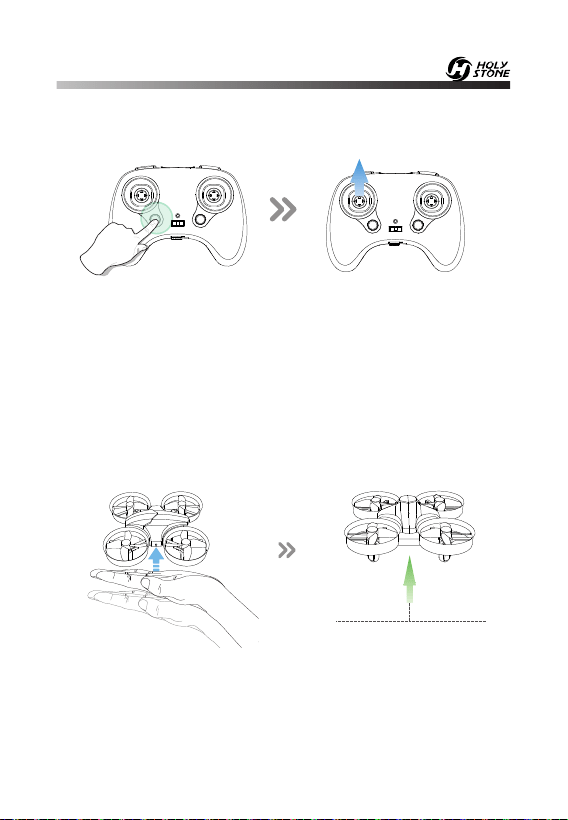
There are two methods to take off the drone.
Method 1: Press the One Key Start button, the propellers will start
spinning, indicating this drone is ready to fly. Then push the left joystick
up slowly to take off. The more the joystick is pushed away from the
center position, the faster the drone will change elevation. Always push
the joystick gently to prevent sudden and unexpected elevation
changes.
Method 2: After pairing, pick up the drone and lay it flat on your palm.
Gently toss the drone into air, and it will hover in place.
Takeoff
11.3 Auto Takeoff
- - - - - - - - - - - - - - - - - - - - - - - - - - - - - - - - - - - - - - - - - - - - - - - - - - - - - - - - - - -
-14-
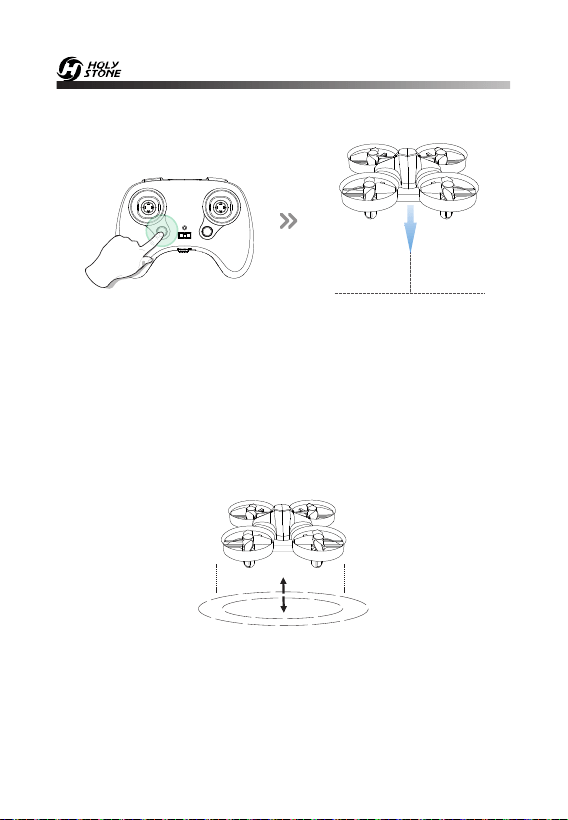
11.4 One Key Landing
When in flight, you can press the One Key Landing button, the drone
will lands automatically.
Landing
12.0 FUNCTIONS DETAILS
12.1 Altitude-Hold FunctionN
The drone is designed with altitude-hold function so the drone can
maintain its altitude after you release the left joystick ( the left joystick will
automatically spring back to the middle ).
-15-
12.2 Trimmer
F/B Sideward Fly Trim
L/R Sideward Fly Trim
- - - - - - - - - - - - - - - - - - - - - - - - - - - - - - - - - - - - - - - - - - - - - - - - - - - - - - - - - - -
(When you hear one long beep from the transmitter that indicates the
drone is adjusted to balance.)
If the drone drifts forward, hold down the throttle joystick and do not
release it while pushing the direction joystick down to balance the
drone; If the drone drifts backwards, hold down the throttle joystick and
do not release it while pushing the direction joystick up to balance the
drone.
If the drone drifts left, hold down the throttle joystick and do not release
it while pushing the direction joystick right to balance the drone; If the
drone drifts right, hold down the throttle joystick and do not release it
while pushing the direction joystick left to balance the drone.
-16-
12.3 Speed Switch
This drone comes with 3 speed modes (Low/ Medium/ High). Press the
Speed Switch button on the upper left of the transmitter to switch the
speed. Increase or decrease one speed at a time.
“Di” indicates Low speed, “DiDi” indicates Medium speed and “DiDiDi”
indicates High speed. (The Low Speed is default speed mode.)
12.4 Emergency Stop
The Emergency Stop function can be only used in case of
emergency during the flight to avoid any of damage or injury.
Press the upper left and upper right button of the transmitter at the
same time, the motors will stop immediately.
-17-
12.5 360° Flip
When you get familiar with all the functions of the drone, you can try
this amazing flip mode. When you fly the drone at least 10 feet, press
the 360° Flip button on the upper right of the transmitter, then push the
right joystick Forward/ Backward or Left/ Right, and the drone will do a
flip towards the corresponding direction.
If you are in MODE 1, push the right joystick Left/ Right or push the left
joystick Forward/ Backward, and the drone will do a flip towards the
corresponding direction.
Tip: This function will perform better when the battery is fully
charged.
10 Feet
-18-
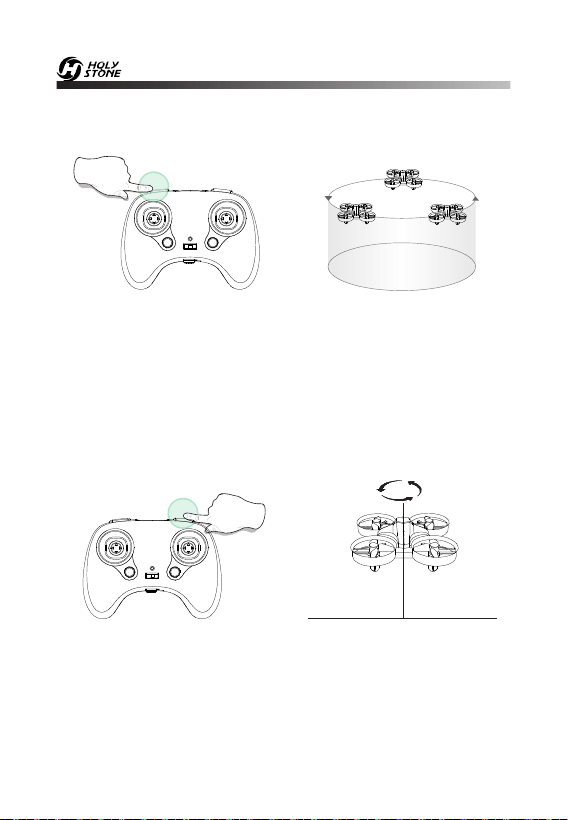
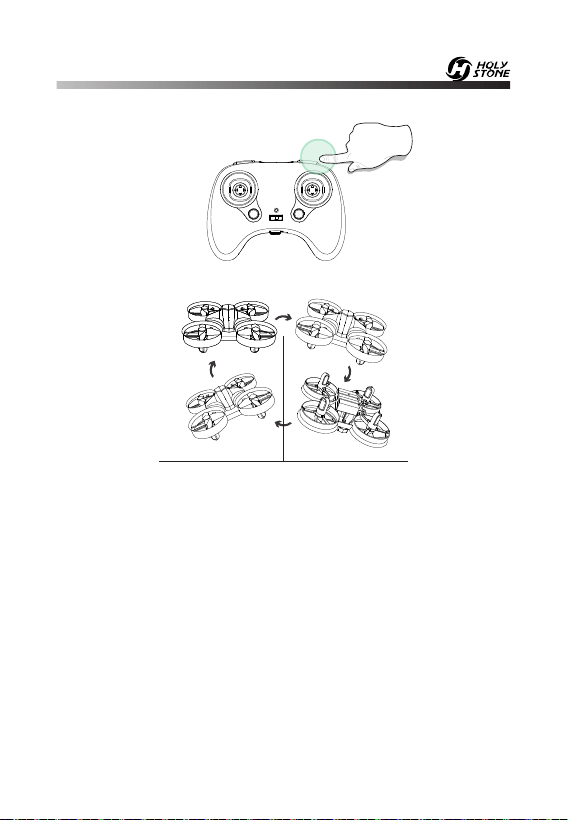
12.6 Circle Fly
Long press for 3 seconds
Press and hold the Speed Switch button for about 3 seconds, the drone
will enter the Circle Fly mode. Exit the Circle Fly mode by long pressing
the same button again or pushing the direction joystick.
12.7 Auto-Rotating
Press and hold the Flip button for about 3 seconds, the drone will enter
the Auto-Rotation mode. Exit the Auto-Rotation mode by long
pressing the same button again or pushing the direction joystick.
Long press for 3 seconds
-19-
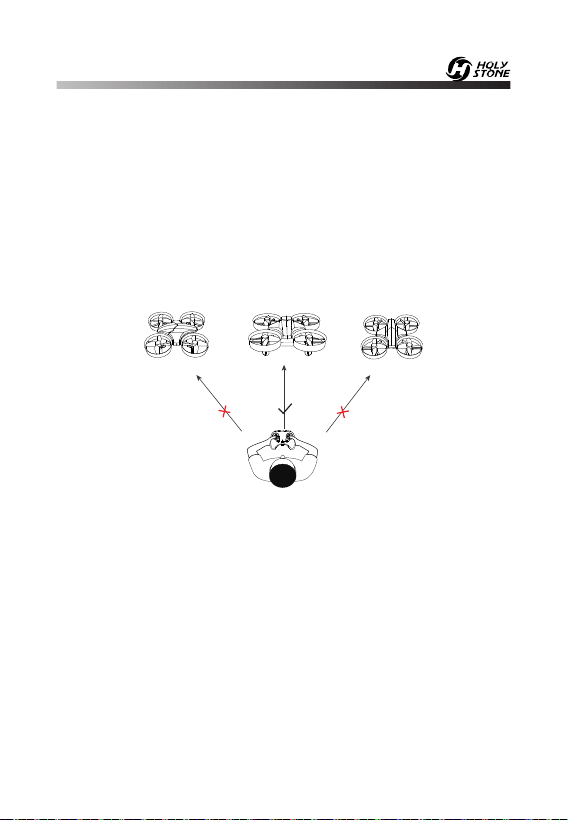
12.8 Headless Mode
1. After pairing/calibration, press the Headless Mode button on the
transmitter. A beep will be heard from the transmitter, and the lights on
the drone will keep blinking. The transmitter will beep slowly to indicate
that drone is in Headless Mode.
2. Press the Headless Mode button again, and you will hear 2 beeps,
the LED indicator lights on the drone will be solid which indicates the
drone exits the Headless Mode.
Please make the pilot stays facing the same direction
as the direction that the head of the drone faces at take-off.
Tail
Tail
Tail
Head
Head
Head
Under Headless Mode, the forward direction is the direction that the
head of drone faces when the drone takes off. In order to make sure
the pilot can tell drone's direction, we recommend that pilots to stay in
the same orientation as the drone head faces when the drone takes off.
If so, when the pilot pushes the direction joystick forward, the drone will
fly forward. If the pilot pushes the direction joystick backward, the drone
will fly towards him/her. If the pilot moves the right stick left / right, the
drone will move left/ right relative to you. It is very important that the
pilot stays in the same orientation as the drone head faces when the
drone takes off.
-20-

13.0 SPECIFICATIONS
DRONE
Model: HS210
Weight: 22g/0.77oz
Max Flight Time: 7 minutes (per battery)
Motor Model: 0615
Operating Temperature Range: 14°F to +104°F (-10°C to +40°C)
Size: 80 x 80 x 30 mm
FLIGHT BATTERY
Capacity: 250mAh
Voltage: 3.7V
Battery Type: Lithium-ion polymer Battery
Charging Temperature Range: 41° to 104°F (5° to 40°C)
Charging Time: 40 - 60 minutes (depends on charging power and
remaining battery power)
TRANSMITTER
Operating Frequency: 2452-2474 MHz
Max Flight Distance: 50 m (outdoors and unobstructed)
Operating Temperature Range: 32° to 104°F (0° to 40°C)
Battery Type: 1.5V AAA Battery (Not included)
USB CHARGING CABLE
Input: 5 V/2A
Rated Power: ≤10 W
-21-
14.0 CONTACT US
Please do not hesitate to contact us if you need further support.
[email protected] (USA)
[email protected] (CA)
[email protected] (EU)
[email protected] (JP)
+1(855) 888-6699
-22-
4:00 PM ~ 7:00 AM (PST)
For online support, please scan
this code with Live Chat

-23-
15.0 GENERAL INFORMATION
FCC Notice:
This device complies with Part 15 of the FCC Rules.
Operation is subject to the following two conditions:
(1) This device may not cause harmful interference, and
(2) This device must accept any interference received, including
interference that may cause undesired operation.
The Supplier's Declaration of Conformity is available at the following
address:
https://www.holystone.com/Download/US/HS210_FCC_sDoC.pdf
NOTE: This equipment has been tested and found to comply with the
limits for a Class B digital device, pursuant to Part 15 of the FCC Rules.
These limits are designed to provide reasonable protection against
harmful interference in a residential installation. This equipment
generates uses and can radiate radio frequency energy and, if not
installed and used in accordance with the instructions, may cause
harmful interference to radio communications. However, there is no
guarantee that interference will not occur in a particular installation. If
this equipment does cause harmful interference to radio or television
reception, which can be determined by turning the equipment off and
on, the user is encouraged to try to correct the interference by one or
more of the following measures:
---Reorient or relocate the receiving antenna.
---Increase the separation between the equipment and receiver.
---Connect the equipment into an outlet on a circuit different from that
to which the receiver is connected.
---Consult the dealer or an experienced radio/TV technician for help.

-24-
RF Exposure
The equipment complies with FCC radiation exposure limits set forth for
an uncontrolled environment. This device should be installed and
operated with minimum distance 20cm between the radiator & your
body.
IC Notice:
This device complies with Canada Industry licence-exempt RSS standard
(s).
Operation is subject to the following two conditions:
(1) this device may not cause interference; and
(2) this device must accept any interference. Including interference that
may cause undesired operation of the device.
CAN ICES-003 (B)
Avis d’Industrie Canada
Le présent appareil est conforme aux CNR d'industrie Canada
applicables aux appareils radio exem pts de licence L'exploitation est
autorisée aux deux conditions suivantes:
1) I'appareil ne doit pas produire de brouillage; et
2) I'utillsateur de I'appareil doit accepterbrouillage radioélectrique subi
meme si le brouillage est susceptible d'encompromettre le fonctionne-
ment. mauvais fonctionnement de I'appareil. Cet appareil numériquie
de la classe B est conforme à la norme NMB-003 du Canada.
WARNING: Changes or modifications not expressly approved by the
party responsible for compliance could void the user's authority to
operate the equipment.

-25-
CAN NMB-003 (B)
RF Exposure
Radiation Exposure Statement:
This equipment complies with IC radiation exposure limits set forth for
an uncontrolled environment. This equipment should be installed and
operated with a minimum distance of 20cm between the radiator &
your body.
Déclaration d'exposition aux radiations:
Cet équipement est conforme aux limites d'exposition aux rayonne-
ments IC établies pour un environnement non contrôlé. Cet
équipement doit être installé et utilisé avec un minimum de 20 cm de
distance entre lasource de rayonnement et votre corps.
HOW TO RECYCLE THIS PRODUCT
This symbol on the product or its documentation indicates that it MUST
not be disposed of together with household waste.
Uncontrolled waste disposal may harm the environment or human
health.
Please separate your device from other types of waste for recycling it
responsibly.
This will help to foster the sustainable re-use of material resources.
We suggest you contact your retailer, inquire at your local town hall or
business store to find out where and how the drone can be recycled.

-26-
BATTERY WARNING:
1. Failure to follow all the instructions may result in serious injury,
irreparable damage to the battery may cause a fire, smoke or explosion
as well.
2. Always check the battery’s condition before charging or using it.
3. Please replace the battery if the battery is dropped or has any peculiar
smell, overheating, discolouration, deformation or leakage happens.
4. Never use anything other than the approved LiPo charger to charge
the battery. Always use a balancing charger for LiPo cells or a LiPo cell
balancer. It is recommended that you use the one provided with the
product.
5. The battery temperature must never exceed 60°C(140°F) otherwise
the battery could be damaged or ignited.
6. Never charge the battery on a flammable surface, near flammable
products or inside a vehicle(preferably place the battery on a non-flam-
mable and non-conductive surface).
7. Never leave the battery unattended during the charging process.
Never disassemble or modify the housing’s wiring, or puncture the
cells. Always ensure that the charger output voltage corresponds to the
voltage of the battery. DO NOT short circuit the batteries.
8. Never expose the Li-Po battery to moisture or direct sunlight, or store
it in a place where temperatures could exceed 60°C(car in the sun, for
example).
9. Always keep it out of reach of children.
10. Improper battery use may result in a fire, explosion or other hazards.
-27-
11. Non-rechargeable batteries are not allowed to be recharged.
Rechargeable batteries should be charged under adults’ supervision.
12. DO NOT mix different types of batteries including the new and
used ones.
13. Batteries MUST be inserted with the correct polarity.
14. The supply terminals MUST not to be short-circuited. Regular exam-
ination of transformer or battery charger for any damage to their
cords, plugs, enclosures and other parts MUST be done. If there is
damage, they MUST not be used until the damage has been repaired.
15. The packaging has to be kept since it contains important informa-
tion.
16. This toy is only can be connected to the equipment with symbol
Class II.
EU RF Power(EIRP): <10 dBm (2452-2474 MHz)
Caution
1.The max operating of the EUT is 45°C, and shouldn’t be
lower than -10°C.
2.The device complies with RF specifications when the device
used at 0mm form your body.
3.Declaration of Conformity.

We, Xiamen Huoshiquan Import & Export CO.,LTD
hereby, declare that the compliance of the essential requirements with
the
Directive 2014/53/EU, the RoHS Directive 2011/65/EU and Safety
Directive 2009/48/EC have been fully fulfilled on our product with
indication below:
Product Name: Remote control four axis series
Model/Mark : HS210/HOLYSTONE
The Statement of compliance is available at the following address:
http://www.holystone.com/Download/CE/HS210_EU_DOC.pdf
This product can be used among EU member states.
MANUFACTURER INFORMATION
Manufactured by
Xiamen Huoshiquan Import & Export CO.,LTD.
Unit 1, Room 501, Hongxiang Building, No.258 Hubin Nan Road,
Siming District, Xiamen, China
+1(855) 888-6699
-28-
MADE IN CHINA(CN)