

Entrance & Exit Station User Manual
0
Entrance/Exit Ticket Station
User Manual

Entrance/Exit Ticket Station User Manual
1
About this Document
● This Document includes instructions for using and managing the Product. Pictures, charts,
images and all other information hereinafter are for description and explanation only.
● The information contained in the Document is subject to change, without notice, due to
firmware updates or other reasons. Please find the latest version of the Document at the
Hikvision website (https://www.hikvision.com). Unless otherwise agreed, Hangzhou Hikvision
Digital Technology Co., Ltd. or its affiliates (hereinafter referred to as "Hikvision") makes no
warranties, express or implied.
● Please use the Document with the guidance and assistance of professionals trained in
supporting the Product. m
2
About this Product
● This product can only enjoy the after-sales service support in the country or region where the
purchase is made.
● If the product you choose is a video product, please scan the following QR code to obtain the
"Initiatives on the Use of Video Products", and read it carefully.
Acknowledgment of Intellectual Property Rights
● Hikvision owns the copyrights and/or patents related to the technology embodied in the
Products described in this Document, which may include licenses obtained from third parties.
● Any part of the Document, including text, pictures, graphics, etc., belongs to Hikvision. No part
of this Document may be excerpted, copied, translated, or modified in whole or in part by any
means without written permission.
● and other Hikvision’s trademarks and logos are the properties of Hikvision in
various jurisdictions.
● Other trademarks and logos mentioned are the properties of their respective owners.
LEGAL DISCLAIMER
● TO THE MAXIMUM EXTENT PERMITTED BY APPLICABLE LAW, THIS DOCUMENT AND THE
PRODUCT DESCRIBED, WITH ITS HARDWARE, SOFTWARE AND FIRMWARE, ARE PROVIDED "AS
IS" AND "WITH ALL FAULTS AND ERRORS". HIKVISION MAKES NO WARRANTIES, EXPRESS OR
IMPLIED, INCLUDING WITHOUT LIMITATION, MERCHANTABILITY, SATISFACTORY QUALITY, OR
FITNESS FOR A PARTICULAR PURPOSE. THE USE OF THE PRODUCT BY YOU IS AT YOUR OWN RISK.
IN NO EVENT WILL HIKVISION BE LIABLE TO YOU FOR ANY SPECIAL, CONSEQUENTIAL,
INCIDENTAL, OR INDIRECT DAMAGES, INCLUDING, AMONG OTHERS, DAMAGES FOR LOSS OF
BUSINESS PROFITS, BUSINESS INTERRUPTION, OR LOSS OF DATA, CORRUPTION OF SYSTEMS, OR

Entrance/Exit Ticket Station User Manual
2
LOSS OF DOCUMENTATION, WHETHER BASED ON BREACH OF CONTRACT, TORT (INCLUDING
NEGLIGENCE), PRODUCT LIABILITY, OR OTHERWISE, IN CONNECTION WITH THE USE OF THE
PRODUCT, EVEN IF HIKVISION HAS BEEN ADVISED OF THE POSSIBILITY OF SUCH DAMAGES OR
LOSS.
● YOU ACKNOWLEDGE THAT THE NATURE OF THE INTERNET PROVIDES FOR INHERENT SECURITY
RISKS, AND HIKVISION SHALL NOT TAKE ANY RESPONSIBILITIES FOR ABNORMAL OPERATION,
PRIVACY LEAKAGE OR OTHER DAMAGES RESULTING FROM CYBER-ATTACK, HACKER ATTACK,
VIRUS INFECTION, OR OTHER INTERNET SECURITY RISKS; HOWEVER, HIKVISION WILL PROVIDE
TIMELY TECHNICAL SUPPORT IF REQUIRED.
● YOU AGREE TO USE THIS PRODUCT IN COMPLIANCE WITH ALL APPLICABLE LAWS, AND YOU ARE
SOLELY RESPONSIBLE FOR ENSURING THAT YOUR USE CONFORMS TO THE APPLICABLE LAW.
ESPECIALLY, YOU ARE RESPONSIBLE, FOR USING THIS PRODUCT IN A MANNER THAT DOES NOT
INFRINGE ON THE RIGHTS OF THIRD PARTIES, INCLUDING WITHOUT LIMITATION, RIGHTS OF
PUBLICITY, INTELLECTUAL PROPERTY RIGHTS, OR DATA PROTECTION AND OTHER PRIVACY
RIGHTS. YOU SHALL NOT USE THIS PRODUCT FOR ANY PROHIBITED END-USES, INCLUDING THE
DEVELOPMENT OR PRODUCTION OF WEAPONS OF MASS DESTRUCTION, THE DEVELOPMENT OR
PRODUCTION OF CHEMICAL OR BIOLOGICAL WEAPONS, ANY ACTIVITIES IN THE CONTEXT
RELATED TO ANY NUCLEAR EXPLOSIVE OR UNSAFE NUCLEAR FUEL-CYCLE, OR IN SUPPORT OF
HUMAN RIGHTS ABUSES.
● IN THE EVENT OF ANY CONFLICTS BETWEEN THIS DOCUMENT AND THE APPLICABLE LAW, THE
LATTER PREVAILS.
© Hangzhou Hikvision Digital Technology Co., Ltd. All rights reserved.
Entrance/Exit Ticket Station User Manual
3
Symbol Conventions
The symbols that may be found in this document are defined as follows.
Symbol
Description
Provides additional information to emphasize or supplement
important points of the main text.
Indicates a potentially hazardous situation, which if not avoided,
could result in equipment damage, data loss, performance
degradation, or unexpected results.
Indicates a hazard with a high level of risk, which if not avoided, will
result in death or serious injury.

Entrance/Exit Ticket Station User Manual
4
Table of Contents
Chapter 1 Introduction ......................................................................................................................... 6
1.1 Product Introduction .......................................................................................................... 6
1.2 Key Feature ......................................................................................................................... 6
Chapter 2 Activation and Login ............................................................................................................ 7
2.1 Activate Device ................................................................................................................... 7
2.1.1 Default Information ................................................................................................... 7
2.1.2 Activate via SADP ...................................................................................................... 7
2.1.3 Activate via Web Browser ......................................................................................... 8
2.2 Log in .................................................................................................................................. 9
2.3 Log out .............................................................................................................................. 10
Chapter 3 Live View Operation .......................................................................................................... 11
Chapter 4 Basic Operation ................................................................................................................. 12
4.1 Configure Entrance & Exit Parameters ............................................................................. 12
4.1.1 Configure Basic Parameters .................................................................................... 12
4.1.2 Configure Ticket ...................................................................................................... 12
4.1.3 Configure Audio ...................................................................................................... 13
4.1.4 Configure Media ...................................................................................................... 14
4.1.5 Configure Screen Display ........................................................................................ 15
4.1.6 View Entrance & Exit Status .................................................................................... 16
4.2 Configure Two-Way Audio................................................................................................ 18
4.2.1 Two-Way Audio with Computer .............................................................................. 18
4.2.2 Two-Way Audio with Software ................................................................................ 18
Chapter 5 Network Configuration ...................................................................................................... 19
5.1 Configure TCP/IP............................................................................................................... 19
5.2 Connect to Platform ......................................................................................................... 20
5.3 Configure Port .................................................................................................................. 21
Chapter 6 Safety Management .......................................................................................................... 22
6.1 Manage User .................................................................................................................... 22
6.1.1 Add User .................................................................................................................. 22
6.1.2 Edit User .................................................................................................................. 23
6.1.3 Delete User .............................................................................................................. 24

Entrance/Exit Ticket Station User Manual
5
6.2 Configure Security ............................................................................................................ 25
Chapter 7 Maintenance ..................................................................................................................... 26
7.1 Configure Basic Information ............................................................................................. 26
7.2 Configure Time ................................................................................................................. 26
7.3 Configure DST ................................................................................................................... 27
7.4 Configure RS-232 .............................................................................................................. 28
7.5 Reboot .............................................................................................................................. 28
7.6 Restore Default Settings ................................................................................................... 29
7.7 Format Database .............................................................................................................. 29
7.8 Export Configuration File ................................................................................................. 29
7.9 Import Configuration File ................................................................................................. 30
7.10 Upgrade .......................................................................................................................... 30
7.11 Configure and Export Log ............................................................................................... 31

Entrance/Exit Ticket Station User Manual
6
Chapter 1 Introduction
1.1 Product Introduction
Entrance/Exit Ticket Station (hereinafter referred to as station) is used for data collection and
management of entrance, exit, and parking lot. Through interaction with the software, the station
can control the entrance/exit, manage the parking lot effectively, and charge parking fee.
Peripheral devices such as capture camera, barrier gate, remote card reader, alarm device, etc. can
be connected to the station to realize vehicle passing, charging, and management.
The station must be used with the matched control terminal software or platform.
1.2 Key Feature
Strong processing performance to realize vehicle management of large traffic flow easily.
Supporting QR code payment, satisfying the vehicle to enter and exit normally in
unattended station scene.
Embedded Linux operating system and modular design to guarantee long-time and stable
operation of the system.
Diversified charging standards configuration to distinguish charging standards for different
vehicles.
Flexible vehicle entering and exiting management strategy. Multiple release rules
configurable to satisfy the requirements of different scenes.
Supporting card reading and writing.
Voice prompt to notice the charging fees, reducing the manual labor.
Abundant peripheral interfaces to connect multiple peripheral devices, satisfying various
scenes.
Backup and restoration to avoid repeated configuration for many times.
Entrance/Exit Ticket Station User Manual
7
Chapter 2 Activation and Login
2.1 Activate Device
You need to activate the station and set the password for first-time login. You can activate the
station via multiple methods. Here we take example of activation via SADP and web browser.
For activation via client software, refer to the software user manual for details.
2.1.1 Default Information
IP Address: 192.168.1.64
User name: admin
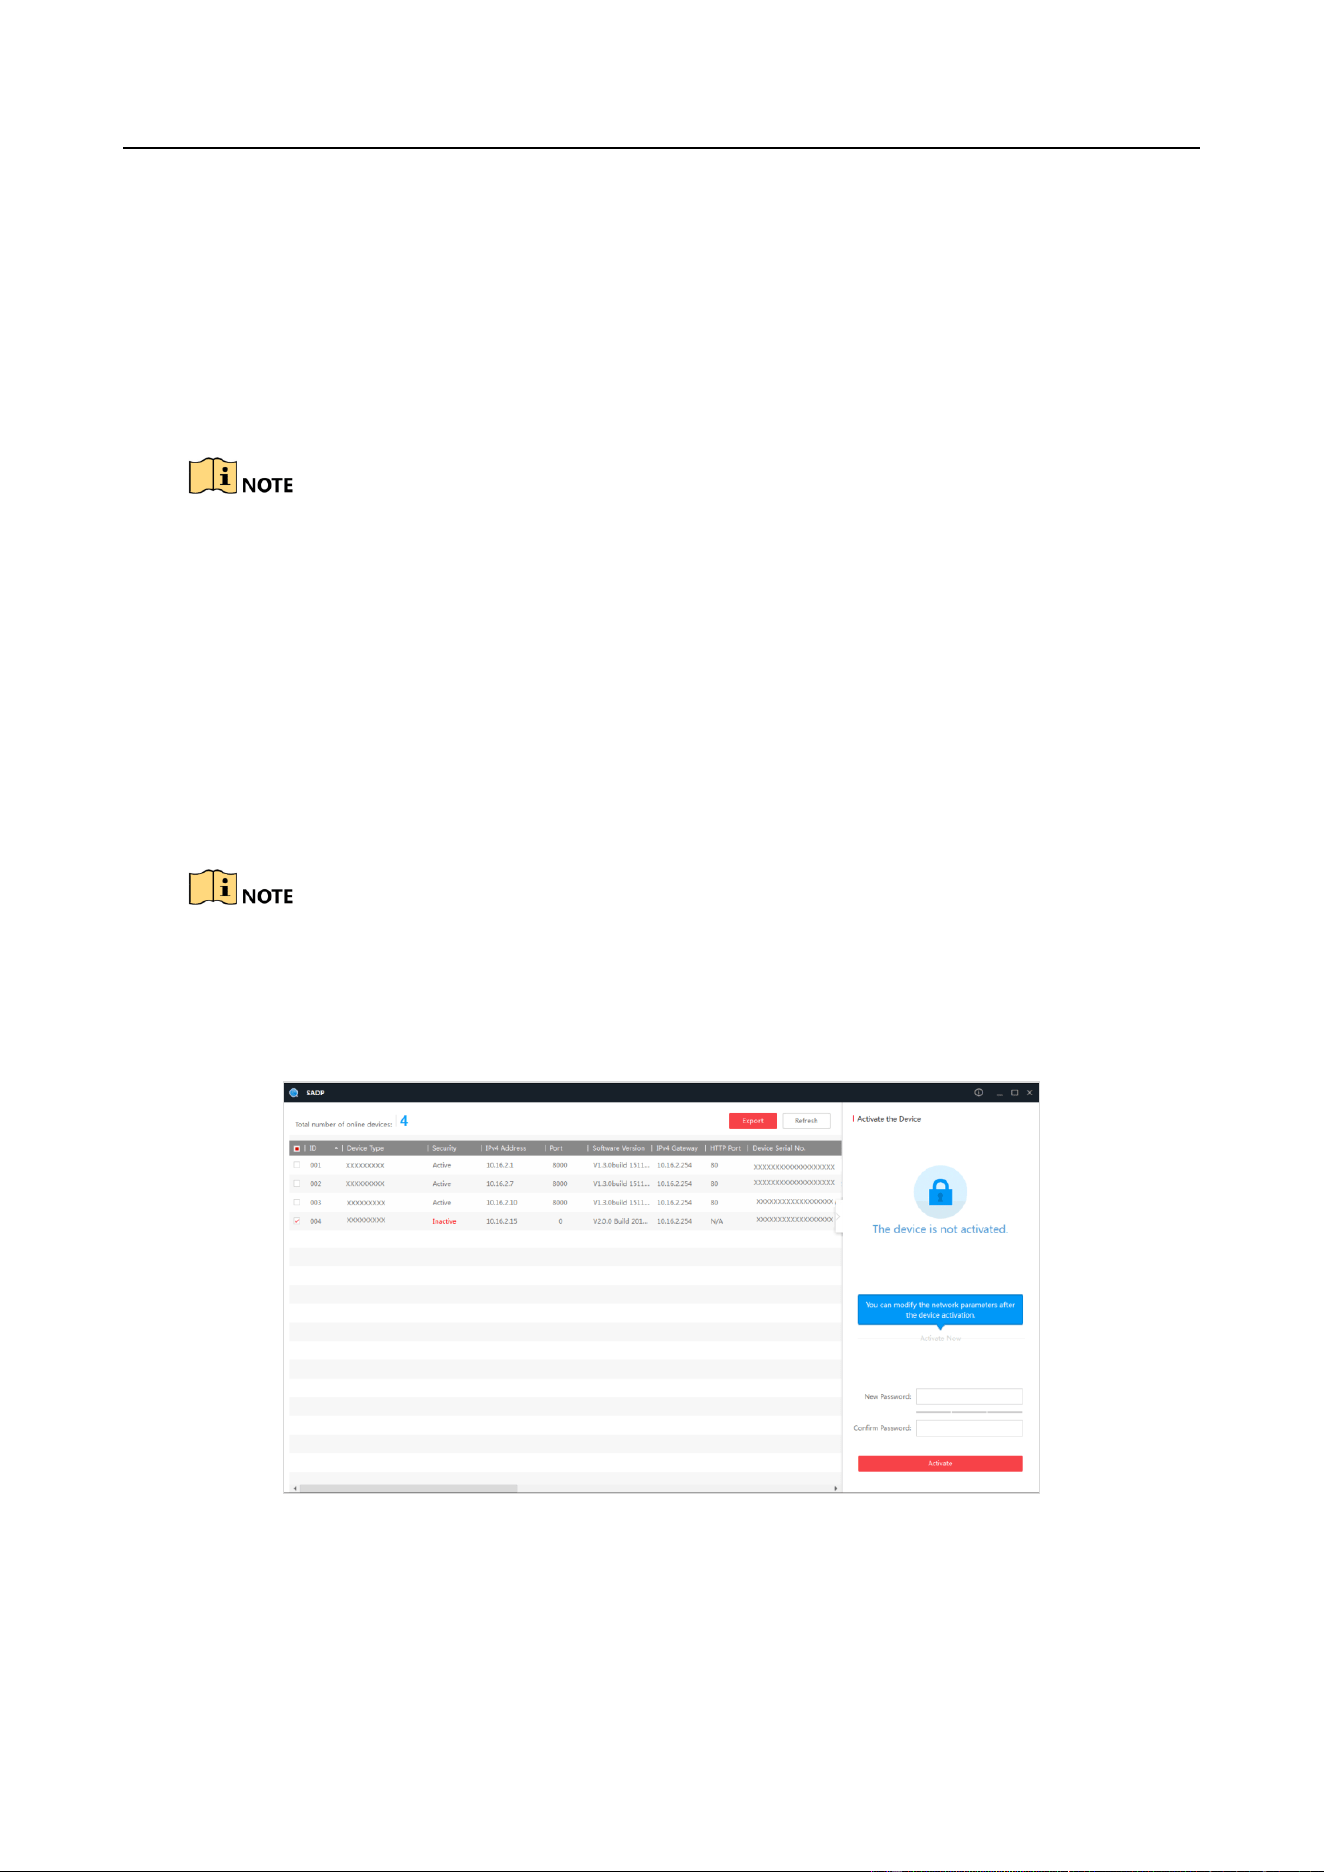
2.1.2 Activate via SADP
You can activate the station via SADP software.
Ensure your station and computer are in the same network segment.
Step 1 Run the SADP software to search the online devices.
Step 2 Check the device status from the device list, and select an inactive device.
Figure 2-1 SADP Interface
Step 3 Create a password and input the password in the password field, and confirm it.
Entrance/Exit Ticket Station User Manual
8
STRONG PASSWORD RECOMMENDED–We highly recommend you create a strong password of
your own choosing (Using a minimum of 8 characters, including at least three of the following
categories: upper case letters, lower case letters, numbers, and special characters.) in order to
increase the security of your product. And we recommend you reset your password regularly,
especially in the high security system, resetting the password monthly or weekly can better protect
your product.
Step 4 Click Activate to activate the device.
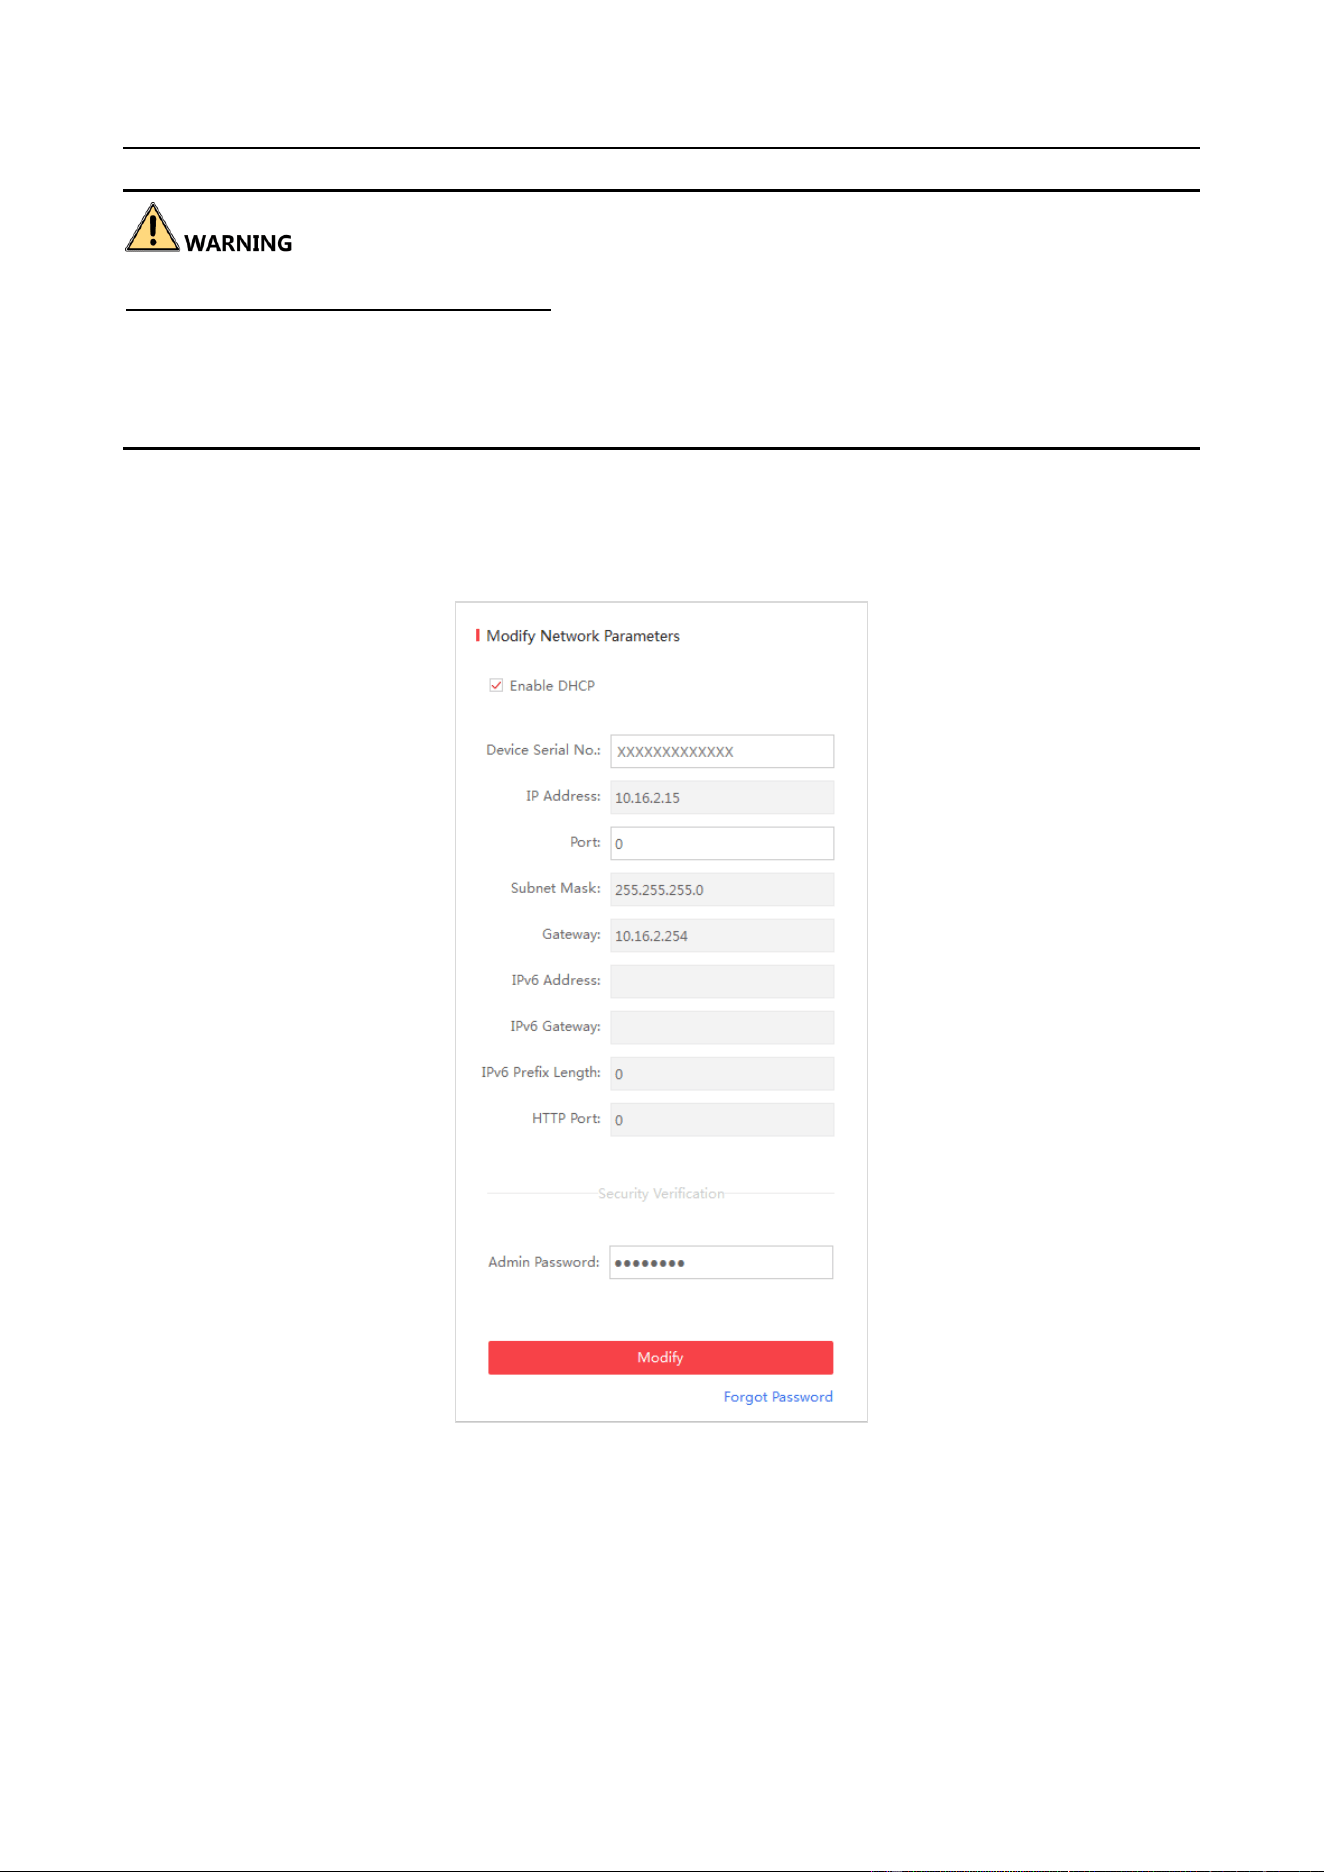
Step 5 Change the device IP address to the same subnet with your computer by either modifying
the IP address manually or checking Enable DHCP.
Figure 2-2 Modify IP Address
Step 6 Input the password and click Modify to activate your IP address modification.
2.1.3 Activate via Web Browser
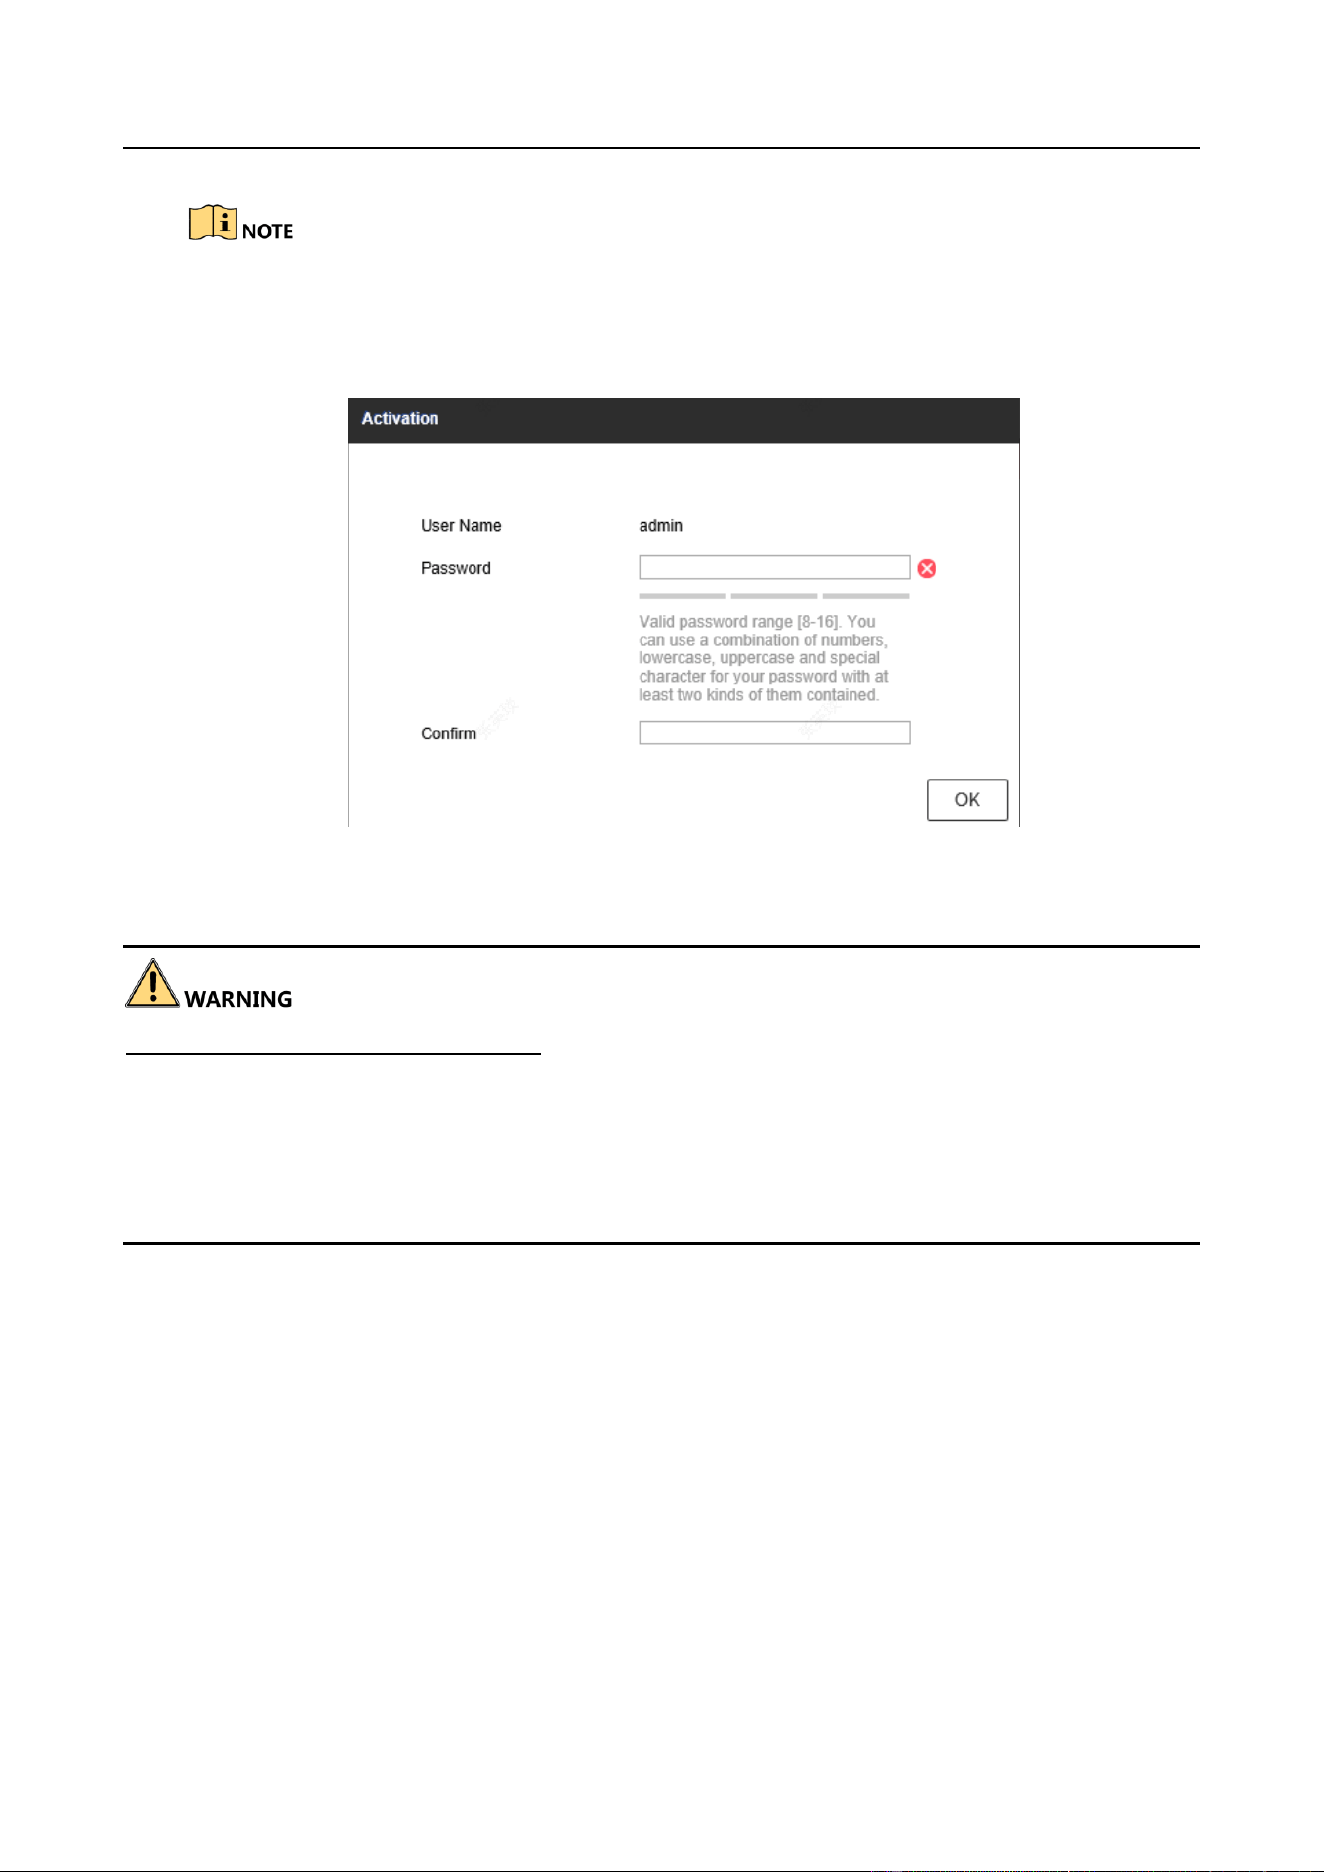
You can activate the station via web browser.
Entrance/Exit Ticket Station User Manual
9
Ensure your station and computer are in the same network segment.
Step 1 Enter the default IP address of the station in the address bar of the web browser and press
the Enter key to enter the activation interface.
Step 2 Enter a new password and confirm it.
Step 3 Click OK to activate the station.
STRONG PASSWORD RECOMMENDED–We highly recommend you create a strong password of
your own choosing (Using a minimum of 8 characters, including at least three of the following
categories: upper case letters, lower case letters, numbers, and special characters.) in order to
increase the security of your product. And we recommend you reset your password regularly,
especially in the high security system, resetting the password monthly or weekly can better protect
your product.
2.2 Log in
You can log in to the station via web browser for further operations such as live view and local
configuration.
Step 1 Open the web browser.
Step 2 Enter the IP address of the station in the address bar, and press the Enter key to enter the
login interface.
Step 3 Enter User Name and Password.
Step 4 Click Login.

Entrance/Exit Ticket Station User Manual
10
Figure 2-3 Login Interface
You are recommended to use web browser of IE 8 or above.
Step 5 Install the plug-in before other operations. Please follow the installation prompts to install
the plug-in.
Close the web browser to install the plug-in. Please reopen the web browser and log in again after
installing the plug-in.
2.3 Log out
After login, click Logout to log out of the station.
Entrance/Exit Ticket Station User Manual
11
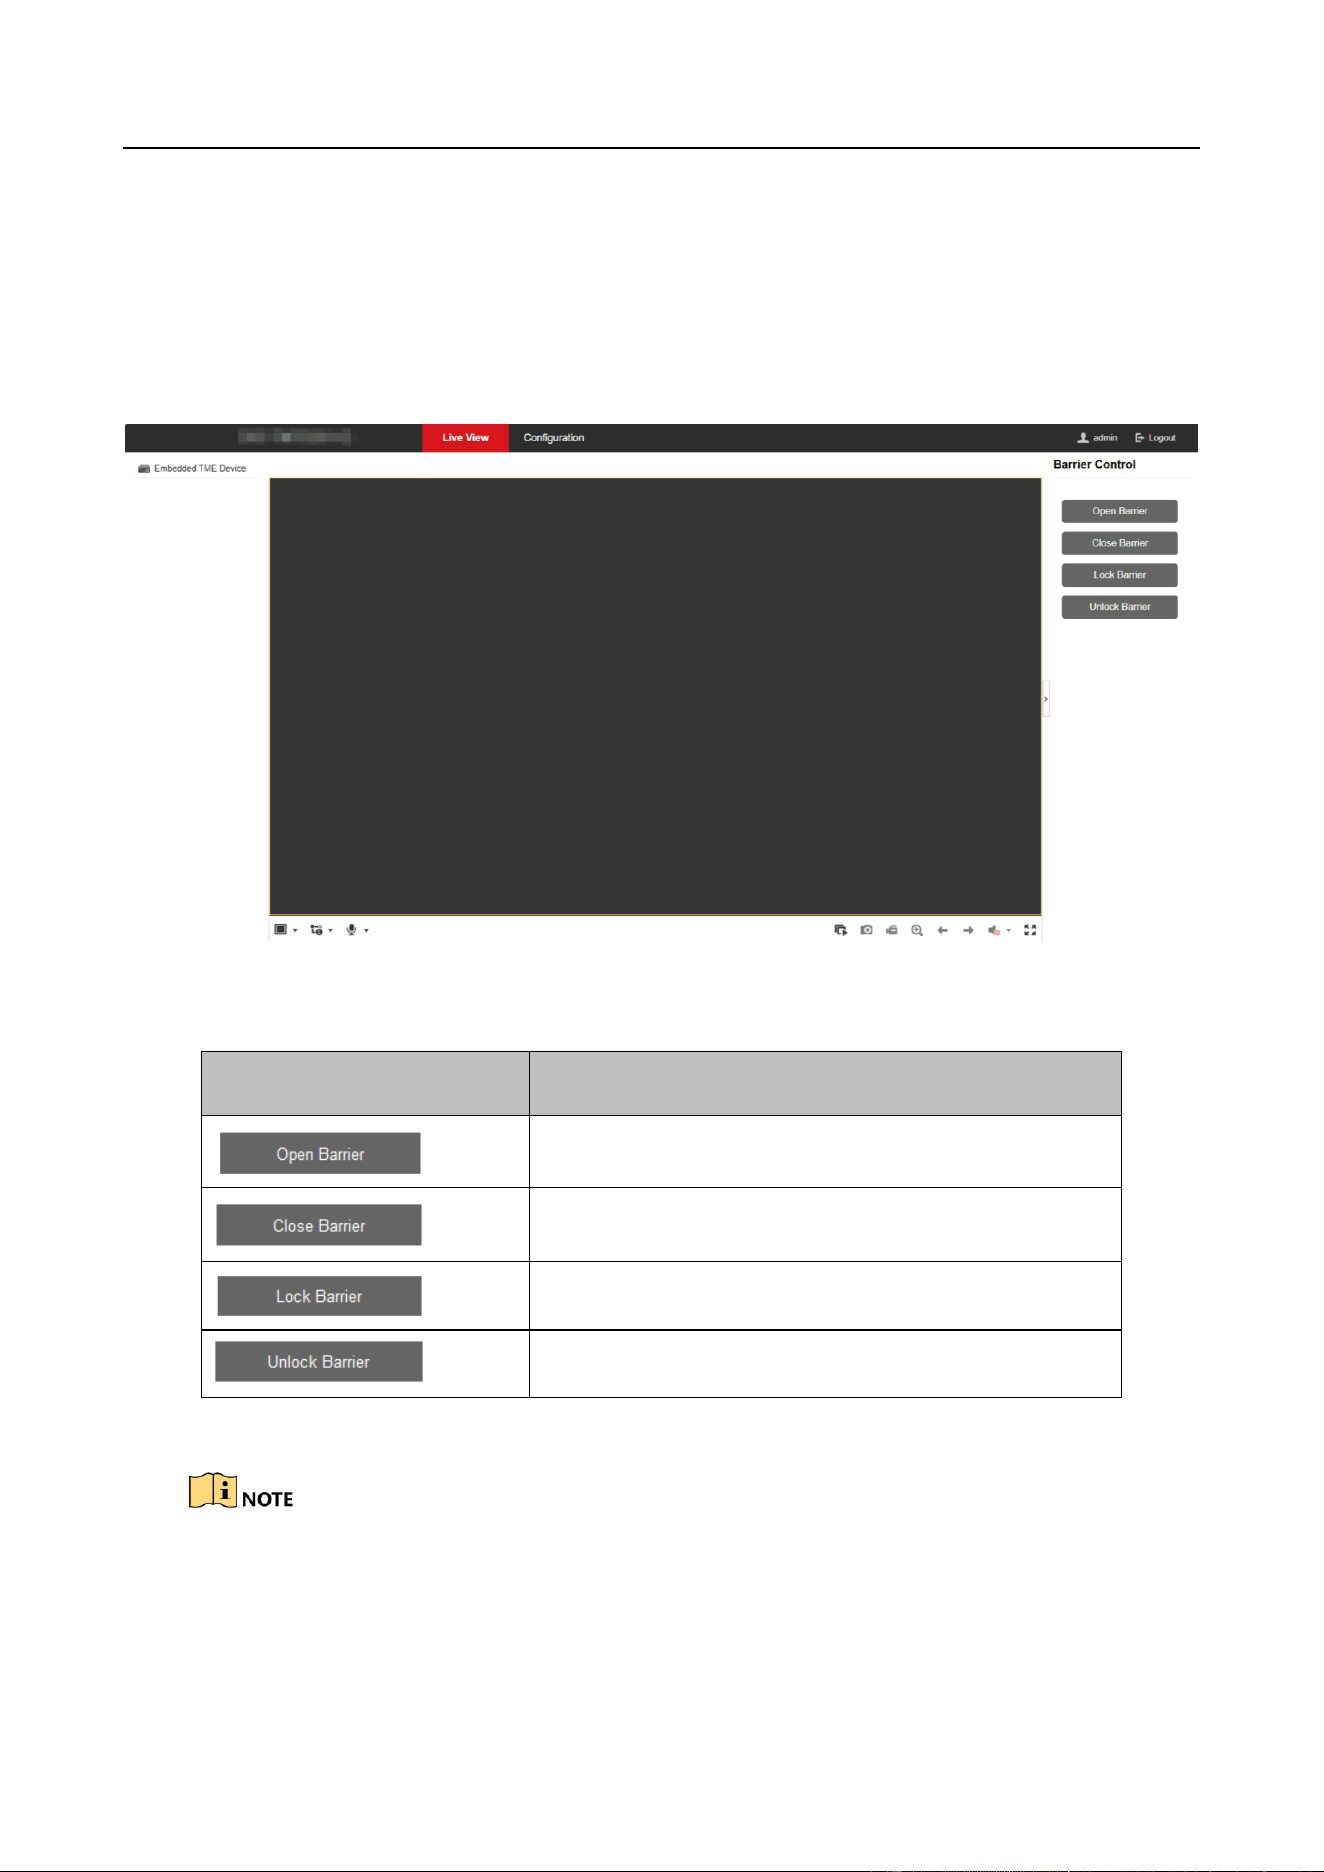
Chapter 3 Live View Operation
Click Live View to enter the Live View interface. You can control the connected barrier on the
interface.
Figure 3-1 Live View
On the Live View interface, see the table below for the functions of the icons.
Icon
Description
Open barrier.
Close barrier.
Lock barrier.
Unlock barrier.
Table 3-1 Live View Icon Description
The functions of different models may differ. Refer to the actual interface.
Entrance/Exit Ticket Station User Manual
12
Chapter 4 Basic Operation
4.1 Configure Entrance & Exit Parameters
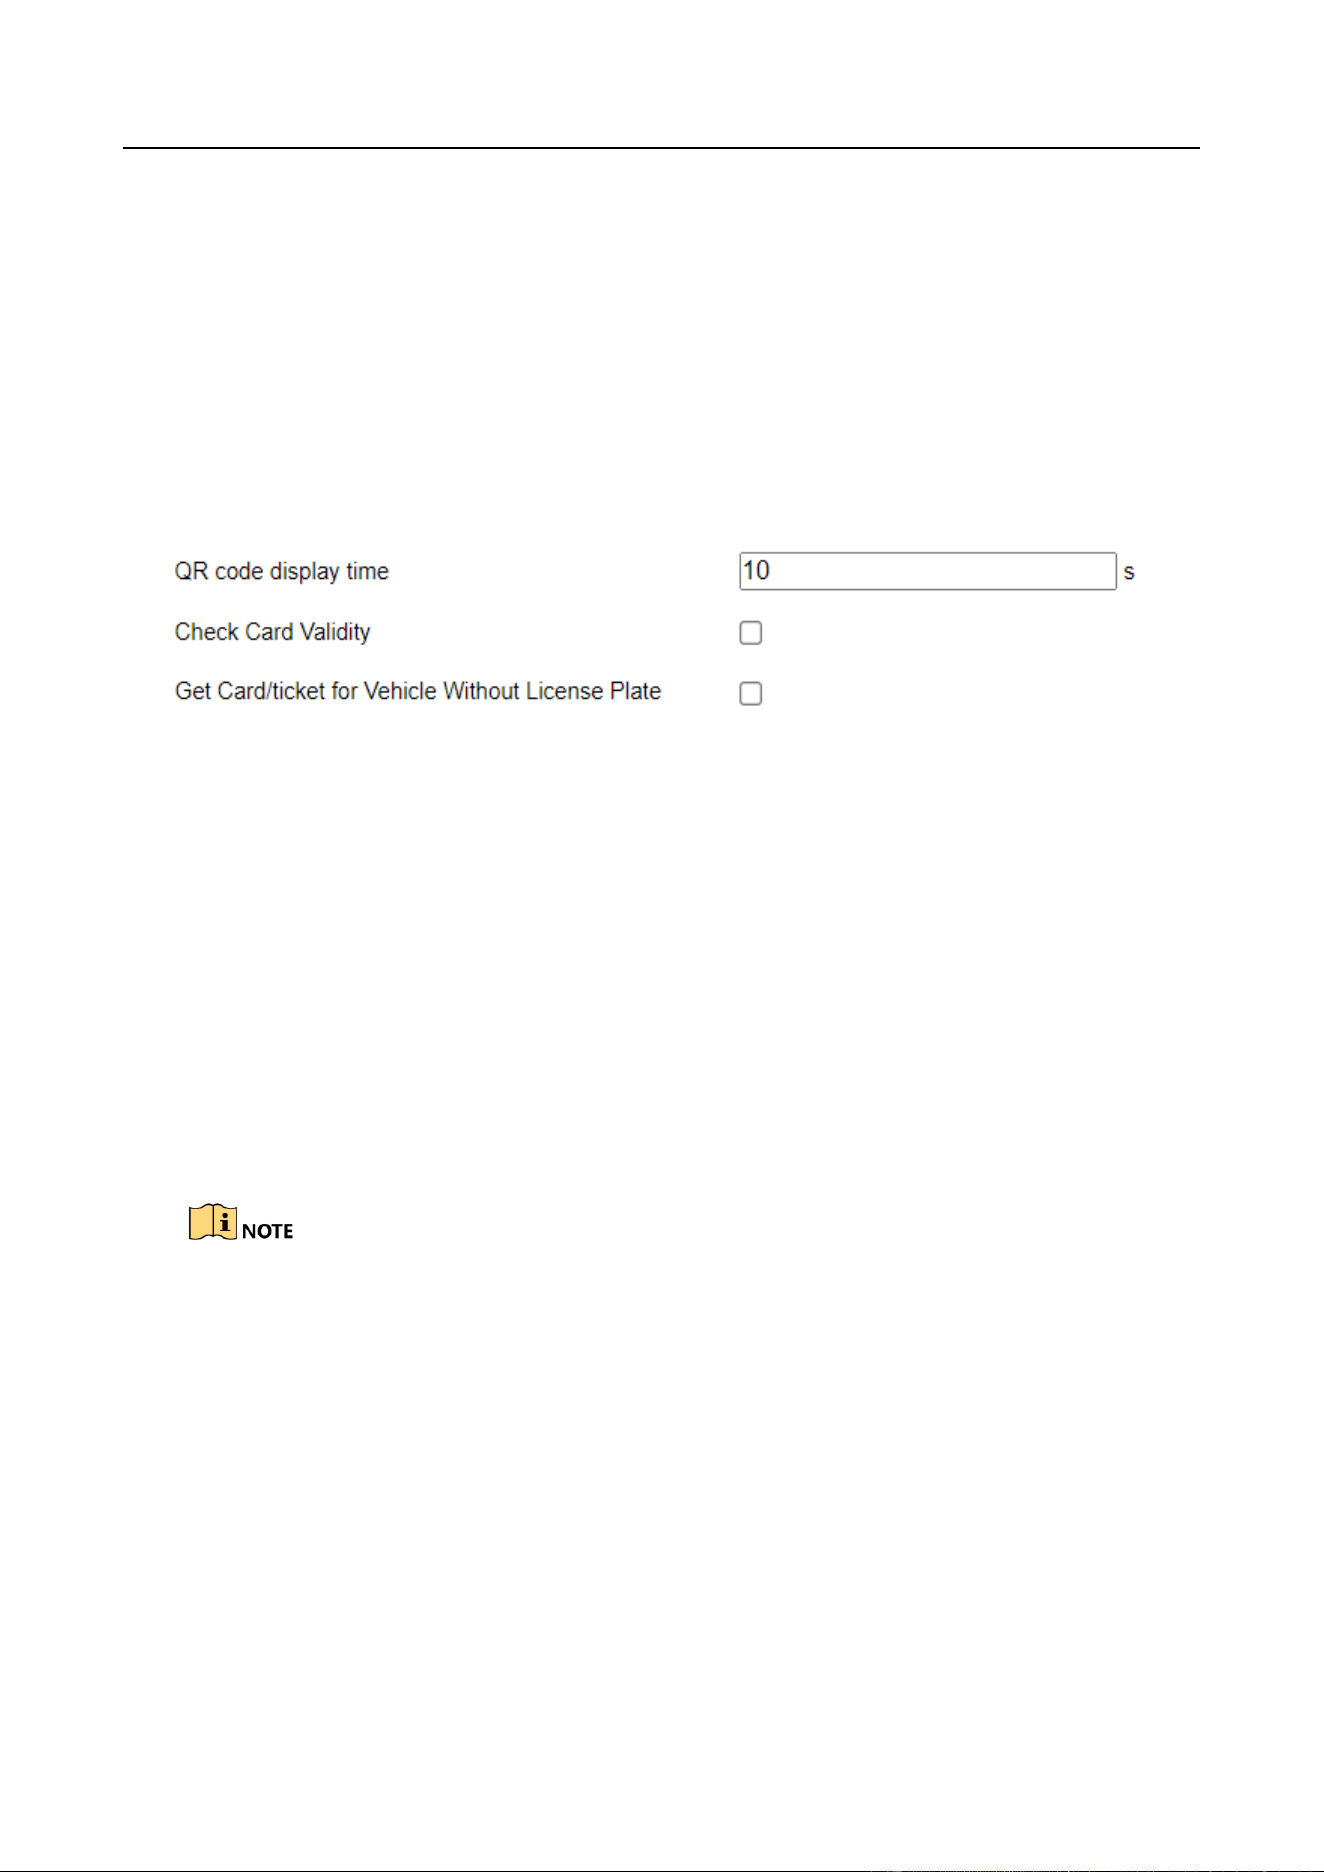
4.1.1 Configure Basic Parameters
You can configure the basic parameters for entrance and exit.
Step 1 Go to Configuration > Entrance and Exit > Settings > Basic Parameters.
Figure 4-1 Basic Parameters
Step 2 Configure the following parameters according to your needs.
QR Code Display Time: The display time of the QR code on the screen.
Check Card Validity: If it is checked, the station will check whether the card is valid.
Get Card/Ticket for Vehicle Without License Plate: For the vehicle without license plate,
the station will play the voice prompt to remind the driver to take card or ticket.
Step 3 Click Save to save the settings.
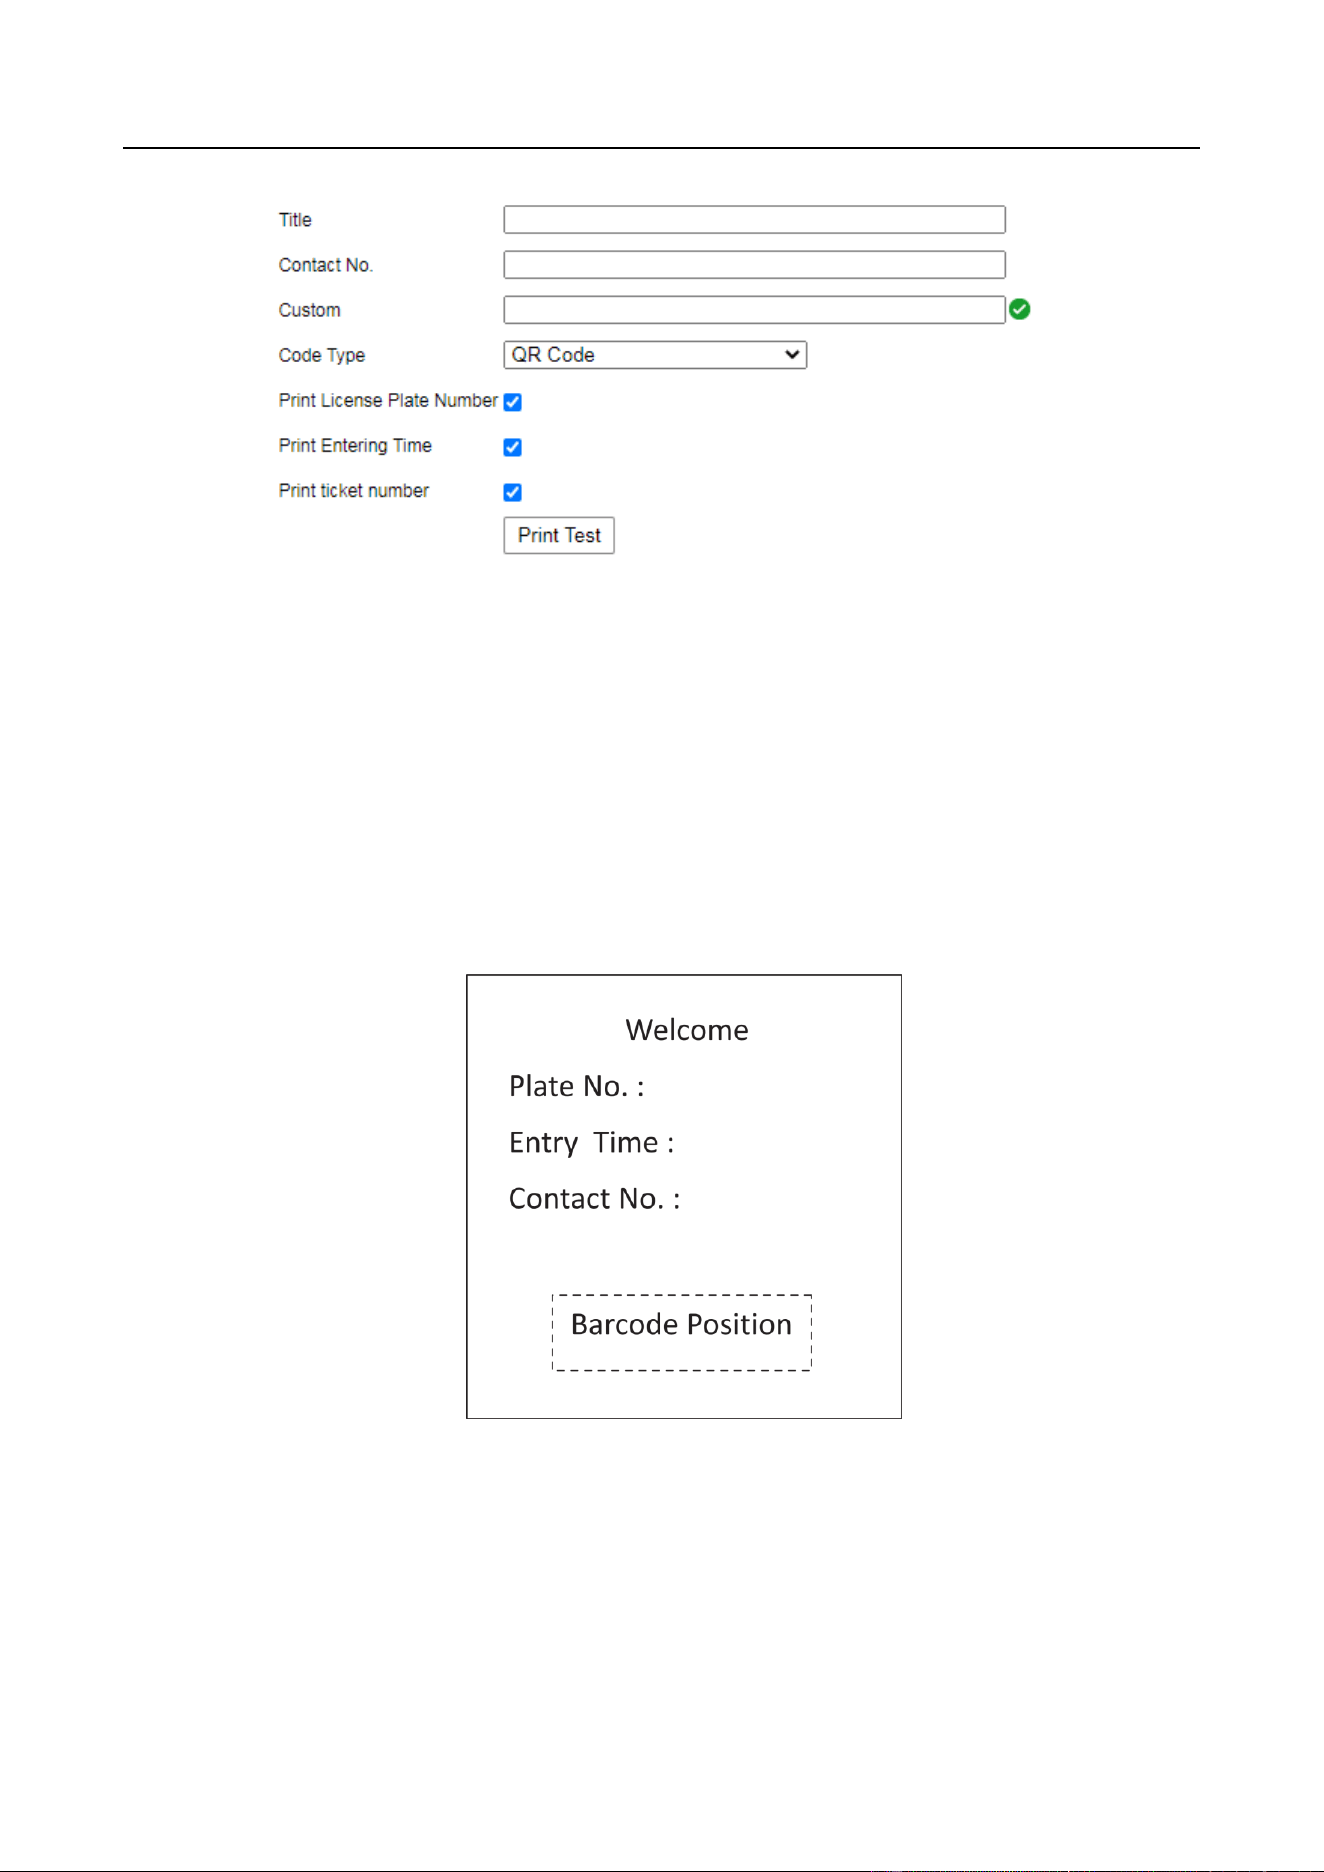
4.1.2 Configure Ticket
You can configure the content on the ticket.
This function is only available to Entrance Station.
Step 1 Go to Configuration > Entrance and Exit > Settings > Ticket Configuration.
Entrance/Exit Ticket Station User Manual
13
Figure 4-2 Ticket Configuration
Step 2 Enter Title, Contact No., and Custom information to be printed on the ticket.
Step 3 Select Code Type. Barcode and QR Code are selectable.
Step 4 (Optional) Check Print License Plate Number to print the license plate number on the ticket.
Step 5 (Optional) Check Print Entering Time to print the entering time of the vehicle on the ticket.
Step 6 (Optional) Check Print Ticket Number to print the ticket number on the ticket.
Step 7 (Optional) Click Print Test to print the configured ticket to view the effect. The ticket format
is shown below.
Step 8 Click Save to save the settings.
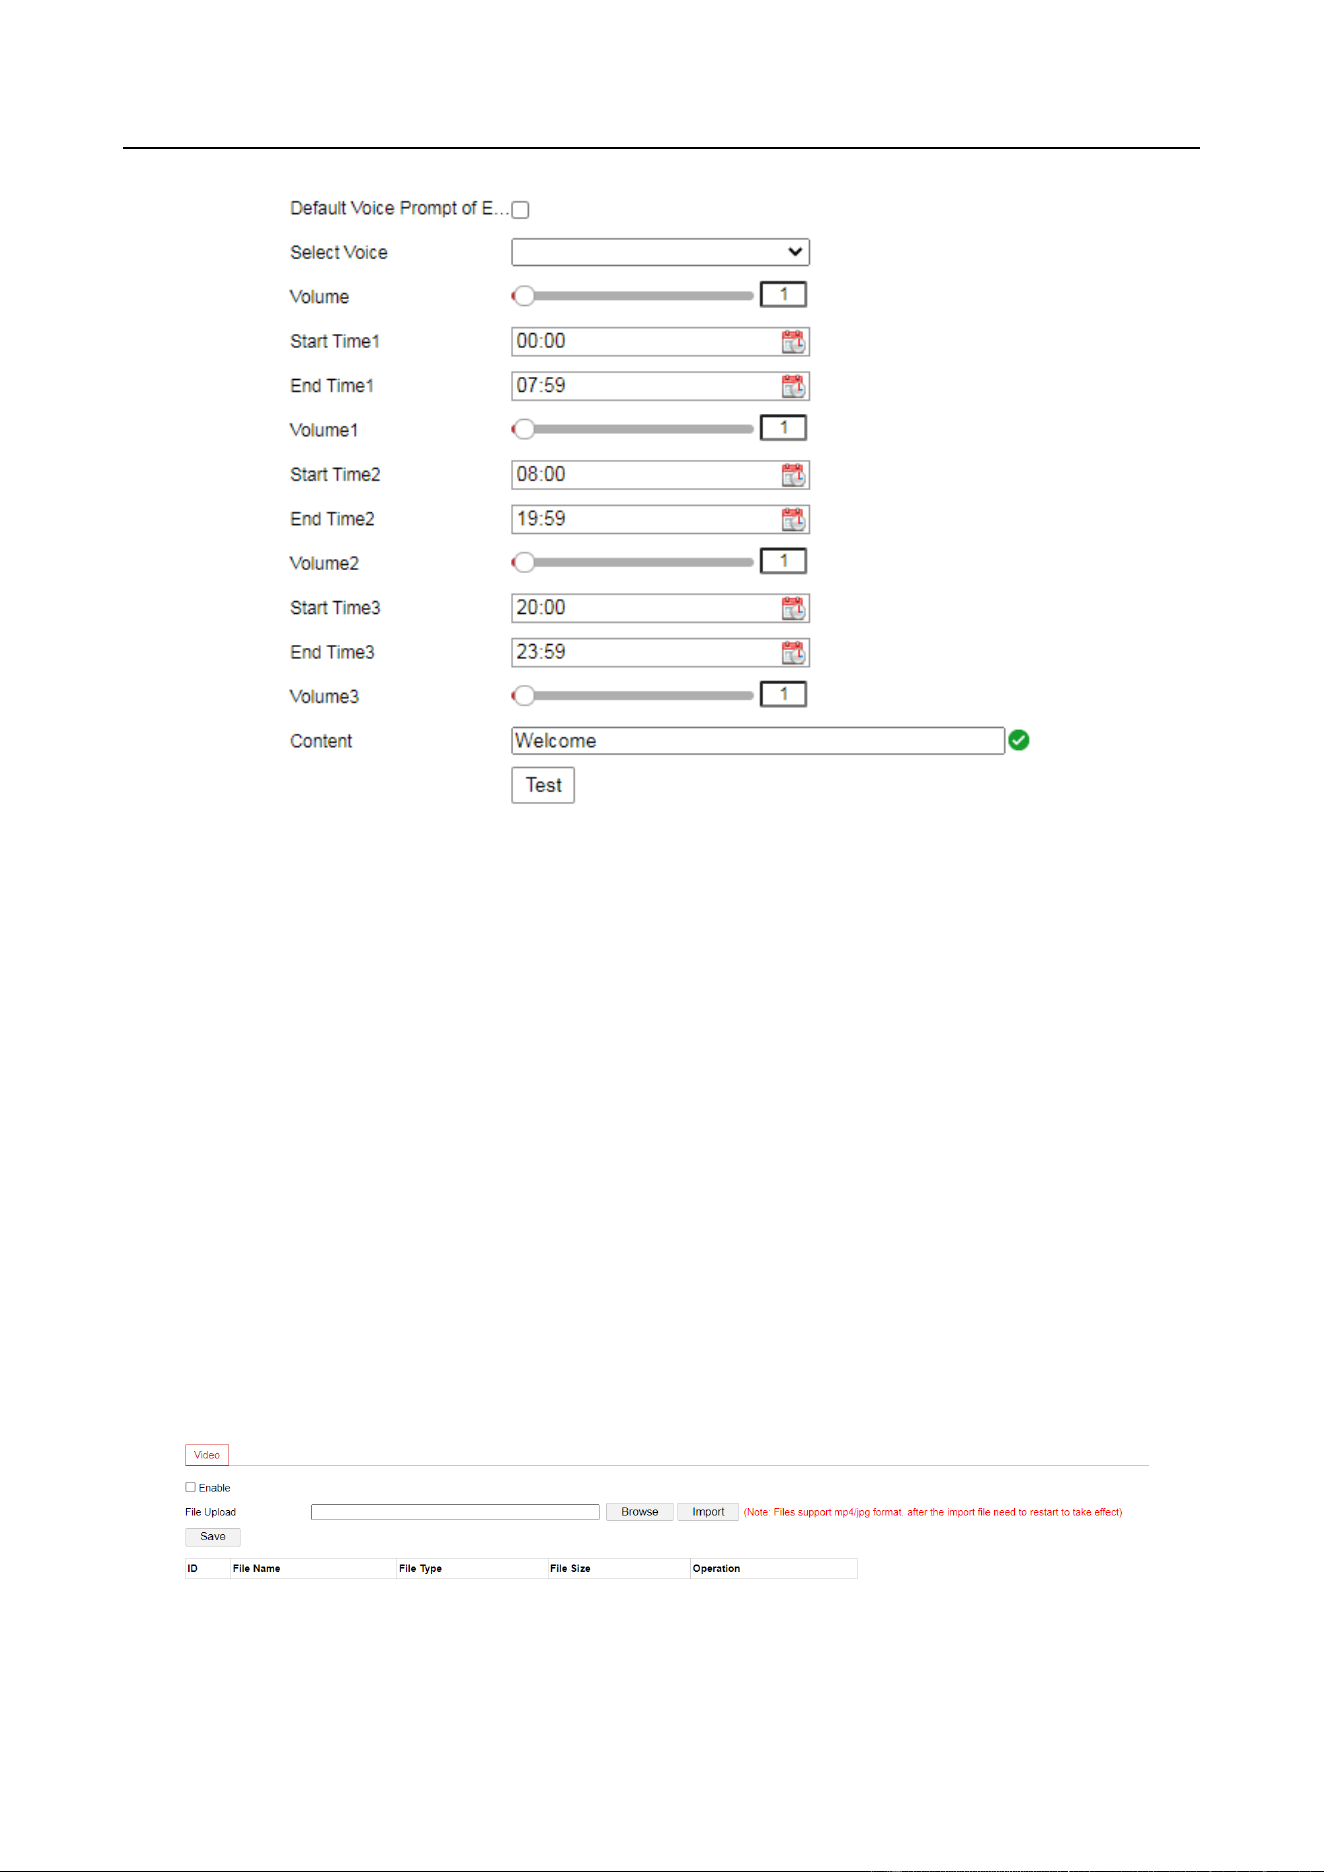
4.1.3 Configure Audio
You can configure the voice prompt.
Step 1 Go to Configuration > Entrance and Exit > Settings > Audio Configuration.
Entrance/Exit Ticket Station User Manual
14
Figure 4-3 Audio Configuration
Step 2 Check Default Voice Prompt of Entrance & Exit to enable the voice prompt when a vehicle
passes the entrance and exit.
Step 3 Select the voice.
Step 4 Set the time period of the voice prompt, and slide the bar to adjust Volume. The value
ranges from 0 to 100.
Step 5 Enter Content of the voice prompt.
Step 6 (Optional) Click Test to test the settings.
Step 7 Click Save to save the settings.
4.1.4 Configure Media
You can configure the video to be played on the LCD.
Step 1 Go to Configuration > Entrance and Exit > Settings > Media Configuration.
Figure 4-4 Media Configuration

Entrance/Exit Ticket Station User Manual
15
Step 2 Check Enable.
Step 3 Click Browse to select the video file.
Step 4 Click Import to import it.
Only MP4 or JPG files are supported. The size should be less than 100 M, and the
recommended resolution is 600 * 1024.
The imported file takes effect after you reboot the device.
Result:
LCD will play the imported video automatically.
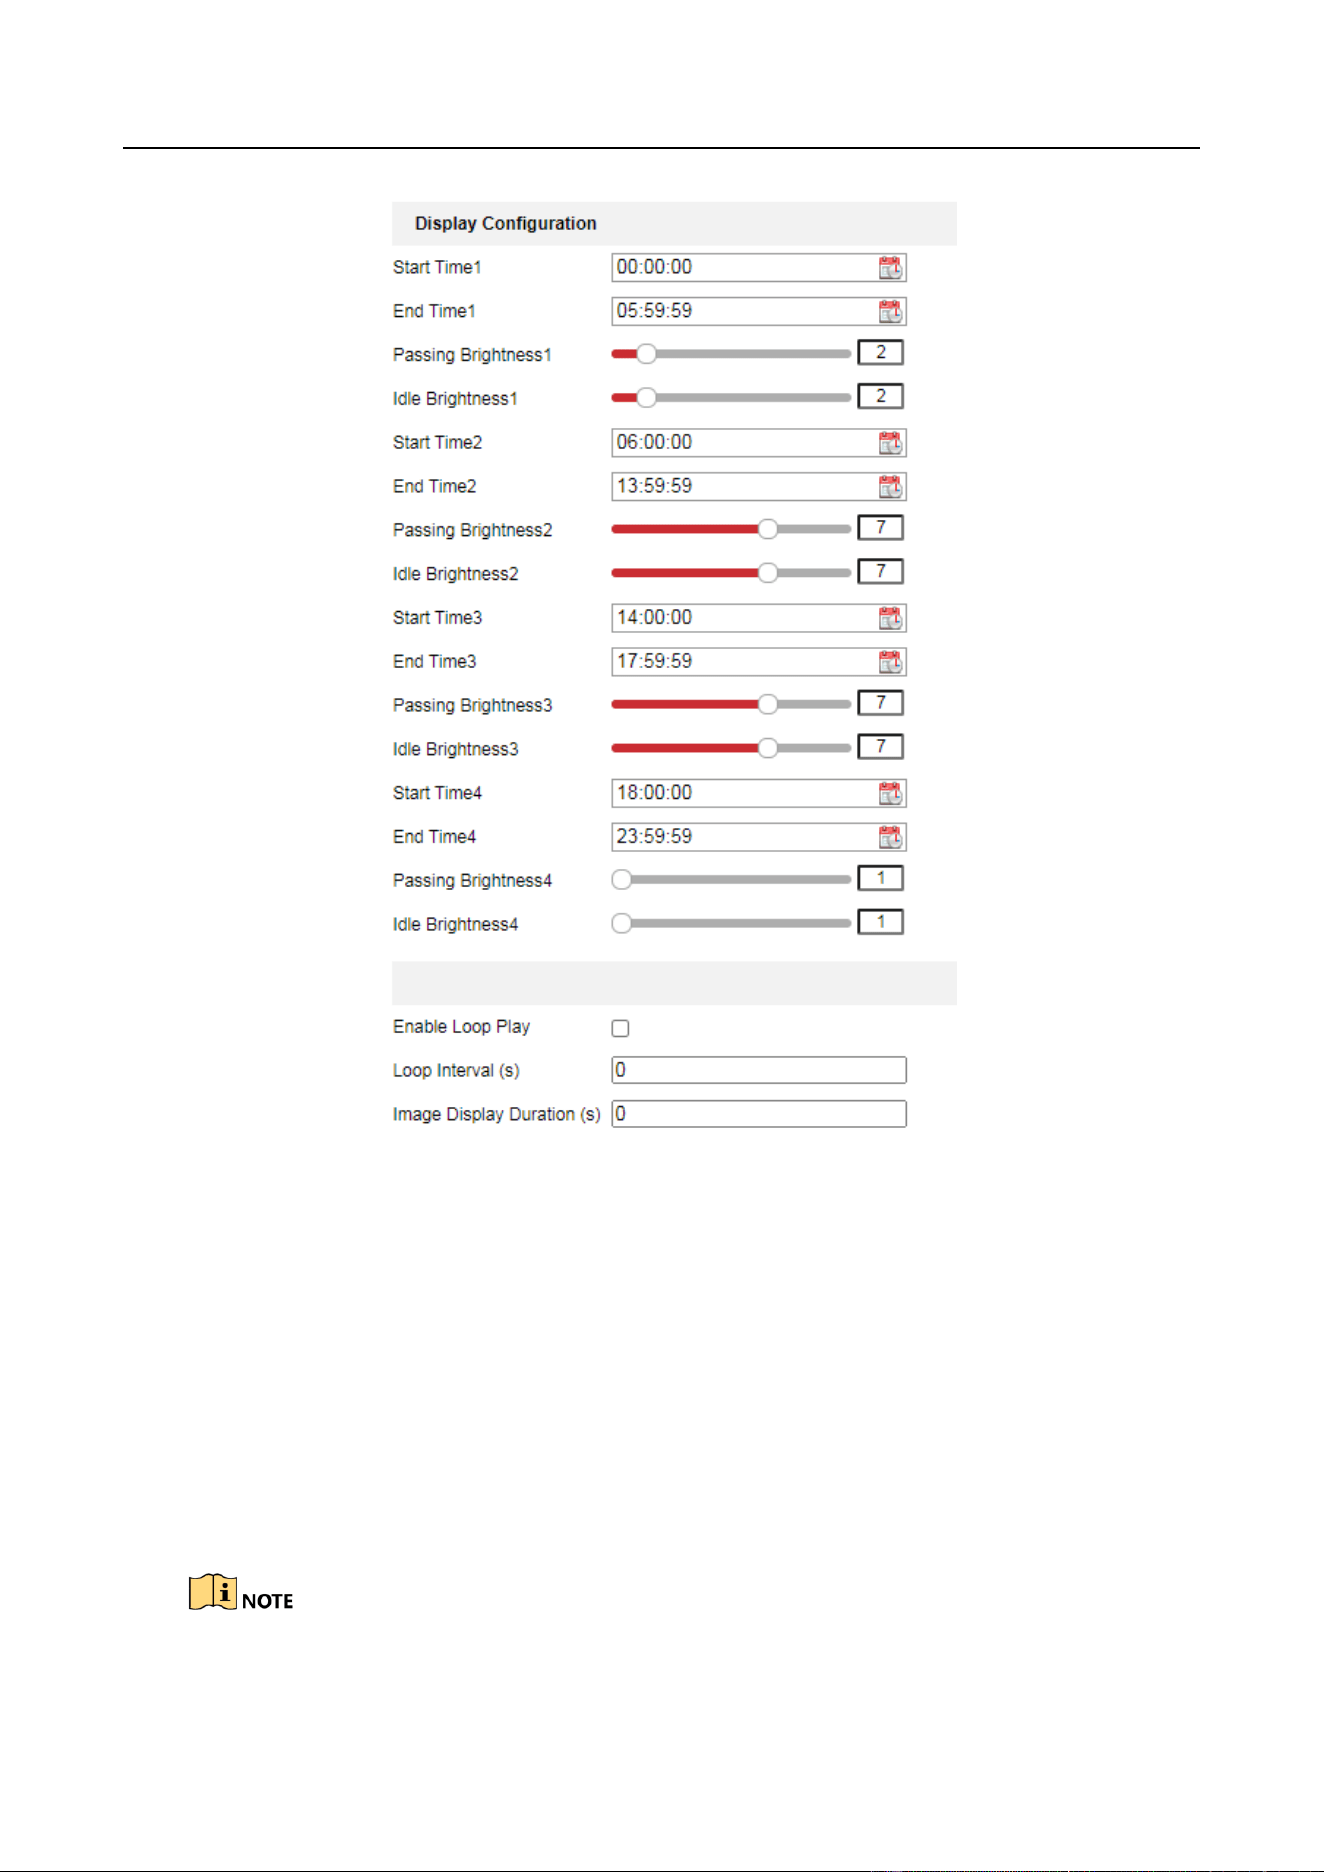
4.1.5 Configure Screen Display
Step 1 Go to Configuration > Entrance and Exit > Settings > Display Configuration.
Entrance/Exit Ticket Station User Manual
16
Figure 4-5 Display Configuration
Step 2 Set the display period on the screen, and set Passing Brightness and Idle Brightness of each
period.
Step 3 (Optional) If you want to enable loop play of the display content, check Enable Loop Play,
and set Loop Interval and Image Display Duration.
Step 4 Click Save.
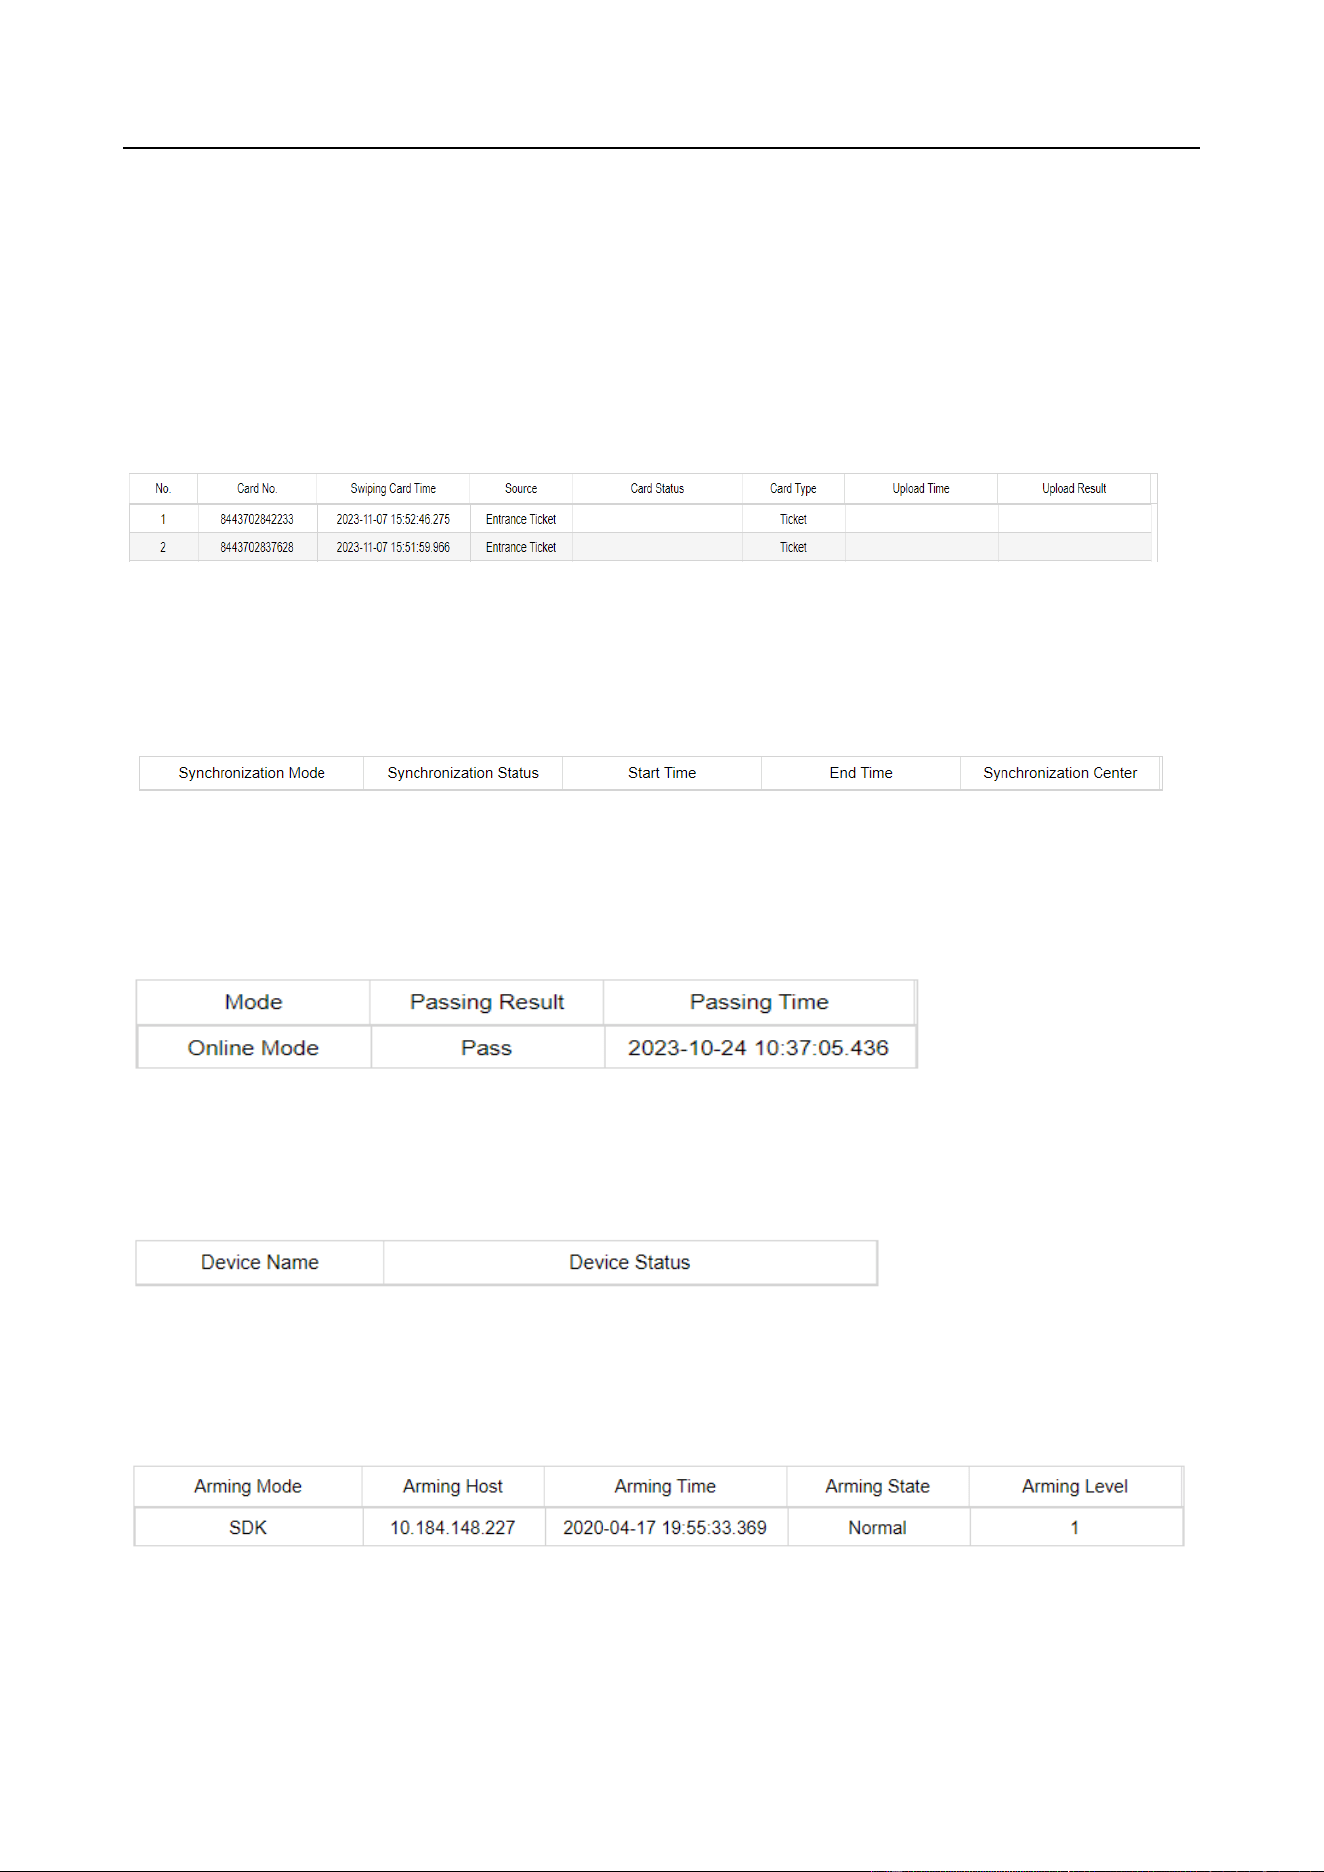
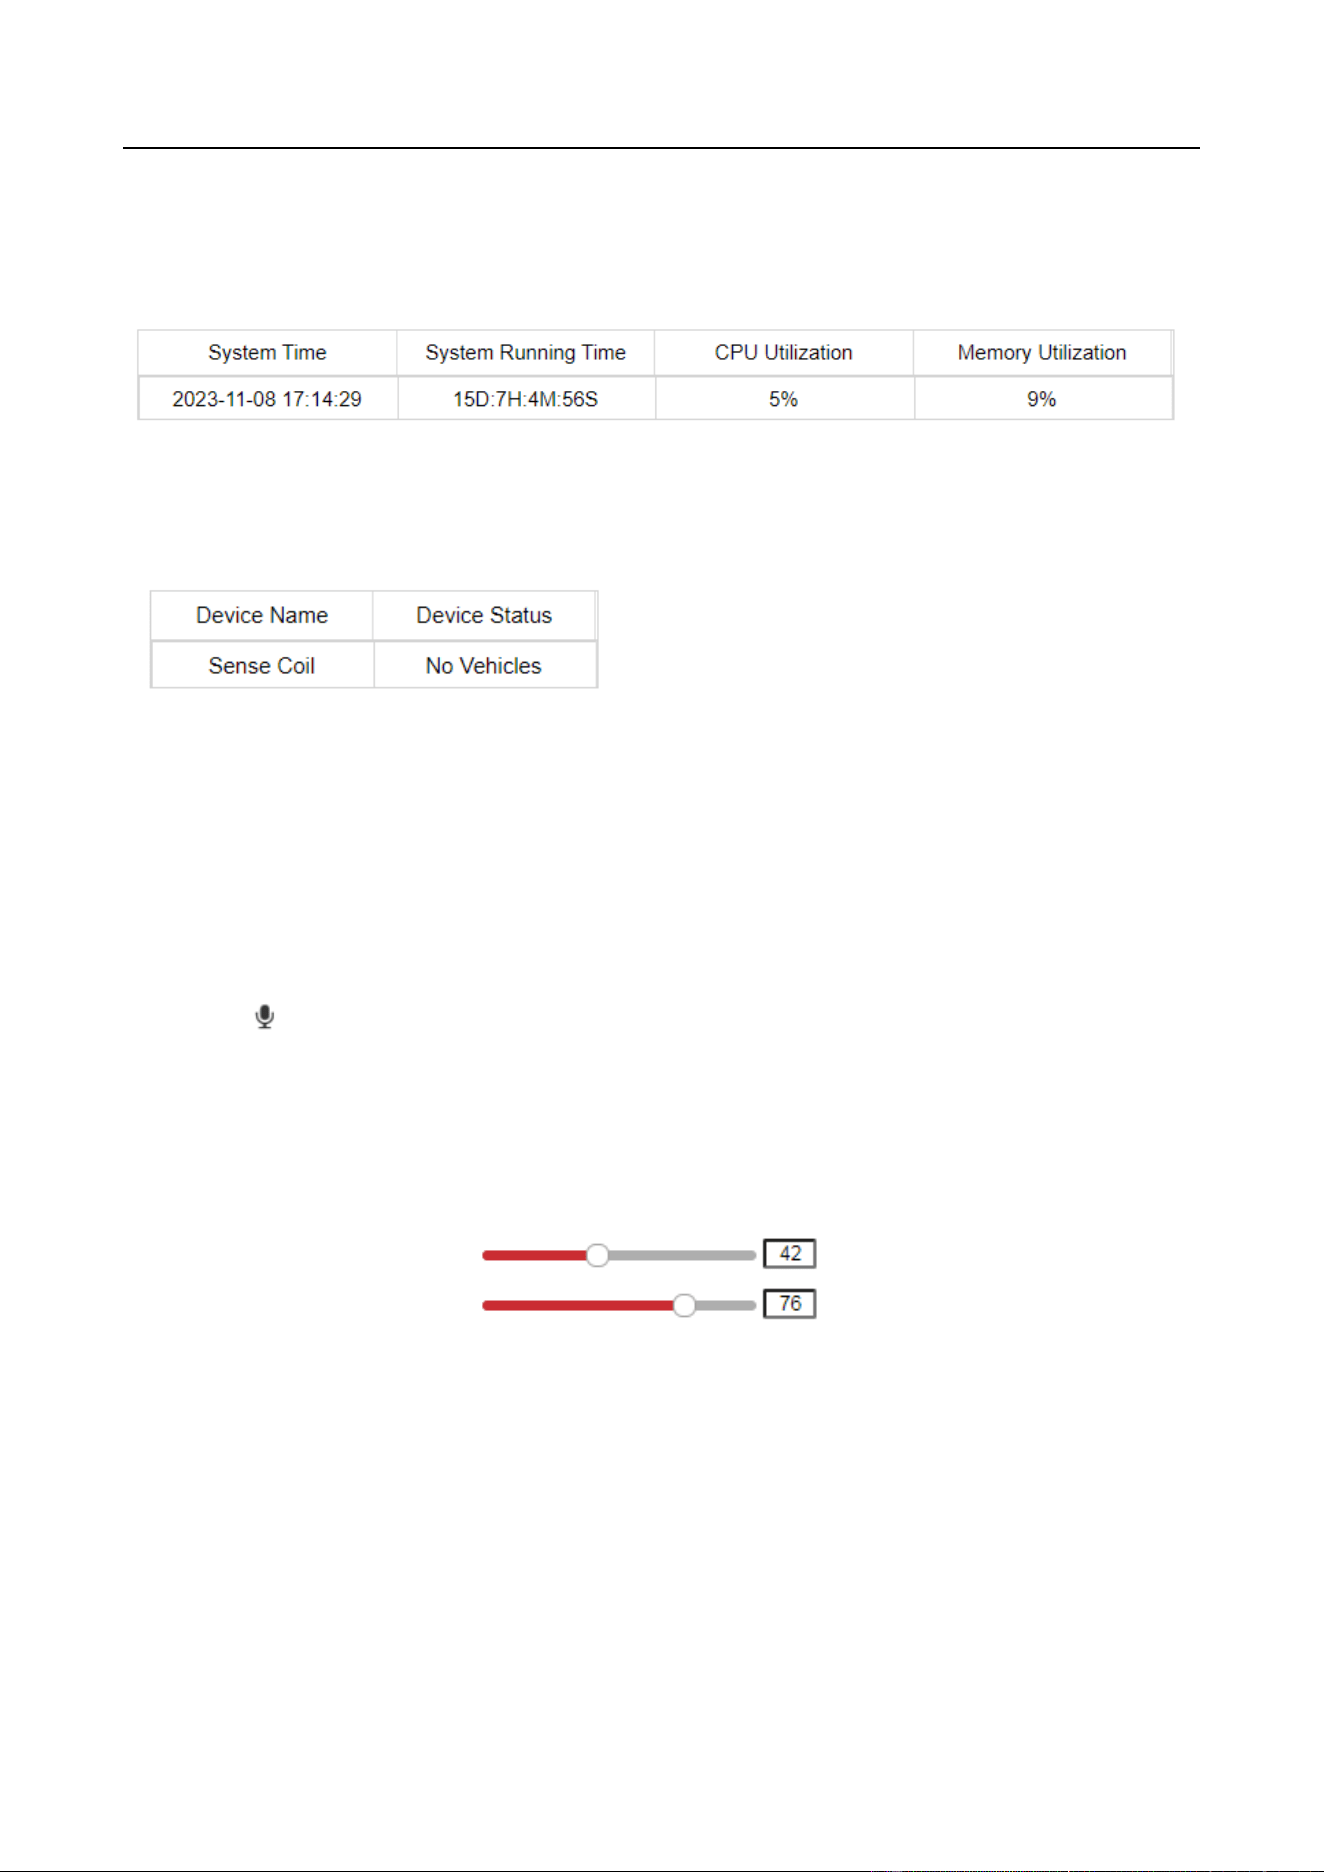
4.1.6 View Entrance & Exit Status
Go to Configuration > Entrance and Exit > Status to view card status, synchronization status, etc.
Entrance/Exit Ticket Station User Manual
17
After the station is added to the dedicated software, the functions such as license plate recognition
of capture unit, vehicle passing of barrier gate, fee charging, etc. can be realized. Refer to the
software user manual for details.
Card Status
View card number, swiping card time, source, card status, card type, upload time, and upload
result.
Synchronization Status
View synchronization mode, synchronization status, synchronization center, start time, and end
time.
Passing Status
View mode, passing result, and passing time.
Peripheral Status
View the name and status of the peripheral devices.
Arming Status
View arming mode, arming host, arming time, arming state, and arming level.
Entrance/Exit Ticket Station User Manual
18
System Status
View system time, system running time, CPU utilization, and memory utilization.
Induction
View the name and status of induction devices.
4.2 Configure Two-Way Audio
4.2.1 Two-Way Audio with Computer
On the live view interface, you can start two-way audio between the controller and the station.
Step 1 On the live view interface, select the image to start two-way audio.
Step 2 Click to start two-way audio.
4.2.2 Two-Way Audio with Software
The controller can connect to the dedicated software to realize two-way audio with the software.
Step 1 Go to Configuration > Network > Advanced Settings > Two-way Audio.
Figure 4-6 Two-Way Audio
Step 2 Adjust the value.
Step 3 Click Save to save the settings.
Step 4 Press Help button on the controller front panel to start two-way audio.
Entrance/Exit Ticket Station User Manual
19
Chapter 5 Network Configuration
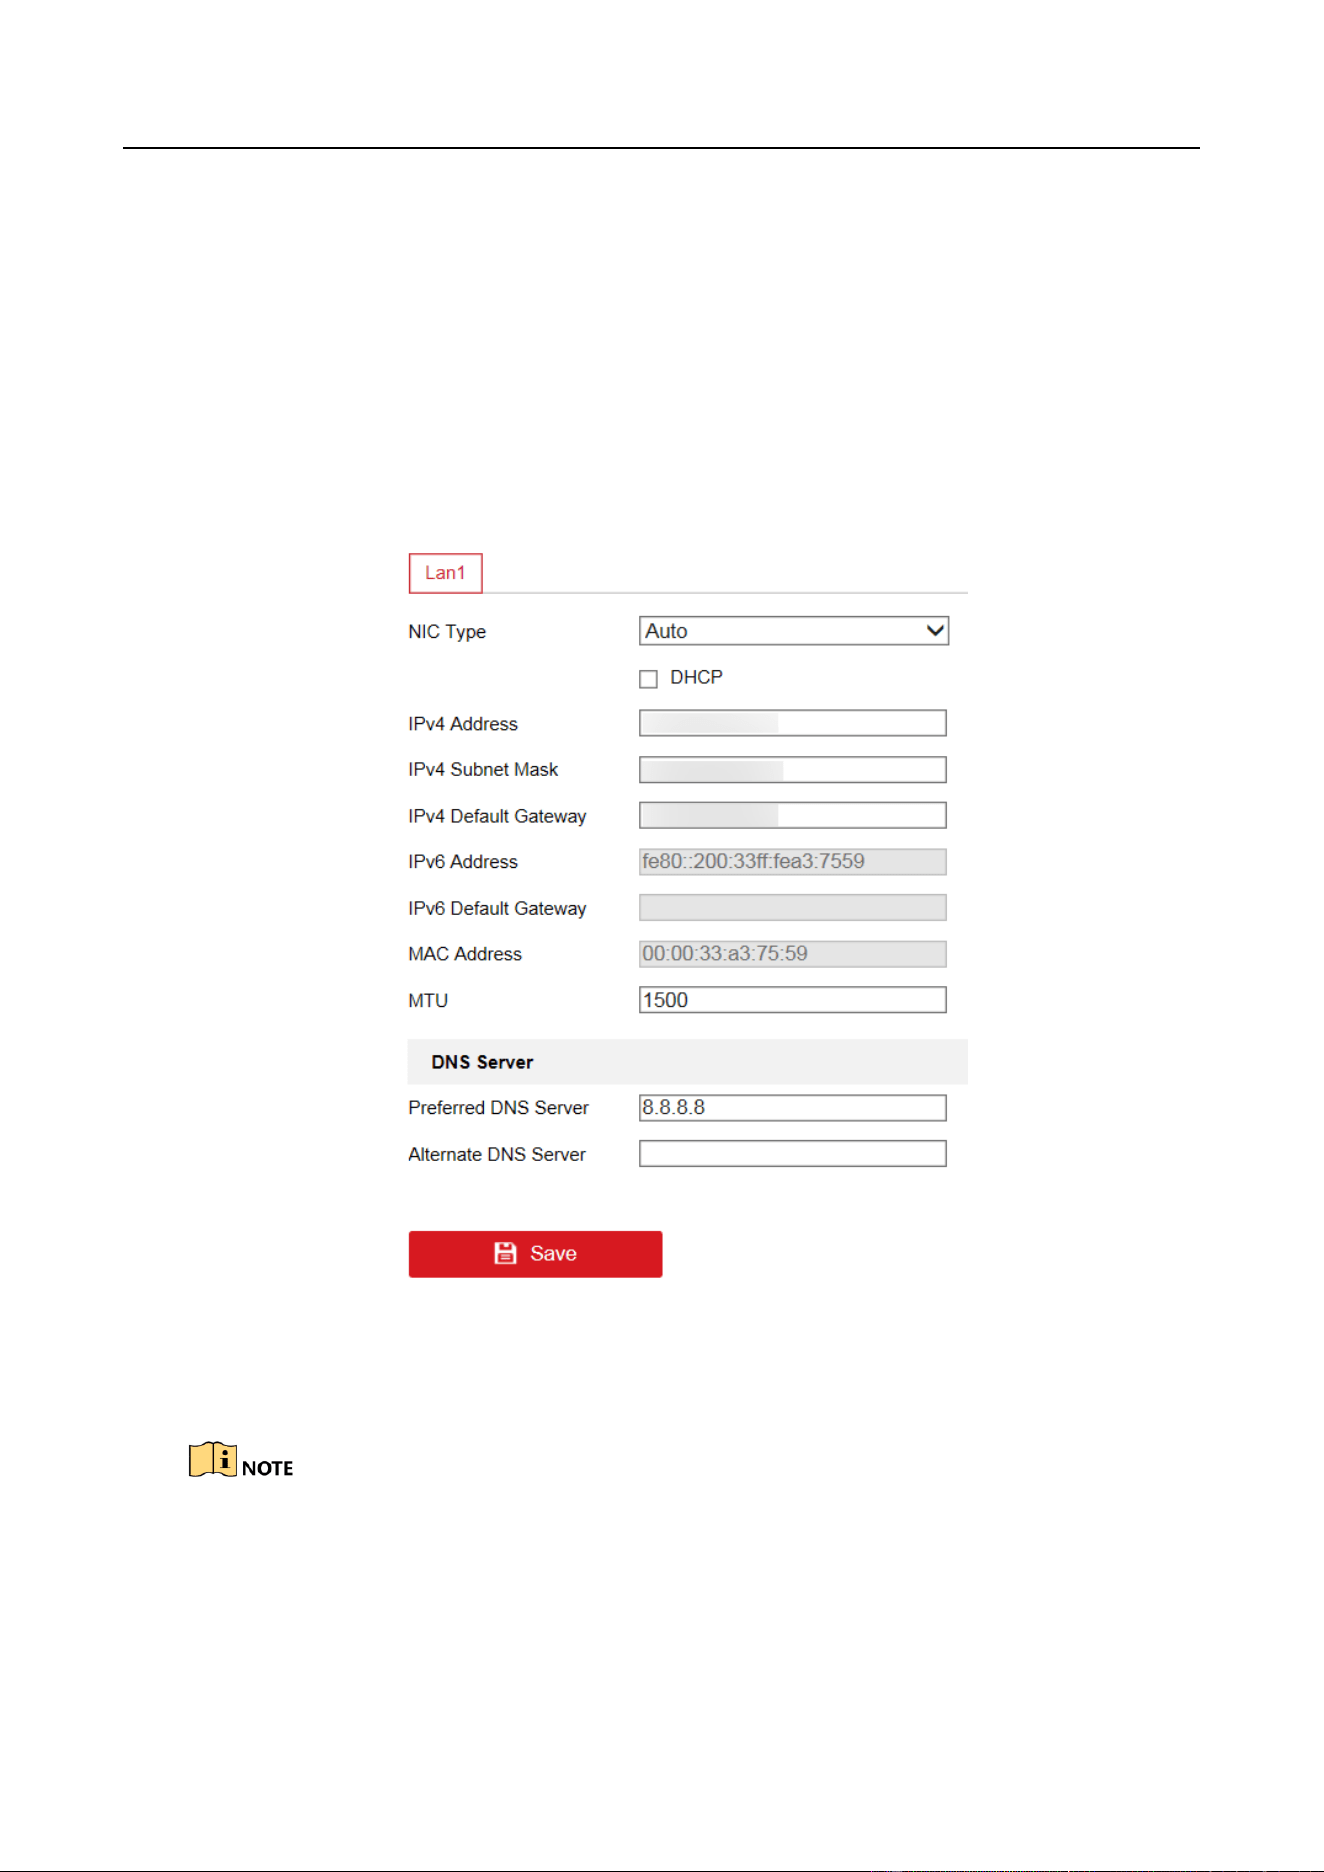
5.1 Configure TCP/IP
The station is connected to the network via network cables. Configure the IP address to access the
network or connect capture unit.
Step 1 Go to Configuration > Network > Basic Settings > TCP/IP.
Figure 5-1 TCP/IP Configuration
Step 2 Configure the parameters, including NIC Type, IPv4/IPv6 Address, IPv4/IPv6 Subnet Mask,
etc.
MTU refers to the maximum size of data packet in transmission.
Step 3 (Optional) If the DHCP server is available, you can check DHCP to automatically obtain an IP
address and other network parameters.
Entrance/Exit Ticket Station User Manual
20
Step 4 (Optional) If you need to access the station via extranet, configure Preferred DNS Server and
Alternate DNS Server.
DNS server can be set according to the DNS settings of router.
Step 5 Click Save to save the settings.
5.2 Connect to Platform
The station can be remotely accessed via ISUP platform.
Before You Start
● Create the station ID on ISUP platform.
● Ensure the station can communicate with the platform normally.
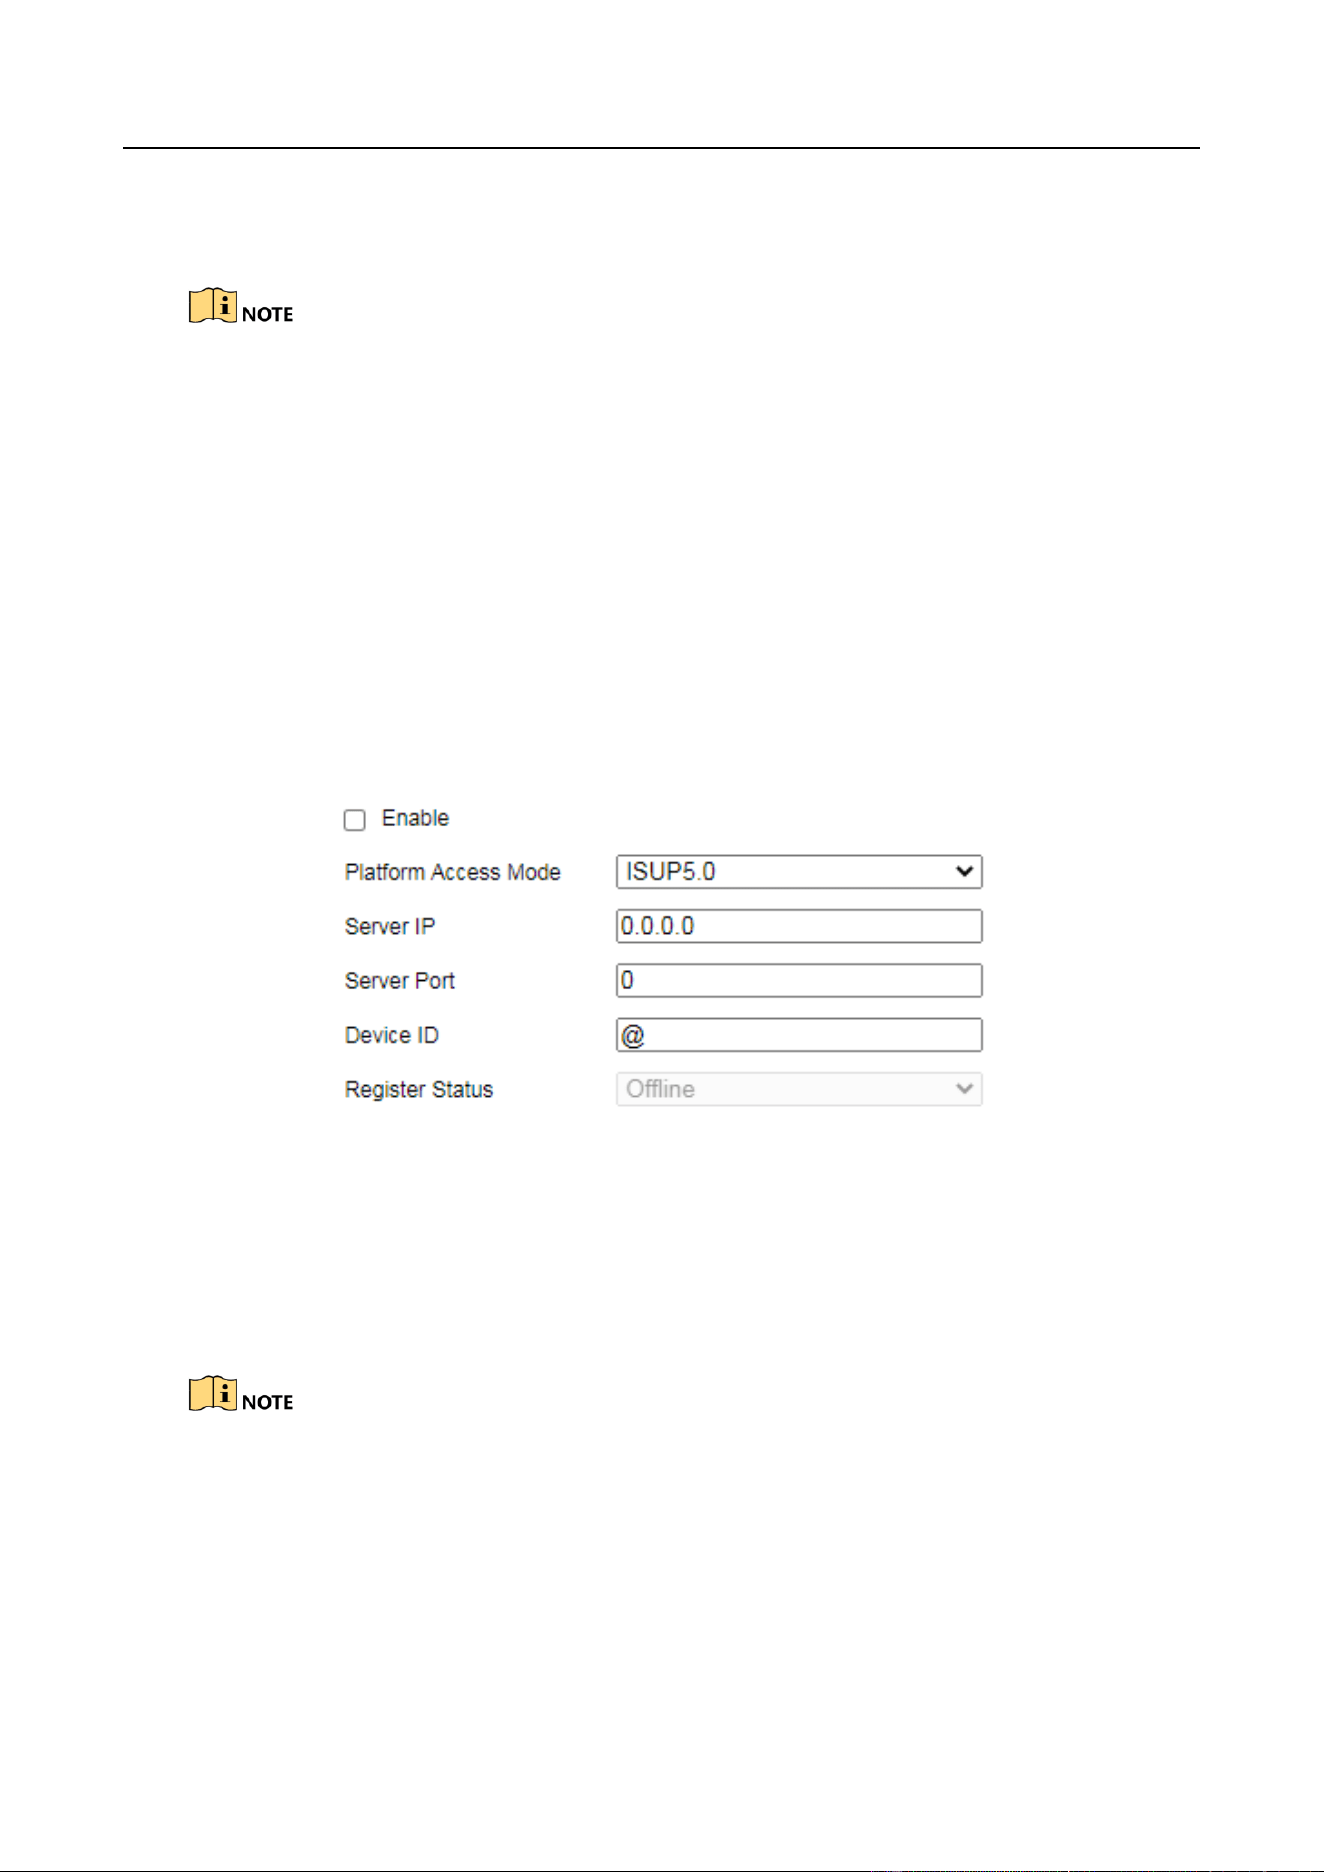
Step 1 Go to Configuration > Network > Advanced Settings > Platform Access.
Figure 5-2 Platform Access
Step 2 Check Enable.
Step 3 Select Platform Access Mode as ISUP5.0.
Step 4 Enter Server IP, Server Port, and Device ID.
The device ID should be the same with the added one on the ISUP platform.
Step 5 Click Save.
Step 6 Optional: View Registration Status.

Entrance/Exit Ticket Station User Manual
21
5.3 Configure Port
HTTP port is used to access the station via web browser. RTSP port is used to get stream. Server
port is used to connect to client software.
Step 1 Go to Configuration > Network > Basic Settings > Port.
Figure 5-3 Port Configuration
Step 2 View the port parameters.
Entrance/Exit Ticket Station User Manual
22
Chapter 6 Safety Management
6.1 Manage User
6.1.1 Add User
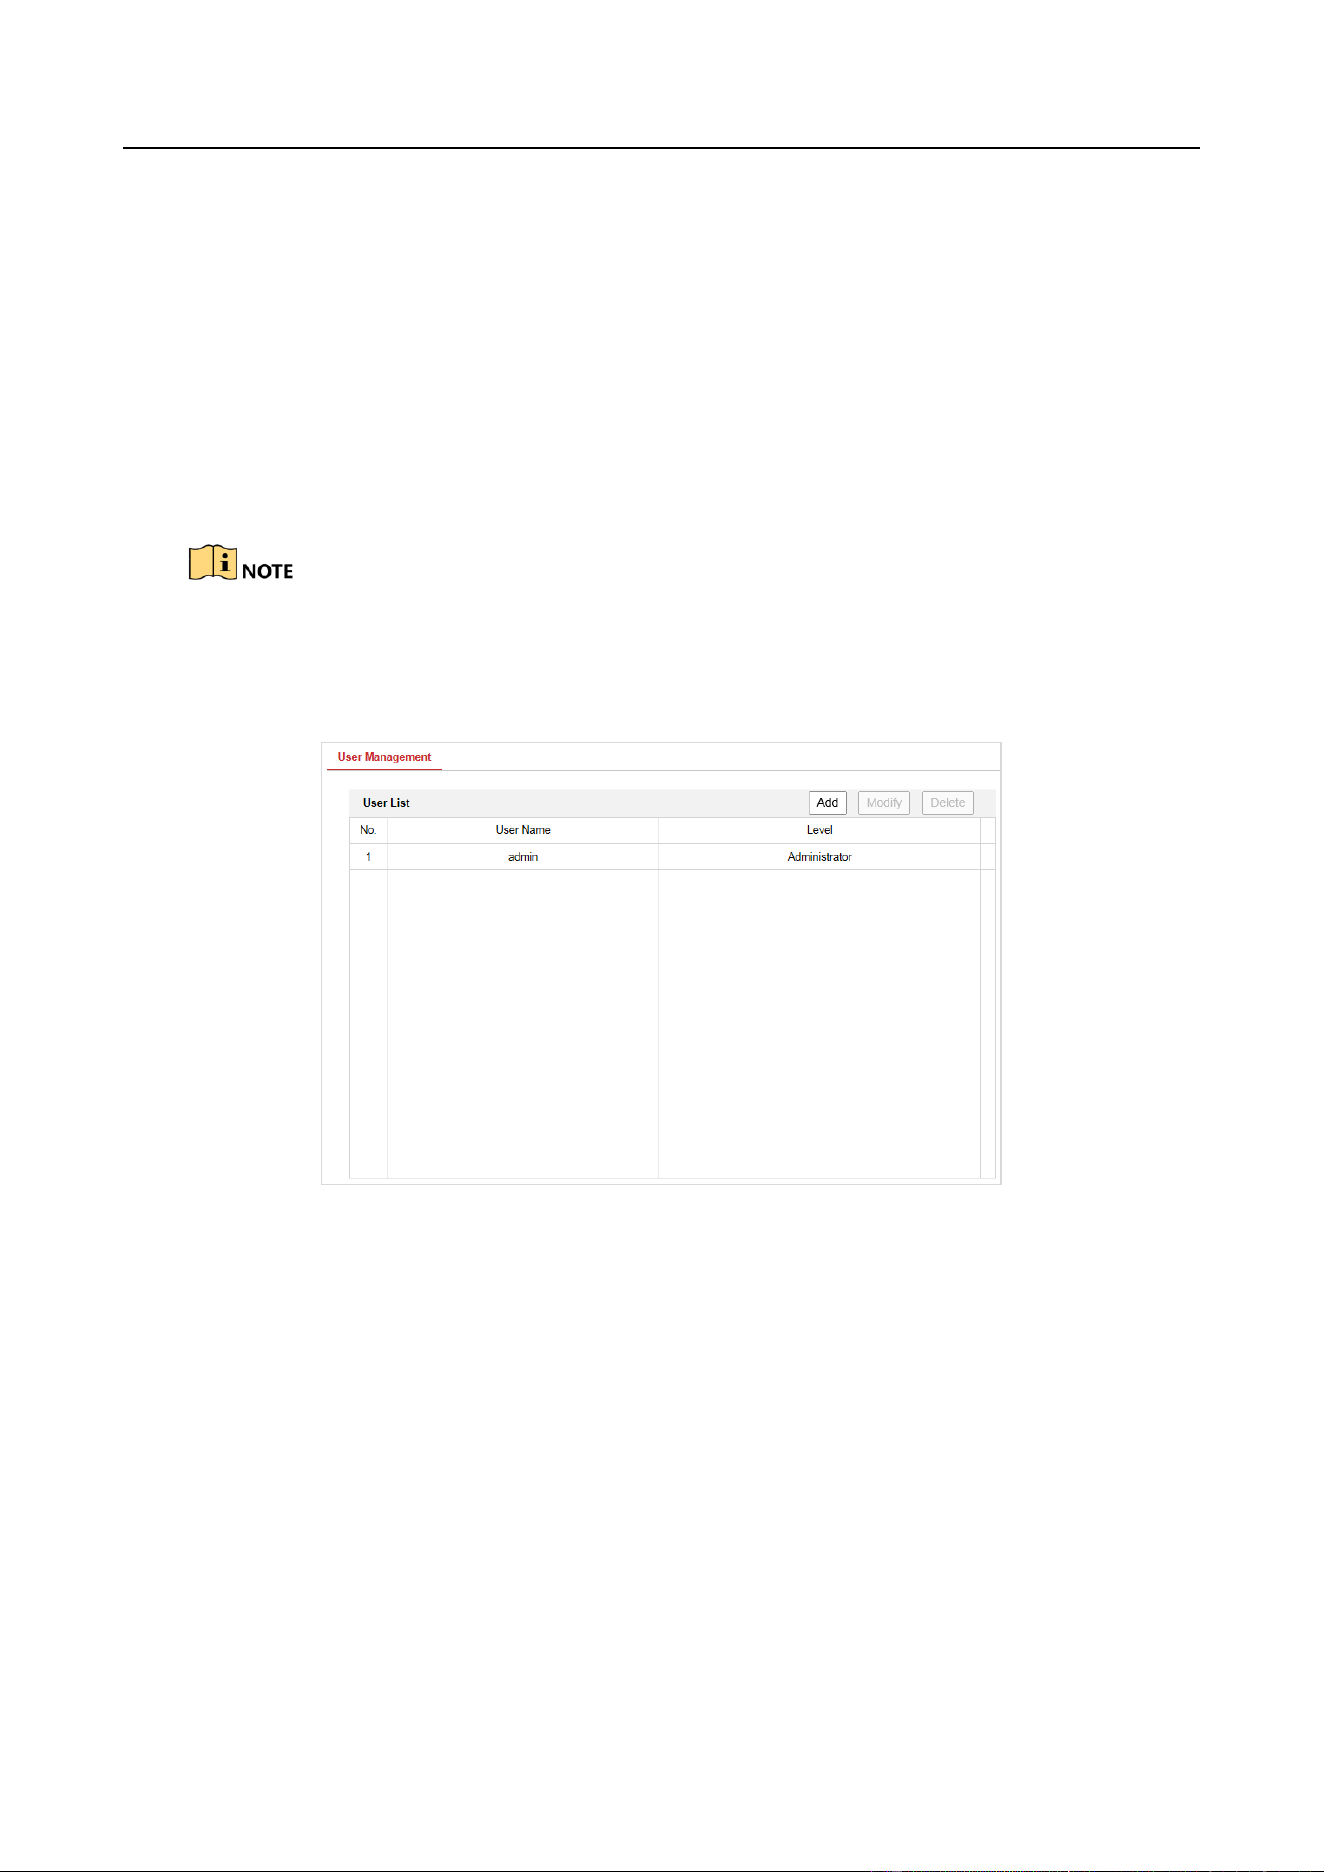
You can add users and set user permissions to control the station.
By default, there is only one user account admin and the level is Administrator. Up to 31 users can
be created and it differs according to different models.
Step 1 Go to Configuration > System > User Management.
Figure 6-1 User Management
Step 2 Click Add.
Entrance/Exit Ticket Station User Manual
23
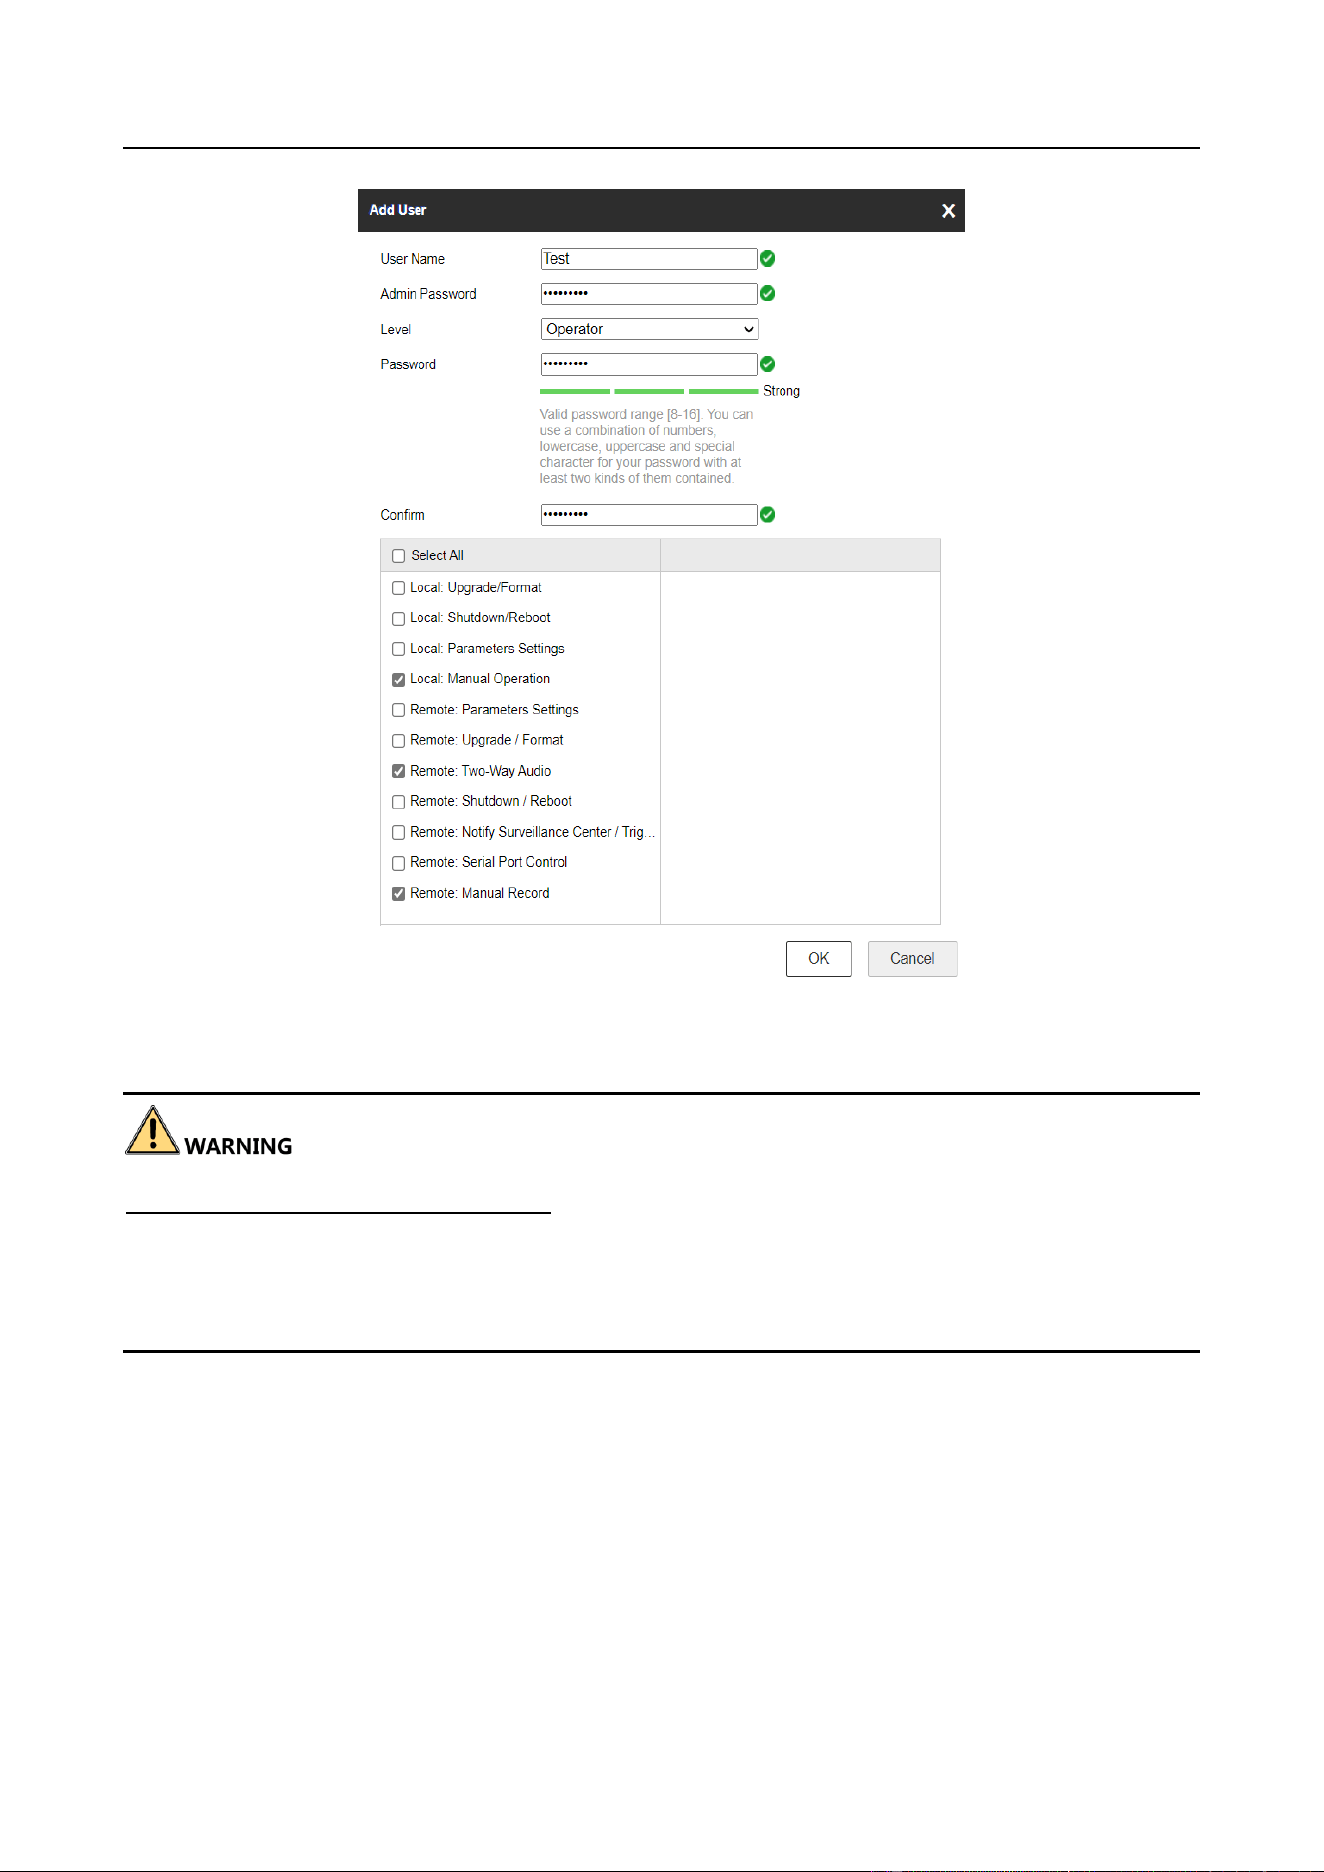
Figure 6-2 Add User
Step 3 Enter User Name and Admin Password, select Level, enter Password, and confirm it.
STRONG PASSWORD RECOMMENDED–We highly recommend you create a strong password of
your own choosing (Using a minimum of 8 characters, including at least two of the following
categories: upper case letters, lower case letters, numbers, and special characters.) in order to
increase the security of your product. And we recommend you reset your password regularly,
especially in the high security system, resetting the password monthly or weekly can better protect
your product.
Step 4 Check the checkbox(es) to select the user permission(s).
Or check Select All to select all the permissions.
Step 5 Click OK to save the settings.
6.1.2 Edit User
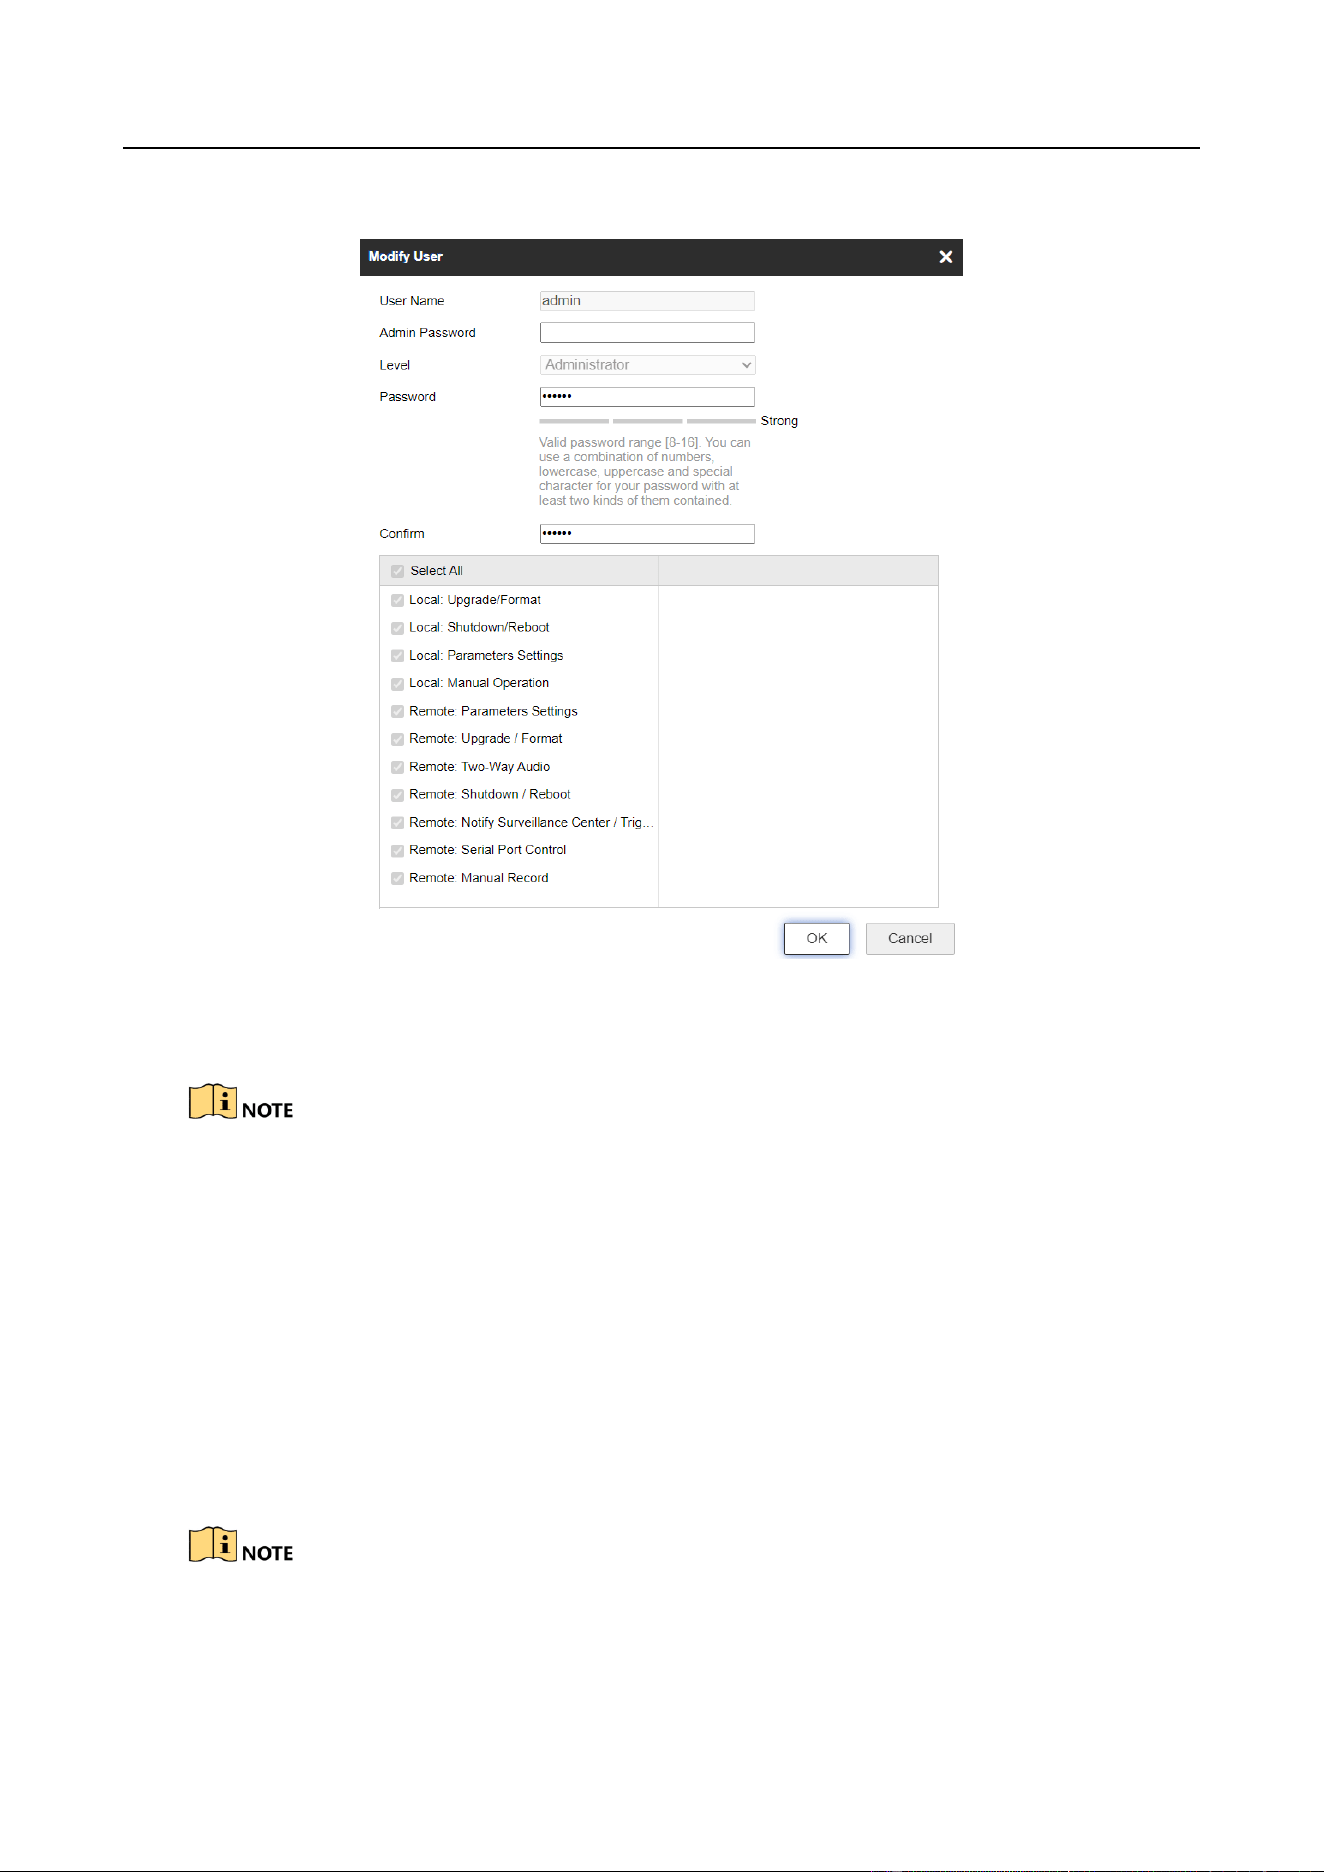
You can edit the added user.
Step 1 Go to Configuration > System > User Management.
Entrance/Exit Ticket Station User Manual
24
Step 2 Select the user account to edit and click Modify.
Figure 6-3 Edit User
Step 3 Edit Admin Password, Password, and permissions.
For admin account, you can only edit the password.
We highly recommend you to use strong password for security purpose.
Step 4 Click OK to save the settings.
6.1.3 Delete User
You can delete the added user.
Step 1 Select the user account to delete.
Step 2 Click Delete to delete it.
You cannot delete the admin account.

Entrance/Exit Ticket Station User Manual
25
6.2 Configure Security
Enabling SSH (Secure Shell) can encrypt and compress the data, and reduce the transmission time.
Step 1 Go to Configuration > System > Security > Security Service.
Figure 6-4 Security Configuration
Step 2 Check Enable SSH to enable the SSH function.
Step 3 Click Save to save the settings.
Entrance/Exit Ticket Station User Manual
26
Chapter 7 Maintenance
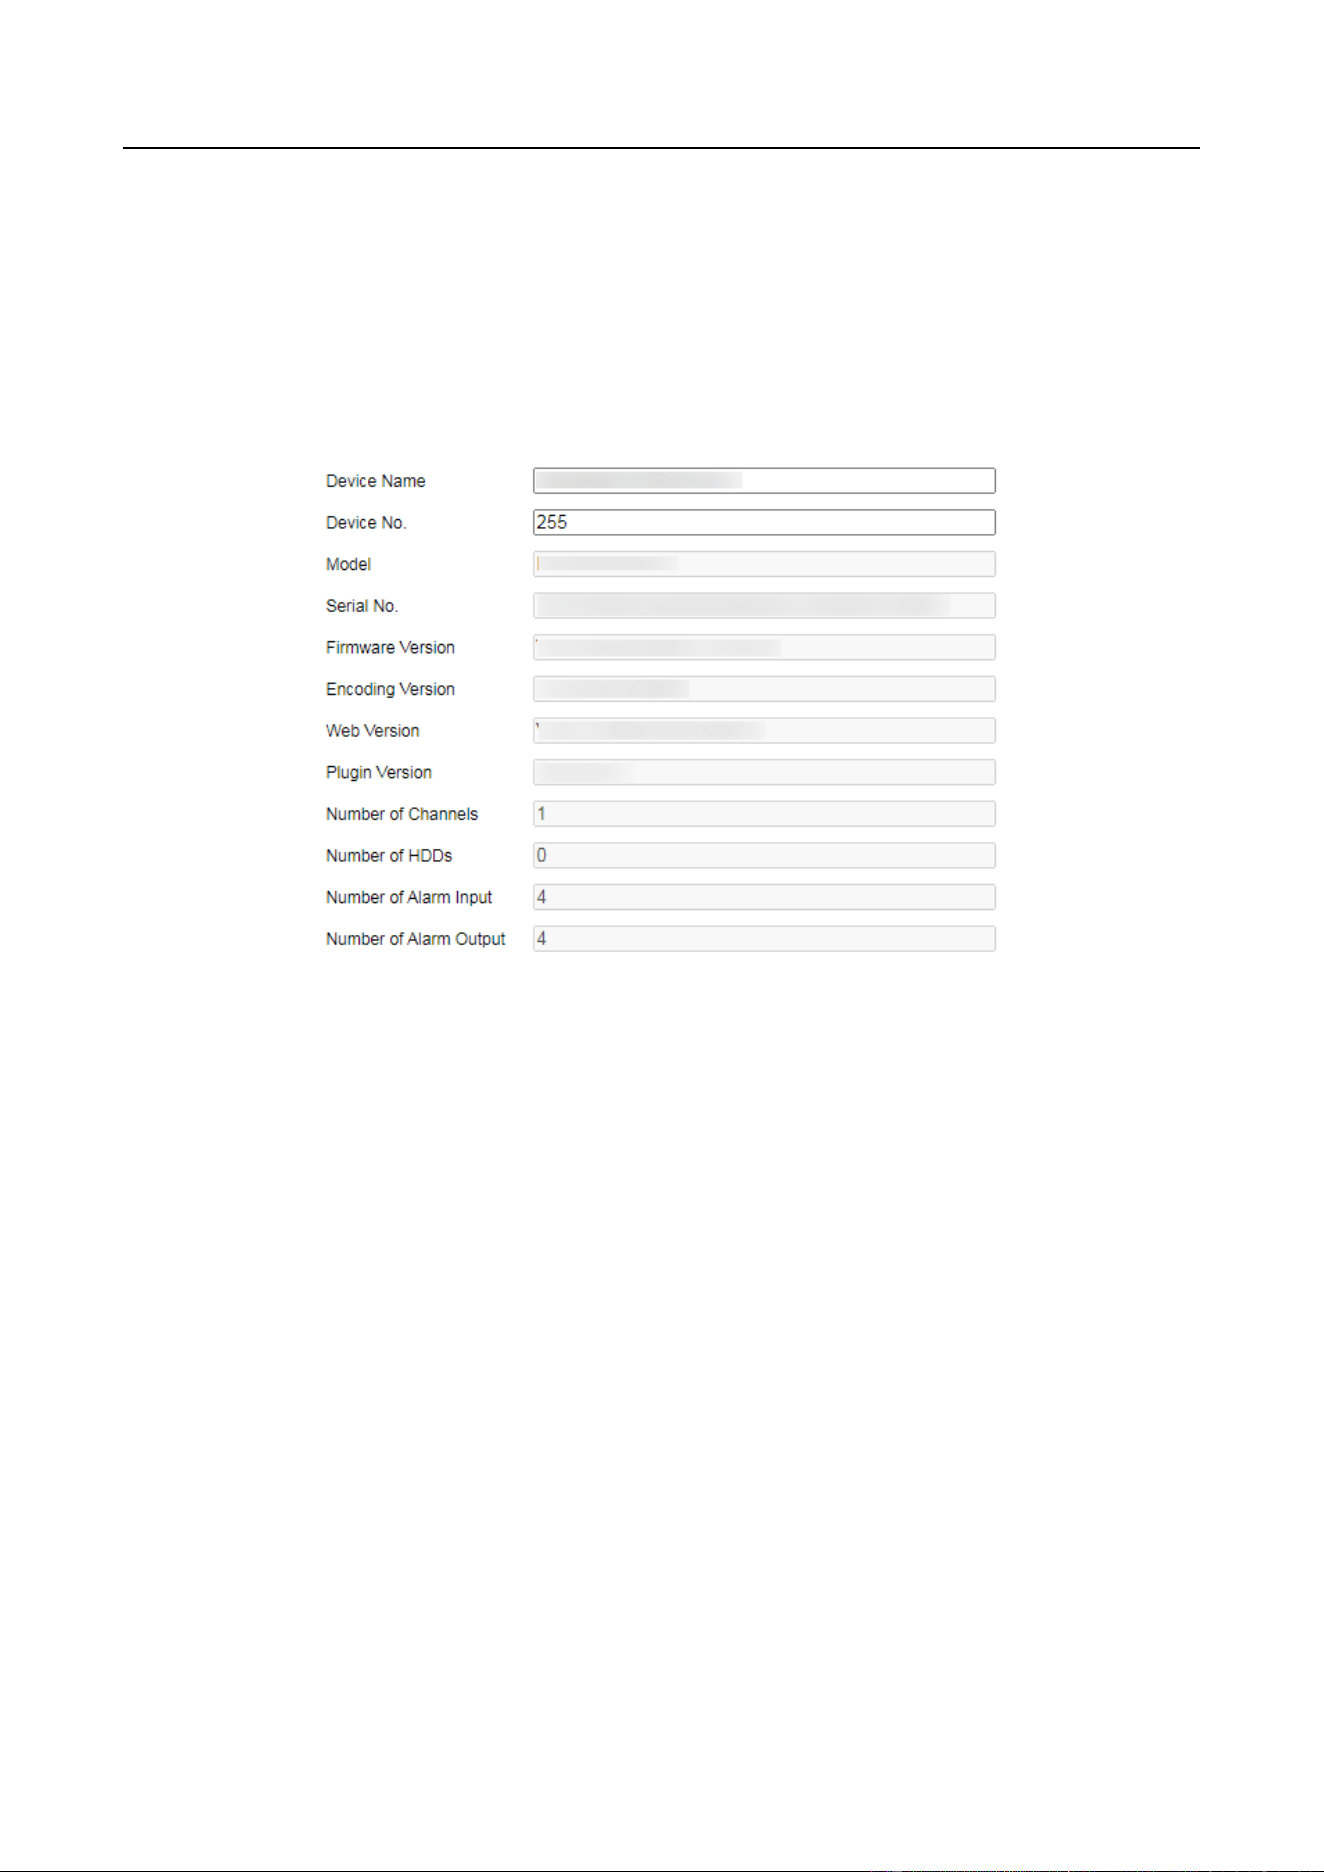
7.1 Configure Basic Information
Step 1 Go to Configuration > System > System Settings > Basic Information.
Figure 7-1 Basic Information
Step 2 (Optional) Edit Device Name and Device No.
Step 3 View the other device information including Model, Serial No., Firmware Version, etc.
Step 4 Click Save to save the settings.
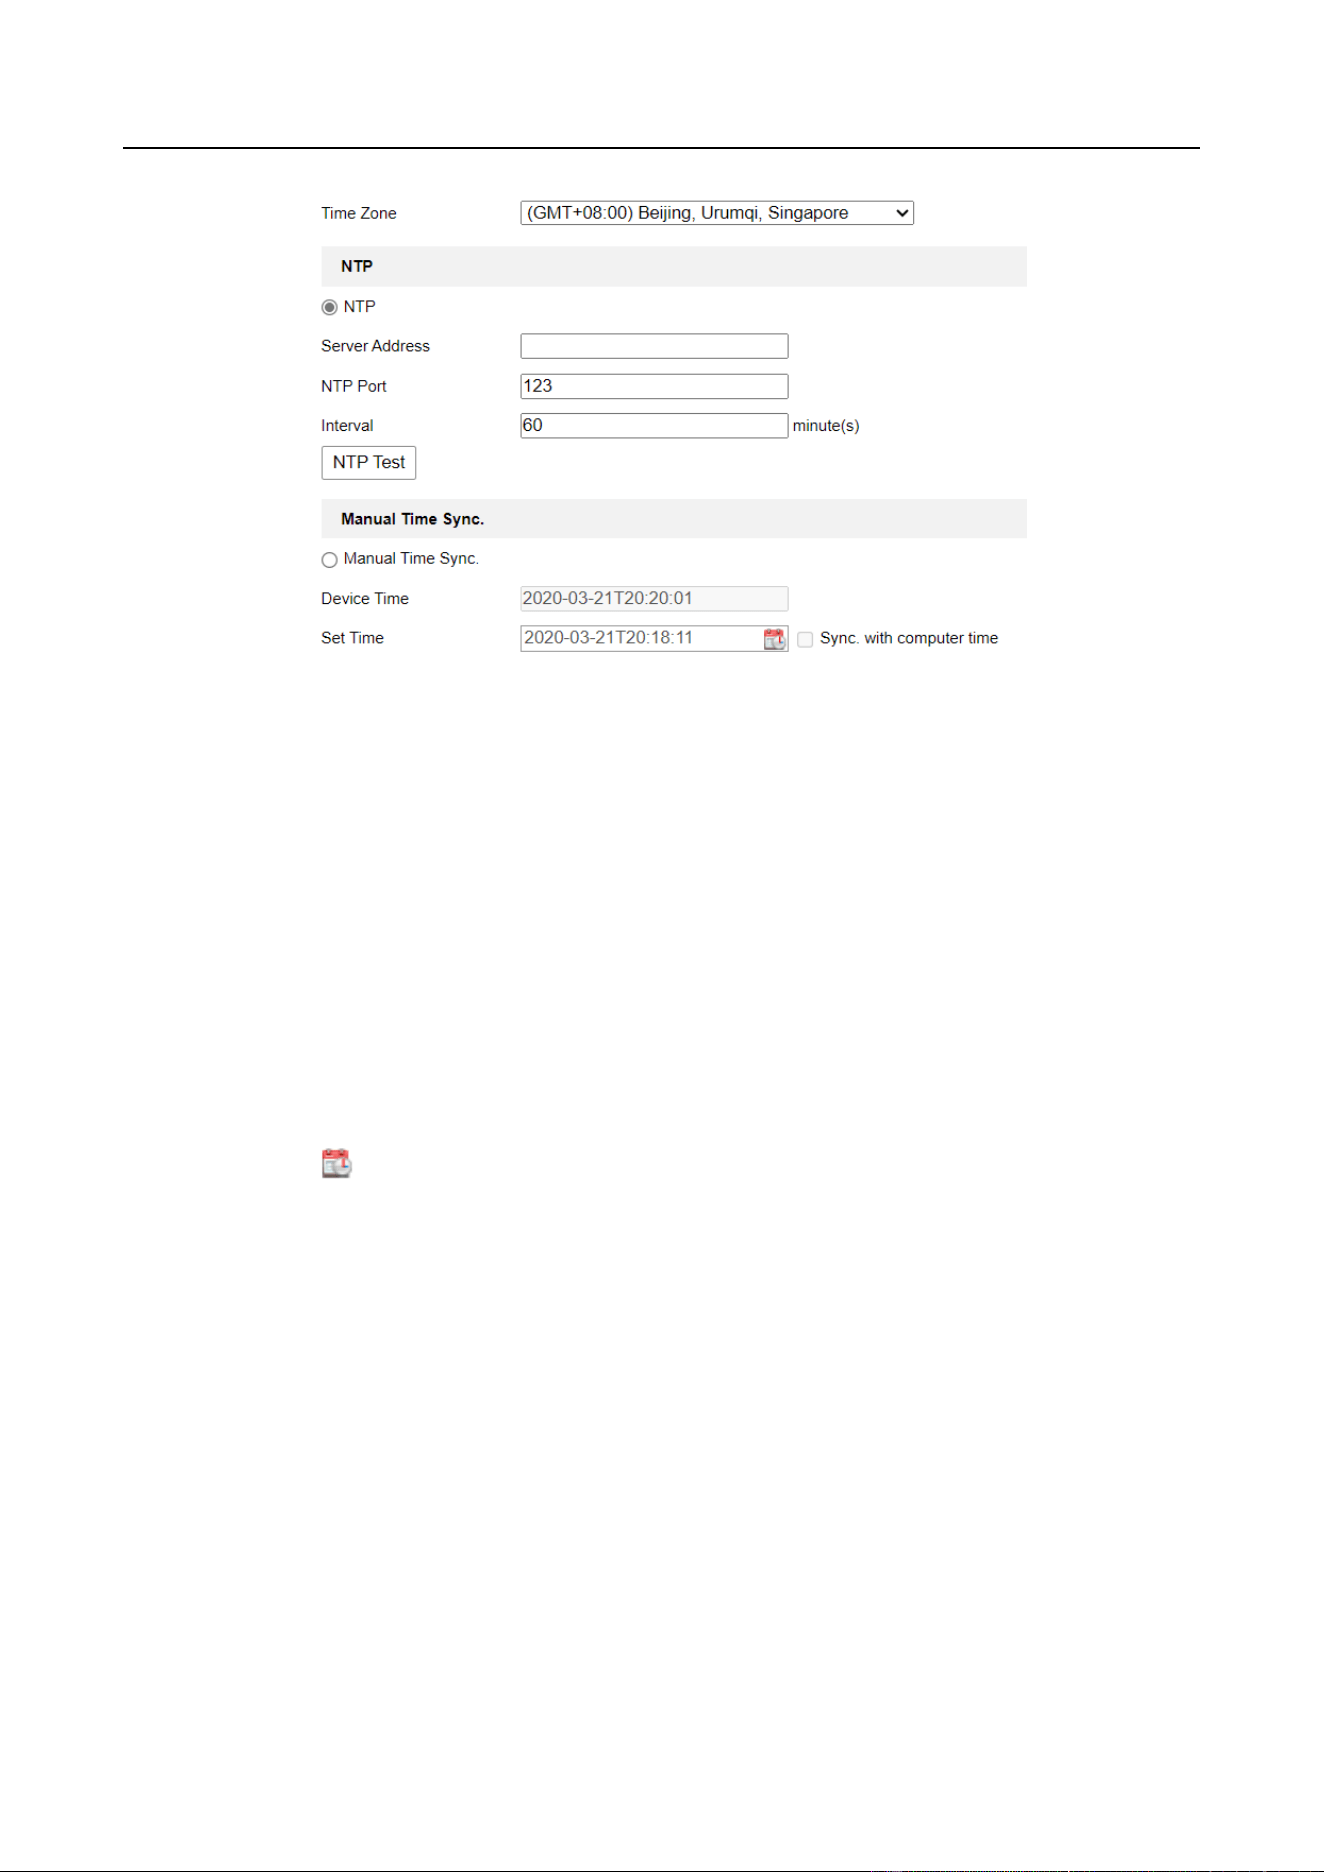
7.2 Configure Time
Step 1 Go to Configuration > System > System Settings > Time Settings.
Entrance/Exit Ticket Station User Manual
27
Figure 7-2 Time Settings
Step 2 Select Time Zone.
Step 3 Synchronize time.
NTP: After enabling NTP, the NTP server will synchronize the station time at regular
intervals.
1) Select NTP.
2) Enter Server Address, NTP Port, and Interval.
Manual Time Sync.: After enabling Manual Time Synchronization, the station time can be
synchronized with the set time or the computer time.
1) Select Manual Time Sync.
2) Click to set the time.
3) (Optional) Check Sync. with computer time to synchronize the station time with the
computer time.
Step 4 Click Save to save the settings.
7.3 Configure DST
If the region where the device is located adopts Daylight Saving Time (DST), you can set this
function.
Step 1 Go to Configuration > System Settings > DST.
Step 2 Check Enable DST.
Step 3 Set Start Time, End Time, and DST Bias.

Entrance/Exit Ticket Station User Manual
28
Step 4 Click Save.
7.4 Configure RS-232
Set RS-232 parameters if you need to debug the device via RS-232 serial port, or peripheral devices
have been connected.
Before You Start
The corresponding device has been connected via the RS-232 serial port.
Steps
Step 1 Go to Configuration > System Settings > RS232.
Figure 7-3 Set RS-232
Step 2 Set Baud Rate, Data Bit, Stop Bit, etc.
The parameters should be same with those of the connected device.
Step 3 Click Save.
7.5 Reboot
You can reboot the station.
Step 1 Go to Configuration > System > Maintenance > Upgrade & Maintenance > Reboot.
Figure 7-4 Reboot
Step 2 Click Reboot.
Step 3 Click OK on the popup window to reboot the station.
Entrance/Exit Ticket Station User Manual
29
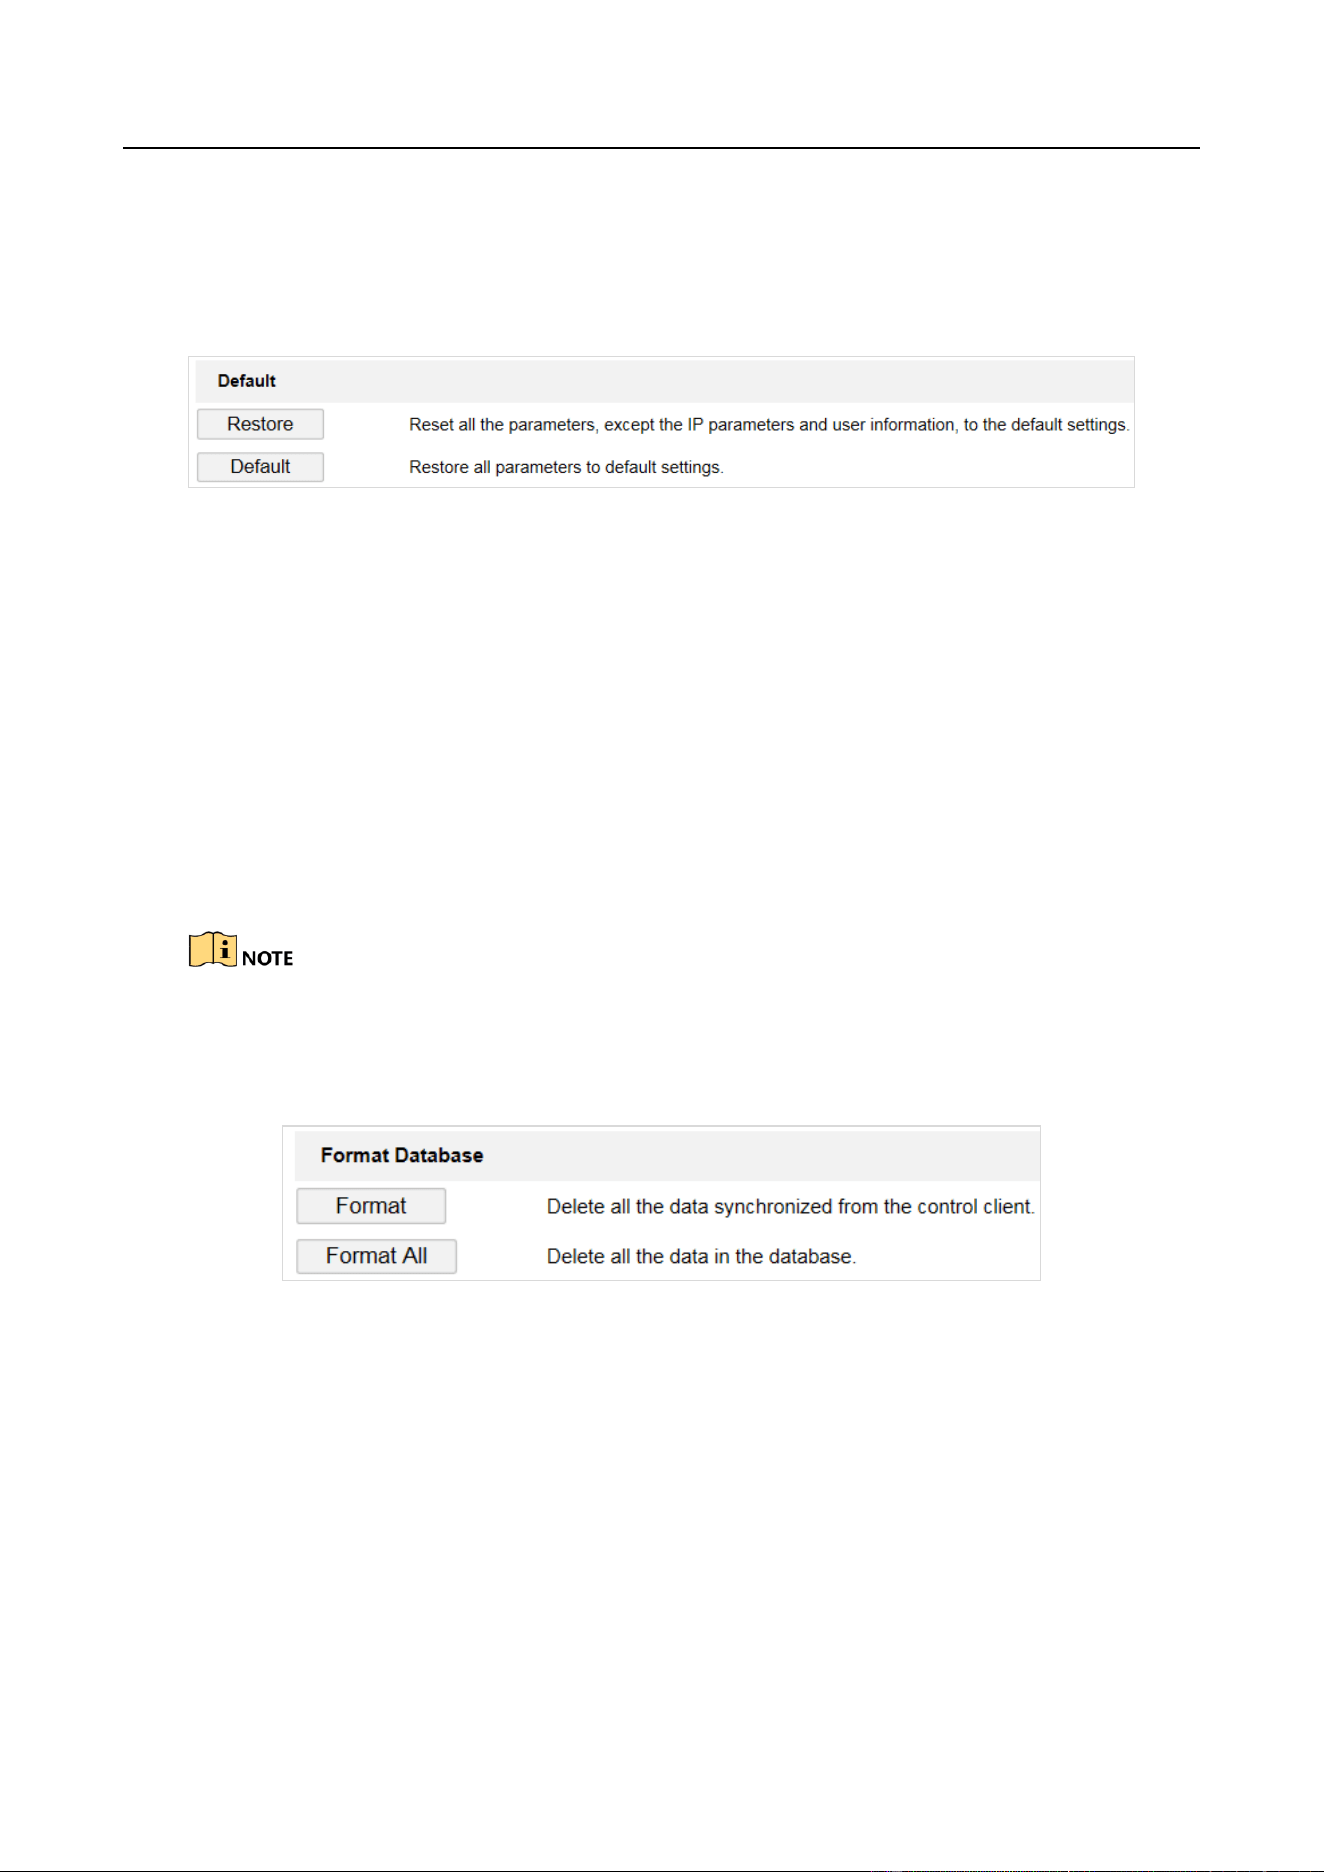
7.6 Restore Default Settings
You can restore the station to default settings if there are parameters errors.
Step 1 Go to Configuration > System > Maintenance > Upgrade & Maintenance > Default.
Figure 7-5 Restore Default Settings
Step 2 Select restoration mode.
Click Restore to reset parameters, except the IP parameters and user information, to the
default settings.
Click Default to restore all parameters to default settings.
Step 3 Click OK on the popup window.
7.7 Format Database
If you need to clear data in the memory card, format the database.
Formatting will clear data. Back up data first.
Step 1 Go to Configuration > System > Maintenance > Upgrade & Maintenance > Format
Database.
Figure 7-6 Format Database
Step 2 Select the formatting mode.
Click Format to clear the captured pictures and cards data.
Click Format All to clear all the data in the memory card.
Step 3 Click OK on the popup window.
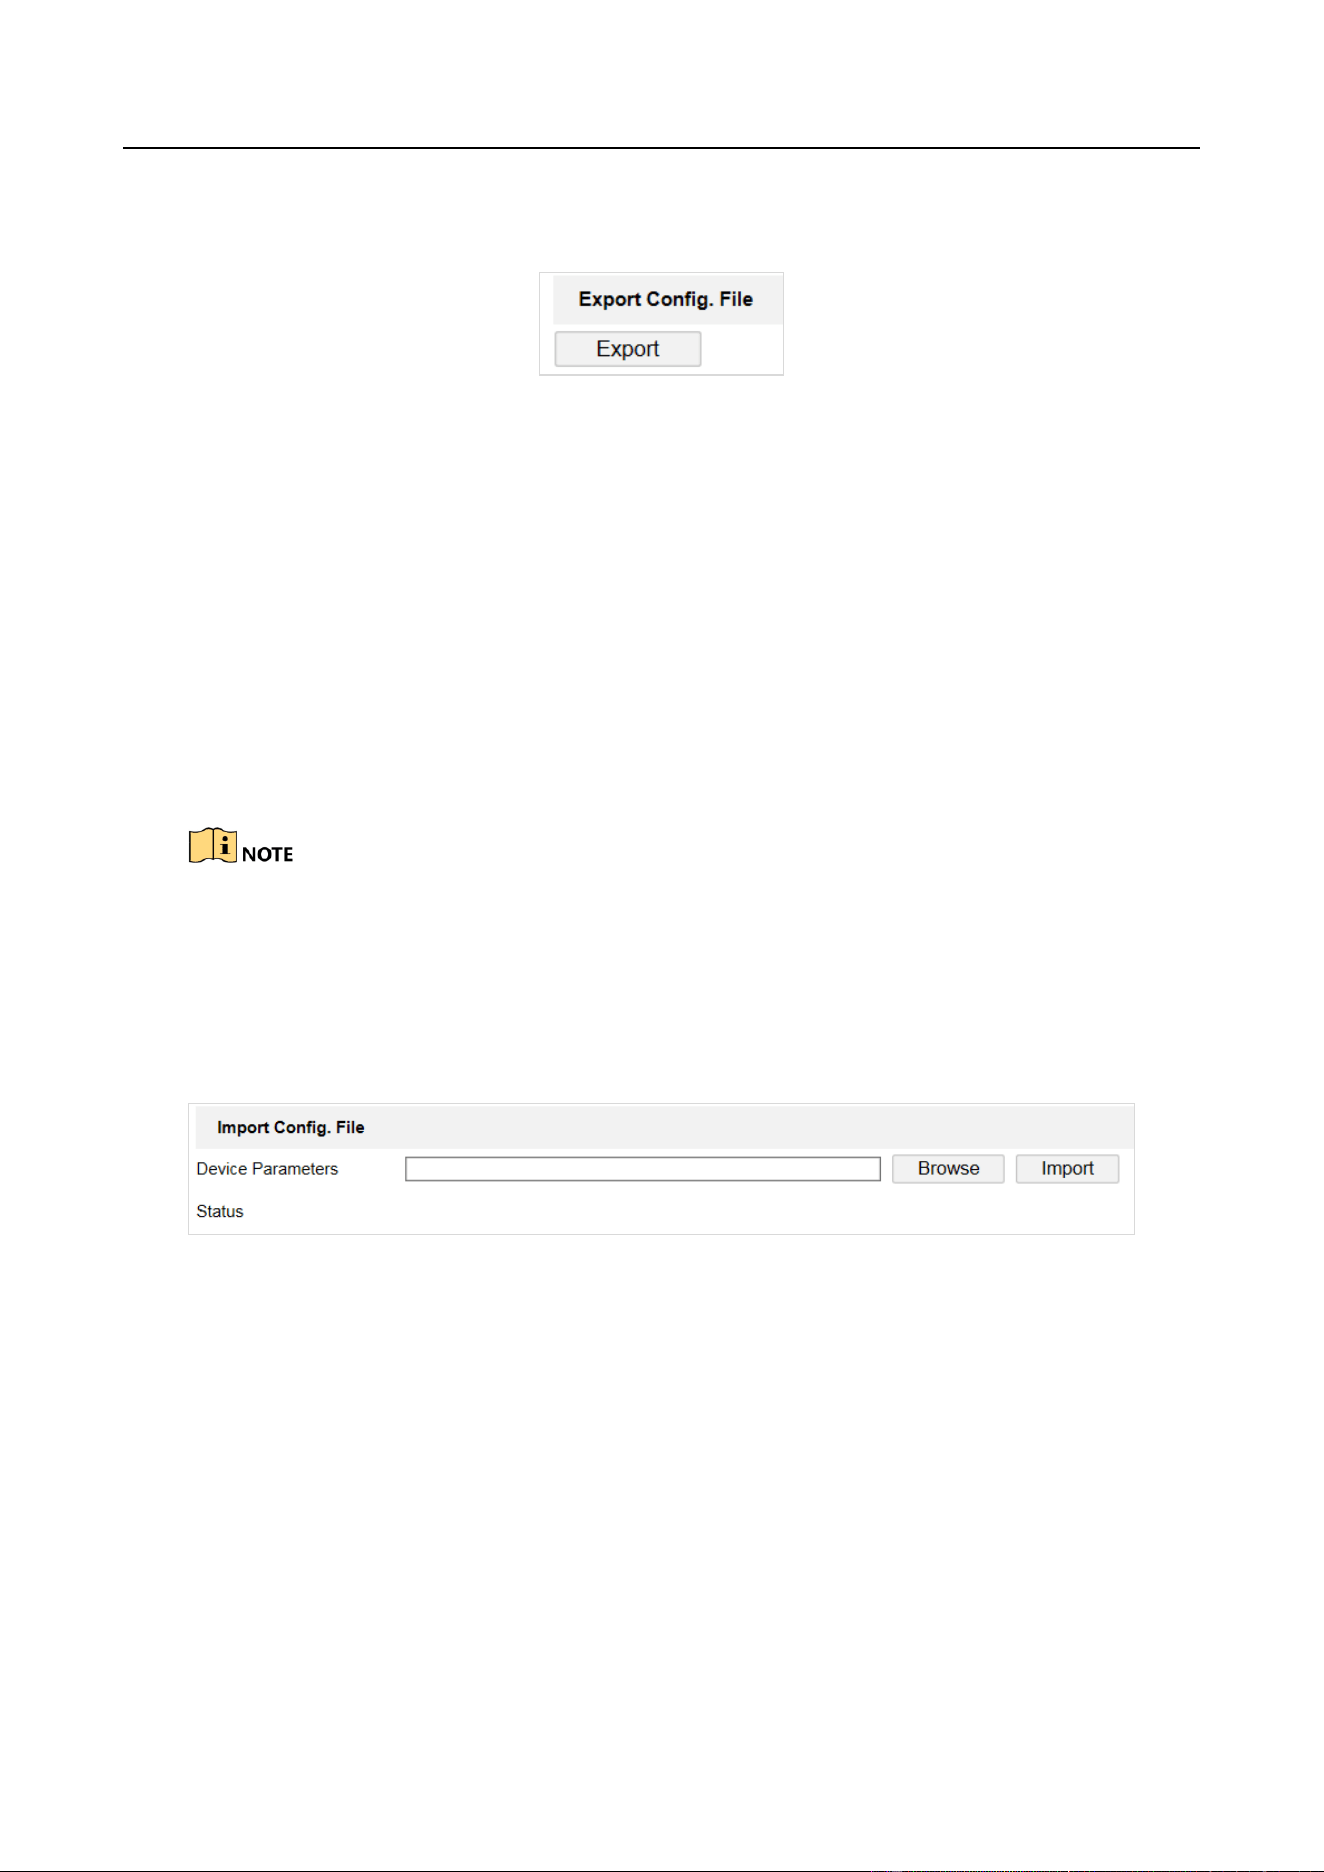
7.8 Export Configuration File
You can export the configuration file of the station.
Entrance/Exit Ticket Station User Manual
30
Step 1 Go to Configuration > System > Maintenance > Upgrade & Maintenance > Export Config.
File.
Figure 7-7 Export Configuration File
Step 2 Click Export.
Step 3 Enter the password on the popup window.
Step 4 Select the saving path and edit the file name.
Step 5 Click Save to export the configuration file to the computer.
7.9 Import Configuration File
If you want to set the same parameters for stations, you can import the configuration file of one
station to another station.
The parameters can only be imported among the stations of the same model or the same version.
Before you start
The configuration file has been exported.
Step 1 Go to Configuration > System > Maintenance > Upgrade & Maintenance > Import Config.
File.
Figure 7-8 Import Configuration File
Step 2 Click Browse to select the configuration file from the computer.
Step 3 Click Import to import the selected configuration file to the station.
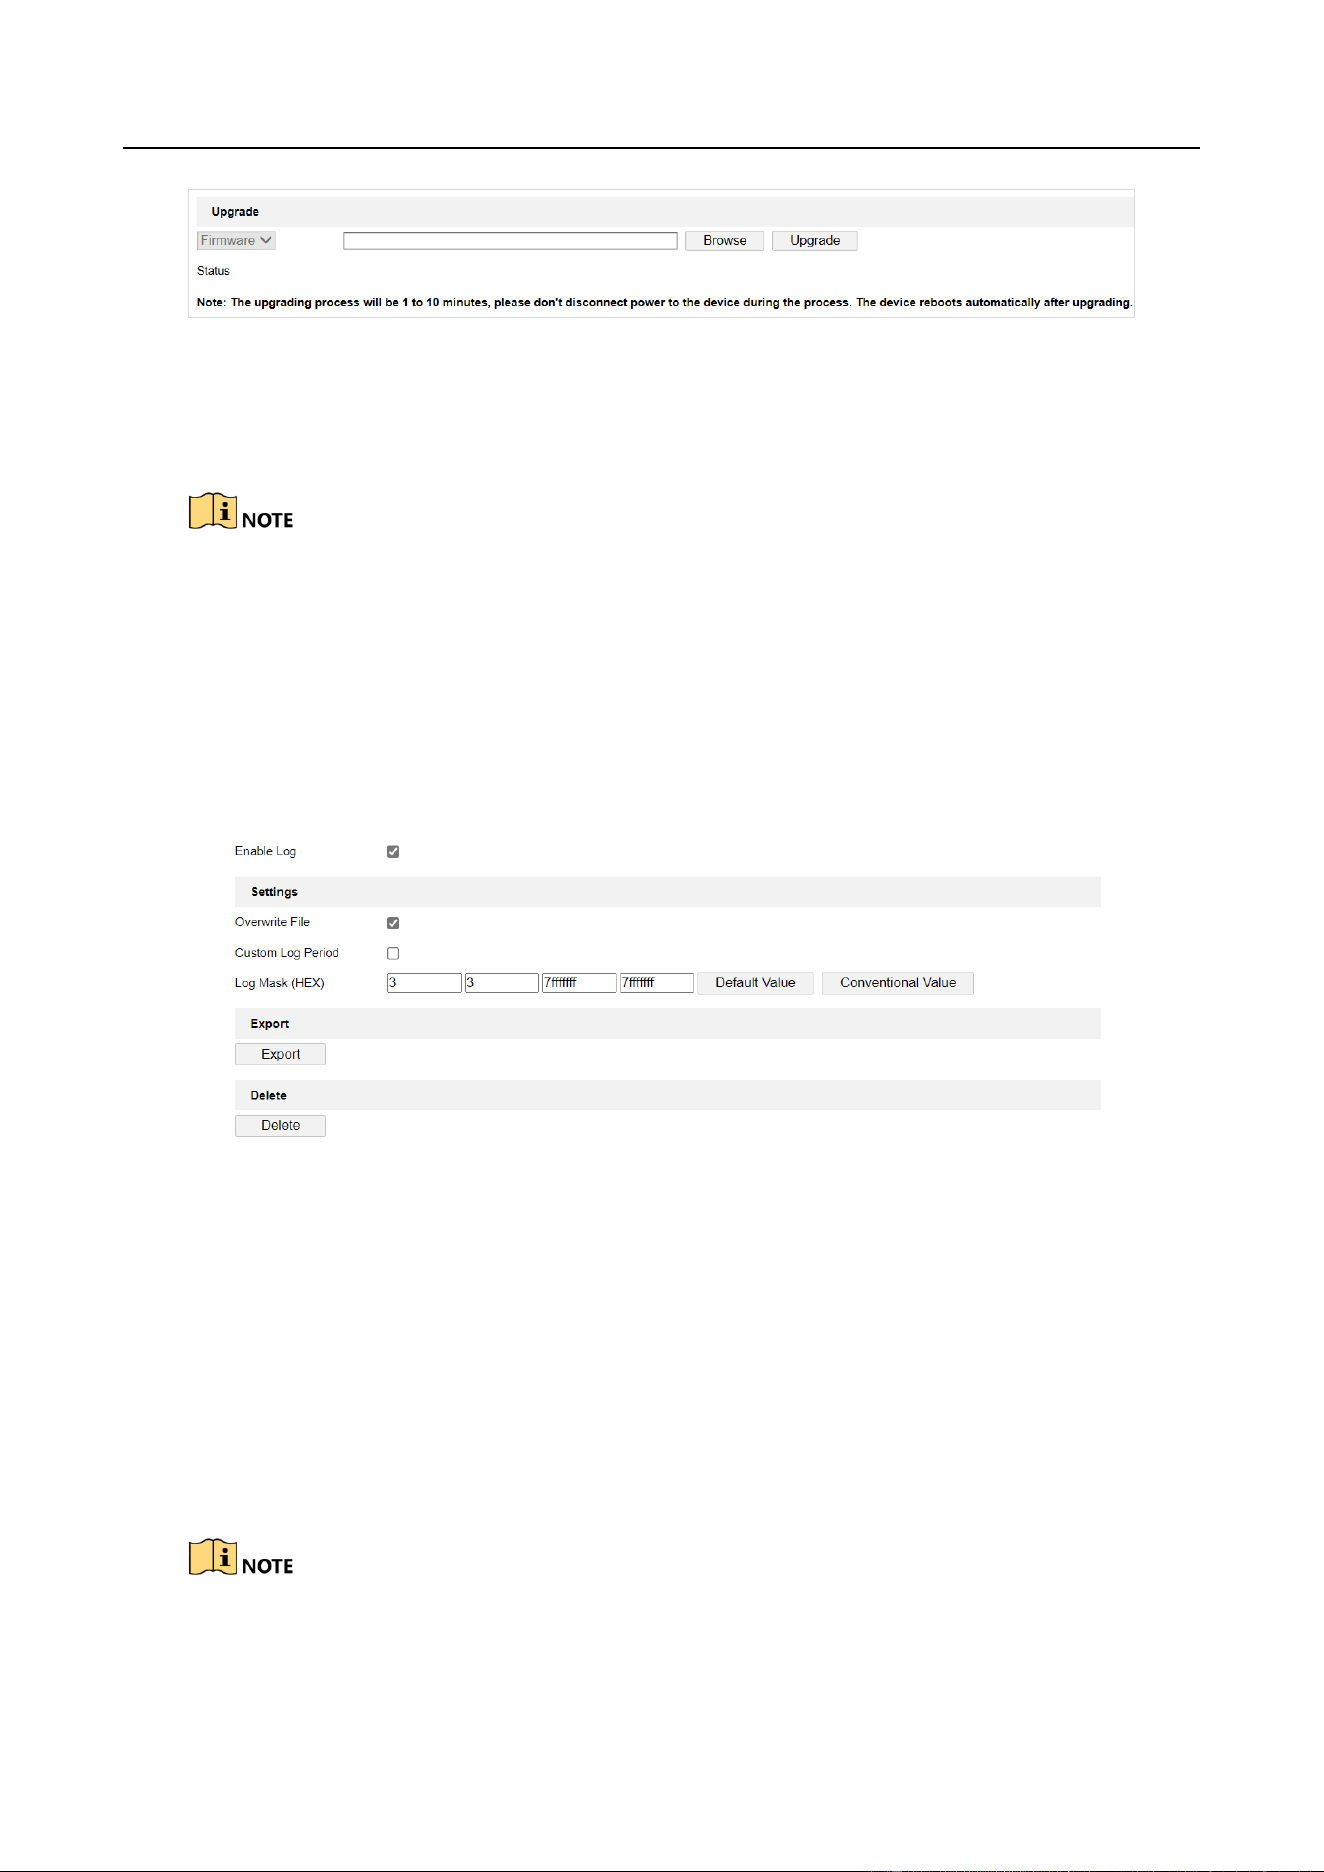
7.10 Upgrade
You can upgrade the station.
Step 1 Go to Configuration > System > Maintenance > Upgrade & Maintenance > Upgrade.
Entrance/Exit Ticket Station User Manual
31
Figure 7-9 Upgrade
Step 2 Click Browse to select the upgrade file from the computer.
Step 3 Click Upgrade to upgrade the firmware.
The station will reboot automatically after upgrading. DO NOT disconnect power to the station
during the process.
7.11 Configure and Export Log
You can configure log parameters, export log, and delete log.
Step 1 Go to Configuration > Entrance and Exit > Log > Log Configuration.
Figure 7-10 Log Configuration
Step 2 Check Enable Log.
Step 3 Configure log parameters.
Overwrite File: Check it, and the former log will be overwritten when the log storage is
full.
Custom Log Period: Check it if you want to record log during custom time period.
Configure the time period.
Log Mask (HEX): If you want to configure the log type, enter the log mask of the log type.
Contact the technical supports of our company to get the log mask.

Entrance/Exit Ticket Station User Manual
32
Step 4 Click Export and select the directory to save the log file.
Step 5 (Optional) Click Delete to delete the log file.
Back up the data before deleting the log file.
Step 6 Click Save to save the settings.

Entrance/Exit Ticket Station User Manual
33
UD35722B
