
Dock Staon
User Manual

Legal Informaon
©2023 Hangzhou Hikvision Digital Technology Co., Ltd. All rights reserved.
About this Manual
The Manual includes instrucons for using and managing the Product. Pictures, charts, images and
all other informaon hereinaer are for descripon and explanaon only. The informaon
contained in the Manual is subject to change, without noce, due to rmware updates or other
reasons. Please nd the latest version of this Manual at the Hikvision website ( hps://
www.hikvision.com/ ).
Please use this Manual with the guidance and assistance of professionals trained in
supporng the
Product.
Trademarks
and other Hikvision's trademarks and logos are the properes of
Hikvision in various jurisdicons.
Other trademarks and logos menoned are the properes of their respecve owners.
Disclaimer
TO THE MAXIMUM EXTENT PERMITTED BY APPLICABLE LAW, THIS MANUAL AND THE PRODUCT
DESCRIBED, WITH ITS HARDWARE, SOFTWARE AND FIRMWARE, ARE PROVIDED "AS IS" AND "WITH
ALL FAULTS AND ERRORS". HIKVISION MAKES NO WARRANTIES, EXPRESS OR IMPLIED, INCLUDING
WITHOUT LIMITATION, MERCHANTABILITY, SATISFACTORY QUALITY, OR FITNESS FOR A PARTICULAR
PURPOSE. THE USE OF THE PRODUCT BY YOU IS AT YOUR OWN RISK. IN NO EVENT WILL HIKVISION
BE LIABLE TO YOU FOR ANY SPECIAL, CONSEQUENTIAL, INCIDENTAL, OR INDIRECT DAMAGES,
INCLUDING, AMONG OTHERS, DAMAGES FOR LOSS OF BUSINESS PROFITS, BUSINESS
INTERRUPTION, OR LOSS OF DATA, CORRUPTION OF SYSTEMS, OR LOSS OF DOCUMENTATION,
WHETHER BASED ON BREACH OF CONTRACT, TORT (INCLUDING NEGLIGENCE), PRODUCT LIABILITY,
OR OTHERWISE, IN CONNECTION WITH THE USE OF THE PRODUCT, EVEN IF HIKVISION HAS BEEN
ADVISED OF THE POSSIBILITY OF SUCH DAMAGES OR LOSS.
YOU ACKNOWLEDGE THAT THE NATURE OF THE INTERNET PROVIDES FOR INHERENT SECURITY
RISKS, AND HIKVISION SHALL NOT TAKE ANY RESPONSIBILITIES FOR ABNORMAL OPERATION,
PRIVACY LEAKAGE OR OTHER DAMAGES RESULTING FROM CYBER-ATTACK, HACKER ATTACK, VIRUS
INFECTION, OR OTHER INTERNET SECURITY RISKS; HOWEVER, HIKVISION WILL PROVIDE TIMELY
TECHNICAL SUPPORT IF REQUIRED.
YOU AGREE TO USE THIS PRODUCT IN COMPLIANCE WITH ALL APPLICABLE LAWS, AND YOU ARE
SOLELY RESPONSIBLE FOR ENSURING THAT YOUR USE CONFORMS TO THE APPLICABLE LAW.
ESPECIALLY, YOU ARE RESPONSIBLE, FOR USING THIS PRODUCT IN A MANNER THAT DOES NOT
INFRINGE ON THE RIGHTS OF THIRD PARTIES, INCLUDING WITHOUT LIMITATION, RIGHTS OF
PUBLICITY, INTELLECTUAL PROPERTY RIGHTS, OR DATA PROTECTION AND OTHER PRIVACY RIGHTS.
YOU SHALL NOT USE THIS PRODUCT FOR ANY PROHIBITED END-USES, INCLUDING THE
Dock Staon User Manual
i

DEVELOPMENT OR PRODUCTION OF WEAPONS OF MASS DESTRUCTION, THE DEVELOPMENT OR
PRODUCTION OF CHEMICAL OR BIOLOGICAL WEAPONS, ANY ACTIVITIES IN THE CONTEXT RELATED
TO ANY NUCLEAR EXPLOSIVE OR UNSAFE NUCLEAR FUEL-CYCLE, OR IN SUPPORT OF HUMAN
RIGHTS ABUSES.
IN THE EVENT OF ANY CONFLICTS BETWEEN THIS MANUAL AND THE APPLICABLE LAW, THE LATTER
PREVAILS.
Dock Staon User Manual
ii

Symbol Convenons
The symbols that may be found in this document are dened as follows.
Symbol Descripon
Danger
Indicates a hazardous situaon which, if not avoided, will or could
result in death or serious injury.
Cauon
Indicates a potenally hazardous situaon which, if not avoided, could
result in equipment damage, data loss, performance degradaon, or
unexpected results.
Note
Provides addional informaon to emphasize or supplement
important points of the main text.
Dock Staon User Manual
iii

Contents
Chapter 1 Introducon ............................................................................................................... 1
1.1 Producon Introducon ......................................................................................................... 1
1.2 Key Feature ............................................................................................................................ 1
Chapter 2 Acvaon and Login ................................................................................................... 2
2.1 Acvaon ............................................................................................................................... 2
2.1.1 Default Informaon ...................................................................................................... 2
2.1.2 Acvate via SADP .......................................................................................................... 2
2.1.3 Acvate via Web Browser ............................................................................................. 3
2.2 Login ...................................................................................................................................... 4
Chapter 3 Basic
Operaon .......................................................................................................... 5
3.1 Homepage .............................................................................................................................. 5
3.2 Access Device ......................................................................................................................... 5
3.3 Collect Data ............................................................................................................................ 6
3.4 Manage Data .......................................................................................................................... 6
3.4.1 Search Data ................................................................................................................... 6
3.4.2 Play Back and Edit Data ................................................................................................. 6
3.4.3 Lock Data ....................................................................................................................... 7
3.4.4 Upload Data .................................................................................................................. 8
3.4.5 Back up Data ................................................................................................................. 8
3.5 Manage Storage ..................................................................................................................... 9
3.5.1 Manage Disk ................................................................................................................. 9
3.5.2 Clean Data
Automacally .............................................................................................. 9
3.5.3 Set Cloud Storage .......................................................................................................... 9
3.5.4 Access Storage Server ................................................................................................. 10
3.5.5 Set Data Storage
Duraon ........................................................................................... 11
Chapter 4 Network ................................................................................................................... 12
Dock Staon User Manual
iv

4.1 Set IP Address ...................................................................................................................... 12
4.2 Access Plaorm .................................................................................................................... 13
4.3 Set Port ................................................................................................................................ 13
Chapter 5 Safety Management ................................................................................................. 14
5.1 Manage User ........................................................................................................................ 14
5.2 Edit Password ....................................................................................................................... 15
5.3 Enable HTTPS ....................................................................................................................... 15
5.4 Set Data
Encrypon ............................................................................................................. 15
5.5 SSH ....................................................................................................................................... 16
Chapter 6 Maintenance ............................................................................................................ 17
6.1 View Device Informaon ...................................................................................................... 17
6.2 Synchronize Time ................................................................................................................. 17
6.3 Set DST ................................................................................................................................. 17
6.4 Set Local Mode .................................................................................................................... 17
6.5 Search Log ............................................................................................................................ 18
6.6 Upgrade ............................................................................................................................... 18
6.6.1 Upgrade via
Plaorm .................................................................................................. 18
6.6.2 Upgrade System .......................................................................................................... 18
6.7 Reboot ................................................................................................................................. 19
6.8 Restore Parameters .............................................................................................................. 19
6.9 Export Parameters ............................................................................................................... 19
6.10 Import Parameters ............................................................................................................. 20
6.11 Format Database ................................................................................................................ 20
6.12 Set File Format ................................................................................................................... 20
6.13 Connect to Third-Party Body Camera ................................................................................ 21
Appendix A.
Communicaon Matrix and Device Command ...................................................... 22
Dock Staon User Manual
v

Chapter 1 Introducon
1.1 Producon Introducon
Dock staon is designed for collecng data from body cameras. It provides you a simplied way to
access and back up data.
1.2 Key Feature
●
Small in size, easy to place.
●
Supports web operaons.
●
Supports collecng data from mulple body cameras.
●
Supports charging, uploading data, and cleaning the storage space
automacally.
●
Prevents data loss via ANR (Automac Network Replenishment).
●
Adopts cyclic covering: Files will be covered
automacally according to the storage meline
when there is no enough space.
●
Supports reading me, date, product No., etc. of the body camera automacally.
●
Supports searching les by mulple methods.
●
Supports playing videos, audios, and images.
●
Supports log management.
Dock Staon User Manual
1
Chapter 2 Acvaon and Login
2.1 Acvaon
For the rst-me access, you need to acvate the device by seng an admin password. No
operaon is allowed before acvaon. The device supports mulple acvaon methods, such as
acvaon via local menu, SADP soware, web browser, and client soware.
Note
Refer to the user manual of client soware for the acvaon via client soware.
2.1.1 Default Informaon
Device default IP address and user name are as follows.
●
Default IP address: 192.168.1.64
●
Default user name: admin
2.1.2
Acvate via SADP
SADP is a tool to detect, acvate, and modify the IP address of the devices over the LAN.
Before You Start
●
Get the SADP soware from the supplied disk or the ocial website hp://
www.hikvision.com/ , and install it according to the prompts.
●
The device and the computer that runs the SADP tool should belong to the same network
segment.
The following steps show how to
acvate one device and modify its IP address. For batch acvaon
and IP address modicaon, refer to User Manual of SADP for details.
Steps
1.
Run the SADP soware and search the online devices.
2.
Find and select your device in online device list.
3.
Enter a new password (admin password) and
conrm the password.
Cauon
STRONG PASSWORD RECOMMENDED-We highly recommend you create a strong password of
your own choosing (using a minimum of 8 characters, including upper case leers, lower case
leers, numbers, and special characters) in order to increase the security of your product. And
we recommend you reset your password regularly, especially in the high security system,
reseng the password monthly or weekly can beer protect your product.
4.
Click Acvate to start acvaon.
Dock Staon User Manual
2
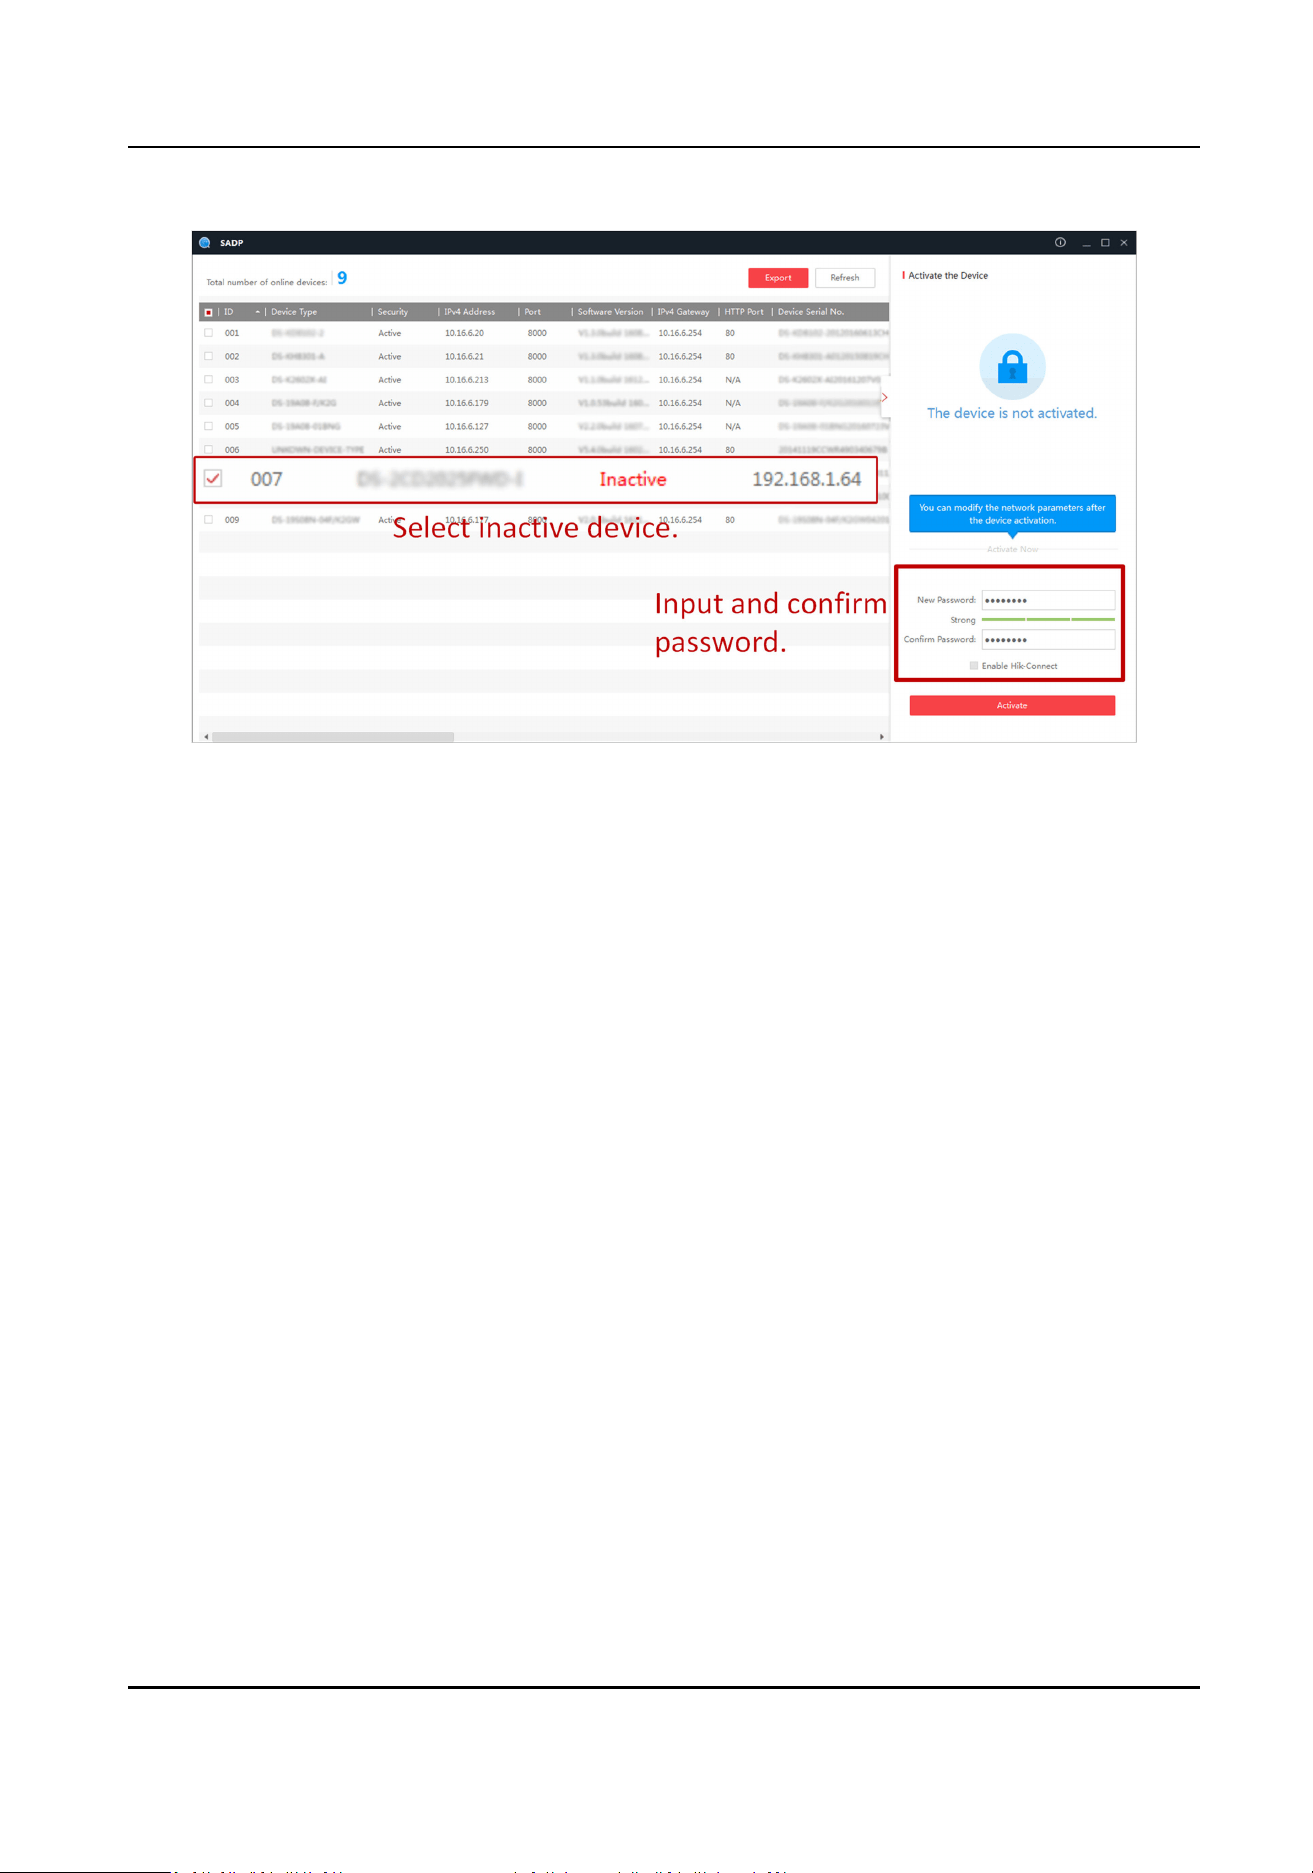
Figure 2-1 Acvate via SADP
Status of the device becomes Acve aer successful acvaon.
5.
Modify IP address of the device.
1) Select the device.
2) Change the device IP address to the same network segment as your computer by either
modifying the IP address manually or checking Enable DHCP.
3) Enter the admin password and click Modify to
acvate your IP address modicaon.
2.1.3
Acvate via Web Browser
Use web browser to acvate the device. For the device with the DHCP enabled by default, use
SADP
soware or client soware to acvate the device.
Before You Start
Ensure the device and the computer connect to the same LAN.
Steps
1.
Change the IP address of your computer to the same network segment as the device.
2.
Open the web browser, and enter the default IP address of the device to enter the acvaon
interface.
3.
Create and conrm the admin password.
Dock Staon User Manual
3

Cauon
STRONG PASSWORD RECOMMENDED-We highly recommend you create a strong password of
your own choosing (using a minimum of 8 characters, including upper case leers, lower case
leers, numbers, and special characters) in order to increase the security of your product. And
we recommend you reset your password regularly, especially in the high security system,
reseng the password monthly or weekly can beer protect your product.
4.
Click OK to complete acvaon.
5.
Go to the network sengs interface to modify IP address of the device.
2.2 Login
You can log in to the device via web browser for further operaons such as live view and local
conguraon.
Before You Start
Connect the device to the network directly, or via a switch or a router.
Steps
1.
Open the web browser, and enter the IP address of the device to enter the login interface.
2.
Enter User Name and Password.
3.
Click Login.
4.
Download and install appropriate plug-in for your web browser. Follow the
installaon prompts
to install the plug-in.
5.
Reopen the web browser
aer the installaon of the plug-in and repeat steps 1 to 3 to login.
6.
Oponal: Click Logout on the upper right corner of the interface to log out of the device.
Dock Staon User Manual
4
Chapter 3 Basic Operaon
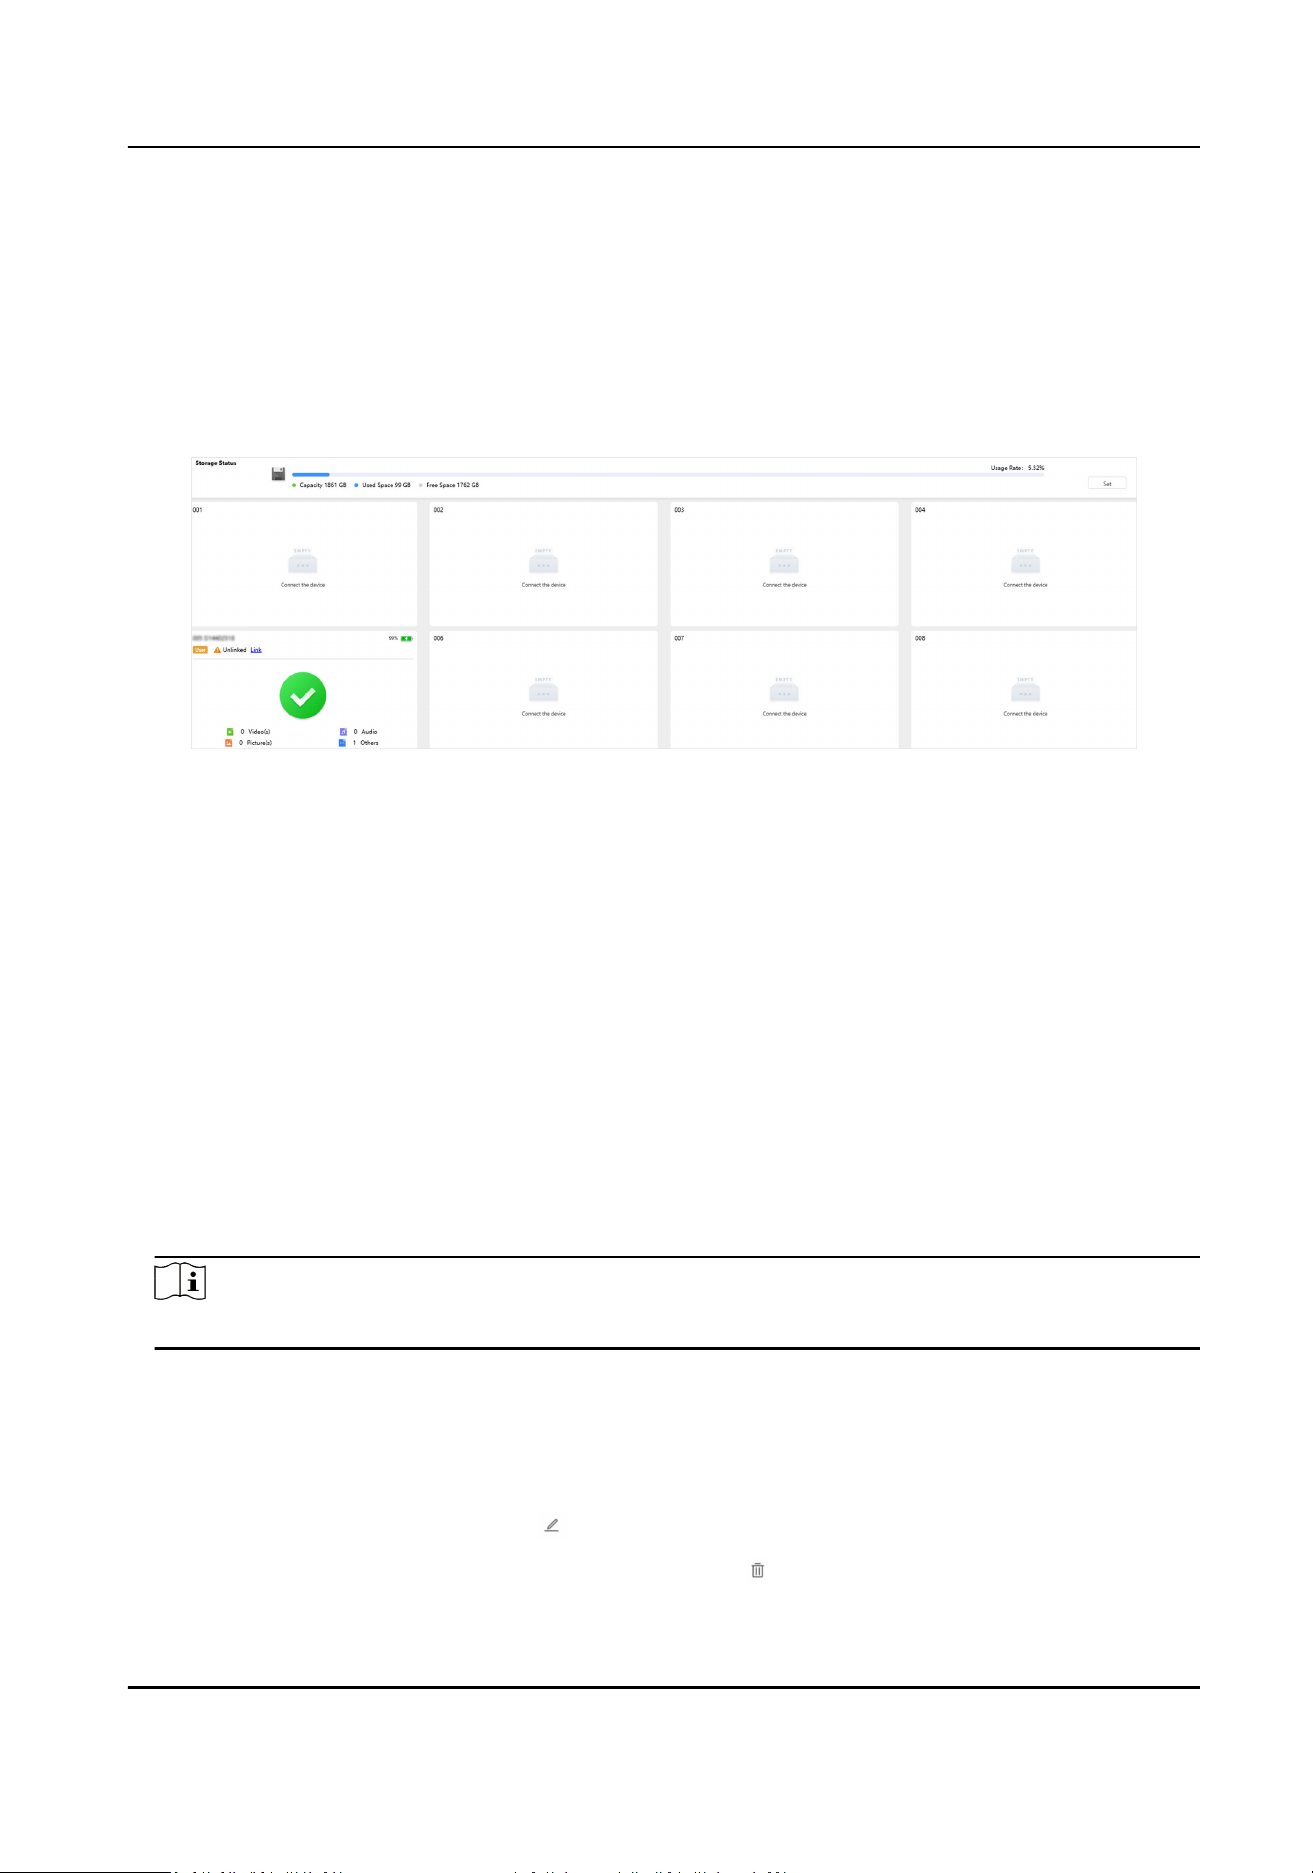
3.1 Homepage
Check the collecon and storage status of body cameras in the homepage.
Figure 3-1 Homepage
3.2 Access Device
Add a body camera and start collecng.
Before You Start
●
Connect a body camera to the dock staon.
●
Go to System → System Maintenance → Local Mode to enable Local Mode.
●
Add a user according to "User Management" if you need to link to a user.
Steps
1.
Click Device Management.
2.
Click Add Device.
3.
Enter Device Name and Device No.
Note
The device No. should be the same with that of the body camera.
4.
Oponal: Select a person.
5.
Click OK.
6.
Oponal: You can also do the following operaons.
Search Device
Enter condions and click Search.
Edit Device Informaon Click to edit device informaon.
Delete Device Select a device and click .
Dock Staon User Manual
5

Import/Export Device
Informaon
If you want to reuse the device informaon, you can click Export
to export device informaon to the local storage and import it to
a new device.
3.3 Collect Data
The dock staon starts to collect data aer a body camera is connected.
If the body camera is unassociated to the person, you can click Link to associate.
During the data collecon, enable Prior Collecon and the le collecon of other body camera(s)
will stop
unl the priority collecon nishes. During the prior collecon process, you can disable
Prior Collecon.
3.4 Manage Data
3.4.1 Search Data
You can search collected data.
Steps
1.
Click File Management.
2.
Enter or select condions.
3.
Click Search.
Result
The searched data will be displayed.
3.4.2 Play Back and Edit Data
You can play back and edit data.
Steps
1.
Click File Management.
2.
Enter condions and click Search.
3.
Click the
le thumbnail to play.
Dock Staon User Manual
6
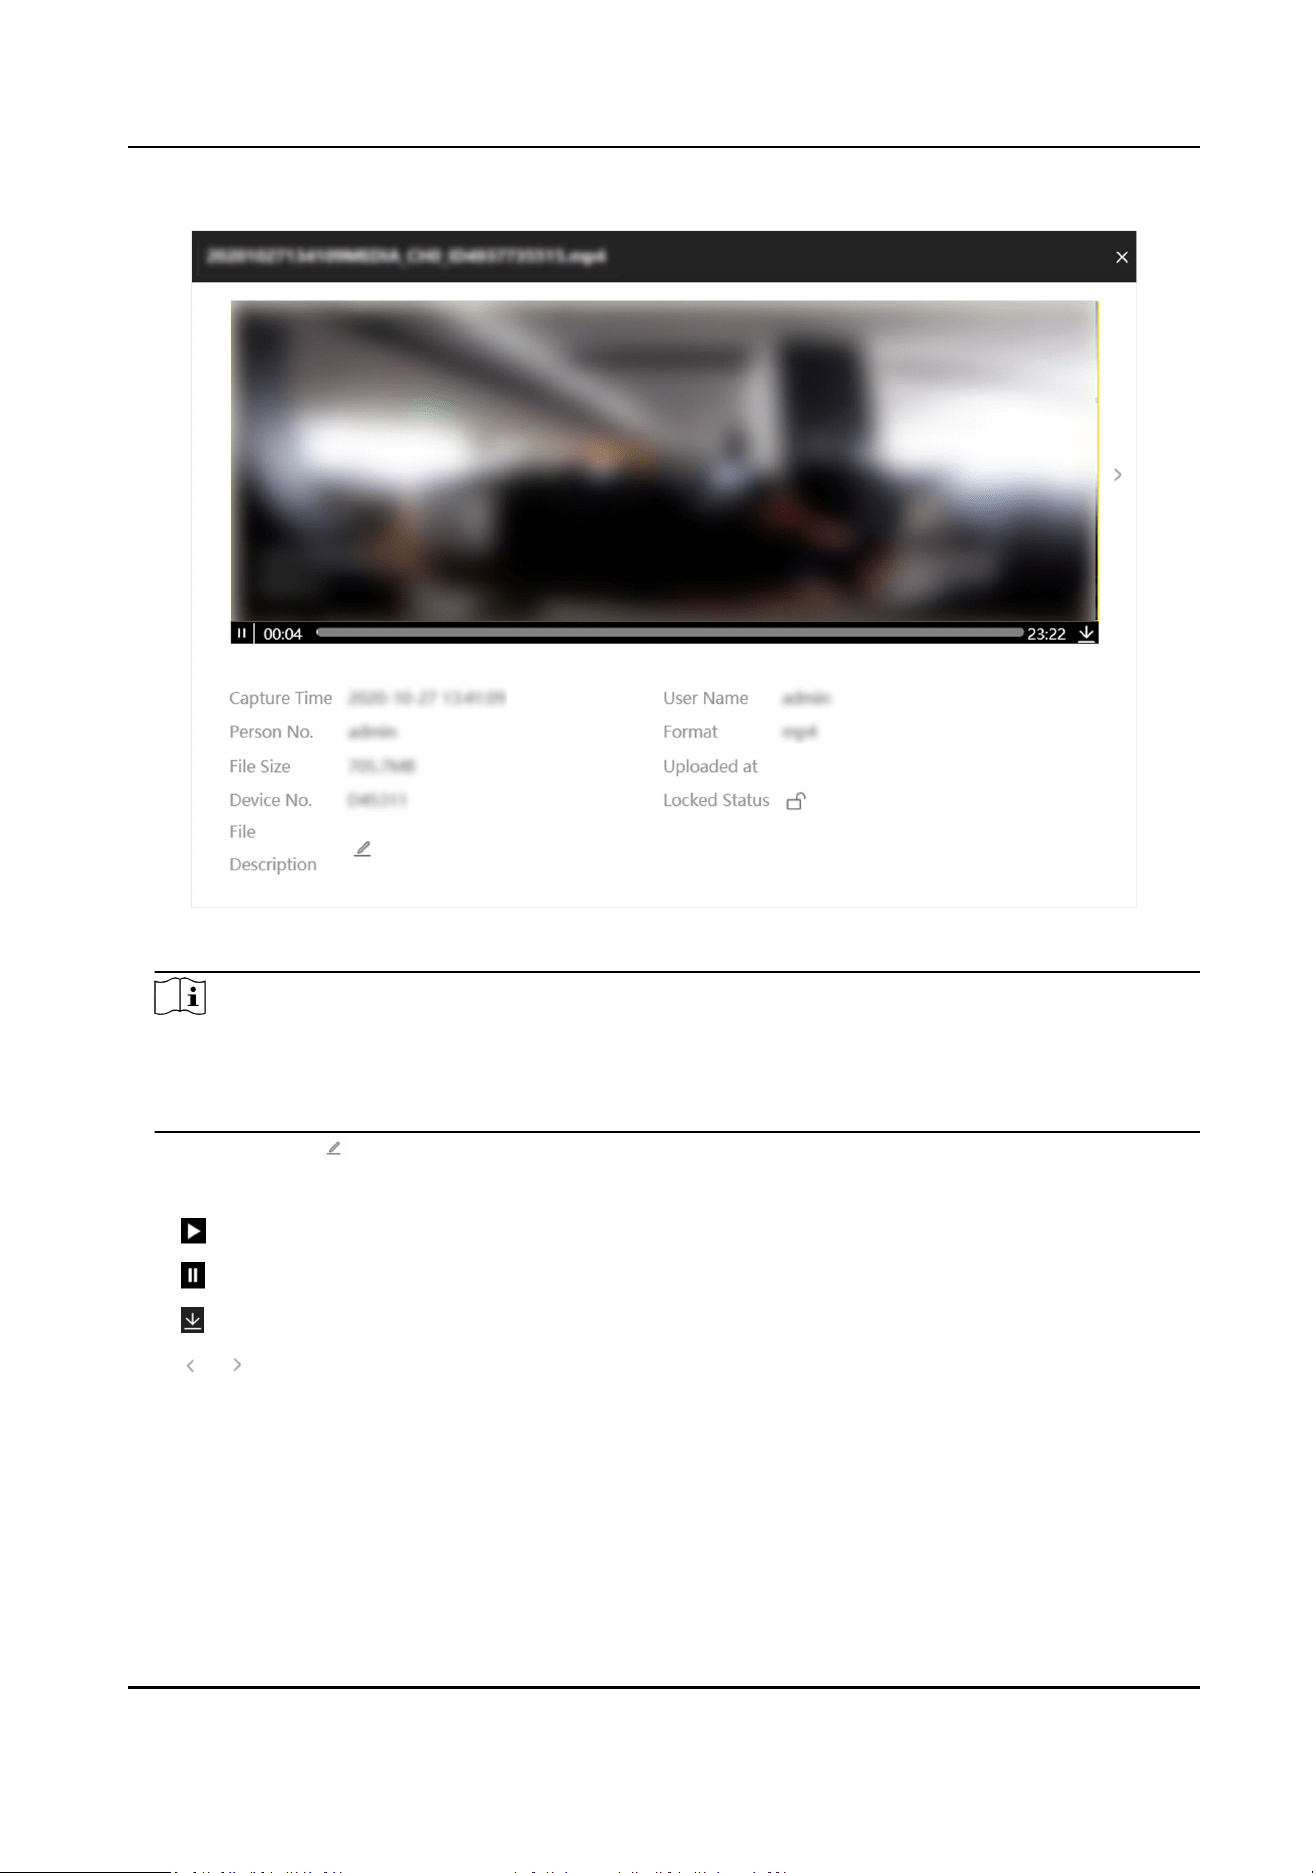
Figure 3-2 Playback
Note
●
If it is a picture le, when you place the cursor on the le side, the area will be magnied on
the right side.
●
Playback interfaces may vary with le types.
4.
Oponal: Click to add descripons to the played le and click OK.
5.
Oponal: You can also do the following operaons.
Start playing.
Stop playing.
Download the le to the local storage on the playback page.
/ View the previous/next le.
3.4.3 Lock Data
Lock important data to prevent them from being overwrien or accidentally deleted.
Steps
1.
Click File Management.
Dock Staon User Manual
7
2.
Enter condions and click Search.
3.
You can lock or unlock data.
-
Click in the row to lock a single record. Click to unlock.
-
Check several records and click Lock to lock them in batch. Click Unlock to unlock.
Result
The locked data cannot be deleted or
overwrien.
3.4.4 Upload Data
The device can upload data to the plaorm aer connected to it.
Before You Start
The device has been connected to the
plaorm.
Steps
1.
Click File Management.
2.
Enter
condions and click Search.
3.
Check les that need to be uploaded.
-
Click
in the row to upload a single record.
-
Check several records and click Upload to upload them in batch.
-
Click Upload All to upload all the records.
4.
Click Upload.
Note
If you enable the backup and set a storage server type in Storage Sengs → Storage
Management , data will be synchronized to the set server.
3.4.5 Back up Data
You can back up data by downloading it to the local storage.
Steps
1.
Click File Management.
2.
Enter
condions and click Search.
3.
Download data.
Download a single
record
a. Click in the row to lock a single record.
b. Select Download to Computer, Download to USB Flash Drive or
Download to FTP.
c. Click OK.
Dock Staon User Manual
8
Download records
in batch
a. Check several records and click Download.
b. Select Download to Computer, Download to USB Flash Drive or
Download to FTP.
c. Click OK.
3.5 Manage Storage
3.5.1 Manage Disk
You can view the disk capacity and status, or format the disk.
Steps
1.
Go to Storage Sengs → Disk .
2.
View the disk capacity, free space, status, etc.
3.
Oponal: Format the disk.
1) Check the disk(s) to be formaed.
2) Click Format.
3) Click OK.
3.5.2 Clean Data
Automacally
The device can delete data automacally when there is no enough space.
Steps
1.
Go to Storage Sengs → Storage Management → Storage Parameters Sengs .
2.
Enable Clear Body Camera Data.
3.
Set Disk Min. Free Space and Cleaned Space Once.
Cauon
Back up or lock important data in me in case of data loss. The device will delete the earliest
data when there is no enough space.
Example
If you set Disk Min. Free Space to 10 and Cleaned Space Once to 5, the device will clean 5 G
automacally when the space is less than 10 G.
4.
Click Save.
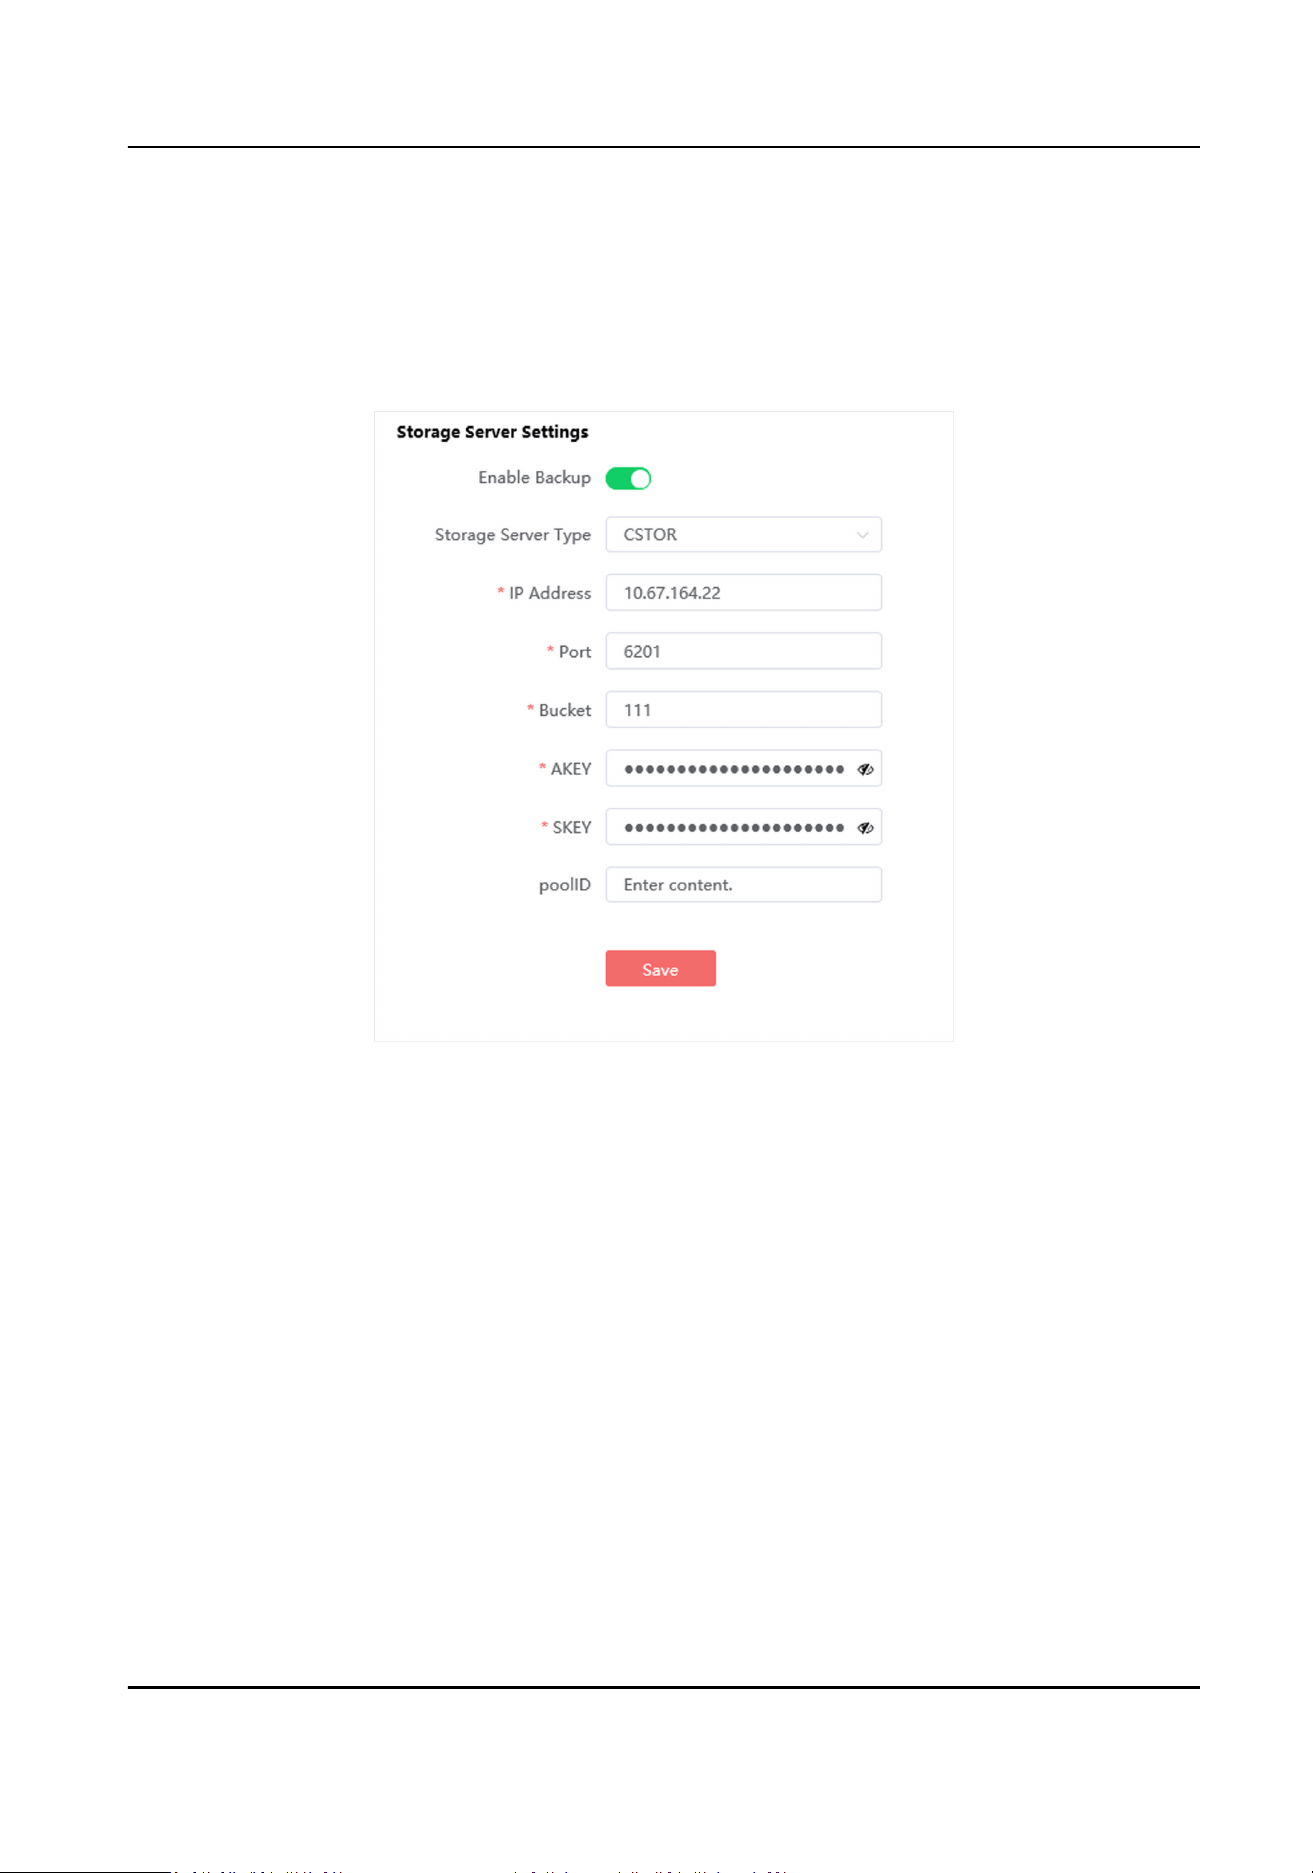
3.5.3 Set Cloud Storage
Cloud storage is a kind of network storage. It can be used as the extended storage to save the
collected data.
Dock Staon User Manual
9
Before You Start
●
Arrange the cloud storage server.
●
The communicaon between the device and server is normal.
Steps
1.
Go to Storage
Sengs → Storage Management → Storage Server Sengs .
Figure 3-3 Set Cloud Storage
2.
Enable backup.
3.
Set Storage Server Type as CSTOR.
4.
Set other parameters according to the actual needs.
5.
Click Save.
3.5.4 Access Storage Server
Storage server can be used as an extended storage to store data of body cameras.
Before You Start
●
Arrange the cloud storage server.
●
The
communicaon between the device and server is normal.
Steps
1.
Go to Storage Sengs → Storage Management → Storage Server Sengs .
Dock Staon User Manual
10

2.
Enable backup.
3.
Set Storage Server Type as CVR.
4.
Enter IP Address, Port, etc.
5.
Click Save.
3.5.5 Set Data Storage Duraon
You can set the data storage duraon of the device.
Steps
1.
Go to Storage Sengs → Storage Management → Storage Duraon Sengs .
2.
Enable the storage
duraon.
3.
Select Storage Duraon Type.
4.
Click Save.
What to do next
Data that exceeds the storage
duraon will be deleted automacally.
Dock Staon User Manual
11
Chapter 4 Network
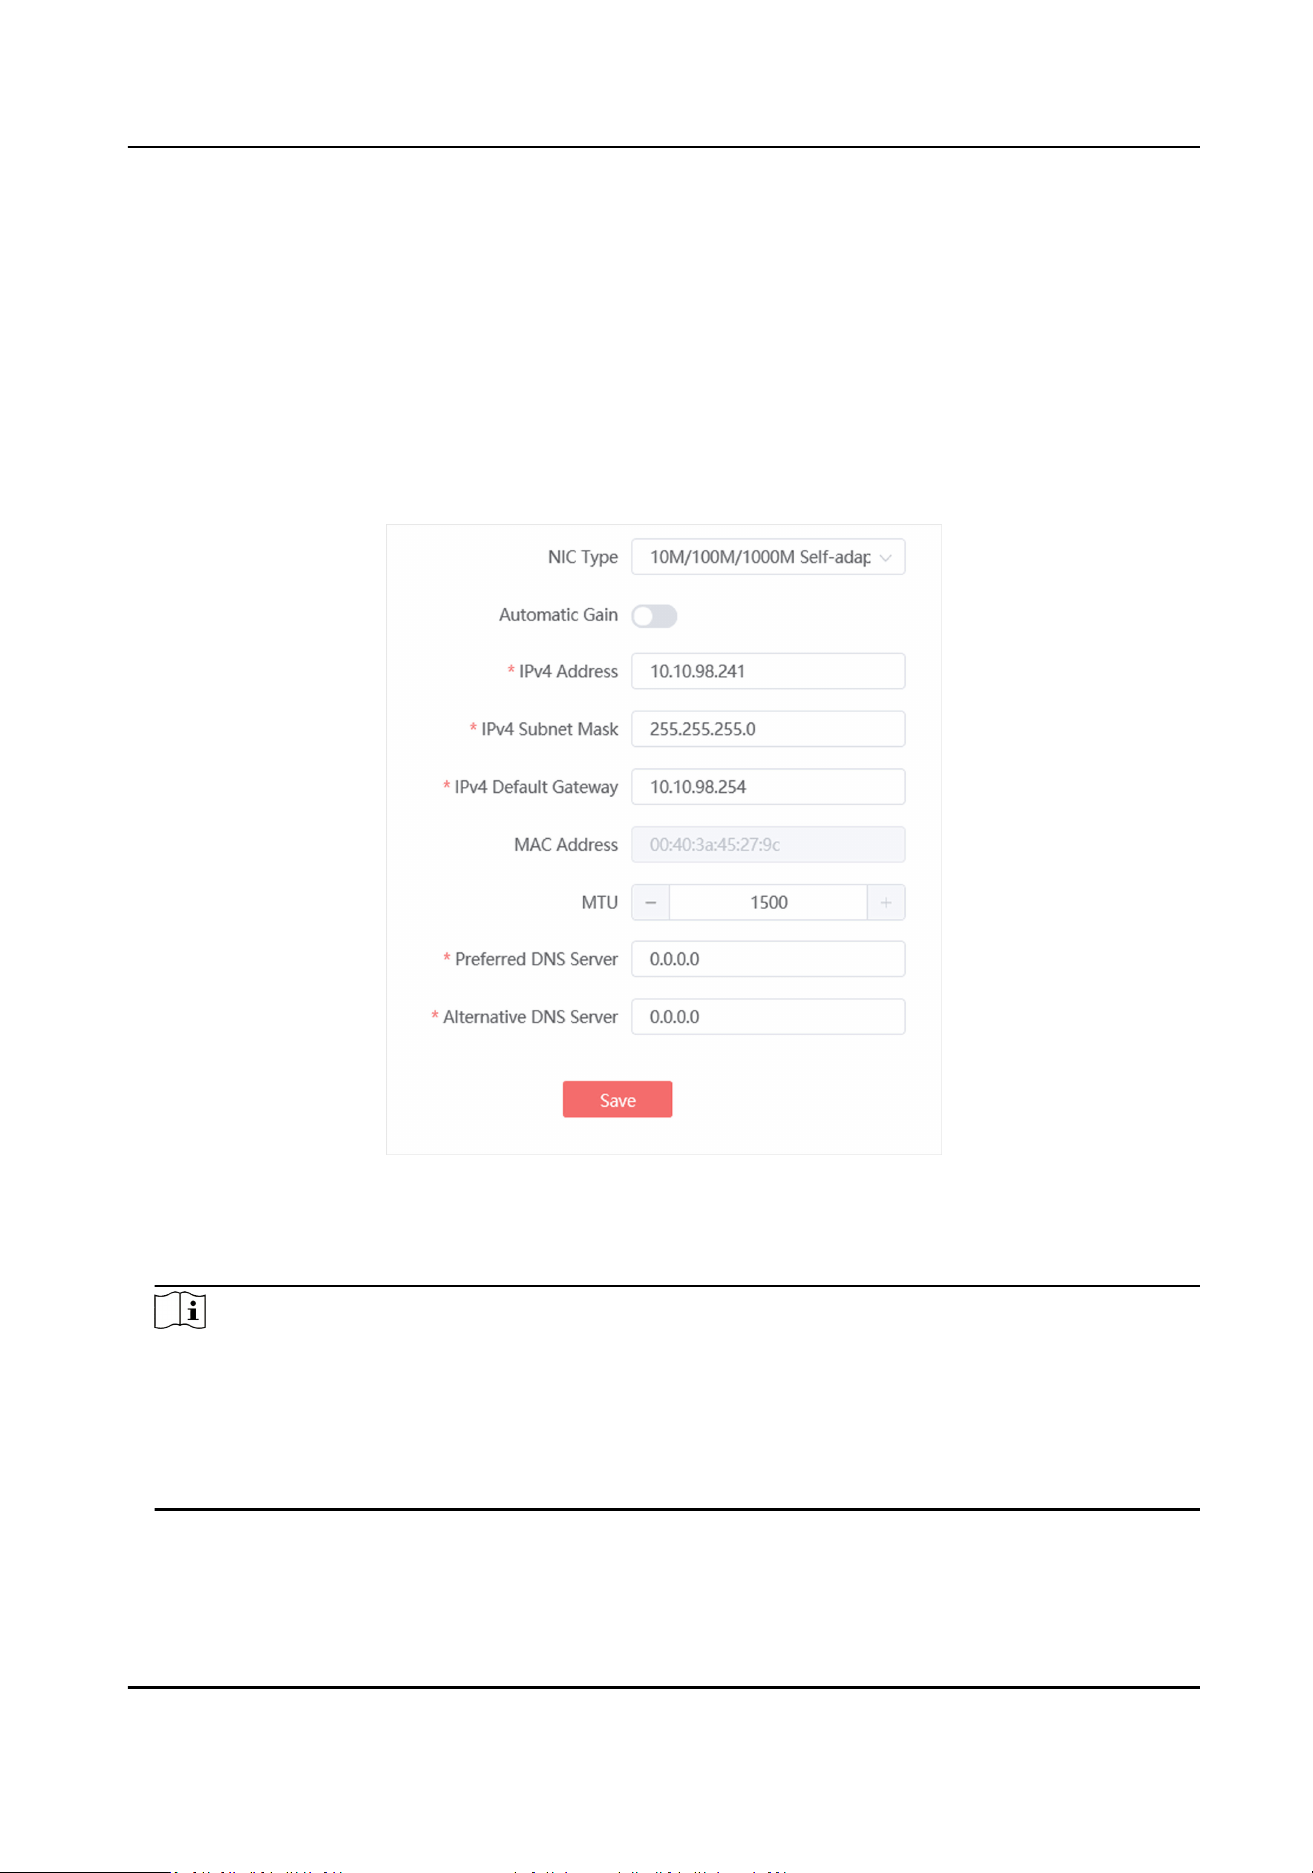
4.1 Set IP Address
You can set an IP address if you need to operate the device over network.
Steps
1.
Go to Network Sengs → TCP/IP .
Figure 4-1 Set IP Address
2.
Select NIC Type.
3.
Set other parameters according to the actual needs.
Note
●
Enable Automac Gain to get the IP address, subnet mask, and default gateway automacally
if the network supports distribung the IP address automacally.
●
MTU: It stands for maximum transmission unit. It is the size of the largest protocol data unit
that can be communicated in a single network layer
transacon.
●
Preferred DNS Sever and
Alternave DNS Server are reserved.
4.
Click Save.
Dock Staon User Manual
12
4.2 Access Plaorm
Access the plaorm to upload data or receive informaon.
Before You Start
●
Arrange the cloud storage server.
●
The
communicaon between the device and server is normal.
Steps
1.
Go to Network
Sengs → Plaorm Sengs .
2.
Enter IP Address, Port, Person Name, and Password.
3.
Oponal: Enable the uploading plan and set Start Time and End Time to upload data in a xed
me period.
Note
If this funcon is disabled, data will be uploaded to the plaorm in real me.
4.
Click Save.
Result
View the plaorm connecon status on the top right corner of the interface. You can upload data if
the plaorm is connected. Check the plaorm informaon and communicaon if connecon
failed.
4.3 Set Port
The device port can be modied when the device cannot access the network due to port conicts.
Steps
1.
Go to System → System
Sengs → Port .
2.
View or edit the port.
HTTP Port
It refers to the port through which the browser accesses the device. For example, when the
HTTP Port is
modied to 81, you need to enter hp://192.168.1.64:81 in the browser for
login.
HTTPS Port
It refers to the port through which the browser accesses the device, but
cercate
vericaon is needed.
3.
Click Save.
Dock Staon User Manual
13

Chapter 5 Safety Management
5.1 Manage User
In order to enhance data security, it is recommended to dierenate users to manage data and
avoid mulple users to manage devices by the same account.
Before You Start
Go to System → System Maintenance → Local Mode to enable Local Mode.
Steps
1.
Click Person Management.
2.
Add a user.
Note
Go to System → System Maintenance → Local Mode to enable Local Mode, then you can add a
user.
1) Click Add User.
2) Enter the user
informaon, such as User No., Password, etc.
3) Set the user's permissions.
File Search Permission
This permission is enabled by default. If you disable the permission, the person cannot
manage the
les collected from the associated body camera.
Super Admin Permission
If you enable this permission, the person can view and manage all the les collected from
all the connected body cameras, no
maer which body camera is associated with him or
her. If you disable this permission, the person can only view and manage the les collected
from the body cameras associated with him or her.
4) Click OK.
5) Link the user to the device in the device management interface.
You can search the linked data
aer logging in with the added person No. and password.
3.
Enter condions and click Search to get user informaon.
4.
Oponal: When you need to set the same user informaon to another dock staon, you can
export or import the user informaon.
Export
Click Export, and select a path to save the le.
Import a. Click Import.
b. Download the import template, edit it, and save it in the computer.
c. Click Select File, and select the user informaon template saving in the computer.
d. Click Import.
5.
Oponal: You can do the following operaons.
Dock Staon User Manual
14

Edit user informaon Click to edit the user informaon.
Delete user
informaon
●
Click to delete the user informaon.
●
Check several user informaon and click Delete to delete them in
batch.
5.2 Edit Password
You are recommended to change the device password regularly to enhance data security.
Steps
1.
Go to admin → Change Password .
2.
Enter Old Password.
3.
Enter New Password and
conrm it.
4.
Click OK.
Result
Next me you log in to the device, use the new password.
5.3 Enable HTTPS
If the demand for external access security is high, you can enable HTTPS protocol to ensure the
data transmission security.
Steps
1.
Go to System → System
Sengs → HTTPS .
2.
Check Enable HTTPS.
5.4 Set Data
Encrypon
Set data encrypon to encrypt the uploaded data from the body cameras to enhance security.
Steps
1.
Go to System → System Sengs → Encrypon .
2.
Enable Status.
3.
Select
Encrypon Type.
4.
Enter Encrypon Key.
5.
Click Save.
Result
Use the dedicated player and enter the key to play the encrypted videos.
Dock Staon User Manual
15

5.5 SSH
To raise network security, disable SSH service. The conguraon is only used to debug the device
for the professionals.
Steps
1.
Go to System → System Maintenance → Enable SSH service .
2.
Set the SSH service.
3.
Click OK.
Dock Staon User Manual
16

Chapter 6 Maintenance
6.1 View Device Informaon
Go to System → System Sengs → Device Informaon to edit the device name or view the device
informaon such as dock staon No., serial No., system version, etc.
6.2 Synchronize Time
Synchronize the device me when it is inconsistent with the actual me.
Steps
1.
Go to System → System
Sengs → Set Time .
2.
Select Time Zone.
-
Select Set Time to synchronize
me manually.
-
Enable Synchronize with computer me to synchronize the device me with that of the
computer automacally.
3.
Set the device me.
-
Select Manual Time Sync to synchronize the device me with that of the computer. Set me
manually, or enable Sync. with computer me.
-
Select NTP Time Sync to synchronize the device
me with that of the NTP sever. Set Server
Address, NTP Port, and Time Sync Interval. Click NTP Test to test if the
connecon between
the device and the server is normal.
4.
Click Save.
6.3 Set DST
If the region where the device is located adopts Daylight Saving Time (DST), you can set this
funcon.
Steps
1.
Go to System → System Sengs → DST .
2.
Enable DST.
3.
Set Start Time, End Time, and Time Bias.
4.
Click Save.
6.4 Set Local Mode
You can enable local mode to add devices and users.
Dock Staon User Manual
17

Steps
1.
Go to System → System Maintenance → Local Mode .
2.
Enable Local Mode.
6.5 Search Log
You can view historical records by searching logs.
Steps
1.
Go to System → Log Search .
2.
Set
condions.
3.
Click Search.
Logs will be displayed.
4.
Oponal: Click Export to save logs to your computer.
6.6 Upgrade
6.6.1 Upgrade via Plaorm
You can upgrade the device program sent by the plaorm.
Before You Start
Connect the device to the
plaorm.
Steps
1.
Go to System → System
Sengs → Upgrade .
2.
Select Staon Host.
3.
Select Work Mode as
Acquision Mode.
4.
Click Upgrade.
5.
Enter the password and click OK.
6.
Oponal: Select Work Mode as Upgrade Mode to upgrade the body camera(s).
6.6.2 Upgrade System
Upgrade the system when you need to update the device version.
Before You Start
Save the upgrade le to the computer.
Steps
1.
Go to System → System Maintenance → Device Upgrade .
2.
Click Select File and select an upgrade le.
Dock Staon User Manual
18

3.
Click Upgrade.
Note
●
The dock staon will stop collecng during upgrade.
●
Do not cut o the power supply. The body cameras will reboot automacally aer upgrade.
6.7 Reboot
When the device needs to be rebooted, reboot it via the web page instead of cung o the power
directly.
Steps
1.
Go to System → System Maintenance → Reboot .
2.
Click Reboot.
3.
Click OK.
6.8 Restore Parameters
When the device is abnormal caused by the incorrect set parameters, you can restore the
parameters.
Steps
1.
Go to System → System Maintenance → Restore Default
Sengs .
2.
Select the restoraon mode.
-
Click Restore Default Sengs to restore the parameters except the IP parameters and user
parameters to the default sengs.
-
Click Restore all parameters to restore all the parameters to the factory sengs.
3.
Click OK.
6.9 Export Parameters
You can export the parameters of one device, and import them to another device to set the two
devices with the same parameters.
Steps
1.
Go to System → System Maintenance →
Exporng conguraon parameters .
2.
Click Export.
3.
Click OK and export the parameters according to the prompts.
Dock Staon User Manual
19
6.10 Import Parameters
Import the conguraon le of another device to the current device to set the same parameters.
Before You Start
Save the
le that needs to be imported to the computer.
Steps
Note
Imporng conguraon le is only available to the devices of the same model and same version.
1.
Go to System → System Maintenance → Imporng conguraon parameters .
2.
Click Select File to import the conguraon le.
3.
Click Import.
Result
The parameters will be imported, and the device will reboot.
6.11 Format Database
If you want to clear all the local data of the dock staon, you can format database.
Steps
Cauon
The database will be cleared aer formang. Operate the funcon carefully.
1.
Go to System → System Maintenance → Formang HDD .
2.
Click Format.
3.
Enter the password on the popup window.
4.
Click OK.
6.12 Set File Format
The device supports seng le formats that can be collected.
Steps
1.
Go to Storage Sengs → File Format Sengs .
2.
Check le formats according to the actual needs.
3.
Oponal: Add new formats and use / to separate them.
4.
Click Save.
Dock Staon User Manual
20

6.13 Connect to Third-Party Body Camera
The device can connect body cameras from the third-party manufacturers to collect les.
Steps
1.
Go to System → System
Sengs → Manufacturer .
2.
Select the manufacturer.
3.
Click Save.
Result
The device will connect the third-party body cameras according to the selected manufacturer
protocols and collect
les.
Dock Staon User Manual
21
Appendix A. Communicaon Matrix and Device
Command
Scan the QR code below to get the
communicaon matrix of the device.
Scan the QR code below to get the device command.
Dock Staon User Manual
22

UD32328B