
Digital Evidence Management System
User Manual

Legal Informaon
©2021 Hangzhou Hikvision Digital Technology Co., Ltd. All rights reserved.
About this Manual
The Manual includes instrucons for using and managing the Product. Pictures, charts, images and
all other informaon hereinaer are for descripon and explanaon only. The informaon
contained in the Manual is subject to change, without noce, due to rmware updates or other
reasons. Please nd the latest version of this Manual at the Hikvision website ( hps://
www.hikvision.com/ ).
Please use this Manual with the guidance and assistance of professionals trained in
supporng the
Product.
Trademarks
and other Hikvision's trademarks and logos are the properes of
Hikvision in various jurisdicons.
Other trademarks and logos menoned are the properes of their respecve owners.
Disclaimer
TO THE MAXIMUM EXTENT PERMITTED BY APPLICABLE LAW, THIS MANUAL AND THE PRODUCT
DESCRIBED, WITH ITS HARDWARE, SOFTWARE AND FIRMWARE, ARE PROVIDED "AS IS" AND "WITH
ALL FAULTS AND ERRORS". HIKVISION MAKES NO WARRANTIES, EXPRESS OR IMPLIED, INCLUDING
WITHOUT LIMITATION, MERCHANTABILITY, SATISFACTORY QUALITY, OR FITNESS FOR A PARTICULAR
PURPOSE. THE USE OF THE PRODUCT BY YOU IS AT YOUR OWN RISK. IN NO EVENT WILL HIKVISION
BE LIABLE TO YOU FOR ANY SPECIAL, CONSEQUENTIAL, INCIDENTAL, OR INDIRECT DAMAGES,
INCLUDING, AMONG OTHERS, DAMAGES FOR LOSS OF BUSINESS PROFITS, BUSINESS
INTERRUPTION, OR LOSS OF DATA, CORRUPTION OF SYSTEMS, OR LOSS OF DOCUMENTATION,
WHETHER BASED ON BREACH OF CONTRACT, TORT (INCLUDING NEGLIGENCE), PRODUCT LIABILITY,
OR OTHERWISE, IN CONNECTION WITH THE USE OF THE PRODUCT, EVEN IF HIKVISION HAS BEEN
ADVISED OF THE POSSIBILITY OF SUCH DAMAGES OR LOSS.
YOU ACKNOWLEDGE THAT THE NATURE OF THE INTERNET PROVIDES FOR INHERENT SECURITY
RISKS, AND HIKVISION SHALL NOT TAKE ANY RESPONSIBILITIES FOR ABNORMAL OPERATION,
PRIVACY LEAKAGE OR OTHER DAMAGES RESULTING FROM CYBER-ATTACK, HACKER ATTACK, VIRUS
INFECTION, OR OTHER INTERNET SECURITY RISKS; HOWEVER, HIKVISION WILL PROVIDE TIMELY
TECHNICAL SUPPORT IF REQUIRED.
YOU AGREE TO USE THIS PRODUCT IN COMPLIANCE WITH ALL APPLICABLE LAWS, AND YOU ARE
SOLELY RESPONSIBLE FOR ENSURING THAT YOUR USE CONFORMS TO THE APPLICABLE LAW.
ESPECIALLY, YOU ARE RESPONSIBLE, FOR USING THIS PRODUCT IN A MANNER THAT DOES NOT
INFRINGE ON THE RIGHTS OF THIRD PARTIES, INCLUDING WITHOUT LIMITATION, RIGHTS OF
PUBLICITY, INTELLECTUAL PROPERTY RIGHTS, OR DATA PROTECTION AND OTHER PRIVACY RIGHTS.
YOU SHALL NOT USE THIS PRODUCT FOR ANY PROHIBITED END-USES, INCLUDING THE
Digital Evidence Management System User Manual
i

DEVELOPMENT OR PRODUCTION OF WEAPONS OF MASS DESTRUCTION, THE DEVELOPMENT OR
PRODUCTION OF CHEMICAL OR BIOLOGICAL WEAPONS, ANY ACTIVITIES IN THE CONTEXT RELATED
TO ANY NUCLEAR EXPLOSIVE OR UNSAFE NUCLEAR FUEL-CYCLE, OR IN SUPPORT OF HUMAN
RIGHTS ABUSES.
IN THE EVENT OF ANY CONFLICTS BETWEEN THIS MANUAL AND THE APPLICABLE LAW, THE LATER
PREVAILS.
Digital Evidence Management System User Manual
ii

Regulatory Informaon
FCC Informaon
Please take aenon that changes or modicaon not expressly approved by the party responsible
for compliance could void the user's authority to operate the equipment.
FCC compliance: This equipment has been tested and found to comply with the limits for a Class A
digital device, pursuant to part 15 of the FCC Rules. These limits are designed to provide
reasonable
protecon against harmful interference when the equipment is operated in a
commercial environment. This equipment generates, uses, and can radiate radio frequency energy
and, if not installed and used in accordance with the
instrucon manual, may cause harmful
interference to radio communicaons. Operaon of this equipment in a residenal area is likely to
cause harmful interference in which case the user will be required to correct the interference at his
own expense.
FCC
Condions
This device complies with part 15 of the FCC Rules. Operaon is subject to the following two
condions:
1. This device may not cause harmful interference.
2. This device must accept any interference received, including interference that may cause
undesired
operaon.
EU Conformity Statement
This product and - if applicable - the supplied accessories too are marked with "CE"
and comply therefore with the applicable harmonized European standards listed
under the EMC Direcve 2014/30/EU, the LVD Direcve 2014/35/EU, the RoHS
Direcve 2011/65/EU.
2012/19/EU (WEEE direcve): Products marked with this symbol cannot be
disposed of as unsorted municipal waste in the European Union. For proper
recycling, return this product to your local supplier upon the purchase of
equivalent new equipment, or dispose of it at designated
collecon points. For
more
informaon see: www.recyclethis.info
2006/66/EC (baery direcve): This product contains a baery that cannot be
disposed of as unsorted municipal waste in the European Union. See the product
documentaon for specic baery informaon. The baery is marked with this
symbol, which may include
leering to indicate cadmium (Cd), lead (Pb), or
mercury (Hg). For proper recycling, return the
baery to your supplier or to a
designated
collecon point. For more informaon see: www.recyclethis.info
Digital Evidence Management System User Manual
iii

Industry Canada ICES-003 Compliance
This device meets the CAN ICES-3 (A)/NMB-3(A) standards requirements.
Digital Evidence Management System User Manual
iv
Symbol Convenons
The symbols that may be found in this document are dened as follows.
Symbol Descripon
Danger
Indicates a hazardous situaon which, if not avoided, will or could
result in death or serious injury.
Cauon
Indicates a potenally hazardous situaon which, if not avoided, could
result in equipment damage, data loss, performance degradaon, or
unexpected results.
Note
Provides addional informaon to emphasize or supplement
important points of the main text.
Digital Evidence Management System User Manual
v

Safety Instrucon
Laws and Regulaons
Use of the product must be in strict compliance with the local laws and regulaons. Please shut
down the device in prohibited area.
Network
●
Please enforce the protecon for the personal informaon and the data security as the device
may be confronted with the network security problems when it is connected to the Internet.
Contact us if network security risks occur.
●
Please understand that you have the responsibility to congure all the passwords and other
security sengs about the device, and keep your user name and password.
Data
DO NOT disconnect the power during formang, uploading, and downloading. Or les may be
damaged.
Digital Evidence Management System User Manual
vi

Contents
Chapter 1 Introducon ............................................................................................................... 1
1.1 Product Introducon .............................................................................................................. 1
1.2 Key Feature ............................................................................................................................ 1
Chapter 2 Operaon Descripon ................................................................................................ 2
2.1 Acvaon ............................................................................................................................... 2
2.2 Home Page Overview ............................................................................................................. 2
Chapter 3 Basic Operaon .......................................................................................................... 5
3.1 Connect Body Camera ............................................................................................................ 5
3.2 Collect File .............................................................................................................................. 5
3.3 Manage File ............................................................................................................................ 7
3.3.1 Search File ..................................................................................................................... 7
3.3.2 Play and Edit File ........................................................................................................... 8
3.3.3 Lock File ...................................................................................................................... 10
3.3.4 Upload File .................................................................................................................. 10
3.3.5 Back up and Restore File ............................................................................................. 10
3.4 Connect to
Plaorm ............................................................................................................. 11
3.5 Manage Storage ................................................................................................................... 11
3.5.1 Set Local Storage ......................................................................................................... 11
3.5.2 Connect to Storage Server .......................................................................................... 12
3.6 Manage Device .................................................................................................................... 13
Chapter 4 Safety Management ................................................................................................. 14
4.1 Manage User ........................................................................................................................ 14
4.2 Edit Password ....................................................................................................................... 14
4.3 Set File Search Permission ................................................................................................... 15
4.4 Set File
Encrypon ............................................................................................................... 16
4.5 Set Firewall ........................................................................................................................... 16
Digital Evidence Management System User Manual
vii

Chapter 5 Maintenance ............................................................................................................ 18
5.1 View Device Informaon ...................................................................................................... 18
5.2 Set Homepage Layout .......................................................................................................... 18
5.3 Set Auto Startup ................................................................................................................... 18
5.4 Select System Language ....................................................................................................... 18
5.5 Set
Collecon Format ........................................................................................................... 18
5.6 Set Trial Period ..................................................................................................................... 19
5.7 Search Log ............................................................................................................................ 19
5.8 Upgrade ............................................................................................................................... 19
5.8.1 Upgrade Body Camera ................................................................................................ 19
5.8.2 Upgrade Soware ....................................................................................................... 20
5.9 Set Nocaon Mode .......................................................................................................... 20
5.10 Disable Process .................................................................................................................. 21
Chapter 6 Accessing by Web Browser ....................................................................................... 22
6.1 Login and Logout .................................................................................................................. 22
6.2 Manage File .......................................................................................................................... 22
6.2.1 Search File ................................................................................................................... 22
6.2.2 Play and Edit File ......................................................................................................... 23
6.2.3 Lock File ...................................................................................................................... 25
6.2.4 Upload File .................................................................................................................. 25
6.2.5 Back up File ................................................................................................................. 25
Digital Evidence Management System User Manual
viii

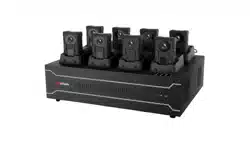
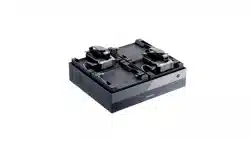
Chapter 1 Introducon
1.1 Product Introducon
Dock staon, integrated with Digital Evidence Management System (hereinaer referred to as
soware), provides you with an easy way to access body cameras, and collect, store, and play
audio and video les in the connected body cameras via the soware. You can associate user
accounts with body cameras, search data collecon records, and upload data via the soware.
1.2 Key Feature
●
One-click installaon.
●
You can search and preview
les with user permission.
●
You can collect, upload, and manage data in the connected body cameras.
●
Supports local
operaon and access via web browser.
●
The GPS traces of the video
les can be displayed.
●
You can play collected audio and video les.
●
User and device management.
Digital Evidence Management System User Manual
1

Chapter 2 Operaon Descripon
2.1 Acvaon
For the rst access, you need to acvate the soware by seng an admin password. No operaon
is allowed before acvaon.
Steps
1.
Open the soware.
2.
Select Start Conguraon.
3.
Select language.
Note
Select Next according to the interface prompt aer each conguraon.
4.
Set the admin password.
Note
We highly recommend you to create a strong password of your own choosing (using a minimum
of 8 characters, including at least three kinds of following categories: upper case leers, lower
case leers, numbers, and special characters) in order to increase the security of your product.
And we recommend you change your password regularly, especially in the high security system,
changing the password monthly or weekly can beer protect your product.
5.
Set HDD space.
6.
Oponal: Enable encrypon, and set encrypon level and key, to encrypt the uploaded data
from body cameras and enhance data security.
You need to use dedicated player and enter
encrypon key to play the encrypted videos.
7.
Oponal: Set plaorm parameters.
2.2 Home Page Overview
Aer running the soware, you will enter the home page. You can set and use the soware.
Digital Evidence Management System User Manual
2
Figure 2-1 Home Page
Table 2-1 Home Page Descripon
No. Descripon No. Descripon
1 Remaining me of trail period.
Note
Only when no soware watchdog
is detected, will the prompt of trail
period appear. If you see this
prompt, you need to extend the
trial period in me, or you will not
allowed to use the
soware aer
the default three months' trial
period. Refer to "Set Trial Period"
for details.
6 Network connecon status.
2 Soware informaon. 7 Nocaon informaon.
3 Current date and me. 8 Data collecon window. You can
view the data collecon status aer
body cameras are connected.
4 Plaorm connecon status. It will
appear only aer you have set
plaorm connecon. You can view
9 Operaon menu:
Digital Evidence Management System User Manual
3

No. Descripon No. Descripon
the plaorm IP address, port No.,
and connecon status.
●
Home: the data collecon home
page.
●
File: You can search and play the
collected
les.
●
Log: You can search the
soware
log.
●
Sengs: the detailed sengs of
the soware.
5 Storage status. You can view the
max. storage capacity and occupied
capacity.
Note
If there is no operaon for more than 10 minutes, the system will return to the home page.
Digital Evidence Management System User Manual
4
Chapter 3 Basic Operaon
3.1 Connect Body Camera
The body camera can be added to the soware automacally aer it is connected. You can also
add it manually.
Before You Start
●
The body camera has been connected to the dock staon.
●
If you need to link a person to the body camera, add the person rst. Refer to "Manage User" for
details.
Steps
1.
Select Sengs.
2.
Enter the admin password, and select OK.
Note
Every me you enter Sengs page, you need to enter the correct admin password to get the
permission. No more descripon about it below.
3.
Select Device.
4.
Select Add.
5.
Enter Device Name and Device No. of the body camera.
6.
Oponal: Double click the added user(s) from the user list to link to the body camera.
7.
Select Save or Save and
Connue.
3.2 Collect File
Collecng Files
Aer the body camera is connected to the dock staon and the soware has been run, the
soware will start collecng les automacally. During the collecon process, move the cursor to
in the lower right corner, you can view the number of the uncollected le(s), user No., and
device No.
Figure 3-1
Collecng Files
Digital Evidence Management System User Manual
5

Prior Collecon
During the collecon process, select First on the upper le corner to enable prior collecon. File
collecon of other body camera(s) will stop unl the priority collecon nishes.
Note
●
If no body camera is enabled prior collecon, the soware will collect les from all the
connected body cameras simultaneously.
●
During the prior collecon process, you can select First again to disable the funcon.
Collecon Finished
Aer le collecon nished, you can select View Details to view the number of failed le(s),
collected video(s), audio(s), and picture(s) respecvely. Select and set the search condions to
search the collected
le(s). Select to return to the collecon nished page. Select to
disconnect the body camera.
Figure 3-2 Files Collected
Figure 3-3 View Details
Digital Evidence Management System User Manual
6
Figure 3-4 Search Files
Note
If you have enabled person list in Sengs → Basic , and linked the body camera and person, then
the device No. in the corresponding le collecon window on the home page will be replaced by
the person name.
3.3 Manage File
3.3.1 Search File
The soware supports searching les collected from body cameras.
Steps
1.
Select File.
2.
Oponal: If you have enabled File Search Permission in Sengs → Basic , enter the admin user
name and password or the person No. and password of the person linked with the body camera,
and select OK.
3.
Set search
condions (keywords, date, etc.).
4.
Select Search.
Searching results will be displayed in the list.
Result
The searched les will be displayed in the list. You can view the thumbnails of the les, le
informaon,
upload status, etc.
Digital Evidence Management System User Manual
7
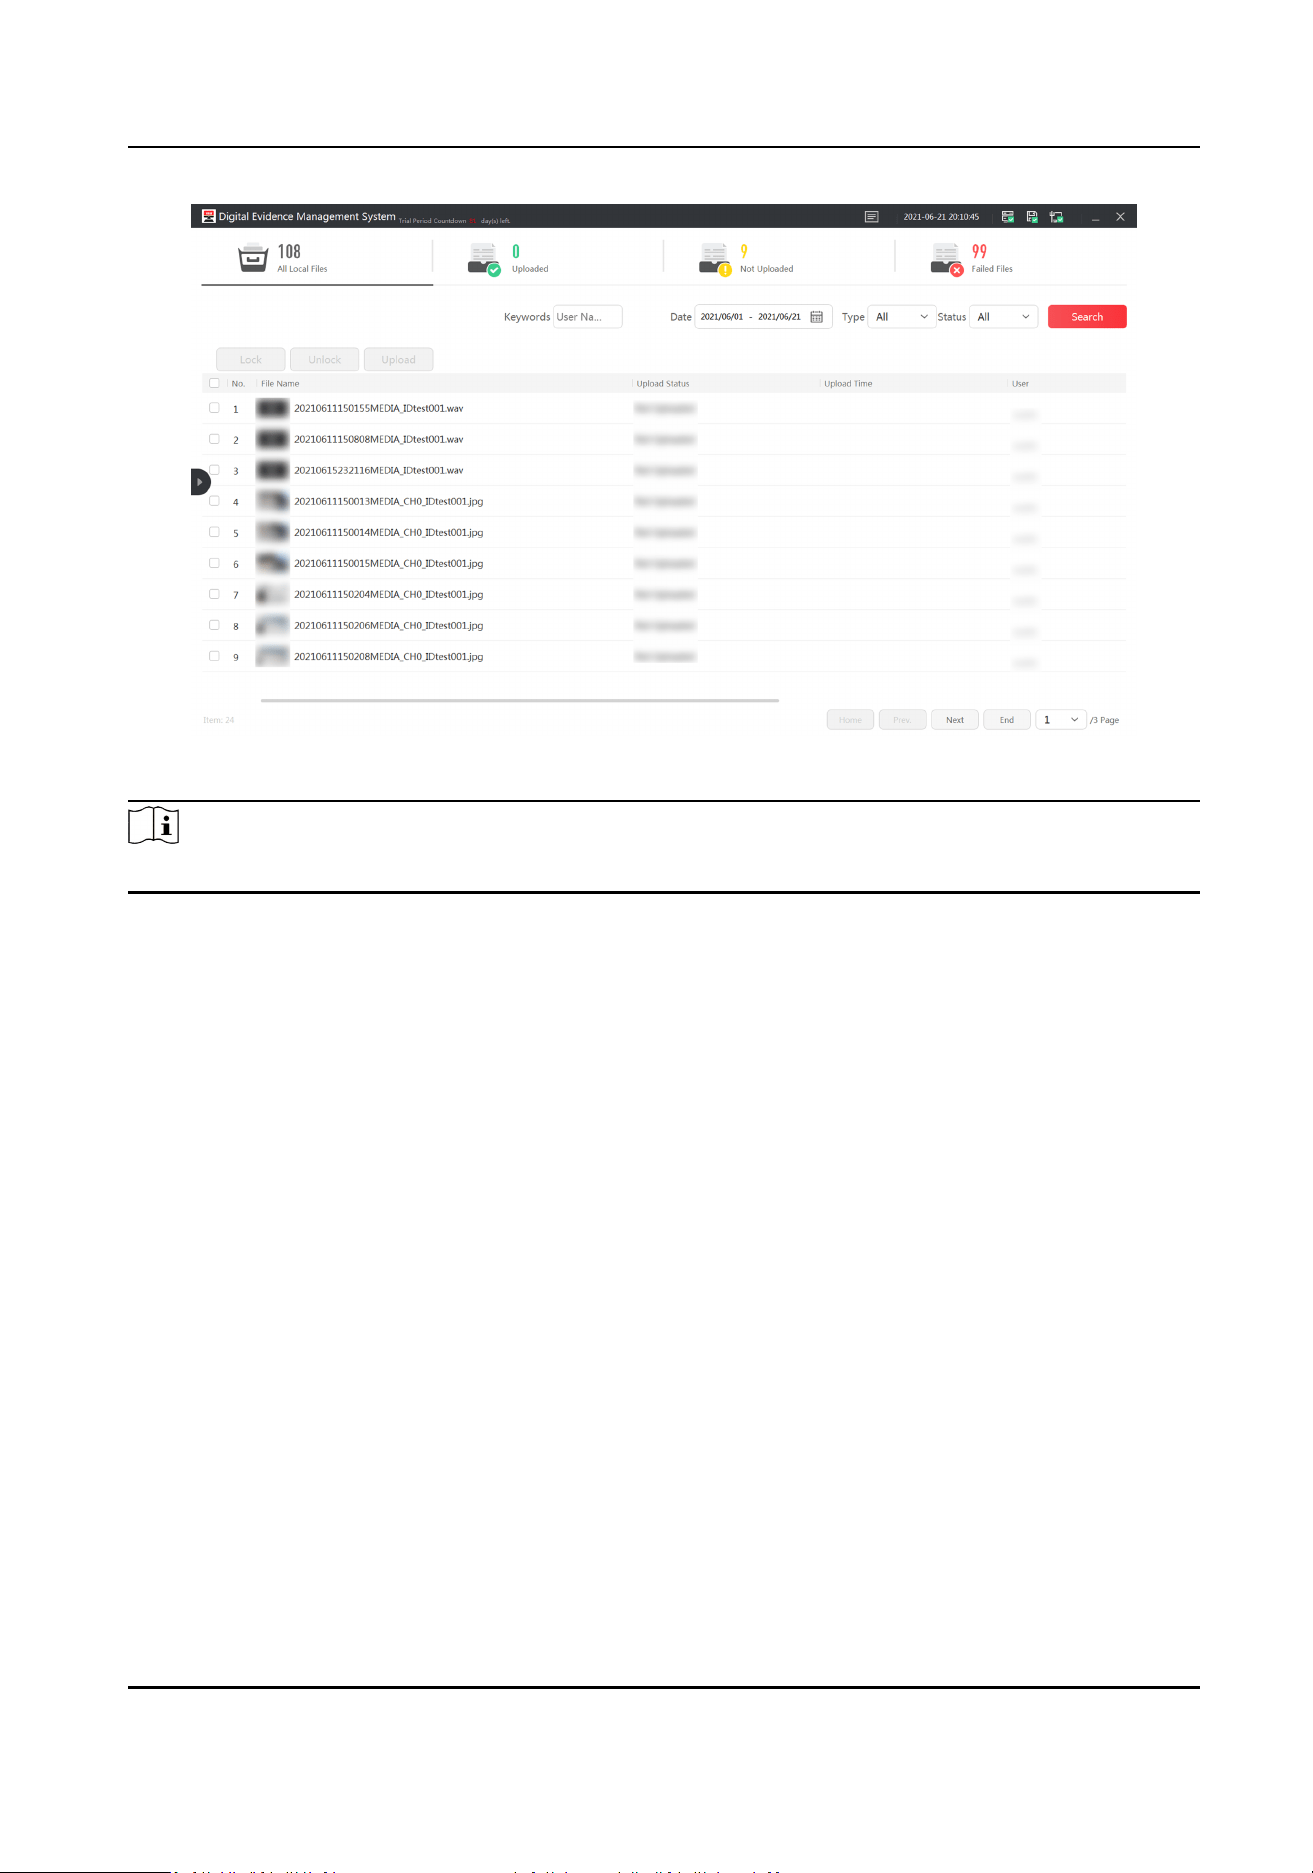
Figure 3-5 File
Note
If the plaorm is not connected, the upload status tab and informaon will not display.
3.3.2 Play and Edit File
Steps
1.
Search les.
2.
Select the le thumbnail to play.
Digital Evidence Management System User Manual
8
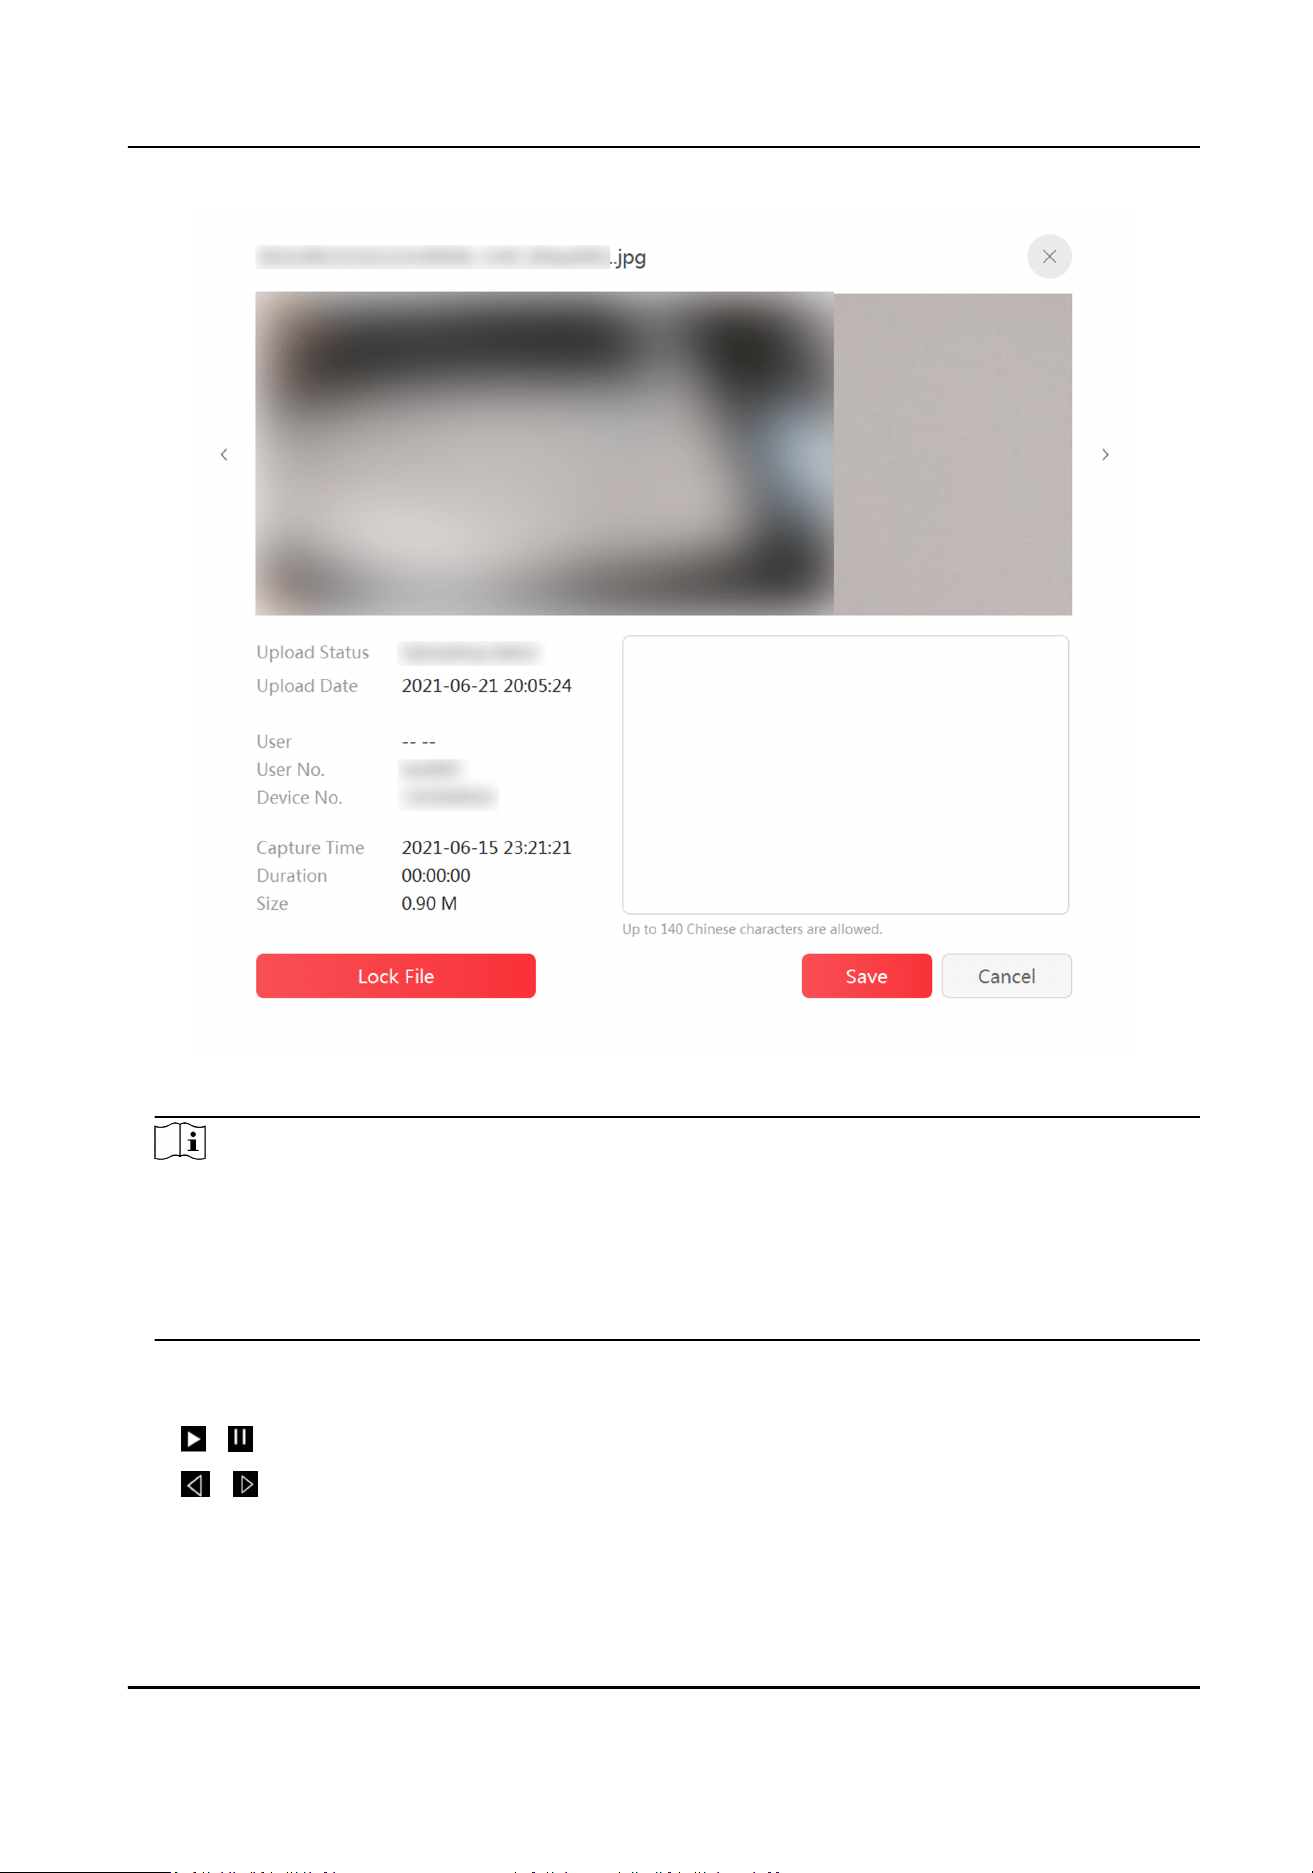
Figure 3-6 Play File
Note
●
If there is GPS le in the video, when you play the video, the GPS informaon will be
displayed.
●
For picture les, you can magnify it by ngers on a touch screen. Or for the media supporng
mouse operaon, place the cursor on the le side, the area will be magnied on the right
side.
3.
Oponal: Add le descripon in the text led, and select Save.
4.
Oponal: Other operaons.
/
Start/Pause video play.
/ Adjust play speed.
Digital Evidence Management System User Manual
9

Note
You cannot adjust when the play speed is 1.
Adjust the volume.
3.3.3 Lock File
Lock important les to prevent them from being overwrien or accidentally deleted.
Steps
1.
Search
les.
2.
Lock or unlock les.
-
Select a le to play. Select Lock File to lock a single le. Select Unlock File to unlock a single
le.
-
Check mulple items of les from the le list, and select Lock to lock the selected les in
batch. Click Unlock to unlock them in batch.
Result
The locked les cannot be deleted or overwrien.
3.3.4 Upload File
If the soware has been connected to the plaorm, the collected les will be uploaded to the
plaorm automacally. Follow the steps below to re-upload the collected les.
Before You Start
The soware has been connected to the plaorm.
Steps
1.
Search les.
2.
Check the le(s) to be uploaded, and select Upload.
Result
The uploaded
les will be marked as "Uploaded" in the le list.
3.3.5 Back up and Restore File
You are recommended to back up the collected les regularly to enhance data security.
Steps
1.
Go to Sengs → Data Backup .
2.
Back up the les.
-
Auto backup: Select Backup Interval, enter Number of Backup File, and select Save.
Digital Evidence Management System User Manual
10

Note
The number of backup le refers to the max. number of backup le. For example, set the
number of backup le as 3. When up to 3 les are backed up, the former backup les will be
overwrien according to the me.
-
Manual backup: Once you select Manual Backup, the les will be backed up once.
3.
Oponal: Select Data Restoraon to restore the les to the saved me.
Aer the soware is reinstalled, you can restore the conguraon informaon of the soware
by restoring the backup les, and search the collected les. No need to recollect les and set
parameters.
3.4 Connect to Plaorm
Connect the soware to the plaorm if you need to upload the les to the plaorm or send
informaon to the soware via the plaorm.
Before You Start
●
Allocate the plaorm.
●
The communicaon between the soware and plaorm is normal.
Steps
1.
Go to
Sengs → Plaorm .
2.
Select Plaorm Type.
3.
Set the plaorm parameters, such as IP Address, Port No., etc.
4.
Oponal: Enable Upload Schedule and set Upload Time to upload les in a xed me period.
Note
If the funcon is disabled, the les will be uploaded to the plaorm in real me.
5.
Select Save.
Result
If
plaorm connecon succeeded, will appear on the upper right corner of the soware page.
You can upload
les if the plaorm is connected. If connecon failed, check the plaorm
parameters and network communicaon.
3.5 Manage Storage
3.5.1 Set Local Storage
You can select the storage space when acvang the soware, or edit and manage local storage via
the followings steps.
Digital Evidence Management System User Manual
11

Steps
1.
Go to Sengs → HDD Space .
2.
Select HDD.
Note
●
It's recommended not to set the storage space as the soware installaon disk.
●
The soware installaon disk will reserve 10 GB space not for storage by default.
3.
Set Total Free Space and Clear Space.
Note
●
The earliest les will be cleared according to me. Back up les in me to avoid data loss.
●
You can lock the important les to prevent them from being deleted automacally when the
storage space is insucient.
Example
If you set Total Free Space as 10 GB, and set Clear Space as 5 GB, when the free storage space is
less than or equal to 10 GB, 5 GB storage space will be cleared automacally.
4.
Oponal: Enable Clear Original Data when you need to delete the body camera les
automacally aer they are collected to the soware.
5.
Select Save.
3.5.2 Connect to Storage Server
Storage server can be used as an extended storage to store the les of body cameras.
Before You Start
●
Allocate the storage server.
●
The
communicaon between the soware and server is normal.
Steps
1.
Go to Sengs → Storage .
2.
Select Storage Type according to the server type.
3.
Enter the server parameters, such as IP Address, Port No., etc.
Note
Some servers support Bucket, AKEY, and other parameters. Keep the parameters same with
those of the server.
4.
Oponal: Enable Auto Backup if you want to upload body camera les to the storage server
automacally.
5.
Select Save.
Digital Evidence Management System User Manual
12

3.6 Manage Device
The connected body cameras will be added automacally. The admin user can edit, delete, import,
or export the body cameras.
Before You Start
Connect body cameras to the dock staon.
Steps
1.
Go to
Sengs → Device .
2.
Set search condions, and select Search to search body camera informaon.
3.
Oponal: Other operaons.
Edit Select to edit body camera informaon.
Delete
●
Select to delete one body camera.
●
Check body camera(s), and select Delete to delete body camera(s) in batch.
Export Select Export to export the body camera informaon le to the local storage when
you need to set the same body camera informaon to another soware.
Import On the new soware, select Import to import the body camera informaon le.
Digital Evidence Management System User Manual
13

Chapter 4 Safety Management
4.1 Manage User
To raise le security, you are recommended to disnguish user's permissions to manage les and
avoid mulple users using one account to manage mulple body cameras.
Steps
1.
Go to Sengs → User .
2.
Add user.
1) Select Add.
2) Enter user
informaon and set user permissions.
3)
Oponal: Double click the added user(s) in Ungrouped Member list to add member(s).
The admin user can search all the les. The group leader can search the le(s) of the body
camera(s) linked with the member(s). The member can only search the
le(s) of the body
camera(s) linked with himself or herself.
4) Select Save or Save and Connue.
5) Go to
Sengs → Device to link the user and body camera.
Note
Refer to "Connect Body Camera" for details.
The user can search the le(s) of the linked body camera(s) aer the permission authencaon
with the user No. and password.
3.
Enter search
condions, and select Search to search user informaon.
Search the user
informaon
Enter the search condions, and select Search.
Edit the user informaon Select to edit the user informaon.
Delete the user
●
Select to delete the user.
●
Check the user(s), and select Delete to delete the user(s) in
batch.
Export the user
informaon
Select Export to export the user informaon le to the local
storage when you need to set the same user informaon to
another soware.
Import the user
informaon
On the new soware, select Import to import the user
informaon le.
4.2 Edit Password
Change the admin password regularly to enhance data security.
Digital Evidence Management System User Manual
14

Steps
1.
Go to Sengs → Admin Password .
2.
Enter Old Password and New Password.
Note
We highly recommend you to create a strong password of your own choosing (using a minimum
of 8 characters, including at least three kinds of following categories: upper case leers, lower
case leers, numbers, and special characters) in order to increase the security of your product.
And we recommend you change your password regularly, especially in the high security system,
changing the password monthly or weekly can beer protect your product.
3.
Conrm the new password.
4.
Select Save.
4.3 Set File Search Permission
To raise le security, you are recommended to enable permission authencaon for le
management.
Steps
1.
Go to
Sengs → Basic .
2.
Enable File Search Permission.
3.
Select Save.
Result
You need to enter the admin password or the linked user No. and password to authencate the
permission when you enter File page.
Digital Evidence Management System User Manual
15
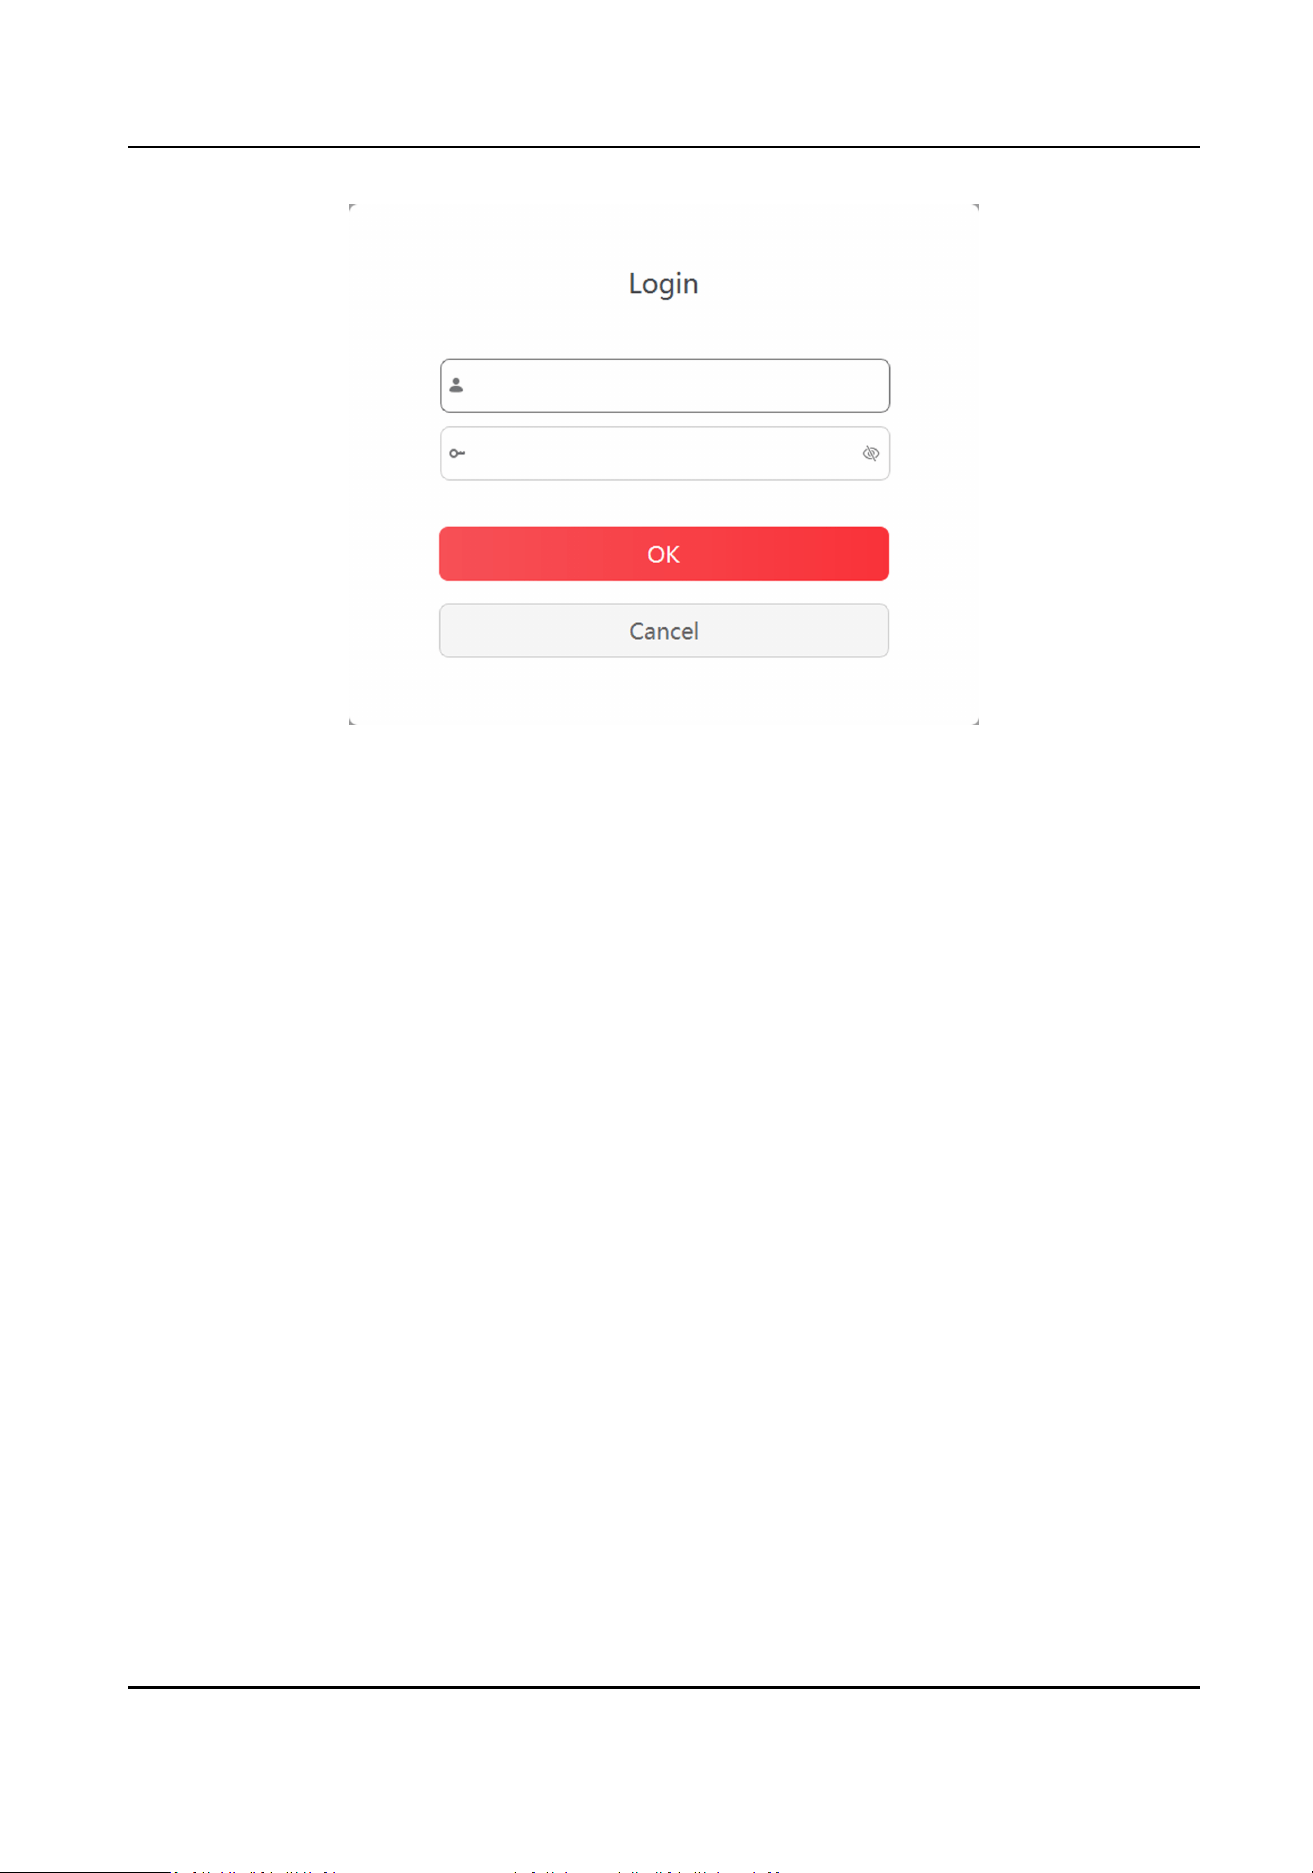
Figure 4-1 Permission Authencaon
4.4 Set File
Encrypon
Set le encrypon to encrypt the uploaded les from the body cameras to enhance security.
Steps
1.
Go to Sengs → Encrypon .
2.
Enable
Encrypon.
3.
Select Encrypon Level.
4.
Enter
Encrypon Key.
5.
Select Save.
What to do next
Use the dedicated player and enter the key to play the encrypted videos.
4.5 Set Firewall
Set rewall to allow the computer to access the specied IP address and port.
Steps
1.
Go to Sengs → Firewall .
2.
Select Add.
3.
Set outbound rules (name, IP address, and port No.).
4.
Select OK.
The added rule(s) will be displayed in the list, and enabled by default.
Digital Evidence Management System User Manual
16

5.
Oponal: Other operaons.
Disable rule(s) Check the added rule(s), and select to disable.
Delete rule(s) Check the rule(s), and select Delete.
Digital Evidence Management System User Manual
17

Chapter 5 Maintenance
5.1 View Device Informaon
Go to Sengs → Basic to view the dock staon No.
5.2 Set Homepage Layout
The default layout of the le collecon windows on homepage is 4 (row) × 5 (column). You can
change the layout.
Steps
1.
Go to
Sengs → Basic .
2.
Enable 5 × 4 Table in Homepage.
3.
Select Save.
Result
Select Home, and the layout of the le collecon windows changes to 5 (row) × 4 (column).
5.3 Set Auto Startup
You can enable auto startup to start up the soware automacally aer the computer starts up.
Steps
1.
Go to Sengs → Basic .
2.
Enable Auto Startup.
3.
Select Save.
5.4 Select System Language
You can select the system language.
Steps
1.
Go to Sengs → Basic .
2.
Select Language.
3.
Select Save.
5.5 Set
Collecon Format
You can set the collecon formats of videos, audios, and pictures via the soware.
Digital Evidence Management System User Manual
18

Steps
1.
Go to Sengs → Basic .
2.
Set the collecon formats of videos, audios, and pictures.
-
Select
to add a new format. Enter the format in the text eld, and select Save.
-
Select
to delete the format.
3.
Oponal: Select Restore Default Format to restore the default le collecon formats.
4.
Select Save.
Result
The dock staon will only collect the les in the set formats.
5.6 Set Trial Period
The soware can be used in a trial period. If you want to connue to use it, you can extend the
trial period.
Steps
1.
Go to
Sengs → Trial Period .
2.
Check and record MAC Address, and send the address to the technical personnel of our
company to get the trial password.
3.
Enter Trail Password.
4.
Select Save.
5.7 Search Log
You can search log to troubleshoot problems.
Steps
1.
Go to Log.
2.
Enter search condions.
3.
Select Search.
Result
The log
informaon will be displayed in the list.
5.8 Upgrade
5.8.1 Upgrade Body Camera
You can upgrade the soware version of the connected body camera(s).
Digital Evidence Management System User Manual
19
Before You Start
●
The body cameras to be upgraded should be in the same model.
●
Save the upgrade le to the local storage.
Steps
1.
Go to
Sengs → Upgrade → Upgrade Body Camera Sengs .
2.
Select Browse to select and open the upgrade le.
3.
Enable upgrade.
Cauon
●
You cannot collect les when upgrading the body camera(s).
●
DO NOT cut o the power during upgrade. The body camera(s) will reboot automacally aer
upgrade.
5.8.2 Upgrade Soware
You can upgrade the soware.
Before You Start
Save the upgrade
le to the local storage.
Steps
1.
Go to Sengs → Upgrade → Upgrade Soware .
2.
Select Browse to select and open the upgrade le.
3.
Enable upgrade.
Cauon
You cannot collect les when upgrading the soware.
Result
The soware will reboot automacally aer upgrade.
5.9 Set
Nocaon Mode
You can set the system nocaon mode of the soware.
Steps
1.
Go to
Sengs → Nocaon .
2.
Select Nocaon Mode.
3.
Select Save.
Digital Evidence Management System User Manual
20

5.10 Disable Process
The soware can detect the running processes and disable them.
Steps
1.
Go to
Sengs → Process Blocklist .
2.
Select Add.
3.
Enter the process name.
4.
Select OK.
5.
Oponal: Check the process(s), and select Delete to delete.
Example
Enter iexplore.exe. Then the
soware will detect if the IE explorer is running. If it is running, the
soware will disable the process.
Digital Evidence Management System User Manual
21
Chapter 6 Accessing by Web Browser
6.1 Login and Logout
The soware supports accessing via web browser.
Before You Start
The dock staon has been connected to the network.
Steps
1.
Set the IP address of the dock staon to ensure the soware is well communicated with the
computer.
Note
Refer to the corresponding operang system user manual for IP address conguraon.
2.
Enter hp://dock staon IP address:port No. in the address bar of the browser, and press Enter
on the keyboard.
Example
Enter
hp://192.168.1.64:5651.
3.
Oponal: Select the language.
4.
Enter the admin user name and password, or the linked user No. and password, and select
Login.
Note
If you fail to visit the IP address when the network is well connected, you can disable protecon
mode of the browser. Then restart the browser.
5.
Oponal: Click the admin user name or the linked user No. on the upper right corner, and select
Exit to log out.
6.2 Manage File
6.2.1 Search File
You can search les collected from body cameras via web browser.
Steps
1.
Set the search condions.
2.
Click Search.
The searched les will be displayed in the list. You can view the thumbnails of the les, le
informaon, upload status, etc.
Digital Evidence Management System User Manual
22
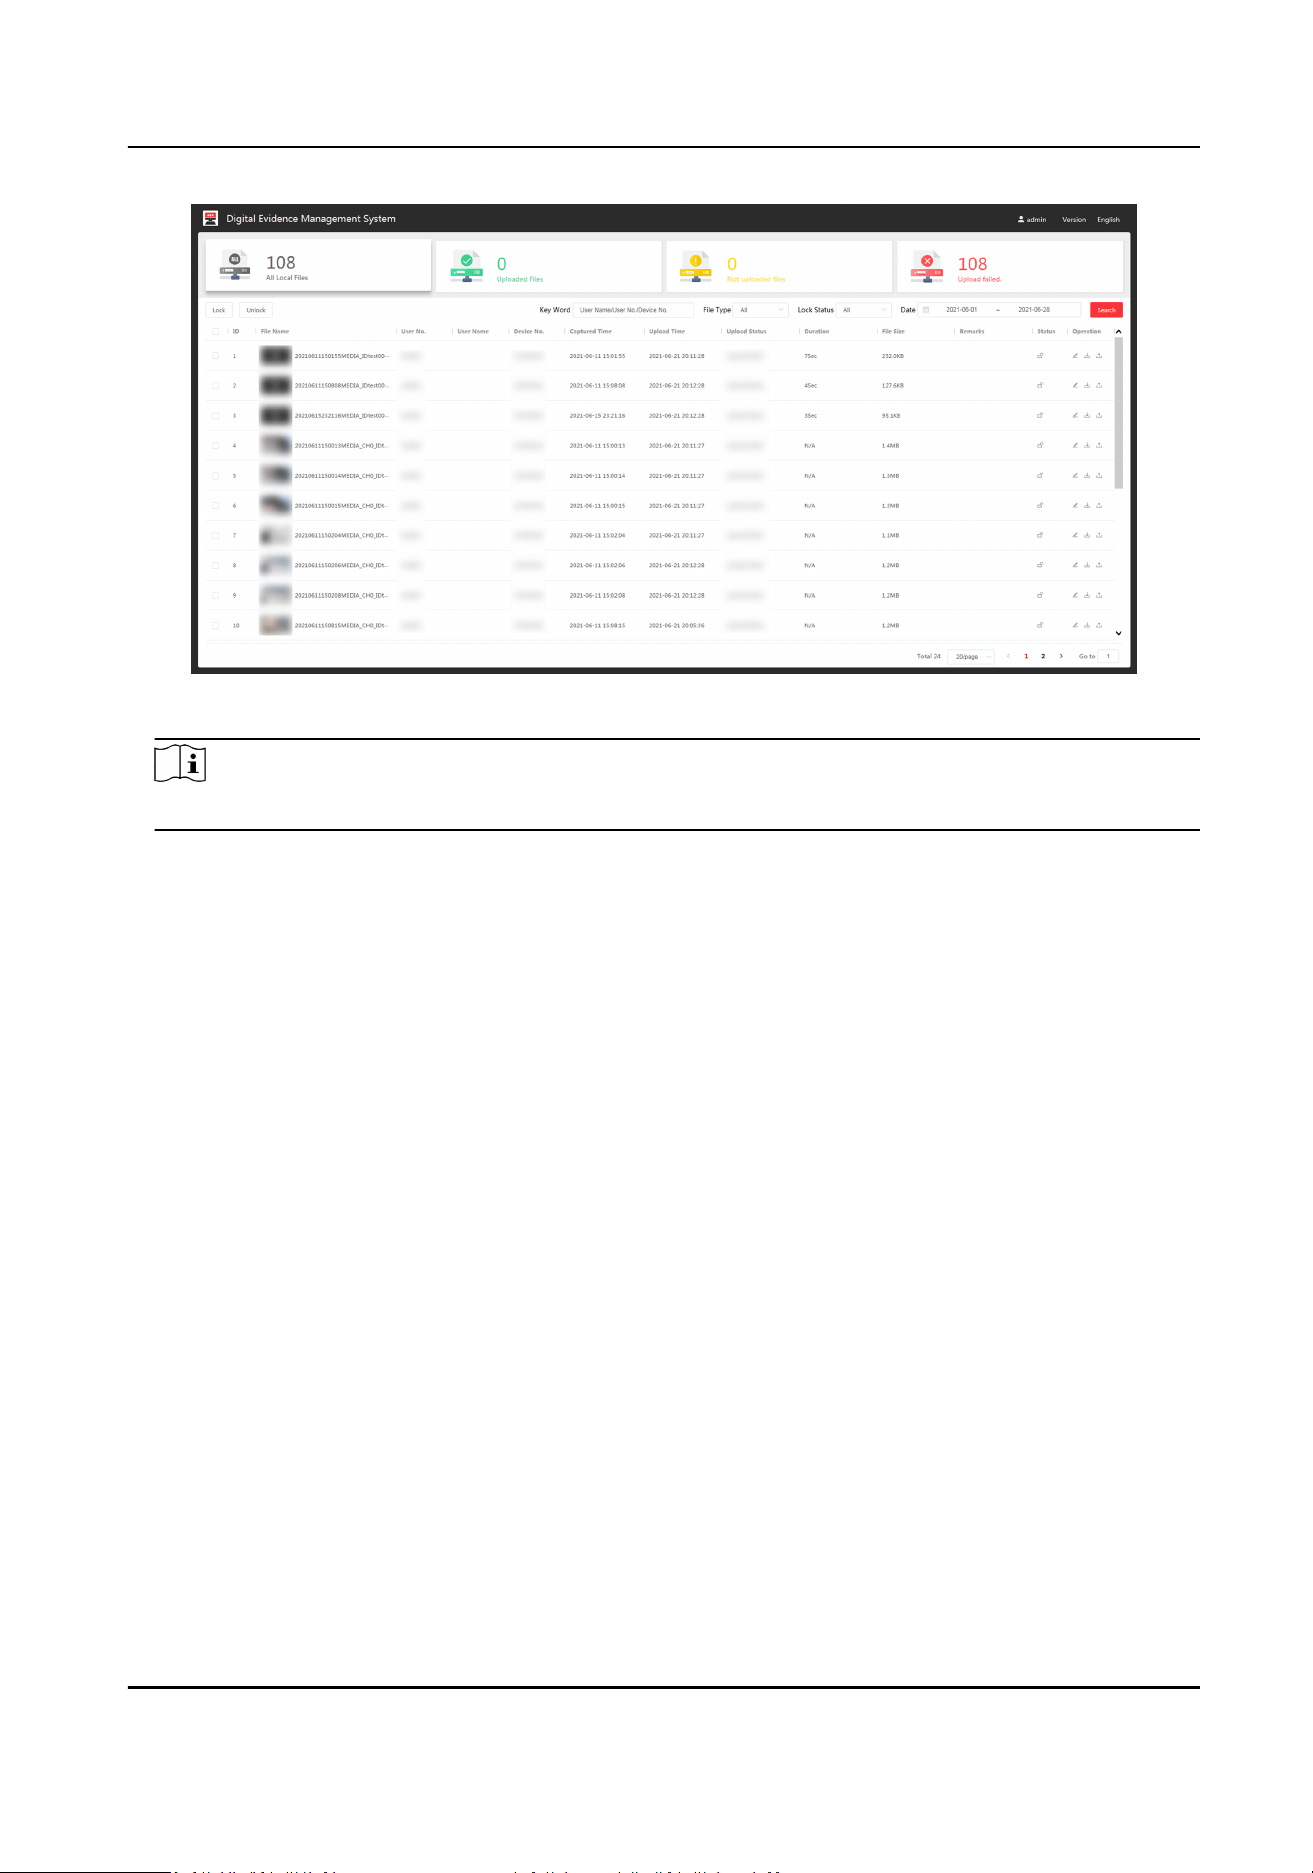
Figure 6-1 File List
Note
If the plaorm is not connected, the upload status tab and informaon will not display.
6.2.2 Play and Edit File
You can play and edit the searched les via web browser.
Steps
1.
Search les.
2.
Click the le thumbnail to play.
Digital Evidence Management System User Manual
23
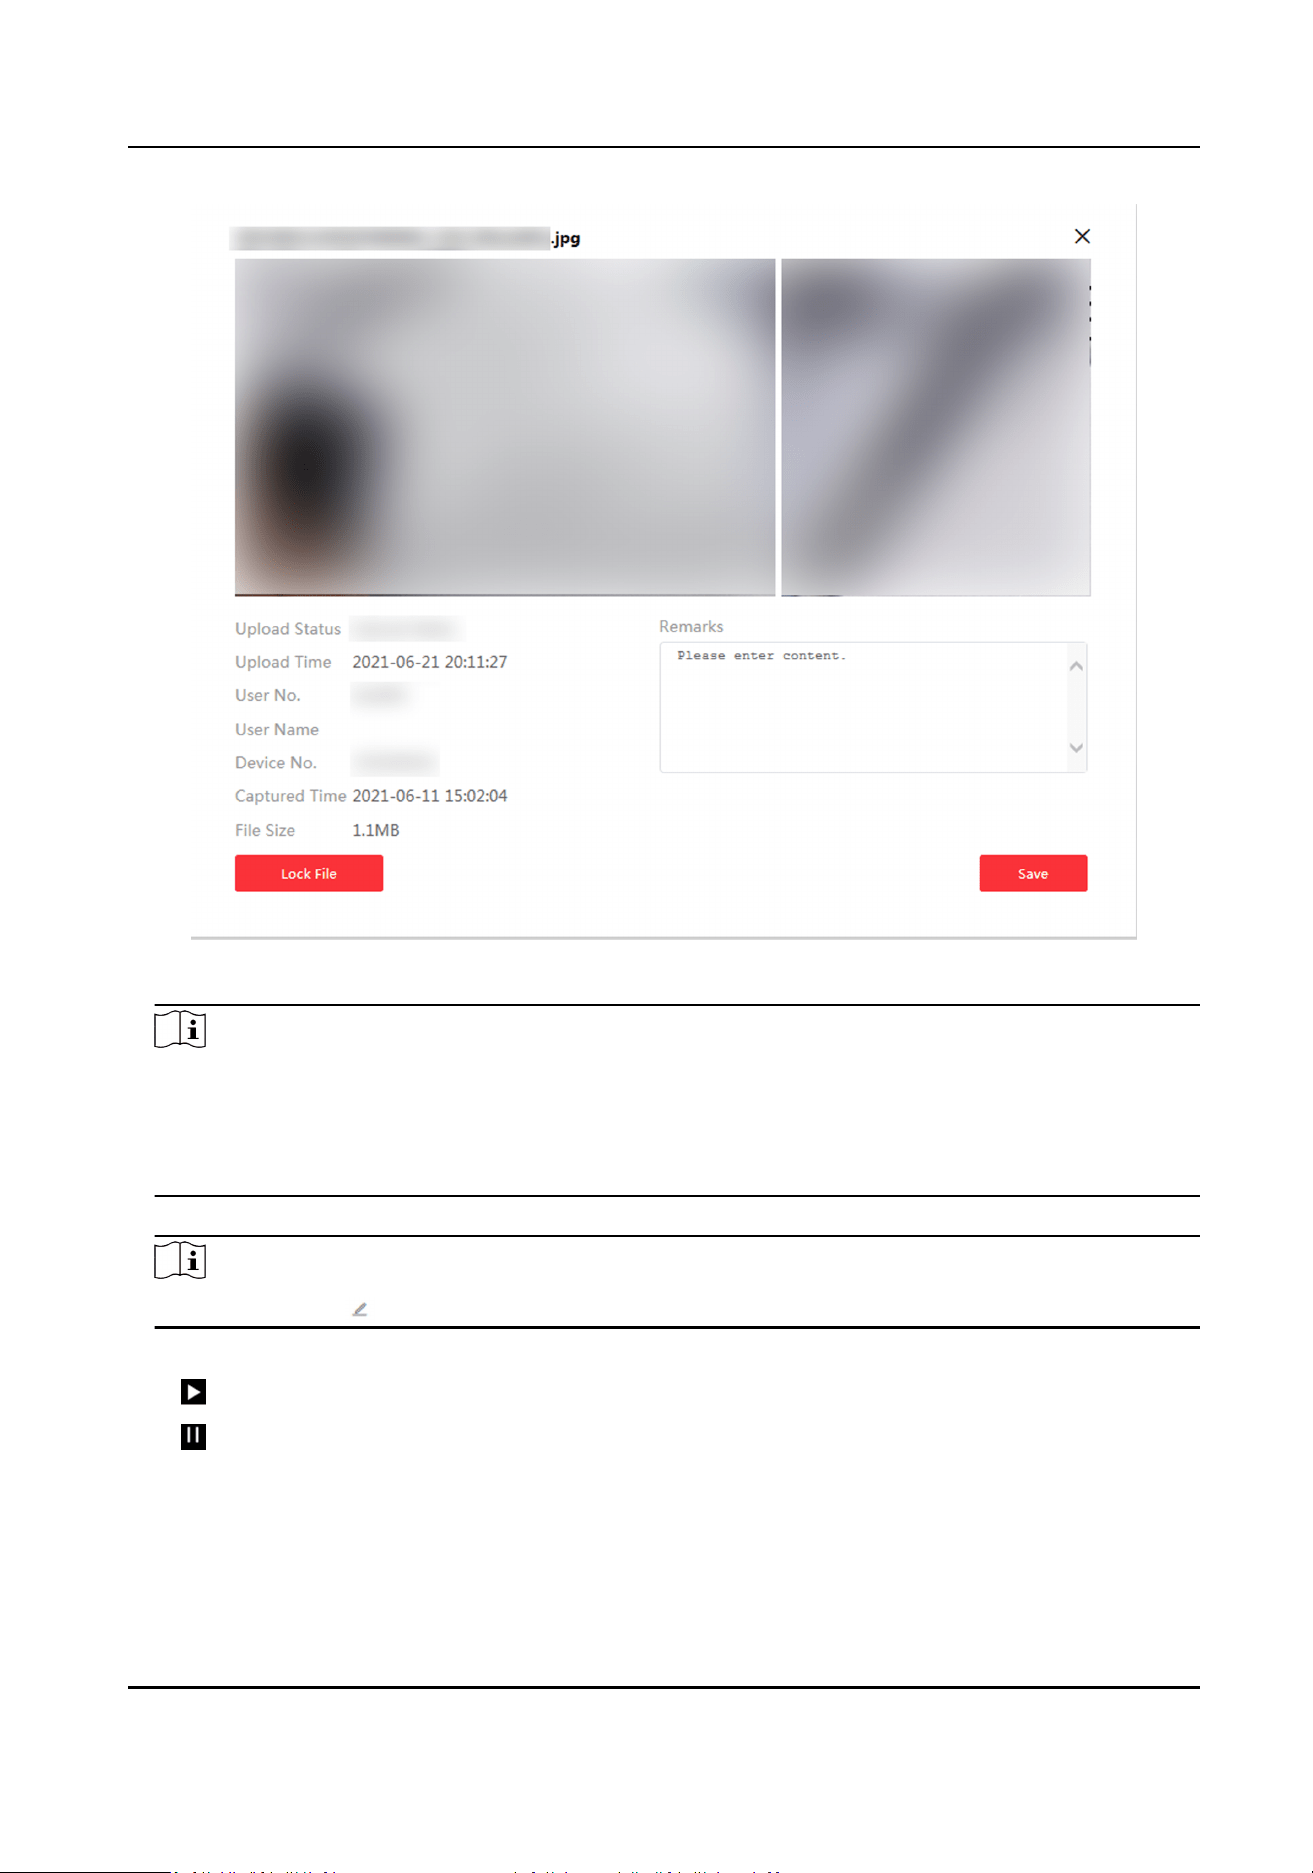
Figure 6-2 Play File
Note
●
If there is GPS le in the video, when you play the video, the GPS informaon will be
displayed.
●
For picture les, you can place the cursor on the le side, the area will be magnied on the
right side.
3.
Oponal: Add le descripon in the text led, and click Save.
Note
You can also click to add le descripon on the le list.
4.
Oponal: Other operaons.
Start video play.
Pause video play.
Digital Evidence Management System User Manual
24

6.2.3 Lock File
Lock important les to prevent them from being overwrien or accidentally deleted.
Steps
1.
Search les.
2.
Lock or unlock les.
-
Click the le thumbnail to play. Click Lock File to lock it. Click Unlock File to unlock it.
-
Click of the le item to lock a single le. Click to unlock it.
-
Check
mulple items of les, and click Lock to lock the selected les in batch. Click Unlock to
unlock them in batch.
Result
The locked les cannot be deleted or overwrien.
6.2.4 Upload File
If the soware has been connected to the plaorm, the collected les will be uploaded to the
plaorm automacally. Follow the steps below to re-upload the collected les.
Before You Start
The
soware has been connected to the plaorm.
Steps
1.
Search
les.
2.
Click of the le item to upload it to the plaorm.
Result
The uploaded les will be marked as "Uploaded Files" in the le list.
6.2.5 Back up File
You can back up the les to the computer.
Steps
1.
Search les.
2.
Click of the le item to download it to the computer.
Digital Evidence Management System User Manual
25

UD24551B