Loading ...
Loading ...
Loading ...
1413
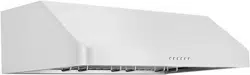
Alpine Wall Preparation
Alpine Wall Installation
4. Mark the locations of the support mounting bracket holes, vent cutout (if used),
and power supply cable cutout on the ceiling. Use drill and saber saw or
keyhole saw to cut openings for power supply cable and vent (see Venting
requirements and Electrical requirements, pages 32-36).
5. If venting to the outside install vent system (see Venting Requirements, page 33,
use caulking to seal exterior wall or roof openings.
6. Disconnect main electrical supply, prepare, and run electrical wiring through
ceiling or wall. Leave approximately 12” of electrical cord hanging from the
ceiling. Do not restore power until wiring is completed.
7. Disconnect power cord, remove the stainless steel filters by pulling down toward
the direction of solid arrow while holding both of the metal handles, and gently
pull the stainless steel filters toward the direction of dashed arrow as shown in
Figure 1.
8. Remove the grease cup by sliding it sideways, see Figure 2 for location of the
grease cup.
9. Set aside the stainless steel filters and grease cup until the range hood is properly
installed.
10. If the range hood comes with a glass canopy and has not already been mounted
to the hood, loosen the four canopy screws and washers from the hood top,
carefully place the canopy on the hood top, and loosely tighten the four canopy
screws along with washers. DO NOT put excessive pressure against the glass.
WARNING: Severe Injury Rotating fan can cause severe injury. Stay clear of fan
when motor is running
WARNING: HAZARD OF ELECTRIC SHOCK
Do not perform service on an electrically live system. Disconnect the main electrical
supply before servicing this device. Touching electrical connectors or other exposed
electrical circuitry inside this range hood when they are energized could result in
death, serious bodily injury, or property damage.
1. Measure the distance between stove top and the bottom of range hood. A dis-
tance of 28” to 31” is required.
2. Make sure the range hood is level and not tilted. Mark the locations of the hang-
ing bracket holes on the wall as shown in Figure 3A and Figure 3B.
3. Place the mounting bracket directly above the range hood, level it, and mark the
locations of the mounting bracket holes on the wall.
4. Place aside all equipments, locate marked regions and drill holes. Attach range
hood to wall using anchors recommended for your type of wall:
• Sheet rock wall: Attach range hood to stud blockings if possible. If stud
blockings are not available, it is required to build a supporting structure
behind the sheet rock for best weight support.
• Concrete wall: Use designated screws (not provided).
• Wood wall: Use at least 5 cm long wood screws (not provided).
5. Fasten two Type “A” anchors (for range hood and for mounting bracket or air
diverted) on the wall as shown in Figure 4. Loosely fasten two Type “B” screws
onto anchors, DO NOT fasten screws all the way. Hang the range hood on the
Type “B” screws and hand tighten them. Leave approximately 1/8” of gap from
the wall to the range hood.
6. Place the mounting bracket against the wall and align the holes from mounting
bracket with holes from Type “A” anchors, fasten two Type “B” screws through
the holes onto the anchors as shown in Figure 5. Leave approximately 1/8” of
gap from the wall to the mounting bracket.
BEFORE INSTALLATION
ALPINE WALL MODELS
INSTALLATION
ALPINE WALL MODELS
Loading ...
Loading ...
Loading ...