1. SAFETY
1.1. ELECTRICAL SAFETY
WARNING! It is the responsibility of the owner and the operator to read, understand and comply with the following: You must check all
electrical products before use to ensure that they are safe. You must inspect power cables, plugs, sockets and any other connectors
for wear or damage. You must ensure that the risk of electric shock is minimised by the installation of appropriate safety devices. A
Residual Current Circuit Breaker (RCCB) should be incorporated in the main distribution board. We also recommend that a Residual
Current Device (RCD) is used. It is particularly important to use an RCD with portable products that are plugged into a supply which is
not protected by an RCCB. If in any doubt consult a qualified electrician. You must also read and understand the following instructions
concerning electrical safety:
1.1.1. The Health & Safety at Work Act 1974 makes owners of electrical appliances responsible for the safe condition of those appliances
and the safety of the appliance operators. If in any doubt about electrical safety, contact a qualified electrician.
1.1.2. Ensure that the insulation on all cables and on the appliance is safe before connecting it to the power supply.
1.1.3. Ensure that cables are always protected against short circuit and overload.
1.1.4. Regularly inspect power supply cables and plugs for wear or damage and check all connections to ensure that none are loose.
1.1.5. Important: Ensure that the voltage marked on the appliance matches the power supply to be used and that the plug is fitted with the
correct fuse.
8 DO NOT pull or carry the appliance by the power cable.
8 DO NOT pull the plug from the socket by the cable.
8 DO NOT use worn or damaged cables, plugs or connectors. Immediately have any faulty item repaired or replaced by a qualified electrician.
1.1.6. Over/current Protection: The user has to make provision for the installation of the over-current protection of the power circuit. The over-
current protection is to be in accordance with EN 60204-1:2006
1.1.7. Electrical disconnecting device: The user has to make provisions for the installation of the electrical disconnecting device of the power circuit.
The supply disconnection device is to be in accordance with EN 60204-1:2006.
NOTE: If using a transformer to supply the compressor, it must be rated at a minimum of 2kVA to allow the compressor to run efficiently.
1.2. GENERAL SAFETY
9 Before you connect the equipment to the mains supply make sure that the data on the rating plate are identical to the mains data .
9 Familiarise yourself with the application and limitations of the compressor.
9 Operation must be with all guards, covers, lids and enclosures correctly in place.
9 This compressor has not been designed for commercial, trade or industrial applications. The warranty will be voided if the machine is used
in commercial, trade or industrial businesses or for equivalent purposes.
9 Fully assemble the compressor before using for the first time.
9 The concentration of processed gases that can displace breathing air shall be kept within acceptable levels. Reference EN 12021 for
acceptable levels of contaminants in breathing air.
9 The equipment is to be used only for it’s prescribed purpose. Any other use is deemed to be a case of misuse. The user/operator and not
the manufacturer will be liable for any damage or injuries of any kind caused as a result of this.
9 Remove from mains supply when performing maintenance or inspections.
9 Ensure the compressor is in good order and condition before use. If in any doubt do not use the unit and contact an electrician/service agent.
9 Delivery hoses should be fitted with a safety cord. It is essential to use separators, water traps and drains which process the liquids
produced by the compressor system is put into operation.
9 The compressor may only be used in suitable rooms (with good ventilation and an ambient temperature from +5°C to +40°C). Ensure
there is no dust, acids, vapours, explosive gases, or inflammable gases in the room.
WARNING! Compressor must only be serviced by an authorised agent. DO NOT tamper with, or attempt to adjust, pressure
switch or safety valve.
9 Before moving, or maintaining the compressor ensure it is unplugged from the mains supply and that the air tank pressure has been vented.
9 Maintain the compressor in good condition and replace any damaged or worn parts. Use genuine parts only. Unauthorised parts may be
dangerous and will invalidate your warranty.
9 Read the instructions relating to any accessory to be used with this compressor. Ensure the safe working pressure of any air appliance
used exceeds compressors output pressure.
9 If using a spray gun, check that the area selected for spraying is provided with an air change/ventilation system.
9 Ensure the air supply valve is turned off before disconnecting the air supply hose.
9 To move the compressor use the handle only. Maintain unit’s centre of gravity when lifting. DO NOT attempt to lift or move the compressor
by any other means.
SAC1900 Issue 3 (3,4) 16/05/24
Original Language Version
© Jack Sealey Limited
19L OIL FREE DIRECT DRIVE AIR
COMPRESSOR 1.5HP
MODEL NO: SAC1900
Thank you for purchasing a Sealey product. Manufactured to a high standard, this product will, if used according to these instructions,
and properly maintained, give you years of trouble free performance.
IMPORTANT: PLEASE READ THESE INSTRUCTIONS CAREFULLY. NOTE THE SAFE OPERATIONAL REQUIREMENTS, WARNINGS & CAUTIONS.
USE THE PRODUCT CORRECTLY AND WITH CARE FOR THE PURPOSE FOR WHICH IT IS INTENDED. FAILURE TO DO SO MAY CAUSE
DAMAGE AND/OR PERSONAL INJURY AND WILL INVALIDATE THE WARRANTY. KEEP THESE INSTRUCTIONS SAFE FOR FUTURE USE.
Refer to
instructions
Wear eye
protection
Wear ear
protection
WARNING:
High Voltage
WARNING:
Hot surface
WARNING:
Automatic
start up
Indoor use only
DO NOT open
the air cock
before an air
hose is attached
9 Use the compressor in a well ventilated area and ensure it is placed on a firm surface.
9 Keep tools and other items away from the compressor when it is in use, and keep area clean and clear of unnecessary items.
9 Ensure the air hose is not tangled, twisted or pinched.
9 Keep children and unauthorised persons away from the working area.
8 DO NOT dis-assemble compressor for any reason. The unit must be checked by qualified personnel only.
8 DO NOT use the compressor outdoors, or in damp, or wet, locations.
8 DO NOT operate within the vicinity of flammable liquids, gases or solids.
8 DO NOT touch compressor cylinder, cylinder head or pipe from head to tank as these may be hot.
8 DO NOT use this product to perform a task for which it has not been designed.
8 DO NOT deface the certification plate attached to the compressor tank.
8 DO NOT cover the compressor or restrict air flow around the unit whilst operating.
▲ DANGER! DO NOT direct the output jet of air towards people or animals.
8 DO NOT operate the compressor without an air filter.
8 DO NOT allow anyone to operate the compressor unless they have received full instructions.
WARNING! The air tank is a pressure vessel and the following safety measures apply:
8 DO NOT tamper with the safety valve, DO NOT modify or alter the tank in any way and DO NOT strap anything to the tank, DO NOT weld tank.
8 DO NOT subject the tank to impact, vibration or to heat and DO NOT allow contact with abrasives or corrosives.
9 Drain condensation from tank daily.
WARNING! If an electrical fuse blows, ensure it is replaced with an identical fuse type and rating.
9 When not in use, store the compressor carefully in a safe, dry, childproof location.
2. INTRODUCTION
Low noise compressor runs at only 79dB(A), suitable for places where a standard compressor would disturb work or people in the
vicinity. Aluminium cylinder head with cast iron cylinder gives added resistance to wear. Fitted with fully automatic pressure cut-out
switch and twin gauges displaying tank and working pressures. Pump head directly coupled to heavy-duty induction motor for reliable
and quiet operation. Precision welded receiver tank manufactured to meet Pressure Vessel Directive. Fitted with two outputs so
multiple tools can be used at once. Suitable for use with the Sealey range of air nailers. Tube chassis and painted metal step, perfect
for construction and automotive applications. The benets of oil free compressors include easy maintenance, reduced noise levels,
better eciency, quieter when running and no oil contamination in the air supply. Lightweight unit with extendible handle and solid
plastic wheels with rubber grip.
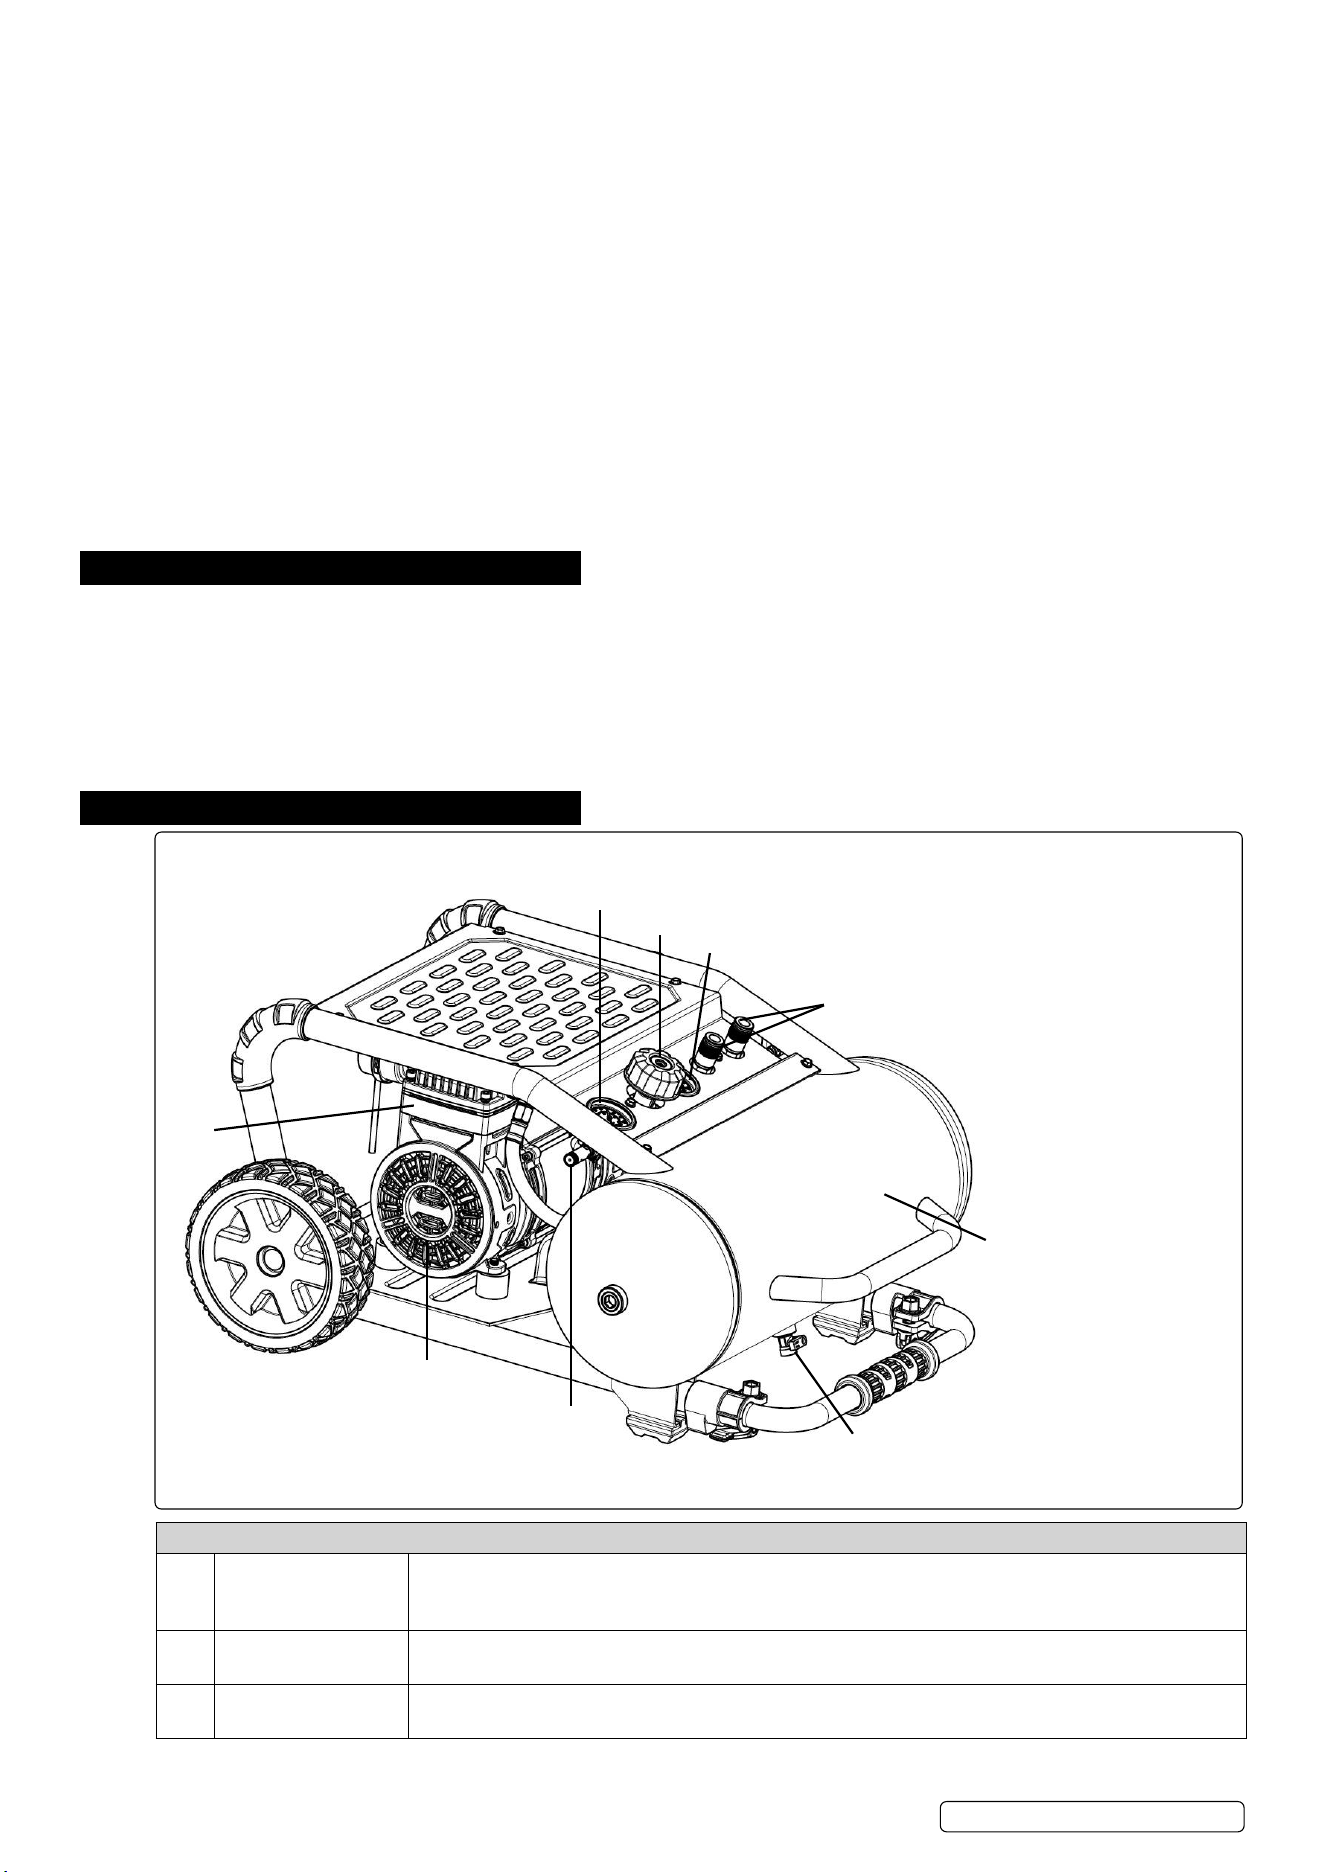
3. CONTENTS
PARTS DESCRIPTION
A Electric Motor The motor is used to power the pump. It is equipped with a thermal overload protector. If the motor
overheats for any reason, the thermal overload protector will shut it down in order to prevent the
motor from being damaged.
B Air Compressor
Pump
The pump compresses the air and discharges it into the tank via the piston that moves up and down
in the cylinder.
C Safety Valve This valve is used to prevent the compressor from building too much pressure. If the pressure
reaches the present level of the motor, it will automatically pop open.
SAC1900 Issue 3 (3,4) 16/05/24
Original Language Version
© Jack Sealey Limited
A - Electrical Motor
B - Air Compressor Pump
C - Safety Valve
D - Pressure Switch (not shown)
E - Air Pressure Regulator
F - Tank Pressure Gauge
G - Outlet Pressure Gauge
H - Quick Coupler
I - Drain Valve
J - Air Tank
K - Power Cord (not shown)
A
B
C
E
F
G
H
I
J
SAC1900 Issue 3 (3,4) 16/05/24
Original Language Version
© Jack Sealey Limited
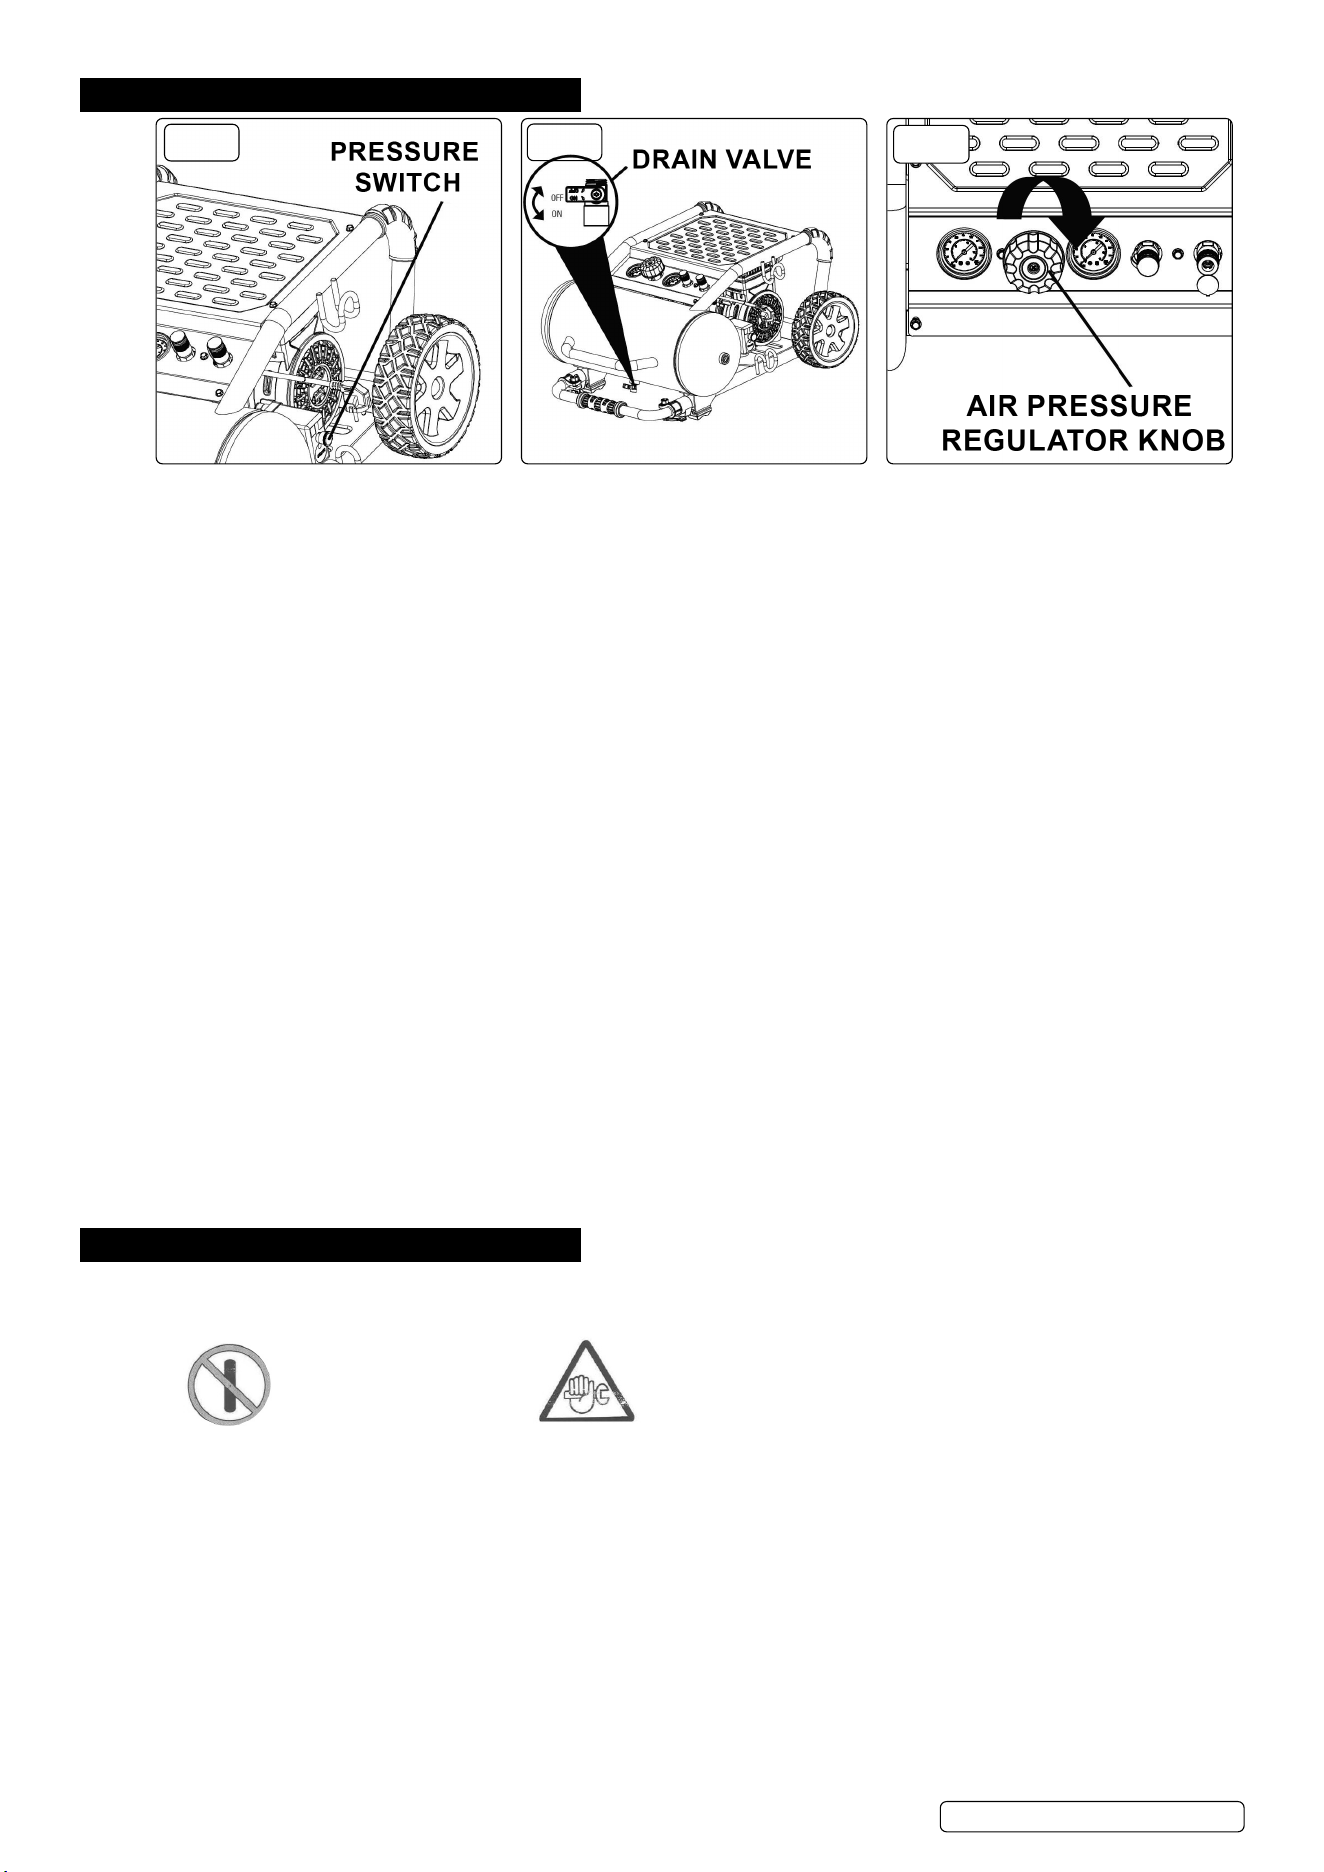
D Pressure Switch This switch turns on the compressor and is operated manually. When in the ON position, it allows the
compressor to start up or shut down automatically, without warning, upon air demand. ALWAYS set
this switch to OFF when the compressor is not being used and before unplugging the compressor.
E Air Pressure
Regulator
The regulator is used to adjust the pressure inside the line to the tool that is being used. Turn the
knob clockwise to increase the pressure and counter-clockwise to decrease the pressure.
F Tank Pressure Gauge The gauge measures the pressure level of the air that is stored in the tank. It cannot be adjusted by
the operator and it does not indicate the pressure inside the line.
G Outlet Pressure
Gauge
The gauge measures the regulated outlet pressure.
H Quick Coupler The quick coupler is connected to a quick connector which is connecting to air hose.
I Drain Valve The drain valve is used to remove moisture from the air tank after the compressor is shut o.
J Air Tank The tank is where the compressed air is stored.
K Power Cord This product is for use on a nominal 240-volt circuit and should be grounded. A cord with a grounding
plug as illustrated must be used. Make sure that the product is connected to an outlet that has the
same conguration as the plug. No adapter should be used with this product. Check with a licensed
electrician if the grounding instructions are not understood or there is doubt as to whether the product
is properly grounded. Do not modify the the plug provided. If it will not t the outlet, have the proper
outlet installed by a licensed electrician.
4. SPECIFICATION
MODEL NO: SAC1900
Air Displacement cfm(L/min): 7.16(203) Noise Level: 79dB(A)
Flow Rate 105L/[email protected] Noise Test Code: EN ISO 2151:2008
Full Load Current 5.2A Outlet: Quick Release Coupling
Fuse Rating: 13A Phase: 1ph
Inlet Intermediate Pressure/Temperature Normal environment Plug Type: 3-Pin BS
Inlet Discharge Pressure 8-10 bar Power Supply Cable Length: 1.8m
Maximum Free Air Delivery cfm(L/min): 4.6(130) Pressure 8-10 bar
Maximum Speed of Unit 1455rpm Receiver Capacity: 19L
Maximum Pressure: 145psi(10bar) Size (W x D x H): 606mm x 361mm x 715mm
Motor Output: 1.5hp Supply: 230V/13A 50Hz
Gross / Nett Weight: 44.6kg / 41.4kg
5. PREPARATION
5.1. UNPACKING THE COMPRESSOR
5.1.1. Unpack the air compressor unit. Inspect the unit for damaged. If the unit has been
damaged, contact the retailer immediately.
5.1.2. Check the air compressor’s identication label to ensure that you have purchased the
intended model and that it has the required pressure rating for its intended use.
5.1.3. The carton should contain the air compressor and owner’s manual.
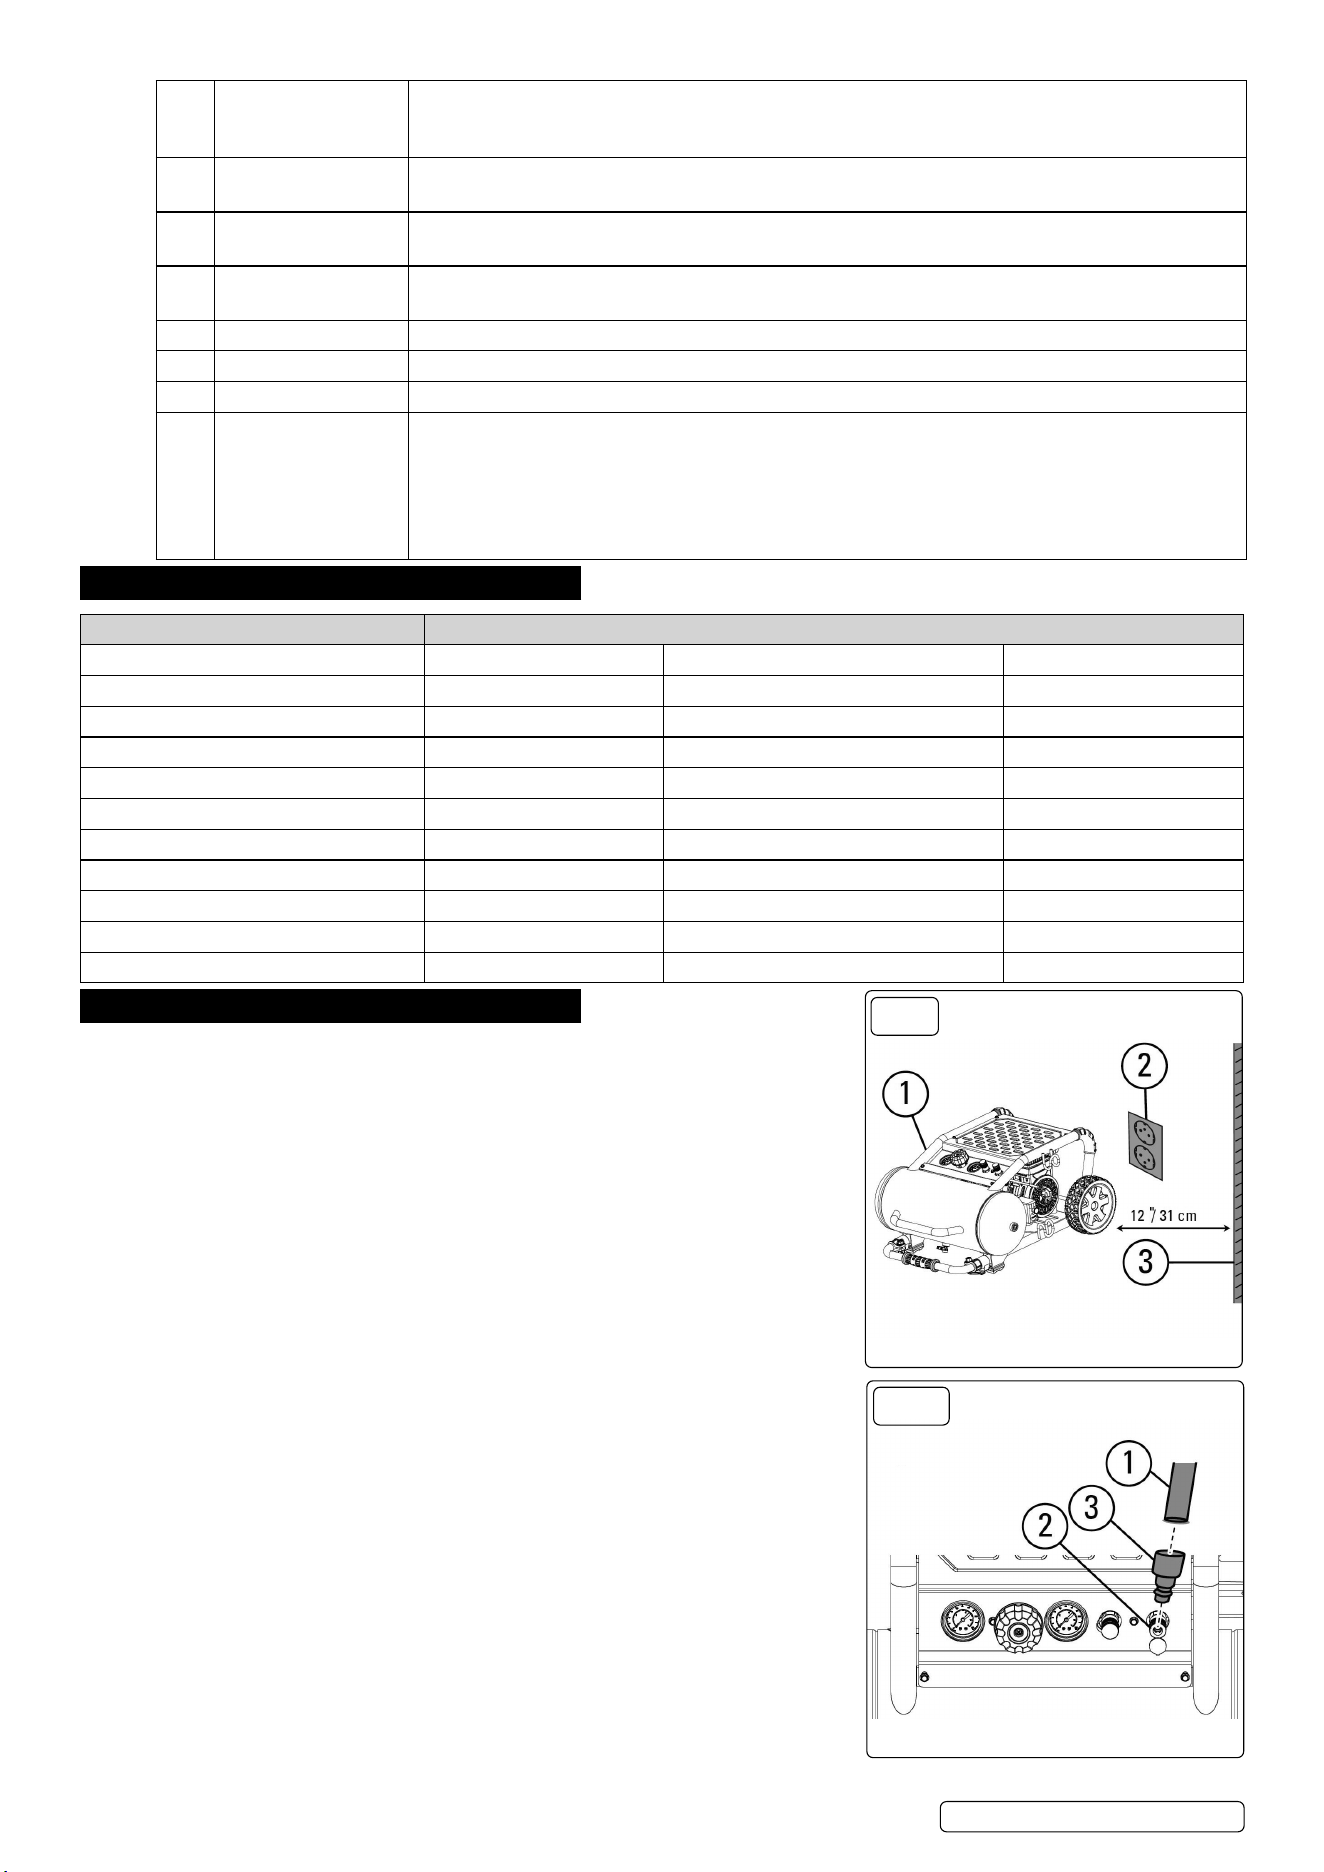
5.2. POSITIONING OF THE AIR COMPRESSOR (FIG.1)
5.2.1. Position the air compressor (1) near an electrical outlet (2).
5.2.2. The compressor must be at least 12”(31cm) from any wall (3) or obstruction, in a clean,
well-ventilated area to ensure sucient air ow and cooling.
5.2.3. Place the air compressor on the oor or a hard,level surface. The air compressor must
be level to ensure proper drainage of the moisture in the tank.
5.3. CONNECT AIR HOSE TO COMPRESSOR (FIG.2)
5.3.1. Connect the air hose (1) to the compressor’s quick coupler (2) with the quick connector
(3).
NOTE: Air hose and quick connector are not provided and need to be purchased
separately. Apply PTFE tape on all the threads to prevent air leakage.
WARNING! High pressure air could result in death or serious injury. Never operate
above maximum operating pressure of the spray gun or tool.
WARNING! Hot compressor surfaces could result in serious injury. Allow compressor
to cool before touching.
NOTE: If the pump has been transported or turned upside down (even partially),
allow the pump to sit in a normal, upright position for approximately 10 minutes before
starting.
WARNING! Risk of serious eye injury from moisture and debris. Always wear CE
safety goggles when opening drain valve.
WARNING! High pressure air could result in death or serious injury. Shut o unit,
unplug and release air pressure prior to servicing.
CAUTION: High pressure air containing water condensation could result in minor or
moderate injury. Do not spray at any person.
FIG.1
FIG.2
SAC1900 Issue 3 (3,4) 16/05/24
Original Language Version
© Jack Sealey Limited
6. OPERATION
FIG.4
FIG.5
FIG.3
6.1. BREAK IN THE PUMP
6.1.1. Set the pressure switch to the OFF position (g.3).
6.1.2. Open tank drain valve by turning it counter-clockwise to permit the air to escape and prevent air pressure build-up in the air tank during
the break-in period (g.4).
6.1.3. Turn the air pressure regulator knob clockwise until it stops (g 5).
6.1.4. Plug in the power cord
Use a dedicated circuit. The compressor will use the full capacity of a typical 10A household circuit. If any other electrical devices are
drawing from the compressor’s circuit, the air compressor may fail to start voltage or an overload circuit can result in sluggish starting
that causes the motor overload protection system or circuit breaker to trip, especially in cold conditions. Disconnect the power cord only
after break-in process has been completed, otherwise the motor might get damaged.
6.1.5. Set the pressure switch to the ON position. The compressor will start. Run the compressor for 30 minutes. If it fails, turn it o
immediately.
NOTE: breaking-in the unit is only required prior to rst use.
6.1.6. After 30 minutes, turn o the pressure switch.
6.1.7. Close the tank drain valve by turning it clockwise (g 4).
6.1.8. Set the pressure switch to the ON position. The air receiver will ll to “cut-out” pressure and then the compressor’s motor will stop. The
compressor is now ready for use.
6.2. BEFORE EACH START-UP
6.2.1. Set the pressure switch to the OFF position (g.3).
6.2.2. Turn the air pressure regulator knob counter-clockwise until it stops (g.5).
6.2.3. Attach hose and accessories (sold separately).
6.3. HOW TO START
6.3.1. Close the tank drain valve (g.4).
6.3.2. Plug-in the power cord.
6.3.3. Set the pressure switch (g.3) to the ON position and allow the tank pressure to build. Motor will stop when tank pressure reaches cut-
out pressure.
6.3.4. Turn the air pressure regulator knob (g.5) clockwise until desired pressure is reached.
6.3.5. The compressor is ready for use.
6.4. HOW TO SHUT DOWN
6.4.1. Set the pressure switch to the OFF position (g.3).
6.4.2. Unplug the power cord.
6.4.3. Set the tank drain valve to ON to ensure tank is drained (g.4).
7. MAINTENANCE
WARNING! Disconnect from all energy supplies before servicing.
WARNING! Display warning signs against reconnection whilst the compressor is being repaired such as:
DO NOT START
MAINTENANCE WORK
WARNING! Air contaminants taken into the compressor will aect optimum performance. Example: Body ller dust or paint overspray
will clog the pump intake lter and may cause internal damage to pump/motor components. Please note that any parts damaged by any
type of contamination will not be covered by warranty.
7.1. DAILY MAINTENANCE
7.1.1. Drain the tank. Through normal operation of your air compressor, condensation of water will accumulate in the tank. To prevent
corrosion of the tank from the inside, condensation must be drained at the end of every workday. Be sure to wear protective goggles.
Relieve the air pressure in the system then open the drain valve on the bottom of the tank to drain. Under cold conditions it is especially
important to drain the tank after each use to reduce the chance of problems resulting from the freezing of condensation water.
NOTE: Refer to 7.5 on how to drain the tank.
Pressure relief valve. Loosen the knob at the top of the safety valve to ensure normal exhaust. Tighten it again and remove any debris.
7.2. MONTHLY MAINTENANCE
7.2.1. Test for leaks. Check that all connections are tight. Small leaks in the tank, hoses,connections or transfer tubes will substantially
reduce the air compressor and tool performance. Spray a small amount of soapy water around the area of suspected leaks with a spray
bottle. If bubbles appear, repair, replace or reseal the faulty component. Do not over-tighten any connections.
SAC1900 Issue 3 (3,4) 16/05/24
Original Language Version
© Jack Sealey Limited
7.3. PRIOR TO STORING
7.3.1. Before storing the air compressor:
• Drain tank.
• Use an air blow gun to clean all dust and debris from the compressor.
• Disconnect and wind up the power cord.
• Clean the ventilation openings on the motor enclosure with a damp cloth.
• Drain all moisture from the tank.
WARNING! Storage covers could cause a re resulting in death or serious injury.
8 DO NOT place a storage cover over a hot air compressor.
9 Let equipment cool for a sucient time before placing the cover on the equipment.
7.4. STORAGE
9 Store the air compressor in a clean and dry location.
9 In cold weather, store the compressor in a warm building when it is not in use. This will reduce problems related to starting the motor
and the freezing of water condensation.
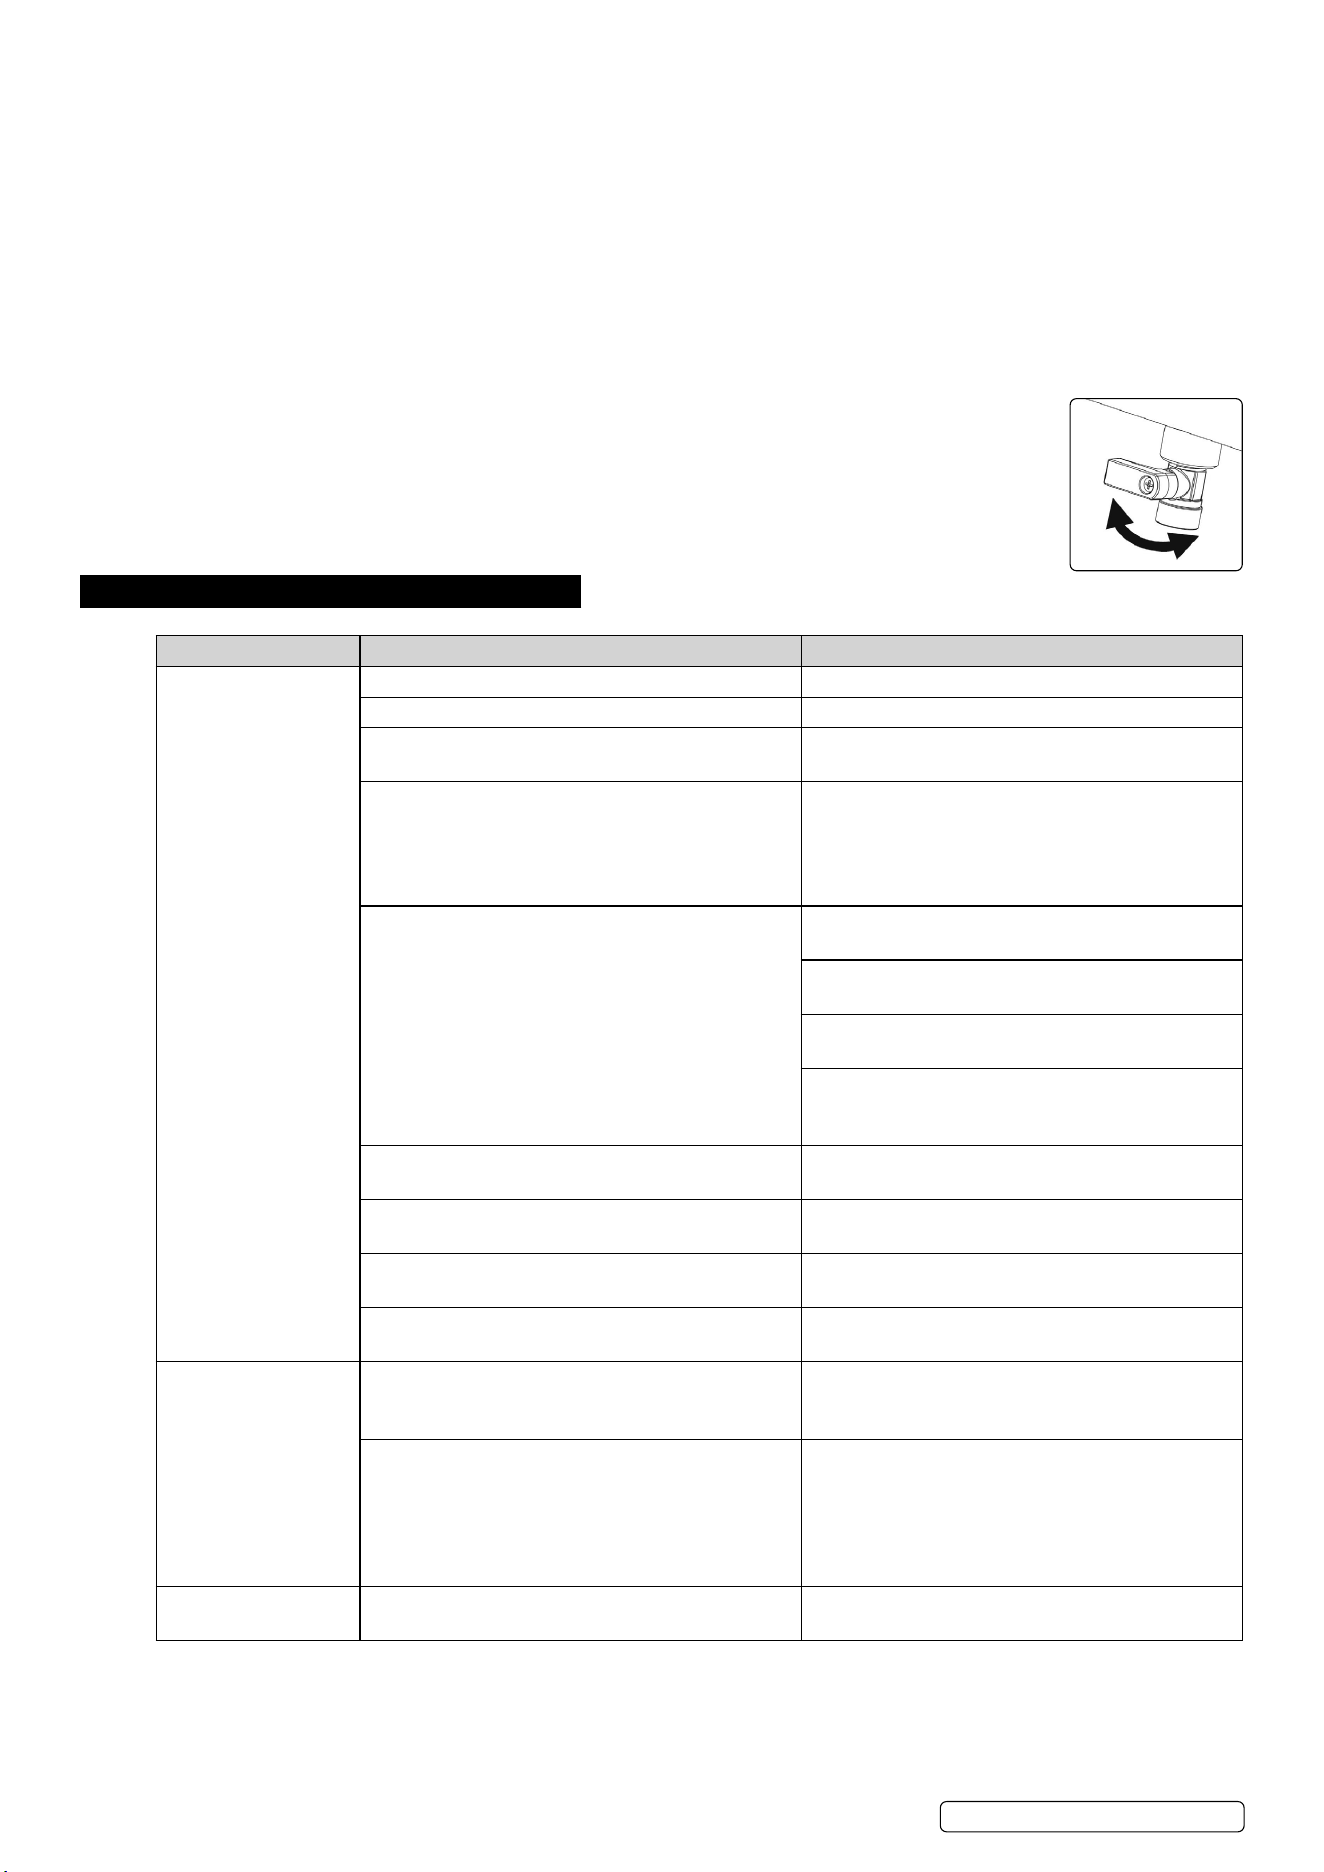
7.5. HOW TO DRAIN TANK
7.5.1. Set the pressure switch to the OFF position.
7.5.2. Unplug the power cord.
7.5.3. Turn air pressure regulator knob counter-clockwise to set the outlet pressure to zero.
7.5.4. Place suitable container under unit to catch water.
7.5.5. Slightly tilt unit and turn drain valve counter-clockwise to open.
7.5.6. After the water has been drained,close the drain valve(clockwise). The air compressor can now be stored.
8. TROUBLESHOOTING
PROBLEM POSSIBLE CAUSE SOLUTION
The motor will not run
or start.
The power cord is not plugged in. Plug the power cord into a grounded outlet.
The pressure switch is in the OFF position. Set the pressure switch to the ON position.
The extension cord is the wrong wire gauge or is too
long.
Check extension cord information for the proper wire
gauge and cord length.
The motor’s thermal overload protection has tripped. Turn the air compressor o, unplug the power cord
and wait until the motor has cooled down. Plug
in the power cord only after the motor has cooled
down, and wait at least 5 minutes to make sure the
thermal overload protector has recovered.
A fuse has blown or a circuit breaker has been
tripped.
Replace the fuse or reset the circuit breaker.
Verify that the fuse has the proper amperage.
Check for low voltage conditions.
Disconnect any other electrical appliances from the
circuit or operate the compressor on a dedicated
circuit.
The air tank pressure exceeds the preset pressure
switch limit.
The motor will start automatically when the tank
pressure drops below the cut-in pressure.
The safety valve is stuck open. Clean or replace the safety valve.
Electrical connections are lose. Contact an authorized service centre
The motor, capacitor or safety valve is defective. Contact an authorized service centre
The motor runs
continuously when the
pressure switch is in
the ON position.
The pressure switch does not shut o the motor
when the air compressor reaches the cut-out
pressure and the safety valve activates.
Set the pressure switch to the OFF position. If the
motor does not shut o, unplug the air compressor.
If the pressure switch is defective, replace it.
The compressor’s capacity is not enough. Check the air requirements of the accessory that
is being used. If it is higher than the L/MIN and
pressure supplied by the compressor (page 2), a
larger capacity air compressor is needed. Most
accessories are rated at 25% of actual
L/MIN while running continuously.
The regulator does not
regulate the pressure.
The regulator or its internal parts are dirty or
damaged.
Replace the regulator.
Sealey Group, Kempson Way, Suffolk Business Park, Bury St Edmunds, Suffolk. IP32 7AR
01284 757500 sales@sealey.co.uk www.sealey.co.uk
Note: It is our policy to continually improve products and as such we reserve the right to alter data, specications and component parts without prior notice.
Important: No Liability is accepted for incorrect use of this product.
Warranty: Guarantee is 12 months from purchase date, proof of which is required for any claim.
ENVIRONMENT PROTECTION
Recycle unwanted materials instead of disposing of them as waste. All tools, accessories and packaging should be
sorted, taken to a recycling centre and disposed of in a manner which is compatible with the environment. When
the product becomes completely unserviceable and requires disposal, drain any uids (if applicable) into approved
containers and dispose of the product and uids according to local regulations.
REGISTER YOUR
PURCHASE HERE
WEEE REGULATIONS
Dispose of this product at the end of its working life in compliance with the EU Directive on Waste Electrical and Electronic
Equipment (WEEE). When the product is no longer required, it must be disposed of in an environmentally protective way. Contact
your local solid waste authority for recycling information.
SAC1900 Issue 3 (3,4) 16/05/24
Original Language Version
© Jack Sealey Limited
The pressure is low or
there is not enough air.
There is a leak at one of the ttings. Check the ttings with soapy water. Tighten or
reseal leaking ttings (apply plumber s tape on
threads). Do not over tighten.
The tank drain valve is open. Close the drain valve.
The air intake is restricted. Clean or replace the air lter element.
Prolonged excessive use of air. Decrease the amount of air used.
There is a hole in the air hose. Check the air hose and replace it if necessary.
The tank leaks. Replace the tank immediately. Do not attempt to
repair it.
The valve is leaking. Check for worn parts and replace them if necessary.
There is moisture in
the discharge air.
There is condensation in the air tank caused by a
high level of atmospheric humidity or because the
air compressor has not been running long enough.
Drain the air tank after each use. Drain the air tank
more often in humid weather and use an air-line
lter.
The compressor
overheats.
The ventilation is inadequate. Relocate the compressor to an area with cool, dry
and well-circulated air.
Cooling surfaces are dirty. Clean all cooling surfaces on the pump and the
motor thoroughly.
The valve is leaking. Replace worn parts and reassemble using new
plumber’s tape.
