User
Manual
TD1 Mate Series
For any questions and malfunctions
of the appliance during use,please
contact our customer service email:

CATALOGUE

SAFETY WARNING
WHAT'S IN THE BOX
OVERVIEW
ASSEMBLY
SPECIFICATION
OPERATING INSTRUCTIONS
CLEANING AND MAINTENANCE
CLEANING A CLOG
TROUBLESHOOTING
WARRANTY
01
03
04
06
06
07
14
17
18
19
1
2
3
4
5
6
7
8
9
10

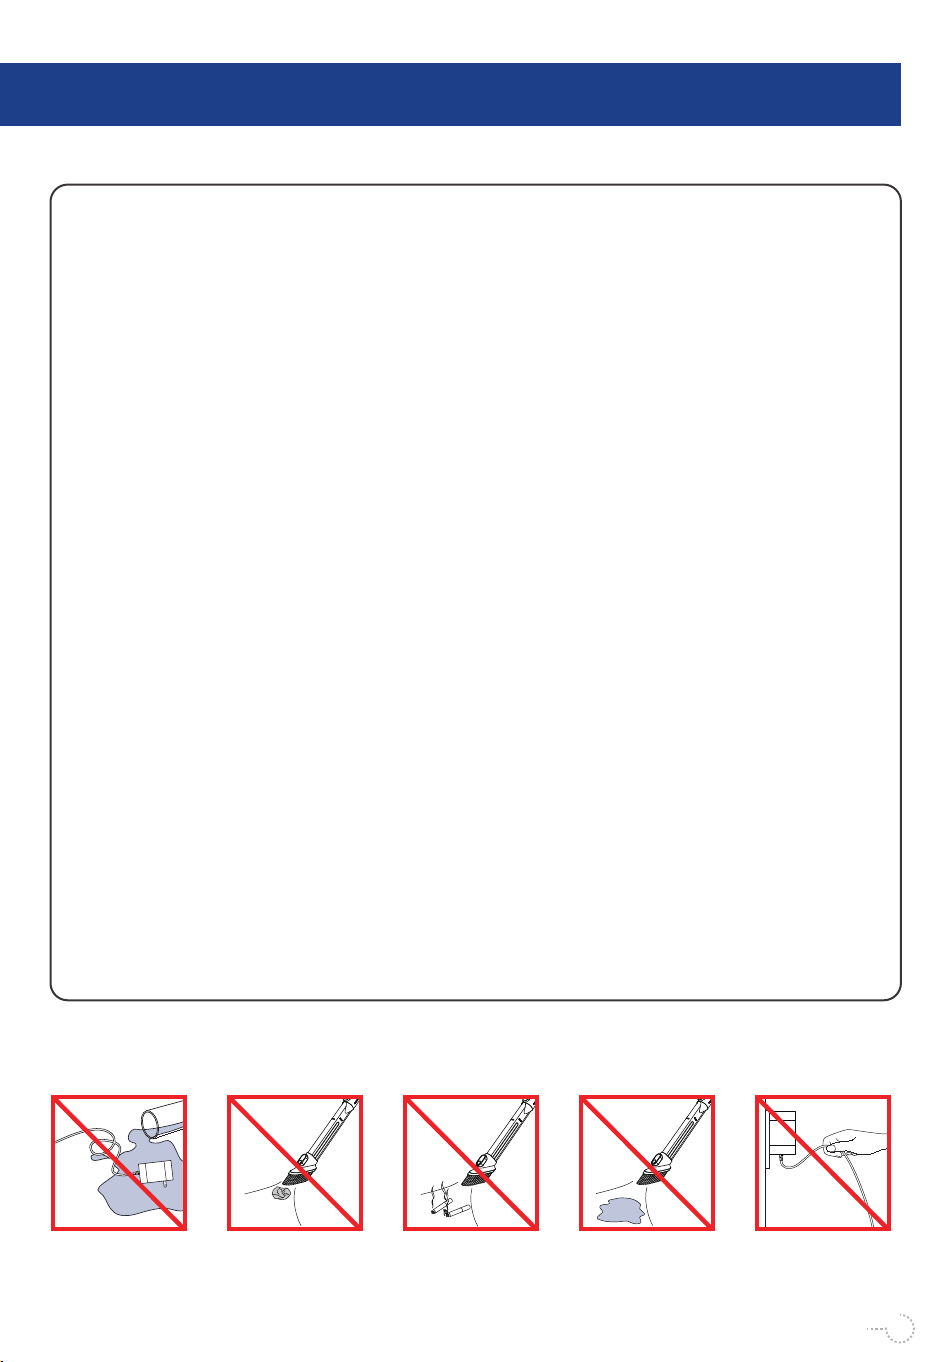
SAFETY WARNING
1
IMPORTANT SAFETY INSTRUCTIONS
When using an basic precautions should always be followed, including the following:
READ ALL INSTRUCTIONS BEFORE USING (THIS APPLIANCE)
WARNING: TO REDUCE THE RISK OF FIRE, ELECTRIC SHOCK,
DAMAGE, OR INJURY:
1. To protect against electrical shock, do not immerse the power cord or plug in
water or any other liquid. Please always operate it with dry hands to avoid the
risk of electrical shock or serious personal injury.
2. Close supervision is necessary when any appliance is used by or near
children. This vacuum is not intended for use by persons (including children) with
reduced physical, sensory, or mental capabilities, or lack of experience and
common sense unless they are supervised or have been given instructions on
using the vacuum by a person responsible for their safety.
3. Do not use the vacuum outdoors. It is for household use only.
4. Do not use the vacuum if it has been dropped, damaged, left outdoors, or
dropped in water. Please contact customer service for help when the appliance
or the adapter is damaged.
5. Use the vacuum only as described in this manual. The use of accessory
attachments not recommended may cause damage to the vacuum or personal
injuries.
6. Do not use abrasive materials to clean the vacuum. Do not use spirits or other
solvents to clean the appliance.
7. Do not use the appliance to vacuum any of the items below:
• Water, flammable, or combustible liquids such as gasoline.
• Lighted stubs, matches, hot ashes, or other combustible items.
• Needles, pins, or other sharp items.
• Wood pieces, gesso, cement, calcimine, or other tiny granules.
• Pieces of string or fabric.
8. Do not pick up liquids with the vacuum or use it on wet floors. Do not immerse
the vacuum in water.
9. Do not use the vacuum on concrete, tar, or similar rough surfaces.
10. Do not vacuum frayed carpets or carpet tassels.
01
Keep the adapter away
from liquids.
Do not vacuum large
pieces of paper.
Do not vacuum flames
or flammable
substances.
Do not vacuum water
or liquids.
Do not remove the
plug by grasping the
cord.
11. Do not use the vacuum without the dust cup lid in place.
12. Do not put any objects into openings of the vacuum. Do not use when any
openings are blocked. Keep free of dust, lint, hair, or anything that may reduce
air flow.
13. Keep hair, loose clothing, fingers, and all body parts away from openings and
moving parts.
14. Store the vacuum indoors. Store after use to prevent accidents.
15. Keep the vacuum cleaner away from stoves and heat-emitting appliances.
Heat can deform and discolor the plastic parts of the unit. Please use the vacuum
at the temperatures between 32ºF-104ºF.
16. Always remove the adapter from the power socket when the appliance is not
being charged.
17. Unplug charging cord from the appliance and power it off before cleaning or
performing maintenance, making tool adjustments, changing accessories, or
storing, to avoid powering it on accidentally.
18. The battery must be removed from the appliance before disposing of it.
19. The battery must be disposed of safely.
20. The appliance includes Li-ion batteries. Do not incinerate the batteries or
expose them to high temperatures, as they may explode.
21. The thermal cutout will switch off the vacuum automatically when it over-
heats. If this happens, turn off the power switch, and wait for 45 minutes to restart
the vacuum.
22. Use only the adapter provided by the manufacturer.
02
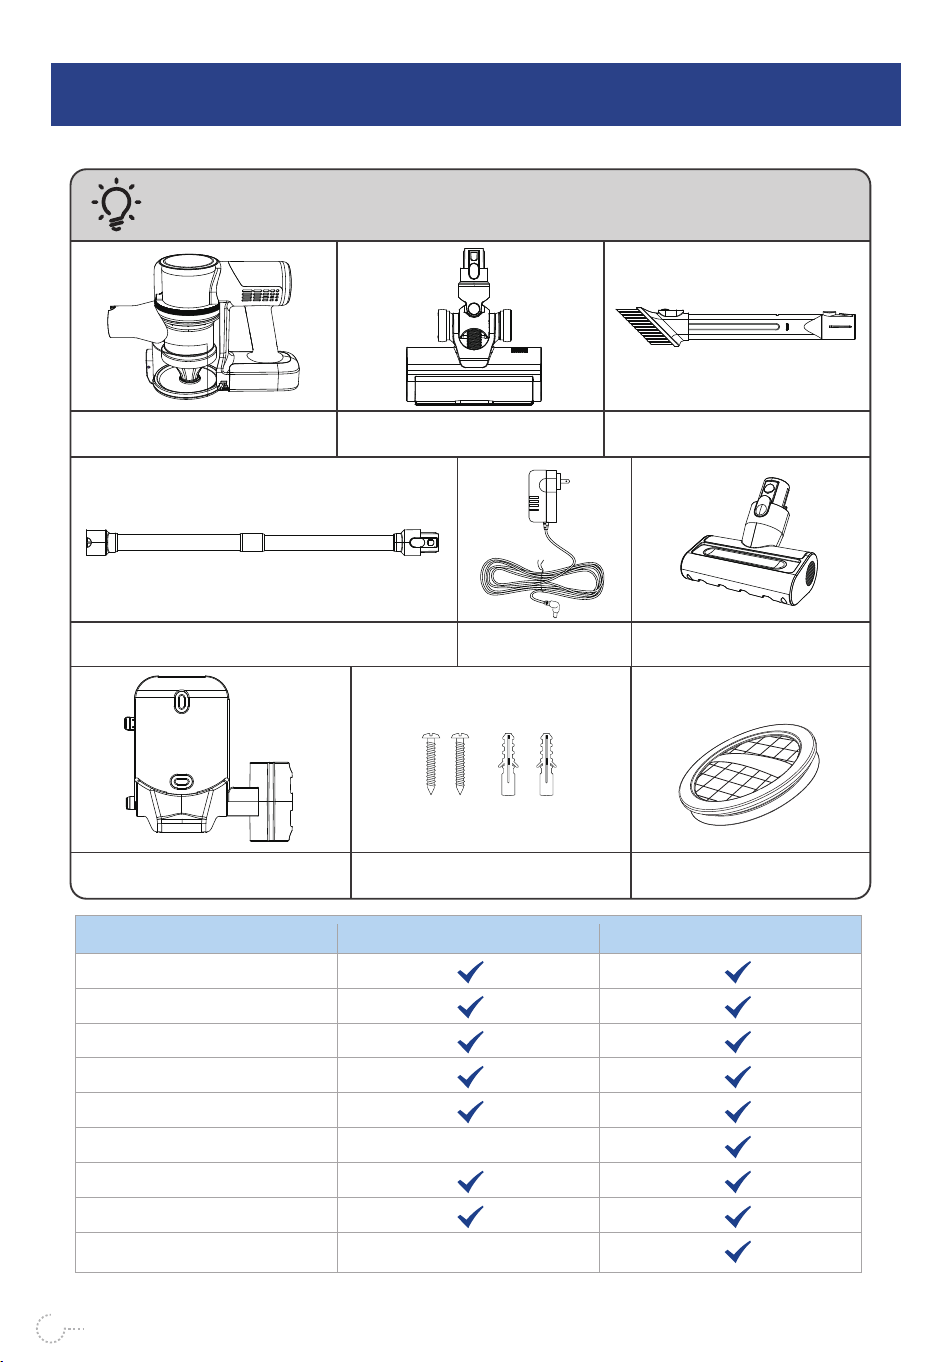
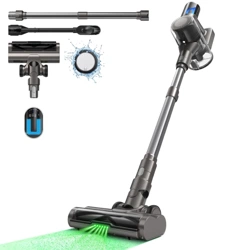
WHAT'S IN THE BOX
2
Vacuum Main Body
Extension Rod
Electric Floor Brush
2-in-1 Crevice Tool
Wall Hanger
Adapter
Screws and Wall Anchors
TD1 MateName/Model
Vacuum Main Body
Electric Floor Brush
2-in-1 Crevice Tool
Extension Rod
Adapter
Electric Sofa Brush
Wall hanger
Screws and Wall Anchors
Extra Hepa×2
TD1 Mate-B
03
CAUTION:
Assemble the vacuum according to the "Assembly" section.
Electric Sofa Brush
Extra Hepa×2
TD1 Mate
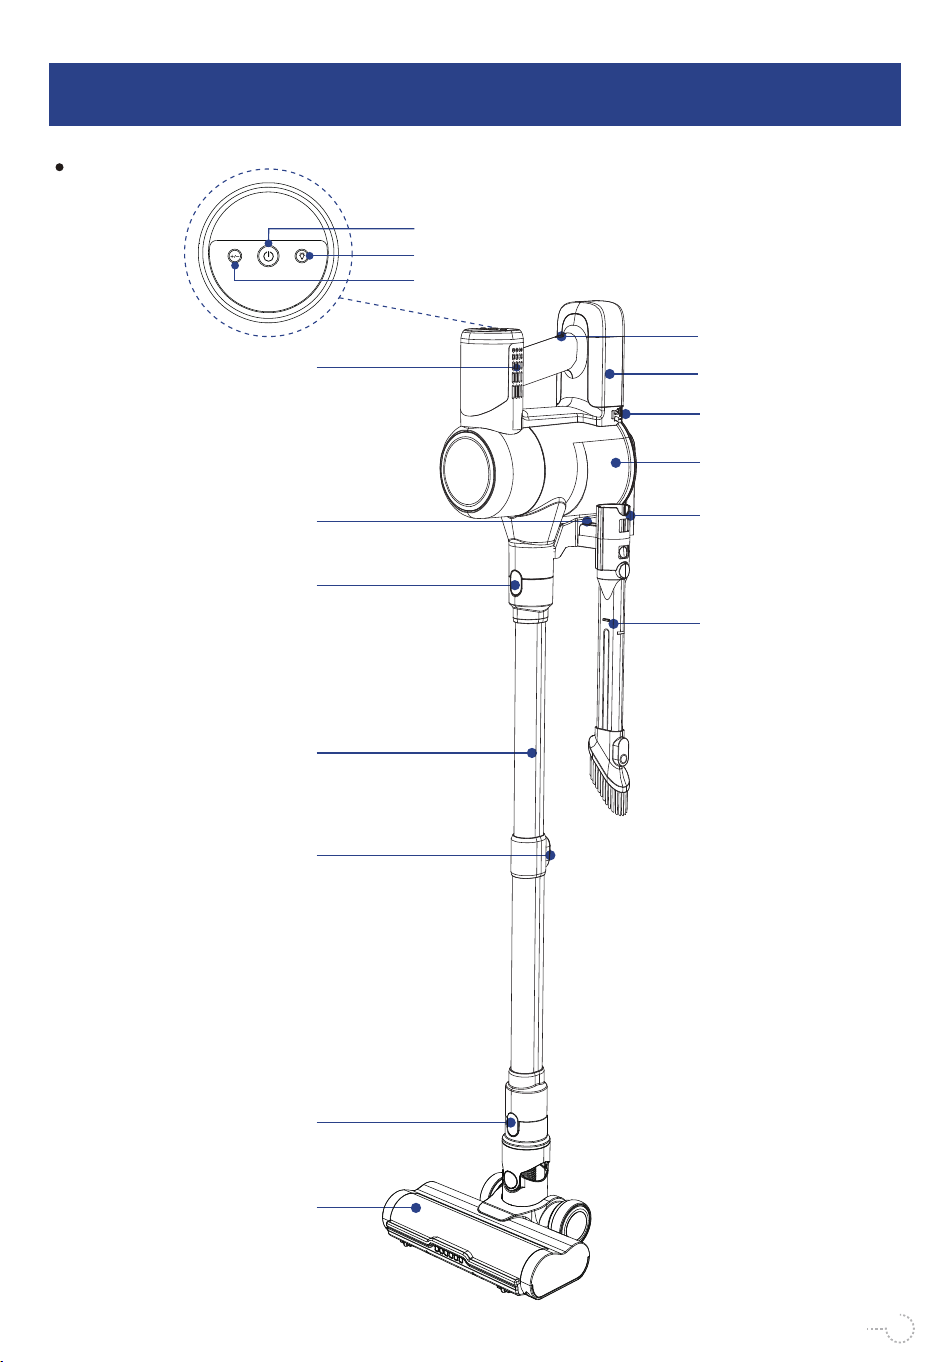
OVERVIEW
3
Air Outlet
Electric Floor Brush
2-in-1 Crevice
Tool
Extend Button
One-key Empty
Dust Button
Floor Brush
Release Button
Battery Pack
Release Button
Dust Cup Removal
Button
Battery Pack
Power Switch
Suction Mode Switch
04
Light Switch
Extension Rod
Extension Rod
Release Button
Wall Hanger
Dust Cup
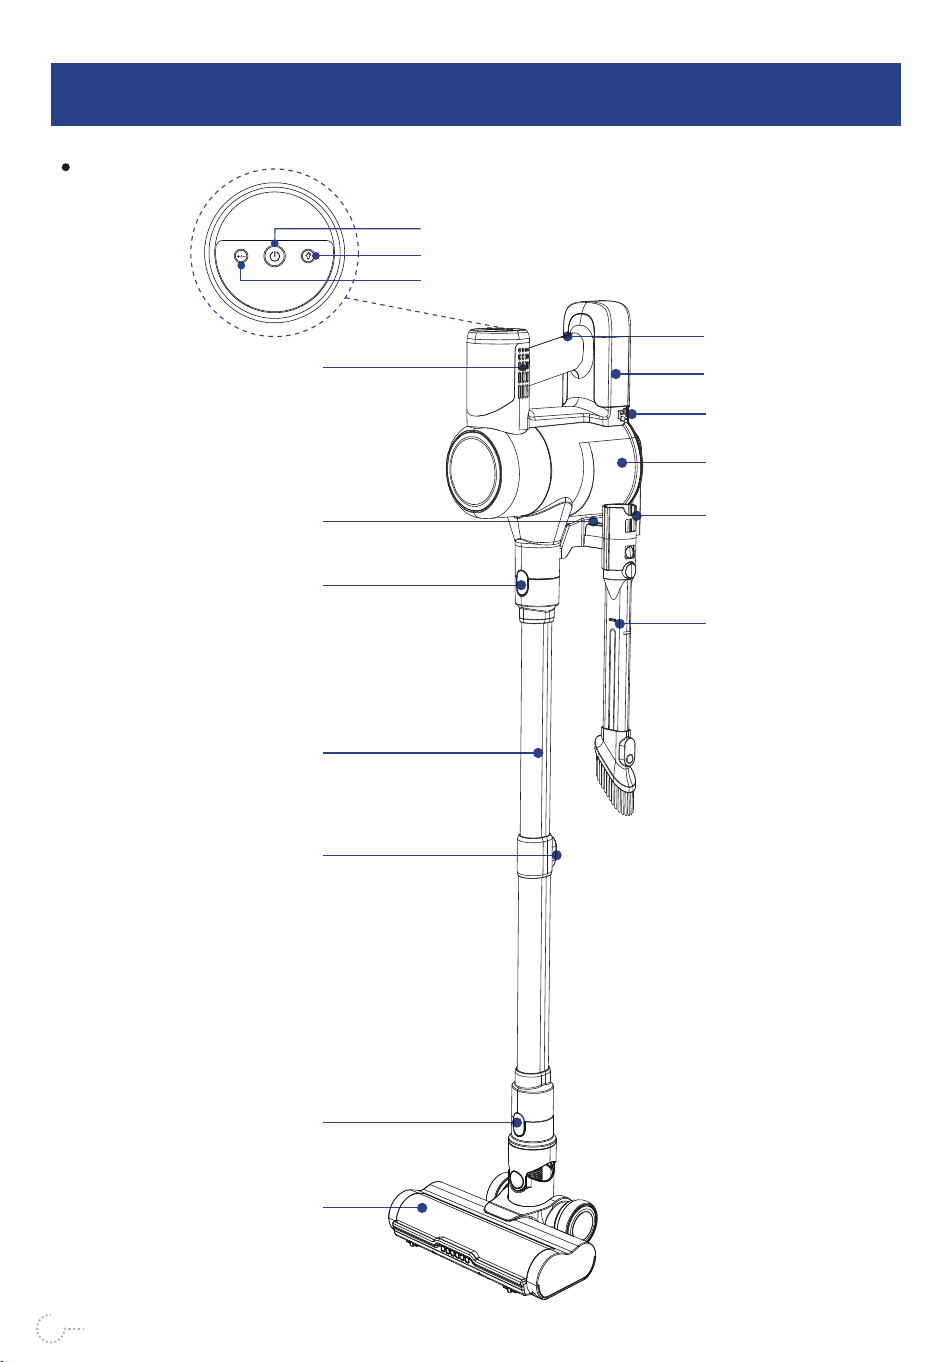
OVERVIEW
3
05
TD1 Mate-B
Air Outlet
Electric Floor Brush
2-in-1 Crevice
Tool
Extend Button
One-key Empty
Dust Button
Floor Brush
Release Button
Battery Pack
Release Button
Dust Cup Removal
Button
Battery Pack
Power Switch
Suction Mode Switch
Light Switch
Extension Rod
Extension Rod
Release Button
Wall Hanger
Dust Cup
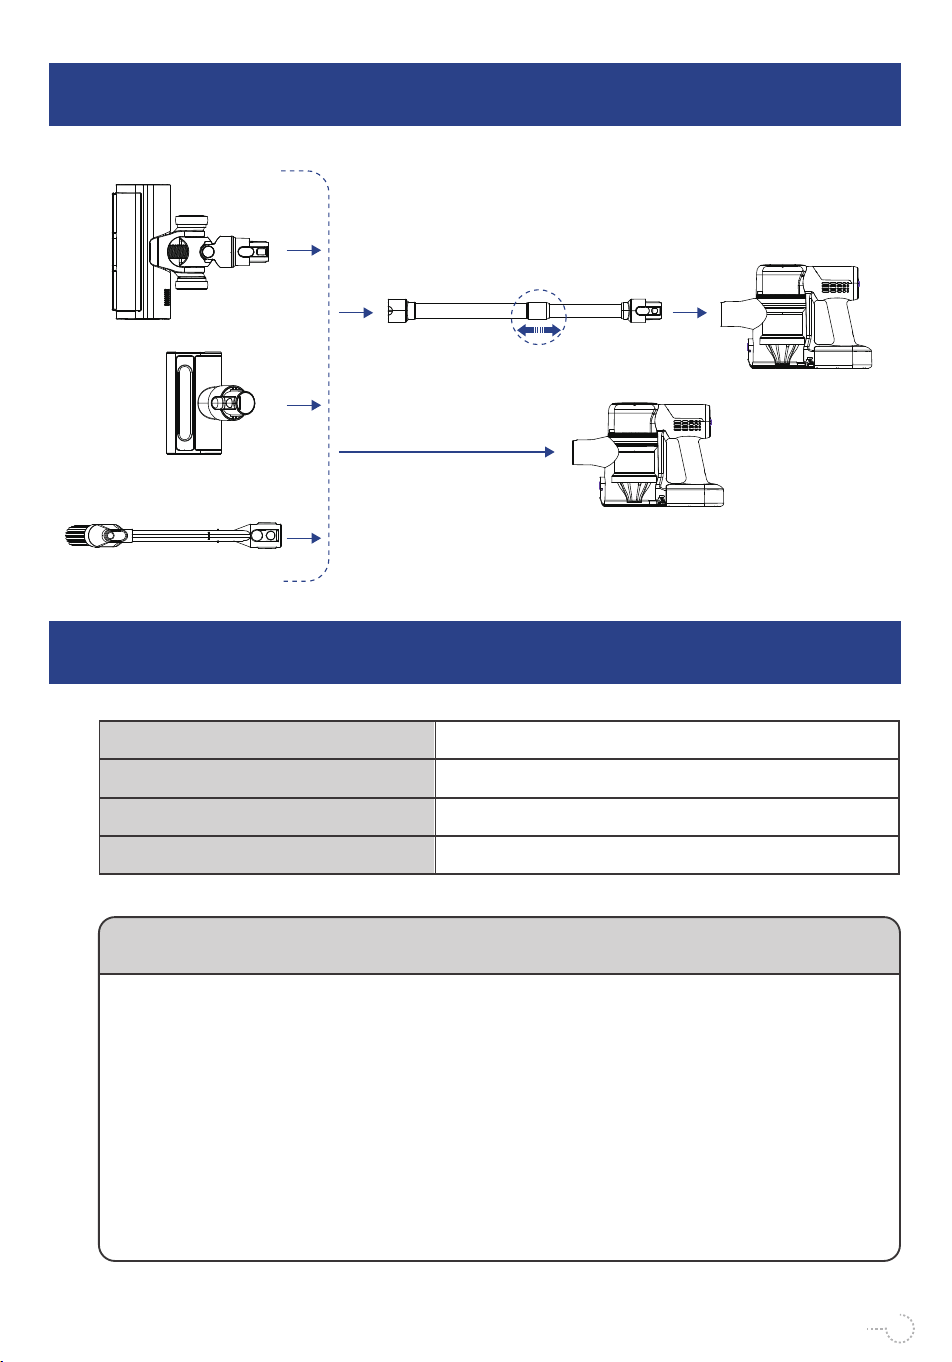
ASSEMBLY
4
SPECIFICATION
5
The chemical substances contained in the built-in lithium-ion battery of this product will pollute the environment. Before
discarding the product, the battery must be removed and handed over to a professional waste battery recycling station
for disposal.
Do not dispose of old appliances with household waste.
Before disposing of your old machine, remove the dust cup and dust cup filter assembly, which can be disposed of with
normal household waste.
Notice:
1. When removing the battery, please make sure that the power is exhausted and operate with the adapter disconnect-
ed.
2. Be careful not to make the positive and negative electrodes touch when unplugging the connector, so as not to
cause a short circuit.
3. Please disassemble the entire battery pack at the same time, so as not to damage the shell of the battery pack,
cause a short circuit or cause leakage of dangerous substances.
4. If you accidentally come into contact with battery leakage, please rinse with clean water and seek medical attention.
Name
Model
Adapter Input Voltage
Adapter Output Voltage
Vacuum Cleaner
100-240V 50/60Hz
31V
Environmental Protection Instructions:
TD1 Mate Series
06
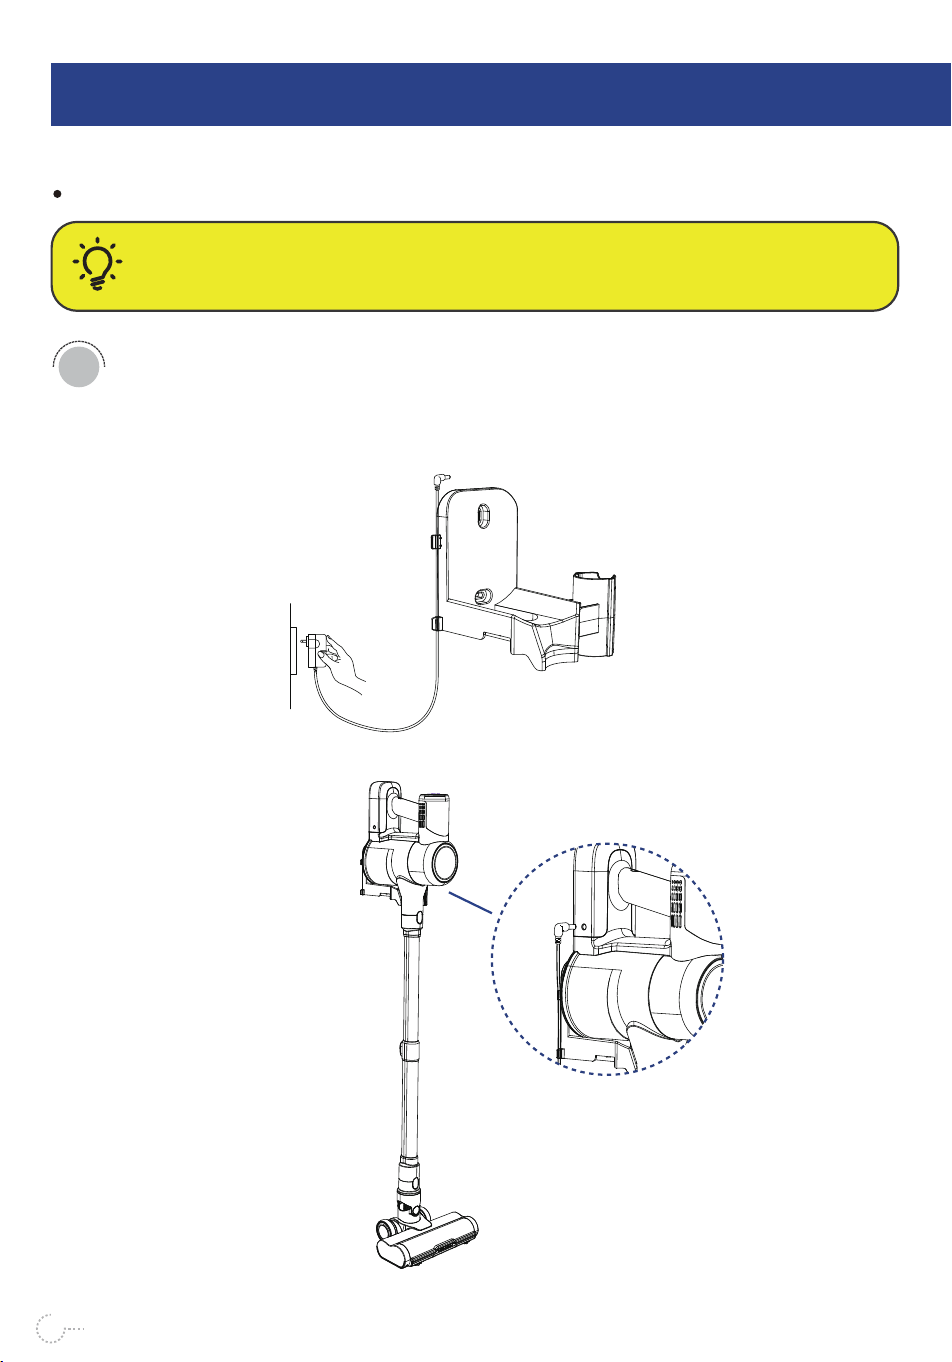
Charging Instruction
OPERATING INSTRUCTIONS
6
CAUTION:
It is important to fully charge your machine before using it for the first time and after every use.
Plug the adapter into a wall outlet and connect to the charging port of
the battery pack.
1
Charging with Wall Hanger
07
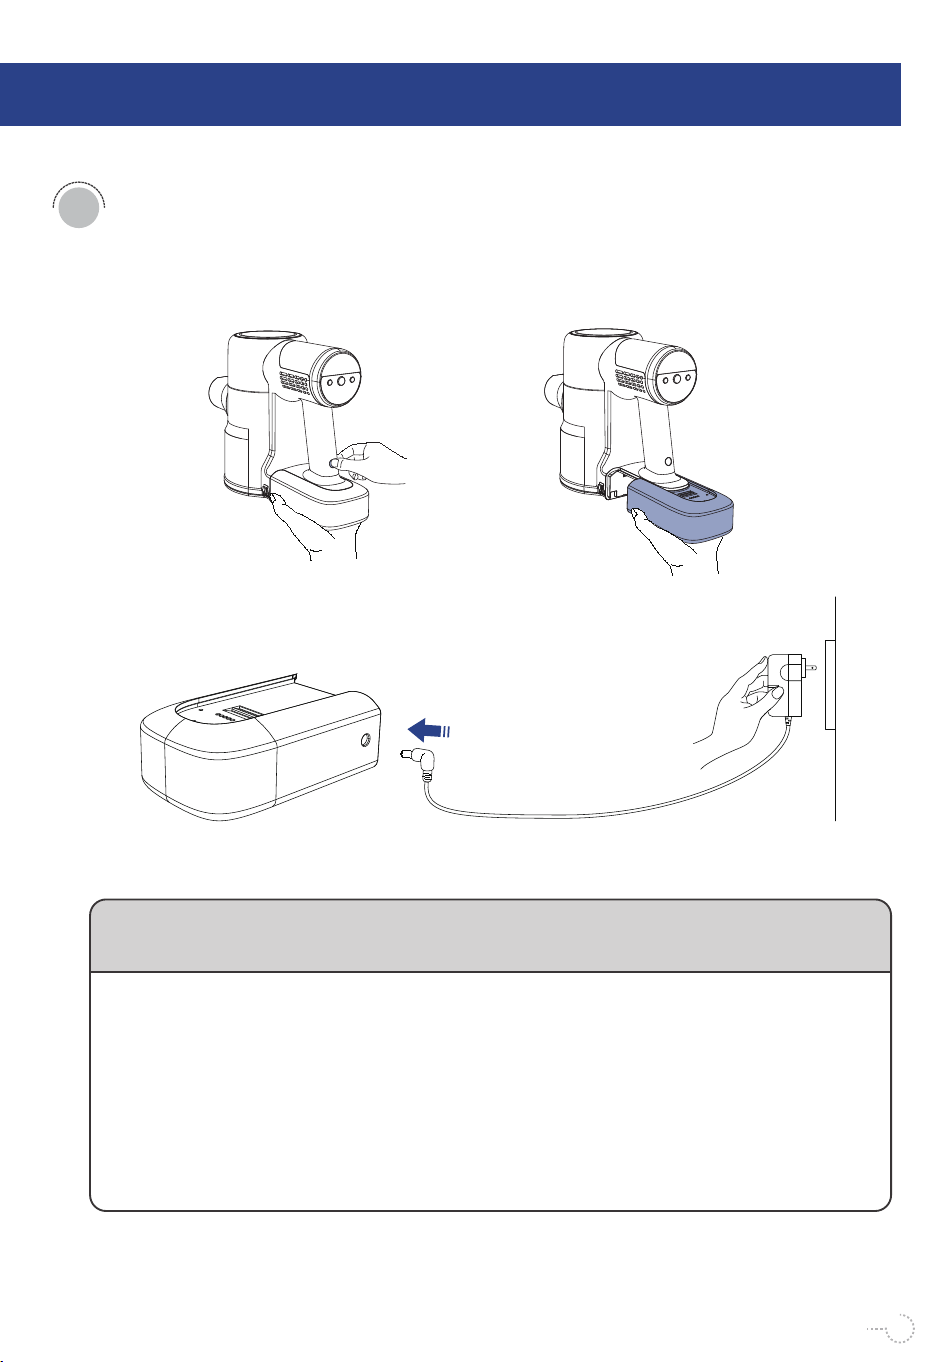
(2) Plug the adapter into a wall socket and connect it to the charging port
of the removed battery pack.
When charging, plug the adapter into the AC power socket, and plug the DC connector of
the adapter charging output cable into the charging interface of the battery pack to charge
the vacuum cleaner.
When the machine is in the charging state, the vacuum cleaner atmosphere light (blue light)
lights up, and the battery indicator light jumps in turn, indicating that the vacuum cleaner is
in the charging state, and the vacuum cleaner atmosphere light (blue light) automatically
turns off after 1 minute of charging; when the power indicator light is fully on, When it stops
flashing, it means the vacuum cleaner is fully charged.
Do not leave the vacuum cleaner in a state of low power for a long time, please pay
attention to using the original charger of this product to charge.
Description of Charging Indicator:
08
Charging with Battery Pack
(1) Press and hold the release button on the top of the battery pack while holding
the battery pack and take it out.
2
OPERATING INSTRUCTIONS
6
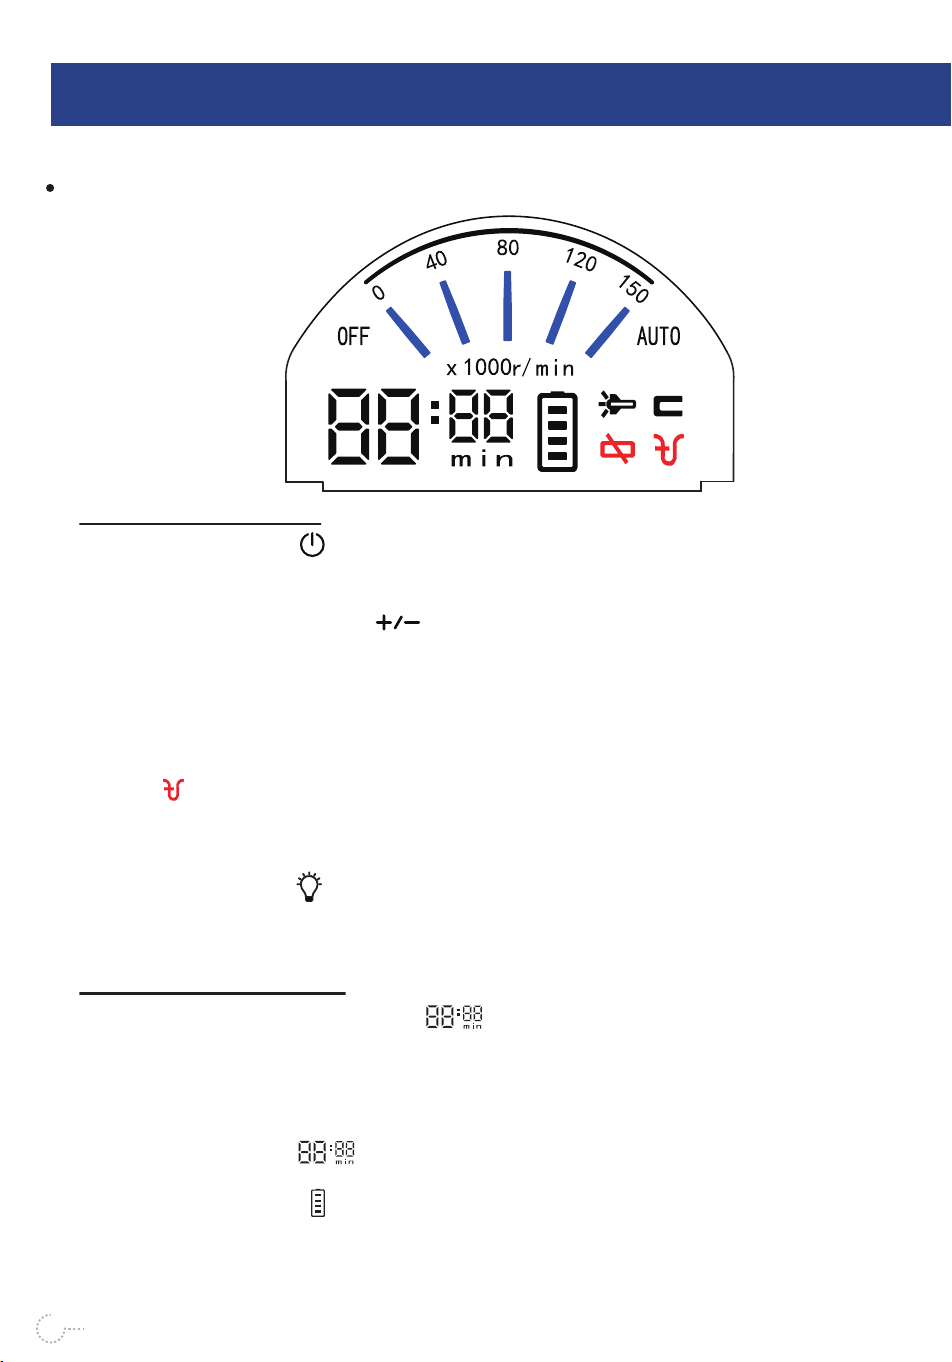
1. Press Switch Button : Vacuum cleaner starts to run, and the vacuum cleaner works
at the 80 gear by default. When vacuum cleaner is working at any gear, just press the switch
button again, and vacuum cleaner will stop running.
2. Press Speed Control Button : The working speed of vacuum cleaner, that is the
suction power of vacuum cleaner, has 5 gears, which are 0 gear, 40 gear, 80 gear, 120 gear,
and 150 gear. 40 gears, 80 gears, and 120 gears can be switched by the speed control
button.
The 0 gear is the OFF gear, and the 150 gear is the AUTO gear. The AUTO gear is realized
by automatic adjustment of the smoothness of the air duct sensed by vacuum cleaner.When
vacuum cleaner encounters a relatively serious air duct blockage, the suction blockage
indicator will flash, and vacuum cleaner will automatically switch to the AUTO gear, which
will instantly increase the suction power of vacuum cleaner and remove the blockage. If the
blockage is removed after 7 seconds, vacuum cleaner returns to the original working gear to
run.
3. Light Control Button : Can control the LED lighting on and off.
Press the light control button, the light on the brush head of the vacuum cleaner will light up,
and press it again to turn off the LED light.
1. Display of Remaining Working Time : After starting up, the display will automatically
display the remaining working time of vacuum cleaner in minutes. Within 1-2 seconds after
turning on the vacuum, the time display will fluctuate, because the CPU of vacuum cleaner
is calculating and verifying the remaining working time. Due to changes in the environment
and temperature of the vacuum cleaner, there will be a slight deviation between the remain-
ing working time display and the actual display time during use, which is normal. When the
power of battery is low The time display will blink, indicating that the battery is low
and needs to be charged immediately.
2.Battery Power Display : The 4 squares on the power display represent the remaining
power. 1 grid represents 25% power, 2 grid is 50% power, 3 grid is 75% power, 4 grid is
100% power. When charging, the 4 squares of the power display will flash one by one.
09
On-Screen Indicator Description
Button Description:
Description of Display:
When the power indicator stops flashing, it means it is fully charged.When working, the 4
squares of the power display will disappear in turn. When the bottom square is flashing, it
means that the battery is low, and the vacuum cleaner needs to be charged as soon as
possible.
3. LED Lighting Indicator : When the LED lighting indicator is on, it means that the LED
lighting of vacuum cleaner is working.
4. Ambience Light Indicator : When the ambience light indicator is on, it means the ambi-
ent light of the vacuum cleaner is working.
5. Brushroll Jam Indicator : It is necessary to clean the brush roller, remove blockages
or adjust the contact between the floor brush and the ground to avoid rugs, towels or bed
sheets getting caught in the floor brush air intake.
6. Suction Blockage Indicator : When the suction blockage alarm indicator is on (red),
it means that the air duct of vacuum cleaner is blocked, and it is necessary to check and
clean the air duct of the vacuum cleaner:
Please check whether the extension rod and the air inlet of the main body of vacuum cleaner
are blocked, and whether the filter in the main body needs to be cleaned, etc.
7.Vacuum Cleaner State Indicator : 0 gear means vacuum cleaner is OFF. 40
gear means low working state. 80 gear means mid-range working state. 120 gear means
high working state. And 150 gear is the AUTO-state.
The gears (0, 40, 80, 120, 150) are related to the speed of vacuum cleaner's motor, which
represents the state of the motor's speed. The data is larger, the speed of motor is higher.
10
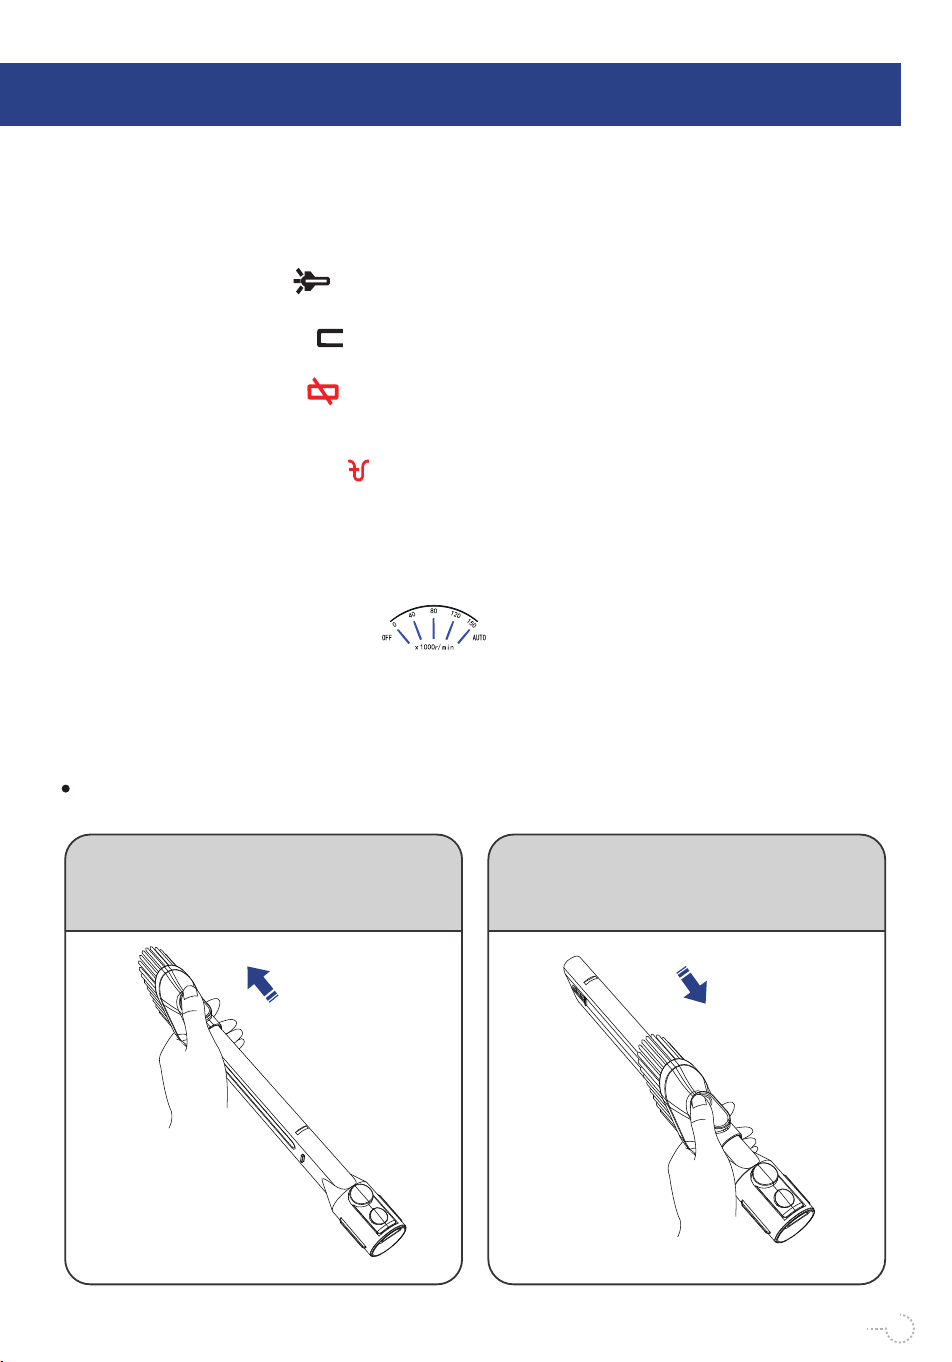
2-in-1 Crevice Tool Instruction
Press and hold the button while pushing
and pulling forward. At this time, the brush
can be used as a dusting brush to clean
keyboards, curtains, etc.
Press and hold the button while pushing
and pulling back. At this time, the brush can
be used as a flat suction to clean the gap
particles such as windows.
OPERATING INSTRUCTIONS
6
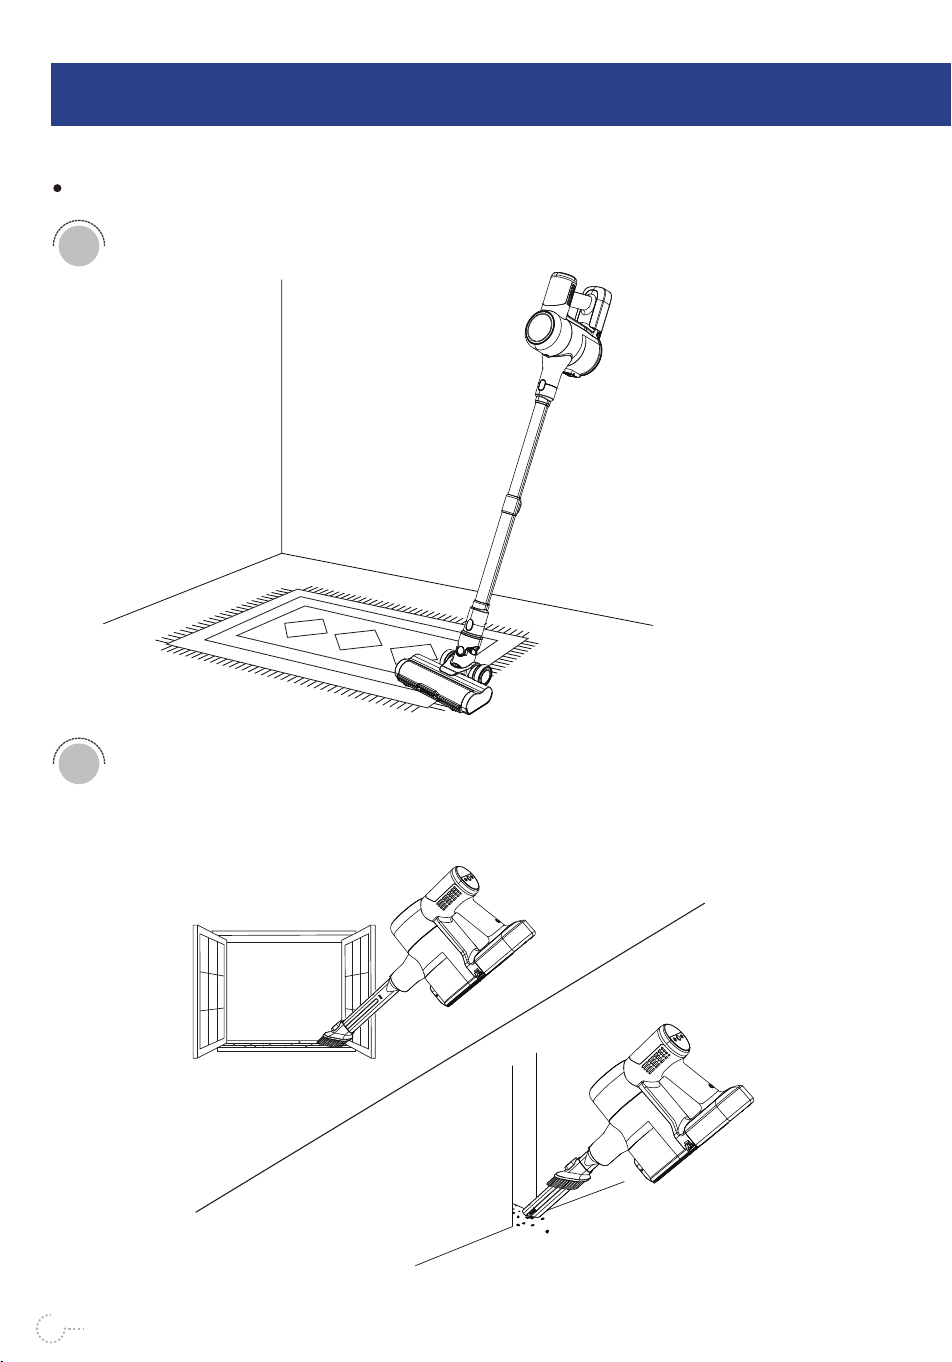
Accessories Usage Guide
Floor Brush: suitable for carpets, floors, and other flat, horizontal surfaces.
2-in-1 Brush: suitable for cleaning the dust or large particles in the gaps of
doors, windows, keyboards, car interiors, etc.
1
2
11
12
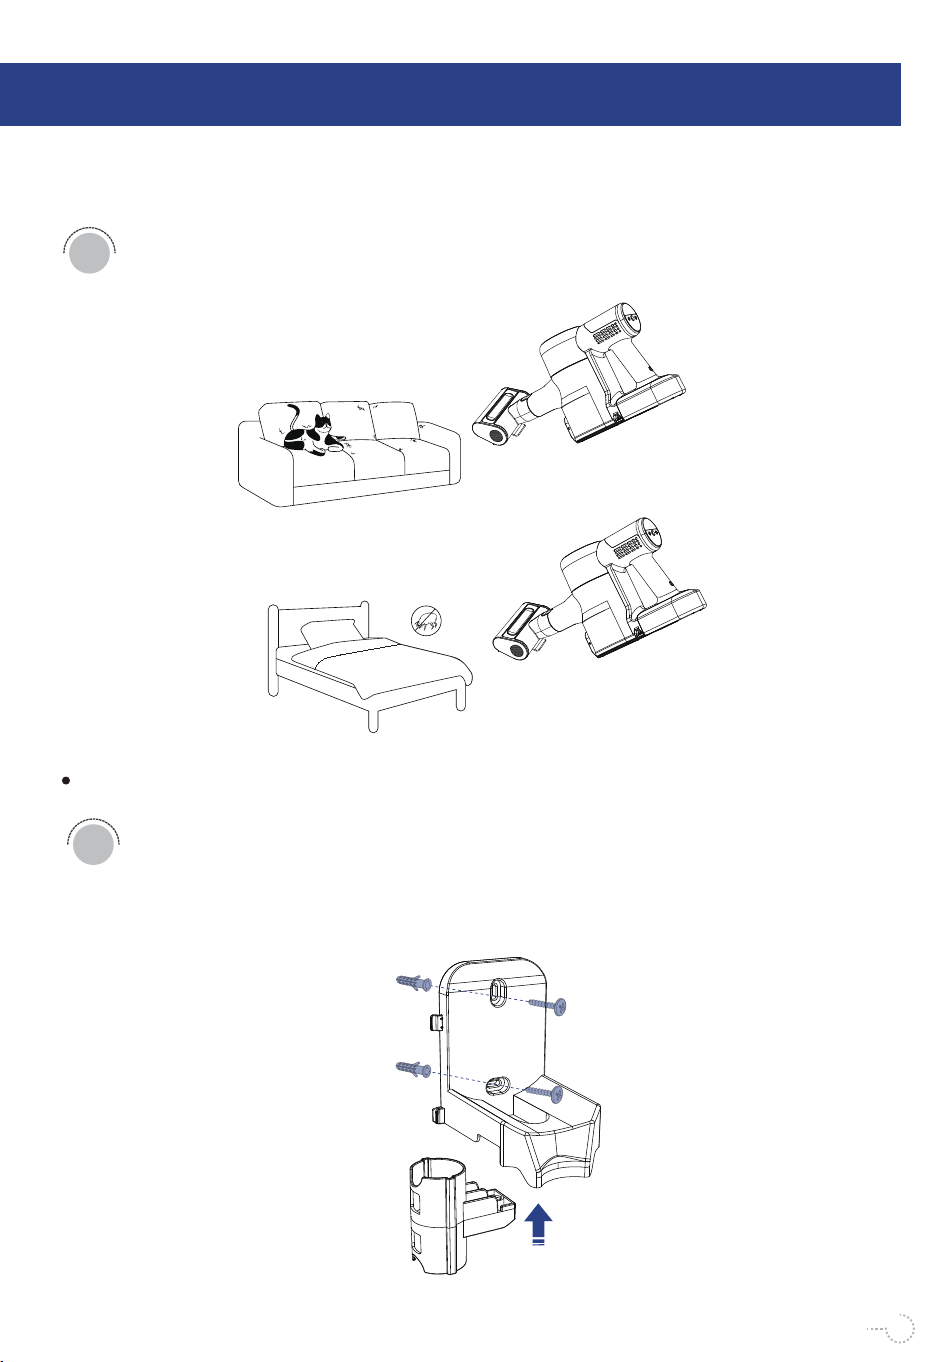
Wall Hanger Instruction
Insert wall anchors into the preinstalled holes of the wall, use two fixing
screws to respectively pass through the two installation holes of the wall
hanger.Align wall anchors, insert the fixing screw into wall anchors, and
tighten the screw clockwise.
1
Sofa Brush: suitable for surface dust, pet hair, mites, etc., on soft surfaces,
such as sofas or mattresses.
3

OPERATING INSTRUCTIONS
6
After the wall hanger is fixed, the vacuum main body is placed on the wall
hanger as shown in the figure, and the accessories are inserted into the
accessory fixing holes on the side of the wall hanging to fix, as shown in
the figure.
2
13
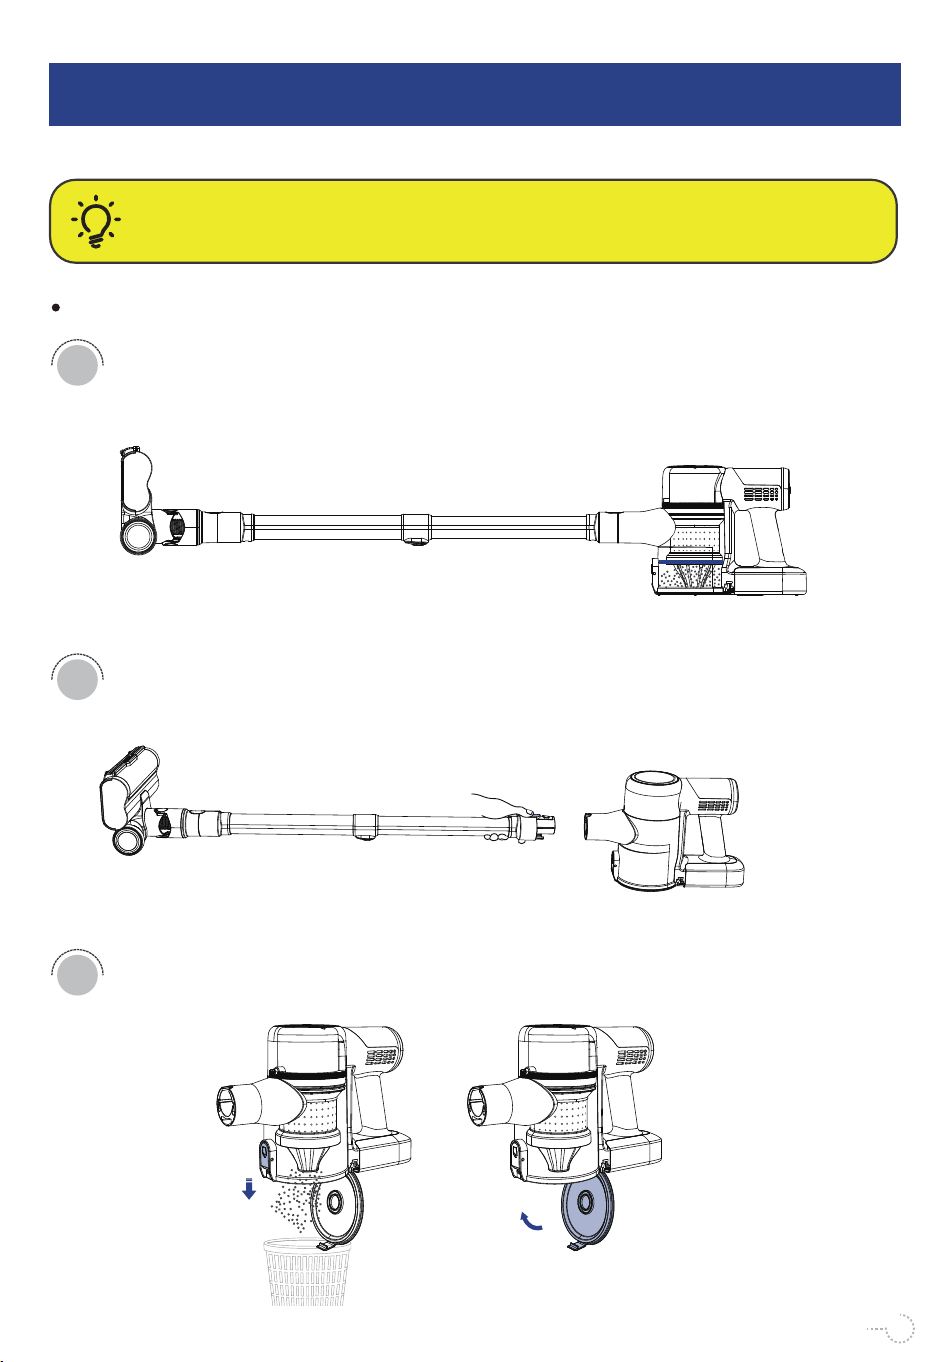
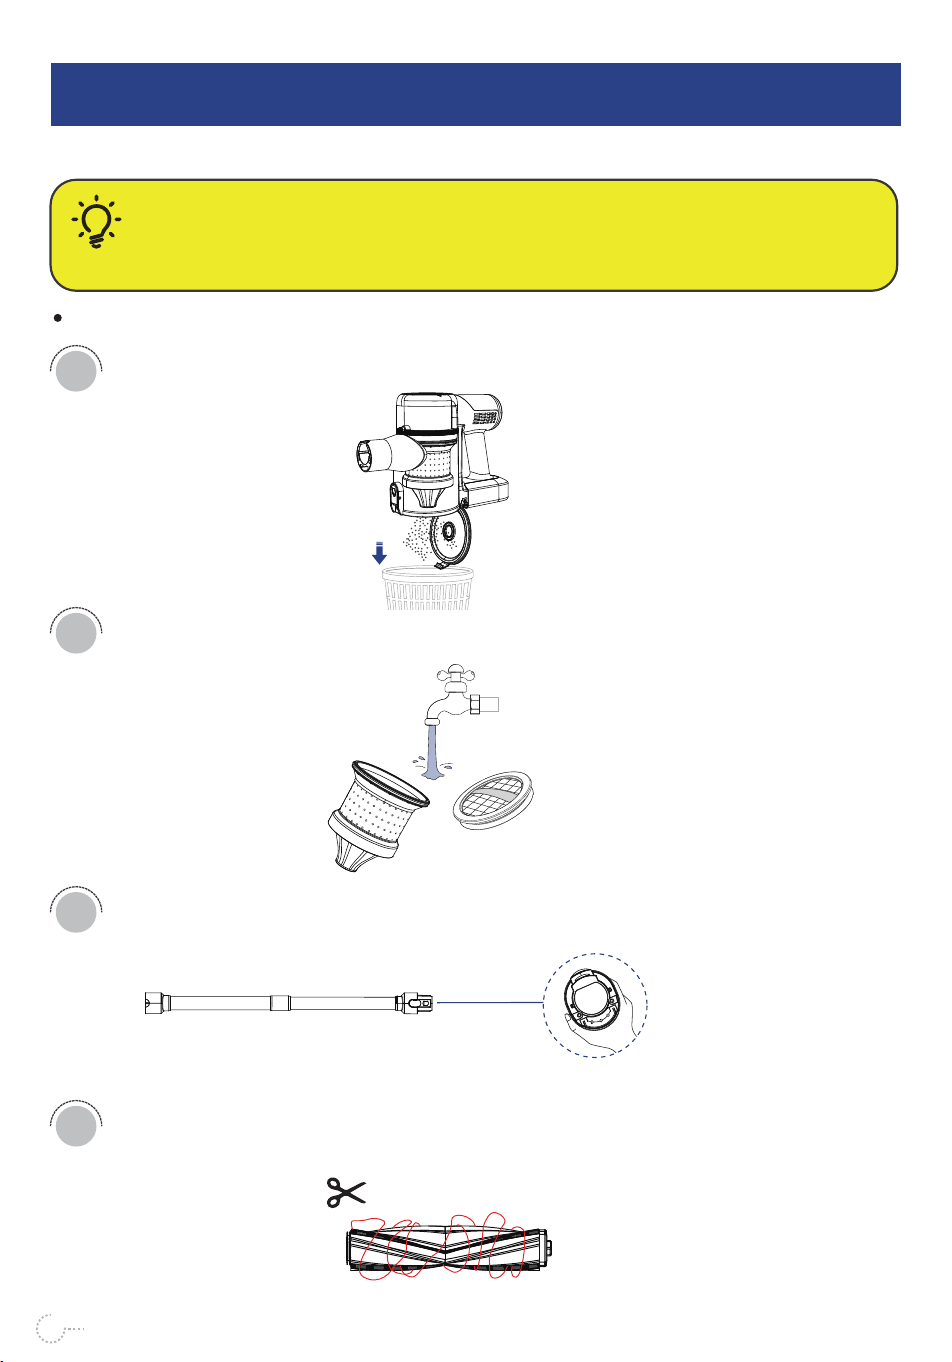
CLEANING AND MAINTENANCE
7
Clean the Dust Cup
When the dust in the dust cup exceeds the MAX mark, please empty the
dust cup in time, otherwise the suction may be weakened.
Remove the extension rod from the main body before maintaining and
cleaning dust cup and HEPA filter.
Open the dust cup cover to dump the dust, and please close the dust cup
cover after emptying the dust cup.
CAUTION:
Always switch the vacuum OFF before attempting to empty the dust cup.
1
2
3
14
CLEANING AND MAINTENANCE
7
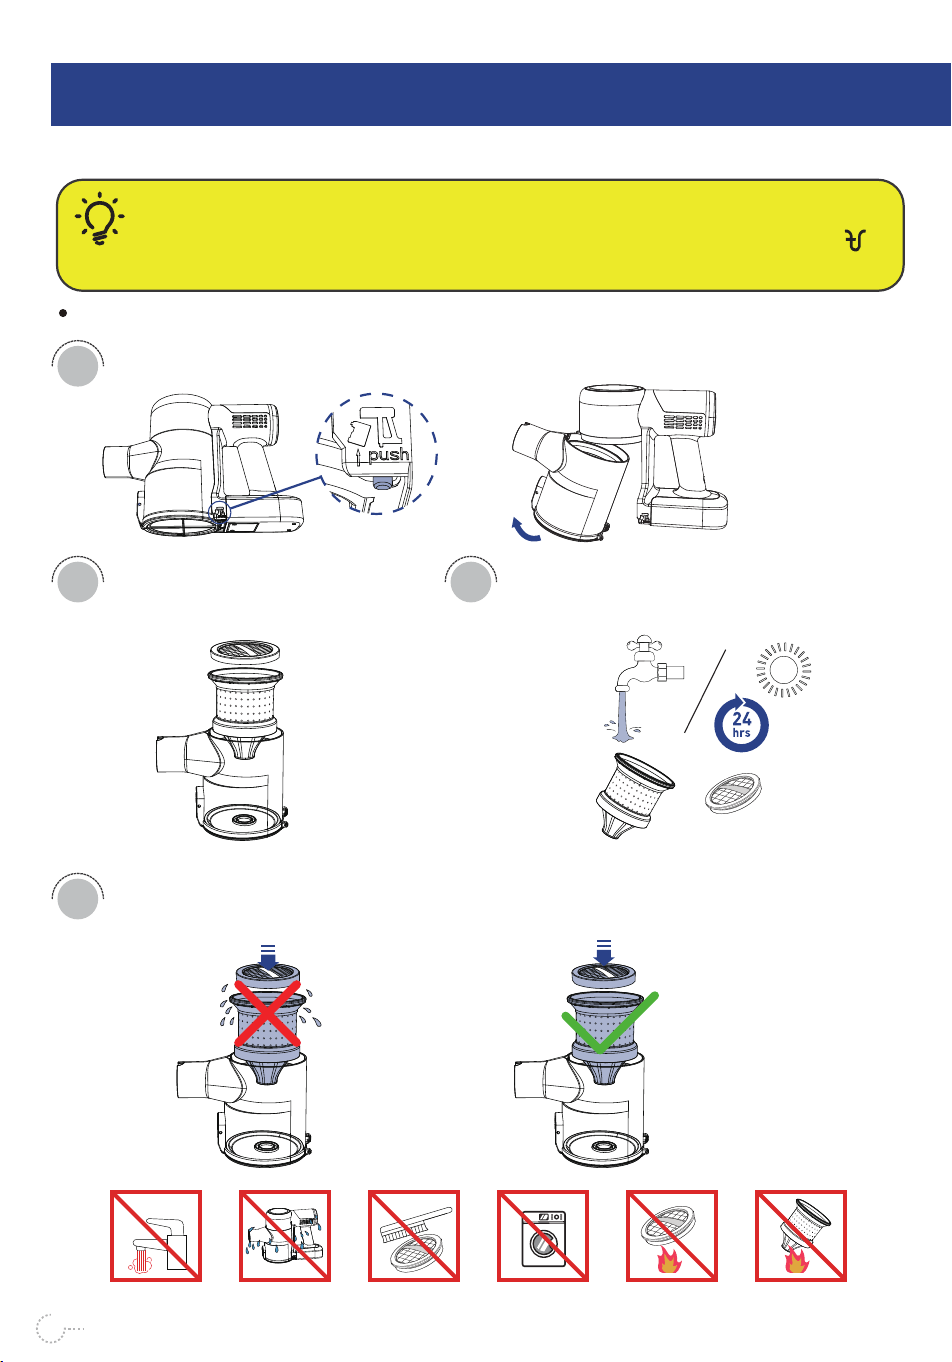
Press the dust cup release button and remove the dust cup.
1
Lift the HEPA out of the dust cup.
2
Assemble the filter screen and filter cotton back to the original position.Do not
assemble them until completely dry.
4
Cleaning the Filter Device
CAUTION:
If you find that the suction is weak or the “ Suction Blockage Indicator" on the LED screen
flashes, then please wash the filter.
Wet Dry
≥140°F
15
Clean the filter screen and filter cotton
under water, Air dry them for at least
24 hours before using them again.
3
≥140°F
16
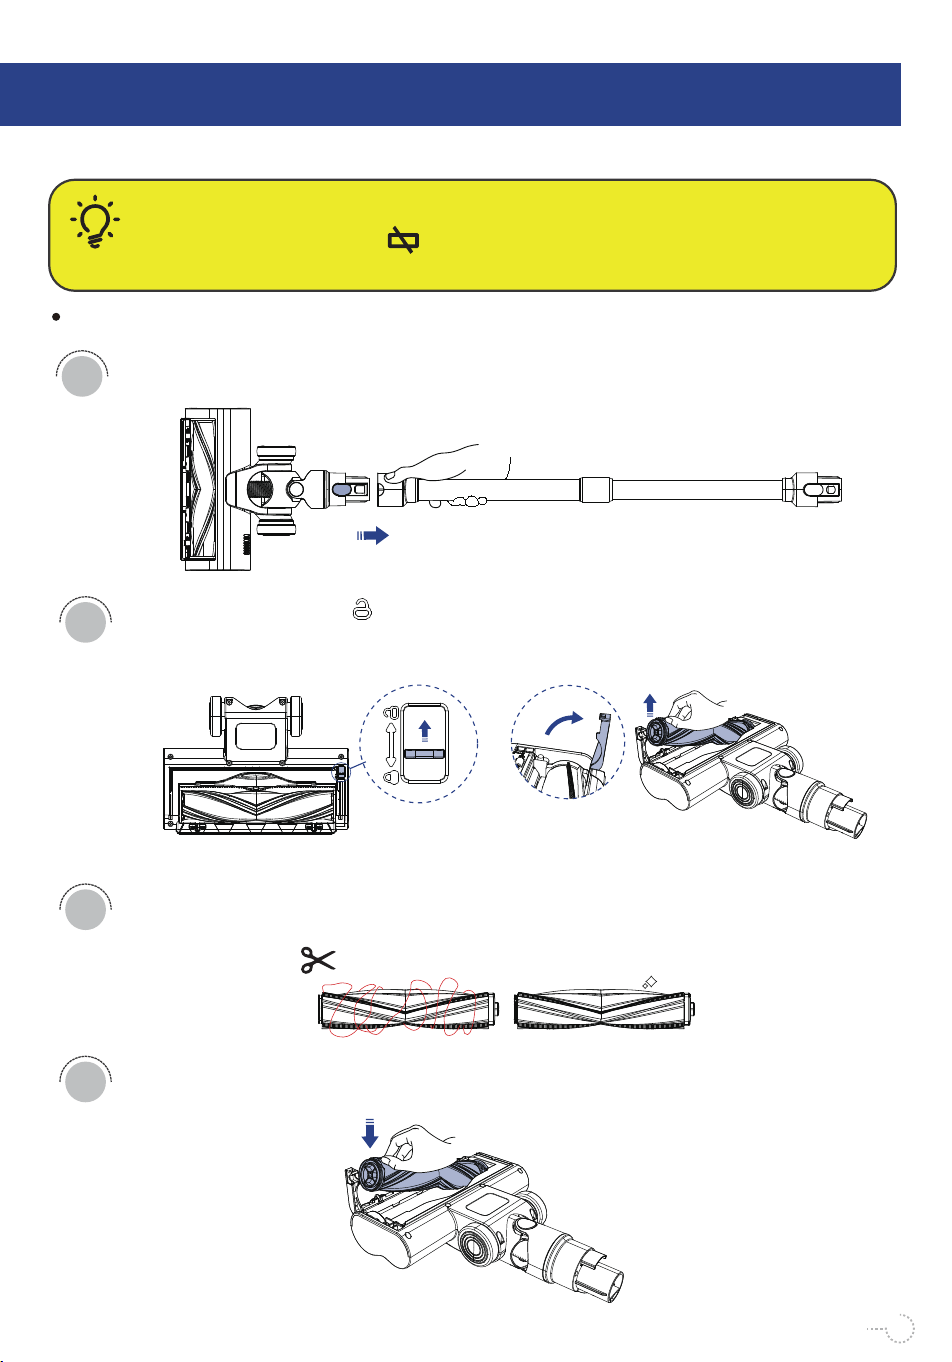
Turn the switch to the " " sign, rotate the catch upwards and remove the floor
brush.
CAUTION:
When “Brushroll Jam Indicator” flashes until the screen goes off and floor brush stops
rotating, it means that the floor brush is blocked. Check the floor brush and clear the blockage.
Press the release button and hold to pull out to detach the rob from floor brush.
1
2
Use scissors to remove hair and strings that get wrapped around the roller brush.
3
Make sure the triangle groove of the floor brush suits the bulge the floor
brush.
4
Clean the Floor Brush
CLEANING A CLOG
8
Cleaning a Clog
CAUTION:
Low suction or vacuum failure caused by overheating may be due to a clog in the vacuum.
Please check and clear clogs in the dust cup, mesh shell, pre-motor filter, post-motor filter,
metal tube, and floor brush.
Check and empty the dust cup.
1
3
4
2
Check and rinse the filter and sponge. Do not assemble them until completely dry.
Check and empty for clogs inside the extension rod.
Check and clean tangles on roller brushes, remove with scissors.
17

TROUBLESHOOTING
9
18
The used adapter is not the
original one
The battery pack/adapter
malfunctions
The battery runs out
The battery pack is not
attached correctly
Other malfunctions
The battery has drained
The floor brush gets stuck
1. The air duct is blocked
2. The dust cup is full
Other malfunctions
Incorrect use of the vacuum
The battery runs out
1.The air duct is blocked
2.The dust cup is full
The sponge is not
completely dry
There is too much dust
inside the dust cup
The vacuum runs with much
static
The floor brush gets stuck
Other malfunctions
The vacuum
cannot be
charged
The vacuum
cannot be
powered on
The vacuum
stops working
suddenly
The cleaning
results are not
satisfactory
There is static
during
vacuuming
The electric
floor brush
stops working
PROBLEM POSSIBLE REASONS SOLUTIONS
Charge the vacuum with the original adapter.
Contact customer service for help.
Charge the vacuum with the original adapter.
Remove and reattach the battery pack and make
sure it is securely attached in place.
Contact customer service for help.
Clean foreign objects entangled on the floor
brush.
Clean the floor brush, tube, dust cup, and the
sponge regularly.
Contact customer service for help.
Please charge the vacuum fully and try to turn
it on again.
Clean the floor brush, tube, dust cup and the
sponge regularly.
Detach and air dry the sponge completely. It is
recommended to clean and replace it regularly.
Empty the dust cup.
It's normal for there to be much static in the air
in winter and in dry regions.
Clean foreign objects entangled on the floor
brush.
Contact customer service for help.
1. Use the high suction mode for cleaning
complicated environments.
2. Use the crevice tool for better pickup of
heavy objects such as beans.
3. Use the floor brush for cleaning stains.
Use the original adapter for charging. It is
recommended to charge the vacuum after each
use, and use the low-suction mode for longer
runtime.

19
WARRANTY
10
CUSTOMER CARE
The 1-year Limited Warranty is valid for Products.
If your machine is used correctly according to the instruction manual and
there is a quality failure during the warranty period, we will provide you with
free warranty service once you contact us.
*If service parts are no longer available or discontinued,they will be replaced
with functional replacements.
WHAT IS NOT COVERED
1. Under your machine guarantee, warrenty shall not be liable for costs of
repair or replacement of a product incurred as a result of:Accidental damage,
faults caused by negligent use or care, misuse, neglect, careless operation or
any handling of the appliance which is not in accordance with this Instruction
Manual.
2. Machines purchased from an unauthorized dealer.
3. Use of parts and accessories other than those produced or recommended by
unauthorized parties or agents.
4. Repairs or alterations carried out by unauthorized parties or agents.
5. Use of the machine other than for normal domestic purposes, e.g., for com-
mercial or rental purposes.
6. Reduction in battery run time due to battery age or usage.

20
WARRANTY SERVICE
1. If you have a query about your appliance, please contact customer service at:
2. Please inform us of your model name/number, purchased date, order number,
machine malfunction details and your request for reparations.
3. Your model number can be found on the rating plate.
4. Please keep your purchase receipt in a safe place to ensure you have
this information.
Service rendered under this warranty will not extend the term of the warranty.