
Read this user manual with diagrams carefully before using this product and
store it properly for future reference.
Roborock Flexi Lite
Wet and Dry Vacuum Cleaner User Manual

02
Contents
English
English 02
Français 14
Español 25
03 Safety Information
05 International Symbols Explanation
06 FCC Statement
08 Product Introduction
08 Product Installation
08 Instructions for Use
10 Routine Maintenance
11 Basic Parameters
12 Common Issues
13 Environmental Protection Description
13 Holiday Energy Saving Function

03
IMPORTANT SAFETY INSTRUCTIONS
WARNING
Safety Information
When using an electrical appliance, basic precautions should always be followed, including the following:
• READ ALL INSTRUCTIONS BEFORE USING (THIS APPLIANCE).
• Failure to follow the warnings and instructions may result in electric shock, fire and/or serious injury.
• Do not use outdoors or on wet surfaces when charging. Store indoors. Use indoor only.
• Do not allow to be used as a toy. Close attention is necessary when used by or near children, pets or plants.
• Use only as described in this manual. Use only manufacturer’s recommended attachments.
• Use the maintenance brush carefully to avoid injury. Keep out of reach of children.
• Do not use with damaged cord or plug. If appliance is not working as it should, has been dropped, damaged, left outdoors, or dropped into
water, return it to a service center.
• Do not pull or carry by cord, use cord as a handle, close a door on cord, or pull cord around sharp edges or corners. Do not run appliance
over cord. Keep cord away from heated surfaces.
• Do not unplug by pulling on cord. To unplug, grasp the plug, not the cord.
• Do not handle power cord, including power cord plug, and power cord terminals with wet hands.
• Do not put any object into openings. Do not use with any opening blocked; keep free of dust, lint, hair, and anything that may reduce air flow.
• Do not immerse. Use only on carpet moistened by cleaning process.
• Brush may start unexpectedly. To reduce the risk of injury from moving parts, keep the power off before cleaning or servicing.
• Keep hair, loose clothing, fingers, and all parts of body away from openings and moving parts.
• Use extra care when cleaning on stairs.
• Do not use to pick up flammable or combustible liquids, such as gasoline, or use in areas where they may be present.
• Do not pick up anything that is burning or smoking, such as cigarettes, matches, or hot ashes.
• Prevent unintentional starting. Ensure the switch is in the off-position before picking up or carrying the appliance. Carrying the appliance
with your finger on the switch or energizing appliance that have the switch on invites accidents.
• Recharge only with the charger specified by the manufacturer. A charger that is suitable for one type of battery pack may create a risk of fire
when used with another battery pack.
• Use appliances only with specifically designated battery packs. Use of any other battery packs may create a risk of injury and fire.
To reduce the risk of fire, electric shock or injury:

04
• When battery pack is not in use, keep it away from other metal objects, like paper clips, coins, keys, nails, screws or other small metal
objects, that can make a connection from one terminal to another. Shorting the battery terminals together may cause burns or a fire.
• Under abusive conditions, liquid may be ejected from the battery; avoid contact. If contact accidentally occurs, flush with water. If liquid
contacts eyes, additionally seek medical help. Liquid ejected from the battery may cause irritation or burns.
• Do not use a battery pack or appliance that is damaged or modified. Damaged or modified batteries may exhibit unpredictable behavior
resulting in fire, explosion or risk of injury.
• Do not expose a battery pack or appliance to fire or excessive temperature. Exposure to fire or temperature above 130°C (265 °F) may
cause explosion.
• Follow all charging instructions and do not charge the battery pack or appliance outside of the temperature range specified in the
instructions. Charging improperly or at temperatures outside of the specified range may damage the battery and increase the risk of fire.
• Have servicing performed by a qualified repair person using only identical replacement parts. This will ensure that the safety of the product
is maintained.
• Do not modify or attempt to repair the appliance or the battery pack except as indicated in the instructions for use and care.
• Always turn off this appliance before connecting or disconnecting motorized nozzle.
• Do not use without filters in place.
• Do not use a flammable or combustible liquid to clean a floor.
• Please do not use the product when the temperature is higher than 40°C (104°F) or lower than 4°C (39°F) , or there is any liquid or sticky
substance on the floor.
• Turn off all controls before unplugging.
• This product can be used by children aged from 8 years and above and persons with reduced physical, sensory or mental capabilities
or lack of experience and knowledge if they have been given supervision or instruction concerning use of the product in a safe way and
understand the hazards involved. Children shall not play with the product. Cleaning and user maintenance shall not be made by children
without supervision.
• Do not vacuum cords or other cables to avoid danger.
• Only use the product in accordance with the User Manual. Any loss or damage caused by improper use will be borne by the user.
05
SAVE THESE INSTRUCTIONS
Household use only.
Battery and Charging
• Please keep the power cord and docking station away from heat (such as heating plates).
• The battery must be removed from the appliance before it is scrapped.
• The appliance must be disconnected from the supply mains when removing the battery.
• The battery is to be disposed of safely. Please do not discard waste batteries. Leave them to a professional recycling organization.
• Do not wipe or clean the power cord or docking station charging contacts with a piece of wet cloth or wet hands.
• Please make sure the cleaner is powered off in shipment and original packaging is advised.
• If left unused for a long period, please store the cleaner in a cool and dry place afer having it fully charged and switched off, charge it at
least every three months to avoid the battery being over discharged.
• Do not discard waste batteries. Leave them with a professional recycling organization.
International Symbols Explanation
– ON-OFF (push-push) symbol [symbol IEC 60417-5010 (2009-02)]
– ALTERNATING CURRENT symbol [symbol IEC 60417-5032 (2009-02)]
– DIRECT CURRENT symbol [symbol IEC 60417-5031 (2009-02)]
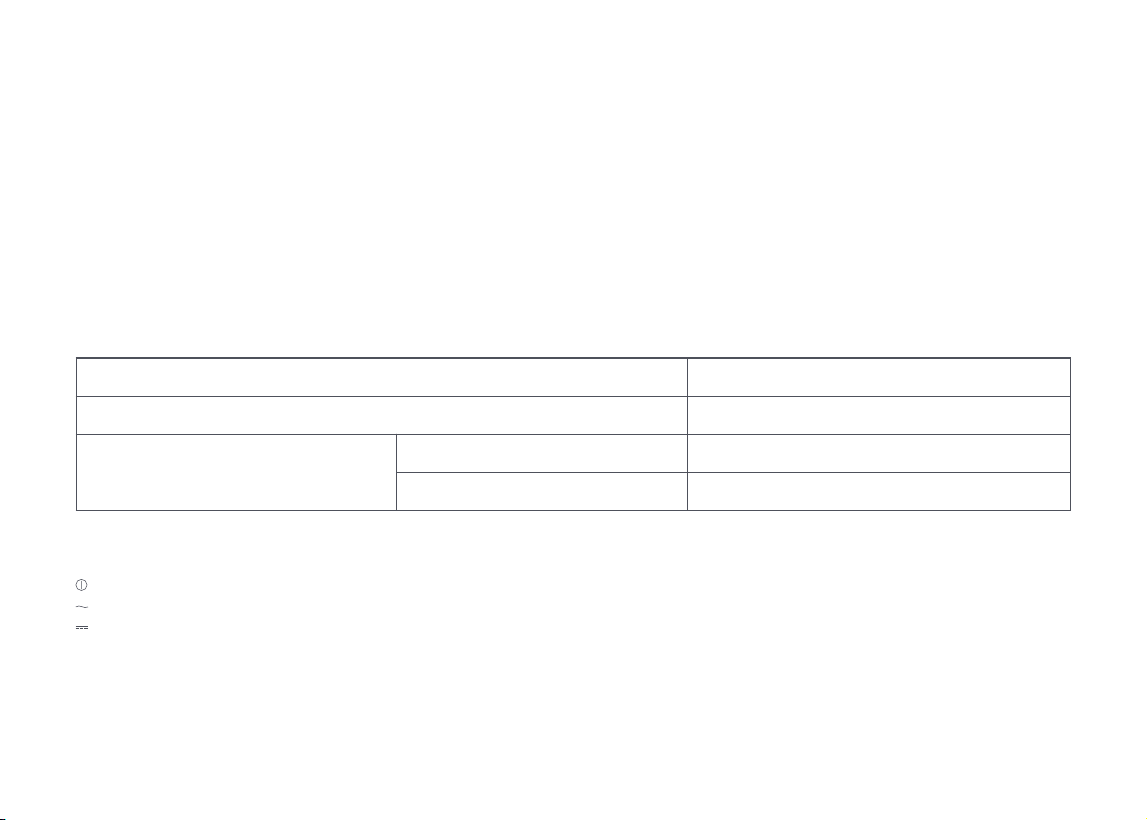
Battery pack charging temperature
Battery pack using temperature
Battery pack storage temperature
Long Storage(3 months)
Long Storage(6 months)
4°C ~ 40°C (39 ~ 104°F)
4°C ~ 40°C (39 ~ 104°F)
-20°C ~ 45°C (-4 ~ 113 °F)
-20°C ~ 20°C (-4 ~ 68 °F)

06
FCC Statement
Compliance Information
Product Name
Product Model
Compliance Statement
Company
Address
Email
Correspondence of the responsible party in USA
Wet and Dry Vacuum Cleaner and Accessories
Wet and Dry Vacuum Cleaner Model: WD3D3A
Dock Charger Model: MDS08LRR
This device complies with part 15 of the FCC Rules.
Operation is subject to the following two conditions:
(1) This device may not cause harmful interference, and (2) this device must
accept any interference received, including inter-ference that may cause
undesired operation.
Roborock Technology Co.
ROOM 1227, 12TH FLOOR, 1000 N. WEST STREET, WILMINGTON, DE 19801
support@roborock.com

07
Warning
Any changes or modifications to this unit not expressly approved by the party responsible for compliance could void the user's authority to
operate the equipment.
Note: This equipment has been tested and found to comply with the limits for a Class B digital device, pursuant to part 15 of the FCC
Rules. These limits are designed to provide reasonable protection against harmful interference in a residential installation. This equipment
generates, uses and can radiate radio frequency energy and, if not installed and used in accordance with the instructions, may cause harmful
interference to radio communications. However, there is no guarantee that interference will not occur in a particular installation. If this
equipment does cause harmful interference to radio or television reception, which can be determined by turning the equipment off and on,
the user is encouraged to try to correct the interference by one or more of the following measures:
—Reorient or relocate the receiving antenna.
—Increase the separation between the equipment and receiver.
—Connect the equipment into an outlet on a circuit different from that to which the receiver is connected.
—Consult the dealer or an experienced radio/TV technician for help.
IC Statement
This device contains licence-exempt transmitter(s)/receiver(s) that comply with innovation, Science and Economic Development Canada’s
licence-exempt RSS(s). Operation is subject to the following two conditions:
(1) This device may not cause interference, and (2) This device must accept any interference, including interference that may cause undesired
operation of the device.

08
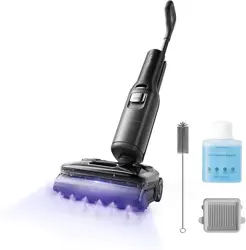
Product Introduction
A
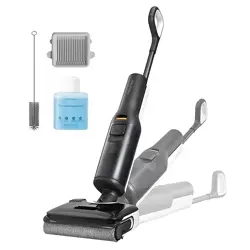
Product Installation
B
A3–1—Charging Contacts
B1–1—
B2–2—
B2–3—
B2–1—
B1–2—
Insert the handle into the vacuum
cleaner until it clicks in place. The
screen should face forward.
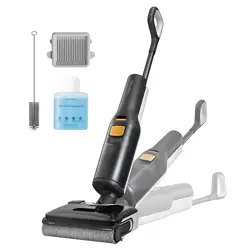
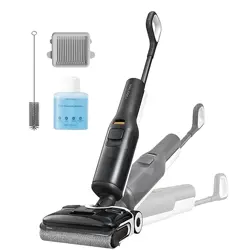
Place the charging dock on a flat,
hard surface and then plug it into
the socket.
The maintenance brush can be
placed in the groove behind the
charging dock.
Place the charging dock upside
down, connect the power cord into
the bottom of the charging dock, and
store the extra cord inside the power
cord storage slot as required.
To remove the handle, hold the
handle firmly and pull it out while
• Press: Start/Pause
• Press and hold for 2 seconds while in
upright and locked position:
Switch off
• Press while charging: Start/
Stop drying
• Press: Switch to AUTO/MAX/
ECO mode
• Press while charging: Start/
Stop self-cleaning
• Press and hold for 2 seconds while
charging: Start DEEP mode
—Power
—
Change Mode
—Self-Clean
A1–1—Handle
A1–2—Handle Release
A1–3—Dirty Tank Release
A1–4—Dirty Tank
A1–5—LED Display
A1–6—Clean Tank Release
A1–7—Clean Tank
A1
Vacuum Cleaner
A2
Screen Functions
A3
Charging Dock
A4
Power Cord
A5
Filter
A6
Maintenance Brush
B1
Installing and Removing
the Handle
B2
Connecting the Charging
Dock
Power cord can exit from either side.Note:
Do not place the charging dock in humid
locations or near any heat sources, such as bathrooms,
kitchens, or radiators.
Note:
A2–1—Dirt Level
A2–2—ECO Mode
A2–3—Charging
A2–4—Battery Level
A2–5—AUTO Mode
A2–6—MAX Mode
A2–7—Error
A2–8—Drying
inserting a hard object into the hole
on the back of the vacuum body to
press the release button.
Instructions for Use
C
• Press: Adjust volume/Turn on or off
• Press and hold for 5s while charging:
Enter language selection mode,
short press to switch languages,
press and hold to select current
language
—
Voice
Language Selection
1. Place the vacuum cleaner on the
charging dock and press and hold
for 5 seconds, enter language selection
mode.
2. Press
to switch languages. When you
hear the language you want to use, press
and hold
for 5 seconds to select the
language.
A1–8—Cleaning Head
A1–9—Roller Cover Release
A1–10—Roller Cover
A1–11—Roller

09
The vacuum cleaner can only be laid flat when
the Self-Clean button faces up.
When the vacuum cleaner is laid flat for cleaning
or when there is a significant amount of water on the
floor, it will automatically adjust its operating mode to
prevent sewage from entering, and there will be no
response when switching between modes.
Note:
C1–1—
C2–2—
C2–1—
C2–3—
C1–2—
C1–3—
Hold the upper part of handle firmly,
and pull out the clean tank.
Locked
Unlocked
Tap one side of the cleaning head
and push the handle to lock the
cleaning head or pull the handle to
unlock the cleaning head.
Open the plug, fill it with tap water,
and then close it tightly. The water
level should not exceed the MAX
line, then close the plug tightly.
Unlock the cleaning head and press the
button to start the vacuum cleaner.
1. When lowering the handle during
Tilt the clean tank, install the bottom
in place, and then gently push it
inward until it clicks in place.
Press the
button to switch to AUTO, MAX,
or ECO mode. The screen will display the
icon for the current mode.
1. When the vacuum cleaner is operating,
press the
button to pause it and enter
standby mode.
2. In standby mode, you can lock the
cleaning head and place the vacuum
cleaner upright on the floor.
3. Lock the cleaning head and press and
hold the
button for 2 seconds to turn
off the vacuum cleaner. If the vacuum
cleaner is left idle for 5 minutes in standby
mode, it will automatically turn off.
C1
Filling the Clean Tank
C2
Locking and Unlocking
C3
C4
Starting the Vacuum Cleaner
Low-Profile Cleaning
C5
C6
Switching Modes
Standby and Power Off
Notes:
• To avoid deforming the clean tank, only use cold water.
• To prevent any potential damage to the clean tank,
do not use any disinfectant and only use detergent
recommended by Roborock.
Notes:
• The cleaning head does not work when locked. Unlock
it first.
• Press the
button to start or stop drying while the
vacuum cleaner is charging.
Note:
Adding and Emptying Water
When the dirty tank is full or the clean tank
is empty during use, the vacuum cleaner
will provide audio and visual alerts. Add
water into the clean tank or empty the dirty
tank before continuing.
operation, the vacuum cleaner can be
positioned flat to clean low-lying areas.
Please be aware that when the vacuum
cleaner is in this flat position, the usable
volume of the dirty tank is reduced.
Therefore, we recommend cleaning the
dirty tank before tackling low-lying.
2. When the vacuum cleaner is laid flat for
cleaning, it will automatically adjust its
operating mode.
1. Lock the cleaning head, and place the
vacuum cleaner onto the charging dock.
The voice alert "Start Charging" indicates
that the vacuum cleaner is charging.
2. Press the
button on the top of the
handle to start self-cleaning. Press and
hold the
button for 2 seconds to start
DEEP self-cleaning.
3. After self-cleaning finishes, empty the
dirty tank to prevent odors.
C7–3— Reinstall the cover, tilt the dirty tank,
install the bottom in place, and then
gently push the tank inward until it
clicks in place.
C8
Charging and Self-Cleaning
C7–1— Hold the body of the dirty tank
with one hand, push the dirty tank
release with another hand, and then
remove the tank.
C7
Emptying the Dirty Tank
C7–2— Gently lift out the handle of the
cover to remove it, and then pour
out the dirty water.

10
C9
Drying
Drying starts automatically after self-
cleaning is completed. To manually start
or stop drying, press the
button on the
docked vacuum cleaner.
Routine Maintenance
D
To maintain optimal performance of the
product, refer to the following table for
routine maintenance.
Parts
Maintenance
Frequency
Replacement
Frequency
Roller 2–4 weeks 6–12 months
Filter 1 month 6–12 months
Cleaning head
and dirty water
pipe
1 month N/A
Dirty tank 1 month N/A
Charging dock As needed N/A
D1–1—Take out the dirty tank, pull out the
cover, and take out the filter from the
cover. Remove any trash attached
to the filter using the provided
maintenance brush. If the filter is
dirty, rinse it with cold water and
Product Maintenance
Wipe and clean the vacuum cleaner with a
soft and dry cloth. Before cleaning, remove
the vacuum cleaner from the charging dock
and switch it off.
Cleaning the Vacuum Cleaner
If this product is left unused for a
prolonged period of time, fully charge it and
unplug it before storing it in a cool and dry
place. Do not place the product in humid
locations or under direct sunlight. Charge
it at least once every 3 months to avoid
overdischarge.
D1
Cleaning the Dirty Tank and
Filter
The frequency of replacement may vary with the
actual situation. If abnormal wear occurs, replace the
parts immediately.
Note:
Notes:
• The product is equipped with a built-in high-
performance lithium-ion rechargeable battery pack.
To maintain battery performance, keep the product
charged for normal use.
• Self-cleaning can only be used when the vacuum
cleaner is charging and the battery level is ≥10%. Do
not lift the vacuum cleaner during the self-cleaning
process.
• Always place the vacuum cleaner on the charging
dock after use to prevent water stains.
Parts
Maintenance
Frequency
Replacement
Frequency
Charging
contacts
1 month N/A
Roller cover 2–4 weeks N/A
then shake off the residual water.
Notes:
• Use a second filter if necessary.
• Do not touch the filter with your hands, brushes, or
sharp objects to avoid damage to the filter.
D1–2—Dry all parts thoroughly before
installing them back in place.
• Use the maintenance brush carefully to avoid injury.
• Before you clean the roller, make sure that the
vacuum cleaner is switched off or in upright and
locked position
Notes:
D2–1—
D2–2—
D2–3—
D2–4—
Press the release buttons on both
sides of the cover simultaneously and
lift the cover upwards to detach it.
Press the buttons on one side of the
roller and pull the roller out from
the side. Remove any dirt attached
to the roller using the provided
maintenance brush, and rinse it with
clean water.
Rinse the detached roller cover with
clean water.
Reinstall the roller and roller cover in
the correct order.
D2
Cleaning the Roller and
Roller Cover

11
Unplug the charging dock and use a soft
dry cloth to clean the surface and charging
contacts of the charging dock.
D3
Cleaning the Cleaning Head
and Dirty Water Pipe
D4
Cleaning the Charging Dock
Do not wash the cleaning head directly with water.
Do not rinse the charging dock directly with
water.
Note:
Note:
1. Switch off the vacuum cleaner and
stabilize the body. Remove the dirty tank,
roller cover, and roller.
2. Clean the roller slot and dirty water pipe
with the provided maintenance brush.
3. Reinstall the roller, roller cover, and dirty
tank in place.
Basic Parameters
Vacuum Cleaner
Dock Charger
Model WD3D3A
Rated Input
25.6V
1A
Battery
21.6 V/2500 mAh (TYP)
Lithium-ion battery
Model MDS08LRR
Rated Input
Voltage
120V~
Rated
Frequency
60Hz
Rated Input 1.25A
Rated Output
25.6V
1A
Charging
Battery
21.6 V/2500 mAh
(TYP) Lithium-ion
battery
12
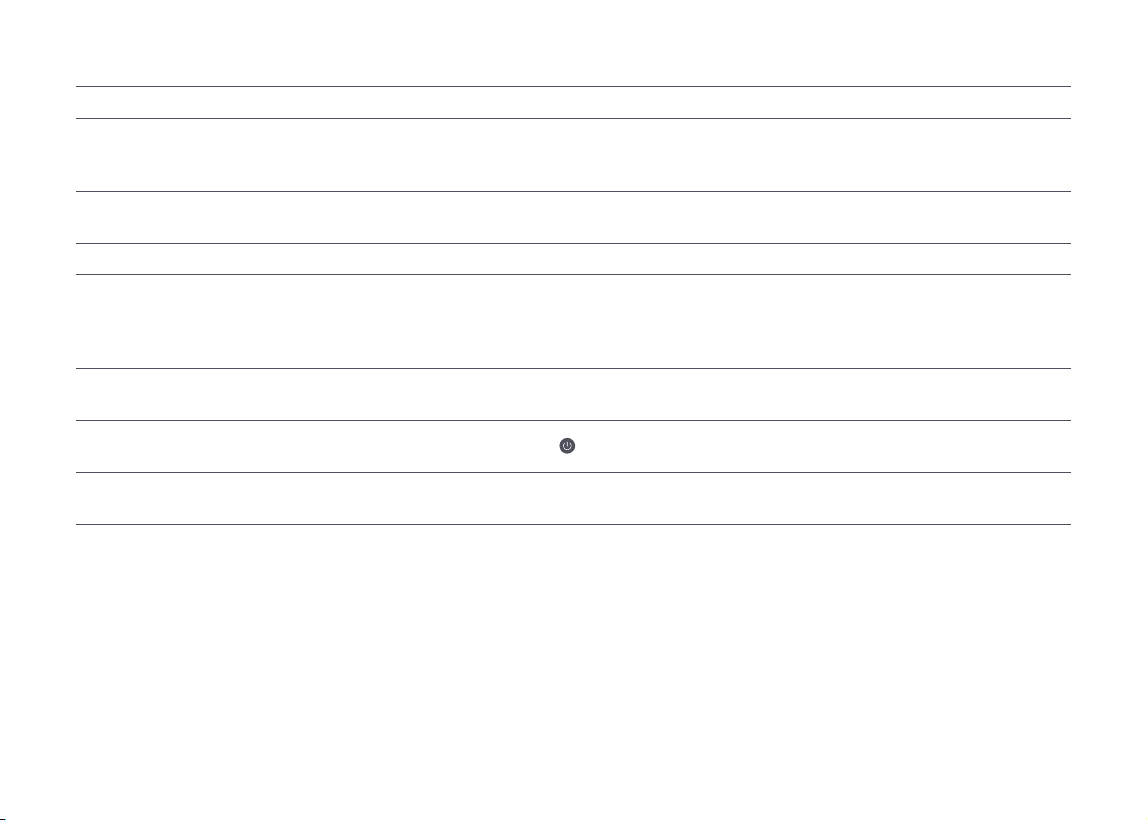
Common Issues
Issue Solution
There are large water stains on the floor,
the cleaning head leaks water, or water
cannot be vacuumed from the floor.
• Remove the roller and the dirty tank to check for a clog in the dirty water pipe or the
suction outlet, and check if the filter is clogged or wet. Clear all blockages, clean the filter,
and make sure dirty tank and filter are properly installed before retrying.
The screen does not light up and the
vacuum cleaner cannot start.
• Low battery level. Charge it before use.
There is an unpleasant smell during use. • Clean the roller, dirty tank, and filter.
Cleaning creates a lot of bubbles.
• Do not add detergent or disinfectants that are not recommended by Roborock to the
clean tank, or spray such detergent or disinfectants on the floor.
• Do not add too much detergent or disinfectants that are recommended by Roborock to
the clean tank.
The vacuum cleaner does not charge
when docked.
• Clean the charging contacts on the charging dock and the corresponding part on the
vacuum cleaner.
The screen is on, but the buttons do not
respond.
• Press and hold the
for 10 seconds to force restart the vacuum cleaner.
Is power always being drawn when the
vacuum cleaner is on the dock?
• The vacuum cleaner will draw power while it is docked to maintain battery performance,
but the power consumption is extremely low.

13
Environmental Protection Description
Notes:
• Before removing the battery, make sure it is fully drained. Do not attempt to remove the battery if the vacuum cleaner is connected to the dock.
• When unpluging the circuit board cord, avoid positive electrodes touching with negative ones to prevent causing short circuits.
• Remove the entire battery pack. Avoid damaging the battery pack casing to avoid short-circuits or leakage of hazardous substances.
• In the event of accidental contact with battery fluid, rinse thoroughly with water and seek immediate medical care.
The chemical substances contained in the built-in lithium-ion battery of this product can cause environmental pollution. Remove the battery
before disposing of this product and hand it to a professional battery recycling facility for centralized disposal.
1. Remove the handle and remove the clean tank and dirty tank at the same time.
2. Unscrew 1 screw below the top rear cover and remove the top rear cover.
3. Unscrew the 6 screws on the bottom rear cover, and then unscrew the 6 screws on the front cover.
4. Disconnect the contacts on the motherboard and remove the battery.
How to remove the battery:
* The following information applies only when disposing of the vacuum cleaner and should not be followed for day-to-day operations.
Removing the Battery
Holiday Energy Saving Function
In holiday mode the device will switch to Low Power mode to minimize power consumption. This includes dimming of the LED indicator, and
the stopping of all non-charging related functions including cleaning, and more.
To activate holiday mode, firstly, remove the wet and dry vacuum cleaner from the charging dock and turn it off. Secondly, press and hold
the Change Mode button and at the same time, put the vacuum back to the dock and wait 10 seconds until hear “ticktack” then release the
button. The wet and dry vacuum cleaner, main unit and charging dock will enter holiday mode.
To deactivate holiday mode, you need two steps:
1. Remove the wet and dry vacuum cleaner from the charging dock and press and hold the Power button for 10 seconds.
2. Unplug the power cord and reconnect.