
EN
DE
FR
ES
IT
PL
With your inspiring rating, COSTWAY will be more consistent to offer you EASY
SHOPPING EXPERIENCE, GOOD PRODUCTS and EFFICIENT SERVICE!
Mit Ihrer inspirierenden Bewertung wird COSTWAY konsistenter sein, um Ihnen EIN
SCHÖNES EINKAUFSERLEBNIS, GUTE PRODUKTE und EFFIZIENTEN SERVICE zu
bieten!
Avec votre évaluation inspirante, COSTWAY continuera à fournir une EXPÉRIENCE
D’ACHAT PRATIQUE, des PRODUITS DE QUALITÉ et un SERVICE EFFICACE !
Con su calificación inspiradora, COSTWAY será más consistente para ofrecerle
EXPERIENCIA DE COMPRA FÁCIL, BUENOS PRODUCTOS y SERVICIO EFICIENTE.
Con la tua valutazione incoraggiante, COSTWAY sarà più coerente per offrirti
ESPERIENZA DI ACQUISTO FACILE, BUONI PRODOTTI e SERVIZIO EFFICIENTE!
Dzięki twojej opinii COSTWAY będzie mógł oferować jeszcze WYGODNIEJSZE
ZAKUPY, LEPSZE PRODUKTY i SPRAWNIEJSZĄ OBSŁUGĘ KLIENTA.
US office: Fontana UK office: Ipswich AU office: Truganina
DE office: FDS GmbH, Neuer Höltigbaum 36, 22143 Hamburg, Deutschland
FR office: Saint Vigor d'Ymonville
PL office: Gdańsk
THIS INSTRUCTION BOOKLET CONTAINS IMPORTANT SAFETY INFORMATION. PLEASE READ AND KEEP FOR FUTURE REFERENCE.
EN DE FR ES IT PL
USER'S MANUAL/HANDBUCH
/MANUEL DE L'UTILISATEUR/MANUAL DEL USUARIO
/MANUALE UTENTE/INSTRUKCJA OBSŁUGI
OP2959
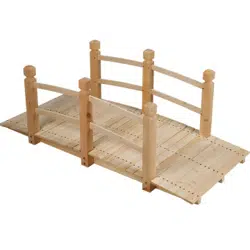
Wooden Bridge / Gartenbrücke / Pont en Bois
/ Puente de Madera de Jardín / Ponte di Legno da Giardino
/ Drewniany mostek
02
HARDWARE LIST /ZUBEHÖRLISTE
/LISTE DES ACCESSOIRES /LISTA DE ACCESORIOS
/LISTA DEGLI ACCESSORI
/LISTA CZĘŚCI MONTAŻOWYCH
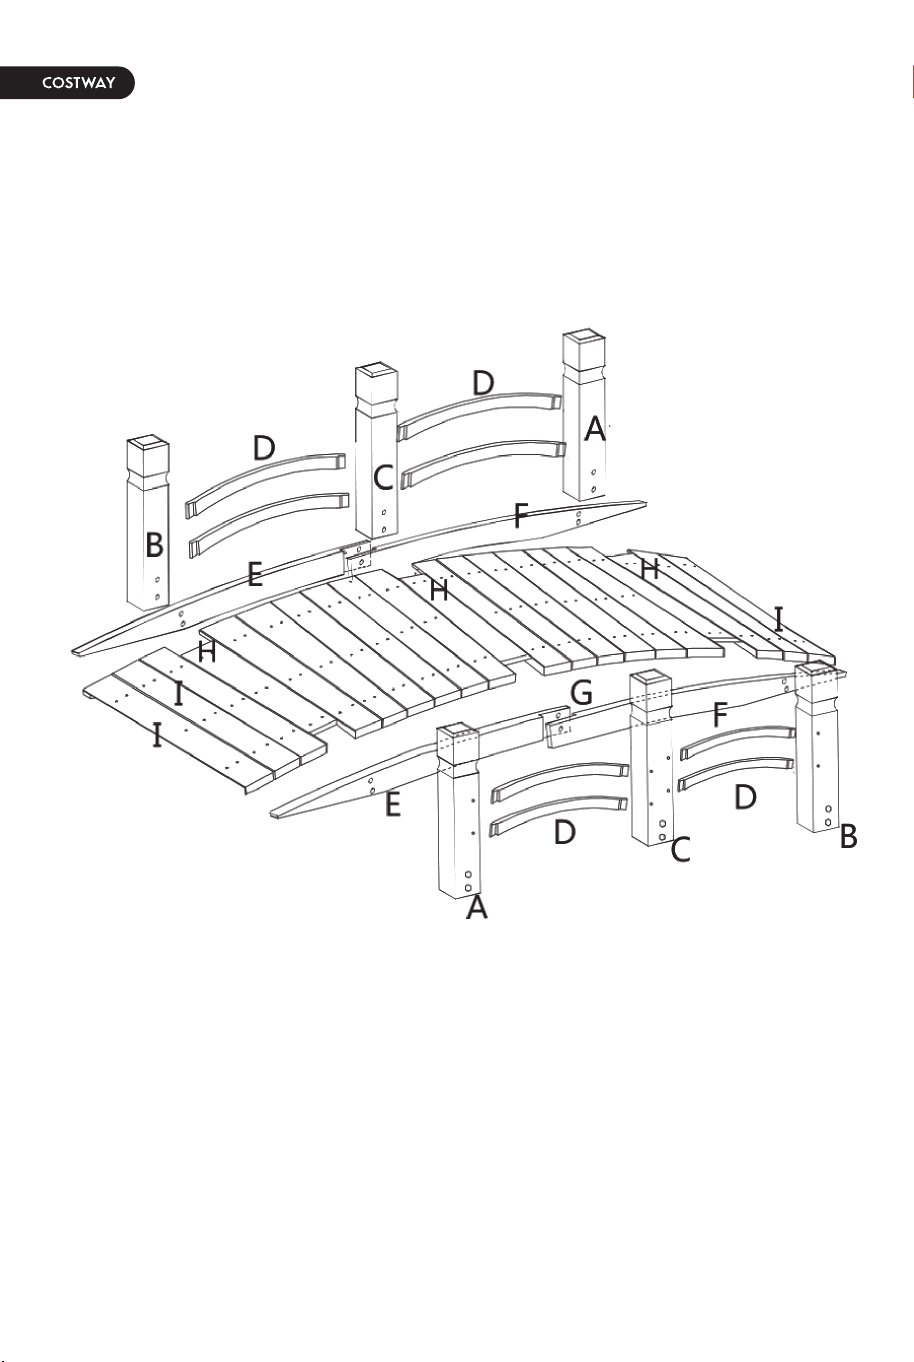
Bolt /Bolzen /Boulon
/Perno /Bullone /Śruba
8x100mm * 12
1
Bolt /Bolzen /Boulon
/Perno /Bullone /Śruba
8X45mm * 2
2
Washer
/Unterlegscheiben
/Rondelle /Arandela
/Rondella /Śruba * 14
3
Nut /Muttern
/Écrou /Tuerca
/Dado /Nakrętka
* 14
4
Screw /Schrauben
/Vis /Tornillo
/Vite /Wkręt
3.5x35mm * 178
5
03
1
04
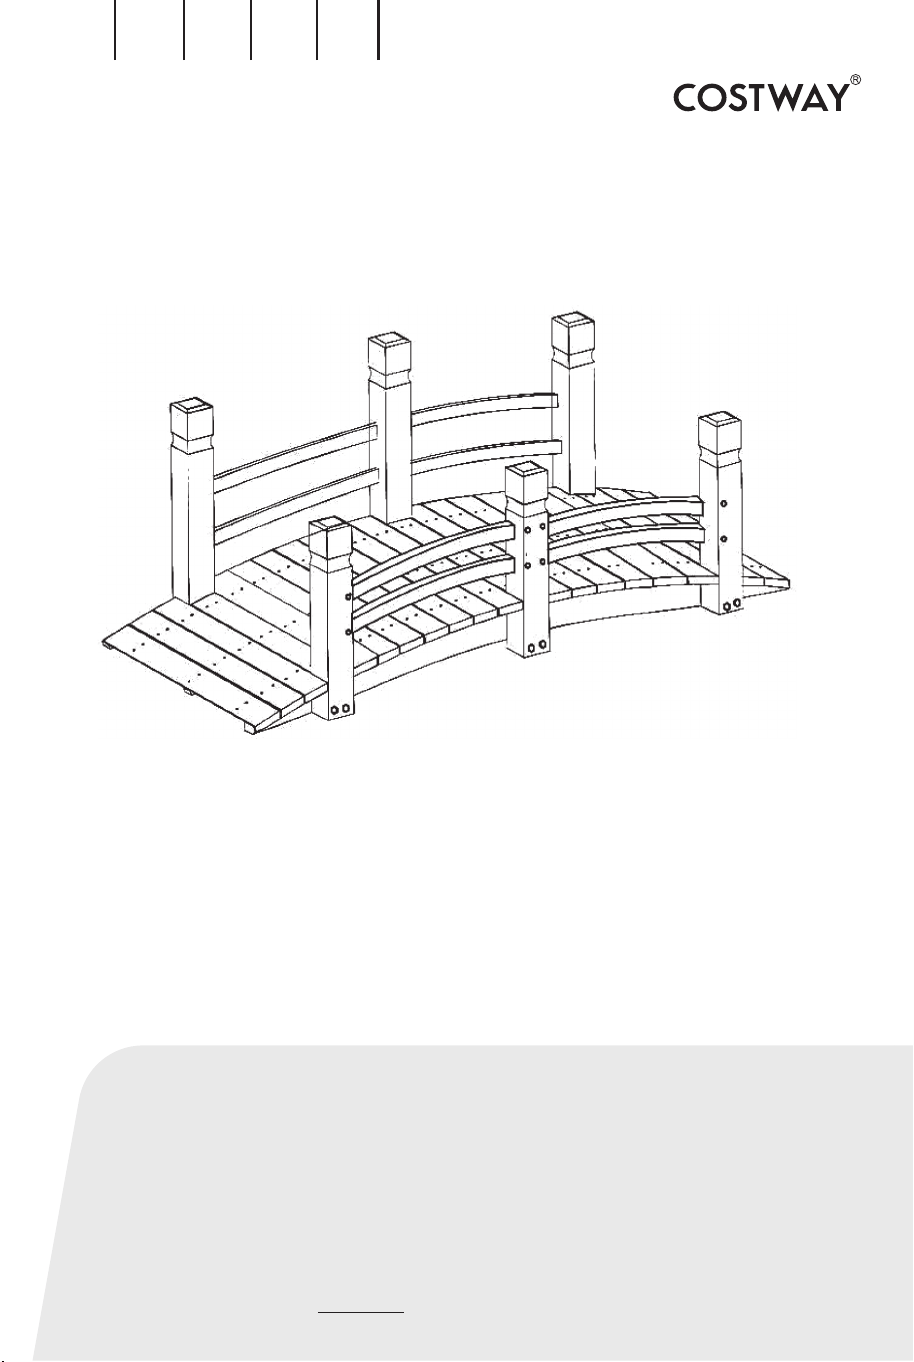
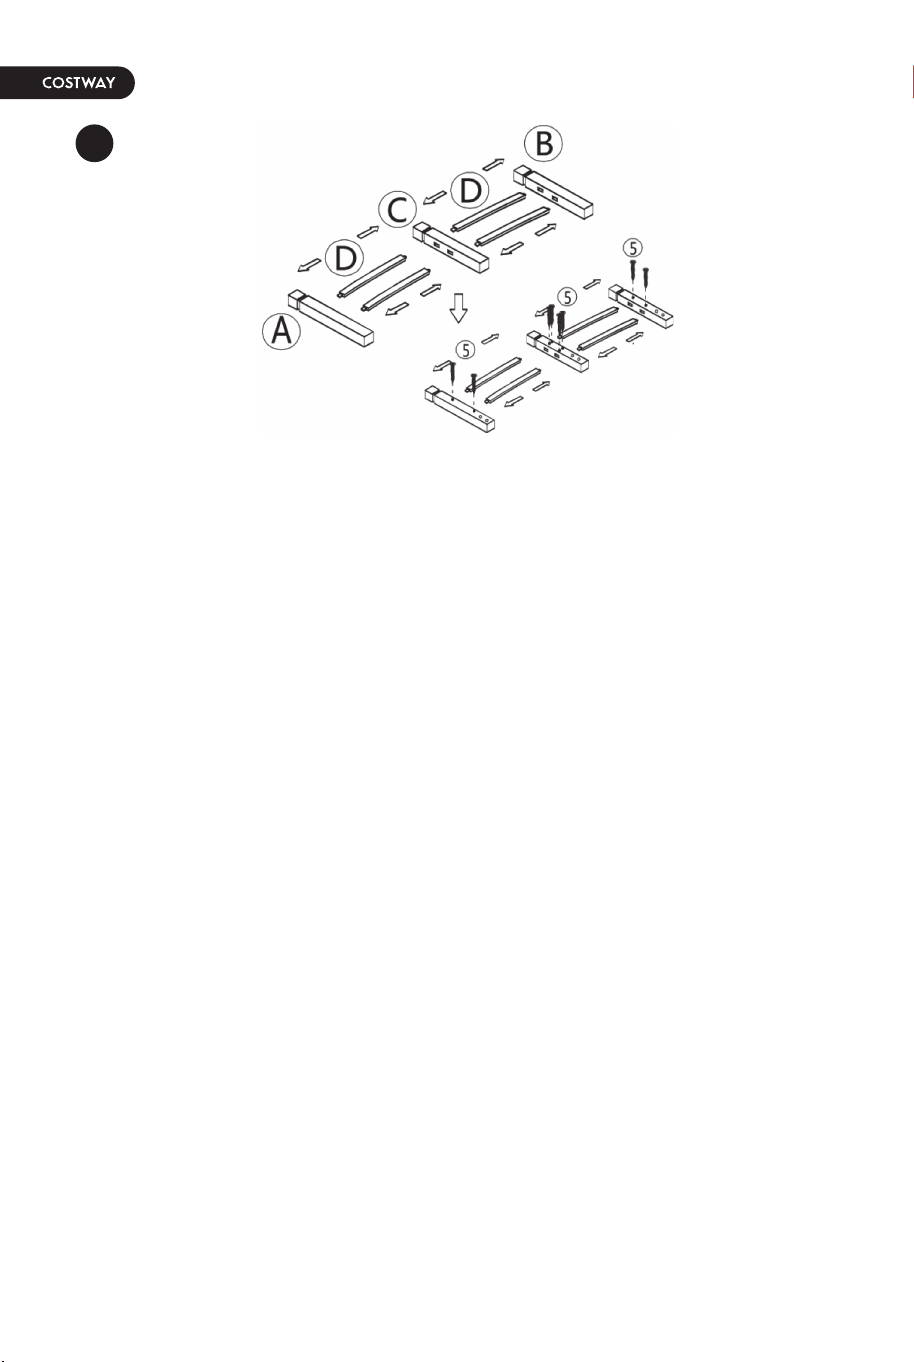
EN: Insert part Ⓓ (4pcs) into part Ⓐ, Ⓑ and Ⓒ. Use a Phillips
screwdriver to fix screw ⑤ securely.
Repeat for the other side.
DE: Setzen Sie Teil Ⓓ (4 Stück) in Teil Ⓐ, Ⓑ und Ⓒ ein. Verwenden Sie
einen Kreuzschlitzschraubendreher, um die Schraube ⑤ sicher zu
befestigen.
Wiederholen Sie den Vorgang für die andere Seite.
FR: Insérez les quatre pièces (D) dans les pièces (A, B et C), fixez les
pièces avec les vis (5) et serrez les vis à l’aide d’un tournevis. Répétez
pour l’autre côté.
ES: Inserte las cuatro piezas (D) en las piezas (A), (B) y (C). Utilice un
destornillador Phillips para apretar firmemente los tornillos (5). Repita
para el otro lado.
IT: Inserire i 4 pezzi della parte (D) nella parte (A, B e C). Utilizzare un
cacciavite a croce per fissare saldamente le viti (5). Ripetere per l'altro
lato.
PL: Zmontuj części Ⓓ (4 szt.) z częściami Ⓐ, Ⓑ i Ⓒ. Dokręć wkręty ⑤
za pomocą śrubokrętu.
Powtórz krok z drugiej strony.
2
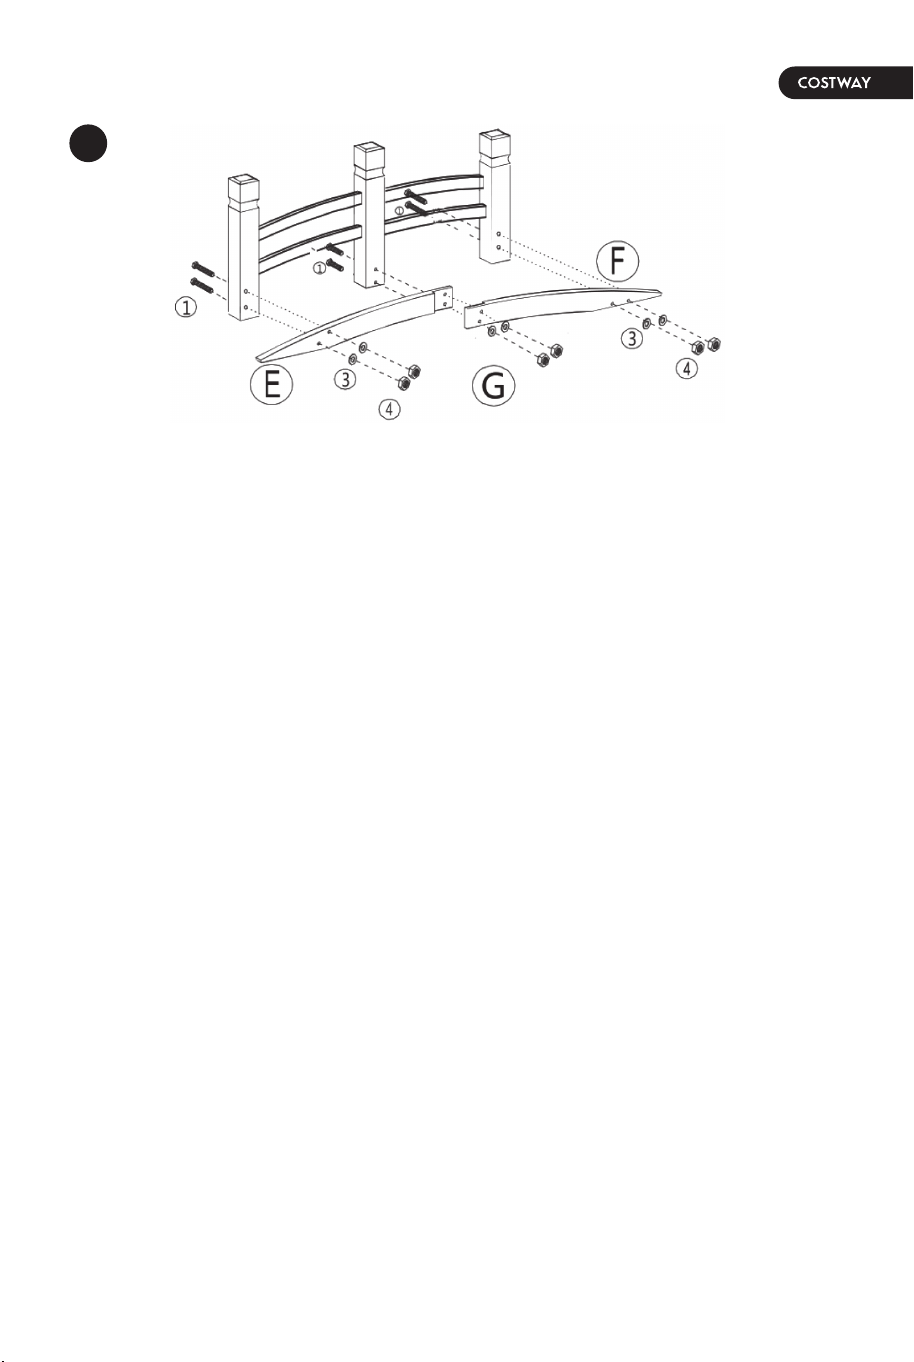
EN: Screw parts Ⓔ and Ⓕ on posts by using 6 bolts ①, 6 washers ③ and
6 nuts ④.
Repeat for the other side.
DE:
Schrauben Sie die Teile
Ⓔ
und
Ⓕ
mit 6 Schrauben
①
, 6
Unterlegscheiben
③
und 6 Muttern
④
an die Pfosten.
Wiederhole den Vorgang für die andere Seite.
FR: Montez les pièces (E et F) sur les poteaux à l’aide des six boulons
(1), des six rondelles (3) et des six écrous (4). Répétez pour l’autre
côté.
ES: Inserte las cuatro piezas (D) en las piezas (A), (B) y (C). Utilice un
destornillador Phillips para apretar firmemente los tornillos (5). Repita
para el otro lado.
IT: Avvitare le parti (E) e (F) sui montanti utilizzando 6 bulloni (1), 6
rondelle (3) e 6 dadi (4). Ripetere per l'altro lato.
PL: Przymocuj części Ⓔ i Ⓕ do słupków. W tym celu użyj 6 śrub ①, 6
podkładek ③ i 6 nakrętek ④.
Powtórz krok z drugiej strony.
05
3
06
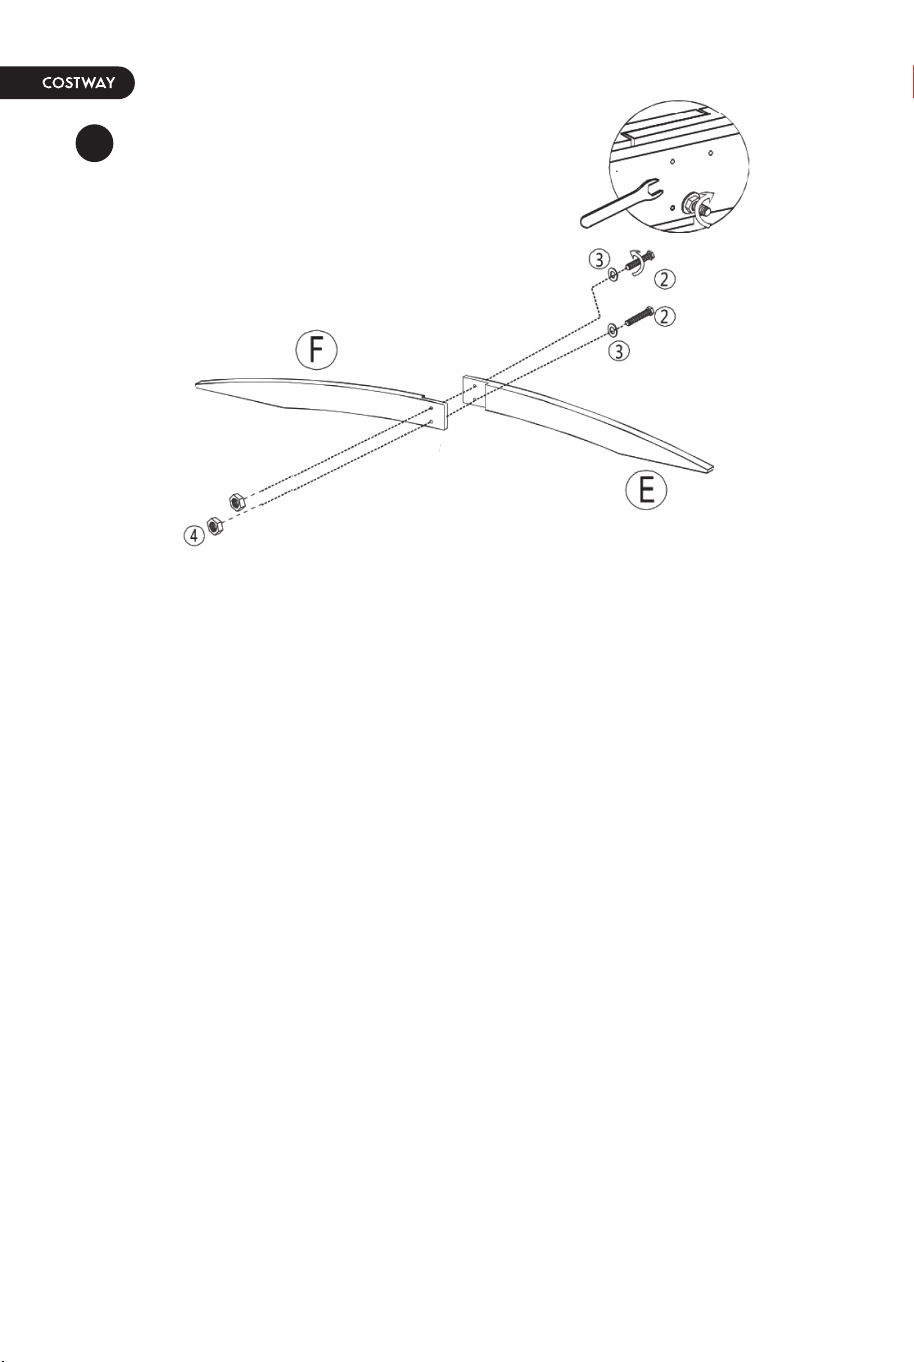
EN: Use 2 bolts ②, 2 washers ③, 2 nuts ④ to tighten parts Ⓔ and Ⓕ
securely with wrench to create middle base.
DE: Ziehen Sie die Teile E und F mit 2 Schrauben ②, 2
Unterlegscheiben ③ und 2 Muttern ④ mit einem Schraubenschlüssel
fest, um eine mittlere Basis zu schaffen.
FR: Utilice 2 pernos (2), 2 arandelas (3), 2 tuercas (4) para conectar
firmemente las piezas (E) y (F) con la llave para construir la base central
del puente.
ES: Utilice 2 pernos (2), 2 arandelas (3), 2 tuercas (4) para conectar
firmemente las piezas (E) y (F) con la llave para construir la base central
del puente.
IT: Utilizzare 2 bulloni (2), 2 rondelle (3), 2 dadi (4) per stringere
saldamente le parti (E) e (F) con la chiave per creare la base centrale.
PL: Użyj 2 śrub ②, 2 podkładek ③ i 2 nakrętek ④, aby za pomocą klucza
dokręcić części Ⓔ i Ⓕ i utworzyć środkową podstawę mostka.
4
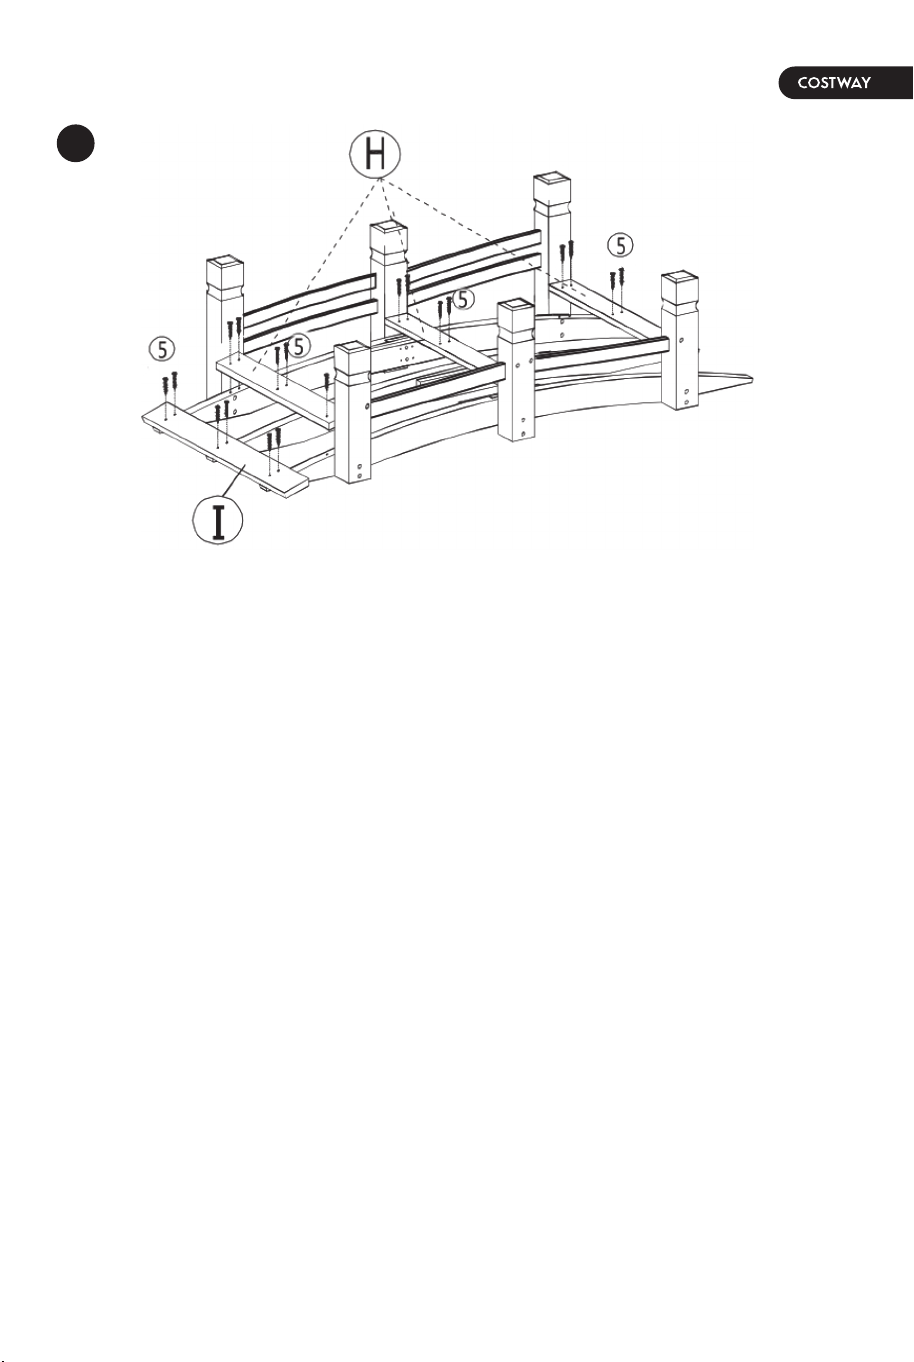
EN: Use 18 screws ⑤ to securely fasten part Ⓗ to the base. Check
panels are in line with the base. Use remaining screws ⑤ to fasten part
Ⓘ on the base and have part Ⓘ aligned straight.
DE: Verwenden Sie 18 Schrauben ⑤, um Teil Ⓗ sicher am Sockel zu
befestigen. Prüfen Sie, ob die Platten in einer Linie mit dem Sockel
liegen. Verwenden Sie die restlichen Schrauben ⑤, um Teil Ⓘ auf der
Basis zu befestigen und achten Sie darauf, dass Teil Ⓘ gerade
ausgerichtet ist.
FR: Montez les panneaux (H) sur la base avec les dix-huit vis (5).
Vérifiez que les panneaux sont alignés avec la base. Fixez les panneaux
(I) sur la base aves les vis (5) restantes.
ES: Utilice 18 tornillos (5) para fijar firmemente los paneles (H) a la
base. Compruebe que los paneles estén alineados con la base. Utilice los
tornillos restantes (5) para fijar las piezas (I) en la base y asegúrese de
que las piezas (I) estén alineadas rectas.
07

IT: Utilizzare 18 viti (5) per fissare saldamente la parte (H) alla base.
Controllare che i pannelli siano in linea con la base. Utilizzare le viti
rimanenti (5) per fissare la parte (I) sulla base e fare in modo che la
parte (I) sia allineata diritta.
PL: Użyj 18 wkrętów ⑤, aby przymocować części Ⓗ do podstawy.
Sprawdź, czy panele są wyrównane z podstawą. Użyj pozostałych
wkrętów ⑤, aby przymocować część Ⓘ do podstawy.
08
5
EN: Make sure all screws and bolts are tightened securely before use.
DE: Vergewissern Sie sich, dass alle Schrauben und Bolzen vor der
Verwendung fest angezogen sind.
FR: Assurez-vous que toutes les vis et boulons soient bien serrés avant
l’utilisation.

ES: Asegúrese de que todos los tornillos y pernos estén bien apretados
antes de usar.
IT: Assicurarsi che tutte le viti e i bulloni siano serrati saldamente prima
dell'uso.
PL: Przed użyciem upewnij się, że wszystkie śruby i wkręty są dobrze
dokręcone.
09
