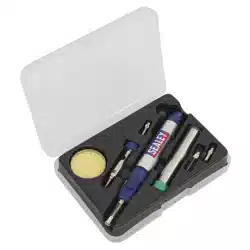
BUTANE HEATING / SOLDERING TORCH KIT
MODEL NO: AK2946
Thank you for purchasing a Sealey product. Manufactured to a high standard, this product will, if used according to these instructions,
and properly maintained, give you years of trouble free performance.
IMPORTANT: PLEASE READ THESE INSTRUCTIONS CAREFULLY. NOTE THE SAFE OPERATIONAL REQUIREMENTS, WARNINGS & CAUTIONS. USE
THE PRODUCT CORRECTLY AND WITH CARE FOR THE PURPOSE FOR WHICH IT IS INTENDED. FAILURE TO DO SO MAY CAUSE DAMAGE AND/OR
PERSONAL INJURY AND WILL INVALIDATE THE WARRANTY. KEEP THESE INSTRUCTIONS SAFE FOR FUTURE USE.
1. SAFETYi
WARNING! Ensure Health & Safety, local authority, and general workshop practice regulations are adhered to when using this
equipment.
WARNING! Always wear approved eye or face protection when operating the torch.
WARNING! Butane gas is extremely ammable, handle with care.
WARNING! Always point the torch away from the eyes, body or ammable objects when igniting and during operation.
WARNING! Ensure the Gas Controller Knob is rmly closed and the ame completely extinguished after use.
WARNING! DO NOT puncture the cartridge or dispose of in a re.
Use only specied gas (Sealey Gas Charger Butane SCS035S)
8 DO NOT use the torch in an area where paint fumes, solvents or other ammable solids, liquids or gases pose a potential hazard.
9 Keep ammable material away from the torch when operating. Flammable waste, such as wiping or cleaning rags, must be placed
in a closed metal container and disposed of correctly.
8 DO NOT operate the torch when you are tired or under the inuence of alcohol, drugs or intoxicating medication.
8 DO NOT hold the workpiece by hand. Use clamps or a vice (not included) to secure the workpiece.
8 DO NOT operate the torch if any parts are damaged or missing as this may cause failure and/or possible personal injury.
8 DO NOT touch the workpiece close to the heated area as it will be very hot. Allow to cool.
8 DO NOT touch the burner tube during or immediately after use as it will be very hot. Allow to cool.
8 DO NOT leave the torch operating unattended.
8 DO NOT allow children to operate the torch.
9 Disconnect the gas cartridge when not in use. Store cartridge away from direct sunlight in a safe, dry, childproof area, where the
temperature will not exceed 40°C (104°F).
9 After use, allow the torch to cool before storing it.
IMPORTANT! Observe cautions on the gas rell cartridge label.
2. INTRODUCTION
Portable and lightweight torch with piezoelectric start. Features adjustable heating control ranging up to 450°C (approximately).
Removable solder tip transforms torch into burning ame heat source. Includes a variety of nozzles for various applications including
a ameless heat source adaptor. Safety cap for storage. Sponge cleaning tray and small roll of solder wire. Suitable for heating,
soldering and shrinking. Powered by Butane (lighter fuel). Supplied in storage case.
3. SPECIFICATION
Model No.:................................................................ AK2946
Sealey Gas Charger Butane .................................. SCS035S
Contents: Deector, soldering head, soldering tips (small, medium, large), hot knife, spanner.
4. OPERATION
WARNING! Ensure you have read and understood the safety instructions in Section 1 before using the torch.
NOTE: The torch is supplied without butane gas. Before use it must be fuelled as follows:
4.1. TO FUEL THE TORCH
4.1.1. Use only high quality butane gas (lighter fuel) to fill the torch.
4.1.2. Ensure the ‘On/Off’ switch is in the ‘Off’ position. See fig.3, ‘Gas On/Off Switch’.
4.1.3. Follow the instructions on the butane fuel can.
4.1.4. Apply the can filler tip to the torch base filler valve (fig.1). Use a pumping action for best filling results.
4.1.5. Once full, allow gas in the torch to stand and stabilise for a few minutes before use.
NOTE: Before refilling, ensure that the filler valve and the probe on the can of lighter fluid are clean and free from dirt and debris.
Check that the correct filling adaptor is fitted to the lighter fluid refill can.
Ensure that the torch and the can of lighter fluid is at room temperature before commencing refill.
Lighter fluid is highly flammable – refill in a well ventilated place, away from any sources of ignition.
Fill in conjunction with the operating and safety instructions found on the can of lighter fluid.
If any spillages occur during the refilling process, allow plenty of time for escaped gas to evaporate before allowing sources of ignition in
the vicinity.
AK2946 Issue 3 (H, F) 28/05/19
Original Language Version
© Jack Sealey Limited
Refer to
instruction
manual
Wear protective
gloves
Wear eye
protection
Warning:
hot surfaces

Once full, check the torch for leaks by listening for a hissing noise. If the hissing persists, DO NOT ignite and remove the torch to a well
ventilated area until the gas has escaped – DO NOT allow any ignition in the vicinity of the tool.
4.2. TOUSEASASOLDERINGIRONorPOLYFOAMCUTTER(Seeg.3A)
WARNING: ENSURE ALL PARTS ARE COOL FROM ANY PREVIOUS USE BEFORE PROCEEDING.
4.2.1. The foam pad for tip cleaning is supplied in dehydrated form pushed into the bottom of the rectangular aluminium container. The pad
will expand when a small amount of water is poured onto it.
4.2.2. The soldering head is retained by the element shield and both are held in place by the black clamping ring. Screw the required soldering
tip, or hot knife to the thread on the top of the soldering head. See fig.3A.
4.2.3. Slide the gas On/Off switch to the ‘On’ position. You will hear the gas hissing.
4.2.4. To ignite the flame hold in the ignition lock release button and slide the ignition switch (fig.3) backwards until a sharp click is heard.
Hold switch in this position for approximately two seconds after ignition.
4.2.5. Allow the soldering head to heat up for about five seconds in order to heat the ceramic element which is inside. Observe the element
through the holes in the element shield, it should glow orange.
4.2.6. Turn the gas flow control (fig.3) to adjust the gas flow to the minimum which will sustain the ceramic glow.
4.2.7. Allow the torch to stand for about 2 minutes in order to achieve maximum output. Rest the torch on the ignition switch which acts as a
stand. Ensure the tip is not near any combustible material.
NOTE: If you cease working and intend to restart, allow all parts to cool before following above procedure again.
4.3. TOUSEASAHOTIRON(forshrinkwrappingetc.Seeg.4)
4.3.1. When the torch has cooled unscrew any soldering tip fitted.
4.3.2. Push the deflector onto the soldering head as shown in fig.4.
4.3.3. For ignition follow steps 4.2.3. to 4.2.6. above. The torch is now ready for use.
4.4. TO USE AS A BURNER (with naked blue flame for burning or heating) See fig.3B.
4.4.1. Unscrew the the black clamping ring. Allow the soldering head to drop out of the element shield. Ret the element shield without the
soldering head and hold in place with the black clamping ring.
4.4.2. Ignite the torch as in 4.2.3. to 4.2.6. above.
4.4.3. Adjust the flame with the gas flow control (fig. 3). Recommended flame length 10 - 25mm.
4.4.4. Apply flame to workpiece. Only use the minimum flame necessary. Too large a flame is less stable and will waste fuel.
4.5. TURNING OFF THE TORCH
4.5.1. When the job is complete move the gas flow control fully to ‘-’ and the ‘On/Off’ switch to ‘Off’.
4.5.2. Once the torch has cooled down, fit the transparent safety cap over the head to prevent accidental damage to the tip or head.
WARNING! The soldering head will be very hot. Allow to cool before handling.
fig.
4
Original Language Version
© Jack Sealey Limited
fig.
2
fig.
1
fig.
3
AK2946 Issue 3 (H, F) 28/05/19

5. TROUBLESHOOTING
Original Language Version
© Jack Sealey Limited
Sealey Group, Kempson Way, Suffolk Business Park, Bury St Edmunds, Suffolk. IP32 7AR
01284 757500 01284 703534 sales@sealey.co.uk www.sealey.co.uk
ENVIRONMENT PROTECTION
Recycle unwanted materials instead of disposing of them as waste. All tools, accessories and packaging should be sorted, taken to
a recycling centre and disposed of in a manner which is compatible with the environment. When the product becomes completely
unserviceable and requires disposal, drain any fluids (if applicable) into approved containers and dispose of the product and fluids
according to local regulations.
Note: It is our policy to continually improve products and as such we reserve the right to alter data, specifications and component parts without prior
notice. If you require documentation for alternative versions, please email or call our technical team on technical@sealey.co.uk or 01284 757505.
Important: No Liability is accepted for incorrect use of this product.
Warranty: Guarantee is 12 months from purchase date, proof of which is required for any claim.
AK2946 Issue 3 (H, F) 28/05/19
Symptom Possible cause Solution
Torch will not ignite. No fuel. Rell with butane gas
Gas pressure too high or too low. Adjust the ame control.
Air holes blocked. Check that all holes are clear.
Damaged torch/piezo fault. Ignite with external ame.
Tip does not heat up. Poor gas pressure. Re-ll or allow gas to warm up. Agitate gently to assist.