Thank you for purchasing a Sealey product. Manufactured to a high standard, this product will, if used according to these instructions,
and properly maintained, give you years of trouble free performance.
IMPORTANT: PLEASE READ THESE INSTRUCTIONS CAREFULLY. NOTE THE SAFE OPERATIONAL REQUIREMENTS, WARNINGS & CAUTIONS. USE
THE PRODUCT CORRECTLY AND WITH CARE FOR THE PURPOSE FOR WHICH IT IS INTENDED. FAILURE TO DO SO MAY CAUSE DAMAGE AND/OR
PERSONAL INJURY AND WILL INVALIDATE THE WARRANTY. KEEP THESE INSTRUCTIONS SAFE FOR FUTURE USE.
1. SAFETY
WARNING! Ensure Health & Safety, local authority, and general workshop practice regulations are adhered to when using this equipment,
make sure you know where the nearest fire extinguisher is.
WARNING! Always wear approved eye / face protection when operating the torch.
WARNING! Solder wire is harmful if swallowed.
WARNING! Soldering process will cause respiratory irritation and causes skin irritation.
WARNING! DO NOT use the torch if you notice damage to the work piece or if there could be a gas leak from it.
WARNING! Butane gas is extremely flammable, handle with care.
WARNING! Always point the torch away from the eyes and body when igniting and during operation.
WARNING! DO NOT put the torch down when it is lit, DO NOT leave it unattended.
WARNING! The ame is not easily visible in bright daylight.
WARNING! Ensure the flame is completely extinguished after use. DO NOT use water to cool the torch down.
WARNING! Only use in a well ventilated area.
8 DO NOT use the torch in an area where paint fumes, solvents or other flammable solids, liquids or gases pose a potential hazard. Keep
flammable material away from the torch when operating.
8 DO NOT operate the torch when you are tired or under the influence of alcohol, drugs or intoxicating medication.
8 DO NOT hold any work piece by hand.
8 DO NOT touch the work piece close to the heated area as it will be very hot. Allow to cool.
8 DO NOT operate the torch if it is damaged as this may cause failure and/or possible personal injury.
8 DO NOT touch the top of the torch during or immediately after use, as it will be very hot. Allow to cool.
8 DO NOT allow children to operate the torch.
9 After use, apply the safety lock and allow the torch to cool before storing it.
9 When not in use, store away from direct sunlight in a safe, dry, childproof location.
8 DO NOT store at over 40°C, such as in a car in hot weather.
2. INTRODUCTION
Portable and lightweight, suitable for heating, soldering and shrinking plus many other applications. Powered by Butane (lighter fuel) and
features an adjustable heat control ranging up to 1300°C. Supplied with 3 x solder tips, soldering sponge and soldering wire. Fitted with
retractable stand. Requires separate ignition. Supplied in storage case.
3. OPERATION
WARNING! Only attempt assembly once the Soldering iron has cooled down.
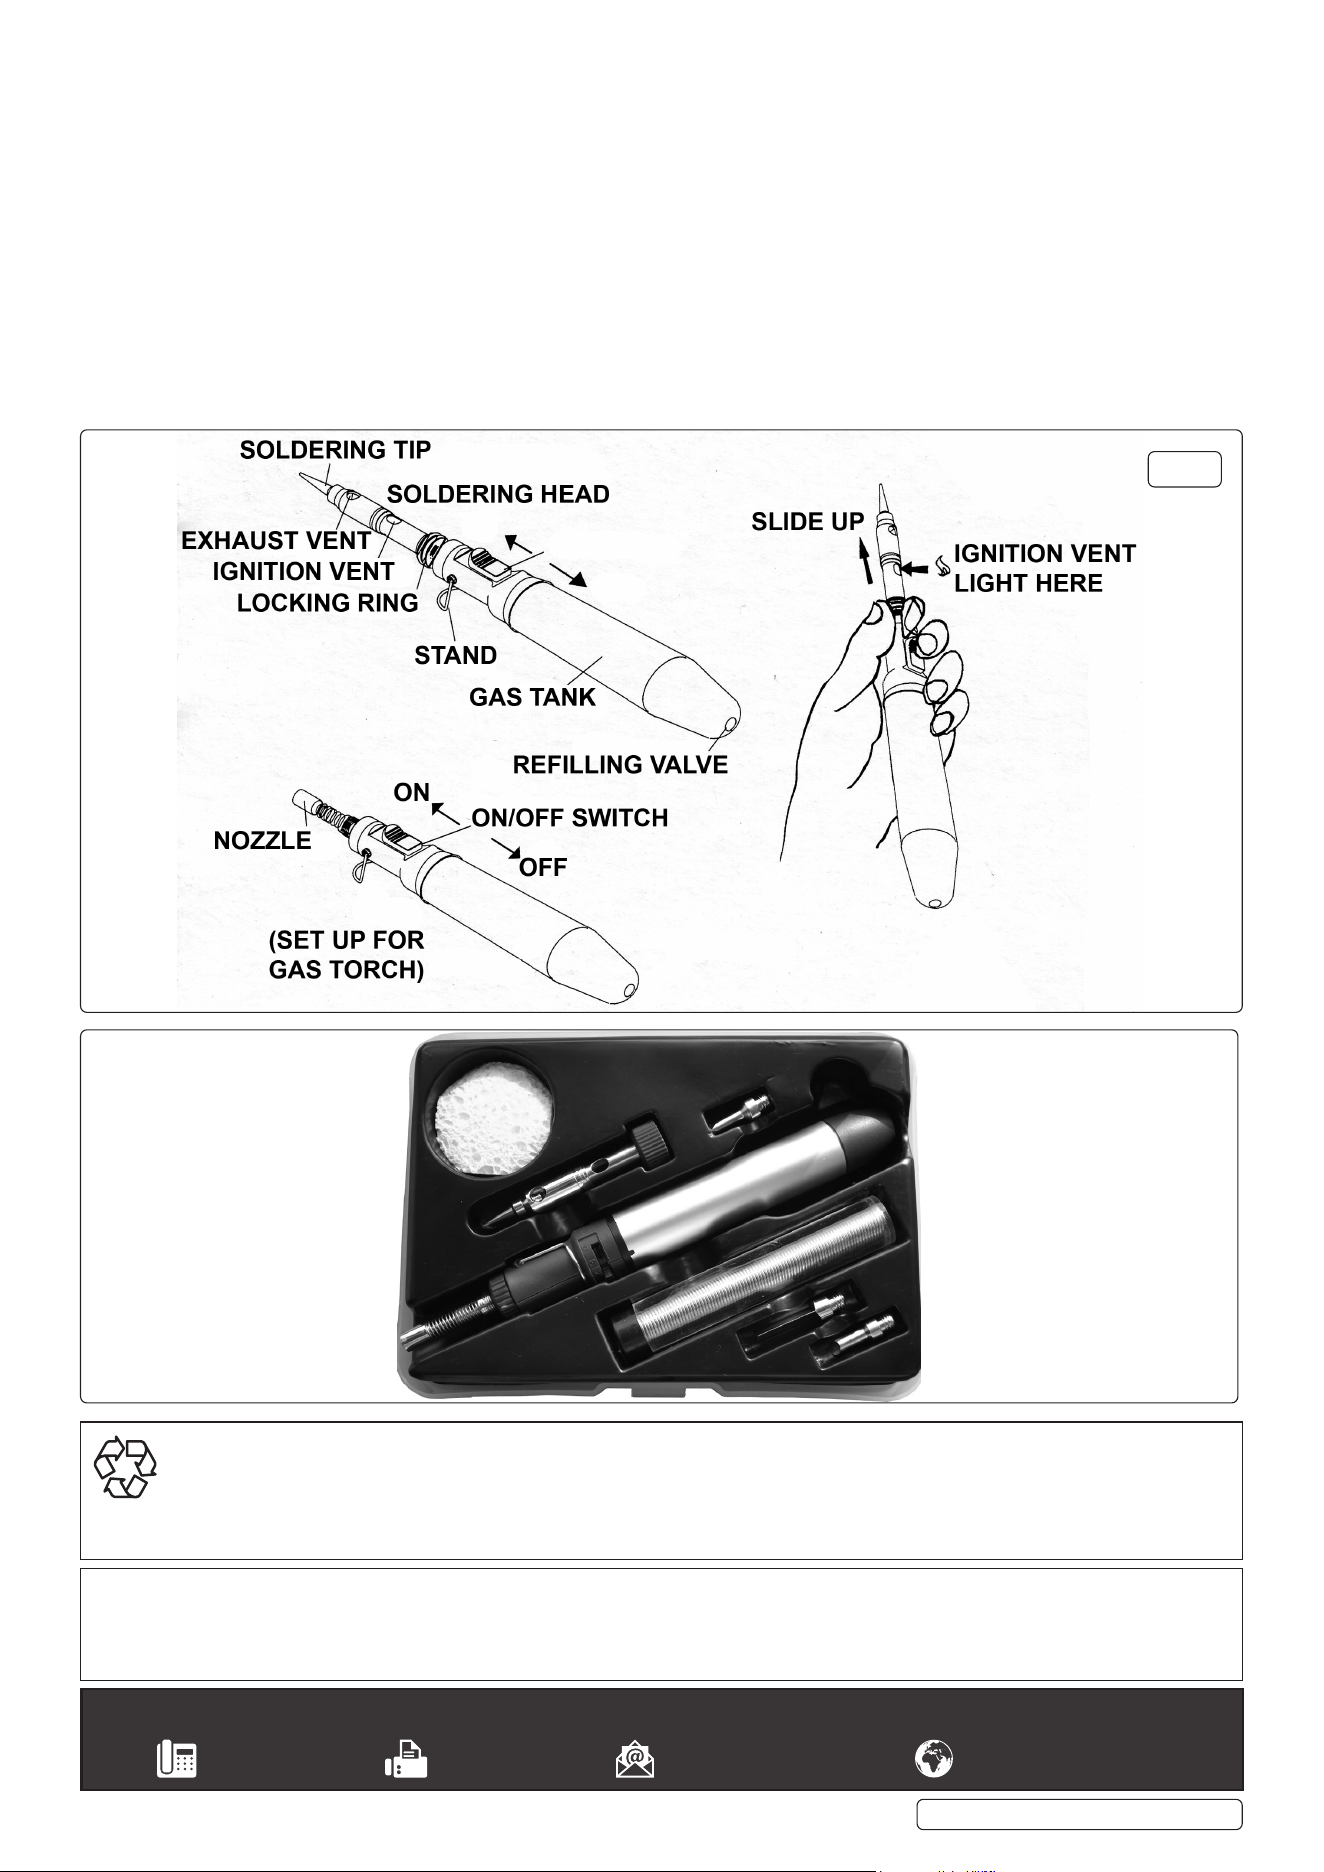
3.1. SOLDERING IRON ASSEMBLY (Refer to g.1)
3.1.1. Assemble the Soldering head into the Torch Nozzle and tighten the locking ring clockwise. The Soldering head can be moved forwards
and backwards.
3.1.2. Make sure the Exhaust vent faces upwards.
3.1.3. Disassemble the Soldering head by rotating the locking ring anticlockwise.
3.2. IGNITION/EXTINGUISHING (Refer to g.1)
3.2.1. Face the Exhaust vent upwards, exhaust air will come out of Exhaust vent.
CAUTION: please keep away from any ammable source and away from other people. Facing the Exhaust vent downwards will damage
the surface of a desk or tabletop.
3.2.2. Move the ON/OFF switch to the ON position to release the gas.
3.2.3. Pull the soldering head forward to see the hole and the nozzle of the gas torch. Light the gas with an open ame (a lighter or a match)
by applying the ame to the ignition vents of the soldering tip.
3.2.4. Pull the soldering head backwards. The ame will then disappear inside the metal sleeves and begin to generate heat.
3.2.5. Move the ON/OFF switch to the OFF position to extinguish the soldering iron.
3.3. GAS TORCH (Refer to g.1)
3.3.1. Remove the Soldering head.
3.3.2. Move the ON/OFF switch to the ON position to release the gas.
3.3.3. Light the torch by placing an open ame next to the Torch Nozzle.
3.3.4. Move the ON/OFF switch to the OFF position to extinguish the ame.
AK2953.V2 | Issue 3 (1) 01/04/20
Original Language Version
© Jack Sealey Limited
7 PIECE MICRO BUTANE TORCH
SOLDERING KIT
MODEL NO: AK2953.V2
Refer to
instruction
manual
Wear a face
shield
Warning:
Hot Surface
3.4. HOT BLOWER (Refer to g.1)
3.4.1. Remove the Soldering Tip by turning anticlockwise. The assembly can now be used as a Hot Blower. (Operation is the same as
above for the Soldering Iron).
3.5. FLAME ADJUSTMENT (Refer to g.1)
3.5.1. Move the gas volume control towards the higher numbered positions to increase the ame or towards the lower numbered positions
to decrease the ame.
Note: DO NOT start the ame at the higher numbered positions, the longer ame may cause the torch to are or extinguish. Move the
gas lever to the ‘1’ position and then set up the most efcient ame.
3.6. REFILLING GAS (Refer to g.1)
WARNING! Take care when refilling.
3.6.1. Before refilling please make sure the flame is fully extinguished and cooled down. Move the ON/OFF switch to the OFF position.
3.6.2. Refill in a well ventilated area away from any source of ignition and away from other people.
3.6.3. Refill with butane gas only, never use unapproved fuels.
3.6.4. Place the Soldering iron in an upside down position and insert the nozzle of the butane canister into the gas refilling valve.
3.6.5. Press down on the canister until the gas starts to overflow.
g.1
Original Language Version
© Jack Sealey Limited
AK2953.V2 | Issue 3 (1) 01/04/20
Sealey Group, Kempson Way, Suffolk Business Park, Bury St Edmunds, Suffolk. IP32 7AR
01284 757500 01284 703534 sales@sealey.co.uk www.sealey.co.uk
Note: It is our policy to continually improve products and as such we reserve the right to alter data, specifications and component parts without prior
notice.
Important: No Liability is accepted for incorrect use of this product.
Warranty: Guarantee is 12 months from purchase date, proof of which is required for any claim.
ENVIRONMENT PROTECTION
Recycle unwanted materials instead of disposing of them as waste. All tools, accessories and packaging should be sorted, taken to
a recycling centre and disposed of in a manner which is compatible with the environment. When the product becomes completely
unserviceable and requires disposal, drain any fluids (if applicable) into approved containers and dispose of the product and fluids
according to local regulations.