
Setup Guide
Doorbell Pro

2 3
Included installation hardware.
Bag Hardware
A
(3) 1" Mounting Screws
(3) Wall Anchors
B
(2) 3/16" Security Screws
C
(2) 1-1/4" Short Bracket Screws
(2) 1-1/2" Medium Bracket Screws
(2) 2" Long Bracket Screws
(2) Wall Anchors
D
(2) Wire Nuts
(2) Wire Extenders
(1) Alt Pro Power Kit Cables
(1) 1/8" Terminal Screw
QR+FR
Quick Start
1. Open the Ring app and
select Set Up Device.
Then follow the
in-app instructions.
2. Scan this code.
This identifies your Ring
device to make setup fast
and easy.
For additional help, visit
ring.com/help

4 5
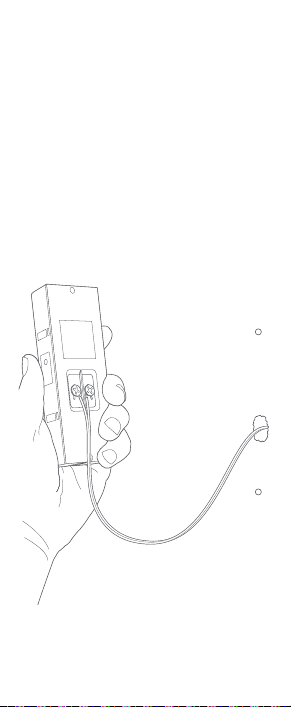
Find your doorbell chime.
Your Doorbell Pro is designed
to replace an existing doorbell
button, and gets its power
from the doorbell system.
Ring your existing doorbell and
listen for the chime. If it rings, we
know your existing doorbell
system is working.
Follow the sound to find your
chime and make a mental note
of the location. We’ll return to
your chime soon.
Download the Ring App.
The Ring App walks you through
setting up and managing your
Ring Video Doorbell Pro.
Search for “Ring” in one of the app
stores below, or visit ring.com/app
Set up your Ring Doorbell.
In the Ring app, select
Set Up a Device and follow
the in-app instructions.
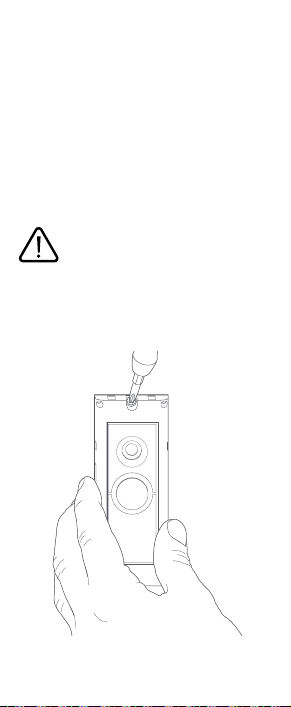
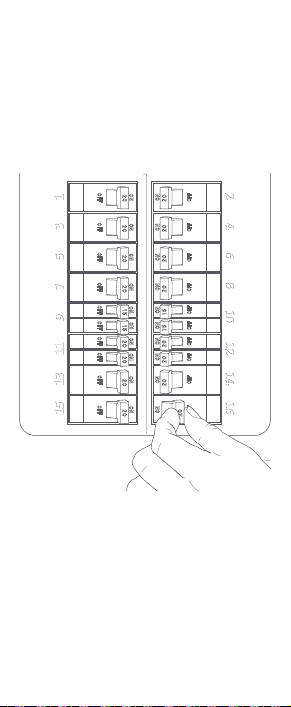
Turn o power at the breaker.
This is essential to keeping you and
your new Ring Doorbell safe.
If you’re not sure which breaker
controls your doorbell chime, turn
o the master breaker for your
home, or contact an electrician.
CAUTION!
You’ll be working with electrical
wires during the install process.
If you are uncomfortable or
inexperienced with doing so,
consult with a licensed electrician.

4 5
Find your doorbell chime.
Your Doorbell Pro is designed
to replace an existing doorbell
button, and gets its power
from the doorbell system.
Ring your existing doorbell and
listen for the chime. If it rings, we
know your existing doorbell
system is working.
Follow the sound to find your
chime and make a mental note
of the location. We’ll return to
your chime soon.
Download the Ring App.
The Ring App walks you through
setting up and managing your
Ring Video Doorbell Pro.
Search for “Ring” in one of the app
stores below, or visit ring.com/app
Set up your Ring Doorbell.
In the Ring app, select
Set Up a Device and follow
the in-app instructions.
Turn o power at the breaker.
This is essential to keeping you and
your new Ring Doorbell safe.
If you’re not sure which breaker
controls your doorbell chime, turn
o the master breaker for your
home, or contact an electrician.
CAUTION!
You’ll be working with electrical
wires during the install process.
If you are uncomfortable or
inexperienced with doing so,
consult with a licensed electrician.

6 7
Grab the included Pro Power Kit.
The Pro Power Kit ensures that your
Ring Doorbell gets the power it
needs, and must be installed before
you install your Ring Doorbell.
Your Ring Doorbell is compatible
with doorbell systems supplying
16–24 volts AC at 50 or 60Hz,
40VA max.
If you have an existing Pro Power Kit
already installed, you must use the new
one included with your new doorbell.
Remove the cover from your
doorbell chime.
After you’ve turned o power at
the breaker, remove the cover from
your chime and set it aside for now.
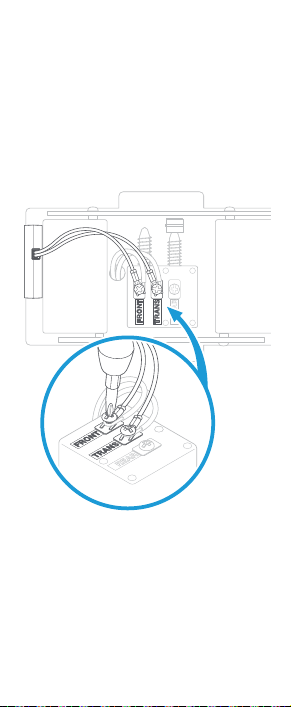
Loosen the “Front” and “Trans”
terminal screws.
Make sure to keep the existing
doorbell wires in place.

6 7
Grab the included Pro Power Kit.
The Pro Power Kit ensures that your
Ring Doorbell gets the power it
needs, and must be installed before
you install your Ring Doorbell.
Your Ring Doorbell is compatible
with doorbell systems supplying
16–24 volts AC at 50 or 60Hz,
40VA max.
If you have an existing Pro Power Kit
already installed, you must use the new
one included with your new doorbell.
Remove the cover from your
doorbell chime.
After you’ve turned o power at
the breaker, remove the cover from
your chime and set it aside for now.
Loosen the “Front” and “Trans”
terminal screws.
Make sure to keep the existing
doorbell wires in place.
8 9
Connect the Pro Power Kit wires.
Connect one wire from the Pro
Power Kit to the “Front” terminal,
and the other to the “Trans”
terminal. It doesn’t matter which
wire you connect to which terminal.
Then re-tighten the terminal screws.
Position the Pro Power Kit
and replace the cover.
Place it within your internal
doorbell, away from any
moving parts.
Uninstall your existing
doorbell button.
Remove your doorbell from the
wall and disconnect the wires. Make
sure they don’t fall back inside your
wall so you can access them later.
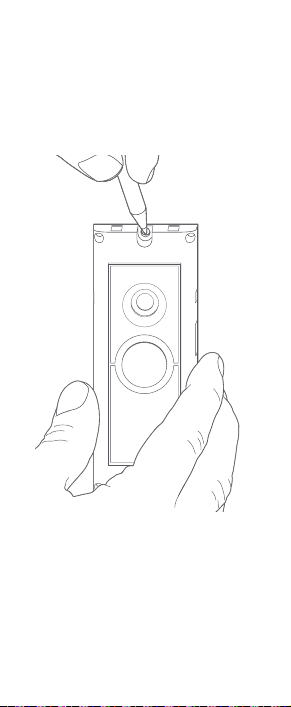
Remove the faceplate.
Grasp the edges of the faceplate
and push gently against the front
of the Doorbell to remove.

8 9
Connect the Pro Power Kit wires.
Connect one wire from the Pro
Power Kit to the “Front” terminal,
and the other to the “Trans”
terminal. It doesn’t matter which
wire you connect to which terminal.
Then re-tighten the terminal screws.
Position the Pro Power Kit
and replace the cover.
Place it within your internal
doorbell, away from any
moving parts.
Uninstall your existing
doorbell button.
Remove your doorbell from the
wall and disconnect the wires. Make
sure they don’t fall back inside your
wall so you can access them later.
Remove the faceplate.
Grasp the edges of the faceplate
and push gently against the front
of the Doorbell to remove.

10 11
Install the included Corner or
Wedge Mount. (optional)
The Corner and Wedge Mounts
can angle your Ring Doorbell to
improve motion detection and
provide a better view.
First, position your chosen mount
on your wall, and feed your
doorbell wires through the center
hole. Then mark two mounting
holes on your wall through the slots
on your Corner or Wedge Mount.
(Skip to page 14 if you don’t plan
on using the Corner or Wedge
Mounts.)
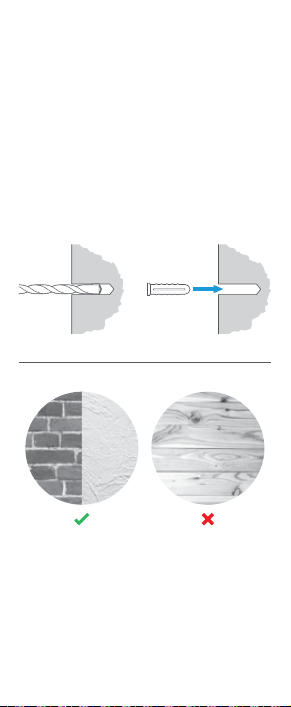
Install the anchors.
(optional)
On stucco, brick, or concrete, use
a 1/4" masonry bit to drill holes in
your wall, then insert the included
wall anchors.
(If you’re installing on wood or
siding, you can skip this step.)

10 11
Install the included Corner or
Wedge Mount. (optional)
The Corner and Wedge Mounts
can angle your Ring Doorbell to
improve motion detection and
provide a better view.
First, position your chosen mount
on your wall, and feed your
doorbell wires through the center
hole. Then mark two mounting
holes on your wall through the slots
on your Corner or Wedge Mount.
(Skip to page 14 if you don’t plan
on using the Corner or Wedge
Mounts.)
Install the anchors.
(optional)
On stucco, brick, or concrete, use
a 1/4" masonry bit to drill holes in
your wall, then insert the included
wall anchors.
(If you’re installing on wood or
siding, you can skip this step.)

12 13
Screw in the Corner
or Wedge Mount.
Using the short bracket screws,
secure the Corner or Wedge
Mount to the wall.
You’ll use the 1" mounting screws
to attach your Doorbell to the
bracket later.
DO NOT USE any screw other than
the included 1" mounting screws when
securing your Ring Doorbell.
If you need both
vertical and horizontal
adjustment, you can
stack the Corner and
Wedge Mounts and
mount them both
with the medium or
long bracket screws.
Connect the doorbell wires.
Loop one doorbell wire around
each of the screw terminals on the
rear of your Ring Doorbell then
tighten the terminals to secure.
If your doorbell wires are too
short to reach your new Ring
Doorbell, you can attach the
included wire extenders using
the included wire nuts.

14 15
Mount your Ring Doorbell to
the Corner or Wedge Mount.
Secure your Ring Doorbell to the
Corner or Wedge Mount with two
of the included 1" mounting screws.
Be sure to feed any excess wiring
back into the wall first. If you
used the wire nuts, push them
through the hole as well.
Once you’re done, skip
ahead to page 18.
DO NOT USE any screw other than
the included 1" mounting screws when
securing your Ring Doorbell.
Mark the screw holes.
Using your Ring Doorbell as a
template, mark the location of the
two mounting holes on your wall.
16 17
Install the anchors.
(optional)
On stucco, brick, or concrete, use
a 1/4" masonry bit to drill holes in
your wall, then insert the included
wall anchors.
(If you’re installing on wood or
siding, you can skip this step.)
Connect the doorbell wires.
Loop one doorbell wire around
each of the screw terminals on the
rear of your Ring Doorbell then
tighten the terminals to secure.
If your doorbell wires are too
short to reach your new Ring
Doorbell, you can attach the
included wire extenders using
the included wire nuts.
18 19
Screw in your Ring Doorbell.
Mount your Ring Doorbell with two
of the included 1" mounting screws.
Be sure to feed any excess wiring
back into the wall first. If you
used the wire nuts, push them
through the hole as well.
DO NOT USE any screw other than
the included 1" mounting screws when
securing your Ring Doorbell.
Restore power at the breaker.
It may take a moment for your
Ring Doorbell to power on.
You’ll know it’s ready once it
lights up and speaks to you.
3/16"
Security
Screw
Free Ring Protect Plan for 30 days.
Your new device comes with a
free, 30-day trial of Ring Protect.
This comprehensive subscription
service lets you review, save, and
share your video and photo history
anytime so you never miss a
moment.*
To continue using Ring Protect after
your free trial ends, visit ring.com/
protect-plans to compare plans
and pricing.
*Your free trial isn’t applicable for locations with
an existing Ring Protect subscription. See ring.
com/protect-plans to learn more about your
plan’s retention period.
20
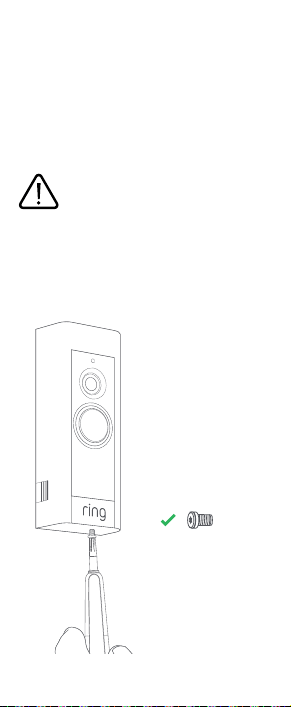
Secure your Ring Doorbell.
Re-attach the faceplate, then
use the included screwdriver
to insert and tighten one of the
3/16” Security Screws.
CAUTION!
If you use the wrong screws to secure the
Ring Doorbell, you could damage the
battery during installation, create a fire
hazard, and be seriously injured.

3/16"
Security
Screw
Free Ring Protect Plan for 30 days.
Your new device comes with a
free, 30-day trial of Ring Protect.
This comprehensive subscription
service lets you review, save, and
share your video and photo history
anytime so you never miss a
moment.*
To continue using Ring Protect after
your free trial ends, visit ring.com/
protect-plans to compare plans
and pricing.
*Your free trial isn’t applicable for locations with
an existing Ring Protect subscription. See ring.
com/protect-plans to learn more about your
plan’s retention period.
20
Secure your Ring Doorbell.
Re-attach the faceplate, then
use the included screwdriver
to insert and tighten one of the
3/16” Security Screws.
CAUTION!
If you use the wrong screws to secure the
Ring Doorbell, you could damage the
battery during installation, create a fire
hazard, and be seriously injured.

For information on our warranty, theft protection,
and Ring Protect Plans, visit ring.com/legal
© 2022 Ring LLC or its aliates.
Ring and all related marks are trademarks
of Ring LLC or its aliates.
xx-xxxxxx-xx
For additional help, visit
ring.com/help
Or give us a call
US 1 800 656 1918
Canada 1 855 300 7289
Worldwide +1 310 929 7085
For a list of all our customer
support numbers, visit
ring.com/callus
