Security-Vision-Systems
EN
www.mobotix.com
Quick Install AudioMount
MX-FLEX-OPT-AM-BL
31.812-002_EN_08/2015
Innovations - Made in Germany
The German company MOBOTIX AG is known as the leading pioneer in network camera technology and its decentra-
lized concept has made high-resolution video systems cost ecient.
MOBOTIX AG • D-67722 Langmeil • Phone: +49 6302 9816-103 • Fax: +49 6302 9816-190 • [email protected]
• Easy installation using adhesive film
• Integrated speaker and microphone
• Suitable for all FlexMount mono cameras
•
Double-sided adhesive tape for mounting Interface
Box (e.g., MX-232-IO-Box) included
Audio Extension for
MOBOTIX S15M/S14M
The AudioMount is a mounting adapter for the S14M and S15M cameras allowing attachment to thin and smooth
surfaces (e.g., stainless steel plate, mailbox, etc.) using an adhesive film on the backside of the AudioMount.
Speaker and microphone are included so that the AudioMount can provide full intercom functionality. Using the
appropriate MOBOTIX accessories, you can also use the FlexMount camera in conjunction with the AudioMount
as a hemispheric door station (door station function with firmware 4.1.9 and higher).
1. Choose installation site
The AudioMount can be mounted horizontally or vertically
to (stainless) steel sheets 1.2 mm to 3.0 mm thick.
2. Prepare mount surface
Drill holes for the lens, the microphone and the speaker
using the drilling template (item 1.9). For alignment of
the mount, mark the position of the four notches (see a)
on the side of the mount surface where the mount is to
be glued to.
3. Ax AudioMount
Remove the red protection film completely and position the
AudioMount concentrically to the drilling in the panel with
use of the centering aid. Align horizontally or vertically by
means of the four notches (a) and then press the AudioMount
onto the panel. Break o the four pegs by pushing them
inwards (b).
When installing an Interface Box (e.g., MX-232-IO-Box),
you can glue it next to the AudioMount using the double-
sided adhesive tape (item 1.9, see fig. c).
Notes: Recommended working temp. 5 to 20°C (59to
68°F). The surface has to be clean, fat-free and dry. Press
hard when attaching the mount (the glue is activated by
pressure!)
Installation of the AudioMount
Installation of the Camera
1. Temporarily attach camera
To make the cable connection easy, temporarily
attach the camera upside down onto the AudioMount
with the two Allen screws (item 1.6).
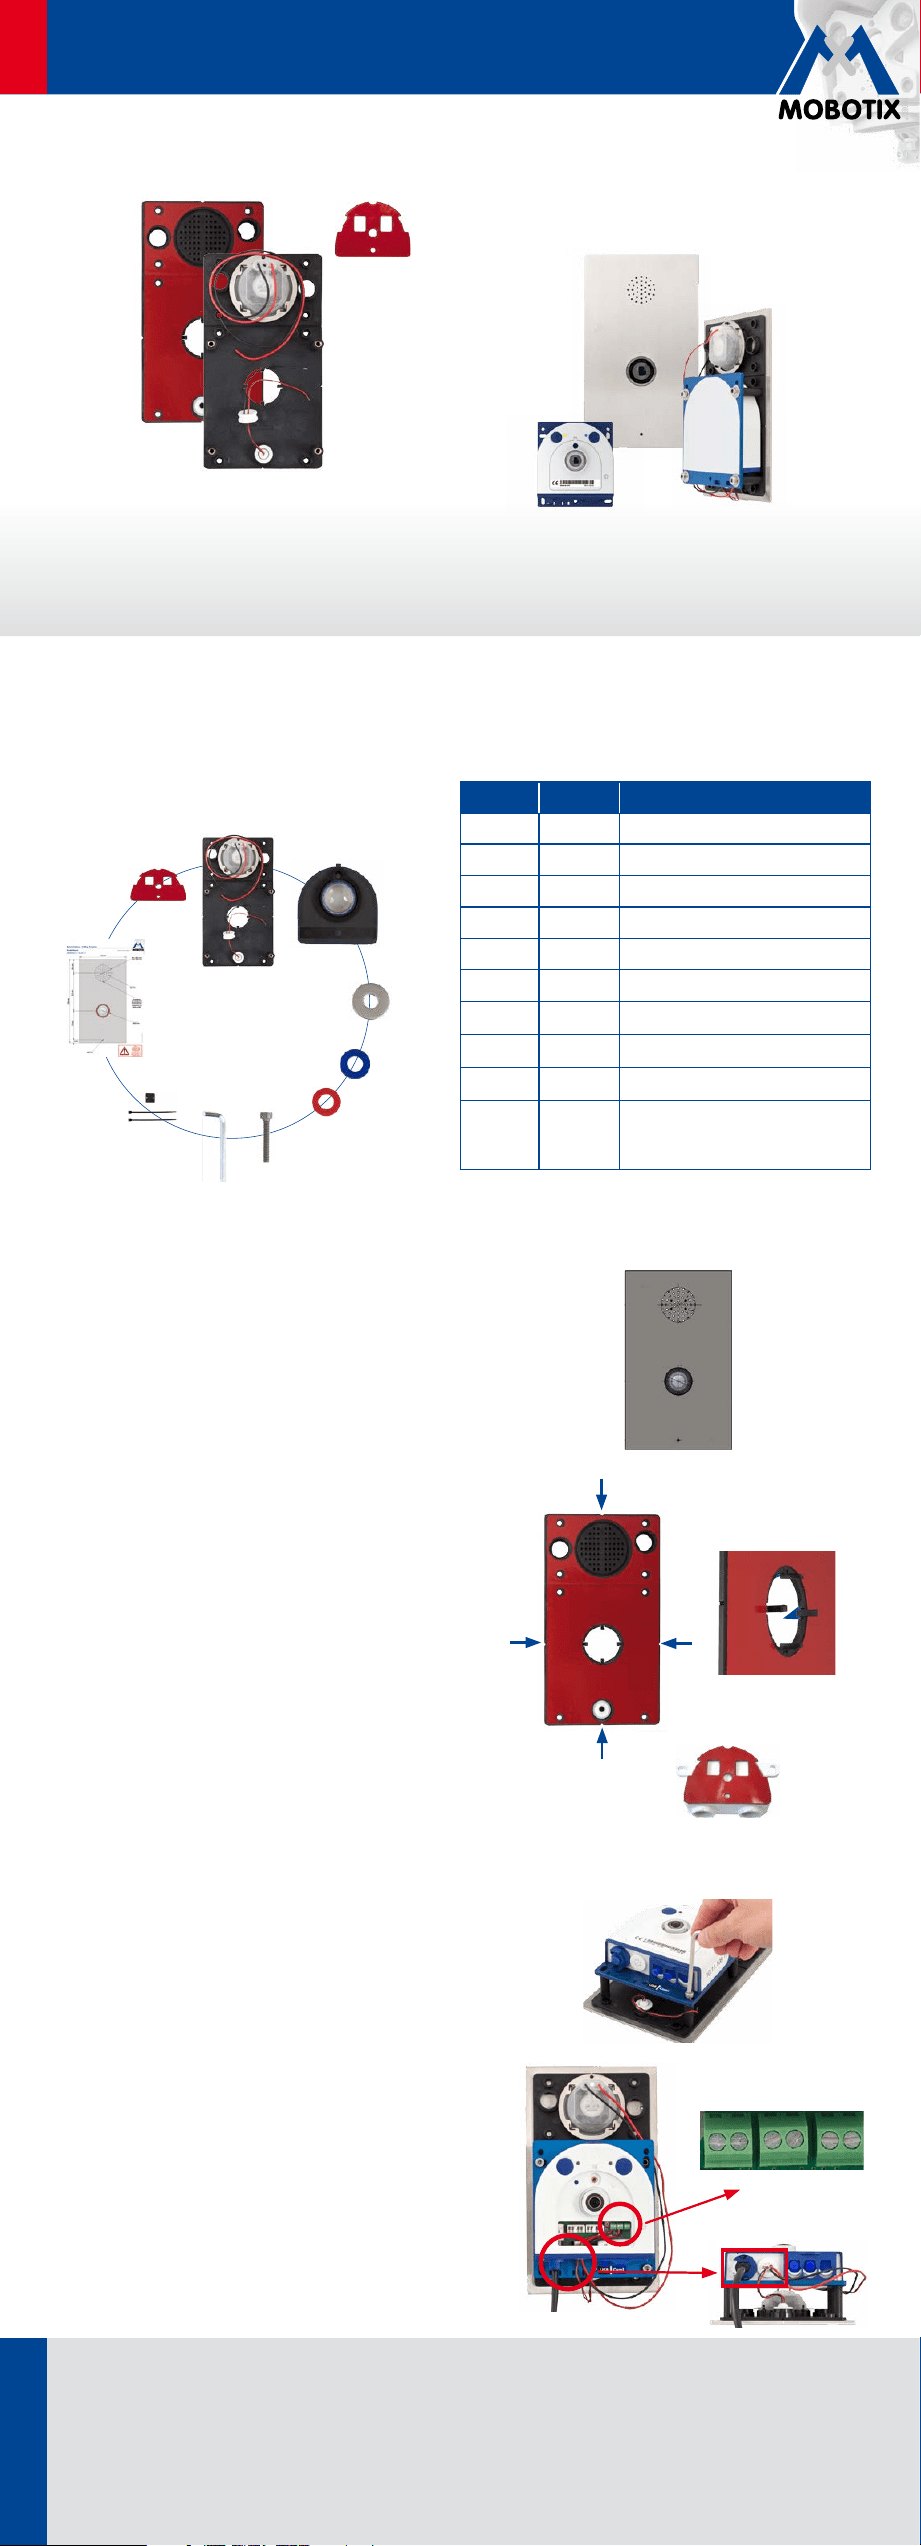
2. Attach connection cables
Open the camera housing with a 2.5 mm Allen wrench
(provided with the camera). Connect the required cables:
•
Lead the AudioMount´s microphone and speaker cables
as well as the MxBus cables (when using MxBus modules)
through the camera opening for additional cables and
connect them (see S15 Camera Manual, Chapter 2).
•
Insert the patch cable into the left opening of the camera
and secure it with the blue bayonet catch (see S15
Camera Manual, Chapter 2).
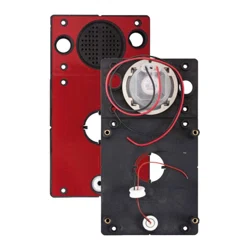
Delivered Parts
Item Number Part Name
1.1 1 AudioMount
1.2 1 Black front cover with dome
1.3 4 Metal washer
1.4 5 Blue washer
1.5 5 Red washer
1.6 4 Allen screw M5x20
1.7 1 Allen wrench
1.8 1 Cable tie
1.9 1 Drilling template
1.10 1 Double-sided adhesive tape
for mounting Interface Box (not
included)
Micro Spk. MxBus
Example: metall sheet not included in delivered parts
a)
b)
c)
1.1
1.2
1.3
1.5
1.4
1.6
1.7
1.8
1.10
1.9
Security-Vision-Systems
EN
www.mobotix.com
Quick Install AudioMount
Innovations - Made in Germany
The German company MOBOTIX AG is known as the leading pioneer in network camera technology and its decentra-
lized concept has made high-resolution video systems cost ecient.
MOBOTIX AG • D-67722 Langmeil • Phone: +49 6302 9816-103 • Fax: +49 6302 9816-190 • [email protected]
Copyright © MOBOTIX AG 2013 • Made in Germany • Technical information subject to change without notice.
1. Remove and re-attach camera
Remove the Allen screws (item 1.6), turn the camera around
and attach it to the AudioMount. Make sure that you lead
the cables on the left side around the four black mounting
pegs. Screw the camera with the Allen wrench (item 1.7)
to the mounting pegs using Allen screws (item 1.6) and
metal washers (item 1.3).
Thickness of material: The AudioMount is constructed
for sheet metals with a 3mm thickness. If the material is
less than 2.4mm thick, additional washers have to be put
between the mounting pegs and the back of the S15, so that
the dome of the camera lens attains its optimal position.
2. Attach cable tie
Remove the protective foil from the cable tie (item 1.8) and
stick it to the left side of the camera. Secure the audio
cables with the cable tie.
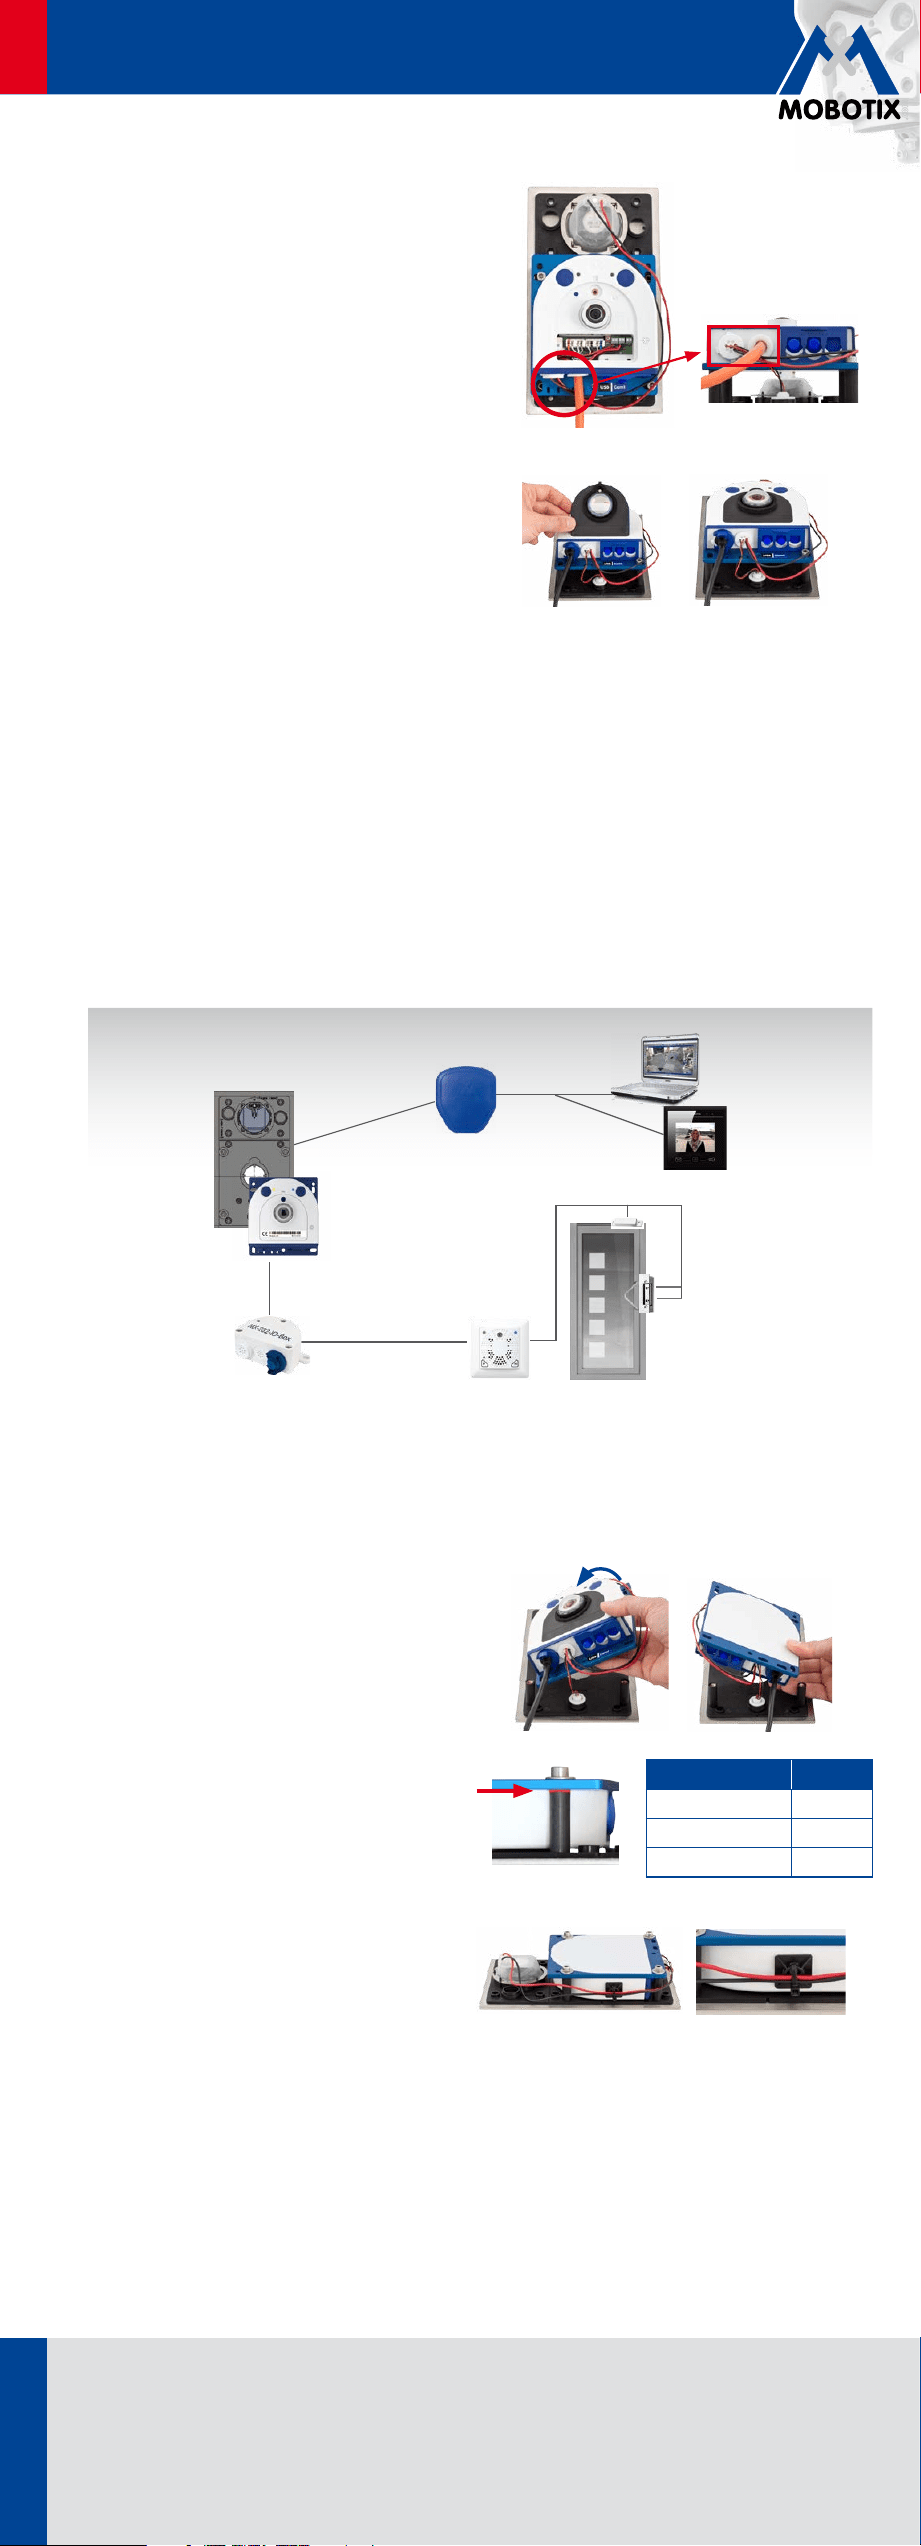
Finishing the Installation
MxBus
AudioMount with
mounted S15M
Door
Door Opener and
Lock Sensor
DoorMaster
Door Sensor
e.g., MX-232-IO-Box to
connect door bells
MxBus
NPA-PoE-Set
Remote Stations
Patch Cable (RJ45)
Setup of the Camera
You find detailed information to the standard installation in the S15 Camera Manual, Section 3 “Operating the
Camera”.
1. Establish PoE power supply
2. Put camera into operation
3. Optional: Start auto configuration
If you would like to use the FlexMount camera in conjunction with the AudioMount as a door station, you can run
the auto configuration with the aid of the camera buttons now. To do this, reboot the camera by disconnecting
and reconnecting the PoE power supply. After the reboot, press the camera buttons according to the description
in the S15 Camera Manual, “Setting up an S15 FlexMount as a Door Station” and configure the connected door
station modules (e.g., bell and DoorMaster).
• When using a solid core wire cable (instead of a patch
cable), lead that cable through the camera opening
for “additional” cables. Remove the bayonet catch on
the left camera opening and insert the cable plug that
holds the additional cables (see S15 Camera Manual,
Chapter 2).
• If a USB decive is to be connected, insert the MiniUSB
cable into the MiniUSB plug (see S15 Camera Manual,
Chapter 2).
3. Attach housing cover
Attach the black front cover with dome included in the
delivered parts (item 1.2) to the camera and fasten it in place.
The previously removed white front cover is not needed.
MxDisplay
Thickness/Material Washer
1.20 - 1.79 mm blue
1.80 - 2.39 mm red
2.40 - 3.00 mm none
a)
b)
