
How to Download the App
How to Pair with the App
Reset
Warnings and Precautions
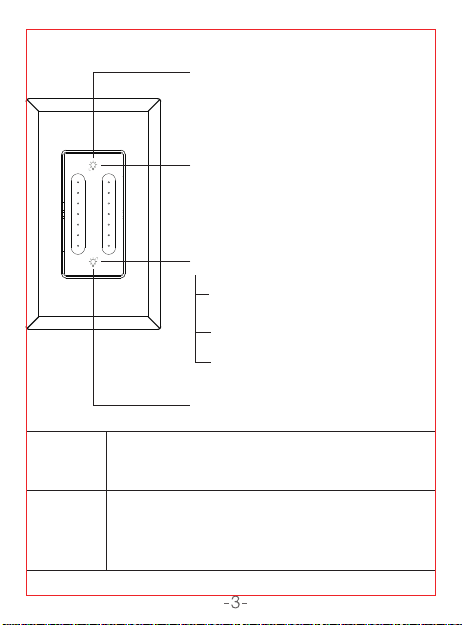
Light Indicator
Light Indicator
Fast blinking red:
Ready for Easy Mode connection
Slow blinking red:
Ready for AP Mode connection
Blue:
Switch is ON
EZ mode
long press the pair button for 5 seconds,
fast blinking indicates it’s ready to pair.
hold the pair button for another 5 seconds
after the fast blinking,then slow blinking
indicates it's ready to pair.
AP mode
On/Off Button(Reset Button)
On/Off Button(Reset Button)
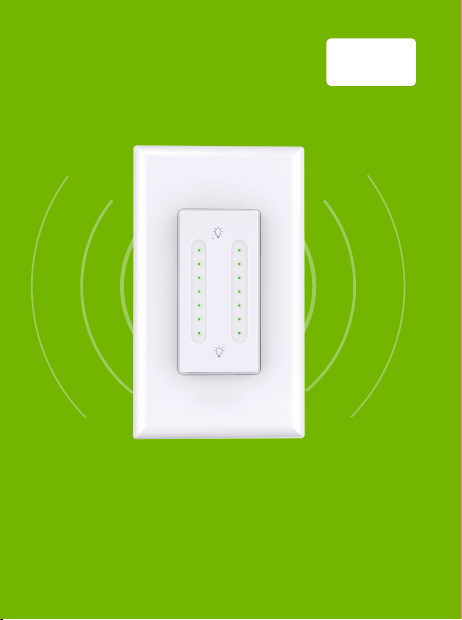
Product Overview
Parameters
Before You Install
Before You Install
Install the Dual Dimmer Switch
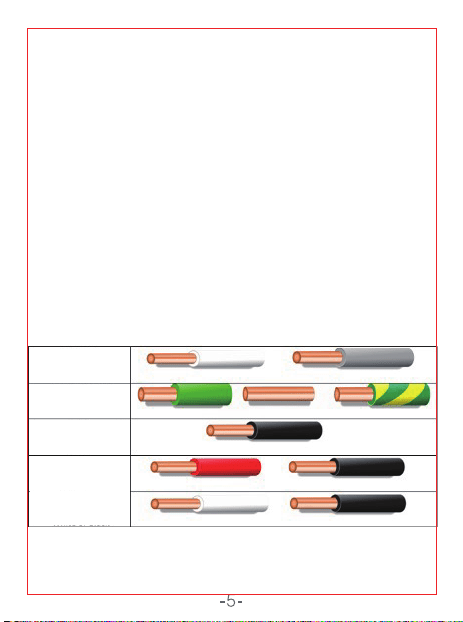
Identify Wires By Color
If Line and Load Are Both Black
WARNING: SHOCK HAZARD
Installation Tips!
Incorrect installation may be dangerous or illegal.
Multiple circuit breakers may need to be de-energized for
safe installation. If you are not familiar with electrical work,
please call a professional electrician.
• After removing the face plate, turn the breaker
back on.
• Very carefully, press the voltage pen against
each wire.
• The pen will glow red when the wire is hot.
• The wire that causes the pen to glow red is the
hot wire; also known as the Line wire.
• The wire that does not cause the pen to glow
red is the Load wire.
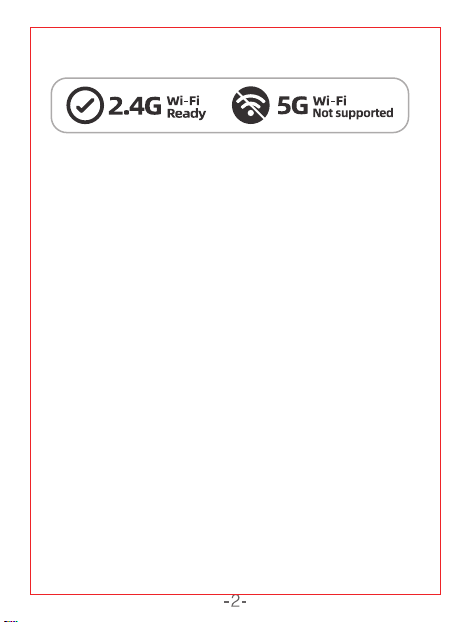
Since the device only supports 2.4G Wi-Fi
connection, please ensure that the
mobile phone and the device are connected
under 2.4G Wi-Fi simultaneously.
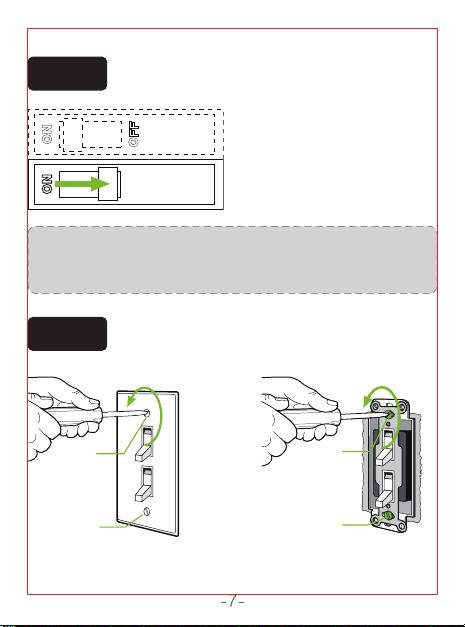
Step 1
OFF
ON
Shut OFF the power at the circuit breaker for
the switch you are replacing.
Step 2
Unscrew and disconnect the wires from the
old switch using a screw driver.
Step 3
Install the Dual Dimmer Switch. Insert wire to
terminal,then tighten the screw.
Step 4
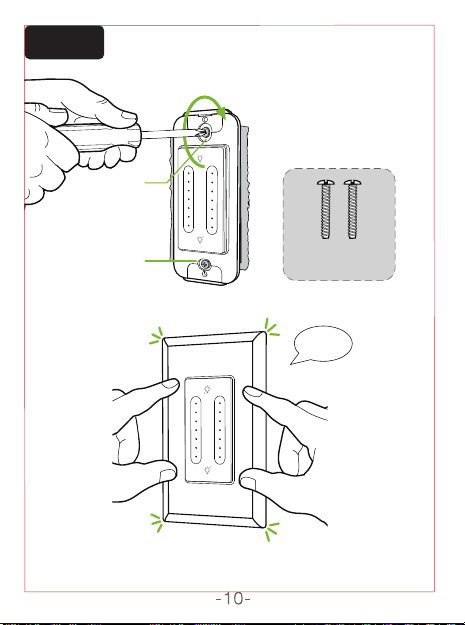
Mount the device using the provided screws.
Step 5
Turn power on at circuit breaker.
You may need to shut OFF more
than one circuit breaker/switch
to make sure the switch you're
working onis powered OFF.
IMPORTANT: USE A NON-CONTACT VOLTAGE DETECTOR
OR FLIP YOUR LIGHT SWITCH A FEW TIMES TO MAKE
SURE THAT THE POWER IS OFF.
(If you installed the dimmer next to other dimmers or
switches, you’ll need to install a wallplate with the correct
size/number of openings to accommodate all the devices.)
Remove the wallplate from switch.
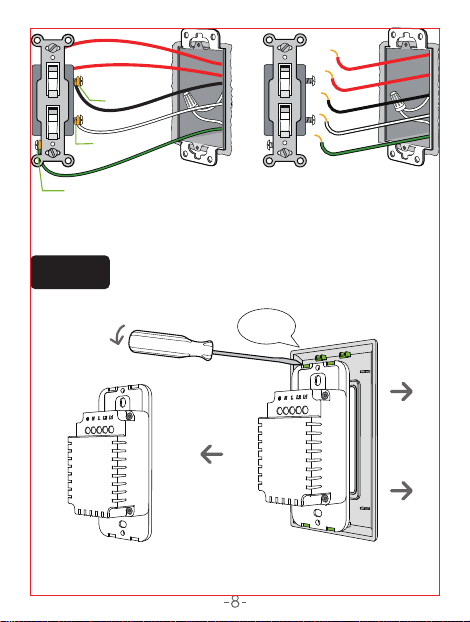
1
1
2
Ground
Neutral
Live
Light 2
Light
1
2
Disconnect all ve wires from the switch.
Use a at-head screwdriver to pry open the panel.
Connect the wires in order.
Tighten the incoming wires.
Close the top cover.
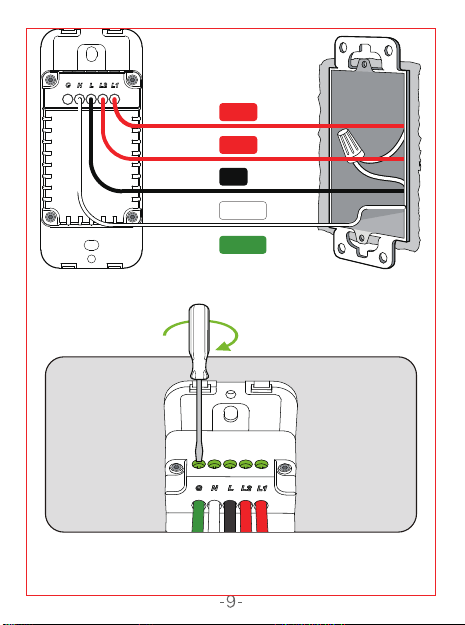
7
5
8
6
Ground
Neutral
Live
Light 1
Light 2
9
Remove the switch and pull it
away from the wall.
3
4
Ground
Neutral
Light
1
Light 2
Live
①
②
③
④
⑤
‘snap’
‘snap’
Use the screws
provided.
Model: SW7
Input: 120V~ 50/60Hz
Output: 120V~ 50/60Hz 4A Max.
Wi-Fi: 802.11 b/g/n, 2.4GHz (only)
Operating Temp.: -10~40 ℃
Option 1: Search for "Gosund" in the Apple APP Store or
Google Play.
Tip #1: An easy way to identify the wires in your wall box
is by looking at the color.
Tip #2: The Load wire is usually coming from the top of
the box. The Line wire is usually coming from the bottom
of the box.
Tip #3: Before removing the switch, test each wire with a
voltage tester.
Live Wire (Line Wire) : A live wire is a wire carrying an
electric current. If you keep your tester here, it will show
indication when power is there.
CAUTION: Risk of electric shock. Do NOT touch any wires
during this process.
CAUTION: Risk of electric shock. Before continuing with
the rest of the installation process, make sure to turn the
power breaker off.
Ground Wire: Ground wire is a bare copper wire that
provides a conducting path to the earth.
If the wires in your switch wall box are different from the
ones listed below, we recommend consulting a qualified
electrician.
Neutral Wire: A neutral wire which normally in white color
allows the switch to be powered while simultaneously
allowing the lighting circuit connected to your lights to be
power off.
Load Wire: The load wire connects your light switch to
your light fixture.It is usually attached to a brass terminal
on the previous switch. It is sometimes black or red.
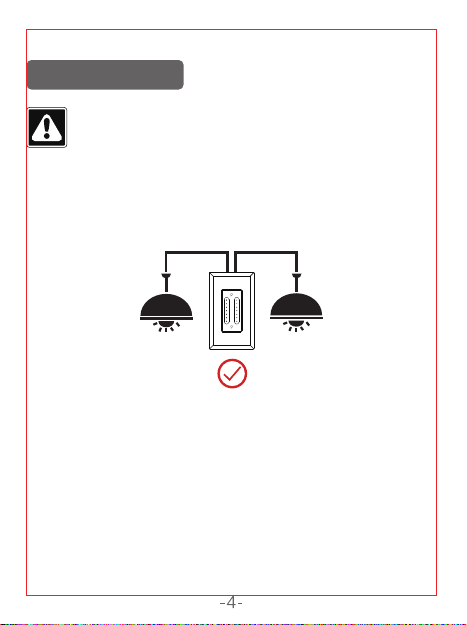
2 load wires are required for connecting with dual dimmer switch.
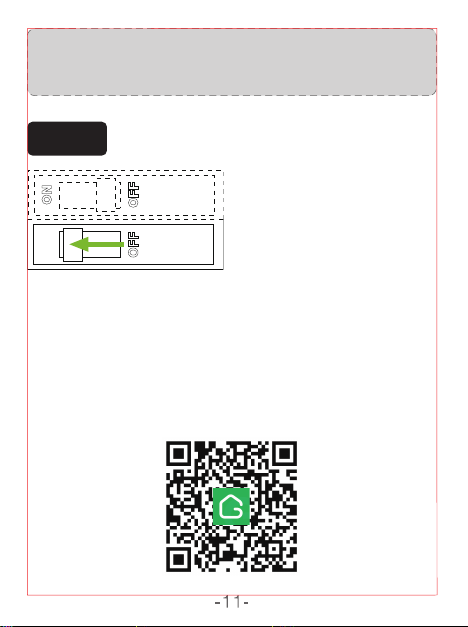
Option 2: Scan the QR code below to enter the
download page.
1. Open the APP and create your account.
2. Turn on the switch and put it close to the router when
pairing.
3. Press and hold the ON/OFF button for 5 seconds and
release it when the switch starts blinking fast, enter the
network pairing mode.
4.Tap "+" on the upper right corner to select "Add
Manually", and then select " Switch (Wi-Fi)".
Follow the App instructions to complete the operation.
Turn on the power, hold the Reset button for 5 seconds
and let it go when the Switch starts to flash quickly, the
reset is successful.
When the Switch is in a new network environment, you
need to restore the factory settings, and then reconnect to
the network.
Keep it out of the reach of children and pets.
Do not use this product in humid environments or
outdoors.It's for indoor use only.
Do not store the device for extended periods in poor
ambient conditions.
Never use aggressive detergents such as rubbing
alcohol or other chemical solutions because these could
damage the casing or even impair the functioning of the
product.
Note: The image shown in the manual is indicative
only. If there is inconsistency between the image
and the actual product, the actual product shall
govern.
Do not place this product near heating devices, such as
microwave ovens, stoves, or radiators.
Protect the product from extreme temperatures, direct
sunlight, strong jolts, high humidity, moisture, flammable
gases, vapors and solvents.
Do not disassemble, modify, or repair your device, and
ask help from the authorized professionals for device
malfunction.
Do not use the device when it is no longer working
properly or visibly damaged.
Neutral
White or Grey
Black
Red or Black
White or Black
Green, Copper or
Green with Yellow Strip
Ground
Line
Load
Traveler
Smart Switch Instruction
SW7
料号:4.02.000.0730 V1.0
名称:SW7 白牌说明书
材质:105g 哑粉纸, 4色双面印,风琴折
尺寸:75X100mm
正面
背面
4.02.000.0730 V1.0
How to Download the App
How to Pair with the App
Reset
Warnings and Precautions
Light Indicator
Light Indicator
Fast blinking red:
Ready for Easy Mode connection
Slow blinking red:
Ready for AP Mode connection
Blue:
Switch is ON
EZ mode
long press the pair button for 5 seconds,
fast blinking indicates it’s ready to pair.
hold the pair button for another 5 seconds
after the fast blinking,then slow blinking
indicates it's ready to pair.
AP mode
On/Off Button(Reset Button)
On/Off Button(Reset Button)
Product Overview
Parameters
Before You Install
Before You Install
Install the Dual Dimmer Switch
Identify Wires By Color
If Line and Load Are Both Black
WARNING: SHOCK HAZARD
Installation Tips!
Incorrect installation may be dangerous or illegal.
Multiple circuit breakers may need to be de-energized for
safe installation. If you are not familiar with electrical work,
please call a professional electrician.
• After removing the face plate, turn the breaker
back on.
• Very carefully, press the voltage pen against
each wire.
• The pen will glow red when the wire is hot.
• The wire that causes the pen to glow red is the
hot wire; also known as the Line wire.
• The wire that does not cause the pen to glow
red is the Load wire.
Since the device only supports 2.4G Wi-Fi
connection, please ensure that the
mobile phone and the device are connected
under 2.4G Wi-Fi simultaneously.
Step 1
OFF
ON
Shut OFF the power at the circuit breaker for
the switch you are replacing.
Step 2
Unscrew and disconnect the wires from the
old switch using a screw driver.
Step 3
Install the Dual Dimmer Switch. Insert wire to
terminal,then tighten the screw.
Step 4
Mount the device using the provided screws.
Step 5
Turn power on at circuit breaker.
You may need to shut OFF more
than one circuit breaker/switch
to make sure the switch you're
working onis powered OFF.
IMPORTANT: USE A NON-CONTACT VOLTAGE DETECTOR
OR FLIP YOUR LIGHT SWITCH A FEW TIMES TO MAKE
SURE THAT THE POWER IS OFF.
(If you installed the dimmer next to other dimmers or
switches, you’ll need to install a wallplate with the correct
size/number of openings to accommodate all the devices.)
Remove the wallplate from switch.
1
1
2
Ground
Neutral
Live
Light 2
Light
1
2
Disconnect all ve wires from the switch.
Use a at-head screwdriver to pry open the panel.
Connect the wires in order.
Tighten the incoming wires.
Close the top cover.
7
5
8
6
Ground
Neutral
Live
Light 1
Light 2
9
Remove the switch and pull it
away from the wall.
3
4
Ground
Neutral
Light
1
Light 2
Live
①
②
③
④
⑤
‘snap’
‘snap’
Use the screws
provided.
Model: SW7
Input: 120V~ 50/60Hz
Output: 120V~ 50/60Hz 4A Max.
Wi-Fi: 802.11 b/g/n, 2.4GHz (only)
Operating Temp.: -10~40 ℃
Option 1: Search for "Gosund" in the Apple APP Store or
Google Play.
Tip #1: An easy way to identify the wires in your wall box
is by looking at the color.
Tip #2: The Load wire is usually coming from the top of
the box. The Line wire is usually coming from the bottom
of the box.
Tip #3: Before removing the switch, test each wire with a
voltage tester.
Live Wire (Line Wire) : A live wire is a wire carrying an
electric current. If you keep your tester here, it will show
indication when power is there.
CAUTION: Risk of electric shock. Do NOT touch any wires
during this process.
CAUTION: Risk of electric shock. Before continuing with
the rest of the installation process, make sure to turn the
power breaker off.
Ground Wire: Ground wire is a bare copper wire that
provides a conducting path to the earth.
If the wires in your switch wall box are different from the
ones listed below, we recommend consulting a qualified
electrician.
Neutral Wire: A neutral wire which normally in white color
allows the switch to be powered while simultaneously
allowing the lighting circuit connected to your lights to be
power off.
Load Wire: The load wire connects your light switch to
your light fixture.It is usually attached to a brass terminal
on the previous switch. It is sometimes black or red.
2 load wires are required for connecting with dual dimmer switch.
Option 2: Scan the QR code below to enter the
download page.
1. Open the APP and create your account.
2. Turn on the switch and put it close to the router when
pairing.
3. Press and hold the ON/OFF button for 5 seconds and
release it when the switch starts blinking fast, enter the
network pairing mode.
4.Tap "+" on the upper right corner to select "Add
Manually", and then select " Switch (Wi-Fi)".
Follow the App instructions to complete the operation.
Turn on the power, hold the Reset button for 5 seconds
and let it go when the Switch starts to flash quickly, the
reset is successful.
When the Switch is in a new network environment, you
need to restore the factory settings, and then reconnect to
the network.
Keep it out of the reach of children and pets.
Do not use this product in humid environments or
outdoors.It's for indoor use only.
Do not store the device for extended periods in poor
ambient conditions.
Never use aggressive detergents such as rubbing
alcohol or other chemical solutions because these could
damage the casing or even impair the functioning of the
product.
Note: The image shown in the manual is indicative
only. If there is inconsistency between the image
and the actual product, the actual product shall
govern.
Do not place this product near heating devices, such as
microwave ovens, stoves, or radiators.
Protect the product from extreme temperatures, direct
sunlight, strong jolts, high humidity, moisture, flammable
gases, vapors and solvents.
Do not disassemble, modify, or repair your device, and
ask help from the authorized professionals for device
malfunction.
Do not use the device when it is no longer working
properly or visibly damaged.
Neutral
White or Grey
Black
Red or Black
White or Black
Green, Copper or
Green with Yellow Strip
Ground
Line
Load
Traveler
Smart Switch Instruction
SW7
料号:4.02.000.0730 V1.0
名称:SW7 白牌说明书
材质:105g 哑粉纸, 4色双面印,风琴折
尺寸:75X100mm
正面
背面
4.02.000.0730 V1.0
