EN
USER AND SAFETY GUIDE
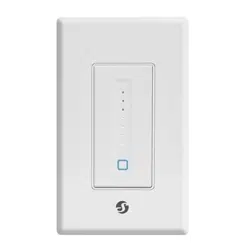
SHELLY PLUS WALL DIMMER
Read before use
This document contains important technical and safety information about the de-
vice, its safety use and installation.
⚠CAUTION! Before beginning the installation, please read carefully and entirely this
guide and any other documents accompanying the device. Failure to follow the instal-
lation procedures could lead to malfunction, danger to your health and life, violation of
law or refusal of legal and/or commercial guarantee (if any). Allterco Robotics EOOD
is not responsible for any loss or damage in case of incorrect installation or improper
operation of this device due to failure of following the user and safety instructions
in this guide.
Product Introduction
Shelly® is a line of innovative microprocessor-managed devices, which allow re-
mote control of electric circuits through a mobile phone, tablet, PC, or home auto-
mation system. Shelly® devices can work standalone in a local Wi-Fi network or
they can also be operated through cloud home automation services. Shelly Cloud
is a service that can be accessed using either Android or iOS mobile application,
or with any internet browser at https://home.shelly.cloud/. Shelly® devices can
be accessed, controlled and monitored remotely from any place where the user
has internet connectivity, as long as the devices are connected to a Wi-Fi router
and the Internet. Shelly® devices have Embedded Web Interface accessible at
http://192.168.33.1 when connected directly to the device access point, or at the
device IP address on the local Wi-Fi network. The embedded Web Interface can be
used to monitor and control the device, as well as adjust its settings.
Shelly® devices can communicate directly with other Wi-Fi devices through HTTP
protocol. An API is provided by Allterco Robotics EOOD. For more information,
please visit:
https://shelly-api-docs.shelly.cloud/#shelly-family-overview.
Shelly® devices are delivered with factory-installed rmware. If rmware updates
are necessary to keep the devices in conformity, including security updates, Allterco
Robotics EOOD will provide the updates free of charge through the device Embed-
ded Web Interface or the Shelly mobile application, where the information about the
current rmware version is available. The choice to install or not the device rmware
updates is the user’s sole responsibility. Allterco Robotics EOOD shall not be liable
for any lack of conformity of the device caused by failure of the user to install the
provided updates in a timely manner.
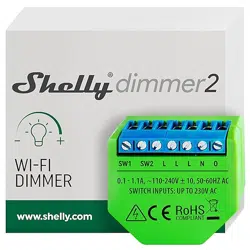
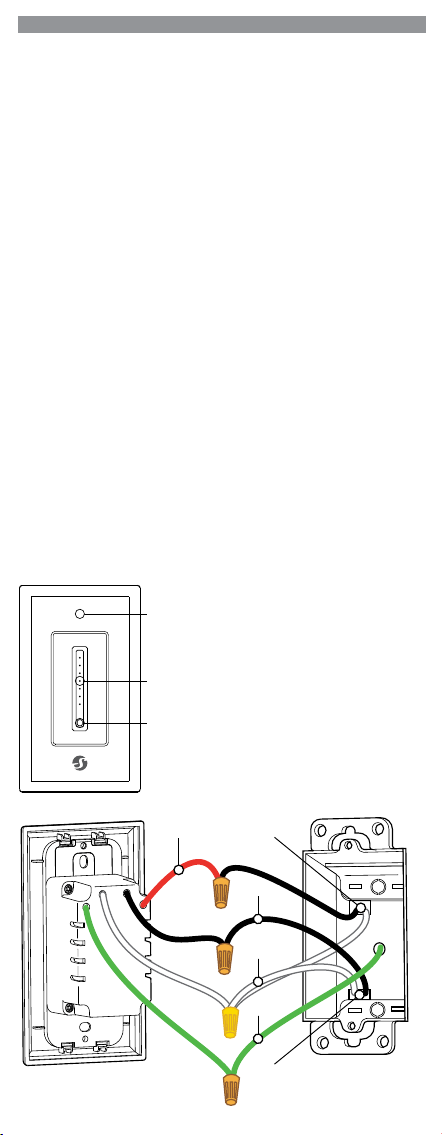
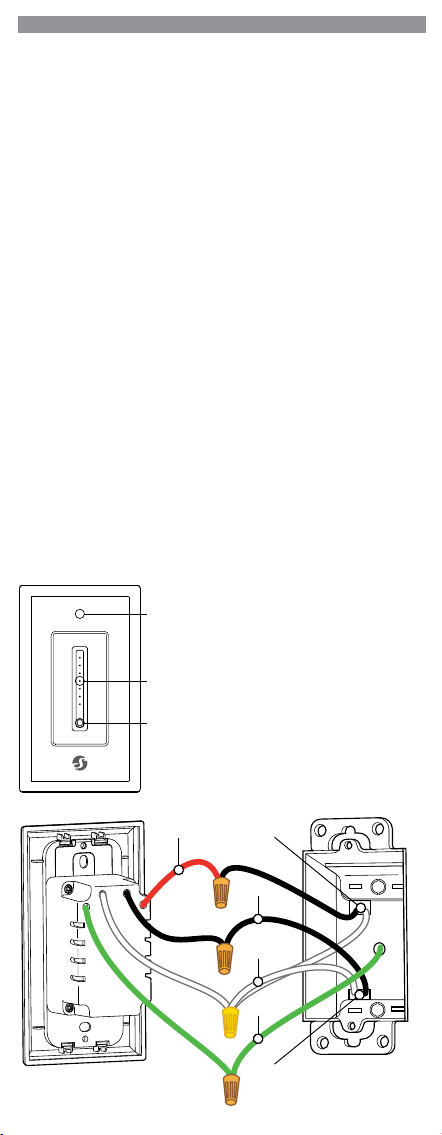
Wiring diagram
Slider with
brightnes indicator
Removable
face plate
Power button with
power and
Wi-Fi indicators
Out To the load
From the mains
Neutral
Live
Ground
Shelly Plus Wall Dimmer Wall box
Installation Instructions
⚠CAUTION! Danger of electrocution. Mounting/installation of the Device to the
power grid has to be performed with caution, by a qualied electrician.
⚠CAUTION! Danger of electrocution. Every change in the connections has to be
done after ensuring there is no voltage present at the Device terminals.
⚠CAUTION! Use the Device only with a power grid and appliances which comply
with all applicable regulations. A short circuit in the power grid or any appliance con-
nected to the Device may damage it.
⚠CAUTION! Do not connect the Device to appliances exceeding the given max load!
⚠CAUTION! Connect the Device only in the way shown in these instructions. Any
other method could cause damage and/or injury.
⚠CAUTION! Do not install the Device where it can get wet.
⚠RECOMMENDATION: Connect the Device using solid single-core cables with in-
creased insulation heat resistance not less than PVC T105°C (221°F).
Before starting the mounting/installation of the Device, check that the breakers are
turned off and there is no voltage on their terminals. This can be done with a phase
tester or multimeter. When you are sure that there is no voltage, you can proceed to
connecting the cables.
1. Verify that the circuit breaker is turned off and no voltage is present on its output
terminals.
2. Remove the existing light switch wall plate and light switch.
3. Make sure that a neutral wire is present in the gang box. If neutral is present, dis-
connect the existing light switch, making note of the line and load wires.
4. Connect the following wires from the Shelly Plus Wall Dimmer Switch to your
circuit:
• Green wire connects to the Ground wire.
• White wire connects to the Neutral wire.
• Black wire connects to the incoming Live wire.
• Red wire connects to the load wire.
5. Fix rmly the Shelly Plus Wall Dimmer to the gang box with the included screws.
6. Install the new wall plate.
7. Turn on the circuit breaker.
8. Press the power button. The power indicator will turn white, and the brightness
indicators will display a vertical bar of illuminated dots.
Operation
1. Switch the lights on or off by pressing the power button.
2. Swipe your nger up or down the slider to adjust the brightness of the lights. The
brightness indicator will display the current status with a vertical bar of illuminat-
ed dots. The highest of the dots stays illuminated after the lights are switched off.
Initial Inclusion
If you choose to use the Device with the Shelly Cloud mobile application and Shelly
Cloud service, instructions on how to connect the Device to the Cloud and control it
can be found at kb.shelly.cloud/knowledge-base/application-guide
The Shelly mobile application and Shelly Cloud service are not not conditions for
the Device to function properly. This Device can be used standalone or with various
other home automation platforms and protocols.
⚠CAUTION! Do not allow children to play with the buttons/switches connected to
the Device. Keep the devices for remote control of Shelly (mobile phones, tablets,
PCs) away from children.
LED indication
Power button LED indication:
• Blue Wi-Fi LED¹ while lights are turned off:
- Flashing when AP (Access Point) is enabled and Wi-Fi is disabled.
- Flashing slower when Wi-Fi is enabled, but not connected.
- Constantly on when Wi-Fi is connected and Cloud is disabled or Cloud is con-
nected.
- Flashing very slow when Wi-Fi is connected and Cloud is enabled, but not con-
nected.
- Flashing quickly when OTA (Over-The-Air) update is in progress.
• White Power LED² while lights are turned on:
- Flashing when AP is enabled and Wi-Fi is disabled.
- Flashing slower when Wi-Fi is enabled, but not connected.
- Constantly on when Wi-Fi is connected and Cloud is disabled or Cloud is con-
nected.
- Flashing very slow whe Wi-Fi is connected and Cloud is enabled, but not con-
nected.
- Flashing quickly when OTA update is in progress.
Brightness LED indication:
• When the lights are turned off a single white dot is lit, indicating the brightness
level before the lights have been turned off.
• When the lights are turned on a vertical bar of white dots is lit, indicating the
brightness level.
¹ Blue Wi-Fi LED can be enabled (default) or disabled by the user.
² White Power LED can be set by the user to: match the Device output (default), invert
the Device output, to be always ON, or to be always OFF.
Power button
• Press to turn on or off the lights
• Press and hold for 5 sec to activate Device AP
• Press and hold for 10 sec to factory reset the Device
Specication
• Dimensions (HxWxD):
- 104x44x39 ±0.5 mm / 4.09 x 1.73 x 1.50 ±0.02 in (without face plate )
- 120x70x39 ±0.5 mm / 4.72 x 2.76 x 1.50 ±0.02 in (with face plate)
• Mounting: Wall box
• Ambient temperature: from -20 °C to 40 °C / from -5 °F to 105 °F
• Humidity 30 % to 70 % RH
• Max. altitude 2000 m / 6562 ft
• Power supply: 100 - 120 VAC, 50/60 Hz
• Electrical consumption: < 3 W
• Radio frequency: 2.4 GHz (Max. 2495 MHz)
• Max. RF power: < 20 dBm
• Wi-Fi protocol: 802.11 b/g/n
• Wi-Fi operational range (depending on local conditions):
- up to 50 m / 160 ft outdoors
- up to 30 m / 100 ft indoors
• CPU: ESP32
• Flash: 4 MB
• Schedules: 20
• Webhooks (URL actions): 20 with 5 URLs per hook
• Scripting: mJS
• MQTT: Yes
Disposal & Recycling
This refers to the waste of electrical and electronic equipment. It is applica- ! the US
and other countries to collect waste separately.
This symbol on the product or in the accompanying literature indicates that
the product should not be disposed of in the daily waste.
Shelly Plus Wall Dimmer must be recycled to avoid possible damage to the
environment or human health from uncontrolled waste disposal and to promote the
reuse of materials and resources. It is your responsibility to dispose of the device
separately from general household waste when it is already unusable.
FCC Notes
This device complies with Part 15 of the FCC Rules. Operation is subject to the
following two conditions: {1) this device may not cause harmful interference, and
(2) this device must accept any interference received, including interference that
may cause undesired operation.
The manufacturer is not responsible for any radio or TV interference caused by un-
authorized modication or change to this equipment. Such modications or change
could void the user’s authority to operate the equipment.
This equipment has been tested and found to comply with the limits for a Class B
digital device, pursuant to part 15 of the FCC Rules. These limits are designed to
provide reasonable protection against harmful interference in a residential installa-
tion. This equipment generates, uses and can radiate radio frequency energy and,
if not installed and used in accordance with the instructions, may cause harmful
interference to radio communications. However, there is no guarantee that interfer-
ence will not occur in a particular installation. If this equipment does cause harmful
interference to radio or television reception, which can be determined by turning the
equipment off and on, the user is encouraged to try to correct the interference by
one or more of the following measures:
• Reorient or relocate the receiving antenna.
• Increase the separation between the equipment and receiver.
• Connect the equipment into an outlet on a circuit different from that to which the
receiver is connected.
• Consult the dealer or an experienced radio/TV technician for help.
RF exposure statement:
This equipment complies with FCC radiation exposure limits set forth for an un-
controlled environment. The device has been evaluated to meet general RF expo-
sure requirement. The device can be used in portable exposure condition without
restriction.
Manufacturer: Allterco Robotics EOOD
Address: 103 Cherni vrah Blvd., 1407 Soa, Bulgaria
Tel.: +359 2 988 7435
E-mail: support@shelly.cloud
Ocial website: https://www.shelly.cloud
Changes in the contact information data are published by the Manufacturer on the
ocial website.
All rights to the trademark Shelly® and other intellectual rights associated with this
Device belong to Allterco Robotics EOOD.
45/2022

EN
USER AND SAFETY GUIDE
SHELLY PLUS WALL DIMMER
Read before use
This document contains important technical and safety information about the de-
vice, its safety use and installation.
⚠CAUTION! Before beginning the installation, please read carefully and entirely this
guide and any other documents accompanying the device. Failure to follow the instal-
lation procedures could lead to malfunction, danger to your health and life, violation of
law or refusal of legal and/or commercial guarantee (if any). Allterco Robotics EOOD
is not responsible for any loss or damage in case of incorrect installation or improper
operation of this device due to failure of following the user and safety instructions
in this guide.
Product Introduction
Shelly® is a line of innovative microprocessor-managed devices, which allow re-
mote control of electric circuits through a mobile phone, tablet, PC, or home auto-
mation system. Shelly® devices can work standalone in a local Wi-Fi network or
they can also be operated through cloud home automation services. Shelly Cloud
is a service that can be accessed using either Android or iOS mobile application,
or with any internet browser at https://home.shelly.cloud/. Shelly® devices can
be accessed, controlled and monitored remotely from any place where the user
has internet connectivity, as long as the devices are connected to a Wi-Fi router
and the Internet. Shelly® devices have Embedded Web Interface accessible at
http://192.168.33.1 when connected directly to the device access point, or at the
device IP address on the local Wi-Fi network. The embedded Web Interface can be
used to monitor and control the device, as well as adjust its settings.
Shelly® devices can communicate directly with other Wi-Fi devices through HTTP
protocol. An API is provided by Allterco Robotics EOOD. For more information,
please visit:
https://shelly-api-docs.shelly.cloud/#shelly-family-overview.
Shelly® devices are delivered with factory-installed rmware. If rmware updates
are necessary to keep the devices in conformity, including security updates, Allterco
Robotics EOOD will provide the updates free of charge through the device Embed-
ded Web Interface or the Shelly mobile application, where the information about the
current rmware version is available. The choice to install or not the device rmware
updates is the user’s sole responsibility. Allterco Robotics EOOD shall not be liable
for any lack of conformity of the device caused by failure of the user to install the
provided updates in a timely manner.
Wiring diagram
Slider with
brightnes indicator
Removable
face plate
Power button with
power and
Wi-Fi indicators
Out To the load
From the mains
Neutral
Live
Ground
Shelly Plus Wall Dimmer Wall box
Installation Instructions
⚠CAUTION! Danger of electrocution. Mounting/installation of the Device to the
power grid has to be performed with caution, by a qualied electrician.
⚠CAUTION! Danger of electrocution. Every change in the connections has to be
done after ensuring there is no voltage present at the Device terminals.
⚠CAUTION! Use the Device only with a power grid and appliances which comply
with all applicable regulations. A short circuit in the power grid or any appliance con-
nected to the Device may damage it.
⚠CAUTION! Do not connect the Device to appliances exceeding the given max load!
⚠CAUTION! Connect the Device only in the way shown in these instructions. Any
other method could cause damage and/or injury.
⚠CAUTION! Do not install the Device where it can get wet.
⚠RECOMMENDATION: Connect the Device using solid single-core cables with in-
creased insulation heat resistance not less than PVC T105°C (221°F).
Before starting the mounting/installation of the Device, check that the breakers are
turned off and there is no voltage on their terminals. This can be done with a phase
tester or multimeter. When you are sure that there is no voltage, you can proceed to
connecting the cables.
1. Verify that the circuit breaker is turned off and no voltage is present on its output
terminals.
2. Remove the existing light switch wall plate and light switch.
3. Make sure that a neutral wire is present in the gang box. If neutral is present, dis-
connect the existing light switch, making note of the line and load wires.
4. Connect the following wires from the Shelly Plus Wall Dimmer Switch to your
circuit:
• Green wire connects to the Ground wire.
• White wire connects to the Neutral wire.
• Black wire connects to the incoming Live wire.
• Red wire connects to the load wire.
5. Fix rmly the Shelly Plus Wall Dimmer to the gang box with the included screws.
6. Install the new wall plate.
7. Turn on the circuit breaker.
8. Press the power button. The power indicator will turn white, and the brightness
indicators will display a vertical bar of illuminated dots.
Operation
1. Switch the lights on or off by pressing the power button.
2. Swipe your nger up or down the slider to adjust the brightness of the lights. The
brightness indicator will display the current status with a vertical bar of illuminat-
ed dots. The highest of the dots stays illuminated after the lights are switched off.
Initial Inclusion
If you choose to use the Device with the Shelly Cloud mobile application and Shelly
Cloud service, instructions on how to connect the Device to the Cloud and control it
can be found at kb.shelly.cloud/knowledge-base/application-guide
The Shelly mobile application and Shelly Cloud service are not not conditions for
the Device to function properly. This Device can be used standalone or with various
other home automation platforms and protocols.
⚠CAUTION! Do not allow children to play with the buttons/switches connected to
the Device. Keep the devices for remote control of Shelly (mobile phones, tablets,
PCs) away from children.
LED indication
Power button LED indication:
• Blue Wi-Fi LED¹ while lights are turned off:
- Flashing when AP (Access Point) is enabled and Wi-Fi is disabled.
- Flashing slower when Wi-Fi is enabled, but not connected.
- Constantly on when Wi-Fi is connected and Cloud is disabled or Cloud is con-
nected.
- Flashing very slow when Wi-Fi is connected and Cloud is enabled, but not con-
nected.
- Flashing quickly when OTA (Over-The-Air) update is in progress.
• White Power LED² while lights are turned on:
- Flashing when AP is enabled and Wi-Fi is disabled.
- Flashing slower when Wi-Fi is enabled, but not connected.
- Constantly on when Wi-Fi is connected and Cloud is disabled or Cloud is con-
nected.
- Flashing very slow whe Wi-Fi is connected and Cloud is enabled, but not con-
nected.
- Flashing quickly when OTA update is in progress.
Brightness LED indication:
• When the lights are turned off a single white dot is lit, indicating the brightness
level before the lights have been turned off.
• When the lights are turned on a vertical bar of white dots is lit, indicating the
brightness level.
¹ Blue Wi-Fi LED can be enabled (default) or disabled by the user.
² White Power LED can be set by the user to: match the Device output (default), invert
the Device output, to be always ON, or to be always OFF.
Power button
• Press to turn on or off the lights
• Press and hold for 5 sec to activate Device AP
• Press and hold for 10 sec to factory reset the Device
Specication
• Dimensions (HxWxD):
- 104x44x39 ±0.5 mm / 4.09 x 1.73 x 1.50 ±0.02 in (without face plate )
- 120x70x39 ±0.5 mm / 4.72 x 2.76 x 1.50 ±0.02 in (with face plate)
• Mounting: Wall box
• Ambient temperature: from -20 °C to 40 °C / from -5 °F to 105 °F
• Humidity 30 % to 70 % RH
• Max. altitude 2000 m / 6562 ft
• Power supply: 100 - 120 VAC, 50/60 Hz
• Electrical consumption: < 3 W
• Radio frequency: 2.4 GHz (Max. 2495 MHz)
• Max. RF power: < 20 dBm
• Wi-Fi protocol: 802.11 b/g/n
• Wi-Fi operational range (depending on local conditions):
- up to 50 m / 160 ft outdoors
- up to 30 m / 100 ft indoors
• CPU: ESP32
• Flash: 4 MB
• Schedules: 20
• Webhooks (URL actions): 20 with 5 URLs per hook
• Scripting: mJS
• MQTT: Yes
Disposal & Recycling
This refers to the waste of electrical and electronic equipment. It is applica- ! the US
and other countries to collect waste separately.
This symbol on the product or in the accompanying literature indicates that
the product should not be disposed of in the daily waste.
Shelly Plus Wall Dimmer must be recycled to avoid possible damage to the
environment or human health from uncontrolled waste disposal and to promote the
reuse of materials and resources. It is your responsibility to dispose of the device
separately from general household waste when it is already unusable.
FCC Notes
This device complies with Part 15 of the FCC Rules. Operation is subject to the
following two conditions: {1) this device may not cause harmful interference, and
(2) this device must accept any interference received, including interference that
may cause undesired operation.
The manufacturer is not responsible for any radio or TV interference caused by un-
authorized modication or change to this equipment. Such modications or change
could void the user’s authority to operate the equipment.
This equipment has been tested and found to comply with the limits for a Class B
digital device, pursuant to part 15 of the FCC Rules. These limits are designed to
provide reasonable protection against harmful interference in a residential installa-
tion. This equipment generates, uses and can radiate radio frequency energy and,
if not installed and used in accordance with the instructions, may cause harmful
interference to radio communications. However, there is no guarantee that interfer-
ence will not occur in a particular installation. If this equipment does cause harmful
interference to radio or television reception, which can be determined by turning the
equipment off and on, the user is encouraged to try to correct the interference by
one or more of the following measures:
• Reorient or relocate the receiving antenna.
• Increase the separation between the equipment and receiver.
• Connect the equipment into an outlet on a circuit different from that to which the
receiver is connected.
• Consult the dealer or an experienced radio/TV technician for help.
RF exposure statement:
This equipment complies with FCC radiation exposure limits set forth for an un-
controlled environment. The device has been evaluated to meet general RF expo-
sure requirement. The device can be used in portable exposure condition without
restriction.
Manufacturer: Allterco Robotics EOOD
Address: 103 Cherni vrah Blvd., 1407 Soa, Bulgaria
Tel.: +359 2 988 7435
E-mail: support@shelly.cloud
Ocial website: https://www.shelly.cloud
Changes in the contact information data are published by the Manufacturer on the
ocial website.
All rights to the trademark Shelly® and other intellectual rights associated with this
Device belong to Allterco Robotics EOOD.
45/2022
ES
GUÍA DE USO Y SEGURIDAD
SHELLY PLUS WALL DIMMER
Leia antes de utilizar
Este documento contiene información técnica y de seguridad importante sobre el
aparato, su uso y su instalación segura.
⚠¡ATENCIÓN! Antes de comenzar la instalación, lea atentamente y por completo la
documentación adjunta. El incumplimiento de los procedimientos recomendados puede
provocar un mal funcionamiento, un peligro para su vida o una violación de la ley. Allterco
Robotics no se hace responsable de cualquier pérdida o daño debido a una instalación o
uso inadecuado de este dispositivo.
Resumen del producto
Shelly® es una gama de dispositivos innovadores basados en microprocesadores, que
permiten controlar a distancia los electrodomésticos a través de un teléfono móvil, una
tableta, una PC o un sistema domótico. Los dispositivos Shelly® pueden funcionar de
forma autónoma en una red Wi-Fi local o también pueden ser operados por servicios de
automatización del hogar a través del Cloud. Shelly Cloud es un servicio que se puede
utilizar a través de la aplicación móvil Android o iOS, o a través de cualquier navegador
web en https://home.shelly.cloud/. Los dispositivos Shelly® se pueden manejar, contro-
lar y supervisar a distancia desde cualquier lugar en el que el usuario disponga de una
conexión a Internet, siempre que los dispositivos estén conectados a un router Wi-Fi y a
Internet. Los dispositivos Shelly® tienen una interfaz web integrada a la que se puede
acceder en http://192.168.33.1 dentro de la red Wi-Fi, creada por el dispositivo en modo
de punto de acceso, o en la URL del dispositivo en la red Wi-Fi a la que está conectado. La
interfaz web integrada puede utilizarse para supervisar y controlar el dispositivo y ajustar
su conguración.
Los dispositivos Shelly® pueden comunicarse directamente con otros dispositivos Wi-Fi
a través de HTTP. Allterco Robotics EOOD proporciona una API. Para más información,
visite https://shelly-api-docs.shelly.cloud/#shelly-family-overview.
Los dispositivos Shelly® vienen con el rmware instalado de fábrica. Si es necesario ac-
tualizar el rmware para que los dispositivos sigan cumpliendo la normativa, incluidas las
actualizaciones de seguridad, Allterco Robotics EOOD proporcionará las actualizaciones
de forma gratuita a través de la interfaz web integrada en el dispositivo o la aplicación
móvil Shelly, donde está disponible la información de la versión actual del rmware. La
decisión de instalar o no las actualizaciones del rmware del dispositivo es responsabil-
idad exclusiva del usuario. Allterco Robotics EOOD no se hace responsable de la falta de
conformidad del Dispositivo causada por el hecho de que el Usuario no instale oportuna-
mente las actualizaciones previstas.
Diagrama de cableado
Slider with
brightnes indicator
Removable
face plate
Power button with
power and
Wi-Fi indicators
Out A la carga
De la red
Neutral
Vivo
Tierra
Shelly Plus Wall Dimmer Caja de pared
Instrucciones de instalación
⚠¡ATENCIÓN! Peligro de descarga eléctrica. El montaje/instalación del aparato a la red
eléctrica debe ser realizado con cuidado, por un electricista cualicado.
⚠¡ATENCIÓN!Peligro de descarga eléctrica. Cualquier modicación de las conexiones
debe realizarse después de asegurarse de que no hay tensión en los terminales del Dis-
positivo.
⚠¡ATENCIÓN!Utilice el dispositivo sólo con una fuente de alimentación y un equipo que
cumplan con todas las normas aplicables. Un cortocircuito en la red eléctrica o en cualqui-
er dispositivo conectado al aparato puede dañar el aparato.
⚠¡ATENCIÓN!No conecte el aparato a dispositivos que superen la carga máxima indi-
cada.
⚠¡ATENCIÓN!Conecte el aparato sólo de la manera indicada en estas instrucciones.
Cualquier otro método puede causar daños y/o lesiones.
⚠¡ATENCIÓN!No instale el aparato en un lugar donde pueda mojarse.
⚠¡RECOMENDACIÓN! Conecte el aparato con cables monoconductores sólidos con
una resistencia térmica del aislamiento superior a la del PVC T105°C.
Antes de iniciar la instalación/montaje del aparato, compruebe que los disyuntores están
desconectados y que no hay tensión en sus bornes. Esto puede hacerse con un medidor
de fase o un multímetro. Cuando esté seguro de que no hay tensión, puede proceder a
conectar los cables.
1. Verique que el disyuntor este apagado y que no haya voltaje en sus terminales de
salida.
2. Retire la placa de pared del interrupter de luz existente y el interrupter de luz.
3. Asegurese de que haya un cable neutro en la caja electrica. Si el neutro esta presente,
desconecte el interrupter de luz existente, tomando nota de las cables de linea y carga.
4. Conecte las siguientes cables del interrupter atenuador de pared Shelly Plus a su cir-
cuito:
• El cable verde se conecta al cable de tierra.
• El cable blanco se conecta al cable neutro.
• El cable negro se conecta al cable vivo entrante.
• El cable rojo se conecta al cable de carga.
5. Fije rmemente el atenuador de pared Shelly Plus a la caja electrica con las tornillos
incluidos.
6. lnstale la nueva placa de pared.
7. Encienda el disyuntor.
8. Presiona el baton de poder. El indicador de encendido se volvera blanco y las indica-
dores de brillo mostraran una barra vertical de puntos iluminados.
Operación
1. Encienda o apague las luces presionando el botón de encendido.
2. Deslice el dedo hacia arriba o hacia abajo por el control deslizante para ajustar el brillo
de las luces. El indicador de brillo mostrará el estado actual con una barra vertical
de puntos iluminados. El punto más alto permanece iluminado después de apagar
las luces.
Inclusión inicial
Si elige usar el dispositivo con la aplicación móvil Shelly Cloud y el servicio Shelly Cloud,
las instrucciones sobre cómo conectar el dispositivo a la nube y controlarlo se pueden
encontrar en
kb.shelly.cloud/knowledge-base/application-guide
La aplicación móvil Shelly y el servicio Shelly Cloud no son condiciones para el buen
funcionamiento del Dispositivo. Este dispositivo puede utilizarse con otros servicios y
aplicaciones de domótica.
⚠¡ATENCIÓN! No permita que los niños jueguen con los botones/interruptores conecta-
dos al aparato. Mantenga los dispositivos que permiten el control remoto de Shelly (telé-
fonos móviles, tabletas, ordenadores) fuera del alcance de los niños.
Indicacion LED
Indicador LED del botón de encendido:
• LED azul de Wi-Fi¹ mientras las luces están apagadas:
- Parpadeando cuando AP (Punto de acceso) está habilitado y Wi-Fi está deshabilit-
ado.
- Parpadeo más lento cuando Wi-Fi está habilitado, pero no conectado.
- Encendido constantemente cuando Wi-Fi está conectado y la nube está deshabilita-
da o la nube está conectada.
- Parpadeo muy lento cuando Wi-Fi está conectado y Cloud está habilitado, pero no
conectado.
- Parpadeo rápido cuando la actualización OTA (Over-The-Air) está en curso.
• LED de encendido blanco² mientras las luces están encendidas:
- Parpadeando cuando AP está habilitado y Wi-Fi está deshabilitado.
- Parpadeo más lento cuando Wi-Fi está habilitado, pero no conectado.
- Encendido constantemente cuando Wi-Fi está conectado y la nube está deshabilita-
da o la nube está conectada.
- Parpadeo muy lento cuando Wi-Fi está conectado y Cloud está habilitado, pero no
conectado.
- Parpadeo rápido cuando la actualización OTA está en curso.
Indicación LED de brillo:
• Cuando se apagan las luces, se enciende un solo punto blanco, que indica el nivel de
brillo antes de que se apaguen las luces.
• Cuando se encienden las luces, se enciende una barra vertical de puntos blancos que
indica el nivel de brillo.
¹ El LED azul de Wi-Fi puede ser habilitado (predeterminado) o deshabilitado por el usuario.
² El LED de alimentación blanco puede ser congurado por el usuario para: coincidir con
la salida del dispositivo (predeterminado), invertir la salida del dispositivo, para que esté
siempre ENCENDIDO o para que esté siempre APAGADO.
Botón de encendido
• Pulse para encender o apagar las luces
• Mantenga presionado durante 5 segundos para activar el dispositivo AP
• Mantenga presionado durante 10 segundos para restablecer de fábrica el dispositivo
Especicaciones
• Dimensiones (AxAxP):
- 104x44x39 ±0.5 mm / 4.09 x 1.73 x 1.50 ±0.02 in (sin placa frontal)
- 120x70x39 ±0.5 mm / 4.72 x 2.76 x 1.50 ±0.02 in (con placa frontal)
• Montaje: Caja de pared
• Temperatura ambiente: -20 °C a 40 °C / -5 °F a 105 °F
• Humedad 30 % a 70 % HR
• Altitud máxima: 2000 m / 6562 ft
• Alimentación: 100 - 120 VAC, 50/60Hz
• Consumo eléctrico: < 3 W
• Radiofrecuencia: 2.4 GHz (máx. 2495 MHz)
• Máx. potencia RF: < 20 dBm
• Protocolo Wi-Fi: 802.11 b/g/n
• Alcance operativo Wi-Fi (dependiendo de las condiciones locales):
- hasta 50 m / 160 ft en exteriores
- hasta 30 m / 100 ft en interiores
• CPU: ESP32
• Flash: 4 MB
• Horarios: 20
• Webhooks (acciones URL): 20 con 5 URLs por hook
• Scripting: mJS
• MQTT: SÍ
Eliminacion y reciclaje
Esto se reere a los residuos de equipos eléctricos y electrónicos. Es aplicable en los EE.
UU. y otros países para recolectar desechos por separado.
Este símbolo en el producto o en la documentación que lo acompaña indica que el
producto no debe desecharse con la basura diaria.
El atenuador de pared Shelly® Plus debe reciclarse para evitar posibles daños al
medio ambiente o la salud humana por la eliminación de desechos sin control y para pro-
mover la reutilización de materiales y recursos. Es su responsabilidad desechar el dispos-
itivo por separado de los residuos domésticos generales cuando ya no se pueda utilizar.
Notas de la FCC
Este dispositivo cumple con la Parte 15 de las Normas de la FCC. El funcionamiento está
sujeto a las siguientes dos condiciones: (1) este dispositivo no puede causar interferen-
cias dañinas y (2) este dispositivo debe aceptar cualquier interferencia recibida, incluidas
las interferencias que puedan causar un funcionamiento no deseado.
El fabricante no es responsable de ninguna interferencia de radio o televisión causada
por modicaciones o cambios no autorizados en este equipo. Dichas modicaciones o
cambios podrían anular la autoridad del usuario para operar el equipo.
Este equipo ha sido probado y se encontró que cumple con los límites para un dispositivo
digital de Clase B, de conformidad con la parte 15 de las Reglas de la FCC. Estos límites
están diseñados para brindar una protección razonable contra interferencias dañinas
en una instalación residencial. Este equipo genera, usa y puede irradiar energía de ra-
diofrecuencia y, si no se instala y usa de acuerdo con las instrucciones, puede causar
interferencias dañinas en las comunicaciones por radio. Sin embargo, no hay garantía de
que no se produzcan interferencias en una instalación en particular. Si este equipo causa
interferencias dañinas en la recepción de radio o televisión, lo que se puede determinar
apagando y encendiendo el equipo, se recomienda al usuario que intente corregir la inter-
ferencia mediante una o más de las siguientes medidas:
• Reorientar o reubicar la antena receptora.
• Aumente la separación entre el equipo y el receptor.
• Conecte el equipo a una toma de un circuito diferente al que está conectado el receptor.
• Consulte al distribuidor oa un técnico experimentado en radio/TV para obtener ayuda.
Declaracion de exposici6n a RF
Este equipo cumple con los límites de exposición a la radiación de la FCC establecidos
para un entorno no controlado. El dispositivo ha sido evaluado para cumplir con los req-
uisitos generales de exposición a RF. El dispositivo se puede utilizar en condiciones de
exposición portátil sin restricciones.
Fabricante: Allterco Robotics EOOD
Dirección: Bulgaria, Soa, 1407, 103 Cherni vrah Blvd.
Tel: +359 2 988 7435
Correo electrónico: support@shelly.cloud
Sitio web ocial: https://www.shelly.cloud
Los cambios en la información de contacto son publicados por el fabricante en el sitio
web ocial.
Todos los derechos de las marcas Shelly®, y otros derechos de propiedad intelectual
asociados a este dispositivo pertenecen a Allterco Robotics EOOD.
45/2022