OWNER'S MANUAL
DISHWASHER
Before beginning installation, read these instructions
carefully. This will simplify installation and ensure that the
product is installed correctly and safely. Leave these
instructions near the product after installation for future
reference.
ENGLISH
XD3*25** XD3*15** XD4*15** XD4*24** XD4*14** XD5*24**
MFL70282401
Rev.16_072324
www.lg.com
Copyright © 2017-2024 LG Electronics. All Rights Reserved

TABLE OF CONTENTS
This manual may contain images or
content that may be different from the
model you purchased.
This manual is subject to revision by the
manufacturer.
SAFETY INSTRUCTIONS
READ ALL INSTRUCTIONS BEFORE USE...........................................................4
WARNING............................................................................................................4
CAUTION .............................................................................................................9
INSTALLATION
Parts and Specifications ..................................................................................11
Preparing Cabinet Opening............................................................................13
Levelling the Appliance ...................................................................................16
Installing the Drain Hose ................................................................................17
Preparing Water and Electrical Connections................................................18
Final Installation Check ...................................................................................19
OPERATION
Operation Overview.........................................................................................20
Before Using .....................................................................................................21
Control Panel ....................................................................................................24
Wash Cycles ......................................................................................................26
Options and Extra Functions ..........................................................................27
Programme Table ............................................................................................29
Information for Energy Test (AS/NZS 2007)..................................................32
Loading the Dishwasher .................................................................................34
Adding Cleaning Agents..................................................................................40
Refilling..............................................................................................................42
Useful Tips.........................................................................................................42
SMART FUNCTIONS
LG ThinQ Application.......................................................................................43
Smart Diagnosis ...............................................................................................45
MAINTENANCE
Cleaning and Caring ........................................................................................47

4
SAFETY INSTRUCTIONS
SAFETY INSTRUCTIONS
READ ALL INSTRUCTIONS BEFORE USE
The following safety guidelines are intended to prevent unforeseen
risks or damage from unsafe or incorrect operation of the appliance.
The guidelines are separated into ‘WARNING’ and ‘CAUTION’ as
described below.
Safety Messages
WARNING
WARNING
• To reduce the risk of explosion, fire, death, electric shock, injury or
scalding to persons when using this product, follow basic
precautions, including the following:
Technical Safety
• This appliance is not intended for use by persons (including children)
with reduced physical, sensory or mental capabilities, or lack of
experience and knowledge, unless they have been given supervision
This symbol is displayed to indicate matters and operations that
can cause risk.
Read the part with this symbol carefully and follow the
instructions in order to avoid risk.
WARNING
This indicates that the failure to follow the instructions can cause
serious injury or death.
CAUTION
This indicates that the failure to follow the instructions can cause
minor injury or damage to the product.

5
SAFETY INSTRUCTIONS
ENGLISH
or instruction concerning use of the appliance by a person
responsible for their safety. Children should be supervised to ensure
that they do not play with the appliance.
• Observe the information given in Specifications regarding the
maximum number of place settings to be washed of the dishwasher.
• The water pressure must be between 0.05 MPa and 1.0 MPa.
Installation
• Never attempt to operate the appliance if it is damaged,
malfunctioning, partially disassembled, or has missing or broken
parts, including a damaged cord or plug.
• If the power cord is damaged or the hole of the socket outlet is loose,
do not use the power cord and contact an authorized service centre.
• Do not modify the power cord provided with the appliance. Please
contact the LG Customer information centre to advise of its
incompatibility.
• This appliance should only be transported by two or more people
holding the appliance securely.
• Do not install the appliance in a damp and dusty place. Do not install
or store the appliance in any outdoor area, or any area that is subject
to weathering conditions such as direct sunlight, wind, or rain or
temperatures below freezing.
• Do not plug multiple socket outlets, an extension power cable or
adapter with this appliance.
• Disconnect the power cord, house fuse or circuit breaker before
installing or servicing the appliance.
• When moving or installing the product in a different location, call
qualified service personnel for installation and service.
• Fix the drain hose securely in place.
• This appliance is not designed for maritime use or for mobile
installations such as in RVs, trailers, or aircraft.
• This appliance must be positioned near to an electrical power supply.

6
SAFETY INSTRUCTIONS
• When installing or moving the appliance, be careful not to pinch,
crush, or damage the power cord.
• Use new hose or hose-set supplied with the appliance. Reusing old
hoses can cause a water leak and subsequent property damage.
• Improper connection of the equipment-grounding conductor can
result in risk of electric shock. Check with a qualified electrician or
service personnel if you are in doubt as to whether the appliance is
properly grounded.
• This appliance must be grounded. In the event of malfunction or
breakdown, grounding will reduce the risk of electric shock by
providing a path of least resistance for electric current.
• This appliance is equipped with a power cord having an equipment-
grounding conductor and a grounding power plug. The power plug
must be plugged into an appropriate socket outlet that is installed
and grounded in accordance with all local codes and ordinances.
• After installing, check the hose connection for leaks before moving
the appliance into the cabinet opening.
• Do not damage or place heavy items on the power cord of the
appliance.
• This appliance is intended to be used in household and domestic
applications only and must not be used for commercial purposes.
• For a permanently connected dishwasher: This appliance must be
connected to a grounded metal, permanent wiring system, or an
equipment-grounding conductor must be run with the circuit
conductors and connected to the equipment-grounding terminal or
lead to the appliance.
• Connect the ground wire to the green ground connector in the
terminal box.
Operation
• Immediately unplug the power plug and contact an LG Electronics
customer information centre if you detect a strange sound, odour, or
smoke coming from the appliance.

7
SAFETY INSTRUCTIONS
ENGLISH
• Do not repair or replace any part of the appliance. All repairs and
servicing must be performed by qualified service personnel unless
specifically recommended in this Owner’s Manual. Use only
authorized factory parts.
• Do not leave the appliance door open. Children may hang on the door
or crawl inside the appliance, causing damage or injury.
• Do not use flammable gas and combustible substances (benzene,
gasoline, thinner, petroleum, alcohol, etc.) near the appliance.
• Do not attempt to separate any panels or disassemble the appliance.
Do not apply any sharp objects to the control panel in order to
operate the appliance.
• Do not bend the power cable excessively or place a heavy object on it.
• Do not put animals, such as pets into the appliance.
• Do not touch the power plug or the appliance controls with wet
hands.
• If there is a gas leakage (isobutane, propane, natural gas, etc.), do not
touch the appliance or power plug and ventilate the area
immediately.
• In case of flood, disconnect the power plug and contact the LG
Electronics Customer Information Centre.
• Under certain conditions, hydrogen gas may be produced in a hot-
water system that has not been used for two weeks or more.
HYDROGEN GAS IS EXPLOSIVE. If the hot-water system has not been
used for such a period, before using the appliance turn on all hot
water tap and let the water flow from each for several minutes. This
will release any accumulated hydrogen gas. As the gas is flammable,
do not smoke or use an open flame during this time.
• Keep the area underneath and around your appliances free of
combustible materials such as lint, paper, rags, chemicals, etc.
• Some dishwasher detergents are strongly alkaline. They can be
extremely dangerous if swallowed. Avoid contact with the skin and
eyes and keep children away from the dishwasher when the door is
open. Check that the detergent receptacle is empty after completion
of the wash cycle.

8
SAFETY INSTRUCTIONS
• Do not operate the appliance unless all enclosure panels are properly
in place.
• Use only detergents or wetting agents recommended for use in a
appliance and keep them out of the reach of children.
• Do not wash and dry articles that have been soaked in explosive
substances such as gasoline, solvents, solvent-based detergent.
• When loading items to be washed:
- Locate sharp items so that they are not likely to damage the door
seal.
- Load sharp knives with the handles up to reduce the risk of cut-type
injuries.
• Do not wash plastic items unless they are marked “dishwasher safe”
or the equivalent. For plastic items not so marked, check the
manufacturer’s recommendations.
• Do not touch any heating element (where it is exposed) during or
immediately after use.
• Do not abuse, sit on, or stand on the door or dish rack of the
dishwasher.
• After cleaning the dishes, turn off the tap. Turn on the tap again and
check the connection status of water supply hose before cleaning.
• Do not open the door while the appliance is in operation. Water will
splash out and could cause a slipping hazard.
• Be careful not to catch your hand when closing the door of the
appliance.
• Do not come into contact with any fitted steam outlet.
• Small parts, such as rack clips and filter retaining posts can be a choke
hazard to small children if removed from the dishwasher. Keep out of
reach of small children.
• Knives and other utensils with sharp points must be loaded in the
basket with their points down or placed in a horizontal position.
• The door should not be left in the open position since this could
present a tripping hazard.

9
SAFETY INSTRUCTIONS
ENGLISH
Maintenance
• Never unplug the appliance by pulling on the power cable. Always
grip the power plug firmly and pull straight out from the socket
outlet.
• Securely plug the power plug in the socket outlet after completely
removing any moisture and dust.
• Do not spray water inside or outside the appliance to clean it.
• Disconnect the appliance from the power supply before cleaning the
appliance. Setting the controls to the OFF or stand by position does
not disconnect this appliance from the power supply.
Disposal
• Before discarding an old appliance, unplug it. Cut off the cable
directly behind the appliance to prevent misuse.
• Dispose of all packaging materials (such as plastic bags and
styrofoam) away from children. The packaging materials can cause
suffocation.
• Remove the door before disposing of or discarding this appliance to
avoid the danger of children or small animals getting trapped inside.
CAUTION
CAUTION
• To reduce the risk of fire, electric shock, or injury to persons when
using your product, basic safety precautions should be followed,
including the following:
Installation
• Install the product on a firm and level floor.
• Do not put the drain hose under the dishwasher during installation.

10
SAFETY INSTRUCTIONS
Operation
• Turn off the water tap and unplug the appliance if the appliance is to
be left for an extended period of time, such as during vacations.
• Do not place objects on the top of the appliance.
• Do not wipe or coat the surface of the product with liquid detergent
or bleach (chlorine bleach, oxygen bleach, etc). Failure to follow these
instructions may result in corrosion or discoloration of the coating.
• Do not touch water draining from the machine as it may be hot.
• If the drain hose and the water supply hose are frozen in winter,
defrost before using.
• Do not put hands, feet, or metal objects below or behind the
appliance.
• Do not wash dishes stained with chemical products such as oil, cream
or lotions used in a massage parlor, skin care shop, beauty shop or
barber shop.
Maintenance
• If cooking oil is spilled on the exterior of the product, wipe it off
immediately. Do not clean the exterior of the product with cleaners
which contain alcohol, thinners, bleach, benzene, flammable liquids,
or abrasives. These substances may discolor or damage the
appliance.
11
INSTALLATION
ENGLISH
INSTALLATION
Parts and Specifications
NOTE
• Appearance and specifications may change without notice to improve the quality of the appliance.
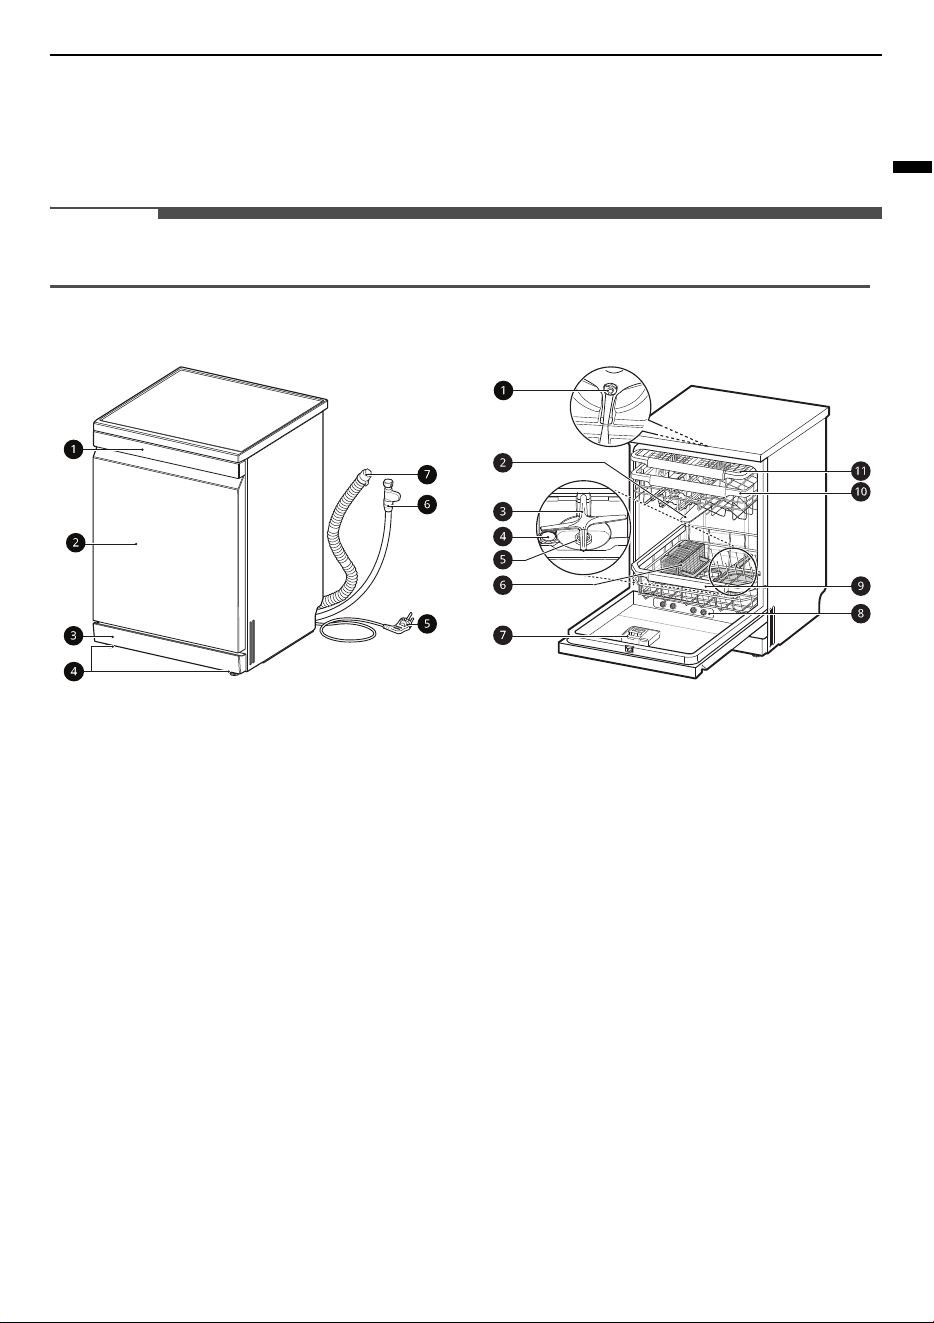
Front View
a
Control Panel & Door Handle
b
Front Cover
c
Lower Cover
d
Levelling Feet
e
Power Cord
f
Water Supply Hose
g
Drain Hose
Interior View
a
Top Wash Impeller
b
Upper Spray Arm
c
Lower Spray Arm
d
Salt Dispenser Cap
e
Filtration System
f
Cutlery Basket
*1
g
Detergent and Rinse Aid Dispenser
h
Steam Nozzle
*1
i
Lower Rack
j
Upper Rack
k
Cutlery Rack
*1
*1 This feature is only available on some models.
12
INSTALLATION
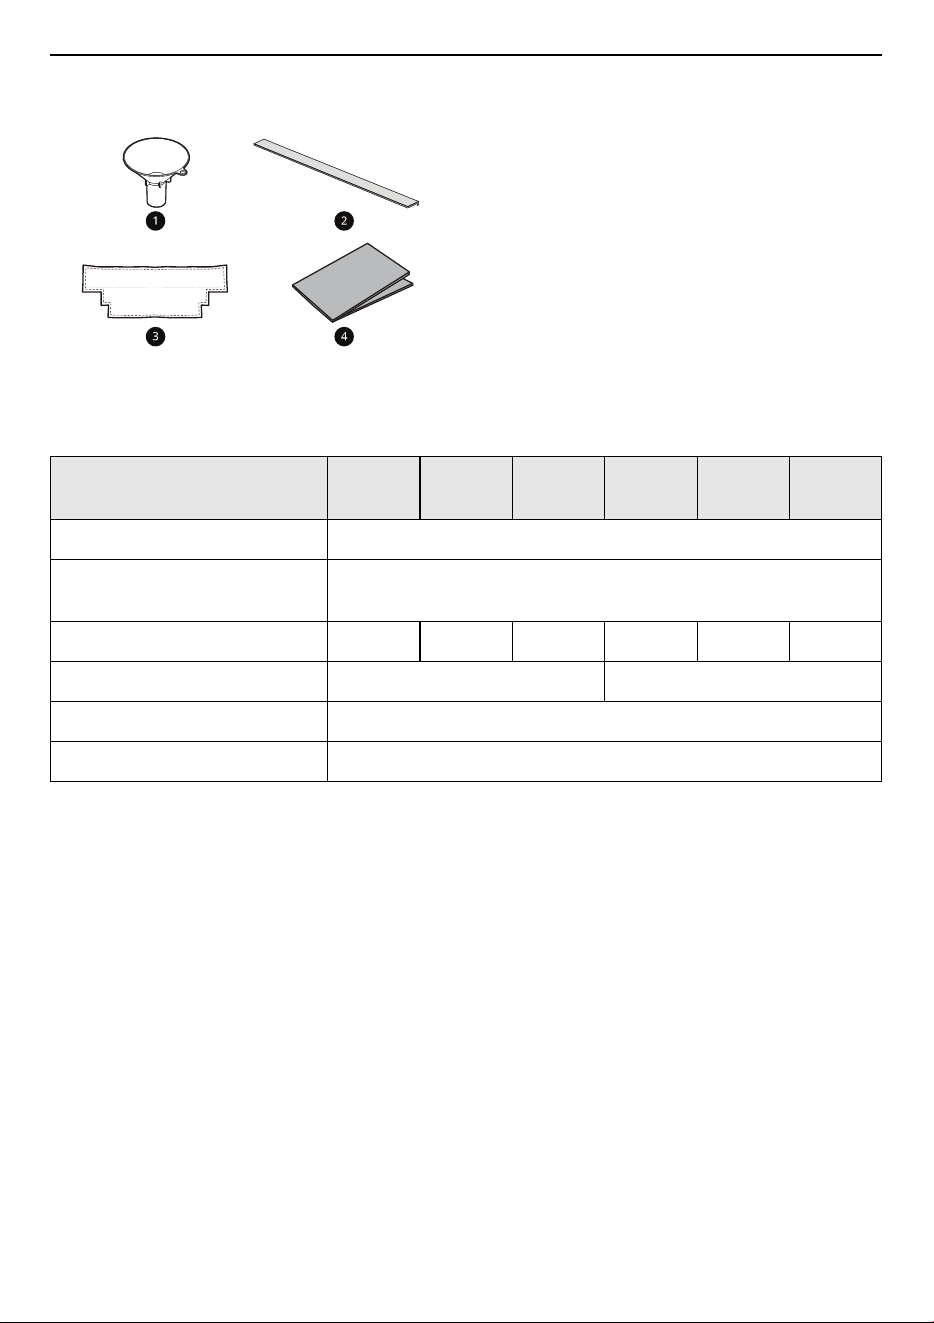
Accessories
a
Funnel
b
Noise Strip
*1
c
Cover Felt
*2
d
Moisture Barrier Tape (Aluminum tape)
*2
*1 Noise strips are provided: Lower - 1 EA, Front - 1
EA, Side - 2 EA
*2 This feature is only available on some models.
Specifications
Model
XD3*25
**
XD3*15
**
XD4*15
**
XD4*24
**
XD4*14
**
XD5*24
**
Power Supply 220 - 240 V~, 50 Hz
Dimension
(Width X Height X Depth)
600 mm X 850 mm X 600 mm
Product Weight 52 kg 50 kg 48 kg 48 kg 47 kg 48 kg
Max. Capacity 15 Place Settings 14 Place Settings
Permissible Inlet Water Pressure 0.05 - 1.0 MPa
Power Consumption 1600 - 1800 W

13
INSTALLATION
ENGLISH
Preparing Cabinet Opening
Choosing the Proper Location
• Install the appliance on a flat and stable area
floor.
• Cut out for hoses and electrical cables on either
side. (Approximately 100 mm X 75 mm)
• Select a location as close to the sink as possible
for ease of connection to the water and drain
pipes.
• To ensure drainage, the appliance should not be
installed more than 1 metre away from the sink.
• If the appliance is installed in a corner, allow
minimum clearance of at least 50 mm between
the appliance and an adjacent cabinet or wall.
• Before sliding the appliance into the installation
opening, all necessary height adjustments
should be made using a spanner.
CAUTION
• Any bare wood surrounding the appliance
should be sealed with a waterproof paint or
sealant to prevent it from swelling.
• Slide the dishwasher into the cabinet, opening
carefully. Make sure that the drain hose behind
the machine and inside the cabinet is not kinked
or stretched.
• Install the appliance on a flat and stable area. Do
not place any objects in-between the floor and
base or leg off the appliance.
NOTE
• This installation must be conducted by qualified
service personnel to ensure it has been installed
correctly.
• Do not pull or lift the appliance using the handle;
dosing so can damage the door and hinges.
Open the door and grab the body frame and the
top front opening of the tub to move or lift the
appliance.
• Do not push the door of the dishwasher with
knees.
Attaching the Strip to the
Appliance Base
To reduce noise attach the strip to the appliance
base.

14
INSTALLATION
1
Lay down the appliance and pull on both the
hooks at the bottom of the lower cover.
2
Pull on the lower cover to remove it.
3
Remove the double-sided tape on the back of
the felt and attach it to the front side of the
appliance’s bottom.
4
Remove the double-sided tape from the lower
and front strips.
5
Attach the black coloured lower strip
a
to the
bottom of the lower cover.
6
Attach the black coloured front strip
b
to the
top of the lower cover.
• The length of the front strip is longer than
the lower cover. Attach the front strip so that
the overhang is equal on both sides of the
lower cover.
7
Attach the lower cover with the strip onto the
appliance.
15
INSTALLATION
ENGLISH
Attaching the Strip to the
Appliance Side Cabinet
To reduce noise attach the strip to the appliance
sides, if the opening space allows.
1
Remove the double-side tape from the side
strips.
2
Attach the side strip to the front of the side
cabinet and then push down the side strip so
that the side strip adheres well to the cabinet.
3
Repeat the above steps for attaching the
opposite side strip to the opposite side cabinet.
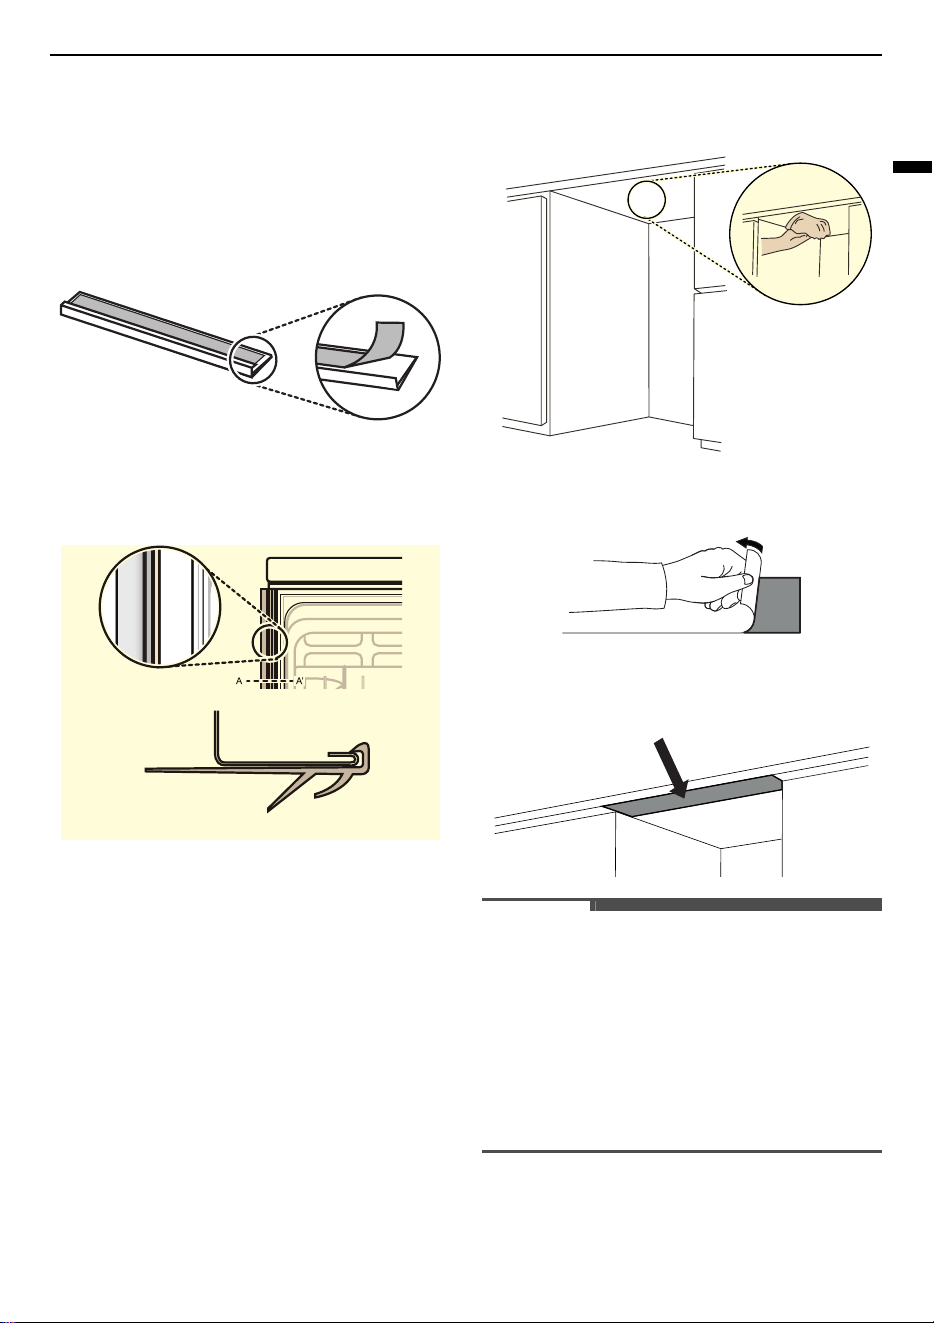
Installing Moisture Barrier Tape
When the appliance is installed without the top
cover, the counter top underside may be damaged
by steam or condensation when the door is
opened.
• Install the moisture barrier tape to the underside
of counter top to protect the counter top from
condensation when the appliance opened.
1
Clean and dry the underside of the counter top
on which the tape will be attached.
2
Remove the protective film from the tape.
3
Install the tape to the underside of the counter
top.
NOTE
• Moisture barrier tape is included in the manual
assembly bag.
• If the counter top is made of granite or
waterproof materials, the moisture barrier tape
is not required.
• Condensation may occur on the underside or
along the front edge of the counter top when the
room temperature is low.
$$ȅ
16
INSTALLATION
Levelling the Appliance
Checking the Level
Levelling the appliance prevents unnecessary
leakage and poor washing. Check whether the
appliance is perfectly level after installation.
• If the appliance rocks when pushing the top
plate of the appliance diagonally, adjust the feet
again.
NOTE
• When the appliance is correctly leveled, there
should be no slant, stickiness or rubbing sound
when the door is opened.
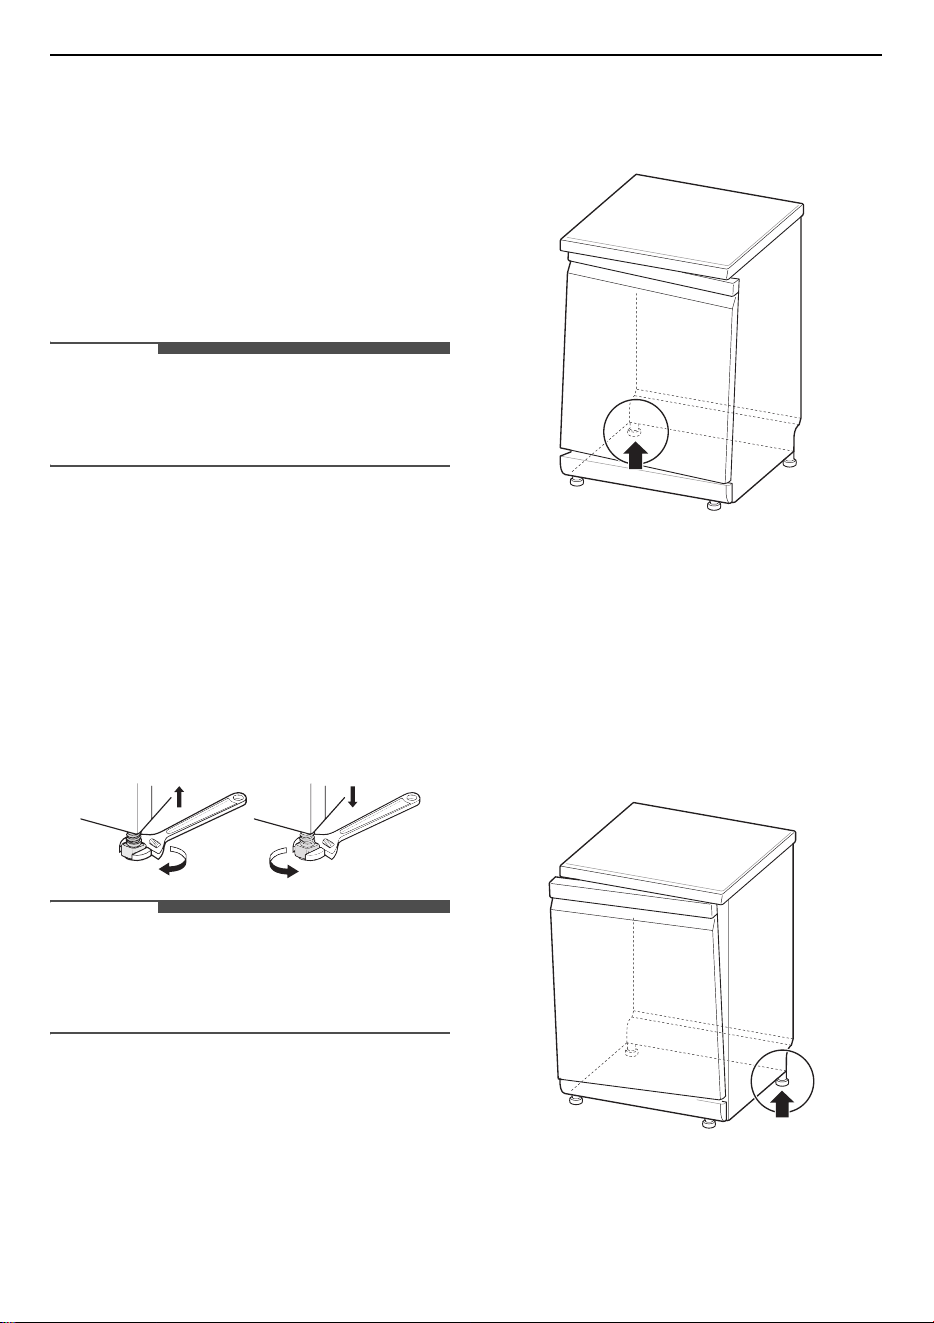
Adjusting and Leveling the
Appliance
When the appliance is not perfectly level, turn the
adjustable feet until the appliance no longer
wobbles.
• Turn the adjustable feet clockwise to raise or
turn the adjustable feet counterclockwise to
lower from front-to-back, side-to-side and
corner-to-corner.
NOTE
• Place the appliance on a solid, level floor.
• Do not install the appliance on an elevated
surface.
Case 1. The Door is Slanted to the
Right
1
Unscrew (counter-clockwise) the rear left leg
and correct the level.
2
Check the opening of door and repeat if
necessary until the door opens and closes
properly.
Case 2. The Door is Slanted to the
Left
1
Unscrew (counter-clockwise) the rear right leg
and correct the level.
2
Check the opening of door and repeat if
necessary until the door opens and closes
properly.
17
INSTALLATION
ENGLISH
Installing the Drain Hose
If the end of the drain hose does not fit to the drain
line, use a drain extension kit (optional) that is
resistant to heat and detergent.
• This should be available from a plumbing shop
or a hardware store.
Connection to the Waste Spigot
Check the waste spigot when initially installing. An
OE
error can occur when the waste spigot below
the sink is not drilled out properly. To connect the
drain hose, drill out at least a 15 mm diameter hole
in the waste spigot before connecting and
securing.
CAUTION
• Make sure that plastic debris is not remaining
inside of spigot after it has been drilled out.
• Do not attempt to open the waste hole with a
screwdriver and hammer. This will induce debris
to become stuck and cause a malfunction.
• Caution should be taken when passing hoses
through Cabinetry holes as they may have sharp
edges and could damage the hoses. Smooth or
sand edges to avoid damaging the drain or inlet
hose.
• Make sure that the line is not kinked or sharply
bent.
• Make sure the drain hose is straight before
feeding the end of it through the hole for the
water supply.
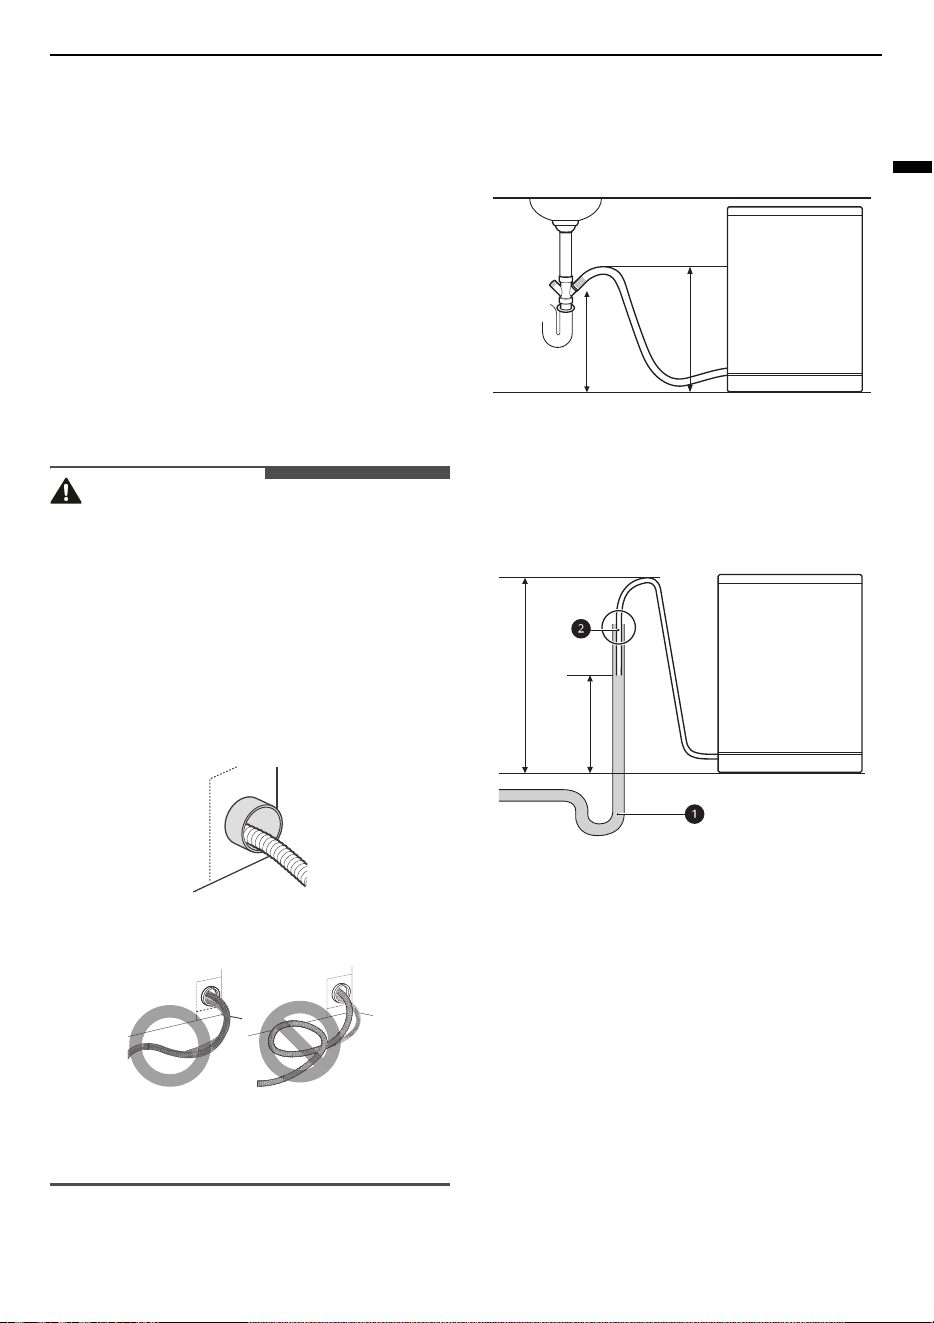
To prevent siphoning, one of the following
methods must be used.
Method 1
When the drain hose is connected to a waste
spigot, the hose must be looped up to the
underside of the bench top and secured.
Method 2
When the drain hose is connected to a separate
standpipe
a
, it is essential that an airtight
connection
b
be made. If not, it can induce odours.
• Standpipe diameter is at least 40 mm.
≥ 300 mm
700 – 1000 mm
700 – 1000 mm
≥ 300 mm
18
INSTALLATION
Preparing Water and
Electrical Connections
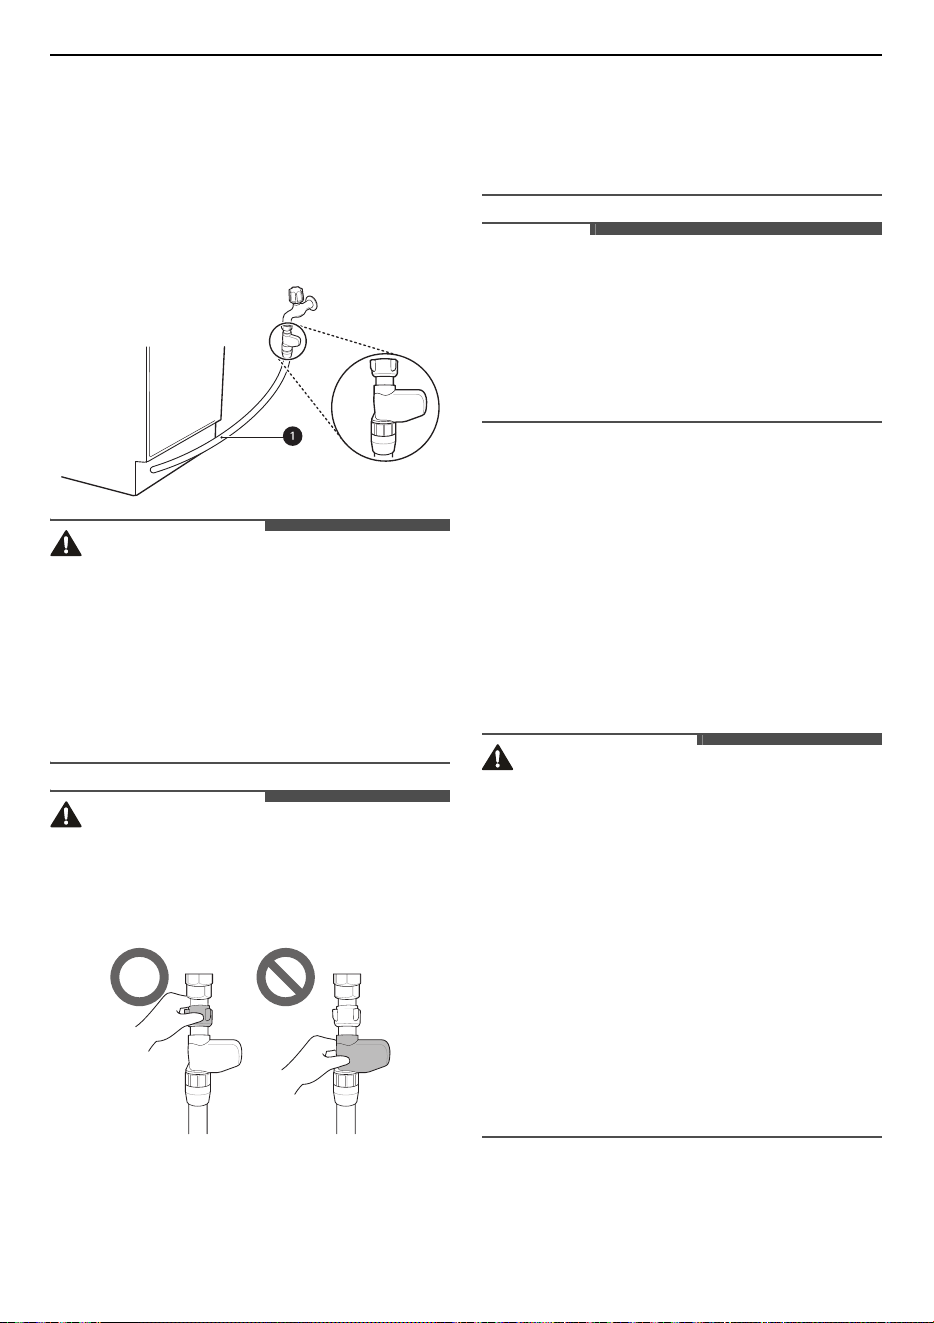
Connecting the Hose to the
Water Tap
Connect the water supply hose
a
to the water tap.
WARNING
• Do not shorten or damage the water supply hose
as it contains electrical wires and components. It
can not be detached or removed from the
appliance for installation purposes.
• It is important that the water supply hose not be
tampered with, cut, disassembled, pulled, or
kinked. It contains electrical wiring inside and if
damaged, can cause an electrical hazard.
CAUTION
• Only use the threaded nut of the water supply
hose to tighten it to the tap.
• Do not twist or kink the water supply hose when
connecting it to the tap.
• This appliance may be fed with either hot or cold
water. If the water connection can not be
maintained below 65ºC, the appliance must be
connected to cold water.
• Use sealant tape or sealing compound on the
tap’s thread to avoid water leaks.
• Make sure that the line is not kinked or sharply
bent.
NOTE
• Before connecting the water supply hose to the
tap, turn on the tap to flush out foreign
substances (dirt, sand or sawdust) in the water
lines. Let water drain into a bucket.
• It takes about 3 – 4 minutes for the first supply
water.
Routing Electrical Wiring
Connect the appliance to an earthed socket in
accordance with the current wiring regulations,
protected by a minimum 15 amp circuit breaker or
time delay fuse.
Wiring must be two wires with earth.
The power cord should not be positioned behind
the appliance but within 1.2 metres of the side so
that the plug is easily accessible.
WARNING
• For personal safety, remove house fuse or open
circuit breaker or switch off power plug before
installation.
• Do not use an extension cord or double adapter.
• The plug must be plugged into an appropriate
outlet that is properly installed and grounded in
accordance with all local codes and ordinances.
• Repairs to the appliance must only be carried out
by qualified service personnel. Repairs carried
out by inexperienced persons may cause injury
or serious malfunctioning. Contact our local
service centre.
• Connect to a properly rated, protected, and sized
power circuit to avoid electrical overload.

19
INSTALLATION
ENGLISH
Final Installation Check
Testing the Dishwasher
1
Turn on electrical power.
2
Turn on house water supply.
3
The door should open and close smoothly and
without harsh noises, if the unit has been
levelled correctly.
4
Run the appliance on a
Rinse
cycle to verify
proper operation and check for leaks.
Installation Check Error Codes
Error
Code
Possible Cause and Solution
OE
Drain hose kinked or pinched.
• Feed the drainage and supply
hoses through the hole under
the sink. Then gradually slide the
dishwasher into the cabinet
while pulling on the hoses under
the sink to take up any slack. This
helps avoid kinking the hoses or
trapping them beneath the
dishwasher.
Waste spigot under sink is
clogged.
• Drill out the waste spigot under
the sink.
IE
Water supply line kinked under
dishwasher.
• Feed the drainage and supply
hoses through the hole under
the sink. Then gradually slide the
dishwasher into the cabinet
while pulling on the hoses under
the sink to take up any slack. This
helps avoid kinking the hoses or
trapping them beneath the
dishwasher.
House water supply not turned
on.
• Turn water on. Water pressure
may be too high or too low.
Error
Code
Possible Cause and Solution
20
OPERATION
OPERATION
Operation Overview
Using the Appliance
1
Open the door and press the
Power
button.
• The unit will turn on. Check the indicators.
2
Check that there is rinse aid and dishwasher
salt present.
• Refill the rinse aid and the salt, if the
corresponding icons illuminate. For more
information, refer to
Refilling
section.
• Salt Refill Icon
• Rinse Aid Refill Icon
3
Check the filters.
• Always clean the filter either after a wash or
before a wash so that it does not impair the
washing results.
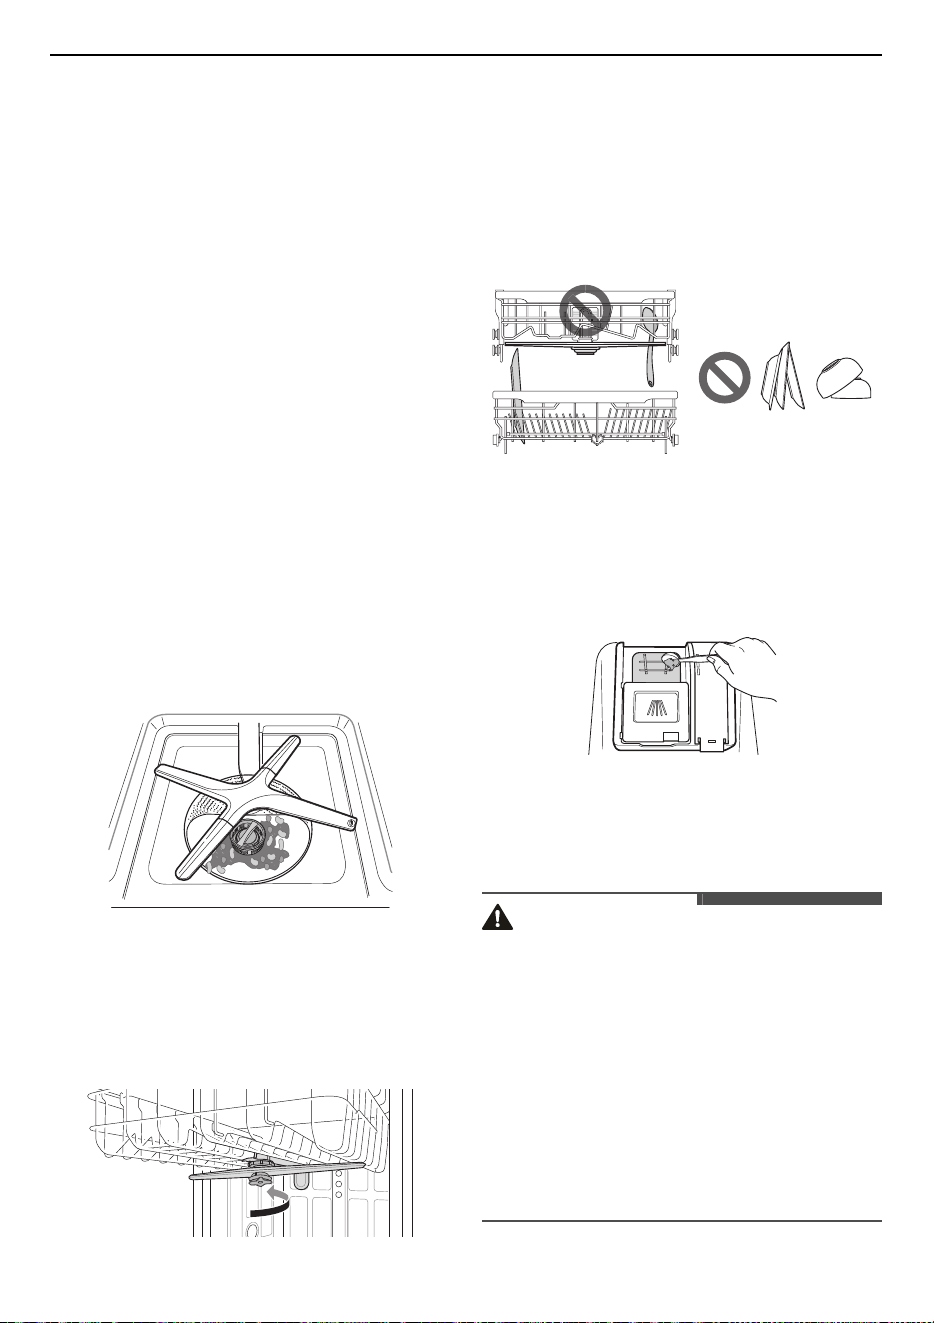
4
Ensure the spray arms can unobstructedly
rotate.
• Ensure that the upper spray arms and the
lower spray arms rotate well. Remove the
spray arm and clean it if it does not rotate.
5
Load the dishes in the rack.
• Make certain that no dishes or utensils are in
the path of the spray arms.
• Do not place one dish on top of another.
6
Add the proper amount of detergent
powder to the dispenser.
• If using Tablets, they can simply be placed
directly on the base of the tub, or on the
lower part of the inner door.
7
Set and start the programme.
• The programme will start automatically in 4
seconds after any setting is selected.
WARNING
• Do not load any items in upper rack when the
lower rack is pulled out and loaded. Failure to do
so may result in injury as the appliance could
become unbalanced and topple over.
• Push the upper rack in all the way.
• Empty the lower rack first and then the upper
one. It will avoid water dripping from the upper
rack onto the dishes below.
• Do not open the door during operation or right
after it has completed the wash cycle as the
steam may cause scalding as the door is opened.
15
25
21
OPERATION
ENGLISH
NOTE
• Never use liquid dishwashing detergent in the
appliance.
• It is not recommended to rinse the dishes
manually before operating the dishwasher
because it increases water and energy
consumption.
• Washing tableware in a household dishwasher
usually consumes less energy and water in the
use phase than hand dishwashing when the
household dishwasher is used according to the
manufacturer’s instructions.
• Loading the household dishwasher up to the
capacity indicated by the manufacturer will
contribute to energy and water savings.
Before Using
This model has a water softener to soften hard
water.
NOTE
• The appliance can be used without dishwasher
salt if not required, however, the hardness level
needs to be set to H0 so that the icon does not
remain lit.
• In order to provide satisfactory rinsing results,
the appliance requires soft water, i.e., containing
little or no lime, otherwise water stains will be
left behind on the dishes and inside the
appliance.
• If the tap water exceeds a certain level of
hardness, it must be softened, i.e., decalcified.
This is achieved by adding dishwasher salt to the
water softener inside the appliance. The
required amount of the salt is set up according
to how hard tap water is.
Checking Water Hardness Level
1
Check the water hardness in your area. The
water utility company can help you with this.
2
Set the softening system level of the appliance
according to the water hardness level.
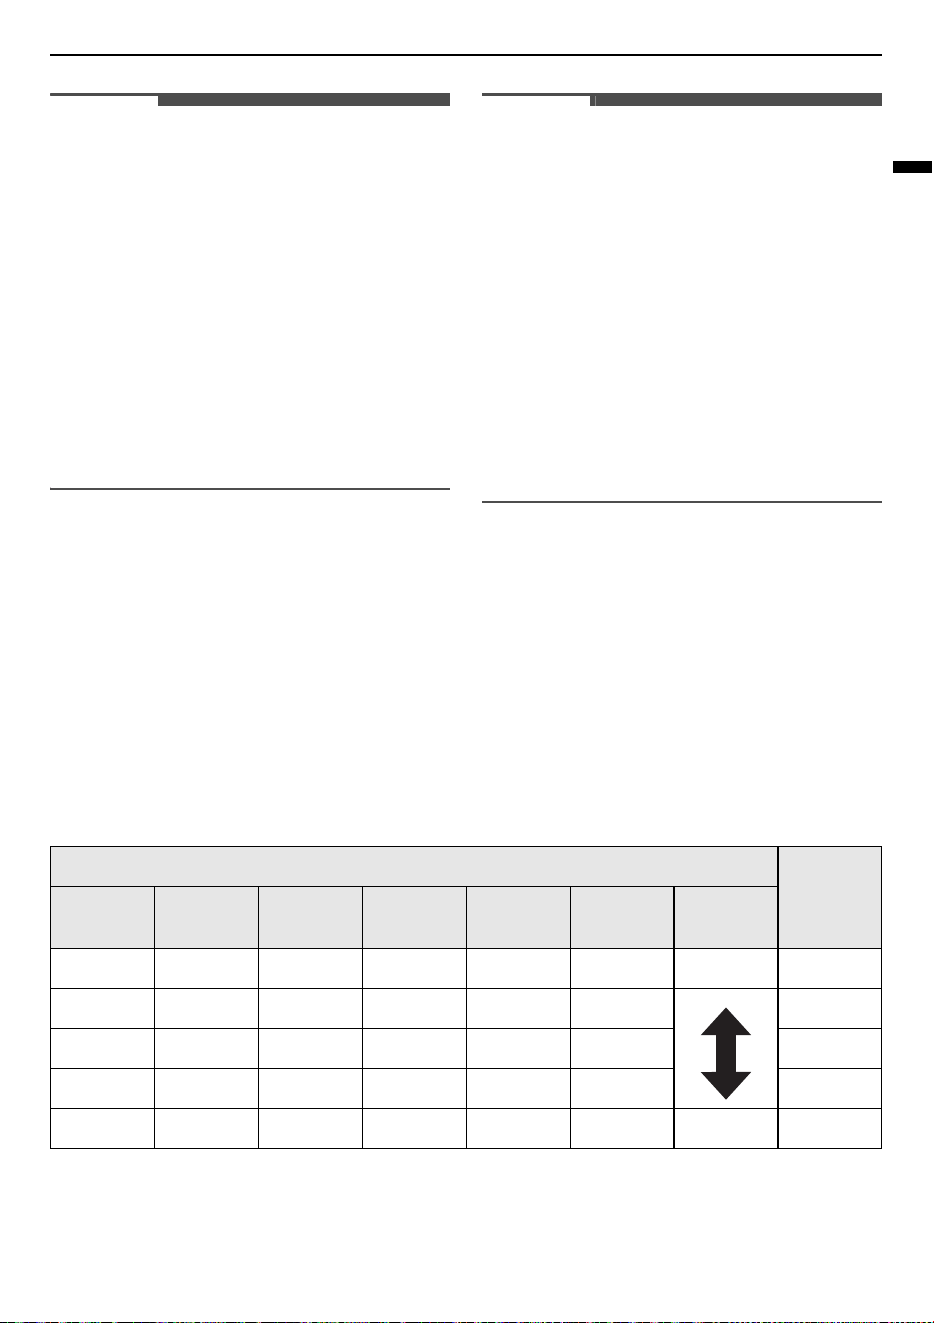
Water Hardness Table
Setting the Water Softening
System
For effective washing results, adjust the setting
corresponding to the hardness level of water used
in water supply. The water softener has 5
Water Hardness
Softening
level
ppm °d °e °f
mmol/l
(Ca+Mg)
mg/l
(Ca)
Range
0 <4 <5 <7 <0.7 <29 Soft H0
75 4 - 7 5 - 9 7 - 13 0.7 - 1.3 29 - 50 H1
125 7 - 14 9 - 17.5 13 - 25 1.3 - 2.5 50 - 100 H2
250 14 - 21 17.5 - 26 25 - 38 2.5 - 3.8 100 - 150 H3
375 >21 >26 >38 >3.8 >150 Hard H4
22
OPERATION
adjustment levels, and the appliance is
programmed at the factory for a water hardness
level of H2. You can check the default setting value
and adjust it in the following steps:
1
Press
Power
and
Half Load
button
simultaneously.
• Current setting value indicated.
2
Press the
Delay Start
button, and then set up
the intended value.
• Scope of setting value is H0 to H4.
3
Press the
START
button to save the setting.
• The power turns off after saving.
NOTE
• The
Salt Refill
icon turns on in the display if
dishwasher salt is not in the softening system.
• If the hardness setting is set to H0, no icon
indicates in spite of no salt.
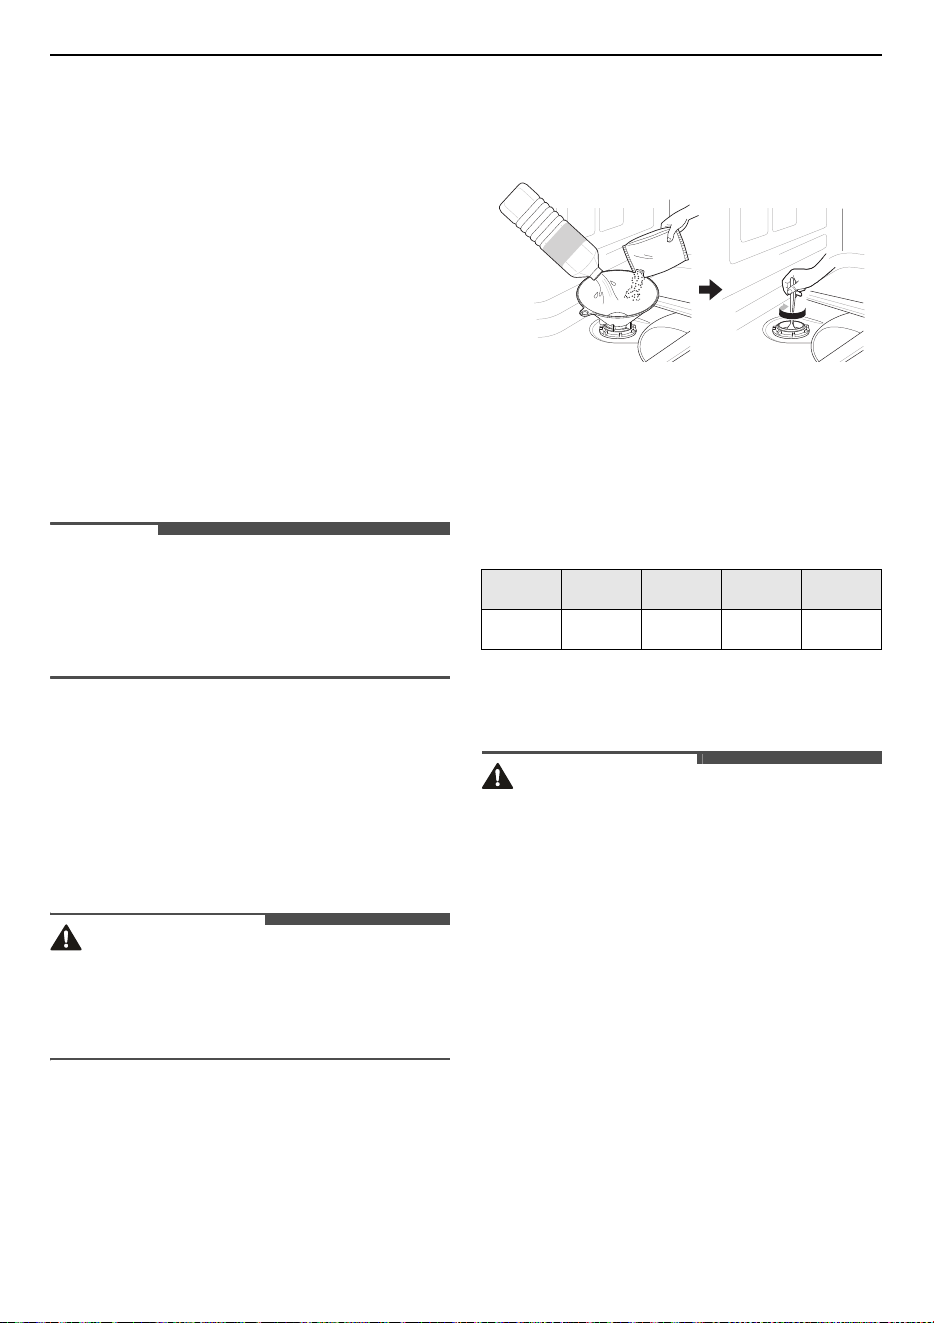
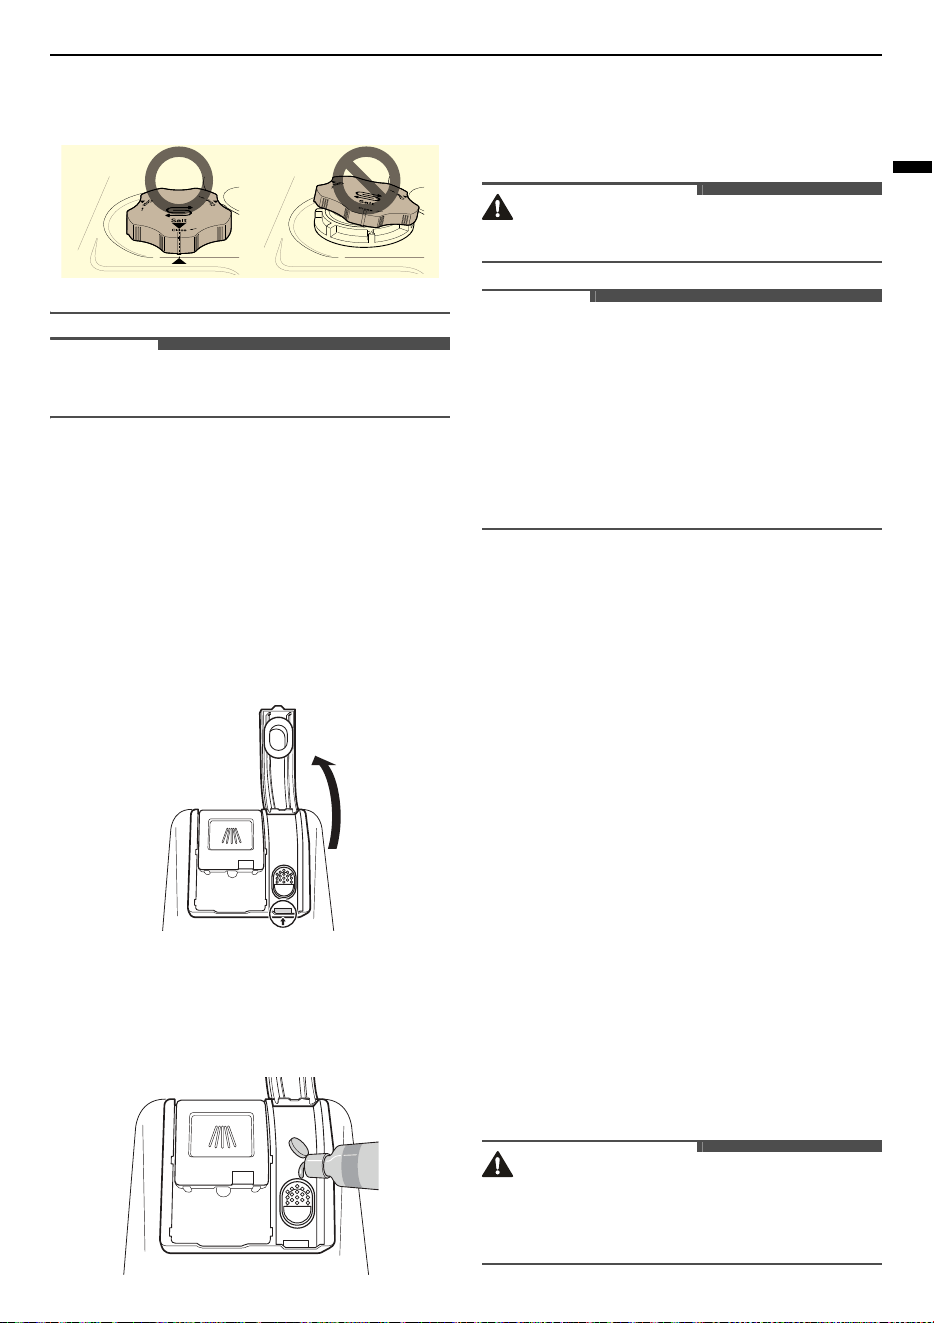
Filling with Dishwasher Salt
The salt dispenser must be filled with salt before
starting the washing programme. In case of
insufficient salt, the
Salt Refill
icon indicates on the
display, unless the hardness level has been set to
H0.
CAUTION
• Once you have filled with dishwasher salt you
must run the Rinse cycle immediately to remove
the salt and the salt water around the inner tub
in order to prevent corrosion.
1
Remove the lower rack and remove the cap of
the salt dispenser located on the left side of the
filters.
2
Before using the appliance for the first time, it
is necessary to pour 1 kg of dishwasher salt
and 1 litre of water at the same time if
intending to use the water softener system.
When refilling the salt, use a funnel. Refer to
Before Using
section.
3
Refit the cap tightly.
4
Run the
Rinse
cycle without dishes.
Salt Refill Cycle (1 kg for each load)
• The table describes information of
Auto
programme.
• Cycle may vary on the salt refill amount.
CAUTION
• Do not pour any detergent in the salt dispenser.
It will cause a malfunction.
• Wipe off any spilled salt around the salt
dispenser cap. Saline solution that runs into can
cause corrosion in the tub and to the dishwasher
load.
• Seal the cap properly by aligning it horizontally
and turning it clockwise. A loosely fitted cap may
cause the saline solution to leak from the salt
dispenser into the tub and cause corrosion.
• After refilling the dishwasher salt, a wash
programme should be operated without dishes,
as any spilled salt inside the appliance may cause
H1 H2 H3 H4
Cycles 130 50 20 10
Salt
Water
23
OPERATION
ENGLISH
rust or damage to the appliance if the left
unwashed.
NOTE
• The salt can be purchased from salt distributors.
Adding Rinse Aid
The
Rinse Aid Refill
icon appears in the display
when more rinse aid is needed.
The use of rinse aid is recommended to prevent
water spots on dishes and to enhance drying
results.
1
Open the rinse aid lid by lifting up the flap.
2
Add a liquid rinse aid to the maximum fill level.
The rinse aid should be settled in the dispenser
while filling, or air bubbles may result in poor
drying results.
3
Close the lid to lock the dispenser. Rinse aid is
dispensed automatically during the final rinse
cycle.
CAUTION
• Wipe off any spilled rinse aid to prevent suds.
NOTE
• Only use liquid rinse aid in the appliance.
• Do not overfill the rinse aid dispenser.
• Too much or too little rinse aid can inhibit the
drying results.
• If rinse aid flows out of the dispenser, wipe it off.
Otherwise many suds can occur and stain the
dishwasher.
Setting the Rinse Aid Level
The dispenser has five adjustment levels. The
default programme is rinse aid level 2. This can be
checked and altered by using the buttons on the
control panel.
1
Ensure the appliance is off.
2
Press
Power
and
Dual Zone
simultaneously to
check the current setting.
3
Press
Delay Start
to change the rinse aid
dispenser setting. Each press of the button
changes the setting one step from L0(off) to L4.
4
Once the desired rinse aid dispenser setting is
selected, press
START
to save.
• The power turns off after saving.
CAUTION
• If the rinse aid lid is not closed properly, a large
amount of rinse aid will release into the tub and
cause washability problems.

24
OPERATION
NOTE
• The
Rinse Aid Refill
icon will illuminate when
more rinse aid is needed.
• If you notice cloudy spots, streaks or water
marks on the glassware after washing, increase
the setting level.
• Setting the control too high can cause foaming,
which will cause poor wash results.
• If the glass is smeared or foam is present on the
bottom, decrease the level setting.
• Setting the rinse aid control too low can cause
spotting and streaking on dishes and poor
drying results.
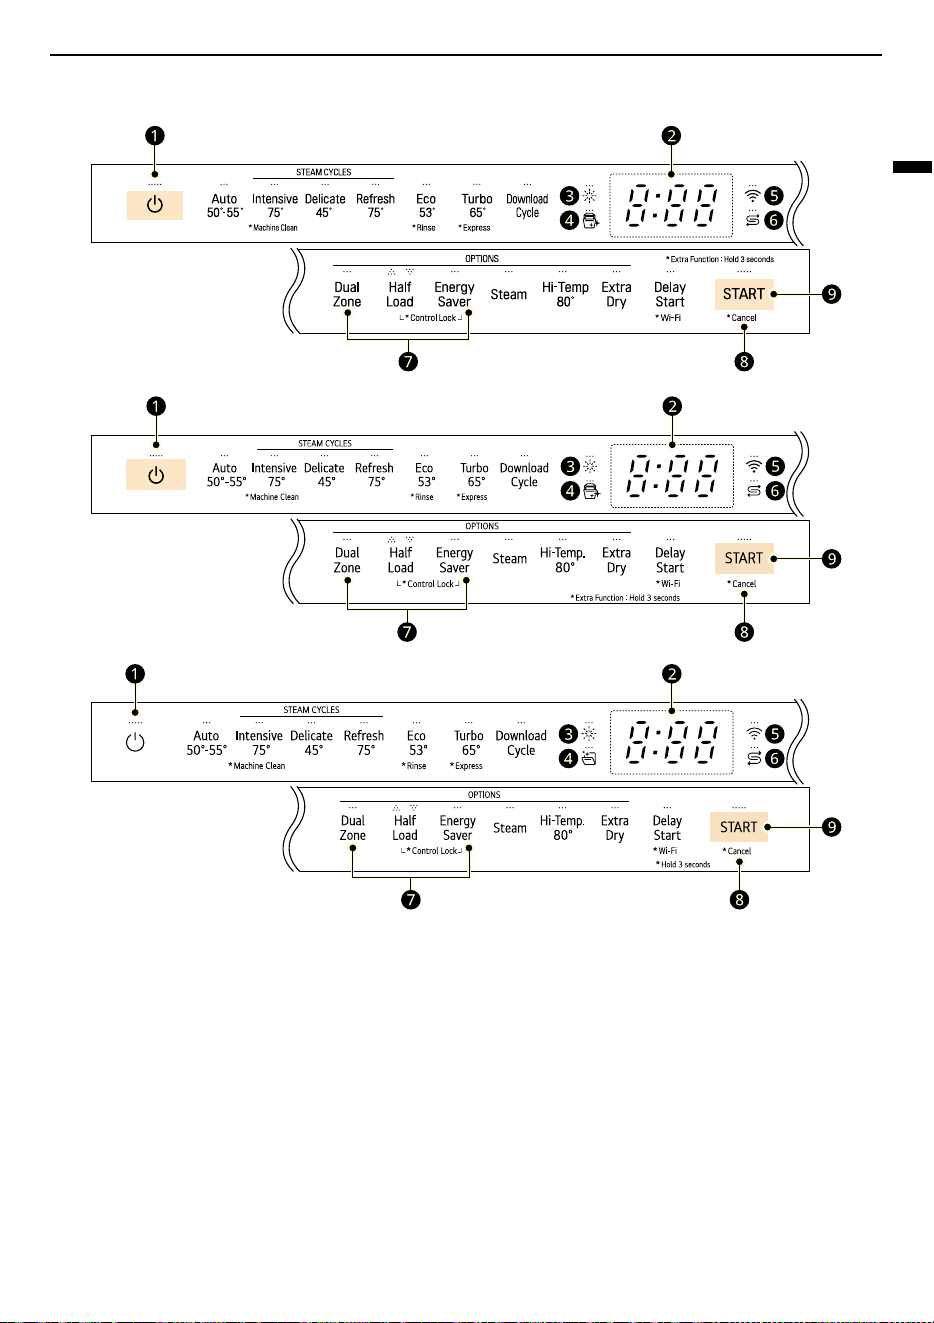
Control Panel
Control Panel Features
For Non-Steam Models (XD3*15**, XD4*14**, XD4*15**)
25
OPERATION
ENGLISH
For Steam Models (XD3*25**, XD4*24**, XD5*24**)
a
Power
• Press
Power
button to turn power on and off.
• After the cycle is complete, the power automatically turns off for purposes of safety and economy.
• If there is a power surge, power outage, or disruption of any kind, power is automatically turned off
for safety.
• When power is connected again, it will turn on automatically and resume the cycle.
b
Digital Display
• The digital display on the control panel shows the ESTIMATED cycle time. When the cycle and options
are selected, the display shows the total estimated time to complete those selections. During
operation, the display shows the remaining estimated operating time.
• The estimated time shown on the display does not include delay times for heating water, etc.
• If
Delay Start
is selected, the display shows the delay time in hours.

26
OPERATION
• The
Auto
cycle time may vary depending on the soil level of your load.
c
Rinse Aid Refill Icon
• This icon flashes when the rinse aid level is low. The LED automatically shuts off when the rinse aid is
refilled or the level is set to 0.
d
Machine Clean Icon
• This icon flashes after every 30 cycles.
• To activate or deactivate the icon, press the
Delicate
button for 3 seconds.
e
Wi-Fi
• When the appliance is connected to the internet through a home Wi-Fi network, this icon illuminates.
f
Salt Refill Icon
• This icon flashes when the salt level is low. The LED automatically shuts off when the salt is refilled.
g
Chime On/Off
• To activate or deactivate the button sounds, press and hold
Dual Zone
and
Energy Saver
simultaneously for 3 seconds. The error alert sound cannot be turned off.
h
Cancel
• The drain pump activates and the cycle cancels. Once the appliance finishes draining, the power
turns off.
• Press and hold
START
button for 3 seconds to activate the cancel function.
i
START
• To operate the appliance, either (depending on display type) press
START
button and close the door
or close the door and press
START
button.
• If
START
button is not pressed to start the cycle within 4 minutes, the power will automatically turn
off.
Wash Cycles
Wash Cycles
Auto
This cycle senses the soil amount and water clarity
and optimizes the wash to achieve the best
cleaning. The wash time may vary depending on
the soil level.
Intensive
This cycle is for heavily soiled dishes and dishes
with hardened on soil. This cycle defaults to the
strongest spray intensity and uses it to wash
heavily soiled dishes.
Delicate
Use this cycle to clean delicate items such as fine
china and stemware.
Refresh
This cycle freshens up and warms dishes that have
been unused for a long time.
• Do not use detergent when using this cycle.
Eco
It provides the most efficient energy and water
consumption for a good washing result and drying
result on a normally soiled load and as it uses very
little energy.
•
Eco
cycle and the
Energy Saver
option are
suitable for a normally soiled load.
Turbo
This cycle will clean moderately soiled dishes using
slightly more energy and water.
•
Extra Dry
is set to on as default. If you do not
want to dry dishes after washing, turn off the

27
OPERATION
ENGLISH
Extra Dry
option. Not drying the dishes will
result in a shorter cycle time.
Download Cycle
Use a dedicated cycle downloadable via Wi-Fi or
NFC. (depending on model).
NOTE
• Only the cycle code for the currently downloaded
cycle appears on the appliance. See the
smartphone app for cycle codes, names, and
more information about the available cycles.
- Default Cycle: P1. Pots & Pans
Machine Clean
This cycle is for cleaning the inside of the appliance.
Use the cycle without dishes in the appliance. It
eliminates residual soils, odor, white spots,
limescale, and other dirt. Add citric acid or another
cleaning agent for more effective results.
• Press and hold
Intensive
for 3 seconds to
activate.
Rinse
This cycle is a quick rinse only for dishes that will
not be washed immediately. The cycle rinses dishes
that have excess soil to soften dried on residue.
Rinsing the dishes helps prevent odors in the
appliance.
• Press and hold
Eco
for 3 seconds to activate.
NOTE
• Do not use detergent with this option.
• This cycle does not have drying.
Express
This cycle will quickly clean lightly soiled dishes.
• Press and hold
Turbo
for 3 seconds to activate.
NOTE
• This cycle does not have drying. Select the
Extra
Dry
option or another cycle for better drying.
Extra Dry
will add to the overall cycle time.
• Detergent tablets are not recommended for use
of
Express
cycle. If the detergent tablets are
used, it may cause detergent residue on dishes
due to the relatively low rinse temperatures.
Options and Extra
Functions
Select the desired cycle button and then select the
options for that cycle. For more information, see
the
Cycle/Option Guide
section.
Options and Extra Functions
Dual Zone
This option automatically sets the spray intensity to
soft for the upper spray arm and strong for the
lower spray arm. Place heavily soiled dishes like
plates and bowls in the lower rack and lightly soiled
dishes like cups and small plates in the upper rack
to get the best results.
Half Load
This option washes intensively by selecting the
upper or lower racks. For small loads, use just the
upper or lower rack to save energy and time. By
pressing the
Half Load
button, the settings
f
(Upper),
g
(Lower) and the cancellation of the this
option are available.
Energy Saver
This option saves energy by reducing the wash and
rinse temperatures. Wash time is increased to
maintain wash results. Do not use this cycle with
heavily soiled dishes.
Steam
This option adds steam during the cycle to improve
wash results.
Hi-Temp.
Raises the main wash or heating rinse temperature
to improve cleaning.
• A chime will sound to alert you of any residual
temperatures inside the appliance. Wait for the
appliance to completely cool down before
opening the door.
Extra Dry
Select this option for better drying results. This
option adds extra drying time to the cycle and
raises the heating rinse temperature.
28
OPERATION
• When the rinse aid is empty, this option is
selected automatically.
Delay Start
This feature delays the start of a selected cycle.
Each time the
Delay Start
button is pressed, the
delay time increases by an hour. The delay time can
be set from 1 to 12 hours, in one-hour increments.
• To cancel this feature, turn the power off.
• To change the cycle and cycle option, open the
door and then select another cycle and cycle
option. The countdown will continue.
Control Lock
This feature helps prevent settings from being
changed during a cycle. Selecting this feature locks
all of the buttons, except for the
Power
button, on
the control panel. This feature does not lock the
door.
• On models with the external display, while a
cycle is running, press and hold
Half Load
and
Energy Saver
simultaneously for 3 seconds to
activate or deactivate this feature. On models
with a concealed display, open the door during
operation and follow the same instruction.
• When this feature is activated, the display code
CL
will show on the display.
• To start a new cycle, deactivate this feature.
• This feature can be set at any time by turning on
the appliance.
Wi-Fi
Press and hold
Delay Start
for 3 seconds to
connect to the network. Refer to
SMART
FUNCTIONS
sections for detailed information
about this feature.
Auto Open Dry
This feature may vary depending on the model
purchased.
The Auto Open Dry feature enhances the drying
performance by opening the door automatically
during the drying stage within the displayed
program time. For optimum drying results wait
until the program ends before unloading the
dishwasher. The program is fully complete when
the display shows "End". The door opening time
varies depending on the program selected.
• To activate or deactivate this feature, press and
hold the
Energy Saver
button and the
Hi-Temp.
button simultaneously for 3 seconds.
• This feature is not available when the
Machine
Clean
and
Rinse
cycle is selected.
• When you select the
Download Cycle
, this
feature may operate even if the feature is
deactivated. Because the
Download Cycle
is
designed to achieve the best results in a specific
purpose regardless of appliance settings.
• The display shows whether this feature is on or
off.
WARNING
• Keep children away from the appliance while the
appliance is operating. Exposure to high
temperature steam may cause scalding or
burns.
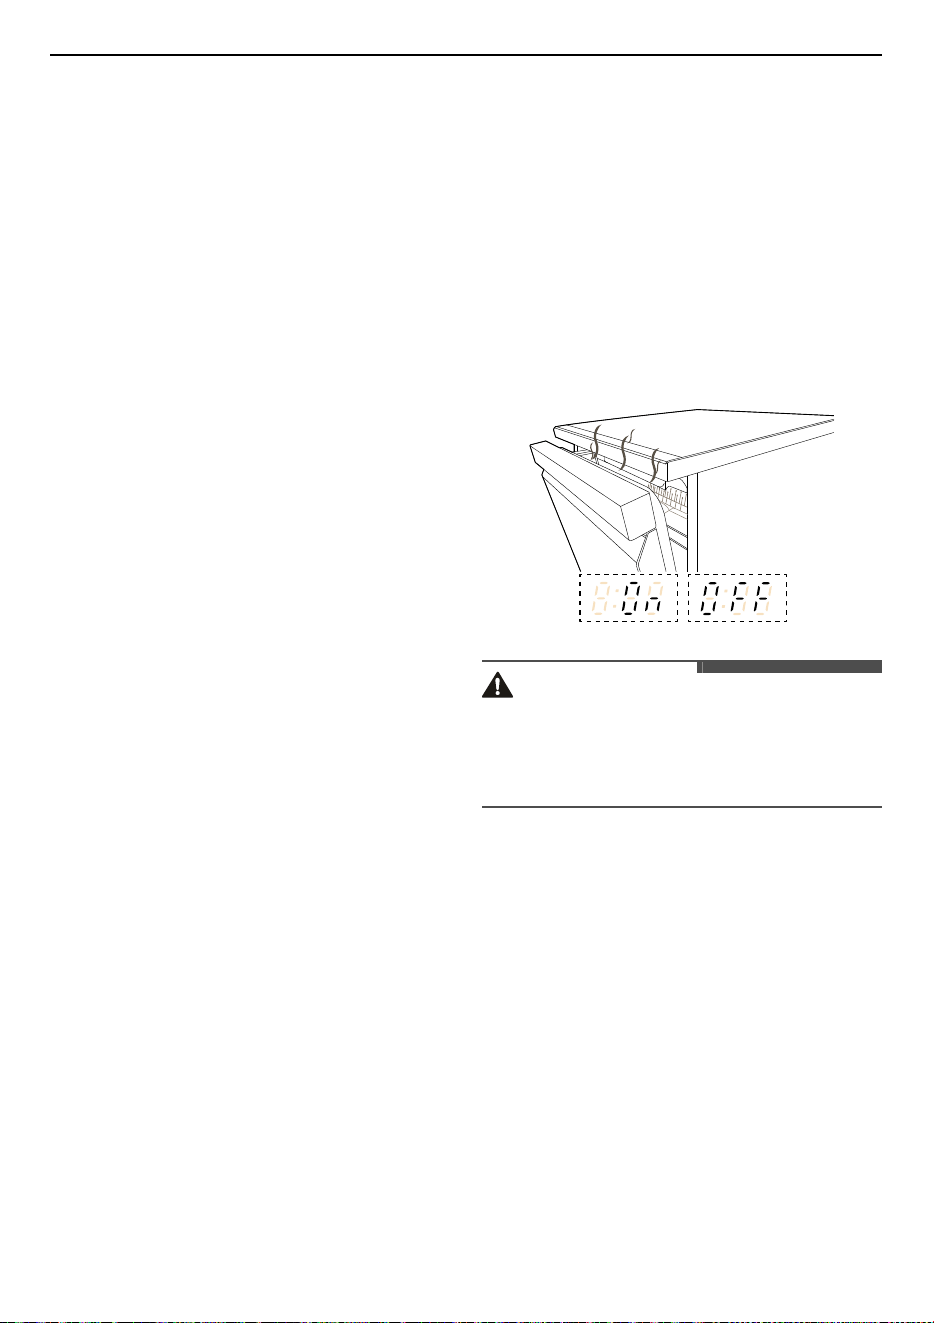
SignaLight™
This feature may vary depending on the model
purchased.
SignaLight™ shows the status of the appliance,
whether it has encountered any problems,
whether it is operating normally, or whether it is
ready to wash dishes.
• Depending on the model, the lamp may be
located either on the front of the appliance or
the top of the door.
Red (left)
The red lamp flashes when the appliance
encounters an error. For more information about
the error, see the
Error Code
part of the
TROUBLESHOOTING
section.
29
OPERATION
ENGLISH
White (middle)
The white lamp flashes when you select an option
cycle or when a cycle has been paused.
• The white lamp lights up when a cycle is running.
Green (right)
The green lamp lights up when a cycle is finished.
When the door is opened, the lamp turns off.
Turn the power on, and then press and hold the
Hi-
Temp.
button for 3 seconds until
ON
shows on the
display.
• The default setting is on
OFF
. When
OFF
shows
on the display, the green lamp stays on for 90
seconds after the cycle has finished.
• You can set the lamp setting to
ON
on the display
so that the dishwasher keeps the green lamp on
until the door is opened manually. (and the
Auto
Open Dry
feature is set to OFF).
Programme Table
Programme Guide
For Non-Steam Models
NOTE
• Running time may vary according to the water temperature, ambient temperature, water pressure and
voltage.
Program
me
Soil Level
Wash Rinse
Dry
Pre-wash Main wash Rinse Heating rinse
Auto
All levels
##
(50 - 55 ℃)
##
(70 ℃)
#
Intensive
Heavy
##
(75 ℃)
##
(70 ℃)
#
Delicate
Light
##
(45 ℃)
##
(70 ℃)
#
Eco
Moderate
##
(53 ℃)
##
(70 ℃)
#
Turbo
Moderate
##
(65 ℃)
##
(65 ℃)
Express
Light
##
(45 ℃)
##
(60 ℃)
Rinse
Light
#
Machine
Clean
##
(50 ℃)
##
(70 ℃)
#
30
OPERATION
For Steam Models
NOTE
• Running time may vary according to the water temperature, ambient temperature, water pressure and
voltage.
• When the
Auto Open Dry
feature is activated, the heating rinse temperature will be changed as 60~75
℃.
Program
me
Soil Level
Wash Rinse
Dry
Pre-wash Main wash Rinse Heating rinse
Auto
All levels
##
(50 - 55 ℃)
##
(70 ℃)
#
Intensive
Heavy
##
(75 ℃)
##
(70 ℃)
#
Delicate
Light
##
(45 ℃)
##
(70 ℃)
#
Refresh
###
(75 ℃)
#
Eco
Moderate
##
(53 ℃)
##
(70 ℃)
#
Turbo
Moderate
##
(65 ℃)
##
(65 ℃)
Express
Light
##
(45 ℃)
##
(60 ℃)
Rinse
Light
#
Machine
Clean
##
(50 ℃)
##
(70 ℃)
#
31
OPERATION
ENGLISH
Available Options
NOTE
• The
Energy Saver
option is not available with the
Hi-Temp.
or
Extra Dry
option.
Programm
e
Dual
Zone
Half
Load
Energy
Saver
Steam Hi-Temp. Extra Dry
Delay
Start
Auto
#######
Intensive
## ####
Delicate
## # # #
Refresh
###
Eco
#######
Turbo
# ####
Express
# ###
Rinse
#
Machine
Clean
#
Download
Cycle
#
32
OPERATION
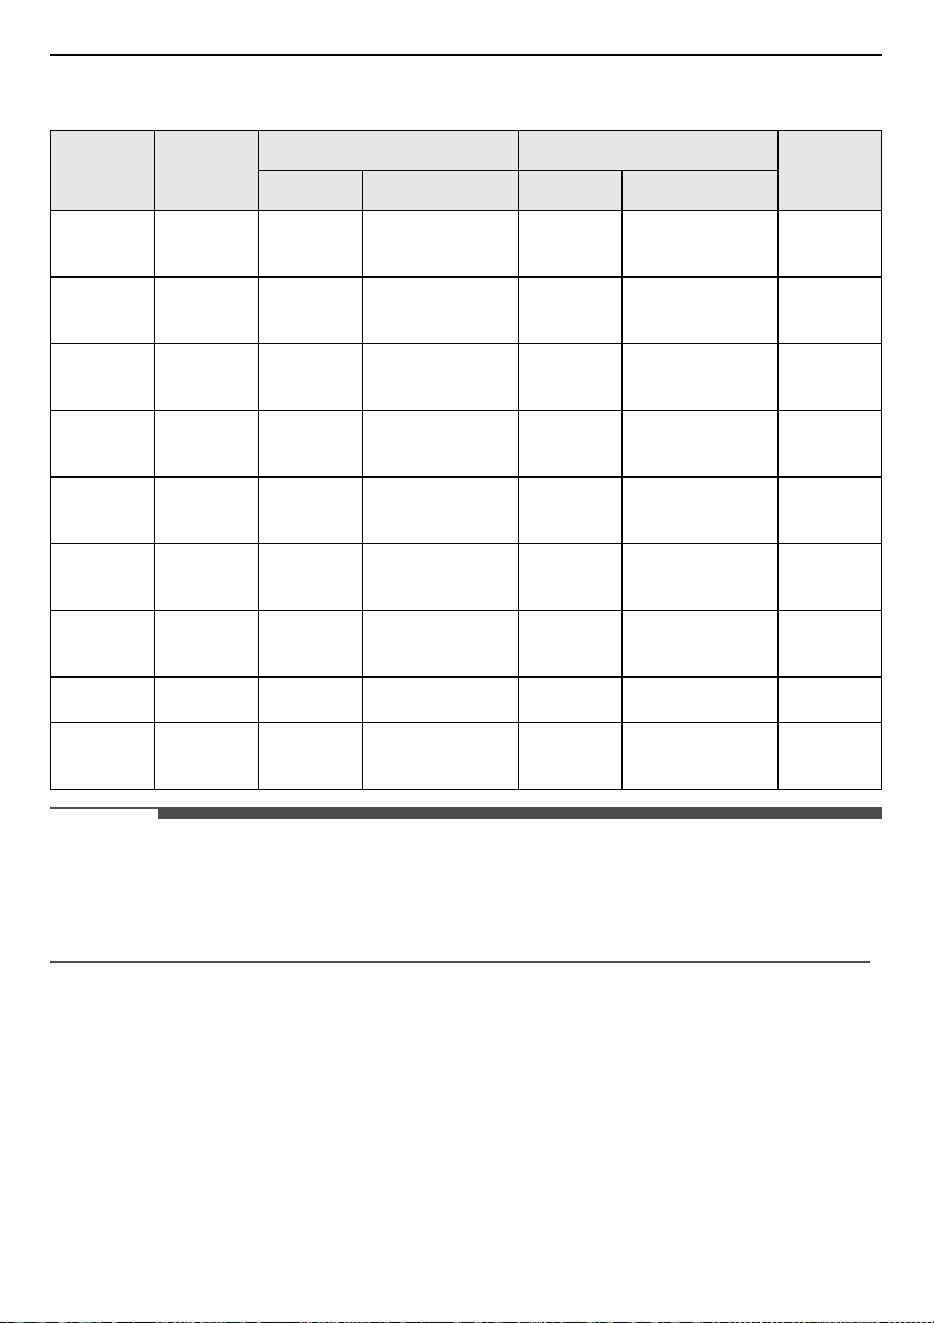
Information for Energy
Test (AS/NZS 2007)
Appliance loaded in accordance with
standardspecifications.
For Model with Cutlery Rack
• Model: XD3*15**, XD3*25**
• Capacity: 15 place settings
• Comparability programme:
Eco
+
Energy Saver
• Rinse Aid setting: L4
• Reference cleaner: 27.5 g of detergent onto the
inside surface of the door and 5 g of detergent
into the dispenser.
• Height-adjustable Rack-U position: Middle
•
Auto Open Dry
setting: On
• Model: XD4*15**
• Capacity: 15 place settings
• Comparability programme:
Eco
+
Energy Saver
• Rinse Aid setting: L4
• Reference cleaner: 27.5 g of detergent onto the
inside surface of the door and 5 g of detergent
into the dispenser.
• Door is opened at the end of the drying cycle for
the drying performance test. (Door position:
Open 50 mm)
• Height-adjustable Rack-U position: Middle
For Model without Cutlery Rack
• Model: XD4*14**, XD4*24**, XD5*24**
• Capacity: 14 place settings
• Comparability programme:
Eco
+
Energy Saver
• Rinse Aid setting: L4
• Reference cleaner: 27.5 g of detergent onto the
inside surface of the door and 5 g of detergent
into the dispenser.
• Door is opened at the end of the drying cycle for
the drying performance test. (Door position:
Open 50 mm)
• Height-adjustable Rack-U position: uppermost
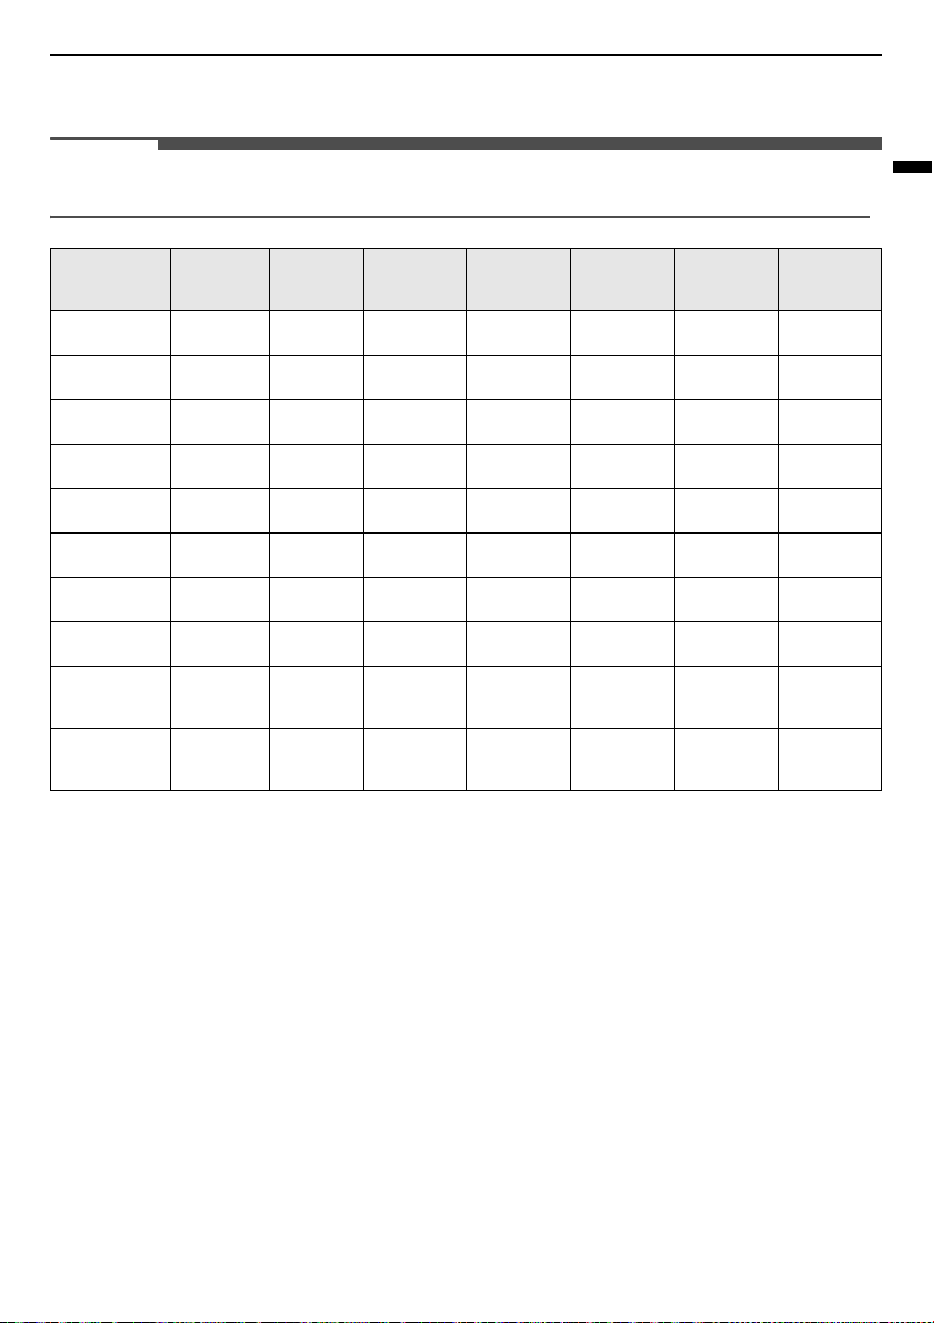
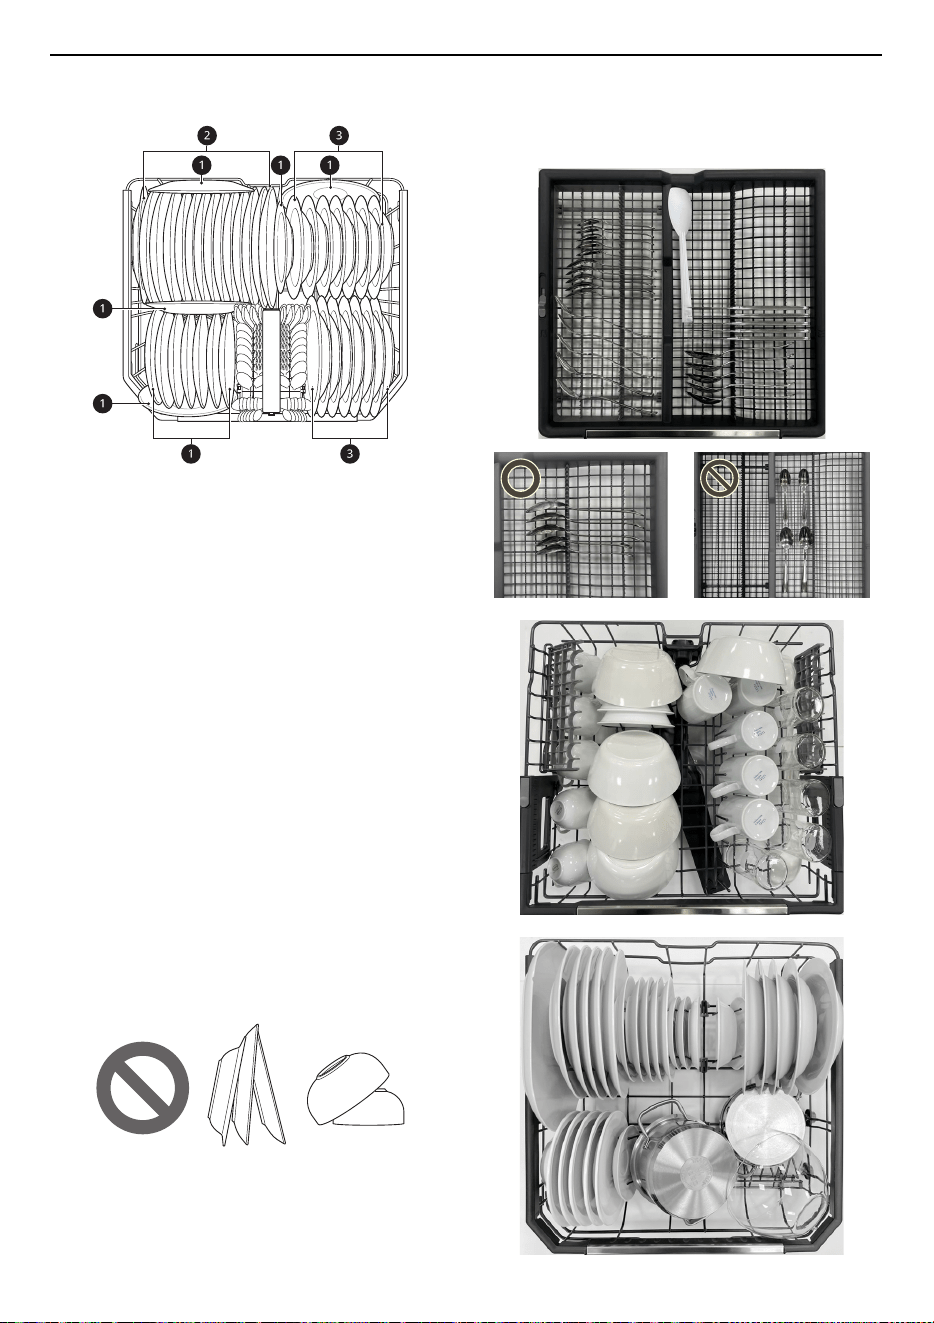
Loading the Dishes
Cutlery Rack
a
Teaspoons
b
Dessert spoons
c
Soup spoons
d
Forks
e
Knives
Upper Rack
a
Glasses
b
Cups
c
Saucers
33
OPERATION
ENGLISH
Lower Rack
a
Dinner plates
b
Soup plates
c
Dessert plates
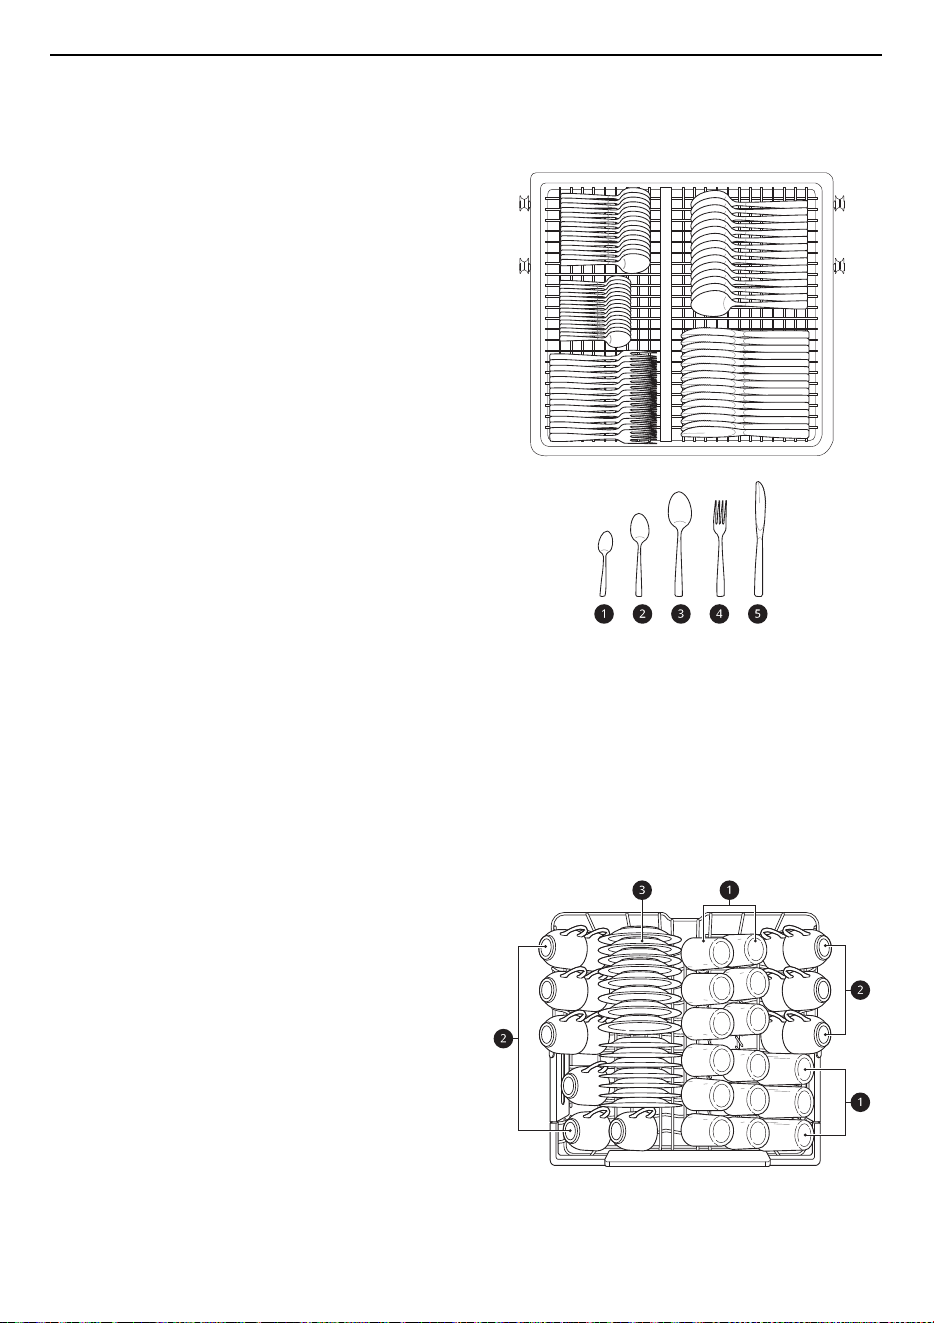
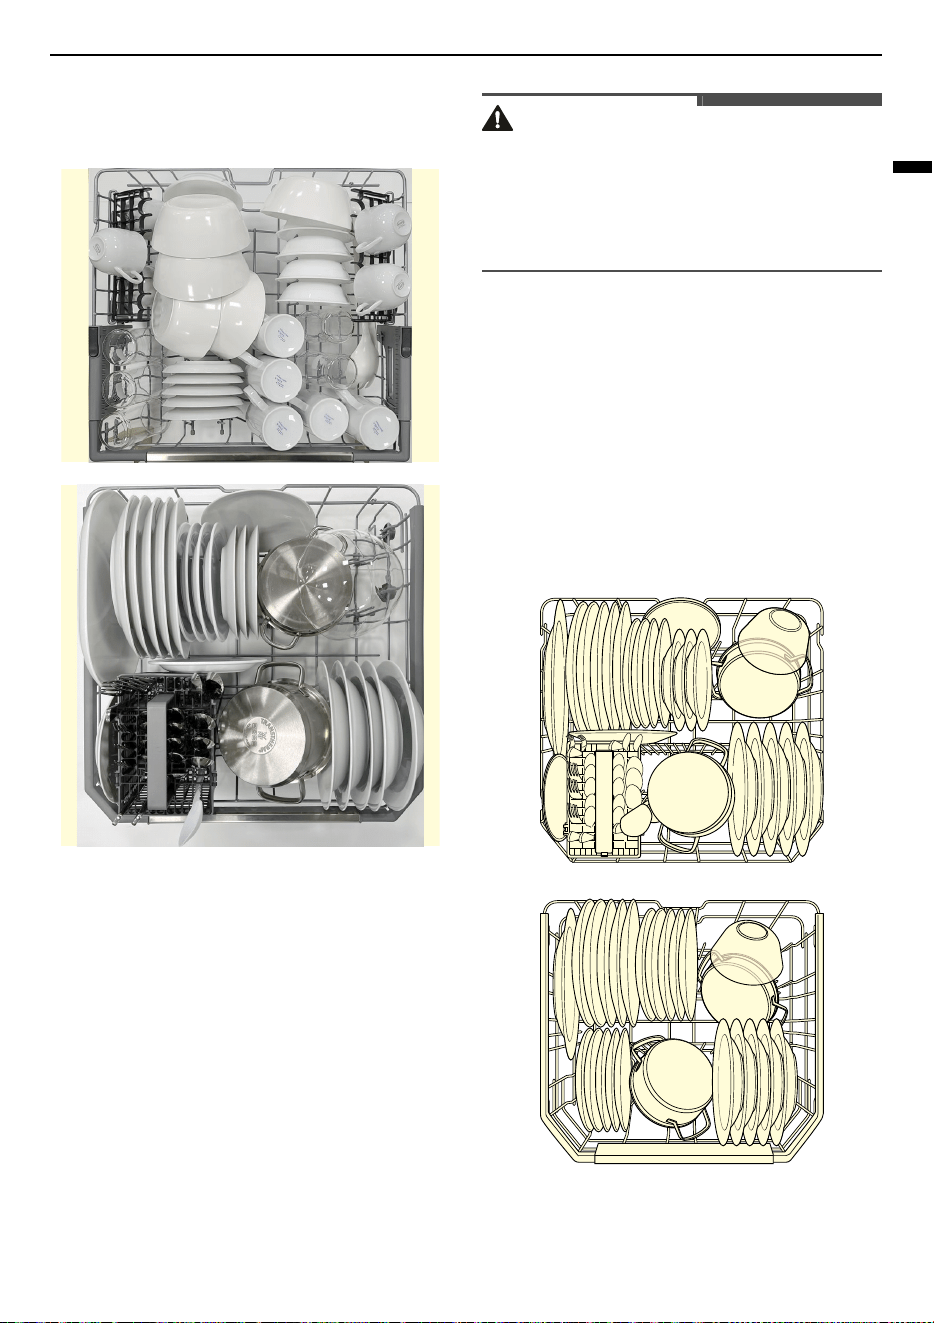
Loading the Dishes
Cutlery Basket
a
Teaspoons
b
Dessert spoons
c
Soup spoons
d
Forks
e
Knives
Upper Rack
a
Glasses
b
Cups
c
Saucers
d
Dessert plates
34
OPERATION
Lower Rack
a
Dessert plates
b
Dinner plates
c
Soup plates
Loading the Dishwasher
For effective washing results, always follow the
instructions.
• Remove large particles of food debris from
plates including bones etc. before loading.
Always rinse off plates when loading if they are
not to be washed immediately.
• Items with burnt on food should be soaked prior
to loading the dishwasher.
• Deep based items should be placed upside
down.
• Plastic items will not dry well, compared to other
items.
• Make sure that all items do not touch each other.
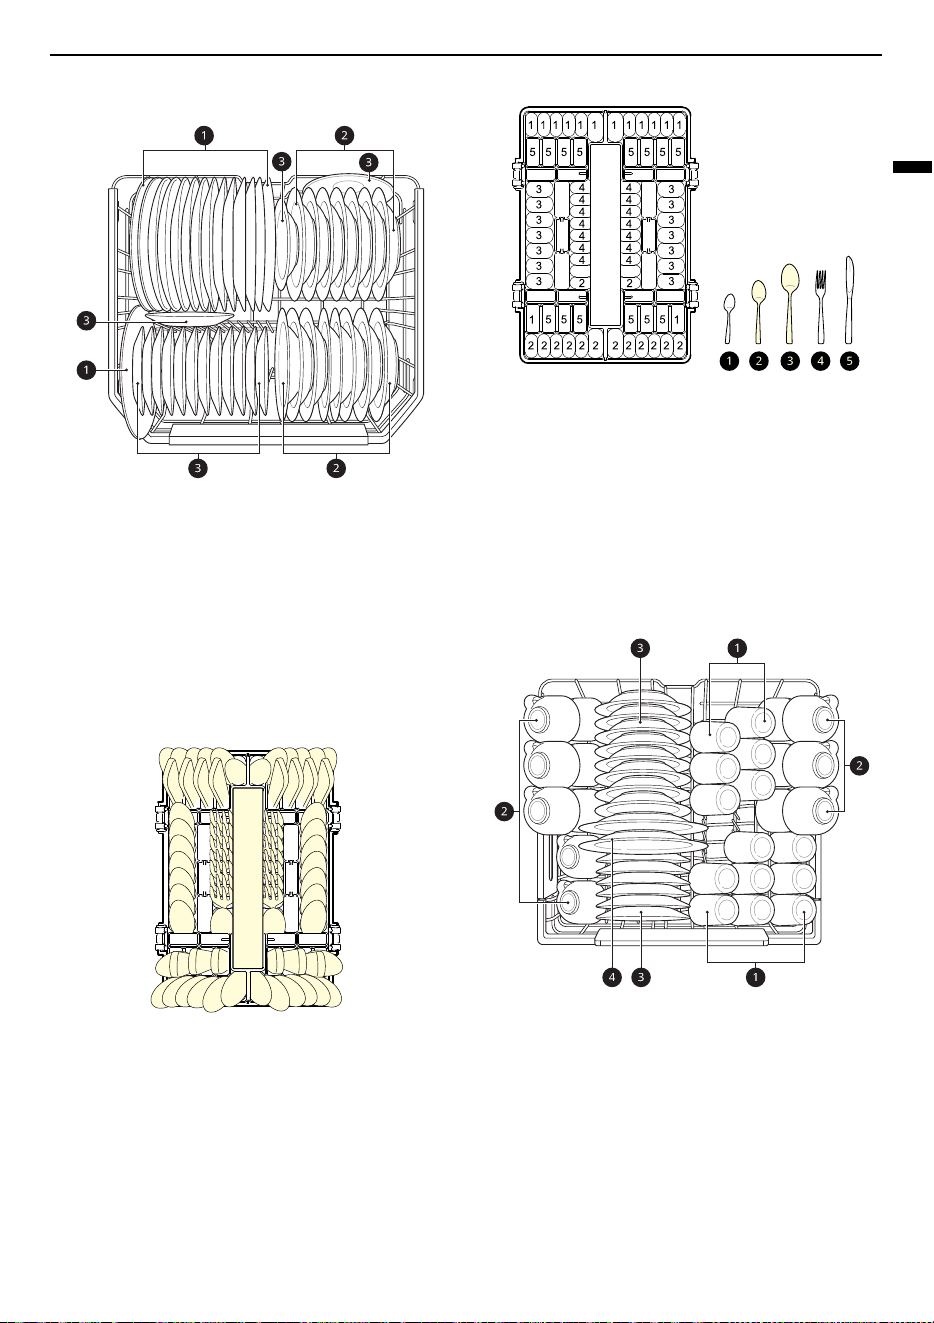
Daily Use Load (For Model with
Cutlery Rack)
35
OPERATION
ENGLISH
Daily Use Load (For Model
without Cutlery Rack)
Items not Suitable for
Dishwashers
The combination of high water temperature and
dishwasher detergents may damage certain items.
Do not wash the following items.
• Copper or anodised aluminium
• Hand painted silver or gold leaf crockery
• Wood or bone handled utensils
• Iron or non rust proof utensils
• Plastic items which are not appliance safe
• Expensive ware such as silver and dishes with
golden rings
• Fragile item such as crystal glasses
CAUTION
• Do not place pots or pans with plastic handles in
the appliance as the handles may deteriorate
due to the heat and detergent.
• Water proof or long lasting lipstick smudges on
glasses may not be removed during the wash.
Loading the Lower Rack
Daily Use Load
The lower rack is suitable for dinner plates, soup
bowls, dishes, pots, pans, lids and even a grill tray.
Plates should be positioned upright and facing the
centre of the rack and pots, pans and large dishes
must be turned upside down.
To make it easier to load larger dishes, the front
row of tines can be folded down.
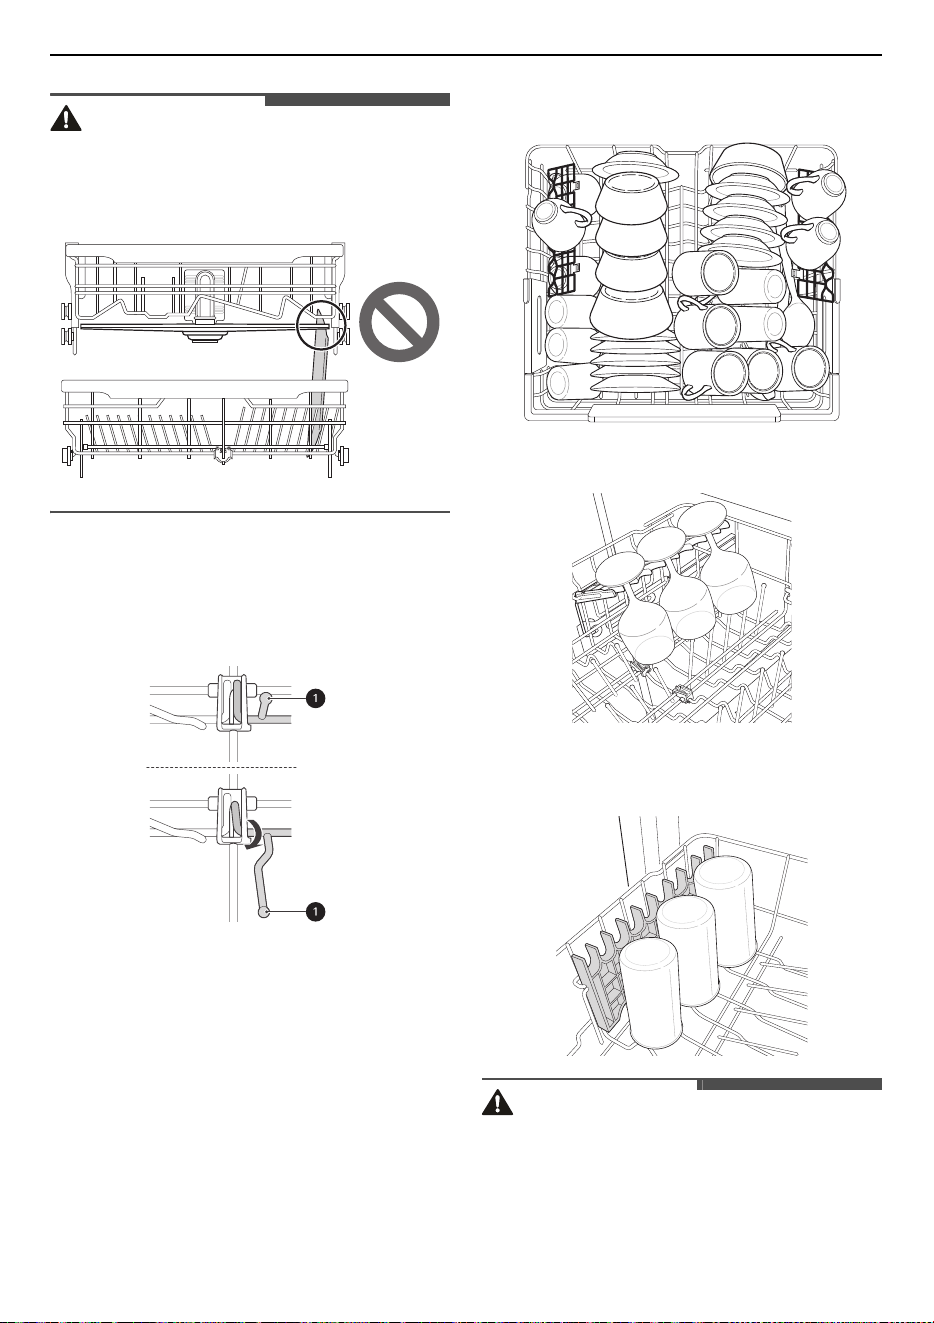
36
OPERATION
CAUTION
• The spray arms must not be blocked by items
that are too tall or hang through the baskets.
Test for free movement by manually rotating the
spray arms.
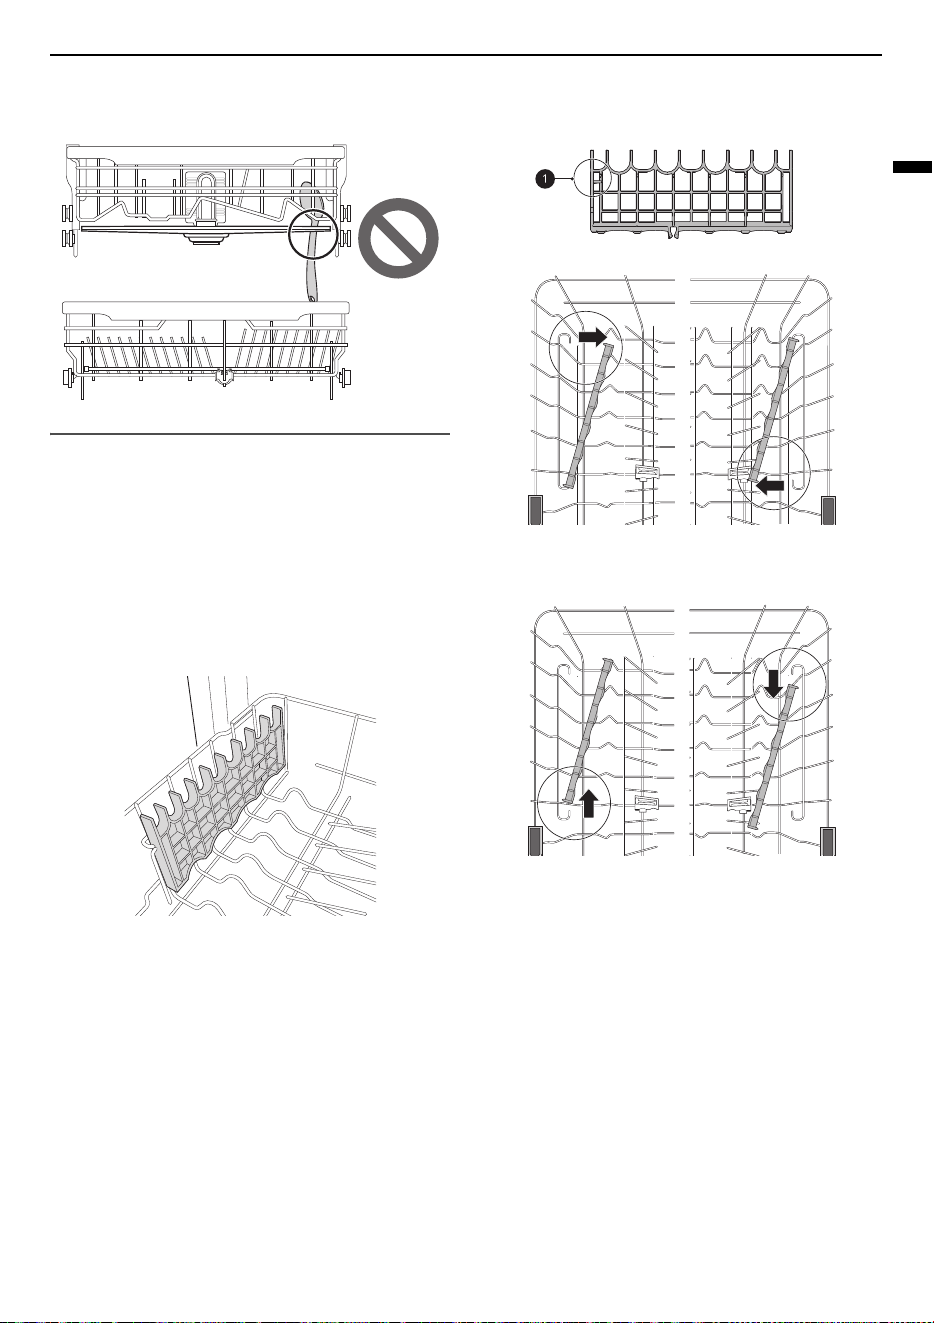
Folding Down the Rack Tines
This feature is only available on some models.
Fold tines down to fit larger dishes; pull tines back
up to fit smaller dishes.
Loading the Upper Rack
Daily Use Load
The upper rack is suitable for delicate items such
as, small plates, long cutlery, cups, glasses and
appliance safe plastic items.
Cups, glasses and bowls must be positioned upside
down.
Plates should be positioned upwards with the
plate.
The cup racks provide support for long stem
glasses.
The left side row of tines can be folded down or the
cup racks can be folded up out of the way for tall
crockery items.
CAUTION
• The spray arms must not be blocked by items
that are too tall or hang through the baskets.
37
OPERATION
ENGLISH
Test for free movement by manually rotating the
spray arms.
Removing and Replacing Cup
Racks
The left and right cup racks are interchangeable
and can be removed.
1
Slide cup rack down into its closed position.
2
Locate assembly slot
a
on cup rack and firmly
pop rack off support bar on that side.
• The rack on the left pops free at the back.
The rack on the right pops free at the front.
3
Slide cup rack off support bar on opposite side.
4
Reverse instructions to replace cup rack.
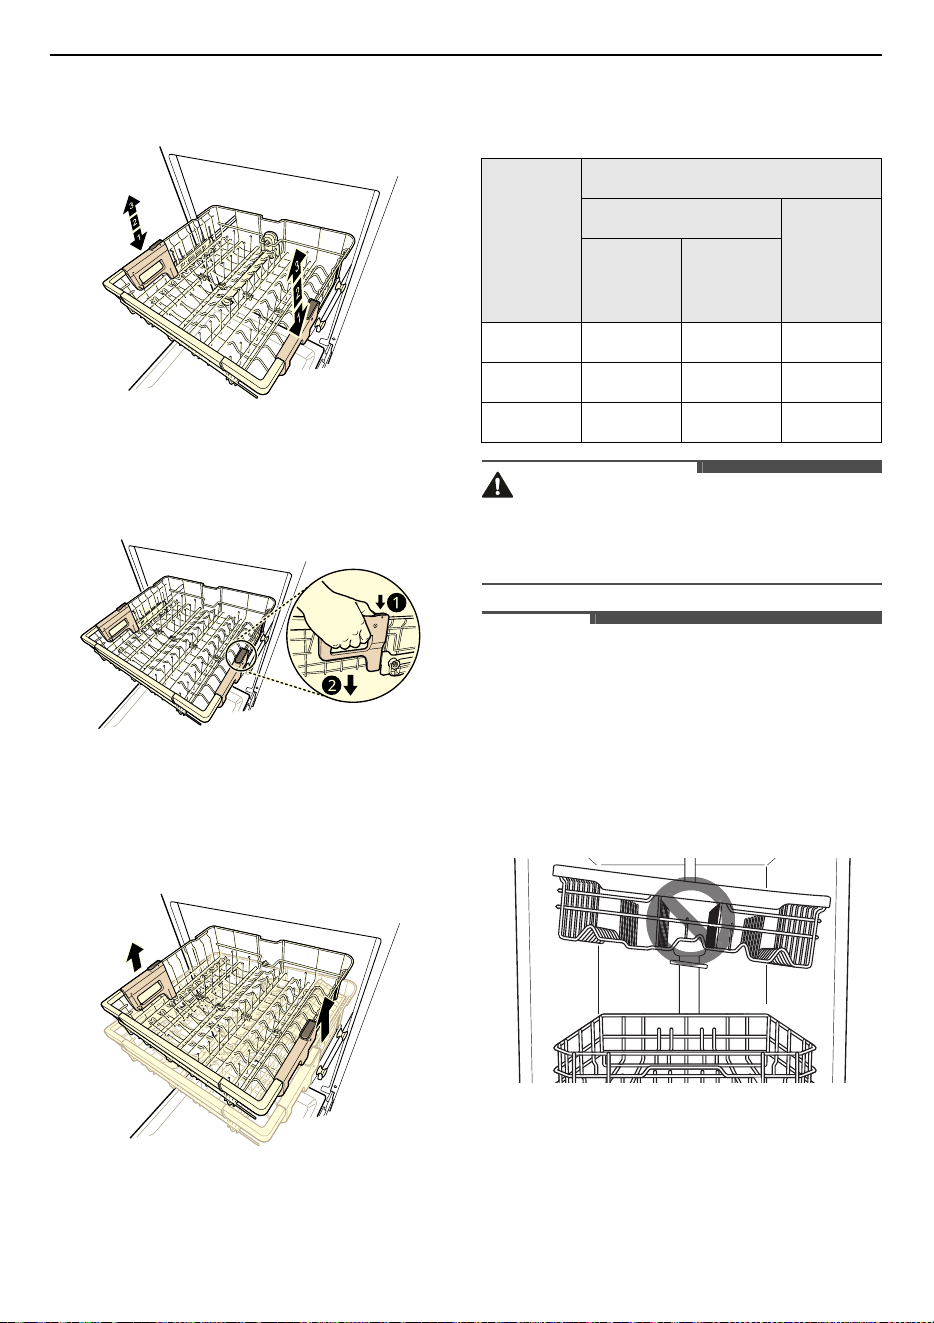
Height Adjustable Upper Rack
The height of the upper rack can be adjusted when
you load glasses with long stems or tall crockery
items.
38
OPERATION
There are three available positions for adjusting
the height of the upper rack to create more space.
Lowering the Rack
Hold the rack at the centre of each side to support
its weight. Then, push the button on each side to
release the rack and lower it to the lower position.
Raising the Rack
Lift the rack at the centre of each side until the rack
locks into place in the upper position. It is not
necessary to lift the lock levers to raise the rack.
Possible plate size according to the
upper rack position
WARNING
• Before adjusting, ensure the rack is empty of all
dishes. Otherwise dishes may get damaged or
you may get injured.
NOTE
• Raise the upper rack without pushing the
buttons on each side. Pushing the buttons when
raising the rack will prevent the rack from
locking into position.
• To set the rack to the middle position, it may be
easier to lower the rack all the way down and
then raise each side of the rack individually until
it clicks into place.
• There is a 56 mm gain in height when the upper
rack is moved to the lower position.
• After adjusting the rack levels, check that the
spray arms are free to rotate.
• With the lower position of the upper rack, check
if the bottom part of upper rack including spray
arm is not disturbing items on the lower rack.
Upper
Rack
Position
Plate Size (mm)
Upper Rack
Lower
Rack
with
Cutlery
Rack
without
Cutlery
Rack
Upper 165 215 300
Middle 193 243 272
Lower 221 271 244
39
OPERATION
ENGLISH
• When the upper rack is in the lower position,
push in the upper rack first, and the lower rack
later.
• Pull out the lower rack first, and the upper rack
later.
• When the upper rack is in the lower position, the
possible height of dishes differs with models
where the cutlery rack is fitted.
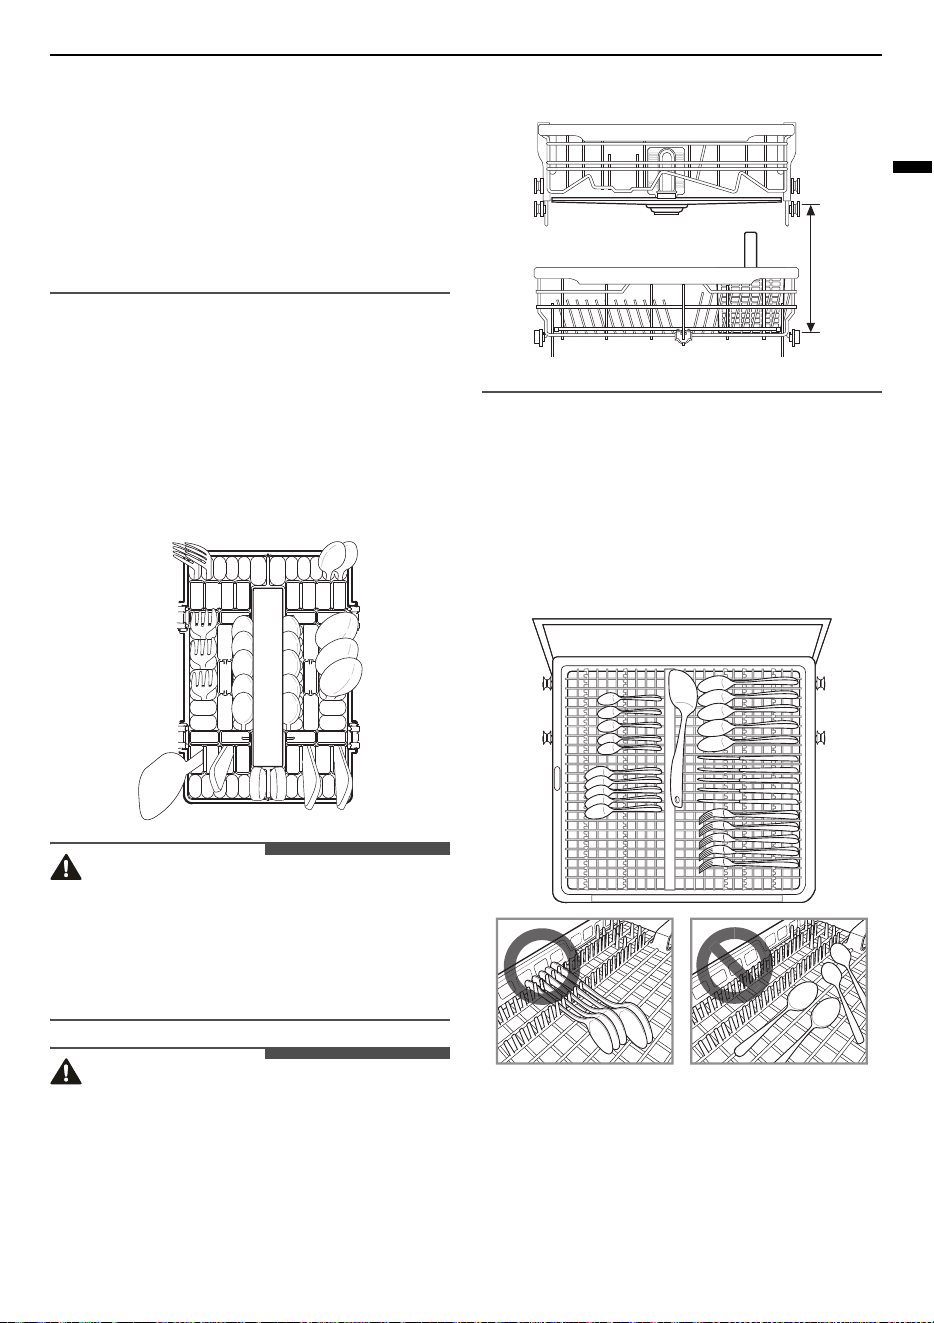
Loading the Cutlery Basket
Daily Use Load
For Large utensils, such as whisks, the cover can be
opened by being unhinged.
Place forks and spoons in the cutlery basket with
their handles downwards.
WARNING
• To prevent injuries, place knives and other
utensils with sharp points on the cutlery basket.
• If you want to load them in the cutlery basket,
place them with the pointed edges facing
downwards.
CAUTION
• Do not obstruct the rotation of the spray arms.
• The cutlery shouldn’t be longer than 18 cm.
Loading the Cutlery Rack
The cutlery rack is best suited for flatware and most
cooking or serving utensils. It can also fit small
prep bowls and lids. The separators on the cutlery
rack help keep utensils separated to avoid damage
and improve cleaning.
≤ 18cm
40
OPERATION
If the handles of your cutlery are too thick, then
reverse the pieces so that the handles face the
other direction.
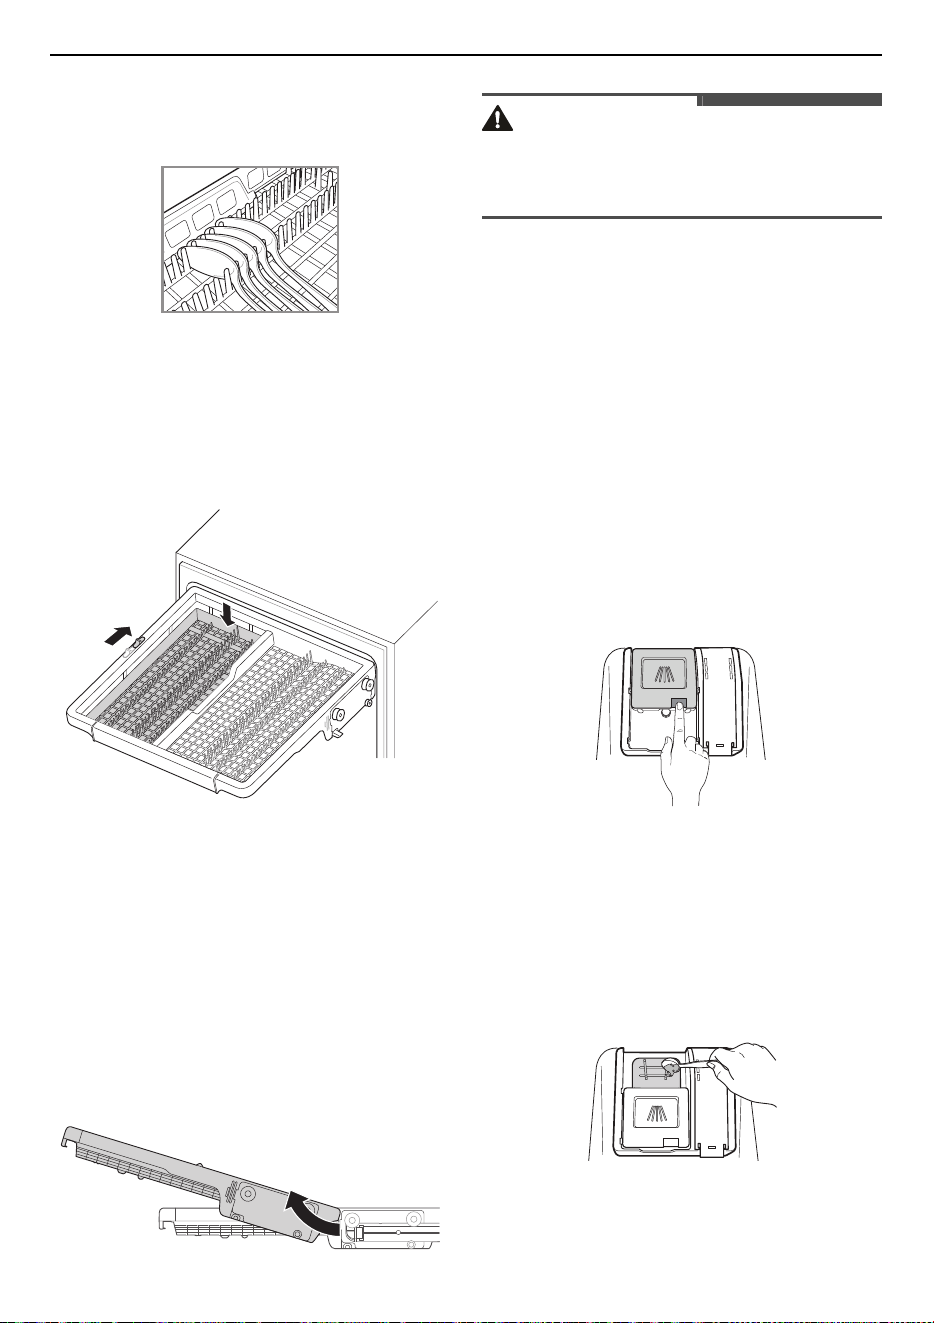
Height Adjustable Tray
The tray on the left side can be adjusted to a high
or low position to accommodate utensils or cutlery
of different sizes. Remove dishes before adjusting
the tray. Adjust the tray by sliding the lever.
Removing the Cutlery Rack
The entire cutlery rack can be removed if more
space is needed on the upper rack for larger items.
Always remove the cutlery from the rack before
removing the rack.
Pull the rack out to the end of the rails. Then, lift the
front of the rack so that the rollers clear the stop on
the end of the rail. The rack can now be slid forward
and removed from the rails.
Inserting the cutlery rack is in the reverse order.
WARNING
• Be careful when loading and unloading items
with sharp edges. Load sharp knives with the
blade down to reduce the risk of injury.
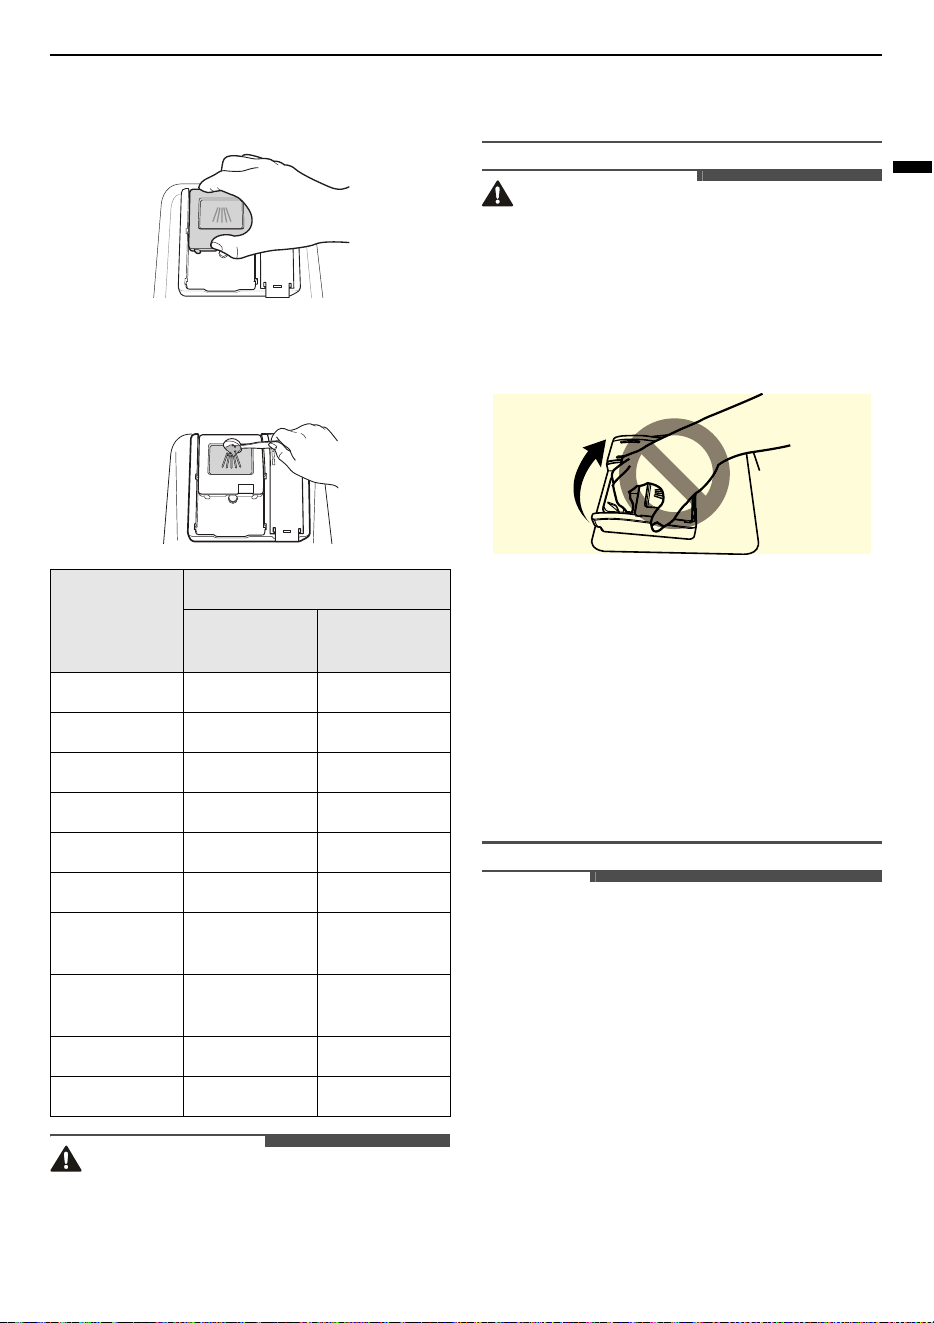
Adding Cleaning Agents
Adding Detergent to the
Dispenser
• Remove the label on the dispenser prior to
running the appliance for the first time.
• The amount of detergent needed depends on
the cycle, load size, and soil level of dishes.
• Put detergent into the detergent compartment
before starting any cycle, except the
Rinse
cycle.
1
Push the button on the dispenser lid to open
the cover.
2
Add dishwashing detergent to the main wash
compartment until the level is between the
lines marked 15 and 25.
• Fill to over the 25 line for hard water or
heavily soiled loads.
• Fill to the 15 line for soft water or lightly
soiled loads.
۱٥
۲٥
41
OPERATION
ENGLISH
3
Push the detergent lid to slide the lid closed
until it clicks.
4
If a prewash is desired, fill the recessed
prewash compartment area on the lid with
detergent.
WARNING
• Dishwasher detergent and rinse aid contain
chemical components, like all other household
detergent. So, they must be kept out of the reach
of children.
CAUTION
• Use only detergent intended for dishwashers.
Incorrect detergent may cause the appliance to
fill with suds during operation. Excess suds may
reduce wash results and may cause the
appliance to leak.
• To avoid damaging the appliance, do not pull up
on the dispenser to close the appliance door.
• Use of an unsuitable detergent and rinse aid
may result in a risk of damage, corrosion, poor
washing results, poor drying or leakage.
• Only use the detergent and rinse aid that has
been qualified with standard. Use of an
unqualified detergent and rinse aid may present
a risk of damage, corrosion, poor washing
results, poor drying, and leakage.
• If too much detergent is used, too many suds
can occur. It may cause leakage of suds and stain
the dishes in the dishwasher.
NOTE
• Too much detergent can leave a film on dishes
and in the tub, resulting in poor wash results.
• After washing, check whether the detergent was
completely washed out.
• Some appliance detergent tablets may become
stuck in the dispenser due to their excessive size.
Tablets can be placed onto the base of the wash
tub next to the filter before starting the cycle.
• Never use liquid dishwashing detergent in the
appliance.
Programme
Amount of detergent
Pre-wash
(onto the lid)
Main wash
(dispenser)
Auto
5 g 20 g
Intensive
5 g 30 g
Delicate
5 g 20 g
Refresh
--
Eco
-25 g
Turbo
5 g 20 g
Download
Cycle
5 g 20 g
Machine
Clean
5 g 20 g
Rinse
--
Express
-20 g
42
OPERATION
NOTE
• Detergent tablets are not recommended for use
of
Express
cycle. If the detergent tablets are
used, it may cause detergent residue on dishes
due to the relatively low rinse temperatures.
Refilling
To maintain the effective dry results, check and
refill rinse aid regularly.
To maintain the effective wash results, check and
refill dishwasher salt regularly.
Checking the Rinse Aid
When the
Rinse Aid Refill
icon illuminates lit, it
means the rinse aid is almost empty. If necessary,
refill the rinse aid dispenser.
Checking the Dishwasher Salt
After refilling the dishwasher salt, a wash
programme should be operated without dishes, as
any spilled salt inside the appliance may cause rust
or damage to the appliance if the left unwashed.
When the
Salt Refill
icon illuminates, it means the
salt is almost empty. If necessary, refill the salt
dispenser.
CAUTION
• Do not add detergent or any other solution into
the water softener housing other than
dishwasher salt. Doing so will cause the water
softening system to malfunction.
Useful Tips
Drying
• Plastic items may cause poor drying results
compared to other items.
• To assist drying, the door can be opened for a
short period of time after the cycle.
NOTE
• Make sure that all items do not touch each other.
• If dry results are not good or water stains
remain, add the
Extra Dry
option or set the rinse
level.
• When using tablet type (2 in 1, 3 in 1) detergent,
an additional rinse may be required, depending
on the volume of dishes, in this case use the
Extra Dry
option or set the rinse level.
Unloading the Dishwasher
• Before unload the dishes, check if the dishes
cooled down to hand-warm condition.
• Empty the lower rack first and then the upper
one. It will avoid water dripping from the upper
rack onto the dishes below.
WARNING
• Do not pull out all full loaded racks at on time,
the appliance can topple over. Unload each rack
one by one.
43
SMART FUNCTIONS
ENGLISH
SMART FUNCTIONS
LG ThinQ Application
The
LG ThinQ
application allows you to
communicate with the appliance using a
smartphone.
LG ThinQ Application Features
Communicate with the appliance from a
smartphone using the convenient smart features.
Monitoring
This function checks the current status, cycle,
options running time and cycle end time for the
application on a single screen.
Download Cycle
You can download new and special cycles that are
not included in the basic cycles on the appliance.
Appliances that have been successfully registered
can download a variety of specialty cycles specific
to the appliance.
Only one cycle can be stored on the appliance at
the same time.
Once cycle download is completed in the appliance,
the appliance keep the downloaded cycle until a
new cycle is downloaded.
Machine Clean Reminder
This function shows how many cycles remain
before it is time to run the
Machine Clean
cycle.
Smart Diagnosis
This function provides useful information for
diagnosing and solving issues with the appliance
based on the pattern of use.
Settings
Allows you to set various options on the appliance
and in the application.
Push Alert
When the cycle is complete or the appliance has
problems, you have the option of receiving push
notifications on a smartphone. The notifications
are triggered even if the
LG ThinQ
application is
off.
NOTE
• If you change your wireless router, Internet
service provider, or password, delete the
registered appliance from the
LG ThinQ
application and register it again.
• The application is subject to change for
appliance improvement purposes without notice
to users.
• Functions may vary by model.
Installing LG ThinQ Application
and Connecting an LG
Appliance
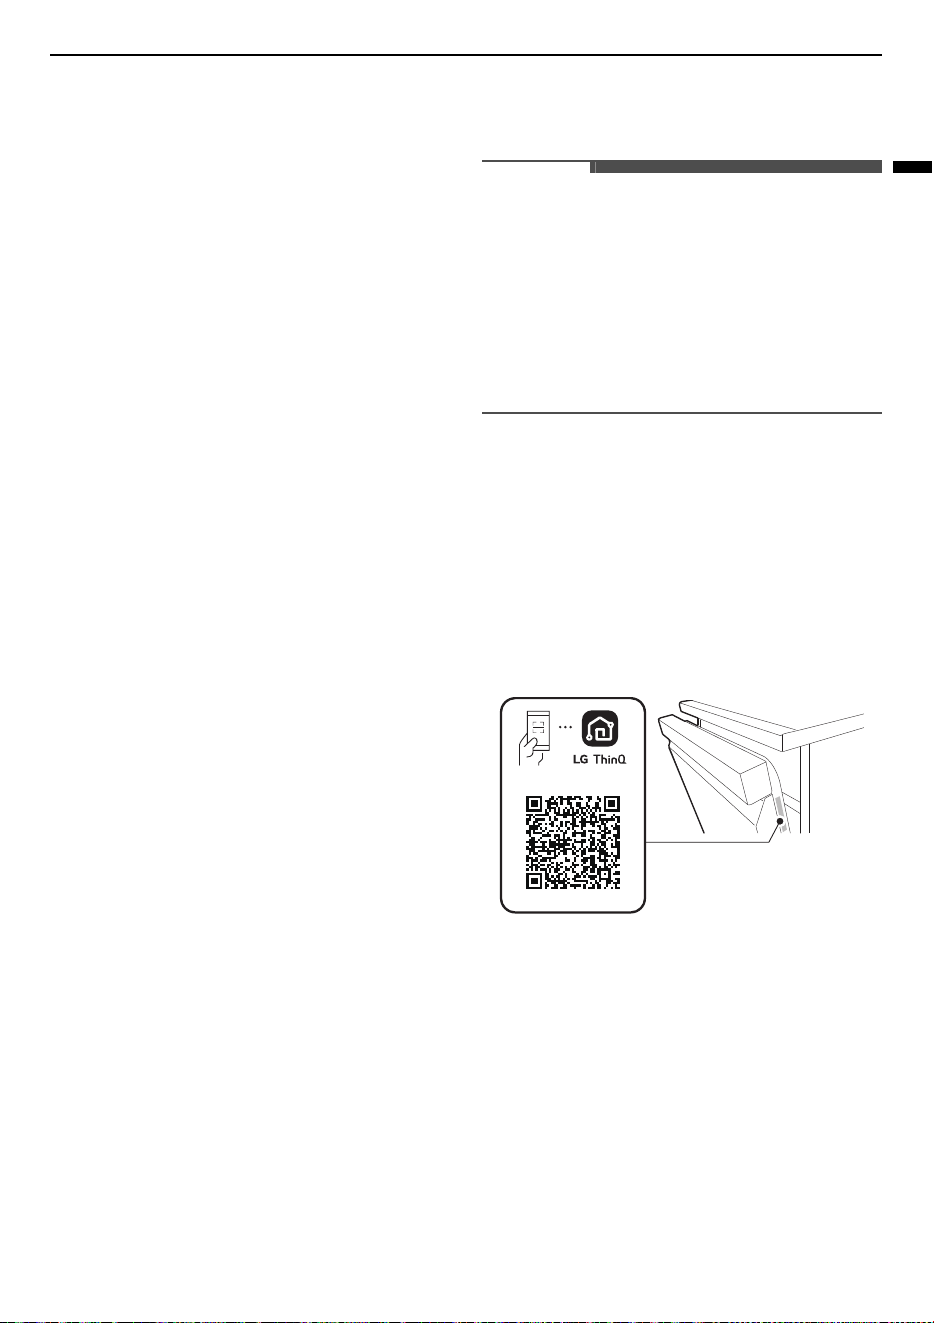
Models with QR Code
Scan the QR code attached to the product using the
camera or a QR code reader application on your
smartphone.
Models without QR Code
1
Search for and install the
LG ThinQ
application
from the Google Play Store or Apple App Store
on a smartphone.
2
Run the
LG ThinQ
application and sign in with
your existing account or create an LG account
to sign in.

44
SMART FUNCTIONS
3
Touch the add (
~
) button on the
LG ThinQ
application to connect your LG appliance.
Follow the instructions in the application to
complete the process.
NOTE
• To verify the Wi-Fi connection, check that
f
icon
on the control panel is lit.
• The appliance supports 2.4 GHz Wi-Fi networks
only. To check your network frequency, contact
your Internet service provider or refer to your
wireless router manual.
•
LG ThinQ
is not responsible for any network
connection problems or any faults,
malfunctions, or errors caused by network
connection.
• The surrounding wireless environment can
make the wireless network service run slowly.
• If the distance between the appliance and the
wireless router is too far, the signal strength
becomes weak. It may take a long time to
connect or installation may fail.
• If the appliance is having trouble connecting to
the Wi-Fi network, it may be too far from the
router. Purchase a Wi-Fi repeater (range
extender) to improve the Wi-Fi signal strength.
• The network connection may not work properly
depending on the Internet service provider.
• The Wi-Fi connection may not connect or may be
interrupted because of the home network
environment.
• The appliance cannot be connected due to
problems with the wireless signal transmission.
Unplug the appliance and wait about a minute
before trying again.
• If the firewall on your wireless router is enabled,
disable the firewall or add an exception to it.
• The wireless network name (SSID) should be a
combination of English letters and numbers. (Do
not use special characters.)
• Smartphone user interface (UI) may vary
depending on the mobile operating system (OS)
and the manufacturer.
• If the security protocol of the router is set to
WEP
, you may fail to set up the network. Please
change it to other security protocols (
WPA2
is
recommended) and connect the product again.
Deactivating Network
Connection
On your smartphone, disconnect to your home Wi-
Fi network.
1
Run the
LG ThinQ
application.
2
Select and touch the
Dishwasher
in the
application.
3
Select and touch the
Delete Product
on the
settings menu to disconnect it.
Wireless LAN Module
Specifications
Module Name
LCW-003
Frequency Range
2412 to 2472 MHz
Output Power (Max)
IEEE 802.11b: 18.37
dBm
IEEE 802.11g: 17.67
dBm
IEEE 802.11n: 17.67
dBm
Module Name
LCWB-001
Wireless LAN
Frequency Range
2412 to 2472 MHz
Wireless LAN Output
Power (Max)
18.14 dBm
Bluetooth Frequency
Range
2402 to 2480 MHz
Bluetooth Output
Power (Max)
7.03 dBm
45
SMART FUNCTIONS
ENGLISH
Wireless function S/W version : V 1.0
RF Radiation Exposure Statement
This equipment shall be installed and used at a
minimum distance of 20 cm from the human body.
NOTE
• Only one wireless module applies to the product.
Open Source Software Notice
Information
To obtain the source code that is contained in this
product, under GPL, LGPL, MPL, and other open
source licenses that have the obligation to disclose
source code, and to access all referred license
terms, copyright notices and other relevant
documents, please visit https://
opensource.lge.com.
LG Electronics will also provide open source code to
you on CD-ROM for a charge covering the cost of
performing such distribution (such as the cost of
media, shipping, and handling) upon email request
to openso[email protected]om
.
This offer is valid to anyone in receipt of this
information for a period of three years after our
last shipment of this product.
Smart Diagnosis
This feature is only available on models with the
c
or
d
logo.
Use this feature to help you diagnose and solve
problems with your appliance.
NOTE
• For reasons not attributable to LGE’s negligence,
the service may not operate due to external
factors such as, but not limited to, Wi-Fi
unavailability, Wi-Fi disconnection, local app
store policy, or app unavailability.
• The feature may be subject to change without
prior notice and may have a different form
depending on where you are located.
Using LG ThinQ to Diagnose
Issues
If you experience a problem with your Wi-Fi
equipped appliance, it can transmit
troubleshooting data to a smartphone using the
LG ThinQ
application.
• Launch the
LG ThinQ
application and select the
Smart Diagnosis
feature in the menu. Follow
the instructions provided in the
LG ThinQ
application.
Using Audible Diagnosis to
Diagnose Issues
Follow the instructions below to use the audible
diagnosis method.
• Launch the
LG ThinQ
application and select the
Smart Diagnosis
feature in the menu. Follow
the instructions for audible diagnosis provided
in the
LG ThinQ
application.
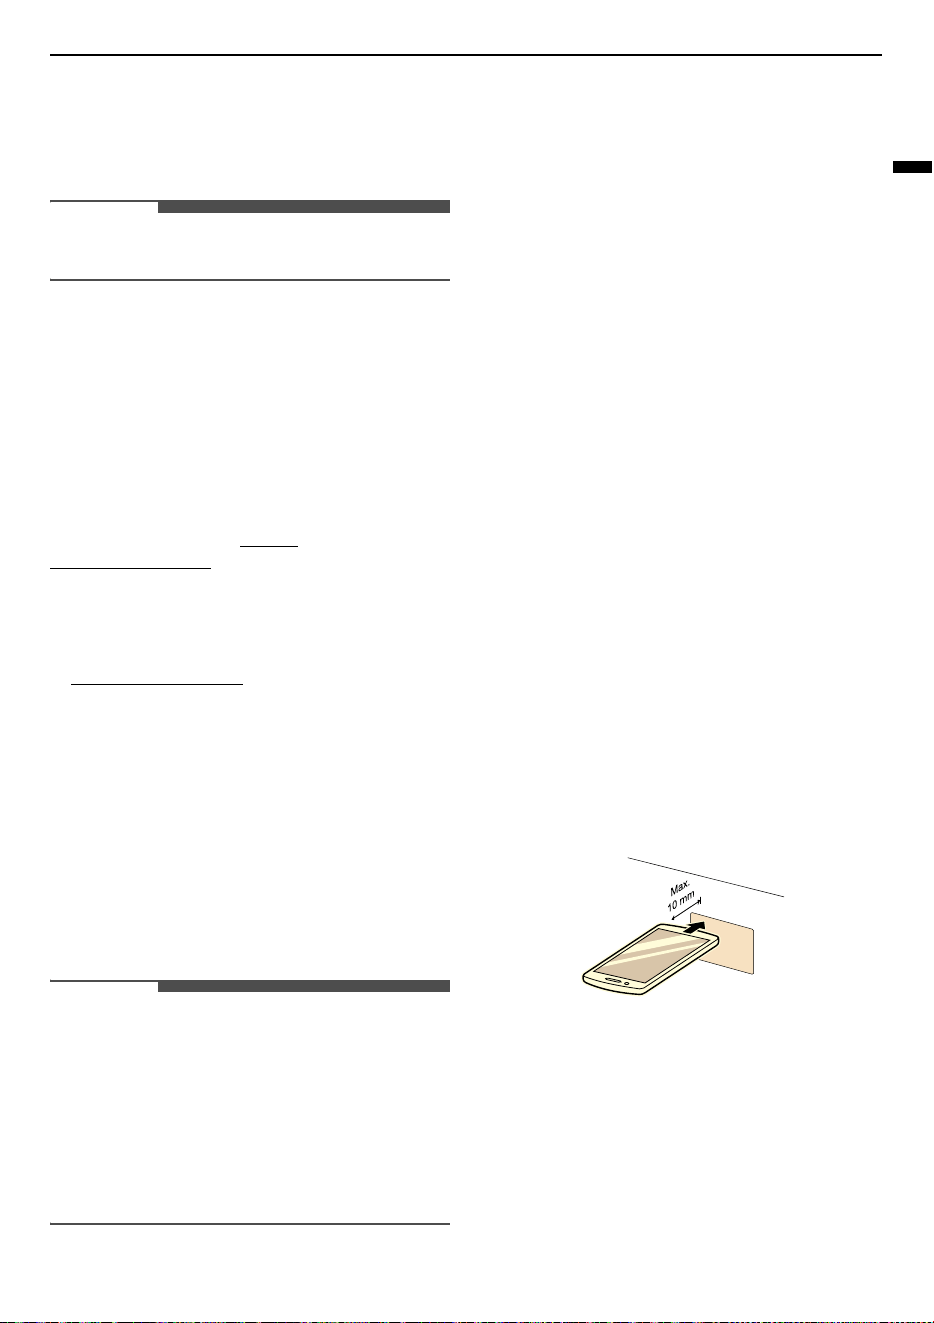
1
Press the
POWER
button to turn on the
appliance.
• Do not press any other buttons.
2
Place the mouthpiece of your smartphone in
front of the display located on the control
panel.
3
Press and hold the
Download Cycle
button for
3 seconds or longer while holding the
smartphone mouthpiece to the logo until the
data transfer is complete.
• Keep the smartphone in place until the data
transfer has finished. Time remaining for
data transfer is displayed.

46
SMART FUNCTIONS
4
After the data transfer is complete, the
diagnosis will be displayed in the application.
NOTE
• For best results, do not move the smartphone
while the tones are being transmitted.
47
MAINTENANCE
ENGLISH
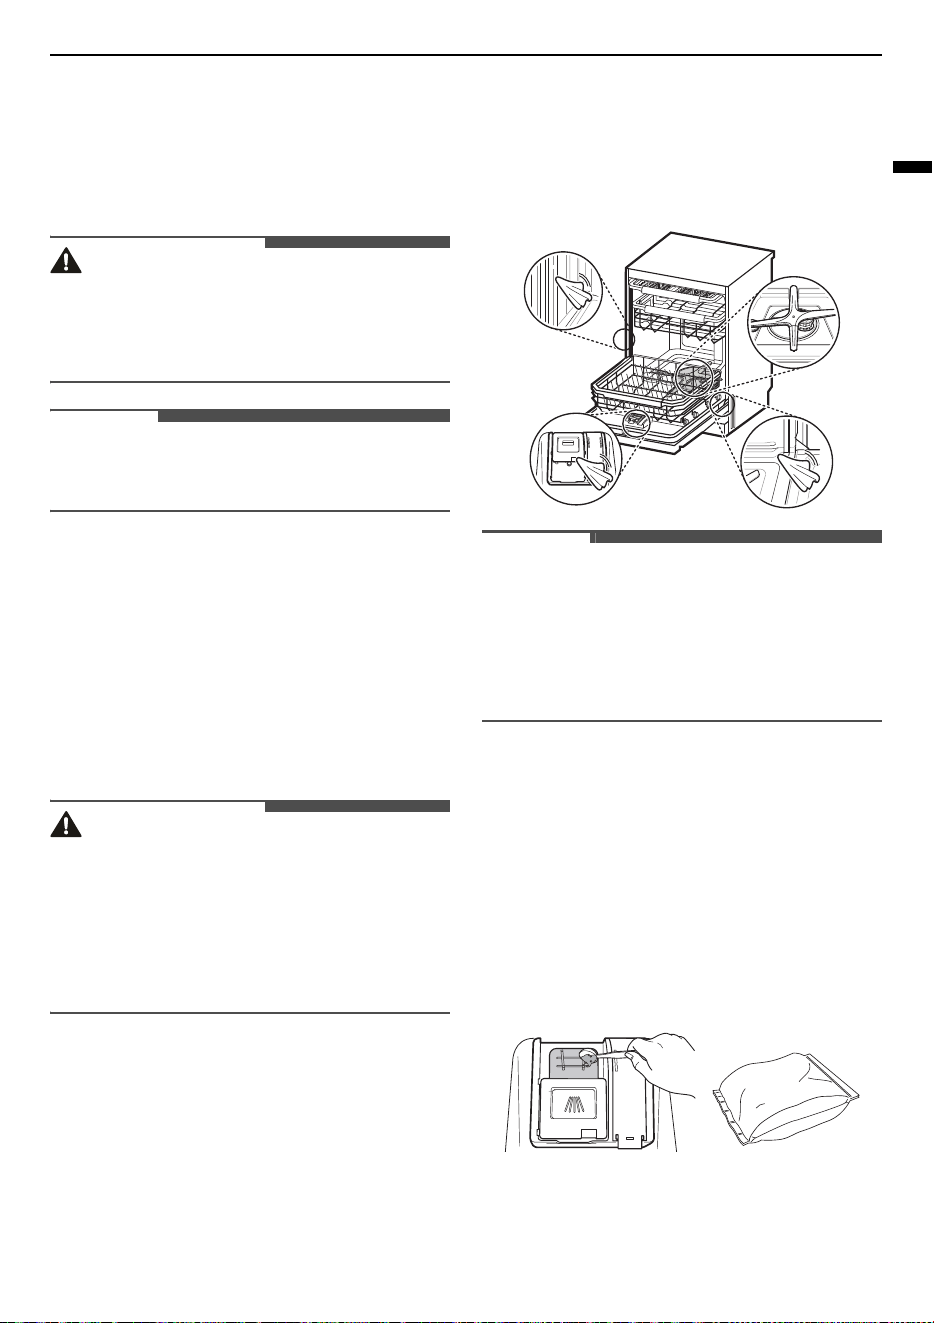
MAINTENANCE
To maintain performance and prevent problems,
check the outside and inside of the appliance,
including filters and spray arms regularly.
WARNING
• When cleaning the outside and inside of the
appliance, do not use any solvent based
solutions such as thinners or acetone. It may
cause fire or explosion.
NOTE
• Prevent animals from nibbling on the power
cable or water hose.
Cleaning and Caring
Cleaning the Exterior
In most cases, the exterior of the appliance can be
cleaned with a soft damp cloth or sponge, then
dried with a soft cloth. If the appliance has a
stainless steel exterior, use a stainless steel
cleaner.
CAUTION
• If cooking oil is spilled on the exterior of the
product, wipe it off immediately. Do not clean
the exterior of the product with cleaners which
contain alcohol, thinners, bleach, benzene,
flammable liquids, or abrasives. These
substances may discolour or damage the
appliance.
Cleaning the Interior
It is recommended to clean the interior, spray
arms, or filters once every two weeks.
Clean the interior of the appliance periodically with
a soft, damp cloth or sponge to remove food and
dirt particles.
Food residue may be stuck in the narrow gaps
inside the appliance after completion of washing.
Wipe off all food residue.
NOTE
• If you have not used the appliance for a long
time, refresh the inside by running
Turbo
or
Machine Clean
programme with detergent.
When the cycle is finished, clean the inside and
outside of the appliance according to the
MAINTENANCE
instructions.
Cleaning the Tub
Using Citric Acid
Remove all dishes, cutlery basket and cutlery
basket holder from appliance. Only racks should
remain in tub. For best results, use citric acid
powder (can be found in canning sections of most
supermarkets or online). Measure 3 tablespoons
(45 g) of citric acid powder. Fill main wash
compartment with measured powder.
Using White Vinegar
If you cannot find citric acid powder, pour
approximately 3/4 - 1 1/4 cups (200 - 300 mL) of
15
25
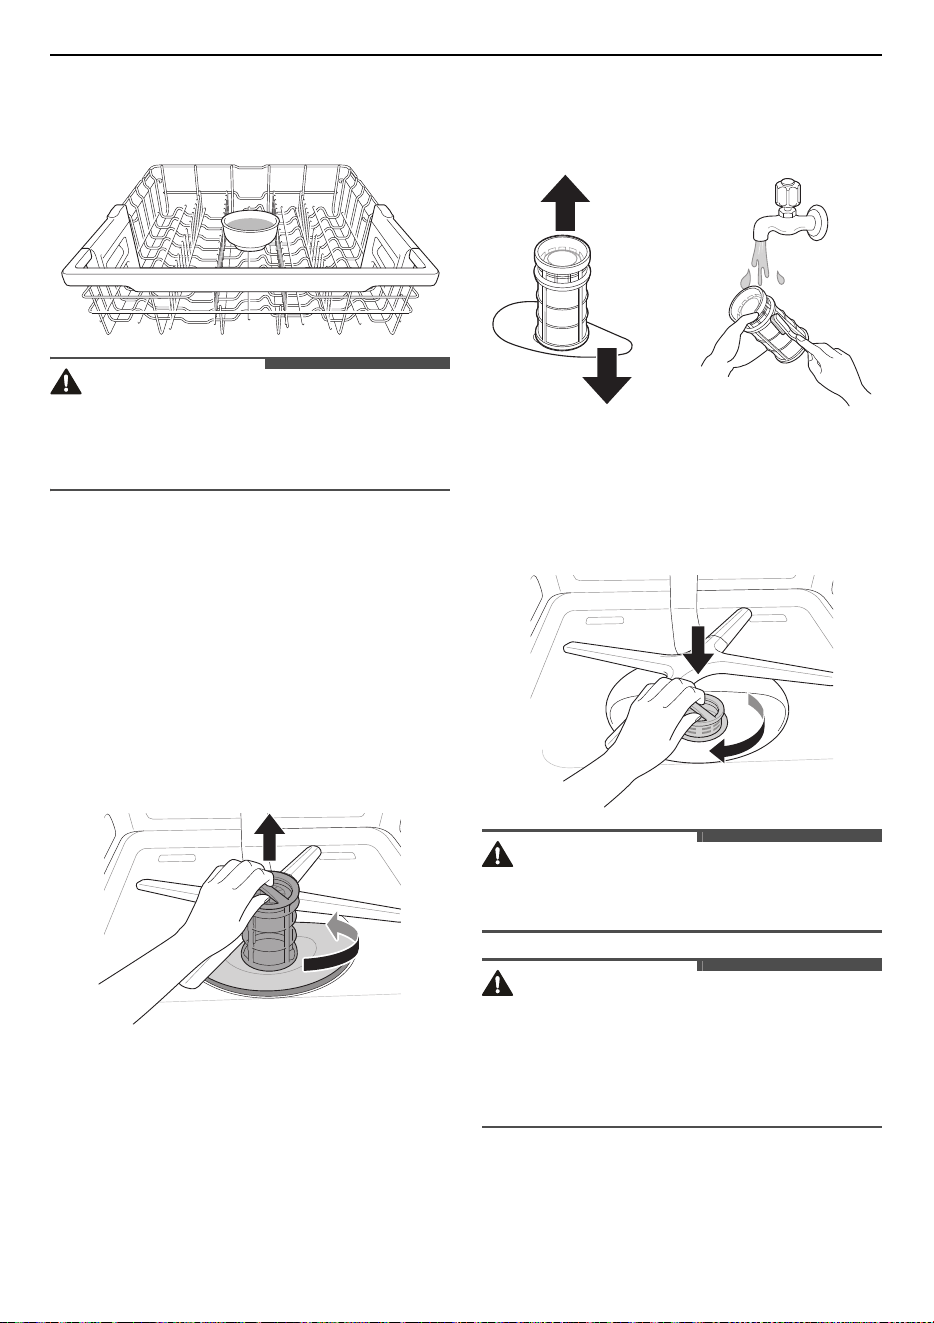
48
MAINTENANCE
white vinegar into shallow bowl and place in upper
rack. Run
Auto
cycle. Do not use detergent. When
the cycle is finished, restart.
CAUTION
• Do not pour vinegar directly into the base.
• Excessive use of vinegar may cause damage to
the appliance.
Cleaning the Filters
1
Remove the lower rack and position the
bottom spray arm so a wider vee is open to the
front.
2
Turn the inner filter counter-clockwise and take
out the assembled inner filter and stainless
steel filter.
3
Clean the filters with a soft brush under
running water. Reassemble the filters before
reinstalling them.
4
To replace the assembled filters, position the
spray arm so the wider vee is toward the front.
Fit the filters back into the filter holder and
secure them by turning the inner filter
clockwise until it clicks into place.
WARNING
• Be cautious of sharp edges when handling the
stainless steel filter.
CAUTION
• After using the appliance, particles of food are
filtered by the filters. Any unremoved food
residue may cause bad smell. In addition,
drainage may have a problem due to food
residue stuck in the filters.
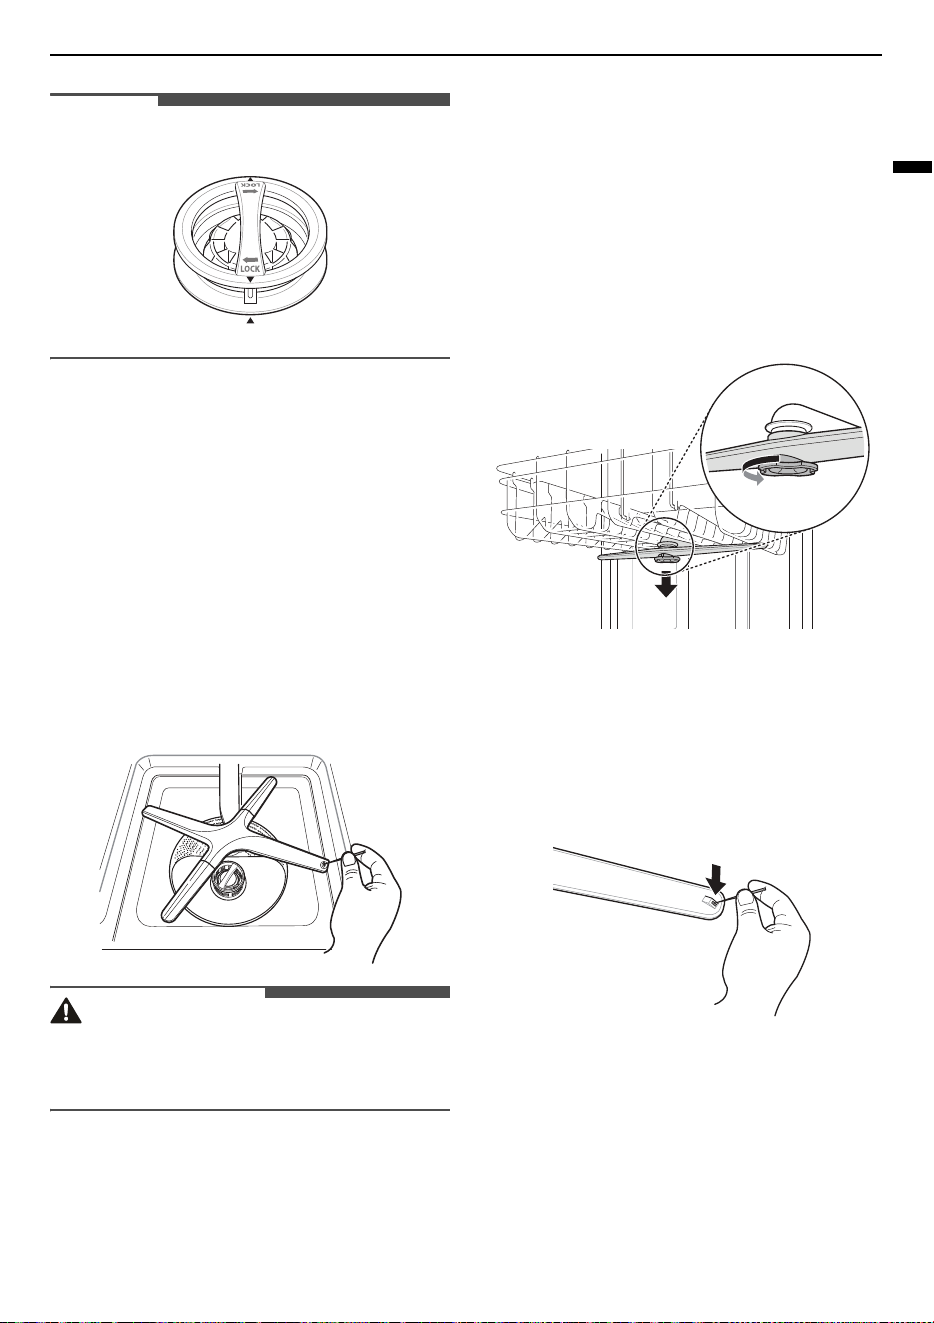
49
MAINTENANCE
ENGLISH
NOTE
• When assembling, rotate it firmly until it clicks.
Cleaning the Spray Arms
If the spray arm holes are blocked by any food
residue, dishes may not be cleaned well due to
improper water spray.
Cleaning the Lower Spray Arm
1
Make sure that the water jet holes are not
blocked by food particles.
2
If any food residue blocks the spray arm holes,
remove it with a pin or any sharp tool.
CAUTION
• To avoid breaking the variable angle spray arm
end sections, do not pull or manually rotate
them.
Cleaning the Upper Spray Arm
1
Pull the upper rack forward. Make sure that the
water jet holes are not blocked by food
particles.
2
When cleaning is necessary, remove the upper
spray arm by turning the nut on the bottom of
the spray arm 1/8 turn counterclockwise and
pulling down.
3
Remove food particles by rinsing or shaking
the spray arm.
4
If any food residue blocks the spray arm holes,
remove it with a pin or any sharp tool.
5
After removing the food residue, clean the
spray arms holes under running water.

50
MAINTENANCE
6
After cleaning the upper spray arm, press it up
into place. Turn the nut 1/8 turn clockwise to
make sure that the nut locks back into place.
7
After assembly, check whether the spray arms
rotate freely.
Cleaning the Water Supply Hose
Filter
1
Unplug the appliance.
2
Turn off the water tap.
3
Unscrew the water supply hose.
4
Remove the seal and the plastic filter with a
pair of small pliers or scissor grips.
5
Refit the filter and gasket and make sure that it
is sitting correctly.
6
Refit and secure the water supply hose in
reverse order. Do not use any mechanical
device to tighten the hose. A soft cloth can be
used to assist hand tightening.
NOTE
• A filter is fitted into the inlet of the water supply
hose connection.
• If insufficient water flows into the appliance,
check that the filter is not blocked.
• If there is a leak, the water supply hose will need
to be checked for proper connection.
• Never over tighten the water supply valve or use
mechanical devices to tighten.
• When reassembling the seal and the filter,
ensure that they free from dirt or grit that may
have come from the water supply.
Seasonal Maintenance and
Storage
• If you will be absent for an extended period of
time during warmer months, close the water
valve and unplug the power cord, or turn off the
circuit breaker. Clean the filter, tub and
dispenser to prevent odour.
• If you will be absent for an extended period of
time during colder months and there is a
possibility of freezing temperatures, winterize
the water supply lines and the appliance itself.
Winterization must be performed by qualified
service personnel.

51
TROUBLESHOOTING
ENGLISH
TROUBLESHOOTING
Before Calling for Service
Operation of the appliance can lead to errors and malfunctions. The following tables contain possible
causes and notes for resolving an error message or malfunction. You can remedy most of the problems by
yourself, consequently save time and money, since you do not need to call service centre. The following
table should assist you by troubleshooting.
Error Codes
The appliance is equipped with an automatic error-monitoring system to detect and diagnose problems at
an early stage. If this appliance does not function properly or does not function at all, check the following
before you call LG Electronics service centre.
Symptoms Possible Cause & Solution
IE
Water inlet problem.
• Check for a clogged, kinked or frozen water supply hose.
• Check water supply.
OE
Drainage Problem.
• Check for a clogged, kinked or frozen drain hose.
Waste spigot is clogged.
• Remove knockout on waste spigot.
Filters are clogged.
• Clean Filters.
bE
Oversudsing caused by improper detergent, such as liquid dish soap.
• Do not use hand dishwashing liquids. Only use detergents which are
designed for use in automatic dishwashers.
• To remove detergent residue in the tub, pour approximately 100~200 ml
of milk into a shallow bowl, place it to the upper rack and then run the
appliance on the
Auto
cycle.
Failure to level appliance.
• Make sure that the appliance is properly leveled.
HE
Heater circuit failure
• Call for service if the same problem occurs again.
FE
Excessive water supplied.
• Call for service if the same problem occurs again.
AE
Water leakage problem
• Call for service if the same problem occurs again.
tE
Thermistor failure
• Call for service if the same problem occurs again.
52
TROUBLESHOOTING
Operation
LE
Motor trouble
• Call for service if the same problem occurs again.
NE
Vario motor trouble
• Call for service if the same problem occurs again.
Symptoms Possible Cause & Solution
Symptoms Possible Cause & Solution
Noise Some level of noise is normal during operation.
• Detergent cover opening.
• Drain pump at the beginning of drain cycle.
The appliance is not level.
• Adjust leveling feet.
Nozzle arm knocking against dishes.
• Reposition the dishes.
Water pressure is too high.
• Adjust water pressure.
Appliance will not
operate.
Door is not completely closed.
• Level the appliance again.
Power supply or power cord is not connected.
• Connect the power supply or cord properly.
When the Control Lock feature is activated, the display code
CL
will show
on the display.
• Deactivate the
Control Lock
button.
• Press and hold
Half Load
and
Energy Saver
simultaneously for 3 seconds
to activate or deactivate this feature.
Fuse is blown or circuit breaker tripped.
• Replace the fuse or reset the circuit breaker.
Appliance
continuously beeps
when the door is
opened, during or right
after a cycle has
completed.
The contents of the appliance are hot and care should be used when
placing your hands inside the appliance.
• Close the door until the appliance and dishes have cooled down. The
beeping will stop if the door is closed or the interior temperature has
cooled.
Water remains in sump
after completion of
cycle.
Drain hose is kinked or clogged.
• Adjust hose or clear blockage.
53
TROUBLESHOOTING
ENGLISH
Performance
Water remains in sump
after completion of
cycle.
Water may remain if the power supply was lost before normal end of the
course or was manually disconnected.
• Re-start the course.
Sprays arms do not
rotate smoothly.
Holes of spray arms are blocked by food particles.
• Clean the holes of spray arms.
Upper rack is crooked. Rack is poorly adjusted.
• See the
Height Adjustable Upper Rack
section.
Lamps do not
illuminate.
Power is not connected.
• Connect power supply.
There is excessive
foam inside the
appliance.
Failure to use the detergent exclusive for appliance.
• Use the detergent exclusive for appliance.
An excessive amount of rinse may cause foam.
• Reduce the rinse aid dispensing level.
Detergent is left in the
detergent dispenser.
Unbalanced upper rack.
• Adjust the left/right height of the upper rack.
Detergent may not be dispensed because poor stacking of the dishes
prevent automatic opening of the detergent dispenser.
• Correctly arrange the dishes and always dry out the dispenser before
adding new detergent so that it does not clump together.
Water leaks outside
the appliance.
The door may not be closed due to tilted appliance. In this case a water
leak may occur.
• Check the levelling by adjust the leg.
Wrong installation of drainage hose may cause water leak.
• Check the connecting part of drainage hose.
If the power is off, a water leak may be caused by a poor connection to
the tap.
• Check the connection water supply hose.
Symptoms Possible Cause & Solution
Symptoms Possible Cause & Solution
Cloudiness on
glassware
Combination of excessive detergent and hard water
• Use less detergent and use a rinse aid to minimize the problem.
• Check the setting of softening system.
Black or gray marks on
dishes
Aluminum items rubbing dishes during cycle
• Reposition the dishes.

54
TROUBLESHOOTING
Yellow or brown film
on inside surfaces of
appliance
Coffee or tea stains
• Eliminate the stain by using a stain removal product.
Yellow water remains
inside the dishwasher.
When initially using the appliance, Yellow water may generate in the
water softener tank.
• This is a normal condition, and it is harmless to humans. It disappears after
1 - 3 cycles.
Spots and filming on
dishes
Wrong amount of detergent used
• Use the recommended amount of detergent.
Overloading
• Do not overload the appliance.
Improper loading
• See the
OPERATION
section.
Insufficient water pressure
• Water pressure should be between 0.05 - 1.0 MPa.
Insufficient detergent
• Add the recommended amount of detergent. See the
OPERATION
section.
Rinse aid dispenser is empty.
• Refill rinse aid dispenser.
The water softener has no salt or insufficient the salt.
• Check whether there is the salt in the water softener.
Water hardness level may be set too low.
• Increase the hardness level setting value.
The rinse aid may be insufficient.
• Refill the rinse aid or increase the dispensing level.
Hard water buildup in the tub
• Remove all dishes, cutlery basket and cutlery basket holder from
appliance. Only racks should remain in tub. For best results, use citric acid
powder (can be found in canning sections of most grocery stores or
online). Measure 3 tablespoons (45 g) of citric acid powder. Fill main wash
compartment with measured powder. If you cannot find citric acid
powder, pour approximately 3/4 - 1 1/4 cups (200 - 300 mL) of white
vinegar into shallow bowl and place in upper rack. Run
Auto
cycle. Do not
use detergent. When the cycle finish, run it again.
Odour The previous cycle was stopped before completion and residual water
remains in the appliance.
• Turn on the power, run the
Cancel
cycle option to remove the residual
water, then run the
Turbo
cycle using detergent but with the appliance
empty.
Symptoms Possible Cause & Solution
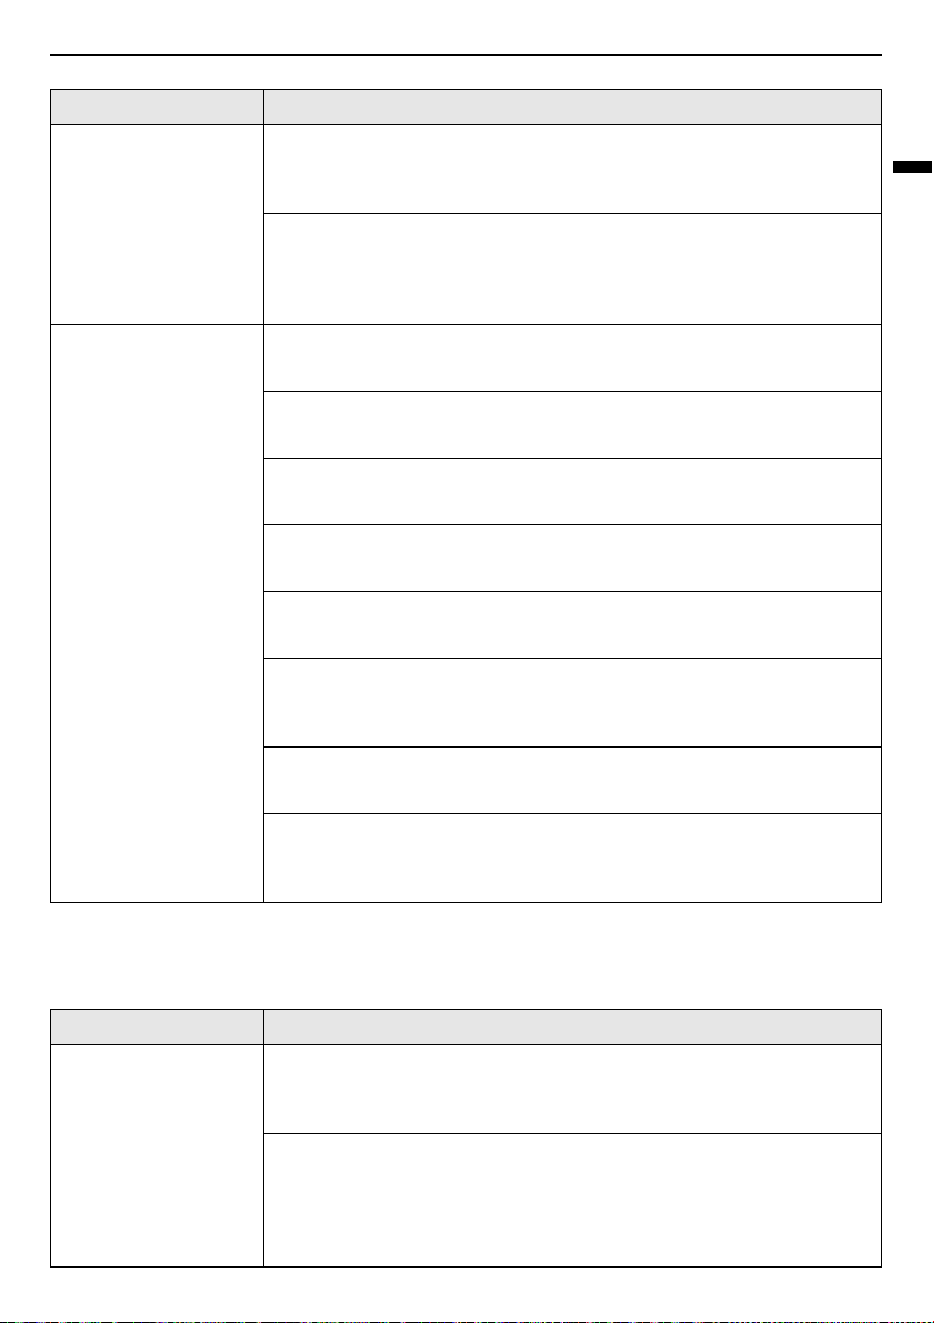
55
TROUBLESHOOTING
ENGLISH
Drying
Odour There is food in the bottom of the unit or in the filter.
• Clean the filter and the interior according to the
MAINTENANCE
section of
the owner’s manual.
Unwashed dishes are left in the unit for a long time.
• Cycle with one cup of white vinegar in a appliance safe glass or bowl placed
on the upper rack. (Vinegar is an acid, and with constant use it could
damage your appliance.)
Food soil remains on
dishes.
Improper cycle selection
• Select correct cycle based on soil level and type of dishware being washed.
Water temperature is too low.
• Check water supply connection or water heater setting.
Dishwashing detergent was not used.
• Use recommended detergent.
Low inlet water pressure
• Water pressure should be between 0.05 - 1.0 MPa.
Water jet holes on spray arms blocked.
• Clean the spray arms.
Improper loading of dishes.
• Make sure dishes do not block spray arm rotation or interfere with
detergent dispenser.
Filters are clogged.
• Clean filters.
Too much unremoved food debris on dishes.
• Large particles of food residues should be removed from the dishes before
starting wash.
Symptoms Possible Cause & Solution
Symptoms Possible Cause & Solution
Dishes don’t dry. Rinse agent dispenser empty.
• Check and refill the rinse agent dispenser if empty. For better drying result,
slightly open the door after operation.
Tablets used may not have a built in rinse aid. This will reduce the drying
performance.
• Change to a tablet that includes a rinse agent (contact the tablet
manufacturer if unsure). Alternatively, you can use a liquid rinse agent in
the dispenser if the tablets don’t have a rinse agent built in.

56
TROUBLESHOOTING
Wi-Fi
Dishes don’t dry. A cycle without the Extra Dry option was selected.
• Select a cycle that defaults to the
Extra Dry
option.
Symptoms Possible Cause & Solution
Your home appliance
and smartphone are
not connected to the
Wi-Fi network.
The password for the Wi-Fi that you are trying to connect to is incorrect.
• Find the Wi-Fi network connected to your smartphone and remove it, then
register your appliance on
LG ThinQ
.
Mobile data for your smartphone is turned on.
• Turn off the
Mobile data
of your smartphone and register the appliance
using the Wi-Fi network.
The wireless network name (SSID) is set incorrectly.
• The wireless network name (SSID) should be a combination of English
letters and numbers. (Do not use special characters).
The router frequency is not 2.4 GHz.
• Only a 2.4 GHz router frequency is supported. Set the wireless router to 2.4
GHz and connect the appliance to the wireless router. To check the router
frequency, check with your internet service provider or the router
manufacturer.
The distance between the appliance and the router is too far.
• If the distance between the appliance and the router is too far, the signal
may be weak and the connection may not be configured correctly. Move
the location of the router so that it is closer to the appliance.
Symptoms Possible Cause & Solution

Memo

Memo

Memo

