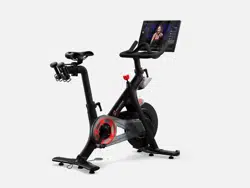
BIKE+ HOME ASSEMBLY GUIDE

2 | WARNINGS AND SAFETY INSTRUCTIONS 3 | GETTING READY
WARNINGS AND SAFETY
INSTRUCTIONS
Read all warnings and instructions before beginning to assemble the Peloton
Bike+. Assemble the Bike+ according to the procedures described in this guide.
Peloton is not responsible for damage, injury, or equipment failure caused by
improper assembly or use.
This is an assembly guide and does not contain instructions for using the
Peloton Bike+. Do not operate the Bike+ before reading the Peloton Bike+
User Manual for full safety information and usage instructions. Use only as
described.
It is the owner’s responsibility to ensure that all users are aware of all warnings
and precautions.
Keep children and pets away from the Bike+ at all times.
The Bike+ and Bike+ package are extremely heavy and require more than
one person to lift or carry. Lifting heavy objects can cause muscle strain and
back injuries. Use lifting aids and proper lifting techniques when moving or
assembling the Peloton Bike+.
Perform a complete visual inspection of the Peloton Bike+ and test all features
and functions prior to use.
SAVE THESE INSTRUCTIONS FOR FUTURE USE.
GETTING READY
A
B
C
D
G
H
I
K
L
M
N
O
P
Q
R
S
E
F
J
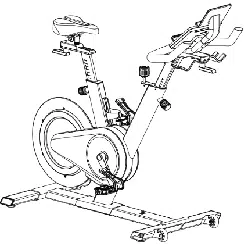
A Touchscreen
B Swivel
C Handlebar post
D Handlebar height adjustment knob
E Water bottle holders
F Front shroud
G Flywheel
H Wheels
I Leveling feet
J Belt guard
K Pedals
L Crank arms
M Seat height adjustment knob
N Seat slider latch
O Weight holders
P Saddle
Q Resistance knob /
emergency brake
R Audio jack
S Handlebars
Bike weight:
141lb/64kg/10 stone, 1lb
Footprint:
4ft x 2ft/120cm x 60cm
VIDEO INSTRUCTIONS
Scan the QR code or go to
onepeloton.com/setup to access the latest
instructions, including an assembly video.
US UK

2 | WARNINGS AND SAFETY INSTRUCTIONS 3 | GETTING READY
WARNINGS AND SAFETY
INSTRUCTIONS
Read all warnings and instructions before beginning to assemble the Peloton
Bike+. Assemble the Bike+ according to the procedures described in this guide.
Peloton is not responsible for damage, injury, or equipment failure caused by
improper assembly or use.
This is an assembly guide and does not contain instructions for using the
Peloton Bike+. Do not operate the Bike+ before reading the Peloton Bike+
User Manual for full safety information and usage instructions. Use only as
described.
It is the owner’s responsibility to ensure that all users are aware of all warnings
and precautions.
Keep children and pets away from the Bike+ at all times.
The Bike+ and Bike+ package are extremely heavy and require more than
one person to lift or carry. Lifting heavy objects can cause muscle strain and
back injuries. Use lifting aids and proper lifting techniques when moving or
assembling the Peloton Bike+.
Perform a complete visual inspection of the Peloton Bike+ and test all features
and functions prior to use.
SAVE THESE INSTRUCTIONS FOR FUTURE USE.
GETTING READY
A
B
C
D
G
H
I
K
L
M
N
O
P
Q
R
S
E
F
J
A Touchscreen
B Swivel
C Handlebar post
D Handlebar height adjustment knob
E Water bottle holders
F Front shroud
G Flywheel
H Wheels
I Leveling feet
J Belt guard
K Pedals
L Crank arms
M Seat height adjustment knob
N Seat slider latch
O Weight holders
P Saddle
Q Resistance knob /
emergency brake
R Audio jack
S Handlebars
Bike weight:
141lb/64kg/10 stone, 1lb
Footprint:
4ft x 2ft/120cm x 60cm
VIDEO INSTRUCTIONS
Scan the QR code or go to
onepeloton.com/setup to access the latest
instructions, including an assembly video.
US UK
4 | GETTING READY 5 | GETTING READY
GETTING READY
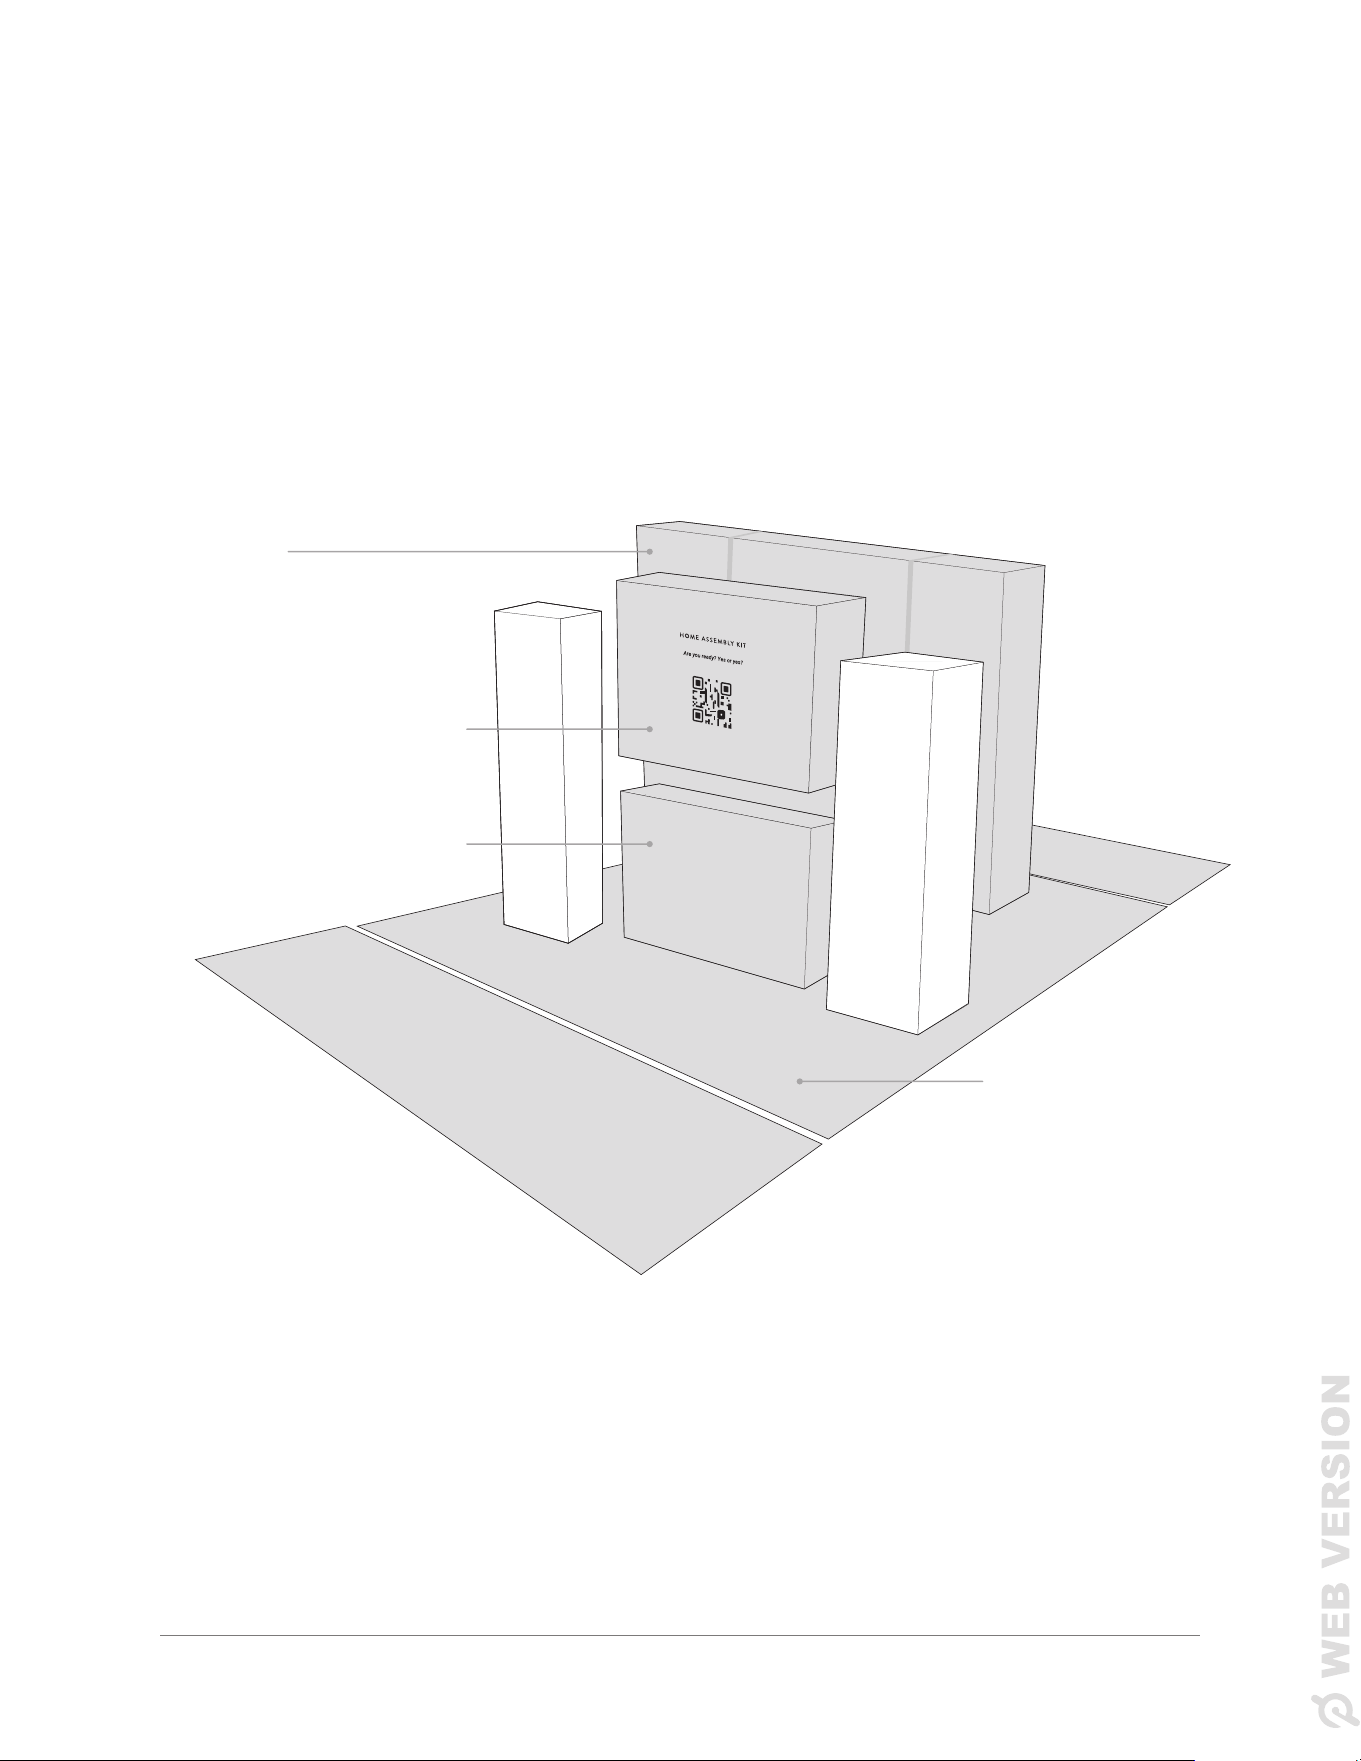
UNPACK YOUR BIKE+
1 Open the outer carton. Inside, nd the inner bike carton, the home assembly kit, and the touchscreen
box. Clear away the rest of the cardboard, but leave the unfolded outer carton under the Bike+—it will
protect the Bike+ and your oor during the assembly process.
BIKE+
CARTON
HOME ASSEMBLY KIT
TOUCHSCREEN BOX
OUTER CARTON
A mat helps protect
your Bike+ and floor
The power cord should
be able to reach an
outlet without passing
under the Bike+.
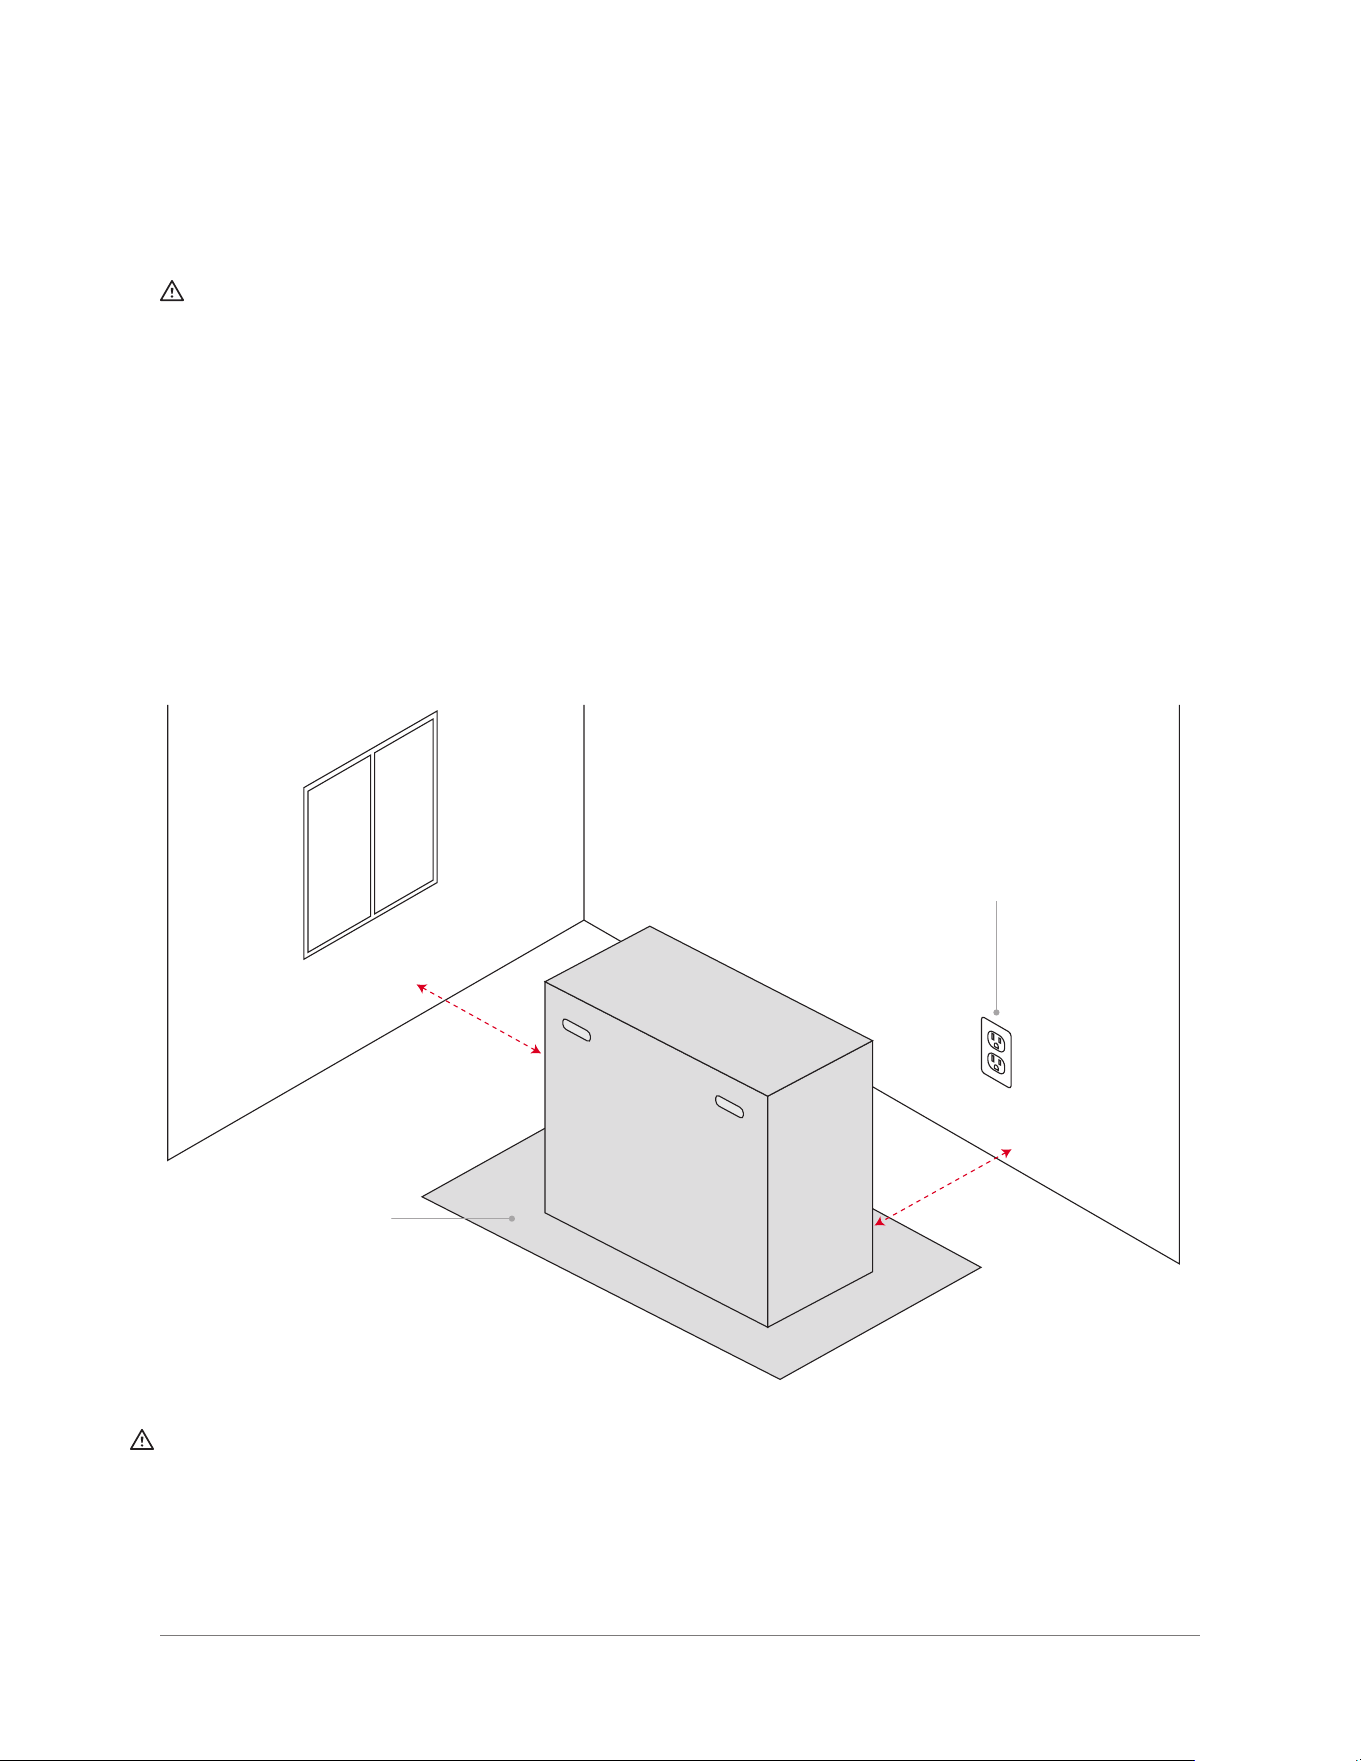
* There should be 24 in/60 cm of empty space on each side of the assembled Bike+.
CAUTION: Do not use extension cords or adapters. Ensure that the power cable never passes under the
Bike+. Always keep the power cable clean and dry. Sweat, spills, and other damage to the power cable may
result in property damage or bodily harm.
24 in/60 cm*
24 in/60 cm*
GETTING READY
PREPARE YOUR WORKSPACE
CAUTION: The Peloton Bike+ and Bike+ package are extremely heavy and require more than one
person to lift or carry.
� Find a location for your Bike+. Peloton recommends assembling the Bike+ in the same space
where it will be used, to limit movement after assembly. The Bike+ must be installed on a solid, level
surface with appropriate clearance on all sides. Refer to the Bike+ User Manual for complete location
requirements.
� Clear a 5 ft by 5 ft/1.5 m by 1.5 m space for assembly.
� Locate a pair of scissors or a similar tool. The Bike+ includes all the tools you will need for assembly,
but you will need scissors to unpack it.
� If you can, have somebody available to help you. A second person isn't required for assembly, but can
make some steps easier.
BOX A
BOX B
BOX C
2 Using a pair of scissors, cut the two plastic straps on the inner carton.
3 Lift the carton lid off the base. It should slide off easily.
4 | GETTING READY 5 | GETTING READY
GETTING READY
UNPACK YOUR BIKE+
1 Open the outer carton. Inside, nd the inner bike carton, the home assembly kit, and the touchscreen
box. Clear away the rest of the cardboard, but leave the unfolded outer carton under the Bike+—it will
protect the Bike+ and your oor during the assembly process.
BIKE+
CARTON
HOME ASSEMBLY KIT
TOUCHSCREEN BOX
OUTER CARTON
A mat helps protect
your Bike+ and floor
The power cord should
be able to reach an
outlet without passing
under the Bike+.
* There should be 24 in/60 cm of empty space on each side of the assembled Bike+.
CAUTION: Do not use extension cords or adapters. Ensure that the power cable never passes under the
Bike+. Always keep the power cable clean and dry. Sweat, spills, and other damage to the power cable may
result in property damage or bodily harm.
24 in/60 cm*
24 in/60 cm*
GETTING READY
PREPARE YOUR WORKSPACE
CAUTION: The Peloton Bike+ and Bike+ package are extremely heavy and require more than one
person to lift or carry.
� Find a location for your Bike+. Peloton recommends assembling the Bike+ in the same space
where it will be used, to limit movement after assembly. The Bike+ must be installed on a solid, level
surface with appropriate clearance on all sides. Refer to the Bike+ User Manual for complete location
requirements.
� Clear a 5 ft by 5 ft/1.5 m by 1.5 m space for assembly.
� Locate a pair of scissors or a similar tool. The Bike+ includes all the tools you will need for assembly,
but you will need scissors to unpack it.
� If you can, have somebody available to help you. A second person isn't required for assembly, but can
make some steps easier.
BOX A
BOX B
BOX C
2 Using a pair of scissors, cut the two plastic straps on the inner carton.
3 Lift the carton lid off the base. It should slide off easily.
6 | GETTING READY 7 | GETTING READY
GETTING READY
IDENTIFY PARTS
Before beginning to assemble your Bike, locate and identify all parts and tools.
* Box A is located underneath the bike frame. You can take it out when you remove the carton base from
the bike.
BIKE BOX
BOX A*
Front Stabilizer
Handlebar Post Pedals
LEFT RIGHT
BOX B
BOX C
BOX A
BOX B
4 Remove the cardboard at the front and back of the bike. Make sure to take the weight holder out of the
cardboard at the back.
5 Pull boxes B and C out of the carton base and remove the plastic around the bike frame.
6 Cut two zip ties to free the handlebars. Set them aside.
GETTING READY
Handlebars
Bike Frame
Weight Holder
Rear Stabilizer
Power Supply
9 | ASSEMBLING THE BIKE+8 | GETTING READY
GETTING READY ASSEMBLING THE BIKE+
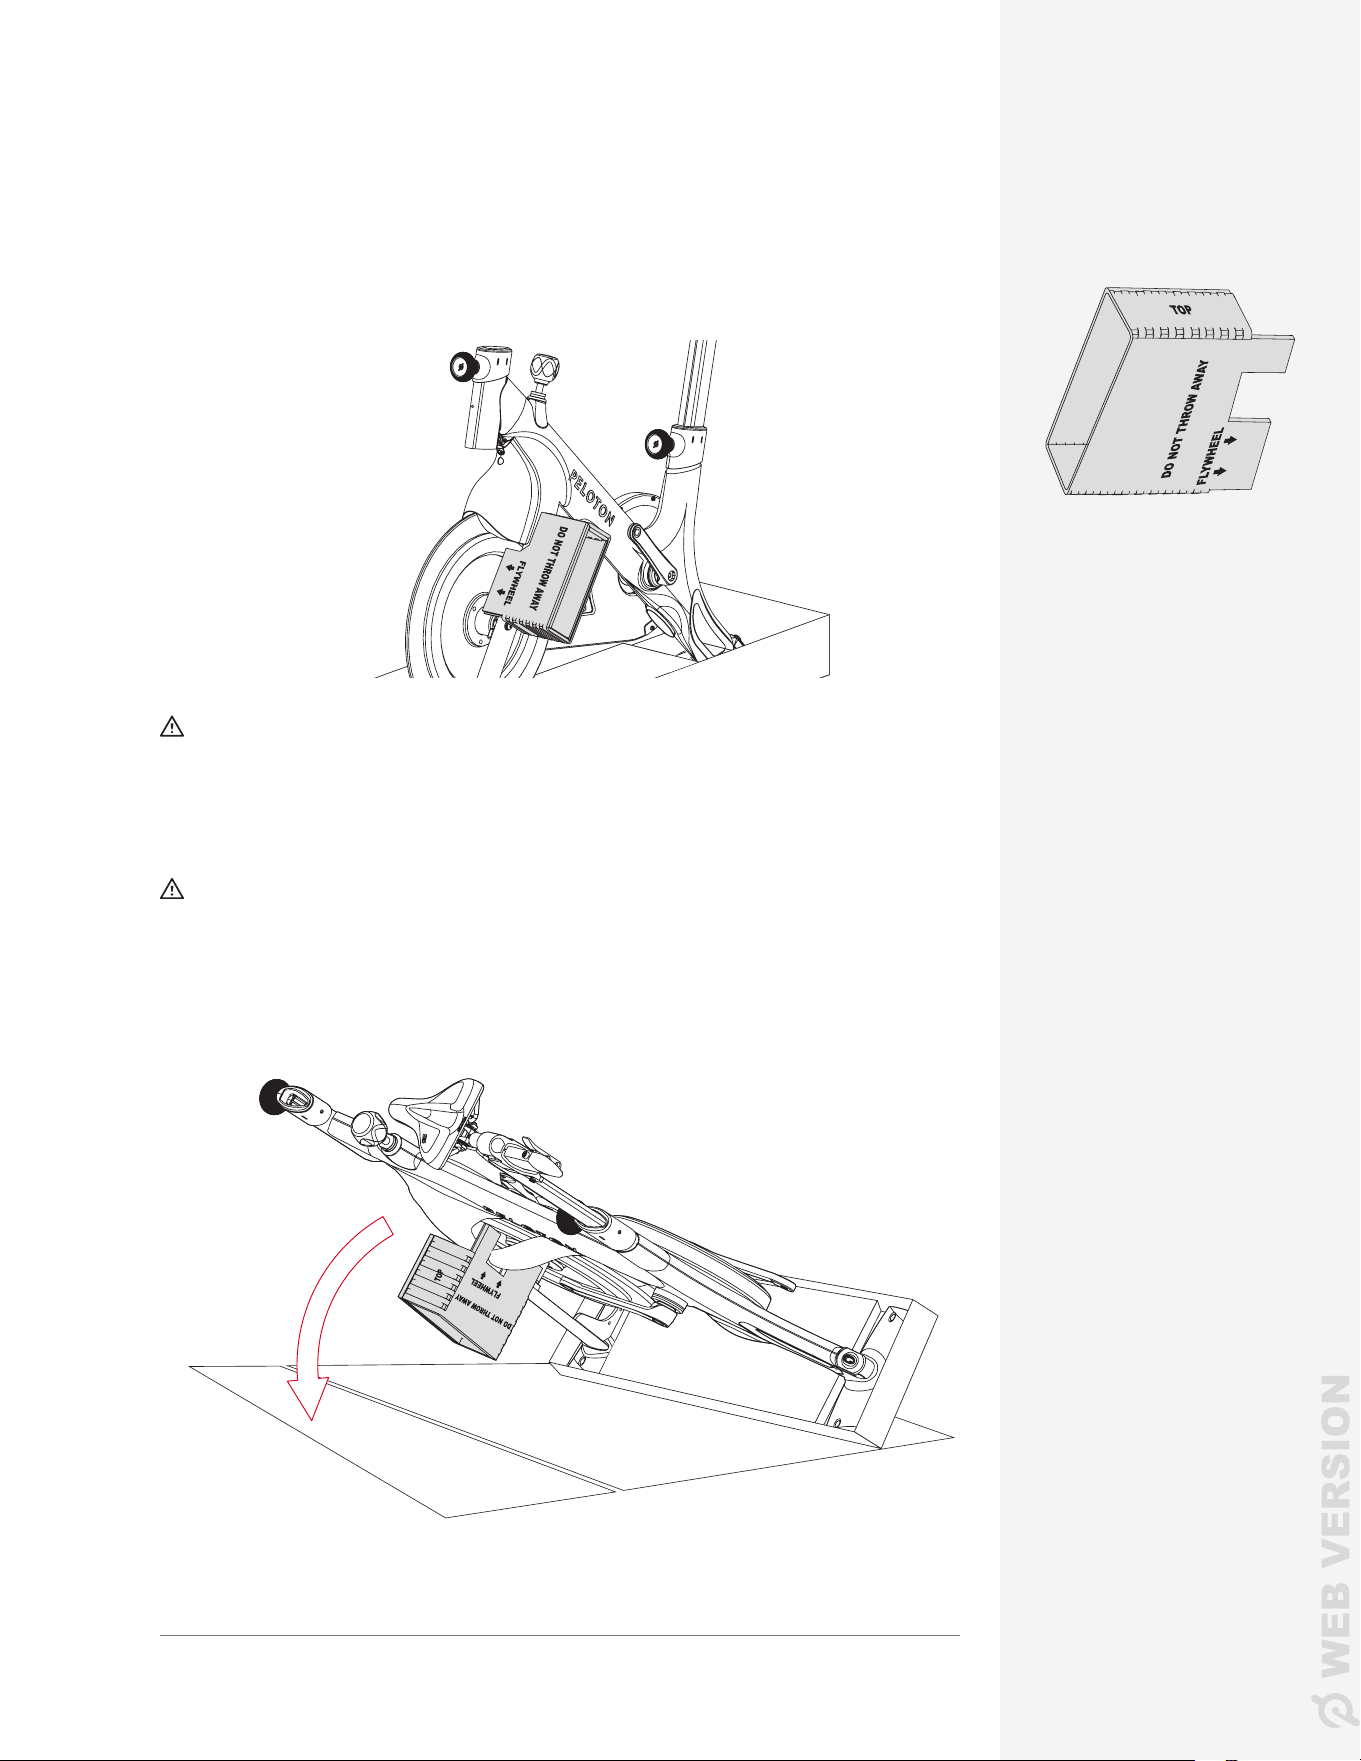
LOWERING THE BIKE+
1 Fit the cardboard stabilizer insert onto the frame as shown. Make sure it sits
ush against the ywheel.
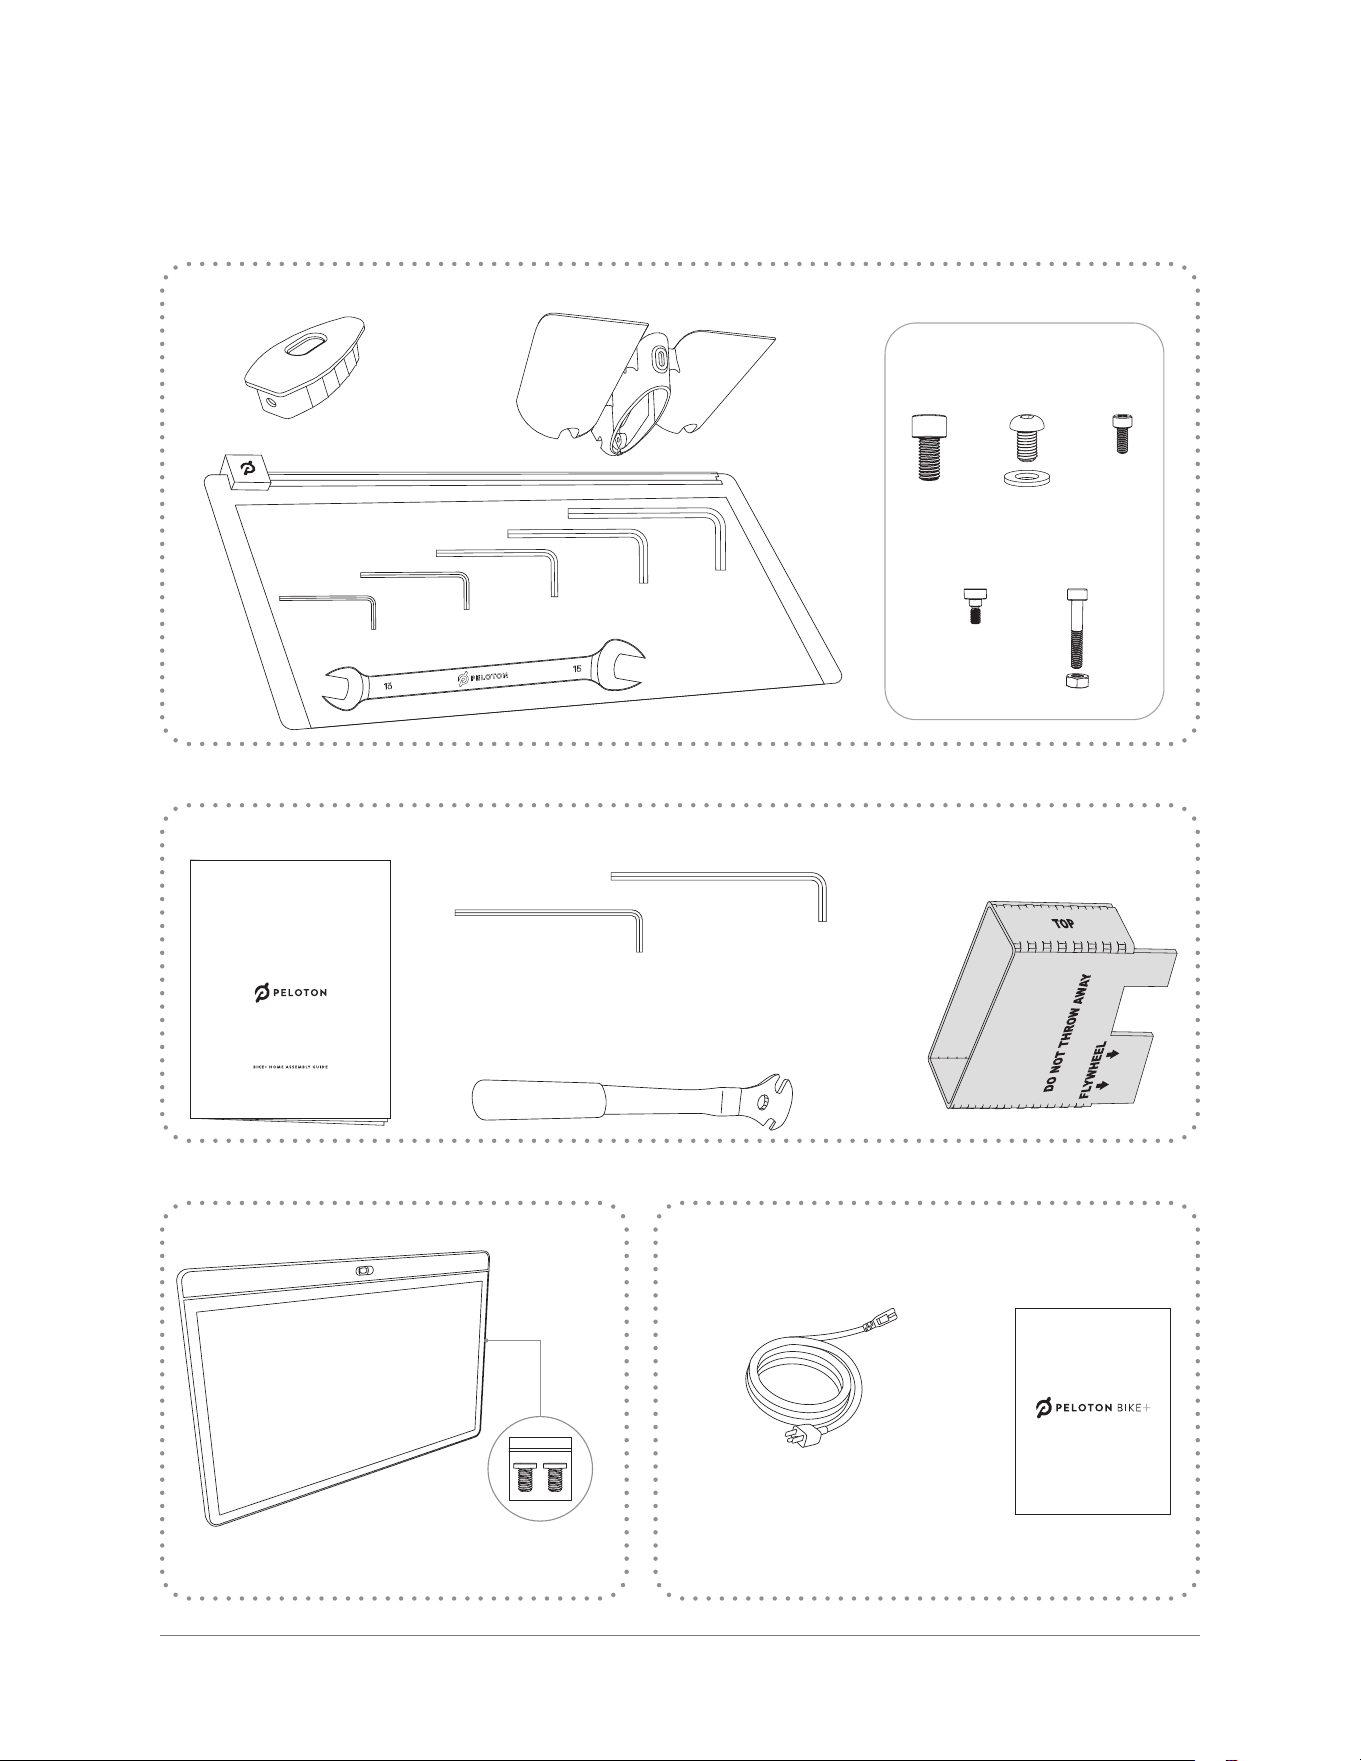
PARTS AND TOOLS
CAUTION: Lifting heavy objects can cause muscle strain and back injuries.
Use lifting aids and proper lifting techniques when moving or assembling
the Peloton Bike+. A second person may be helpful when raising and lowering
the Bike+.
CAUTION: Ensure that the seat post height adjustment knob is securely
tightened before proceeding.
2 Slowly lower the Bike+ onto its left side. Make sure the stabilizer insert stays
in place and rests at against the oor.
3 Remove the carton base from the bottom of the Bike+. Remove Box A from
the carton.
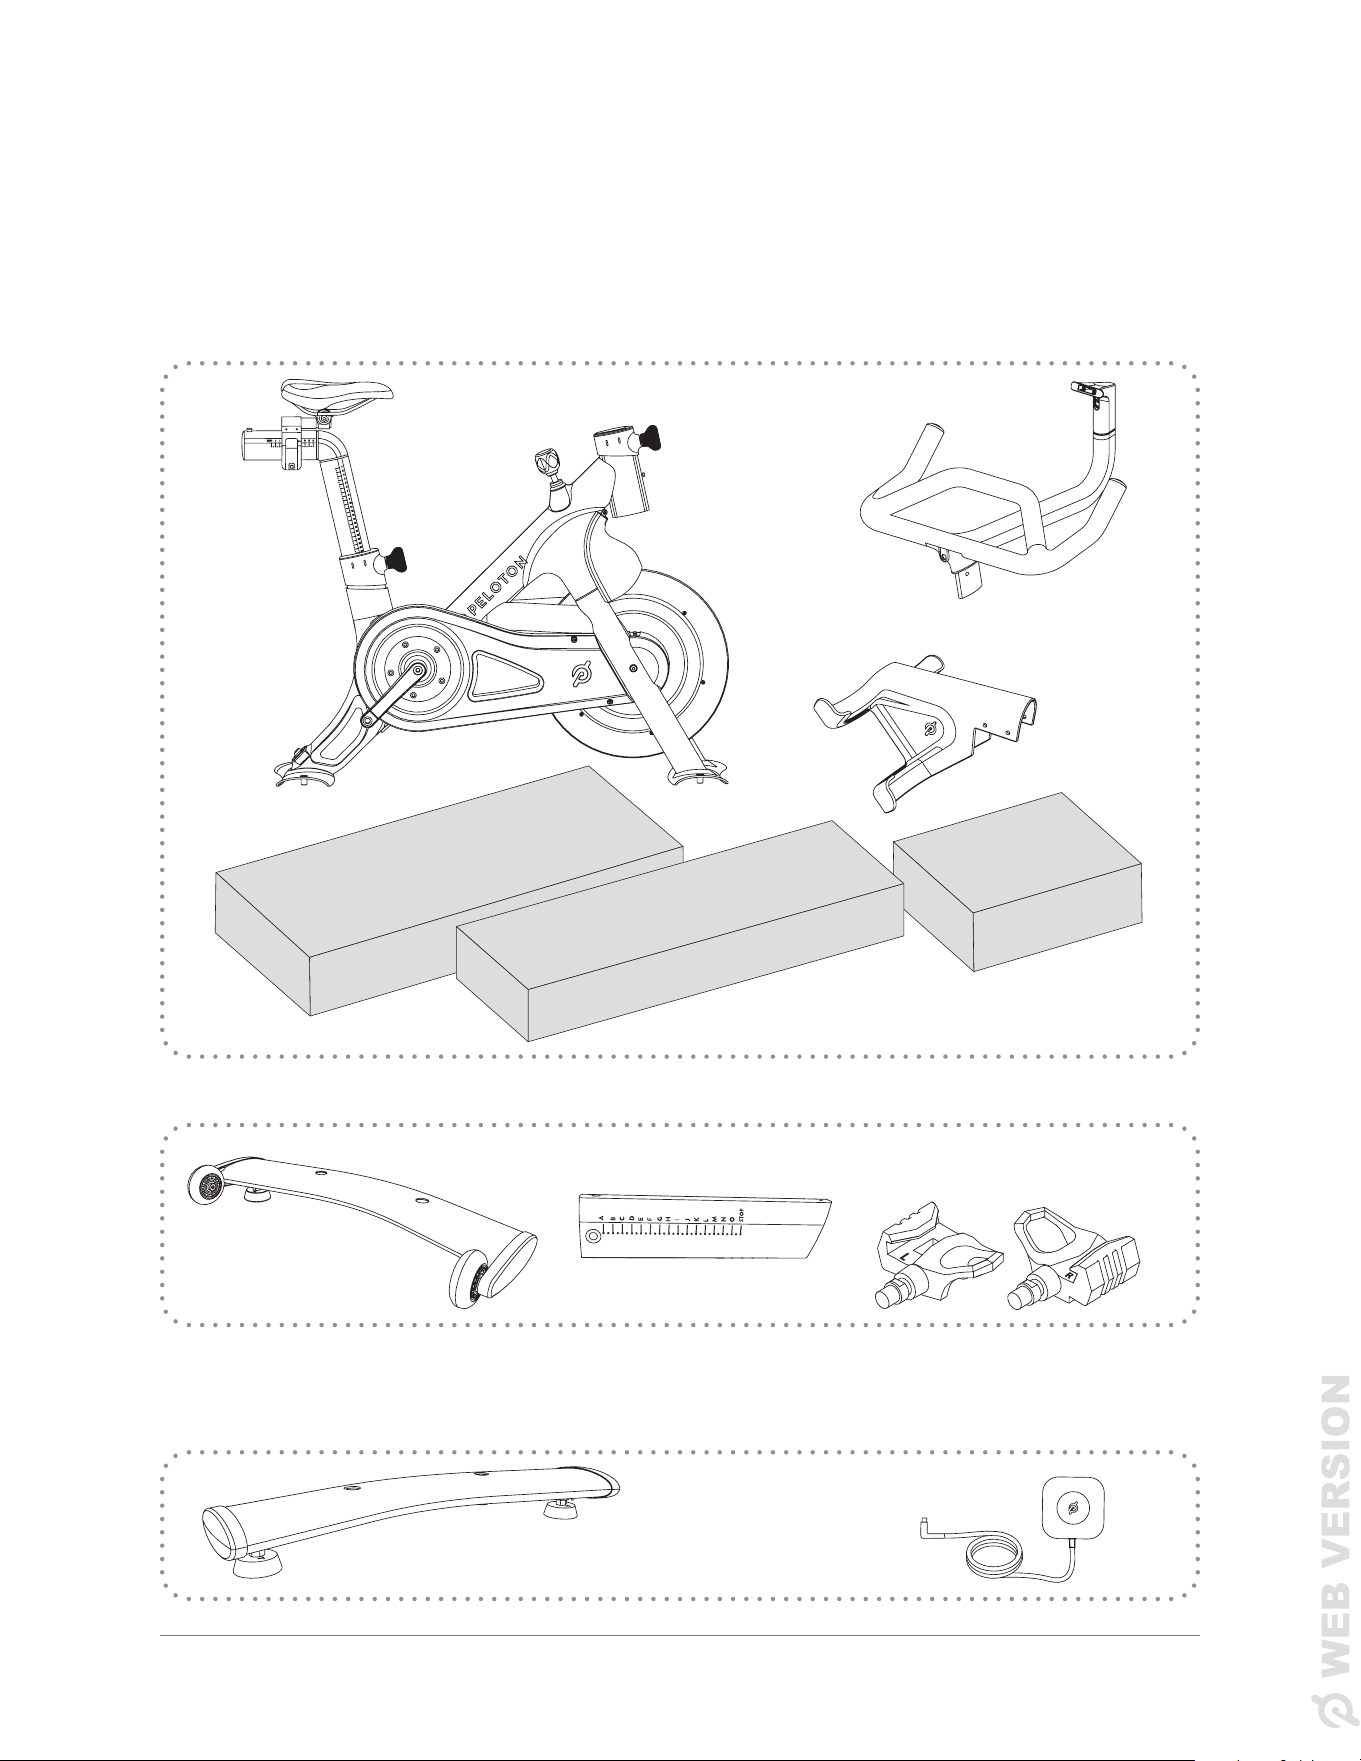
BOX C
Water Bottle Holder Hardware bag
A
4x
B
3x
C
1x
D
5x
E
1x
End cap
Tool Kit
Allen Wrenches
3mm
4mm
5mm
2.5mm
6mm
15/13 mm
Wrench
HOME ASSEMBLY KIT
Bike+ Assembly Guide
Pedal Wrench
Long Allen Wrenches
The Bike+ tool kit already has 4 and 5 mm Allen wrenches,
but these longer ones will make things easier.
Cardboard
Stabilizer Insert
4mm
5mm
Cardboard Stabilizer Insert
TOUCHSCREEN BOX
Touchscreen
User Manual
Power Cord
The Bike+ User Manual and power cord may arrive
either in Box C or in the Home Assembly Kit.
If your box includes multiple
power cords, make sure to use the
appropriate one for your region.
U SER M AN UA L
Touchscreen
screws 2x
9 | ASSEMBLING THE BIKE+8 | GETTING READY
GETTING READY ASSEMBLING THE BIKE+
LOWERING THE BIKE+
1 Fit the cardboard stabilizer insert onto the frame as shown. Make sure it sits
ush against the ywheel.
PARTS AND TOOLS
CAUTION: Lifting heavy objects can cause muscle strain and back injuries.
Use lifting aids and proper lifting techniques when moving or assembling
the Peloton Bike+. A second person may be helpful when raising and lowering
the Bike+.
CAUTION: Ensure that the seat post height adjustment knob is securely
tightened before proceeding.
2 Slowly lower the Bike+ onto its left side. Make sure the stabilizer insert stays
in place and rests at against the oor.
3 Remove the carton base from the bottom of the Bike+. Remove Box A from
the carton.
BOX C
Water Bottle Holder Hardware bag
A
4x
B
3x
C
1x
D
5x
E
1x
End cap
Tool Kit
Allen Wrenches
3mm
4mm
5mm
2.5mm
6mm
15/13 mm
Wrench
HOME ASSEMBLY KIT
Bike+ Assembly Guide
Pedal Wrench
Long Allen Wrenches
The Bike+ tool kit already has 4 and 5 mm Allen wrenches,
but these longer ones will make things easier.
Cardboard
Stabilizer Insert
4mm
5mm
Cardboard Stabilizer Insert
TOUCHSCREEN BOX
Touchscreen
User Manual
Power Cord
The Bike+ User Manual and power cord may arrive
either in Box C or in the Home Assembly Kit.
If your box includes multiple
power cords, make sure to use the
appropriate one for your region.
U SER M AN UA L
Touchscreen
screws 2x
10 | ASSEMBLING THE BIKE+ 11 | ASSEMBLING THE BIKE+
A × 2
A × 2
6mm
6mm
Front
Rear
ASSEMBLING THE BIKE+
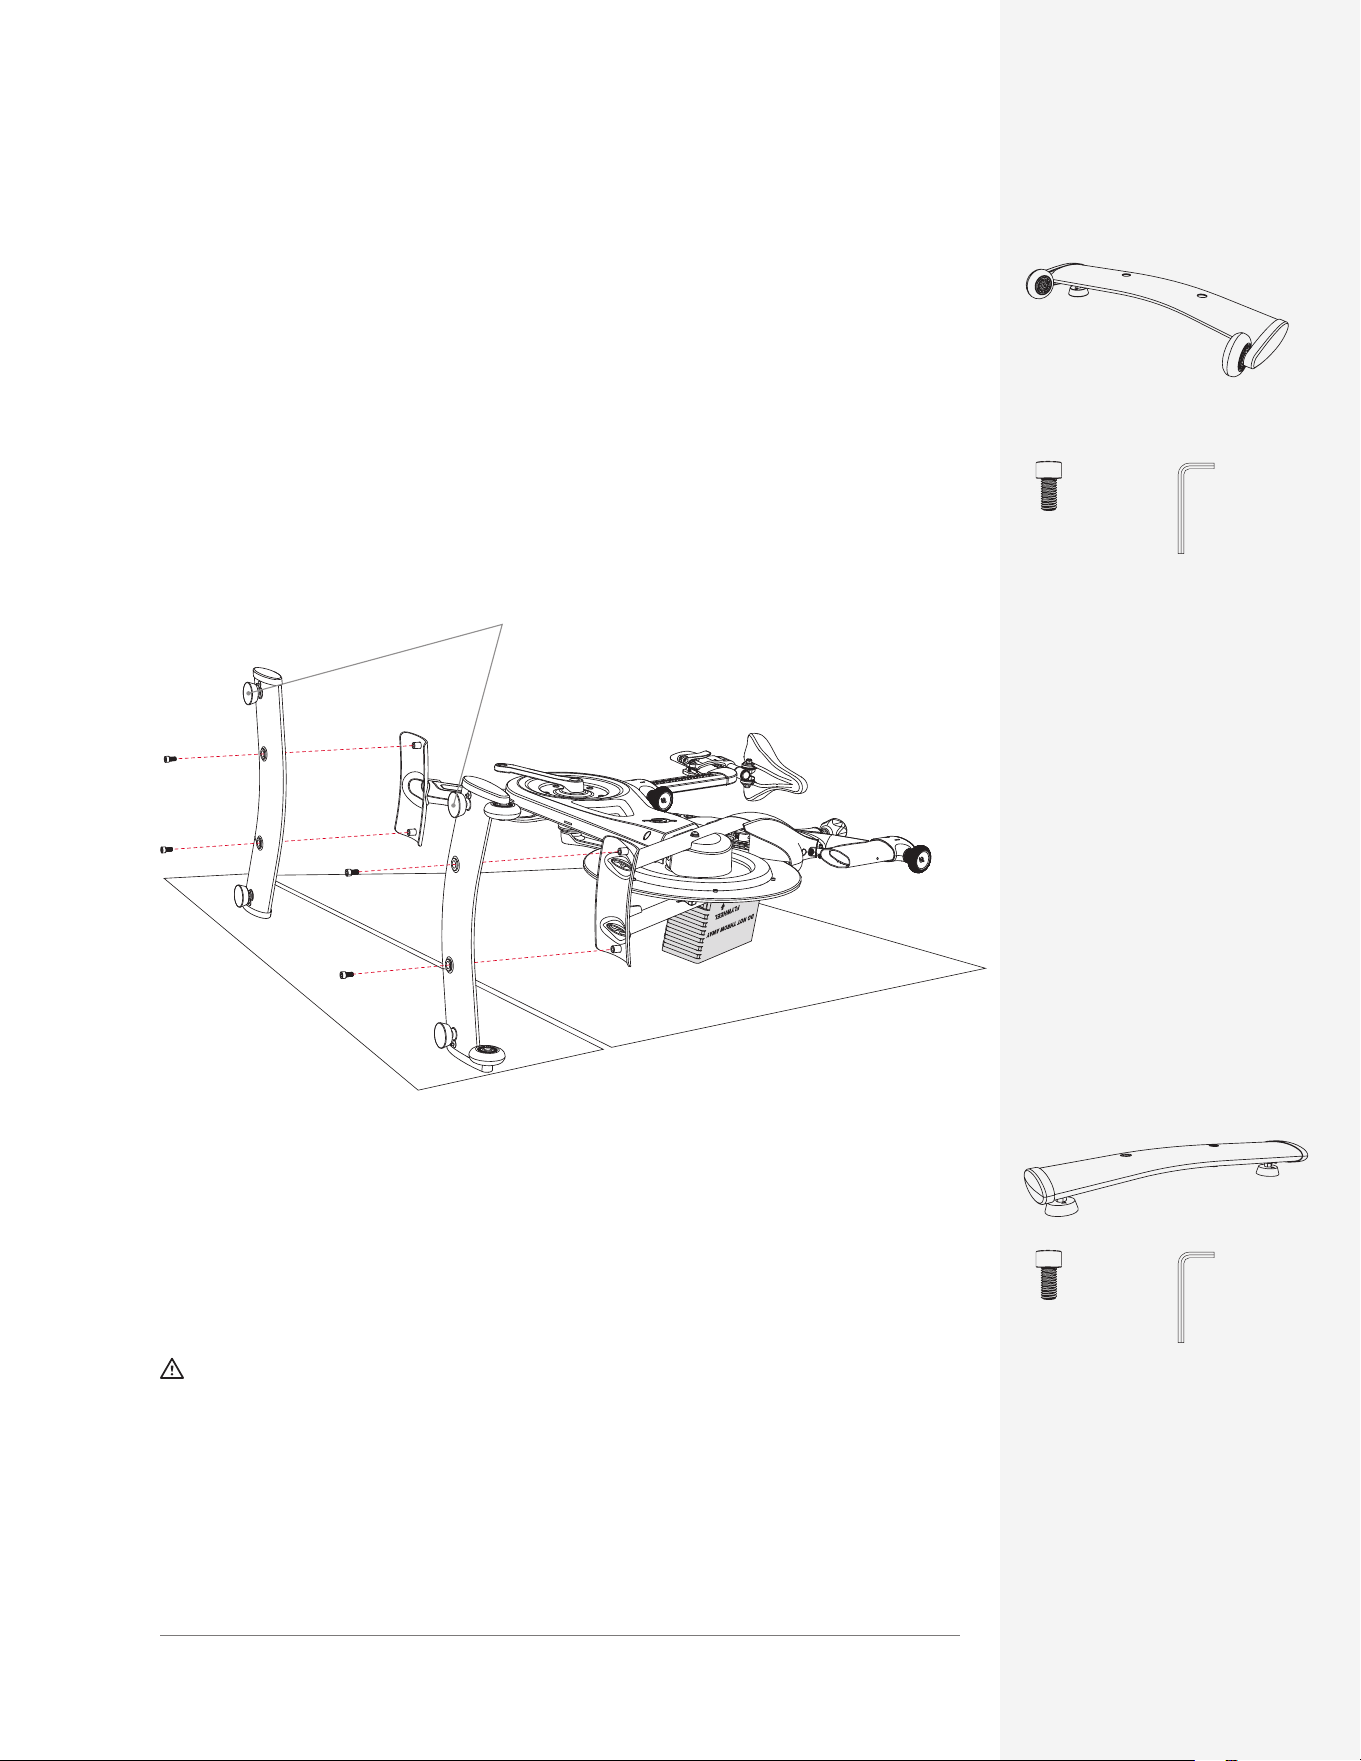
ADDING THE STABILIZERS
1 Fit the front stabilizer tightly against the front foot of the Peloton Bike+.
Note: Make sure you have the correct stabilizer. The front stabilizer has wheels
and the rear stabilizer does not.
2 Using the 6mm Allen wrench and (2) bolts A, secure the front stabilizer to the
foot of the Bike+. Make sure you fully tighten both bolts.
PARTS AND TOOLS
ASSEMBLING THE BIKE+
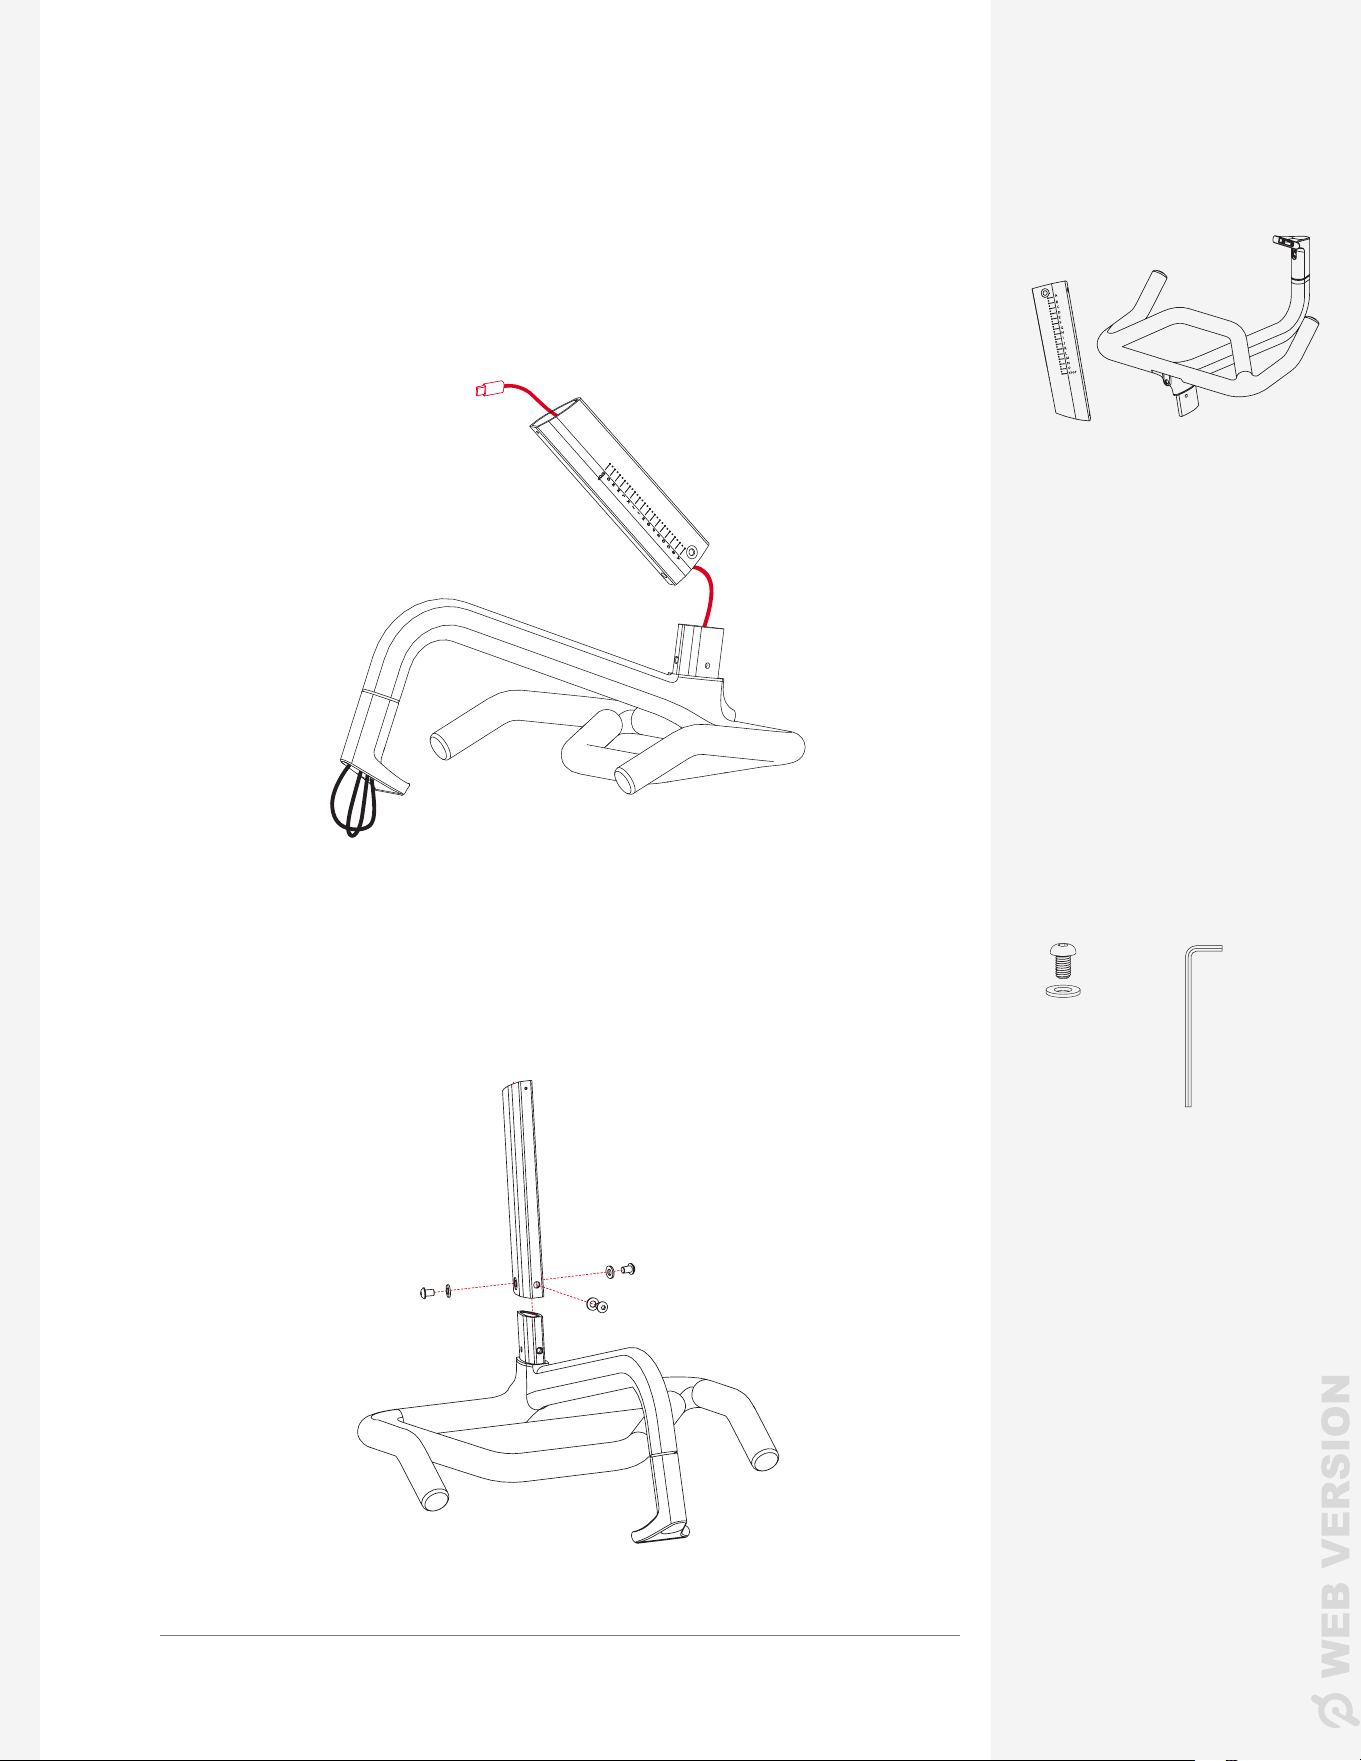
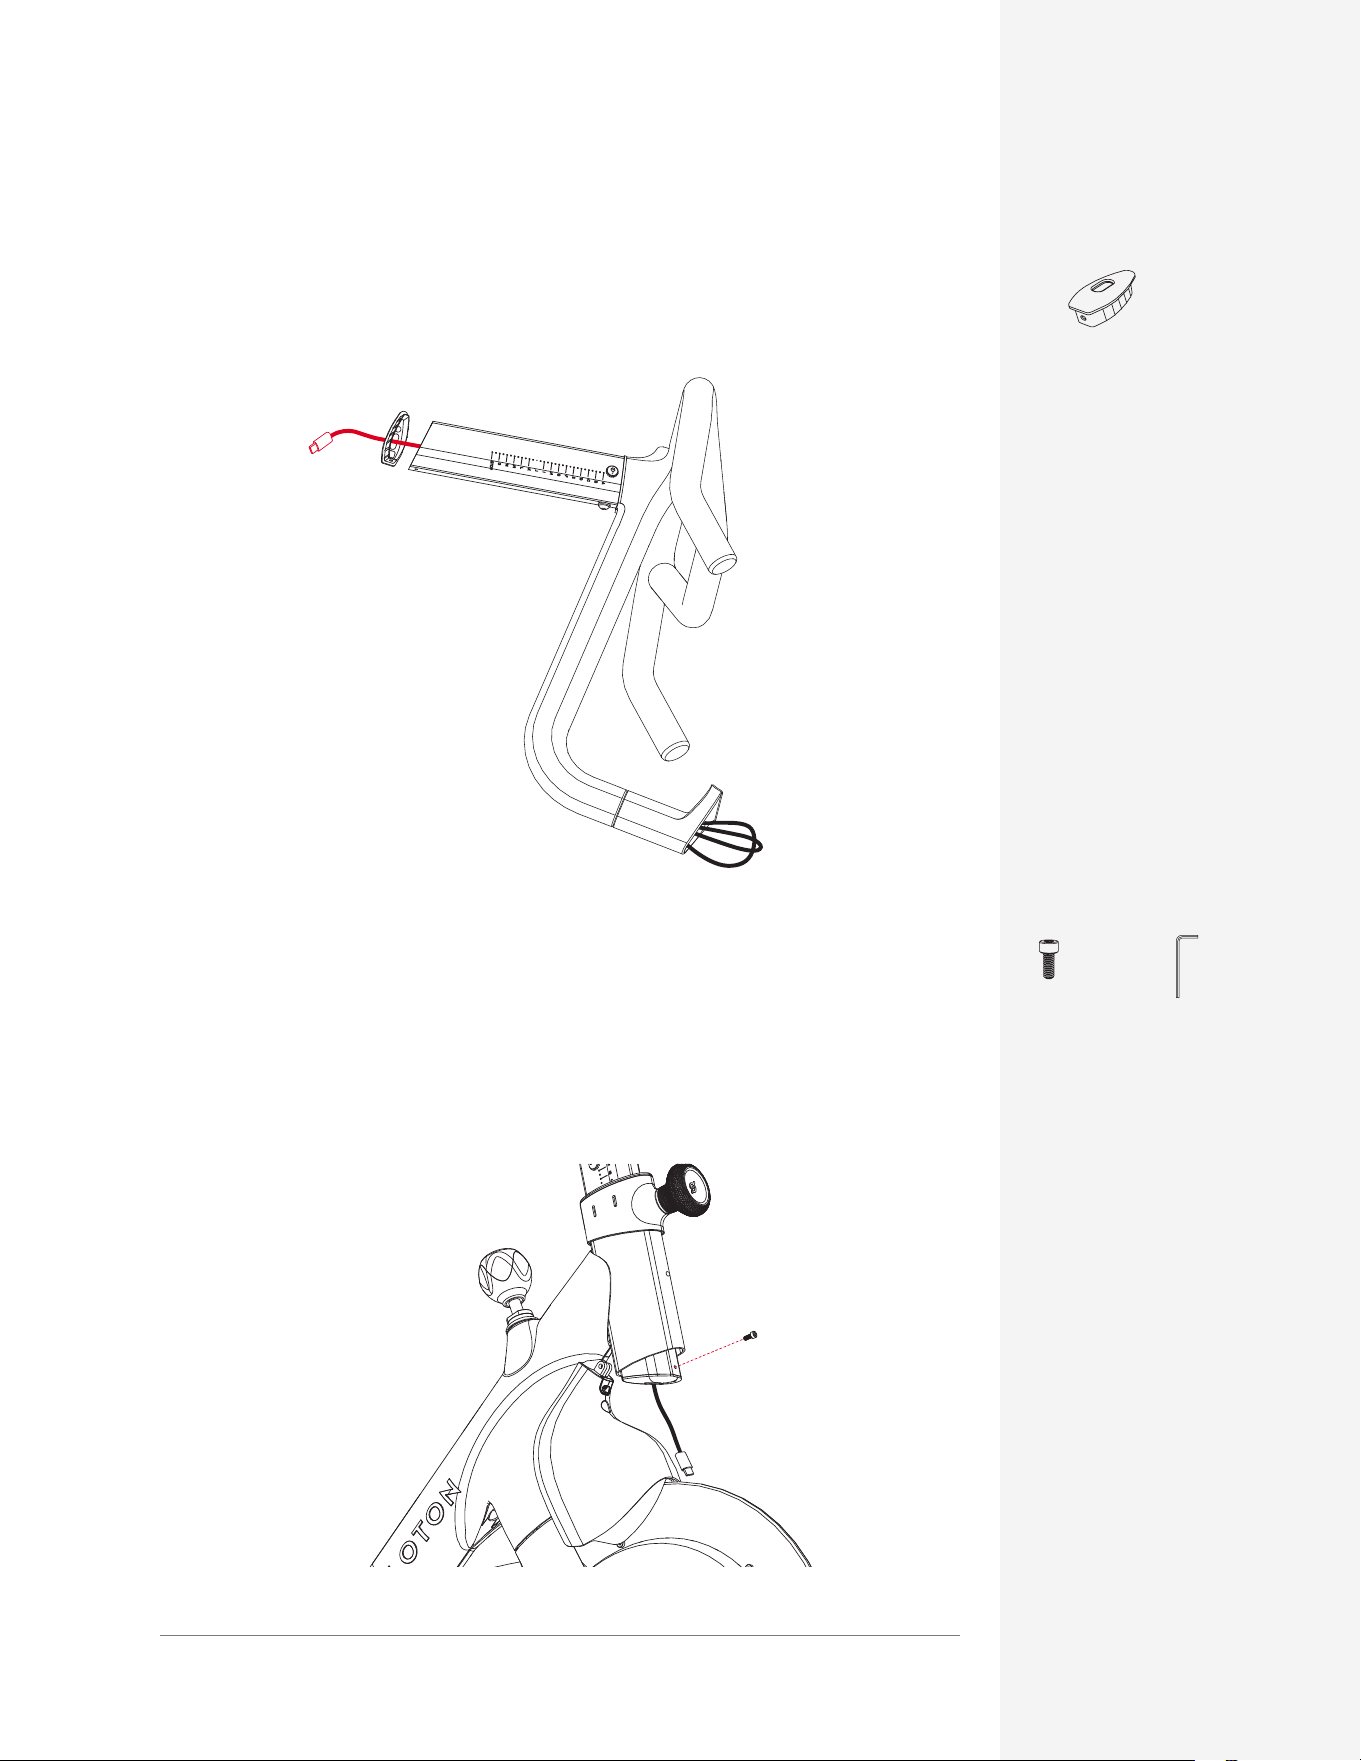
ASSEMBLING THE HANDLEBARS
B × 3
Long 5mm
1 Pull the coiled cable out of the bottom of the handlebars and thread it through
the handlebar post.
2 Fit the handlebar post onto the handlebar base.
3 Add the three bolts B with washers to the handlebar post. Screw them in
using the long 5mm Allen wrench from the Home Assembly Kit.
Make sure the stabilizer feet
point away from the Bike+.
PARTS AND TOOLS
3 Fit the rear stabilizer onto the back foot of the Bike+.
4 Using the 6mm Allen wrench and (2) bolts A, secure the back stabilizer to
the foot of the Bike+. Make sure you fully tighten both bolts.
CAUTION: Make sure all bolts are tight before moving to the next step.
Shake each stabilizer to make sure it is held securely against the frame. If
there is any movement, tighten each bolt again. When tightening, insert the
short end of the Allen wrench into the bolt.
5 Carefully lift the Bike+ and set it upright.
10 | ASSEMBLING THE BIKE+ 11 | ASSEMBLING THE BIKE+
A × 2
A × 2
6mm
6mm
Front
Rear
ASSEMBLING THE BIKE+
ADDING THE STABILIZERS
1 Fit the front stabilizer tightly against the front foot of the Peloton Bike+.
Note: Make sure you have the correct stabilizer. The front stabilizer has wheels
and the rear stabilizer does not.
2 Using the 6mm Allen wrench and (2) bolts A, secure the front stabilizer to the
foot of the Bike+. Make sure you fully tighten both bolts.
PARTS AND TOOLS
ASSEMBLING THE BIKE+
ASSEMBLING THE HANDLEBARS
B × 3
Long 5mm
1 Pull the coiled cable out of the bottom of the handlebars and thread it through
the handlebar post.
2 Fit the handlebar post onto the handlebar base.
3 Add the three bolts B with washers to the handlebar post. Screw them in
using the long 5mm Allen wrench from the Home Assembly Kit.
Make sure the stabilizer feet
point away from the Bike+.
PARTS AND TOOLS
3 Fit the rear stabilizer onto the back foot of the Bike+.
4 Using the 6mm Allen wrench and (2) bolts A, secure the back stabilizer to
the foot of the Bike+. Make sure you fully tighten both bolts.
CAUTION: Make sure all bolts are tight before moving to the next step.
Shake each stabilizer to make sure it is held securely against the frame. If
there is any movement, tighten each bolt again. When tightening, insert the
short end of the Allen wrench into the bolt.
5 Carefully lift the Bike+ and set it upright.
12 | ASSEMBLING THE BIKE+ 13 | ASSEMBLING THE BIKE+
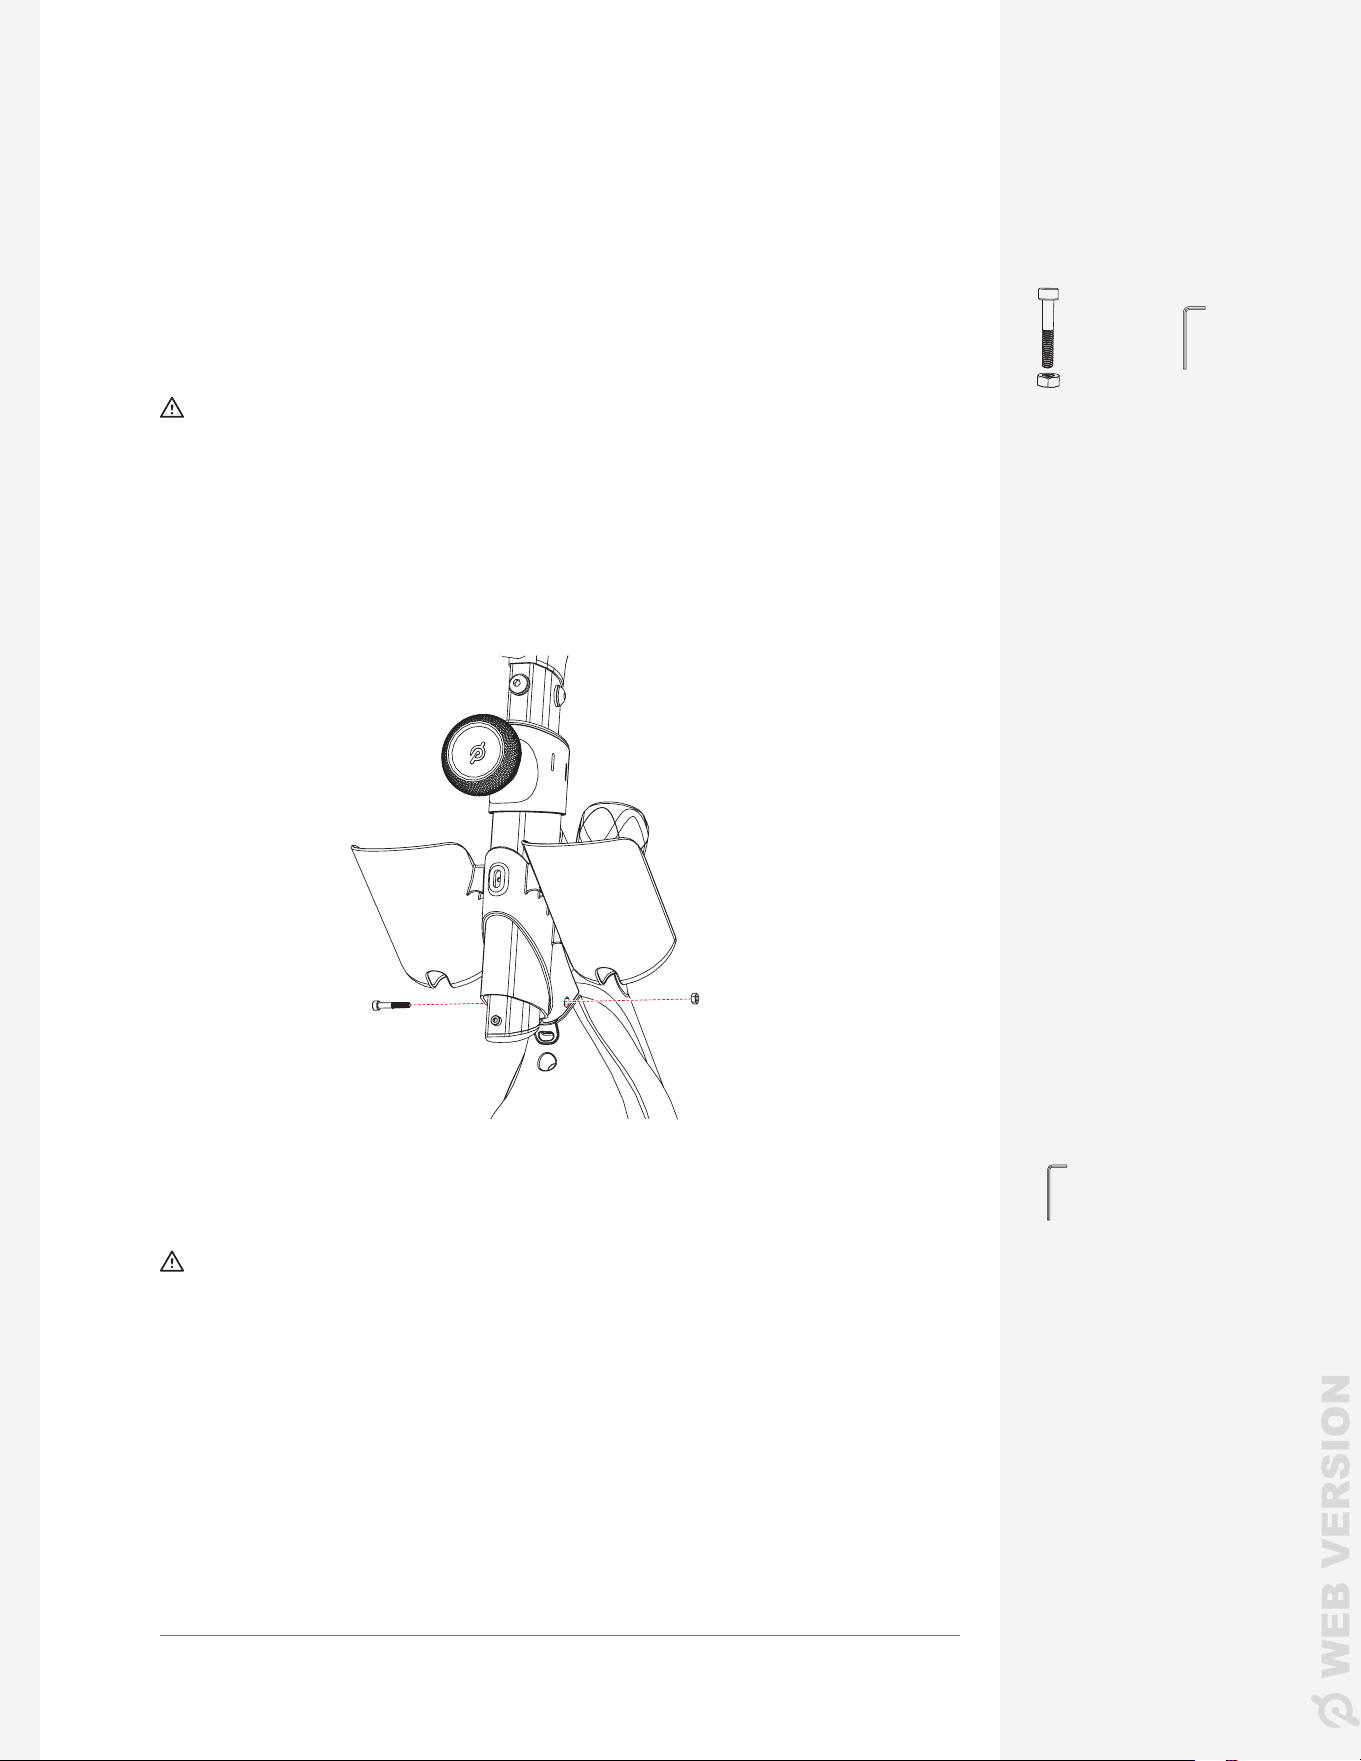
ASSEMBLING THE BIKE+
5 Loosen the adjustment knob at the front of the Bike+ by turning it
counterclockwise.
6 Thread the cable through the head tube and then insert the handlebar post.
7 Move the handlebars to their lowest position and add bolt C to the handlebar
post using a 3 mm Allen wrench.
C × 1 3mm
4 Thread the cable through the end cap and add the end cap to the
handlebar post.
PARTS AND TOOLS
8 Plug the cable into the front shroud.
9 Tighten the adjustment knob and wiggle the handlebars. Look for
movement between the handlebars and post. Then check again with the
handlebars in the highest position. If you see any movement in either
position, retighten the bolts on the handlebar post.
CAUTION:
Make sure the handlebar height adjustment knob and all bolts are
tight before moving to the next step.
ASSEMBLING THE BIKE+
PARTS AND TOOLS
End cap

12 | ASSEMBLING THE BIKE+ 13 | ASSEMBLING THE BIKE+
ASSEMBLING THE BIKE+
5 Loosen the adjustment knob at the front of the Bike+ by turning it
counterclockwise.
6 Thread the cable through the head tube and then insert the handlebar post.
7 Move the handlebars to their lowest position and add bolt C to the handlebar
post using a 3 mm Allen wrench.
C × 1 3mm
4 Thread the cable through the end cap and add the end cap to the
handlebar post.
PARTS AND TOOLS
8 Plug the cable into the front shroud.
9 Tighten the adjustment knob and wiggle the handlebars. Look for
movement between the handlebars and post. Then check again with the
handlebars in the highest position. If you see any movement in either
position, retighten the bolts on the handlebar post.
CAUTION:
Make sure the handlebar height adjustment knob and all bolts are
tight before moving to the next step.
ASSEMBLING THE BIKE+
PARTS AND TOOLS
End cap
14 | ASSEMBLING THE BIKE+ 15 | ASSEMBLING THE BIKE+
D × 4
ASSEMBLING THE BIKE+
ADDING THE WEIGHT HOLDER
1 Fit the weight holder onto the back of the seat post.
2 Secure it using (4) bolts D and the 3 mm Allen wrench.
INSTALLING THE PEDALS
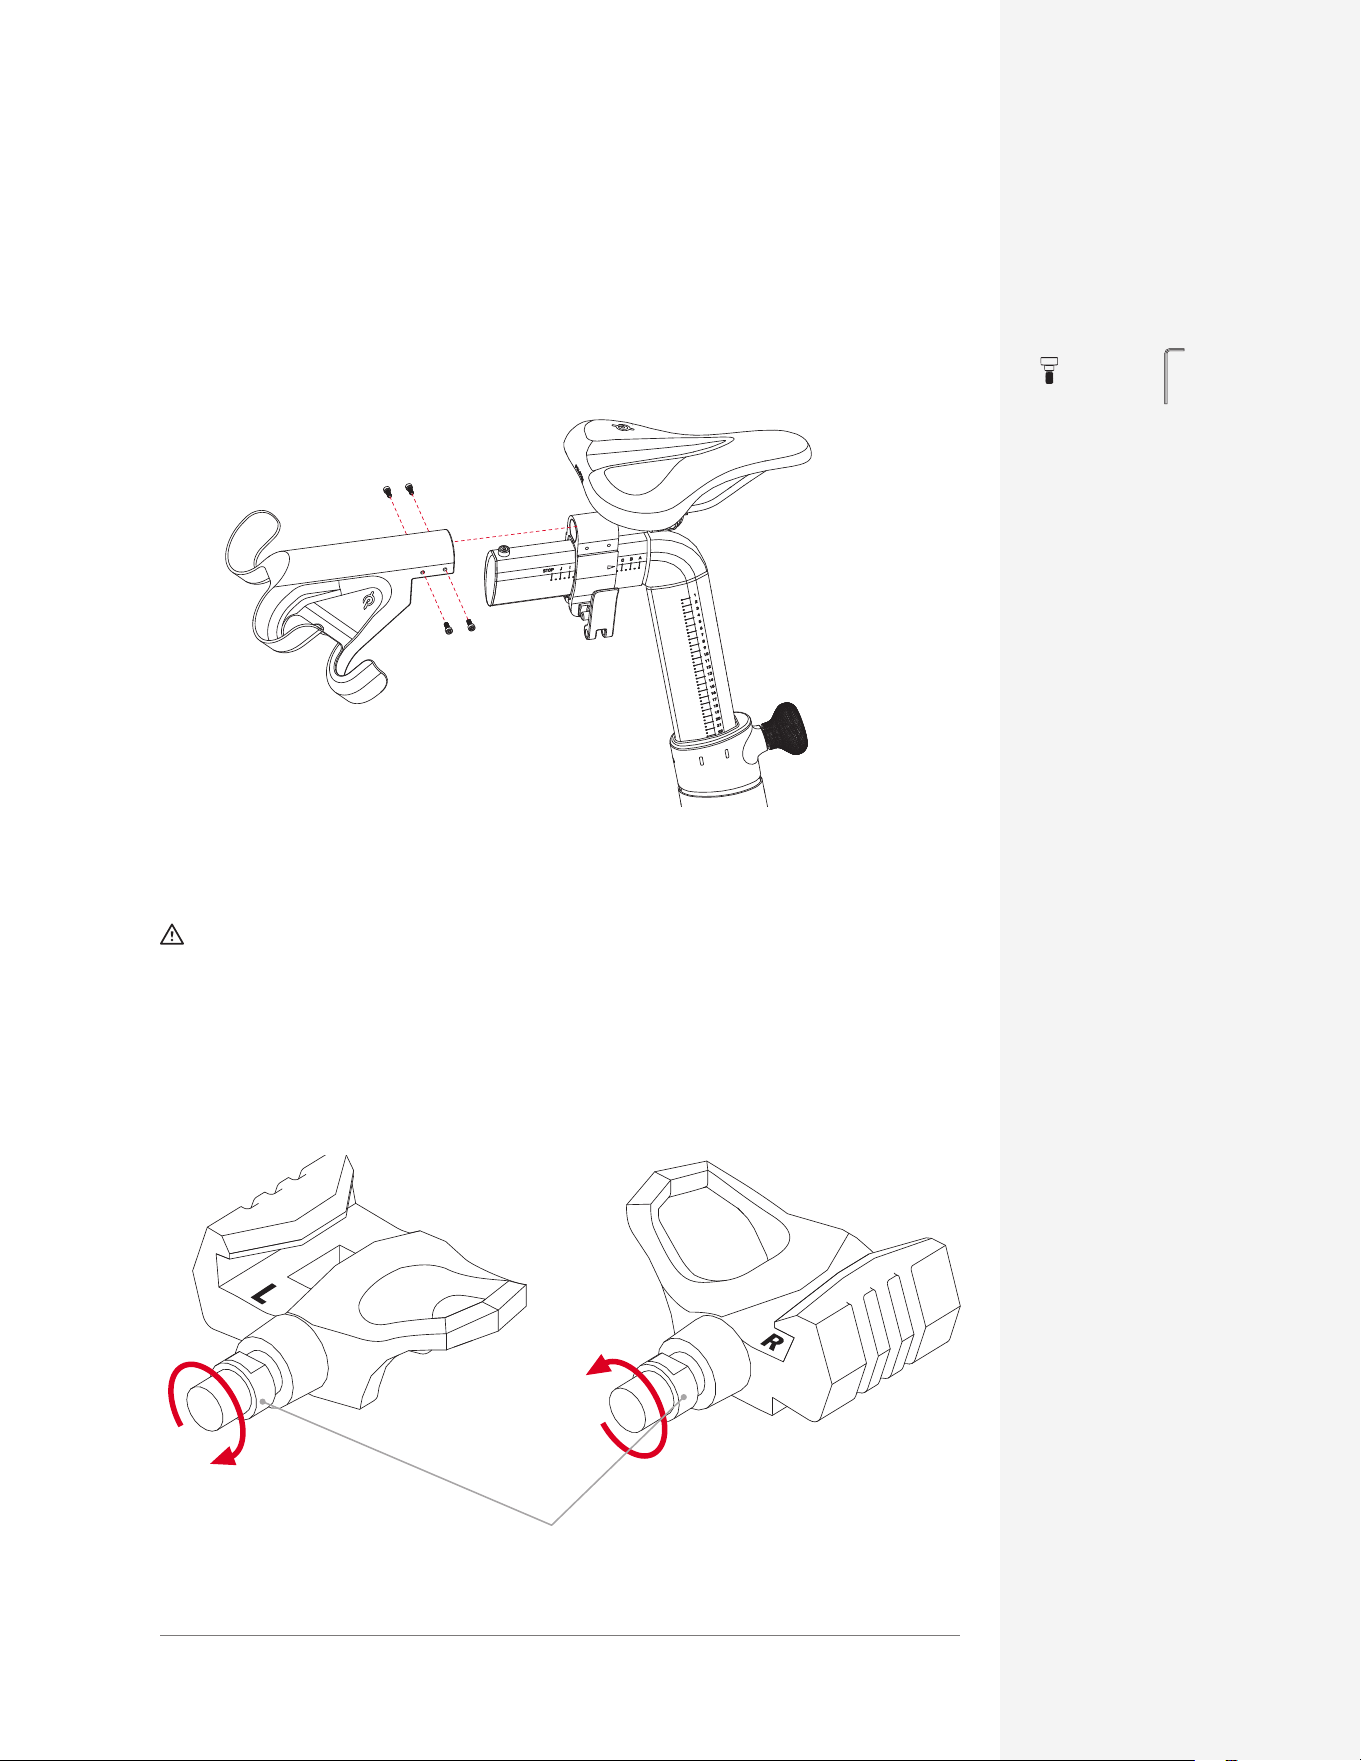
CAUTION: Identify the right and left pedals before beginning installation.
Make sure each pedal is correctly threaded before screwing it in. Misaligning
the threads or turning a pedal in the wrong direction could lead to injury and
damage the pedal and Bike+.
Look for the "L" and "R"
markings on the pedals.
Pedal spindle
LEFT RIGHT
3 mm
PARTS AND TOOLS
ASSEMBLING THE BIKE+
1 Insert the right pedal into the right crank arm at a 90-degree angle. Hold the
pedal steady and rotate the spindle clockwise until it is hand-tight. You may
need to turn it slightly counterclockwise to seat it before you can screw it in.
RIGHT
LEFT
2 Insert the left pedal into the left crank arm at a 90-degree angle. Hold the pedal
steady and rotate the spindle counterclockwise until it is hand-tight. You may
need to turn it slightly clockwise to seat it before you can screw it in.
CAUTION: Do not use any tool on the pedals until each pedal is screwed in
at least (4) full rotations by hand.
PARTS AND TOOLS
14 | ASSEMBLING THE BIKE+ 15 | ASSEMBLING THE BIKE+
D × 4
ASSEMBLING THE BIKE+
ADDING THE WEIGHT HOLDER
1 Fit the weight holder onto the back of the seat post.
2 Secure it using (4) bolts D and the 3 mm Allen wrench.
INSTALLING THE PEDALS
CAUTION: Identify the right and left pedals before beginning installation.
Make sure each pedal is correctly threaded before screwing it in. Misaligning
the threads or turning a pedal in the wrong direction could lead to injury and
damage the pedal and Bike+.
Look for the "L" and "R"
markings on the pedals.
Pedal spindle
LEFT RIGHT
3 mm
PARTS AND TOOLS
ASSEMBLING THE BIKE+
1 Insert the right pedal into the right crank arm at a 90-degree angle. Hold the
pedal steady and rotate the spindle clockwise until it is hand-tight. You may
need to turn it slightly counterclockwise to seat it before you can screw it in.
RIGHT
LEFT
2 Insert the left pedal into the left crank arm at a 90-degree angle. Hold the pedal
steady and rotate the spindle counterclockwise until it is hand-tight. You may
need to turn it slightly clockwise to seat it before you can screw it in.
CAUTION: Do not use any tool on the pedals until each pedal is screwed in
at least (4) full rotations by hand.
PARTS AND TOOLS
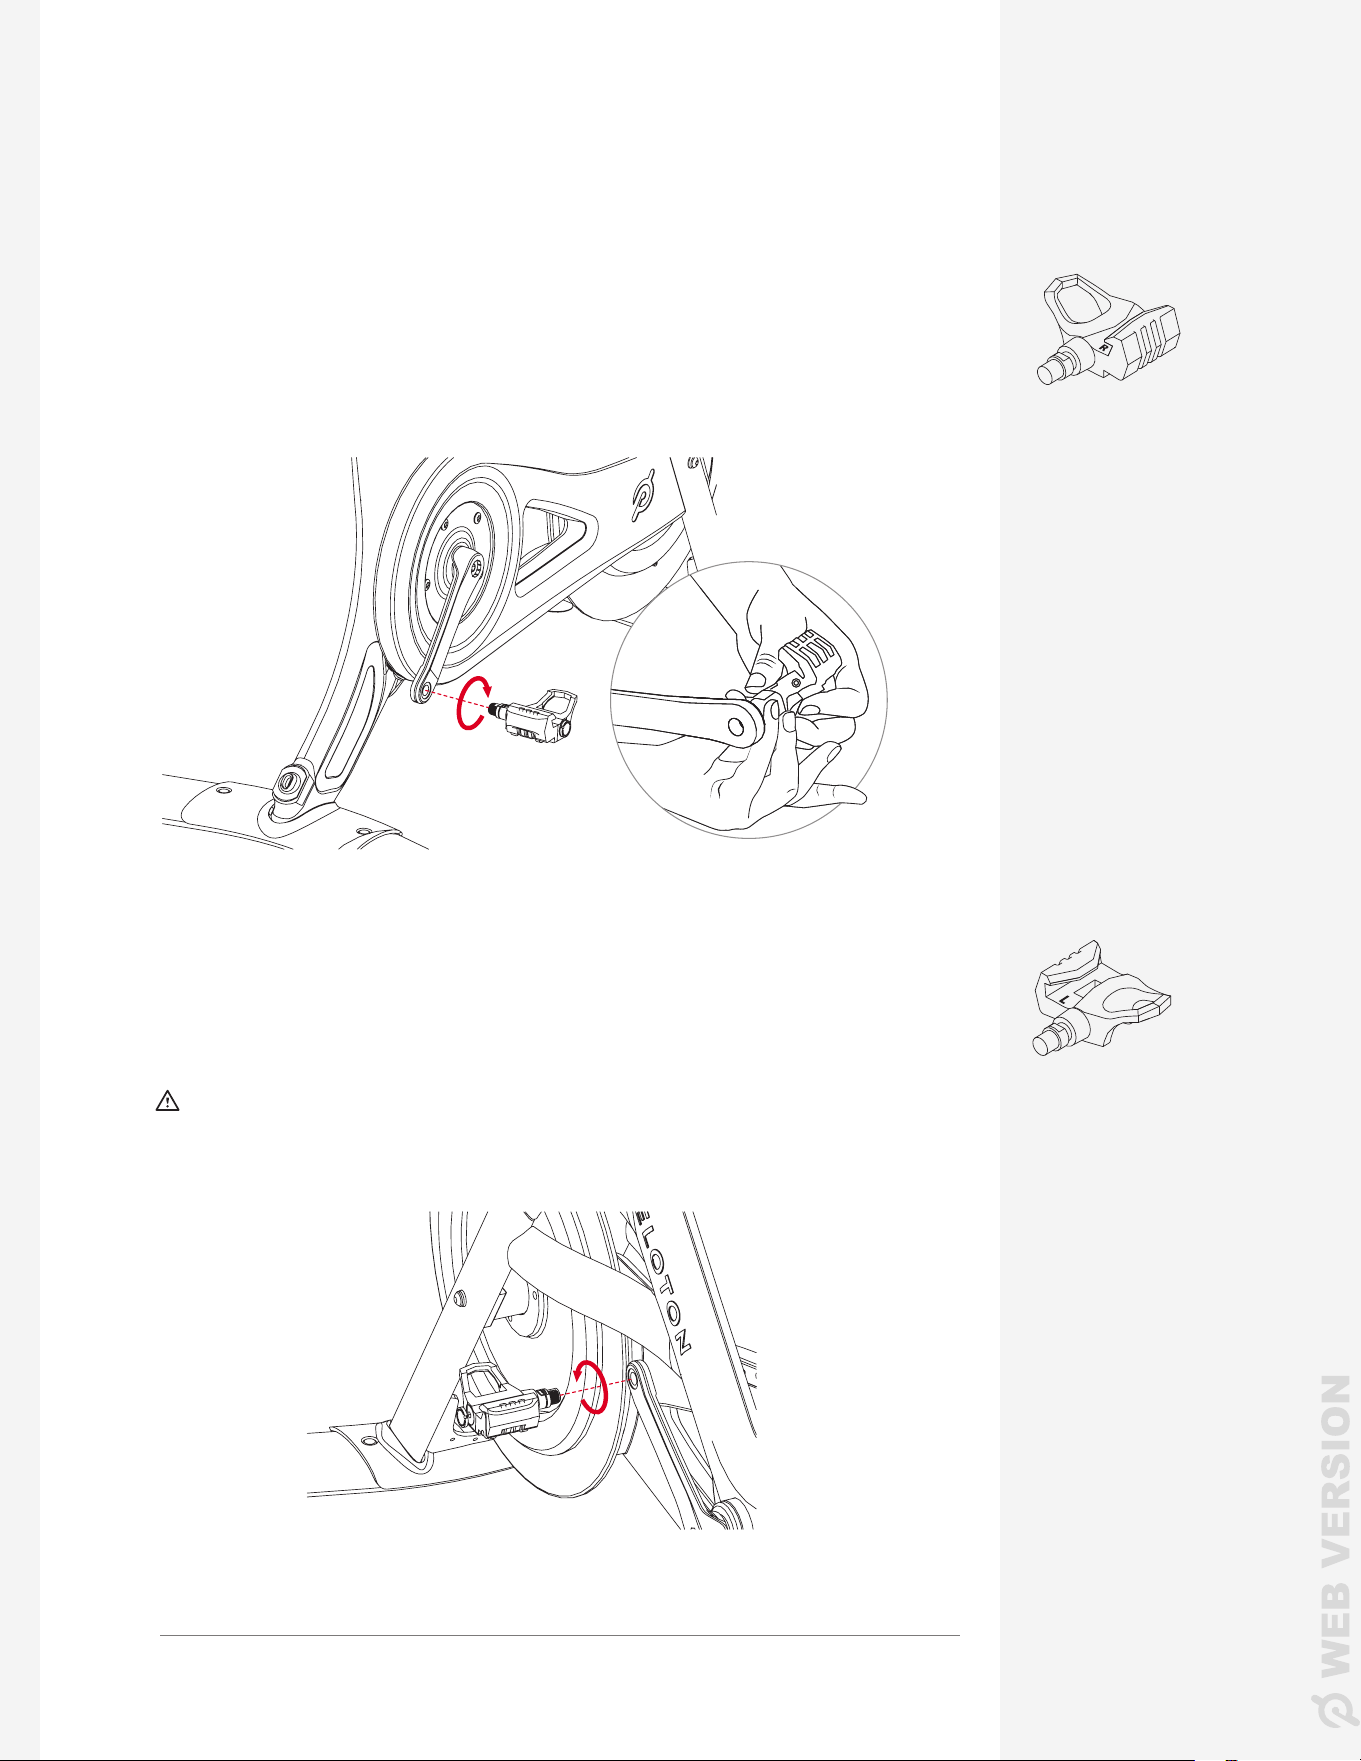
16 | ASSEMBLING THE BIKE+ 17 | ASSEMBLING THE BIKE+
Pedal Wrench
Note: Remember to turn the left pedal counterclockwise to tighten.
3 Once both pedals are screwed in, hold the crank arm and use your pedal
wrench to fully tighten them. Turn the wrench toward the front of the
Bike+ on both sides.
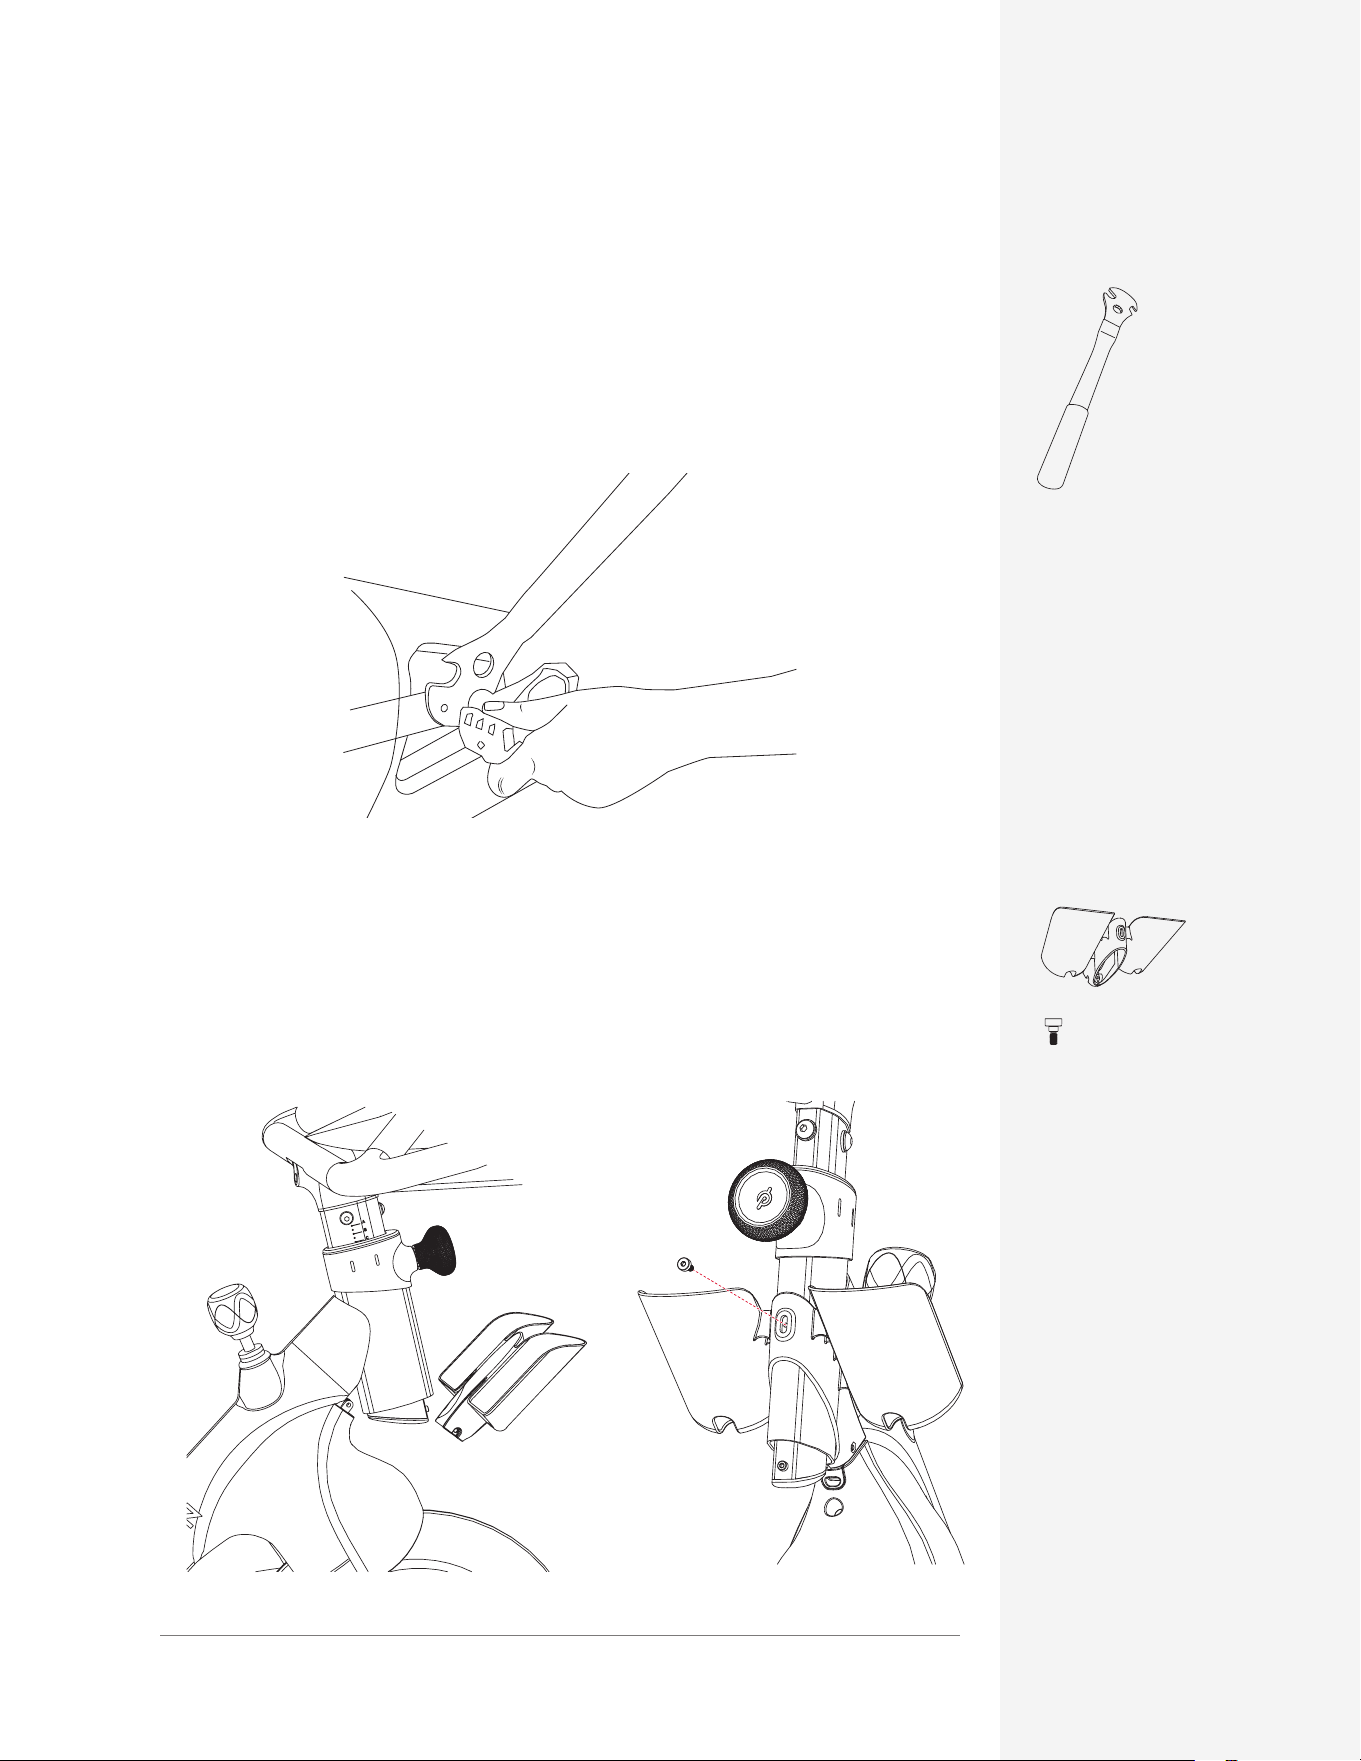
ADDING THE WATER BOTTLE HOLDERS
1 Pull the water bottle holder apart slightly to t it onto the head tube.
2 Add the last bolt D to the front of the water bottle holder, but don't tighten it.
PARTS AND TOOLS
ASSEMBLING THE BIKE+
E × 1
3mm
3 Find the long screw and nut E. Push the screw all the way into the right side of
the water bottle holder.
CAUTION: Before adding the long screw, make sure that the holes in the
front shroud, water bottle holder, and rubber USB-C inlet line up. Failure to t
these parts together correctly could damage the cable.
4 Add the nut to the other side and tighten the screw using the 3 mm Allen wrench.
You may need to hold the nut in place with a nger or another Allen wrench.
5 Return to bolt D and tighten it using the 3 mm Allen wrench.
CAUTION: Make sure the USB-C inlet is ush with the front shroud. If it
sticks out, the inlet, water bottle holder and shroud are not lined up correctly.
Return to step 3.
3 mm
ASSEMBLING THE BIKE+
D × 1
16 | ASSEMBLING THE BIKE+ 17 | ASSEMBLING THE BIKE+
Pedal Wrench
Note: Remember to turn the left pedal counterclockwise to tighten.
3 Once both pedals are screwed in, hold the crank arm and use your pedal
wrench to fully tighten them. Turn the wrench toward the front of the
Bike+ on both sides.
ADDING THE WATER BOTTLE HOLDERS
1 Pull the water bottle holder apart slightly to t it onto the head tube.
2 Add the last bolt D to the front of the water bottle holder, but don't tighten it.
PARTS AND TOOLS
ASSEMBLING THE BIKE+
E × 1
3mm
3 Find the long screw and nut E. Push the screw all the way into the right side of
the water bottle holder.
CAUTION: Before adding the long screw, make sure that the holes in the
front shroud, water bottle holder, and rubber USB-C inlet line up. Failure to t
these parts together correctly could damage the cable.
4 Add the nut to the other side and tighten the screw using the 3 mm Allen wrench.
You may need to hold the nut in place with a nger or another Allen wrench.
5 Return to bolt D and tighten it using the 3 mm Allen wrench.
CAUTION: Make sure the USB-C inlet is ush with the front shroud. If it
sticks out, the inlet, water bottle holder and shroud are not lined up correctly.
Return to step 3.
3 mm
ASSEMBLING THE BIKE+
D × 1

18 | ASSEMBLING THE BIKE+ 19 | ASSEMBLING THE BIKE+
ASSEMBLING THE BIKE+
ATTACHING THE TOUCHSCREEN
1 Open the touchscreen box and remove the touchscreen and the small bag
containing two screws.
CAUTION: Hold onto the touchscreen during installation. Until the
touchscreen is fully secured to the monitor mount, it can fall and break.
2 Fit the touchscreen onto the monitor mount and tilt it up.
Long 4mm
Touchscreen screws
× 2
3 Add the two screws to the underside of the monitor mount. Screw them in
using the long 4mm Allen wrench from the Home Assembly Kit.
CAUTION: Make sure the screws go in straight and are ush against
the monitor mount when tight. Cross-threaded screws may not hold the
touchscreen securely, and create a risk of damage and injury.
4 Locate the two cables coming from the monitor mount and remove
any remaining foam or twist-ties. Plug the audio cable into the top port.
Plug the USB-C cable into the middle port.
PARTS AND TOOLS
ASSEMBLING THE BIKE+
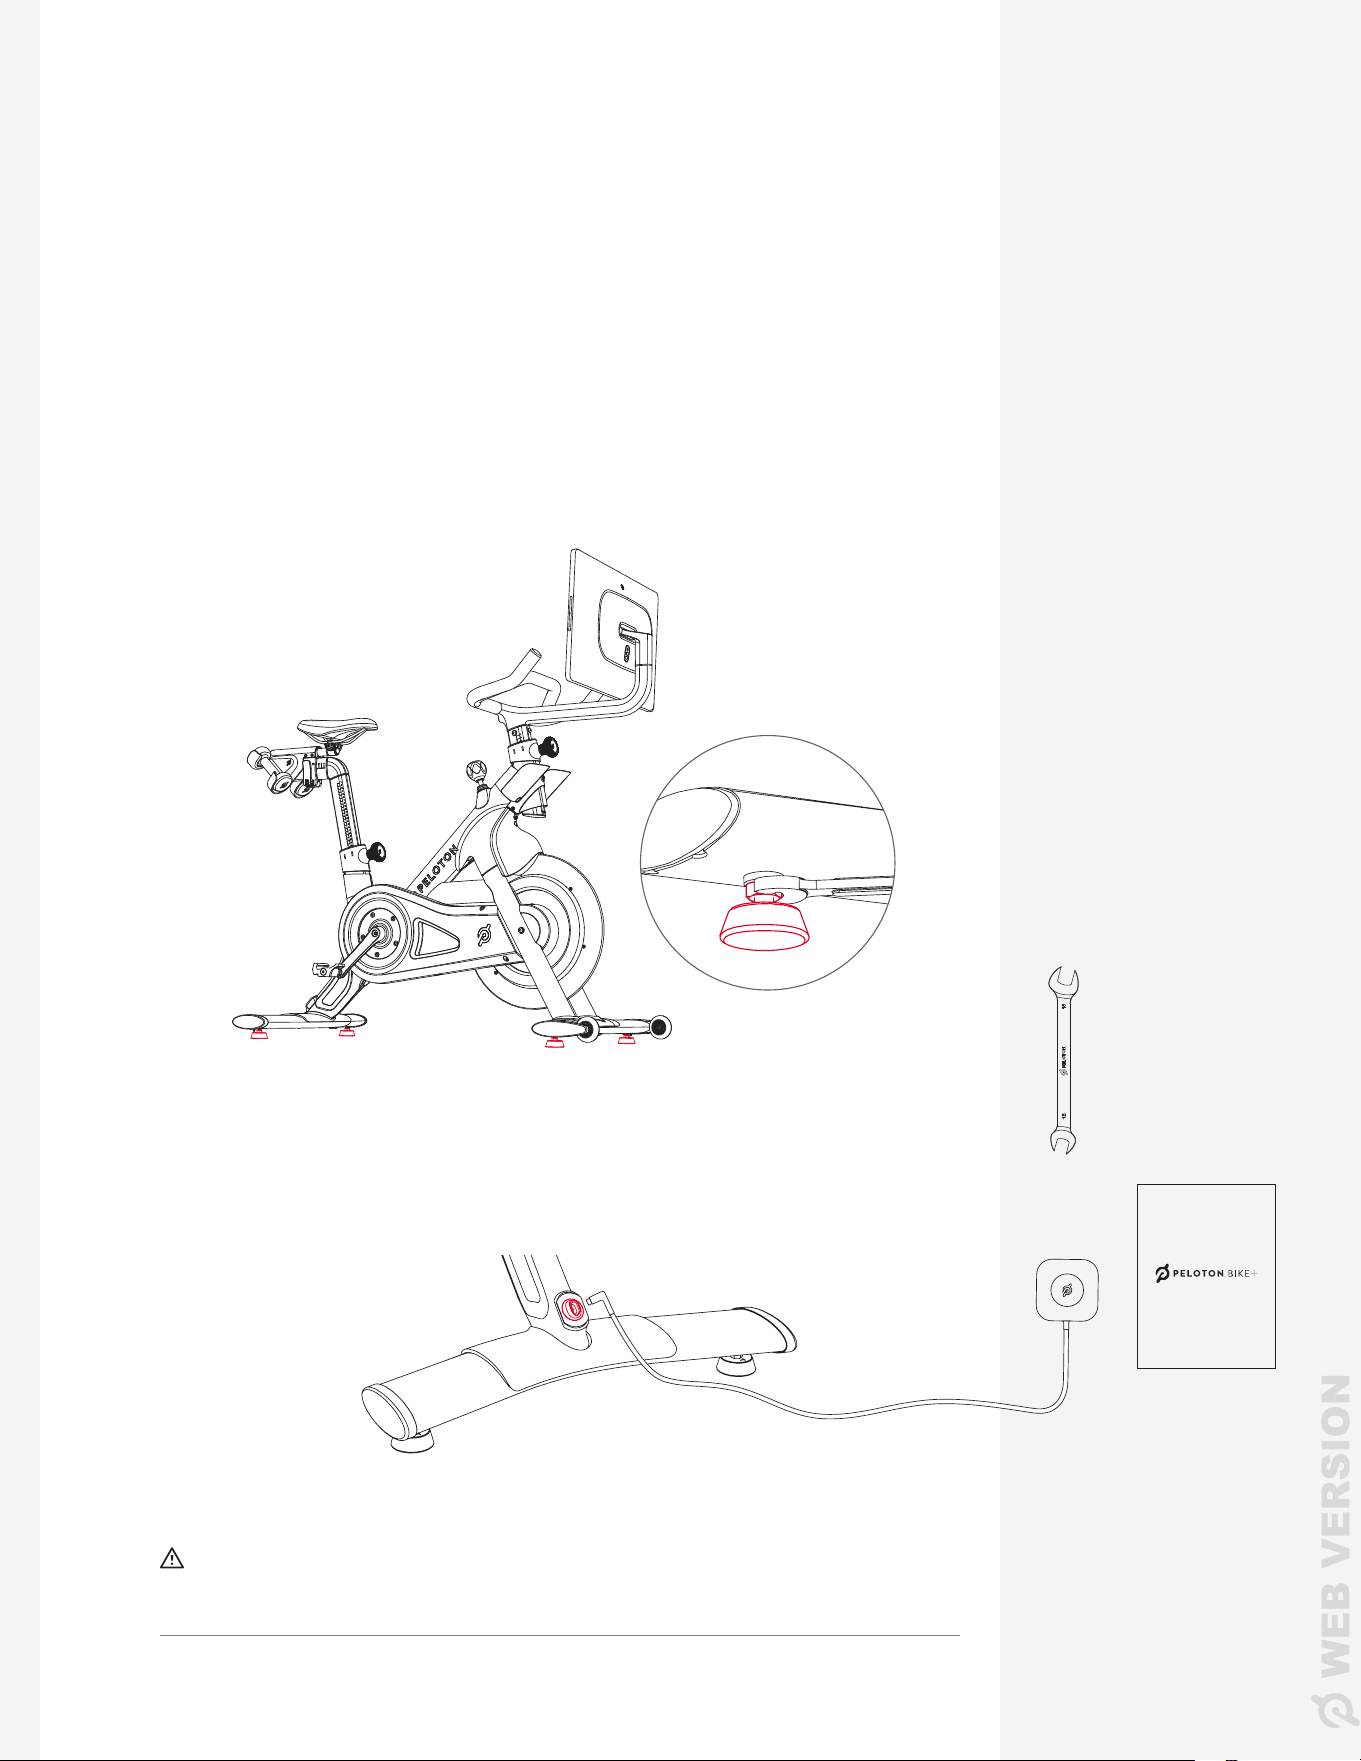
LEVELING THE BIKE+
1 Roll the Bike+ off the cardboard by tilting it forward onto the front wheels.
Check the User Manual for location requirements, and make sure the Bike+
is located where you plan to use it.
2 Gently push the seat and handlebars from side to side to check if the Bike+
rocks or wobbles.
3 If there is any wobble, check each of the four leveling feet. If any foot does not
rest rmly against the oor, turn it clockwise to lower it.
15 mm
User Manual
PARTS AND TOOLS
4 Using the 15 mm wrench, tighten the nut on each leveling foot. The nut
should sit against the underside of the stabilizer.
WAIT! Your Peloton Bike+ is now fully assembled, but there are still a few
steps to complete before you start riding. Please see the Peloton Bike+ User
Manual for instructions on plugging in your bike and connecting to an account
and subscription.
U SER MA NU AL
CAUTION: Only plug the monitor mount USB-C cable into the port.
Never plug the power supply directly into the touchscreen.
Power
supply
If your box included more than one power cord, make sure to use the appropriate
one for your region.
CAUTION: Perform a complete visual inspection of the Peloton Bike+ and
test all features and functions prior to use.
18 | ASSEMBLING THE BIKE+ 19 | ASSEMBLING THE BIKE+
ASSEMBLING THE BIKE+
ATTACHING THE TOUCHSCREEN
1 Open the touchscreen box and remove the touchscreen and the small bag
containing two screws.
CAUTION: Hold onto the touchscreen during installation. Until the
touchscreen is fully secured to the monitor mount, it can fall and break.
2 Fit the touchscreen onto the monitor mount and tilt it up.
Long 4mm
Touchscreen screws
× 2
3 Add the two screws to the underside of the monitor mount. Screw them in
using the long 4mm Allen wrench from the Home Assembly Kit.
CAUTION: Make sure the screws go in straight and are ush against
the monitor mount when tight. Cross-threaded screws may not hold the
touchscreen securely, and create a risk of damage and injury.
4 Locate the two cables coming from the monitor mount and remove
any remaining foam or twist-ties. Plug the audio cable into the top port.
Plug the USB-C cable into the middle port.
PARTS AND TOOLS
ASSEMBLING THE BIKE+
LEVELING THE BIKE+
1 Roll the Bike+ off the cardboard by tilting it forward onto the front wheels.
Check the User Manual for location requirements, and make sure the Bike+
is located where you plan to use it.
2 Gently push the seat and handlebars from side to side to check if the Bike+
rocks or wobbles.
3 If there is any wobble, check each of the four leveling feet. If any foot does not
rest rmly against the oor, turn it clockwise to lower it.
15 mm
User Manual
PARTS AND TOOLS
4 Using the 15 mm wrench, tighten the nut on each leveling foot. The nut
should sit against the underside of the stabilizer.
WAIT! Your Peloton Bike+ is now fully assembled, but there are still a few
steps to complete before you start riding. Please see the Peloton Bike+ User
Manual for instructions on plugging in your bike and connecting to an account
and subscription.
U SER MA NU AL
CAUTION: Only plug the monitor mount USB-C cable into the port.
Never plug the power supply directly into the touchscreen.
Power
supply
If your box included more than one power cord, make sure to use the appropriate
one for your region.
CAUTION: Perform a complete visual inspection of the Peloton Bike+ and
test all features and functions prior to use.

© Peloton 2023, Peloton Interactive, Inc. All rights reserved.
onepeloton.com
PL-02 | 00093-1.1