
USER MANUAL

In Studio with Tunde Oyeneyin
2
TABLE OF CONTENTS
3
CAUTION Read all precautions and instructions in this manual before using this equipment. Improper use or
maintenance can void the warranty. Keep this manual for future reference. The information in this manual may
not reect recent updates as we continue to improve our product. Please see onepeloton.com/manuals for the latest
version of the manual.
Connecting to Wifi
Connecting to Ethernet
Logging In
Adding a Rider
Peloton 101
Joining a Ride
THE CLASS SCREEN
MAINTENANCE AND CARE
After Each Ride
Every 3 to 5 rides
Every 15 to 20 Rides
Annually
BIKE ASSEMBLY
Bike Parts
Spare Parts
Assembly
WARRANTY
SUPPORT
14
14
15
15
15
15
16
17
17
17
18
19
20
20
23
24
27
31
SAFETY INFORMATION
NOTICES
SPECIFICATIONS
Bike Specifications
Touchscreen Specifications
SETTING UP YOUR BIKE
Location Requirements
Moving The Bike
Seat Height
Seat Depth
Handlebar Height
Proper Body Position
Clipping In and Out
Adjusting Resistance
GETTING STARTED
Plugging In
Powering On and Off
04
05
06
06
07
09
09
09
10
10
11
11
12
12
13
13
13
3

SAFETY INFORMATION
Read all safety information before
operating the bike. It is the owner’s
responsibility to ensure that users are
aware of all warnings and precautions.
Consult a physician before beginning a
new tness plan. Incorrect or excessive
training can result in serious injury.
If you experience faintness, chest pain,
or shortness of breath, stop exercising
immediately and consult a physician.
Metrics on the screen, including
heart rate monitoring, may be
inaccurate. Values should be used
for reference only.
This bike has a direct driven ywheel.
If the ywheel is moving, the pedals
are moving. Stop by reducing pedaling
frequency in a controlled manner or
by using the emergency brake. Do not
remove your feet from the pedals until
the ywheel stops moving.
The resistance knob can be used as an
emergency brake. To stop immediately,
push down on the resistance knob.
Use caution when mounting
and dismounting.
To prevent injury, always adjust the
seat and handlebars to your
personal requirements.
Children under the age of 14 and
persons with reduced physical, sensory,
or mental capabilities that impair the
safe use of the bike must not use the
bike. Keep children and pets away from
the bike at all times.
Children over the age of 14 and
persons with a lack of experience and
knowledge must be given supervision or
instruction before using the bike.
Do not allow children to perform
maintenance or to play with the bike.
Always fully engage the brake when the
bike is not in use.
Keep hands, loose clothing, shoelaces,
and accessories away from moving
parts. Do not insert objects into
openings on the equipment.
The bike is equipped with
Delta-compatible pedals. Always
cycle using footwear equipped with
appropriate cleats.
Perform regular maintenance for
optimal performance and longevity. To
ensure safety, the bike must be checked
for wear and damage on a regular basis.
Replace any damaged or worn parts
immediately. Do not use the bike until
the repair is performed.
Use only original parts from the
manufacturer. Changes or
modications to this unit not expressly
approved by Peloton could void
the warranty.
Always unplug the bike immediately
after use and before cleaning or
performing maintenance. Service
other than the procedures described
here must be performed by an
authorized technician.
The bike should not be used by persons
exceeding 297 lb in weight.
This bike is for indoor home use only. Do
not store the bike outdoors, near water,
or at high humidity levels.
This bike is for home use only. Do not
use in a commercial setting. Use the
bike only for its intended purpose.
4

NOTICES
1 Reorient or relocate the
receiving antenna.
2 Increase the separation between the
equipment and receiver.
3 Connect the equipment to an outlet
on a circuit different from that to
which the receiver is connected.
4 Consult the dealer or an experienced
radio/TV technician for help.
CAUTION:
1 To comply with FCC RF exposure
compliance requirements, a separation
distance of at least 20 cm must be
maintained between the antenna of
this device and all persons.
2 This transmitter must not be
co-located or operating in conjunction
with any other antenna or transmitter.
This device complies with part 15 of
the FCC Rules. Operation is subject to
the following two conditions: (1) this
device must not cause harmful
interference, and(2) this device must
not accept any interference received,
including interference that may
cause undesired operation.
NOTE: This equipment has been
tested and found to comply with the
limits for a Class B digital device,
pursuant to Part 15 of the FCC Rules.
These limits are designed to provide
reasonable protection against harmful
interference in a residential installation.
This equipment generates, uses and can
radiate radio frequency energy and, if
not installed and used in accordance
with the instructions, may cause
harmful interference to radio
communications. However, there is
no guarantee that interference will not
occur in a particular installation. If this
equipment does cause harmful
interference to radio or television
reception, which can be determined by
turning the equipment off and on, the
user is encouraged to try to correct the
interference by one or more of the
following measures:
DISTRIBUTED BY:
US/CANADA
Peloton Interactive, Inc.
441 9th Ave, 9th Floor
New York, NY 10001
United States
UK
Peloton Interactive UK Limited
110 Long Acre
Covent Garden
London WC2E 9LH
United Kingdom
EU
Peloton Interactive Deutschland GmbH
c/o WeWork Neue Schönhauser Str. 3-5
Neue Schönhauser Straße 3-5
10178 Berlin
Germany
AUSTRALIA
Peloton Interactive Australia Pty Ltd
20 Martin Place
Sydney NSW 2000
Australia
Waste electrical products should
not be disposed of with household
waste. Please recycle where
facilities exist. Check with your
local authority or retailer for
recycling advice.
This product is ANT+™ certied and
is compatible with ANT+ sensors
that support heart rate monitoring.
5
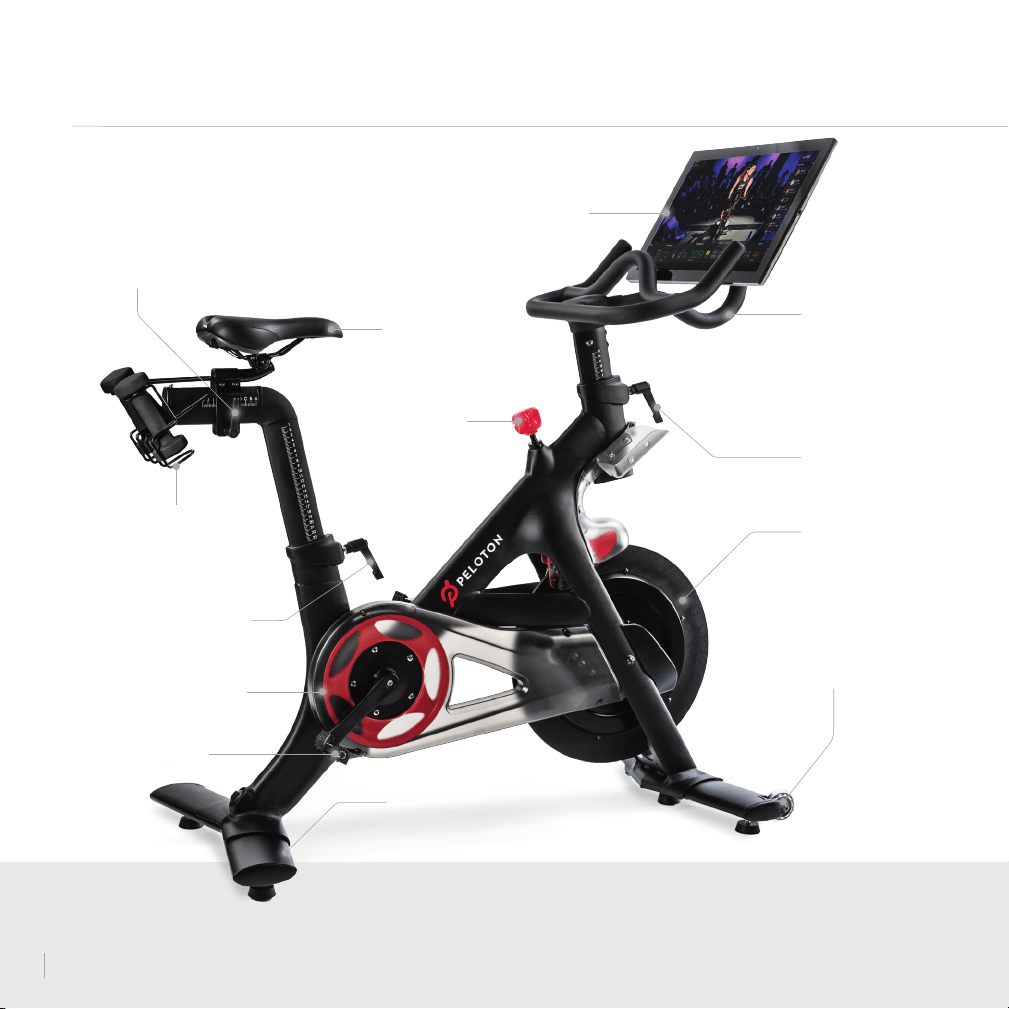
SPECIFICATIONS
WEIGHT
HOLDERS
SADDLE
SEAT HEIGHT
L-HANDLE
HANDLEBARS
HANDLEBAR HEIGHT
L-HANDLE
FLYWHEEL
TRANSPORT
WHEELS
PEDAL
BELT GUARD
RESISTANCE KNOB/
EMERGENCY BRAKE
LEVELING FEET
TOUCHSCREEN
SEAT DEPTH
L-HANDLE
6

VOLUME CONTROLS
ETHERNET PORT
METRICS PORT
POWER BUTTON
POWER INPUT
USB PORT
AUDIO JACK
7

SPECIFICATIONS CONTINUED
FOOTPRINT : 4' L x 2' W
WEIGHT : 138 lbs
HEIGHT : 4' 10"
USER HEIGHT RANGE : 4'11"–6'5"
MAX USER WEIGHT :
297 lbs
WEIGHT HOLDER CAPACITY : 3 lbs
BIKE TOUCHSCREEN
21.5” 1080p HD touchscreen
WiFi 802.11 a/b/g/n/ac / 100 Mbps Ethernet
16 GB internal ash storage
ANT+™ wireless / Bluetooth® 4.0
2×10 watt stereo speakers
8
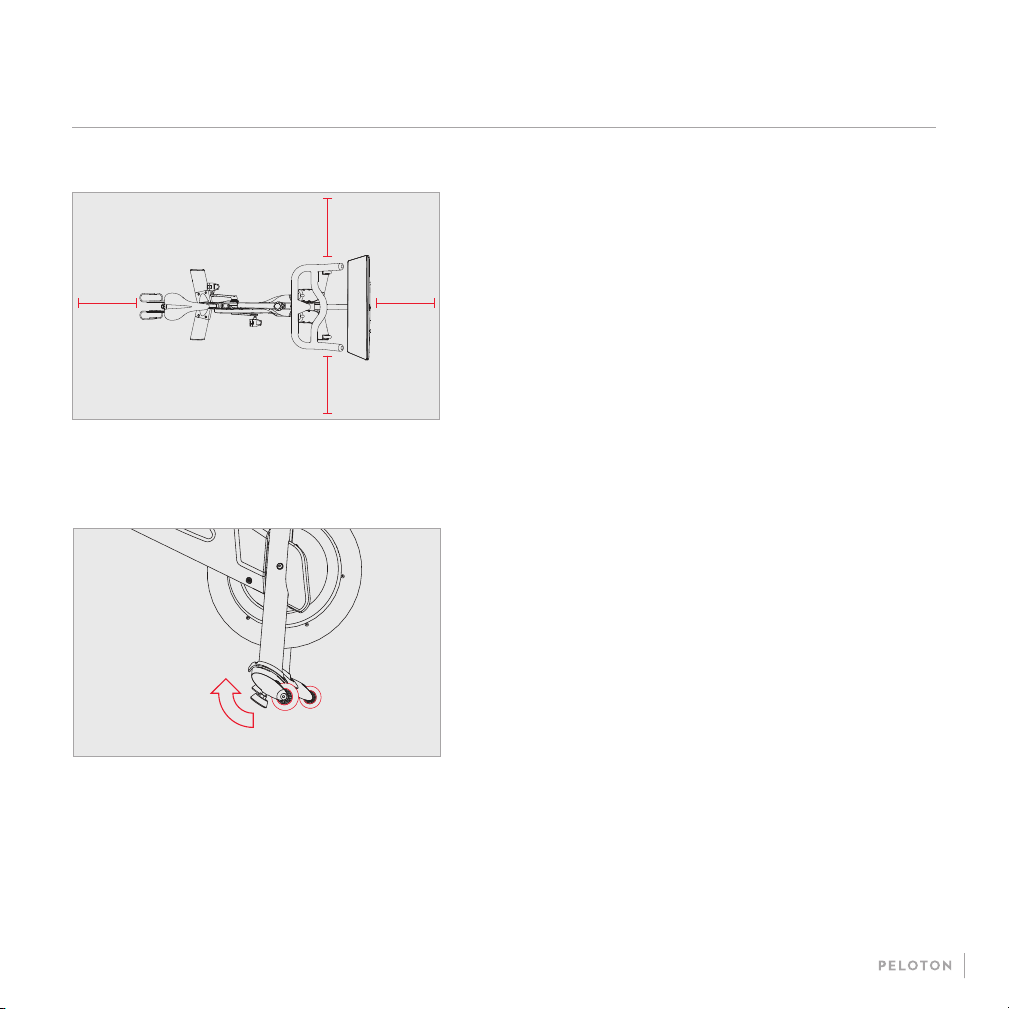
SETTING UP YOUR BIKE
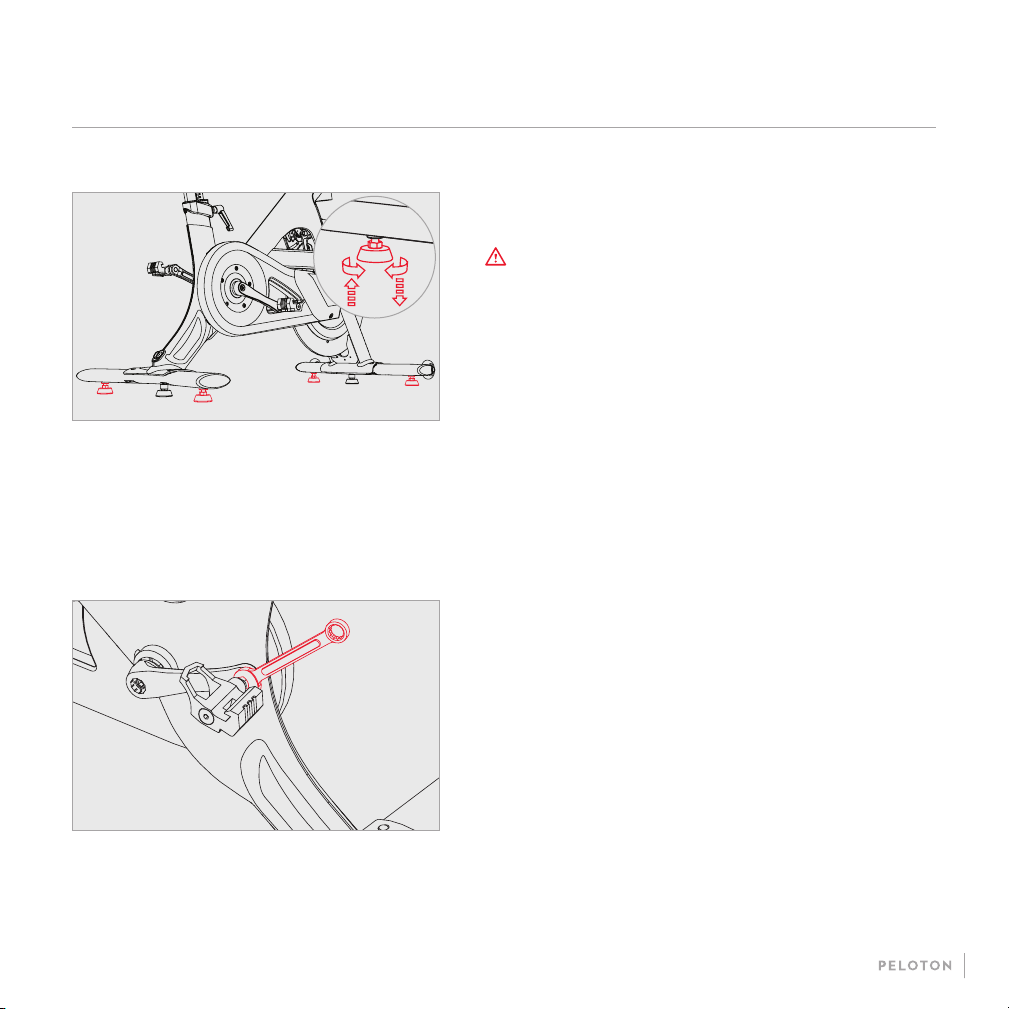
LOCATION REQUIREMENTS
MOVING THE BIKE
24"24"
24"
24"
y Place the bike on a solid, level and horizontal surface
y Use a mat to avoid damage to the bike and oor
y Allow a clearance of 24” (60 cm) on each side of the bike
y Tilt the bike forward onto the wheels. Lift the rear stabilizer
while a second person holds the handlebars
y Carefully roll the bike to the new location. Avoid
uneven surfaces
y If the bike rocks after being set down, unscrew each leveling
foot until it rests rmly on the oor
9
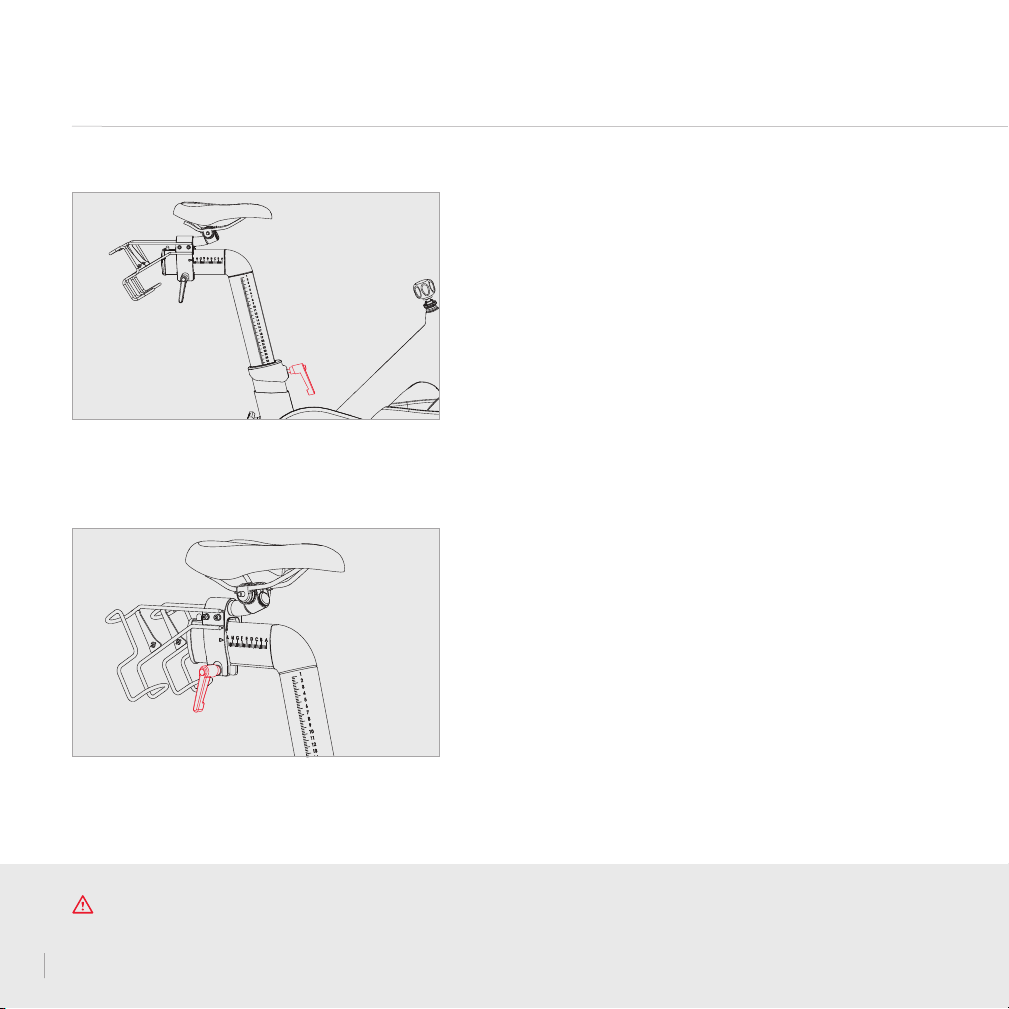
SEAT HEIGHT
SEAT DEPTH
Set the seat depth so that the distance between seat and
handlebars is equal to the distance between your elbow
and ngertips.
y Turn L-handle counterclockwise to loosen
y Raise or lower seat
y Turn L-handle clockwise to tighten
y Turn L-handle counterclockwise to loosen
y Move seat forward or back
y Turn L-handle clockwise to tighten
Set the seat height to line up with the top of your hip bone.
SETTING UP YOUR BIKE CONTINUED
CAUTION To prevent injury, always adjust seat and handlebars to your personal requirements. Tighten all adjustment handles
before using the Peloton Bike. Projecting adjustment handles could interfere with your movements. Do not exceed maximum
adjustment marks on seat and handlebar posts and sliders.If any adjustment handle sticks out sideways, pull the handle out, rotate it
to point down, and then release it.
10
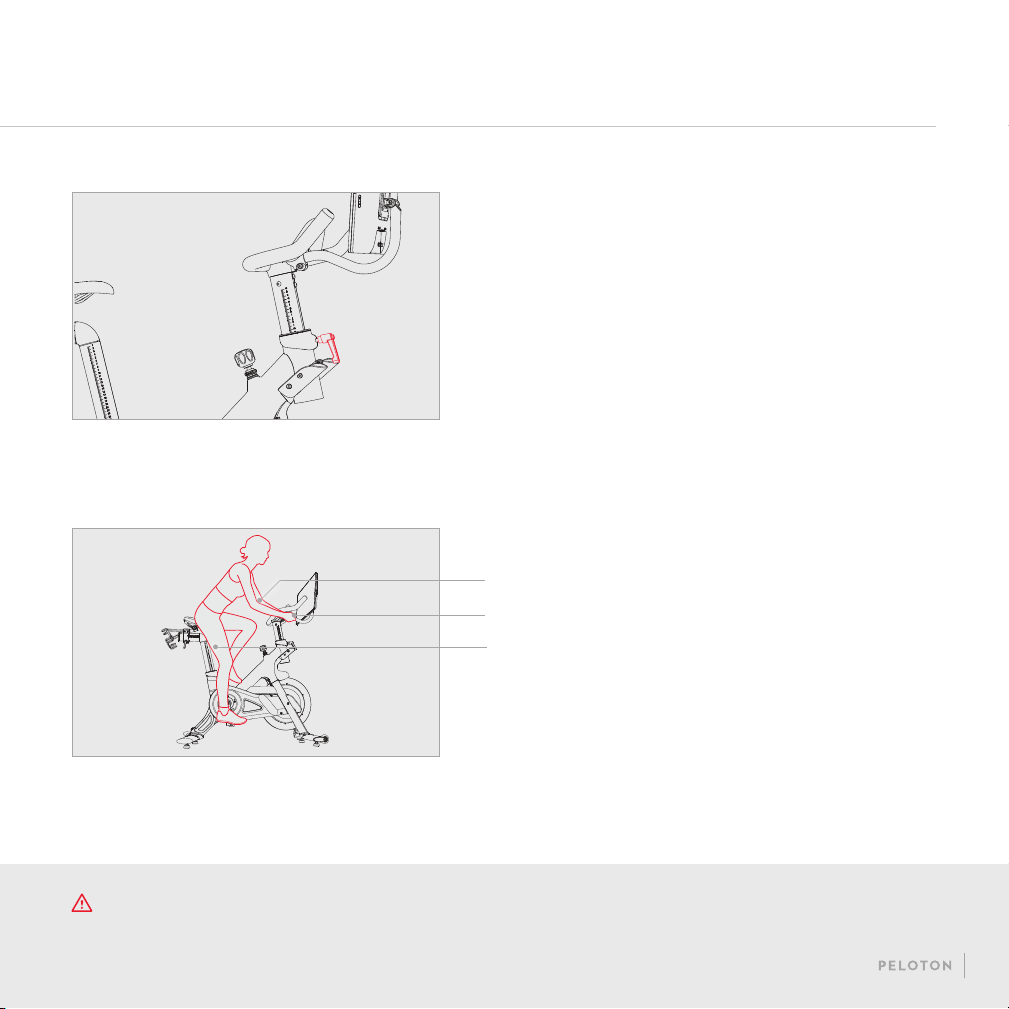
BODY POSITION
Arms slightly bent
Hands rest on handlebars without reaching
Leg slightly bent at the bottom of the stroke
These adjustments should get you started. If you’re
uncomfortable, or want to ne-tune your bike’s settings, go
to support.onepeloton.com.
HANDLEBAR HEIGHT
Set the handlebars to seat height, then adjust until you
feel comfortable.
y Turn L-handle counterclockwise to loosen
y Raise or lower the handlebars
y Turn L-handle clockwise to tighten
CAUTION The Peloton Bike has a direct driven ywheel; the pedals will continue to move until the ywheel stops. Reduce
speed slowly. To stop the ywheel immediately, push down the resistance knob.
11

SETTING UP YOUR BIKE CONTINUED
CLIPPING IN AND OUT
TO CLIP IN: Point your toes down to t the cleat
into the pedal, then push down through your heel.
TO CLIP OUT: Kick your heel away from the bike.
ADJUSTING RESISTANCE
y Turn knob right to increase resistance
y Turn knob left to decrease resistances
y Press knob down for emergency brake
12
GETTING STARTED
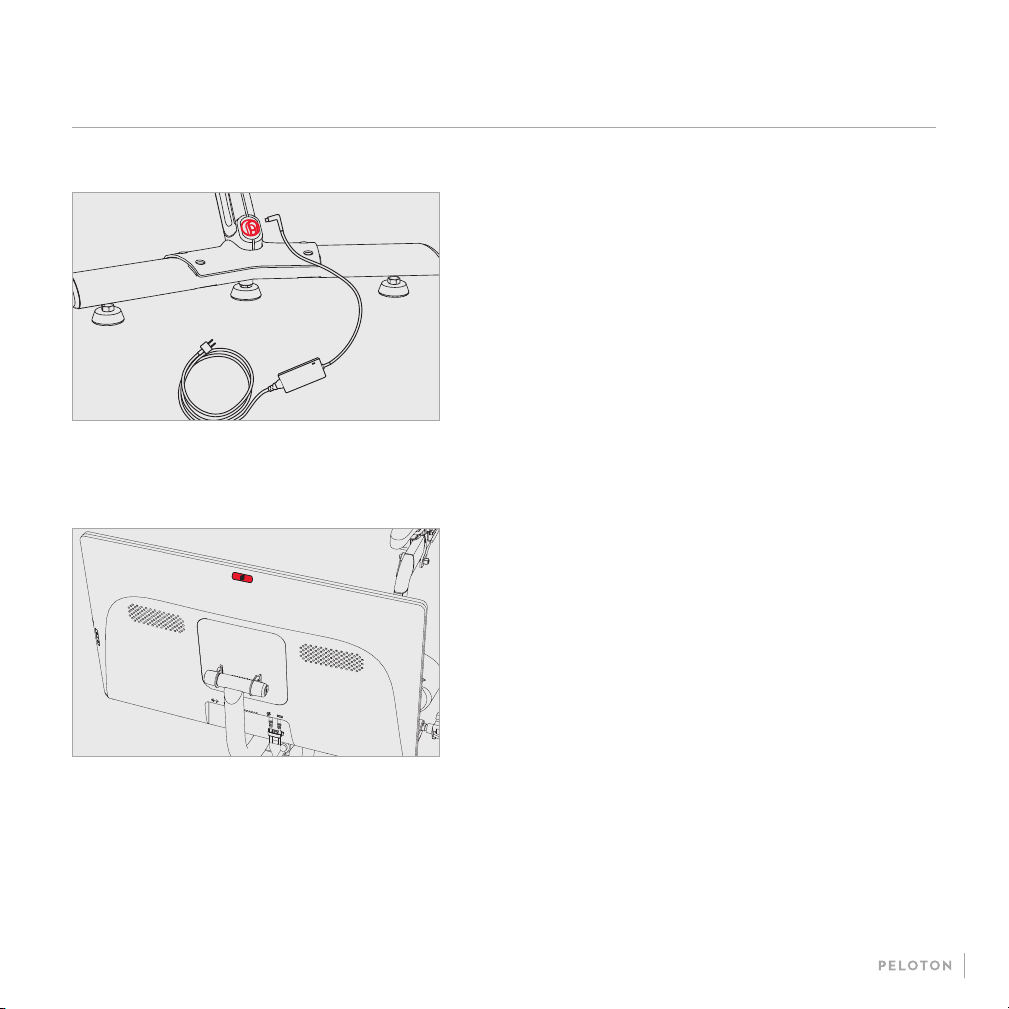
POWERING ON AND OFF
y Hold the power button for two seconds to power on the bike
y The bike will sleep after about 20 minutes of inactivity. To
wake the bike, press the power button
y To power down, hold the power button for two seconds.
Select Shut Down when prompted
PLUGGING IN
tooltip
t
p
tooltip
t
y Plug the power supply into the wall
y Plug the power cord into the power jack at the back of
the bike
13

CONNECTING TO THE INTERNET
To connect to a WiFi network, tap the network name
y If the network is not secured, the bike will connect to
the network
y If the network is secured, you will be prompted
to enter a password. Type in the password and
tap Connect
To connect to a wired network, connect an Ethernet cable to the
Ethernet port on the back of the touchscreen and to a wall jack
or router used by your local area network. The bike will connect
to the network automatically.
GETTING STARTED CONTINUED
14

ADDING A PROFILE
To let another person use your bike, tap the icon
next to your username at the lower left of the screen and
select Add/Remove Proles. The new user can
log in with an existing Peloton account or tap
Create an Account to set up a new one.
LOGGING IN
When logging in for the rst time, please have
available your Subscription Activation Key or the
login information you set up when you purchased the
Peloton Bike.
Once a subscription is activated and associated
with this bike, any user can log in and access
subscription content.
JOINING A RIDE
y Find live classes on the schedule or choose
from on-demand classes.
y Filter by instructor, class length,
class type, and more.
y Your instructor will guide you through your
workout. If the workout does not include a
warmup and cooldown, warmup and cooldown classes
are available separately.
y Select More for a Scenic Ride or Just
Ride experience.
PELOTON 101
Select Peloton 101 from the menu for more on adjusting your
bike to t your body and maintaining proper body position
when you ride.
15

CLASS SCREEN
RESISTANCE
Pedaling diculty, measured
as a percentage
CADENCE
How fast you're pedaling,
in revolutions per minute
OUTPUT
The power you're exerting,
measured in watts
TIME REMAINING
HEART RATE*
LEADERBOARD
DISTANCE
TRAVELED
TOTAL OUTPUT
CALORIES BURNED
* Appears only when a heart rate monitor is connected.
16
MAINTENANCE AND CARE
CLEANING: Wipe down the bike using a damp cloth.
LEVELING FEET: If the bike rocks back and forth, turn
each leveling foot clockwise (when viewed from above) until it
rests rmly on the ground.
EVERY 3 TO 5 RIDES
CLEANING: Clean the bike thoroughly using a damp cloth and
a mild household cleaner diluted in water. Clean the touchscreen
using an electronics wipe.
PEDALS: Tighten any loose pedal with the included 15mm
wrench. Pedals should be tightened to 25 lb-ft of torque. Turn
clockwise to tighten the right pedal and counterclockwise to
tighten the left pedal.
CAUTION To ensure safe operation and optimal
performance, check for wear and damage and perform
maintenance on a regular basis. Replace any damaged
or defective parts immediately. Do not use the bike until
the repair is performed. Only use original parts from the
manufacturer. Changes or modications to this unit not
expressly approved by Peloton could void the warranty.
AFTER EVERY RIDE
17

EMERGENCY BRAKE: Press down on the resistance knob
while pedaling slowly. The flywheel should come to a complete
stop immediately. If it does not, stop using the bike immediately and
contact Peloton Support.
FRAME: Check the entire frame for signs of wear and damage,
and tighten any loose bolts.
EVERY 3 TO 5 RIDES CONTINUED
CLEATS: Use a 4 mm Allen wrench to tighten any loose screws
attaching your cleats to your cycling shoes.
SADDLE: Make sure the saddle is parallel to the ground. Then
use the included 13mm wrench to tighten the seat-xing nuts on
both sides.
CAUTION Service other than the procedures described here
must be performed by an authorized technician.
EVERY 15 TO 20 RIDES
MAINTENANCE AND CARE CONTINUED
18

ANNUALLY
PEDALS: Replace pedals. Tighten new pedals to 25 lb-ft of
torque. For further instructions, see support.onepeloton.com.
19

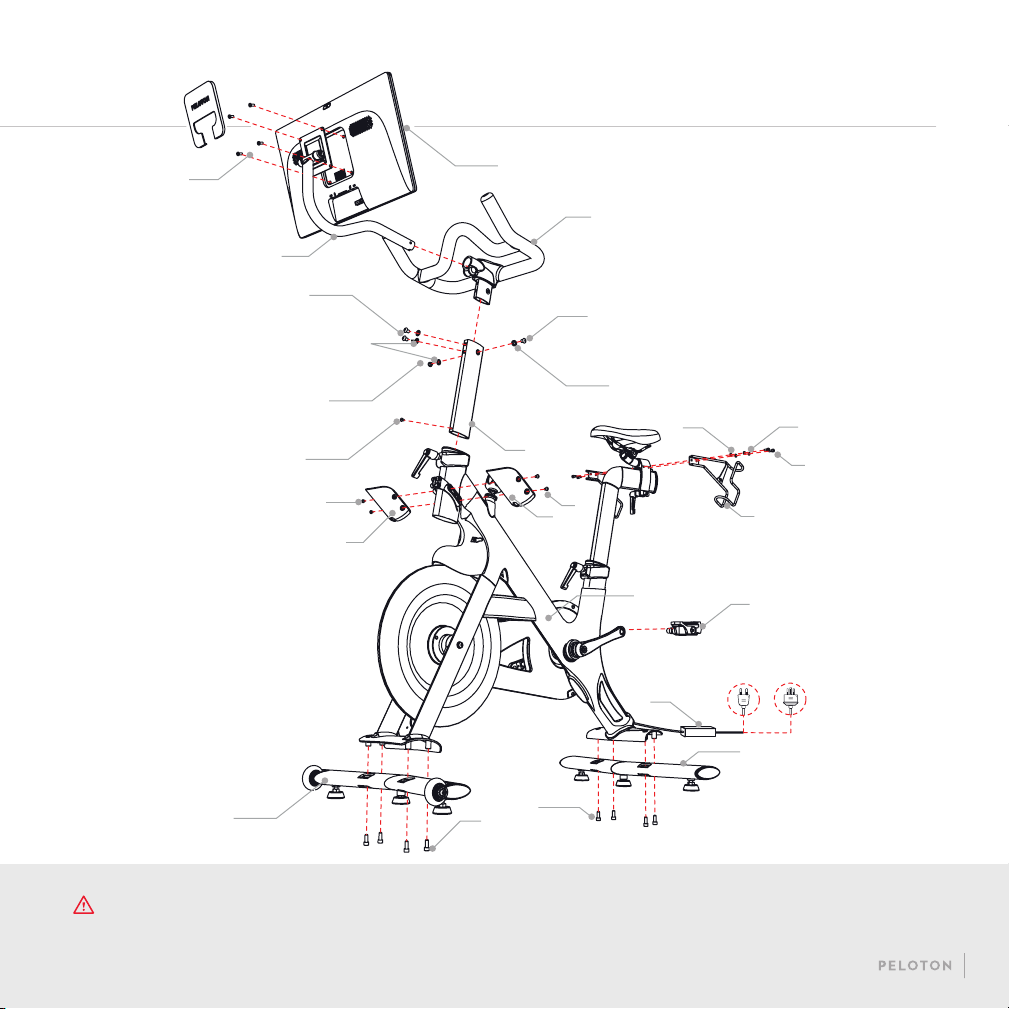
1 Bike frame
2 Front stabilizer
3 Rear stabilizer
4 M8×20 socket cap screw × 8
5 Right and left pedals
6 Handlebar post
7 M8×12 round head screw × 2
8 M8×10 round head screw × 2
9 Flat washer × 4
10 M5×15 Phillips head screw
11 Handlebars
12 Water bottle holder cups × 2
13 M5×8 stainless steel screws × 4
14 Touchscreen arm
15 Touchscreen
16 M4×10mm ange head screws × 4
17 Right and left weight holders
18 M5 washer × 4
19 M5 spring washer × 4
20 M5×8 round head screw × 4
21 Power supply and cord
BIKE PARTS
BIKE ASSEMBLY
y 3mm Allen wrench
y 4mm Allen wrench
y 5mm Allen wrench
y 6mm Allen wrench
y Phillips head screwdriver
y Torque wrench with 15mm
crowfoot attachment
TOOLS
WARNING These assembly instructions are intended to assist trained professional installers in assembling the Peloton
Bike. Damage or equipment failure resulting from the improper or negligent assembly of the bike will not be covered
under Peloton’s warranties.
20
WARNING Perform a complete visual inspection of the Peloton Bike and test all features and functions prior to use.
15
11
7
9
6
16
14
8
9
7
10
13
2
4
4
3
1
19
5
21
20
18
12
12
17
13
21

BIKE ASSEMBLY CONTINUED
C
F
I
A
D
G
B
E
H
22
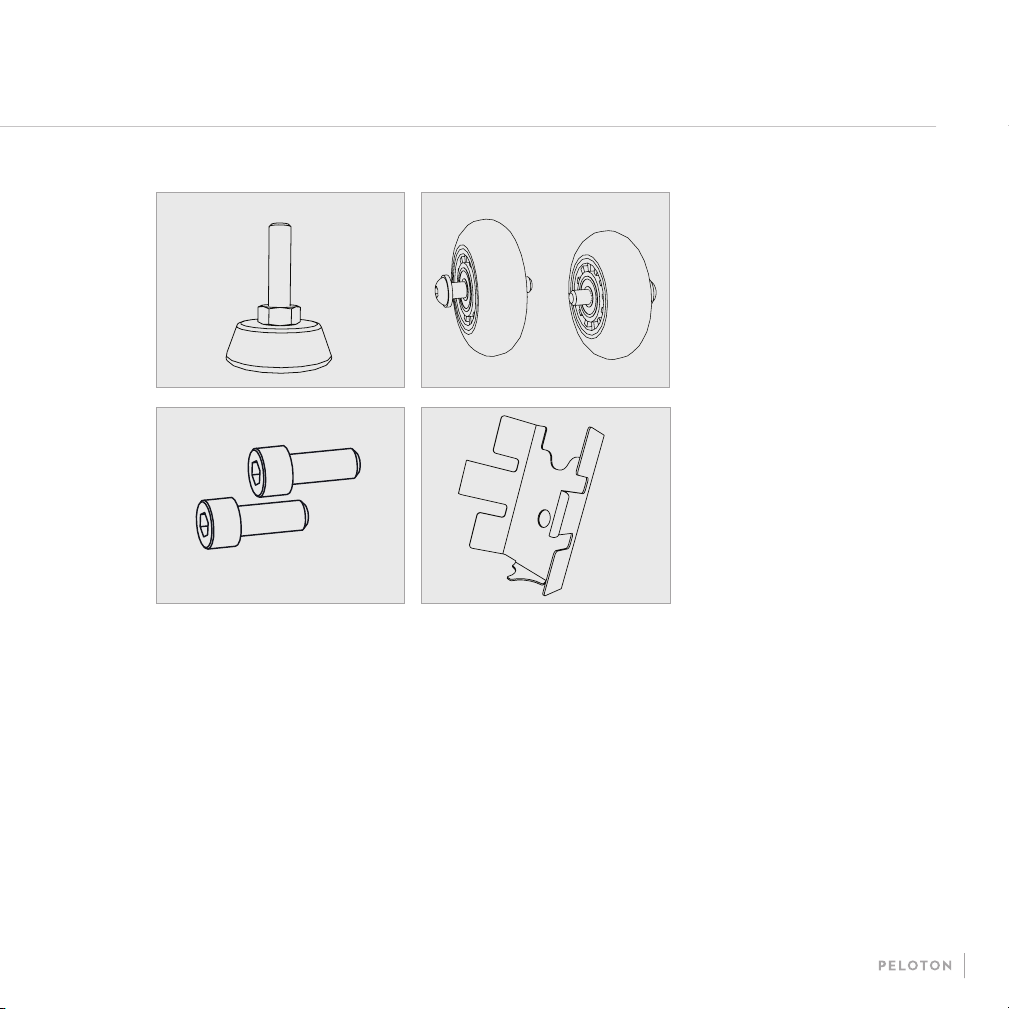
A Saddle SP-03-1
B Small L-handle SP-06/RP-06
C Large L-handle SP-07/RP-07
D Outer Belt Guard SP-11-12
E Belt SP-15
F Right Crank Arm SP-11-17
G Left Crank Arm SP-11-19
H Front Belt Guard SP-11-26
I Sensor Assembly SP-27-2/RP-27
J Foot SP-31
K Wheels SP-32
L Stabilizer Screw Set SP-35
M Wire Bracket SP-41/RP-41
SPARE PARTSJ
L
K
M
y Monitor Cable SP-39
y Inner Wiring SP-38/RP-38
y Label package PL-11-KIT
y Pedals PL-PS7-02-L/R
y Weight Holders SP-09/RP-09
y Front Stabilizer SP-33/RP-33
y Rear Stabilizer SP-34/RP-34
y Handlebars SP-43/RP-43
23
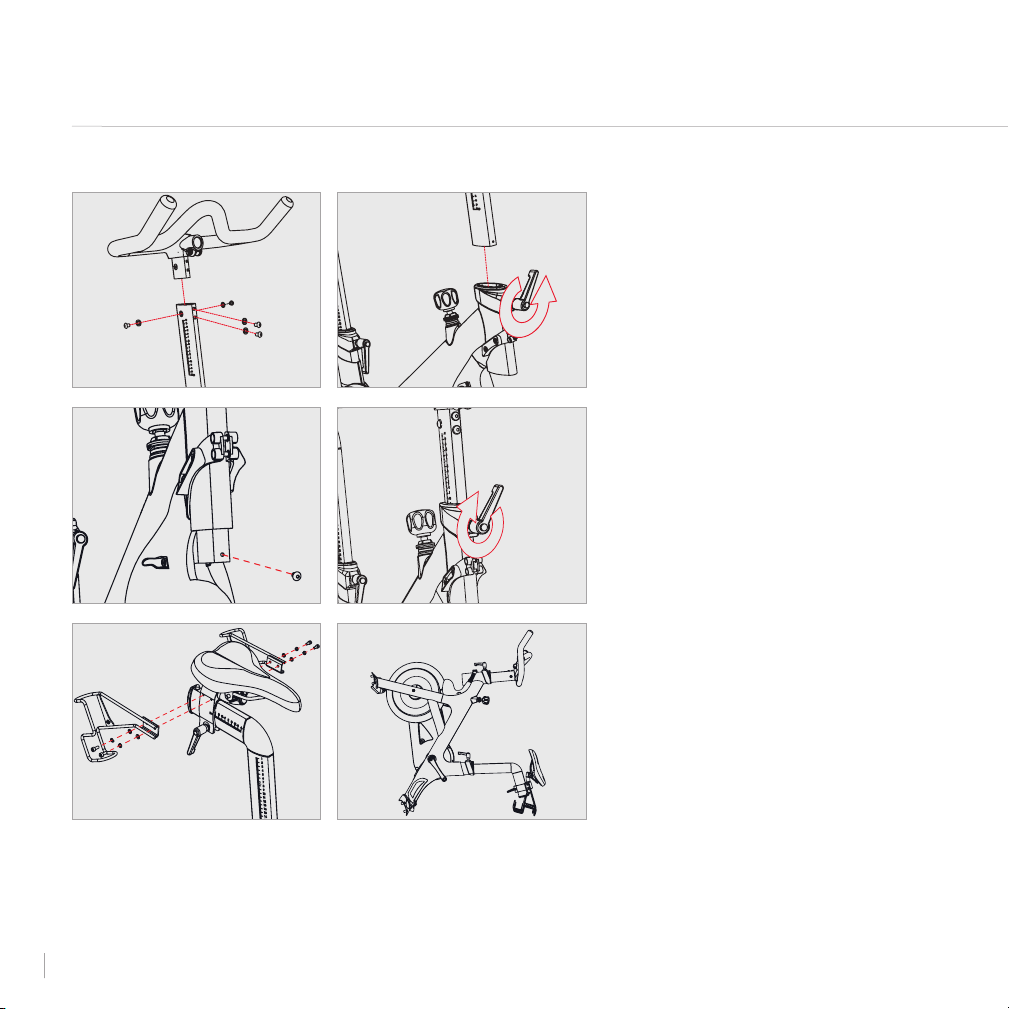
ASSEMBLY
1 Fit the handlebar post onto the
handlebars. Make sure the letters on
the post will be upright when the
handlebar is right-side-up.
2 Add two at washers and two M8×12
round head screws to the front of the
handlebar base. Screw them in with a
5mm Allen wrench.
3 Add two at washers and two M8×10
round head screws to the sides of the
handlebar base. Screw them in with the
5mm Allen wrench.
4 Loosen the L-handle at the front of the
bike frame and slide the handlebar post
into the head tube.
5 Add an M5×15 Phillips head screw to
the hole at the end of the handlebar
post. Screw it in using a Phillips
head screwdriver.
6 Raise the handlebars to seat height and
tighten the L-handle.
7 Take four M5x12 round head screws
and add one at washer and one spring
washer to each.
8 Secure each weight holder to the seat
slider using two screw-and-washer sets
and a 4mm Allen wrench.
9 Rest the bike frame on the weight
holders and back foot.
1-3
5
4
6
BIKE ASSEMBLY CONTINUED
7-8 9
24

10
12
11
13
15 16
ASSEMBLY CONTINUED
10 Add the front stabilizer and four M8x20
socket cap screws. Screw them in with
a 6mm Allen wrench.
11 Rest the bike frame on the handlebars
and front stabilizer.
12 Add the rear stabilizer and four M8x20
socket cap screws. Screw them in with
the 6mm Allen wrench.
13 Remove the square panel from the back
of the touchscreen. Using a Phillips
head screwdriver and four M4x10
ange head screws, secure the
touchscreen to the monitor arm.
14 Return the back panel to
the touchscreen.
15 Push the monitor arm all the way into
the handlebars.
16 Tighten the bolt at the right side using
the 6mm Allen wrench.
25
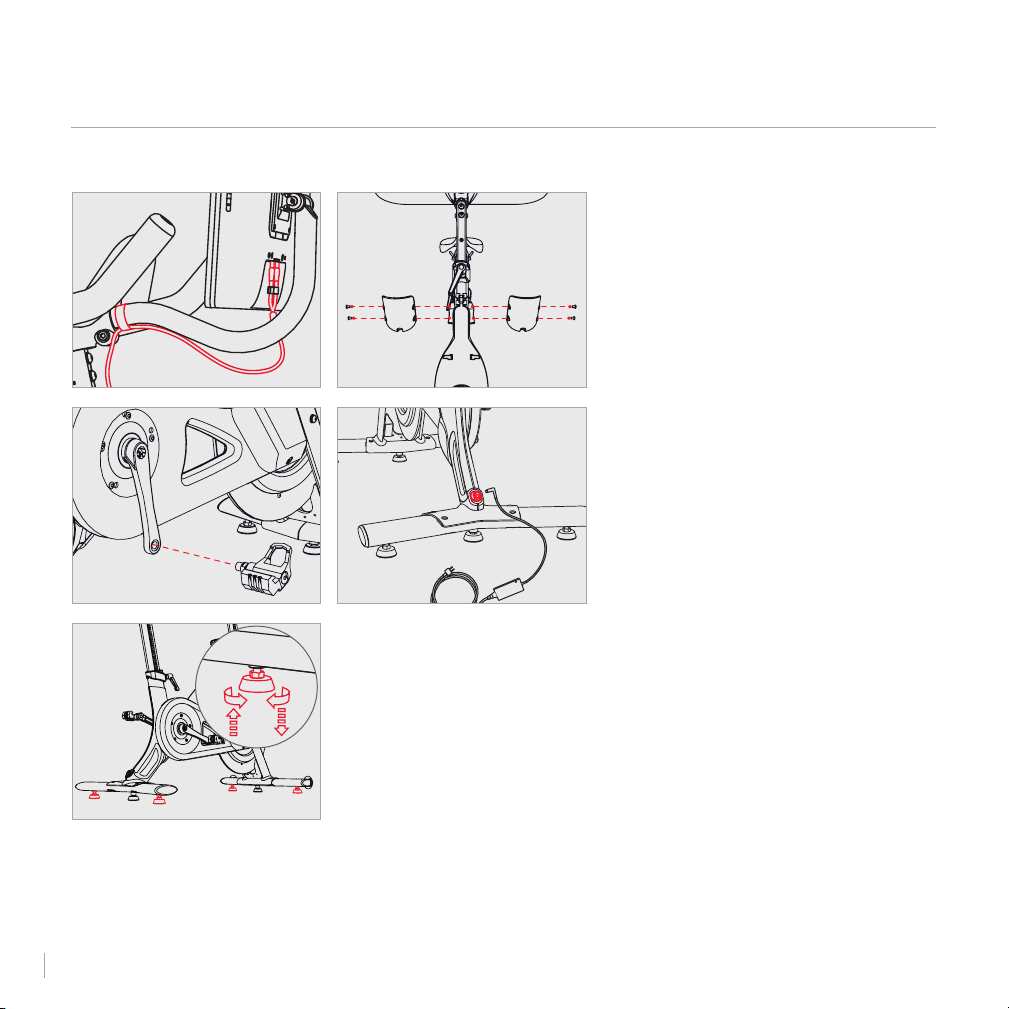
ASSEMBLY CONTINUED
BIKE ASSEMBLY CONTINUED
17 Plug the monitor cable into the back of
the touchscreen. Use the velcro strap to
secure it to the monitor arm.
18 Add a water bottle cup to each side
of the front shroud using two M5x8
screws and a 3mm Allen wrench.
19 Screw the pedals into the crank arms.
The left pedal is reverse-threaded.
20 Using a torque wrench and a 15mm
crowfoot, tighten each pedal to 25 lb-ft.
Be careful not to over-tighten
the pedals.
21 Plug the power cord into the power
supply and the back of the bike. Plug
the power supply into an outlet.
22 Check that the bike is stable. If it rocks
or wobbles, adjust the outer feet on
each stabilizer until all feet rest rmly
on the ground.
17
19
18
21
22
26

LIMITED HOME USE WARRANTY
*
Peloton Interactive, Inc. ("Peloton")
extends the following Limited Warranty,
which applies only to non-commercial,
in-home, indoor use of the Peloton
Bike. Any other use of the Peloton
Bike shall void this Limited Warranty.
During the applicable Limited Warranty
periods described below, the covered
components of the Peloton Bike will be
free of defects or malfunctions during
normal use. Certain exclusions apply,
as further described in this
Limited Warranty.
The Limited Warranty applies for the
following components of the Peloton
Bike only, for the time period indicated.
The Limited Warranty applies only
against defects discovered within the
applicable Limited Warranty period
and only so long as the Peloton
Bike remains in the possession of
the original purchaser, or, for gifted
Peloton Bikes, the owner of the original
Subscription attached to that
Peloton Bike.
HD TOUCHSCREEN: 12 MONTHS
Peloton warrants the touchscreen
against defects in workmanship and
materials for a period of 12 months
from the date of original delivery.
FRAME: FIVE YEARS
Peloton warrants the frame (excluding
any moving parts attached to the
structural frame) against defects in
workmanship and materials for a
period of ve years from the date of
original delivery.
BIKE COMPONENTS: 12 MONTHS
Peloton warrants the components and
all original parts of the Peloton Bike
other than pedals, including its belt,
brake resistance, crank shaft, seatpost,
handlebars and water bottle holder,
against defects in workmanship and
materials for a period of 12 months
from the date of original delivery.
BIKE PEDALS: 12 MONTHS
Peloton warrants the components
and all original parts of the original
pedals that come with the Peloton
Bike against defects in workmanship
and materials for a period of 12
months from the date of original
delivery. Bike pedals are not warranted
against normal wear and tear and it is
important that you maintain the pedals
by inspecting the pedals regularly
for any damage, loose parts or other
signs of wear and tear that could cause
breakdowns or part failures.
Any pedal that shows signs of worn
or damaged parts should be removed
from service immediately. Please refer
to Peloton’s guide on maintaining your
pedals, available on Peloton’s website.
LABOR: 12 MONTHS
For Peloton Bikes originally assembled
by an authorized Peloton technician,
Peloton will cover the labor cost for
the repair or replacement made under
this Limited Warranty for a period of
12 months from the date of original
delivery. Except where applicable law
requires otherwise, repair labor is not
covered for locations where Peloton
did not originally assemble the Peloton
Bike or if the Peloton Bike is moved to
a location that is outside of Peloton's
service area.
EXCLUSIONS AND LIMITATIONS
WHO AND WHAT IS COVERED:
The original owner of the Peloton Bike.
27

The Peloton Bike must remain in the
possession of the original purchaser,
or, for gifted Peloton Bikes, the owner
of the original Subscription attached to
that Peloton Bike. This Limited Warranty
is not transferable.
If a defect arises in the Peloton Bike
or a warranted component within the
applicable Limited Warranty period,
the purchaser’s sole and exclusive
remedy is for Peloton to, at Peloton’s
discretion to the extent permitted
by law, either replace or repair the
defective or malfunctioning Peloton
Bike or component with the same or a
comparable model. Any replacement or
repaired component shall be warranted
for the remainder of the original Limited
Warranty period or 30 days, whichever is
longer, or for any additional period that
is required by applicable law.
WHAT IS NOT COVERED:
Any other Peloton products or services,
non-Peloton products or labor, units
that are, or that Peloton reasonably
believes to be, stolen, counterfeit, or
purchased from an unauthorized
distributor or reseller, units purchased
or used outside the U.S. or Canada, and
units missing serial numbers.
Software, even if sold with or
embedded in the Peloton Bike, or
Internet connectivity. Peloton does
not warrant that the operation of the
Peloton Bike will be uninterrupted or
error-free.
Damage or equipment failure due to
normal wear and tear, improper or
negligent assembly, maintenance,
installation, relocation, or repair
(other than that caused by a Peloton
authorized service technician), use
of the Peloton Bike with parts or
accessories from third parties, or with
parts or accessories not originally
intended for or compatible with the
Peloton Bike, or any use contrary to the
instructions in the Peloton Bike
User Manual.
Damage or equipment failure due to
accident, abuse, improper or abnormal
use, neglect, corrosion, discoloration
of paint or plastic (or any other change
in cosmetic appearance that does not
affect performance), theft, vandalism,
re, ood, wind, lightning, freezing or
other natural disasters or acts of God
of any kind, electrical wiring, power
reduction, power uctuation or power
failure from whatever cause, unusual
atmospheric conditions, collision,
introduction of foreign objects, or
modications that are unauthorized or
not recommended by Peloton.
Incidental or consequential damages.
Peloton is not responsible or liable
for indirect, special, incidental or
consequential damages, economic
loss, loss of property or prots,
loss of enjoyment or use, or other
consequential damages of any nature
whatsoever in connection with the
purchase, use, repair or maintenance
of equipment or parts. Peloton
does not provide monetary or other
compensation for any such repairs or
replacement parts costs, including
but not limited to gym membership
fees, work time lost, cost of substitute
equipment, diagnostic visits,
maintenance visits or transportation.
Equipment used for commercial
purposes or for any use other than a
single family or household.
Any attempt to move or repair tness
equipment creates a risk of injury
and property damage. Peloton is not
responsible or liable for any damage
or injury incurred during, or as a result
LIMITED HOME USE WARRANTY
*
CONTINUED
28

of, any move, repair or attempted repair
of equipment by anyone other than a
Peloton authorized service technician.
All moves or repairs attempted by you
or your agents are undertaken AT YOUR
OWN RISK and Peloton shall have
no liability for any injury to person or
property arising from such attempted
moves or repairs. In addition, labor
may no longer be covered if you move
outside of Peloton's service area.
Where permitted by law, replacement
units, parts and electronic components
reconditioned to as-new condition
by Peloton or its vendors may
sometimes be supplied as warranty
replacement and constitute fulllment
of warranty terms.
EXTENDED WARRANTY SERVICE
Extended warranty coverage is
available for purchase through
Peloton’s authorized partner.
See support.onepeloton.com for
more details.
HOW TO OBTAIN
WARRANTY SERVICE
To be eligible for service under this
Limited Warranty you must contact
the Peloton Support team. You will be
asked to provide Peloton with the
serial number of your Peloton Bike
and the dated receipt, or other proof
of purchase indicating the date
purchased, upon discovering any
nonconformity or defect.
Claims must be made within the
specied warranty period.
Any disputes between you and Peloton
related to this Limited Warranty or
the Peloton Bike will be governed by
the then-current dispute resolution
procedures in Peloton’s Terms of
Service, available at www.onepeloton.
com/terms-of-service.
*This limited warranty is the exclusive
warranty given by Peloton and
supersedes any prior, contrary
or additional representations. All
other warranties, express or implied,
including any statutory warranty
or condition of merchantability or
tness for a particular purpose, are
disclaimed except to the extent
prohibited by law. In such event, such
warranty is limited to the duration of
the warranty periods set forth above.
This exclusion applies even if this
warranty fails of its essential purposes
and regardless of whether damages
are sought for breach of warranty,
breach of contract, negligence, or
strict liability in tort or under any other
legal theory. Some jurisdictions do
not allow the exclusion or limitation of
incidental or consequential damages,
so the above limitation may not apply
to you. This limited warranty gives you
specic legal rights, and you may also
have other legal rights, which vary from
state to state.
29

In Studio with Kendall Toole
30

SUPPORT
QUESTIONS OR CONCERNS
Peloton’s #1 concern is member
satisfaction. If you require assistance
or are experiencing issues with your
Peloton Bike, please contact the
member support team for
additional help.
US: 1.866.679.9129
Canada: 1.833.821.0099
support.onepeloton.com
support.onepeloton.ca
Peloton Interactive, Inc.
441 9th Avenue, 9th Fl
New York, NY 10001
Attn: Limited Warranty Claims
31

© Peloton 2021, Peloton Interactive, Inc. All rights reserved.
onepeloton.com
PL01 000013.0