
EN DE FR ES IT PL
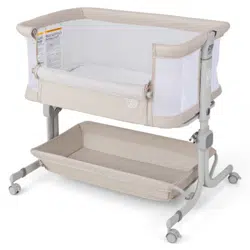
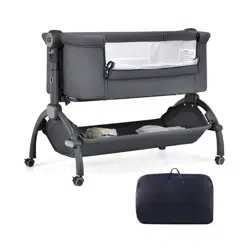
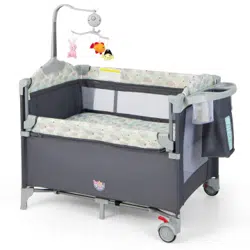
Baby playpen
BB5558
B. carrying bag C. foldable mattressA.playpen
D. diaper changer E. storage
F. Turning toy bar
with music box
Manual Instruction
IMPORTANT: Read all instructions BEFORE assembly and USE of product, and KEEP THEM FOR
FUTURE USE.
1 WARNING
WARNING: Never leave the child unattended.
WARNING: Do not put the playpen near a fireplace or any other source of heat.
WARNING: Upper age /weight limit for children using the playpen: 3 years or 15 kg.
WARNING: Do not use the playpen without the bottom being in place.
WARNING: Make sure the playpen is completely unfolded and all the locking systems are fully secured
before putting your child into it.
2. RECOMMENDATIONS
RECOMMENDATION: Check that all assembly mechanisms are properly secured and regularly
monitored.
RECOMMENDATION: To avoid injury, keep children well away when folding or unfolding the playpen.
RECOMMENDATION: Do not leave anything inside the playpen and do not place it alongside anything
that the child could climb onto or which could pose a risk of suffocation or strangulation, e.g. strings,
curtains, ties, etc .
RECOMMENDATION: Do not move the playpen when the child is in it.
RECOMMENDATION: Do not use if one or more items are broken or missing.
RECOMMENDATION: Use only accessories or spare parts that have been approved by the manufacturer.
RECOMMENDATION: Make sure that your child cannot climb out of the playpen. To avoid the risk of
falls, stop using the playpen as soon as the child is able to climb out of it.
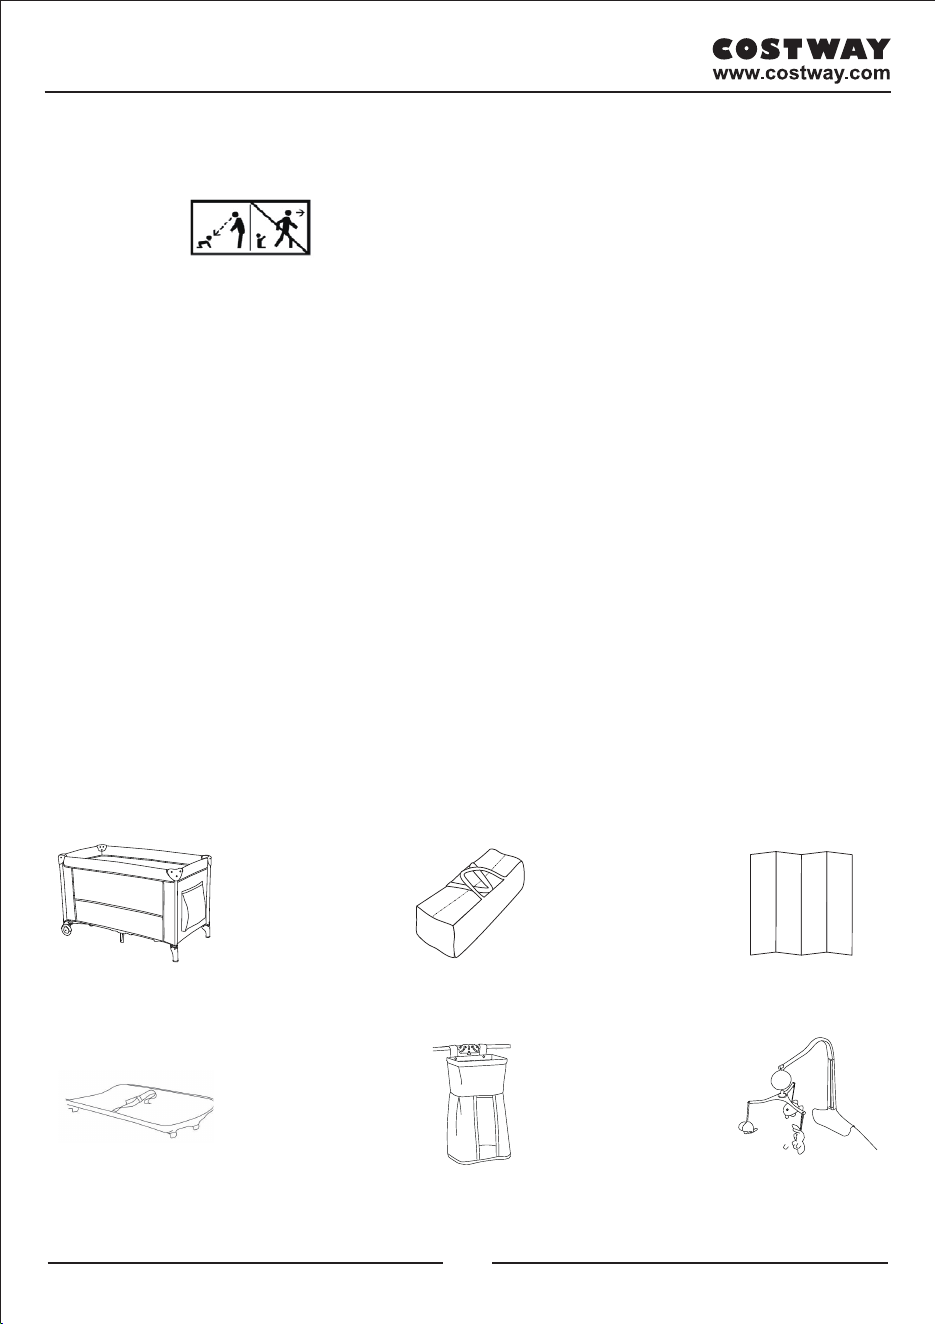
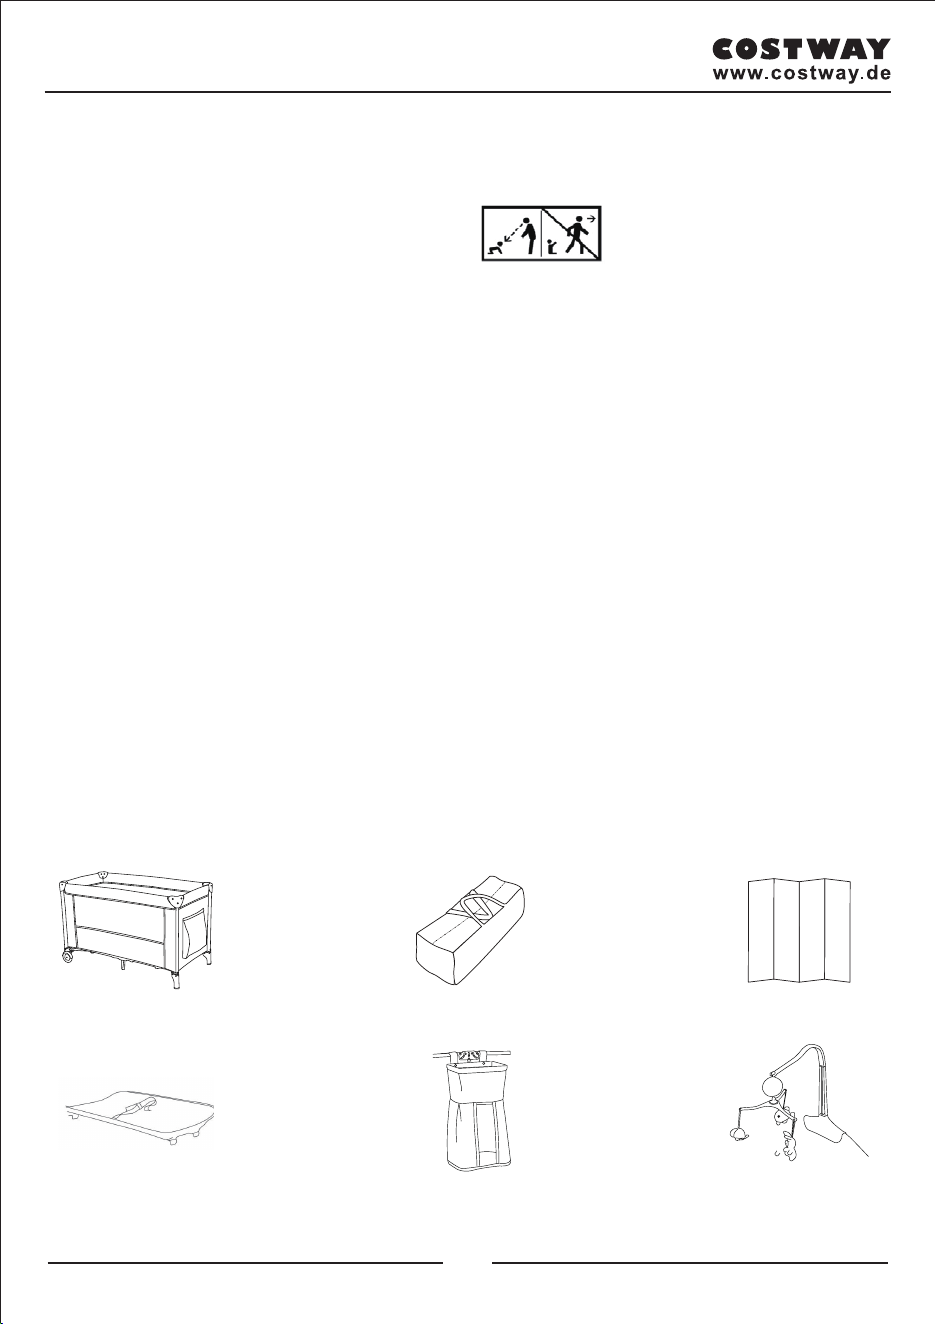
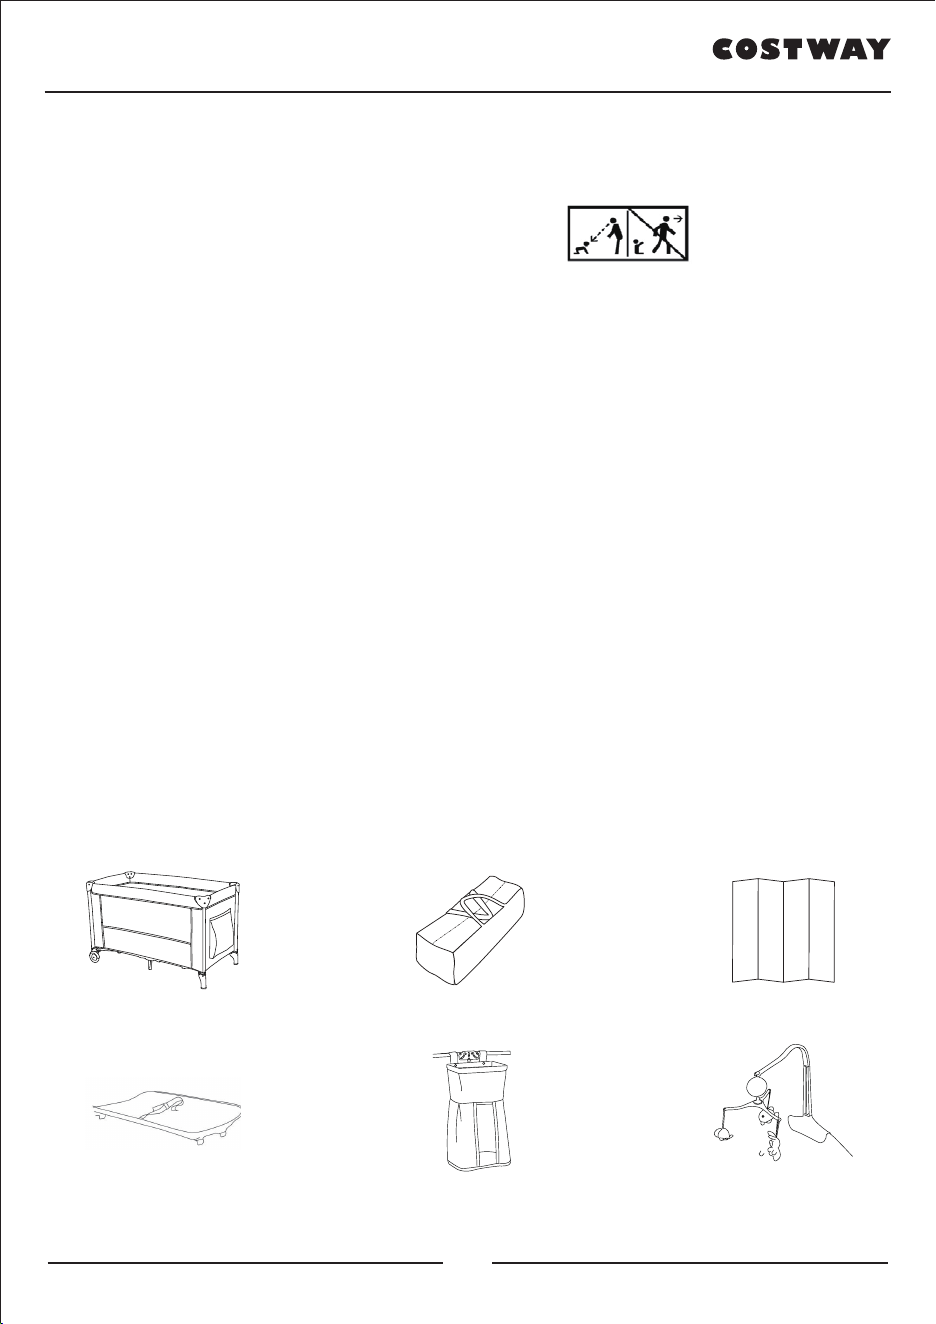
LIST OF PARTS
Check that no parts are missing before setting up the playpen.
A. 1 playpen B. 1 carrying bag C. 1 foldable mattress
D. 1 diaper changer E. 1 storage F. 1 Turning toy bar with music box
Please read all instructions carefully and keep it for future reference.
General Warnings:
Attention: To prevent possible injury by entanglement, remove this toy when the child starts
trying to get up on its hands and knees in a crawling position.
Danger! Keep all small parts and packaging materials for this product away from babies and
children, otherwise they may pose a choking hazard.
The product must be installed and used under the supervision of an adult.
Read through each step carefully and follow the proper order.
Remove all Packaging, separate and count all parts and hardware before Installation.
Please ensure that all parts are correctly installed, incorrect Installation can lead to a Danger.
We recommend that, where possible, all items are assembled near to the area in which
they will be placed in use, to avoid moving the product unnecessarily once assembled.
Ensure a secure surface during construction, and place the product always on a flat, steady
and stable surface.
02 03
B. carrying bag C. foldable mattressA.playpen
D. diaper changer E. storage
F. Turning toy bar
with music box
Manual Instruction
IMPORTANT: Read all instructions BEFORE assembly and USE of product, and KEEP THEM FOR
FUTURE USE.
1 WARNING
WARNING: Never leave the child unattended.
WARNING: Do not put the playpen near a fireplace or any other source of heat.
WARNING: Upper age /weight limit for children using the playpen: 3 years or 15 kg.
WARNING: Do not use the playpen without the bottom being in place.
WARNING: Make sure the playpen is completely unfolded and all the locking systems are fully secured
before putting your child into it.
2. RECOMMENDATIONS
RECOMMENDATION: Check that all assembly mechanisms are properly secured and regularly
monitored.
RECOMMENDATION: To avoid injury, keep children well away when folding or unfolding the playpen.
RECOMMENDATION: Do not leave anything inside the playpen and do not place it alongside anything
that the child could climb onto or which could pose a risk of suffocation or strangulation, e.g. strings,
curtains, ties, etc .
RECOMMENDATION: Do not move the playpen when the child is in it.
RECOMMENDATION: Do not use if one or more items are broken or missing.
RECOMMENDATION: Use only accessories or spare parts that have been approved by the manufacturer.
RECOMMENDATION: Make sure that your child cannot climb out of the playpen. To avoid the risk of
falls, stop using the playpen as soon as the child is able to climb out of it.
LIST OF PARTS
Check that no parts are missing before setting up the playpen.
A. 1 playpen B. 1 carrying bag C. 1 foldable mattress
D. 1 diaper changer E. 1 storage F. 1 Turning toy bar with music box
Please read all instructions carefully and keep it for future reference.
General Warnings:
Attention: To prevent possible injury by entanglement, remove this toy when the child starts
trying to get up on its hands and knees in a crawling position.
Danger! Keep all small parts and packaging materials for this product away from babies and
children, otherwise they may pose a choking hazard.
The product must be installed and used under the supervision of an adult.
Read through each step carefully and follow the proper order.
Remove all Packaging, separate and count all parts and hardware before Installation.
Please ensure that all parts are correctly installed, incorrect Installation can lead to a Danger.
We recommend that, where possible, all items are assembled near to the area in which
they will be placed in use, to avoid moving the product unnecessarily once assembled.
Ensure a secure surface during construction, and place the product always on a flat, steady
and stable surface.
02 03
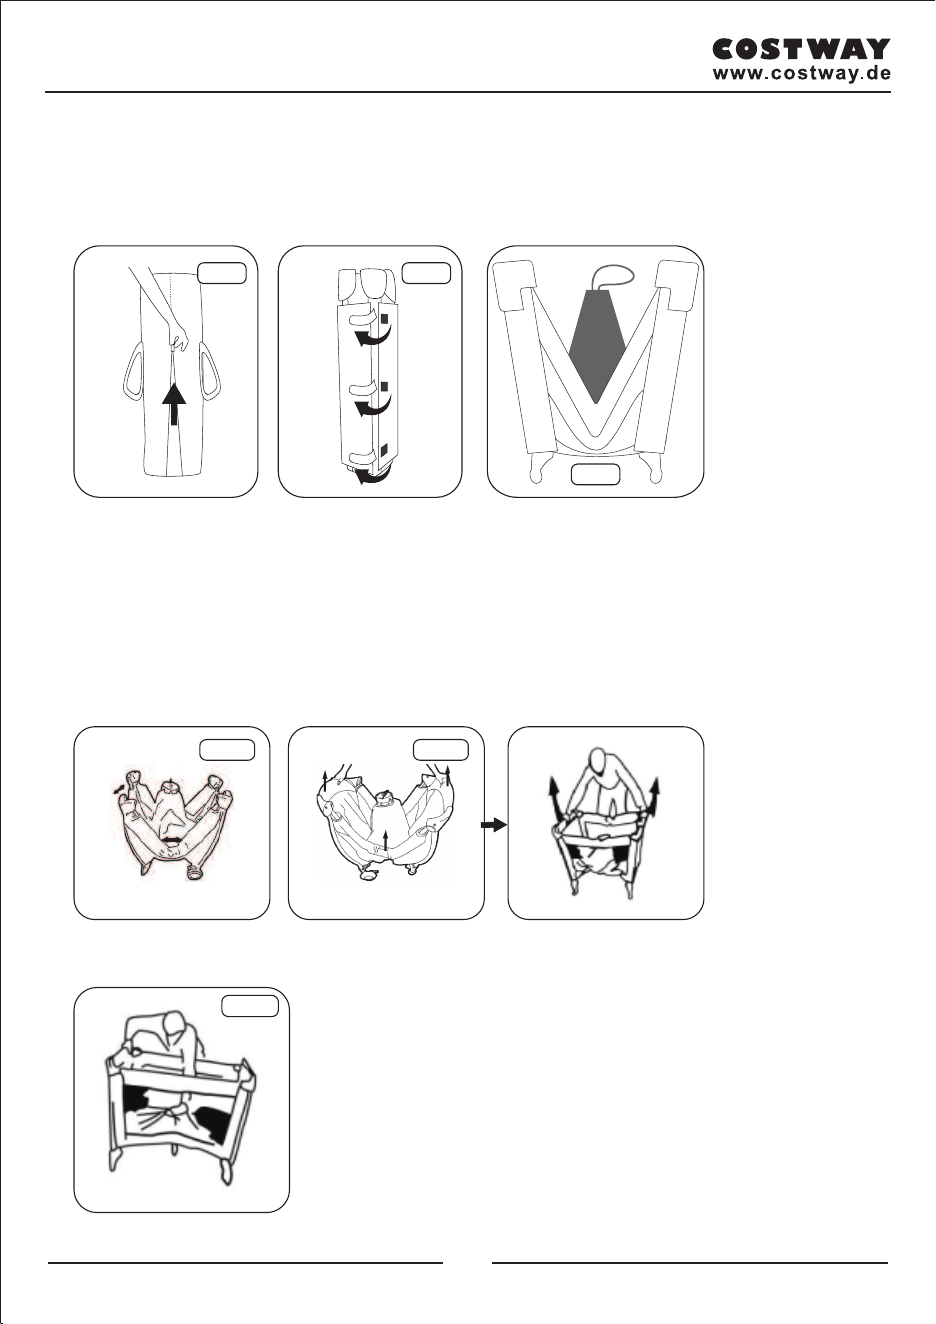
3. ASSEMBLY INSTRUCTIONS
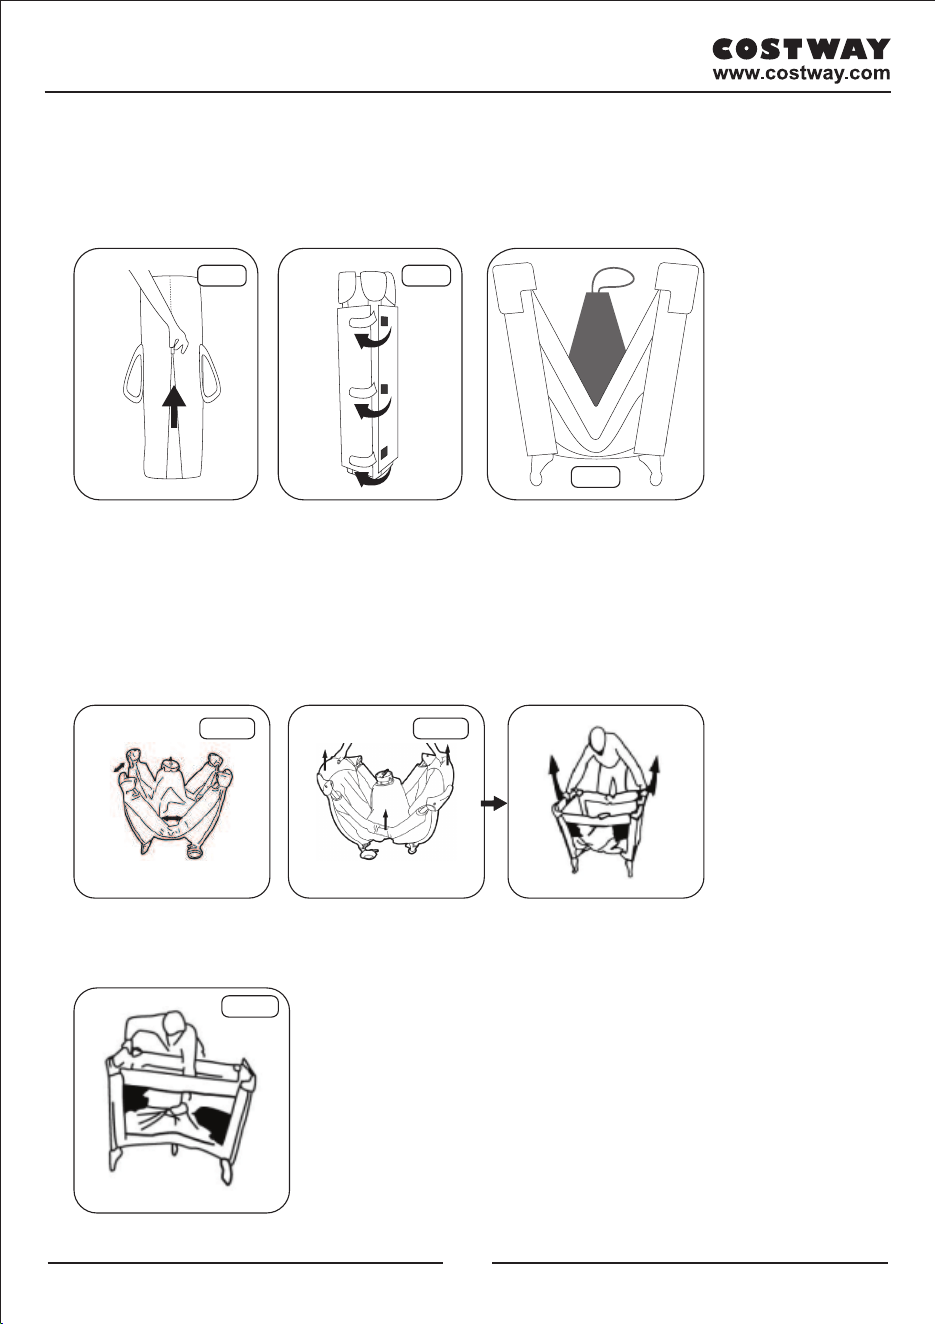
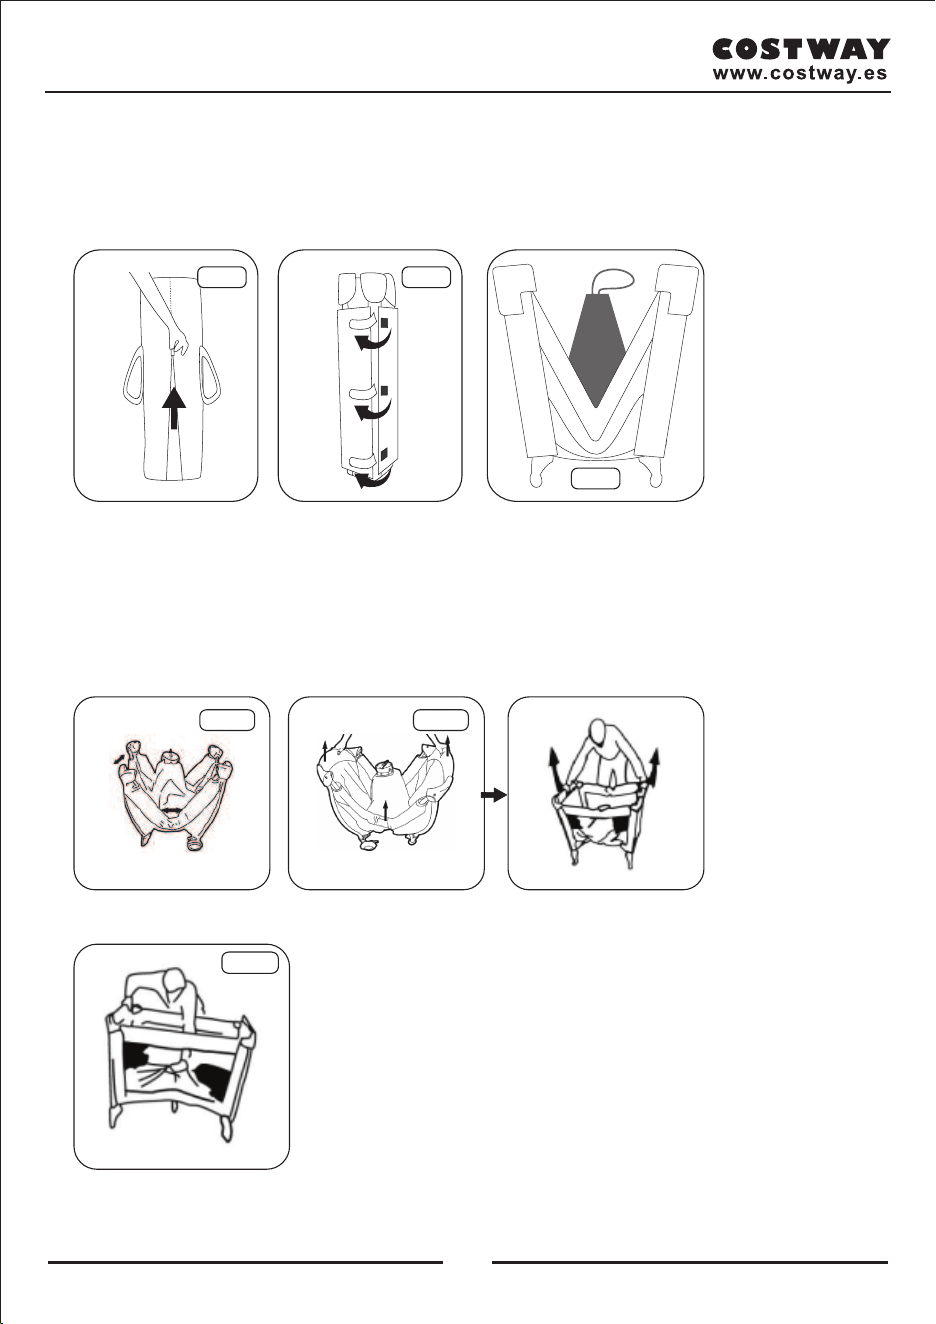
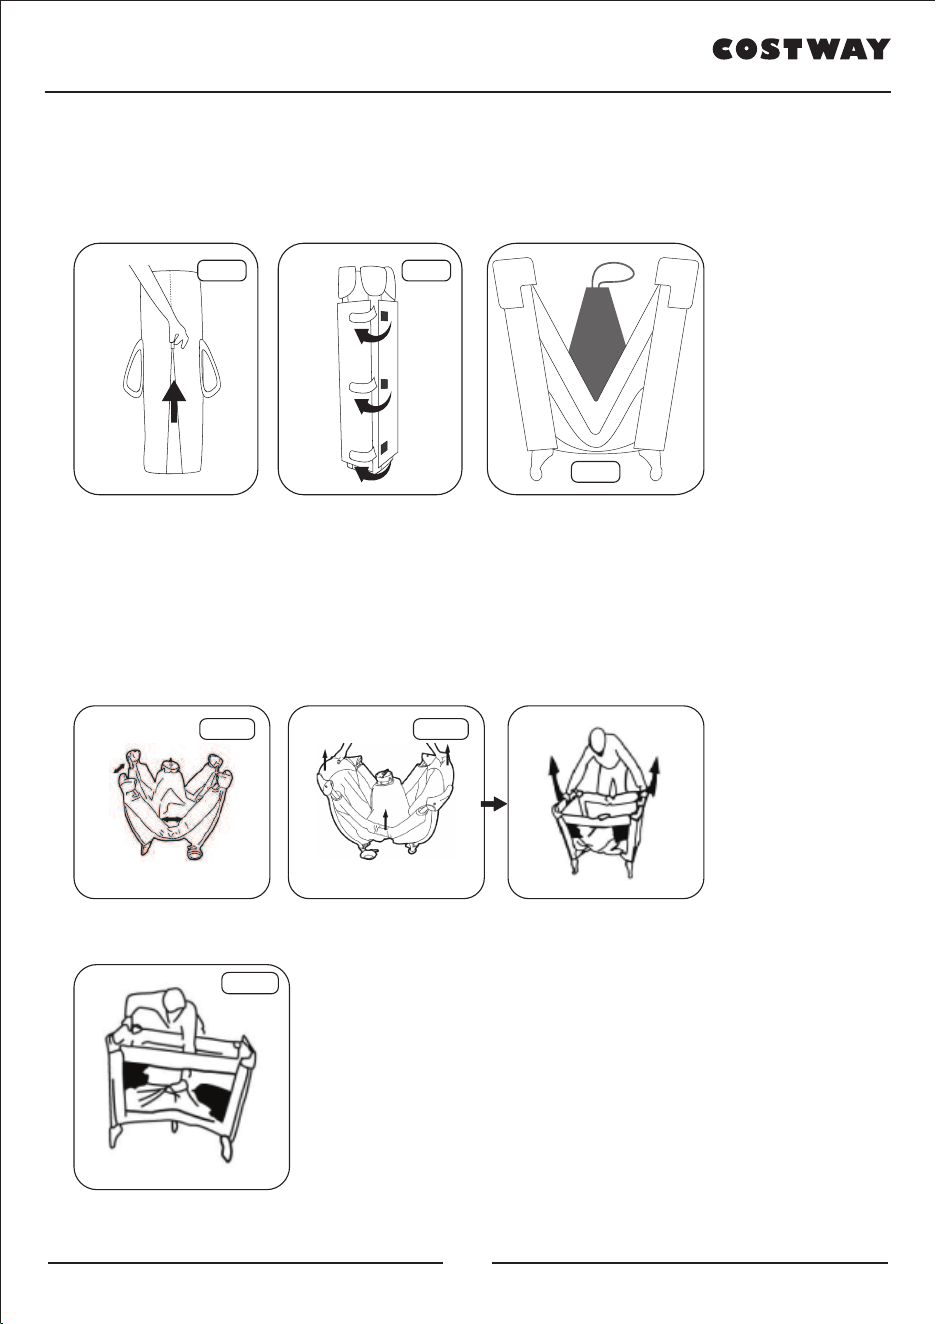
STEP 1: OPENING OF THE PACK
Open the carrying bag (Fig.1) and take the playpen out. Detach the foldable mattress from the playpen
by unfastening the self-fasting straps (Fig. 2) to release the playpen.
STEP 2: SECURING THE PLAYPEN
a.Unfold the structure slightly to push the sides of the playpen apart (Fig. 3).
IMPORTANT
Start by unfolding the playpen by pushing the sides apart. The bottom of the playpen( in the
centre) should be lowered last.
b.Follow the instructions illustrated Fig.4a and Fig.4b on both sides at the same time.
c.Finish by banging down on the bottom of the playpen( Fig .5) to secure the blocking mechanism.
Fig.1 Fig.2
Fig.3
SIDE A
(with opening)
SIDE A
(with opening)
« CLICK
Fig.4a Fig.4b
Fig.5
Fig.6-1
Fig.6-2
Fig.6-3
Fig.6-4
zipper
Fig.6-5 Fig.6-6 Fig.6-7
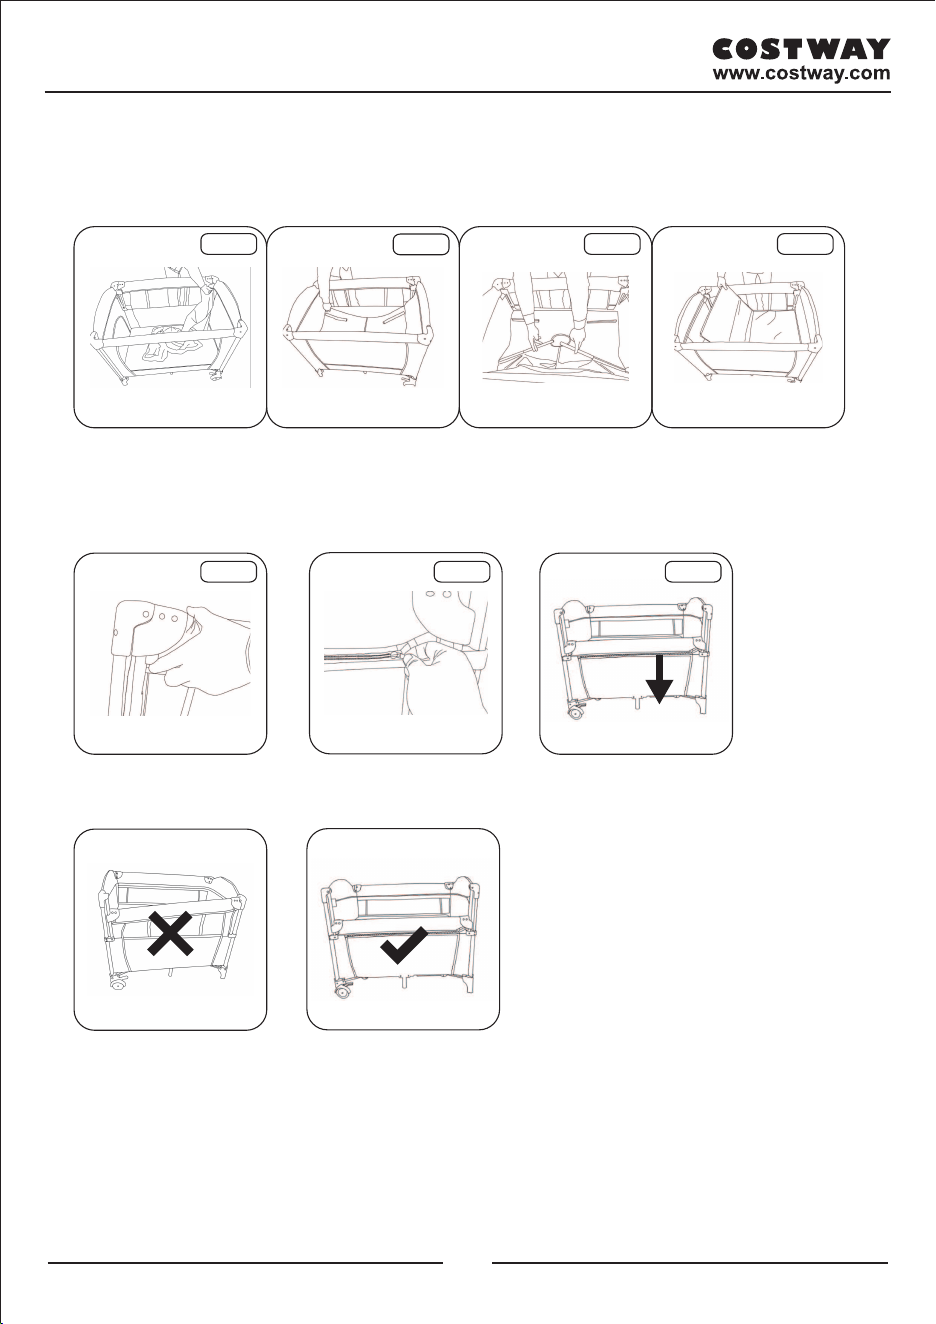
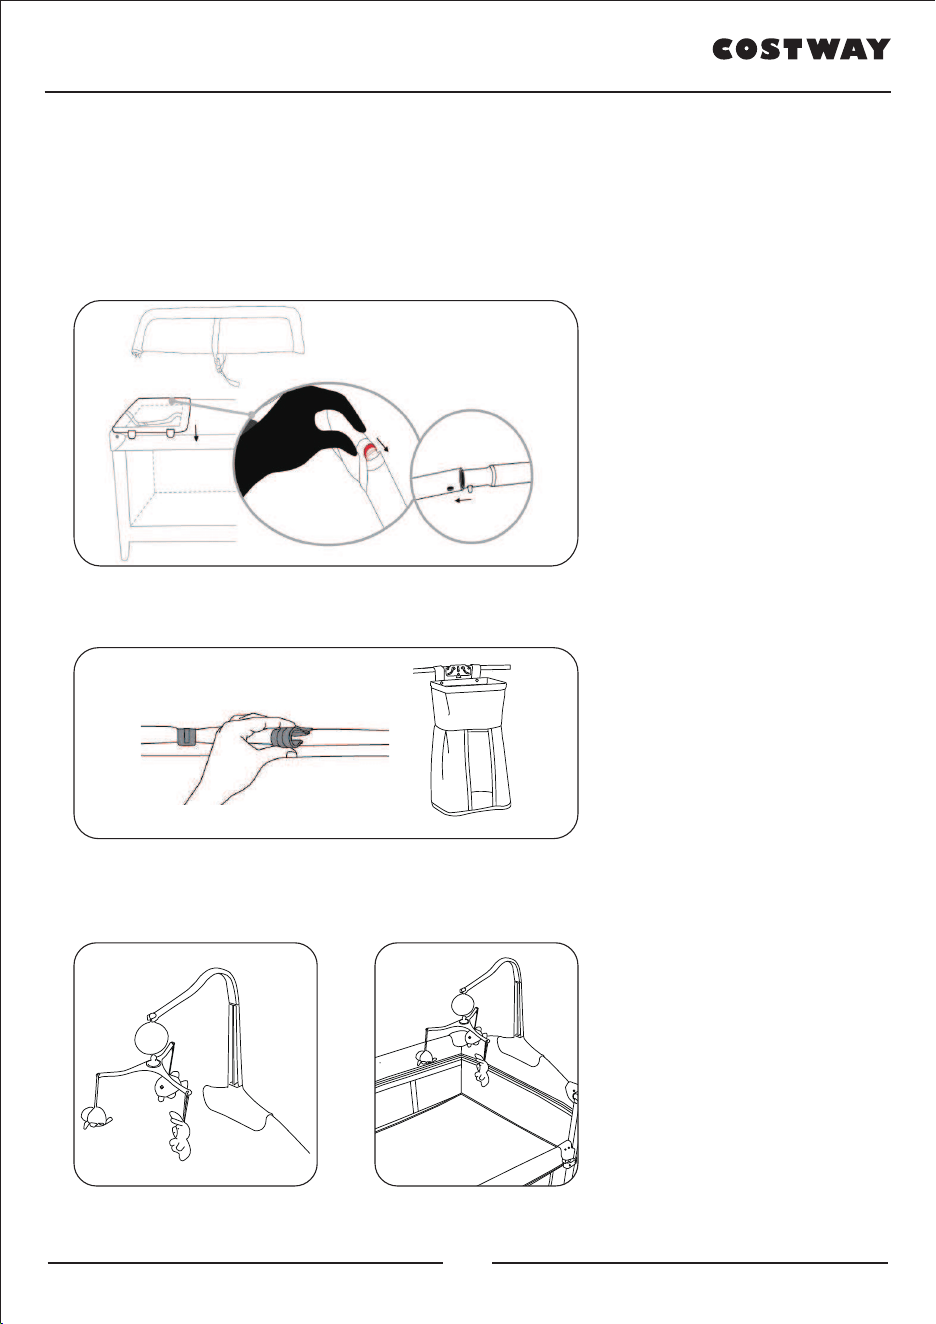
STEP 3: Install the bassinet
a.Before installing, remove the foldable mattress from the bottom of playard, place bassinet inside the
playard and attach the zipper to the top rails. Fig.6-1
Make sure the zipper is securely attached to the top rails
b.Insert the metal tube together in the bottom of the playard as shown, MAKE SURE tubes are
connected before installing the foldable mattress. Fig.6-3 Slip the foldable mattress into the bottom of
the bassinet. Fig.6-4
Press the buttons on both sides of the playpen, and move the top rail down. Fig. 6-5
The top rail and the second layer are fixed with a zipper. Fig. 6-6 Fig.6-7
Note
The lifting function of the playpen must be operated on both sides of the bed.
04 05
3. ASSEMBLY INSTRUCTIONS
STEP 1: OPENING OF THE PACK
Open the carrying bag (Fig.1) and take the playpen out. Detach the foldable mattress from the playpen
by unfastening the self-fasting straps (Fig. 2) to release the playpen.
STEP 2: SECURING THE PLAYPEN
a.Unfold the structure slightly to push the sides of the playpen apart (Fig. 3).
IMPORTANT
Start by unfolding the playpen by pushing the sides apart. The bottom of the playpen( in the
centre) should be lowered last.
b.Follow the instructions illustrated Fig.4a and Fig.4b on both sides at the same time.
c.Finish by banging down on the bottom of the playpen( Fig .5) to secure the blocking mechanism.
Fig.1 Fig.2
Fig.3
SIDE A
(with opening)
SIDE A
(with opening)
« CLICK
Fig.4a Fig.4b
Fig.5
Fig.6-1
Fig.6-2
Fig.6-3
Fig.6-4
zipper
Fig.6-5 Fig.6-6 Fig.6-7
STEP 3: Install the bassinet
a.Before installing, remove the foldable mattress from the bottom of playard, place bassinet inside the
playard and attach the zipper to the top rails. Fig.6-1
Make sure the zipper is securely attached to the top rails
b.Insert the metal tube together in the bottom of the playard as shown, MAKE SURE tubes are
connected before installing the foldable mattress. Fig.6-3 Slip the foldable mattress into the bottom of
the bassinet. Fig.6-4
Press the buttons on both sides of the playpen, and move the top rail down. Fig. 6-5
The top rail and the second layer are fixed with a zipper. Fig. 6-6 Fig.6-7
Note
The lifting function of the playpen must be operated on both sides of the bed.
04 05

STEP4: Diaper changer assembly
a.Unfold the diaper changer.
b.Insert the two tubes inside the diaper changer as shown.
c.Attach the 4 clips on the top short hand rails. Make sure all 4 clips are securely attached to the top
short rails.
When you put you baby on the diaper changer, Always use the harness to keep your baby in safe.
Storage assembly
Attach the clips of the storage to the top rail.
Turning toy bar with music box assembly
Hanging the music box on the bracket hook, then put the bracket onto the short handrail
www.costway.com
Fig.10 Fig.10-1
Fig.11 Fig.12
Fig.13 Fig.14
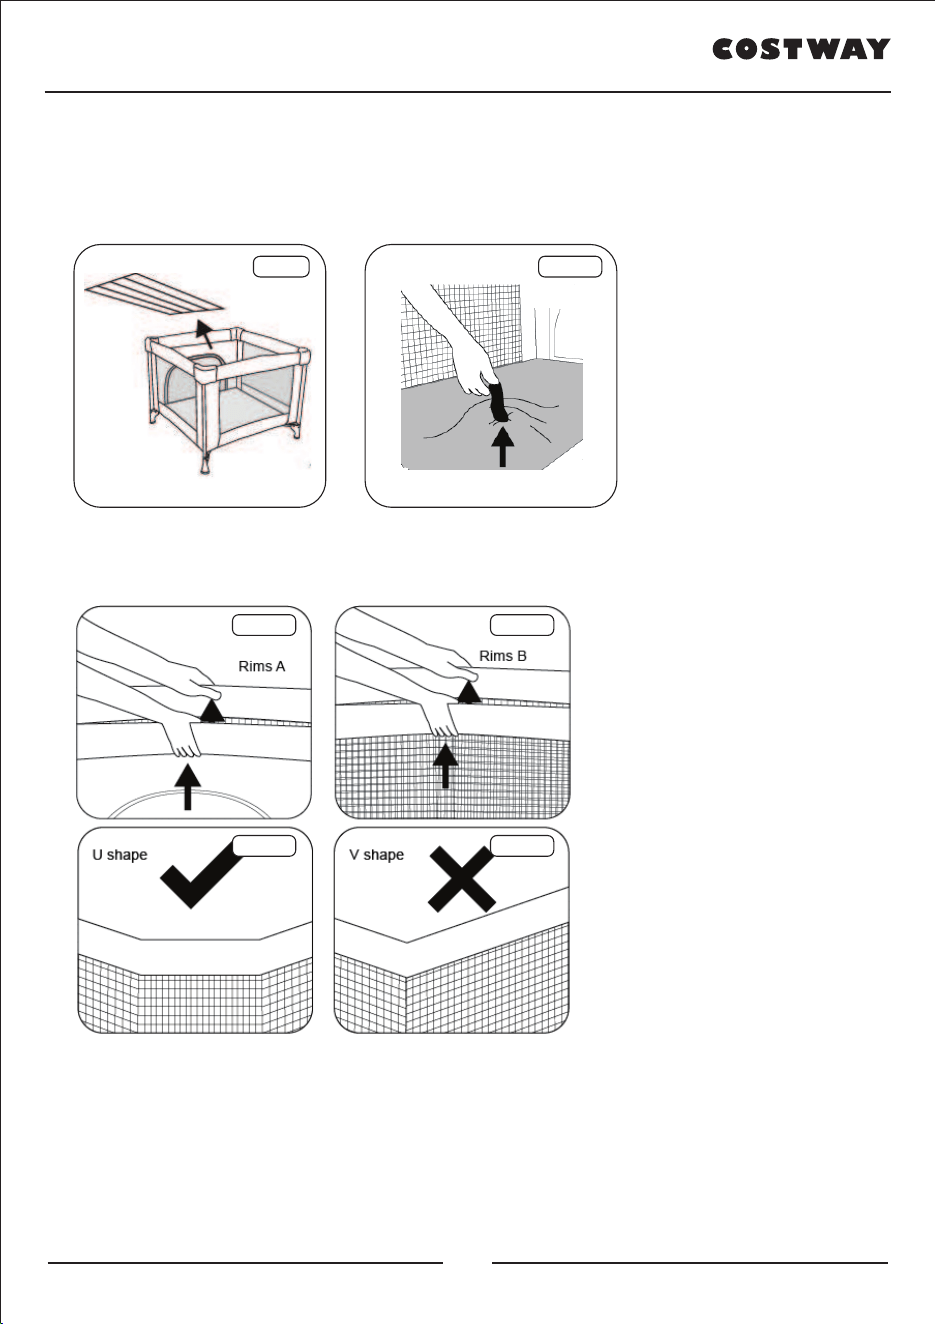
4. FOLDING AND STORING THE PRODUCT
STEP 1: FOLDING THE PLAYPEN
a.Remove the mattress from the playpen (Fig. 10) and lift up the bottom with the help of the fabric
pulling strap (Fig.10-1).
b. Lift up rims A simultaneously while pressing the unlocking button underneath the rim( Fig.11).
c. Lift up rims B simultaneously while pressing the unlocking button underneath the rim( Fig.12).
Each rim should buckle on both sides, as shown here(Fig. 13 and Fig.14).
06 07
STEP4: Diaper changer assembly
a.Unfold the diaper changer.
b.Insert the two tubes inside the diaper changer as shown.
c.Attach the 4 clips on the top short hand rails. Make sure all 4 clips are securely attached to the top
short rails.
When you put you baby on the diaper changer, Always use the harness to keep your baby in safe.
Storage assembly
Attach the clips of the storage to the top rail.
Turning toy bar with music box assembly
Hanging the music box on the bracket hook, then put the bracket onto the short handrail
www.costway.com
Fig.10 Fig.10-1
Fig.11 Fig.12
Fig.13 Fig.14
4. FOLDING AND STORING THE PRODUCT
STEP 1: FOLDING THE PLAYPEN
a.Remove the mattress from the playpen (Fig. 10) and lift up the bottom with the help of the fabric
pulling strap (Fig.10-1).
b. Lift up rims A simultaneously while pressing the unlocking button underneath the rim( Fig.11).
c. Lift up rims B simultaneously while pressing the unlocking button underneath the rim( Fig.12).
Each rim should buckle on both sides, as shown here(Fig. 13 and Fig.14).
06 07

IMPORTANT
If the rims of the playpen do not fold down completely, repeat the procedure shown in Fig.11 and
Fig.12
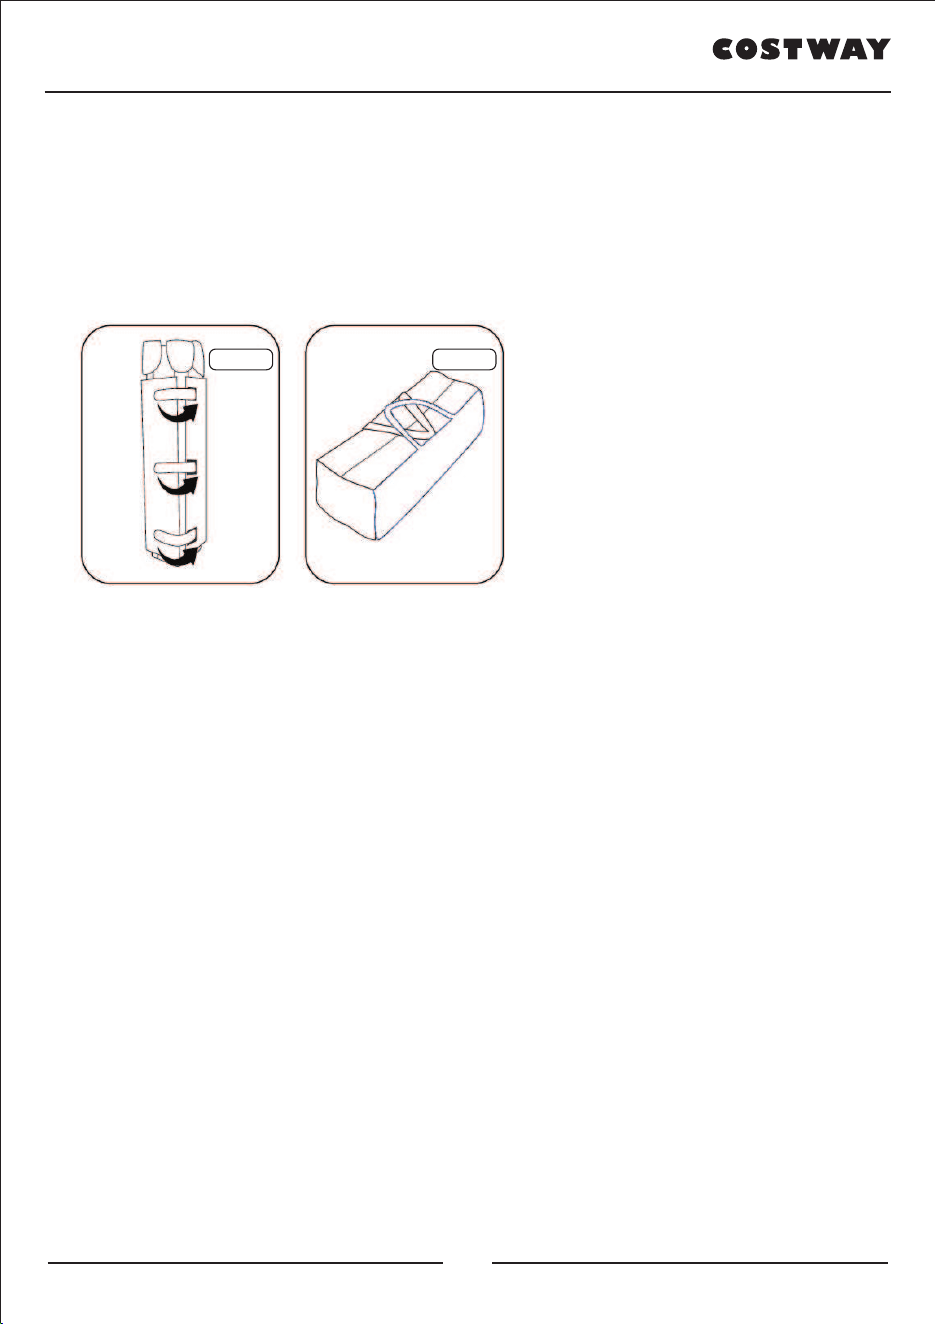
STEP 2: STORING THE PLAYPEN
Once the playpen locking mechanisms have been released, fold it up completely and fit the mattress
around the structure, securing it with the self-fastening straps( Fig.15), Slip the whole thing into the
carrying bag (Fig. 16).
MAINTENANCE INSTRUCTIONS
You can extend the life of your playpen by taking good care of it, here is some advice.
1 - Never immerse the playpen,just wipe down the different surfaces.
2 - Clean with a sponge and soap or a gentle detergent. Air-dry, preferably away from sunlight.
3 - Always store this product in a well-aired place.
4 - Do not expose to sunlight for long periods of time.
Fig.15 Fig.16
08 09

IMPORTANT
If the rims of the playpen do not fold down completely, repeat the procedure shown in Fig.11 and
Fig.12
STEP 2: STORING THE PLAYPEN
Once the playpen locking mechanisms have been released, fold it up completely and fit the mattress
around the structure, securing it with the self-fastening straps( Fig.15), Slip the whole thing into the
carrying bag (Fig. 16).
MAINTENANCE INSTRUCTIONS
You can extend the life of your playpen by taking good care of it, here is some advice.
1 - Never immerse the playpen,just wipe down the different surfaces.
2 - Clean with a sponge and soap or a gentle detergent. Air-dry, preferably away from sunlight.
3 - Always store this product in a well-aired place.
4 - Do not expose to sunlight for long periods of time.
Fig.15 Fig.16
08 09
Bitte lesen Sie alle Anweisungen sorgfältig durch und Bewahren Sie die Anweisungen zur
zukünftigen Verwendung auf.
Allgemeine Warnhinweise:
Achtung! Um mögliche Verletzungen durch Verheddern zu verhindern, ist dieses Spielzeug zu
entfernen, wenn das Kind beginnt, auf allen vieren zu krabbeln.
Achtung! Halten Sie alle kleinteile und Verpackungsmaterialien fern von Babys und Kindern,
ansonsten besteht Erstickungsgefahr.
Das Produkt muss unter Aufsicht eines Erwachsenen installiert und verwendet werden.
Lesen Sie jeden Schritt sorgfältig durch und befolgen Sie die richtige Reihenfolge.
Entfernen Sie alle Verpackungen, separieren und zählen Sie alle Teile und Hardware vor der
Montage oder Verwendung.
Bitte beachten Sie darauf, alle Teile richtig anzubringen, eine falsche Montage kann zu einer
Gefährdung führen.
Wir empfehlen, wenn möglich, alle Artikel in der Nähe des Einsatzortes zu montieren, um eine
unnötige Bewegung der Artikel zu vermeiden.
Achten Sie auf einen sicheren Untergrund während des Aufbaus stellen, und stellen Sie das
Produkt immer auf eine glatte, flache und stabile Oberfläche.
Bitte geben Sie uns eine Chance,
es zu korrigieren und besser zu machen!
Wenden Sie sich zunächst an unseren freundlichen Kundendienst.
Ersatz für fehlende oder beschädigte Teile wird so schnell wie möglich versendet!
Kontakeren Sie uns!
Senden Sie diesen Artikel NICHT zurück.
Wenden Sie sich zunächst an unseren freundlichen Kundendienst.
Vor dem Beginnen
EN DE FR ES IT PL
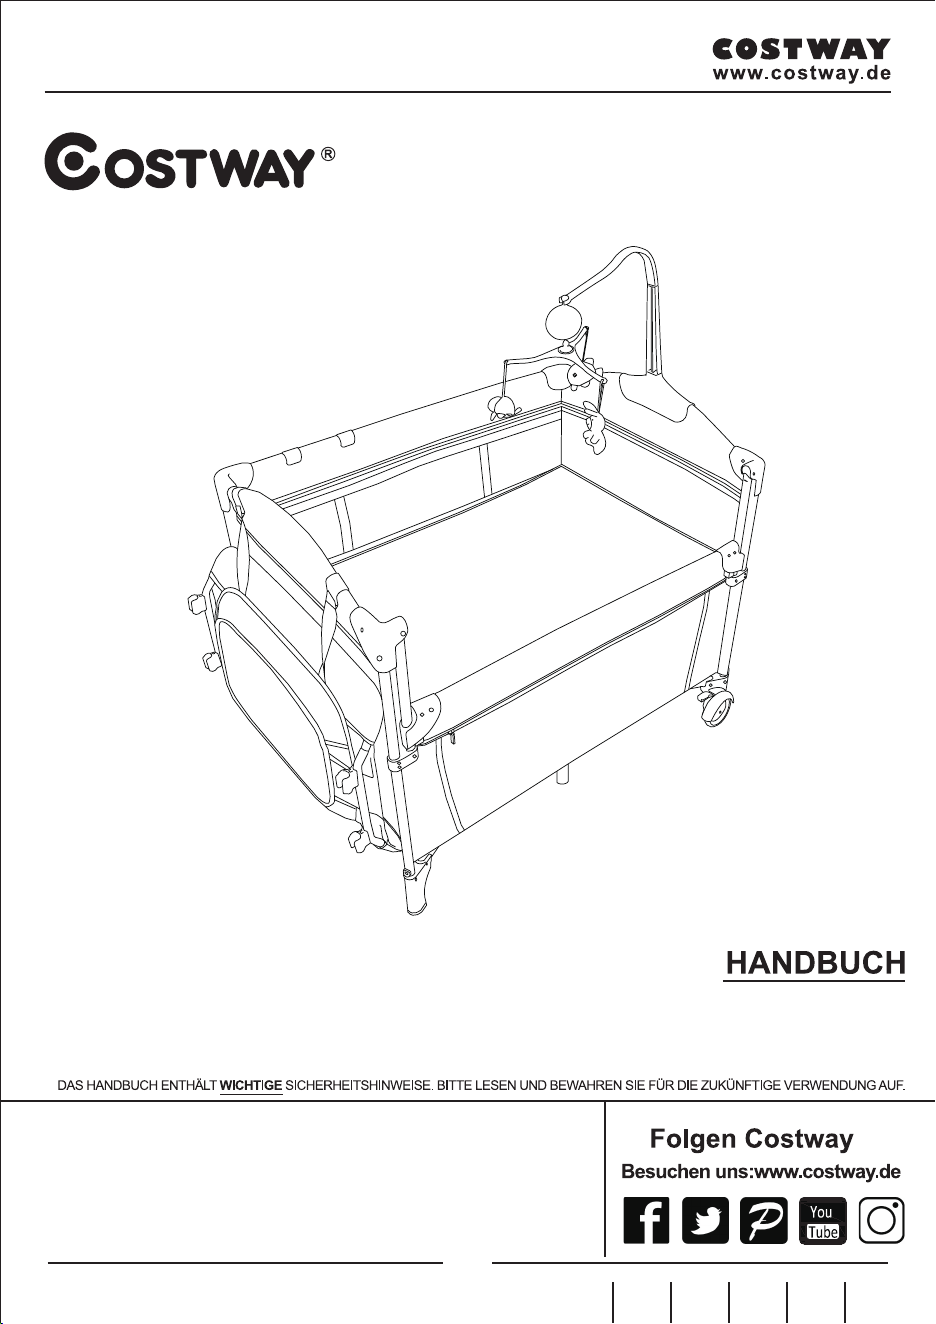
Kinderreisebett
BB5558
10 11
Bitte lesen Sie alle Anweisungen sorgfältig durch und Bewahren Sie die Anweisungen zur
zukünftigen Verwendung auf.
Allgemeine Warnhinweise:
Achtung! Um mögliche Verletzungen durch Verheddern zu verhindern, ist dieses Spielzeug zu
entfernen, wenn das Kind beginnt, auf allen vieren zu krabbeln.
Achtung! Halten Sie alle kleinteile und Verpackungsmaterialien fern von Babys und Kindern,
ansonsten besteht Erstickungsgefahr.
Das Produkt muss unter Aufsicht eines Erwachsenen installiert und verwendet werden.
Lesen Sie jeden Schritt sorgfältig durch und befolgen Sie die richtige Reihenfolge.
Entfernen Sie alle Verpackungen, separieren und zählen Sie alle Teile und Hardware vor der
Montage oder Verwendung.
Bitte beachten Sie darauf, alle Teile richtig anzubringen, eine falsche Montage kann zu einer
Gefährdung führen.
Wir empfehlen, wenn möglich, alle Artikel in der Nähe des Einsatzortes zu montieren, um eine
unnötige Bewegung der Artikel zu vermeiden.
Achten Sie auf einen sicheren Untergrund während des Aufbaus stellen, und stellen Sie das
Produkt immer auf eine glatte, flache und stabile Oberfläche.
Bitte geben Sie uns eine Chance,
es zu korrigieren und besser zu machen!
Wenden Sie sich zunächst an unseren freundlichen Kundendienst.
Ersatz für fehlende oder beschädigte Teile wird so schnell wie möglich versendet!
Kontakeren Sie uns!
Senden Sie diesen Artikel NICHT zurück.
Wenden Sie sich zunächst an unseren freundlichen Kundendienst.
Vor dem Beginnen
EN DE FR ES IT PL
Kinderreisebett
BB5558
10 11
3.MONTAGEANL EITUNGEN SCHRITT 1:ÖFFNUNG DER PACKUNG
Öffnen Sie die Tragetasche (Abb.1) und nehmen Sie den Laufstall heraus. Lösen Sie diefaltbare
Matratze vom Laufstall, indem Sie die selbstbefestigenden Gurte lösen (Abb. 2), um den Laufstall
freizugeben.
SCHRITT 2: Sichern des Laufstalls
a. Falten Sie die Struktur leicht auseinander, um die Seiten des Laufstalls auseinander zu drücken
(Abb. 3).
WICHTIG
Beginnen Sie mit dem Entfalten des Laufstalls, indem Sie die Seiten auseinander drücken. Der
Boden des Laufstalls (in der Mitte) sollte zuletzt abgesenkt werden.
b.Befolgen Sie gleichzeitig die Anweisungen in Abb.4a und Abb.4b auf beiden Seiten.
c. Schlagen Sie zum Schluss auf die Unterseite des Laufstalls (Abb.5), um den Blockiermechanismus
zu sichern.
Abb.1 Abb.2
Abb.3
SEIT A
(geöffnet)
SEIT A
(geöffnet)
KLICKEN
Abb.4a Abb.4b
Abb.5
B. TragetascheA. Laufstall
D. Windelwechsler E. Lager
C. Faltbare Matratze
F. Spielzeugbar
mit Spieluhr
Handbuch
WICHTIG: Lesen Sie alle Anweisungen, BEVOR Sie das Produkt montieren und verwenden,
undbewahren Sie diese für den zukünftigen Gebrauch auf.
1.WARNUNG
WARNUNG: Lassen Sie Ihr Kind niemals unbeaufsichtigt.
WARNUNG: Stellen Sie den Laufstall nicht in die Nähe eines Kamins oder einer anderen Wärmequelle.
WARNUNG: Obere Alters-/Gewichtsgrenze für Kinder, die den Laufstall benutzen: 3 Jahre oder 15kg.
WARNUNG: Verwenden Sie den Laufstall nicht ohne den Boden an seinem Platz.
WARNUNG: Stellen Sie sicher, dass der Laufstall vollständig entfaltet ist und das gesamte
Verriegelungssystem vollständig gesichert ist, bevor Sie Ihr Kind hineinlegen.
2.EMPFEHLUNGEN
EMPFEHLUNG: Überprüfen Sie, ob alle Montagemechanismen ordnungsgemäß gesichert undregelmäßig
überwacht werden.
EMPFEHLUNG: Um Verletzungen zu vermeiden, halten Sie Kinder beim Falten oder Entfalten des
Laufstalls fern. EMPFEHLUNG: Lassen Sie nichts in den Laufstall und legen Sie ihn nicht neben etwas,auf
das das Kind kletten könnte oder das ein Erstickungs- oder Strangulationsrisiko darstellen könnte, z.B.
Schnüre, Vorhänge, Krawatten usw.
EMPFEHLUNG: Bewegen Sie den Laufstall nicht mit dem Kind hinein.
EMPFEHLUNG: Verwenden Sie nicht, wenn ein oder mehrere Elemente beschädigt sind oder fehlen.
EMPFEHLUNG: Verwenden Sie nur Zubehör oder Ersatzteile, die vom Hersteller genehmigt wurden.
EMPFEHLUNG: Stellen Sie sicher, dass Ihr Kind nicht aus dem Laufstall klettern kann. Um das Risikovon
Stürzen zu vermeiden, sollten Sie den L aufstall nicht mehr benutzen, sobald das Kind in der Lageist, aus
ihm heraus zu klettern.
Bauteilliste
Stellen Sie sicher, dass keine Teile fehlen, bevor Sie den Laufstall einrichten.
A. Laufstall x 1 B. Tragetasche x 1 C. Faltbare Matratze x 1
D. Windelwechsler x 1 E. Lager x 1 F. Spielzeugbar mit Spieluhr x 1
12 13
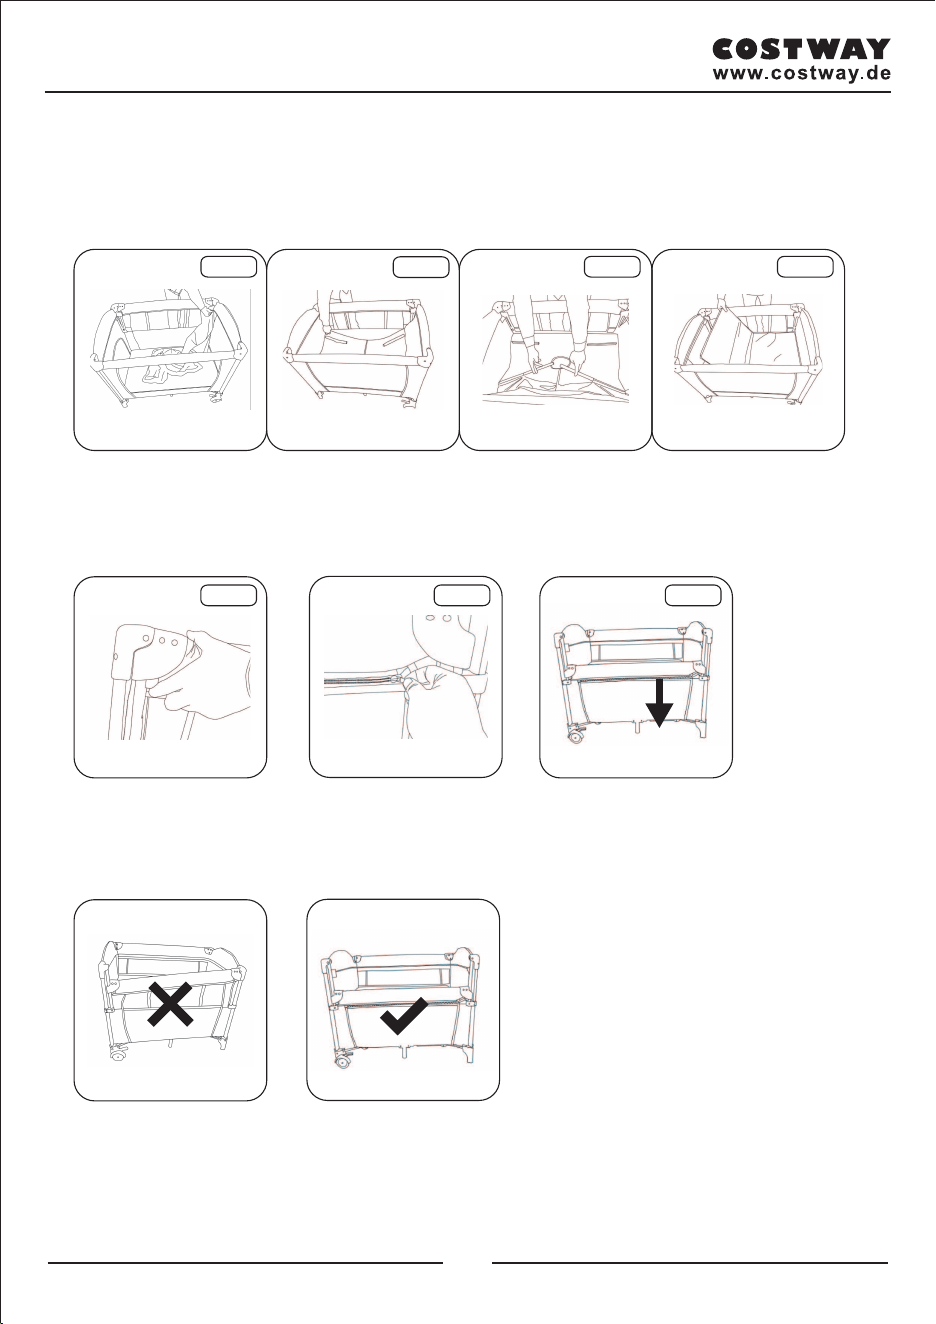
Abb.6-1
Abb.6-2
Abb.6-3
Abb.6-4
Reißverschluss
Abb.6-5 Abb.6-6 Abb.6-7
SCHRITT 3 : Installieren Sie die Wiege
a. Vor der Installation entfernen Sie die faltbare Matratze von der Unterseite des Laufstalls, setzen
SieKorbwiege in Seite des Laufstalls und befestigen Sie die 12 Klammern an den oberen Schienen.
Abb.6-1
Stellen Sie sicher, dass alle 12 Clips sicher an den oberen Schienen befestigt sind
b.Setzen Sie das Metallrohr wie abgebildet unten in den L aufstall ein. Stellen Sie sicher, dass
dieSchläuche verbunden sind, bevor Sie die faltbare Matratze installieren. Abb. 6-3 Schieben Sie
diefaltbare Matratze in den Boden des Laufstalls. Abb.6-4
Drücken Sie die Tasten auf beiden Seiten des Laufstalls und bewegen Sie die obere Schiene nach
unten. Abb.6-5
Die obere Schiene und die zweite Schicht sind mit einem Reißverschluss befestigt. Abb.6-6
Abb.6-7
Hinweis:
Die Hebefunktion des Laufstalls muss auf beiden Seiten des Bettes betätigt werden.
SCHRITT 4: Montage des Windelwechslersa
a. Entfalten Sie den Windelwechsler.
b.Setzen Sie die beiden Schläuche wie gezeigt in den Windelwechsler ein.
c.Befestigen Sie die 4Clips an den oberen kurzen Handläufen. Stellen Sie sicher, dass alle 4 Clipssicher
an den oberen kurzen Schienen befestigt sind.
Wenn Sie Ihr Baby auf den Windelwechsler legen, verwenden Sie immer das Geschirr, um
IhrBaby in Sicherheit zu bringen.
Montage des Lagers
Befestigen Sie die Clips des Lagers an der oberen Schiene.
Drehbare Spielzeugstange mit Spieluhr
Hängen Sie die Spieluhr an den Halterungshaken und setzen Sie die Halterung auf den kurzen
Handlauf.
14 15

Abb.6-1
Abb.6-2
Abb.6-3
Abb.6-4
Reißverschluss
Abb.6-5 Abb.6-6 Abb.6-7
SCHRITT 3 : Installieren Sie die Wiege
a. Vor der Installation entfernen Sie die faltbare Matratze von der Unterseite des Laufstalls, setzen
SieKorbwiege in Seite des Laufstalls und befestigen Sie die 12 Klammern an den oberen Schienen.
Abb.6-1
Stellen Sie sicher, dass alle 12 Clips sicher an den oberen Schienen befestigt sind
b.Setzen Sie das Metallrohr wie abgebildet unten in den L aufstall ein. Stellen Sie sicher, dass
dieSchläuche verbunden sind, bevor Sie die faltbare Matratze installieren. Abb. 6-3 Schieben Sie
diefaltbare Matratze in den Boden des Laufstalls. Abb.6-4
Drücken Sie die Tasten auf beiden Seiten des Laufstalls und bewegen Sie die obere Schiene nach
unten. Abb.6-5
Die obere Schiene und die zweite Schicht sind mit einem Reißverschluss befestigt. Abb.6-6
Abb.6-7
Hinweis:
Die Hebefunktion des Laufstalls muss auf beiden Seiten des Bettes betätigt werden.
SCHRITT 4: Montage des Windelwechslersa
a. Entfalten Sie den Windelwechsler.
b.Setzen Sie die beiden Schläuche wie gezeigt in den Windelwechsler ein.
c.Befestigen Sie die 4Clips an den oberen kurzen Handläufen. Stellen Sie sicher, dass alle 4 Clipssicher
an den oberen kurzen Schienen befestigt sind.
Wenn Sie Ihr Baby auf den Windelwechsler legen, verwenden Sie immer das Geschirr, um
IhrBaby in Sicherheit zu bringen.
Montage des Lagers
Befestigen Sie die Clips des Lagers an der oberen Schiene.
Drehbare Spielzeugstange mit Spieluhr
Hängen Sie die Spieluhr an den Halterungshaken und setzen Sie die Halterung auf den kurzen
Handlauf.
14 15

Abb.10 Abb.10-1
Abb.11 Abb.12
Abb.13 Abb.14
4.FALTEN UND SPEICHERN DES PRODUKTS
SCHRITT 1: Falten des Laufstalls
a. Entfernen Sie die Matratze vom Laufstall (Abb.10) und heben Sie den Boden mit Hilfe
desStoffziehgurts an (Abb.10-1).
b.Heben Sie die Felgen A gleichzeitig an, während Sie den Entriegelungsknopf unter der Felgedrücken
(Abb.11).
c. Heben Sie die Felgen B gleichzeitig an, während Sie den Entriegelungsknopf unter dem
Felgenranddrücken (Abb.12). Jede Felge sollte sich wie abgebildet an beiden Seiten verbiegen (Abb.13
und Abb.14).
U-Form V-Form
WICHTIG
Wenn die Ränder des Laufstalls nicht vollständig herunterklappen, wiederholen Sie das in
Abb.11 und Abb. 12 gezeigte Verfahren
SCHRITT 2: Speichern des Laufstalls
Wenn die Verriegelungen des Laufstalls gelöst sind, falten Sie ihn vollständig zusammen und legenSie
die Matratze um die Struktur, sichern Sie sie mit den Befestigungsgurten (Abb. 15). Schieben Siedas
Ganze in die Tragetasche (Abb. 16).
WARTUNGSHINWEISE
Sie können das Leben Ihres Laufstalls verlängern, indem Sie gut darauf achten, hier ist ein Ratschlag.
1- Tauchen Sie niemals den Laufstall, sondern wischen Sie einfach die verschiedenenOberflächen ab.
2- Mit einem Schwamm und Seife oder einem sanften Reinigungsmittel reinigen. Natürlichtrocken. Es
ist am besten, sich von der Sonne fern zu halten.
3- Bewahren Sie dieses Produkt immer an einem gut belüfteten Ort auf.
4- Setzen Sie das Gerät nicht für längere Zeit dem Sonnenlicht aus.
Abb.15 Abb.16
16 17

VIELEN
DANK
Ihre Vorschläge und Kommentare für COSTWAY sind wirklich wichg für uns!
Belohnungspunkte
Exklusiver Kundendienst
Personalisierte Empfehlungen
Permanenter Einkaufswagen
Bestellverlauf
Wir möchten uns bei allen Kunden herzlich bedanken,
dass sie sich die Zeit genommen haben, dieses Produkt
zusammenzubauen und uns wertvolle Bewertung
zukommen zu lassen.
www.costway.de
Wir bitten Sie aufrichtig, in unsere Geschäft zurückzukehren und durch nur einen
Klick eine gute Bewertung zu hinterlassen. Es wäre sehr ermutigend, wenn Sie
das so tun könnten:
24. Februar 2019
Gute Produkte. Schnelle Lieferung, einfaches Aufbauen, funktionieren ohne Problem.
Tolle Produkte bis jetzt
Mit Ihrer inspirierenden Bewertung wird COSTWAY konsistenter sein, um Ihnen
EIN SCHÖNES EINKAUFSERLEBNIS, GUTE PRODUKTE und EFFIZIENTEN SERVICE zu bieten!
DE office:FDS GmbH,Neuer Höltigbaum 36,22143 Hamburg,Deutschland
5 Sterne Bewertung
CE MANUEL D’INSTRUCTIONS CONTIENT DES INFORMATIONS IMPORTANTES SUR LA SÉCURITÉ. VEUILLEZ LIRE ET CONSERVER POUR LA RÉFÉRENCE FUTURE.
EN DE FR ES IT PL
Lit de Bébé
BB5558
18 19
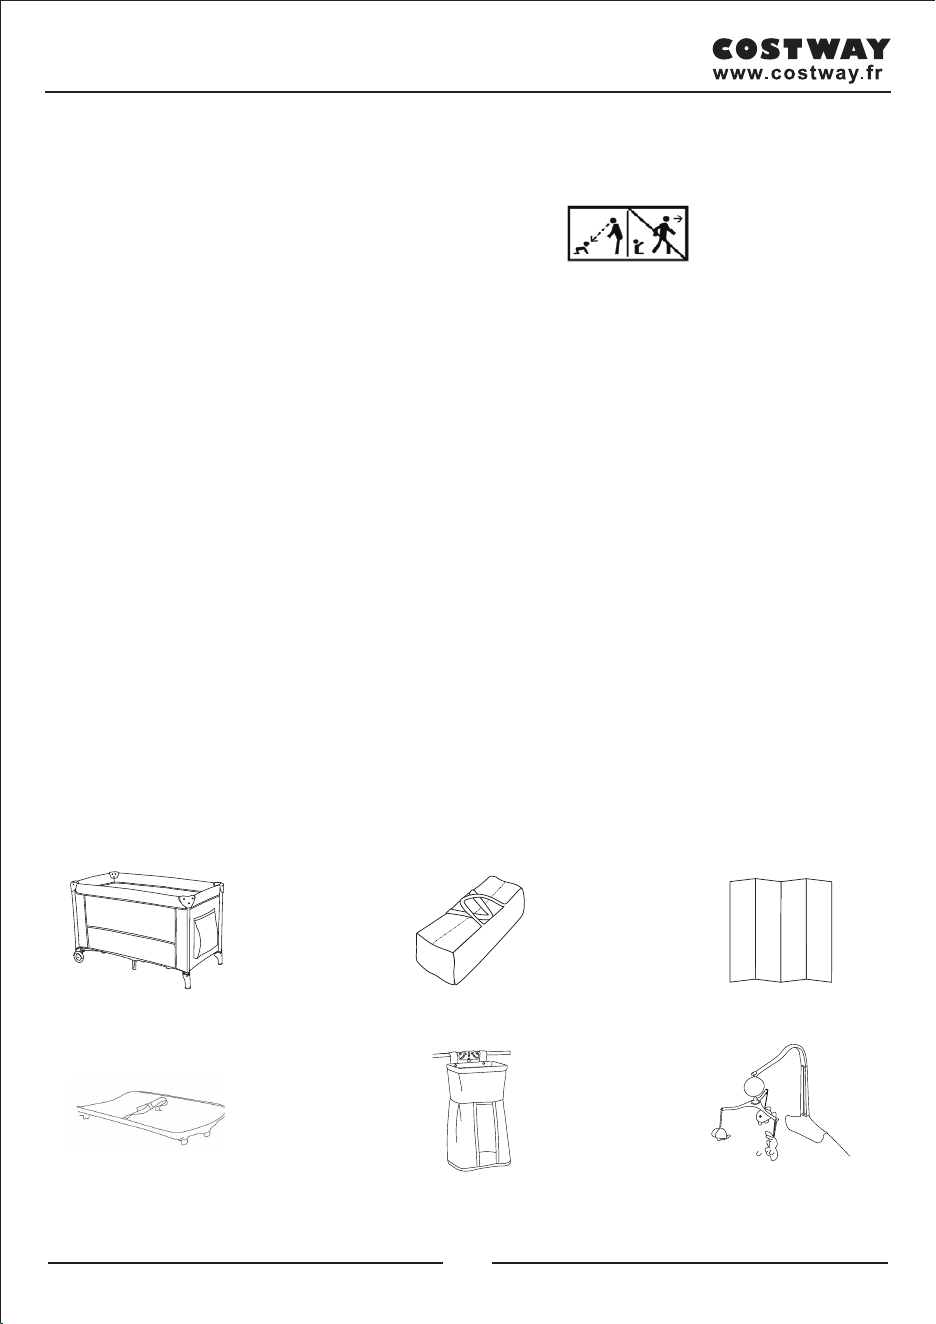
B. Sac de transportA. Lit
D. Changeur de couche E. Espace de rangement
C. Matelas pliable
F. Barre à jouets tournant
avec boîte à musique
Manuel d’Instruction
IMPORTANT: Lisez toutes les instructions AVANT l’assemblage et l’utilisation du produit, et
CONSERVEZ-LES POUR UNE RÉFÉRENCE FUTURE
1. AVERTISSEMENT
AVERTISSEMEN : Ne laissez jamais l’enfant sans surveillance.
AVERTISSEMEN : Ne placez pas le lit près d’un foyer ou de toute autre source de chaleur.
AVERTISSEMEN : Limite d’âge / de poids pour les bébés du produit : 3 ans ou 15 kg.
AVERTISSEMEN : Ne utilisez pas le produit sans que le fond soit en place.
AVERTISSEMEN : Assurez-vous que le lit est complètement déplié et que tous les systèmes de
verrouillage sont complètement fixés avant d’y placer votre bébé.
2. RECOMMANDATIONS
RECOMMANDATION : Vérifiez que tous les mécanismes d’assemblage sont correctement fixés et il faut
les contrôler régulièrement.
RECOMMANDATION : Pour éviter les blessures, éloignez les enfants du lit pendant le pliage ou le
dépliage.
RECOMMANDATIONS : Ne laissez rien dans le lit et ne placez pas l’enfant à côté de tout objet sur lequel
l’enfant pourrait grimper ou qui pourrait présenter un risque d’étouffement ou d’étranglement, par exemple,
les ficelles, les liens de rideaux, etc.
RECOMMANDATION : Ne déplacez pas le lit quand l’enfant est dans le lit.
RECOMMANDATION : Ne l’utilisez pas si un ou plusieurs pièces sont cassées ou manquantes.
RECOMMANDATION : Utilisez uniquement des accessoires ou des pièces de rechange approuvés par le
vendeur.
RECOMMANDATION : Assurez-vous que votre enfant ne peut pas sortir du lit. Pour éviter tout risque de
chute, arrêtez d’utiliser le lit dès que l’enfant est capable de s’en sortir.
LISTE DES PIÈCES
Vérifiez que ce produit ne manque aucune pièce avant d’installer le lit.
A. Lit B. Sac de transport C. Matelas pliable
D. Changeur de couches E. Espace de rangement F. Barre à jouets tournant avec boîte à musique
Veuillez lire attentivement toutes les instructions et les conserver pour la référence ultérieure.
Avertissements Généraux:
Attention : pour éviter toute blessure par enchevêtrement, retirez ce jouet lorsque l’enfant
commence à essayer de se mettre debout avec les mains et les genoux en rampant.
Danger ! Éloignez toutes les petites pièces et le matériel d’emballage des bébés et des
enfants pour éviter un risque d’étouffement.
Le produit doit être installé et utilisé sous la surveillance d’un adulte.
Lisez attentivement chaque étape et suivez le bon ordre.
Retirez tous les emballages, séparez et comptez toutes les pièces et le matériel avant
l’installation.
Assurez-vous que toutes les pièces sont correctement installées. Une installation incorrecte
peut entraîner un danger.
Assurez une surface sûre pendant l’assemblage et placez le produit toujours sur une surface
plane et stable.
20 21
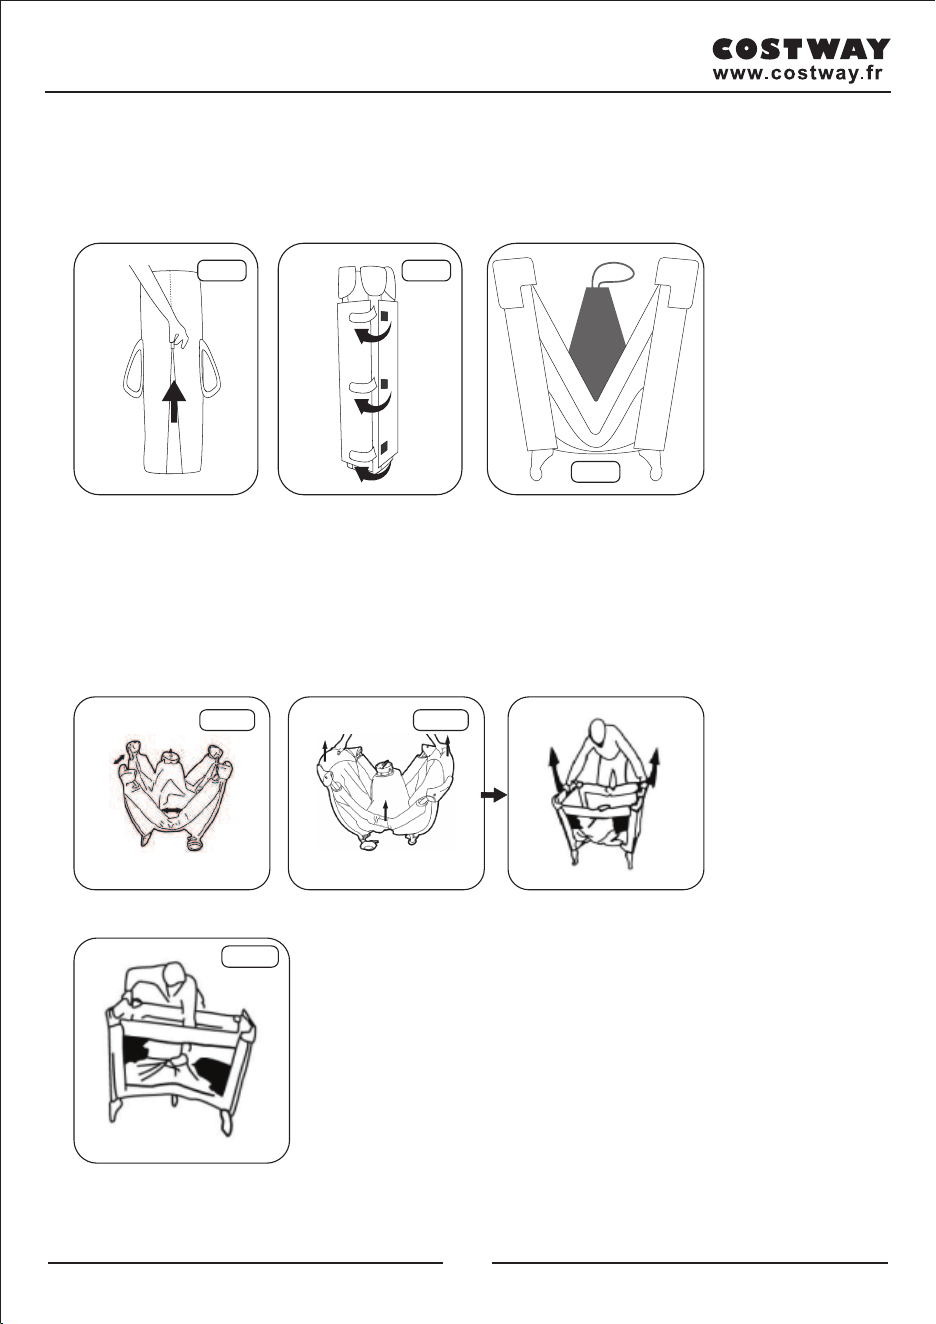
3. INSTRUCTIONS D’ASSEMBLAGE
ÉTAPE 1 : OUVERTURE DU PAQUET
Ouvrez le sac de transport (Fig.1) et sortez le lit. Sortez le matelas pliable du lit en détachant les sangles
auto-fixantes (Fig. 2) pour libérer le lit.
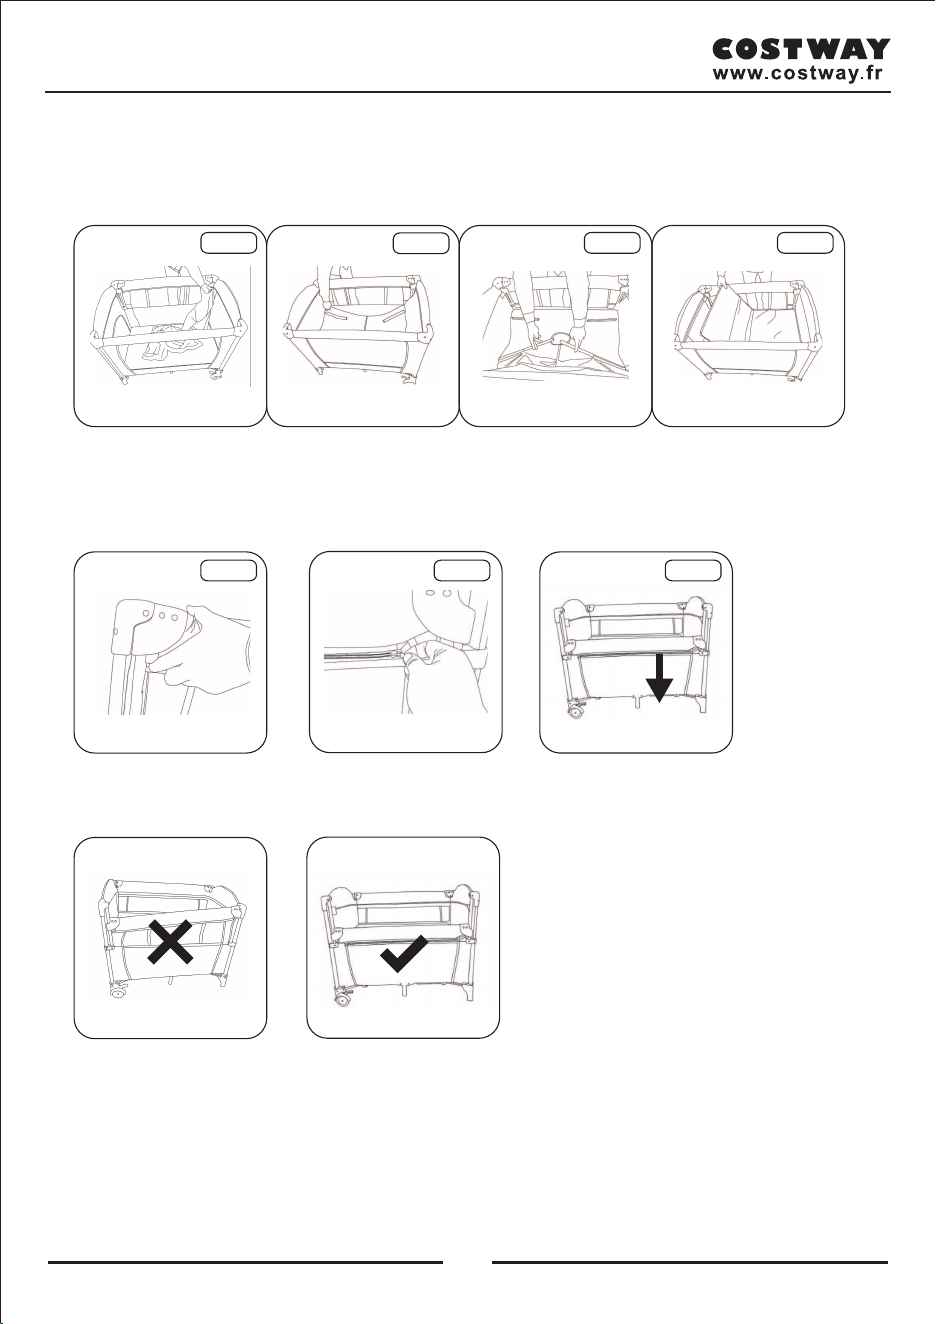
ÉTAPE 2 : FIXATION DU LIT
a. Dépliez légèrement la structure pour pour écarter les côtés du lit (Fig. 3).
IMPORTANT
Commencez par déplier le lit en écartant les côtés. Le fond du lit (au centre) doit être abaissé en
dernier.
b. Suivez les instructions illustrées par (Fig.4a) et (Fig.4b) des deux côtés en même temps.
c. Terminez la fixation par frapper le fond du lit (Fig. 5) pour verrouiller le mécanisme de blocage.
Fig.1 Fig.2
Fig.3
Côté A
(avec l’ouverture)
Côté A
(avec l’ouverture)
CLIC
Fig.4a Fig.4b
Fig.5
Fig.6-1
Fig.6-2
Fig.6-3
Fig.6-4
Fermeture Éclair
Fig.6-5 Fig.6-6 Fig.6-7
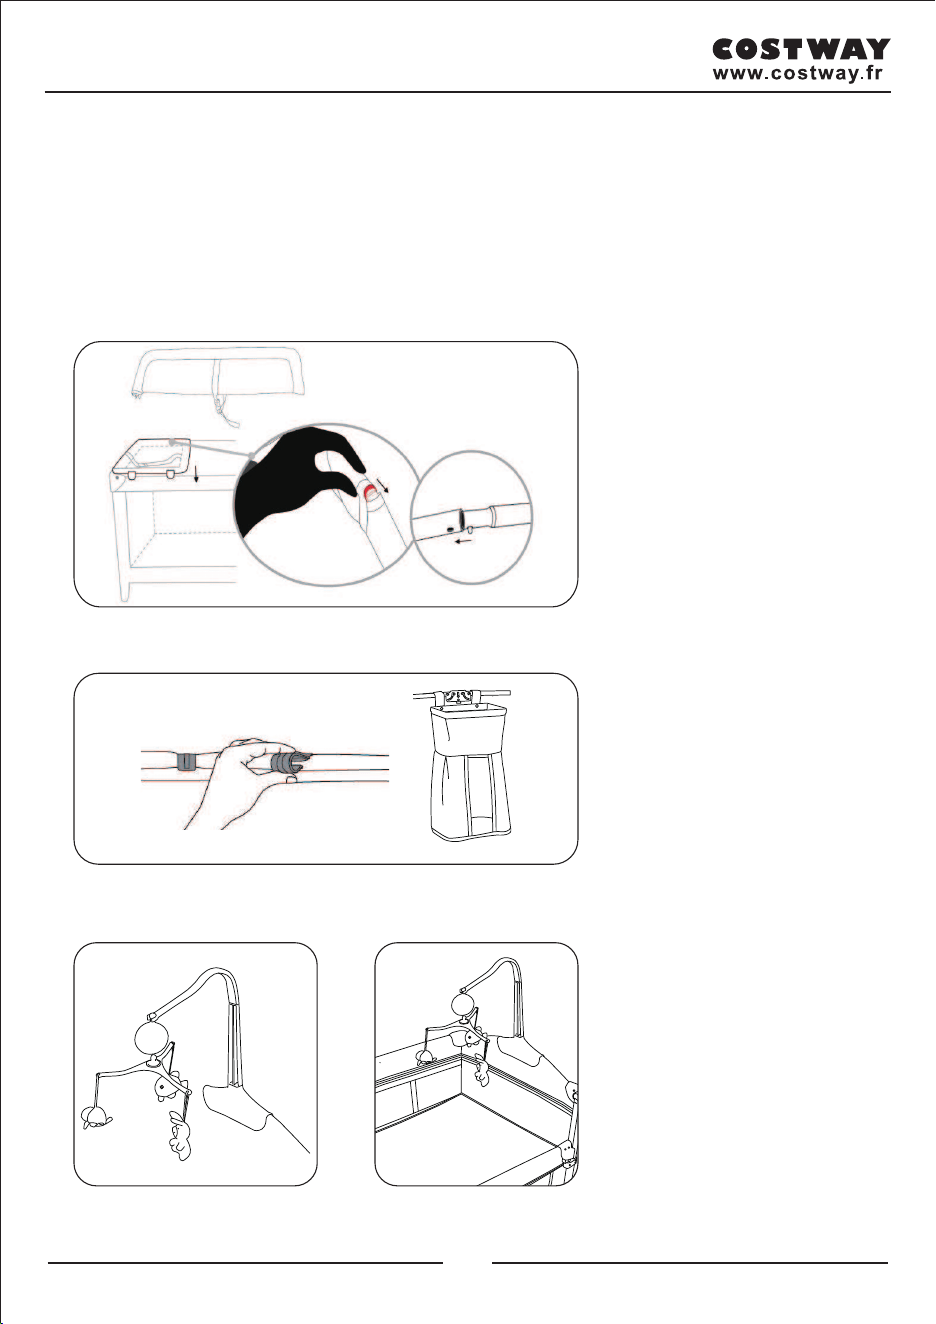
ÉTAPE 3 : INSTALLATION DU BERCEAU
a. Avant l’installation, retirez le matelas pliable du fond de lit, placez le berceau à l’intérieur de lit et
attachez la fermeture éclair aux rails supérieurs. (Fig.6-1)
Assurez-vous que la fermeture éclair est bien fixée aux rails supérieurs
b. Insérez le tube métallique ensemble dans le fond de lit comme indiqué, assurez-vous que les tubes
sont connectés avant d’installer le matelas pliable. (Fig.6-3) Glissez le matelas pliable dans le fond du
berceau. (Fig.6-4)
Appuyez sur les boutons des deux côtés du lit, et déplacez le rail supérieur vers le bas. (Fig. 6-5)
Le rail supérieur et la deuxième couche sont fixés par une fermeture éclair. (Fig. 6-6, Fig.6-7)
Note
La fonction de levage du lit doit être actionnée des deux côtés du lit.
22 23
3. INSTRUCTIONS D’ASSEMBLAGE
ÉTAPE 1 : OUVERTURE DU PAQUET
Ouvrez le sac de transport (Fig.1) et sortez le lit. Sortez le matelas pliable du lit en détachant les sangles
auto-fixantes (Fig. 2) pour libérer le lit.
ÉTAPE 2 : FIXATION DU LIT
a. Dépliez légèrement la structure pour pour écarter les côtés du lit (Fig. 3).
IMPORTANT
Commencez par déplier le lit en écartant les côtés. Le fond du lit (au centre) doit être abaissé en
dernier.
b. Suivez les instructions illustrées par (Fig.4a) et (Fig.4b) des deux côtés en même temps.
c. Terminez la fixation par frapper le fond du lit (Fig. 5) pour verrouiller le mécanisme de blocage.
Fig.1 Fig.2
Fig.3
Côté A
(avec l’ouverture)
Côté A
(avec l’ouverture)
CLIC
Fig.4a Fig.4b
Fig.5
Fig.6-1
Fig.6-2
Fig.6-3
Fig.6-4
Fermeture Éclair
Fig.6-5 Fig.6-6 Fig.6-7
ÉTAPE 3 : INSTALLATION DU BERCEAU
a. Avant l’installation, retirez le matelas pliable du fond de lit, placez le berceau à l’intérieur de lit et
attachez la fermeture éclair aux rails supérieurs. (Fig.6-1)
Assurez-vous que la fermeture éclair est bien fixée aux rails supérieurs
b. Insérez le tube métallique ensemble dans le fond de lit comme indiqué, assurez-vous que les tubes
sont connectés avant d’installer le matelas pliable. (Fig.6-3) Glissez le matelas pliable dans le fond du
berceau. (Fig.6-4)
Appuyez sur les boutons des deux côtés du lit, et déplacez le rail supérieur vers le bas. (Fig. 6-5)
Le rail supérieur et la deuxième couche sont fixés par une fermeture éclair. (Fig. 6-6, Fig.6-7)
Note
La fonction de levage du lit doit être actionnée des deux côtés du lit.
22 23
ÉTAPE 4 : Assemblage de changeur de couche
a. Dépliez le changeur de couche.
b. Insérez les deux tubes à l’intérieur du changeur de couche comme indiqué.
c. Fixez les 4 clips sur la balustrade courte supérieure ; assurez-vous que les 4 clips sont solidement
fixés aux rails courts supérieurs
Lorsque vous placez votre bébé sur le changeur de couches, utilisez toujours le harnais pour
garder votre bébé en sécurité.
Assemblage d’espace de rangement
Attachez les clips d’espace de rangement sur le rail supérieur.
Assemblage de la Barre de jouets tournante avec boîte à musique
Accrochez la boîte à musique au crochet du support, puis placez le support sur la main courante courte
Fig.10 Fig.10-1
Fig.11 Fig.12
Fig.13 Fig.14
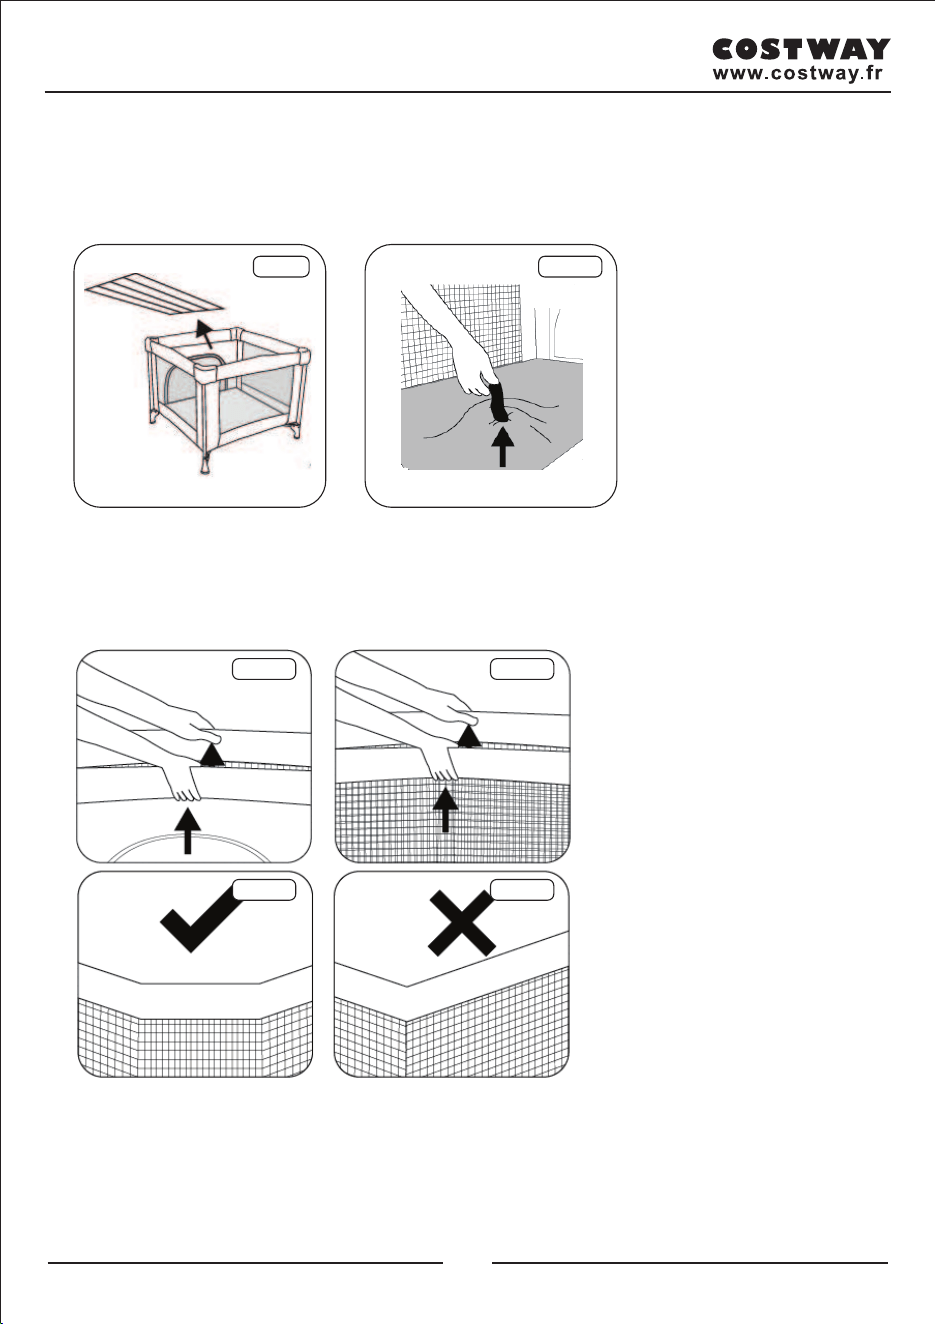
4. PLIAGE ET CONSERVATION LE PRODUIT
ÉTAPE 1 : PLIER LE LIT
a. Retirez le matelas du lit (Fig. 10) et soulevez le fond à l’aide de la sangle de traction en tissu
(Fig. 10-1).
b. Soulevez les bords A simultanément tout en appuyant sur le bouton de déverrouillage situé sous le
bord (Fig. 11).
c. Soulevez les bords B simultanément tout en appuyant sur le bouton de déverrouillage situé sous le
bord (Fig. 12).
Chaque bord doit être bouclé sur des deux côtés, comme indiqué ici (Fig. 13 et Fig. 14).
Bords A
En forme
de U
En forme
de V
Bords B
24 25
ÉTAPE 4 : Assemblage de changeur de couche
a. Dépliez le changeur de couche.
b. Insérez les deux tubes à l’intérieur du changeur de couche comme indiqué.
c. Fixez les 4 clips sur la balustrade courte supérieure ; assurez-vous que les 4 clips sont solidement
fixés aux rails courts supérieurs
Lorsque vous placez votre bébé sur le changeur de couches, utilisez toujours le harnais pour
garder votre bébé en sécurité.
Assemblage d’espace de rangement
Attachez les clips d’espace de rangement sur le rail supérieur.
Assemblage de la Barre de jouets tournante avec boîte à musique
Accrochez la boîte à musique au crochet du support, puis placez le support sur la main courante courte
Fig.10 Fig.10-1
Fig.11 Fig.12
Fig.13 Fig.14
4. PLIAGE ET CONSERVATION LE PRODUIT
ÉTAPE 1 : PLIER LE LIT
a. Retirez le matelas du lit (Fig. 10) et soulevez le fond à l’aide de la sangle de traction en tissu
(Fig. 10-1).
b. Soulevez les bords A simultanément tout en appuyant sur le bouton de déverrouillage situé sous le
bord (Fig. 11).
c. Soulevez les bords B simultanément tout en appuyant sur le bouton de déverrouillage situé sous le
bord (Fig. 12).
Chaque bord doit être bouclé sur des deux côtés, comme indiqué ici (Fig. 13 et Fig. 14).
Bords A
En forme
de U
En forme
de V
Bords B
24 25
Bienvenue pour visiter notre site et acheter nos produits de qualité!
Points de Récompense
Service à la Clientèle Exclusif
Recommandaons Personnalisées
Panier Permanent
Historique des Commandes
Nous tenons à vous présenter nos remerciements
sincères à tous nos clients qui prennent beaucoup
de temps pour assembler ce produit et nous donner
des commentaires précieux.
www.costway.fr
Vos suggestions et commentaires pour COSTWAY sont vraiment importants pour nous!
Nous vous sollicitons sincèrement de revenir dans notre boutique et de laisser une bonne évaluation en
un simple clic. Ce serait très encourageant si vous pouviez le faire comme ci-dessous:
24 février 2019
Excellents produits jusqu’à présent. Livraison rapide et l’installation facile. Et le fonctionnnement sans problème.
Bons produits jusqu’a présent
Avec votre évaluation inspirante, COSTWAY sera plus professionnel pour vous offrir une
BONNE EXPÉRIENCE D’ACHATS, de BONS PRODUITS et un SERCIVE EFFICACE !
FR office : 26 RUE DU VERTUQUET, 59960 NEUVILLE EN FERRAIN, FRANCE
Évaluation de Cinq-étoiles
merci
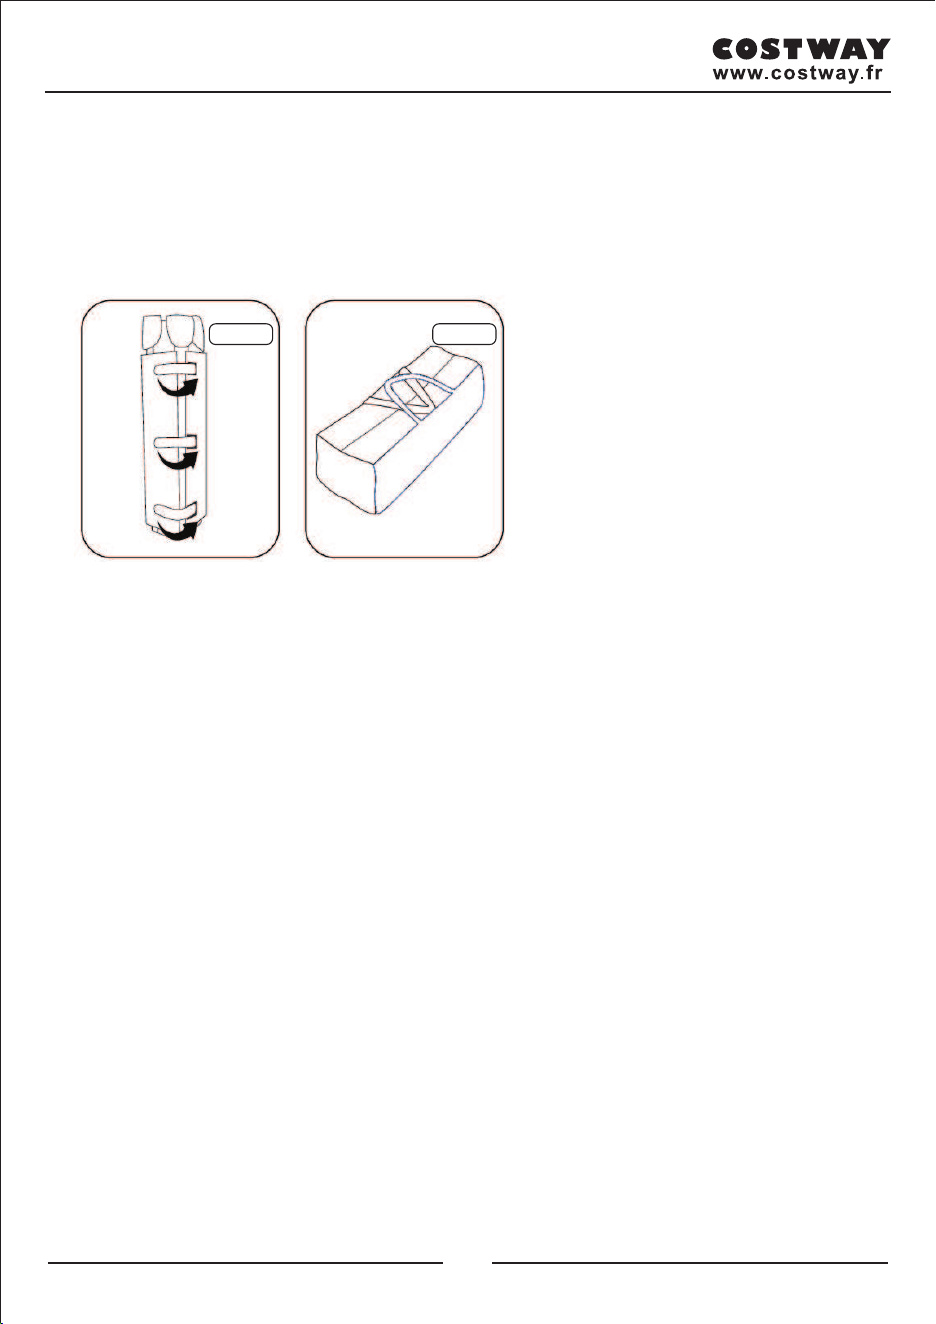
IMPORTANT
Si les bords du lit ne se plient pas complètement, répétez l’étape illustrée aux Fig. 11 et Fig. 12.
ÉTAPE 2 : STOCKER LE LIT
Une fois que les mécanismes de verrouillage du lit ont été relâchés, repliez-les complètement et ajustez
le matelas autour de la structure en le fixant avec les sangles auto-fixantes (Fig. 15). Glissez le produit
entier dans le sac de transport (Fig. 16).
CONSIGNES D’ENTRETIEN
Vous pouvez prolonger la durée de vie de votre lit avec le soin méticuleux, voici quelques conseils.
1 - Ne plongez jamais le lit, essuyez simplement les surfaces différentes.
2 - Nettoyez-le avec une éponge et du savon ou un détergent doux. Faites-le sécher au vent, il faut
mieux à l’abri du soleil,
3 - Stockez toujours ce produit dans un endroit bien aéré.
4 - Ne l’exposez pas au soleil pendant longtemps.
Fig.15 Fig.16
26 27
Bienvenue pour visiter notre site et acheter nos produits de qualité!
Points de Récompense
Service à la Clientèle Exclusif
Recommandaons Personnalisées
Panier Permanent
Historique des Commandes
Nous tenons à vous présenter nos remerciements
sincères à tous nos clients qui prennent beaucoup
de temps pour assembler ce produit et nous donner
des commentaires précieux.
www.costway.fr
Vos suggestions et commentaires pour COSTWAY sont vraiment importants pour nous!
Nous vous sollicitons sincèrement de revenir dans notre boutique et de laisser une bonne évaluation en
un simple clic. Ce serait très encourageant si vous pouviez le faire comme ci-dessous:
24 février 2019
Excellents produits jusqu’à présent. Livraison rapide et l’installation facile. Et le fonctionnnement sans problème.
Bons produits jusqu’a présent
Avec votre évaluation inspirante, COSTWAY sera plus professionnel pour vous offrir une
BONNE EXPÉRIENCE D’ACHATS, de BONS PRODUITS et un SERCIVE EFFICACE !
FR office : 26 RUE DU VERTUQUET, 59960 NEUVILLE EN FERRAIN, FRANCE
Évaluation de Cinq-étoiles
merci
IMPORTANT
Si les bords du lit ne se plient pas complètement, répétez l’étape illustrée aux Fig. 11 et Fig. 12.
ÉTAPE 2 : STOCKER LE LIT
Une fois que les mécanismes de verrouillage du lit ont été relâchés, repliez-les complètement et ajustez
le matelas autour de la structure en le fixant avec les sangles auto-fixantes (Fig. 15). Glissez le produit
entier dans le sac de transport (Fig. 16).
CONSIGNES D’ENTRETIEN
Vous pouvez prolonger la durée de vie de votre lit avec le soin méticuleux, voici quelques conseils.
1 - Ne plongez jamais le lit, essuyez simplement les surfaces différentes.
2 - Nettoyez-le avec une éponge et du savon ou un détergent doux. Faites-le sécher au vent, il faut
mieux à l’abri du soleil,
3 - Stockez toujours ce produit dans un endroit bien aéré.
4 - Ne l’exposez pas au soleil pendant longtemps.
Fig.15 Fig.16
26 27
Lea todas las instrucciones detenidamente y guárdelas para futuras referencias.
Advertencias Generales:
Atención: para evitar posibles lesiones por enredos, retire este juguete cuando el niño
comience a levantarse sobre sus manos y rodillas en posición de gateo.
¡Peligro! Mantenga todas las piezas pequeñas y materiales de embalaje de este producto
fuera del alcance de bebés y niños, de lo contrario, pueden presentar un peligro de asfixia.
El producto debe instalarse y usarse bajo la supervisión de un adulto.
Lea cada paso cuidadosamente y siga el orden correcto.
Retire todo el embalaje, separe y cuente todas las piezas y los accesorios antes de la
instalación.
Asegúrese de que todas las piezas estén instaladas correctamente, la instalación incorrecta
puede provocar un peligro.
Asegúrese de de esté en una superficie segura durante la construcción y coloque el producto
siempre sobre una superficie plana y estable.
ES
ESTE MANUAL DE INSTRUCCIONES CONTIENE IMPORTANTES INFORMACIONES DE SEGURIDAD, POR FAVOR LO LEA Y GUARDE PARA REFERENCIAS FUTURAS.
¡Contáctenos!
NO devuelva este artículo.
Primero póngase en contacto con nuestro amable departamento de servicio al cliente para
obtener ayuda.
EN DE FR ES IT PL
Cuna de Viaje
BB5558
28 29
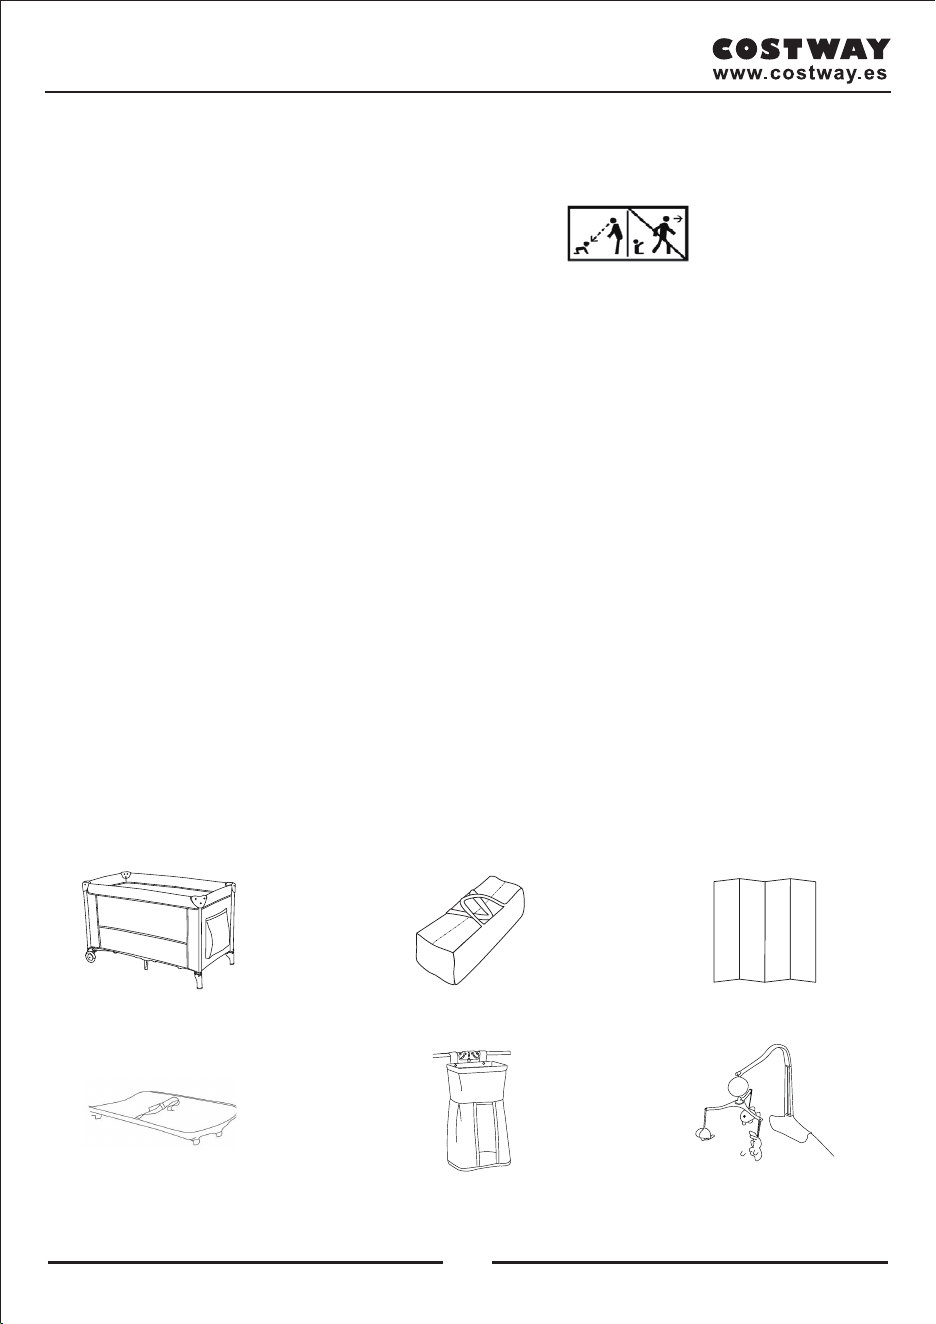
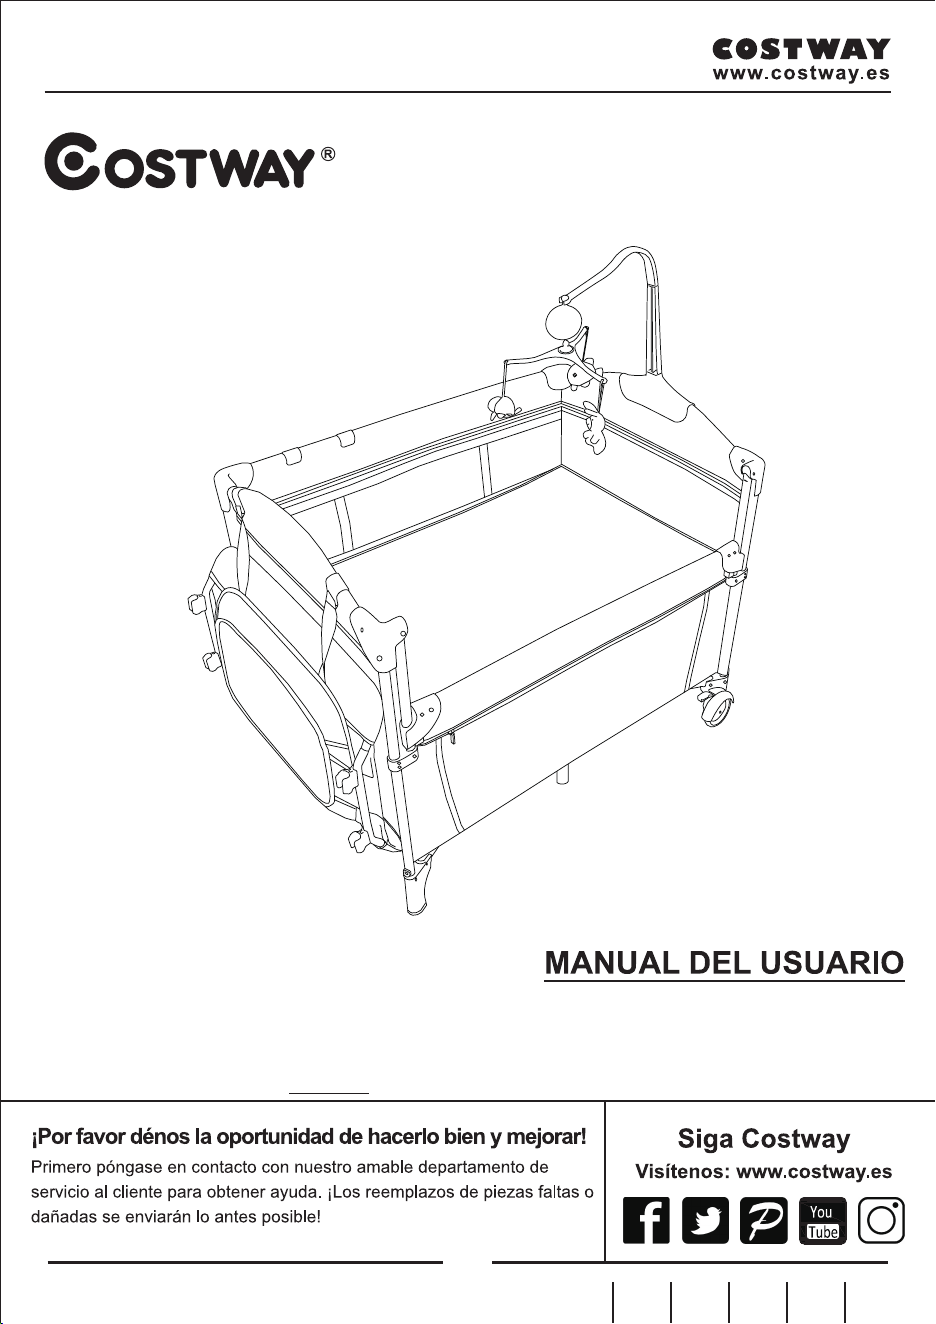
B. 1 bolsa de transporteA. 1 cuna de viaje
D. 1 cambiador de pañales E. 1 almacenamiento
C. 1 colchón plegable
F. 1 barra de juguete giratoria
con caja de música
Instrucción manual
IMPORTANTE: Lea todas las instrucciones ANTES del ensamblaje y USO del producto, y
MANTÉNGALOS PARA USO FUTURO.
1. ADVERTENCIA
ADVERTENCIA: Nunca deje al niño desatendido.
ADVERTENCIA: No coloque la cuna cerca de una chimenea o cualquier otra fuente de calor.
ADVERTENCIA: Límite superior de edad / peso para niños que usan lu cuna: 3 años o 15 kg.
ADVERTENCIA: No use la cuna sin la parte inferior en su lugar.
ADVERTENCIA: Asegúrese de que la cuna esté completamente desplegado y que todos los sistemas de
bloqueo esté completamente asegurado antes de colocar a su hijo en él.
2. RECOMENDACIONES
RECOMENDACIÓN: Verifique que todos los mecanismos de ensamblaje estén debidamente asegurados y
monitoreados regularmente.
RECOMENDACIÓN: Para evitar lesiones, mantenga a los niños bien alejados al plegar o desplegar la
cuna.
RECOMENDACIÓN: No deje nada dentro de la cuna y no lo coloque junto a nada sobre lo que el niño
pueda treparse o que pueda presentar un riesgo de asfixia o estrangulamiento, p. Ej. cuerdas, cortinas,
corbatas, etc.
RECOMENDACIÓN: No mueva la cuna cuando el niño esté en él.
RECOMENDACIÓN: No lo use si uno o más artículos están rotos o faltan.
RECOMENDACIÓN: Use solo accesorios o repuestos que hayan sido aprobados por el fabricante.
RECOMENDACIÓN: Asegúrese de que su hijo no pueda salir de la cuna. Para evitar el riesgo de caídas,
deje de usar la cuna tan pronto como el niño pueda salir de él.
LISTA DE PIEZAS
Compruebe que no faltan piezas antes de configurar la cuna.
A. 1 cuna de viaje B. 1 bolsa de transporte C. 1 colchón plegable
D. 1 cambiador de pañales E. 1 almacenamiento F. 1 barra de juguete giratoria con caja de música
3. INSTRUCCIONES DE MONTAJE
PASO 1: APERTURA DEL PAQUETE
Abra la bolsa de transporte (Fig. 1) y saque la cuna. Separe el colchón plegable de la cuna
desabrochando las correas autoajustables (Fig. 2) para liberar la cuna.
PASO 2: ASEGURAR LA CUNA
a. Despliegue la estructura ligeramente para separar los lados de la cuna (Fig. 3).
IMPORTANTE
Comience desplegando la cuna separando los lados. La parte inferior de la cuna (en el centro)
debe bajarse en último lugar.
b. Siga las instrucciones ilustradas Fig.4a y Fig.4b en ambos lados al mismo tiempo.
c. Termine golpeando la parte inferior de la cuna (Fig. 5) para asegurar el mecanismo de bloqueo.
Fig.1 Fig.2
Fig.3
LADO A
(con apertura)
LADO A
(con apertura)
CLIC
Fig.4a Fig.4b
Fig.5
30 31
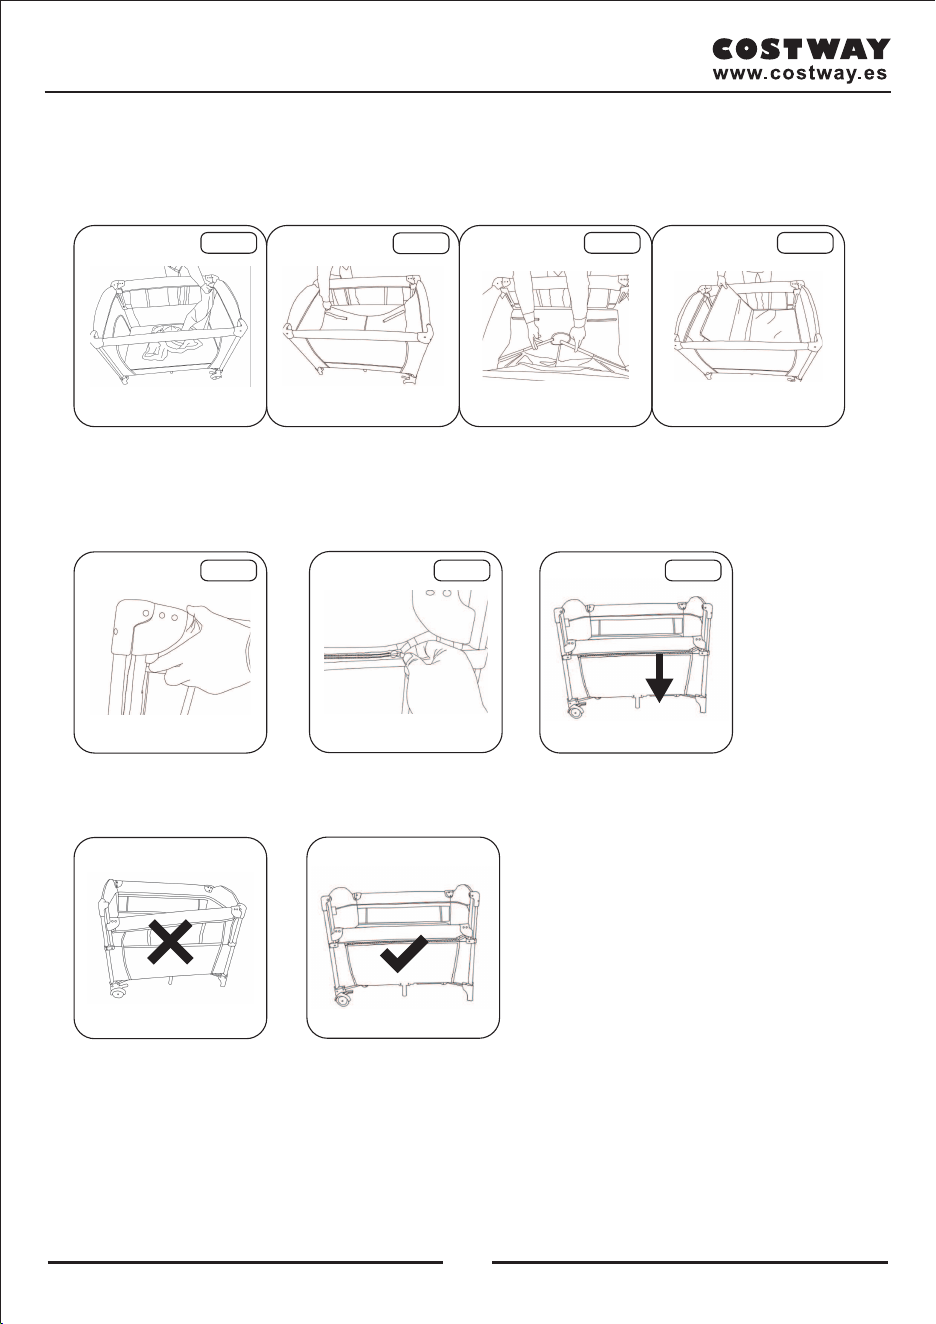
Fig.6-1
Fig.6-2
Fig.6-3
Fig.6-4
cremallera
Fig.6-5 Fig.6-6 Fig.6-7
PASO 3: Instale la cuna
a. Antes de instalar, retire el colchón plegable de la parte inferior de la cuna, coloque el moisés dentro
del corral y coloque la cremallera en los rieles superiores. Fig.6-1
Asegúrese de que la cremallera esté bien sujeta a los rieles superiores
b. Inserte el tubo de metal en la parte inferior del corral como se muestra, ASEGÚRESE de que los
tubos estén conectados antes de instalar el colchón plegable. Fig.6-3 Deslice el colchón plegable en la
parte inferior de la cuna. Fig.6-4
Presione los botones a ambos lados de la cuna y mueva el riel superior hacia abajo. Fig. 6-5
El riel superior y la segunda capa se fijan con una cremallera. Fig. 6-6 Fig.6-7
Nota
La función de elevación de la cuna se debe operar a ambos lados de la cama.
PASO 4: conjunto del cambiador de pañales
a. Despliegue el cambiador de pañales.
b. Inserte los dos tubos dentro del cambiador de pañales como se muestra.
c. Coloque los 4 clips en los rieles cortos superiores. Asegúrese de que los 4 clips estén bien sujetos a
los rieles cortos superiores.
Cuando coloque a su bebé en el cambiador de pañales, use siempre el arnés para mantener a su
bebé a salvo.
Montaje de almacenamiento
Conecte los clips del almacenamiento al riel superior.
Barra giratoria de juguete con ensamblaje de caja de música
Cuelgue la caja de música en el gancho del soporte, luego coloque el soporte en el pasamanos corto.
32 33
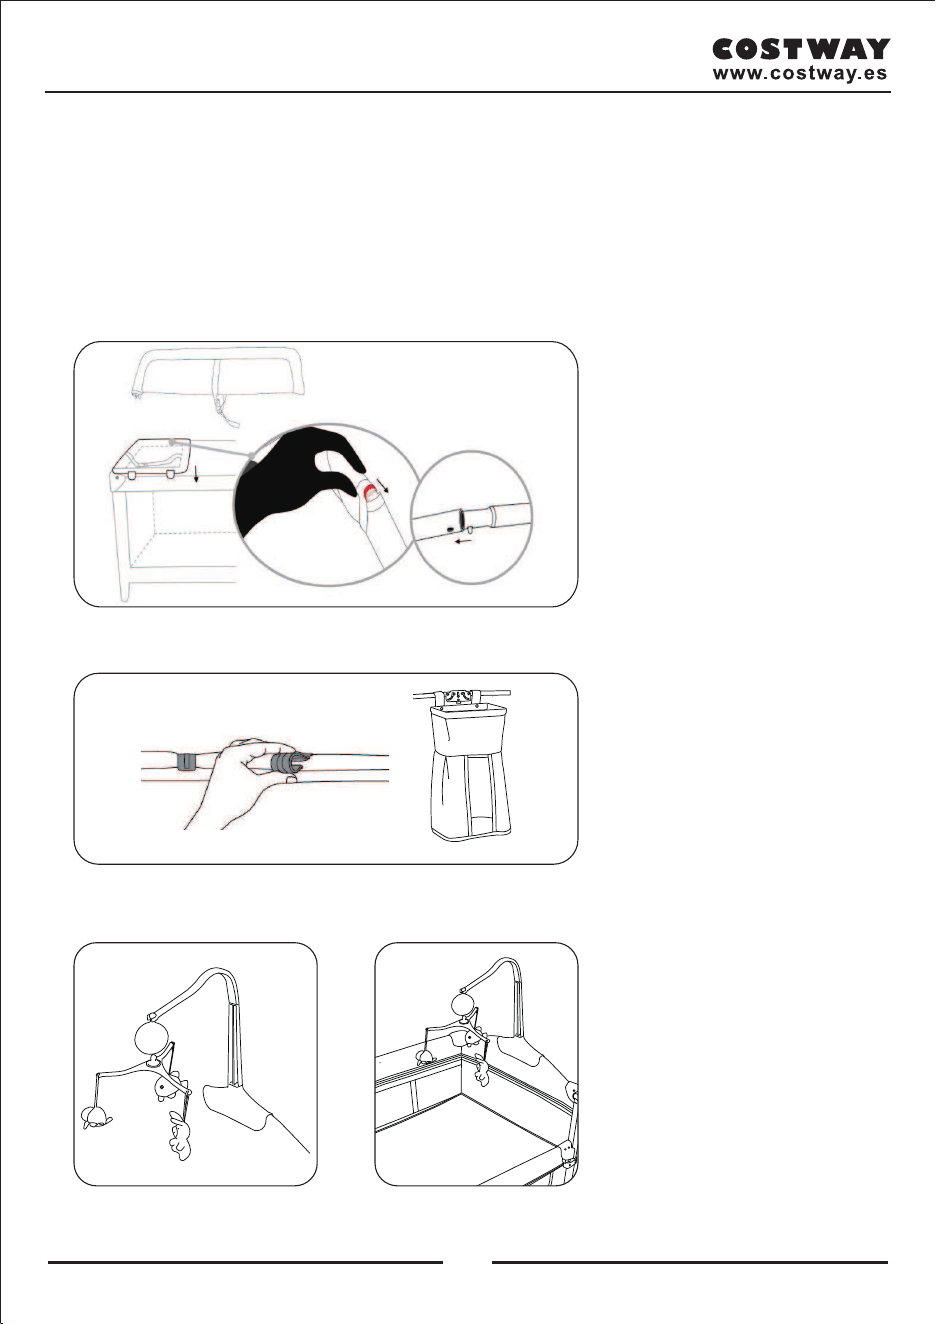

Fig.10 Fig.10-1
Fig.11 Fig.12
Fig.13 Fig.14
4. PLEGAR Y ALMACENAR EL PRODUCTO
PASO 1: PLEGAR LA CUNA
a. Retire el colchón de la cuna (Fig. 10) y levante la parte inferior con la ayuda de la correa de tela (Fig.
10-1).
b. Levante las llantas A simultáneamente mientras presiona el botón de desbloqueo debajo de la llanta
(Fig.11).
C. Levante las llantas B simultáneamente mientras presiona el botón de desbloqueo debajo de la llanta
(Fig. 12).
Cada borde debe abrocharse en ambos lados, como se muestra aquí (Fig.13 y Fig.14).
Llantas A
Forma U
Forma V
Llantas B
IMPORTANTE
Si los bordes de la cuna no se pliegan completamente, repita el procedimiento que se muestra en
la Fig.11 y Fig.12
PASO 2: ALMACENAMIENTO DE LA CUNA
Una vez que se hayan liberado los mecanismos de bloqueo de la cuna, dóblelo por completo y ajuste el
colchón alrededor de la estructura, asegurándolo con las correas de sujeción automática (Fig. 15),
deslice todo en la bolsa de transporte (Fig. 16).
INSTRUCCIONES DE MANTENIMIENTO
Puede extender la vida de su parque infantil cuidándolo bien, aquí hay algunos consejos.
1 - Nunca sumerja la cuna, simplemente limpie las diferentes superficies.
2 - Limpiar con una esponja y jabón o un detergente suave. Secar al aire, preferiblemente lejos de la luz
solar.
3 - Siempre almacene este producto en un lugar bien ventilado.
4 - No exponer a la luz solar por largos períodos de tiempo.
Fig. 15 Fig. 16
34 35
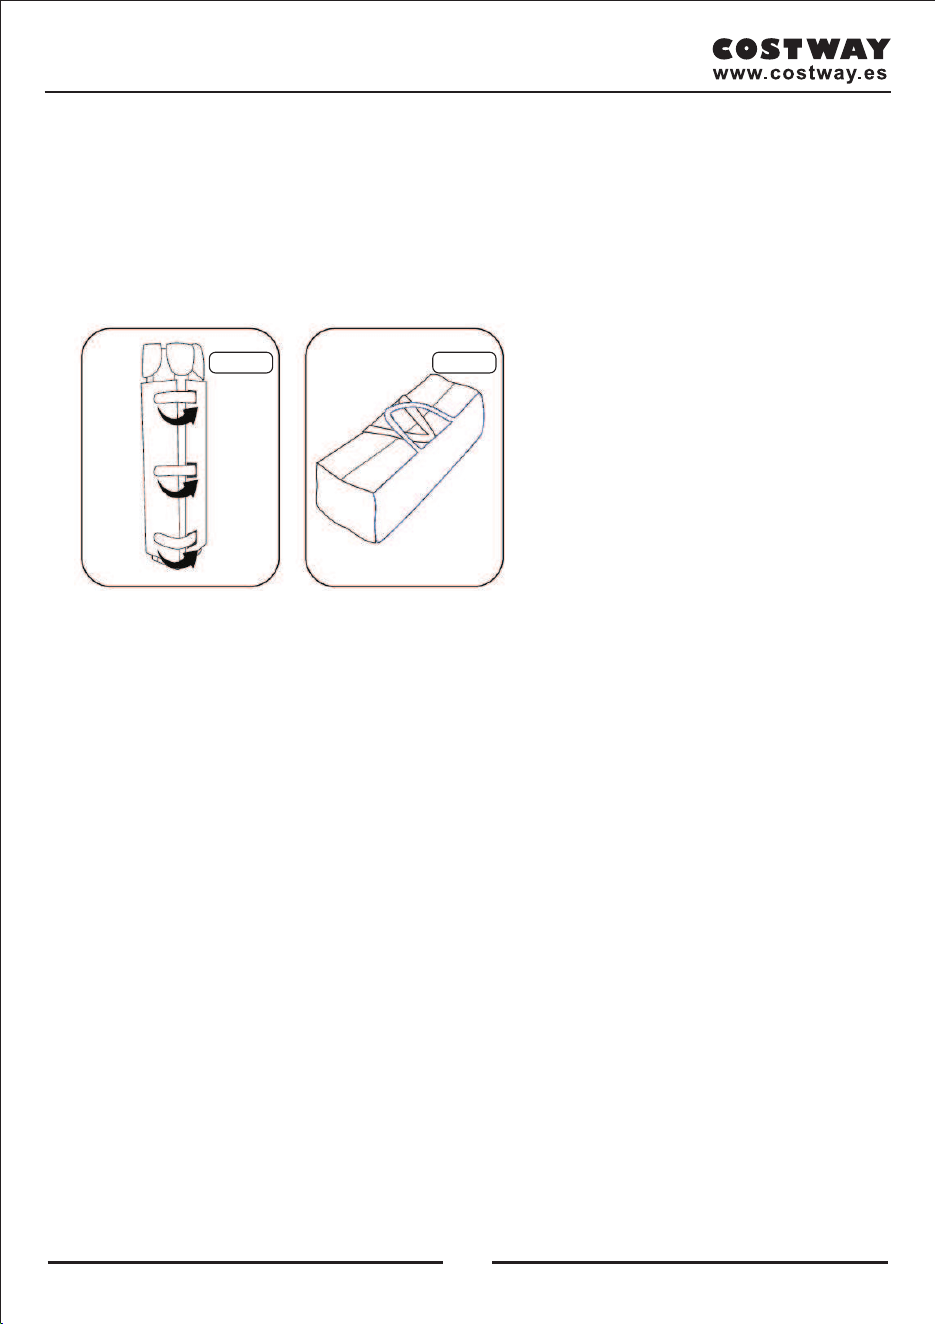

Visitateci: www.costway.it
Seguire Costway
Per prima cosa contatta il nostro servizio di assistenza clienti.
Sostituzioni per parti mancanti o danneggiate saranno spedite al più
presto!
MANUALE UTENTE
www.costway.it
37
QUESTO MANUALE DI ISTRUZIONI CONTIENE IMPORTANTI INFORMAZIONI SULLA SICUREZZA. SI PREGA DI LEGGERE E CONSERVARE PER RIFERIMENTO FUTURO.
Vi preghiamo di darci la possibilità di fare bene e fare di meglio!
EN DE FR ES IT PL
Lettino per Bambini
BB5558
36 37

B. Borsa per il trasportoA. Lettino
D. Fasciatoio del pannolino
E. Cesto portaoggetti
C. Materasso pieghevole
F. Barra dei giocattoli
con carillon
Istruzioni Manuali
IMPORTANTE: Leggere tutte le istruzioni PRIMA dell'assemblaggio e dell'USO del prodotto e
CONSERVARLI PER UN USO FUTURO.
1. AVVERTIMENTO
AVVERTIMENTO: Non lasciare mai il bambino incustodito.
AVVERTIMENTO: Non posizionare il lettino vicino a un camino o qualsiasi altra fonte di calore.
AVVERTIMENTO: Limite superiore di età / peso per i bambini che usano il lettino: 3 anni o 15 kg.
AVVERTIMENTO: Non utilizzare il lettino per bambini quando il fondo non è in posizione.
AVVERTIMENTO: Assicurarsi che il lettino sia completamente aperto e che tutto il sistema di bloccaggio
sia completamente fissato prima di inserire il bambino.
2. RACCOMANDAZIONI
RACCOMANDAZIONE: Verificare che tutti i meccanismi di assemblaggio siano adeguatamente protetti e
regolarmente monitorati.
RACCOMANDAZIONE: Per evitare lesioni, tenere lontani i bambini quando si piega o si apre il lettino.
RACCOMANDAZIONE: Non lasciare nulla all'interno del lettino e non posizionarlo accanto a qualcosa su
cui il bambino possa arrampicarsi o che possa comportare il rischio di soffocamento o strangolamento, per
esempio. corde, cravatte per tende, ecc.
RACCOMANDAZIONE: Non spostare il lettino quando il bambino è dentro.
RACCOMANDAZIONE: Non utilizzare se uno o più articoli sono rotti o mancanti.
RACCOMANDAZIONE: Utilizzare solo accessori o pezzi di ricambio approvati dal venditore.
RACCOMANDAZIONE: Assicurarsi che il bambino non possa uscire dal lettino. Per evitare il rischio di
cadute, smettere di usare il lettino non appena il bambino è in grado di uscirne.
ELENCO DELLE PARTI
Verificare che non manchino parti prima di impostare il lettino.
A. 1 Lettino B. 1 Borsa per il trasporto C. 1 Materasso pieghevole
D. 1 Fasciatoio del pannolino E. 1 Cesto portaoggetti F. 1 Barra dei giocattoli con carillon
www.costway.it
Contaaci!
NON restituire questo articolo.
Per prima cosa contatta il nostro servizio di assistenza clienti.
Prima di iniziare
www.costway.it
Si prega di leggere attentamente tutte le istruzioni e conservarle per riferimenti futuri.
Avvertenze Generali:
Attenzione: Per prevenire possibili lesioni dovute all'entanglement, rimuovere questo
giocattolo quando il bambino inizia a cercare di alzarsi sulle mani e sulle ginocchia in una
posizione strisciante.
Pericolo! Tenere tutte le parti piccole e i materiali di imballaggio per questo prodotto
lontano da neonati e bambini, altrimenti potrebbero rappresentare un rischio di
soffocamento.
Il prodotto deve essere installato e utilizzato sotto la supervisione di un adulto.
Leggere attentamente ogni passo e seguire l'ordine corretto.
Rimuovere tutti gli imballaggi, separare e contare tutte le parti e l'hardware prima
dell'installazione.
Assicurarsi che tutte le parti siano installate correttamente, un'installazione errata può
comportare un pericolo.
Assicurare una superficie sicura durante la costruzione e posizionare il prodotto sempre
su una superficie piana, stabile e solida.
E-mail
IT: cs.it@costway.com
38 39
www.costway.it www.costway.it
3. ISTRUZIONI DI MONTAGGIO
PASSO 1: APRI IL PACCHETTO
Aprire la borsa per il trasporto (Fig.1) ed estrarre il lettino. Staccare il materasso pieghevole dal lettino
allentando le cinghie autoserranti (Fig. 2) per liberare il lettino.
PASSO 2: SICUREZZA DEL LETTINO
a. Spiegare leggermente la struttura per allontanare i lati del lettino (Fig. 3).
IMPORTANTE
Inizia aprendo il lettino spingendo i lati a parte. La parte inferiore del lettino (al centro) deve
essere abbassata per ultima.
b. Seguire le istruzioni illustrate Fig 4a e Fig 4b su entrambi i lati contemporaneamente.
c. Terminare sbattendo sulla parte inferiore del lettino (Fig .5) per fissare il meccanismo di blocco.
Fig.1 Fig.2
Fig.3
LATO A
(con apertura)
LATO A
(con apertura)
CLIC
Fig.4a Fig.4b
Fig.5
Fig.6-1
Fig.6-2
Fig.6-3
Fig.6-4
Cerniera
Fig.6-5 Fig.6-6 Fig.6-7
PASSO 3: Installa la culla
a. Prima dell'installazione, rimuovere il materasso pieghevole dalla parte inferiore del lettino,
posizionare la culla all'interno del lettino e fissare la cerniera alle guide superiori. Fig.6-1
Assicurarsi che la cerniera sia saldamente fissata alle guide superiori.
b. Inserire il tubo metallico insieme nella parte inferiore del lettino come mostrato, ASSICURARSI che
i tubi siano collegati prima di installare il materasso pieghevole. Fig.6-3. Inserire il materasso
pieghevole nella parte inferiore della culla. Fig.6-4
Premere i pulsanti su entrambi i lati del lettino e spostare la guida superiore verso il basso. Fig.
6-5
La guida superiore e il secondo ripiano sono fissati con una cerniera. Fig. 6-6 Fig.6-7
Nota
La funzione di sollevamento del lettino deve essere azionata su entrambi i lati del letto.
40 41
www.costway.it www.costway.it
PASSO 4: Gruppo del fasciatoio
a. Spiegare il fasciatoio.
b. Inserire i due tubi all'interno del fasciatoio come mostrato.
c. Fissare i 4 clip sui corrimani superiori corti.
Quando metti il tuo bambino sul fasciatoio, usa sempre l'imbracatura per tenerlo al sicuro.
Assemblaggio di stoccaggio
Attaccare le clip dello stoccaggio portaoggetti alla guida superiore.
Girando la barra dei giocattoli con il gruppo carillon.
Appendere il carillon sul gancio della staffa, quindi posizionare la staffa sul corrimano corto.
Fig.10 Fig.10-1
Fig.11 Fig.12
Fig.13 Fig.14
4. PIEGARE E CONSERVARE IL PRODOTTO
PASSO 1: PIEGARE IL LETTINO
a. Rimuovere il materasso dal lettino (Fig. 10) e sollevare il fondo con l'aiuto della cinghia di trazione
in tessuto (Fig.10-1).
b. Sollevare i bordi A contemporaneamente premendo il pulsante di sblocco sotto il bordo(Fig.11).
c. Sollevare contemporaneamente i bordi B mentre si preme il pulsante di sblocco sotto il bordo
(Fig.12)
Ogni cerchio dovrebbe allacciarsi su entrambi i lati, come mostrato qui (Fig.13 and Fig.14).
Bordi A
Forma di U
Forma di V
Bordi A
42 43
www.costway.it www.costway.it
Benvenu a visitare il nostro sito Web e acquistare i nostri
prodo di qualità!
Ringraziamo sinceramente tu i nostri clien per
aver dedicato del tempo per assemblare questo
prodoo e fornirci preziosi feedback.
www.costway.it
I tuoi suggerimenti e commenti per COSTWAY sono davvero importanti per noi!
Ti chiediamo sinceramente di tornare al nostro negozio e lasciare un buono
commento con un semplice clic. Sarebbe piuttosto incoraggiante se potessi
gentilmente farlo come in seguito:
24 febbraio 2019
Grandi prodotti finora. Consegna veloce, facile configurazione e funzionamento senza problemi.
Ottimi prodotti finora
Con il tuo commento stimolante, COSTWAY continuerà a offrirti FACILITÀ DI ACQUISTO FACILE,
PRODOTTI BUONI e SERVIZIO EFFICIENTE!
US ufficio: Fontana, California
UK ufficio: Ipswich
Commento di 5 stelle
Grazie
Pun del premio
Servizio dei clien esclusivo
Raccomandazioni personalizzate
Carrello permanente
Storia degli ordini
IMPORTANT
Se i bordi del lettino non si ripiegano completamente, ripetere la procedura mostrata in Fig.11 e
Fig.12
PASSO 2:Conservare il lettino
Una volta rilasciati i meccanismi di bloccaggio del lettino, piegalo completamente e monta il materasso
attorno alla struttura, fissandolo con le cinghie auto-fissanti (Fig.15), infila il tutto nella borsa da
trasporto (Fig. 16).
ISTRUZIONI DI MANUTENZIONE
Puoi prolungare la vita del tuo lettino prendendoti cura di esso, ecco alcuni consigli.
1. Non immergere mai il lettino in acqua, basta pulire diverse superfici.
2. Pulire con una spugna e sapone o un detergente delicato. Asciugare all'aria, preferibilmente lontano
dalla luce solare.
3. Conservare sempre questo prodotto in un luogo ben ventilato.
4. Non esporre alla luce solare per lunghi periodi di tempo.
Fig.15 Fig.16
44 45

Przeczytaj uważnie wszystkie instrukcje i zachowaj je na przyszłość.
Ogólne ostrzeżenia:
Uwaga: Aby zapobiec możliwym obrażeniom w wyniku zaplątania, usuń tę zabawkę, gdy
dziecko zacznie próbować wstawać na rękach i kolanach w pozycji pełzającej.
Niebezpieczeństwo! Wszystkie małe części i materiały opakowaniowe należy przechowywać z
dala od niemowląt i dzieci, w przeciwnym razie mogą stwarzać ryzyko zadławienia.
Produkt musi być zainstalowany i używany pod nadzorem osoby dorosłej.
Przeczytaj uważnie każdy krok i postępuj we właściwej kolejności.
Usuń opakowanie i upewnij się, że zestaw zawiera wszystkie części i elementy montażowe.
Upewnij się, że wszystkie części są zainstalowane poprawnie - nieprawidłowa instalacja może
prowadzić do wypadków.
Zalecamy, aby w miarę możliwości wszystkie elementy były montowane w pobliżu miejsca, w
którym będą używane, aby uniknąć niepotrzebnego przenoszenia produktu po złożeniu.
Zapewnij bezpieczną przestrzeń roboczą podczas montażu i upewnij się, że produkt znajduje
się na płaskiej i stabilnej powierzchni.
Skontaktuj się z nami!
Nie zwracaj tego produktu.
Jeśli potrzebujesz pomocy, skontaktuj się z naszym przyjaznym działem obsługi klienta.
Zanim Zaczniesz
Odwiedź nas: www.costway.pl
Śledź Costway
Jeśli potrzebujesz pomocy skontaktuj się z naszym przyjaznym działem
obsługi klienta.
Ewentualne braki elementów zostaną uzupełnione najszybciej jak to możliwe!
INSTRUKCJA OBSŁUGI
www.costway.pl
NINIEJSZA INSTRUKCJA ZAWIERA ISTOTNE INFORMACJE DOTYCZĄCE BEZPIECZEŃSTWA. PROSIMY O ZAPOZNANIE SIĘ Z NIĄ I ZACHOWANIE JEJ DO WGLĄDU W PRZYSZŁOŚCI.
W razie kłopotów skontaktuj się z nami!
EN DE FR ES IT PL
www.costway.pl
E-mail
PL: sklep@costway.pl
Łóżeczko podróżne
BB5558
46 47
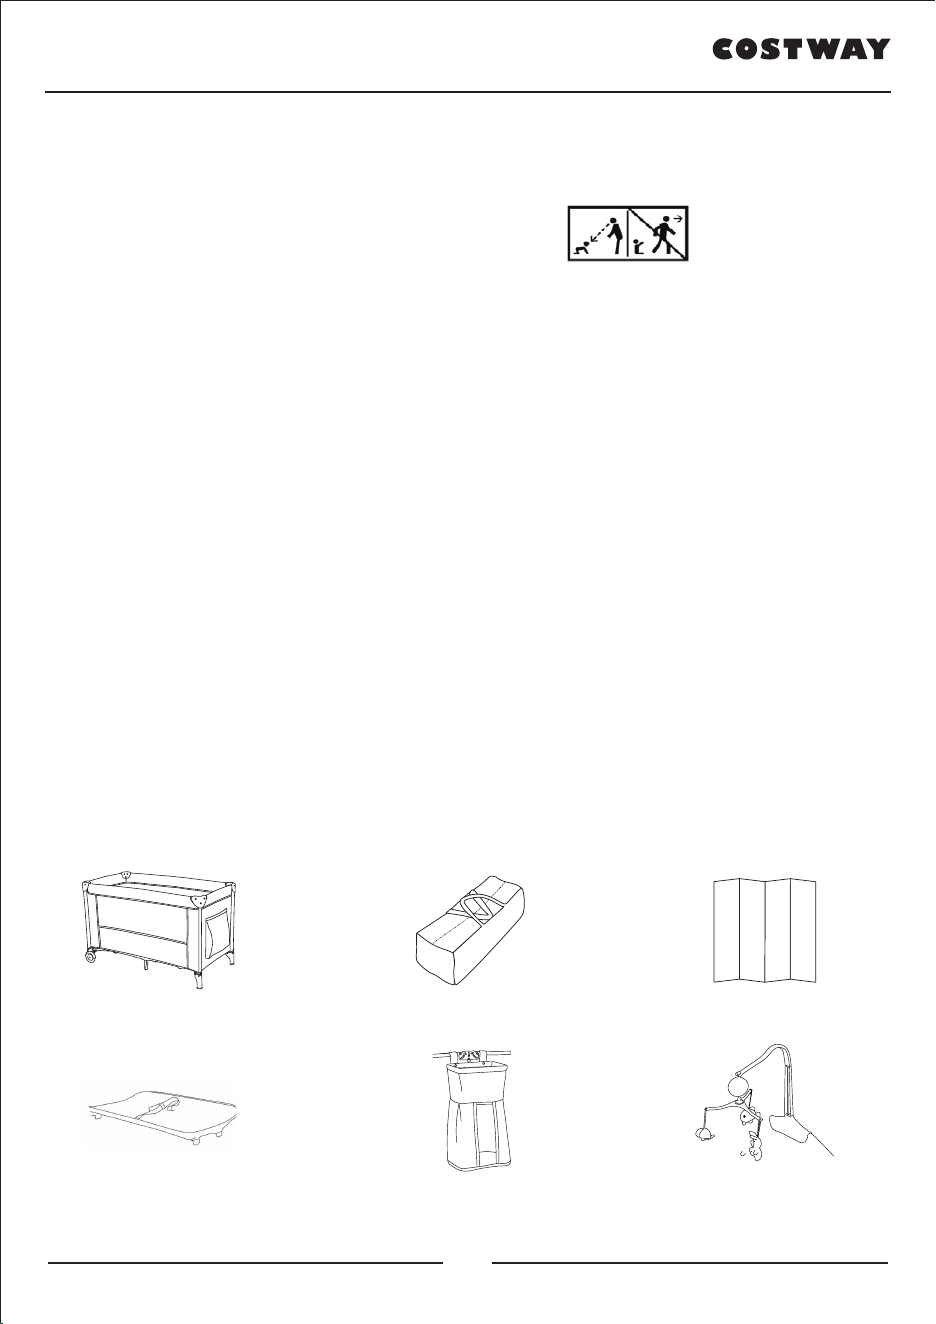
www.costway.plwww.costway.pl
B. Torba przenośnaA. Łóżeczko
D. Przewijak E. Organizer
C. Składany materac
F. Obrotowy pałąk na
zabawki z pozytywką
Instrukcja obsługi
WAŻNE: Przeczytaj całą instrukcję PRZED montażem i UŻYCIEM produktu, ZACHOWAJ ją na
PRZYSZŁOŚĆ
1. UWAGA
UWAGA: Nigdy nie zostawiaj dziecka bez opieki.
UWAGA: Nie zostawiaj łóżeczka blisko kominka lub innego źródła gorąca.
UWAGA: Górne limity wieku i wagi dziecka to odpowiednio: 3 lata i 15 kg.
UWAGA: Nie używaj łóżeczka bez dolnej połowy na swoim miejscu.
UWAGA: Zanim włożysz dziecko do łóżeczka upewnij się, że łóżeczko jest w całości rozwinięte i
mechanizmy zatrzaskowe są zapięte w pełni.
2. ZALECENIA
ZALECENIA: Upewnij się, że wszystkie mechanizmy montażowe są dokręcone i regularnie je sprawdzaj.
ZALECENIA: Aby zapobiec urazom, podczas składania lub rozkładania łóżeczka trzymaj dzieci z daleka.
ZALECENIA: Nie pozostawiaj w łóżeczku lub obok niego, przedmiotów na które dziecko może się
wspinać lub które mogą stwarzać ryzyko zadławienia lub uduszenia, np. Sznurków, firanek, krawatów itp.
ZALECENIA: Nie przenoś łóżeczka gdy znajduje się w nim dziecko.
ZALECENIA: Nie używaj gdy w łóżeczku brakuje jednego lub więcej elementów lub elementy są
uszkodzone.
ZALECENIA: Do wymiany używaj jedynie akcesoriów zatwierdzonych przez producenta.
ZALECENIA: Upewnij się, że Twoje dziecko nie jest w stanie wspiąć i wyjść z łóżeczka. Aby uniknąć
ryzyka upadku dziecka, przestań używać łóżeczka kiedy tylko dziecko będzie w stanie wpiąć się po
łóżeczku.
LISTA ELEMENTÓW
Przed rozpoczęciem składania łóżeczka upewnij się, że wszystkie elementy są zawarte w paczce.
A. 1 Łóżeczko B. 1 Torba przenośna C. 1 Składany materac
D. 1 Przewijak E. 1 Organizer F. 1 Obrotowy pałąk na zabawki z pozytywką
3. INSTRUKCJE MONTAŻU
KROK 1: OTWIERANIE OPAKOWANIA
Otwórz torbę przenośną (Obrazek 1) i wyjmij łóżeczko. Wyjmij składany materac z łóżeczka przez
odczepienie pasów (Obrazek 2).
KROK 2: ROZKŁADANIE ŁÓŻECZKA
A. Rozłóż odrobinę łóżeczko, tak aby móc rozłożyć boki naciskając na nie (Obrazek 3).
WAŻNE
Zacznij od rozkładania łóżeczka rozsuwając boki. Dół łóżeczka (w środku) powinien być
opuszczony na końcu
B. Wykonaj instrukcje zawarte na ilustracjach z Obrazka 4a i Obrazka 4b po obu stronach w tym
samym czasie.
C. Na koniec poklep spód łóżeczka (Obrazek 5) aby zatrzasnąć mechanizm blokujący.
Obr.1 Obr.2
Obr.3
STRONA A
(po otwarciu)
STRONA A
(po otwarciu)
KLIK
Obr.4a Obr.4b
Obr.5
48 49
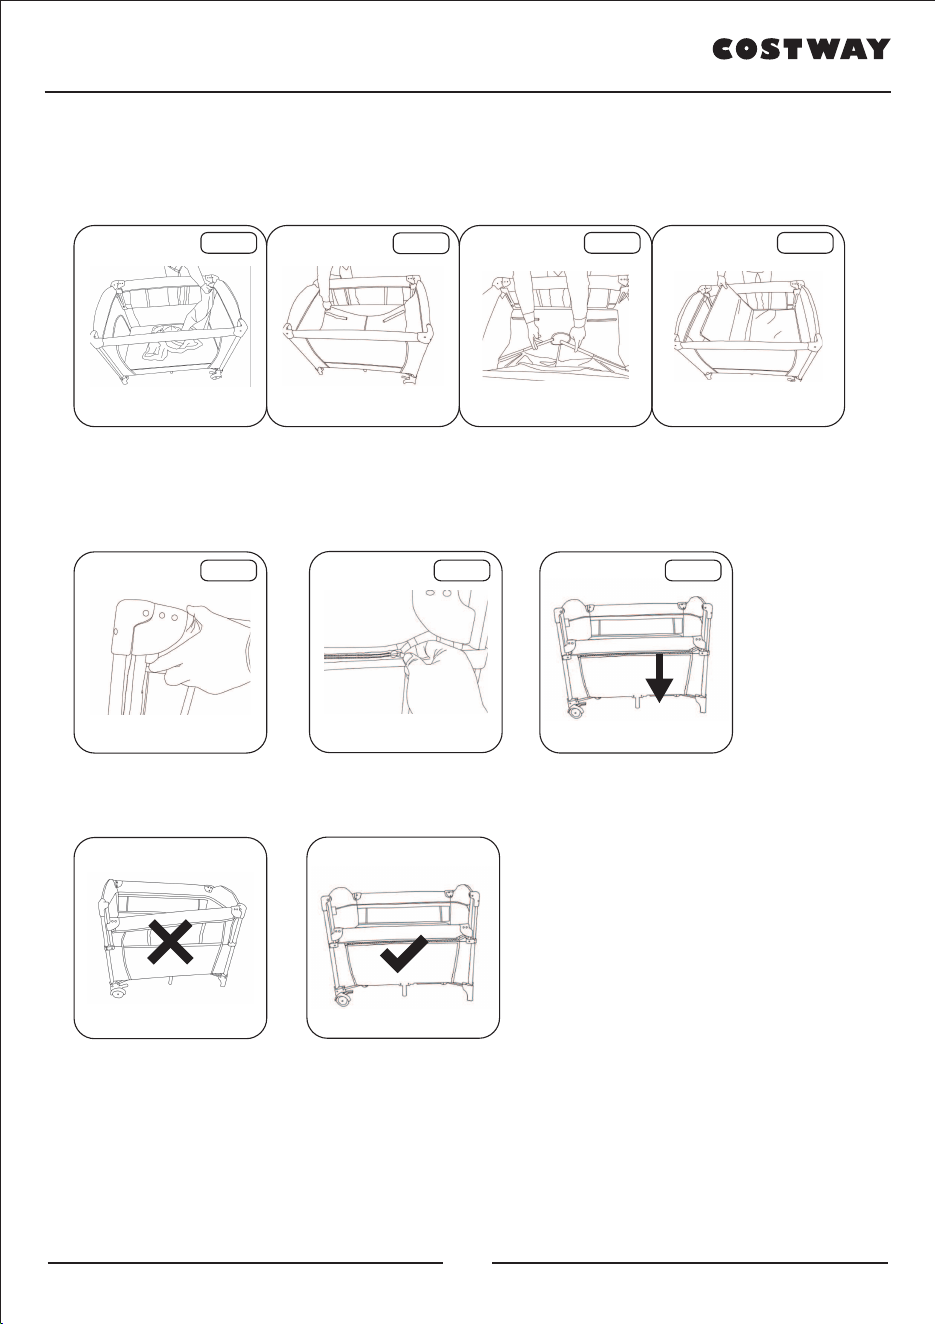
www.costway.plwww.costway.pl
Obr.6-1
Obr.6-2
Obr.6-3
Obr.6-4
zamek
Obr.6-5 Obr.6-6 Obr.6-7
KROK 3: Mocowanie siatki
A. Przed instalacją, usuń składany materac z dna łóżeczka i włóż siatkę do łóżeczka, mocując ją
zamkiem błyskawicznym na szczycie ramki (Obrazek 6-1)
Upewnij się, że zamek jest dobrze przymocowany na górze ramki.
B. Włóż metalowe rurki razem na dnie łóżeczka jak pokazano na obrazku, UPEWNIJ SIĘ, że rurki są
połączone zanim zamocujesz składany materac. Obrazek 6-3 wsuń składany materac na spód siatki.
Obrazek 6-4
Naciśnij przyciski na obu stronach łóżeczka i obniż ramkę. Obrazek 6-5. Górna ramka i druga
warstwa są połączone zamkiem. Obrazek 6-6 Obrazek .6-7
Pamiętaj
Funkcja podnoszenia łóżeczka musi być użyta po obu stronach łóżeczka.
KROK 4: Montaż przewijaka do pieluch
A. Rozwiń przewijak.
B. Włóż dwie rurki do przewijaka tak jak pokazano na obrazku.
C. Zamocuj 4 klipsy na górze poręczy. Upewnij się, że wszystkie 4 klipsy są prawidłowo
przymocowane do góry.
Zawsze używaj uprzęży bezpieczeństwa gdy umieszczasz dziecko na przewijaku.
Montaż organizera
Przymocuj klips organizera do górnej poręczy.
Montaż Obrotowego pałąka na zabawki z pozytywką
Zawieś pozytywkę na pałąku i włóż pałąk do krótkiej poręczy.
50 51
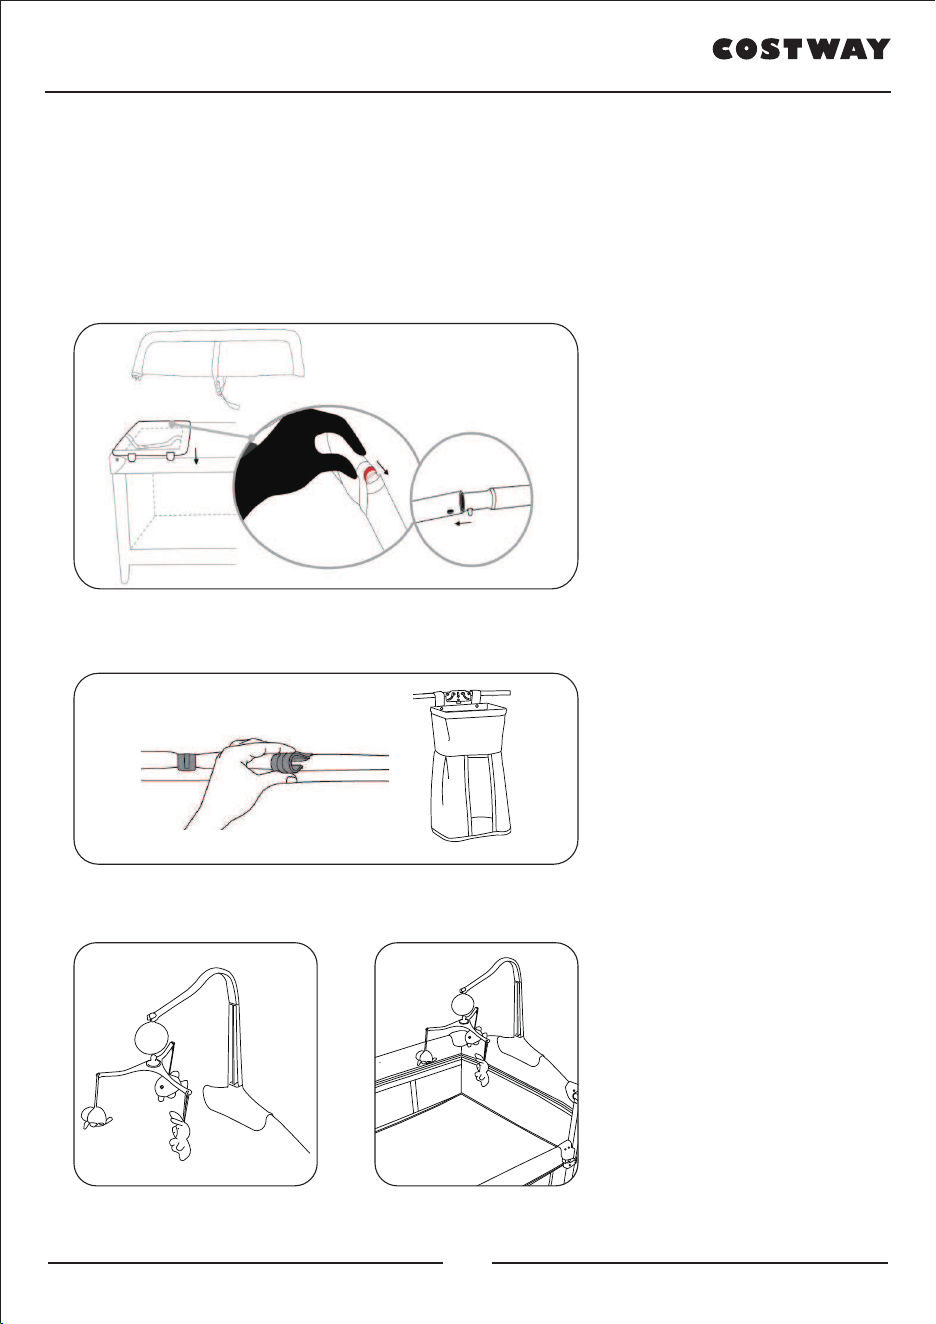
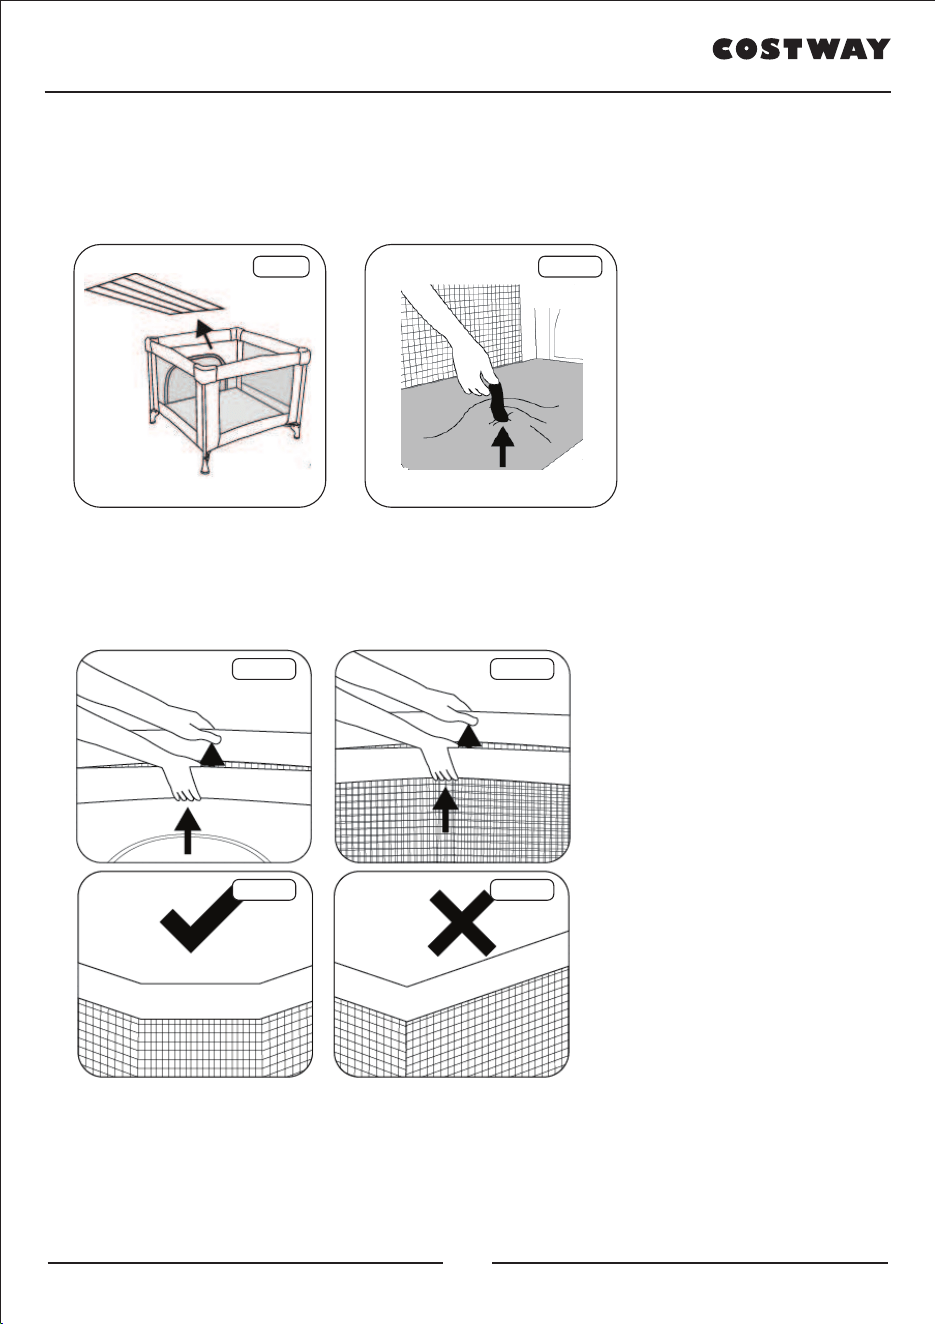
www.costway.plwww.costway.pl
Obr.10 Obr.10-1
Obr.11 Obr.12
Obr.13 Obr.14
4. SKŁADANIE I PRZECHOWYWANIE PRODUKTU
KROK 1: SKŁADANIE ŁÓŻECZKA
A. Usuń materac z łóżeczka (Obrazek 10) i podnieś spód za pomocą paska przyszytego do tkaniny
(Obrazek 10-1).
B. Podnieś ramę A jednocześnie naciskając przycisk zwalniający na dole ramy (Obrazek 11).
C. Podnieś ramę B jednocześnie naciskając przycisk zwalniający na dole ramy (Obrazek 12).
Każda z ram powinna być obsługiwana z obu stron jednocześnie jak pokazano na Obrazku 13 i
Obrazku 14.
Rama A
Kształt U
Kształt V
Rama B
WAŻNE
Jeżeli ramy łóżeczka nie złożą się całkowicie, powtórz procedurę pokazaną na Obrazku 11 i
Obrazku 12.
KROK 2: PRZECHOWYWANIE ŁÓŻECZKA
Po zwolnieniu mechanizmów blokujących złóż łóżeczko całkowicie i owiń materac wokół złożonego
łóżeczka , zabezpieczając je za pomocą pasów mocujących (Obrazek 15), wsuń wszystko do torby
transportowej (Obrazek 16).
INSTRUKCJE KONSERWACJI
Możesz wydłużyć żywotność swojego łóżeczka poprzez dbanie o nie, oto kilka rad.
1 - Nigdy nie zanurzaj łóżeczka, wytrzyj wyłącznie zabrudzone powierzchnie.
2 - Czyść gąbką i mydłem lub łagodnym detergentem. Susz na powietrzu, najlepiej poza bezpośrednim
światłem słonecznym.
3 - Zawsze przechowuj produkt w dobrze wentylowanym miejscu.
4 - Nie wystawiaj na słońce na długie okresy czasu.
Obr.15 Obr.16
52 53
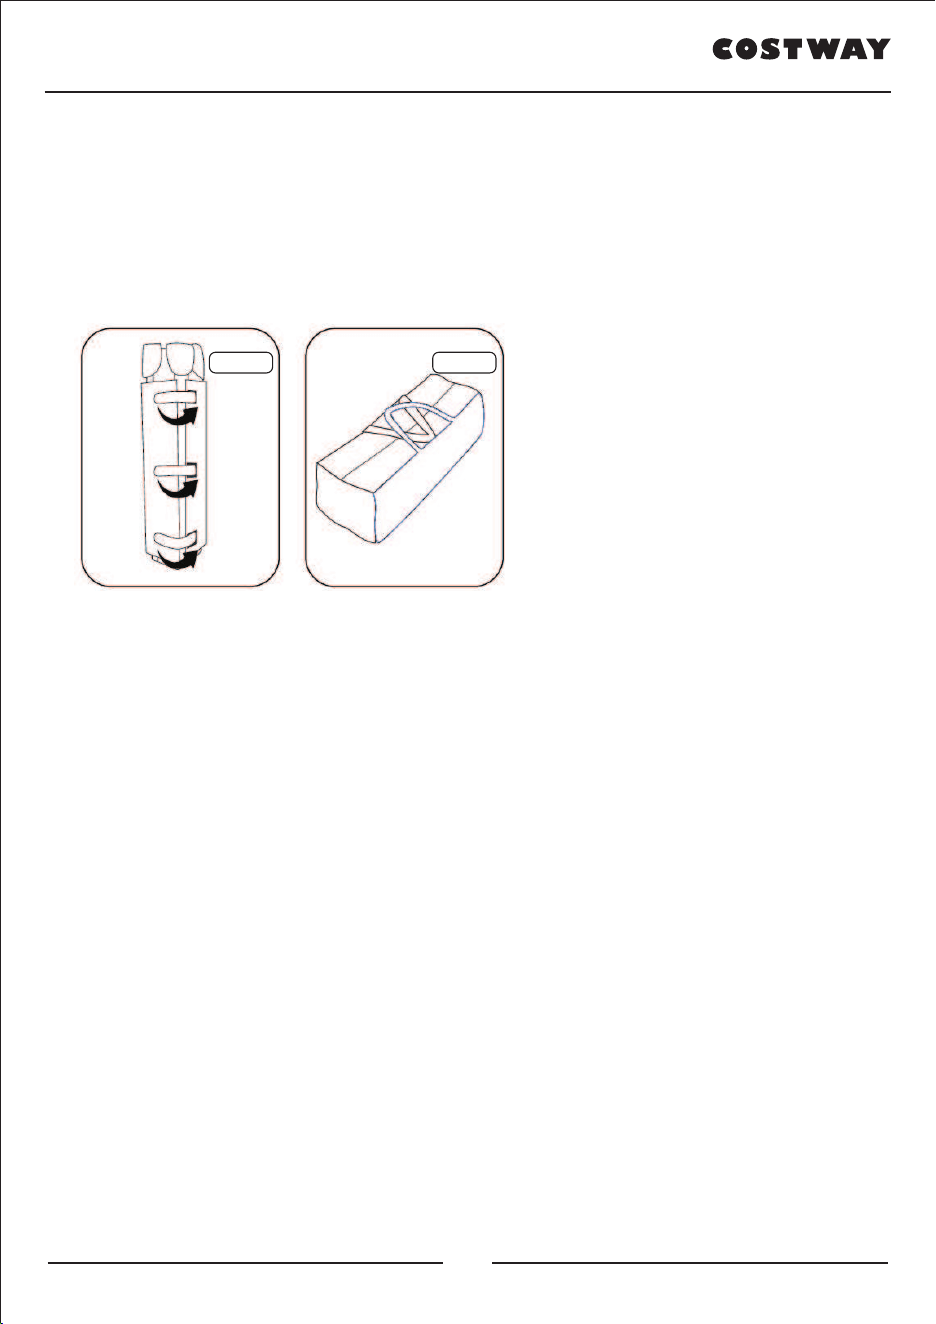
www.costway.pl
Zapraszamy do odwiedzenia naszej strony internetowej!
Dziękujemy za dokonanie zakupu w naszym
sklepie i zapraszamy do odwiedzenia go w
przyszłości!
www.costway.pl
Twoje sugestie i komentarze dotyczące COSTWAY są dla nas bardzo ważne!
Serdecznie zachęcamy do powrotu do naszego sklepu i pozostawienia dobrej
oceny - wystarczy proste kliknięcie. Byłoby nam miło, gdyby twoja ocena
wyglądała jak poniżej:
24 luty 2018
Świetne produkty. Szybka dostawa, łatwa konfiguracja i wysoka jakość wykonania.
Świetne produkty
Twoja ocena nas inspiruje! Dzięki niej COSTWAY będzie dążył do zaoferowania ci WYDAJNEJ
OBSŁUGI, DOBRYCH PRODUKTÓW I BEZPROBLEMOWYCH ZAKUPÓW!
PL office: Gdańsk
Pięciogwiazdkowa Ocena
punkty lojalnościowe
doskonała obsługa klienta
personalizowane rekomendacje
karta stałego klienta
historia zamówień
54

www.costway.pl
Zapraszamy do odwiedzenia naszej strony internetowej!
Dziękujemy za dokonanie zakupu w naszym
sklepie i zapraszamy do odwiedzenia go w
przyszłości!
www.costway.pl
Twoje sugestie i komentarze dotyczące COSTWAY są dla nas bardzo ważne!
Serdecznie zachęcamy do powrotu do naszego sklepu i pozostawienia dobrej
oceny - wystarczy proste kliknięcie. Byłoby nam miło, gdyby twoja ocena
wyglądała jak poniżej:
24 luty 2018
Świetne produkty. Szybka dostawa, łatwa konfiguracja i wysoka jakość wykonania.
Świetne produkty
Twoja ocena nas inspiruje! Dzięki niej COSTWAY będzie dążył do zaoferowania ci WYDAJNEJ
OBSŁUGI, DOBRYCH PRODUKTÓW I BEZPROBLEMOWYCH ZAKUPÓW!
PL office: Gdańsk
Pięciogwiazdkowa Ocena
punkty lojalnościowe
doskonała obsługa klienta
personalizowane rekomendacje
karta stałego klienta
historia zamówień
54

EN DE FR ES IT PL
Baby playpen
BB5558