V1.0
redtigercam.com
The information in this manual is subject to change without notice.
F8 User Manual

1
Content
Notice . . . . . . . . . . . . . . . . . . . . . . . . . . . . . .
2
~ňīßřÙŔŅãÙąƍÙ¼ŔąīģŌ . . . . . . . . . . . . . . . . . . . . .
3
~¼Ùė¼ùãīģŔãģŔŌ . . . . . . . . . . . . . . . . . . . . . . .
4
ŅŅã¼ň¼ģÙã . . . . . . . . . . . . . . . . . . . . . . . . . . .
5
řŔŔīģŌ¼ģß;řģÙŔąīģŌ . . . . . . . . . . . . . . . . . . . .
6
īřÙāÙňããģ;řģÙŔąīģ . . . . . . . . . . . . . . . . . . . .
8
ŌãňDģŔãƐ¼ÙãdűãƒąãŲ. . . . . . . . . . . . . . . . . . .
11
;řģÙŔąīģdűãƒąãŲ . . . . . . . . . . . . . . . . . . . . . .
14
~~¼ģߪą;ą;řģÙŔąīģ. . . . . . . . . . . . . . . . . . .
17
AīŲŔī~ě¼ŸŌąģù¼īġŅřŔãň. . . . . . . . . . . . . . .
19
DģŌŔ¼ěě¼Ŕąīģ . . . . . . . . . . . . . . . . . . . . . . . . . .
21
ňīřØěãāīīŔąģù . . . . . . . . . . . . . . . . . . . . . . .
24
řŌŔīġãňãƒąÙããģŔãň . . . . . . . . . . . . . . . . . .
26

2
Notice
• Please read this manual carefully before operation and keep it
for future reference. It will be helpful should you encounter any
operational problem.
• Improper installation will void the manufacturer's warranty.
The installation instructions do not apply to all types of vehicles
and are written as guidelines to assist in installing the system.
• īģŌřěŔ¼ģãŷŅãňąãģÙãßŔãÙāģąÙą¼ģąøŸīř¼ňãģīŔÙīġøīƑ¼Øěã
installing the product.
• Please make sure to read and understand local laws and
regulations regarding cameras and their use in a vehicle. Laws
ű¼ƔØŸŌŔ¼Ŕã˚
• Do not obscure the view of the road ahead or impede the
deployment of any airbags in the event of an accident.
• When not in use, please disconnect the car adapter from both
the 12/24V DC outlet in your vehicle and the device itself.
• dģěŸÙěã¼ģŔāãßãűąÙãŲąŔā¼ŌīøŔßƔÙěīŔā˛øīňŔīřùāßąƑ˛¼ŅŅěŸ
ŌīġãģãřŔň¼ěßãŔãňùãģŔßąěřŔãßąģɧŔīɨŅ¼ƑŌŲ¼Ŕãňīģ¼ŌīøŔ
cloth.
• Note that alcohol, thinner, benzene, etc could cause damage to
the paint or coatings.
• Avoid making contact with the lens as this may cause damage.
• The video recordings made by this Digital Video Recorder are
intended for personal use only.
• While driving, do not adjust the controls of your device as this
is a distraction to driving.

3
~ňīßřÙŔŅãÙąƍÙ¼ŔąīģŌ
DŔãġ^¼ġã F8 Dash Cam ©ąßãī;īňġ¼Ŕ MP4
Ùňããģąƀã 3.18" IPS Touch Screen ~āīŔī;īňġ¼Ŕ JPEG
ãÙīňßąģù
ãŌīěřŔąīģ
Front 2160P @30fps /
Front 1440P @60fps
Front 1080P @120fps
VãģŌ F1.5
dŅãň¼Ŕąģù
Temperature
-4°F~158°F DģŅřŔ DC 5V-2.5A
Micro SD card 32GB-256GB
ª¼ňň¼ģŔŸ
Period
1 Year
Note:
If you have any problems during use, we will provide 1 year free
ňãŅě¼ÙãġãģŔ¼ģßěąøãŔąġãŔãÙāģąÙ¼ěŌřŅŅīƑ˚
˥āãŌŅãÙąƍÙŲ¼ňň¼ģŔŸŅãňąīßąŌŌřØēãÙŔŔīěīÙ¼ěě¼ŲŌ˚
)ŷŔãģßãߪ¼ňň¼ģŔŸãƒąÙã˜
After registering information on redtigercam.com, you may extend
the warranty for an additional 6 months free of charge.
V˜āŔŔŅŌ˜˫˫ŲŲŲ˚ňãßŔąùãňÙ¼ġ˚Ùīġ˫Ņ¼ùãŌ˫Ų¼ňň¼ģŔŸøīňġ
4
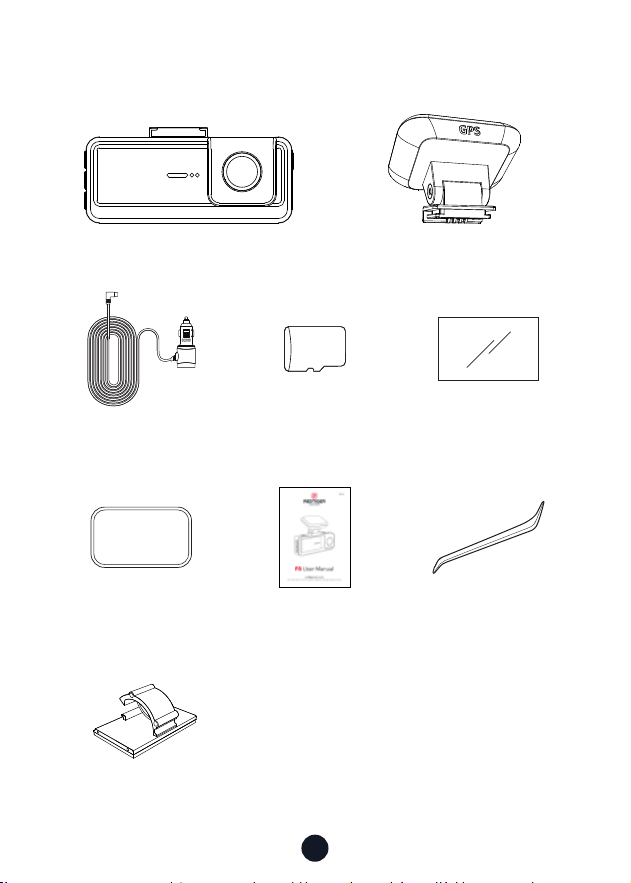
~¼Ùė¼ùãīģŔãģŔŌ
•F8 4K Dash cam •GPS Mount
•3M Adhesive •User Manual •Tool
•Power Supply Cable
with Car Charger
•Electrostatic
Sticker *2
•ɥɤ<\ãġīƔ¼ňß
•Cable Clips*5
3M
32GB
5
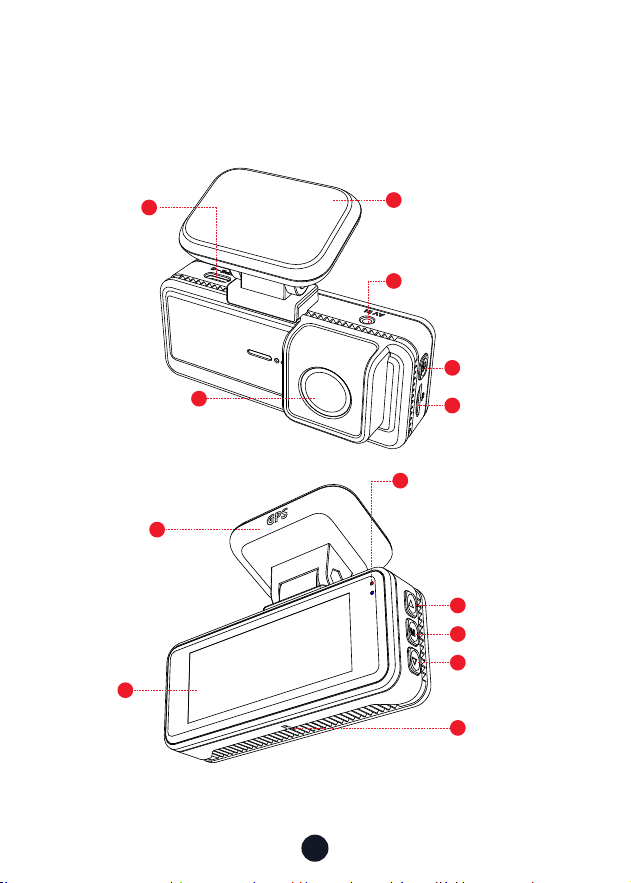
ŅŅã¼ň¼ģÙã
4
1
11
12
5
8
9
10
13
6
7
Front Camera Len
3M Adhesive
GPS Mount
Touch
Screen
USB
ŸŅã~īƑ
Power Button
Up Button
Menu Button
Down Button
Reset Button
Rear Cam Slot
Status Light
Blue light means power
īģ˛ňãßěąùāŔƏ¼Ōāąģù
means recording
\ãġīƔ¼ňß
Slot
3
2
6
řŔŔīģŌ¼ģß;řģÙŔąīģŌ
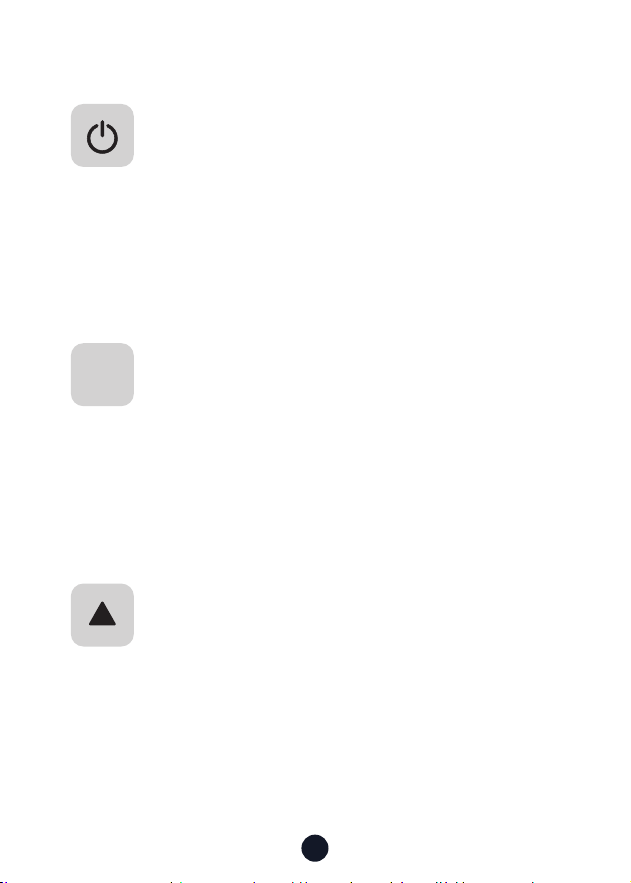
Power Button
ãÙīňßąģù\īßã˜
• āīƑŅňãŌŌŔīŲąŔÙāŌÙňããģ
• VīģùŅňãŌŌŔīřňģīƆŔāã¼ġãň¼
Setup Mode:
• āīƑŅňãŌŌŔīãŔřňģŔīŔāãŅňãűąīřŌŌÙňããģ
~ě¼ŸØ¼Ùė\īßã˜
• āīƑŅňãŌŌŔīãŔřňģŔīŔāãŅňãűąīřŌŌÙňããģ
Menu Button
ãÙīňßąģù\īßã˜
• āīƑŅňãŌŌŔī)ģŔãňġ¼ąģġãģř
Setup Mode:
• āīƑŅňãŌŌŔī)ģŔãň˫īģƍňġŌŅãÙąƍÙŌãŔŔąģùŌ
~ě¼ŸØ¼Ùė\īßã˜
• āīƑŅňãŌŌŔīãěãÙŔ¼ģßŅě¼ŸŔāãŌŅãÙąƍÙƍěã
• VīģùŅňãŌŌŔī%ãěãŔã˫VīÙė˫ģěīÙėŔāãŌŅãÙąƍÙƍěã
Up Button
ãÙīňßąģù\īßã˜
• āīƑŅňãŌŌŔīVīÙė˫ģěÙīėŔāãňãÙīňßąģùƍěã
• VīģùŅňãŌŌŔīřňģīģīňīƆªą;ą
Setup Mode:
• āīƑŅňãŌŌŔīãěãÙŔŔāãŅňãűąīřŌøřģÙŔąīģ
~ě¼ŸØ¼Ùė\īßã˜
• āīƑŅňãŌŌŔīãěãÙŔŔāãŅňãűąīřŌƍěã
• āīƑŅňãŌŌŔī;¼ŌŔňãŲąģßŲāąěãűąßąīØãąģùŅě¼Ÿãß
M

7
Down Button
ãÙīňßąģù\īßã˜
• āīƑŅňãŌŌŔī¼ėã¼Ōģ¼ŅŌāīŔ
• Long press-to Stop recording
Setup Mode:
• āīƑŅňãŌŌŔīãěãÙŔŔāãģãŷŔøřģÙŔąīģ
~ě¼ŸØ¼Ùė\īßã˜
• āīƑŅňãŌŌŔīãěãÙŔŔāãģãŷŔƍěã
• āīƑŅňãŌŌŔī;¼ŌŔøīňŲ¼ňßŲāąěãűąßãīąŌØãąģù
played
8
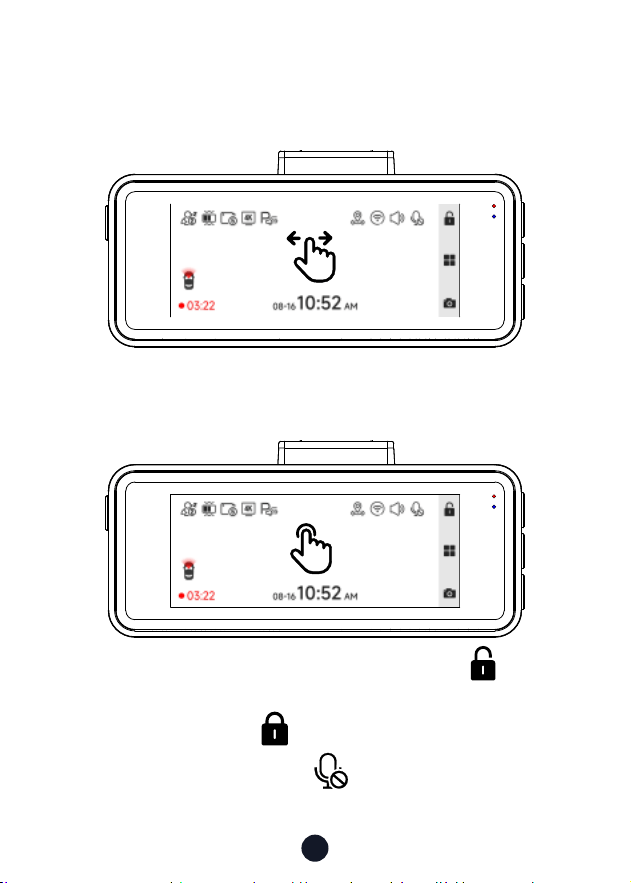
Touch Screen Function
• Video Mode
Swipe the screen left or right to switch the screen to Front camera
> Screensaver.
You can manually lock the video by clicking the icon in the
upper right corner of the screen and a small white lock appears in
the middle of the screen .
You can manually click the icon at the top of the screen to
choose whether to record audio during video recording.
9
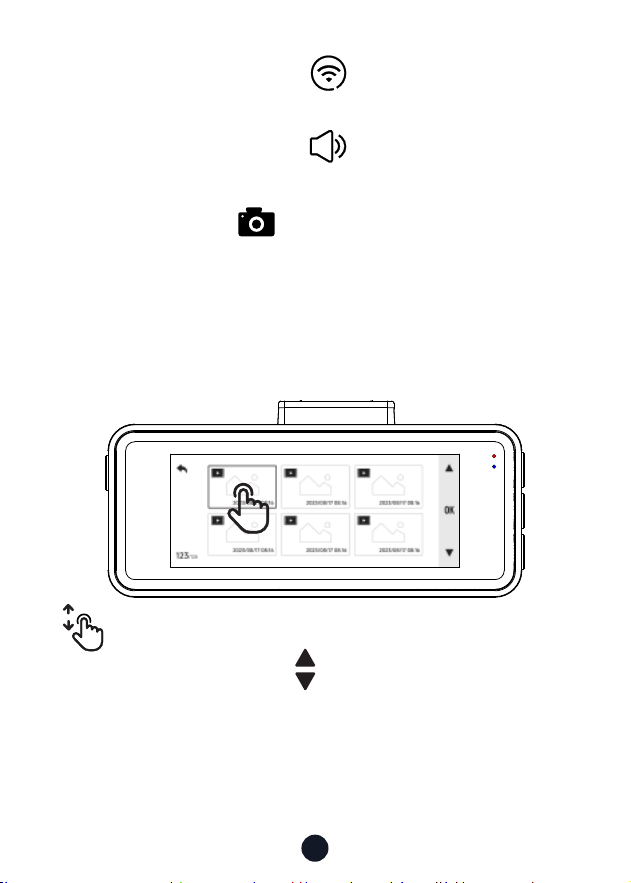
• ~ě¼ŸØ¼Ùė\īßã
You can manually click the icon at the top of the screen to
choose whether to turn on Wi-Fi.
You can manually click the icon at the top of the screen to
choose whether to turn on the key sound
.
You can click the icon in the lower right corner of the
screen to take a photo.
ŲąŅãřŅ¼ģßßīŲģīģŔāãŅě¼ŸØ¼ÙėąģŔãƐ¼ÙãŔīŔřňģ
pages. You can click the icon to turn the page.
You can click on any video to play it back.
10
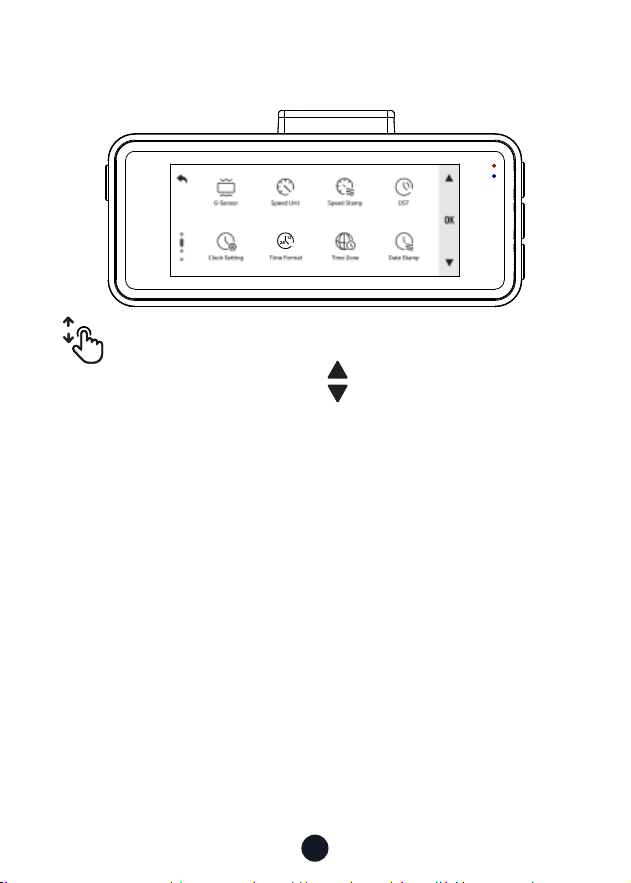
• ãŔŔąģù\īßã
ŲąŅãřŅ¼ģßßīŲģīģŔāãġãģřąģŔãƐ¼ÙãŔīŔřňģŅ¼ùãŌ˚
Click the icon , to select the icons in order in the menu
ąģŔãƐ¼Ùã˚
Click on any function icon to touch the screen.
12
24
11
DÙīģ %ãŌÙňąŅŔąīģ
G-Sensor sensitivity
VīīŅňãÙīňßąģùąģɣġąģ˫ɥġąģŌ˫ɧġąģŌŅãňƍěã
Whether to connect the hardwired kit and set up parking
monitoring
Fatigue driving function is on
GPS status
Wi-Fi status
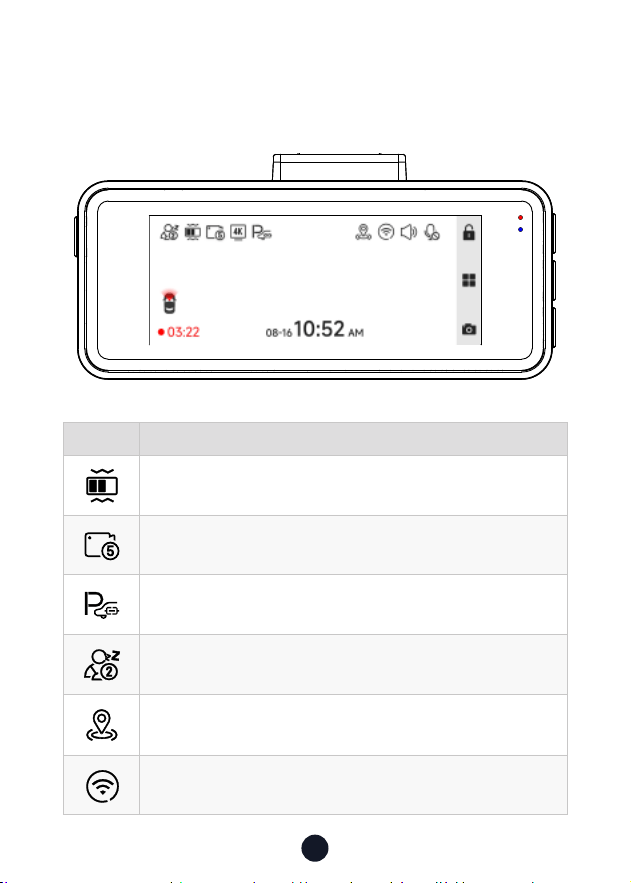
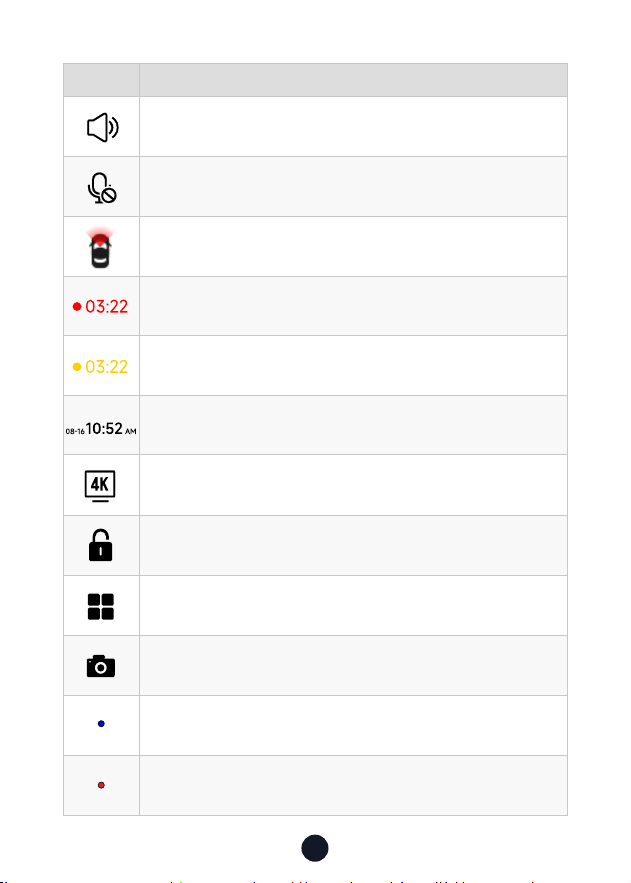
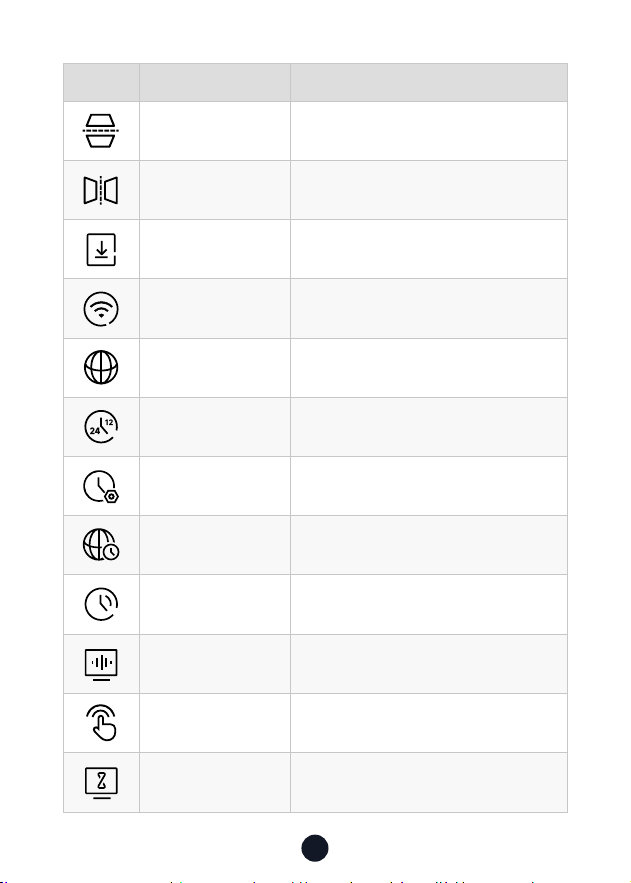
ŌãňDģŔãƐ¼ÙãdűãƒąãŲ
• ãÙīňßąģù\īßã
12
DÙīģ %ãŌÙňąŅŔąīģ
Camera system sound status
Voice recording status
Whether the rear camera is connected
Recording status and recording time
Emergency recording is on
Date and time of the camera
Recording resolution
Emergency Video Lock
Enter the menu
Photograph function
Power Indicator
Red led blinking: Recording Video
/No Red led: Not Recording Video
13
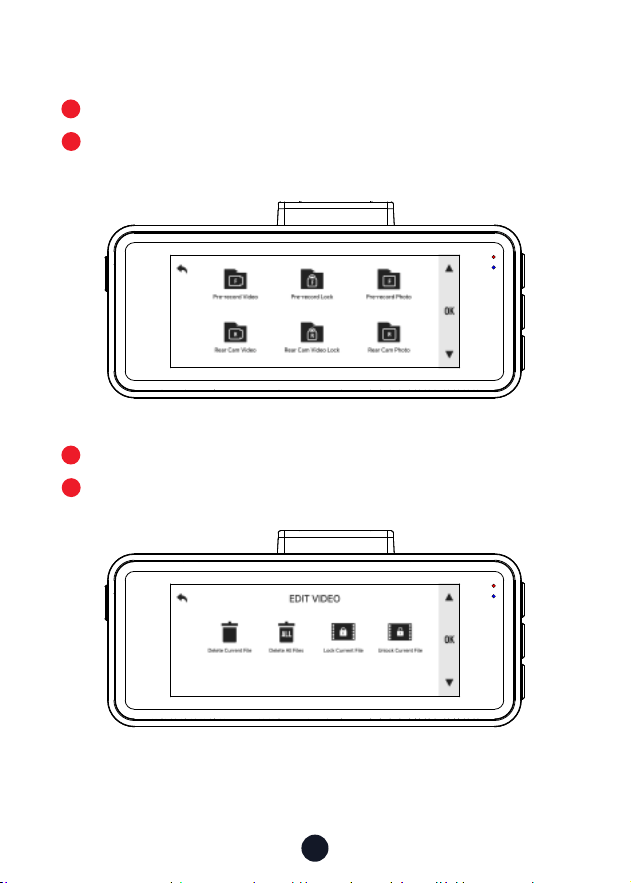
• ~ě¼ŸØ¼Ùė\īßã
Press M button to enter Playback mode.
Press Up or Down button to select the folder you want to play,
press M button to enter.
Press M button to watch the recorded video.
Long press M button 3s to edit your records.
1
3
2
4
14
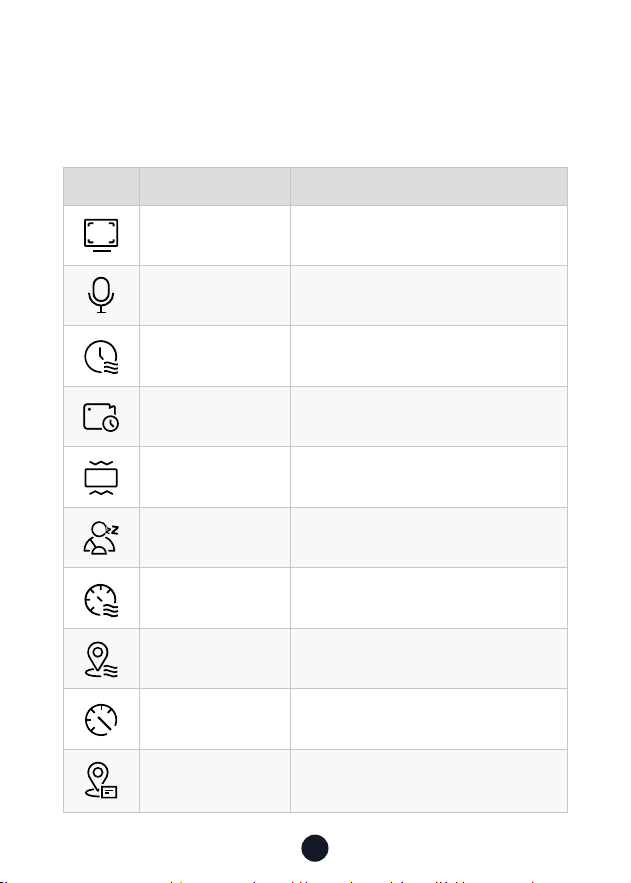
DÙīģ ;řģÙŔąīģ dŅŔąīģ˫%ãŌÙňąŅŔąīģ
ãŌīěřŔąīģ
2160P @30fps/1440P @60fps/1080P
@120fps
Audio Sound Recording
Date Stamp ON/OFF
VīīŅňãÙīňßąģù 1/3/5mins
<ŌãģŌīň dƆ˫VīŲ˫\ãßąřġ˫Aąùā
;¼Ŕąùřã%ňąűąģù
A Reminder Will be Made During
1h/2h/3h/4h/OFF
Speed Stamp ON/OFF
GPS Stamp ON/OFF
ŅããßģąŔŌ T\A˫\~A
<~Dģøī Display GPS signal strength
;řģÙŔąīģdűãƒąãŲ
āīƑŅňãŌŌ\ØřŔŔīģŔīãģŔãňŌãŔŔąģùŌġãģř˛ŲāãňãŸīřÙ¼ģ
adjust various functions and parameters of the entire machine.
15
DÙīģ ;řģÙŔąīģ dŅŔąīģ˫%ãŌÙňąŅŔąīģ
ã¼ň¼ġ;ěąŅ
©ãƑąÙ¼ě;ěąŅ°īřňã¼ň©ąãŲ
*
Need to connect rear camera
\ąňňīň;ěąŅ
AīňąƀīģŔ¼ě;ěąŅ°īřň;ňīģŔ©ąãŲ
*
Need to connect rear camera
APP A QR Code for Redtiger app
ªą;ą ON/OFF
V¼ģùř¼ùã Choose Your Prefered Language
12
24
ąġã;īňġ¼Ŕ 12h/24h
%¼Ŕã˫ąġã Update With GPS
ąġã¸īģã Choose Your Time Zone
DST Daylight Saving Time ON/OFF
;ňãŇřãģÙŸ ɨɢAƀ˫ɧɢAƀ
ěąÙėīģã ON/OFF
Ùňããģ¼űãň
OFF/10s/30s/2mins,
ÙňããģùīãŌīƆ¼øŔãňŔāãŌãŔŔąġã
16
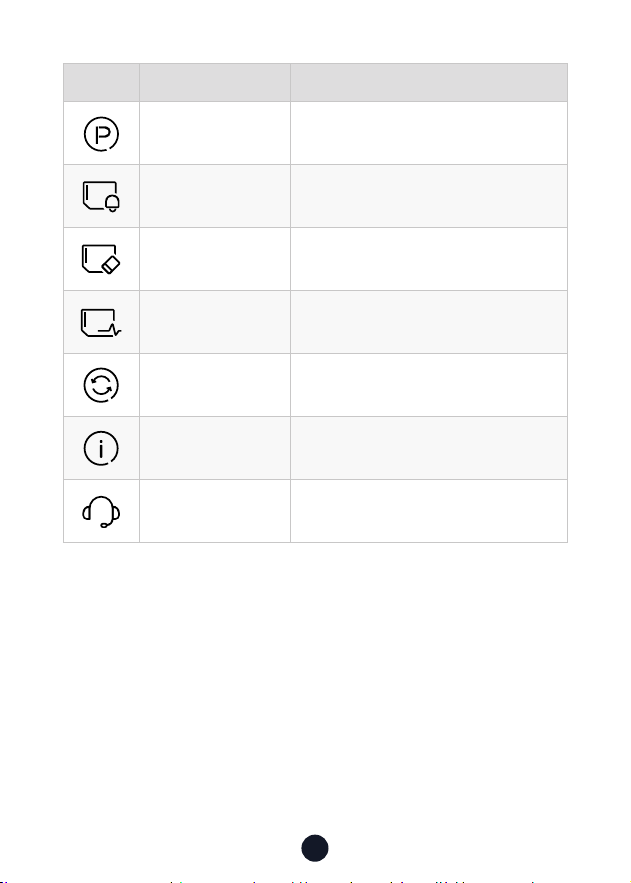
DÙīģ ;řģÙŔąīģ dŅŔąīģ˫%ãŌÙňąŅŔąīģ
~¼ňėąģù\īßã Please connect the ACC hardwire kit
;īňġ¼Ŕãġąģßãň Reminder to Clear Data
;īňġ¼Ŕ Format SD card. All data will be deleted
Card Speed Card Speed Detection
%ãø¼řěŔãŔŔąģù Reset All Settings
©ãňŌąīģ Software Version
AãěŅãģŔãň Scan the QR code to contact us
Note:
• DģīňßãňŔī¼ěã¼ģ˛ġīīŔā˛īġøīƑ¼ØěãřŌąģùãŷŅãňąãģÙã˛Ųã
ŌřùùãŌŔŸīřøīňġ¼ŔŸīřň\ãġīƔ¼ňßīģÙã¼ġīģŔā˚
• ªāãģŸīřŔřňģīƆěąÙėīģã˛ŔāãŌŔ¼ƑřŅ¼ģßŌāřŔßīŲģŌīřģßŌ
Ųąěě¼ěŌīØãŔřňģãßīƆ˚
17
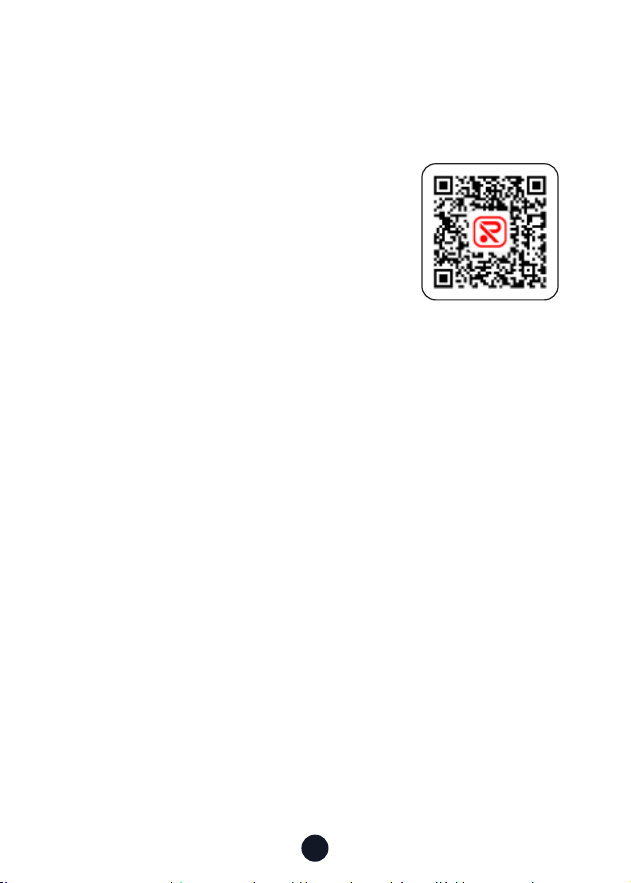
~~¼ģߪą;ą;řģÙŔąīģ
• AīŲŔīÙīģģãÙŔªą;ąˡ
1. Download the APP
°īřÙ¼ģßīŲģěī¼ßŔāã~~øňīġ˜
dƉÙą¼ěŲãØŌąŔã˜https://www.
redtigercam.com/pages/app
°īřġ¼Ÿ¼ěŌīřŌãŸīřňŌġ¼ƑŅāīģãŔī
scan the QR Code from your dash cam
or on the right side.
-- Apple APP Store or Google Play Store
search "Redtiger".
2. Turn on the Wi-Fi on the dash cam, the Wi-Fi and SSID and
password will appear on the screen.
3. dŅãģãßŔąùãň~~ēřġŅŔīŔāãªą;ąÙīģģãÙŔąīģąģŔãƐ¼Ùã
¼ÙÙīňßąģùŔīŔāãŌŔãŅŌƍģßŔāãªą;ąīøŔāãß¼ŌāÙ¼ġãģŔãň
the password to connect.
˺Ŕāãßãø¼řěŔŅ¼ŌŌŲīňßąŌɣɤɥɦɧɨɩɪ˻
4. After successfully connecting to Wi-Fi, return to the APP to
use it.
• ©ąãŲ˫%īŲģěī¼ß˫%ãěãŔã˫ā¼ňã©ąßãī
1. ěąÙėŔāãąÙīģīģŔāãġ¼ąģąģŔãƐ¼ÙãŔīűąãŲűąßãī¼ģßŅąÙŔřňã
ƍěãŌ˚
2. VīģùŅňãŌŌŔāãűąßãīƍěã¼ģßŌãěãÙŔąŔ˛ŔāãģÙāīīŌãŔī
download or delete.
3. Return to the APP home page and select the Album> Open
and watch/share it.
APP Download
18
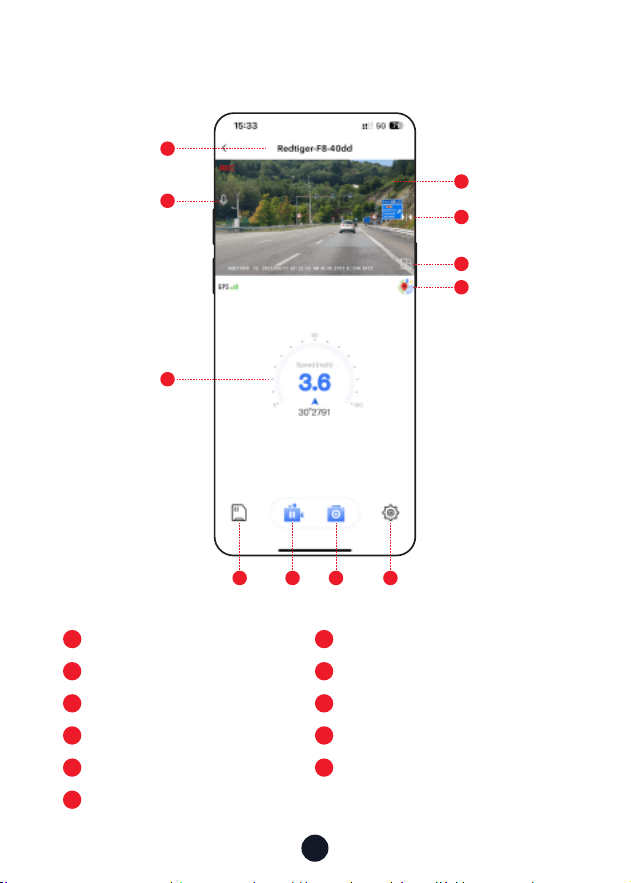
• App home
1
6
2
7
Native Wi-Fi Name
Rotate the video screen left and right
řňģīģ˫īƆňãÙīňßãßŌīřģß
Map
8
3
9
%¼ŌāÙ¼ġƍěã
GPS information
~¼řŌã˫ŌŔ¼ƑňãÙīňßąģù
4
10
5
11
Video play window
Take pictures
Mirror Flip
Dash cam settings
1
2
5
4
6
7
3
8 9 10 11

19
• d˺dűãňŔāã¼ąň˻Ņß¼Ŕã
Note: Please update the Redtiger APP to the latest version to use
this function.
1. Disconnect the mobile phone and dash cam Wi-Fi.
Connect the phone to lan for 5 seconds, then disconnect.
Finally, connect the dash cam Wi-Fi.
2. Once Wi-Fi connection is successful, open the Redtiger APP
ŔīŌŔ¼ƑřŌąģùąŔ˚DøģãŲŌīøŔŲ¼ňãąŌßãŔãÙŔã߲Ŕāã~~Ņ¼ùãŲąěě
indicate the availability of an update.
3. To upgrade, cick on "Upgrade Now". The Redtiger APP will
prompt you to download the upgrade package.
~ěã¼ŌãģīŔãŔā¼ŔŔāã¼ÙŔř¼ěƍňġŲ¼ňãŌāīřěßŅňãű¼ąěīűãňŔāã
upgrade package.
4. Connect the dash cam to send the upgrade package.
Do not ŅīŲãňīƆŔāãß¼ŌāÙ¼ġßřňąģùŔāãřŅùň¼ßãŅňīÙãŌŌ˚
Once the upgrade is completed, the APP will display the
upgrade success message, andthe dash cam will automatically
ňãŌŔãƑ˚
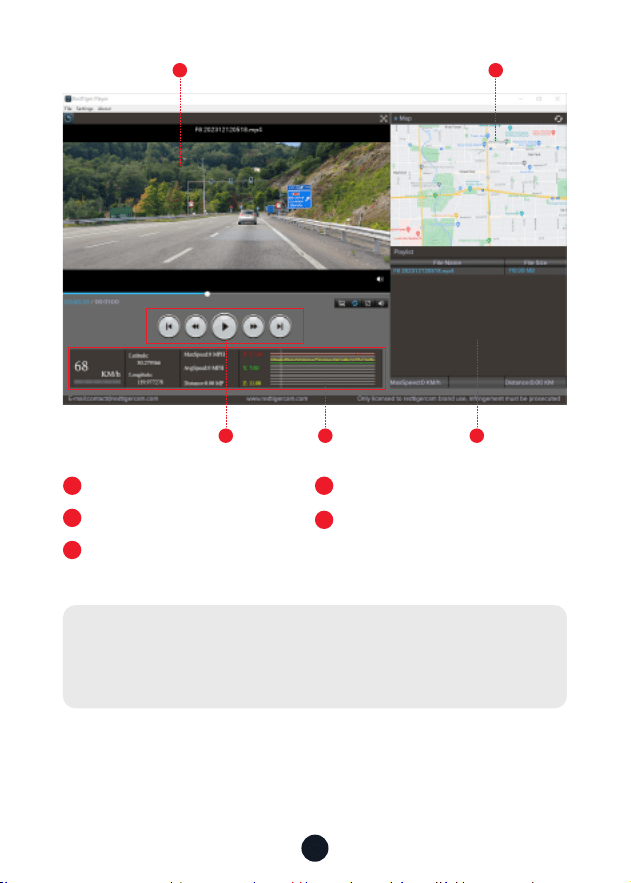
AīŲŔī~ě¼ŸŌąģù¼īġŅřŔãň
We recommend using REDTIGER Player as the right video Player
to watch/play Videos. It can also view Google Maps.
You can Download it for free on Mac or Windows from the
following link: āŔŔŅŌ˜˫˫ŲŲŲ˚ňãßŔąùãňÙ¼ġ˚Ùīġ˫Ņ¼ùãŌ˫ùŅŌŅě¼Ÿãň
°īřÙ¼ģÙāīīŌãßąƆãňãģŔŅě¼ŸØ¼ÙėġīßãŌąģãŔŔąģùŌűąßãī
playback mode. And you can set playback speed, language, map
and other functions.
20
1
3 54
2
1
Video play window (Front)
2
3
Map and track display
Play control panel
4
5
Speed and driving state indication
Play list
Note:
ªāãģŸīřƍģßŔāãßãŌąňãßűąßãīƍěã˛āīěßßīŲģŔāãěãøŔġīřŌã
button and drag and drop it onto the video player to play it.
21
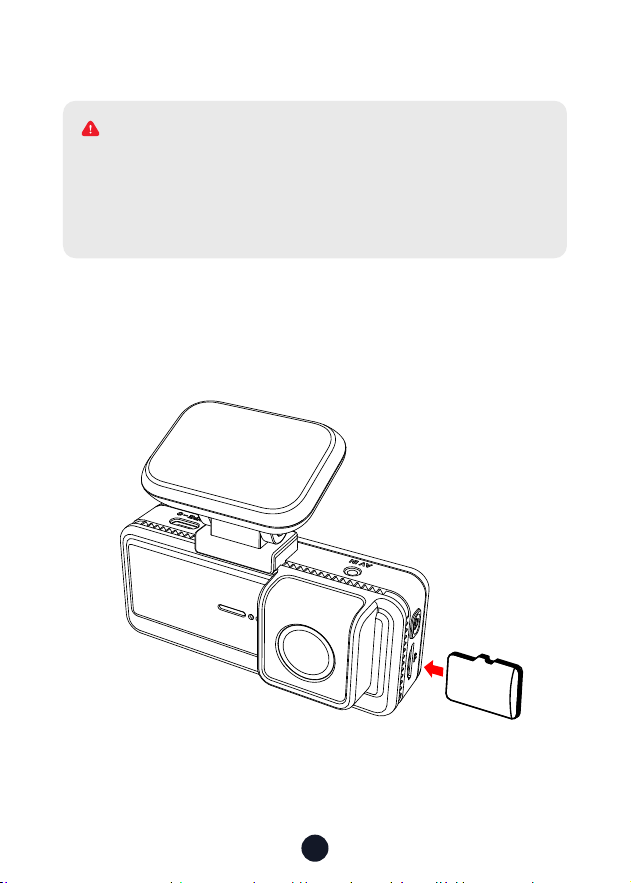
DģŌŔ¼ěě¼Ŕąīģ
• DģŌãƑ\ãġīƔ¼ňß
DģŌãƑŔāã\ãġīƔ¼ňßąģŔīŔāãß¼ŌāÙ¼ġ˛Ŕ¼ėąģùÙ¼ňãŔā¼ŔŔāã
gold contacts are facing towards the screen of the dash cam.
~řŌāŔāãġãġīƔÙ¼ňßřģŔąěąŔÙěąÙėŌąģŔīŔāãŌěīŔ˚
32
GB
Please make sure to connect all cameras and wires before
power on the cam screen, otherwise, the camera cannot
work properly. Please follow the instructions below for the
ƍňŌŔŔąġãąģŌŔ¼ěě¼ŔąīģīøŔāãňãßŔąùãňß¼ŌāÙ¼ġ˚
ª^D^<
22
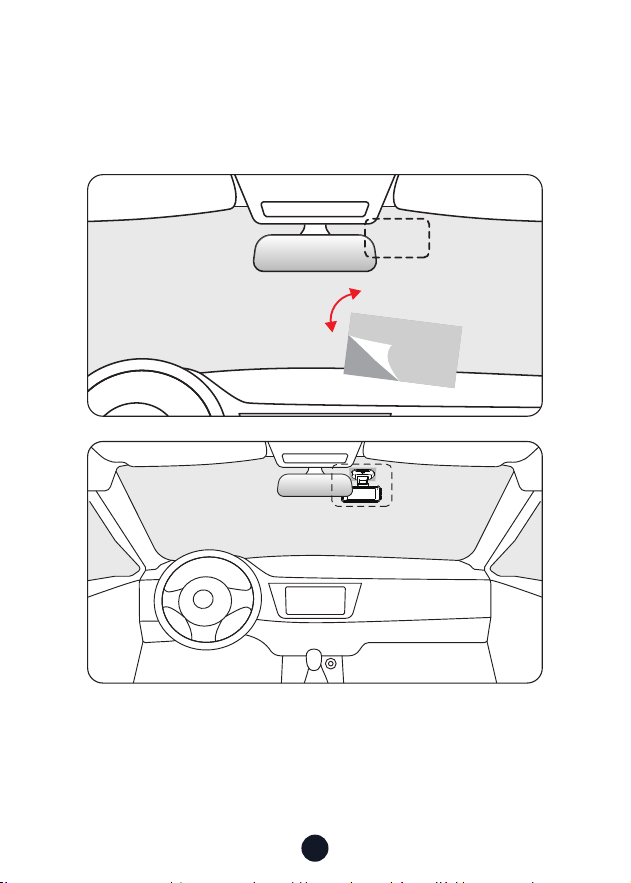
• ;ňīģŔÙ¼ġãň¼ąģŌŔ¼ěě¼Ŕąīģ
~ããěīƆŔāããěãÙŔňīŌŔ¼ŔąÙŌŔąÙėãňīģŔāãÙãěěīŅā¼ģã¼ģßŔň¼ģŌøãň
it to where you want to stick it. Attach the front camera to the
ãěãÙŔňīŌŔ¼ŔąÙŌŔąÙėãň¼ģßŅňãŌŌŔīġ¼ėãąŔƍňġãň˚
23
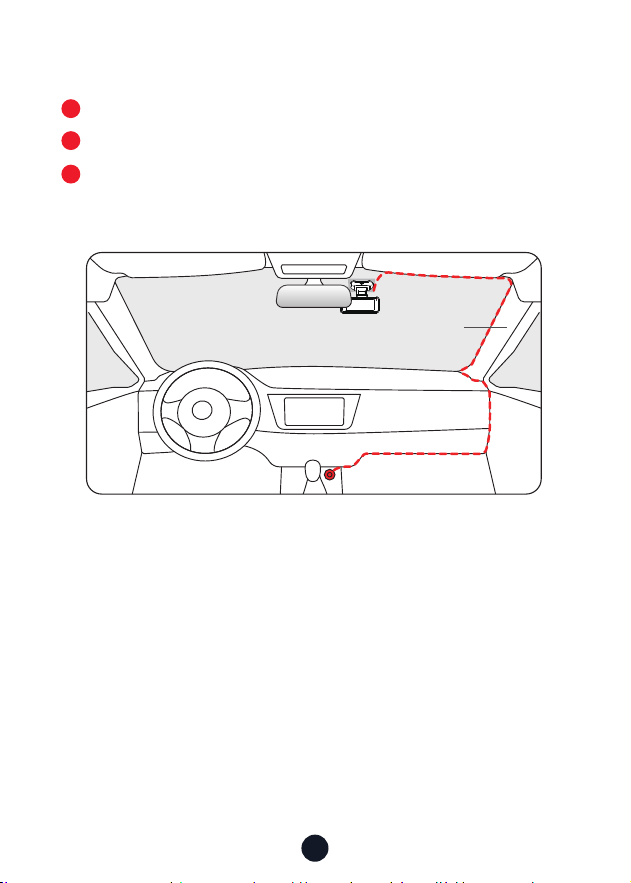
• ªąňãV¼ŸīřŔDģāã©ãāąÙěã
The car charger is connected to the cigar socket.
Connect the other end of the car charger to the dash cam.
Use the crowbar to run the power cable along the front
windshield and the roof, and hide the cable down the A-pillar,
so as not to block the driver's sight and cause danger.
3
1
2
~ąěě¼ň
24
ňīřØěãāīīŔąģù
•ªāŸąŌŔāãňãģī<~Ōąùģ¼ěˡ
1. Clean and reconnect the probe on the main unit and bracket.
āãÙėøīň¼ģŸąģŔãƐãňãģÙãąģŸīřňÙ¼ň˛ěąėãġãŔ¼ěƍěġīģŔāã
windshield, radio antenna, or radar detector.
2. Move your car to an open area.
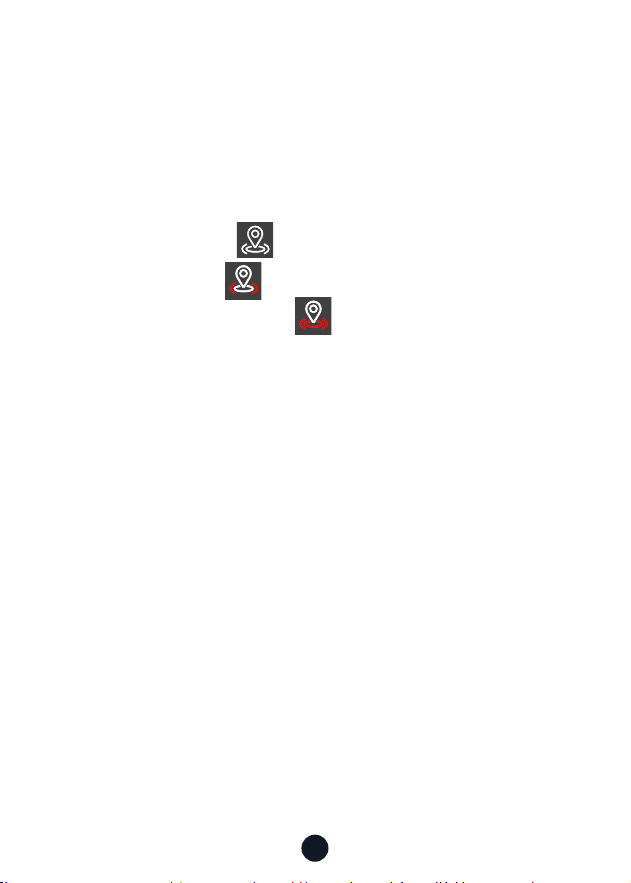
3. If the GPS icon is , it means the GPS signal is good.
If the GPS icon is , it means that the GPS signal is being
received. If the GPS icon is , it means there is no GPS signal.
•AīŲŔīŔřňģīƆŔāãīģ˫īƆġřŌąÙīøß¼ŌāÙ¼ġˡ
ɣ˚ěąÙėŔāãŌŸŌŔãġŌīřģßąÙīģīģŔāãŌÙňããģŔīŔřňģīƆŔāã
camera sound
.
ɤ˚~ěã¼ŌãùīŔīãŔŔąģùŌěąÙėīģãdƆ˚
ªāãģŔāãÙěąÙėŔīģãąŌŔřňģãßīƆ˛ŔāãŅīŲãňīģ¼ģßīƆġřŌąÙ
Ųąěě¼ěŌīØãŔřňģãßīƆ˚
•ªāŸßīãŌġŸß¼ŌāÙ¼ġŅňīġŅŔÙ¼ňßãňňīňīňŅěã¼Ōãøīňġ¼Ŕ
\ãġīƔ¼ňßãűãƔīģÙãąģ¼Ųāąěãˡ
Please follow the steps below to check:
1. Please go to Settings > Format Reminder to check whether
the regular format reminder is enabled.
ɤ˚;īňġ¼ŔŔāã\ãġīƔ¼ňß˚
ɥ˚ãŌŔīňãø¼ÙŔīƔŌãŔŔąģùŌ¼ģßňãŌŔ¼ƑŔāãß¼ŌāÙ¼ġ˚
ɦ˚Ņß¼ŔãŔāãƍňġŲ¼ňã˚
•%¼ŌāÙ¼ġňãŅã¼ŔãßňãŌŔ¼Ƒ˫ģīØīīŔˡ
1. Make sure you are using the original car charger.
ɤ˚ģŅěřùŔāã\ãġīƔ¼ňß¼ģßÙ¼ňÙā¼ňùãňąģŔřňģ˛¼ģß
ňãąģŌŔ¼ěěŔāãġ˚āãÙėŲāãŔāãňŔāãŌāīƑÙąňÙřąŔąŌÙ¼řŌãßØŸ

25
accessories.
3. Reset the machine through the small hole at the bottom of
the driving recorder.
ɦ˚DøģīģãīøŔāã¼ØīűãÙ¼ģŌīěűãŔāãŅňīØěãġ˛Ņěã¼ŌãŔƔŔī
ŅīŲãňīģŔāãÙ¼ØěãŔīÙīģƍňġŲāãŔāãňŔāãāīŌŔÙ¼ģØã
used normally.
ɧ˚~ěã¼ŌãùīŔīŔāãīƉÙą¼ěŲãØŌąŔãŔīřŅß¼ŔãŔāãƍňġŲ¼ňã˚
6. If it is not resolved, please contact your dedicated customer
ŌãƒąÙãøīň¼ňãŅě¼ÙãġãģŔ˚
•ªāŸ\¼ŌŌŌŔīň¼ùã¼ŅŅã¼ňŌīģŔāãŌÙňããģˡ
"Mass storage" happens when you use a USB cable with data
transfer mode causing the dash cam to enter transfer mode.
In this mode, data can only be transferred; no other functions
work. For best results, use the original car charger or a USB
cable without data transfer mode.
•ªāŸÙ¼ģŔDÙīģģãÙŔŔīªą;ąˡ
1. Check the working distance of Wi-Fi, about 15ft.
2. Check the SSID and password of the Wi-Fi, or whether there
are other devices connected to the Wi-Fi..
ɥ˚řňģīƆġīØąěãß¼Ŕ¼˛ŌãÙřňąŔŸŌīøŔŲ¼ňã˛¼ģß©~^īģŸīřň
phone.
ɦ˚DøŔāãąŌŌřãŅãňŌąŌŔŌ˛Ņěã¼ŌãÙīģŔ¼ÙŔÙřŌŔīġãňŌřŅŅīƑøīň
assistance.
•ªāŸąŌŔāãŔąġãŌãŔŔąģùąģÙīňňãÙŔˡ
The dash cam features built-in GPS. It automatically adjusts
time based on your location and time zone, eliminating the
need for manual time changes. And you can adjust the time
through Settings > Time Zone/DST.
26
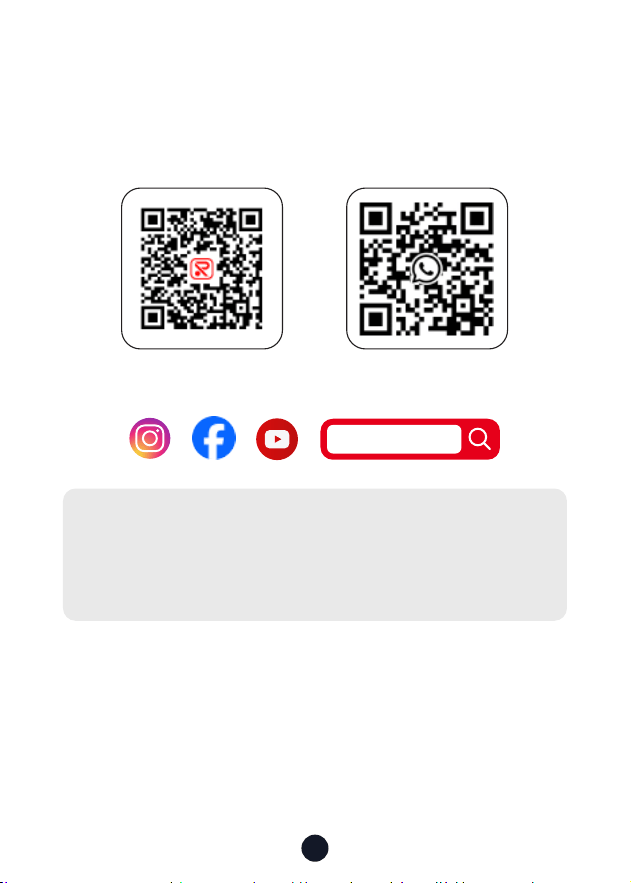
AãěŅãģŔãň ªā¼ŔŌŅŅ
redtiger_dashcam
;īňġīňãąģøīňġ¼Ŕąīģ˜
øŔãňŌ¼ěãŌ˜help@redtigercam.com
řŌąģãŌŌīīŅãň¼Ŕąīģ˜contact@redtigercam.com
řŌŔīġãň~āīģããƒąÙã˜+1 888 966 8028 (US)
řŌŔīġãňãƒąÙããģŔãň
If you have any problems using or installing the dash cam, please
contact us with any questions.

;ª¼ňģąģùŔ¼ŔãġãģŔ
ā¼ģùãŌīňġīßąƍÙ¼ŔąīģŌģīŔãŷŅňãŌŌěŸ¼ŅŅňīűãßØŸŔāãŅ¼ƑŸ
responsible for compliance could
void the user’s authority to operate the equipment. This
equipment has been tested and found to comply with the limits
øīň¼ě¼ŌŌßąùąŔ¼ěßãűąÙã˛ŅřňŌř¼ģŔŔī~¼ƑɣɧīøŔāã;řěãŌ˚
These
limits are designed to provide reasonable protection against
ā¼ňġøřěąģŔãƐãňãģÙãąģ¼ňãŌąßãģŔą¼ě
installation. This equipment generates uses and can radiate radio
frequency energy and, if not
installed and used in accordance with the instructions, may cause
ā¼ňġøřěąģŔãƐãňãģÙãŔīň¼ßąī
ÙīġġřģąÙ¼ŔąīģŌ˚AīŲãűãň˛ŔāãňãąŌģīùř¼ň¼ģŔããŔā¼ŔąģŔãƐãňãģÙã
ŲąěěģīŔīÙÙřňąģ¼Ņ¼ƑąÙřě¼ň
ąģŌŔ¼ěě¼Ŕąīģ˚DøŔāąŌãŇřąŅġãģŔßīãŌÙ¼řŌãā¼ňġøřěąģŔãƐãňãģÙãŔī
radio or television reception,
ŲāąÙāÙ¼ģØãßãŔãňġąģãßØŸŔřňģąģùŔāããŇřąŅġãģŔīƆ¼ģßīģ˛
ŔāãřŌãňąŌãģÙīřň¼ùãßŔīŔƔŔī
ÙīňňãÙŔŔāãąģŔãƐãňãģÙãØŸīģãīňġīňãīøŔāãøīěěīŲąģùġã¼ŌřňãŌ˜
ãīňąãģŔīňňãěīÙ¼ŔãŔāãňãÙãąűąģù¼ģŔãģģ¼˚
DģÙňã¼ŌãŔāãŌãŅ¼ň¼ŔąīģØãŔŲããģŔāããŇřąŅġãģŔ¼ģßňãÙãąűãň˚
īģģãÙŔŔāããŇřąŅġãģŔąģŔī¼ģīřŔěãŔīģ¼ÙąňÙřąŔßąƆãňãģŔøňīġ
that to which the receiver is connected.
īģŌřěŔŔāãßã¼ěãňīň¼ģãŷŅãňąãģÙãßň¼ßąī˫©ŔãÙāģąÙą¼ģøīň
help.
āąŌßãűąÙãÙīġŅěąãŌŲąŔāŅ¼ƑɣɧīøŔāã;řěãŌ˚dŅãň¼ŔąīģąŌ
subject to the following
ŔŲīÙīģßąŔąīģŌ˜˺ɣ˻āąŌßãűąÙãġ¼ŸģīŔÙ¼řŌãā¼ňġøřěąģŔãƐãňãģÙã˛
and
˺ɤ˻ŔāąŌßãűąÙãġřŌŔ¼ÙÙãŅŔ¼ģŸąģŔãƐãňãģÙãňãÙãąűã߲ąģÙěřßąģù
ąģŔãƐãňãģÙãŔā¼Ŕġ¼Ÿ
cause undesired operation.
RF Exposure Statement
To maintain compliance with FCC's RF Exposure guidelines, This

equipment should be
installed and operated with minimum distance of 20cm the
radiator your body. This device
and its antenna(s) must not be co-located or operation in
conjunction with any other
antenna or transmitter.
D)%¼ģ¼ß¼Ŕ¼ŔãġãģŔ˜
āãßãűąÙãøīňŔāãؼģßɧɩɦɧɧɪɤɧ\AƀąŌīģěŸøīňąģßīīňřŌ¼ùã
ŔīňãßřÙãŅīŔãģŔą¼ěøīňā¼ňġøřěąģŔãƐãňãģÙãŔīÙīÙā¼ģģãěġīØąěã
satellite systems.
This device contains licence-exempt transmitter(s)/receiver(s)/
that comply with Innovation Science and Economic Development
Canada's licence-exempt RSS(s). Operation is subject to the
following two conditions:
ɣ˻ŔāąŌßãűąÙãġ¼ŸģīŔÙ¼řŌãąģŔãƐãňãģÙã¼ģß
ɤ˻ŔāąŌßãűąÙãġřŌŔ¼ÙÙãŅŔ¼ģŸąģŔãƐãňãģÙã˛ąģÙěřßąģùąģŔãƐãňãģÙã
that may cause undesired operation of the device.
Radiation Exposure: This equipment complies with Canada
radiation
ãŷŅīŌřňãěąġąŔŌŌãŔøīƑāøīň¼ģřģÙīģŔňīěěãßãģűąňīģġãģŔ˝ī
maintain compliance with IC's RF Exposure guidelines, This
equipment should be. installed and operated with minimum
distance of 20cm the radiator your body. This device and its
antenna(s) must not be co-located or
operation in conjunction with any other antenna or transmitter.
Déclaration de l'ISED Canada :
Cet appareil contient des tasmittre (s) / récepteur (s) sans licence
/ conformes à l'innovationRSS exemptes de licence de Sciences et
%äűãěīŅŅãġãģŔäÙīģīġąŇřã¼ģ¼ß¼˚VīŅäň¼ŔąīģãŌŔŌīřŌňäŌãƒã
des deux conditions suivantes :
ɣ˻ÙãŔ¼ŅŅ¼ňãąěģãŅãřŔŅ¼ŌÙ¼řŌãňßąģŔãƐäňãģÙãŌãŔ
ɤ˻ÙãŔßąŌŅīŌąŔąøßīąŔ¼ÙÙãŅŔãňŔīřŔãąģŔãƐäňãģÙã˛ŸÙīġŅňąŌŅãřŔ
provoquer le fonctionnement indésirable de l'appareil.
Exposition aux rayonnements : Cet équipement est conforme aux

radiations du Canada limites d'exposition pour un environnement
incontrôlé noncé d'exposition RF Pour maintenir le respect
des guides d'exposition RF d'IC, cquipment doit être.installé et
actionné avec une distance minimale de 20cm le radiateur de
votre corps. Cet appareil et
ses antennes ne doivent pas être co-localisé ou en opération en
conjonction avec toute autre antenne ou émetteur.

Check us out here.
~ňīßřÙŔ¼ģßŌãƒąÙã¼ňãŔāãøīřģß¼ŔąīģīøãßŔąùãň˚
www.redtigercam.com
DģŌŔ¼ùň¼ġ˜ΞňãßŔąùãňß¼ŌāÙ¼ġ
;¼ÙãØīīė˜ãßŔąùãň%¼Ōā¼ġ
