
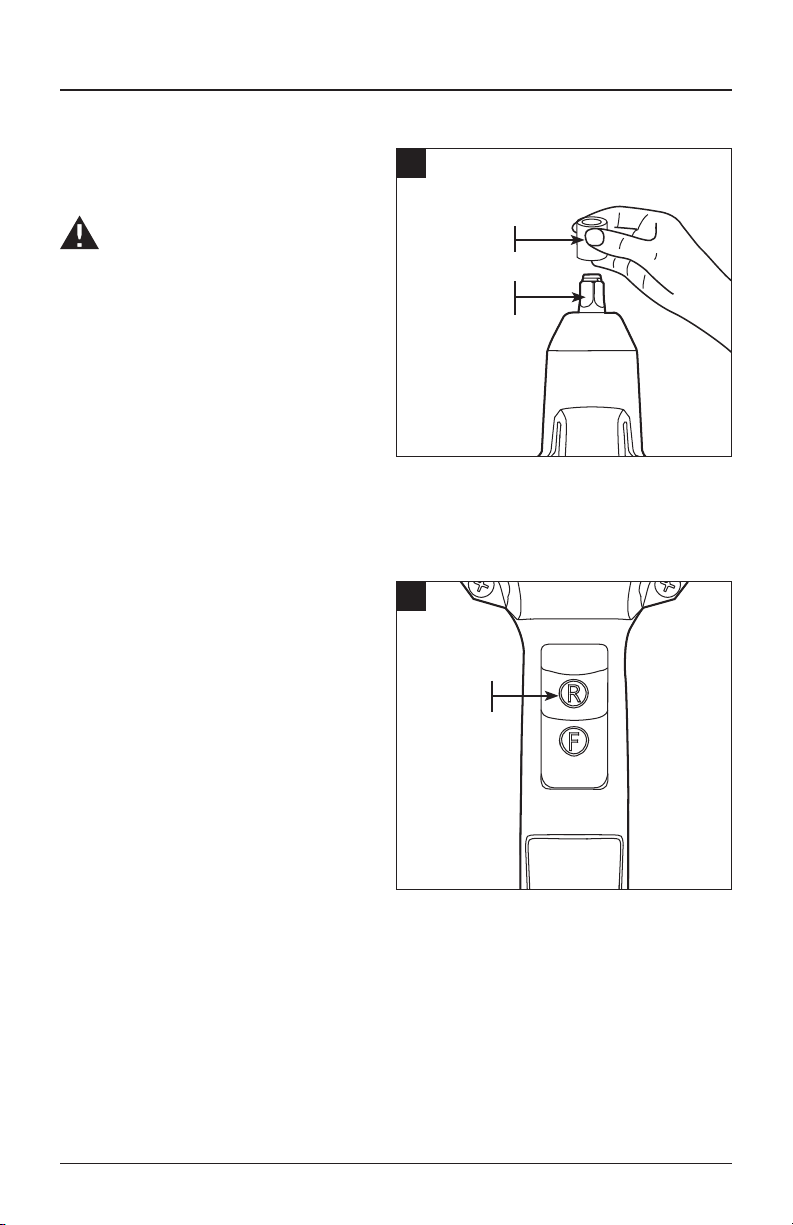
7.5 AMP
IMPACT WRENCH
MODEL HDIW075
ATTACH YOUR RECEIPT HERE
Serial Number _____________________ Purchase Date ______________________
Questions, problems, missing parts? Before returning to your retailer, call
our customer service department at 1-877-888-1880, 8:30 a.m. – 8:00 p.m.
EST (Monday – Friday) & 10:00 a.m. – 6:00 p.m. EST (Saturday and Sunday).

2 7.5 AMP IMPACT WRENCH
TABLE OF CONTENTS
Product Specifications ....................................................2
Safety Information .......................................................3
Preparation .............................................................7
Package Contents ........................................................8
Operating Instructions ....................................................9
Care and Maintenance ...................................................13
Troubleshooting ........................................................13
Warranty ..............................................................13
PRODUCT SPECIFICATIONS
COMPONENT SPECIFICATIONS
Motor 120V~, 60Hz, 7.5A
No-load speed 2,200 RPM
Impacts per minute 2,700 BPM
Max torque 240 ft. lbs.
Driver 1/2" square driver
Tool weight 7 lbs. (3.18 kg)
7.5 AMP IMPACT WRENCH 3
SAFETY INFORMATION
Please read and understand this entire manual before attempting to assemble or operate
this product. If you have any questions regarding the product, please call Hammerhead
customer service at 1-877-888-1880, 8:30 a.m. – 8:00 p.m. EST (Monday – Friday) &
10:00 a.m. – 6:00 p.m. EST (Saturday and Sunday).
WARNING
The operation of any power tool can result in foreign objects being thrown into your eyes,
which can result in severe eye damage. Before beginning power-tool operation, always
wear safety goggles or safety glasses with side shields and a full-face shield, when
needed. We recommend using a wide vision safety mask over eyeglasses or standard
safety glasses with shields. Always use eye protection marked to comply with ANSI Z87.1.
DANGER
People with electronic devices, such as pacemakers, should consult their physician(s)
before using this product. Operation of electrical equipment in close proximity to a heart
pacemaker could cause interference or failure of the pacemaker.
WARNING
Some dust created by power sanding, sawing, grinding, drilling and other construction
activities contains chemicals known to the state of California to cause cancer, birth defects
or other reproductive harm. Some examples of these chemicals are:
• Lead from lead-based paints.
• Crystalline silica from bricks and cement and other masonry products, and
• Arsenic and chromium from chemically-treated lumber.
Your risk from these exposures varies, depending on how often you do this type of work.
To reduce your exposure to these chemical: work in a well-ventilated area, and work with
approved safety equipment, such as those dust masks that are specially designed to filter
out microscopic particles.
4 7.5 AMP IMPACT WRENCH
SAFETY INFORMATION
Know the Tool
To operate this tool, carefully read this manual and all labels affixed to the impact wrench
before using it. Keep this manual available for future reference.
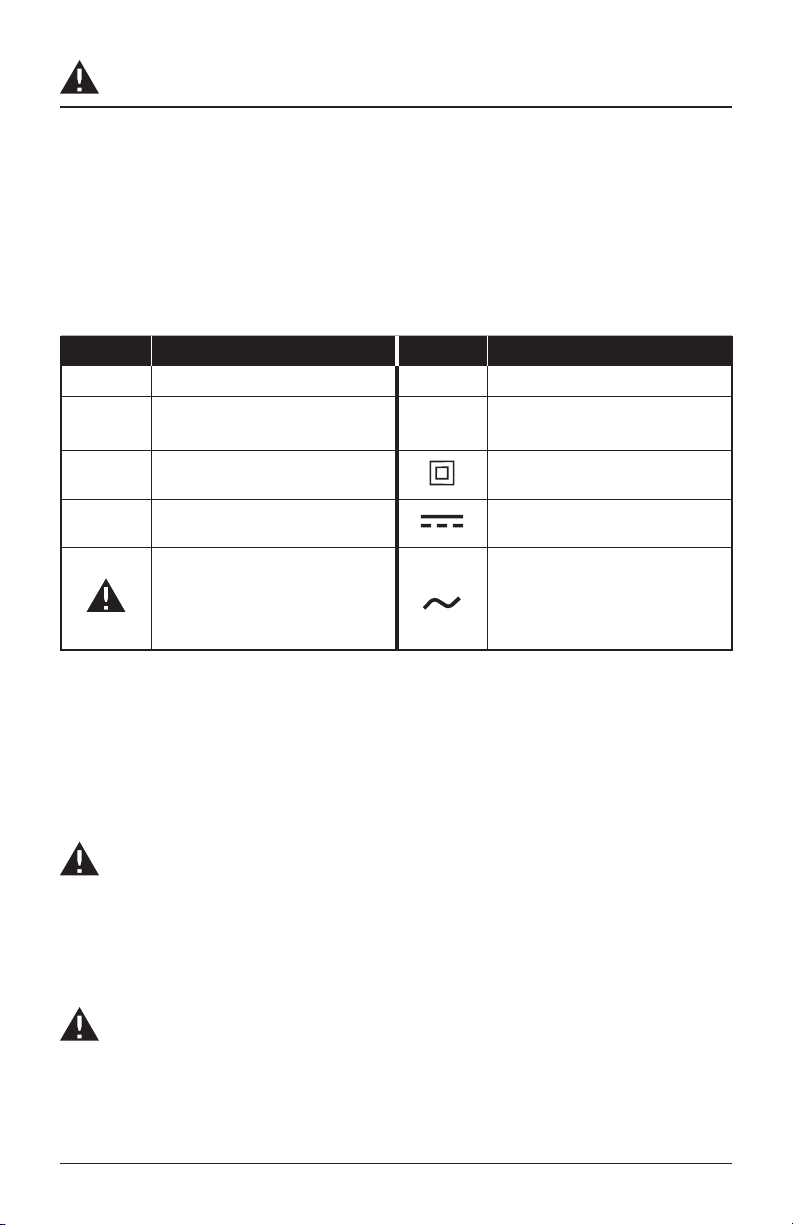
Some of the following symbols may be used on this impact wrench. Please study them
and their meaning. Proper interpretation of these symbols will allow you to operate the tool
better and more safely.
SYMBOL DEFINITION SYMBOL DEFINITION
V Volts n
0
No-load Speed
A Amps /min
Revolutions, Strokes, Beats or
Impacts per Minute
Hz Hertz Class II Construction
W Watts Direct Current
A danger, warning or caution.
It means ‘ATTENTION! Your
safety is involved.’
Alternating Current
IMPORTANT: This tool should only be serviced only by a qualified service technician.
IMPORANT SAFETY INSTRUCTIONS
SAVE THESE INSTRUCTIONS-This manual contains important safety and operating
instructions for impact wrench Model HDIW075.
DANGER
To reduce the risk of fire or electric shock, carefully follow these operating instructions
General Power Tool Safety Warnings
WARNING
Read all safety warnings and all instructions. Failure to follow all warnings and instructions
may result in electric shock, fire and/or serious injury.
Save all warnings and instructions for future reference
The term “power tool” in the warnings refers to your mains-operated (corded) power tool or
battery-operated (cordless) power tool.

7.5 AMP IMPACT WRENCH 5
SAFETY INFORMATION
Work Area Safety
• Keep work area clean and well lit. Cluttered and dark areas invite accidents.
• Do not operate power tools in explosive atmospheres, such as in the presence of
flammable liquids, gases or dust. Power tools create sparks which may ignite the dust
or fumes.
• Keep children and bystanders away while operating a power tool. Distractions can
cause you to lose control.
Electrical safety
• Power tool plugs must match the outlet. Never modify the plug in any way. Do not
use any adapter plugs with earthed (grounded) power tools. Unmodified plugs and
matching outlets will reduce risk of electric shock.
• Avoid body contact with earthed or grounded surfaces, such as pipes, radiators,
ranges and refrigerators. There is an increased risk of electric shock if your body is
earthed or grounded.
• Do not expose power tools to rain or wet conditions. Water entering a power tool will
increase the risk of electric shock.
• Do not abuse the cord. Never use the cord for carrying, pulling or unplugging the
power tool. Keep cord away from heat, oil, sharp edges or moving parts. Damaged
or entangled cords increase the risk of electric shock.
• When operating a power tool outdoors, use an extension cord suitable for outdoor
use. Use of a cord suitable for outdoor use reduces the risk of electric shock.
• If operating a power tools in a damp location is unavoidable, use a ground-fault circuit
interrupter (GFCI) protected supply. Use of a GFCI reduces the risk of electric shock.
Personal Safety
• Stay alert, watch what you are doing and use common sense when operating a
power tool. Do not use a power tool while you are tired or under the influence of
drugs, alcohol or medication. A moment of inattention while operating power tools may
result in serious personal injury.
• Use personal protective equipment. Always wear eye protection. Protective
equipment such as dust mask, non-skid safety shoes, hard hat, or hearing protection
used for appropriate conditions will reduce personal injuries.
• Prevent unintentional starting. Ensure the switch is in the off-position before
connecting to power source and/or battery pack, picking up or carrying the tool.
Carrying power tools with your finger on the switch or energizing power tools that have
the switch on invites accidents.

6 7.5 AMP IMPACT WRENCH
SAFETY INFORMATION
• Remove any adjusting key or wrench before turning the power tool on. A wrench or
a key left attached to a rotating part of the power tool may result in personal injury.
• Do not overreach. Keep proper footing and balance at all times. This enables better
control of the power tool in unexpected situations.
• Dress properly. Do not wear loose clothing or jewelry. Keep your hair, clothing and
gloves away from moving parts. Loose clothes, jewelry or long hair can be caught in
moving parts.
• If devices are provided for the connection of dust extraction and collection
facilities, ensure these are connected and properly used. Use of dust devices can
reduce dust related hazards.
Power Tool Use and Care
• Do not force the power tool. Use the correct power tool for your application. The
correct power tool will do the job better and more safely at the rate for which it was
designed.
• Do not use the power tool if the switch does not turn it on and off. Any power tool
that cannot be controlled with the switch is dangerous and must be repaired.
• Disconnect the plug from the power source and/or the battery pack from the
power tool before making any adjustments, changing accessories, or storing
power tools. Such preventive safety measures reduce the risk of starting the power tool
accidentally.
• Store idle power tools out of the reach of children and do not allow persons
unfamiliar with the power tool or these instructions to operate the power tool.
Power tools are dangerous in the hands of untrained users.
• Maintain power tools. Check for misalignment or binding of moving parts,
breakage of parts and any other condition that may affect the power tool's
operation. If damaged, have the power tool repaired before use. Many accidents are
caused by poorly maintained power tools.
• Keep cutting tools sharp and clean. Properly maintained cutting tools with sharp
cutting edges are less likely to bind and are easier to control.
• Use the power tool, accessories, tool bits, etc. in accordance with these
instructions, taking into account the working conditions and the work to be
performed. Use of the power tool for operations different from those intended could
result in a hazardous situation.
Service
• Have your power tool serviced by a qualified repair person using only identical
replacement parts. This will ensure that the safety of the power tool is maintained.

7.5 AMP IMPACT WRENCH 7
SAFETY INFORMATION
Specific Safety Rules for Impact Wrench
• Hold power tool by insulated gripping surfaces, when performing an operation
where the fastener may contact hidden wiring or its own cord. Fasteners with a
“live” wire may make exposed metal parts of the tool live and could give the operator an
electric shock.
• Do not use the power tool with a damaged cord. Do not touch the damaged
cord and pull the plug from the outlet when the cord is damaged while working.
Damaged cords increase the risk of an electric shock.
• Secure the workpiece. A workpiece clamped with clamping devices or in a vice is held
more secure than by hand.
• Always wait until the power tool has come to a complete stop before placing it
down. The tool insert can jam and lead to loss of control over the power tool.
PREPARATION
Before attempting to use the impact wrench, familiarize yourself with all of its operating
features and safety requirements.

8 7.5 AMP IMPACT WRENCH
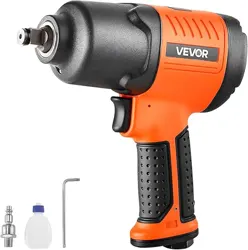
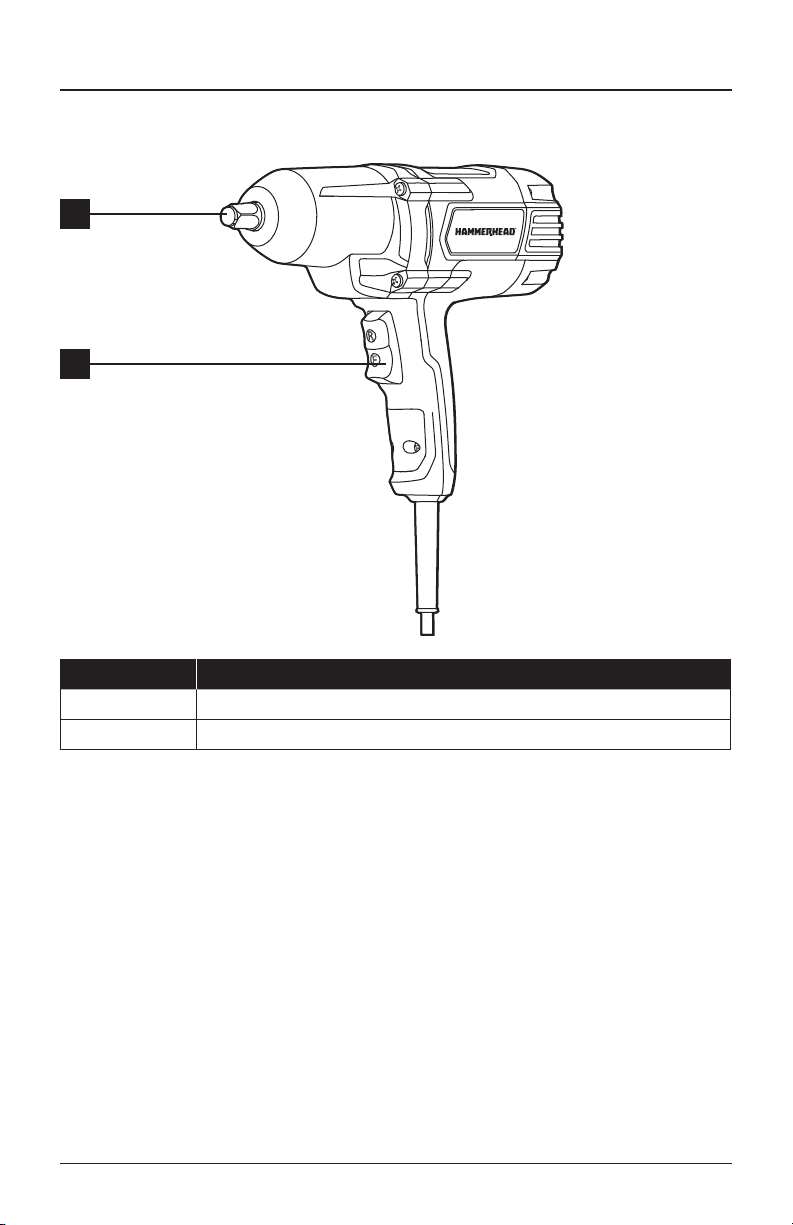
PACKAGE CONTENTS
A
B
PARTS DESCRIPTION
A 1/2" square drive
B Forward/reverse switch
7.5 AMP IMPACT WRENCH 9
OPERATING INSTRUCTIONS
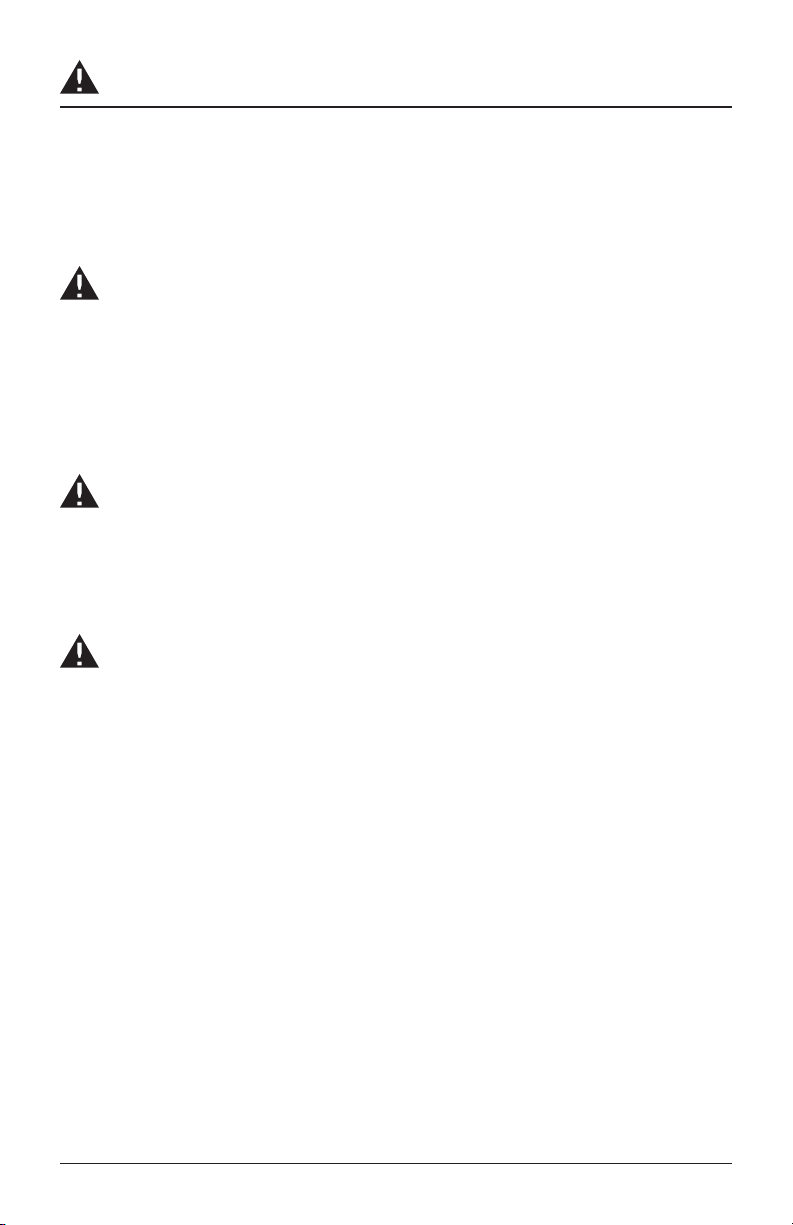
1. Installing and Removing
the Socket
WARNING: Always verify that the
tool is switched off and unplugged before
installing any accessories on the tool.
Always use the correct size socket for
bolts and nuts. An incorrect socket
will result in inaccurate and inconsis-
tent fastening torque and/or damage
to the bolt or nut.
a. To install the socket, push it onto
the 1/2-inch square drive of the
tool until it locks into place.
b. To remove the socket, simply pull it off.
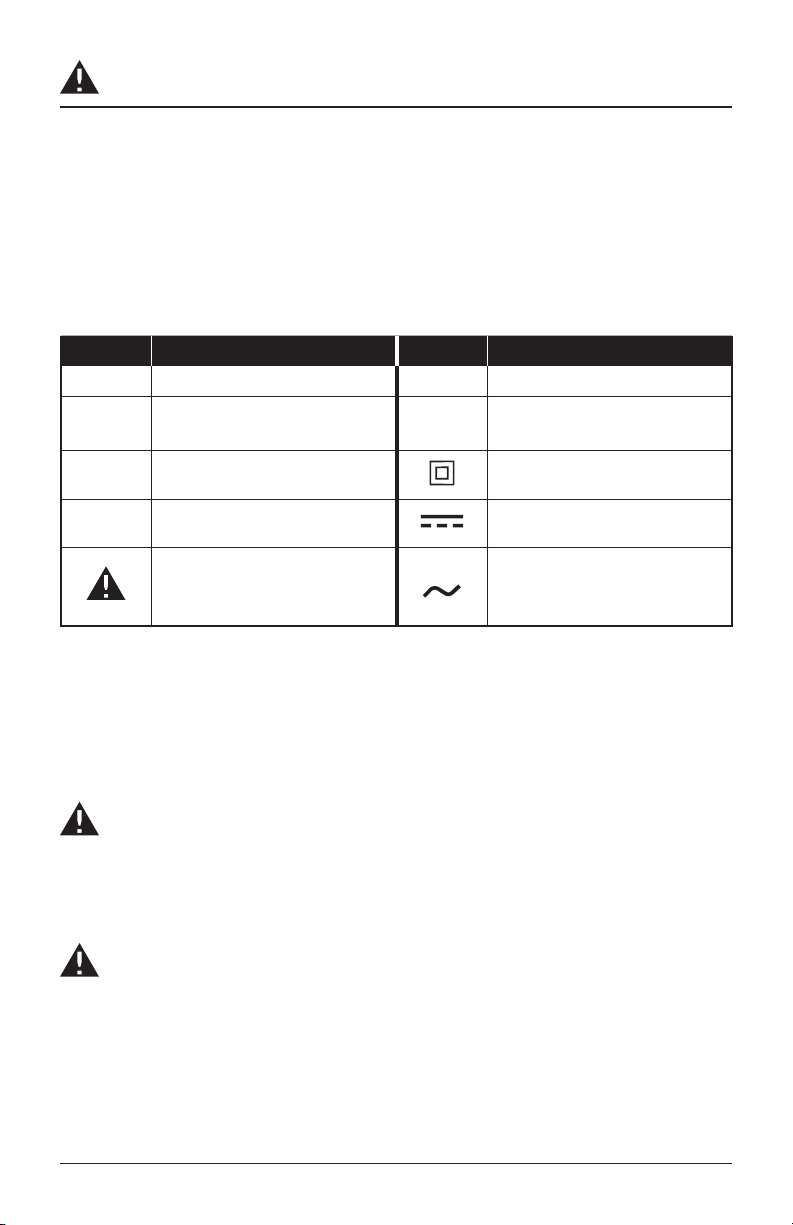
2. Turning The Impact Wrench On
a. Connect the power cord of your
impact wrench to a standard
household power outlet.
b. Press the part of the switch
marked “F” to run the tool in
the forward direction (clockwise
rotation). Use this direction for
tightening bolts or nuts.
c. Press the part of the switch
marked “R” to reverse the motor
direction (counter-clockwise
rotation). Use this direction for
loosening bolts or nuts.
d. Release the switch to stop the tool.
e. Keep the switch pressed for continuous operation.
1
SOCKET
1/2-INCH
SQUARE DRIVE
2
SWITCH

10 7.5 AMP IMPACT WRENCH
OPERATING INSTRUCTIONS
3. Installing Fasteners
NOTICE: Always keep the impact wrench at a right angle to the fastener to avoid
damaging the fastener head.
TO FASTEN:
a. Start threading the fastener by hand onto or into its threaded counterpart (e.g., nut
onto bolt, or bolt into nut or threaded hole).
b. With the proper impact socket securely mounted to the wrench, slide the impact
socket onto the nut or bolt head.
c. Firmly hold the tool and depress the switch at “F”. The impact socket will turn the
fastener and impacting will begin once the fastener encounters resistance.
WARNING: Do not over-tighten, as the force of the impact wrench can break the
fastener and cause injury.
TO LOOSEN:
a. With the proper impact socket securely mounted to the wrench, slide the impact
socket onto the bolt head.
b. Firmly hold the tool and depress the switch at “R”. The tool will start to impact
immediately.
c. Once the fastener has "broken loose", it will start to unthread. Be careful that you
do not allow a fastener to spin freely once it is no longer engaged with its threaded
counterpart, as it may be thrown out of the socket.

7.5 AMP IMPACT WRENCH 11
OPERATING INSTRUCTIONS
4. Impacting Tips
The proper fastening torque may differ depending on the type or size of the bolt, the
material of the workpiece to be fastened, etc.
NOTICE: Hold the tool sop that the socket is straight along the axis of the bolt or nut.
a. Excessive fastening torque may damage the bolt/nut or socket. Before starting your
job, always perform a test operation to determine the proper fastening time for
your bolt or nut. Practice with various fasteners, noting the length of time required
to reach the desired torque. Check the tightness with a hand-torque wrench. If
the fasteners are too tight, reduce the impacting time. If they are not tight enough,
increase the impacting time.
b. Hold the tool firmly, and place the socket over the bolt or nut. Turn the tool on, and
fasten the bolt or nut to the proper torque.
c. The torque that is required to loosen a fastener averages 75% to 80% of the
tightening torque, depending on the condition of the contacting surfaces. However, if
rust or corrosion causes seizing, more torque may be required.
d. After fastening, always check the torque with a torque wrench. The fastening torque
is affected by a wide variety of factors, including the following:
• Voltage
A voltage reduction will cause a reduction in the fastening torque.
• Socket
Failure to use the correct size socket will cause a reduction in the fastening torque. A
worn socket (wear on the hex end or square end) will cause a reduction in the fasten-
ing torque.
• Bolt
Although the torque coefficient and the class of bolt may be the same, the proper
fastening torque will differ according to the diameter of the bolt.
Even if the diameters of bolts are the same, the proper fastening torque will differ
according to the torque coefficient, the class of bolt and the bolt length.
• The use of a universal joint or an extension bar (both available separately) will
reduce the fastening force of the impact wrench somewhat. Compensate by
fastening for a longer period of time.
• The manner of holding the tool or the material to be fastened will affect the torque.

12 7.5 AMP IMPACT WRENCH
OPERATING INSTRUCTIONS
5. Before Each Use
a. Inspect the impact wrench, the On/Off switch, the cord and the accessories for
damage.
b. Check for damaged, missing, or worn parts.
c. Check for loose screws, misalignment or binding of moving parts, or any other
condition that may affect the operation.
d. If abnormal vibration or noise occurs, turn the tool off immediately and have the
problem corrected before further use. Unplug the tool from the power source before
cleaning or performing any maintenance. Using compressed air may be the most
effective cleaning method. Always wear safety goggles when cleaning tools using
compressed air.
WARNING: Do not allow brake fluids, gasoline, petroleum-based products,
penetrating oil, etc. to come into contact with plastic parts. These substances contain
chemicals that can damage, weaken, or destroy plastic.
WARNING: When servicing, use only identical replacement parts. The use of any
other parts may create a hazard or cause damage to the product.
WARNING: If the supply cord is damaged, it must be replaced by a specially
prepared cord available through the service organization.
WARNING: Use only accessories that are recommended for this impact wrench by
the manufacturer. Accessories that may be suitable for one tool may become hazardous
when used with another tool.
WARNING: To ensure safety and reliability, all repairs should be performed by a
qualified service technician.

7.5 AMP IMPACT WRENCH 13
CARE AND MAINTENANCE
All maintenance should only be carried out by an authorized service organization.
Cleaning
Before cleaning or performing any maintenance, unplug the impact wrench from the power
source. For safe and proper operation, always keep the tool and its ventilation slots clean.
Always use only a soft, dry cloth to clean your impact wrench; never use detergent or
alcohol.
TROUBLESHOOTING
PROBLEM POSSIBLE CAUSE CORRECTIVE ACTION
The impact wrench does
not work
The impact wrench is not
plugged into a power source
Plug the impact wrench into
an appropriate power source
Socket cannot be installed Improper socket selection Use a suitable socket
The motor is overheating
Cooling vents are obstructed Clean and clear vents. Do
not cover with hand during
operation
3 YEAR LIMITED WARRANTY
This impact wrench is warranted to the original purchaser from the original purchase date for
two years, plus one additional year with product registration at www.hammerheadtools.com
(2+1), for a total three years subject to the warranty coverage described herein.
Please retain your receipt.
This impact wrench is warranted to the original user to be free from defects in material
and workmanship. If you believe that the impact wrench is defective at any time during the
specified warranty period, call HAMMERHEAD support at 1-877-888-1880 to speak with a
customer service agent. This warranty does not cover: (1) Part failure due to normal wear or
tool abuse (2) Any parts have been altered or modified by anyone other than an authorized
HAMMERHEAD personnel.
This warranty excludes bits, bulbs and accessories. This warranty gives you specific legal
rights, and you may also have other rights that vary from state.

14 7.5 AMP IMPACT WRENCH
LLAVE DE
PERCUSIÓN DE
7.5 AMPERIOS
MODELO HDIW075
ADJUNTE SU RECIBO AQUÍ
Número de serie ___________________ Fecha de compra ____________________
¿Preguntas, problemas, piezas faltantes? Antes de volver a la tienda,
llame a nuestro departamento de Servicio al Cliente al 1-877-888-1880, de
8:30 a.m. a 8:00 p.m. hora estándar del Este (lunes a viernes) y de 10:00
a.m. a 6:00 p.m. hora estándar del Este (sábado y domingo).

16 LLAVE DE PERCUSIÓN DE 7.5 AMPERIOS
ÍNDICE
Especificaciones del producto. . . . . . . . . . . . . . . . . . . . . . . . . . . . . . . . . . . . . . . . . . . . . . 16
Información de seguridad .................................................17
Preparación ...........................................................21
Contenido del paquete ...................................................22
Instrucciones de funcionamiento ...........................................23
Cuidado y mantenimiento .................................................27
Solución de problemas ...................................................27
Garantía ..............................................................27
ESPECIFICACIONES DEL PRODUCTO
COMPONENTE ESPECIFICACIONES
Motor 120V~, 60Hz, 7.5A
Velocidad sin carga 2,200 RPM
Impactos por minuto 2,700 GPM
Torque máximo 240 pies libras
Portaherramientas Portaherramientas cuadrado de 1/2"
Peso de la herramienta 3.18 kg (7 lb)
LLAVE DE PERCUSIÓN DE 7.5 AMPERIOS 17
INFORMACIÓN DE SEGURIDAD
Lea y comprenda completamente este manual antes de intentar ensamblar u operar
este producto. Si tiene preguntas sobre este producto, llame al Servicio al Cliente de
Hammerhead al 1-888-HAMMERHEAD (1-877-888-1880), de 8:30 a.m. a 8:00 p.m. hora
estándar del Este (lunes a viernes) y de 10:00 a.m. a 6:00 p.m. hora estándar del Este
(sábado y domingo).
ADVERTENCIA
El funcionamiento de cualquier herramienta eléctrica puede tener como consecuencia que
objetos extraños salgan expelidos hacia sus ojos, lo que puede provocar daños oculares
graves. Antes de comenzar a utilizar una herramienta eléctrica, póngase siempre gafas de
seguridad o lentes protectores con protección lateral y protección para rostro completo si
es necesario. Recomendamos utilizar una máscara de seguridad de visión amplia sobre
lentes o gafas de seguridad estándar con protecciones. Use siempre lentes de protección
con marcas que indiquen que cumplen con la norma ANSI Z87.1.
PELIGRO
Las personas que poseen dispositivos electrónicos, como marcapasos, deben consultar
al médico antes de usar este producto. La utilización de equipos eléctricos cerca de un
marcapasos puede producir interferencias o fallas en el marcapasos.
ADVERTENCIA
Parte del polvo producto del lijado, aserrado, esmerilado, taladrado y otras actividades de
construcción, contiene químicos que el estado de California reconoce como causantes de
cáncer, malformaciones congénitas u otros daños reproductivos. Algunos ejemplos de estas
sustancias químicas son:
• Plomo de pinturas a base de plomo.
• Sílice cristalina de ladrillos, cemento y otros productos de mampostería.
• Arsénico y cromo de madera tratada químicamente.
El riesgo por estas exposiciones varía según la frecuencia con la que realice este tipo
de trabajo. Medidas para reducir la exposición a estos químicos: Trabaje en un área
bien ventilada y con el equipo de seguridad aprobado, como las mascarillas antipolvo
especialmente diseñadas para filtrar partículas microscópicas.
18 LLAVE DE PERCUSIÓN DE 7.5 AMPERIOS
INFORMACIÓN DE SEGURIDAD
Conozca la herramienta
Para operar esta herramienta, lea detenidamente este manual y todas las etiquetas adjuntas a
la llave de percusión antes de usarla. Mantenga este manual a mano para referencia futura.
Algunos de los siguientes símbolos pueden aparecer en esta llave de percusión. Estúdielos
junto con sus significados. La interpretación correcta de estos símbolos le permitirá operar
la herramienta mejor y de manera más segura.
SÍMBOLO DEFINICIÓN SÍMBOLO DEFINICIÓN
V Voltios n
0
Velocidad sin carga
A Amperios /min
Revoluciones, golpes o
impactos por minuto
Hz Hercios Construcción clase II
W Vatios Corriente continua
Peligro, advertencia o
precaución. Significa:
“¡ATENCIÓN! Su seguridad
está en juego”.
Corriente alterna
IMPORTANTE: Esta herramienta solo debe recibir mantenimiento de parte de un técnico de
servicio calificado.
INSTRUCCIONES IMPORTANTES DE SEGURIDAD
GUARDE ESTAS INSTRUCCIONES: este manual contiene instrucciones de seguridad y de
funcionamiento importantes para la llave de percusión Modelo HDIW075.
PELIGRO
Siga con cuidado las instrucciones de operación a continuación para reducir el riesgo de
incendio o descarga eléctrica.
Advertencias generales de seguridad en el manejo de herramientas eléctricas
ADVERTENCIA
Lea todas las advertencias de seguridad e instrucciones. El no seguir todas las
instrucciones que se indican a continuación podría resultar en descargas eléctricas,
incendios y/o lesiones personales graves.

LLAVE DE PERCUSIÓN DE 7.5 AMPERIOS 19
INFORMACIÓN DE SEGURIDAD
Guarde todas las advertencias e instrucciones para referencia futura
La denominación “herramienta eléctrica” que se menciona en las advertencias hace
referencia a la herramienta eléctrica conectada a la red de suministro eléctrico (con cable)
o a la herramienta eléctrica a batería (inalámbrica).
Seguridad del área de trabajo
• Mantenga el área de trabajo limpia y bien iluminada. Las áreas desordenadas y
oscuras invitan a los accidentes.
• No utilice herramientas eléctricas en ambientes en los que se puedan producir
explosiones, como en los que se encuentran líquidos, gases o polvos inflamables.
Las herramientas eléctricas crean chispas que pueden encender el polvo o los vapores.
• Los niños y otras personas deben mantenerse alejados mientras se usa una herramienta
eléctrica. Las distracciones pueden hacerlo perder el control de la herramienta.
Seguridad eléctrica
• Los enchufes de las herramientas eléctricas deben coincidir con el tomacorriente.
Nunca modifique el enchufe de ningún modo. No use ningún adaptador de enchufe
con herramientas eléctricas con conexión a tierra (puesta a tierra). Los enchufes
sin modificar y los enchufes adecuados reducirán el riesgo de descarga eléctrica.
• Evite el contacto corporal con las superficies con descarga a tierra, como tuberías,
radiadores, estufas y refrigeradores. El riesgo de descarga eléctrica aumenta si su
cuerpo está conectado a tierra o con puesta a tierra.
• No exponga las herramientas eléctricas a la lluvia ni a condiciones húmedas. Si
entra agua en una herramienta eléctrica, aumentará el riesgo de descarga eléctrica.
• No jale del cable. Nunca use el cable para transportar, jalar o desenchufar la herramienta
eléctrica. Mantenga el cable alejado del calor, el aceite, los bordes filosos o las piezas
móviles. Los cables dañados o enredados aumentan el riesgo de descarga eléctrica.
• Al utilizar una herramienta eléctrica en exteriores, use una extensión eléctrica para uso
en exteriores. El uso de una extensión para uso en exteriores reduce el riesgo de electrocución.
• Si no puede evitar operar una herramienta eléctrica en condiciones de humedad,
use un suministro protegido por un tomacorriente con interruptor de circuito de
falla de puesta a tierra (GFCI, por sus siglas en inglés). El uso de un GFCI reduce el
riesgo de descarga eléctrica.
Seguridad personal
• Manténgase atento, mire lo que está haciendo y aplique el sentido común cuando utilice
una herramienta eléctrica. No utilice una herramienta eléctrica si está cansado o bajo
la influencia de las drogas, el alcohol o algún medicamento. Un momento de distracción
mientras opera una herramienta eléctrica puede provocar lesiones personales graves.

20 LLAVE DE PERCUSIÓN DE 7.5 AMPERIOS
INFORMACIÓN DE SEGURIDAD
• Use equipo de protección personal. Use siempre lentes de protección. El equipo de
protección, como mascarillas antipolvo, zapatos de seguridad antideslizantes, cascos duros o
protección auditiva, usado para las condiciones adecuadas, reducirá las lesiones personales.
• Prevenga los arranques involuntarios. Asegúrese de que el interruptor esté en
la posición de apagado antes de conectar a una fuente de alimentación y/o a
un paquete de baterías, de recoger o transportar la herramienta. Transportar
herramientas eléctricas con el dedo en el interruptor o herramientas eléctricas
encendidas invita los accidentes.
• Retire toda llave de tuercas o herramienta de ajuste antes de encender la
herramienta eléctrica. Si deja una llave de tuercas fijada a una parte giratoria de la
herramienta eléctrica, se podrían producir lesiones personales.
• No trate de llegar más allá de donde alcance. Mantenga un apoyo de pies y un
equilibrio adecuados en todo momento. Esto le permitirá tener un mejor control de la
herramienta eléctrica en situaciones inesperadas.
• Use la ropa indicada. No use ropa holgada ni joyas. Mantenga su cabello, ropa y
guantes alejados de las piezas móviles. La ropa holgada, las joyas y el cabello largo
pueden quedar atascados en las piezas móviles.
• Si se proporcionan dispositivos para la conexión de aparatos de extracción
y recolección de polvo, asegúrese de que estén conectados y de que se usen
correctamente. El uso de dispositivos antipolvo puede reducir los peligros relativos al polvo.
Uso y cuidado de las herramientas eléctricas
• No fuerce la herramienta eléctrica. Use la herramienta eléctrica correcta para su
aplicación. La herramienta eléctrica correcta hará el trabajo mejor y de manera más
segura al ritmo para el que se diseñó.
• No use la herramienta eléctrica si el interruptor no la enciende o apaga. Cualquier
herramienta eléctrica que no se pueda controlar con el interruptor es peligrosa y se debe reparar.
• Desconecte el enchufe de la fuente de alimentación o el paquete de baterías de
la herramienta eléctrica antes de hacer ajustes, cambiar accesorios o guardar la
herramienta eléctrica. Estas medidas preventivas de seguridad reducen el riesgo de
arrancar accidentalmente la herramienta eléctrica.
• Almacene las herramientas eléctricas inactivas fuera del alcance de los niños y
no permita que personas no familiarizadas con ellas o con las instrucciones de la
herramienta eléctrica las operen. Las herramientas eléctricas son peligrosas en las
manos de usuarios sin capacitación.

LLAVE DE PERCUSIÓN DE 7.5 AMPERIOS 21
INFORMACIÓN DE SEGURIDAD
• Realice el mantenimiento de las herramientas eléctricas. Revíselas para controlar
que no estén desalineadas y que las piezas móviles no estén atascadas, que
las piezas no estén rotas y que no se presenten otras posibles causas de mal
funcionamiento de la herramienta eléctrica. Si está dañada, haga reparar la
herramienta eléctrica. Muchos accidentes se producen debido a herramientas
eléctricas con mantenimiento deficiente.
• Mantenga las herramientas de corte afiladas y limpias. Las herramientas de corte
que se mantienen a punto, con los bordes afilados, son menos propensas a atascarse y
más fáciles de controlar.
• Use la herramienta eléctrica, los accesorios, las brocas, etc., de acuerdo con estas
instrucciones, tomando en cuenta las condiciones de trabajo y el trabajo que
realizará. El uso de la herramienta eléctrica en operaciones que no son las previstas
puede producir una situación de peligro.
Mantenimiento
• Haga revisar la herramienta eléctrica por una persona calificada y use solo piezas de
repuesto idénticas. Esto asegurará que se mantenga la seguridad de la herramienta eléctrica.
Reglas de seguridad específicas para la llave de percusión
• Sostenga la herramienta eléctrica por las superficies de agarre aisladas cuando
realice una operación en la que el sujetador pueda entrar en contacto con el
cableado oculto o con su propio cable. Si los sujetadores entran en contacto con un
cable energizado, pueden energizarse las piezas metálicas expuestas de la herramienta
eléctrica, y el usuario puede sufrir una descarga eléctrica.
• No use la herramienta eléctrica con un cable dañado. No toque el cable dañado ni
jale el enchufe del tomacorriente cuando esté en funcionamiento. Si el cable está
dañado, aumenta el riesgo de descarga eléctrica.
• Asegure la pieza de trabajo. Una pieza sujetada con abrazaderas o con una prensa de
tornillo se mantiene más segura que con la mano.
• Espere siempre a que la herramienta eléctrica se detenga por completo antes de
colocarla hacia abajo. El accesorio de la herramienta puede atorarse y hacerle perder
el control de la herramienta eléctrica.
PREPARACIÓN
Antes de intentar usar la llave de percusión, familiarícese con todas sus características de
funcionamiento y requisitos de seguridad.
22 LLAVE DE PERCUSIÓN DE 7.5 AMPERIOS
CONTENIDO DEL PAQUETE
A
B
PIEZAS DESCRIPCIÓN
A Portaherramientas cuadrado de 1/2"
B Interruptor de avance/reversa

LLAVE DE PERCUSIÓN DE 7.5 AMPERIOS 23
INSTRUCCIONES DE FUNCIONAMIENTO
1. Cómo instalar y retirar el casquillo
ADVERTENCIA: Verifique siempre
que la herramienta esté apagada y
desconectada antes de instalar cualquier
accesorio en la herramienta.
Use siempre el casquillo de tamaño
correcto para las tuercas y los torni-
llos. Un casquillo incorrecto resultará
en un torque de agarre impreciso
y desparejo, lo que podría dañar el
torillo o la tuerca.
a. Para instalar el casquillo,
introdúzcalo en el portaherramientas cuadrado de ½ pulgada de la herramienta
hasta que encaje en el sitio.
b. Para retirar el casquillo, solo jálelo.
2. Cómo encender la llave de
percusión
a. Conecte el cable de alimentación
de la llave de percusión a un
tomacorriente estándar.
b. Oprima la parte del interruptor
con la marca “F” para encender
la herramienta en la dirección
de avance (en dirección de las
manecillas del reloj). Use esta
dirección para apretar los tornillos
y las tuercas.
c. Oprima la parte del interruptor
con la marca “R” para invertir la dirección del motor (en dirección contraria a las
manecillas del reloj). Use esta dirección para aflojar los tornillos y las tuercas.
d. Para detener la herramienta, suelte el interruptor.
e. Mantenga presionado el interruptor para un funcionamiento continuo.
1
CASQUILLO
PORTAHERRAMIENTAS
CUADRADO DE ½ PULG
2
INTERRUPTOR

24 LLAVE DE PERCUSIÓN DE 7.5 AMPERIOS
INSTRUCCIONES DE FUNCIONAMIENTO
3. Cómo instalar los sujetadores
AVISO: Mantenga siempre la llave de percusión en ángulo recto respecto al sujetador
para evitar dañar el cabezal del sujetador.
PARA APRETAR:
a. Comience por enroscar el sujetador con la mano sobre o dentro de su contraparte
de rosca (por ejemplo, la tuerca en el tornillo, o el tornillo en la tuerca o en el orificio
roscado).
b. Con el casquillo de impacto adecuado colocado de forma segura en la llave de
percusión, deslice el casquillo por la tuerca o por la cabeza del tornillo.
c. Mantenga de forma firme la herramienta y presione el interruptor en la marca “F”.
El casquillo hará girar el sujetador y empezará la percusión una vez que el sujetador
encuentre resistencia.
ADVERTENCIA: No apriete demasiado, ya que la fuerza de la llave de percusión
puede romper el sujetador y causar lesiones.
PARA AFLOJAR:
a. Con el casquillo adecuado colocado de forma segura en la llave, deslice el casquillo
por la tuerca o por la cabeza del tornillo.
b. Mantenga de forma firme la herramienta y presione el interruptor en la marca “R”.
La herramienta comenzará la percusión de inmediato.
c. Una vez que el sujetador se haya “aflojado”, comenzará a desenroscar. Tenga
cuidado de no permitir que el sujetador gire de forma libre una vez que ya no esté
en contacto con la contraparte roscada, ya que puede salirse del casquillo.

LLAVE DE PERCUSIÓN DE 7.5 AMPERIOS 25
INSTRUCCIONES DE FUNCIONAMIENTO
4. Consejos para la percusión
El torque de fijación apropiado podría diferir según el tipo o el tamaño de la tuerca, del
material de la pieza que va a apretar, etc.
AVISO: Sostenga la herramienta de forma tal que el casquillo esté recto a lo largo del
eje del tornillo o la tuerca.
a. Un torque de fijación excesivo podría dañar el tornillo, la tuerca o el casquillo.
Antes de comenzar su trabajo, realice siempre una prueba de funcionamiento para
determinar el tiempo de fijación apropiado para su tornillo o tuerca. Practique con
varios sujetadores, notando la duración del tiempo requerido para alcanzar el torque
deseado. Verifique la firmeza con una llave de torsión manual. Si los sujetadores
están muy ajustados, reduzca el tiempo de percusión. Si no están lo suficiente
ajustados, incremente el tiempo de percusión.
b. Sostenga la herramienta firmemente y coloque el casquillo sobre el tornillo o la
tuerca. Encienda la herramienta y apriete el tornillo o la tuerca al torque apropiado.
c. El torque que se requiere para aflojar un sujetador promedia del 75% al 80% del
torsión de apriete, según la condición de las superficies de contacto. Sin embargo, si
el óxido o la corrosión provocan que se trabe, será necesario un mayor torque.
d. Después de apretar, siempre revise el torque con una llave de torsión. Una gran
variedad de factores afectan el torque de apriete, entre otros:
• Voltaje
Una reducción del voltaje provocará una reducción en el torque de apriete.
• Casquillo
De no usar el casquillo de tamaño correcto, provocará una reducción en el torque de
apriete. Un casquillo desgastado (desgaste en el extremo hexagonal o extremo recto)
causará una reducción en el torque de apriete.
• Tornillo
Aunque el coeficiente de torque y la clase de tornillo podrían ser la misma, el torque
de apriete apropiado diferirá de acuerdo con el diámetro del tornillo.
Incluso si el diámetro de los tornillos son iguales, el torque de apriete apropiado
diferirá de acuerdo con el coeficiente de torque, la clase del tornillo y la longitud del
tornillo.
• El uso de una junta universal o una barra de extensión (ambas disponibles por
separado) reducirá de alguna manera la fuerza de apriete de la llave de percusión.
Para compensar, apriete durante más tiempo.
• La forma de sostener la herramienta o el material que va a apretar afectará el
torque.

26 LLAVE DE PERCUSIÓN DE 7.5 AMPERIOS
INSTRUCCIONES DE FUNCIONAMIENTO
5. Antes de cada uso
a. Inspeccione la llave de percusión, el interruptor de encendido/apagado, el cable y
los accesorios en busca de daños.
b. Revise si faltan piezas, están dañadas o desgastadas.
c. Compruebe si los tornillos están sueltos o desalineados y si las piezas móviles están
atascadas, o cualquier otra condición que pueda afectar el funcionamiento.
d. Si hay una vibración atípica o ruido, apague de inmediato la herramienta y corrija
el problema antes de volver a usarla. Desconecte la herramienta de la fuente de
alimentación antes de limpiarla o realizar cualquier mantenimiento. El uso de aire
comprimido puede ser el método de limpieza más eficaz. Siempre use lentes de
seguridad cuando limpie las herramientas con aire comprimido.
ADVERTENCIA: No permita que las partes plásticas entren en contacto con líquidos
de freno, gasolina, productos a base de petróleo, aceites penetrantes, etc. Estas sustancias
contienen sustancias químicas que pueden dañar, debilitar o destruir el plástico.
ADVERTENCIA: Cuando realice el mantenimiento, solo use piezas de repuesto
idénticas. El uso de cualquier pieza puede generar un peligro o dañar el producto.
ADVERTENCIA: Si el cable eléctrico está dañado, debe remplazarse por un cable
especialmente preparado disponible a través de la organización de servicio.
ADVERTENCIA: Use solo accesorios que el fabricante recomienda para esta llave
de percusión. Los accesorios que puedan ser adecuados para una herramienta pueden ser
peligrosos al usarse con otra herramienta.
ADVERTENCIA: Para garantizar la seguridad y confiabilidad, todas las reparaciones
las debe realizar un técnico calificado.

LLAVE DE PERCUSIÓN DE 7.5 AMPERIOS 27
CUIDADO Y MANTENIMIENTO
Solo una organización de servicio autorizada debe realizar cualquier mantenimiento.
Limpieza
Desconecte la llave de percusión de la fuente de alimentación antes de limpiarla o realizar
cualquier mantenimiento. Para un funcionamiento seguro y adecuado, mantenga siempre
la herramienta y sus ranuras de ventilación limpias.
Use siempre solo un paño suave y seco para limpiar la llave de percusión; nunca use
detergente ni alcohol.
SOLUCIÓN DE PROBLEMAS
PROBLEMA CAUSA POSIBLE ACCIÓN CORRECTIVA
La llave de percusión no
funciona
La llave de percusión no
está conectada a la fuente
de alimentación
Conecte la llave de percusión
a una fuente de alimentación
apropiada
No se puede instalar el
casquillo
Selección del casquillo
incorrecto
Use un casquillo adecuado
El motor se sobrecalienta
Las rejillas de ventilación
están obstruidas
Limpiar y despejar las
ventilaciones. No cubra con la
mano durante la operación
GARANTÍA LIMITADA DE 3 AÑOS
El comprador original de esta llave de percusión cuenta con una garantía de dos años
a partir de la fecha de compra original, más un año adicional si registra el producto en
www.hammerheadtools.com (2 + 1), lo que suma un total de tres años, sujeto a la cobertura
de la garantía que se describe en el presente documento.
Conserve su recibo.
Se garantiza al comprador original que esta llave de percusión no posee defectos de
materiales ni de mano de obra. Si cree que la llave de percusión presenta algún defecto
en cualquier momento durante el período de garantía especificado, simplemente llame al
Servicio de Ayuda al Cliente de HAMMERHEAD al 1-877-888-1880 para hablar con un agente
de Servicio al Cliente. Esta garantía no cubre: (1) falla de las piezas debido al desgaste
normal o al maltrato de la herramienta; (2) cualquier pieza alterada o modificada por alguien
ajeno al personal autorizado de HAMMERHEAD.
Esta garantía excluye las brocas, las bombillas y los accesorios. Esta garantía le otorga
derechos legales específicos, pero podría tener también otros derechos que varían según
el estado.

28 LLAVE DE PERCUSIÓN DE 7.5 AMPERIOS