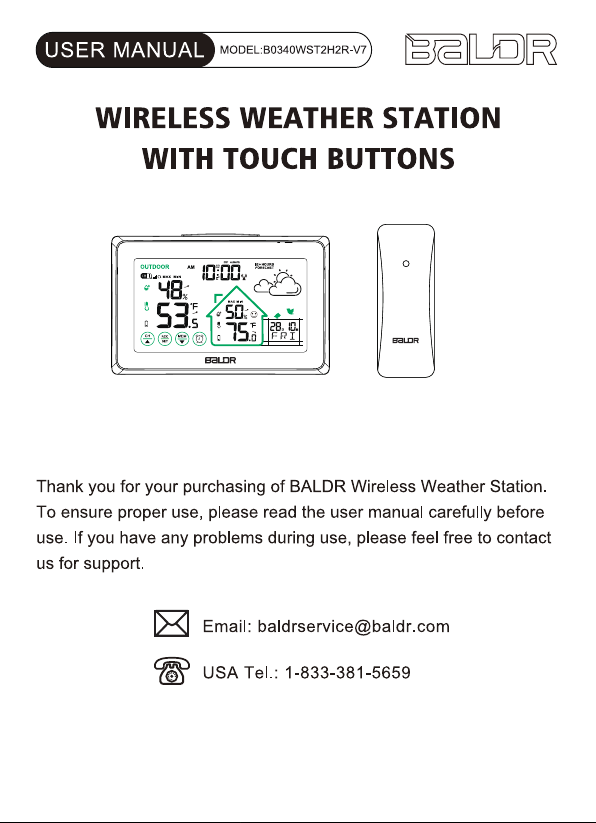
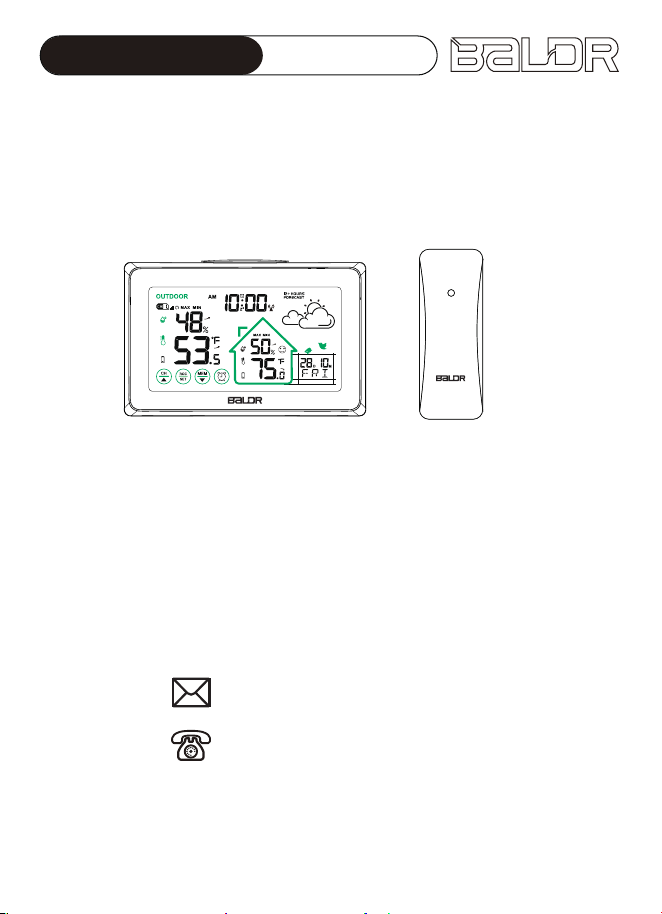
USER MANUAL
MODEL:B0340WST2H2R-V7
WIRELESS WEATHER STATION
WITH TOUCH BUTTONS
Email: [email protected]
USA Tel.: 1-833-381-5659
Thank you for your purchasing of BALDR Wireless Weather Station.
To ensure proper use, please read the user manual carefully before
use. If you have any problems during use, please feel free to contact
us for support.
ALWAYSDST

11
Contents
1. PRODUCT OVERVIEW 2
2
3
4
4
5
6
5
12
7
9
12
13
15
15
14
13
13
14
15
15
16
17
19
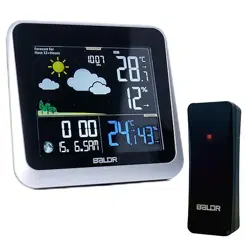
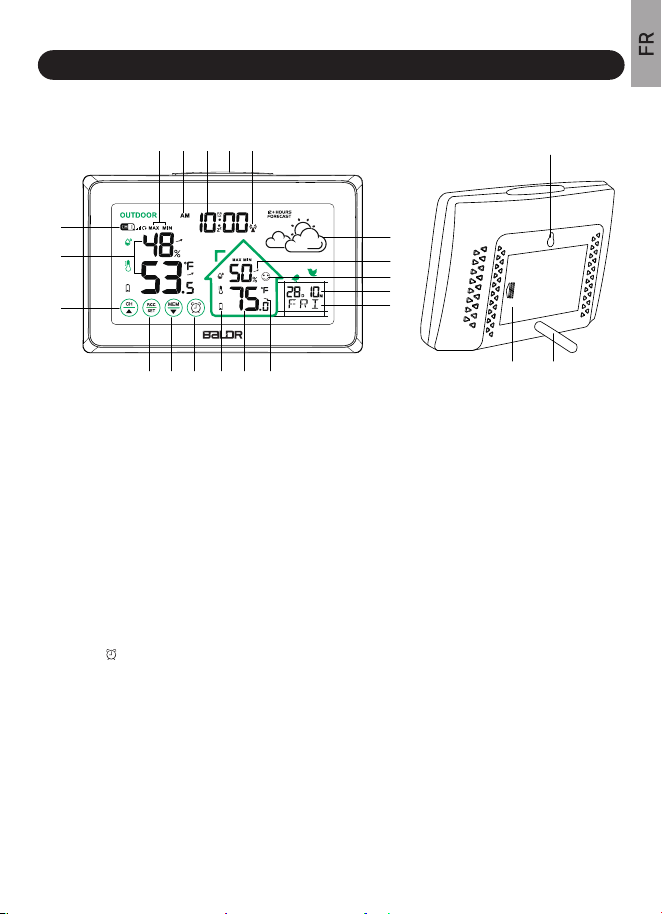
1.1 WEATHER STATION(MAIN UNIT)
1.2 BUTTONS INTRODUCTION
1.3 REMOTE SENSOR
2.PACKAGING INCLUDES
3.1 POWER UP
3.2 RCC FUNCTION
3.QUICK SET-UP GUIDE
3.6 SNOOZE MODE
3.5 ALARM SETTING
3.4 REMOTE SENSOR INSTALLATION
3.3 MANUAL SETTINGS
3.7 MAX/MIN TEMPERATURE & HUMIDITY RECORDS
9.1 TECHNICAL SPECIFICATIONS
9.2 MEASUREMENT SPECIFICATIONS
4.TEMPERATURE & HUMIDITY TREND ARROWS
5.COMFORT LEVEL INDICATOR
6. WEATHER FORECAST
7. BACKLIGHT FUNCTION
8. LOW BATTERY INDICATOR
9. SPECIFICATIONS
10. TROUBLESHOOTING GUIDE
11. PRECAUTIONS
13. WARRANTY
18
12. FCC STATEMENT
ALWAYSDST
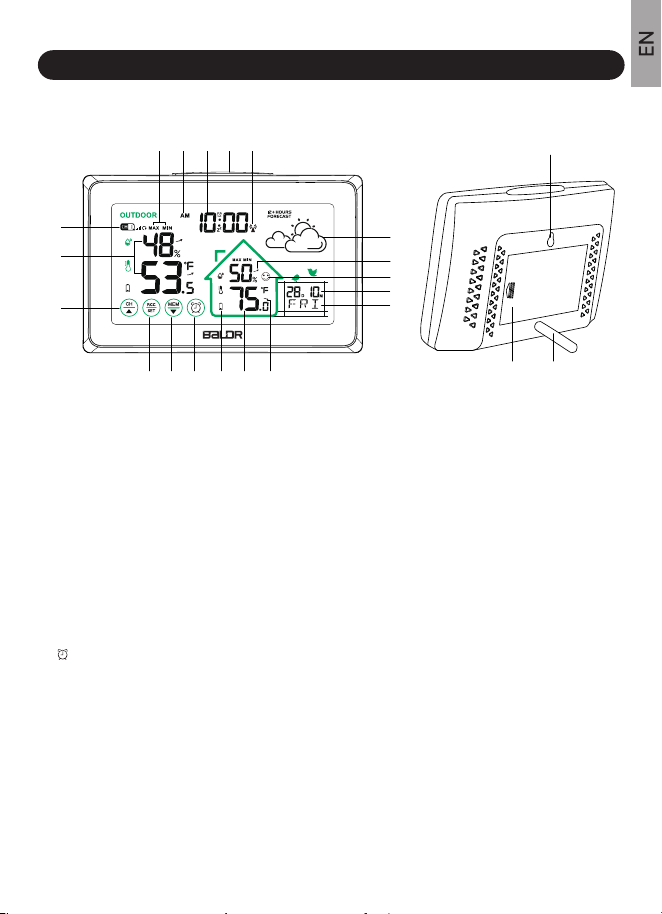
1.1 WEATHER STATION(MAIN UNIT)
1.PRODUCT OVERVIEW
2
1.Outdoor Sensor Channel Indicator
From CH1,CH2,CH3 to Circular Channels model
2.Current Outdoor Temperature and Humidity
3.“CH/▲” Button
Switch channel, re-connect to sensor or increase
the value
4.“RCC/SET” Button
RCC function or enter into time setting
5.“MEM/▼” Button
Check or clear MAX/MIN records,
decrease the value
6.“ ” Button
Check or enter into alarm setting
7.Low Battery Indicator
Remind to replace the new batteries
8.Current Indoor Temperature and Humidity
9.Temperature Trend Arrow
10.Weekday abbreviation in 7 Languages
11.Calendar Display
Month/date or date/month optional
12.Comfort Level Indicator
13.Humidity Trend Arrow
14.Weather Forecast Icon
Weather forecast for next 12-24 hours
15.RCC Function Symbol
16.Backlight/Snooze Button (at top position)
Backlight auto off after 20 seconds,
5 minutes snooze time
17.Current Time
12/24 hours display format optional
18.AM/PM for 12H Display Format
19.Max/Min Records of Indoor/Outdoor
Temperature and Humidity
Auto update at 0:00 each day
20.Hanging Hole
21.Battery Compartment Cover
22.Removable Stand
Stored in the battery compartment
20
2221
1
15
2
3
4 5 6 7
5
6
8 9
10
11
12
14
13
16171819
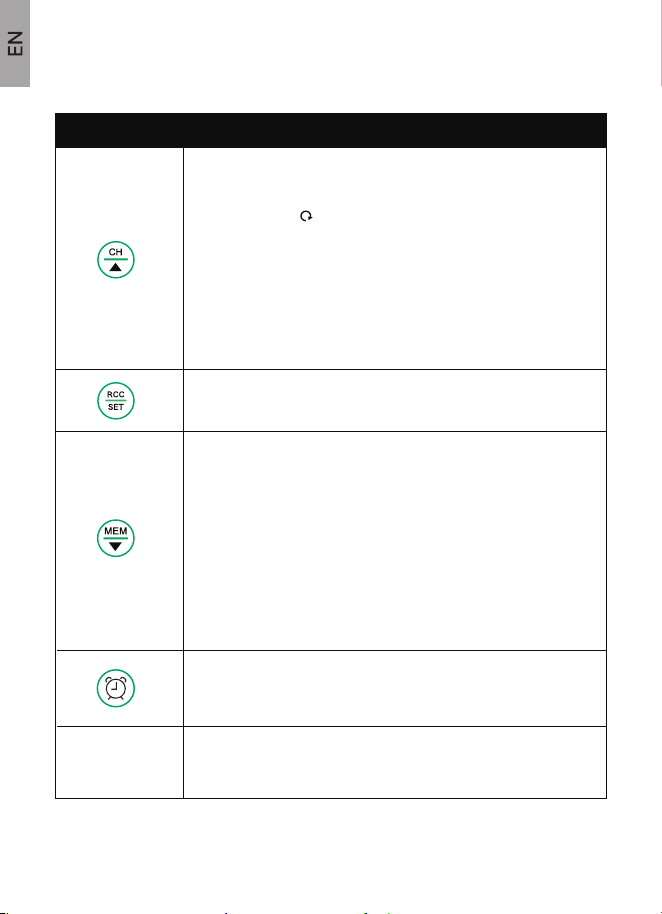
1.2 BUTTONS INTRODUCTION
3
BUTTONS FUNCTIONS
Normal Mode:
1.PRESS to switch channel from CH1, CH2, CH3, or Circular
Channels Mode “ ”.
2.PRESS AND HOLD 3 seconds to re-connect the sensor.
1.PRESS to search WWVB radio signal automatically.
2.PRESS AND HOLD 3 seconds to enter time setting.
Normal Mode:
1.PRESS to check MAX/MIN indoor/outdoor temperature and
humidity.
2.PRESS AND HOLD 3 seconds to clear the MAX/MIN
records.
Time Setting or Alarm Setting:
1.PRESS to decrease the value by 1.
2.PRESS AND HOLD 3 seconds to decrease the value
continuously.
1.PRESS to view alarm time, turn ON/OFF alarm.
2.PRESS AND HOLD 3 seconds to enter into alarm setting.
1.BACKLIGHT: press to turn ON the backlight (auto off after 20s).
2.When alarm rings, press to enter into snooze mode.
TOP BUTTON
Time Setting or Alarm Setting:
1.PRESS to increase the value by 1.
2.PRESS AND HOLD 3 seconds to increase the value
continuously.

To get accurate readings, please keep the main unit away from any
unusual source of heat or cold and make sure that the outdoor sensor
is also protected from direct sunlight, rain, or the heat it may experi-
ence from being mounted on a warm wall, or be closed near to a warm
wall.
1.Signal Indicator Light 3. Battery Compartment
2.Hanging Hole 4. Channel 1-2-3 Switch
Following contents are included in the packaging:
1 x Weather Station Main Unit (not included 3 x AAA batteries)
1 x Remote Sensor (not included 2x AA batteries)
1 x User Manual
1.3 REMOTE SENSOR
2. PACKAGING INCLUDES
4
Notes:
(1). Make sure outside sensor and weather station main unit at the same
channel.
(2). Do not touch any buttons in the 3 MINUTES to avoid sensor searching
be terminated.
(3). The main unit will automatically receive sensor’s RF signal in 3
MINUTES after it powered on. During receiving ,signal icon will
flashing, if no signal received within 3 minutes, it will stop receiving, and
you can press and hold the “CH/▲” Button 3 seconds to receive again.
1.1. Remove the main unit’s battery compartment cover, insert 3 new AAA
batteries in the back of the display console (please take note of the battery
polarity before inserting the batteries).
3.1 POWER UP
2.Take out the metal stand inside the battery compartment and screw it
into the hole at the main unit’s backside. Install the battery compartment
cover.
3.Remove the sensor’s battery compartment cover, set the channel to CH1,
then insert 2 new AA batteries of sensor within 3 MINUTES.
NOTE: Prepare new and high quality alkaline batteries. Do not mix
old and new batteries. Heavy duty or rechargeable batteries are not
recommended.
3. QUICK SET-UP GUIDE
5
Note: The display will beep once and all of the LCD segments will light up
for few seconds to verify all segments are operating properly, then display
indoor temperature and humidity immediately.
NOTES:
(1).Make sure the RCC function is ON or you can set it by 3.3 MANUAL
SETTINGS → Detailed Steps → refers to point 2.
(2).Make sure the time zone is correct (Default time zone is Eastern
Standard Time) or you can set the time zone by 3.3 MANUAL
SETTINGS → Detailed Steps → refers to point 3.
(3).When receiving RCC signal, please keep the weather station close
to the window or receive RCC signal outdoors to enhance the signal
reception.
*RCC Symbol Display:
a.When receiving signal , RCC symbol “ ” will be flashing.
b.When signal successfully received, LCD will display the complete RCC
symbol “ ” and exit RCC receiving.
c.If no signal is received, the RCC symbol will disappear.
After the 3 MINUTES RF signal receiving, the main unit will start searching
WWVB radio signal for 7 minutes.
1. The antenna symbol “ ” will flashing during receiving time, if signal
received, the main unit will display the received time/month/date/weekday
with symbol “ ”displaying on screen.
2. Auto receiving RCC signal at UTC 7:00, 8:00, 9:00, 10:00, and 11:00
each day. It starts receiving RCC signal at UTC 7:00 everyday, once signal
is received at any above time, it will stop receiving signal that day.
3. Manual receiving: press and hold “RCC/SET” button to enter RCC signal
receiving.
4.During receiving, no response if press other buttons, you can press and
hold “RCC/SET” button to exit RCC receiving.
3.2 RCC FUNCTION
6

1.Press and hold “RCC/SET” button to enter time set mode.
2.Press “CH/▲” and “MEM/▼” buttons to adjust the value. Hold to adjust
quickly.
3.Press “RCC/SET” button to confirm and move to the next setting.
4.Press the top button anytime to exit setting.
RCC ON/OFF→Time Zone (if RCC ON)→DST ON/OFF→12/24H Time
Format→Hour→Minute→Year →Month & Date Display→Month→Date→
Weekday abbreviation Language→Temperature Unit→ Exit.
1.Press and hold “RCC/SET” button for 5 seconds to enter setting.
2.RCC ON/OFF part: Press “CH/▲” or “MEM/▼” button to select ON or
OFF. (Note: If RCC OFF is selected, it will skip Time Zone setting and
move to 12/24 Hour setting.)
3.Press “RCC/SET” button to TIME ZONE part. Press “CH/▲” or “MEM/▼”
button to select : AST, EST, CST, MST, PST, AKST, HST. (Default setting:
-5 EST).
3.3 MANUAL SETTINGS
TIPS:
Setting Order:
Detailed Steps:
NOTE: After RCC signal received, if there is no need for other
settings, you can skip the manual settings part. If no RCC signal
received or you need to set other settings, please follow the bellow
steps to finish setting.
7
*DST symbol display:
a. Select “DST ALWAYS” , means DST function is always ON all the year
round.
b. Select “DST ”, means DST function will be ON during daylight saving
time.
c. Select “DST OFF”, means DST function is OFF.
4.Press “RCC/SET” button to DST ON/OFF part. Default setting: ON.
Press “CH/▲” or “MEM/▼” button to select DST ON if you do observe
Daylight Saving Time.
8
Hours from GMT Time Zone Description
-4 AST Atlantic Standard Time
Eastern Standard Time
Central Standard Time
Mountain Standard Time
Pacific Standard Time
Alaska Standard Time
Hawaii Standard Time
EST
CST
MST
PST
AKST
HST
-5
-6
-7
-8
-9
-10
5.Press “RCC/SET” button to 12/24H TIME FORMAT part. Default setting
:12H format.Press “CH/▲” or “MEM/▼” button to select 12-hour format or
24-hour format.
6.Press “RCC/SET” button to HOUR part. Press “CH/▲” or “MEM/▼” button
to adjust the value.
7.Press “RCC/SET” button to MINUTE part. Press “CH/▲” or “MEM/▼”
button to adjust the value.
8.Press “RCC/SET” button to YEAR part (year range: 2000-2099). Press
“CH/▲” or “MEM/▼” button to adjust the value.
9.Press “RCC/SET” button to MONTH & DATE DISPLAY FORMAT part.

3.4 REMOTE SENSOR INSTALLATION
9
NOTE:
When RCC OFF is selected, will move directly to 12/24 hour time
setting.
Weekday will shows automatically after Year, Month and Date are set.
During setting, if no operation for 20 seconds, it will automatically save
and exit setting.
Press “CH/▲” or “MEM/▼” button to select M/D or D/M format (M: Month ,D:
Date).
10.Press “RCC/SET” button to MONTH part. Press “CH/▲” or “MEM/▼”
button to adjust the value.
11.Press “RCC/SET” button to DATE part. Press “CH/▲” or “MEM/▼” button
to adjust the value.
12.Press “RCC/SET” button to WEEKDAY ABBREVIATION LANGUAGE
part. Press “CH/▲” or “MEM/▼” button to select the language: ENG(English),
DUT(Dutch), DAN (Danish), SPA (Spanish), ITA (Italian), GER(German),
FRE(French).
13.Press “RCC/SET” button to TEMPERATURE UNIT part. Press “CH/▲” or
“MEM/▼”button to select Celsius℃ or Fahrenheit ℉.
14.Press “RCC/SET” button to confirm and exit.
The data of weather forecast and outdoor humidity & temperature come from
outdoor sensors. Make sure the outdoor sensor place in proper place. Take
an example:

(1).This is forbidden, if the outdoor sensor is directly exposed to rain, facing
direct sunlight and close to any heat source.
(2).Keep well-ventilated and leave a certain space of gap between the sensor
and the wall to avoid blocking the vent of the sensor.
10
If place the sensor there,
the temperature goes up,
the humidity goes down.
If place the sensor here,
the temperature goes down,
the humidity goes up.

(3).Place the sensor at a height about 1.2-2.5 meters/3.93-8.20 feet vertically.
≥5ft
11
(4).You are near the sensor to connect the main unit. Avoid thick walls
between the units or or strong interference source using same signal
frequency(433Ghz).
(such as TVs, microwaves, computers, etc).
(5).If the main unit disconnects most likely the sensor is too far from the main
unit. Please place it nearer to the sensor. Transmission Range: 100m/330ft
Open Air.
(The sensor is the unit that connects to the main unit and transfer the signal
to the main unit.)
(6).Vertically placement is required:
Note: Allow the main unit and the sensor together at the same
position for 30 minutes to establish a strong connection.
Lift with a rope
Place on a
stable surface
Hang from the back
hole using a nail

3.5.1 Set Alarm Clock in Order: Hour > Minute> Exit.
3.5.2 Check Alarm Time
3.5.3 Alarm OFF/ON
3.6 SNOOZE MODE
3.5 ALARM SETTING
12
(1).Press and hold “ ” button for 3-4 secs to start.
(2).The “Hour” symbol begins to flash. Press “CH/▲” or “MEM/▼” button to
set up “Hour”. Press “ ” button to confirm.
(3).The “Minute” symbol begins to flash. Press “CH/▲” or “MEM/▼” button to
adjust the required minute. Press “ ” button to save and exit it.
(4).Alarm symbol “ ” will display on screen after successfully setting.
(1).Press “ ” button to check alarm time after setting.
(2).Press top button to exit .
(1).Press “ ” button to turn OFF/ON alarm when in alarm time mode.
(2).Alarm symbol “ ” will disappear on screen when in OFF mode or show
on screen when in ON mode.
(3).Press top button to exit.
(4).When the alarm is ringing, The alarm symbol “ ” will flashing and
ascending “Bibi” alarm sound will last for 2 minutes.Press any other button
except top button to stop the alarm. And the alarm will restart next day.
(1).When alarm is ring,press the TOP BUTTON to enter snooze mode, The
alarm will ring again in 5 minutes snooze interval. And the “ ” symbol will be
flashing on screen to indicate the snooze mode. Press any other button
except top button to exit the snooze mode. And the alarm will restart next
day.
(2).When alarm rings, the ascending “Bibi” alarm sound will last for 2 minutes
if no operation,or you can press any other button except top button to stop
the alarm.
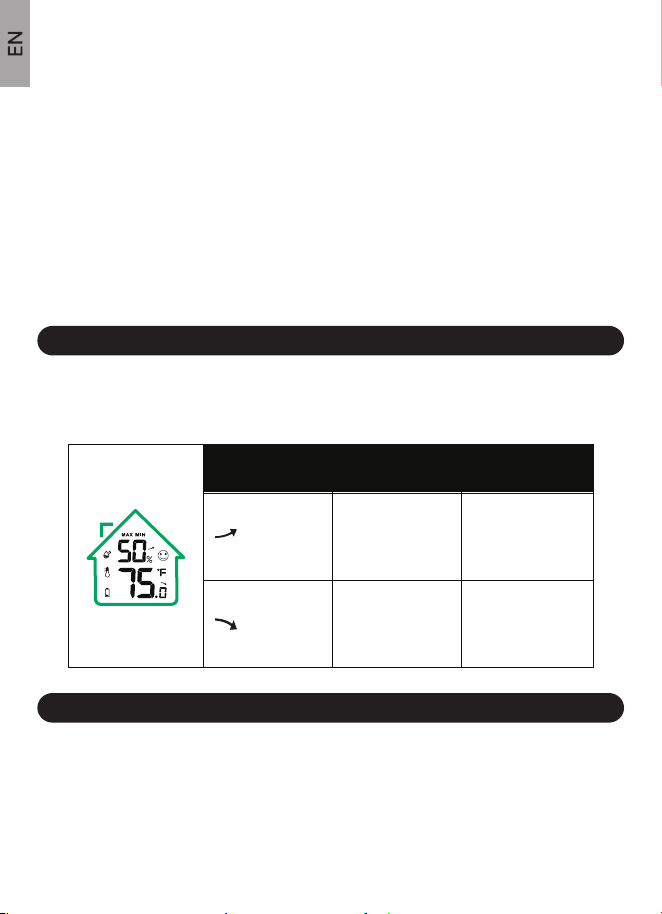
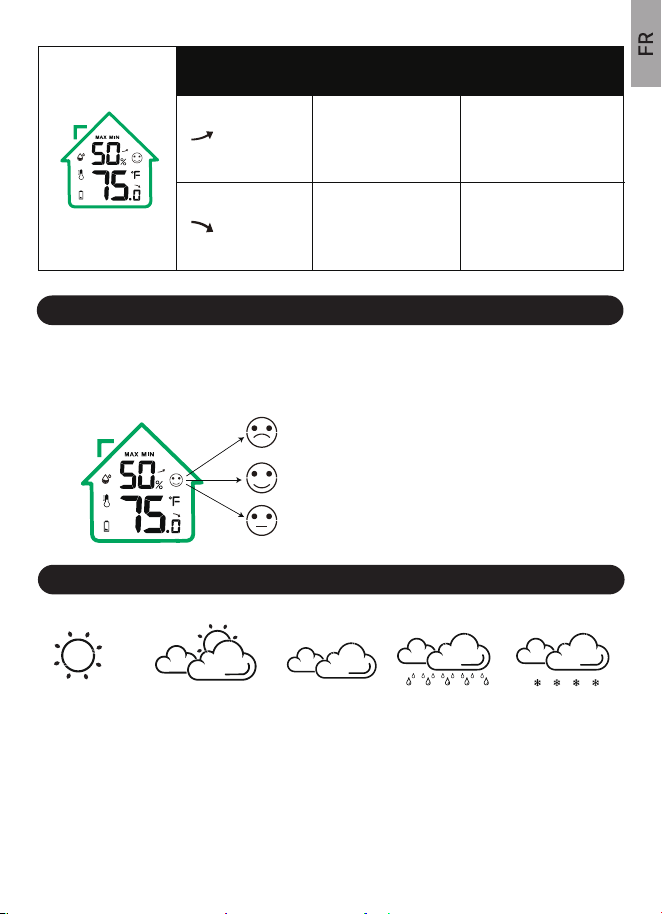
The temperature and humidity trend arrows indicates the temperature or
humidity’s change trend.
Indoor comfort level indicator keeps you informed the comfort level in your
home, and when to dehumidify or humidify.
3.7 MAX/MIN TEMPERATURE & HUMIDITY RECORDS
4. TEMPERATURE & HUMIDITY TREND ARROWS
5. COMFORT LEVEL INDICATOR
13
(1).Check: Press “MEM /▼” button to switch MAX or MIN readings. The
readings will shows for 5 seconds and then will turn back to normal model.
(2).Manually Clear: Press “MEM /▼” button to enter “MAX/MIN” Record
Mode. Then press and hold “MEM /▼” button 3-4 seconds to clear all the
Max/Min data.
The screen of indoor and outdoor temperature & humidity will show “--”.
(3).Automatically Clear: The records will be cleared at 00:00 automatically
daily.
TemperatureArrows Indicator Humidity
Down Arrow
Up Arrow
Increase by 3%
RH within one
hour or compared
with last reading.
Increase by 1.8℉
within one hour or
compared with last
reading.
Decrease by 1.8℉
within one hour or
compared with last
reading.
Decrease by 3%
RH within one
hour or compared
with last reading.
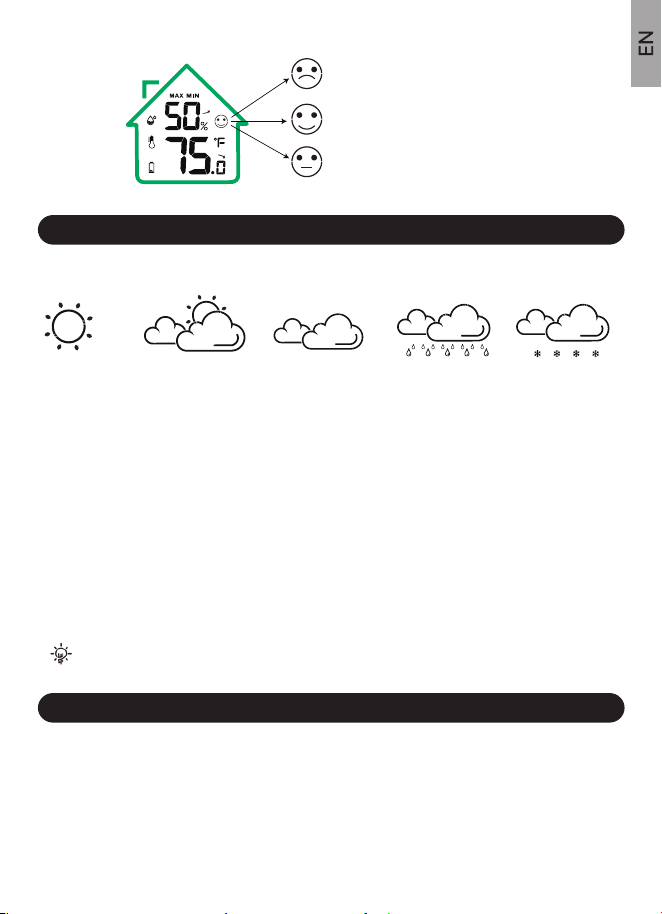
6. WEATHER FORECAST
7. BACKLIGHT FUNCTION
Note: “Sunny To Cloudy” is default after power-on.
Cloudy Rainy SnowySunny Partly Cloudy
14
(1).The weather icon, where data hourly calculated from indoor/outdoor
temperature and humidity forecasts the weather in the next 12 hours.
(2).IT IS NOT THE CURRENT WEATHER. The accuracy will be 70%-75% .
(3).Please note that this forecast can’t compare with professional weather
services supported by satellites and high-performance computers.
(4).It merely provides an approximate indication of current developments.
Please give priority to the weather forecast of the local weather forecast
service.
When powered on, press the top button to turn on the backlight, and the
backlight will last 20 seconds to save power.
DRY: Humidity ≤44%
COMFORT: 45% ≤Humidity≤ 65%
68°F ≤Temperature≤ 79°F
WET: Humidity ≥ 66%
Weather Icons
9.1 TECHNICAL SPECIFICATIONS
9.2 MEASUREMENT SPECIFICATIONS
8. LOW BATTERY INDICATOR
9. SPECIFICATIONS
15
(1).When Battery Indicator shows next to the Outdoor Temperature,
replace batteries in your remote sensor.
(2).When Battery Indicator shows next to the Indoor Temperature, replace
batteries in your weather station main unit.
Indoor Temperature Range: 14 °F~ 122 °F(-10℃~ 50.0℃).
Outdoor Temperature Range: -40 °F~140 °F(-40℃~60℃).
Humidity Range: 1% to 99% RH.
Transmission Range: 328 ft (100 meters), 433MHZ (open air).
Power Requirements:
Main Unit: 3 x AAA Alkaline batteries (not included),
Remote Sensor: 2 x AA Alkaline batteries (not included).
The following table provides the specifications of the measurement parame-
ters.
ResolutionMeasurement Range Accuracy
Indoor Temperature
±2 °F (temperature between
32~122°F, if out of this range: ±3.6 °F)
±2 °F (temperature between
32~122°F, if out of this range: ±3.6 °F)
± 5% (humidity between 30-80%, if out
of this range: ±7%)
± 5% (humidity between 30-80%, if out
of this range: ±7%)
14 °F~ 122 °F 0.1 °F
0.1 °F
1%
1%
-40 °F~140 °F
1% to 99%
1% to 99%
Outdoor Temperature
Indoor Humidity
Outdoor Humidity
Problem Possible Solution
10. TROUBLESHOOTING GUIDE
16
Outdoor sensor signal is
lost or showing dashes
(- -) on the display
Outdoor temperature and
humidity keeps cycling
display/how to exit the
Circular Channels Model
1.Press and hold the "CH/▲” button for 5-6 seconds to resynchronize
(Please make sure the sensor and main unit are in same channel).
2.If the the synchronization fails, bring the sensor with main unit
together and try the bellow steps:
3.Check if the sensor is out of battery and replace with new batteries.
4.The maximum transmission range is 328ft/100m, move the sensor
closer to the main unit .
5.Make sure both main unit and sensor are placed at least 3ft/0.9m
away from electronics that may interfere with the wireless communica-
tion, such as computers, TVs, microwaves, other wireless transmitters
or receivers, etc.
6.It’s much important to install the sensor properly,please refer to
REMOTE SENSOR INSTALLATION part.
“ ”cycle symbol means that main unit enter Circular Channels
Model, it will display the datas of 3 channels in order every 10
seconds.
You can press the "CH/▲” button 1-3 times to exit Circular Channels
Model and fix the channel to CH1,CH2 or CH3.
Temperature reads too
high in the daytime
Inaccurate temperature or
humidity readings
Make sure both the main unit and sensor are placed out of direct
sunlight and away from any heat sources or vents.
When the temperature/humidity is inaccurate, it is often due to the
location of the display or overpowered/under powered batteries. You
can test the accuracy at you home.
Side-by-side test: Bring the sensor in the house and place it next to the
weather station for 2 hours.
1.Temperature:Compare indoor and outdoor temperature. The
temperature should be within 4 ℉to be within tolerance.
2.Humidity:Compare indoor and outdoor humidity. The temperature
should be within 5%RH to be within tolerance.
Factory Restart: (1).Remove all the batteries of sensor and
main unit.(2).Set the sensor channel to "CH1". (3).Insert the
batteries of main unit and press "CH/▲” button and fix the
channel to "CH1". (4).Insert the batteries of sensor,allow the
whole set device to sit together for 30 minutes to establish a
strong connection.
11. PRECAUTIONS
If your BALDR weather station still can't be worked well after trying the above troubleshooting
steps, please contact the seller on your order page or visit https://www.baldr.com or email us by
[email protected] for help.
17
Do not mix old and new batteries.
Do not mix Alkaline, Standard, Lithium, or Rechargeable batteries with
this product.
Remove the batteries if storing this product for a long period of time.
Ensure the batteries are installed with correct polarity (+ and -).
Do not clean any part of the product with benzene, thinner or other
solvent chemicals. Use a soft cloth to clean it when necessary.
Never immerse the product in water. This can cause electrical shock
and damage the product.
Do not expose the product to extreme force, shock or temperature or
humidity fluctuations.
Do not tamper with internal components.
Inaccurate weather
forecast
No response of press any
button on the main unit
The weather forecast is an estimate or generalization of weather
changes in the next 12 to 24 hours, with an accuracy rate of about
70-75%. It is simply a tool for projecting weather conditions and is
never to be relied upon as an accurate method to predict weather.
Battery is dying,please replace a new set of batteries.
Incorrect weekday display
Indoor/Outdoor
temperature shows
"HH.H/LL.L" on display
Press and hold “RCC/SET” button to set the correct Year (year range:
2000-2099).
1.If indoor temperature is lower than 14 °F/-10℃, the reading will be
"LL.L". If higher than 122 °F/+50.0℃, the reading will be “HH.H”.
2.If outdoor temperature is lower than -40 °F/-40℃, the reading will be
"LL.L". If higher than 140 °F/+60℃, the reading will be “HH.H”.

12. FCC Statement
18
This device complies with part 15 of FCC rules. Operation is subject to the
following two conditions:
1- This device may NOT cause harmful interference, and
2- This device must accept any interference received, including interfer-
ence that may cause undesired operation.
WARNING: Changes or modifications to this unit not expressly approved
by the party responsible for compliance could void the user’s authority to
operate the equipment.
NOTE: This equipment has been tested and found to comply with the limits
for a Class B digital device, pursuant to Part 15 of the FCC rules. These
limits are designed to provide reasonable protection against harmful
interference in a residential installation. This equipment generates, uses
and can radiate radio frequency energy and, if not installed and used in
accordance with the instructions, may cause harmful interference to radio
communications. However, there is no guarantee that interference will not
occur in a particular installation. If this equipment does cause harmful
interference to radio or television reception, which can be determined by
turning the equipment off and on, the user is encouraged to try to correct
the interference by one or more of the following measures:
• Reorient or relocate the receiving antenna.
• Increase the separation between the equipment and the receiver.
• Connect the equipment into an outlet on a circuit different from that to
which the receiver is connected.
• Consult the dealer or an experienced radio/TV technician for help.
NOTE: The manufacturer is not responsible for any radio or TV interfer-
ence caused by unauthorized modifications to this equipment.
Such modifications could void the user authority to operate the equipment.

Email: [email protected]
Direct Contact Amazon Store: Within 24 Hours
US TEL: 1-833-381-5659
(Support Hours:Monday-Friday, 9:00A.M.-5:00P.M. PST)
13. WARRANTY
19
Dear customer,
Thank you for choosing BALDR. We provide 1-year limited warranty on
this product from the date of purchase. This product has undergone
thorough quality inspection at the factory to ensure that the product is in
good condition. We will remedy all defects in workmanship or materials
within the warranty period.
In order for the warranty to be granted, all warranty claims must be
accompanied by proof of purchase from an authorized distribution partner.
Damages due to improper installation or use, unauthorized removal/modi-
fy/repair are not covered by the warranty.
If you have any problems with this product or during use, please do not
hesitate to contact us, we will try our best to solve it and offer you
satisfactory service including replacement or refund.
For Full Warranty Details, contact us by:
MANUEL D’UTILISATION
MODEL : B0340WST2H2R-V7
STATION MÉTÉO SANS FIL
AVEC TOUCHES TACTILES
Email: [email protected]
USA Tel.: 1-833-381-5659
ALWAYSDST
Nous vous remercions d'avoir acheté la station météorologique sans
fil BALDR. Pour garantir une utilisation correcte, veuillez lire attentive-
ment le manuel d'utilisation avant de l'utiliser. Si vous avez des
problèmes pendant l'utilisation, n'hésitez pas à nous contacter pour
obtenir de l'aide.

20
TABLE DES MATIERES
1. PRÉSENTATION DU PRODUIT 21
21
22
23
23
24
25
24
31
26
28
32
32
34
35
33
33
32
34
34
34
35
37
1.1 STATION MÉTÉO(UNITÉ CENTRALE)
1.2 INTRODUCTION DES BOUTONS
1.3 CAPTEUR SANS FIL
2. INCLUS DANS LE PACKAGE
3.1 MISE SOUS TENSION
3.2 FONCTION RCC
3. GUIDE D'INSTALLATION RAPIDE
3.6 MODE SNOOZE
3.5 RÉGLAGE DE L'ALARME
3.4 INSTALLATION DU CAPTEUR SANS FIL
3.3 RÉGLAGE MANUEL
3.7 MAX/MIN TEMPÉRATURE & HUMIDITÉ RELEVÉS
9.1 SPECIFICATIONS TECHNIQUES
9.2 SPÉCIFICATIONS DES MESURES
4. FLÈCHES DE TENDANCE DE TEMPÉRATURE & HUMIDITÉ
5. INDICATION DU NIVEAU DU CONFORT
6. PRÉVISION MÉTÉO
7. FONCTION DE RÉTROÉCLAIRAGE
8. INDICATEUR PILE FAIBLE
9. SPECIFICATIONS
10. GUIDE DE DÉPANNAGE
11. PRÉCAUTIONS
37
12. GARANTIE
ALWAYSDST
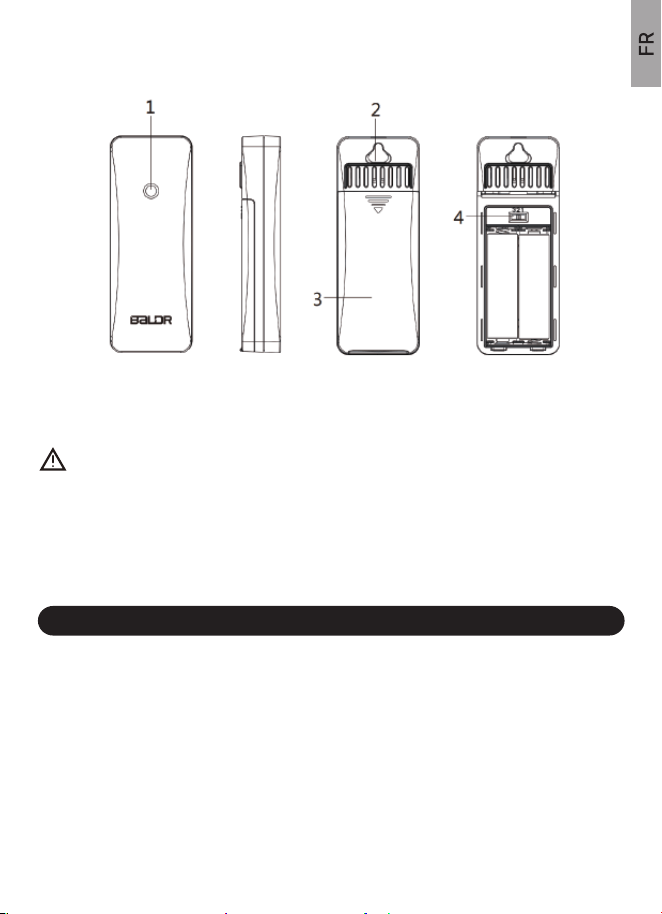
1.1 Station météo( unité centrale)
1. Présentation du produit
21
1.Indicateur de canal de capteur extérieur
De CH1, CH2, CH3 au modèle de canaux circulaires
2. Température et humidité extérieures actuelles
3.Touche “ CH /▲”
Changer de canal, se reconnecter au capteur ou
augmenter la valeur.
4. Bouton "RCC/SET
Fonction RCC ou entrer dans le réglage de l'heure
5.Touche “ MEM /▲”
Vérifier ou effacer les enregistrements MAX/MIN,
diminuer la valeur.
6.Touche “ ”
Vérifier ou entrer dans le réglage de l'alarme
7.Voyant de pile faible
Rappelle de mettre les nouvelles piles en place
8. Température et Humidité extérieures actuelles
9.Flèche de tendance de température
10. Abréviation du jour de la semaine en 7 langues
11. Affichage du calendrier
Mois/date ou date/mois facultatif
12.Indication du niveau du confort
13.Flèche de tendance d’Humidité
14. Icône de prévision météo
Prévisions Météo pour les 12-24 prochaines heures
15.Symbole de la Fonction RCC
16. Bouton de rétroéclairage/Snooze (au-dessus)
Le rétro-éclairage s'éteint automatiquement après 20
secondes, Temps de répétition de 5 minutes
17. l'heure actuelle
Affichage Format 12/24 heures sélectionnable
18.AM/ PM pour le Format d’affichage 12H
19.Max/min intérieure/extérieure enregistrer
Température et Humidité
Mise à jour automatique à 0:00 chaque jour
20. Trou d'accrochage
21. Couvercle du compartiment à pile
22.Support amovible
Stocké dans le compartiment batterie
20
2221
1
15
2
3
4 5 6 7
5
6
8 9
10
11
12
14
13
16171819

Mode Normal :
1.PRESSER pour changer de canal entre CH1, CH2, CH3, ou le
Modèle de Canaux Circulaires “ ”.
2. Maintenez appuyé pendant 3 secondes pour reconnecter le capteur.
1.2 INTRODUCTION DES BOUTONS
22
BUTTONS FUNCTIONS
1. PRESSER pour rechercher automatiquement le signal radio WWVB.
2. Maintenez appuyée 3 secondes pour accéder au réglage de Temps.
Mode Normal :
1. PRESSER pour vérifier la température et l'humidité
intérieures/extérieures MAX/MIN.
2. MAINTENEZ APPUYER pendant 3 secondes pour effacer
le MAX/MIN.
Réglage de l'heure ou de l'alarme
1. APPUYER pour diminuer la valeur de 1.
2. MAINTENEZ APPUYER pendant 3 secondes pour
diminuer continuellement la valeur de 3.
1. APPUYER pour visualiser l'heure de l'alarme, activer ou désactiver
l'alarme.
2. Maintenez appuyée 3 secondes pour accéder au réglage de l'alarme.
1. Rétroéclairage : appuyez sur cette touche pour allumer le
rétroéclairage (extinction auto après 20 secondes).
2. Lorsque l'alarme sonne, appuyez sur cette touche pour passer en
mode "snooze".
BOUTON DU
HAUT
Réglage de l'heure ou de l'alarme
1. APPUYER pour augmenter la valeur de 1.
2. Maintenez appuyé pendant 3 secondes pour augmenter
continuellement la valeur de 3.
Pour obtenir des relevés précis, veuillez éloigner l'unité centrale de
toute source inhabituelle de chaleur ou de froid et veillez à ce que le
capteur extérieur soit également protégé de la lumière directe du soleil,
de la pluie ou de la chaleur qu'il pourrait ressentir en étant monté sur
un mur chaud ou en étant placé à proximité d'un mur chaud.
1.Témoin lumineux de signal 3. Compartiment batterie
2.Trou d'accrochage 4. Commutateur des canaux 1-2-3
Les contenus suivants sont inclus dans le paquet :
1 x Unité centrale de la station météo (3 piles AAA non incluses)
1 x Capteur sans fil (2 piles AA non incluses)
1 x Manuel d'utilisation
1.3 CAPTEUR SANS FIL
2. INCLUS DANS LE PACKAGE
23
Notes:
(1) Assurez-vous que le capteur extérieur et l'unité centrale de la station
météo soient sur le même canal.
(2). Ne touchez aucun bouton pendant les 3 MINUTES pour éviter que la
recherche du capteur ne soit interrompue.
(3). L'unité centrale recevra automatiquement le signal RF du capteur
dans les 3 MINUTES suivant sa mise sous tension. Pendant la réception,
l'icône du signal clignote, si aucun signal n'est reçu dans les 3 minutes,
la réception s'arrête, et vous pouvez maintenir appuyé la touche "CH/▲" 3
secondes pour recevoir à nouveau.
1.1. Retirez le couvercle du compartiment à piles de l'unité centrale, insérez
3 nouvelles piles AAA à l'arrière de la console d'affichage (veuillez tenir
compte de la polarité des piles avant de les insérer).
3.1 MISE SOUS TENSION
NOTE : Utilisez des piles alcalines neuves et de qualité supérieure.
Ne pas mixer des vielles et de nouvelles piles Les piles à usage intensif
ou rechargeables ne sont pas recommandées.
3. GUIDE D'INSTALLATION RAPIDE
24
Note : L'écran émet un bip et tous les segments LCD s'allument pendant
quelques secondes pour vérifier que tous les segments fonctionnent
correctement, puis affichent immédiatement la température et l'humidité
intérieures.
2.Retirez le support métallique situé dans le compartiment des piles et
vissez-le dans le trou situé à l'arrière de l'unité centrale. Remettez en place
couvercle du compartiment des piles.
Retirez le couvercle du compartiment à piles du capteur, réglez le canal sur
CH1, puis insérez 2 piles AA neuves dans le capteur dans les 3 MINUTES.

NOTES:
(1). Assurez-vous que la fonction RCC est activée ou vous pouvez la régler
par 3.3 RÉGLAGES MANUELS → Étapes détaillées → se réfère au point 2.
(2). Assurez-vous que le fuseau horaire est correct (le fuseau horaire par
défaut est l'heure normale de l'Est) ou vous pouvez régler le fuseau horaire
par 3.3 RÉGLAGES MANUELS → Étapes détaillées → se réfère au point 3.
(3). Lors de la réception du signal RCC, veuillez garder la station
météorologique près de la fenêtre ou recevoir le signal RCC à l'extérieur
pour améliorer la réception du signal.
*Affichage du symbole RCC :
a. Lors de la réception du signal, le symbole RCC " " clignote.
b. Lorsque le signal est reçu avec succès, l'écran LCD affiche le symbole
RCC complet " " et quitte la réception RCC.
c. Si aucun signal n'est reçu, le symbole RCC disparaît.
Après la réception du signal RF pendant 3 MINUTES, l'unité centrale
commence à rechercher le signal radio WWVB pendant 7 minutes.
1. Le symbole de l'antenne " " clignote pendant le temps de réception, si le
signal est reçu, l'unité centrale affiche l'heure/mois/date/jour de la semaine
avec le symbole " " à l'écran.
2. Réception automatique du signal RCC à UTC 7:00, 8:00, 9:00, 10:00 et
11:00 chaque jour. Il commence à recevoir le signal RCC à UTC 7:00 tous
les jours, une fois que le signal est reçu à n'importe quelle heure ci-dessus,
il cessera de recevoir le signal ce jour-là.
3. Réception manuelle : appuyez et maintenez la touche "RCC/SET" pour
entrer dans la réception du signal RCC.
Pendant la réception, si vous n'obtenez pas de réponse en appuyant sur
d'autres touches, vous pouvez maintenir la touche "RCC/SET" enfoncée
pour quitter la réception RCC.
3.2 FONCTION RCC
25

3.3 RÉGLAGE MANUEL
ASTUCES :
NOTE : Après réception du signal RCC, si aucun autre réglage n'est
nécessaire, vous pouvez sauter la partie des réglages manuels. Si aucun
signal RCC n'est reçu ou si vous avez besoin de régler d'autres paramètres,
veuillez suivre les étapes ci-dessous pour terminer le réglage.
26
1. Maintenez la touche "RCC/SET" enfoncée pour accéder au mode de
réglage de l'heure.
2. Appuyez sur la touche "CH/▲" ou " MEM/ ▼ " pour modifier la valeur.
Maintenez pour régler rapidement.
3. Appuyez sur la touche "RCC/SET" pour confirmer et passer au réglage
suivant.
4. Appuyez la touche haute à tout moment pour quitter le réglage.
Ordre de réglage :
RCC ON/OFF→Fuseau horaire (si RCC ON)→DST ON/OFF→12/24H
Format de l'heure→Heure→Minute→Année →Affichage du mois et de la
date→Mois→Date→Abréviation du jour de la semaine Langue→Unité de
température→ Quitter.
Étapes détaillées :
1. Maintenez appuyée la touche "RCC/ SET" pendant 5 secondes pour
accéder au réglage.
2. RCC ON/OFF partie : Appuyez sur la touche "CH/▲" ou " MEM/ ▼ " pour
sélectionner ON ou OFF. (Note : Si RCC OFF est sélectionné, il sautera le
réglage du fuseau horaire et passera au réglage 12/24 heures).
3. Appuyez sur la touche "RCC/SET" pour accéder à la partie FUSEAU
HORAIRE. Appuyez sur la touche "CH/▲" ou " MEM/ ▼ " pour sélectionner :
AST, EST, CST, MST, PST, AKST, HST. (Réglage par défaut : -5 EST).
*Affichage du symbole DST :
a. Sélectionnez "DST ALWAYS", signifie que la fonction DST est toujours
activée toute l'année.
b. Sélectionnez "DST", signifie que la fonction DST sera activée pendant
l'heure d'été.
c. Sélectionnez "DST OFF", signifie que la fonction DST est désactivée.
4. Appuyez la touche "RCC/SET" sur la partie DST ON/OFF. Réglage par
défaut : ON. Appuyez sur la touche "CH/▲" ou " MEM/ ▼ " pour sélectionner
DST ON ou ALWAYS ON si vous appliquez l'heure d'été.
27
Heures GMT
Fuseau
Horaire
Description
-4 AST Fuseau Standard Atlantique
Fuseau standard de l'Est
Fuseau standard centrale
Fuseau montagne standard
Fuseau Normale du Pacifique
Fuseau Alaska
Heure d’Hawaii
EST
CST
MST
HNP
AKST
HST
-5
-6
-7
-8
-9
-10
5. Appuyez sur la touche "RCC/SET" pour accéder à la partie FORMAT DE
TEMPS 12/24H. Réglage par défaut : format 12H.Appuyez sur la touche
"CH/▲" ou "MEM/▼" pour sélectionner le format 12 heures ou le format 24
heures.
6. Appuyez sur la touche "RCC/SET" pour accéder à la partie HEURE.
Appuyez sur la touche "CH/▲" ou " MEM/ ▼ " pour modifier la valeur.
7. 11.Appuyez sur la touche "RCC/SET" pour accéder à la partie MINUTE.
Appuyez sur la touche "CH/▲" ou " MEM/ ▼ " pour modifier la valeur.
8. Appuyez sur la touche "RCC/SET" pour accéder à la partie ANNEE.
(Intervalle d'années : 2000-2099). Appuyez sur "CH/▲" ou " MEM/ ▼ « pour
modifier la valeur.

3.4 INSTALLATION DU CAPTEUR SANS FIL
28
NOTE:
Lorsque RCC OFF est sélectionné, on passe directement au réglage de
l'heure 12/24 heures.
Lorsque RCC OFF est sélectionné, on passe directement au réglage de
l'heure 12/24 heures.
Pendant le réglage, si aucune opération n'est effectuée pendant 20
secondes, il enregistre automatiquement et quitte le réglage.
9. Appuyez sur la touche "RCC/SET" pour accéder à la partie FORMAT
D'AFFICHAGE DU MOIS ET DE LA DATE. Presser la touche “ CH/▲” ou
"MEM/ ▼" pour sélectionner le format M/D ou D/M. (M : Mois, D : Date).
10. Appuyez sur la touche "RCC/SET" pour accéder à la partie MOIS.
Appuyez sur la touche "CH/▲" ou " MEM/ ▼ " pour modifier la valeur.
11. Appuyez sur la touche "RCC/SET" pour accéder à la partie DATE.
Appuyez sur la touche "CH/▲" ou " MEM/ ▼ " pour modifier la valeur.
12. Appuyez sur la touche "RCC/SET" pour accéder à la partie LANGUE
D'ABRÉVIATION DU JOUR DE LA SEMAINE. Appuyez sur la touche
"CH/▲" ou " MEM/ ▼ " pour sélectionner la langue : ENG(Anglais),
DUT(Néerlandais), DAN(Danois), SPA(Espagnol), ITA(Italien), GER(Alle-
mand), FRE(Français).
13. Appuyez sur la touche "RCC/SET" pour accéder à la partie UNIT
TEMPERATURE. Appuyez sur la touche "CH/▲" ou " MEM/ ▼ " pour
sélectionner Celsius℃ ou Fahrenheit ℉.
14. Appuyez sur la touche "RCC/ SET" pour confirmer et quitter.
Les données relatives aux prévisions météorologiques et à l'humidité & la
température extérieures proviennent de capteurs extérieurs. Assurez-vous
que le capteur extérieur est placé au bon endroit. Par exemple :
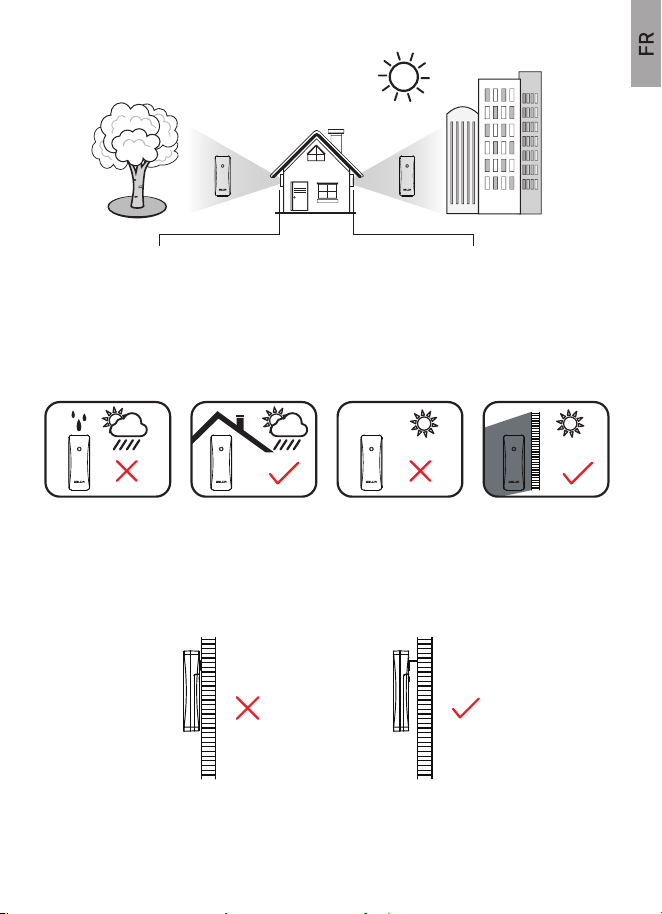
(1). Ceci est interdit, si le capteur extérieur est directement exposé à la pluie,
à la lumière directe du soleil et à proximité d'une source de chaleur.
(2). Maintenez une bonne ventilation et laissez un certain espace entre le
capteur et le mur pour éviter de bloquer l'évent du capteur.
29
*Si on place le capteur ici,
la température baisse,
l'humidité augmente.
*Si on place le capteur là-bas,
la température augmente,
l'humidité diminue.
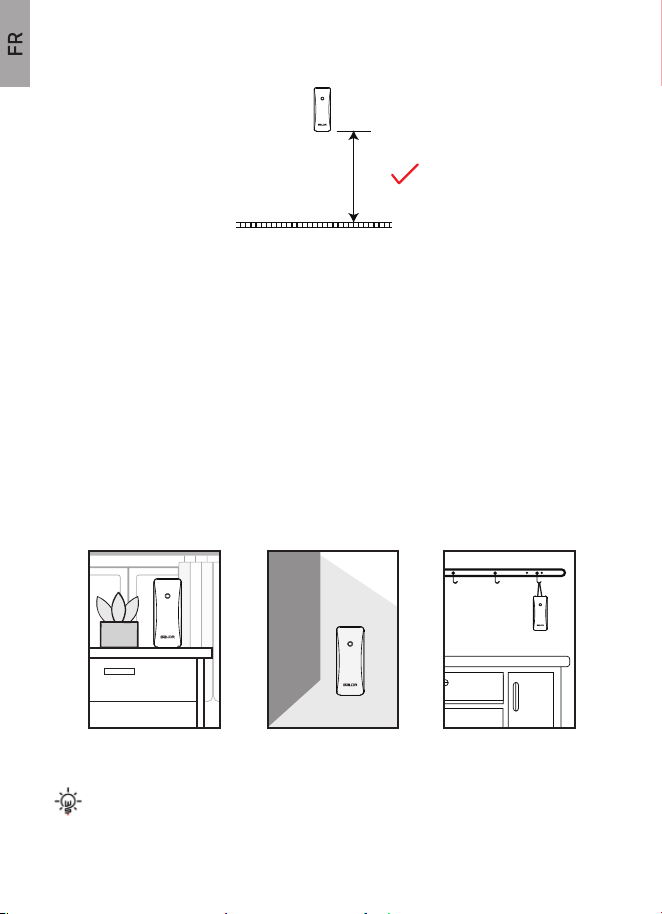
(3). Placez le capteur à une hauteur verticale d'environ 1,2-2,5
mètres/3,93-8,20 pieds.
≥5ft
30
(4). Vous êtes près du capteur pour connecter l'unité centrale. Évitez les
murs épais entre les unités ou les sources d'interférences fortes utilisant la
même fréquence de signal (433Ghz).
(Comme les téléviseurs, les micro-ondes, les ordinateurs, etc).
(5). Si l'unité centrale se déconnecte, il est probable que le capteur soit trop
éloigné de l'unité centrale. Veuillez la rapprocher du capteur. Plage de
transmission : 100m/330pds en plein air.
(Le capteur est l'unité qui se connecte à l'unité centrale et transfère le signal à
l'unité centrale).
(6). Le placement vertical est requis :
Note: Laissez l'unité centrale et le capteur ensemble dans la même
position pendant 30 minutes pour établir une connexion solide.
*Poser sur une
surface stable
*Accrocher par le
trou arrière sur un clou
*Suspendre avec
une corde

3.5.1 Régler le réveil dans l'ordre : Heure> Minute> Quitter.
3.5.2 Vérifier le temps d'alarme
3.5.3 Alarme OFF/ON
3.5 Réglage de l'alarme
31
(1) Appuyez et maintenez la touche " " pendant 3-4 secondes pour
commencer.
(2) Le symbole "Heure" commence à clignoter. Appuyez sur la touche
"CH/▲" ou " MEM/ ▼ " pour régler « l’heure ». Appuyez sur la touche " "
pour confirmer.
(3) Le symbole "Minute" commence à clignoter. Appuyez sur la touche
"CH/▲" ou " MEM/ ▼ " pour modifier la minute voulue. Appuyez sur la
touche " " pour sauvegarder et quitter.
(4) Le symbole d'alarme " " s'affiche à l'écran après un réglage réussi.
(1) Appuyez sur la touche " " pour vérifier l'heure de l'alarme après le
réglage.
(2) Appuyez sur le bouton du haut pour sortir.
(1) Appuyez sur la touche " " pour activer ou désactiver l'alarme en mode
alarme.
(2) Le symbole d'. Alarme " " disparaît de l'écran en mode OFF ou
s'affiche à l'écran en mode ON.
(3) Appuyez sur le bouton du haut pour sortir.
(4) Lorsque l'alarme sonne, le symbole d'alarme " " clignotera et le son
d'alarme ascendant "Bibi" durera 2 minutes. Appuyez sur n'importe quel autre
touche, sauf la touche du haut, pour arrêter l'alarme. Et l'alarme reprendra le
jour suivant.

3.6 Mode Snooze
Les flèches de tendance de température et d'humidité indiquent la tendance
de changement de la température ou de l'humidité.
3.7 MAX/MIN TEMPÉRATURE & HUMIDITÉ RELEVÉS
4. FLÈCHES DE TENDANCE DE TEMPÉRATURE
& HUMIDITÉ
32
(1) . Vérifier : Appuyez sur la touche "MEM /▼" pour changer les lectures
MAX ou MIN. Les relevés s'affichent pendant 5 secondes, puis reviennent au
modèle normal.
(2) Effacer manuellement : Pressez la touche "MEM /▼" pour entrer dans le
mode d'enregistrement "MAX/MIN". Ensuite, appuyez et maintenez la touche
"MEM /▼" pendant 3-4 secondes pour effacer toutes les sauvegardes.
L'écran affichera "--" pour la température & l'humidité intérieures et
extérieures.
(3) Effacer Automatiquement : Les enregistrements seront effacés à 00 :00
automatiquement chaque jour.
(1) Lorsque l'alarme sonne, appuyez sur le BOUTON DU HAUT pour passer
en mode "snooze", l'alarme sonnera à nouveau après 5 minutes d'intervalle
de répétition. Et le symbole " " clignotera à l'écran pour indiquer le mode
"snooze". Appuyez sur n'importe quel autre touche à l'exception de la touche
du haut pour quitter le mode snooze. Et l'alarme reprendra le jour suivant.
(2) Lorsque l'alarme sonne, le son " Bibi " ascendant dure 2 minutes si
aucune opération n'est effectuée, ou vous pouvez appuyer sur n'importe quel
autre bouton sauf le bouton "HAUT" pour arrêter l'alarme.
L'indicateur de niveau de confort intérieur vous informe du niveau de confort
de votre maison et vous indique quand il faut déshumidifier ou humidifier.
5. INDICATION DU NIVEAU DU CONFORT
6. Prévision météo
Nuageux Pluvieux NeigeEnsoleillé Partiellement nuageu
33
(1). L'icône météo, dont les données sont calculées toutes les heures à partir
de la température intérieure/extérieure et de l'humidité, prévoit le temps qu'il
fera dans les 12 prochaines heures.
(2). CE N'EST PAS LE METEO ACTUEL. La précision sera de 70 % à 75 %.
Température
Indicateur de
flèches
Humidité
Flèche vers
le bas
Flèche vers
le haut
Augmentation de 3%
de l'humidité relative
en une heure ou par
rapport à la dernière
lecture.
SEC : Humidité ≤44%
COMFORT : 45%≤Humidité≤ 65%
68°F ≤Température≤ 79°F
HUMIDE : Humidité≥ 66%
Augmentation de 1.8℉
relative en une heure ou
par rapport à la dernière
lecture.
Diminution de 1.8℉
relative en une heure ou
par rapport à la dernière
lecture.
Diminution de 3% de
l'humidité relative en
une heure ou par
rapport à la dernière
lecture.
(Icônes météo)
9.1 SPECIFICATIONS TECHNIQUES
7. FONCTION DE RÉTROÉCLAIRAGE
9. SPECIFICATIONS
Note " Ensoleillé à nuageux " est la valeur par défaut après la mise
sous tension.
34
(3). Veuillez noter que cette prévision n'est pas comparable aux services
météorologiques professionnels soutenus par des satellites et des ordinateurs
performants.
(4). Il fournit simplement une indication approximative des développements
actuels. Veuillez donner la priorité aux prévisions météorologiques du service
local de prévisions météorologiques.
Une fois sous tension, appuyez sur le bouton du haut pour allumer le
rétroéclairage. Le rétroéclairage ne durera que 20 secondes pour économiser
l'énergie.
Plage de température à l’intérieure : 14 °F~ 122 °F (-10℃~ 50,0℃).
Plage de température à l’extérieure : -40°F-~ 140°F (-40℃~ 60℃).
Plage Humidité : 0,1%-99% RH.
Plage de transmission : 100 mètres (328 pieds), 433MHZ (air libre).
Alimentation requise :
8. INDICATEUR PILE FAIBLE
(1). Lorsque l'indicateur de piles s'affiche à côté de la température
extérieure, remplacez les piles de vos capteurs extérieurs.
(2). Lorsque l'indicateur de piles s'affiche à côté de la température
intérieure, remplacez les piles de votre Station UNITE PRINCIPALE.
9.2 SPÉCIFICATIONS DES MESURES
10. GUIDE DE DÉPANNAGE
35
Le tableau suivant présente les spécifications des paramètres de mesure.
RésolutionMesure Gamme Précision
Température intérieure
±2 °F (température entre 32~122°F, si
hors de cette gamme : ± 3.6°F)
± 2 °F (température entre 32~122°F, si
hors de cette gamme : ± 3.6°F)
± 5% (température entre 30- 80°F, si
hors de cette gamme : ± 7%)
± 5% (température entre 30- 80°F, si
hors de cette gamme : ± 7%)
14 °F~ 122 °F 0.1 °F
0.1 °F
1%
1%
-40 °F~140 °F
1% to 99%
1% to 99%
Température Extérieur
Humidité Intérieure
Humidité Extérieure
Problème Solution possible
Le signal du capteur
extérieur est perdu ou
affiche des tirets
(- -) sur l'écran.
1. Maintenez appuyée la touche "CH/▲" pendant 5-6 secondes pour
resynchroniser (Assurez-vous que le capteur et l'unité centrale sont
sur le même canal).
2. Si la synchronisation échoue, rapprochez le capteur et l'unité
centrale et essayez les étapes suivantes :
3. Vérifiez si les piles du capteur ne sont épuisées et remplacez-les
par des piles neuves.
4. La portée maximale de transmission est de 328pd/100m,
rapprochez le capteur de l'unité centrale.
Unité Principale : 3 piles alcalines AAA (non incluses).
Capteur sans fil : 2 piles alcalines AA (non incluses).
Rétablir les paramètres d’usine : (1) Retirez toutes les piles du
capteur et de l'unité centrale. (2). Régler le canal du capteur sur
"CH1". (3) Insérez les piles de l'unité centrale et appuyez sur la
touche "CH/▲" et réglez le canal sur "CH1". (4) Insérez les piles du
capteur, laissez l'ensemble du dispositif ensemble pendant 30
minutes pour établir une connexion forte.
36
La température affichée
est trop élevée pendant
la journée
La Température et
l'Humidité sont affichées
en boucle/comment sortir
du Mode Canal Circulaire
5. Assurez-vous que les deux unités sont éloignées d'au moins 3 ft
(0,9 m de tout appareil électronique susceptible d'interférer avec la
communication sans fil (téléviseurs, micro-ondes, ordinateurs, etc.).
6. Il est très important d'installer le capteur correctement, veuillez-vous
référer à la partie INSTALLATION DU CAPTEUR SANS FIL.
Le symbole "cycle" signifie que l'unité centrale entre dans le mode
canaux circulaires, il affichera les données de 3 canaux dans l'ordre
toutes les 10 secondes.
Vous pouvez appuyer 1 à 3 fois sur la touche "CH/▲" pour quitter le
mode canaux circulaires et fixer le canal sur CH1, CH2 ou CH3.
Lecture de Température
ou humidité imprécise
Prévision météo
imprécise
Pas de réponse lorsqu'on
appuie sur une touche de
l'unité centrale.
Affichage erroné du jour
de la semaine
La température
intérieure/extérieure
affiche "HH.H/LL.L" sur
l'écran.
Assurez-vous que l'unité centrale et le capteur sont placés hors de
portée des rayons directs du soleil et loin de toute source de chaleur
ou d'aération.
Lorsque la température/humidité est inexacte, cela est souvent dû à
l'emplacement de l'écran ou à des piles trop ou pas assez puissantes.
Vous pouvez tester la précision à votre domicile.
Test côte à côte : Apportez le capteur dans la maison et placez-le à
côté de la station météo pendant 2 heures.
1.Température : Comparez la température intérieure et extérieure. La
température doit être comprise dans une fourchette de 4 ℉pour être
dans la tolérance.
2.Humidité : Comparez l'humidité intérieure et extérieure. La
température doit se situer dans une fourchette de 5%RH pour être
dans la tolérance.
La prévision météorologique est une estimation ou une généralisation
des changements météorologiques dans les 12 à 24 heures à venir,
avec un taux de précision d'environ 70-75%. Il s'agit simplement d'un
outil de projection des conditions météorologiques et il ne faut en
aucun cas substitué à une méthode précise de prédiction du temps.
Si les piles sont déchargées, remplacez-les par de nouvelles.
Appuyez sur la touche "RCC/SET" et maintenez-le enfoncé pour
régler l'année correcte (plage d'années : 2000-2099).
1.Si la température intérieure est inférieure à 14 °F/-10℃, la lecture
sera "LL.L". Si elle est supérieure à 122 °F/+50.0℃, la lecture sera
"HH.H".
2.Si la température extérieure est inférieure à -40 °F/-40℃, la lecture
sera "LL.L". Si elle est supérieure à 140 °F/+60℃, la lecture sera
"HH.H".
Si votre station météo BALDR ne fonctionne toujours pas correctement après avoir essayé
les étapes de dépannage, contactez le distributeur sur la page de vente, visitez
https://www.baldr.com ou veuillez nous envoyer un e-mail à [email protected] pour
obtenir de l'aide.

11. PRÉCAUTIONS
Ne mixez pas des vielles et des nouvelles piles.
Ne mixez pas des piles alcalines, standard, Lithium ou rechargeables
dans ce produit.
Retirez les piles si vous stockez ce produit pendant une longue période.
Assurez-vous que les piles sont installées en respectant la polarité (+ et -).
Ne nettoyez aucune partie du produit avec du benzène, un diluant ou
d'autres produits chimiques solvants. Utilisez un chiffon doux pour le nettoyer
si nécessaire.
Ne jamais cet appareil est immergé dans de l'eau. Cela peut entraîner un
choc électrique et endommager le produit.
N'exposez pas le produit à une force extrême, à un choc ou à des
fluctuations de température ou d'humidité.
Ne modifiez pas les composants internes.
Cher client,
Merci d'avoir choisi BALDR. Nous offrons une garantie limitée d'un an sur ce
produit à partir de la date d'achat. Ce produit a fait l'objet d'un contrôle de
qualité approfondi à l'usine afin de s'assurer que le produit est en bon état.
Nous remédierons à tous les défauts de fabrication ou de matériaux pendant
la période de garantie.
12. GARANTIE
37
EMAIL : [email protected]
CONTACT AMAZON STORE : Sous 24h
US TEL: 1-833-381-5659
(Heure ouvrable:Lundi-Vendredi, 9:00A.M.-5:00P.M. HNP)
38
Pour que la garantie soit accordée, toutes les demandes de garantie
doivent être accompagnées d'une preuve d'achat auprès d'un partenaire
de distribution agréé. Les dommages dus à une installation ou une
utilisation incorrecte, à un retrait/modification/réparation non autorisé ne
sont pas couverts par la garantie.
Si vous avez un quelconque problème avec ce produit ou pendant son
utilisation, n'hésitez pas à nous contacter, nous ferons de notre mieux pour
le résoudre et vous offrir un service satisfaisant comprenant le remplace-
ment ou le remboursement.
Pour des détails complets sur la garantie, contactez-nous par :