Loading ...
Loading ...
Loading ...
- 4 -
01/2023
2023, .
• Thank you for purchasing aSENCOR brand product and we hope that
you will be happy with it.
• Prior to using this appliance, please read the user'smanual
thoroughly, even in cases, when one has already familiarised
themselves with previous use of similar types of appliances. Only use
the appliance in the manner described in this user’smanual. Keep
this user'smanual in asafe place where it can be easily retrieved for
future use.
• We recommend saving the original cardboard box, packaging
material, purchase receipt and responsibility statement of the vendor
or warranty card for at least the duration of the legal liability for
unsatisfactory performance or quality. In the event of transportation,
we recommend that you pack the appliance in the original box from
the manufacturer.
. . . . . . . . . . . . . . . . . . . . . . . . . . . . . . . . . . . . . . . . . . . . . . . . . . . . . . . . . . . . . . . . . . . .
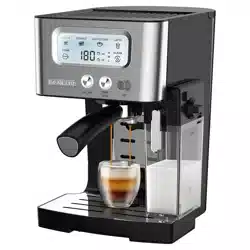
DESCRIPTION OF THE ESPRESSO MACHINE
A1 Cup warming surface
A2 Control panel with display
A3 Brew head
A4 Portafilter with coffee spout
A5 Folding tray
A6 Full drip tray indicator
A7 Removable drip tray grate
A8 Removable drip tray
A9 Water tank lid
A10 1.4-litre removable water tank
with handle
A11 Milk tank lid with control
elements
A12 Milk tank removal button
A13 Milk frothing setting knob
A14 Milk nozzle lever
A15 Milk tank
A16 Milk nozzle (located on the
inner side of the milk tank)
A17 Milk hose
A18 Coffee measuring cup with
tamper
A19 Stainless steel strainer for
brewing 1 cup
A20 Stainless steel strainer for
brewing 2 cups
. . . . . . . . . . . . . . . . . . . . . . . . . . . . . . . . . . . . . . . . . . . . . . . . . . . . . . . . . . . . . . . . . . . .
DESCRIPTION OF THE CONTROL PANEL AND BUTTONS
B1 Display
B2 ON/OFF button – turn the
espresso machine on/off
B3 START/STOP button – start
the espresso machine
B4 Combination control button/
knob
SET button – confirm setting
Control knob – select coffee/
setting
Before first use
• Remove all packaging materials from the espresso machine and
remove any protective film, promotional tags or labels.
• Place the appliance on an even, dry and clean surface. Ensure that
there is free space around the espresso machine of at least 35 cm
above it and 15 cm around its sides. Wipe the outer surface of the
appliance with alightly dampened sponge and then wipe it dry.
• Remove the water tank and milk tank from the appliance. Rinse it
out using clean water with the addition of asmall amount of neutral
kitchen detergent. Then thoroughly rinse them out using clean water,
dry them and put them back in their place. Wipe the water tank lid
with aclean soft sponge lightly dampened in warm water.
• Take out the removable drip tray with grate, wipe with adampened
textile, wipe dry and and insert it back into the bottom part of the
appliance.
• Wash the portafilter, coffee measuring cup and the stainless steel
strainers under clean running water with an addition of kitchen
detergent. Then rinse with clean water and wipe dry.
Rinsing out the espresso machine
1. Insert the milk tank into the espresso machine. Correct insertion is
indicated by aclick.
2. Fill the water tank with clean, cold, drinking water. Do not fill the water
tank with hot or warm water or any other liquid.
3. Place acup underneath the brew head.
4. Insert the power plug into apower socket. Press the ON/OFF button.
The display will be lit. The display and all the buttons will flash
intermittently.
5. Press the START/STOP button. The pump will start and asmall amount
of water will flow through the brew head. During this time, the display
and all the buttons will flash intermittently.
6. As soon as the pump stops pumping water, the appliance will beep
twice and the ON/OFF button will start flashing, which means that the
espresso machine is heating up.
Note:
The flush out process of the espresso machine always runs
when it is turned on for the first time or when it is reset to
the factory settings.
Note:
Each time the SET knob is turned when selecting
afunction, abeep is made and the icon of the respective
function flashes on the display.
. . . . . . . . . . . . . . . . . . . . . . . . . . . . . . . . . . . . . . . . . . . . . . . . . . . . . . . . . . . . . . . . . . . .
OPERATING THE ESPRESSO MACHINE
Inserting the drip tray
• The drip tray with grate catches drops of brewed coffee when the
portafilter is removed, or hot water is released from the milk frothing
boiler, it also prevents coffee from burning and also catches any milk
spilt during the frothing process. Therefore, make sure that both parts
are correctly installed and inserted in the appliance.
• Insert or remove the drip tray and grate only when the milk tank is
not installed.
• We recommend to empty out and wash the drip tray after every
use. When cleaning, follow the instructions in chapter Cleaning and
maintenance.
Note:
The drip tray has afull level indicator. This comprises of
afloat switch. As soon as the level of the liquid in the drip
tray pushes it up, it is necessary to empty out the drip tray.
Filling the water tank
• Open the water tank lid. Grasp the tank by the handle and pull it
upwards to remove it. Fill it up with cold drinking water up to the
maximum level mark, insert it back in and tilt the handle down into the
tank. Then, close the water tank lid. The water tank must be securely
seated in place in order for water to be pumped out of it into the boiler.
Note:
The water that you pour into the water tank should ideally
be at room temperature (approximately 25 °C). Water that
is too cold, could negatively affect the final taste of the
coffee beverage. Do not leave any remaining water in the
water tank for longer than one day. For brewing quality
fresh coffee, it is necessary to use fresh water. Otherwise,
the resulting flavour of the coffee beverage may be
negatively affected.
Attention:
The water tank has amaximum capacity of 1.4 litres.
Do not overfill it. Never fill the water tank with warm
water, hot water or sparkling water, or liquids such as
milk, etc. Do not fill the water tank when it is inserted
in the appliance. There is adanger of splashing the
appliance or overfilling the water tank.
Filling the milk tank
• To remove the milk tank, hold down the removal button on the lid and
pull the milk tank away from the appliance.
EN
Semi-automatic espresso machine
User'smanual
Loading ...
Loading ...
Loading ...