Loading ...
Loading ...
Loading ...
12 www.petsafe.net
ENFRES
NL
IT
DE
STEP 5
Prepare the Receiver Collar
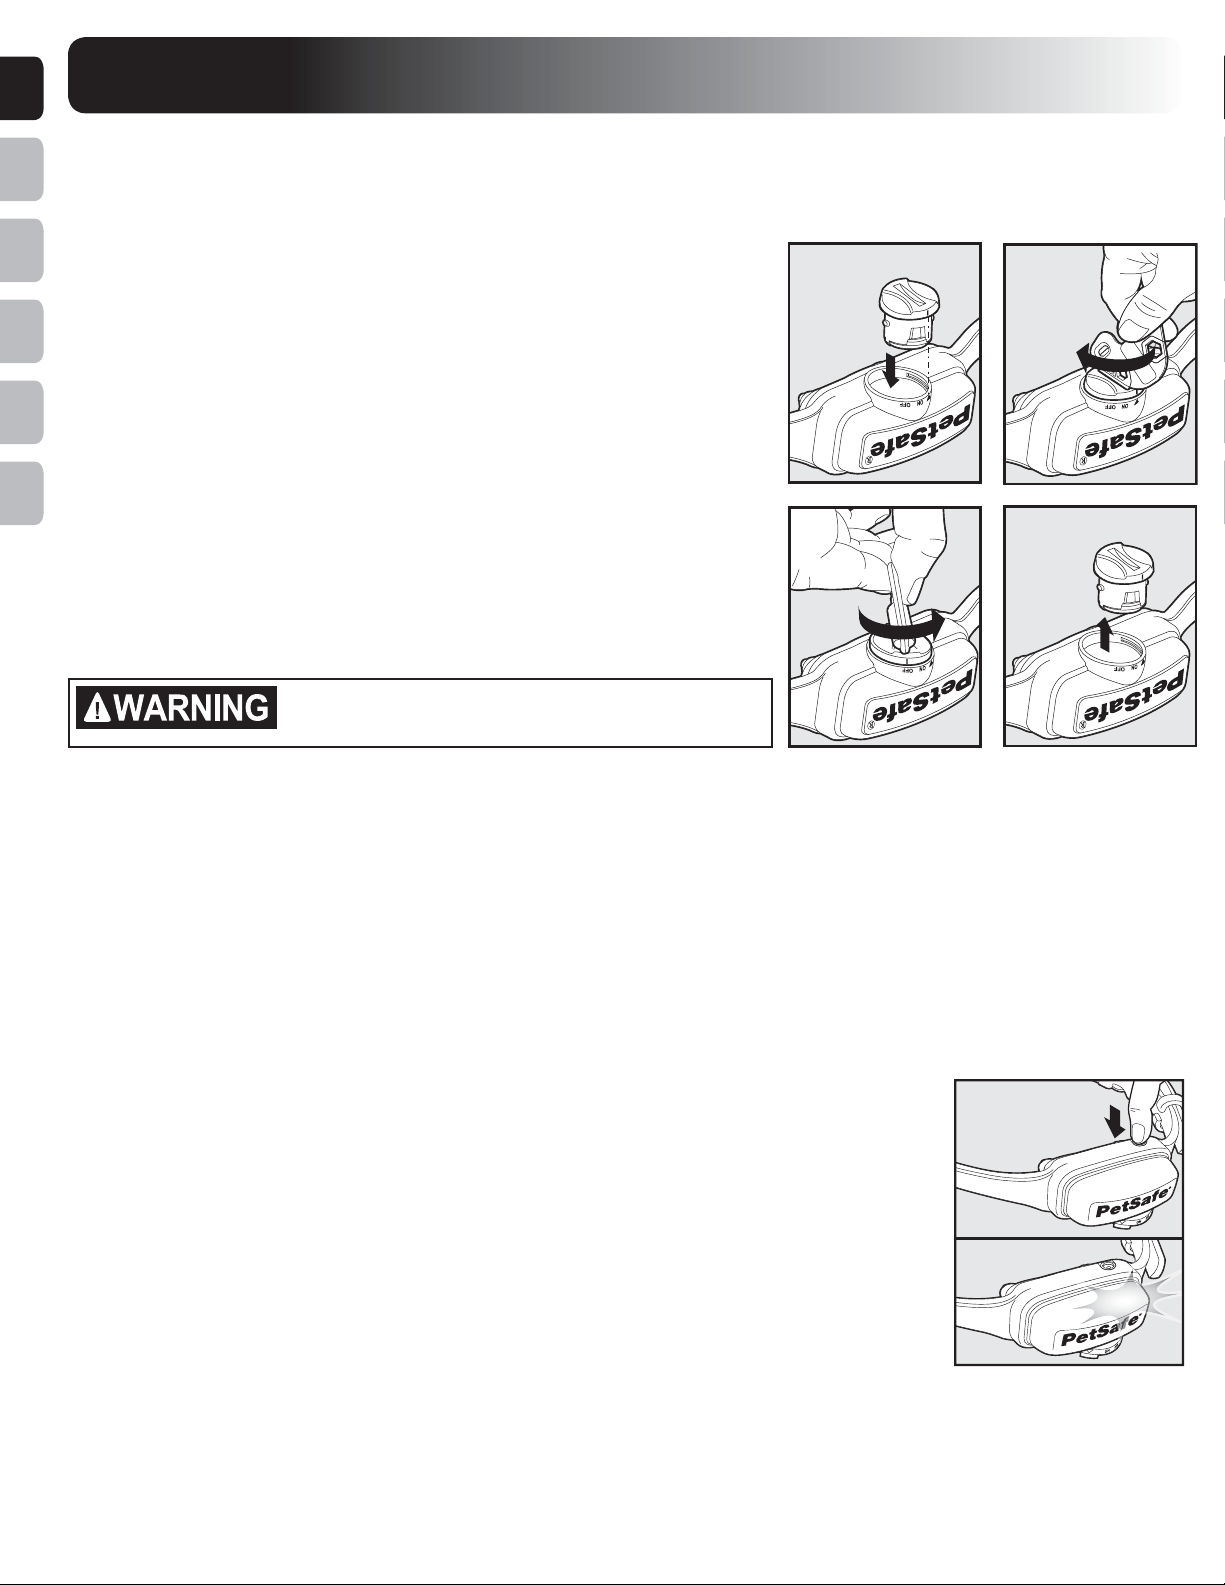
To Insert and Remove the Battery
Note: Do not install the battery while the Receiver Collar is on your pet.
This Receiver Collar utilizes a replaceable PetSafe
®
battery (RFA-188). This
unique battery is designed to make battery replacement easier and increase
water protection.
To activate the collar, insert the battery module (5A). Using the edge of the Test
Light Tool as shown, turn the battery clockwise until the vertical line on the battery
is pointed to the “ON” position (5B). If the PetSafe
®
Receiver Collar is not going
to be used on the pet immediately, leave it in the “OFF” position.
To remove the battery, turn the battery counter-clockwise using the edge of the Test
Light Tool as shown (5C, 5D).
Discharge all power by holding the Stimulation Level Button down until the light is
no longer illuminated. Replace with a new battery.
DO NOT attempt to cut into or pry open the battery.
Be sure to discard the used battery properly.
A replacement PetSafe
®
battery can be found at many retailers. Contact the Customer Care Centre or visit our website
at www.petsafe.net to locate a retailer near you.
Static Stimulation and Battery Test Feature
When the RFA-188 Battery Module is rst installed in the receiver, the red LED will ash the current stimulation level setting
(1 to 5). For the next 30 seconds, the receiver will monitor the battery status and will either ash the green LED once every 5
seconds to indicate a good battery, or ash the red LED once every 5 seconds to indicate a low battery condition. After the 30
second battery test period, the green LED will cease to ash if the battery is good. If the battery was low during the test period,
the red LED will continue to ash at a rate of 1 ash every 20 seconds to indicate a low battery condition. In this situation,
battery replacement is recommended.
To Set the Static Stimulation Level
Read all steps before attempting to set the Static Stimulation Level.
1.With the battery installed, press the Stimulation Level Button and release when the Receiver
Indicator Light lights red (5E).
2.The Receiver Indicator Light will emit a number of red ashes representing the Static
Stimulation Level (5F).
3.Increase the Static Stimulation Level by pressing and releasing the Stimulation Level Button within 5
seconds of the previous ashes.
The Static Stimulation Levels increase from 1 to 5. Pushing the Stimulation Level Button while the
Receiver Collar is on level 5 will cause the Receiver Collar to revert to level 1. Refer to the Function
and Response Table to choose the Static Stimulation level that best ts your pet.
The Receiver Indicator Light acts as a low battery indicator, ashing every 20 seconds when battery replacement is required.
Anti-Linger Prevention
The Anti-Linger Prevention feature keeps your dog from staying in the Warning Zone for long periods of time and draining the
Receiver Collar battery. Your dog will hear a warning tone when he reaches the Warning Zone. If your dog does not return to
the Pet Area after two seconds, he will receive a continuous Static Stimulation until he returns to the Pet Area.
5A 5B
5D
5C
5E
5F
Loading ...
Loading ...
Loading ...