Loading ...
Loading ...
Loading ...
10 www.petsafe.net
ENFRES
NL
IT
DE
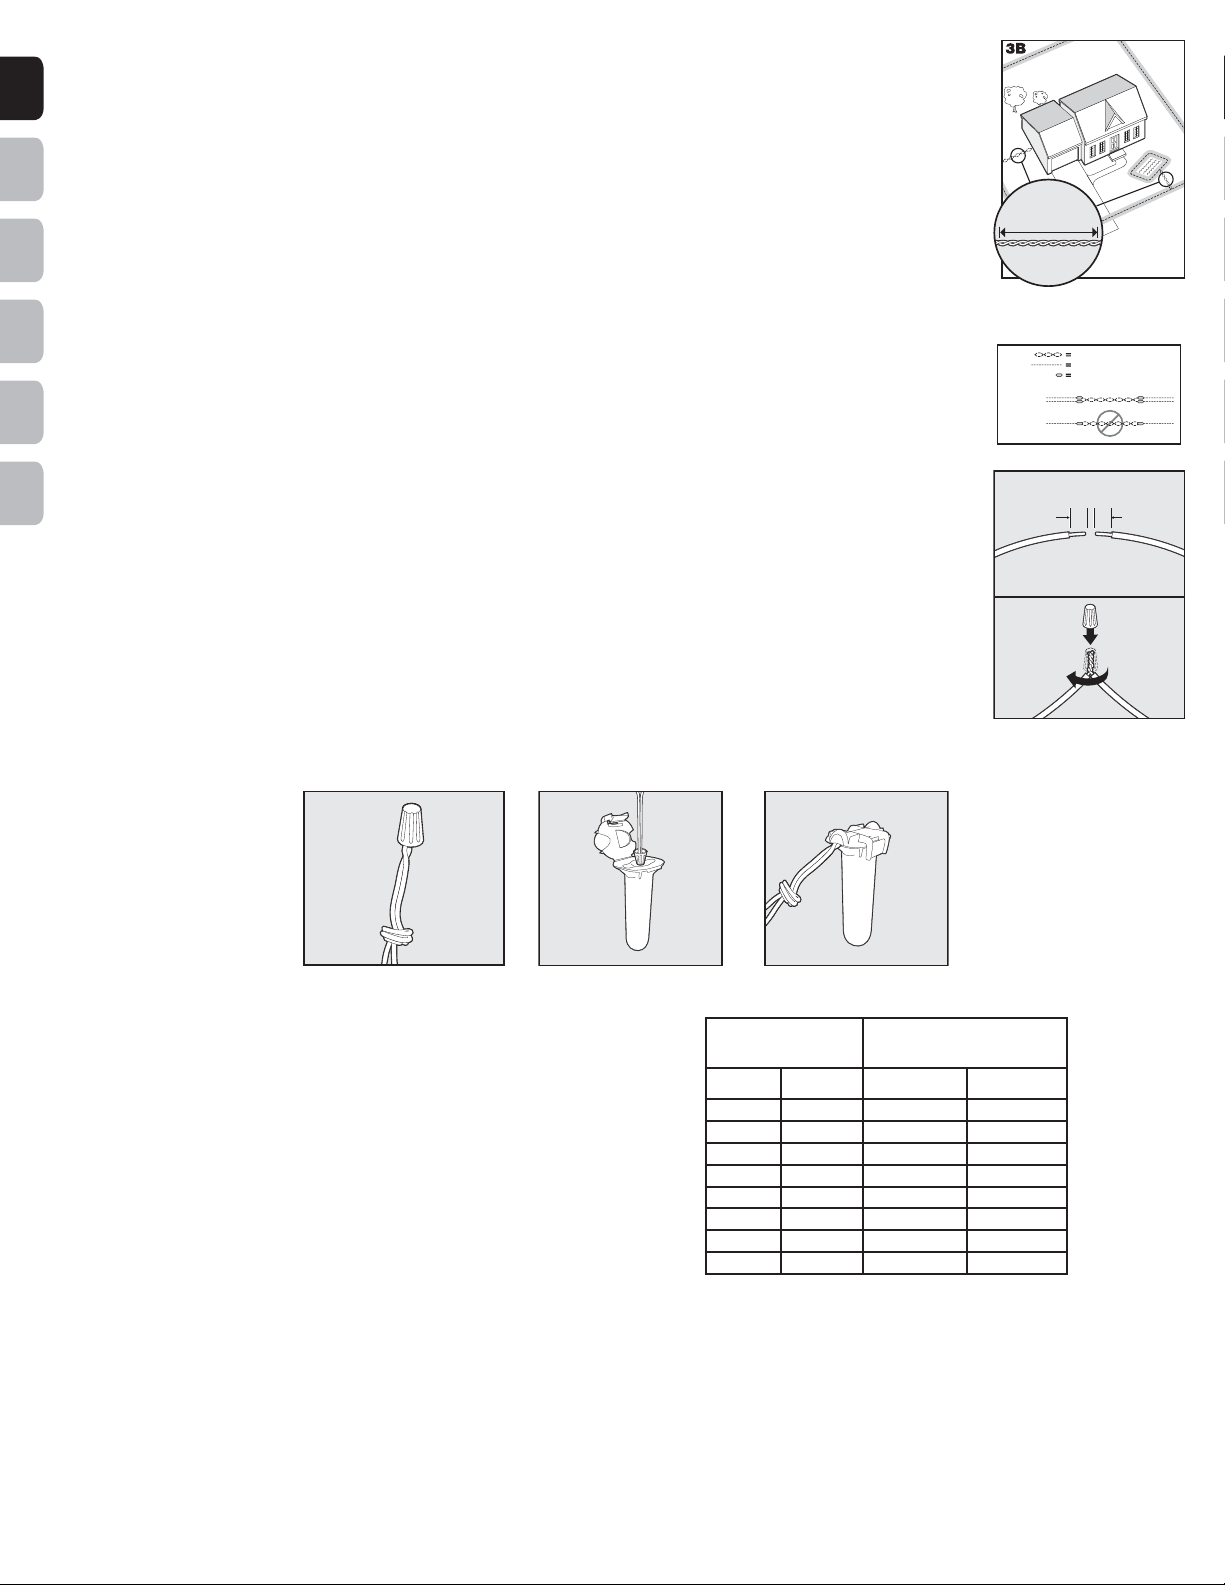
Twisting and Connecting the Boundary Wire
Twisting the Boundary Wire cancels the signal and allows your pet to cross over that area safely (3B).
The signal cannot be cancelled by running the wire through plastic or metal piping. Using shielded
cable in place of the Boundary Wire will also not cancel the signal. Refer to gure (3C) for the correct
method of twisting the wire. You can twist your own wire by cutting two equal lengths of Boundary
Wire supplied and twisting them together. Anchor one end of the wires to something secure and insert
the other end in a power drill. Pull the wire taut. The drill enables you to twist the wire quickly. Twist the
Boundary Wire 30 to 36 times per metre (10 to 12 times per foot) to cancel the signal. Once you have
completed your boundary layout connect one end of the twisted wire to the Perimeter Loop and see Step
4 to connect the other end of the twisted wire to the transmitter. If your layout includes a Secondary Loop to protect landscaping
or pool areas, connect the twisted wire between the Perimeter Loop and the Secondary Loop.
To Splice or Repair the Boundary Wire
If you need additional Boundary Wire to expand your wire loop, you will need to splice the wires
together. Note the locations of all splices for future reference.
Strip approximately 1 cm (3/8") of insulation off the ends of the Boundary Wires to be spliced (3D).
Make sure the copper Boundary Wire is not corroded. If the Boundary Wire is corroded, cut it back to
expose clean copper wire.
Insert the stripped ends into the wire nut and twist the wire nut around the wires. Ensure that there is no
copper exposed beyond the end of the wire nut. Tie a knot 7.5 cm to 10 cm (3" to 4") from the wire nut
(3E). Ensure that the wire nut is secure on the wire splice.
Once you have securely spliced the wires together, open the lid of the gel- lled splice capsule and insert
the wire nut as deeply as possible into the waterproof gel inside the capsule (3F). Snap the lid of the
capsule shut (3G). For proper system performance, the splice connection must be waterproof.
If your splice pulls loose, the entire system will fail. Make sure your splice is secure. Additional gel- lled
splice capsules and wire nuts are available through the Customer Care Centre.
3E
3F
3G
Additional Boundary Wire
Extra direct burial Boundary Wire can be purchased in 150 m (500
feet) spools at the store where you purchased the kit or through the
Customer Care Centre.
Note: When adding Boundary Wire, it must act as a continuous loop.
The table at right indicates the approximate length of Boundary Wire
needed for a square, Single Loop layout. Length will vary due to the
amount of twisted wire and layout used.
Area to
be enclosed
Approximate wire
length required
Ares Acres Metres Feet
10 1/4 127 415
13 1/3 146 480
20 1/2 180 590
40 1 255 835
80 2 360 1180
200 5 570 1870
400 10 854 2800
1011 25 1219 4000
30 Twists/m
10 Twists/ft
TWISTED WIRES
BOUNDARY WIRE
WATERPROOF SPLICE
CORRECT
INCORRECT
3C
1
1 cm
(
3
/
8
in)
1 cm
(
3
/
8
in)
2
3D
Loading ...
Loading ...
Loading ...