CERAMIC HEATER
INSTRUCTION MANUAL
Model: TG200-IP3L
READ AND SAVE THIS INSTRUCTION

.
PLEASE READ THE SAFETY ADVICE CAREFULLY
BEFORE USING THE APPLIANCE
Warning: risk of fire, electric shock, physical injuries and material
damage.
Before using this appliance,always follow the safety advice during
assembly, use and maintenance.
SAFETY ADVICE (Use)
- This appliance can be used by children aged from 8 years and
above and persons with reduced physical, sensory or mental
capabilities or lack of experience and knowledge if they have been
given supervision or instruction concerning use of the appliance in
a safe way and understand the hazards involved. Children shall not
play with the appliance. Cleaning and user maintenance shall not
be made by children without supervision.
- Children of less than 3 years should be kept away unless
continuously supervised.
Children aged from 3 years and less than 8 years shall only switch
on/off the appliance provided that it has been placed or installed in
its intended normal operating position and they have been given
supervision or instruction concerning use of the appliance in a safe
way and understand the hazards involved. Children aged from 3
years and less than 8 years shall not plug in, regulate and clean the
appliance or perform user maintenance.
CAUTION - Some parts of this product can become very hot
and cause burns. Particular attention has to be given where
children and vulnerable people are present.

- If the supply cord is damaged, it must be replaced by the
manufacturer, its service agent or similarly qualified persons in order
to avoid a hazard.
- CAUTION: In order to avoid a hazard due to inadvertent resetting
of the thermal cutout, this appliance must not be supplied through
an external switching device, such as a timer, or connected to a
circuit that is regularly switched on and off by the utility.
- WARNING: In order to avoid overheating, do not cover the
heater.
- The heater must not be located immediately below a socket-outlet.
- Means for disconnection having a contact separation in all poles
must be incorporated in the fixed wiring in accordance with the
wiring rules.
- The heater must be installed at least 1.8 m above the floor.
- Means for disconnection having a contact separation in all poles
must be incorporated in the fixed wiring in accordance with the
wiring rules.
- Do not use this heater in the immediate surroundings of a bath,a
shower or swimming pool.
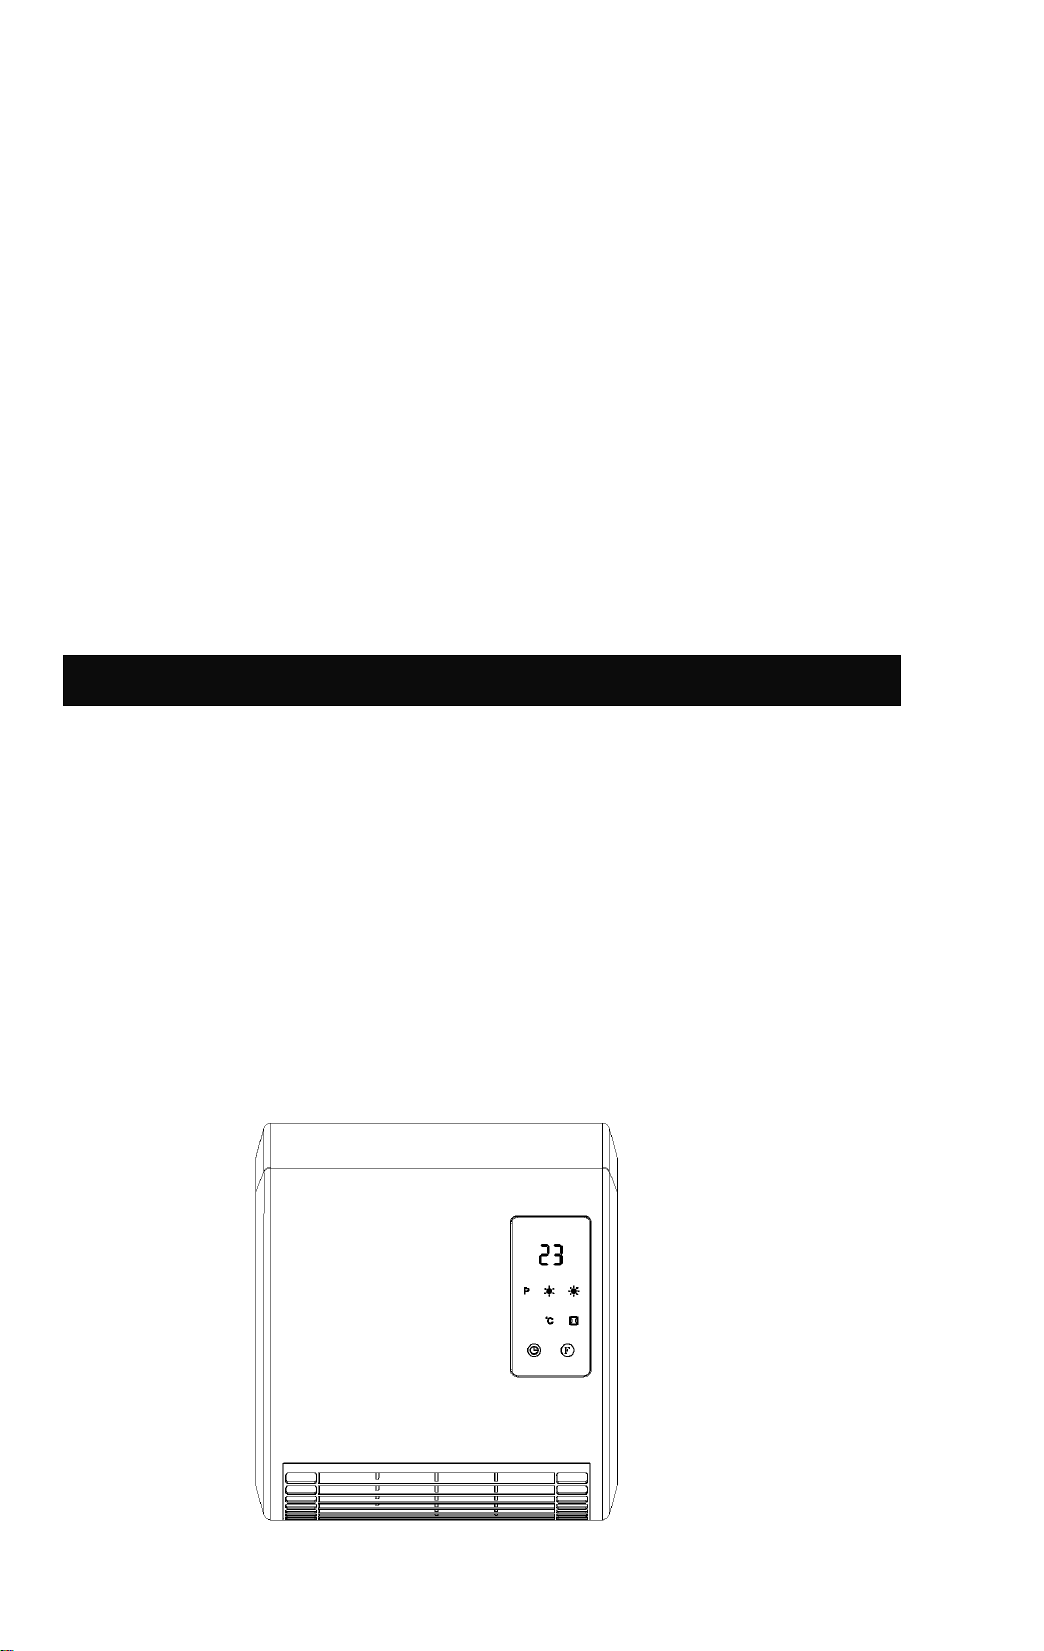
Installation:
The fan heater must be installed on a wall before operating. Don’t try to use it without
installation.
The installation sequence of the fan heater is as follows:
1. Find a space to install the fan heater (See Figure ).
2. Drill two holes of the dimension of the expansible tubes ¢ - 8 mm - in the wall (See
Figure ) - D= 187mm
3. Insert the expansible tubes into the holes and tighten them with the screws provided
firmly.
NOTE: Fasten the screws tightly. Do not fasten the screw into the expansible tube
thoroughly; the length of the bare parts should be 10 mm.
4. Mount the fan heater to the wall . Make sure the two holes located on the back of the
heater do aim at the above two screws, then push the heater backwards to the wall, and
then downwards till the unit is stable.
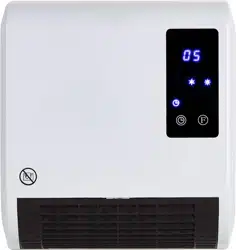
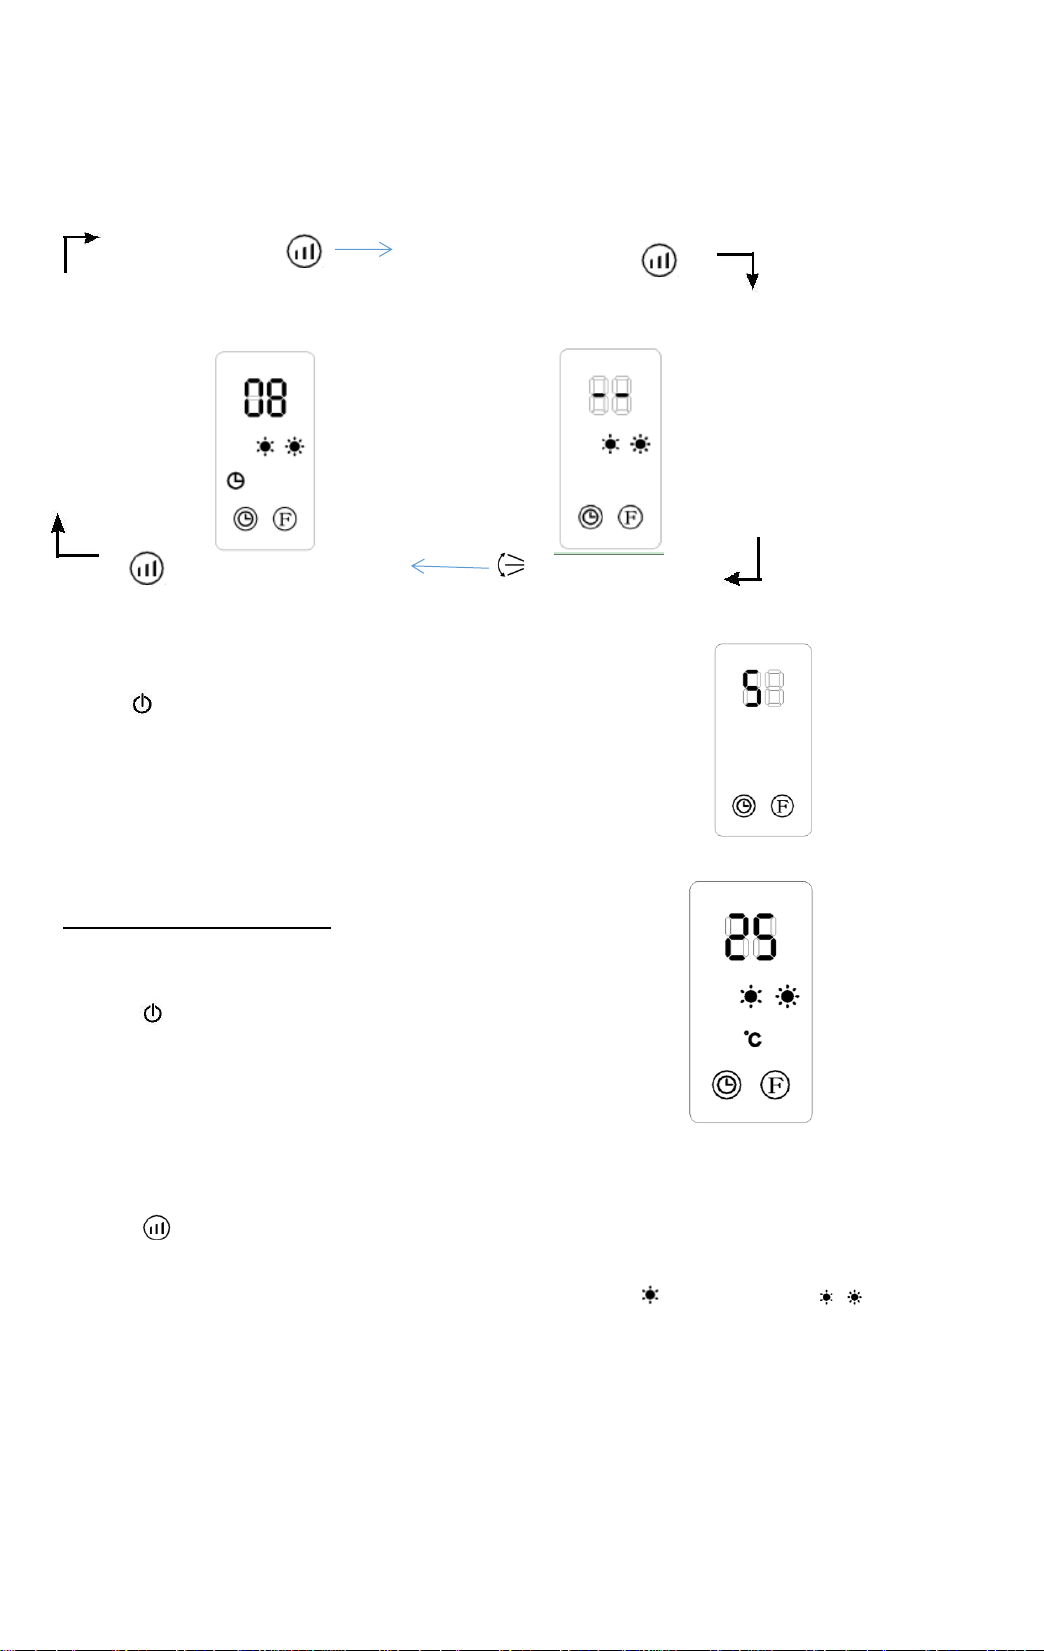
The controls
ON-OFF
- Press the ON -OFF switch to switch the appliance ON (I) or OFF (O).
=Power
Stand-by mode
=Mode selection
= Heating on half power (1000W)
= Heating on full power (2000W)
P = Weekly programming
=Open window Mode
°C = Setting temperature
= swing
= Timer (Turn-on/Turn-off)
Regular function operation
Temperature setting and ErP function
Confirm
Weekly time & window open
detection operation
Part 1 Regular function
FAN and HEATING (by control panel)
- Press the button to select one of the following mode
-
-
-
-
-
Stops by going into standby Fan without heating Heating on half power
(the fan stops 30 seconds
after the stand-by).
Heating on full power with swing Heating on full power
The default setting temperature is 23°C when the light °C is off
FAN and HEATING (ONLY by remote control)
- Press to switch on the appliance.
- Press to select one of the following modes :
Fan without heating Heating on half power
Heating on full power with swing Heating on full power
- Press again to switch off the appliance.
Stops by going into standby
(the fan stops 30 seconds after the stand-by).
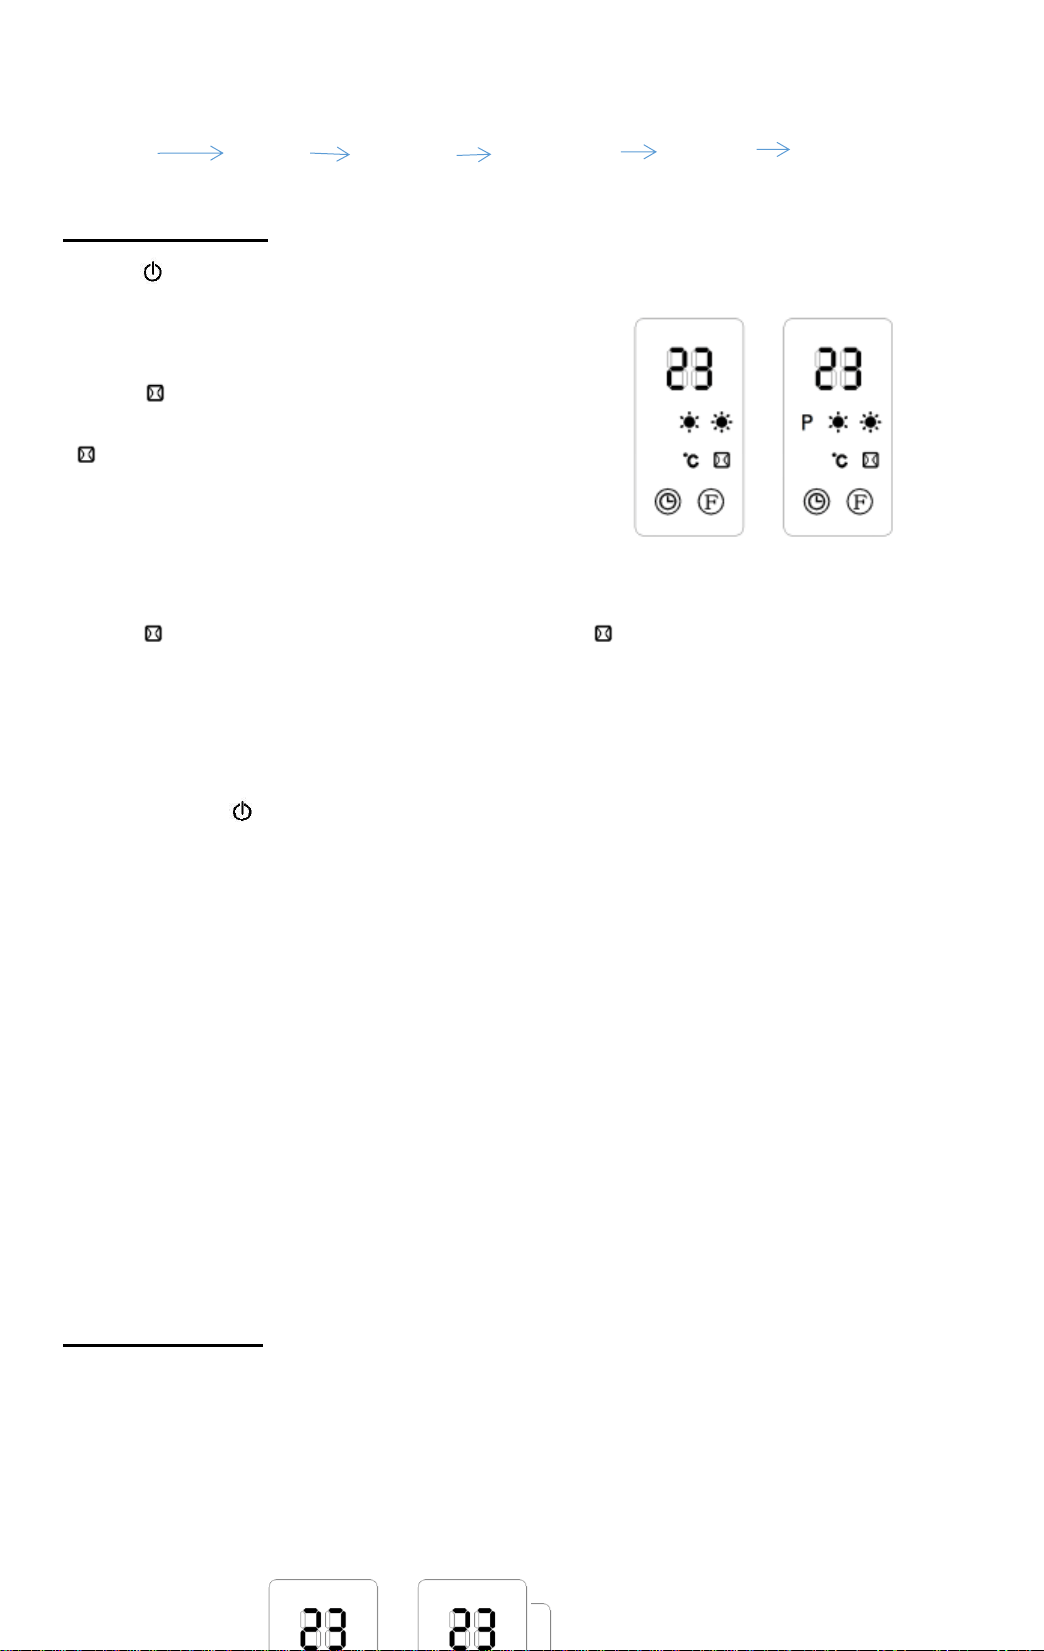
TEMPERATURE CONTROL (ONLY by remote control)
- Press to switch on the appliance.
- Press + or - to set the setting temperature from 10°C to 49°C
(the light °C is on). If room temperature
15°C, setting temperature 25°C, the display as the picture
- Press to cancel the temperature setting
(the light °C is off) and to choose the heating on half power ( ) or full power ( ).
The heater working on full power when the room temperature is 4°C lower than the
setting temperature.
.The heater working on half power when the room temperature is between 0° and 2°C
lower than the setting temperature.
The heater switches off when the room temperature is higher than the setting temperature.
the fan working 30 seconds to make inside cool to protect component, then fan stop, the
unit enter into standby.
.The heater switches on again when the room temperature falls 2°C below the setting
temperature.
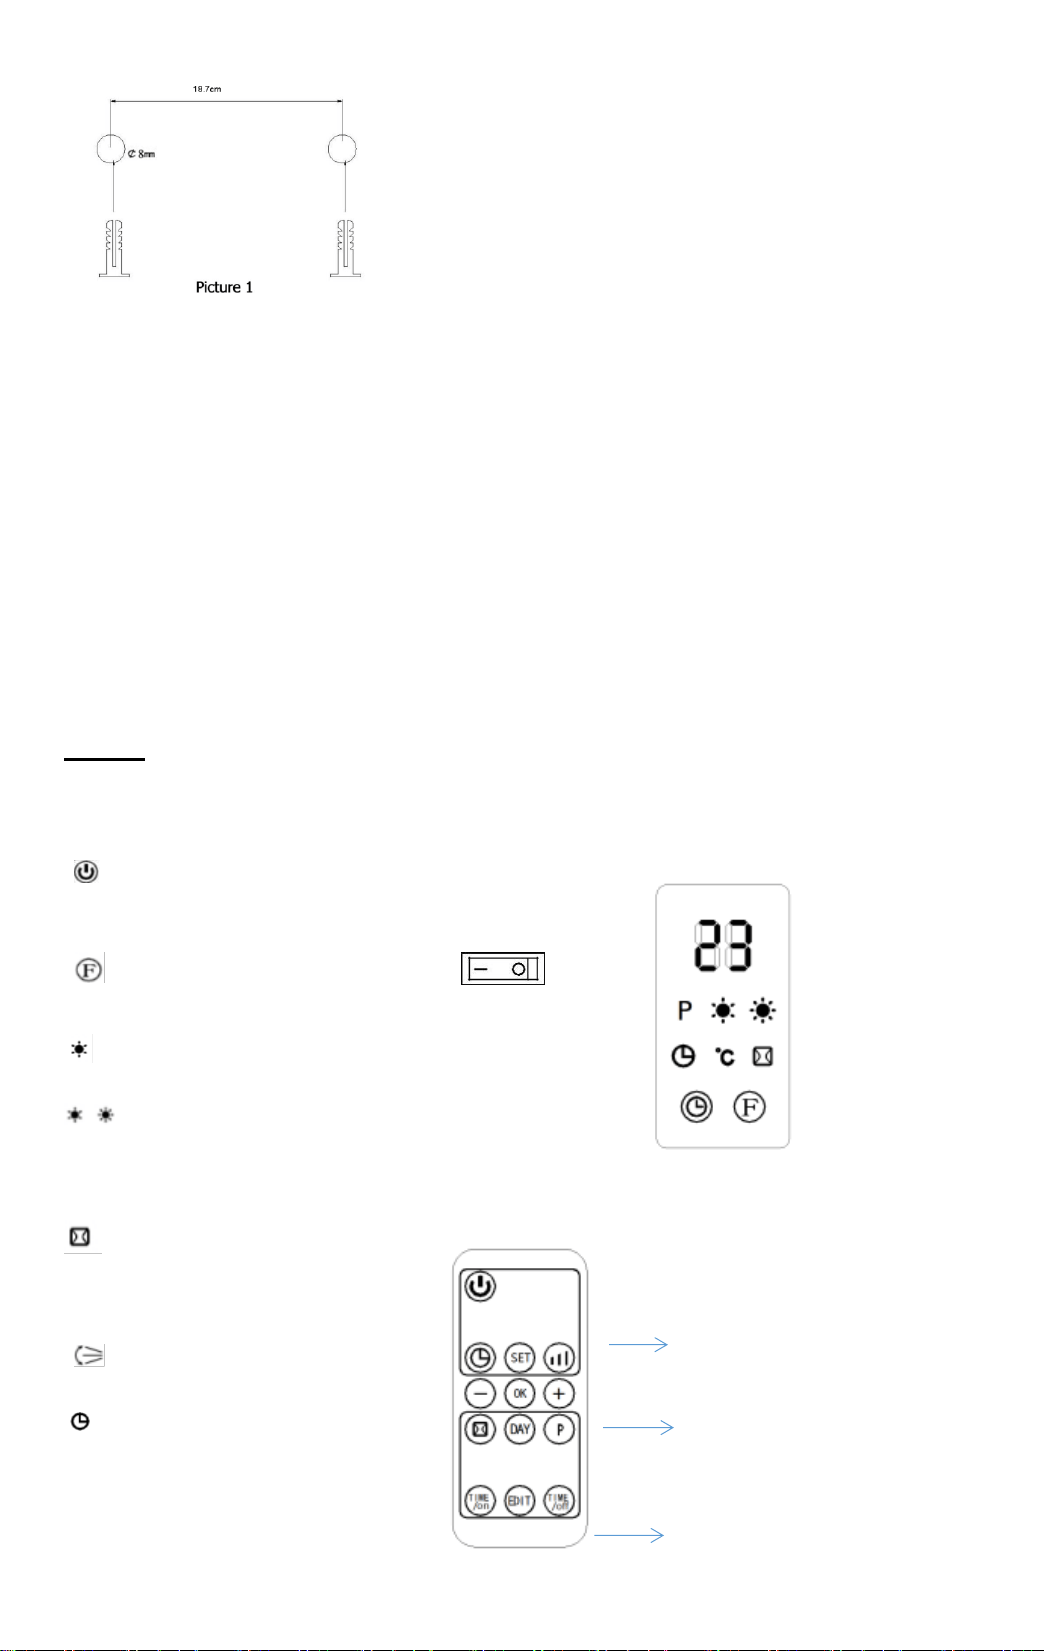
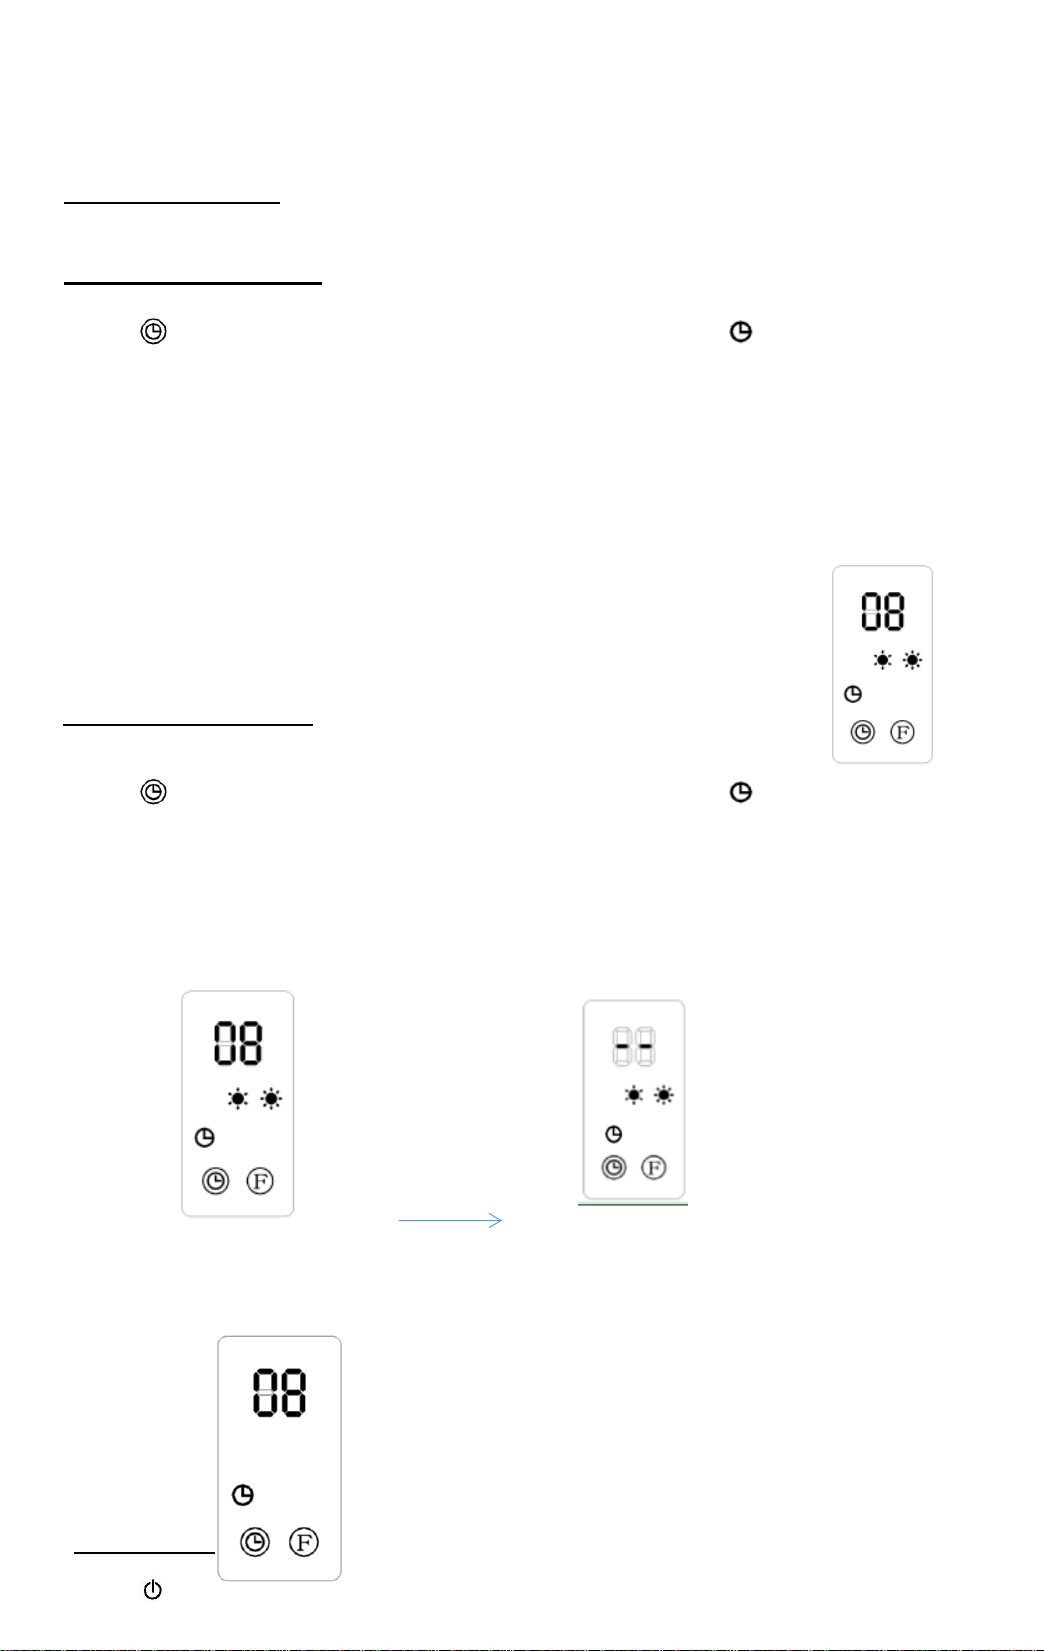
TURN-ON, TURN-OFF (by control panel and remote control)
Turn-on in stand-by mode :
- Press to set the appointment turn-on time in 1-12 hours (the light is on).
.The display automatically decreases 1 hour for each hour passed. When the
appointment power-on time arrived, the product will automatically turns on. The
default setting temperature is 23°C.
.If not setting the setting temperature and weekly program, the unit will automatically
turn-off after continuous working 12hours, then enter into stand-by.
For example to set appointment turn-on time to 8 hours
Turn-off in running mode
Press to set the appointment turn-on time in 1-12 hours (the light is on)
When the appointment power-off time arrived, the product will automatically turns off.
The default setting temperature is 23°C
For example to set appointment turn-off time to 8 hours
5 seconds
5 seconds
Part 2 Weekly time and Window open detection
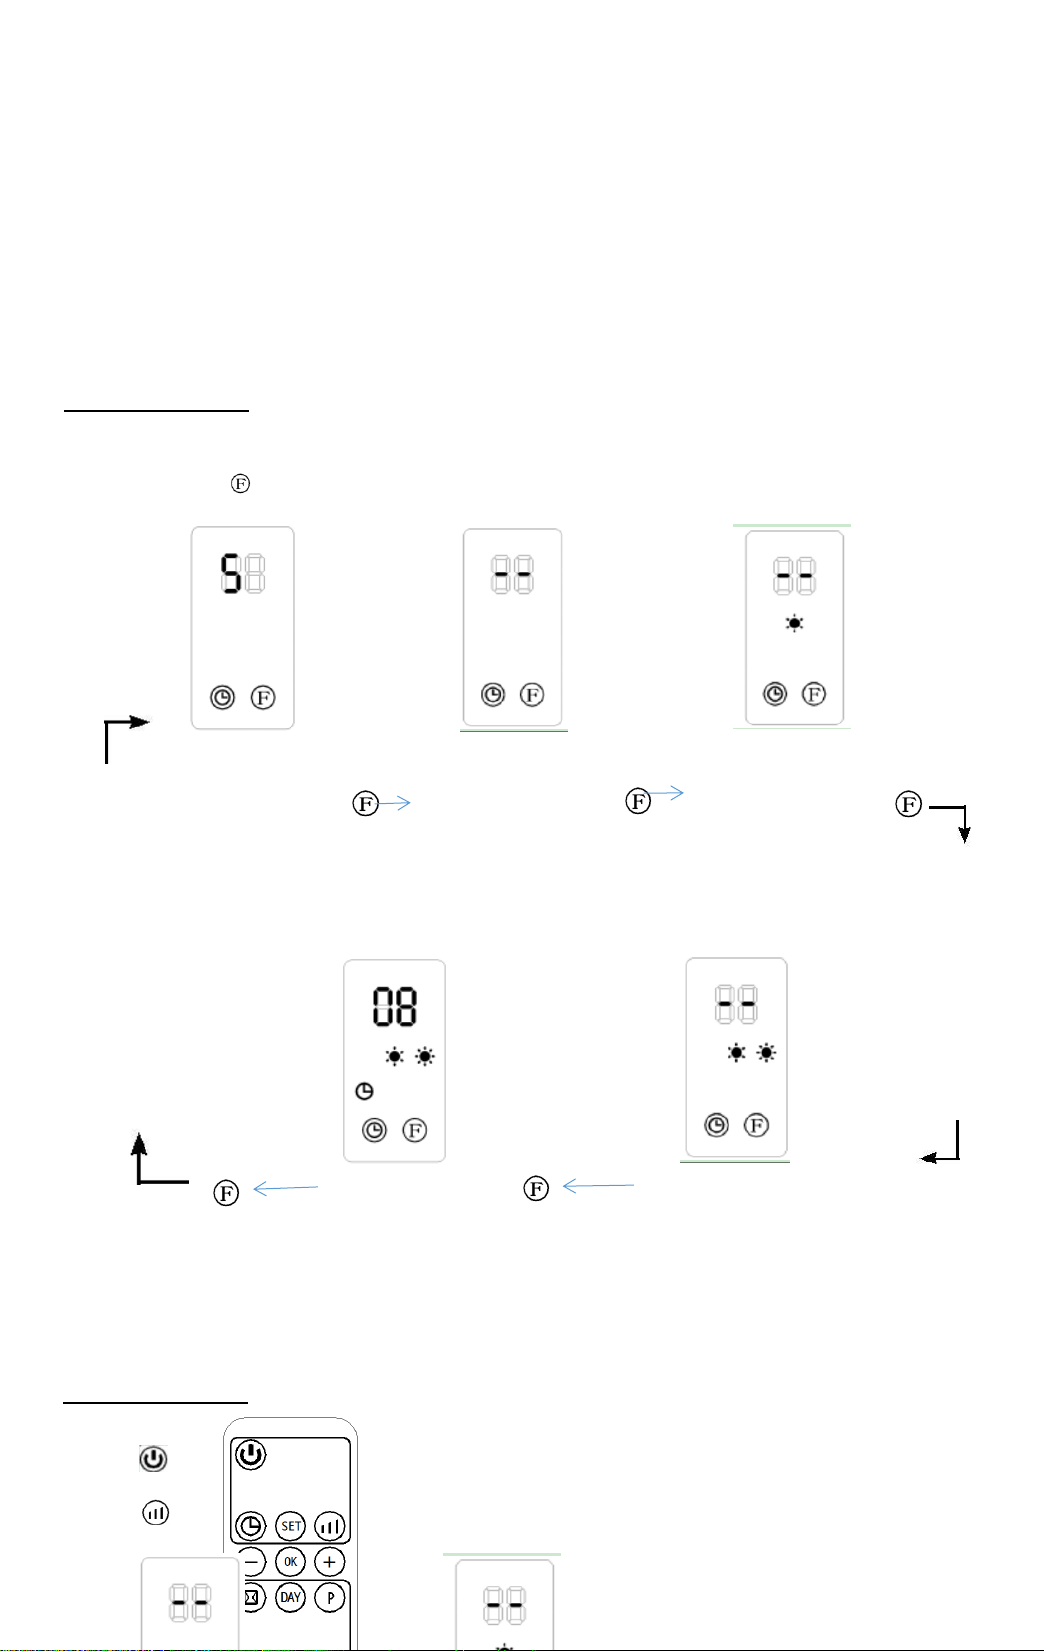
SET CURRENT TIME (ONLY by remote control)
- Press to switch on the appliance & just plug in.
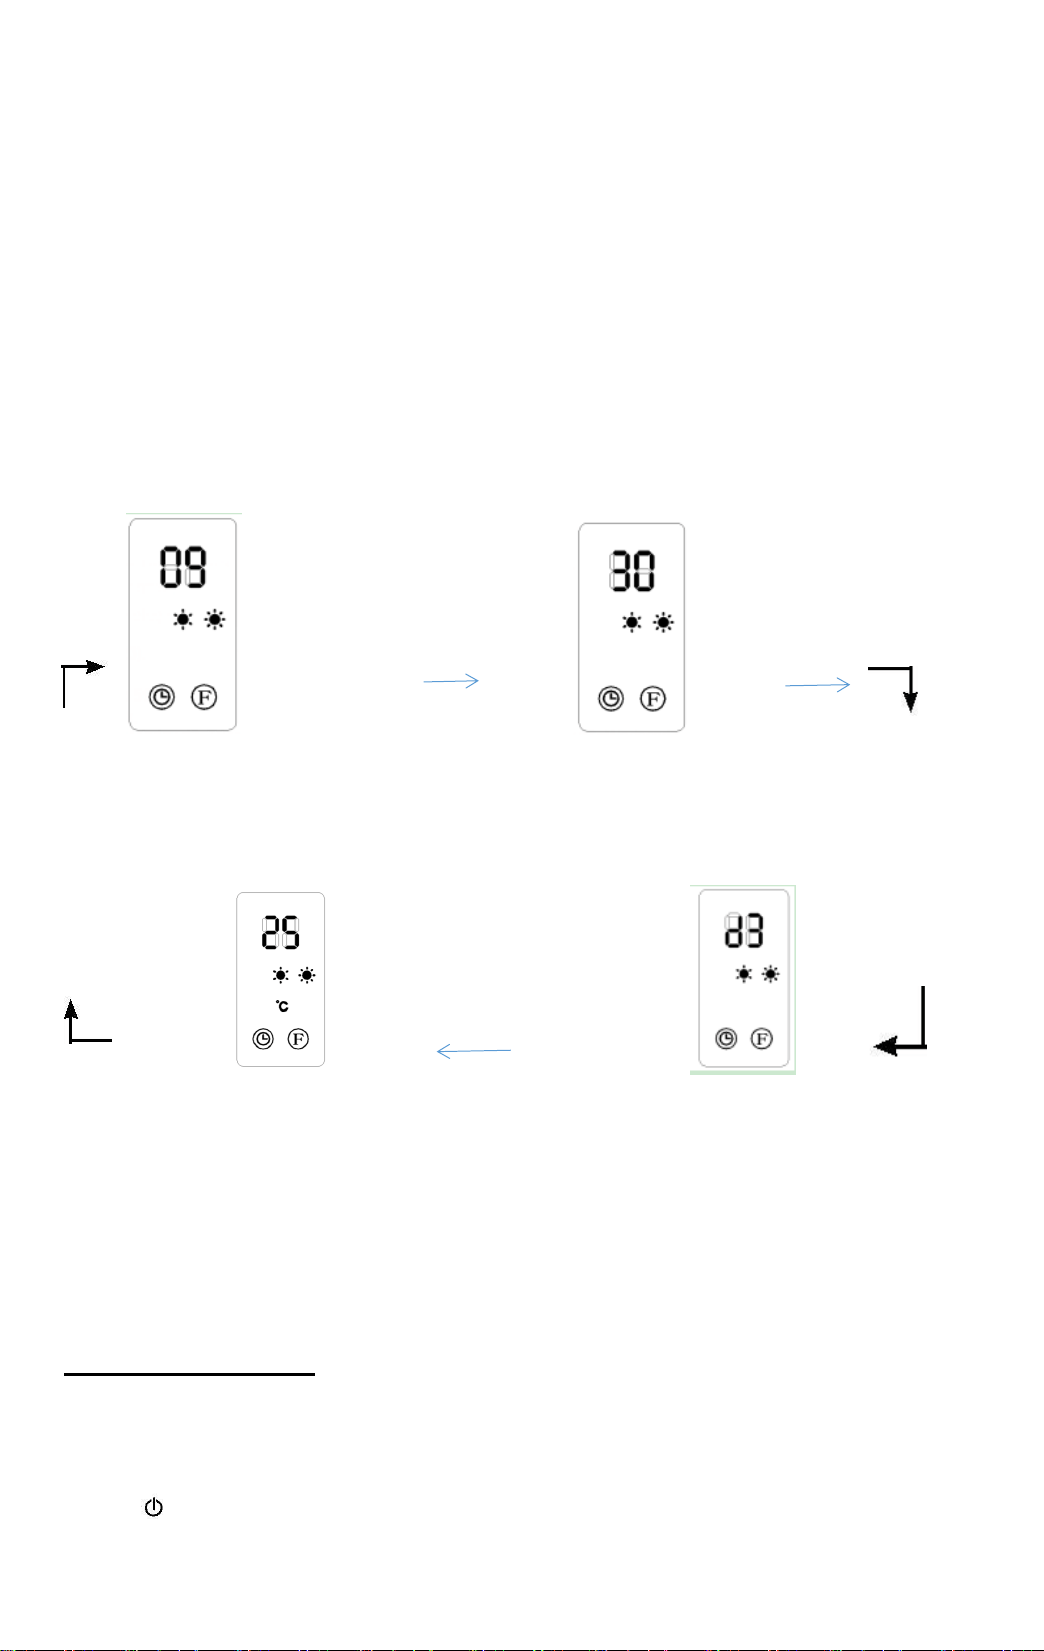
- Press SET to display the hour.
- Press + or - to set the current hour (00 to 23).
- Press SET again to display the minute.
- Press + or - to set the current minute (00 to 59).
- Press SET again to display the day of week.
- Press + or - to set the current day (d1 = Monday,d2=Tuesday,d3=Wednesday,
d4 = Thursday, d5 = Friday, d - Press OK to confirm the setting).
For example, Wednesday 9:30 , Setting temperature = 25°C :
SET SET
Hour Minutes
SET SET
Setting temperature Day
To check the current time and setting temperature, press SET again.
If main switch off or power cut off , it need reset the time
SET WEEKLY PROGRAM (ONLY by remote control)
.The current time must be set before any programming.
- Press to switch on the appliance.
1- Press P to enter into weekly program setting (the light P is on).

2- Press DAY to set the day of program activation (d1, d2,d7...),
3- 3- Press EDIT to set the time period number (P1, P2,...P6),
4- Press TIME/ON to set the turn-on time (00, 01, 02 ..., 24)
Cannot set to minutes.
5- Press TIME/OFF to set the turn-off time (00, 01, 02,..., 24)
Cannot set to minutes.TIME/OFF can not be less than TIME/ON.
6- Press + or - to set the setting temperature of this time period.
7- 7- Press OK to confirm the setting.
8- Repeat steps 3 to 7 to set another time period number for the same day.
Up to 6 programs are available for each day of the week.
9- Repeat steps 2 to 8 to set the others days of the week.
- Press P to active the weekly program (the light P is on), or to disable it (the light P is off).
- After the above setting are completed and P program is work, press DAY / EDIT
TIME/ON and TIME/OFF to check the setting time of each day and time period.
.When the turn-on time is same as the turn-off time, the appliance is in stand by mode.
f the setting temperature is not set, the default setting temperature is 23°C. If room
temperature higher 23°C, the appliance is not switch on.
.The weekly program is erased when the switch is off.
For example: Setting Monday 1
st
period working time 7:00 to 13:00
Press P Day EDIT Time/On Time/Off OK
SET OPEN WINDOW (ONLY by remote control)
- Press to switch on the appliance, heating for a moment
until stability.
- Press to active the open window mode (the light
is on).
- Press + or - to set the setting temperature for the open
windows function.
- Press to disable the open window mode (the light is off).
The appliance will resume to previous working mode.
During open window mode, if the room temperature drops from about 5°C to
10°C in less than 10 minutes, the appliance will stop working and enter into stand
by mode. Press again to switch on the appliance.
.If open-window mode and weekly timer program simultaneously, if the appliance turn off
in weekly time, the appliance is not turned on. If it already turn on in weekly timer, the
appliance working as the setting temperature under open-window mode.
For example: when window open detection function on, the weekly working time already
setting before: it's Monday morning A.M 9:00--10:00 , desired temperature 28 degree, the
window open only working A.M 9:00--10:00 , the unit will cut off when temperature reduce to
23°C or more lower . Other time, the unit not working, just in standby.
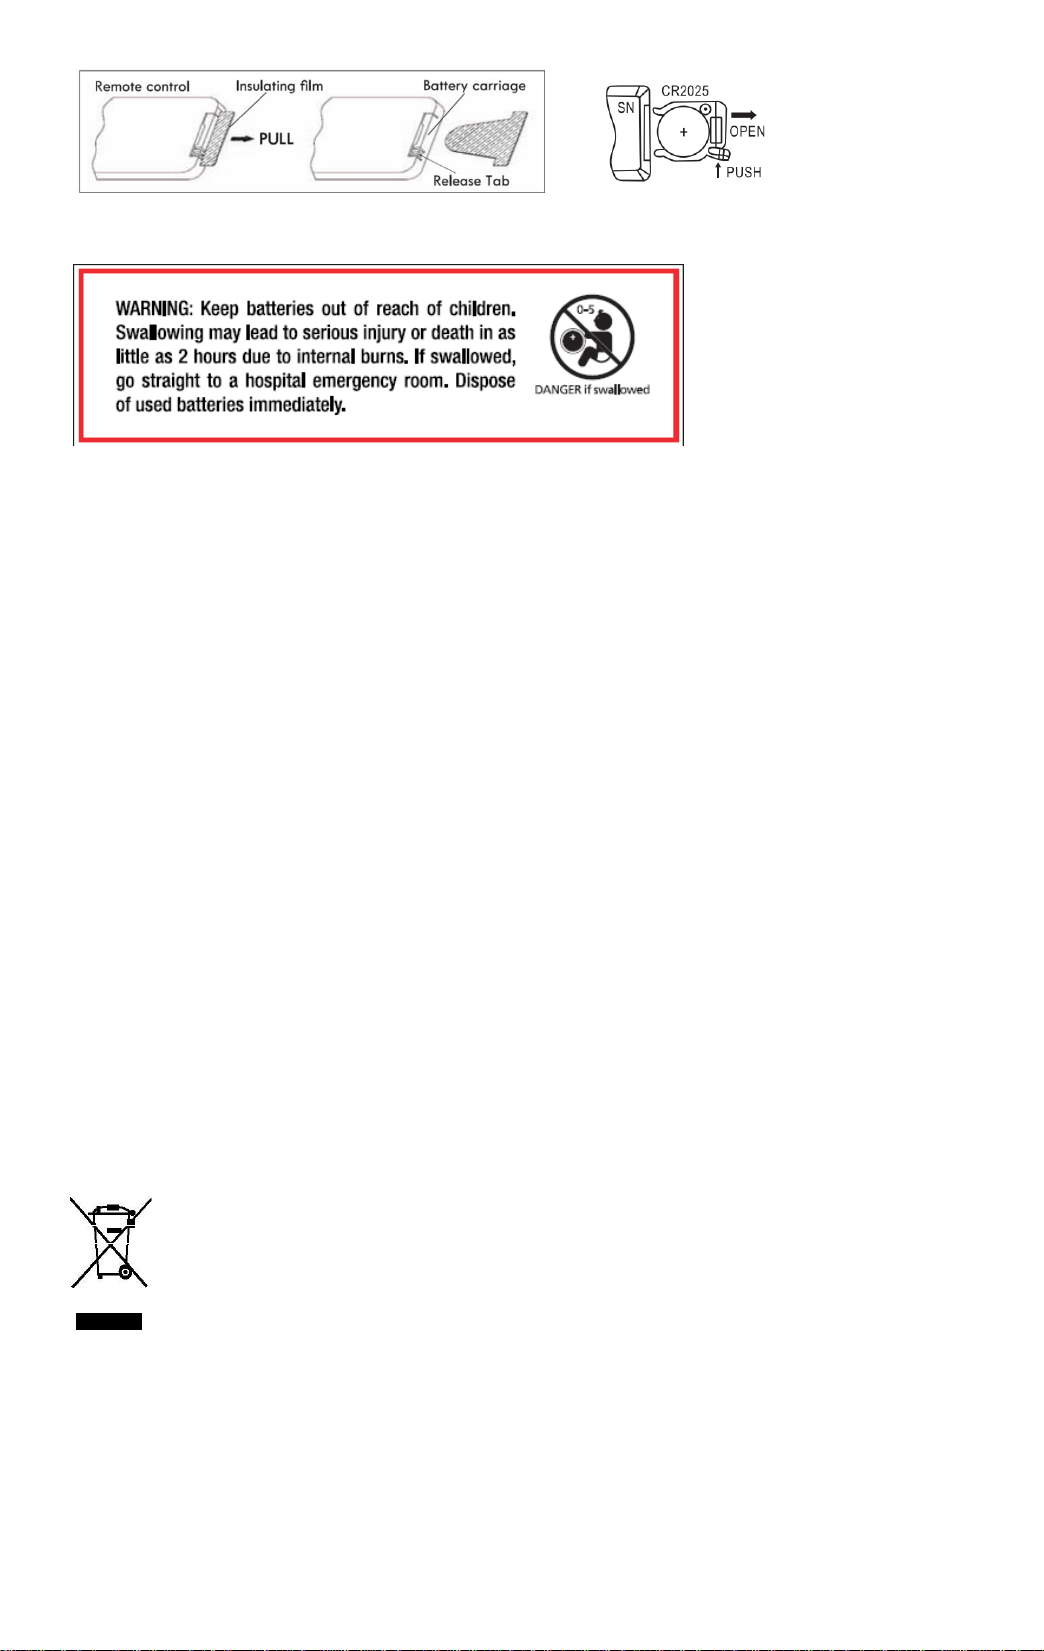
REMOTE CONTROL
The remote control requires 1 CR2025 3V lithium battery (not included)
Important: Follow the instructions of use and the recycle rules given on the battery
packaging.
1- Open the battery compartment by sliding the cover down.
2- Insert the battery into the compartment,
observing the polarity in the diagram (see below drawing).
3- Close the battery compartment.
NOTE: the remote control buttons perform the same functions as those on the control panel
on the unit.
Maintenance and cleaning
- Warning : Never use detergent, chemical damage plastic parts.
- WARNING : Let the appliance cool down completely before handling or cleaning.
- To prevent risk of fire or electrocution inside the appliance.
- Clean the outside wall of the appliance by rubbing it gently with soft, damp cloth, either
with or without soap.
- Regularly clean the air inlet and outlet vents of the fan.
Environmental protection
This symbol is known as the ‘Crossed-out Wheelie Bin
Symbol’. When this symbol is marked on a product or battery, it means that
it shoul general household waste. Some chemicals contained within
electrical/electronic products or batteries can be harmful to health and the
environment. Only dispose of electrical/ electronic/battery items in se which
cater for the recovery and recycling of materials contained within. Your co-
operation is vital to ensure the success of these schemes and for the
protection of the environment.
Disposal of an exhausted batteries
To preserve natural resources, please batteries properly.
Consult your local waste authority for information regarding available recycling and /or
disposal options.
Technical Specification
- Rating power : 2000W
--Power : 220-240V ~ 50Hz
- Class II
- Waterproof:IPx2
Information requirements for electric local space heaters
Model identifier(s): TG200-IP3L
Item
Symbol
Value
Unit
Item
Unit
Heat output
Type of heat input, for electric storage local space heaters
only (select one)
Nominal heat output
Pnom
1,9
kW
manual heat charge control, with integrated
thermostat
[no]
Minimum heat output
(indicative)
Pmin
0
kW
manual heat charge control with room
and/or outdoor temperature feedback
[no]
Maximum continuous
heat output
Pmax,c
1,9
kW
electronic heat charge control with room
and/or outdoor temperature feedback
[no]
Auxiliary electricity
consumption
fan assisted heat output
[no]
At nominal heat output
elmax
0
kW
Type of heat output/room temperature control
(select one)
At minimum heat
output
elmin
0
kW
single stage heat output and no room
temperature control
[no]
In standby mode
elSB
0.000
kW
Two or more manual stages, no room
temperature control
[no]
with mechanic thermostat room temperature
control
[no]
with electronic room temperature control
[no]
electronic room temperature control plus day
timer
[no]
electronic room temperature control plus
week timer
[yes]
Other control options (multiple selections possible)
room temperature control, with presence
detection
[no]
room temperature control, with open window
detection
[yes]
with distance control option
[no]
with adaptive start control
[no]
with working time limitation
[yes]
with black bulb sensor
[no]
Contact details
Name and address of the manufacturer or its authorised representative.
