www.warmlite.co
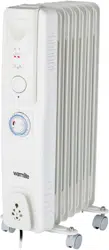
2500W
11 FIN TALL
OIL FILLED RADIATOR
MODEL WL43005YTW
YOUR SAFETY &
INSTRUCTION MANUAL
PLEASE READ CAREFULLY
This product is only suitable for well insulated spaces or occasional use.

2 CUSTOMER SUPPORT TEAM: +44 (0) 333 220 6056
TECHNICAL DATA
Description: 11 Fin Tall Oil Filled Radiator
Model: WL43005YTW
Rated Voltage: 220 - 240V
Frequency: ~ 50/60Hz
Power consumption: 2500 Watts
DOCUMENTATION
We declare that this product conforms to the following product legislation in accordance with the
following directive(s):
2014/30/EU Electromagnetic Compatibility Directive.
2014/35/EU Low Voltage Directive.
2011/65/EU Restriction of Hazardous Substances Directive.
RK Wholesale LTD Quality Assurance, United Kingdom
WARRANTY
This product is guaranteed for 12 months from the date of original purchase. If any defect arises due
to faulty materials of workmanship, the faulty products must be returned to the place of purchase.
Refund or replacement is at the discretion of the retailer.
The following conditions apply:
• The product must be returned to the retailer with proof of purchase.
• The product must be installed and used in accordance with the instructions contained in this
instruction guide.
• It must be used only for domestic purposes.
• It does not cover wear and tear, damage, misuse or consumable parts.
• RK Wholesale LTD has limited liability for incidental or consequential loss or damage.
• This guarantee is only Valid in the UK and Eire Only.
An extended warranty is available for this appliance.
See back page for details.
3www.warmlite.co
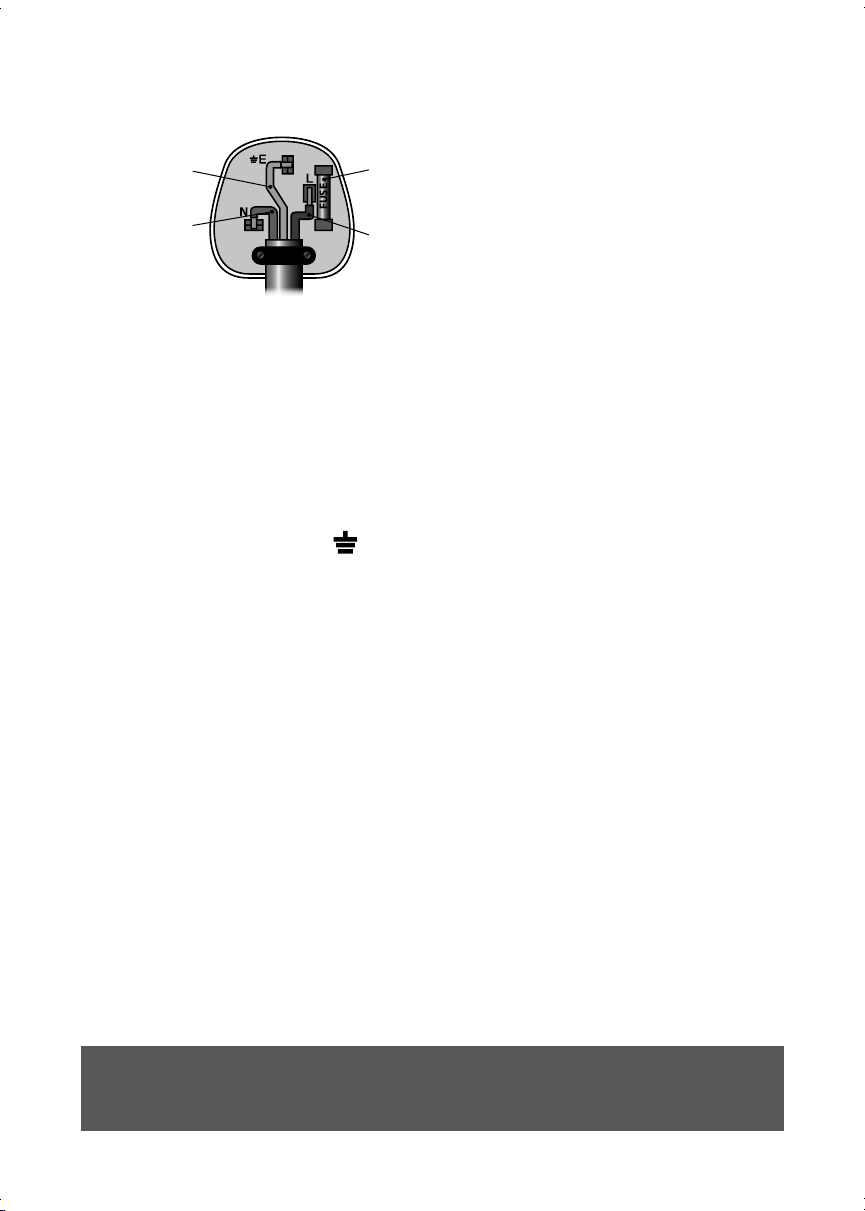
WARNING:
This Appliance MUST be Earthed
WIRING SAFETY FOR UK USE ONLY
IMPORTANT
As the colours in the mains lead of this appliance
may not correspond with the coloured markings
identifying the terminals in your plug, please
proceed as follows:
The wires in the mains lead are labelled in
accordance with the following code:
Blue neutral [N] Brown live [L]
Green/Yellow [EARTH]
Plug Fitting Details (Where Applicable). The
wire labelled blue is the neutral and must be
connected to the terminal marked [N].
The wire labelled brown is the live wire and must
be connected to the terminal marked [L].
The wire labelled green/yellow must be
connected to the terminal marked with the letter
[E].
On no account must either the brown or the blue
wire be connected to the [EARTH] terminal.
Always ensure that the cord grip is fastened
correctly.
The plug must be tted with a fuse of the same
rating already tted and conforming to BS 1362
and be ASTA approved.
If in doubt consult a qualied electrician who will
be pleased to do this for you.
Non-Rewireable Mains Plug
If your appliance is supplied with a non-
rewireable plug tted to the mains lead and
should the fuse need replacing, you must use an
ASTA approved one (conforming to BS 1362 of
the same rating).
If in doubt, consult a qualied electrician who will
be pleased to do this for you.
If you need to remove the plug - disconnect it
from the mains - then cut it o of the mains lead
and immediately dispose of it in a safe manner.
Never attempt to reuse the plug or insert it into a
socket outlet as there is a danger of an electric
shock.
FUSE
Earth
(Green/Yellow)
Fuse
Neautral
(Blue)
Live
(Brown)

4 CUSTOMER SUPPORT TEAM: +44 (0) 333 220 6056
PRODUCT SAFETY
When using any electrical appliance, basic safety precautions should
always be followed including the following:
• Check that the voltage of the
main circuit corresponds with
the rating of the appliance
before operating.
• Please ensure that the
appliance is used on a
stable, level, and heat
resistant surface.
• DO NOT immerse cords,
plugs or any part of the
appliance in water or any
other liquid.
• DO NOT leave the appliance
unattended while it is
operating.
• Close supervision is
necessary when any
appliance is used by or near
children or pets.
• This appliance can be
used by children aged
from 8 years and above
and persons with reduced
physical, sensory or mental
capabilities or lack of
experience and knowledge
if they have been given
supervision or instruction
concerning use of the
appliance in a safe way and
understand the hazards
involved.
• Children shall not play with
the appliance.
• Cleaning and user
maintenance shall not be
made by children without
supervision.
• Switch o at the wall socket
then remove the plug from
the socket when not in use
or before cleaning.
• If the supply cord or
appliance is damaged,
stop using the appliance
immediately and seek advice
from the manufacturer or its
service agent or a similarly
qualied person.
• DO NOT let the cord hang
over the edge of a table
or counter or let it come
into contact with any hot
surfaces.
• The use of accessory
attachments is not
recommended by the
appliance manufacturer
apart from those supplied
with this product. DO NOT
use extension cords with the
appliance.
• DO NOT pull the plug out by
the cord as this may damage
the plug and/or the cable.
• DO NOT use this product
for anything other than its
intended use.

5www.warmlite.co
• This appliance is for
household use only.
• DO NOT carry the appliance
by the power cord.
• DO NOT use the appliance
outdoors.
• Always ensure that the
heater is placed on a rm
level surface. Ensure that the
heater is not positioned close
to curtains, furniture or any
combustible materials as this
could create a re hazard.
• The heater must not be
located immediately below a
mains socket outlet.
• DO NOT cover the heater as
this may lead to a re risk.
• DO NOT obstruct any of
the openings of the heater
especially the heat outlet at
the bottom of the heater.
• DO NOT insert any object
through any openings on the
heater.
• DO NOT use the heater
in areas where ammable
liquids are stored or where
ammable fumes may be
present.
• DO NOT operate the heater
on an external timer.
• Avoid leaving the heater on
overnight, as this poses a re
risk.
• Keep the mains lead away
from the hot body of the
heater and ensure that it is
not pulled tight between the
socket and the heater.
• DO NOT use the heater in the
immediate surroundings of a
bath, a shower, a swimming
pool or similar indoor
locations.
• Always unplug the heater
and allow it to cool before
moving it from one location to
another.
• DO NOT attempt to dismantle
or repair any part of the
heater.
This should only be done by a
qualied service agent.
• In the unlikely event the
appliance develops a fault,
stop using it immediately
and seek advice from the
Customer Support Team.
HIGH VOLTAGE HOT SURFACE DO NOT COVER
6 CUSTOMER SUPPORT TEAM: +44 (0) 333 220 6056
WHAT’S IN THE BOX
Instruction Manual
Oil Filled Radiator
2 x Castor units
4 x Wing Nuts
2 x U bolt
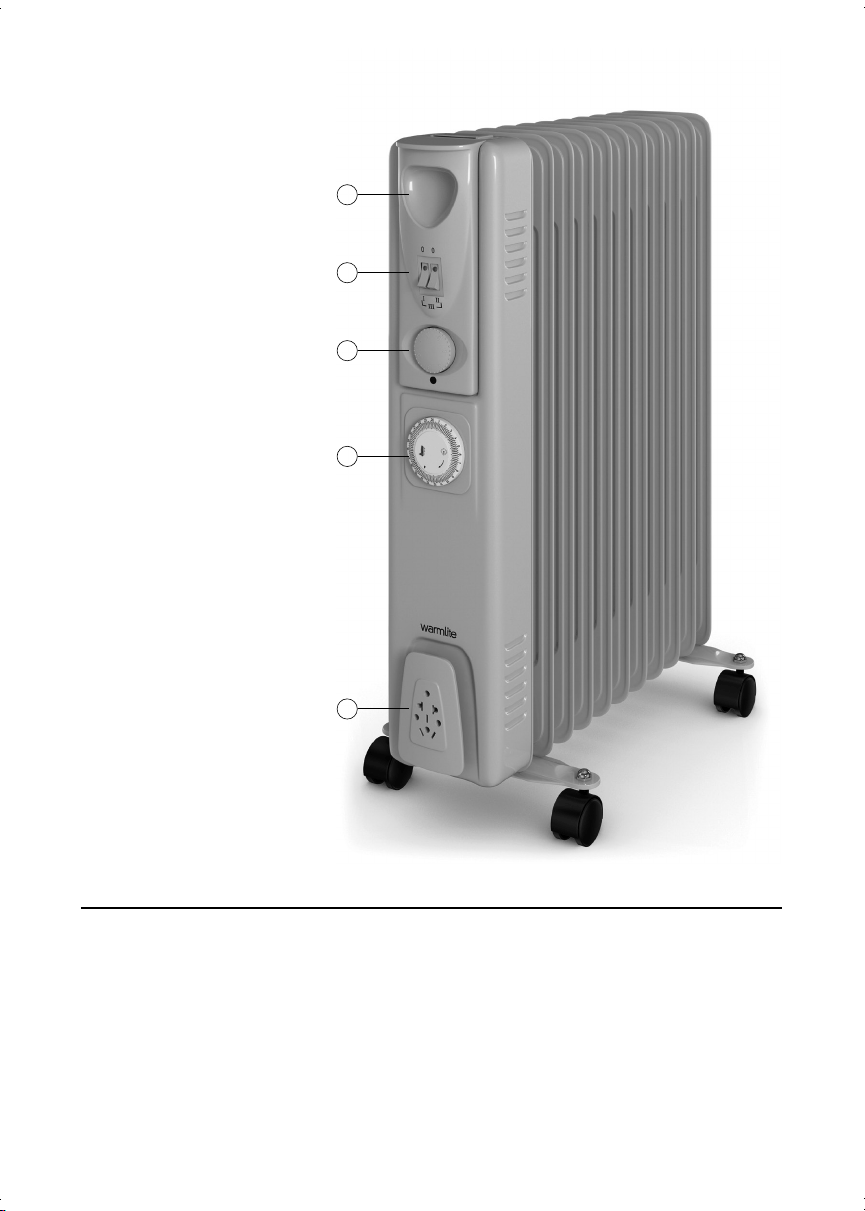
1. Handle
2. Power Switch
3. Thermostat
4. Timer
5. Cable Storage
BEFORE YOUR FIRST USE:
1. Remove your appliance from the packaging.
2. Assemble your appliance.
3. Locate your appliance in accordance with the safety instructions.
4. Plug the appliance into the mains supply.
5. Your appliance is now ready for normal use.
Dispose of the packaging in a responsible manner.
2
3
4
5
1

7www.warmlite.co
ASSEMBLY
A
Fit the Castor units to the cross bars.
B
Turn the radiator upside-down on a
scratch-free and stable surface to
prevent damage to the paint nish or
your oor surfacing.
C
Fit the two Castor units to the radiator
by placing the U bolts between the
outermost ns on each side of the
radiator.
D
Securely fasten the two Castor units onto
the radiator by screwing two Wing Nuts
onto each Foot.
USING YOUR APPLIANCE
1. Set the radiator thermostat to the minimal
position and with the wall socket power
switch in the “OFF” position, insert the plug
into the power supply.
2. The thermostat will automatically maintain
your desired room temperature.
3. Set the power switch to the “ON” position.
4. Turn the thermostat control clockwise
all the way round until you hear a click,
this sound indicates that the oil heater is
activated. Continue turning the thermostat
control clockwise to its highest setting.
5. When the indicator light is ON, the heater is
activated. The indicator light turns ON and
OFF repeatedly during use. This is normal
and shows that the thermostat is keeping
the radiator at the desired temperature.
6. There are three heat settings - choose the
desired setting to maintain a comfortable
temperature.
• Switch 1 = Low Heat
• Switch 2 = Medium Heat
• Both Switches = High Heat
Note: It is normal for the heater to emit some
smell and fumes when it is rst turned on for
the rst time or when it is turned on after a long
period of non-use. This will disappear when the
heater has been on a short while
A
C
D
B
8 CUSTOMER SUPPORT TEAM: +44 (0) 333 220 6056
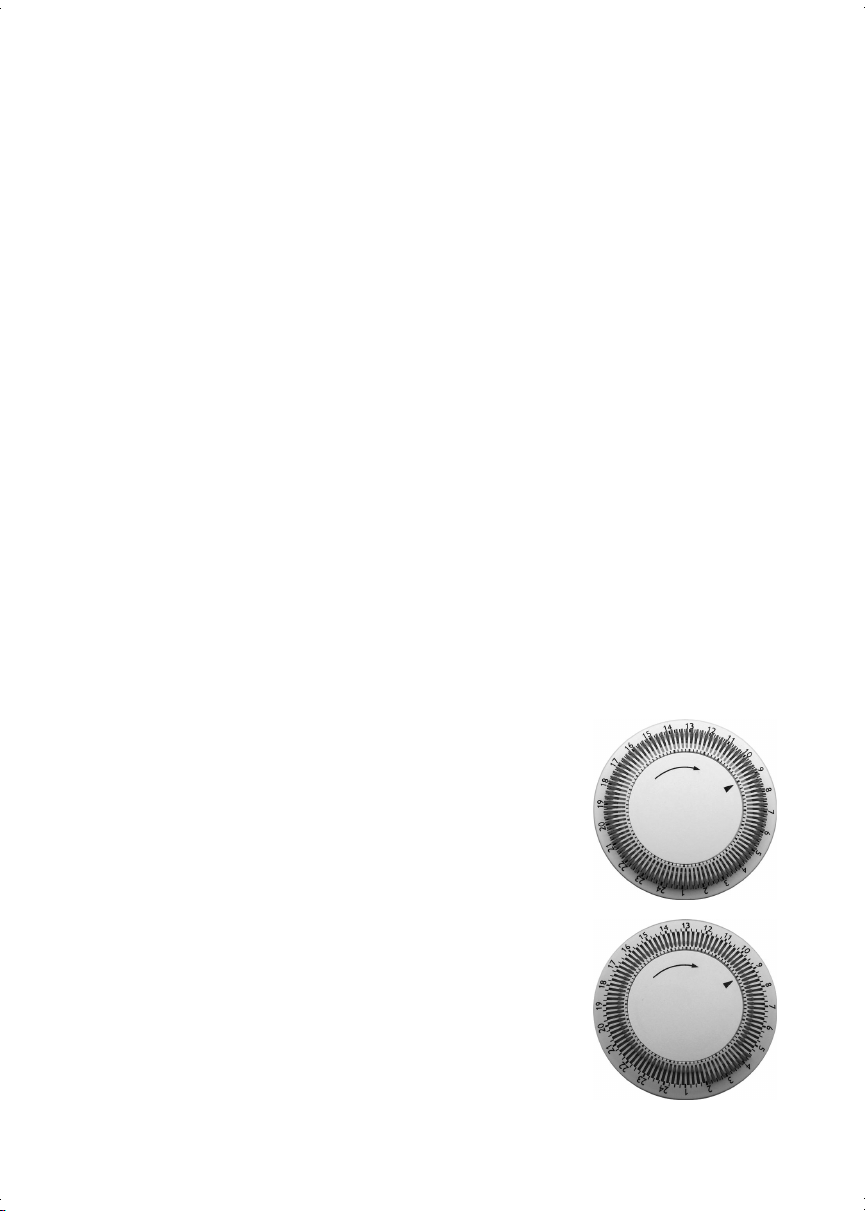
TIMER
Clock Setting:
The programme/timer, as in all clocks, must be
set to the correct time. If for example the time
is 9.00 A.M. (day zone), turn the dial clockwise
(following the direction of the arrow) until 9.00
is aligned with the triangular pointer. (See Fig.
1.)
IMPORTANT
DO NOT TURN CLOCK DIAL COUNTER
CLOCKWISE
Note:
There are 96 segments around the
dial. Each segment represents a 1/4 hour
(15 minutes) and there is a segment for
every quarter of the 24 hour day.
The timer is in eect an electric clock and only
works while plug is connected to the power
supply. Whenever the plug is disconnected, the
timer stops and must be re-set.
Using the timer:
The heater can be programmed to switch itself
ON and OFF at the time you want.
• With the timer you can approximate your
settings to within 15 minute increments
and program up to 48 cycles (1 cycle=1
“ON”+ 1 “OFF”) over a period of 24 hours
(12 hours A.M. +12 hours P.M.).
• The segments can be pushed inward
or pulled outward by simply using your
ngers.
• When the segment is in the outward
position (towards the numbers of the dial),
the heater will operate during that 15
minute period.
• If the segment is in the inward position,
the heater will not operate during this
period.
• Please note when you rst use your
heater, all of the segment will be outward.
• You must pull the chosen segments
outward for the period that you want the
heater to work.
• If you want to bypass the timer, check
that the all 96 segments are pulled
outward. (Fig 1.)
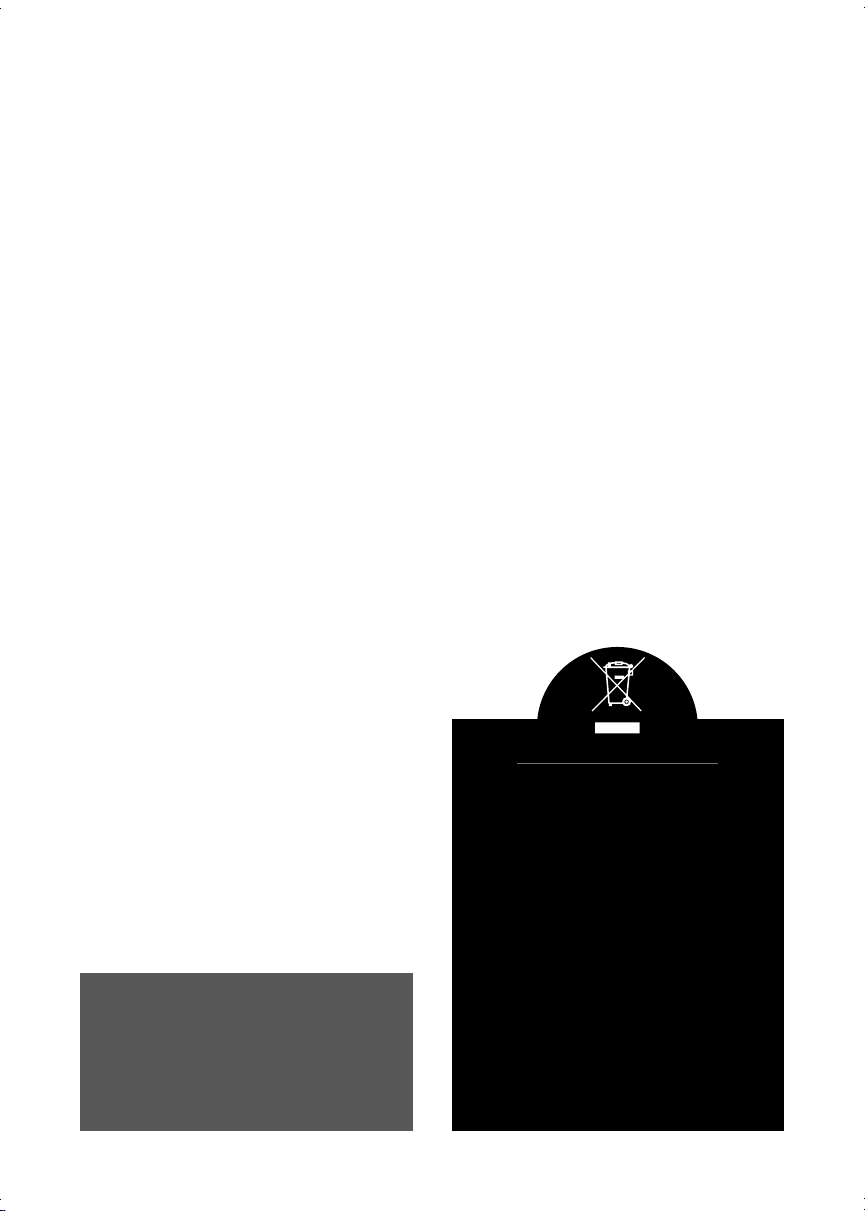
Timer Operation:
1. Plug in the heater.
2. Turn timer dial clockwise to set clock
with the current time of day. (see CLOCK
SETTING)
3. Pull the segments outward for the
period you want the heater to operate.
For example, Figure 2. shows that the
appliance will operate from 2 A.M. to 4.30
A.M. (See Fig. 2.)
4. Push the switch (or switches) in.
5. Once you have set the segments for
the desired heating period, the heater
will cycle on and o according to these
settings.
6. As long as you keep the heater plugged
in, the timer will continue to keep proper
time.
FIG1
All segments
engaged and timer
disengaged
FIG2
Current time set at
9:00 10 segments
engaged Timer set
9www.warmlite.co
CLEANING AND CARE
• The oil heater should be cleaned regularly
to wipe out the dust on the surface of
ns. As the dust may result the radiating
eciency being reduced.
• Unplug from the power supply and allow
the appliance to cool down.
• Wipe with a soft damp cloth. Do not use
detergent or abrasives.
• Avoid scratching the surfaces of radiator
ns with sharp objects and this will
damage the paint surface and allow the
ingress of moisture to the metal body and
may induce rust to form.
• Ensure the oil heater is completely cool.
• Roll up the power cord around the
supports when the heater is not in use.
• Store the appliance in a cool, dry place.
WARNING:
DO NOT IMMERSE ANY ELECTRICAL PART
OF THE APPLIANCE IN WATER SUCH AS
MOTOR UNITS OR PLUGS.
PLEASE SEE CLEANING SECTION FOR
FURTHER INSTRUCTIONS.
DISPOSAL OF THE UNIT
Appliances bearing the symbol shown here
may not be disposed of in domestic rubbish.
You are required to dispose of old electrical
and electronic appliances like this separately.
Please visit www.recycle-more.co.uk or
www.recyclenow.co.uk
for access to information about the recycling
of electrical items.
Please visit www.weeeireland.ie for access to
information about the recycling of electrical
items purchased in Ireland.
The WEEE directive, introduced in August
2006, states that all electrical items must be
recycled, rather than taken to landll.
Please arrange to take this appliance to your
local Civic Amenity site for recycling, once it
has reached the end of its life.
10 CUSTOMER SUPPORT TEAM: +44 (0) 333 220 6056
Model Identier(s): WL43005YT
Item Symbol Valve Unit Item Unit
Heat Output
Type of heat input for electric storage, local space
heaters only (select one)
Nominal heat
output
Pnom 0,9378 kW
Manual heat charge with integrated
thermostat
N/A
Minimum heat
output (indicative)
Pmin 0.0002 kW
Manual heat charge control with room
and/or outdoor temperature feedback
N/A
Maximum
continuous heat
output
Pmax, c 0,9378 kW
Electronic heat charge control with room
and/or outdoor temperature feedback
N/A
Auxiliary electricity
consumption
Fan assisted heat output N/A
At nominal heat
output
elmax N/A kW
Type of heat output/room temperature control
(select one)
At minimum heat
output
elmin N/A kW
Single stage heat output and no room
temperature control
No
In standby mode eISB N/A kW
Two or more manual stages, no room
temperature control
No
With mechanic thermostat room temperature
control
Yes
With electronic room temperature control No
Electronic room temperature control plus day
timer
No
Electronic room temperature control plus
week timer
No
Other control options (multiple selections possible)
Room temperature control with presence
detection
No
Room temperature control with open
window detection
No
With distance control option No
With adaptive start control No
With working time limitation No
With black bulb sensor No
Contact Details: Imported by RK Wholesale LTD., Berryhill Road, Stoke-on-Trent ST4 2NL
11www.warmlite.co
NOTES
0319.V3
We hope you enjoy your appliance for many years.
As a thank you for purchasing one of our fantastic products,
we are oering you an extra 1 year peace of mind.
*To receive your extra guarantee period, register your appliance online
within 28 days of purchase by visiting:
www.warmlite.co
Make sure to retain your original receipt.
Should you have a problem
with your appliance or need any spare parts please call our
Customer Support Team on:
+44 (0) 333 220 6056
Distributed throughout the UK by RK Wholesale LTD