Loading ...
Loading ...
Loading ...
Operation
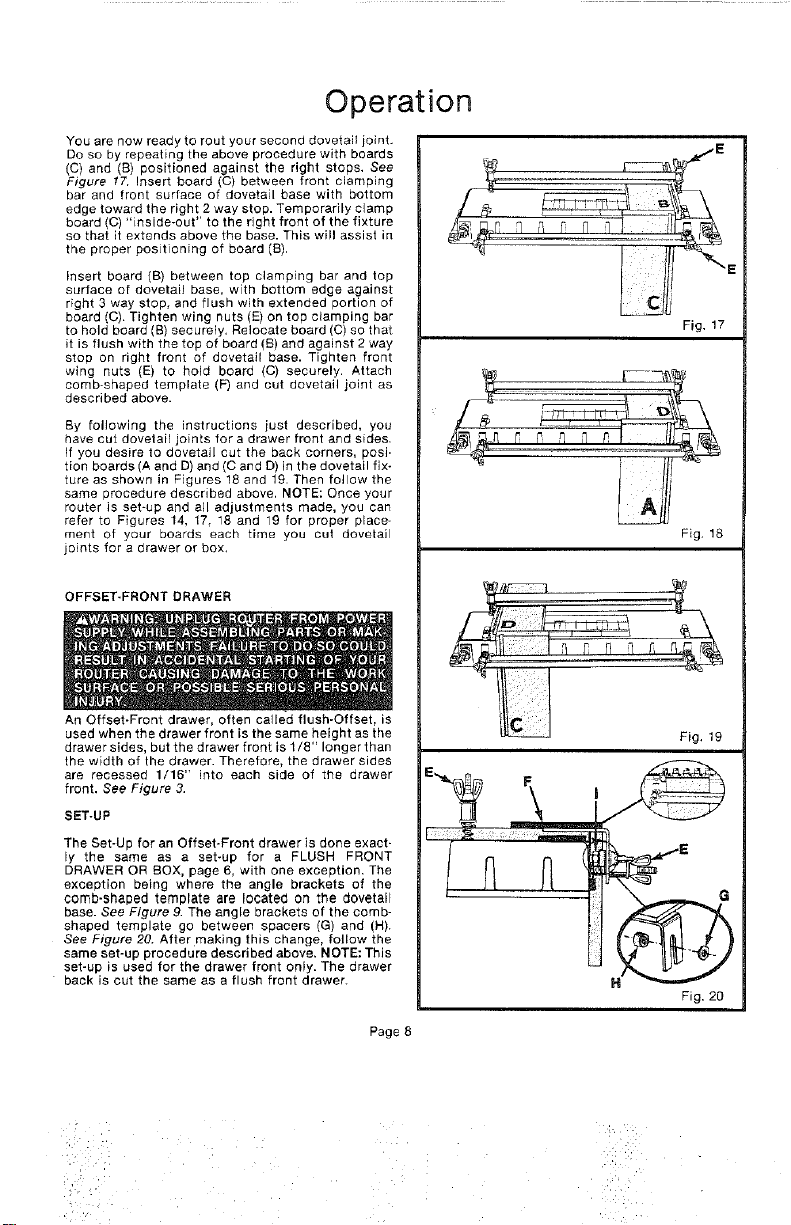
YOU are now ready to rout your second dovetait joint,
Do so by repeating the above procedure with boards
(C) and (B) positioned against the right stops, See
Figure !7. Insert board (C) between front clamping
bar and front surface of dovetail base with bottom
edge toward the right 2 way stop. Temporarily clamp
board (C) "inside-out" to the right front of the fixture
so that it extends above the base. This will assist in
the proper positioning of board (B),
Insert board (B) between top clamping bar and top
surface of dovetail base, with bottom edge against
right 3 way stop, and flush with extended portion of
board (O). Tighten wing nuts (E) on top clamping bar
to hold board (B) securely. Reiocale board (C) so that
it is flush with the top of board (B) and against 2 way
stop on right front of dovetail base. Tighten front
wing nuts (E) to hold board (C) securely. Attach
comb-shaped template (F) and cut dovetail joint as
described above.
By following the instructions just described, you
have cut dovelail joints fora drawer front and sides.
If you desire to dovetail cut the back corners, posi.
tion boards (A and D) and (O and D) in the dovetail fix-
ture as shown in Figures 18 and 19. Then follow the
same )rocedure described above, NOTE: Once your
router is set-up and all adjustments made, you can
refer to Figures 14 17, 18 and 19 for proper place-
ment of your boards each time you cut dovetail
joints for a drawer or box,
OFFSET-FRONT DRAWER
An Offset-Front drawer, often called flush-Offset, is
used when the drawer front is the same height as the
drawer sides, but the drawer front is 1/8" longer than
the width of the drawer. Therefore, the drawer sides
are recessed 1/16" into each side of the drawer
front. See Figure 3.
SET-UP
The Set-Up for an Offset-Front drawer is done exact-
ly the same as a set-up for a FLUSH FRONT
DRAWER OR BOX, page 6, with one exception, The
exception being where the angle brackets of the
comb-shaped template are Iocateci on the dovetail
base. See Figure 9. The angle brackets of the comb-
shaped template go between spacers (G) and (H).
See Figure 20. After making this change, follow the
same set-up procedure described above. NOTE: This
set-up is used for the drawer front only. The drawer
back is out the same as a flush front drawer.
E
L IL
Fig, 17
Fig. 18
Fig. 19
I
H
Fig. 20
Page 8
:i:i_I:, •
:!' :i
Loading ...
Loading ...
Loading ...