Loading ...
Loading ...
Loading ...
Operation
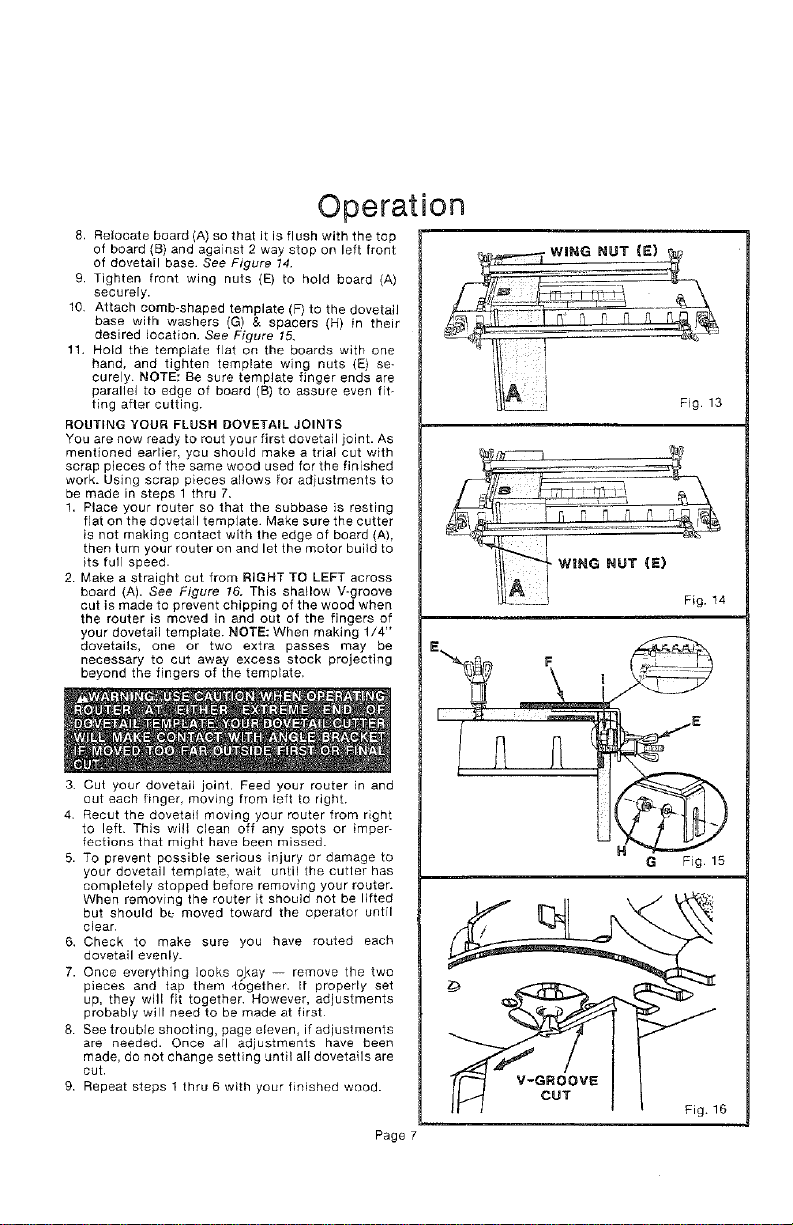
8. Relocate board (A) so that it is flush with the top
of board (B) and against 2 way stop on left front
of dovetail base. See Figure 14.
9. Tighlen front wing nuts {E) to hold board (A)
securely.
10 Attach comb-shaped template (F) to the dovetail
base with washers (G) & spacers (H) in their
desired location. See Figure 15.
11. Hold the template fiat on the boards with one
hand, and tighten template wing nuts (E) se-
curely. NOTE: Be sure template finger ends are
parallel to edge of board (B) to assure even fit-
ting after cutting.
ROUTING YOUR FLUSH DOVETAIL JOINTS
You are now ready to rout your first dovetail joint. As
mentioned earlier, you should make a trial cut with
scrap pieces of the same wood used for the finished
work. Using scrap pieces allows for adjustments to
be made in steps 1 thru 7,
1, Place your router so that the subbase is resting
fiat on the dovetail template. Make sure the cutter
is not making contact with the edge of board (A),
then turn your router on and let the motor build to
its full speed.
2. Make a straight cut from RIGHT TO LEFT across
board (A). See Figure !6. This shallow V-groove
cut is made to prevent chipping of the wood when
the router is moved in and out of the fingers of
your dovetail template. NOTE: When making 1/4"
dovetails, one or two extra passes may be
necessary to cut away excess stock projecting
beyond the fingers of the template.
3. Cut your dovetail joint. Feed your router in and
out each finger moving from left to right.
4. Recur the dovetail moving your router from right
to left. This will clean off any spots or imper-
fections that might have been missed.
5. TO prevent possible serious injury or damage to
your dovetail template, wait until the cutler has
completely stopped before removing your router.
When removing the router it should not be lifted
but should be moved toward the operator until
clear.
6. Check to make sure you have routed each
dovetail evenly.
7. Once everything looks okay -- remove the two
pieces and tap them 4ogether. It properly set
up, they will fit together. However, adjustments
probably will need to be made at first
8. See trouble shooting, page eleven, if adjustments
are needed. Once all adjustments have been
made, do not change setting until all dovetails are
cut.
9. Repeat steps I thru 6 with your finished wood.
Page
Fig. 13
Fig. 14
V-GROOVE
CUT
Fig. 16
Loading ...
Loading ...
Loading ...