Loading ...
Loading ...
Loading ...
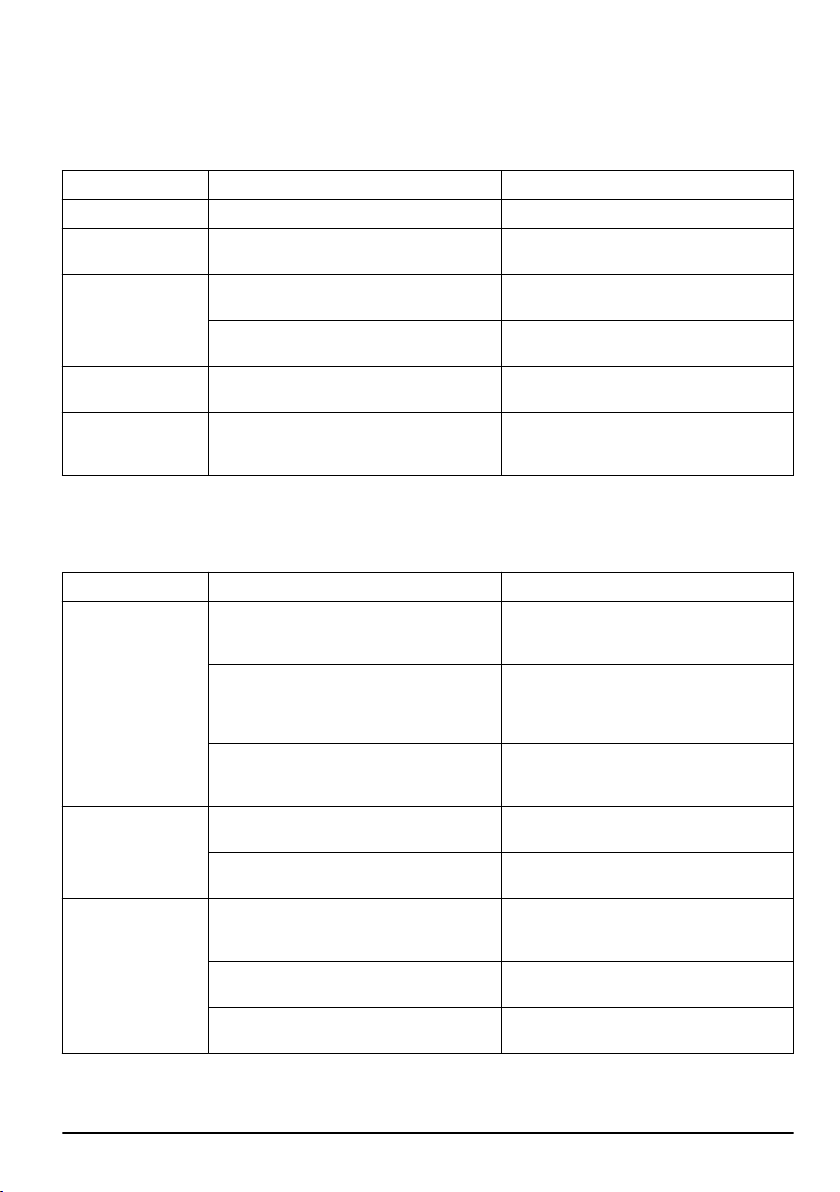
7.4 LED indicator of the charging station for boundary wire installation
The LED indicator of the charging station is green when the installation is correct. If the LED indicator of the charging
station is not green, follow the troubleshooting table below.
Speak to your local Husqvarna representative or go to www.husqvarna.com for more information.
LED indicator Cause Action
Constant green The signals of the charging station are good. No action is necessary.
Flashes green The signals of the charging station are good
and
ECO mode
is enabled.
No action is necessary.
Flashes blue The boundary wire is not connected to the
charging station.
Connect the boundary wire to the charging
station.
The boundary wire is damaged. Replace the damaged section of the boun-
dary wire with new boundary wire.
Flashes red Interference in the antenna of the charging
station.
Speak to your local Husqvarna representa-
tive.
Constant red Error in the circuit board or incorrect power
supply in the charging station.
The error must be corrected by an authorized
service technician. Speak to your local Husq-
varna representative.
7.5 Symptoms
If the product does not operate as usual, follow the symptoms table below. Speak to your Husqvarna customer
service if you cannot find the cause for the fault.
Symptoms
Cause Action
The product has diffi-
culty docking.
The guide wire is not put straight in a line
and correct distance from the charging sta-
tion.
Do a check of the installation of the charging
station. Refer to
To install the charging sta-
tion on page 17
The guide wire is not put in the slot in the
charging station plate.
Make sure that the guide wire is put straight
in a line and put in the slot in the charging
station plate. Refer to
To install the guide
wire on page 18
.
The charging station is not on a level sur-
face.
Put the charging station on a level surface.
Refer to
To examine where to put the charg-
ing station on page 11
.
The product operates
at the wrong time
The time or the date in the product is not
correct.
Set the time or date. Refer to
Time & date on
page 23
.
The start and stop times for operating are
incorrect.
Change the
Schedule
settings. Refer to
Schedule on page 20
.
The product vibrates. The cutting system is not in balance because
of damaged blades.
Examine the blades and screws and replace
them if necessary. Refer to
Replacement of
the blades on page 29
.
The cutting system is not in balance because
of too many blades in the same position.
Do a check that only one blade is attached at
each screw.
Different thickness of blades are installed on
the product.
Do a check if the blades are of different thick-
ness and replace if necessary.
2071 - 001 - 29.03.2023 Troubleshooting - 37
Loading ...
Loading ...
Loading ...