
Loading ...
Loading ...
Loading ...
16
14. CLEANING THE INFUSER
Important!
The infuser (A6) cannot be removed while the machine is on.
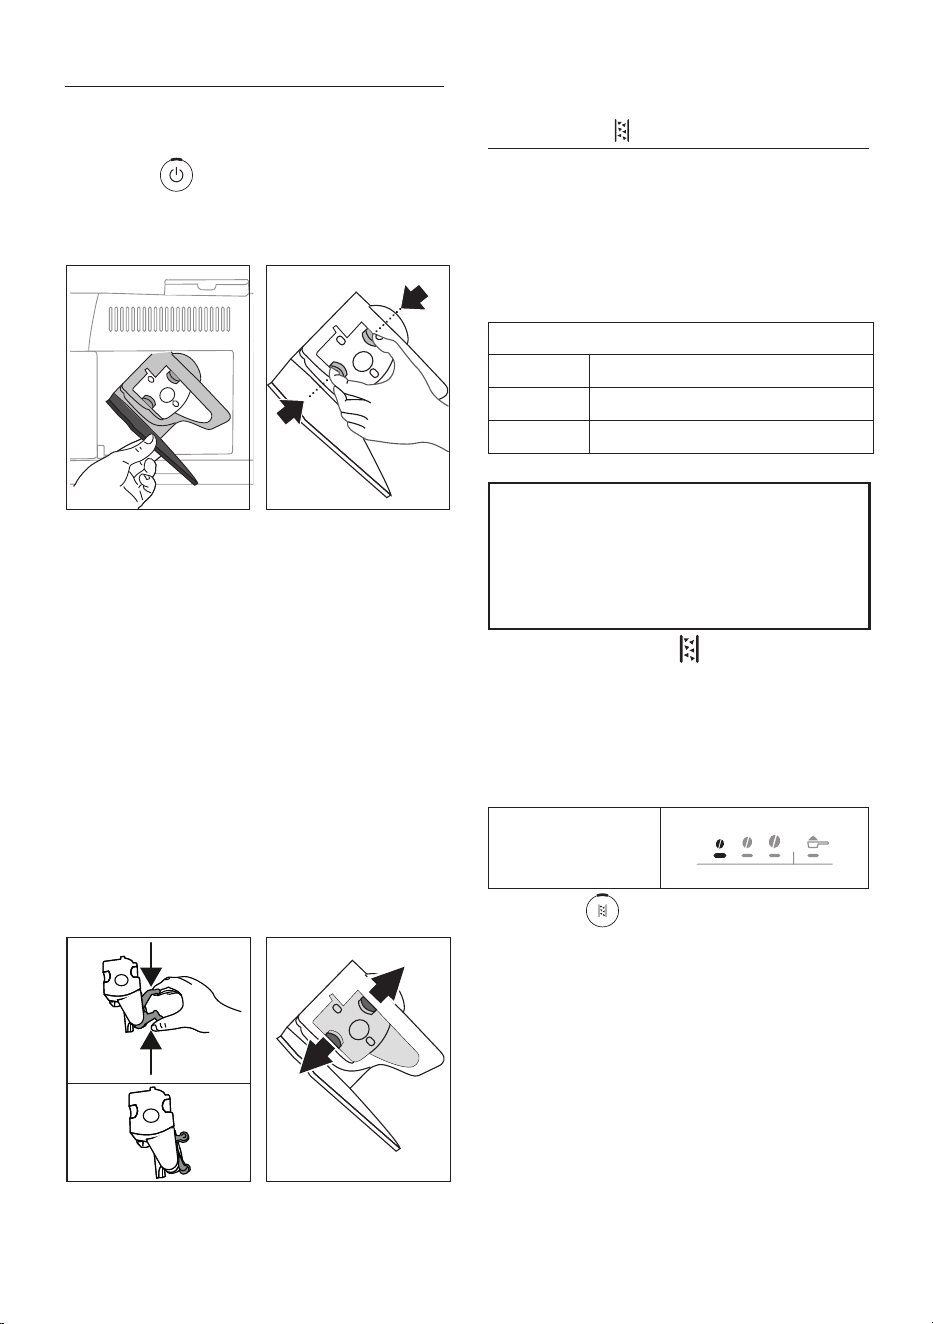
1. Press the button (B1)to turn the machine o;
2. Remove the water tank (A9);
3. Open the infuser door, positioned on the right hand side
(g. 23);
PUSH
23 24
PUSH
4.
Press the two coloured release buttons inwards (g. 24), at
the same time pulling the infuser outwards;
5. Soak the infuser in water for about 5 minutes, then rinse
under the tap;
Important!
RINSE WITH WATER ONLY
NO DETERGENTS - NO DISHWASHER
6. Do not use detergents when cleaning the infuser, as they
could damage it.
7. Use the brush to remove any coee residues left in the
infuser housing, visible through the infuser door;
8. After cleaning, replace the infuser by sliding it onto the
internal support, then push the PUSH symbol fully in until
it clicks into place;
Please note:
If the infuser proves dicult to insert, adapt it (before inser-
tion) to the right position by pressing the two levers (g. 25).
25 26
PUSH
9. Once inserted, make sure the two coloured buttons have
snapped out (g. 26);
10. Close the infuser door;
11. Put the water tank back.
15. DESCALING
• Before use, read the instructions and the labelling on the
descaler pack.
• Use De’Longhi descaler only. Using unsuitable descaler
and/or performing descaling incorrectly may result in
faults not covered by the manufacturer’s guarantee.
• Descaler can cause damage to delicate surfaces. If the
product is accidentally spilt, dry immediately.
To descale
Descaler De’Longhi descaler
Container Recommended capacity: 2 l
Time ~30min
Important:
If the water softener lter is installed, it must be re-
moved before adding the descaler solution.
Thereafter, reinstate the lter at the start of step 3
Descale the machine when the indicator (B13) lights up on
the control panel.
Please note:
• Once the descaling cycle has begun, it cannot be inter-
rupted and must be completed with the entire rinse cycle.
With this in mind, make sure there is sucient descaler.
Proceed as follows:
Step 1: Descaling
action
1. Press the button (B4) and hold for at least 5 sec-
onds, until the relative Led starts ashing rapidly. The
mild intensity Led lights up to indicate that step 1 of the
descale cycle is in progress;
2. Empty the drip tray (A11) and the grounds container
(A10) and reposition them; empty the water tank com-
pletely (A9) and remove the softener lter (if installed);
3. Pour the descaler into the tank, lling to level A (which
corresponds to a 100ml pack) marked on the side (front)
of the tank (g. 27); next, add water (one litre) up to
level B (g. 28); nally, reposition the water tank in the
machine;
Loading ...
Loading ...
Loading ...