Loading ...
Loading ...
Loading ...
10
Please note:
In energy saving mode, a few seconds may elapse before hot
water emerges as the appliance must heat up.
10. WATER SOFTENER FILTER
To ensure the performance of the machine remains constant
over time, we recommend using a De’Longhi water softener
lter.
For more information, visit the www.delonghi.com website.
EAN: 8004399327252
To use the lter correctly, follow the instructions below.
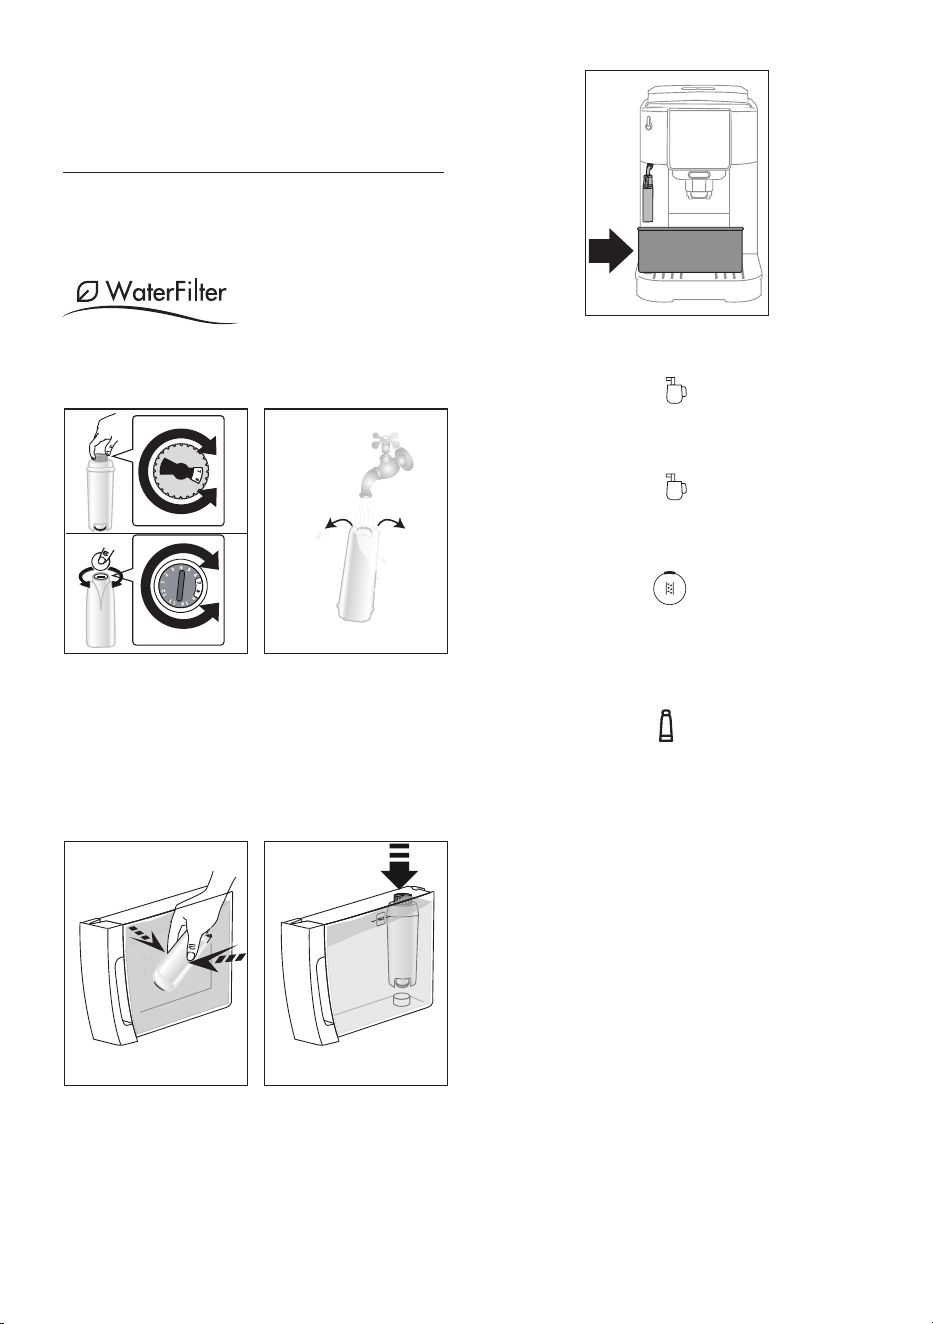
1. Remove the lter from the packaging and turn the date
indicator to view the next two months (g. 18);
19
0,5 L
18
2. To activate the lter, run tap water through the hole in the
centre of the lter until water comes out of the openings
at the side for more than a minute (g. 19);
3. Remove the tank from the machine and ll with water; insert
the lter in the water tank, immersing it completely for about
ten seconds, while tilting it and applying light pressure so that
the air bubbles are able to escape (g. 20);
2120
20
4. Insert the lter in the relative housing
and press fully
home (g. 21);
5. Close
the tank with the lid, then reposition the tank in the
machine;
6. Place an empty container of at least 0.5 litres capacity
under the steam/hot water spout (g. 22).
22
0,5 L
7. See instructions in section “12. Settings menu” for instal-
lation of the lter;
8. The Led relative to the Steam button starts ashing
rapidly: turn the steam/hot water dial (A19) to the I po-
sition (g. 12);
9. The appliance delivers hot water, then stops automatically;
10. The Led relative to the Steam button starts ashing
rapidly: turn the steam/hot water dial to the O position;
11. The lter is now active and the machine can be used.
Please note:
If the Led relative to the button (B4) ashes rapidly,
press the button. This will cause the internal circuits of the
machine to start lling up, expelling the air bubbles that have
been formed and allowing the installation to proceed.
10.1 Replacing the lter
Replace the lter when the indicator (B9) lights up.
1. Remove the water tank and the spent lter;
2. Follow the operations described in the previous section to
activate the lter;
3. See instructions in section “12. Settings menu” to set the
machine and repeat steps 8 to 11 of the preceding section.
Please note:
After two months (see date indicator) or when the appliance
has not been used for 3 weeks,the lter should be replaced
even if the message has not yet been displayed.
10.2 Removing the lter
To continue using the appliance without the lter, it must be
removed, and the appliance notied of its removal.
1. Remove the water tank and the spent lter;
2. See instructions in section “12. Settings menu” to set the
machine.
Please note:
After two months (see date indicator) or when the appliance has
not been used for 3 weeks, the lter should be replaced even if the
message has not yet been displayed.
Loading ...
Loading ...
Loading ...