

20V BRUSHLESS
CORDLESS 18ga BRAD NAILER/STAPLER
241-0497
OPERATOR’S MANUAL
CAUTION: To Reduce The Risk Of Injury, User Must Read And
Understand Operator's Manual. Save These Instructions For Future Reference.
For questions about this product, please call 1-866-915-8626

2
IMPORTANT SAFETY INSTRUCTIONS
a) Keep work area clean and well lit. Cluttered and dark areas invite accidents.
b) Avoid dangerous environments. Do not operate power tools in explosive
atmospheres, such as in the presence of flammable liquids, gases or dust.
Power tools create sparks which may ignite the dust or fumes.
c) Keep children and bystanders away while operating a power tool. Distractions
can cause you to lose control.
d) Keep the tool pointed away from yourself and others at all times and keep hands,
any body parts away from work area to guard against possible injury.
e) Use safety equipment. Always wear eye protection and ear protection. Safety
equipment such as dust mask, non-skid safety shoes, hard hat, or hearing
protection should be used for appropriate conditions.
f) Power tool plugs must match the outlet. Never modify the plug in any way.
Do not use any adapter plugs with grounded power tools. Unmodified
plugs and matching outlets will reduce risk of electric shock.
g) Do not keep the trigger or safety depressed during the loading of fasteners as the
unintentional firing of a fastener could cause personal injury.
h) Disconnect the tool from the power source before making any adjustments,
changing accessories, or storing power tools. Such preventive safety measures
reduce the risk of starting the power tool accidentally.
i) Do not fire if the nails/staples are jammed. This will cause damage to the driver
blade and could invite accidents.
j) DO NOT use on hard surface such as rock, concrete, masonry, bricks or steel.
Personal injury or damage to the power tool could result.
k) Do not drive fasteners close to the edge of the work piece.
l) Do not drive fasteners on top of nailed fastener.
m) Only use parts and accessories recommended by manufacturer.
WARNING When using electric tools, machines or equipment, basic safety
precautions should always be followed to reduce the risk of e, electric shock,
and personal injury.
READ
ALL
INSTRUCTIONS BEFORE USING THIS TOOL

3
Always assume that the tool contains nails. Careless handling of the nailer can result in
unexpected firing of nails and personal injury.
Do not point the tool towards yourself or anyone nearby. Unexpected triggering will
discharge the nail causing an injury.
Do not actuate the tool unless the tool is placed firmly against the workpiece. If the
tool is not in contact with the workpiece, the nail may be deflected away from your target.
Disconnect the tool from the power source when the fastener jams in the tool. While
removing a jammed fastener, the nailer may be accidentally activated if it is plugged in or
battery is inserted.
Use caution while removing a jammed nail. The mechanism may be under compression
and the nail may be forcefully discharged while attempting to free a jammed condition.
Do not use this nailer for fastening electrical cables. It is not designed for electric cable
installation and may damage the insulation of electric cables thereby causing electric shock
or fire hazards.
Hold power tool by insulated gripping surfaces, when performing an operation where
the nail may contact hidden wiring. Nails contacting a “live” wire may make exposed metal
parts of the power tool “live” and could give the operator an electric shock.
Know your power tool. Read operator’s manual carefully. Learn its applications and
limitations, as well as the specific potential hazards related to this power tool. Following this
rule will reduce the risk of electric shock, fire, or serious injury.
Always wear eye protection with side shields marked to comply with ANSI Z87.1.
Everyday glasses have only impact resistant lenses. They are not safety glasses. Following
this rule will reduce the risk of serious personal injury.
Eye protection which conforms to ANSI specifications and provides protection against
flying particles both from the FRONT and SIDE should ALWAYS be worn by the
operator and others in the work area when loading, operating or servicing this tool. Eye
protection is required to guard against flying fasteners and debris, which could cause severe
eye injury. The employer and/or user must ensure that proper eye protection is worn. We
recommend. Wide Vision Safety Mask for use over eyeglasses or standard safety glasses
that provide protection against flying particles both from the front and side. Always use eye
protection which is marked to comply with ANSI Z87.1.
Additional safety protection will be required in some environments. For example, the
working area may include exposure to noise levels which can lead to hearing damage. The
employer and user must ensure that any necessary hearing protection is provided and used
by the operator and others in the work area. Some environments will require the use of head
protection equipment. When required, the employer and user must ensure that head
protection conforming to ANSI Z89.1-1997 is used.
Keep fingers away from trigger when not driving fasteners to avoid accidental firing.
Use safety equipment. Always wear eye protection. Dust mask, nonskid safety shoes,
hard hat, or hearing protection must be used for appropriate conditions.
Protect your lungs. Wear a face or dust mask if the operation is dusty. Following this
rule will reduce the risk of serious personal injury.
Protect your hearing. Wear hearing protection during extended periods of operation.
Following this rule will reduce the risk of serious personal injury.
Battery tools do not have to be plugged into an electrical outlet; therefore, they are
always in operating condition. Be aware of possible hazards when not using your battery
tool or when changing accessories. Following this rule will reduce the risk of electric shock,
fire, or serious personal injury.
Do not place battery tools or their batteries near fire or heat. This will reduce the risk of
explosion and possible injury.
Use the tool only for its intended use. Do not discharge fasteners into open air.
Use the tool only for the purpose for which it was designed.
Use only the nails recommended for this tool. Use of the wrong nails could result in poor
nail feeding, jammed nails, and nails leaving the tool at erratic angles. If nails are not feeding
smoothly and properly, discontinue their use immediately. Jammed and improperly feeding
nails could result in serious personal injury.
SAFETY PRECAUTIONS FOR CORDLESS NAILER & STAPLER
Battery Voltage:20VDC
Firing Speed:average 60 shots/min, max 100 shots/min.
Max Magazine capacity:105 nails/staples
Nails range:18GA Brad 3/4" - 2"
Staples range: 18GA 1/4"Crown Staple 3/4" - 1-9/16"
4
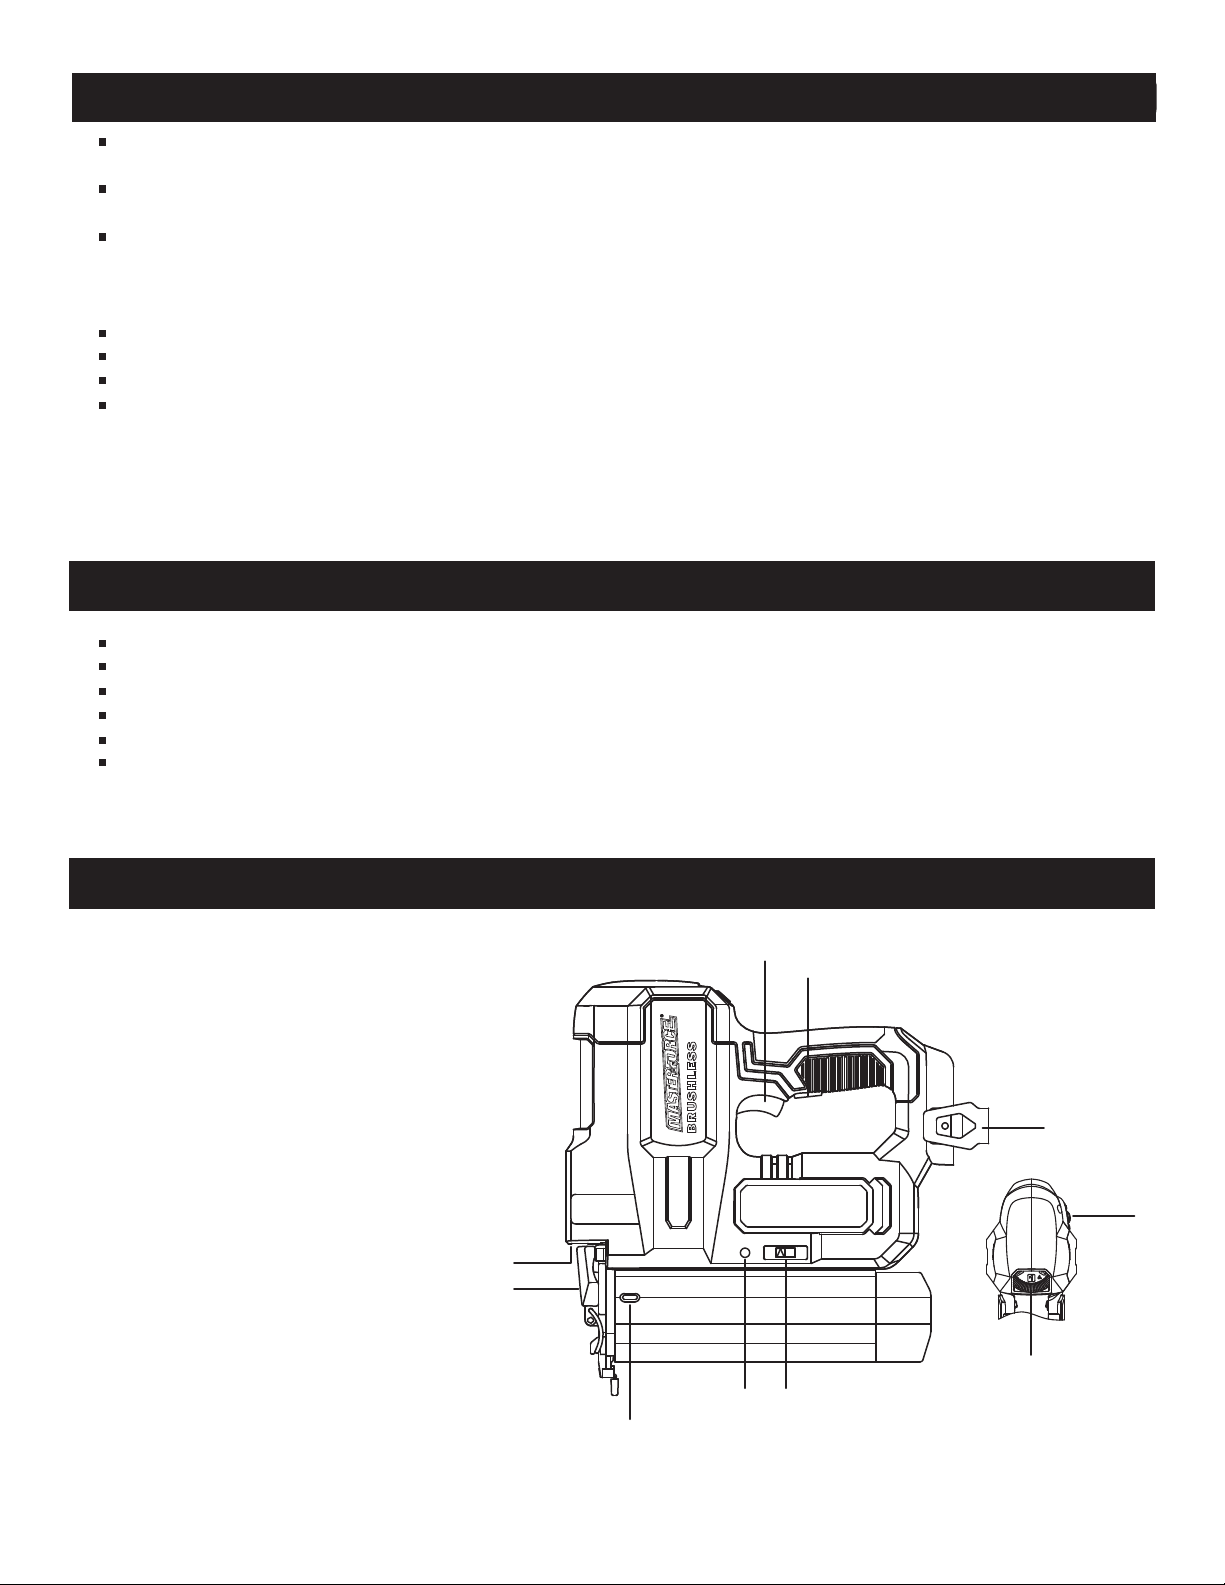
FUNCTION
CRIPTION
1. Trigger
2. Led work light
3. Easy-to-Clear Nose
4. Nails view window
5. LED indicator
6. Single /Contact Firing knob
7. LED WORK LIGHT TRIGGER
8. Belt Hook
9. Depth adjustment knob
10. Impact force adjustment knob
Never use this tool in a manner that could cause a nail to be directed toward
anything other than the workpiece.
Do not use the tool as a hammer.
Always carry the tool by the handle.
Do not alter or modify this tool from the original design or function without
approval from the manufacturer.
Always be aware that misuse and improper handling of this tool can cause injury
to yourself and others.
Never clamp or tape the trigger or workpiece contact in an actuated position.
Never leave tool unattended if the battery is installed.
Do not operate this tool if it does not contain a legible warning label.
Keep the tool and its handle dry, clean and free from oil and grease. Always
use a clean cloth when cleaning. Never use brake fluids, gasoline, petroleum-
based products, or any strong solvents to clean your tool. Following this rule will
reduce the risk of loss of control and deterioration of the enclosure plastic.
SAFETY PRECAUTIONS FOR CORDLESS NAILER & STAPLER
1
2
3
4
5 6
10
9
8
7
SPECIFICATIONS

5
ADJUSTMENTS
OPERATING PROCEDURES
Inserting and Removing the Battery Pack
a) Insert the battery pack into the grip until it clicks in place.
b) To remove the battery pack, depress the lock buttons simultaneously and pull
the pack out of the machine.
LED INDICATOR:
LED Red on=Low battery
LED Red flashing=The nails/staples are jammed.
LED Green on=No nails, power tool in dry fire protection
LED Green flashing=Overheat,power tool in overheat protection (The tool can not
fire in this situation,return to work after it has cooled down)
ADJUSTMENTS
OPERATING PROCEDURES
LED Lighting
Led lighting can be turned on when the machine is working, or press the led
work light switch.
Checking the contact trip mechanism
Remove all staples or nails from the magazine.
Press the safety nose/contact pin and pull the trigger. The safety nose/contact
pin and the trigger should move freely.
Reload the staples or nails to the magazine.
Do not use the tool if the safety nose/contact pin cannot move freely.
Place the contact pin on the workpiece and press the machine without pulling
the trigger, the machine should not fire. Lift the machine off the workpiece, the
contact pin should spring back automatically. Pull the trigger, the machine should
not fire.
Inserting Staples or Nails into the magazine (See FIG 1,FIG 2)
NOTE: The number of staples or nails left in the magazine can be read using
the viewing window.
1 . Remove battery pack from the tool.
2 . Press the release button and pull out the magazine cover.
3 . Tilt the tool (approximately 45° Angle) and place nails/staples into the track of
the magazine channel.
Make sure that the fasteners are placed correctly:
Staples are placed against the profiled side of the rail, the crown of the
staple is in the topmost part of the magazine(legs are facing away from the
body of the tool).
Nails are placed against the profiled side of the rail, with the points of the nails
facing downwards, the leg of the nail is in the bottom of the magazine.
4 . Close the magazine cover until it engages with the release button.
5. Reattach battery pack to tool.
Warning: Do not place fasteners of different length. Do not place staples and
nails mixed together.
B. Loading nails
A.Loading staples
!
Fig.1
Fig.2
45°
45°
6
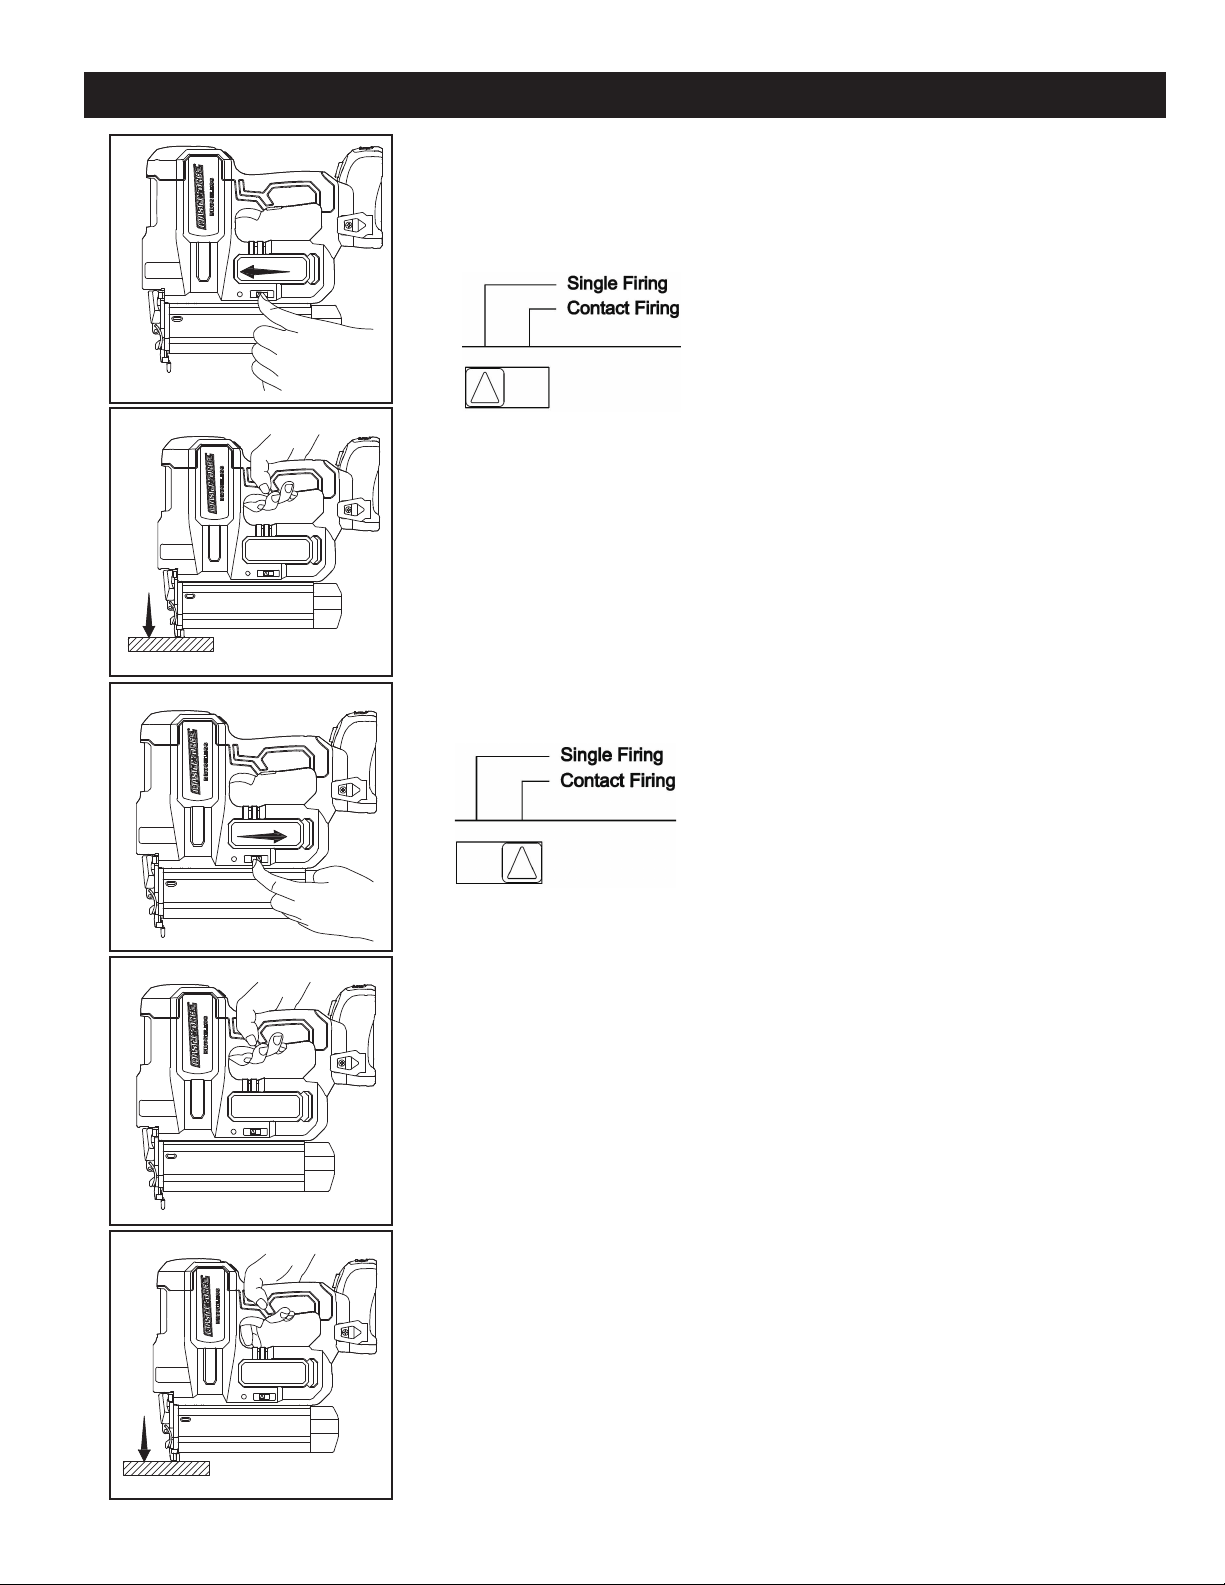
1) Single Firing Mode:(See FIG. 3, FIG. 4)
Push the drive shift (single/contact firing knob) to left side, it is on Single Firing
mode. Single Firing is good for precision placement.
Step 1: Push the drive shift to left side.
Step 2: Depress the safety contact pin against the work piece.
Step 3: Squeeze the trigger to fire the staple or nail.
Step 4: Release the trigger and safety contact pin after firing.
Firing next staple or nail, repeat step 2 ~ step 4
The safety contact pin must be depressed before the trigger is squeezed.
ADJUSTMENTS
OPERATING PROCEDURES
Fig.3
Fig.4
Fig.5
Fig.6
Fig.7
2) Contact Firing Mode:(See FIG. 5, FIG. 6, FIG. 7)
Push the drive shift (single/contact firing knob) to right side, it is on Contact
Firing mode.
Contact Firing is good for conveniently and quickly firing.
Step 1: Push the drive shift to right side.
Step 2: Squeeze the trigger, keep squeezing and don’t release.
Step 3: Depress the safety contact pin against the work piece
to fire the nail or staple.
Step 4: Keep squeezing the trigger all the time but release safety
contact pin after firing.
Step 5: Press it against the next area you want to fire a nail or
staple into. When the contact pin is pressed against the work piece
the tool will fire.
Firing next staple or nail , repeat step 4~step 5
The trigger must be squeezed the entire time the saftey contact pin is
being depressed.
Two modes of firing: Single Firing and Contact Firing.
Do not keep the trigger depressed when the tool is not in use, to prevent
accidental firing.
A significantly reduced working period after charging indicates that the
battery is used and must be replaced.
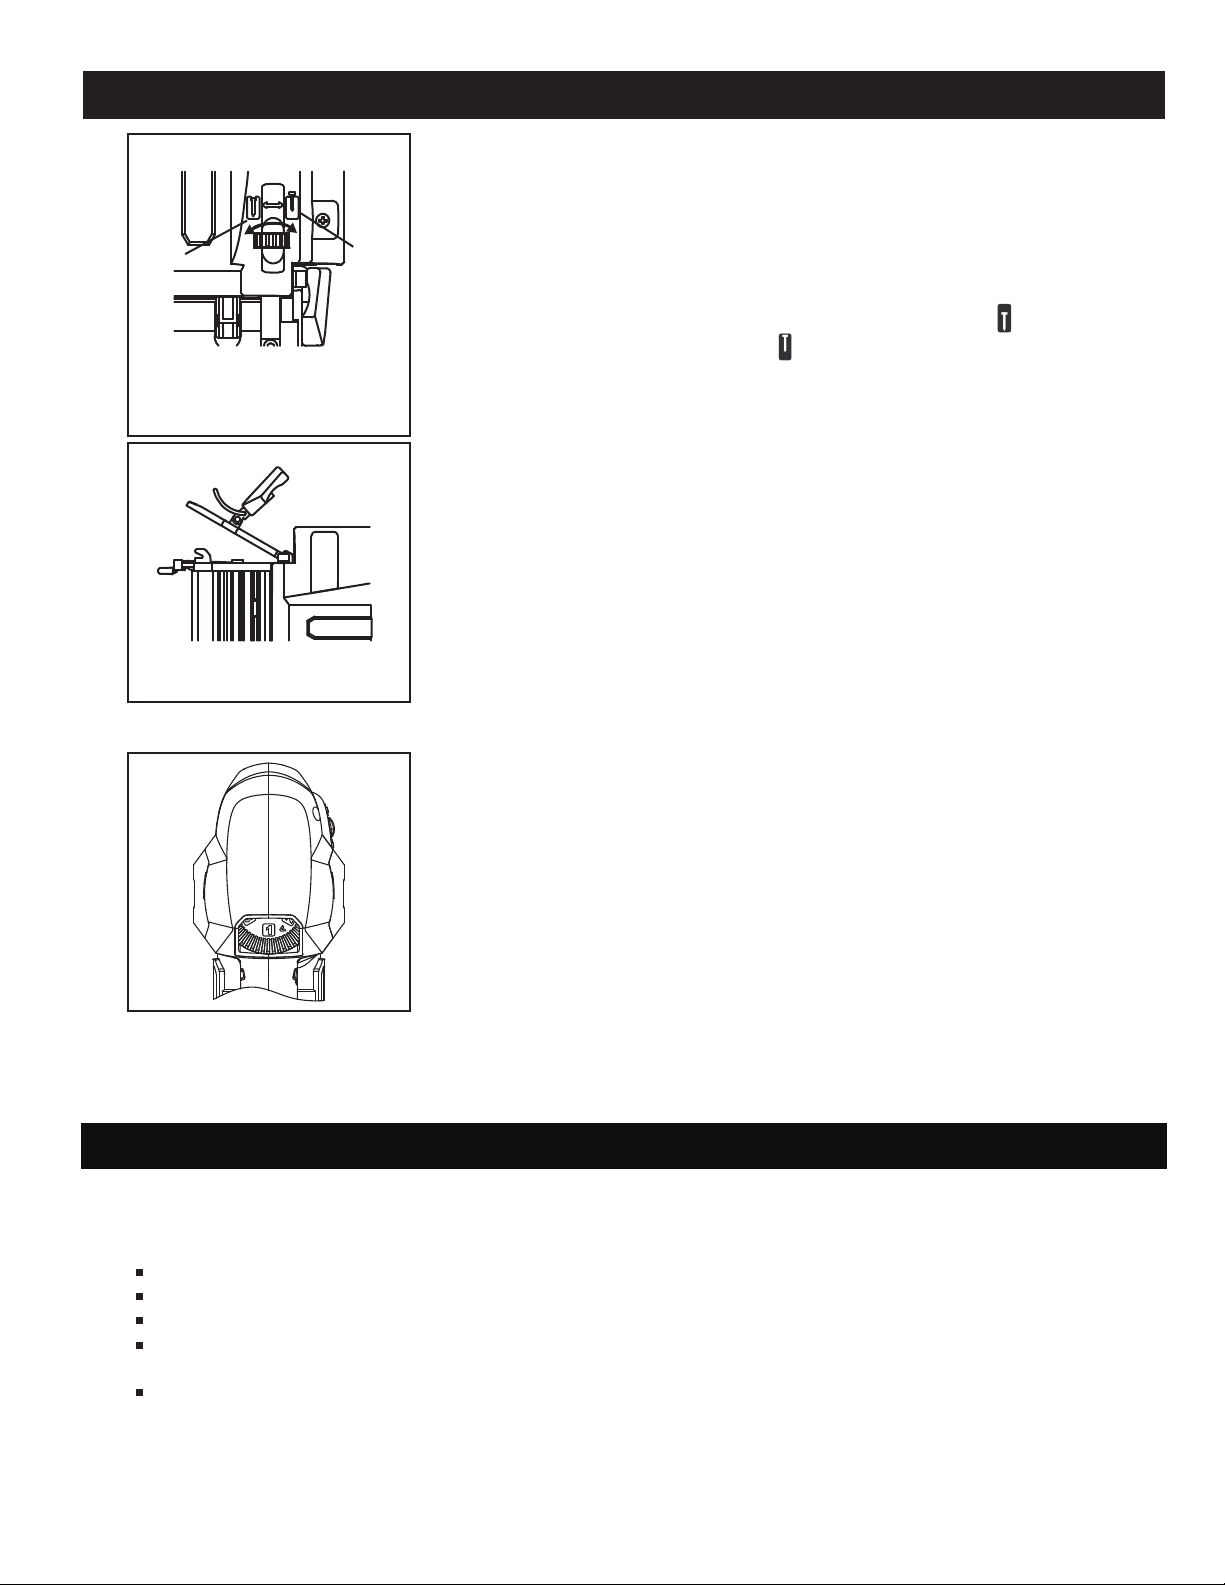
Depth Adjustment Wheel(FIG. 8)
Depth adjustment helps protect work surface and allows proper setting of
nail heads.
For more depth, turn the depth adjustment wheel towards .
For less depth, turn the wheel to .
Removing a jammed nail or staple(FIG. 9)
Note: You must remove any jammed nail/staple before using the tool .
Otherwise, it could cause damage to the mechanism.
Remove the battery pack from the tool.
Open the magazine, remove the staples or nails in channel.
If the fasteners remain jammed after following the above instructions,
open the nosepiece by pulling upwards, then remove the jammed fastener
pieces(Fig9).
Remove the jammed nail with pliers if necessary. After the jammed nail has
been successfully removed , re-tighten the nose piece securely.
With the magazine open, re-insert the battery and shoot 2-3 times, if all is
clear, reload the nails/staples.
The impact force can be adjusted according to the material by using the
impact force knob.The setting range is between stages 1-6. Stage 1 refers
to the lowest impact force, stage 6 to the highest(Fig.10).
If the impact force is set too high, there is a risk that the material to be
attached will be pierced.
If the impact force is set too low, the staples cannot penetrate the material
deeply enough and will not be attached properly.
The required impact force depends on the material and can be determined
by way of field-testing.
ADJUSTMENTS
7
OPERATING PROCEDURES
More
depth
Less
depth
Fig.8
Fig.9
Attention! Always remove the battery before carrying out any work on the machine.
If the tool will not drive a nail, or cycles without driving a nail, glue residue from the nail
strip may need to be cleaned from the area around the driving mechanism.
Remove the battery pack.
Remove nails from the tool.
Open the jam release latch and the magazine.
Use a small amount of air tool oil on a clean cloth or cotton swab to wipe down the
nail channel, removing all traces of glue.
Reinstall nails in the tool and close the magazine
Avoid using solvents when cleaning plastic parts. Most plastics are susceptible to damage
from various types of commercial solvents and may be damaged by their use. Use clean
cloths to remove dirt, dust, oil, grease, etc.
ADJUSTMENTS
MAINTENANCE
Fig.10

ADJUSTMENTS
8
TROUBLESHOOTING
PROBLEM POSSIBLE CAUSE SOLUTION
Work-contacting pin does not de-
press fully - tool does not operate
Low nails
Work-contacting pin is jammed
Replenish nails
Remove battery and clear debris
Tooloperates properly, but fasteners do
not drive fully
Air pressure is too low
Depth of drive isn’t deep enough
Nail is too long for wood hardness
Increase air pressure
Adjust depth of drive
Use nail length that is appropriate for
wood
Tool operates properly,but fasteners
are driven too deep
Air pressure is too high
Depth of drive is too deep
Decrease air pressure
Adjust depth of drive
Tool jams frequently Incorrect nails
Damaged nails
Loose magazine
Dirty magazine
Verify that nails are the correct size
Replace nails
Tighten screws
Clean magazine
Tool stops and LEDs flash rapidly Battery is low or has no charge
Tool is hot
Recharge battery
Allow tool to cool
Tool has charged battery and LEDs
are slowly flashing or LEDs do not turn
off after approximately ten seconds of
non-use
Tool has malfunctioned Take tool to nearest authorized repair
center
Tool will not drive a fastener or cycles
without driving a fastener
Driving mechanism is dirty Clean the nail channel as described in
the Maintenance section of the manual

9
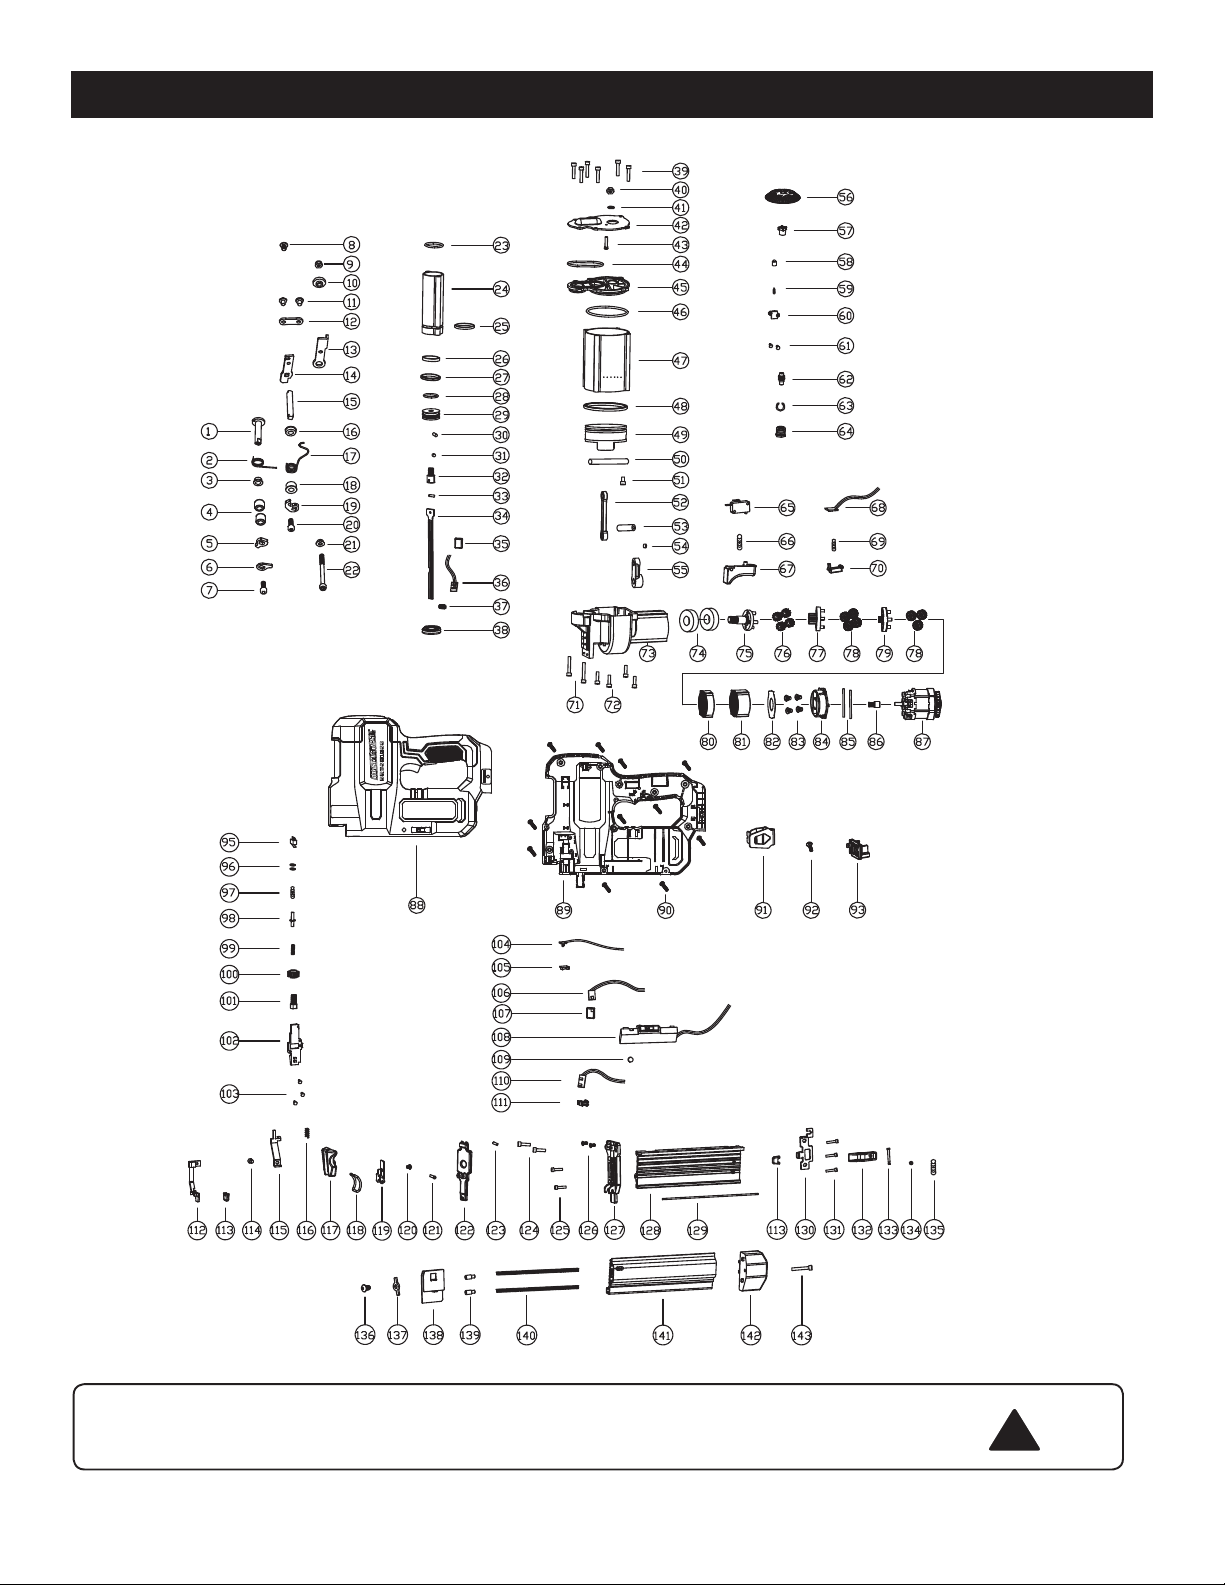
PARTS LIST
Please refer to the schematic drawing on page 10.
10
SCHEMATIC DRAWING
!
WARNING: Repairs should be made by an authorized repair center. Do not open or
disassemble this power tool. Contact customer service at 1-866-915-8626
for questions regarding this power tool.
SAVE YOUR RECEIPTS
THIS WARRANTY IS VOID WITHOUT THEM
20V BRUSHLESS
CORDLESS 18ga BRAD NAILER/STAPLER
WARRANTY
90-DAY MONEY BACK GUARANTEE:
This MASTERFORCE
®
.eetnarauG kcaB yenoM YAD-09 ruo seirrac loot rewop dnarb
If you are not completely
with your MASTERFORCE
®
brand power tool for
any reason within ninety (90) days from the date of purchase, return the tool with your
original receipt to any MENARDS
®
retail store, and we will provide you a refund – no
questions asked.
3-YEAR LIMITED WARRANTY:
This MASTERFORCE
®
brand power tool carries our famous No Hassle 3-Year Limited
Warranty to the original purchaser. If, during normal use, this MASTERFORCE
®
power
tool breaks or fails due to a defect in material or workmanship within three (3) years from
the date of original purchase, simply bring this tool with the original sales receipt back
to your nearest MENARDS
®
retail store. At its discretion, MASTERFORCE
®
agrees
to have the tool or any defective part(s) repaired or replaced with the same or similar
MASTERFORCE
®
product or part free of charge, within the stated warranty period,
when returned by the original purchaser with original sales receipt. Not withstanding
the foregoing, this limited warranty does not cover any damage that has resulted from
abuse or misuse of the Merchandise. This warranty: (1) excludes expendable parts
including but not limited to blades, brushes, belts, bits, light bulbs, and/or batteries; (2)
shall be void if this tool is used for commercial and/or rental purposes; and (3) does
not
cover any losses, injuries to persons/property or costs. This warranty does give you
legal rights and you may have other rights, which vary from state to state. Be
careful, tools are dangerous if improperly used or maintained. Seller’s employees are
not quali
ed to advise you on the use of this Merchandise. Any oral representation(s)
made will not be binding on seller or its employees. The rights under this limited
warranty are to the original purchaser of the Merchandise and may not be transferred
to any subsequent owner. This limited warranty is in lieu of all warranties, expressed
or implied including warranties or merchantability and
for a particular purpose.
Seller shall not be liable for any special, incidental, or consequential damages. The
sole exclusive remedy against the seller will be for the replacement of any defects
as provided herein, as long as the seller is willing or able to replace this product or is
willing to refund the purchase price as provided above. For insurance purposes, seller
is not allowed to demonstrate any of these power tools for you.
For questions / comments, technical assistance or repair parts –
Please Call Toll Free at: 1-866-915-8626. (M-F 9am – 5pm)
11

© 2021 Menard, Inc., Eau Claire, WI 54703 05/2021
