
Loading ...
Loading ...
Loading ...
English - 6
AIR FRYER OVEN ACCESSORIES
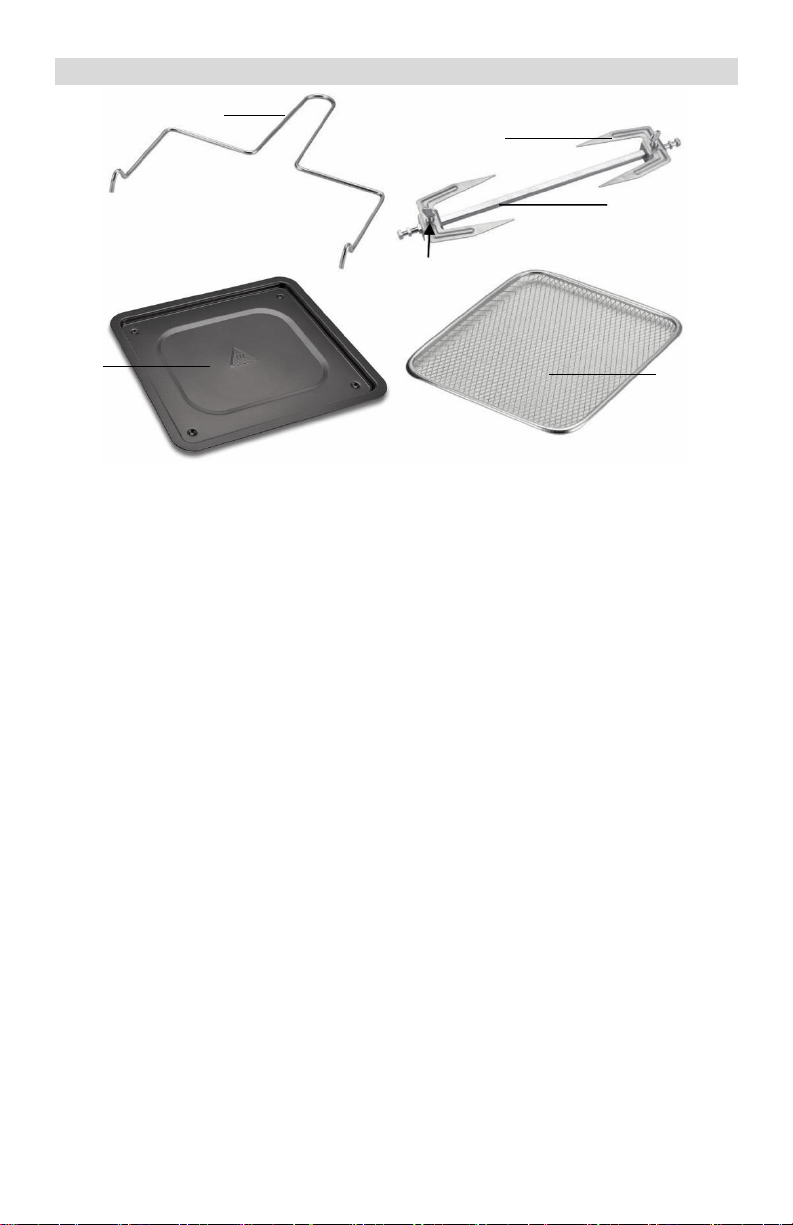
Rotisserie Forks
Drip Tray
Crisping Tray
(X2)
Drip Tray
The drip tray should always be inserted so that any dripping fat, crumbs, or other food
residue can be collected in it. It slides into the bottom of the cooking chamber.
Crisping Trays
The crisping trays are used for crisping, baking, warming, and drying. They can also
be used as a rack for small baking dishes.
The crisping trays slide onto the side rails in the cooking chamber. The heating
element is located at the top of the cooking chamber, so the higher a crisping tray is
placed, the more intense the heat is from above. On the top rack, the food is cooked
faster and crispier. The middle position should be chosen to achieve even heating
from all sides. The bottom rails are suitable for less intense cooking.
Rotisserie
The rotisserie consists of the shaft and two rotisserie forks. The rotisserie feature is
suitable for cooking large pieces of meat, e.g. chicken or grilled or roast pork.
To use the rotisserie function, assemble the rotisserie shaft and forks and insert the
rotisserie assembly into the air fryer:
1. Slide one of the rotisserie forks onto the shaft and lock it with the locking screw.
The shaft contains a small round notch for the tip of the locking screw. In the
case of smaller pieces of food, the rotisserie forks can be secured more centered
on the shaft. Note: The shaft contains two small round notches marking the
outermost position of the locking screws. These locking screws must not be
attached any further than the outer ends of the shaft to ensure that smooth
operation is possible. Do not place any foods that are too large onto the rotisserie
shaft, so that it can rotate without any interference.
2. Slide the food to be grilled onto the rotisserie fork. Try to center the food on the
shaft. Slide the other rotisserie fork onto the shaft and food and lock it with the
locking screw.
3. Plug one end of the shaft into the round hub on the left-hand side of the cooking
chamber, then hang the other end of the shaft into the support on the right-hand
side of the cooking chamber. Ensure that the shaft fits securely. The rotisserie
must not be able to rotate about its own axis when the air fryer is switched off. If
this is not the case, push the left-hand end of the shaft deeper into the holder.
Rotisserie Shaft
Locking Screws
Removal Tool
Loading ...
Loading ...
Loading ...