Owner’s Manual
Convection Steam Oven
Household Use Only
Model No.
NU-SC180B
PLEASE READ THESE INSTRUCTIONS CAREFULLY
BEFORE USING THIS PRODUCT, AND SAVE THIS
MANUAL FOR FUTURE USE.
F0003CF00AP
PA0122-0
Printed in China
© Panasonic Appliances Microwave Oven (Shanghai) Co., Ltd. 2022
To register your product and for all other assistance, please contact us via the web at:
http://shop.panasonic.com/support (U.S.A Only)
Scan this code for product registration
Scan to
Find Recipes!
F0003CF00AP_EN_20220114.indd cover1 2022/1/18 10:25:24

- Eng-2 -
Table of Contents
IMPORTANT SAFETY INSTRUCTIONS ...........................................................................................3-4
Precautions for Placement and Cooking ...........................................................................................4-5
Heating Principle ..................................................................................................................................6
Cooking Techniques .............................................................................................................................7
Food Characteristics.............................................................................................................................7
Feature Diagram................................................................................................................................8-9
Cookware and Utensil Guide ..............................................................................................................10
Control Panel .................................................................................................................................11-12
Steam Setting .....................................................................................................................................13
Slow Cook Setting ..............................................................................................................................14
Airfry Setting .......................................................................................................................................15
Ferment Setting ..................................................................................................................................16
Conv. Bake Setting ....................................................................................................................... 17-18
Steam Conv. Setting ..................................................................................................................... 19-20
Steam Shot Setting.............................................................................................................................21
One Push Setting ...............................................................................................................................22
Child Safety Lock Setting ...................................................................................................................23
Auto Cook Setting and Menus ...................................................................................................... 24-37
Reheating Chart ........................................................................................................................... 38-39
Cooking Chart............................................................................................................................... 39-41
Sanitizing (Utensils) ............................................................................................................................42
Sanitizing (Baby Bottles) ....................................................................................................................43
Oven Cleaning Setting.................................................................................................................. 44-47
Cleaning (Deodorization)..........................................................................................................44
Cleaning (Cavity) ......................................................................................................................45
Cleaning (System) ....................................................................................................................46
Cleaning (with Citric Acid) ........................................................................................................47
Care of Your Oven ..............................................................................................................................48
Shop Accessories ...............................................................................................................................49
Before Requesting Service ........................................................................................................... 49-51
Limited Warranty (Only for U.S.A.) ............................................................................................... 52-53
Specifications .....................................................................................................................................54
User ’s Record .....................................................................................................................................54
F0003CF00AP_EN_20220114.indd 2 2022/1/18 10:25:25

- Eng-3 -
IMPORTANT SAFETY INSTRUCTIONS
1. Read all instructions.
2. Do not touch hot surfaces. Use handles or knobs.
3. To protect against electrical shock do not
immerse cord, plugs, or (state specific part or
parts in question) in water or other liquid.
4. Close supervision is necessary when any
appliance is used by or near children.
5. Unplug from outlet when not in use and before
cleaning. Allow to cool before putting on or taking
off parts.
6. Do not operate any appliance with a damaged
cord or plug or after the appliance malfunctions
or has been damaged in any manner. Return
appliance to the nearest authorized service
facility for examination, repair, or adjustment.
7. The use of accessory attachments not
recommended by the appliance manufacturer
may cause injuries.
8. Do not use outdoors.
9. Do not let cord hang over edge of table or
counter, or touch hot surfaces.
10. Do not place on or near a hot gas or electric
burner, or in a heated oven.
11. Extreme caution must be used when moving an
appliance containing hot oil or other hot liquids.
12. Always attach plug to appliance first, then plug
cord into the wall outlet. To disconnect, turn any
control to "off", then remove plug from wall outlet.
13. Do not use appliance for other than intended use.
Precautions for using this product for cooking
Check whether the product is damaged.
Please inspect your oven as follows before using:
1. The oven door and the oven cavity are not
damaged or cracked. If they are damaged or
cracked, do not use.
2. The oven must be grounded before use. In case
of electric leakage, the ground can provide a
current loop to avoid electric shock. The power
supply plug must be inserted into a single-phase
bipolar socket with grounding.
3. Read this manual carefully before using the
appliance. The oven can only be used for the
purposes indicated in this manual.
Prevention Items
Forbidden items
1. In the event that the oven door or door seal
has been damaged, do not use the oven until a
qualified technician has repaired it.
2. Do not damage the safety lock of the oven door,
including the door hinges.
3. This appliance is not intended for use by persons
(including children) with reduced physical, sensory
or mental capabilities, or lack of experience
and knowledge, unless they have been given
supervision or instruction concerning use of the
appliance by a person responsible for their safety.
4. Children should be supervised to ensure that
they do not play with the appliance.
5. Except for a qualified technician, repair is very
dangerous. Do not attempt to disassemble, repair
or modify the oven yourself.
Thank you for purchasing a Panasonic Convection Steam Oven.
Read the manual carefully and keep it properly.
6. When the oven works abnormally, do not
continue using it.
7. Once finding any crack or notch on the water
tank, do not use the product, as water leakage
can lead to electric leakage or electric shock.
8. When the socket hole gets loose or the power
supply cord or plug is damaged, do not use the
product. If the supply cord is damaged, it must
be replaced by manufacturers, its service agent
or similarly qualified persons in order to avoid a
hazard.
9. Do not use a wet hand to press or insert/remove
the power supply plug; otherwise an electric
shock may be caused.
10. Do not knock on parts such as the control panel,
housing, oven cavity and oven door; otherwise it
may lead to product failure.
11. Do not place the product and power supply cord
in damp places with high temperatures, e.g., near
a gas stove, electrified area or sink.
12. The oven is used for household cooking only
and may not be used for laboratory tests or other
commercial purposes. Moreover, the product
cannot be placed in a cupboard for use.
13. Do not use a rough scrubbing tool or sharp metal
scraper to clean the oven window; otherwise the
glass will be ruptured.
14. Appliances are not intended to be operated by
means of an external timer or separate remote-
control system.
15. Do not block the air inlet and outlet; otherwise
a fire maybe caused. Please clean the product
regularly to prevent the air inlet and outlet from
being blocked by foreign matter and dust.
Dangerous Items
1. Do not place inflammable materials around the
oven or in the oven cavity; otherwise a fire may
be caused.
2. Upon finding smoke, turn off the appliance or
remove the power supply plug and make sure
that the oven door is closed to prevent spreading
fire. Press Stop/Reset button, and then remove
the power supply plug or turn off the general
power switch in the room.
3. Do not use the product for purpose not
mentioned in the manual, e.g., using the product
to dry articles; otherwise a fire may be caused.
4. If the product is not cleaned regularly, the
appliance surface will be degraded to affect the
appliance service life and dangers may occur.
5. Avoid actions or behavior that may damage the
power supply cord and power supply plug, e.g.,
immersing the power supply cord and power
supply plug into water, keeping the power supply
cord at a position at a high temperature, or
forcedly bending, twisting, pressing or binding
the power supply cord. A damaged power supply
cord or plug may lead to dangers such as short
circuit, electric shock and fire. Do not immerse
the appliance in water.
F0003CF00AP_EN_20220114.indd 3 2022/1/18 10:25:25
- Eng-4 -
IMPORTANT SAFETY INSTRUCTIONS
(continued)
Safety Precautions
1. The oven surface may become very hot during
and after use. The temperature at the housing
surface, air outlet, oven door and oven cavity
are relatively high. Do not press these parts;
otherwise you maybe scalded. Young children
should be kept away.
2. If white smoke appears when the Conv. Bake
function is used for the first time, it does not
indicate a fault. The protective oil of components
is volatilized to generate white smoke due to
heating.
3. The vessel and food temperatures are very high
when you stir or turn over the food during cooking
or take food out after the cooking. Please use
insulation gloves or a pot clip to prevent scalding.
4. If you need to open the oven door to stir, turn
over or rearrange food in the process of using
steam, note to keep a distance; otherwise steam
may scald your face or hands.
5. When the oven door is open, do not drag the
container along the oven door. The weight borne
by the oven door cannot exceed
9 lbs (4 kg).
Instruction Items
1. Before using vessels of different materials, first
confirm whether the vessels can withstand high
temperature. When the food is cooked in a
plastic or paper package, please watch it, as it
could catch fire.
2. Food must be placed in a proper vessel and cannot
be directly placed in the oven cavity for cooking.
3. The surface temperature and internal
temperature of the oven are very high after
cooking. Do not clean it immediately after
cooking. Be sure to clean the product after it
cools down; otherwise you may be scalded.
4. Remove the power supply plug before cleaning.
Do not use a corrosive cleaning agent; otherwise
it will damage or corrode the product.
5. Clean dust from the power supply plug on a
regular basis. If the product will not be used for a
long time, remove the power supply plug. Do not
pull the power supply cord as remove the power
supply plug: hold the plug to remove it.
Precautions for Placement and Cooking
Placement of Oven
1. The product must be placed at a position more
than 36 inches (91.6 cm) height from the ground.
In normal use, good ventilation must be ensured
around the product. Allow 8-inch (20 cm) of space
on the top of the oven, reserve a gap not smaller
than 2-inch (5 cm) from the right wall, a gap not
smaller than 2-inch (5 cm) from the left wall and
a gap not less than 4-inch (10 cm) from the back
wall. Do not block the ventilation opening. Keep
the environment clean and prevent roaches and
other insects from entering the product.
(a) Do not block the air inlet and outlet; otherwise
a fire may be caused. Maintain the product
regularly and prevent foreign matter and dust
from blocking the air inlet and outlet.
(b) Do not position the product at a damp place
with high temperatures, e.g., near a gas
stove, electrified area or sink.
(c) The product must be placed level.
(d) Do not remove the legs. Place the product in
a solid position.
(e) Do not put a heavy load on the oven door or top.
(f) The product cannot be used if the indoor
humidity is too high.
2. This product is for household use only. This oven
is intended for Counter-top use only. It is not
intended for built-in use or use inside a cupboard.
The oven shall not be placed in a cabinet.
3. Do not use the cavity for storage purposes.
Power Supply
1. A short power-supply cord is provided to reduce
the risks resulting from becoming entangled in or
tripping over a longer cord.
2. Long cord sets or extension cords are not
recommended.
3. If a long cord or extension cord is used,
• The marked electrical rating of the cord set or
extension cord should be at least as great as
the electrical rating of the appliance.
• The extension cord must be a grounding-type
3-wire cord.
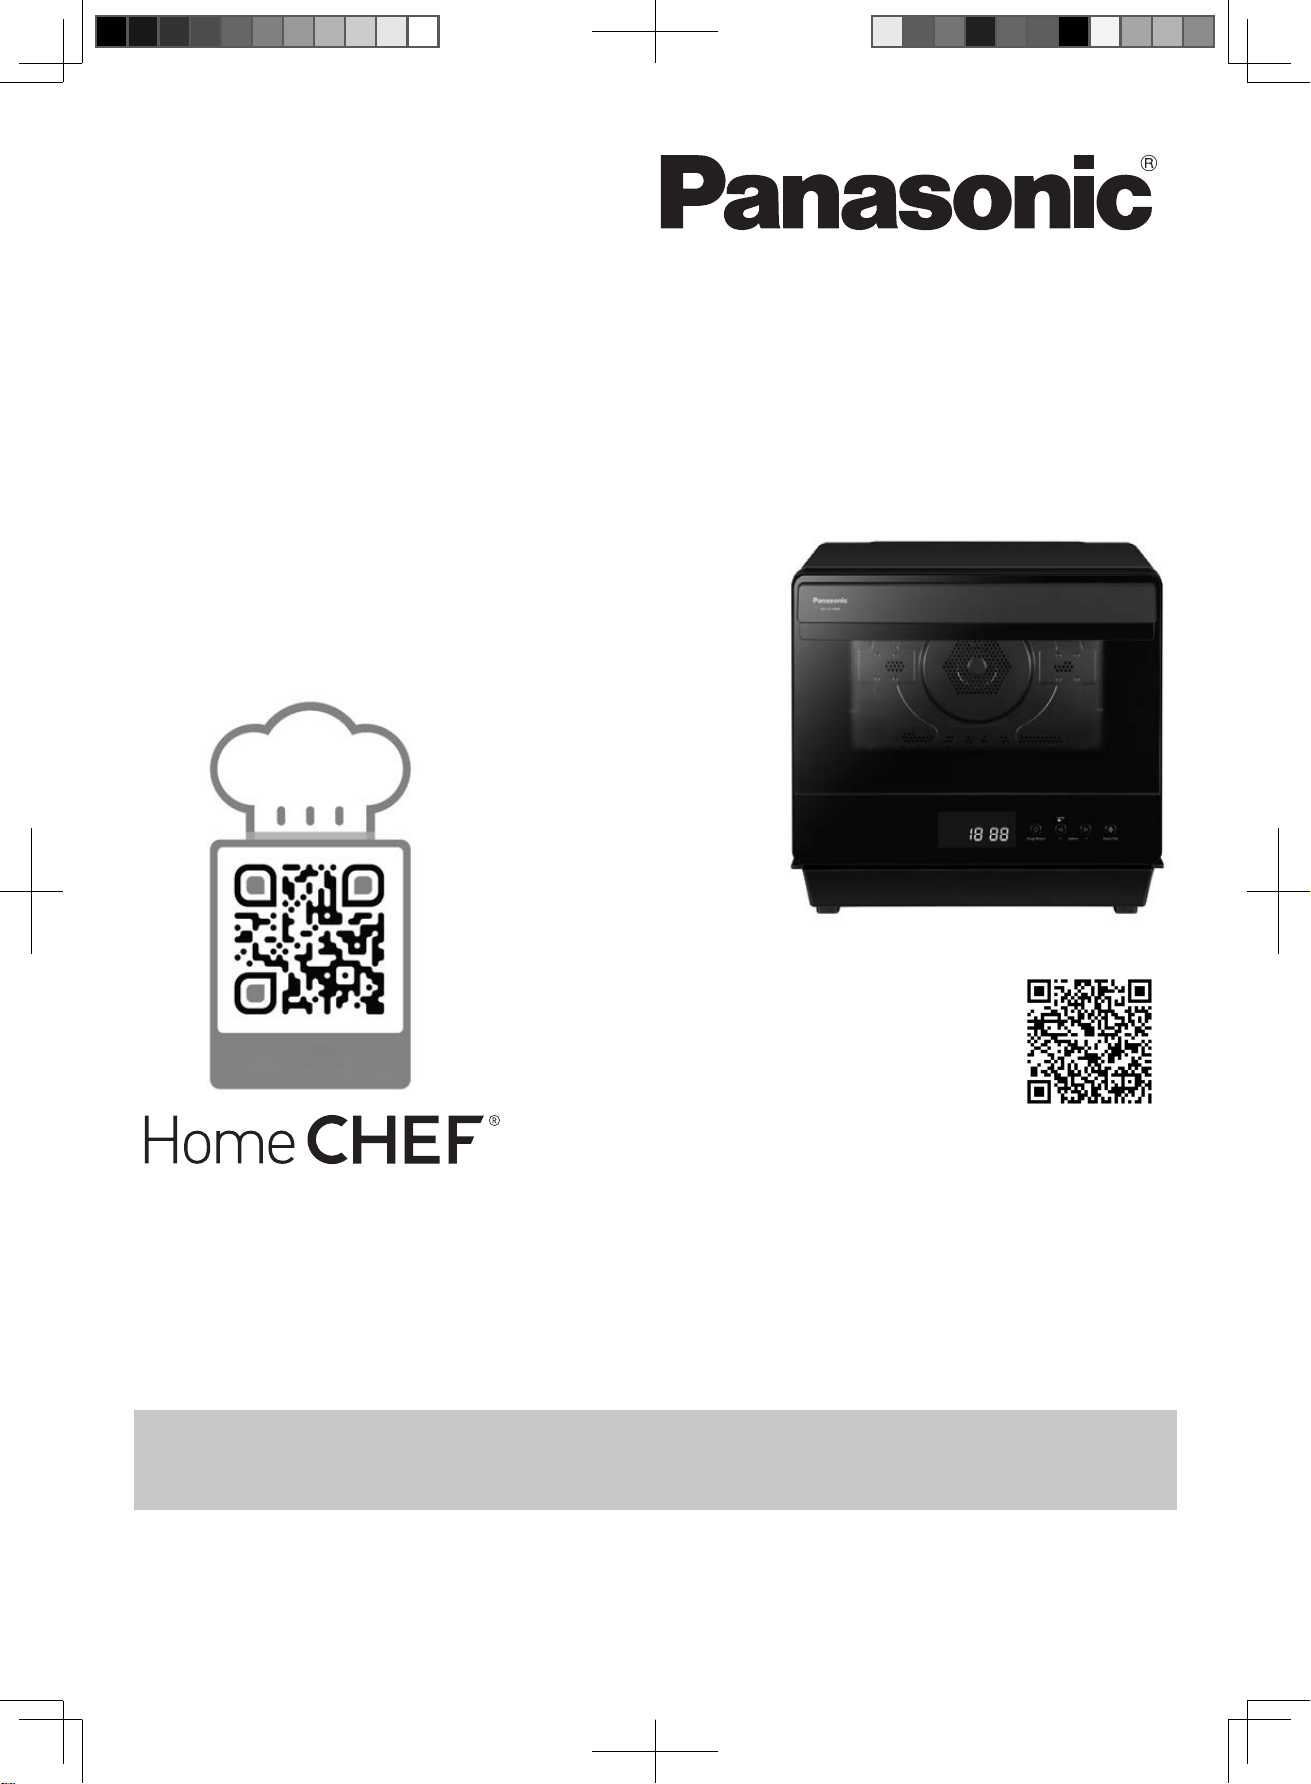
3-Pronged Plug
Ground Plug
3-Prong Receptacle
• The longer cord should be arranged so that it
will not drape over the counter top or tabletop
where it can be pulled on by children or tripped
over accidentally.
Grounding Instructions
THIS APPLIANCE MUST BE GROUNDED.
In the event of an electrical short circuit, grounding
reduces the risk of electric shock by providing an
escape wire for the electric current. This appliance
is equipped with a cord having a grounding wire with
a grounding plug. The plug must be plugged into an
outlet that is properly installed and grounded.
• Plug into properly installed and grounded
three-prong outlet.
• DO NOT remove ground prong.
• DO NOT use an adapter.
F0003CF00AP_EN_20220114.indd 4 2022/1/18 10:25:25

- Eng-5 -
Precautions for Placement and Cooking
(continued)
Warning
(a) In the event that the oven door or door seal has been damaged, do not use the oven until a qualified
technician has repaired it. Do not damage the safety lock of the oven door, including the door hinges.
To repair the product, please contact an authorized Service Center by Panasonic.
(b) Except for a qualified technician, repair work is very dangerous. Do not attempt to disassemble, repair
or modify the oven yourself.
(c) Do not allow children or someone without knowledge of oven operation to use the oven in an
unattended manner unless they get proper instructions on use and know that any improper operation
may lead to danger.
(d) Do not use a rough scrubbing tool or sharp metal scraper to clean the oven door glass; otherwise the
glass will be ruptured.
Wiring Requirements
1. The oven must be operated on a SEPARATE
CIRCUIT. No other appliance should share the
circuit with the oven.
If it does, the branch circuit fuse may blow or the
circuit breaker may trip.
2. The oven must be plugged into at least a 15 A
or 20 A, 120 V, 60 Hz GROUNDED OUTLET.
(Beginning in 2017, all new construction and
all renovated single family homes must have
at least a 20 A, 120 VOLT, 60 Hz GROUNDED
OUTLET). Where a standard two-prong outlet is
encountered, it is the personal responsibility and
obligation of the consumer to have it replaced
with a properly grounded three-prong outlet.
3. The VOLTAGE used must be the same as
specified on this oven (120 V, 60 Hz). Using a
higher voltage is dangerous and may result in
a fire or oven damage. Using a lower voltage
will cause slow cooking. Panasonic is NOT
responsible for any damages resulting from
the use of the oven with any voltage other than
specified.
Precautions for cooking
1. Cautiously take out heated liquid foods such as
soups, sauces and beverages. Pay attention to
the following items during cooking:
(a) Prevent over-heating; otherwise the liquid may
suddenly boil and splash to scald you when
you take out the food.
(b) When you heat liquid food, the liquid should
be loaded to at least eighty percent of the
container capacity; otherwise a small amount
of heated liquids may suddenly splash due to
boiling.
(c) Stir the food before or during the heating.
(d) After heating, keep the food in the oven for a
while, stir it slightly, and then take it out.
(e) After you use a milk bottle or heat baby food,
stir the food or shake the bottle, and check the
temperature before feeding your baby so that
he or she may not be hurt.
2. Using a common thermometer is forbidden.
You must use a meat thermometer to check the
cooking effect. If cooking is insufficient, place the
food into the oven again for further cooking.
3. Cooking recipes provide the cooking time for
reference. A lot of factors may affect the cooking
time, including the desired degree of cooking,
starting temperature, portion, size, food shape
and container type. If you are familiar with
product operations, you can properly adjust the
cooking time by referring to the above factors.
4. When using the Conv. Bake function, you must
control the cooking time and pay attention to the
heated food all times. Over-heated food may lead
to smoke or fire.
Exterior oven surfaces, including air vents on the
cabinet and the oven door will get hot during Conv.
Bake. Use care when opening or closing door and
inserting or removing food and accessories.
Caution! Hot surfaces
Fan Motor Operation
After using the oven, the fan may rotate to cool the
electric components and “ ” rotates in the display
window. You can take out the food from the oven
while the fan operates. It is recommended to keep the
oven plugged in until the Fan Motor completely stops
operating.
SAVE THESE INSTRUCTIONS
For proper use of your oven, read remaining safety cautions and owner’s manual.
F0003CF00AP_EN_20220114.indd 5 2022/1/18 10:25:25

- Eng-6 -
Heating Principle
The diagrams shown below are examples of the accessories placements of various cooking modes. It may vary
depending on the recipe/dish used.
Cooking modes Principle and Types Uses Caution Placement
Conv. Bake, Ferment,
Airfry
Use the convection heater for
heating.
• Baking pastries like puff, swiss
rolls and pizza, etc.
• Roasting meat and poultry, etc.
• Fermentation and making
yoghurt.
• Frying thin foods with high
temperature, such as shrimp,
fish and chicken pieces, etc.
Preheat advised
(without fermenation)
Take food out
immediately after
heating; otherwise
the residual heat will
deepen the browning
color. To maintain the
temperature in the oven
during heating, do not
open and close the
oven door in the heating
process. To uniform
browning color, you
can readjust the food
position or rotate the
metal tray midway.
One level cooking:
lower shelf position
Two levels cooking:
upper and lower shelf
position
Steam-Med
Steam is used for heating to
complete cooking.
• Steaming various seafood,
poultry, meat, vegetables, rice,
and Chinese desserts.
Since steam is
generated during
cooking, the cover
(plastic wrap) cannot
be used in the heating
process. For individual
dishes that require the
plastic wrap, see the
recipes.
One level cooking:
lower shelf position
Two levels cooking:
upper and lower shelf
position
Slow Cook,
Steam-High,
Steam Conv.
(One level)
Steam-High,
Steam Conv.
(Two levels)
Steam combines convection
heater to cooking.
• Stew soup and meat.
• Bake soft cakes, souffle etc.
• Bake soft meat such as teriyaki
chicken pieces etc.
• Steam-High can be used to
cook meat and seafood etc at
a faster speed
• Preheat advised for Steam
Conv.
Cooking can remain
higher temperature and
lock the food moisture. It
is recommended to use
heatproof soup bowl with
4 cups (1 L) volume and
cover with lid when using
Slow Cook function.
One level cooking:
lower shelf position
Two levels cooking:
upper and lower shelf
position
F0003CF00AP_EN_20220114.indd 6 2022/1/18 10:25:25
- Eng-7 -
Cooking Techniques
Food Characteristics
Timing
A range in heating time is given in each recipe. The time
range compensates for the uncontrollable differences
in food shapes, starting temperature and regional
preferences. Always cook food for the minimum cooking
time given in the recipe and check for doneness. If the
food is under cooked, continue cooking. It is easy to
add time to an under cooked product. Once the food is
overcooked, nothing can be done!
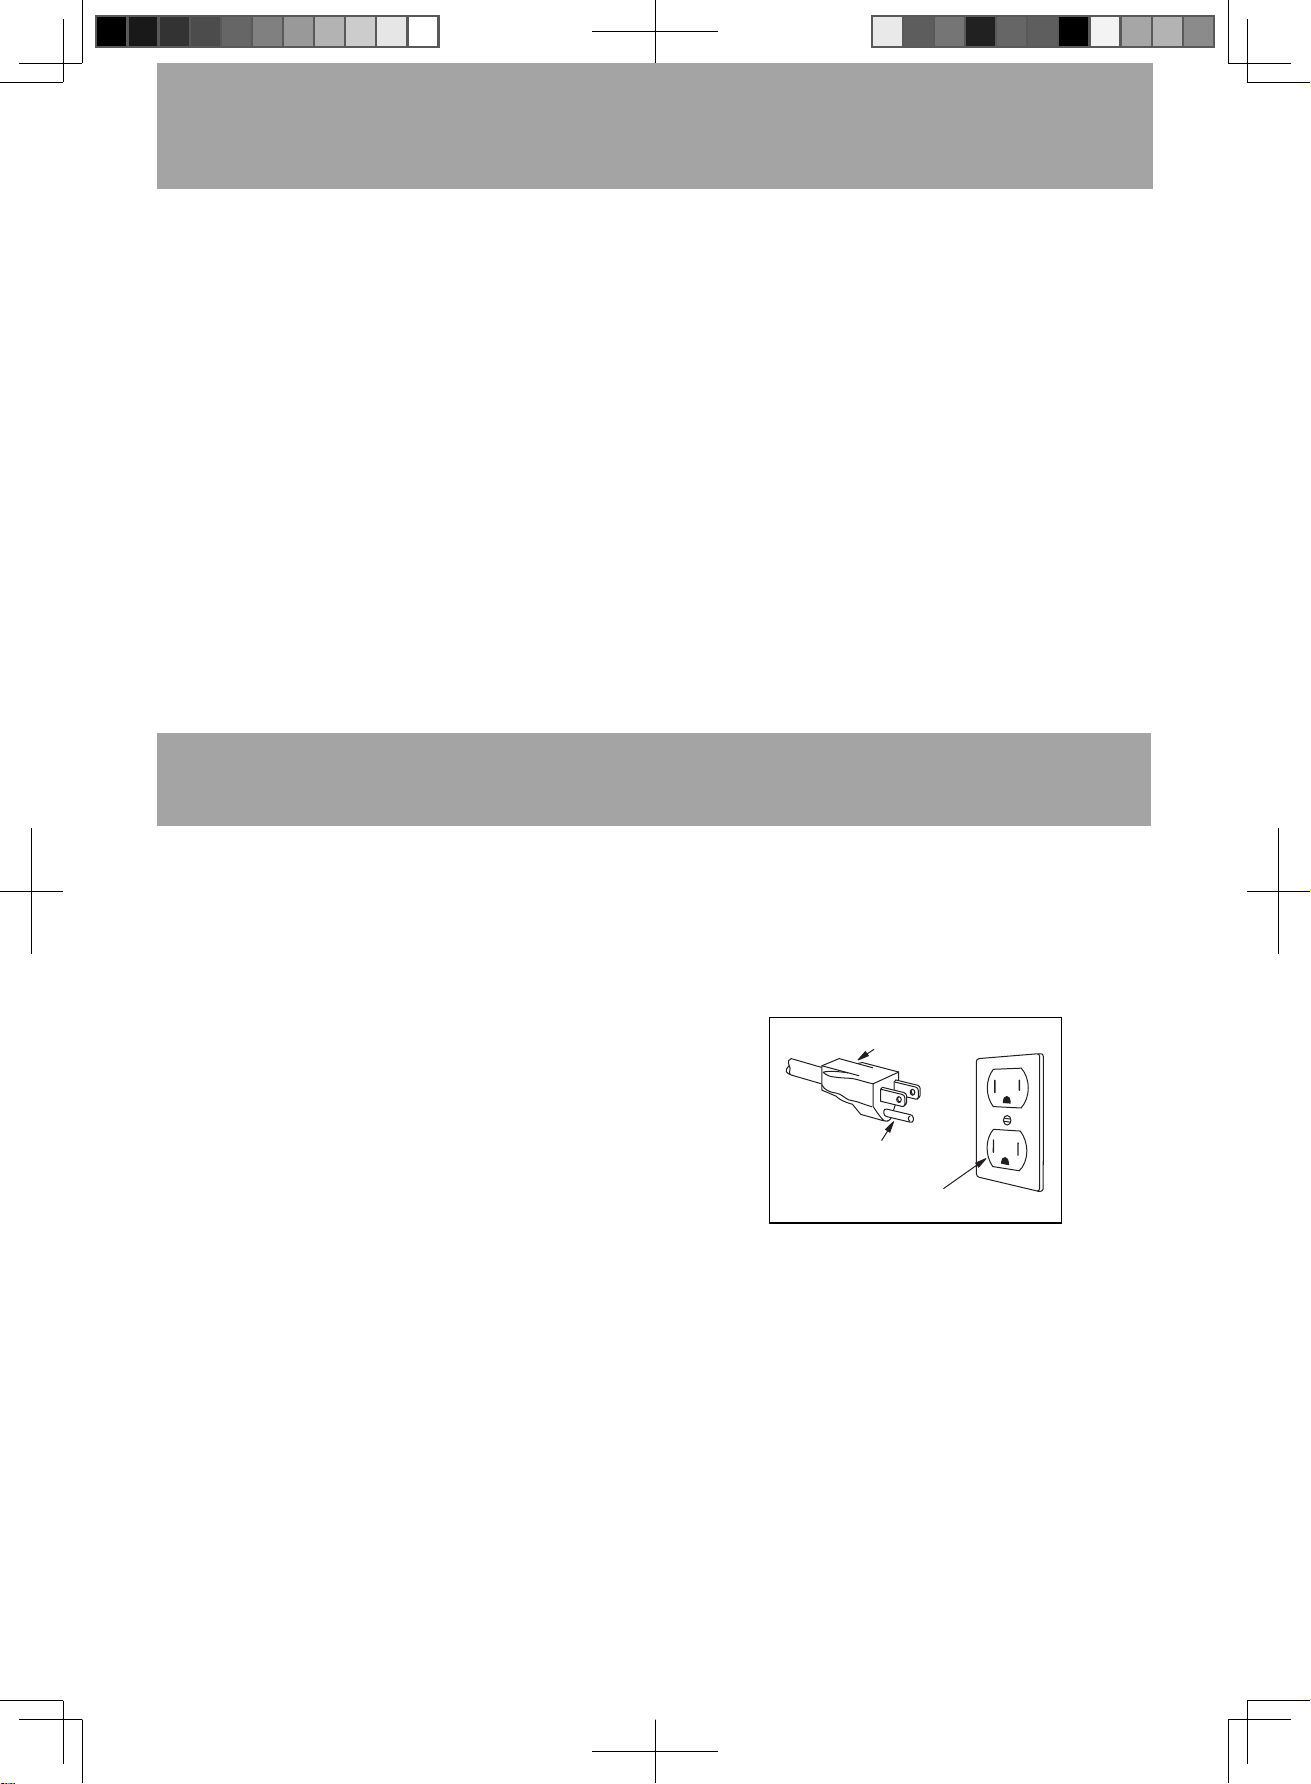
Spacing
Individual foods, such as baked potatoes and
cupcakes will heat more evenly if placed in the oven
equal distance apart. When possible, arrange foods in
a circular pattern.
Similarly, when placing foods around the outside
of accessory, not lined up next to each other. Food
should NOT be stacked on top of each other.
Browning
To shorten the food Conv. Bake or cooking time and
get good color effect, be sure to apply dark soy sauce
or spicy sauce to the food before baking. For quick
breads or muffins, brown sugar can be used in the
recipe in place of granulated sugar, or the surface can
be sprinkled with dark spices before baking.
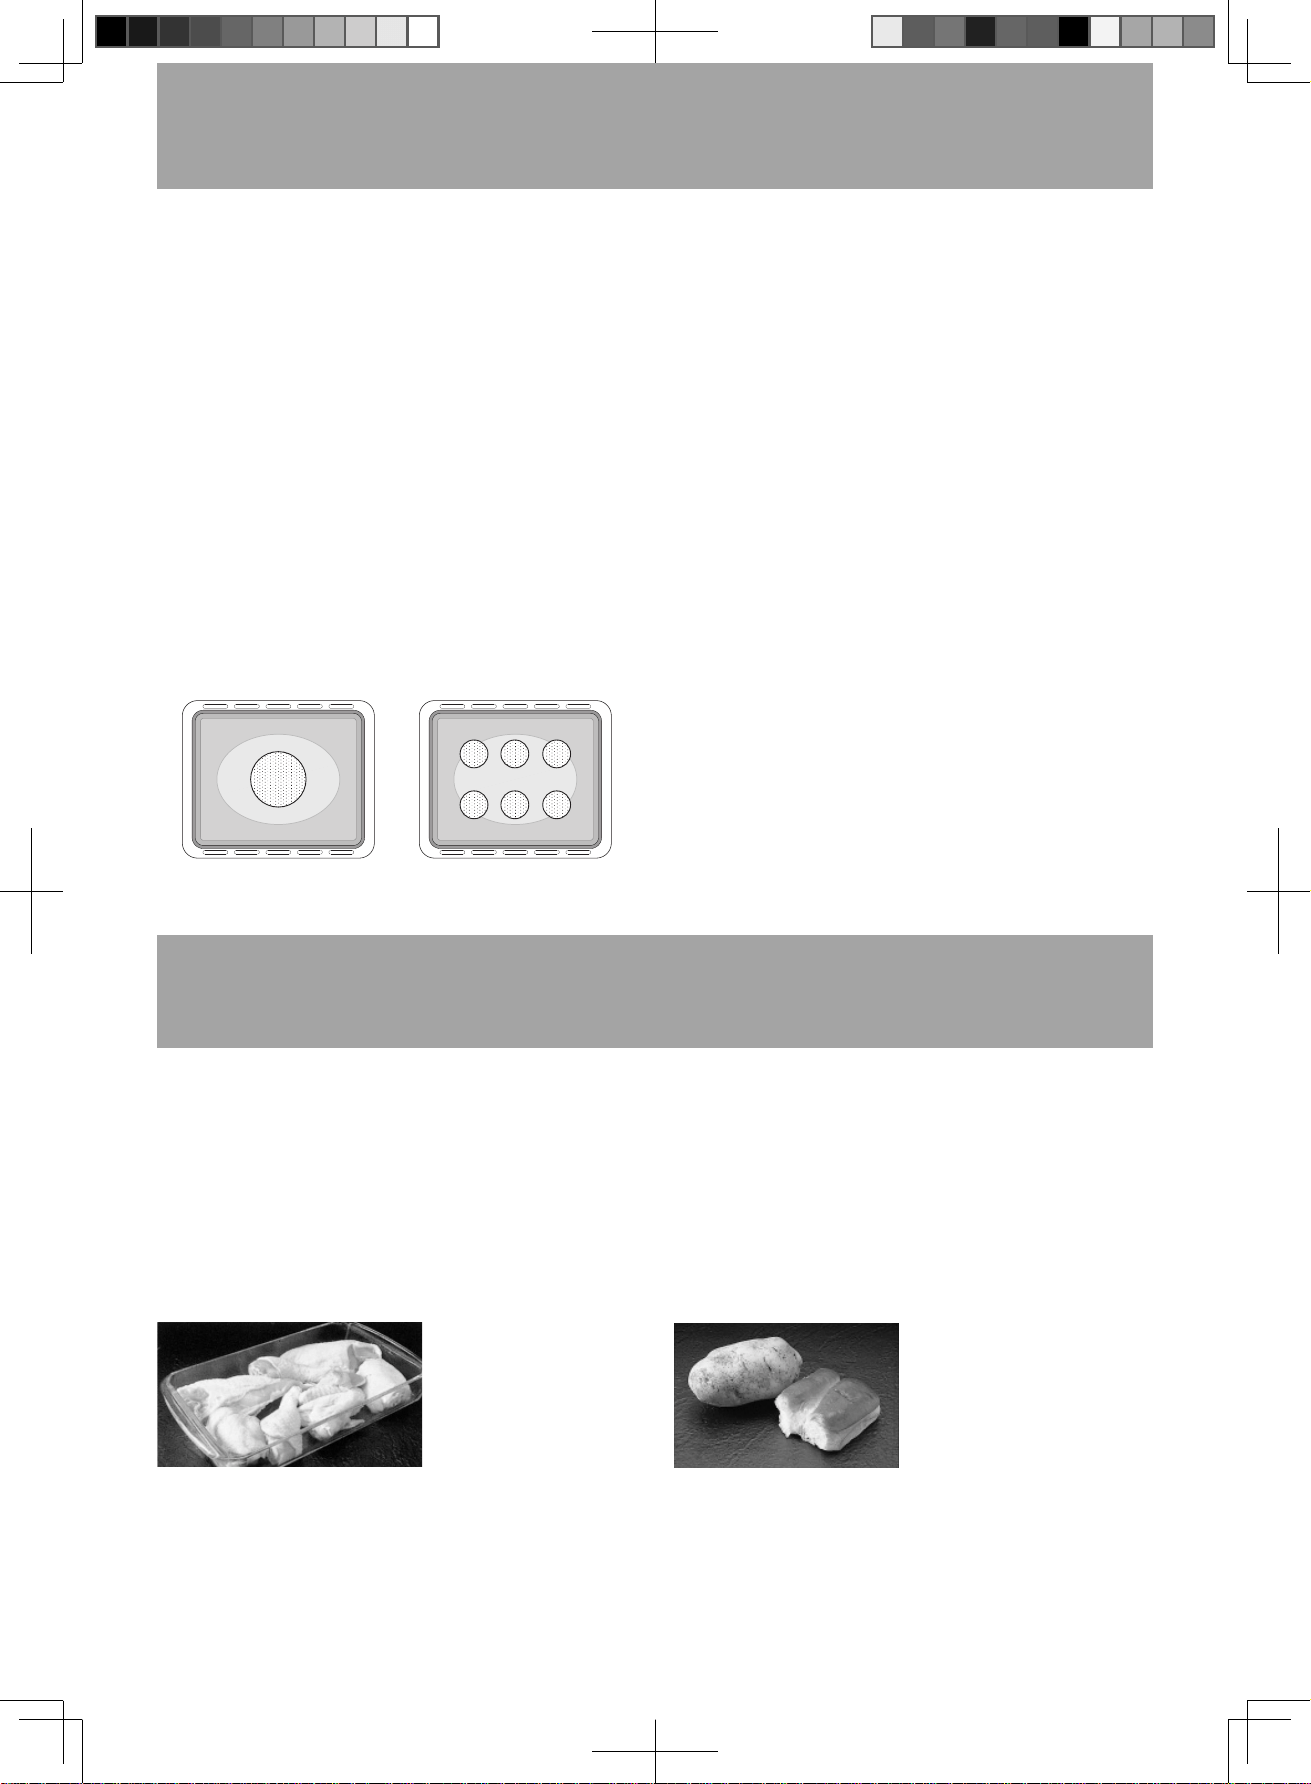
Piercing
The skin or membrane on some foods will cause
steam to build up during cooking. These foods must
be pierced or a strip of skin should be peeled off
before cooking to allow the steam to escape. It has a
good performance during Conv. Bake.
Potatoes — pierced with a fork.
Sausages — scratched smoked sausages. Pierce the
casing with a fork.
Rotating and repositioning food
Sometimes heat cannot be redistributed by stirring
the food. To achieve even cooking effect, you can
reposition or rotate the food. For example, turn over
the food in the cooking process, turn over large
portions of food such as meat or chicken, or rotate the
metal tray during baking.
The cooking method is closely related to the food characteristics.
Size
Small portions cook faster than large ones.
Shape
Uniform sizes heat more evenly. To compensate for
irregular shapes, place thin pieces toward the centre
of the dish and thicker pieces toward the edge of dish.
Starting Temperatures
Room temperature foods take less time to heat up
than refrigerated, or frozen foods.
Density
Porous, airy foods take less time to heat than heavy,
compact foods.
F0003CF00AP_EN_20220114.indd 7 2022/1/18 10:25:25
- Eng-8 -
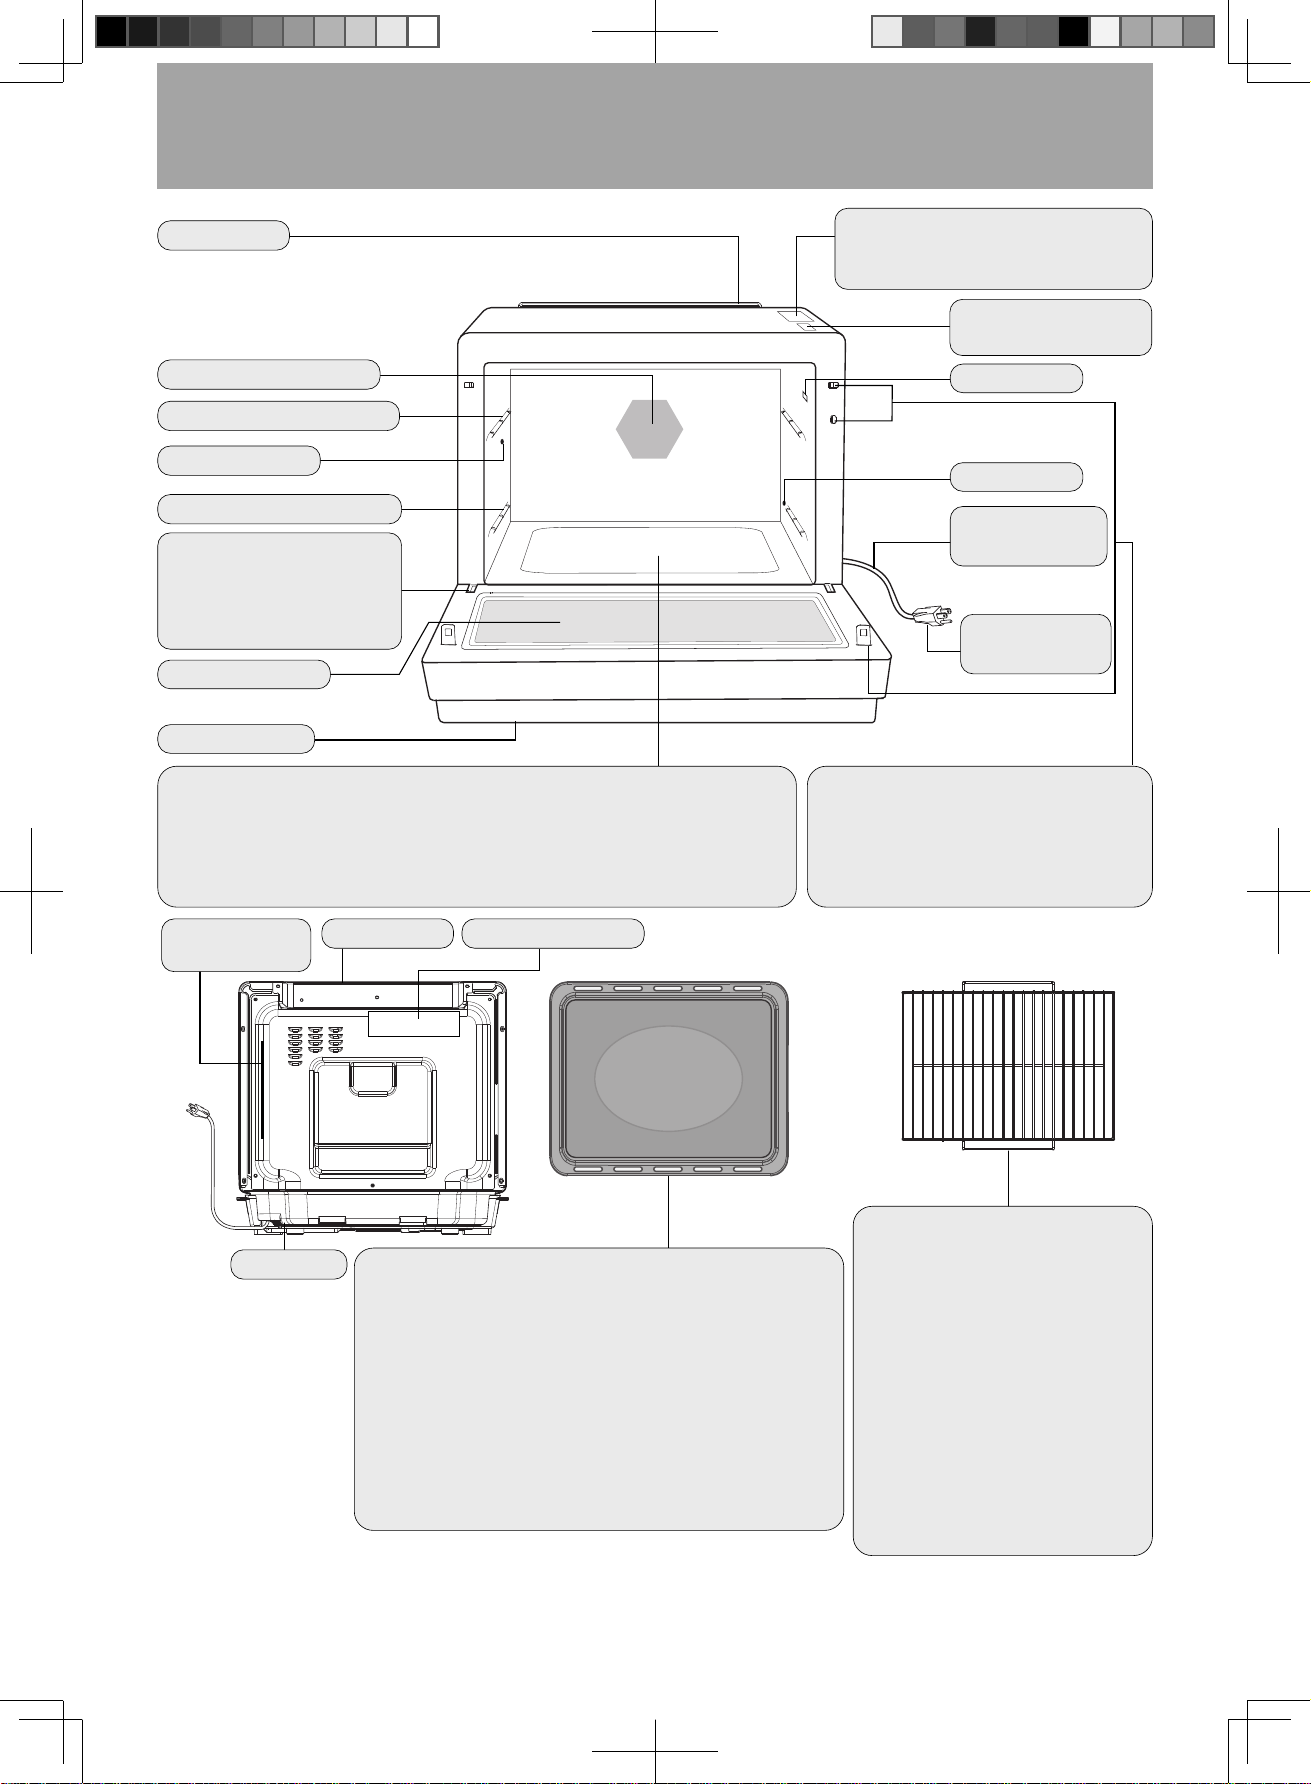
Feature Diagram
Notes:
1. The above illustration is for reference only.
2. Oven accessories are including two metal trays and two wire racks. Other cooking utensils involved
in the instructions should be purchased by you.
Metal Tray (×2)
1. All cooking must use the metal tray. Food cannot be put
directly on bottom plate.
2. When using the metal tray, it must be placed in the
shelf position.
3. Take it out with thermal insulation gloves after use.
To avoid scalding, do not press it with your hands.
4. To avoid damaging the oven door, do not drag on the
oven doors when handing.
5. The maximum weight that can be placed on the metal tray
is 6.5 lbs (3 kg) (include total weight of food and dish).
Bottom Plate
1. Clean oven after cooking is finished, and bottom plate is cooled.
2. Do not cook directly on the bottom plate. Always place food on the
metal tray or wire rack.
Steam Outlet
Oven Window
Door Handle
Lower Shelf Position
Upper Shelf Position
Convection Heater
Warning symbol
(Hot surface )
Air Outlet
Power
Supply Plug
Door Hinges
When opening or closing
the door, do not stretch
your fingers inside the
oven.
LED Light
Air Outlet
Power
Supply Cord
Door Safety Lock System
(both sides)
To prevent injury, do not insert
finger, knife, spoon or other objects
into the latch hole.
Air Outlet Warning Label
Air Inlet
Identification
Plate
Wire Rack (×2)
1.
It can help to keep the base
dry and drip water or fat into
the metal tray. Wire rack
cannot be used individually.
Always put on the metal tray.
2. Always use thermal
insulation gloves after
cooking. Do not press
directly to avoid scalding.
3. The maximum weight
that can be placed on the
wire rack is 6 lbs (2.7 kg)
(includes total weight of food
and dish).
Menu/Warning Label
Attach menu/warning label
according to the required language.
F0003CF00AP_EN_20220114.indd 8 2022/1/18 10:25:26
- Eng-9 -
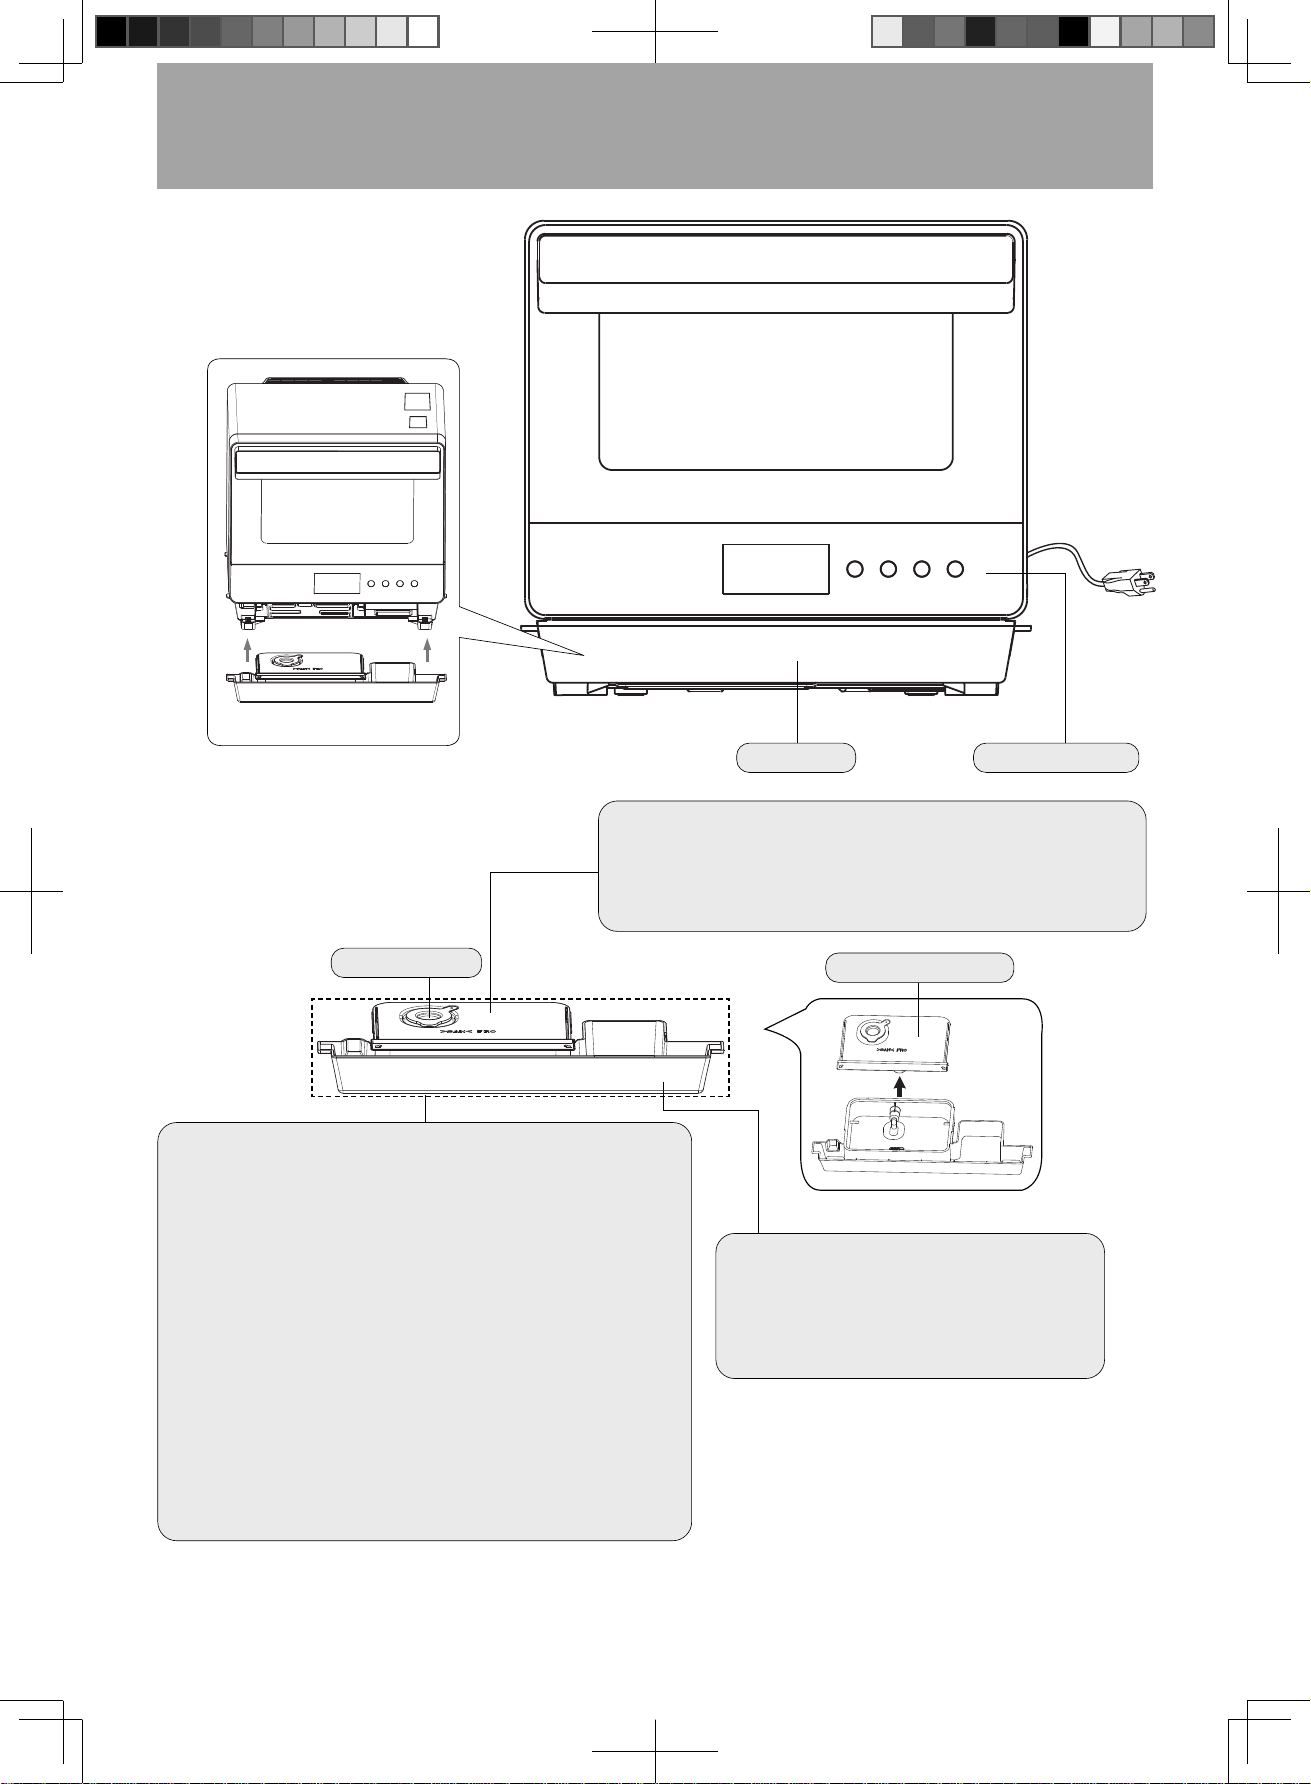
Feature Diagram
(continued)
Notes:
1. The above illustration is for reference only.
2.
Protective films cover the surface of the door handle and control panel. You can remove them before using.
Water Tank
1. Full water level is 3¹⁄ cups (800 ml). Add water to 800 mark.
2. Fill with pure water (do not use mineral water).
3. Fully fill the water tank, and cover with the rubber lid.
Drip tray
1. The drip tray must be fitted as it
collects excess water during cooking.
2. The drip tray should be removed and
cleaned on a regular basis.
Water Tank Lid
Rubber Lid
Figure 1
Drip Tray
Control Panel
Integrated Water Tank
1.
Water tank and drip tray are parts of integrated water tank.
2.
Take integrated water tank out from package before using
according to figure 1. Then install it to the lower side.
3. To remove the drip tray, hold with both hands and
gently ease forward.
4. Always clean the integrated water tank.
5. Ensure the water tank is closed tightly and securely
positioned, otherwise leakage may occur.
6. DO NOT USE A DISHWASHER TO CLEAN THE
INTEGRATED WATER TANK.
Note: When removing the integrated water tank,
several drops may flow from the water outlet of
bottom cavity. You can remove the integrated
water tank after the oven cavity has cooled
down.
F0003CF00AP_EN_20220114.indd 9 2022/1/18 10:25:26
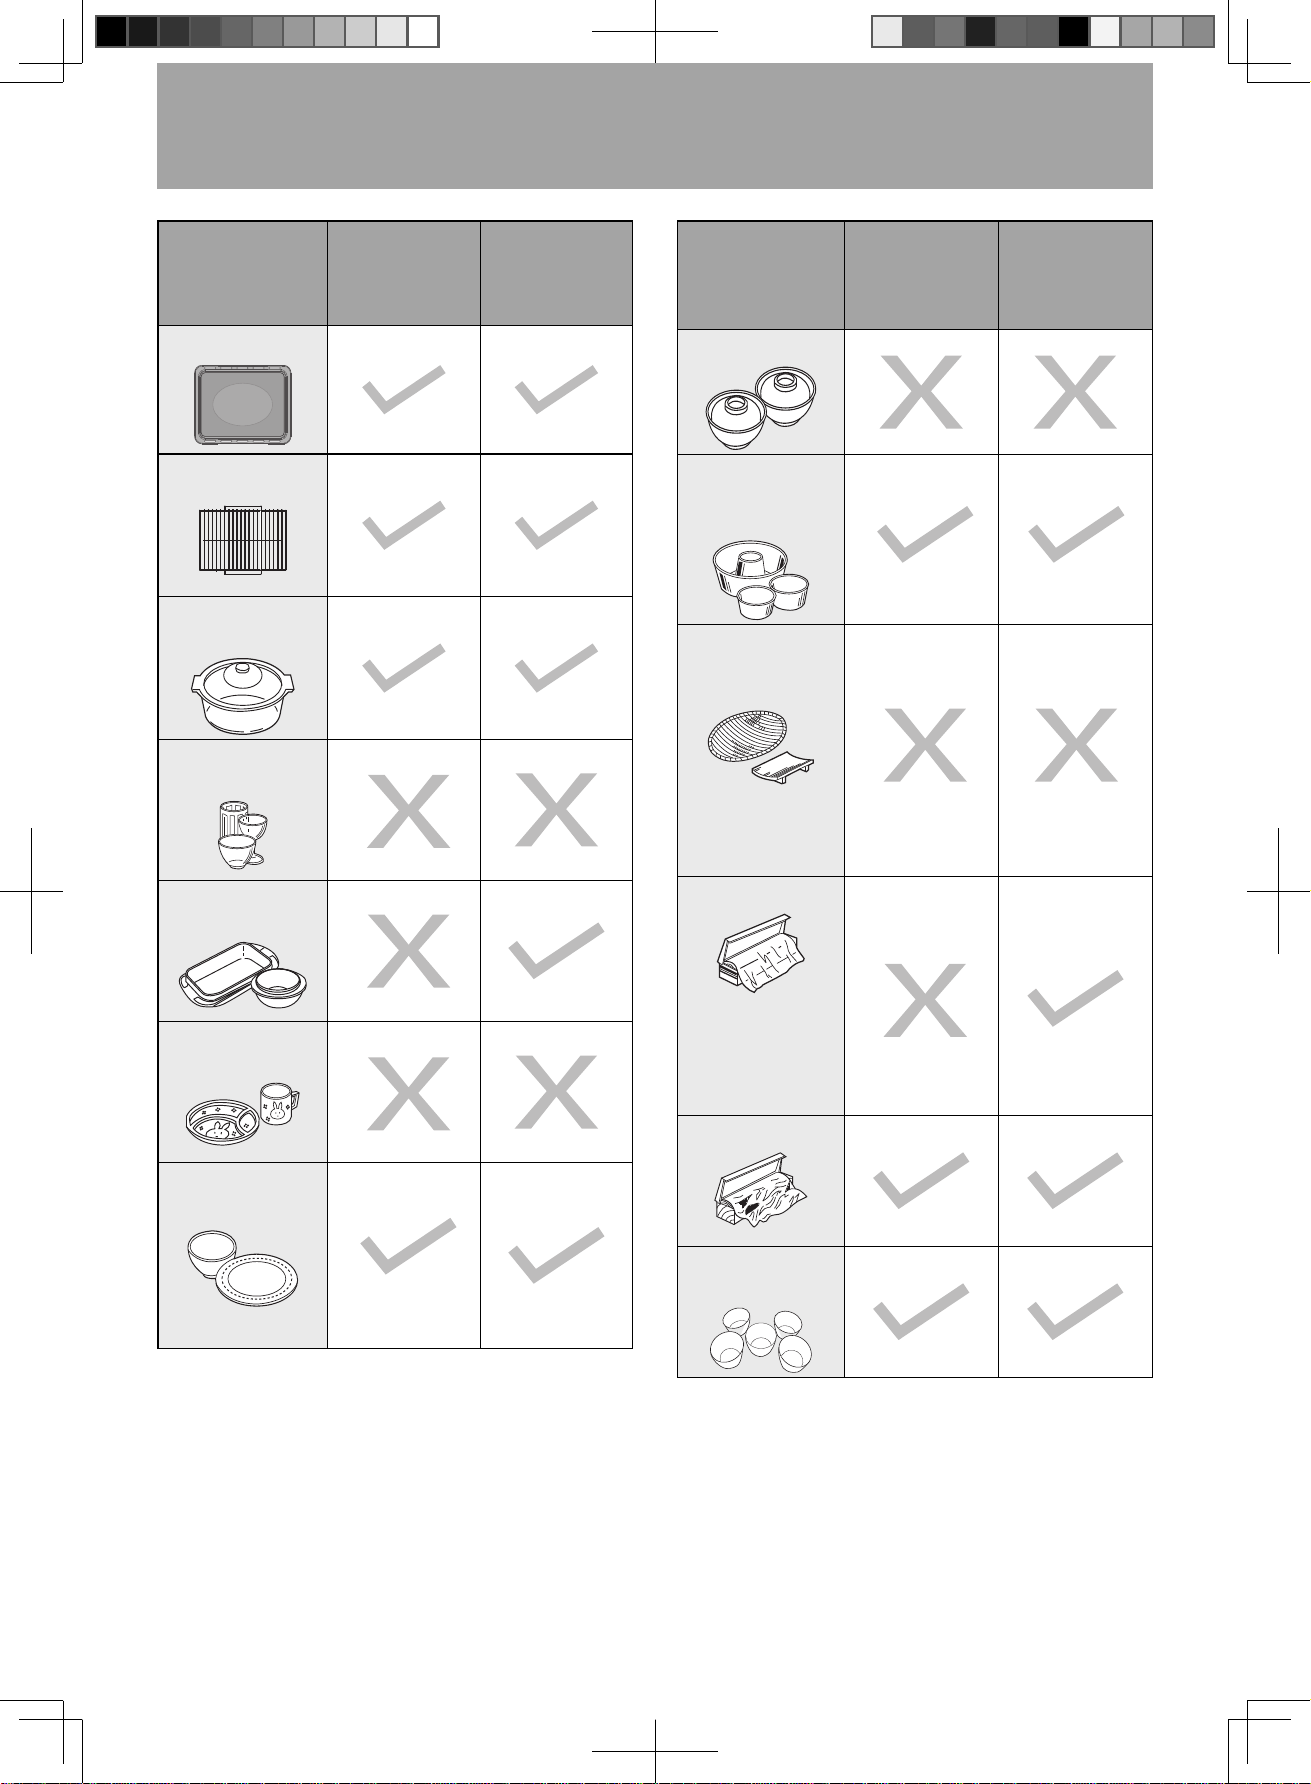
- Eng-10 -
Container
Conv. Bake*,
Steam High,
Ferment
Steam-Med
Metal tray
Wire rack
Heat-proof
glass container
Non-heat-proof
glass containers
Note:
They can
be used for
constant
temperature
fermentation.
Heat-proof plastic
containers
Note:
They can
be used for
constant
temperature
fermentation.
Non-heat-proof
plastic containers
Note:
They can
be used for
constant
temperature
fermentation.
Ceramic • porcelain
Note:
Color stripping
may be found in
containers with
internal color
pictures. Do
not use such a
container.
Cookware and Utensil Guide
Container
Conv. Bake*,
Steam High,
Ferment
Steam-Med
Lacquerware
Aluminum and
other metal
containers
Note:
Meal containers
with resin
handles cannot
be used.
Note:
Easy-rusting
metal container
is forbidden.
Wood •
bamboo • paper
containers
Note:
Paper
containers that
have undergone
Heat-proof
treatment and
Heat-proof
treatment higher
than setting
temperature can
be used.
Note:
Wood and
bamboo
container, paper
containers that
have undergone
Heat-proof
treatment can be
used.
Plastic wrap Note:
① Plastic wrap
will melt
under a high
temperature.
② They can
be used for
constant
temperature
fermentation.
Note:
Do not use
without special
instructions.
Aluminum foil
Heat-proof silica
gel container
Notes:
1. Accessories must be used when cooking.
2. Place the wire rack on the metal tray. Do not use it without the metal tray.
3. Take it out with thermal insulation gloves after use. To avoid scalding, do not press it with your hands.
4. For container placement, in all types of cooking, you can refer to Heating Principle (see page 6).
5. Do not use accessories, or other containers, in the preheating stage.
* When Airfry, Steam Conv. and Slow Cook functions are used, the cooking utensils and accessories
should be selected according to requirements for Conv. Bake.
F0003CF00AP_EN_20220114.indd 10 2022/1/18 10:25:26
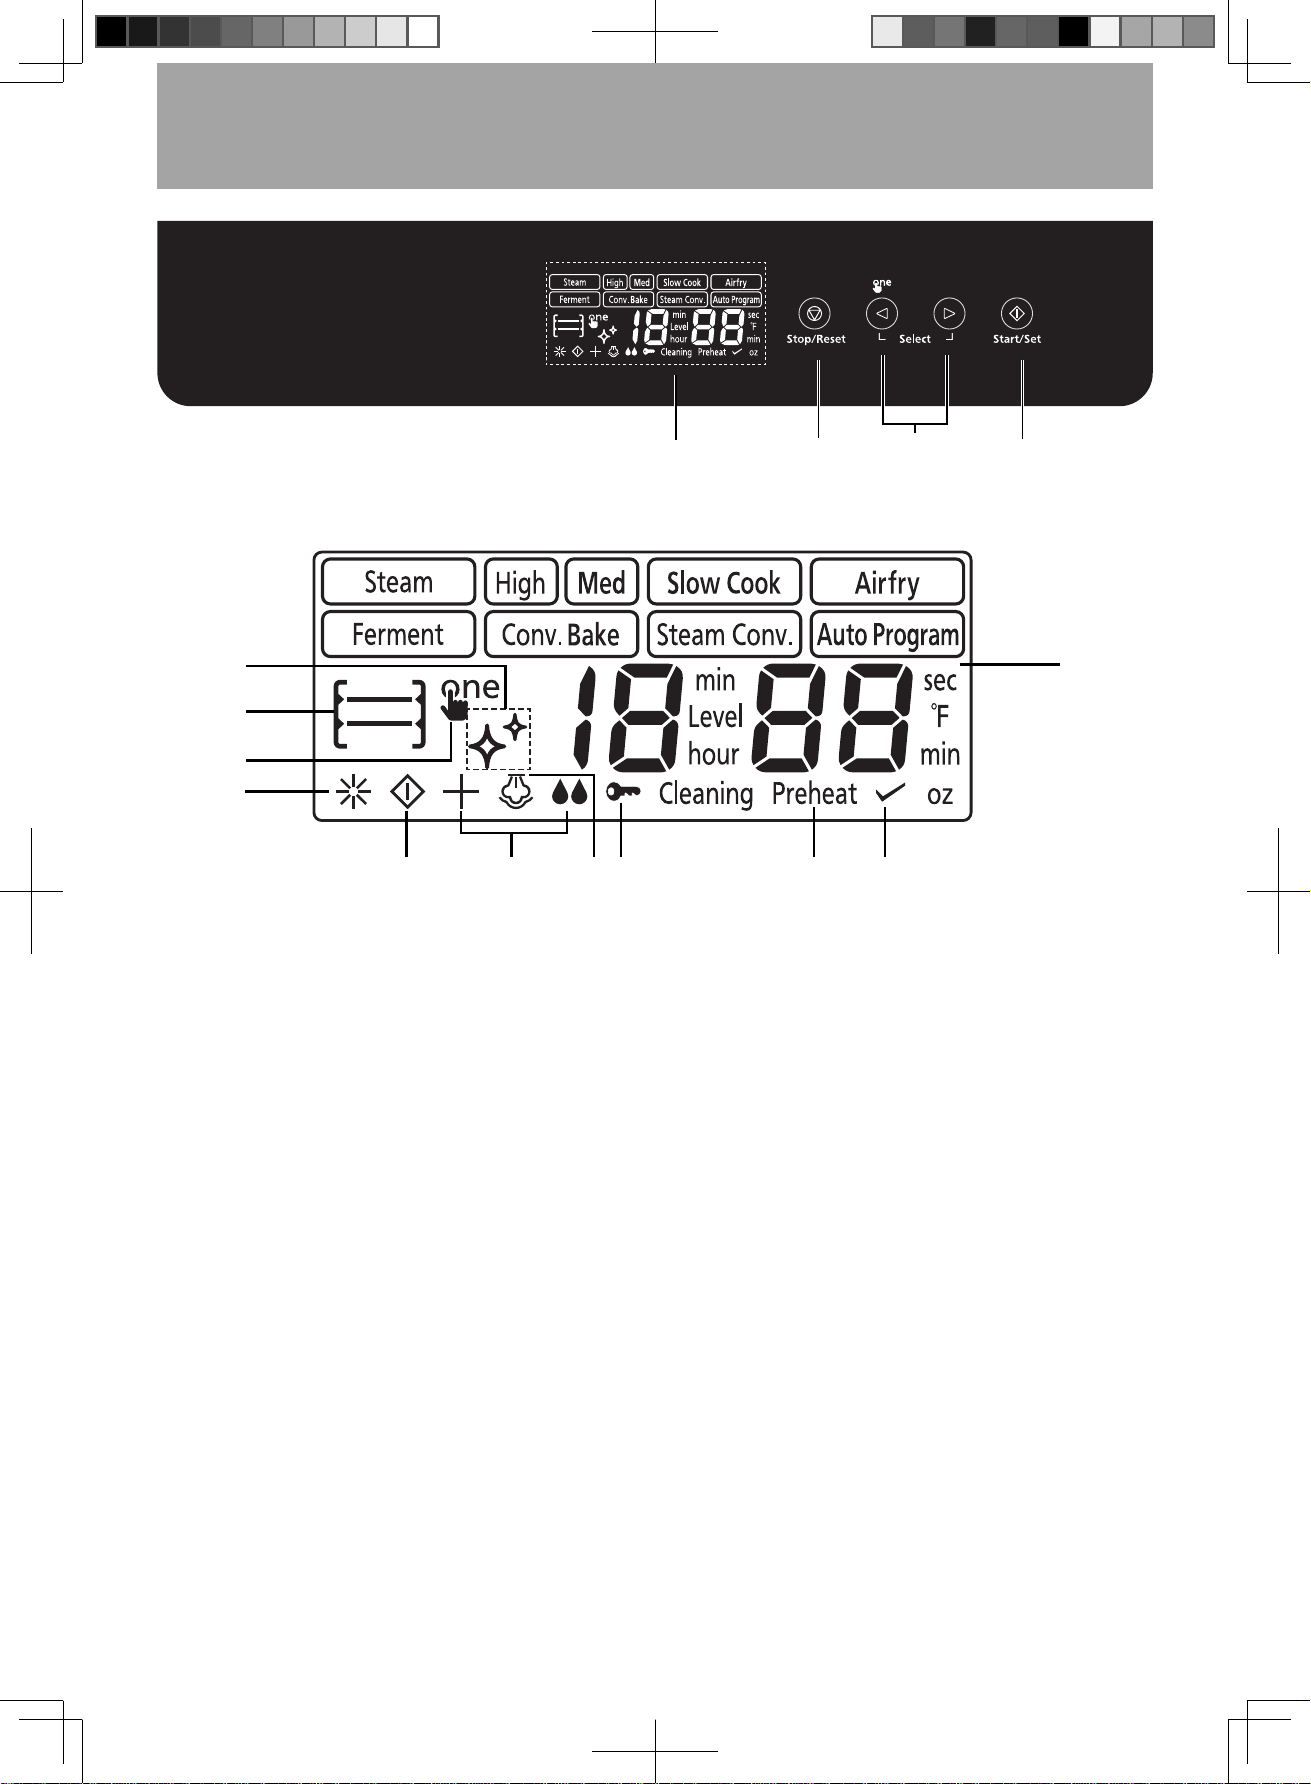
- Eng-11 -
Control Panel
➊ ➍ ➌➋
A
B
D
E
F GH I J
➊
C
➊
Display Window:
A: Top shelf and Bottom
shelf
B: Normal Working
(The mark is rotate
during operation.)
C: Start/Set
D: One Push Function
E: Steam System Cleaning
Function, Citric Acid
Cleaning Function
F: Full Water Icon
G: Steam Shot Icon
H: Child Safety Lock
I: Preheat Icon
J: Preheat End Icon
Mode:
Two modes of steam cooking:
Steam-Med ...........................(See page 13)
Steam-High ..........................(See page 13)
Slow Cook .................................(See page 14)
Airfry ..........................................(See page 15)
Ferment .....................................(See page 16)
Conv. Bake ...........................(See page 17-18)
Steam Conv. .........................(See page 19-20)
Auto Program ......................(See page 24-37)
➋
Stop/Reset button
➌
Start/Set button
➍
Select button
F0003CF00AP_EN_20220114.indd 11 2022/1/18 10:25:26
- Eng-12 -
Control Panel
(continued)
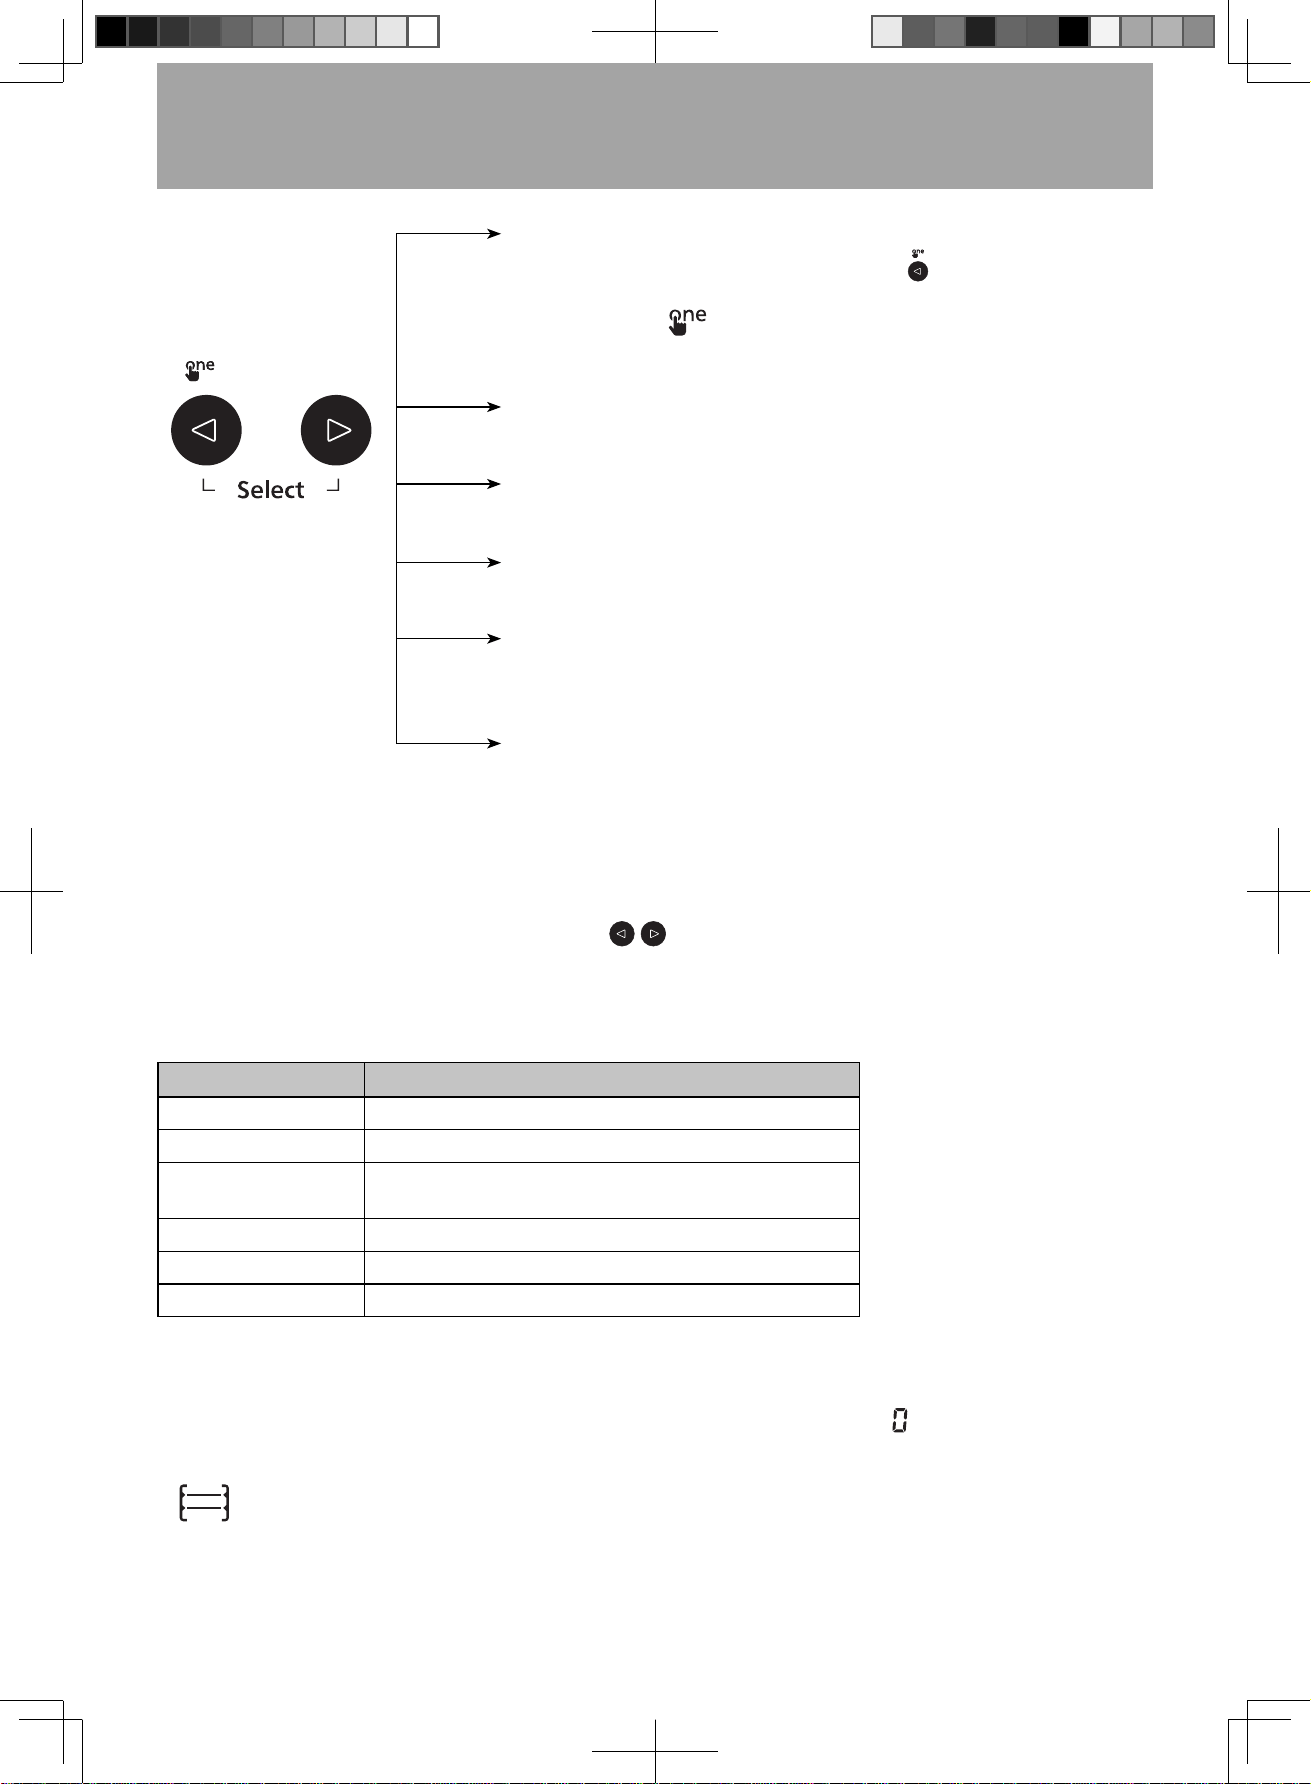
Time Setting*
To set the cooking time.
Function Setting
To select a function which you desired.
One Push Setting/Cancel
To set/cancel one push setting. (Press “ ” button 2 seconds)
One push setting is available for all functions. (only except
Steam Shot). “
” will flash in the display window after
cooking. (See page 22)
Menus Setting
To choose desired menu among Auto Program.
Weight/Serving/Level Setting
To set desired cooking weight/serving/level among Auto Program.
Temperature Setting
To set the temperature of Conv. Bake, Ferment and Steam Conv..
Note: To ensure safety, the Conv. Bake temperature will
gradually decrease to 400 °F (200 °C) when using above
400 °F (200 °C) in cooling and remaining 8 minutes. If you
continue to use above 400 °F (200 °C), cooking time will
shorter. This not influence its performance.
* Press “
/ ” button for a long time, you can fast forward
or rewind of time setting.
Beep Sound:
Times Results
None Did not or could not accept the instruction
Once Accept the instruction
Twice
Between programmed stages to prompt turn over, stir,
rearrange foods or error message during cooking
Three times After preheating for manual setting
Long time beeps After preheating for auto program setting
Five times End of any completed program
Notes:
1. The above illustration is for reference only.
2. After 6 minutes without operation after setting the cooking program, including opening or closing the
oven door, the program will automatically be cancelled and revert back to “ ” or enter standby mode.
Open and close the oven door once, it can operate again. If the oven is used for another time without
being unplugged and plugged in again, the last program will be displayed.
3.
: This illustration is placement of accessory for auto cook menus.
F0003CF00AP_EN_20220114.indd 12 2022/1/18 10:25:27
- Eng-13 -
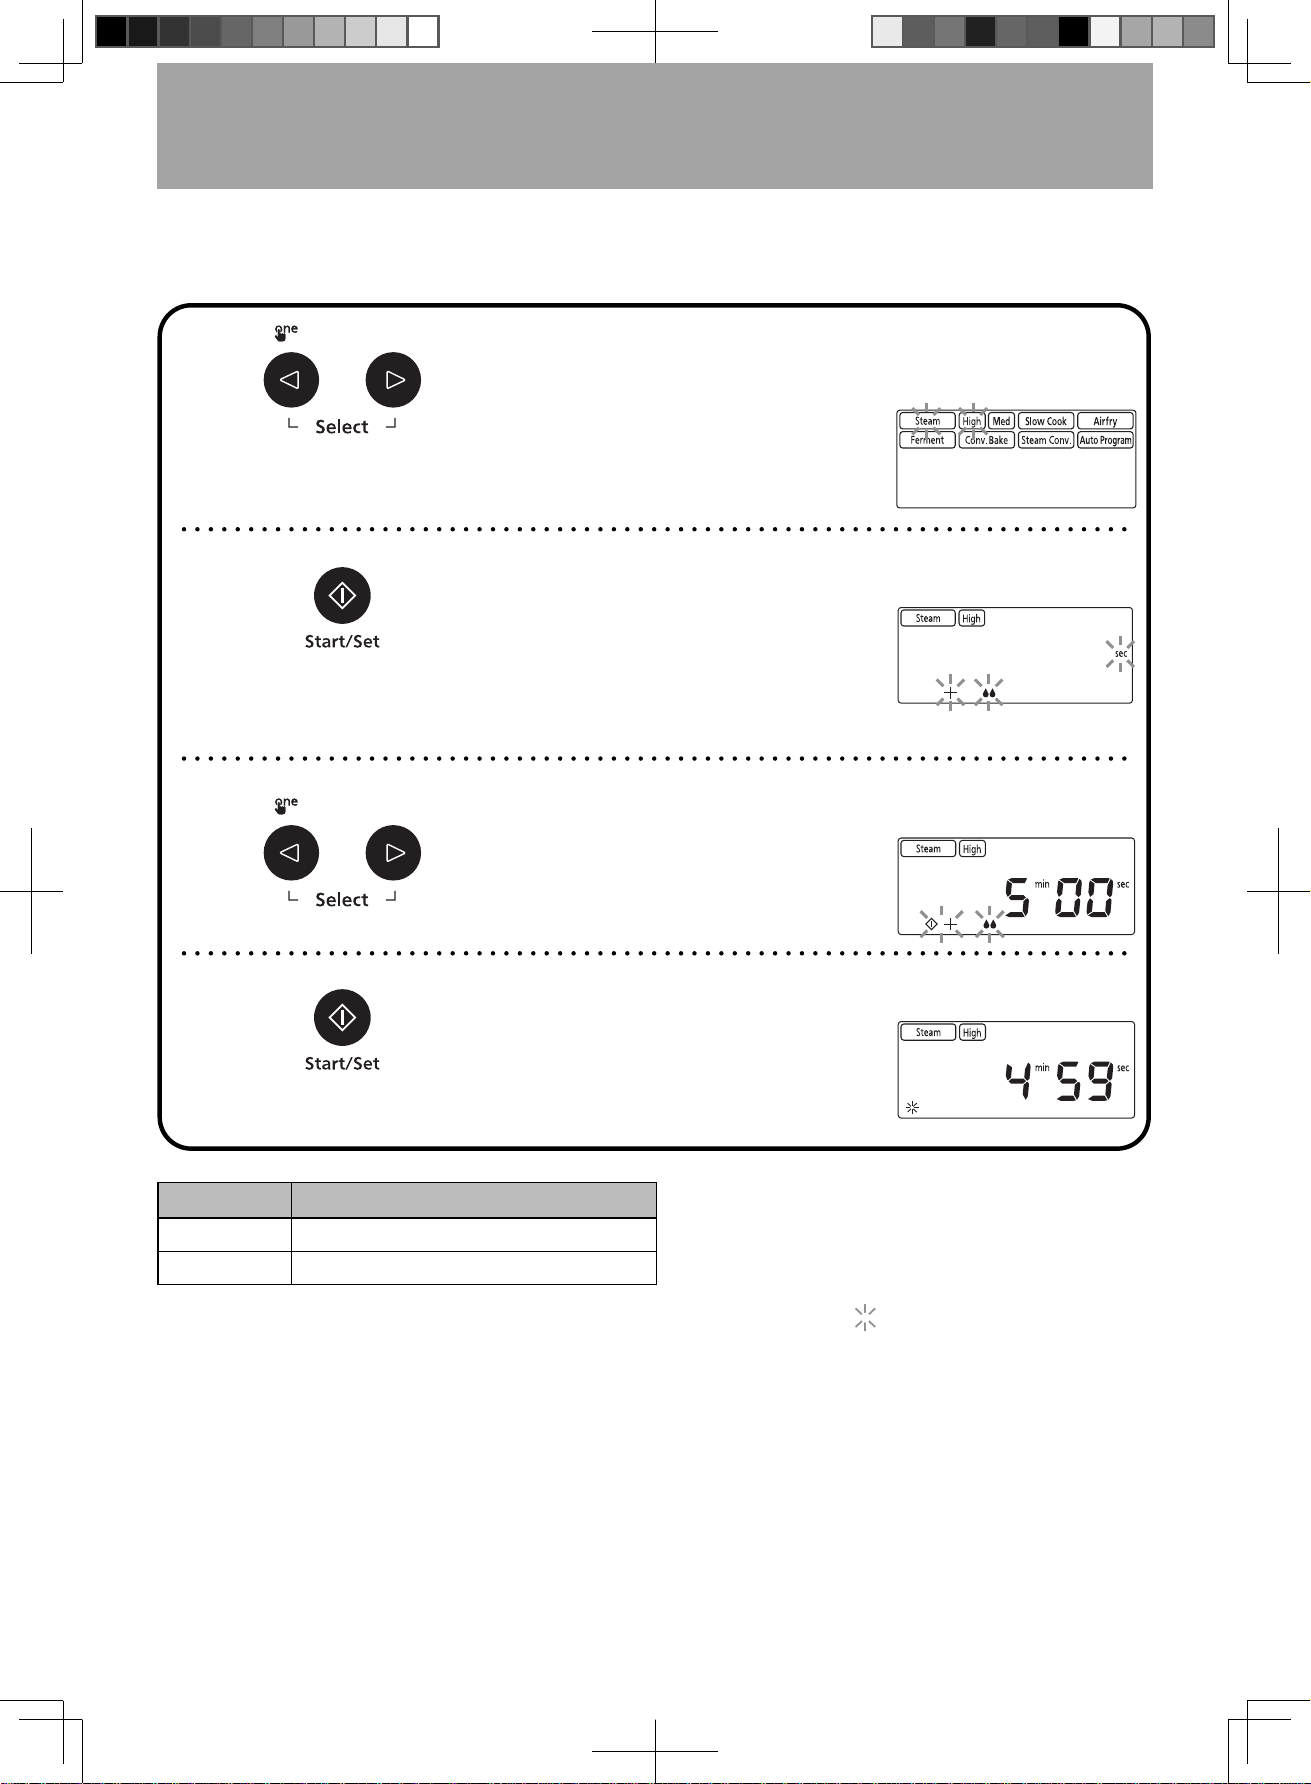
Steam Setting
Two modes for steam cooking, Steam-Med and Steam-High. Cooking with steam can keep foods soft and
moist. For example: vegetables, seafood and so on. Additionally, it also can heat tin foods or vacuum packaged
foods.
➊
Place wire rack with food on the
metal tray in the lower shelf position,
then select Steam-High mode by
pressing Select button.
Note: Fill the tank with water before
using.
Example: select
Steam-High mode
➋
Press Set button to set the Steam-
High mode.
➌
Set desired cooking time by
pressing Select button.
Example: 5 minutes
➍
Press Start button. Cooking will
start. The time in the display window
will count down.
Mode
Suitable kinds of foods
Steam-High Meat, Seafood, Root Vegetables, etc.
Steam-Med Bun, Shrimp, Chicken Breast, etc.
Notes:
1. Fill the tank with water before using. The max
volume is 3¹⁄๚ cups (800 ml).
2. Max time for Steam-Med is 1 hour.
3. Max time for Steam-High is 30 minutes.
4. Flashing state “
” will flash in the display
window.
5. When using Steam-High for cooking, please
ensure that the heat resisting temperature of
the cooking container is above 270 °F (130 °C).
F0003CF00AP_EN_20220114.indd 13 2022/1/18 10:25:27
- Eng-14 -
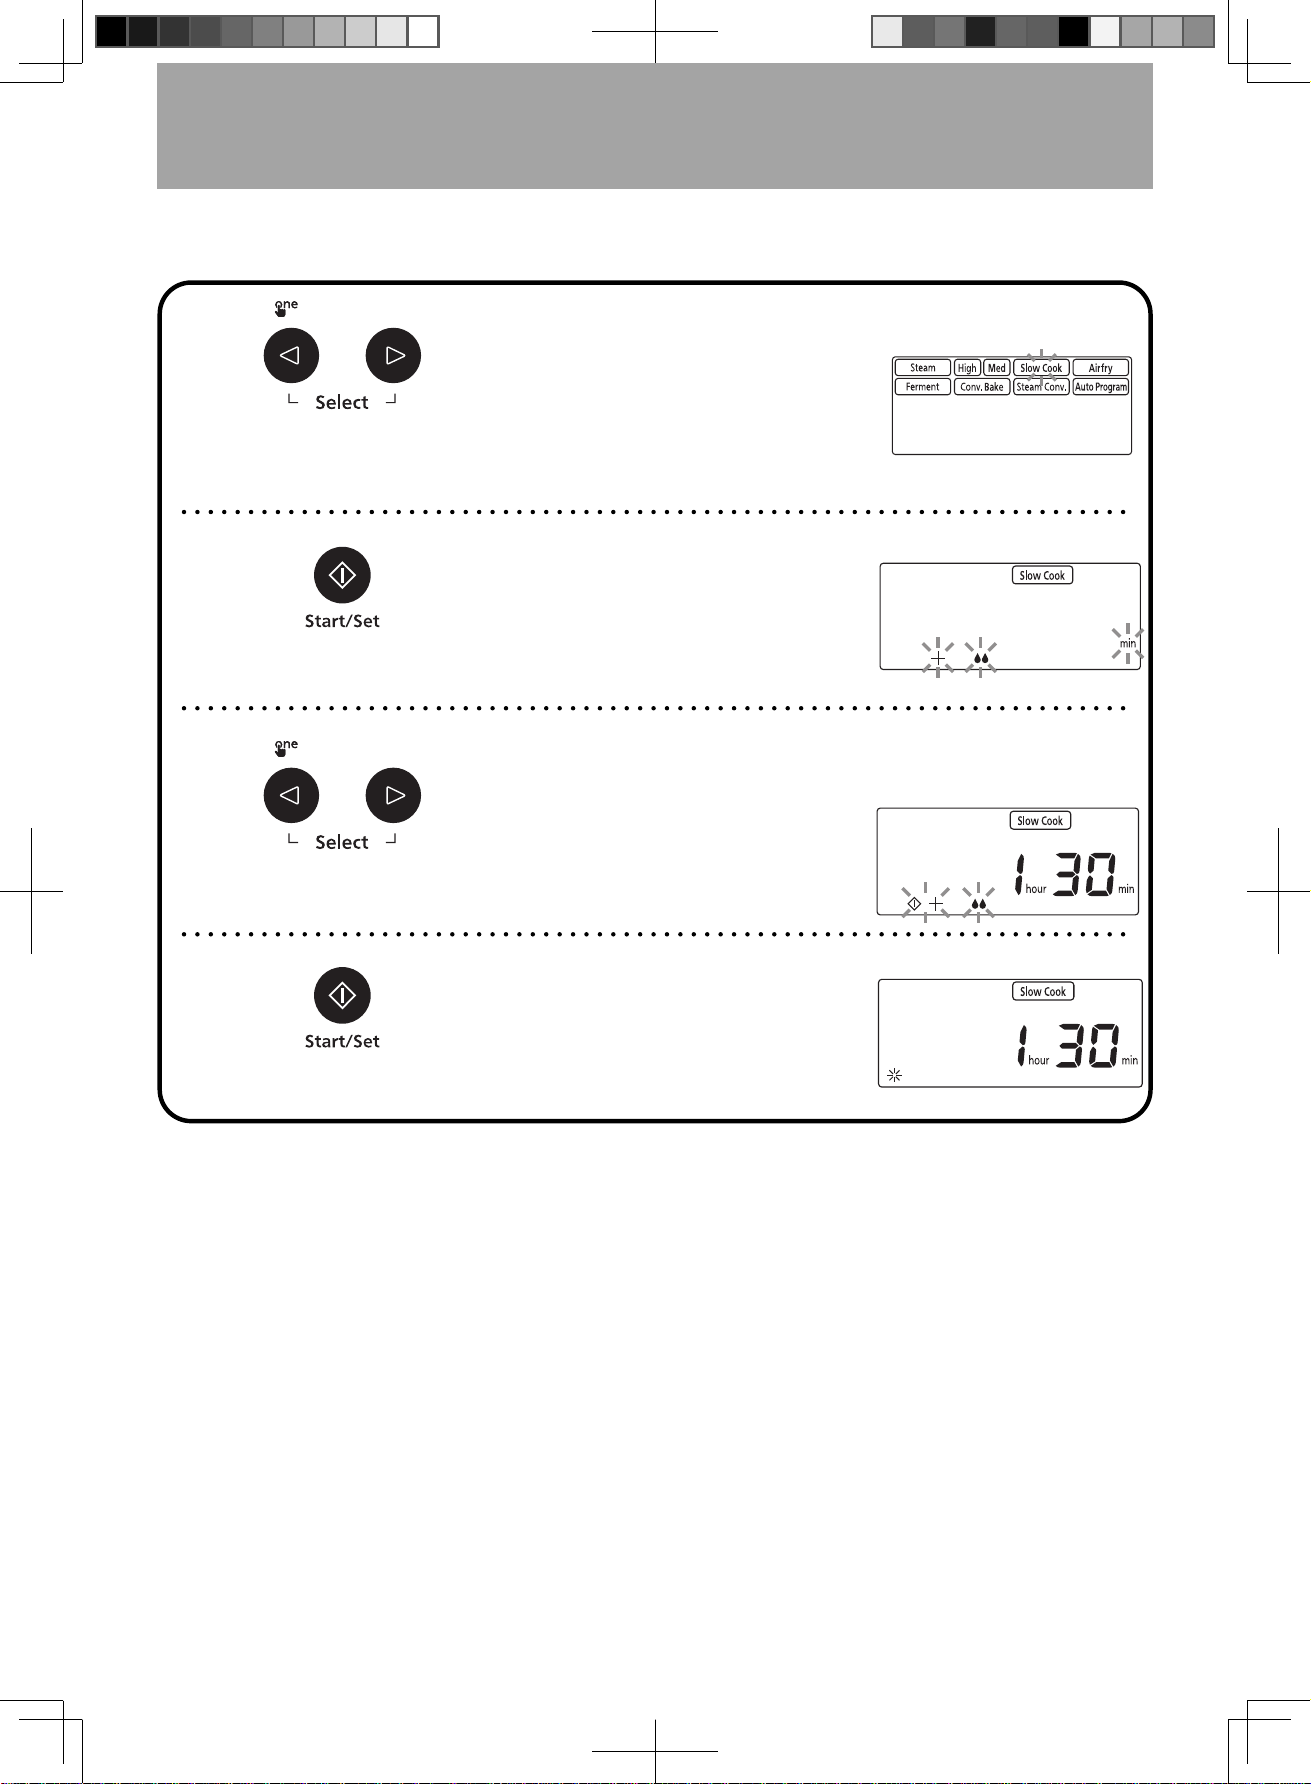
Slow Cook Setting
This mode combines the steam and convection heater. It is suitable for stew soup and vegetables with long
cooking times. You can set cooking time only.
➊
Place wire rack with food on the
metal tray in the lower shelf position.
Select Slow Cook mode by
pressing Select button.
Note: Fill the tank with water before
using.
➋
Press Set button to set the Slow
Cook mode.
➌
Set desired cooking time by
pressing Select button.
(Setting time range from 1 hour and
30 minutes to 3 hours. One shift time is
30 minutes.)
Example: 1 hour
30 minutes
➍
Press Start button. Cooking will
start. The cooking time in the display
window will count down.
Notes:
1. Fill the tank with water before using.
2. This mode is suitable for small soup bowl. If you stew food using large-capacity container, it is
recommended to extend the cooking time appropriately.
F0003CF00AP_EN_20220114.indd 14 2022/1/18 10:25:27
- Eng-15 -
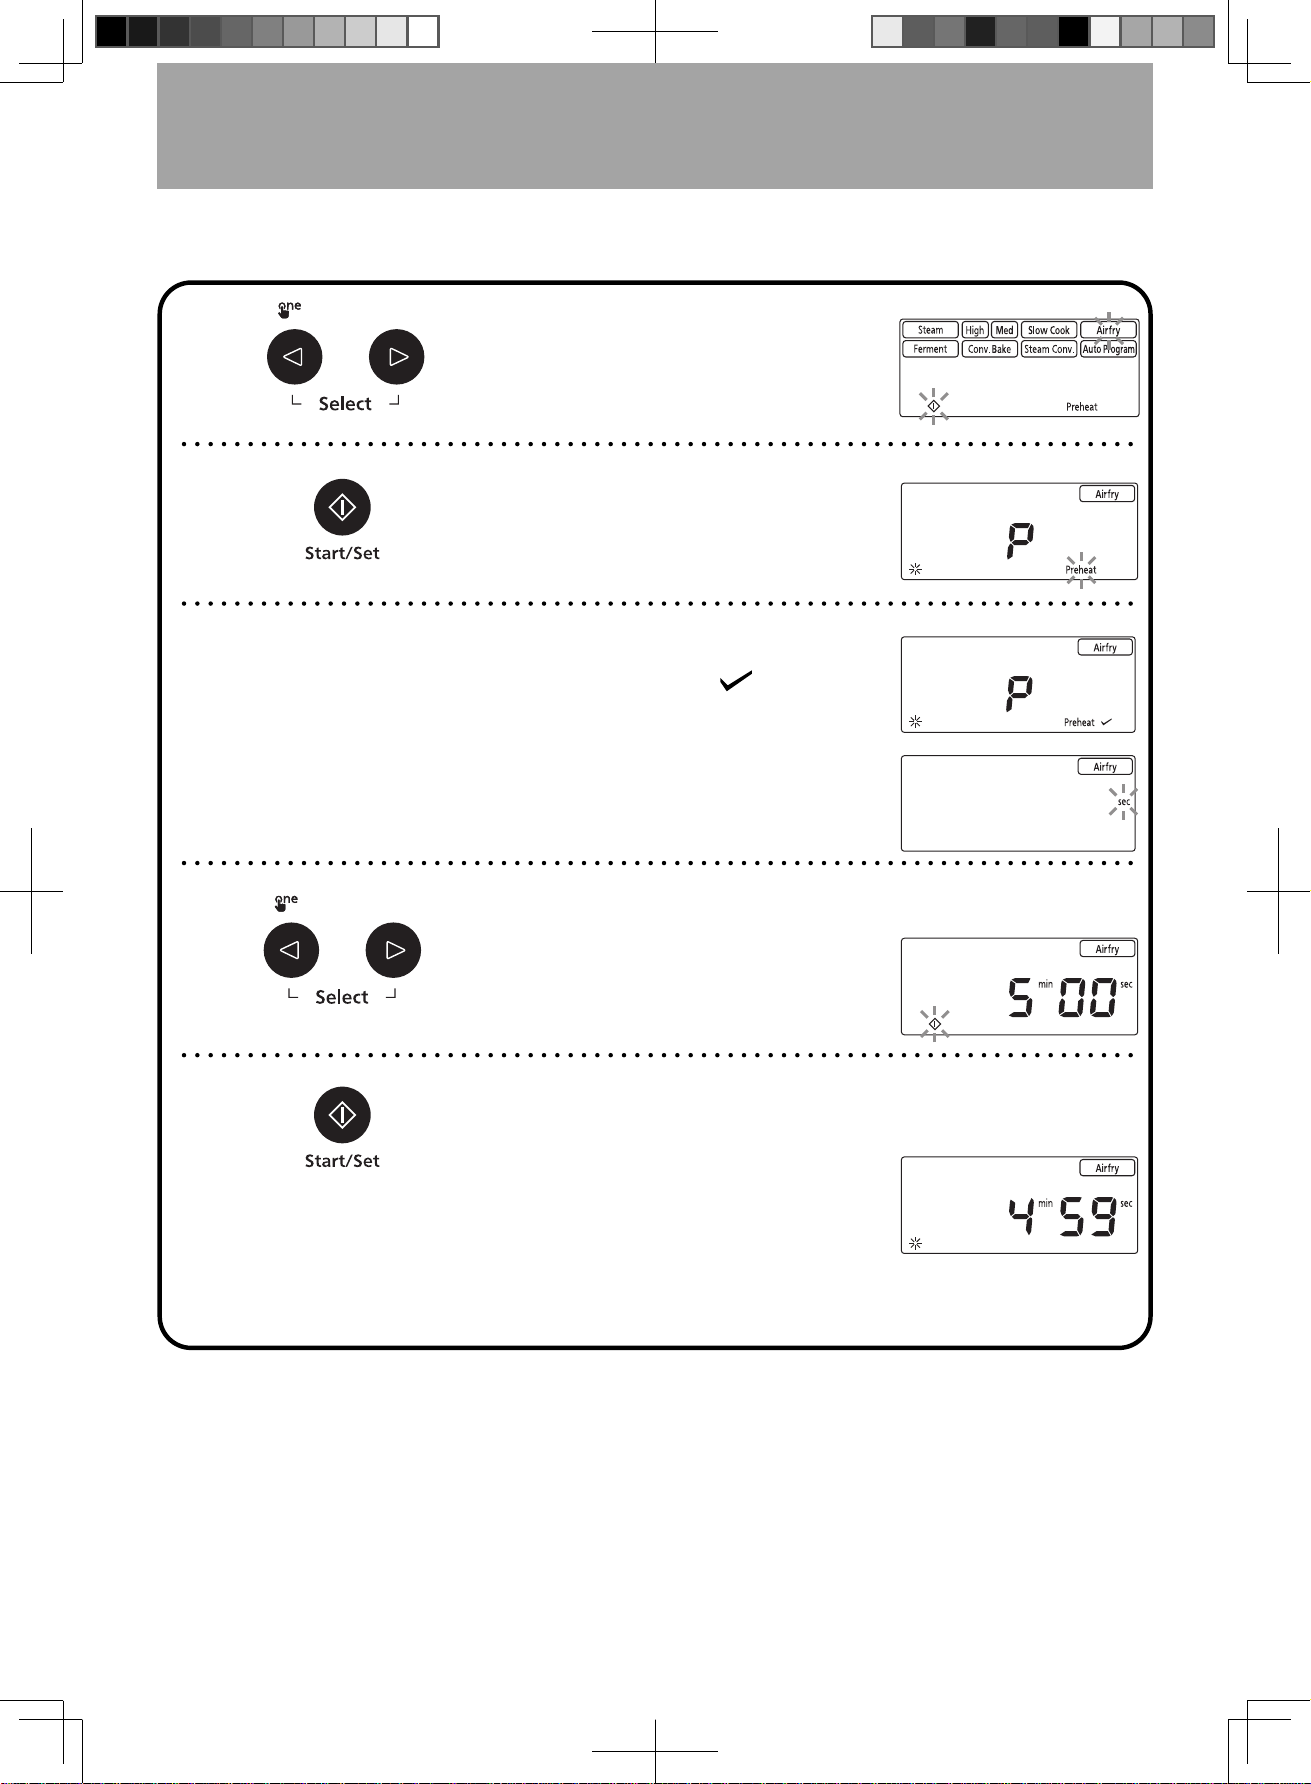
Airfry Setting
This mode can cook foods like fries with little or no oil. This is more healthy than traditional deep-frying and
suitable for fried fish steaks, fried frozen fries, fried chicken wings etc.
➊
Select Airfry mode by pressing
Select button. Preheat is
automatically set and its icon
appears in the display window.
➋
Press Start button and preheating
starts.
➌
After preheating, the oven will beep
three times and the icon “
” appears
to inform preheat is done. Open the
door and place accessory with food in
the according shelf position quickly.
➍
Set desired cooking time by
pressing Select button.
(Maximum setting time is 1 hour
30 minutes.)
Example: 5 minutes
➎
Press Start button. The cooking
time in the display window will count
down.
You can adjust the cooking time
while cooking. Pressing the Select
button can increase or decrease the
cooking time in 1 minute increments
(up to 10 minutes).
Note:
To ensure safety on extended cooking times in the Airfry mode, the oven will gradually decrease the
temperature 8 minutes after it has achieved the desired temperature. This will not influence the cook
performance.
F0003CF00AP_EN_20220114.indd 15 2022/1/18 10:25:27
- Eng-16 -
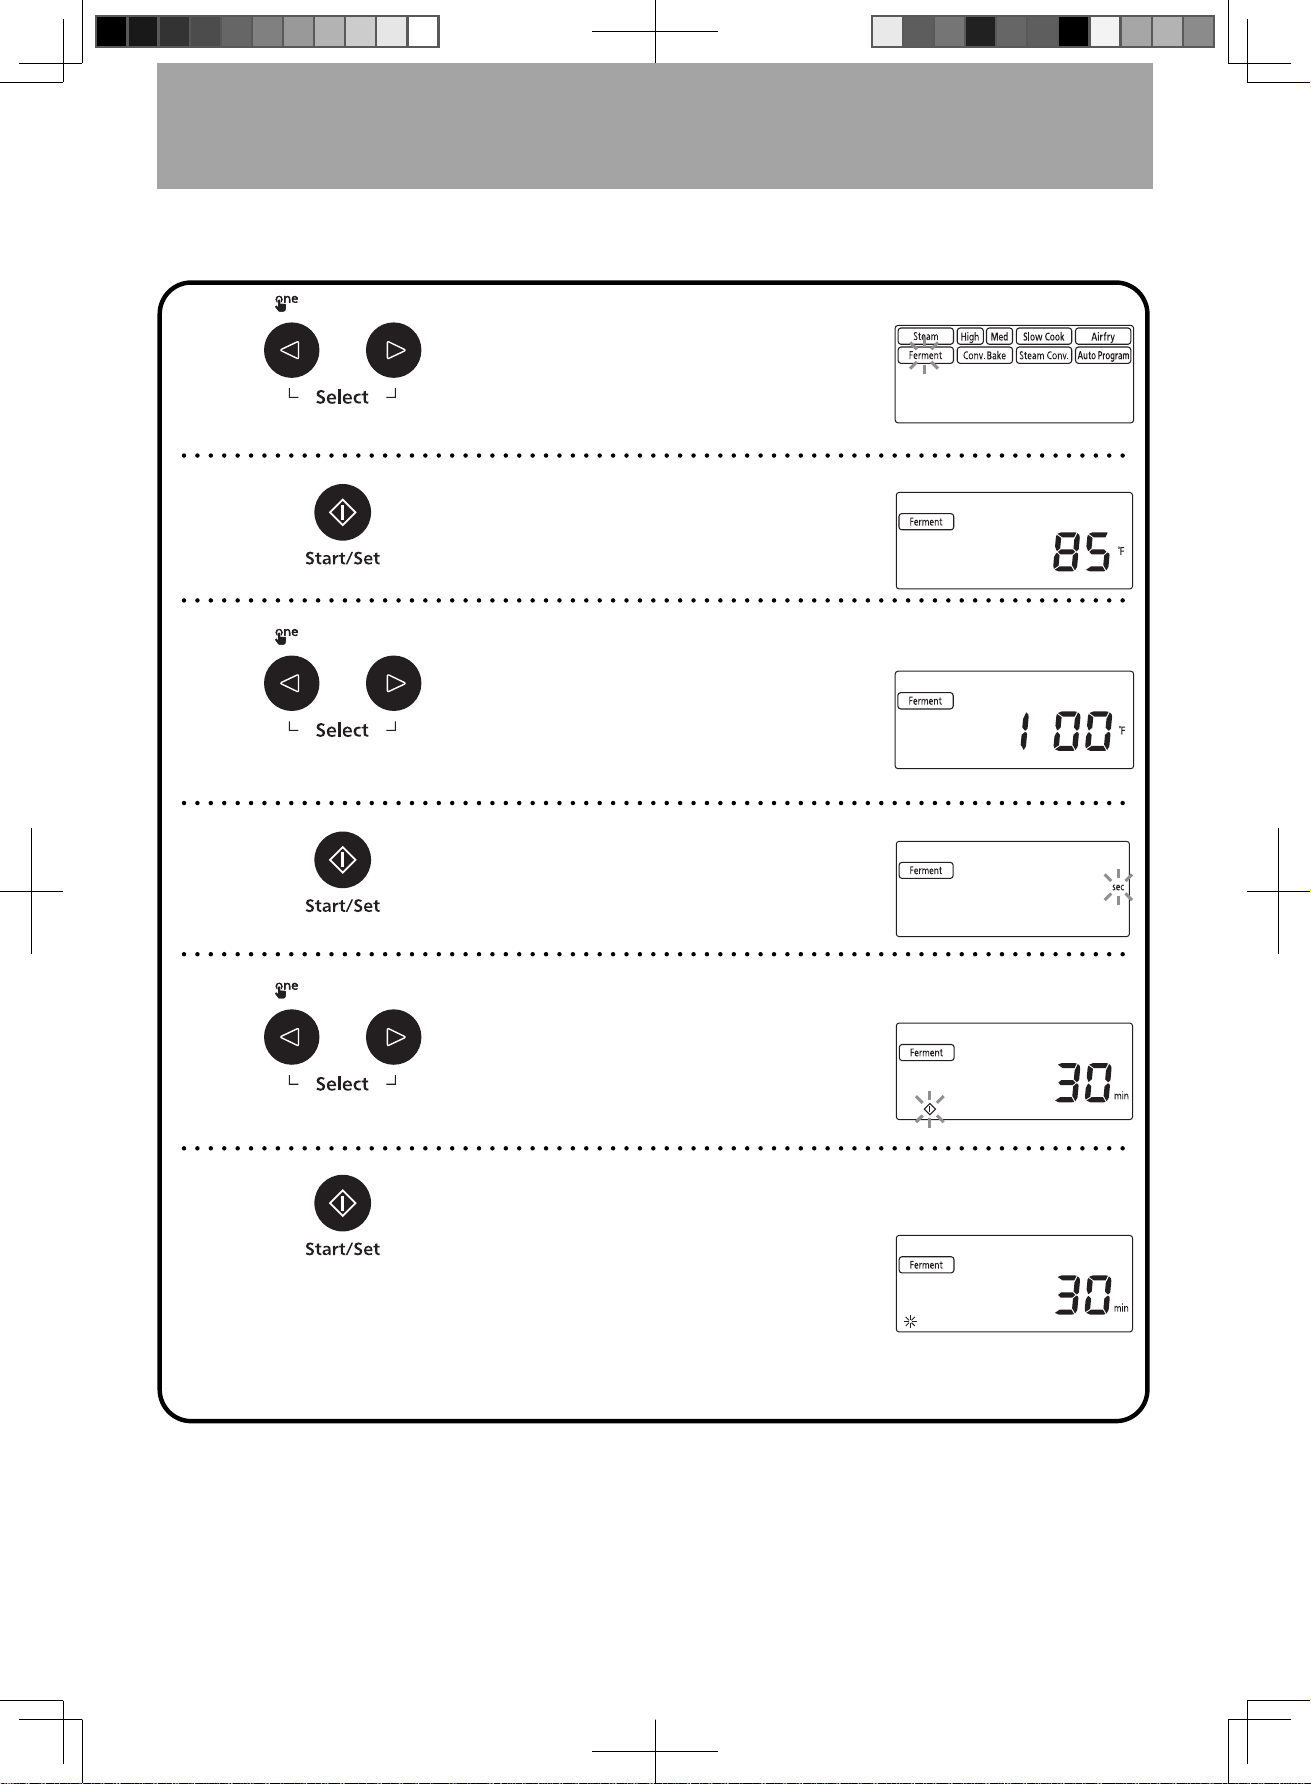
Ferment Setting
Ferment has 85 °F (30 °C) and 100 °F (40 °C) modes. 85 °F (30 °C) can be used for fermentation of European bread and dough
with rich oil. Like baguette or Danish bread. 100 °F (40 °C) can be used for fermentation of Chinese pastry and pizza dough.
Notes:
1. Oven temperature will change with food and room temperature. Please adjust the fermentation time
according to the performance.
2. When cavity or room temperature is higher than the setting fermentation temperature, fermentation
effect of food may be affected, “U50” will be appeared in the display window. Please wait until the
cavity or room temperature cools down. When “U50” disappears, you can use fermentation again or
ferment food at room temperature.
3. Steam Shot function can be used when you need steam in fermentation. Please refer to page 21.
➊
Place food in the container or
directly on the metal tray in the
according shelf position. Press
Select button to choose Ferment.
➋
Press Set button to set Ferment.
➌
Set desired fermentation
temperature by pressing Select
button.
(You can set 85
°F (30 °C)
and 100
°F (40 °C)
.
Default temperature is 85
°F (30 °C)
.)
Example: 100 °F (40 °C)
➍
Press Set button to set desired
temperature.
➎
Set desired cooking time by
pressing Select button.
(Maximum fermentation time is
12 hours.)
Example: 30 minutes
➏
Press Start button. The cooking
time in the display window will
count down.
You can adjust the cooking time
while cooking. Pressing Select
button can increase or decrease the
cooking time in 1 minute increments
(up to 10 minutes).
F0003CF00AP_EN_20220114.indd 16 2022/1/18 10:25:28
- Eng-17 -
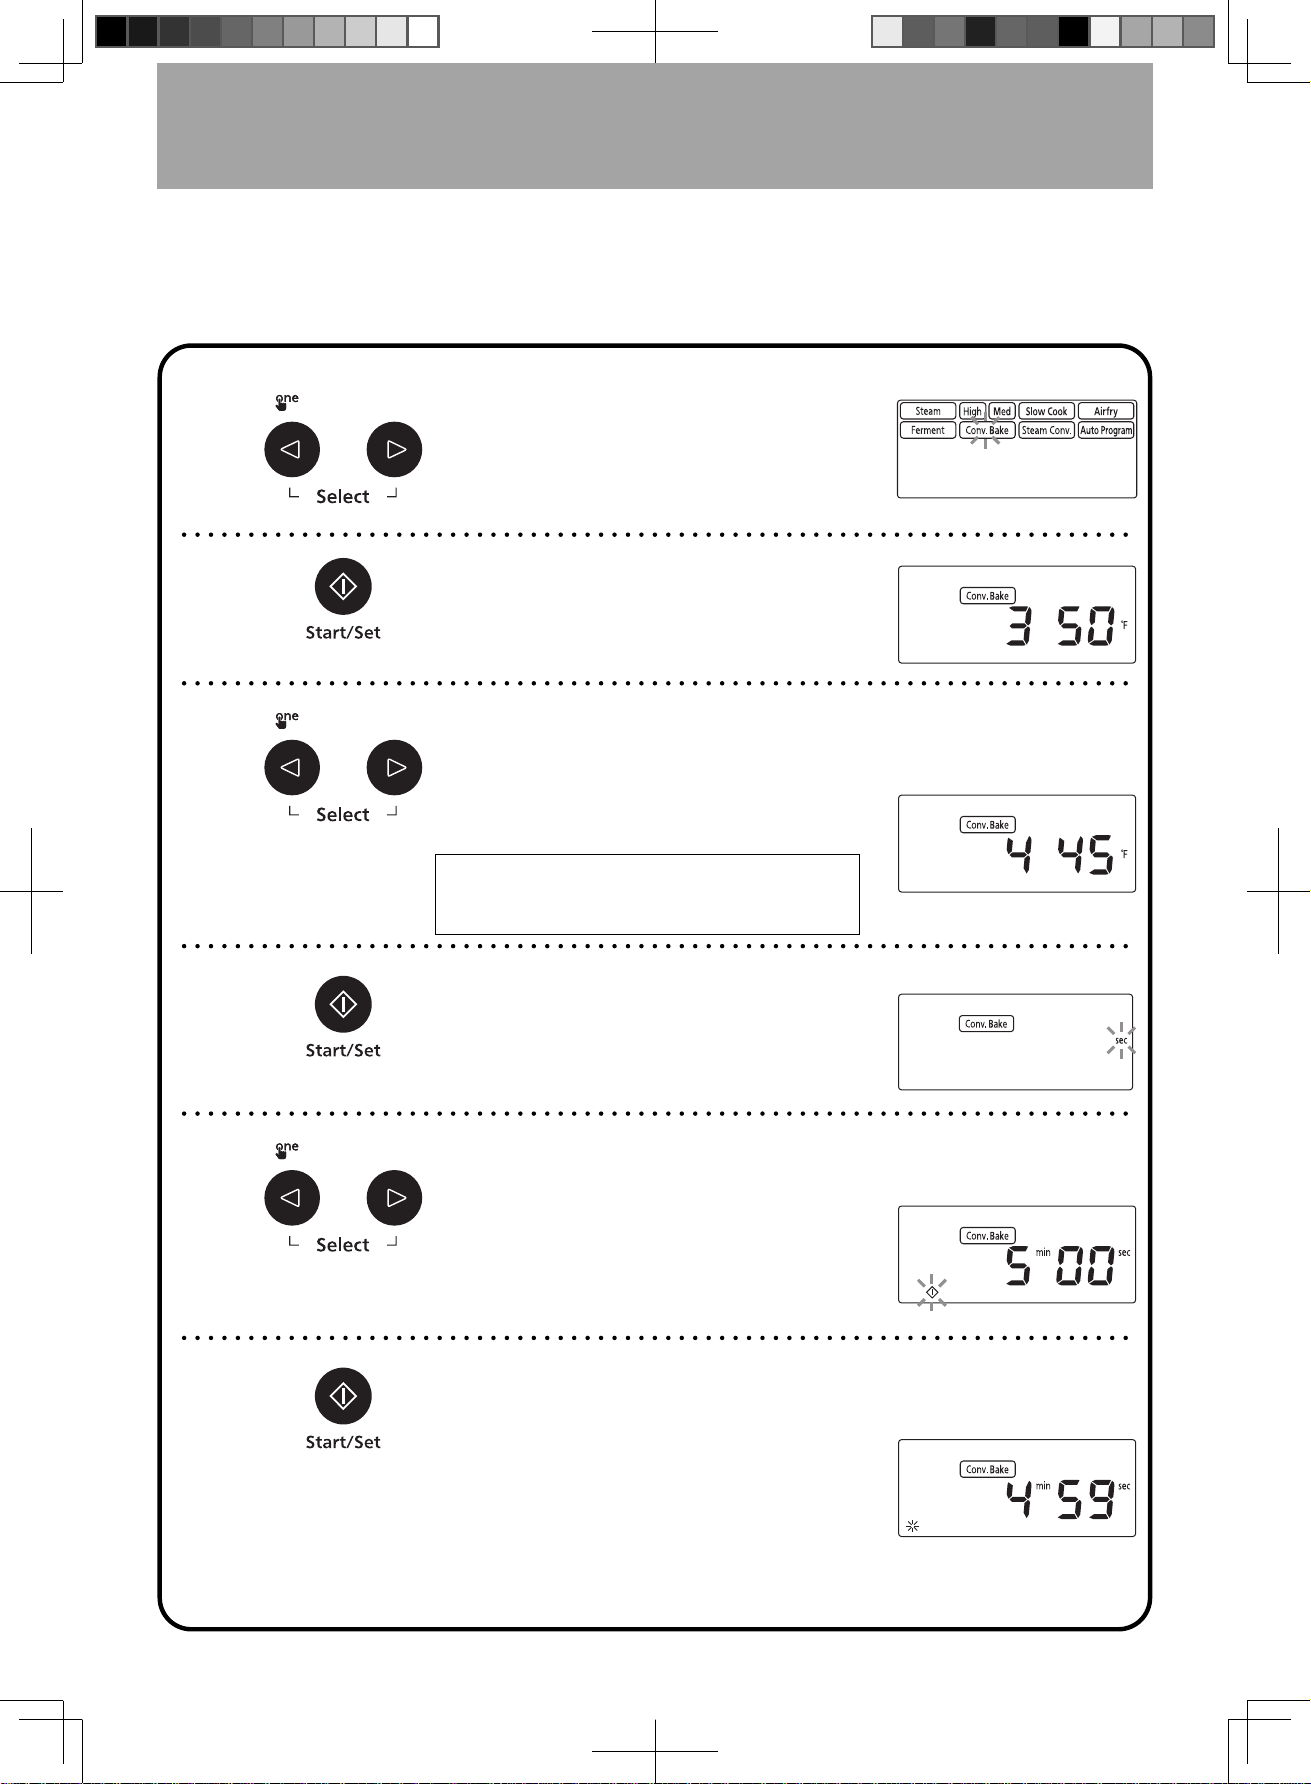
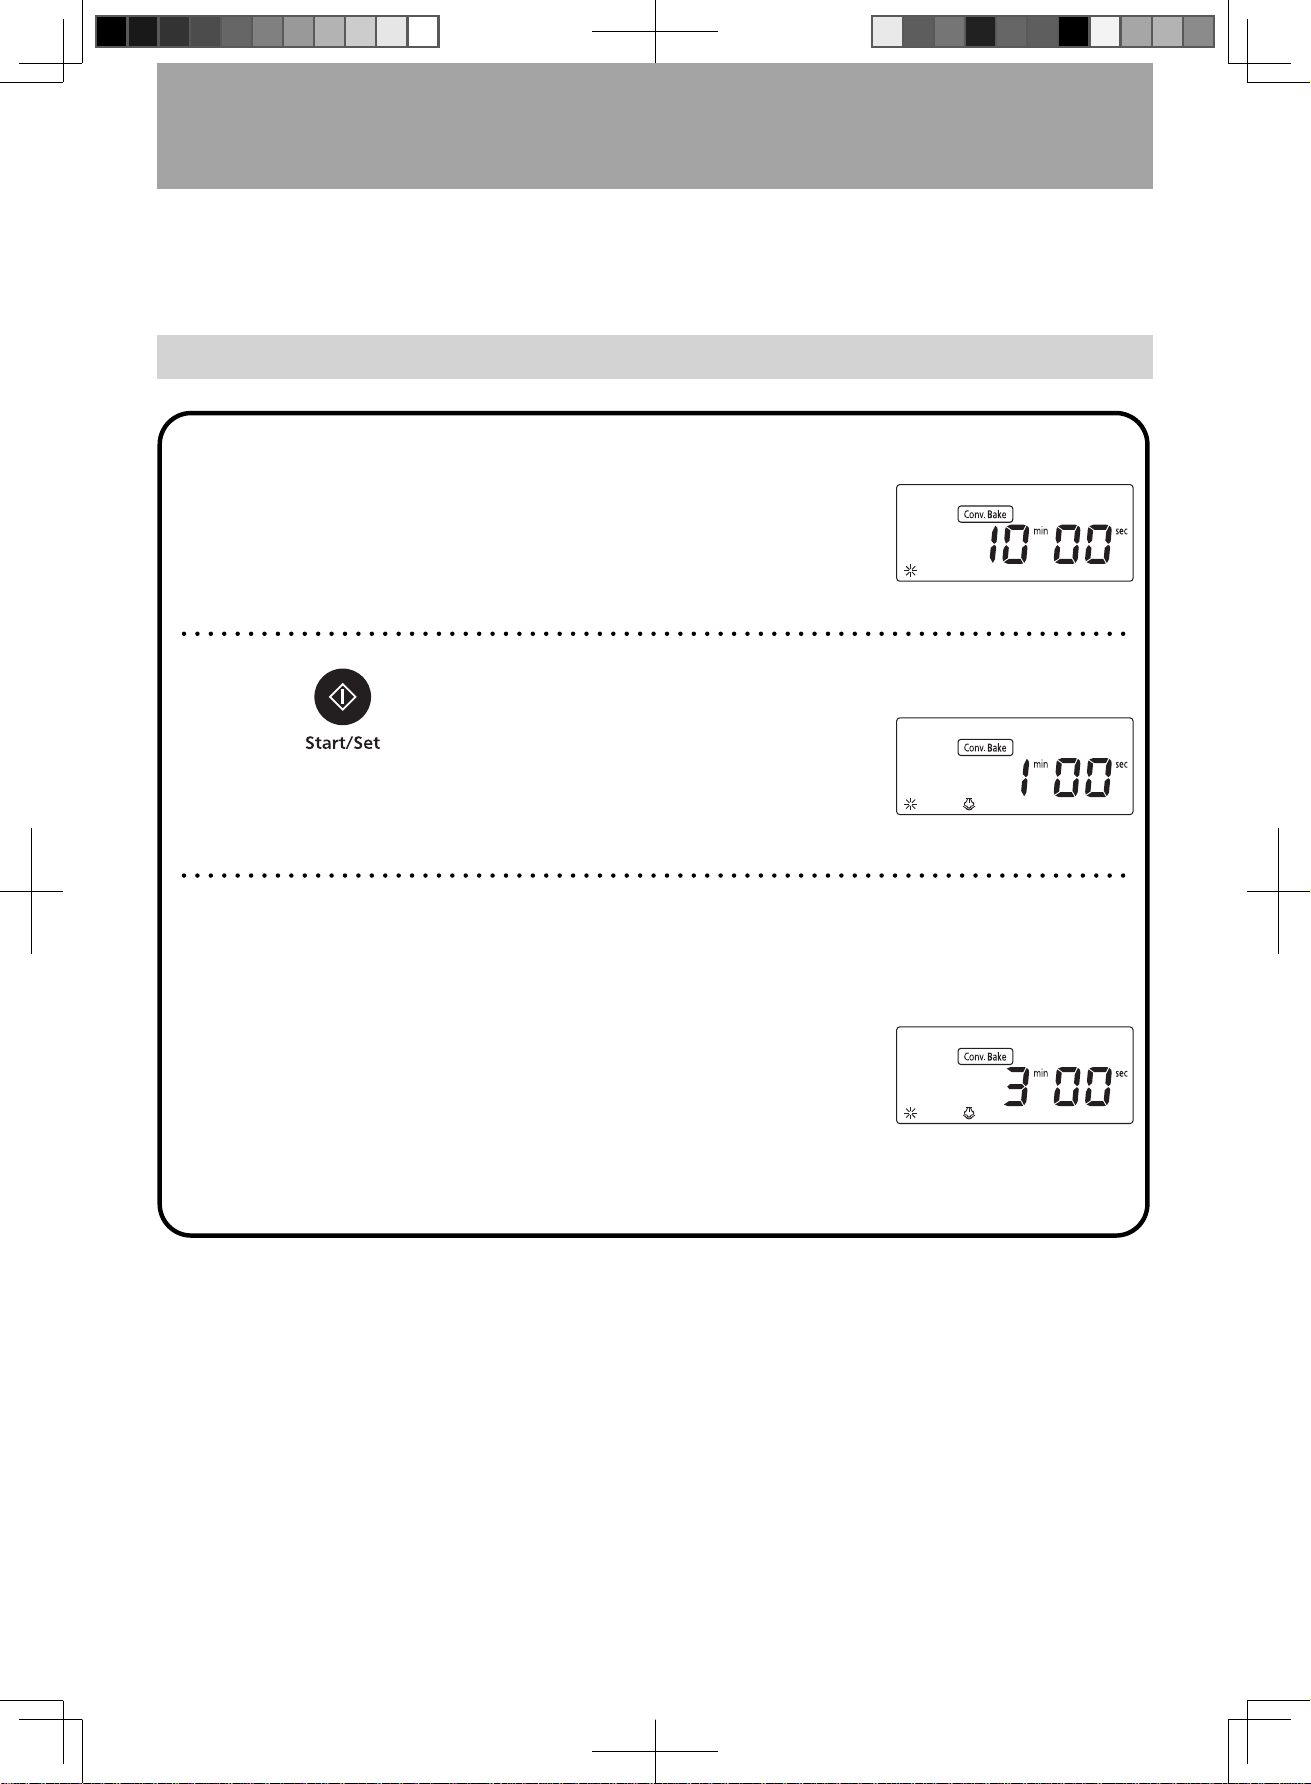
Conv. Bake Setting
Conv. Bake are suitable for baking meat, fish and Western desserts like cakes, pizzas, etc. Place the foods
directly on the accessory, select suitable temperature and time, and start cooking. For evenly distributed color of
cooked food, re-arrange food position or rotate the accessory during cooking.
When cooking without Preheat:
➊
Place food on the accessory in
the upper and lower shelf position.
Select Conv. Bake mode by
pressing Select button. (Without
Preheat)
➋
Press Set button to set Conv. Bake
mode. (Without Preheat)
➌
Set desired cooking temperature by
pressing Select button.
(Temperatures refer to below, and default
temperature is 350 °F (180 °C).)
215 °F (100 °C)
230 °F (110 °C)
250 °F (120 °C)
270 °F (130 °C)
285 °F (140 °C)
300 °F (150 °C)
325 °F (160 °C)
340 °F (170 °C)
350 °F (180 °C)
375 °F (190 °C)
400 °F (200 °C)
410 °F (210 °C)
425 °F (220 °C)
445 °F (230 °C)
Example: 445 °F (230 °C)
➍
Press Set button to set desired
temperature.
➎
Set desired cooking time by
pressing Select button.
(Maximum Conv. Bake time is 1 hour
and 30 minutes.)
Example: 5 minutes
➏
Press Start button. The cooking
time in the display window will
count down.
You can adjust the cooking time
while cooking. Pressing Select
button can increase or decrease the
cooking time in 1 minute increments
(up to 10 minutes).
F0003CF00AP_EN_20220114.indd 17 2022/1/18 10:25:28
- Eng-18 -
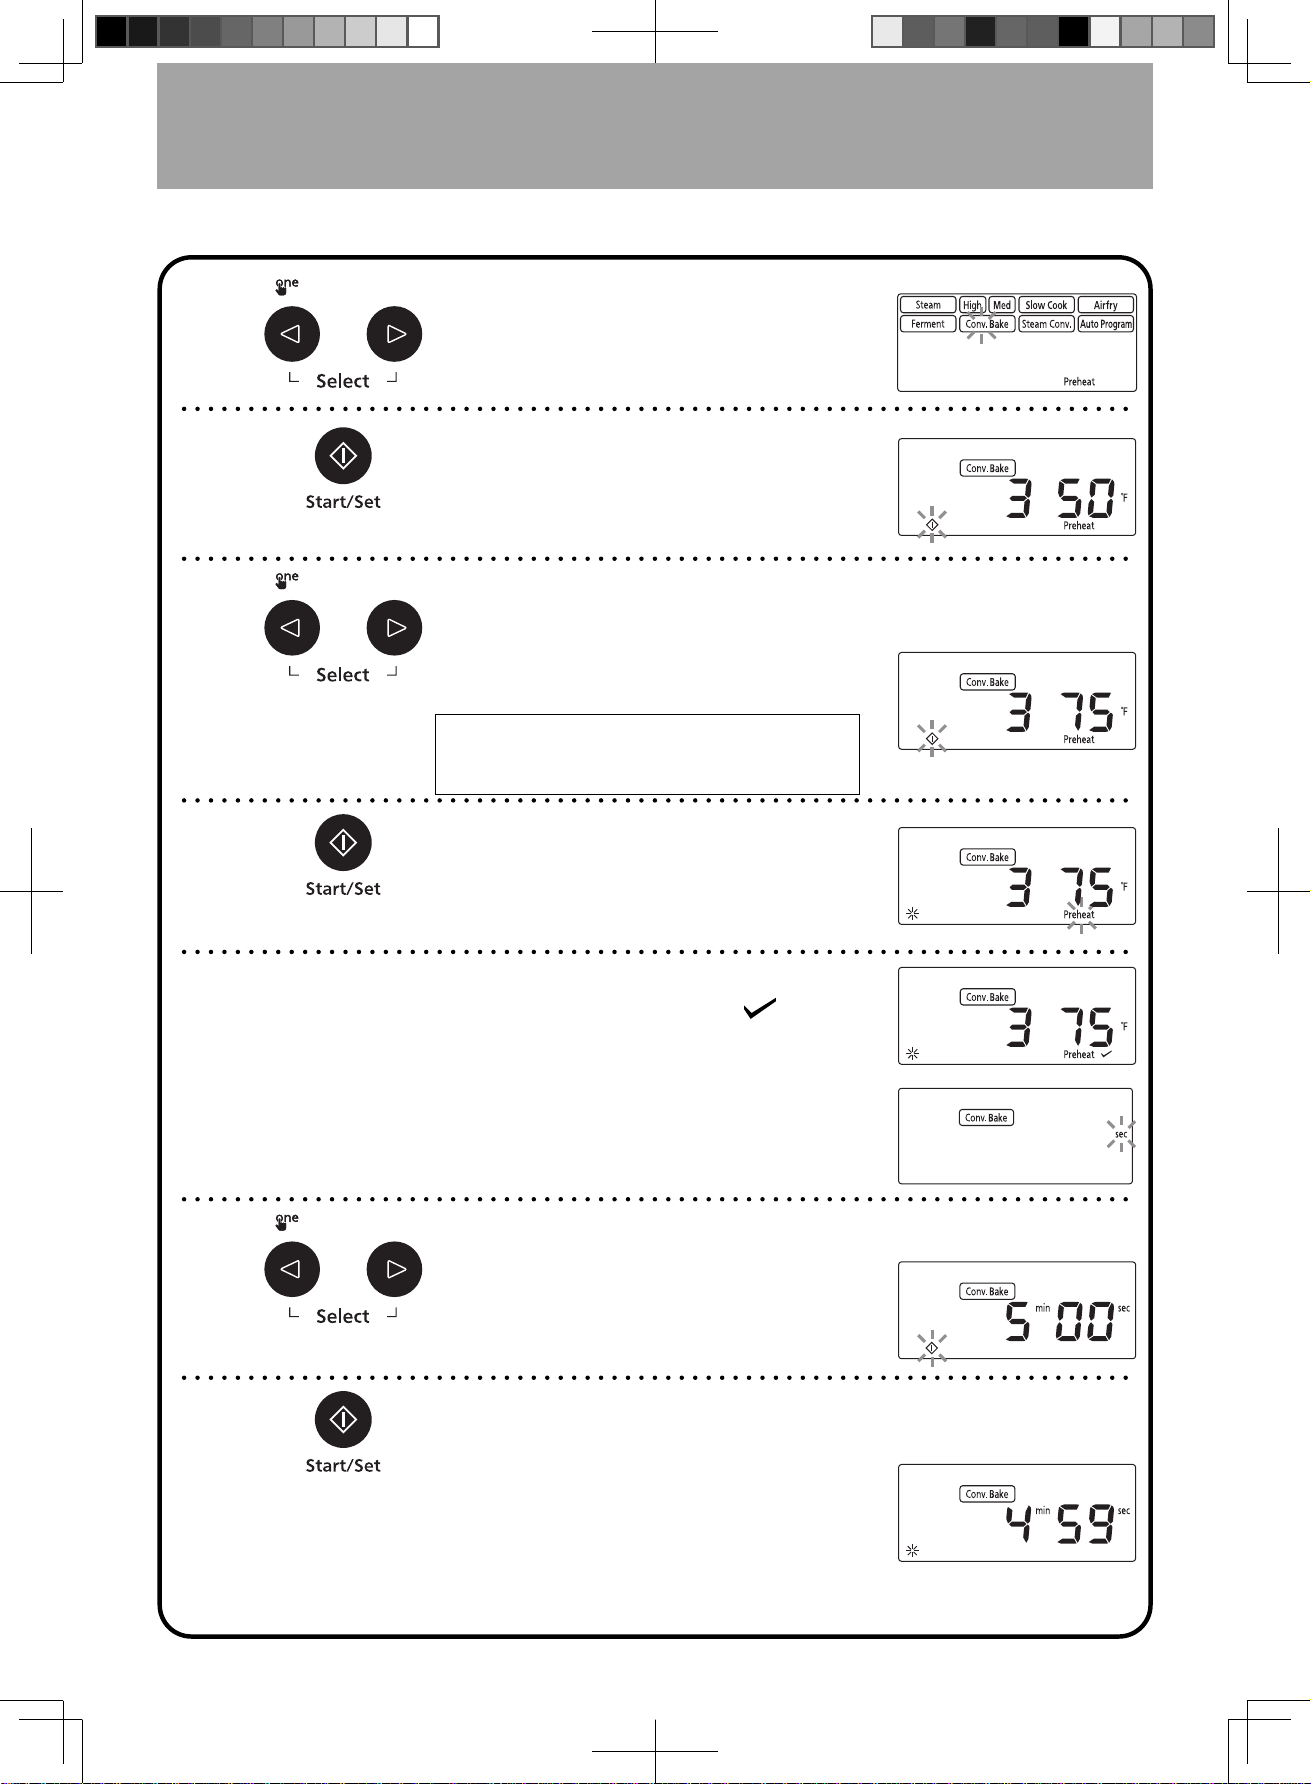
Conv. Bake Setting
(continued)
When cooking with Preheat:
➊
Select Conv. Bake mode by
pressing Select button. (With
Preheat)
➋
Press Set button to set Conv. Bake
mode. (With Preheat)
➌
Set desired cooking temperature by
pressing Select button.
(Temperatures refer to below, and default
temperature is 350 °F (180 °C))
215 °F (100 °C)
230 °F (110 °C)
250 °F (120 °C)
270 °F (130 °C)
285 °F (140 °C)
300 °F (150 °C)
325 °F (160 °C)
340 °F (170 °C)
350 °F (180 °C)
375 °F (190 °C)
400 °F (200 °C)
410 °F (210 °C)
425 °F (220 °C)
445 °F (230 °C)
Example: 375 °F (190 °C)
➍
Press Start button to preheat.
(You can adjust the desired temperature by
pressing Select button during preheating.)
➎
After preheating, the oven will beep
three times and the icon “
”
appears to inform preheat is done.
Open the door and place accessory
with food in the upper and lower
shelf position quickly.
➏
Set desired cooking time by
pressing Select button.
(Maximum Conv. Bake time is 1 hour
and 30 minutes.)
Example: 5 minutes
➐
Press Start button. The cooking
time in the display window will
count down.
You can adjust the cooking time
while cooking. Pressing Select
button can increase or decrease the
cooking time in 1 minute increments
(up to 10 minutes).
F0003CF00AP_EN_20220114.indd 18 2022/1/18 10:25:29
- Eng-19 -
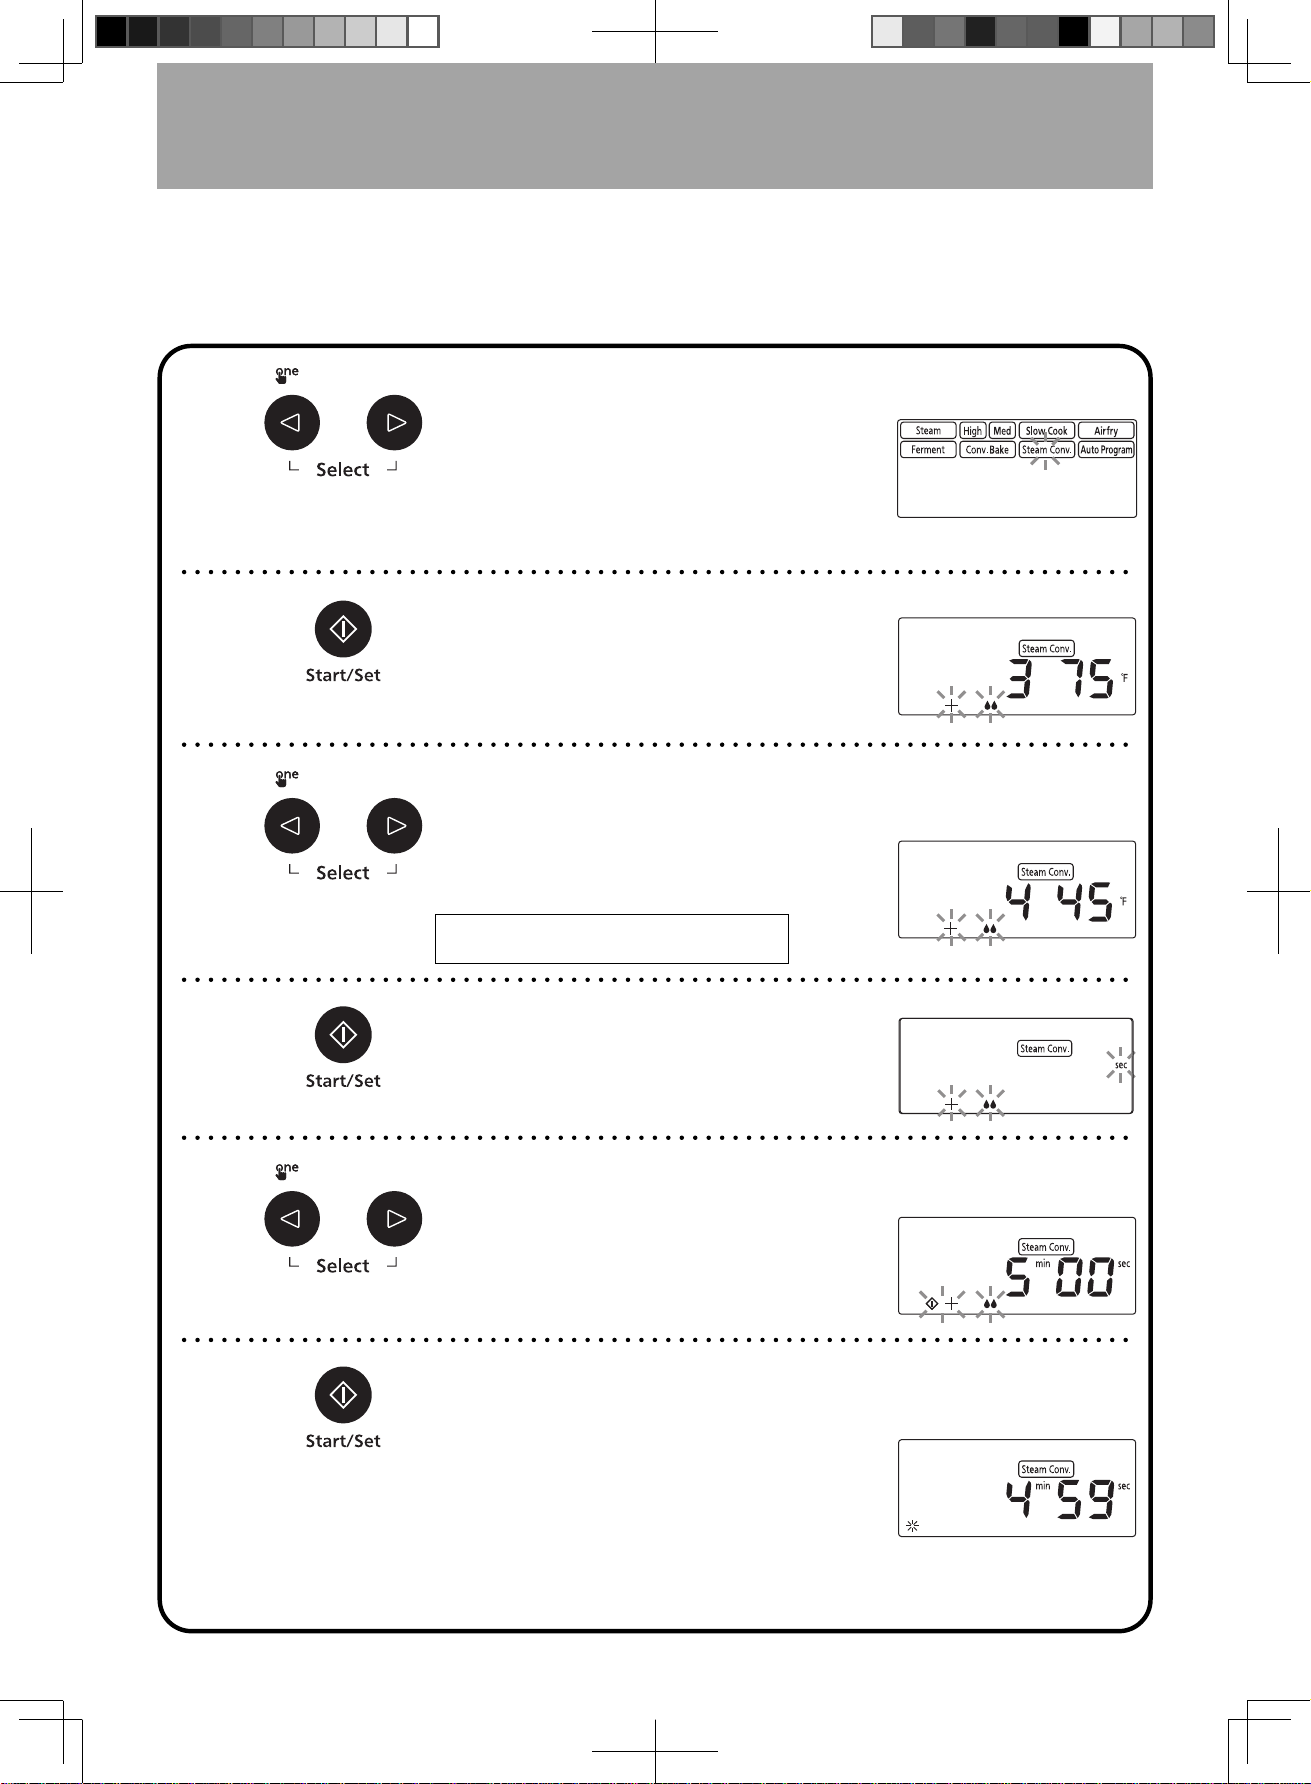
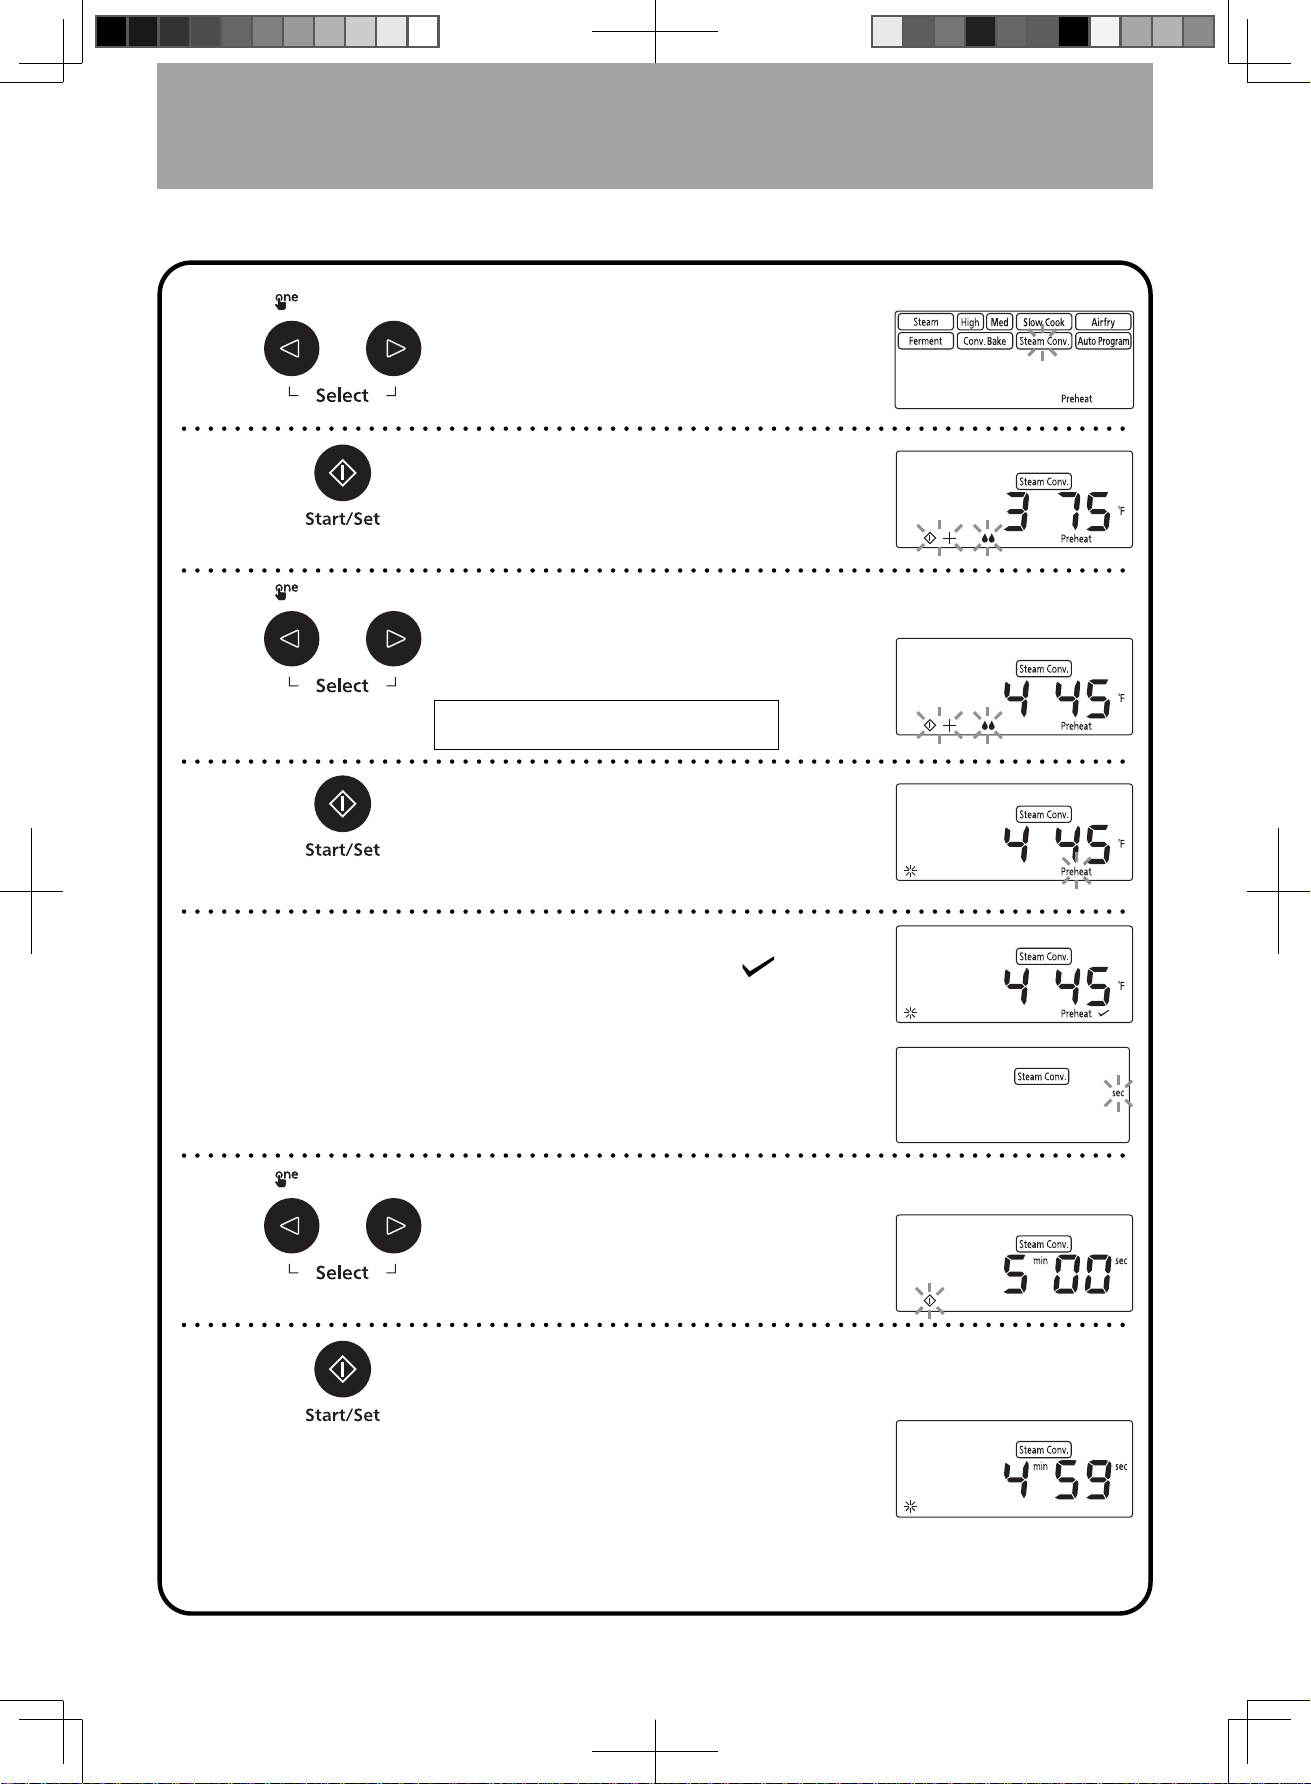
Steam Conv. Setting
This mode combines the steam and Conv. Bake modes, adding steam while cooking in Conv. Bake mode which
creates fluffier cakes and juicier meats. For more evenly distributed food color, re-arrange food or rotate the
accessory during cooking.
When cooking without Preheat:
➊
Place accessory with food in the
according shelf position.
Select Steam Conv. mode by
pressing Select button. (Without
Preheat)
Note: Fill the tank with water before using.
➋
Press Set button to set Steam
Conv. mode. (Without Preheat)
➌
Set desired cooking temperature by
pressing Select button.
(Temperatures refer to below, and default
temperature is 375 °F (190 °C))
375 °F (190 °C)
400 °F (200 °C)
410 °F (210 °C)
425 °F (220 °C)
445 °F (230 °C)
Example: 445 °F (230 °C)
➍
Press Set button to set desired
temperature.
➎
Set desired cooking time by
pressing Select button.
(Maximum setting time is 1 hour.)
Example: 5 minutes
➏
Press Start button. The cooking
time in the display window will
count down.
You can adjust the cooking time
while cooking. Pressing Select
button can increase or decrease the
cooking time in 1 minute increments
(up to 10 minutes).
F0003CF00AP_EN_20220114.indd 19 2022/1/18 10:25:29
- Eng-20 -
Steam Conv. Setting
(continued)
When cooking with Preheat:
➊
Press Select button to select Steam
Conv. mode. (With Preheat)
Note: Fill the tank with water before using.
➋
Press Set button to set Steam
Conv. mode. (With Preheat)
➌
Set desired cooking temperature by
pressing Select button.
(Temperatures refer to below, and default
temperature is 375 °F (190 °C))
375 °F (190 °C)
400 °F (200 °C)
410 °F (210 °C)
425 °F (220 °C)
445 °F (230 °C)
Example: 445 °F (230 °C)
➍
Press Start button to preheat.
You can adjust the desired temperature by
pressing Select button during preheating.
➎
After preheating, the oven will beep
three times and the icon “
”
appears to inform preheat is done.
Open the door and place accessory
with food in the according shelf
position quickly.
➏
Set desired cooking time by
pressing Select button.
(Maximum setting time is 1 hour.)
Example: 5 minutes
➐
Press Start button. The cooking
time in the display window will
count down.
You can adjust the cooking time
while cooking. Pressing Select
button can increase or decrease the
cooking time in 1 minute increments
(up to 10 minutes).
F0003CF00AP_EN_20220114.indd 20 2022/1/18 10:25:30
- Eng-21 -
Steam Shot Setting
This function allows you to add steam during cooking in Conv. Bake and Ferment mode (up to 3 minutes).
Adding steam during cooking can enhance moisture distribution, thus promoting the softer dessert surfaces and
juicier meats. At the beginning of fermentation using steam can increase cavity humidity, which is better for the
dough to ferment.
Example: Add steam 1 minute during cooking in the Conv. Bake mode.
The key to “Steam Shot” in cooking process:
Cooking in the Conv. Bake mode:
For cooking puffs or bread, after preheating, please add steam when heating starts. For cooking cakes, after
preheating, please add steam half way through total heating time.
Notes:
1. Fill the tank with water before using.
2. Steam shot is not available during preheating of Conv. Bake mode.
3. The original Conv. Bake or Ferment cooking time still counts down when setting steam shot.
➊
Cooking in Conv. Bake mode.
➋
Press button 2 seconds
and add steam 1 minute will
appears in the display window.
➌
If you want to add 3 minutes
steam, press the button twice
again within 3 seconds when
the step 2 operation appears.
Display window will increase 3
minutes.
(It will become “0” when you
press button 3 times. You can
reset time by duplicating above
steps.)
F0003CF00AP_EN_20220114.indd 21 2022/1/18 10:25:30
- Eng-22 -
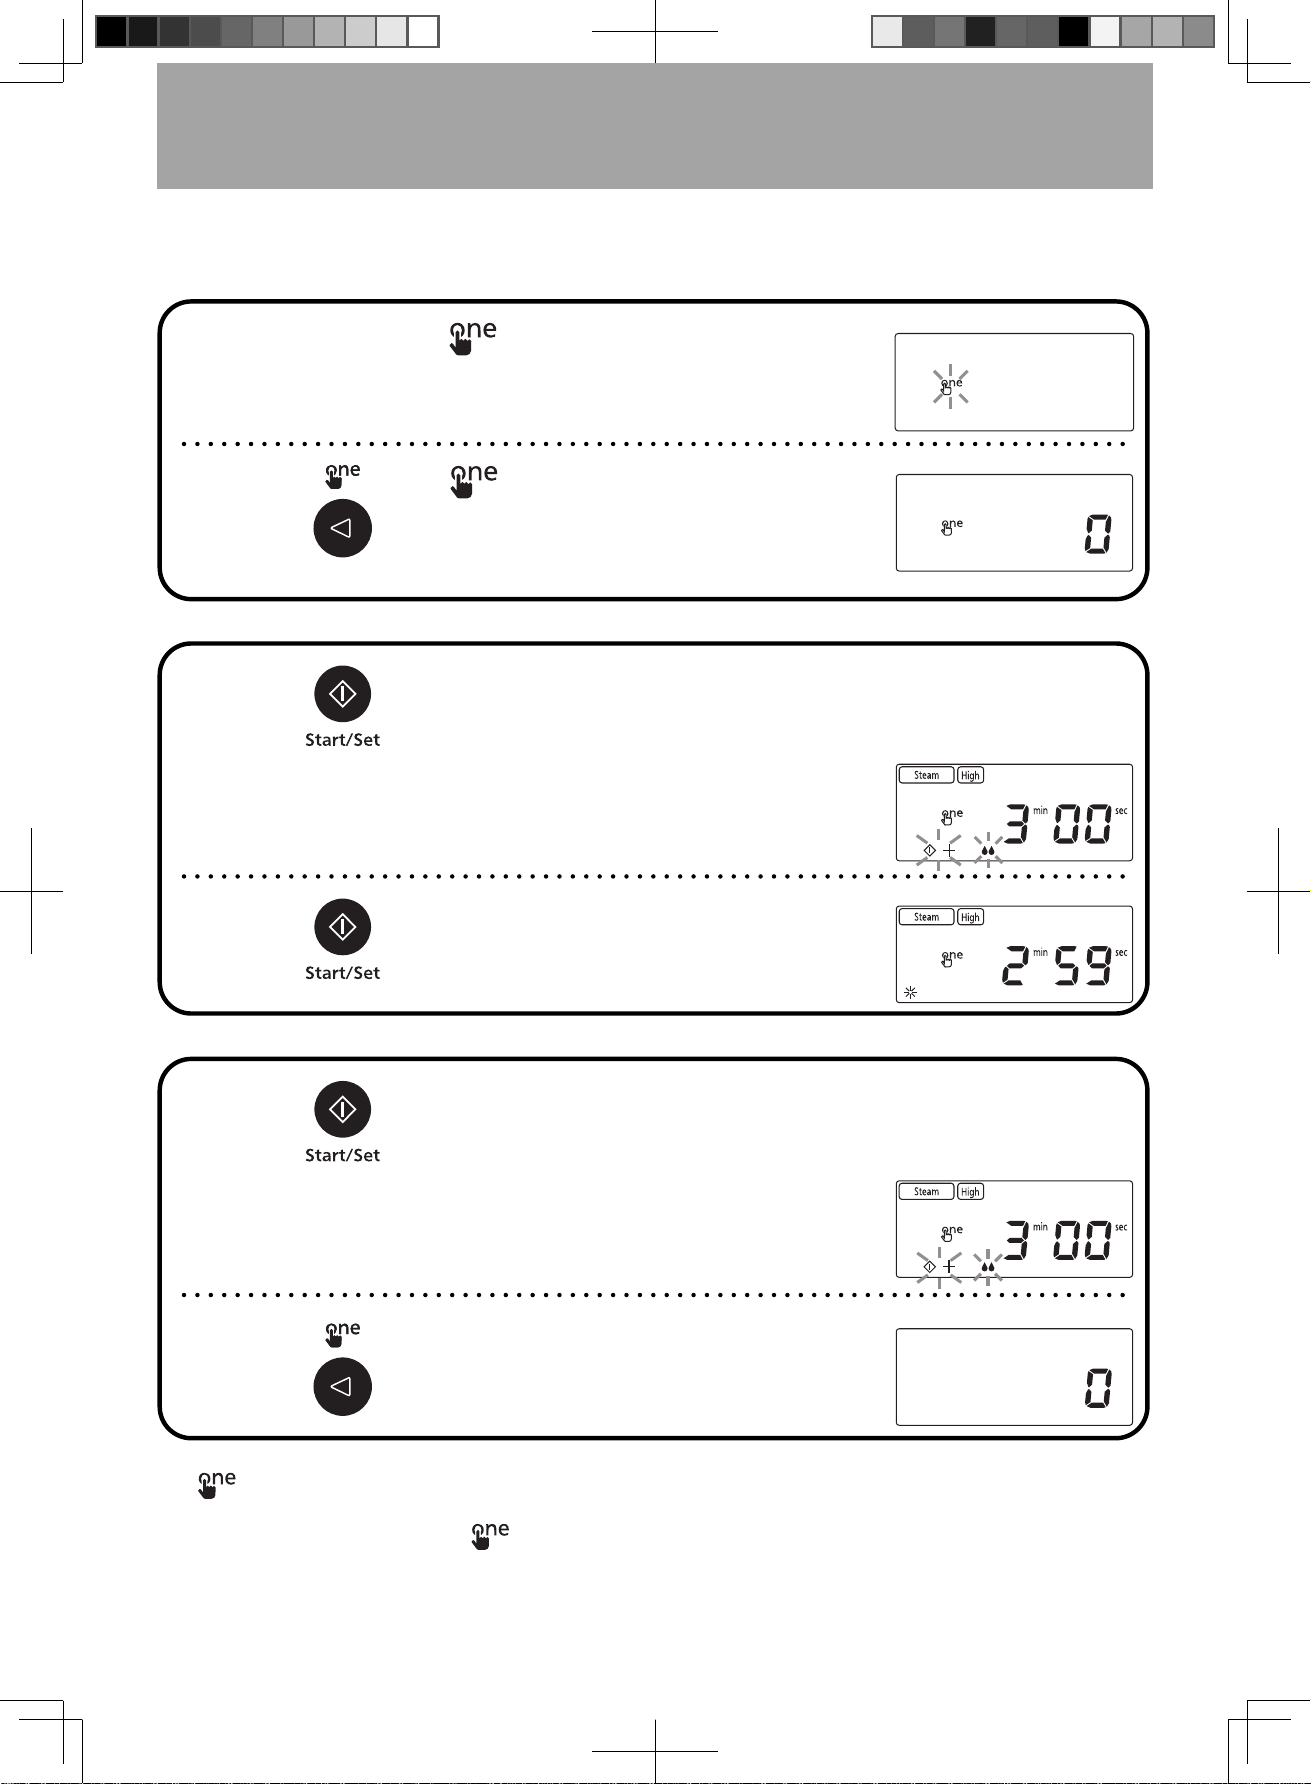
One Push Setting
One push setting can simplify operation. You can set desired function as one push setting that can use easily in
each time.
To Save:
➊
“ ” will flash in the display window
after finishing. It means you can save
program as one push setting.
➋
“ ” will stop flash in the
display window when press
button 2 seconds. Program has
saved successfully.
To set:
➊
Press Start/Set button and saved
program appears in the display
window.
Example: Saved
“Steam-High” for 3
minutes
➋
Press Start button to cooking.
To cancel:
➊
Press Start/Set button and saved
program appears in the display
window.
Example: Cancel
saved “Steam-High”
for 3 minutes
➋
Press the button 2 seconds and
cancel one push setting.
Notes:
1. “
” will flash in the display window after finishing. Press Stop/Reset button if you do not want to
save program as one push setting.
2. If one push setting is saved, “
” will flash in the display window.
3. Only one program can be set to one push setting. Previous one push program will be covered when a
new program is saved.
4. One push program will remain if powered off.
5. One push setting is available for all functions. (only except Steam Shot)
F0003CF00AP_EN_20220114.indd 22 2022/1/18 10:25:30
- Eng-23 -
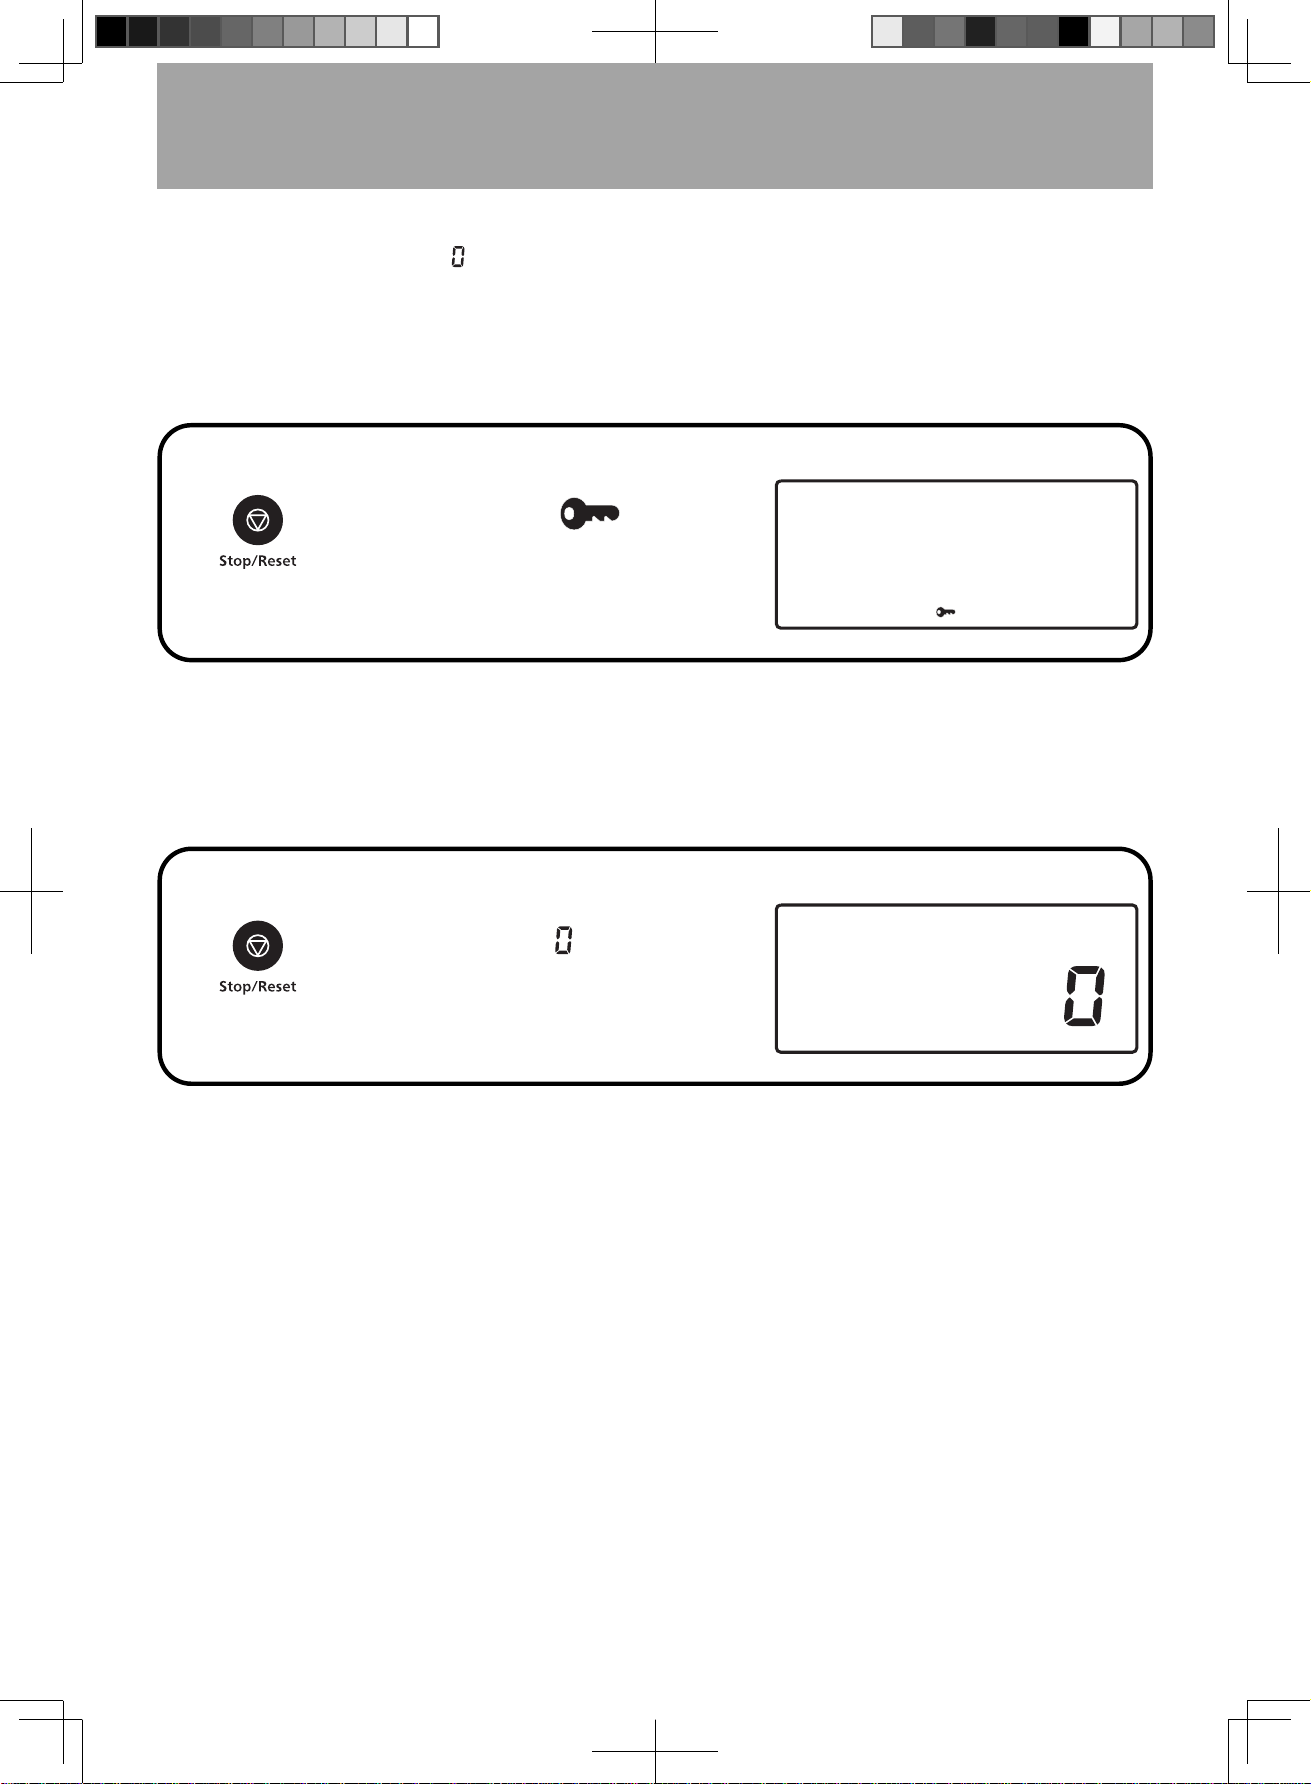
Child Safety Lock Setting
This function allows you to prevent a young child operating the oven; however, the door can still be opened. You
can set Child Safety Lock when “
” shows in display window.
Note:
To set or cancel child safety lock should be pressed within 10 seconds.
To set:
Press 3 times, “ ” appears in
the display window.
To cancel:
Press 3 times, “ ” appears
in the display window.
F0003CF00AP_EN_20220114.indd 23 2022/1/18 10:25:30
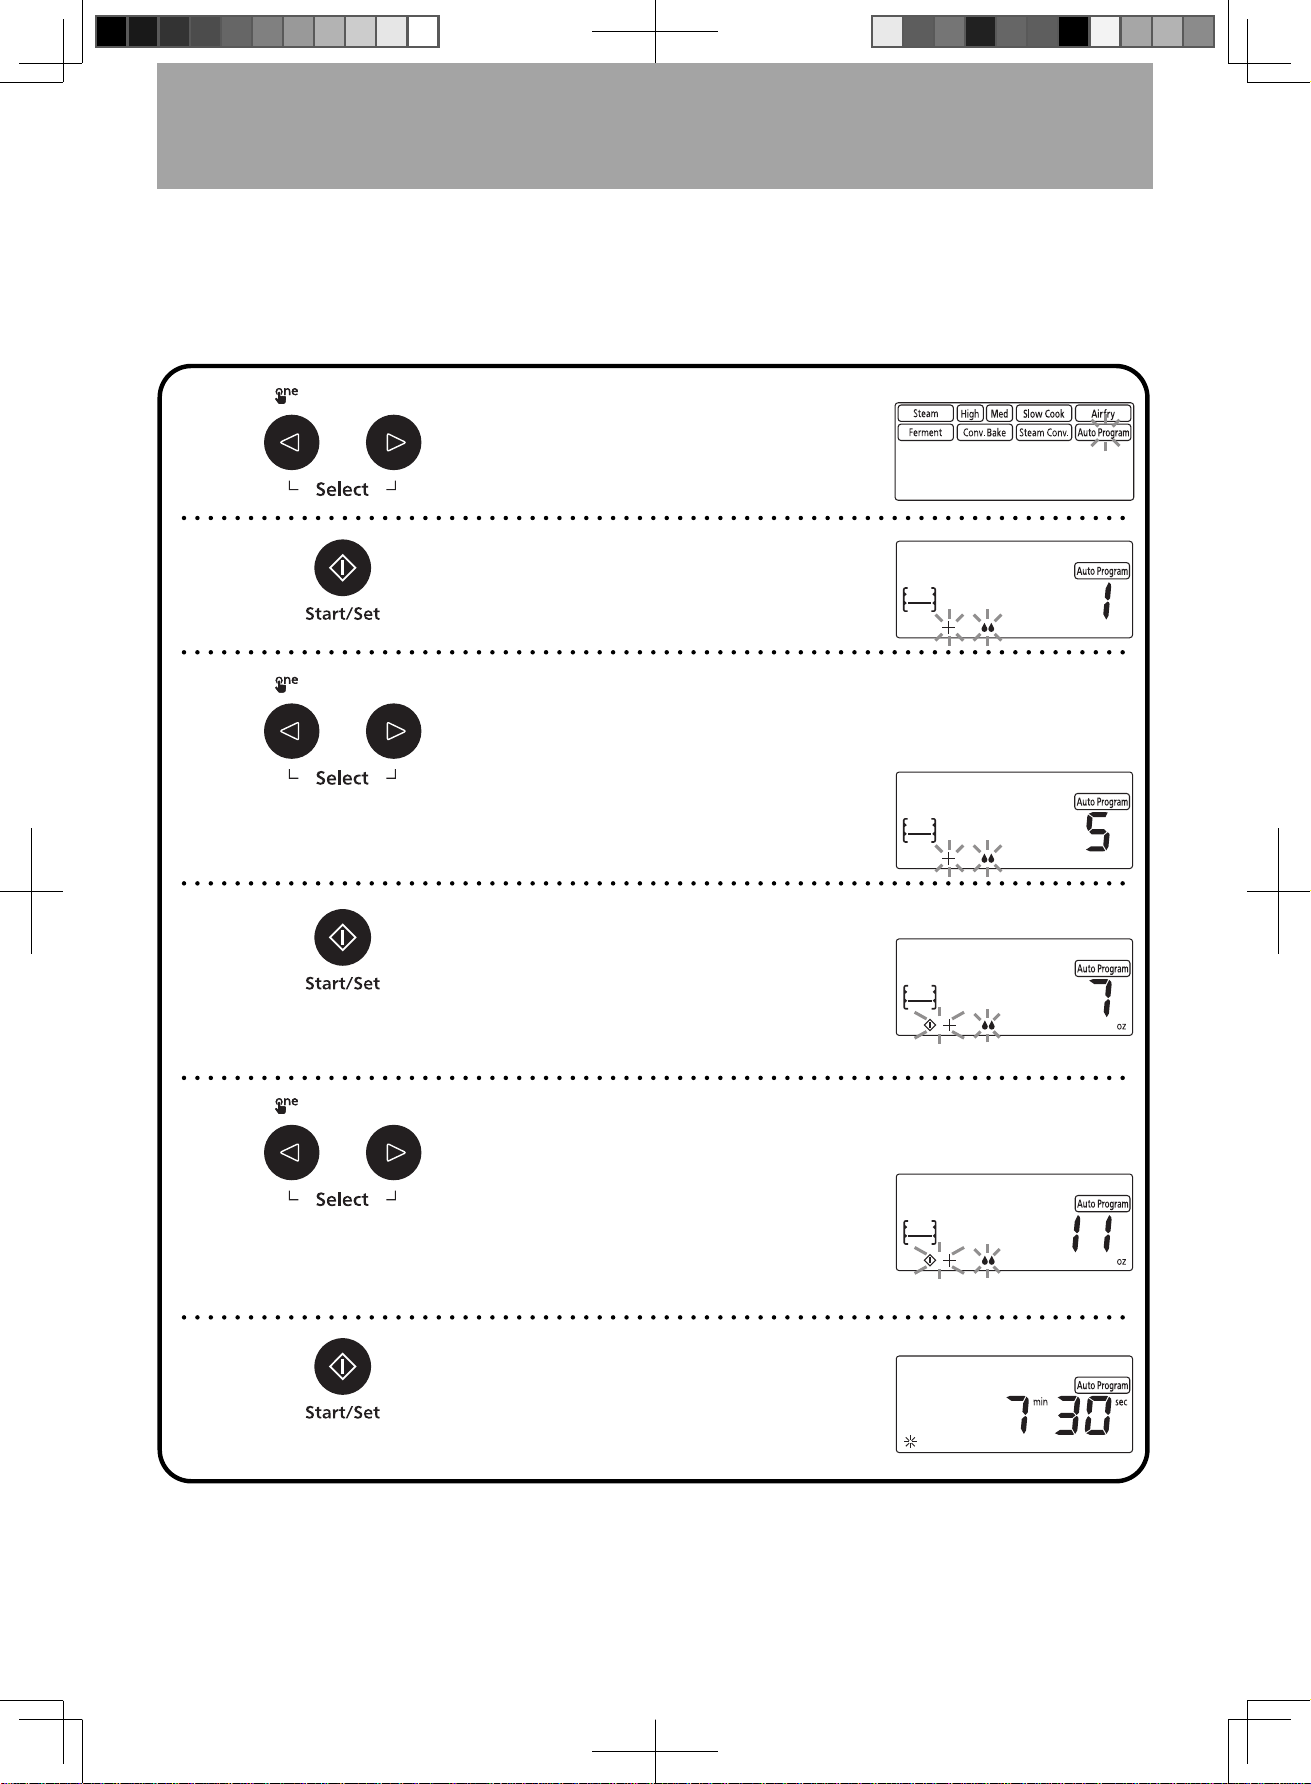
- Eng-24 -
This function allows you to cook most of your favorite foods by setting the different weight. It can follow the
prompts and cooking automatically without setting function, temperature and time. Press Select button and
menu number will appear in the display window.
Operation as follows: (except No.10-11, 13-18)
Auto Cook Setting and Menus
➊
Press Select button to select Auto
Program.
➋
Press Set button to set a desired
Auto Program.
➌
Press Select button to select a
desired cooking menu number.
(See page 26)
Example: No.5
Steamed Fresh
Vegetables
➍
Press Set button to set cooking
menu number.
Note: If you choose the 6, 8, 9, 12 menus,
skip the 4th and 5th steps.
➎
Press Select button to set a desired
Weight/Serving/Level.
Note: If you choose the No.3, No.4 and
No.7 menus, select level according to
weight. If you choose the No.2 menu,
select serving according to weight.
Example: 11 oz (300 g)
➏
Press Start button. The cooking
time in the display window will count
down.
F0003CF00AP_EN_20220114.indd 24 2022/1/18 10:25:30

- Eng-25 -
Operation as follows: No.10-11, 13-18
Auto Cook Setting and Menus
(continued)
➊
Press Select button to select Auto
Program.
➋
Press Set button to set a desired
Auto Program.
➌
Press Select button to select a
desired cooking menu number.
(See page 26)
Example: No.11 Fried
Fish Fillets
➍
Press Set button to set a desired
cooking menu number.
Note: If you choose the No.17 menu,
skip the step 4 and step 5.
➎
Press Select button to set a desired
Weight or Level.
Note: If you set the No.13 menu, select
a desired weight.
Example: 2 levels
➏
Press Start button to preheat.
Notes: If you set the No.18 menu, put
dough into the oven and press Start
to fermentation. Take dough out when
beep sound is heard and then press
Start button again to preheat.
➐
After preheating, the oven will
beep long time and the icon “
”
appears to inform preheat is done.
Place accessory with food in the
upper and lower shelf position
quickly.
➑
Press Start button. The cooking
time in the display window will count
down.
F0003CF00AP_EN_20220114.indd 25 2022/1/18 10:25:31
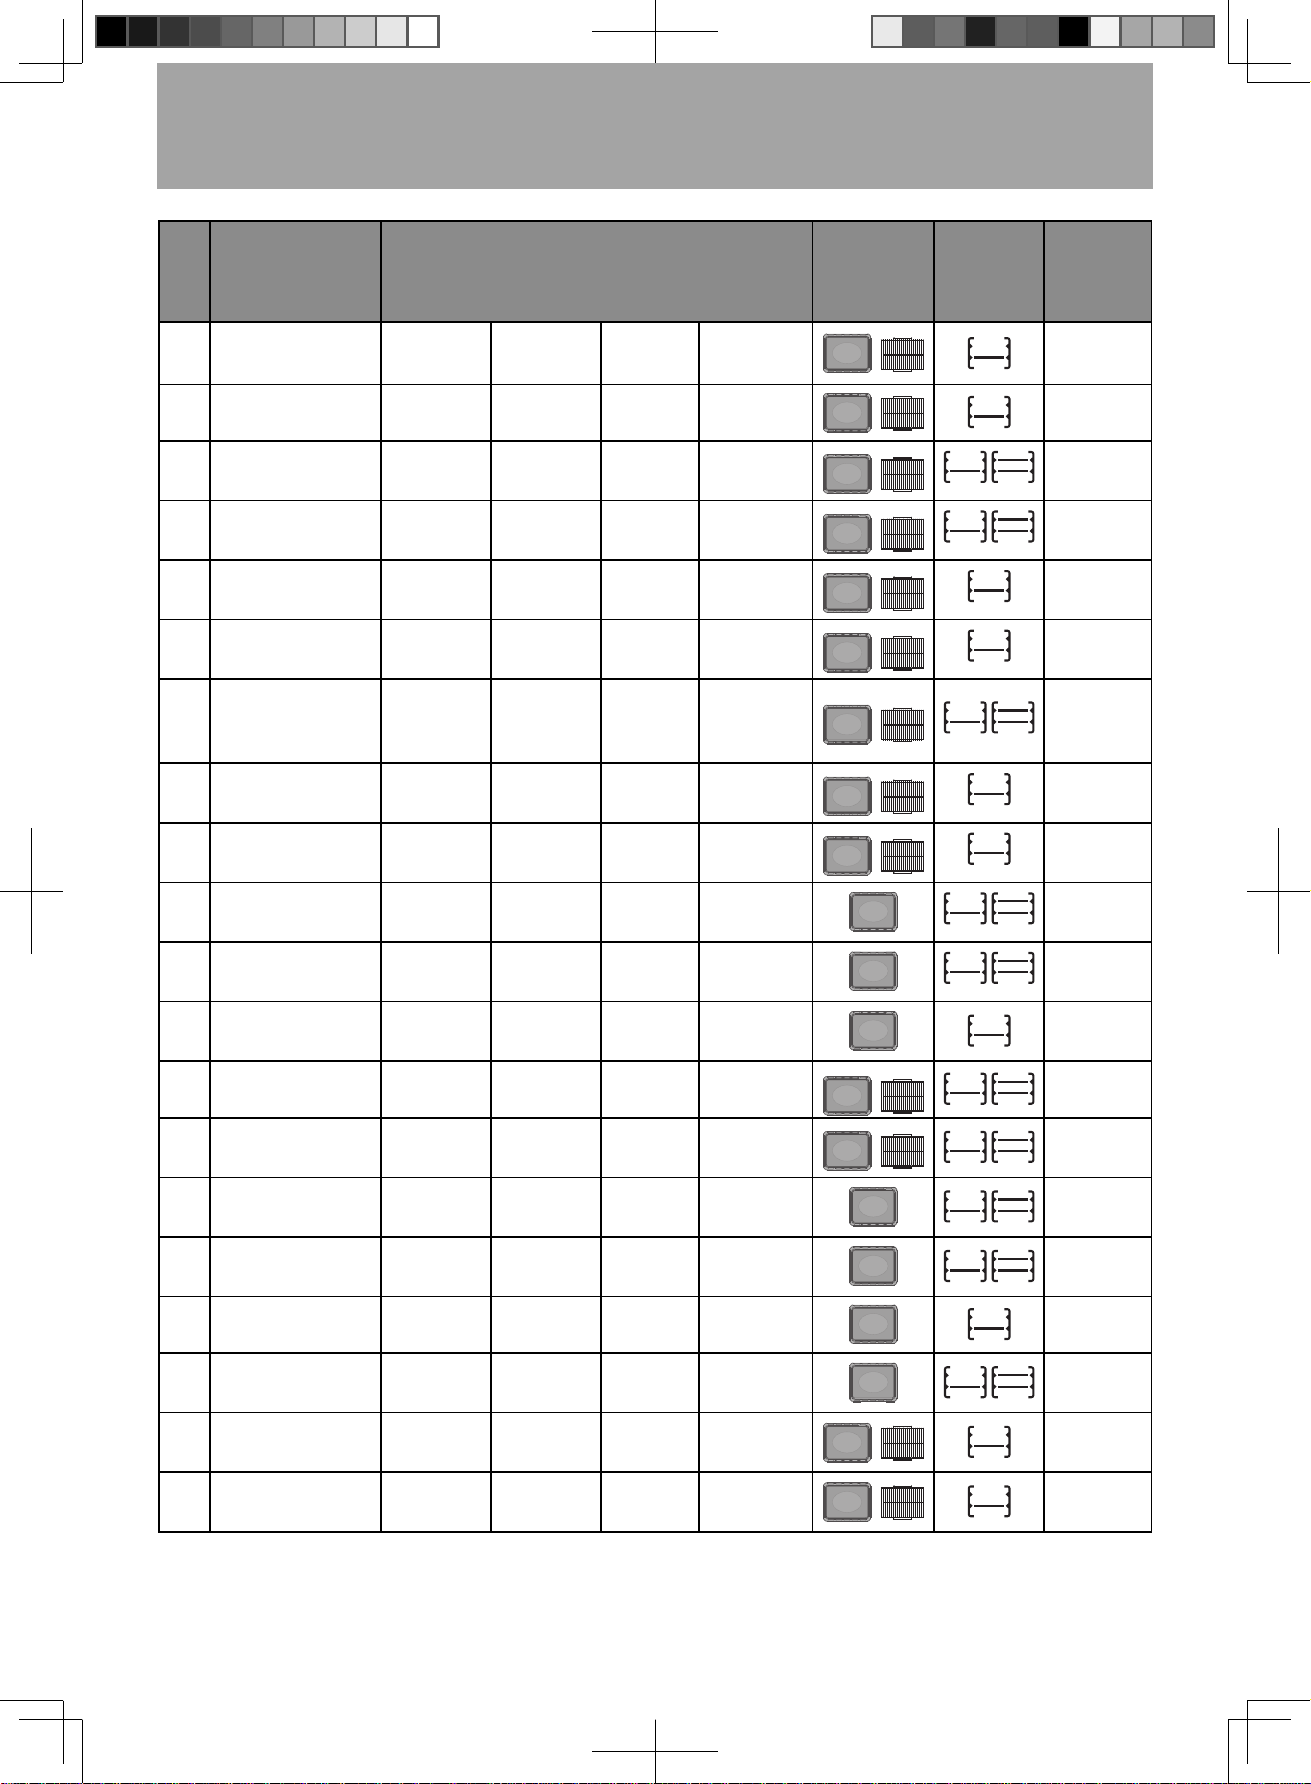
- Eng-26 -
Auto Cook Setting and Menus
(continued)
No. Menu
Weight/Serving/Level
Accessories Placement
Reference
Page
1 Steamed Fish*
7 oz (200 g) 11 oz (300 g) 14 oz (400 g) 18 oz (500 g)
P. 28
2 Steamed Egg*
1-3 serves 4-6 serves -
-
P. 28
3
Steamed Chinese
Buns*
1 level
(9 pcs)
2 levels
(18 pcs)
--
P. 29
4
Steamed Frozen
Foods*
1 level
(12 pcs)
2 levels
(24 pcs)
--
P. 29
5
Steamed Fresh
Vegetables*
7 oz (
200 g
) 11 oz (
300 g
) 14 oz (
400 g
) 18 oz (
500 g
)
P. 30
6
Steamed Sweet
Potato Cubes*
2-6 oz
(
50-150 g
)
---
P. 30
7
Steamed Scallop
with Mashed Garlic*
1 level
(6 pcs)
2 levels
(12 pcs)
--
P. 31
8
Chinese White
Sliced Chicken*
36 oz
(
1000 g
)
---
P. 31
9 Stewed Ribs Soup*
2-4 serves - - -
P. 32
10
Fried Shrimp with
Bread Crumbs
1 level
(16 pcs)
2 levels
(32 pcs)
--
P. 32
11 Fried Fish Fillets
1 level
(12 pcs)
2 levels
(24 pcs)
--
P. 33
12
Home-made
Yoghurt
4-8 cups - - -
P. 33
13 Barbecue Pork
14 oz (
400 g
) 22 oz (
600 g
) 28 oz (
800 g
)
-
P. 34
14
Teriyaki Chicken
Wings*
1 level
(12 pcs)
2 levels
(24 pcs)
--
P. 34
15 Egg Tarts
1 level
(9 pcs)
2 levels
(18 pcs)
--
P. 35
16 Cookies
1 level
(20 pcs)
2 levels
(40 pcs)
--
P. 35
17 Cheese Cake*
7 inch ---
P. 36
18 Home-made Pizza
1 level
(1 pc)
2 levels
(2 pcs)
--
P. 37
19
Sanitizing
(Utensils)*
- ---
P. 42
20
Sanitizing
(Baby Bottles)*
- ---
P. 43
F0003CF00AP_EN_20220114.indd 26 2022/1/18 10:25:31
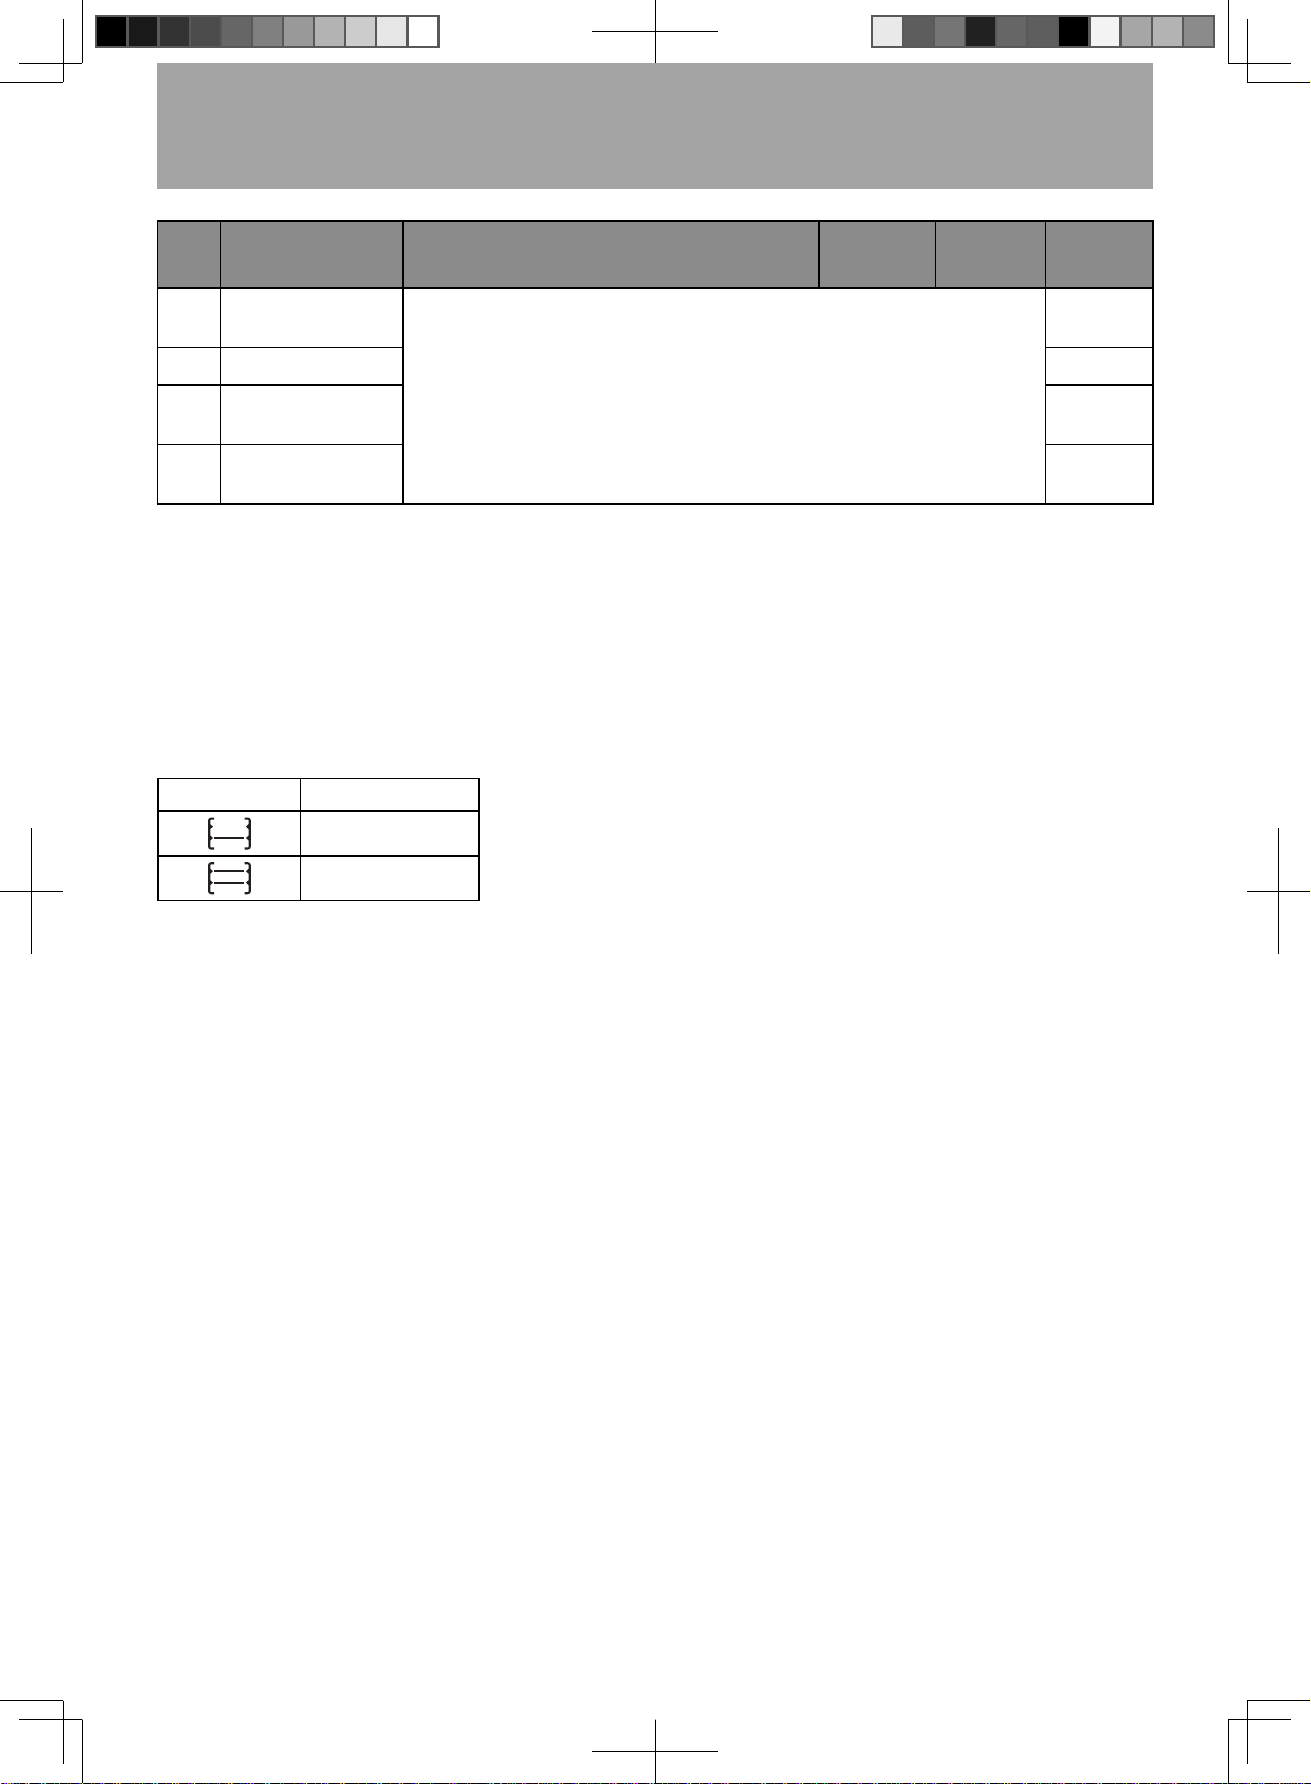
- Eng-27 -
Auto Cook Setting and Menus
(continued)
No. Menu Weight/Serving/Level
Accessories
Placement
Reference
Page
21
Cleaning
(Deodorization)
Oven Cleaning Setting
P. 44
22
Cleaning (Cavity)*
P. 45
23
Cleaning
(System)*
P. 46
24
Cleaning
(with Citric Acid)
P. 47
Notes:
1. The recipes marked with “*” require steam. Be sure to fill the water tank before cooking. Add detergent
before using citric acid cleaning.
2. All seasonings in this book is only for your reference.
3. Accessories placement see the table below.
4. No.19 "Sanitizing (Utensils)" and No.20 "Sanitizing (Baby Bottles)":
Kills 99.99% of Staphylococcus aureus (ATCC 6538), Escherichia coli (ATCC 25922) and Candida
albicans (ATCC 14053) when used as directed. The test results are provided by an independent test
lab. EPA EST# 93165-CHN-2
Display Placement
lower
upper and lower
F0003CF00AP_EN_20220114.indd 27 2022/1/18 10:25:32
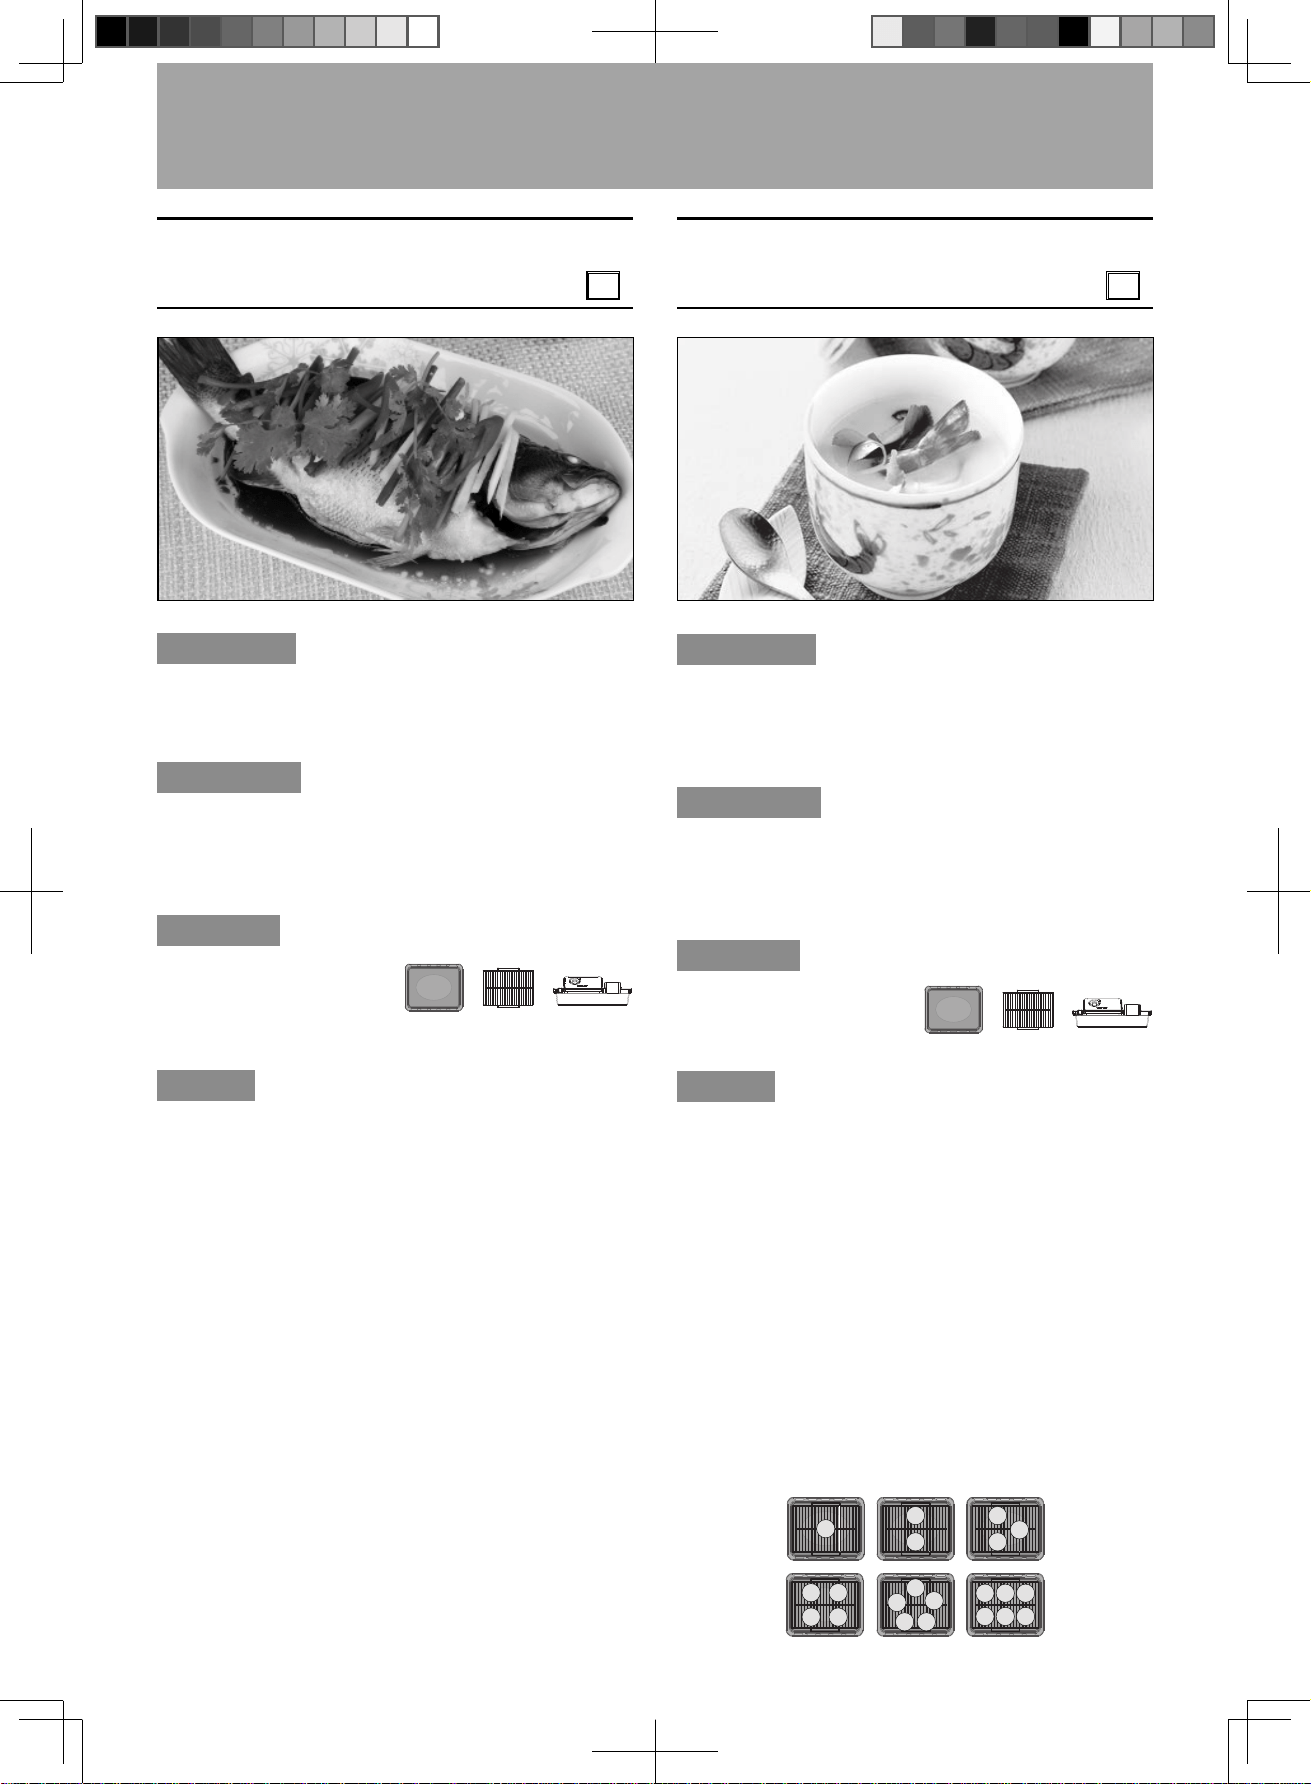
- Eng-28 -
Steamed Fish
7/11/14/18 oz (200/300/400/500
g
)
1
Ingredients
fish .....................................1 (net weight 11 oz (300 g))
sliced ginger .................... ¹⁄ tbsp
green onion ...................... 1 tbsp
Seasonings
salt ................................... taste
cooking wine .................... ¹⁄ tbsp
seasoned soy sauce or
light soy sauce ................. 1 tbsp
Container
Heat-proof dish,
metal tray, wire rack
(lower shelf), integrated
water tank
Method
1. Wash and cut fish both sides 2-3 slices with knife.
2. Marinate with salt and cooking wine. Then set
aside for 10 minutes.
3. Place the fish in a heat-proof dish while topping
with sliced ginger and green onion.
4. Place wire rack with dish on the metal tray, then
place the metal tray in the lower shelf position.
5. Fill water tank.
6. Select Auto Program No.1 and weight, then press
Start to cook.
7. Drizzle with seasoned soy sauce or light soy sauce
to serve immediately.
Notes:
1. The ingredients listed in this recipe are for 11 oz (300 g)
fish, for multiple weights, calculate the material quantities
according to the proportion.
2. For thicker fish, please add additional Steam-Med
cooking time by manually setting according to your
preference.
Auto Cook Setting and Menus
(continued)
Steamed Egg
(1-3/4-6 serves)
2
Ingredients
egg ....................................2 (about 2 oz (50 g) an egg
without shell)
warm water
(about 100 °F (40 °C))
......... ³⁄ cup (180 ml)
Seasonings
light soy sauce ................. ¹⁄ tsp
cooking wine .................... ¹⁄ tsp
salt ................................... taste
sesame oil ....................... drops
Container
Soup bowl, metal tray,
wire rack (lower shelf),
integrated water tank
Method
1. Mix light soy sauce, cooking wine and salt with
beaten eggs. Stir and filtrate well after add warm
water. Pour into bowls with 5 oz (135 g) each and
divide their foam, then cover with plastic wrap or lid.
2. Place wire rack with soup bowl on the metal tray in
the lower shelf position.
3. Fill water tank.
4. Select Auto Program No.2 and serving, then press
Start to cook.
5. Drizzle with sesame oil to serve.
Note:
The ingredients listed in this recipe are for 2 serves.
For multiple servings, calculate the material quantities
according to the proportion, and put them into the soup
bowl respectively, the placement method for cooking of
multiple serves are shown below.
(2 serves)
F0003CF00AP_EN_20220114.indd 28 2022/1/18 10:25:32
- Eng-29 -
Auto Cook Setting and Menus
(continued)
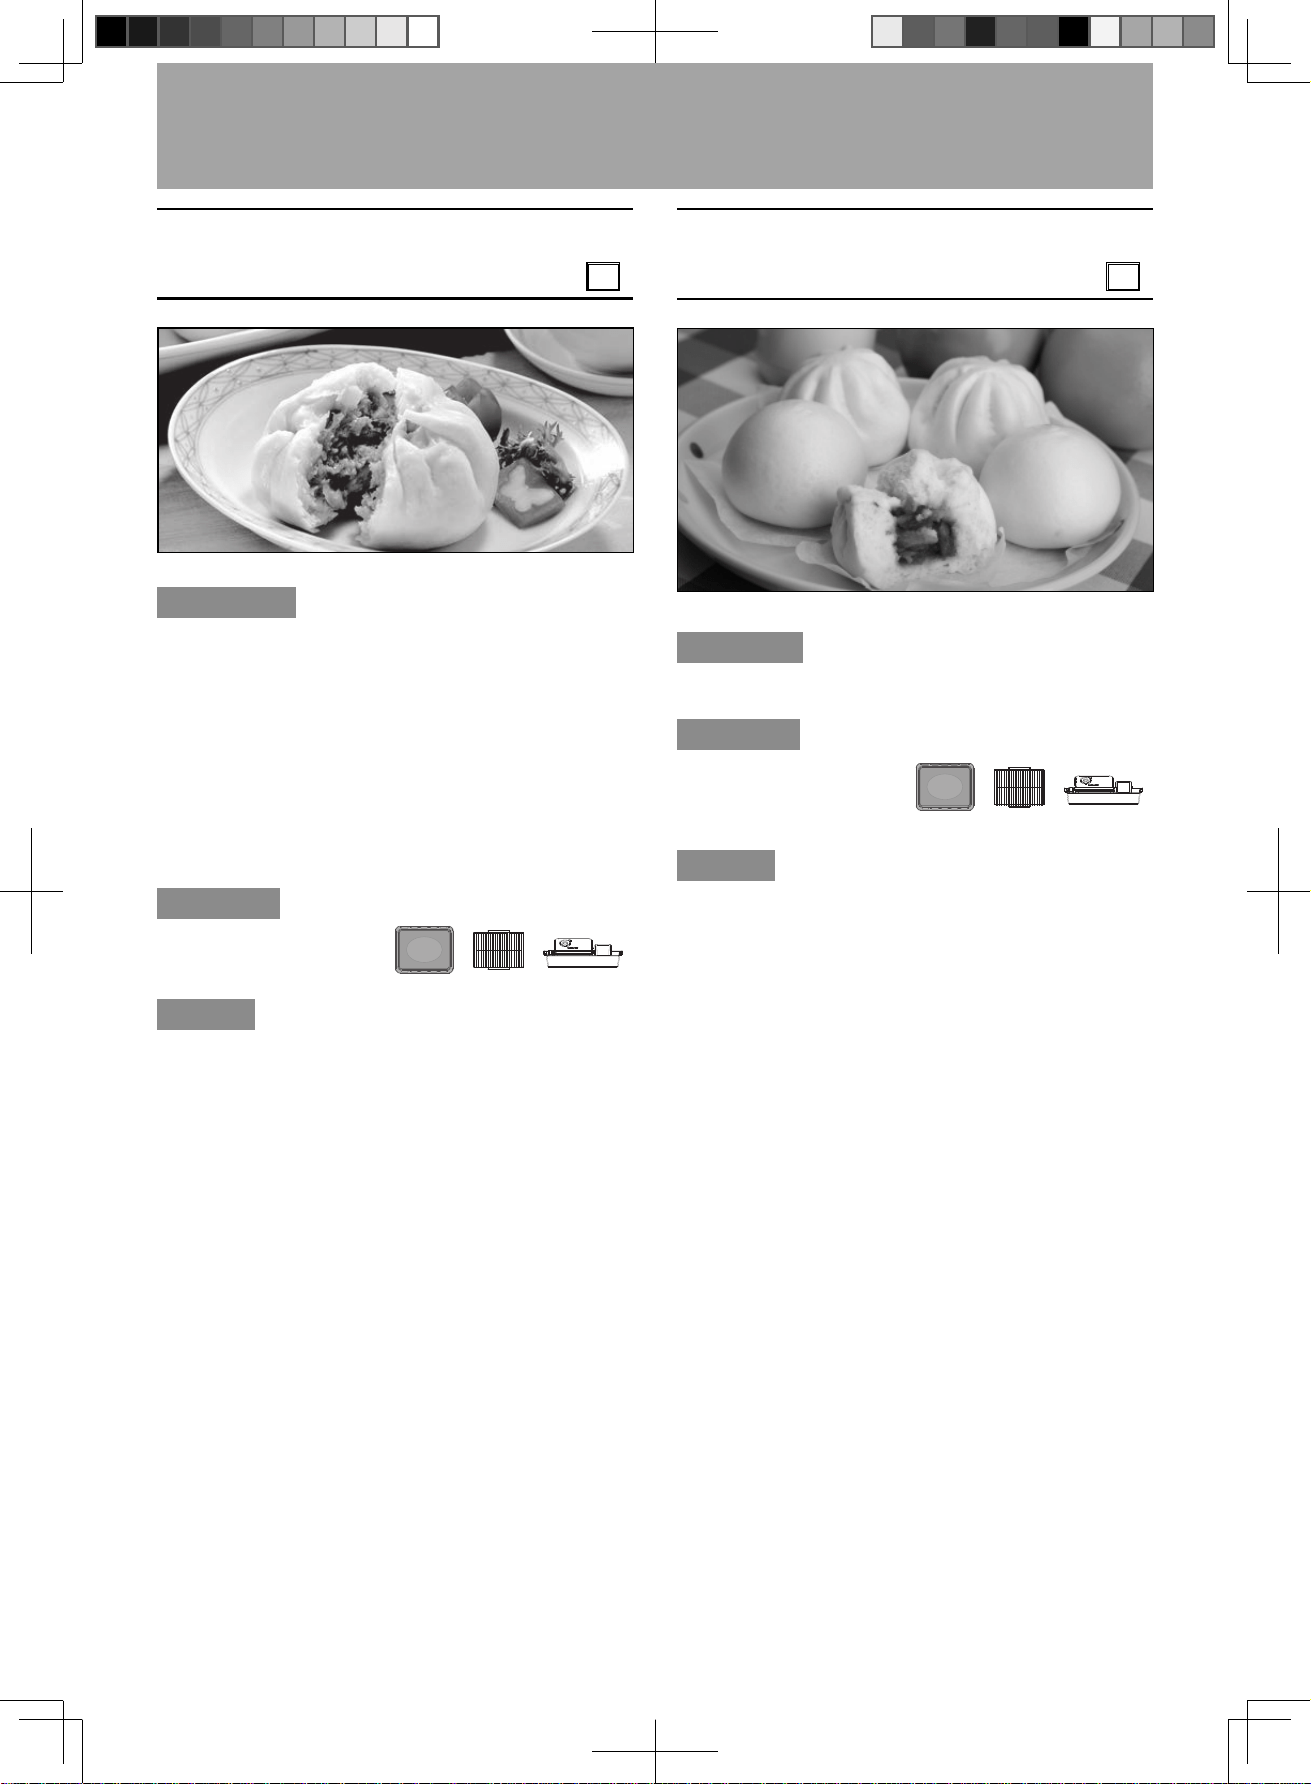
Steamed Chinese Buns
(1 level / 2 levels)
3
Ingredients
Fillings:
minced meat ...................7 oz (200
g
)
dried mushroom .............1.5 oz (40
g
)
(after soaked)
scallion and ginger water 3¹⁄ tbsps
dark soy sauce ..1 tsp
light soy sauce ...1 tbsp
white pepper ......taste
salt .....................¹⁄ tsp
sugar..................¹⁄ tbsp
sesame oil .........¹⁄ tbsp
Wrapper:
all purpose flour ............. 8 oz
(225
g
)
sugar.....................¹⁄ tsp
yeast .....................1 tsp
warm water (100 °F (40 °C))
.........................about ¹⁄ cup (120 ml)
oil ..........................¹⁄ tbsp
Container
Metal tray, wire rack
(lower shelf), integrated
water tank
Method
Filling:
Soak dried mushroom in water for minutes, drain and
chop. Add fillings without scallion and ginger water
into minced meat and stir well. Then add scallion and
ginger water gradually and stirring in one direction
until the mixture thickness.
Wrapper:
1. Pour all purpose flour, sugar, yeast, oil and warm
water into a bowl, and stir evenly and knead the
dough until smooth.
2.
Divide the dough into 9 equal parts and roll into small
round pieces with relatively thick rims for easy stuffing.
Package about 1.2 oz (35 g) meat into the dough.
3. Prepare suitable size baking paper underneath
buns and place them on the wire rack according
to the 3×3 arrangement evenly. Then put the wire
rack on the metal tray in the lower shelf position.
4. Fill water tank.
5. Select Auto Program No.3 and level, then press
Start to cook.
6. Take out after cooking.
Notes:
1. The ingredients listed includes proportions for 9
pieces of 1 level. Cooking for other weights calculate
ingredients in proportion. Each level can put 9 pieces
when cooking 2 levels. Place metal tray in the upper
and lower shelf position, then you select “2 levels”.
2. When the cavity gets overheated, “U50” will appear in
the display window. Please wait until the cavity cools
down, and start operation after “U50” disappears.
(1 level, 9 pcs)
Steamed Frozen Foods
(1 level / 2 levels)
4
Ingredient
Skin-on chicken breast or thigh (1-1.5 oz (30-40 g)/pc)
......
12 pcs
Container
Metal tray, wire rack
(lower shelf), integrated
water tank
Method
1. Prepare suitable size baking paper underneath
frozen foods. Place frozen foods according to 3×4
arrangement evenly on the wire rack, then put the
wire rack on the metal tray in the lower shelf position.
2. Fill water tank.
3. Select Auto Program No.4 and level, then press
Start to cook.
4. Take out after cooking.
Notes:
1. It is suitable for cook frozen foods without defrosting.
Add additional cooking time of steam manually for
over-sized food.
2. Each level can put 12 pieces when cooking. Place
metal tray in the upper and lower shelf position, then
you select “2 levels”.
(1 level, 12 pcs)
F0003CF00AP_EN_20220114.indd 29 2022/1/18 10:25:33
- Eng-30 -
Auto Cook Setting and Menus
(continued)
Steamed Fresh Vegetables
7/11/14/18 oz (
200/300/400/500
g
)
5
Ingredient
vegetables (green vegetables, Chinese Kale etc.)
Container
Metal tray, wire rack
(lower shelf),
integrated water tank
Method
1. Clean the vegetables and cut into suitable size.
2. Arrange vegetables evenly on the wire rack, then
put wire rack on the metal tray in the lower shelf
position.
3. Fill water tank.
4. Select Auto Program No.5 and weight, then press
Start to cook.
Note:
This program is only suitable for leafy vegetables or
root vegetables. Keep the vegetables as flat as possible
when placing them, avoid stacking.
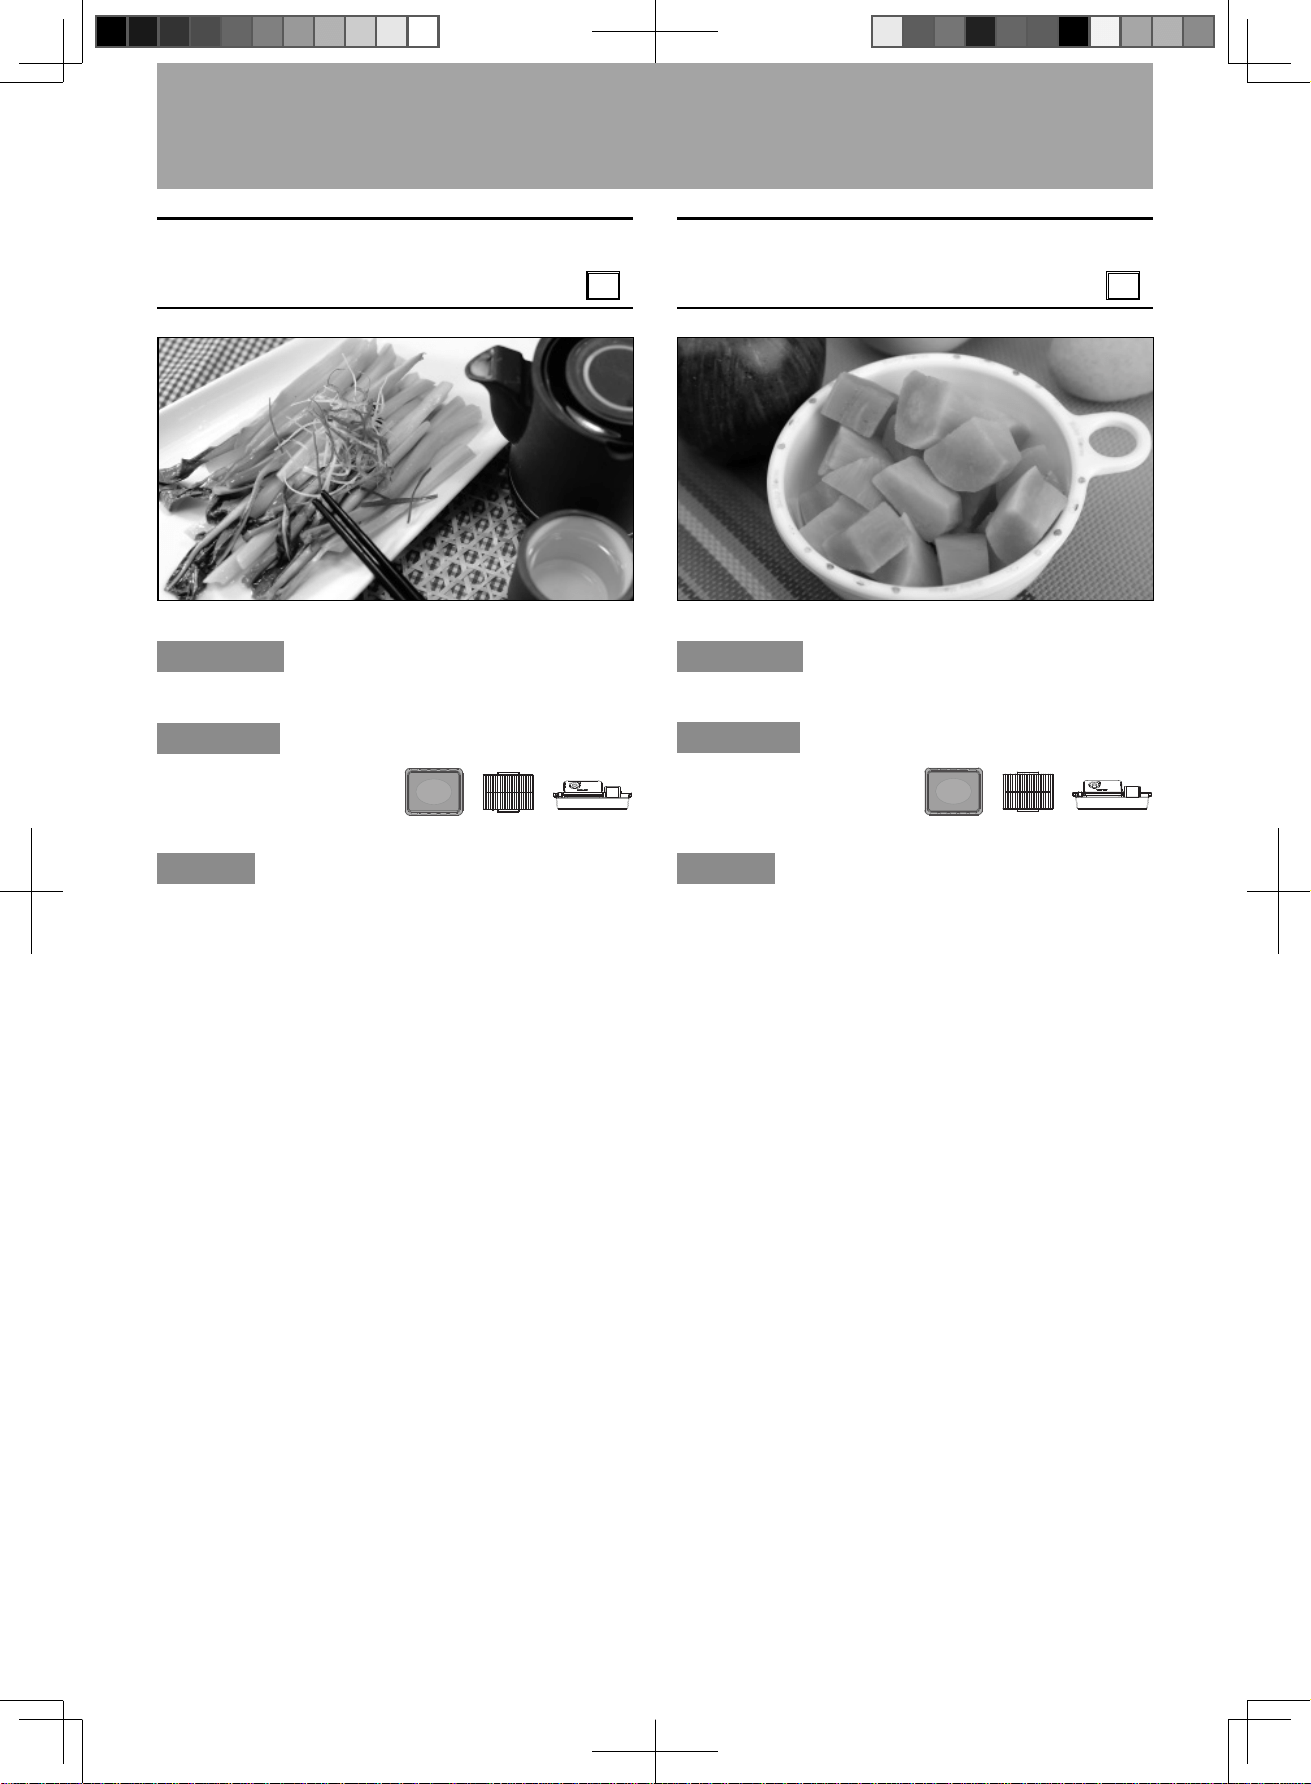
Steamed Sweet Potato
Cubes
2-6 oz (50-150
g
)
6
Ingredient
sweet potatoes ................ 2-6 oz (50-150 g)
Container
Metal tray, wire rack
(lower shelf),
integrated water tank
Method
1. Clean, peel and dice sweet potatoes into small
cubes.
2. Place sweet potatoes evenly on wire rack on the
metal tray in the lower shelf position.
3. Fill water tank.
4. Select Auto Program No.6, then press Start to
cook.
F0003CF00AP_EN_20220114.indd 30 2022/1/18 10:25:33

- Eng-31 -
Auto Cook Setting and Menus
(continued)
(1 level, 6 pcs)
Chinese White Sliced
Chicken
36 oz
(1000
g
)
8
Ingredient
Skin-on chicken breast or thigh ................. about 36 oz (1000 g)
Seasonings
salt ................................... 1 tsp
ginger ............................... 4 tbsps
chopped green onion ....... 1¹⁄ tbsps
oil ..................................... ¹⁄ tbsp
Container
Heat-proof dish, metal tray,
wire rack (lower shelf),
integrated water tank
Method
1.
Ground ginger into minced ginger, extract about 1 tbsp
ginger juice and remaining the pressed ginger to cook.
2. Rub the chicken with salt both side first
, then
spread the ginger juice well to marinate above 2 hours.
Stir chicken with once or twice during marinating to
assure tasty.
3. Put the wire rack on the metal tray. Place chicken
skin side up on baking paper and fold over leaving
both ends uncovered. (Steam can pass through
the paper bag.) Place heat-proof dish on the wire
rack with the paper bag, then place it in the lower
position.
4. Fill water tank.
5. Select Auto Program No.8, then press Start to cook.
6. Put pressed ginger and chopped green onion into
a bowl, add chicken broth (water in heat-proof dish
after steaming) and add hot oil heated in a pan,
then become green onion-ginger oil.
7. When chicken is cool down, chop into pieces to
serve. You can eat with green onion-ginger oil.
Steamed Scallop with Mashed
Garlic
(1 level / 2 levels)
7
Ingredients
scallop ..........................................6 pcs (about 4.5 oz (120 g) each)
vermicelli noodles ............. 1 oz (25 g)
mashed garlic .................. 3 tbsps
chopped green onion ....... 1¹⁄ tbsps
sliced red pepper ............. ¹⁄ tbsp
Seasonings
oil ..................................... 4 tbsps
cooking wine .................... 1 tbsp
seasoned soy sauce ........ 2 tbsps
Container
Metal tray, wire rack
(lower shelf),
integrated water tank
Method
1. Remove any sand and clean the scallop, remove
the shellfish with a knife carefully. Then marinate
with cooking wine in a bowl to reduce fishy smell,
clear the shells and soak the vermicelli noodles with
hot water until soft.
2. Oil is heated and add mashed garlic and sliced
red pepper and stir-fry until light yellow. Serve in a
bowl and add chopped green onion and seasoned
soy sauce, mix well.
3.
Place wire rack on the metal tray and roll the vermicelli
noodles up with chopsticks and lay them on the shells,
topping with scallop meat and sauteed garlic, drizzle
with oil and place them evenly on the wire rack.
4. Fill the water tank.
5. Select Auto Program No.7 and level, then place
the metal tray in the lower shelf position, then press
Start to cook.
Notes:
1. You can put 6 pcs in each level when cooking 2
levels. Place metal tray in the upper and lower shelf
position and select “2 levels”.
2. Thick scallop meat should cut several holes on the
surface.
F0003CF00AP_EN_20220114.indd 31 2022/1/18 10:25:34
- Eng-32 -
Auto Cook Setting and Menus
(continued)
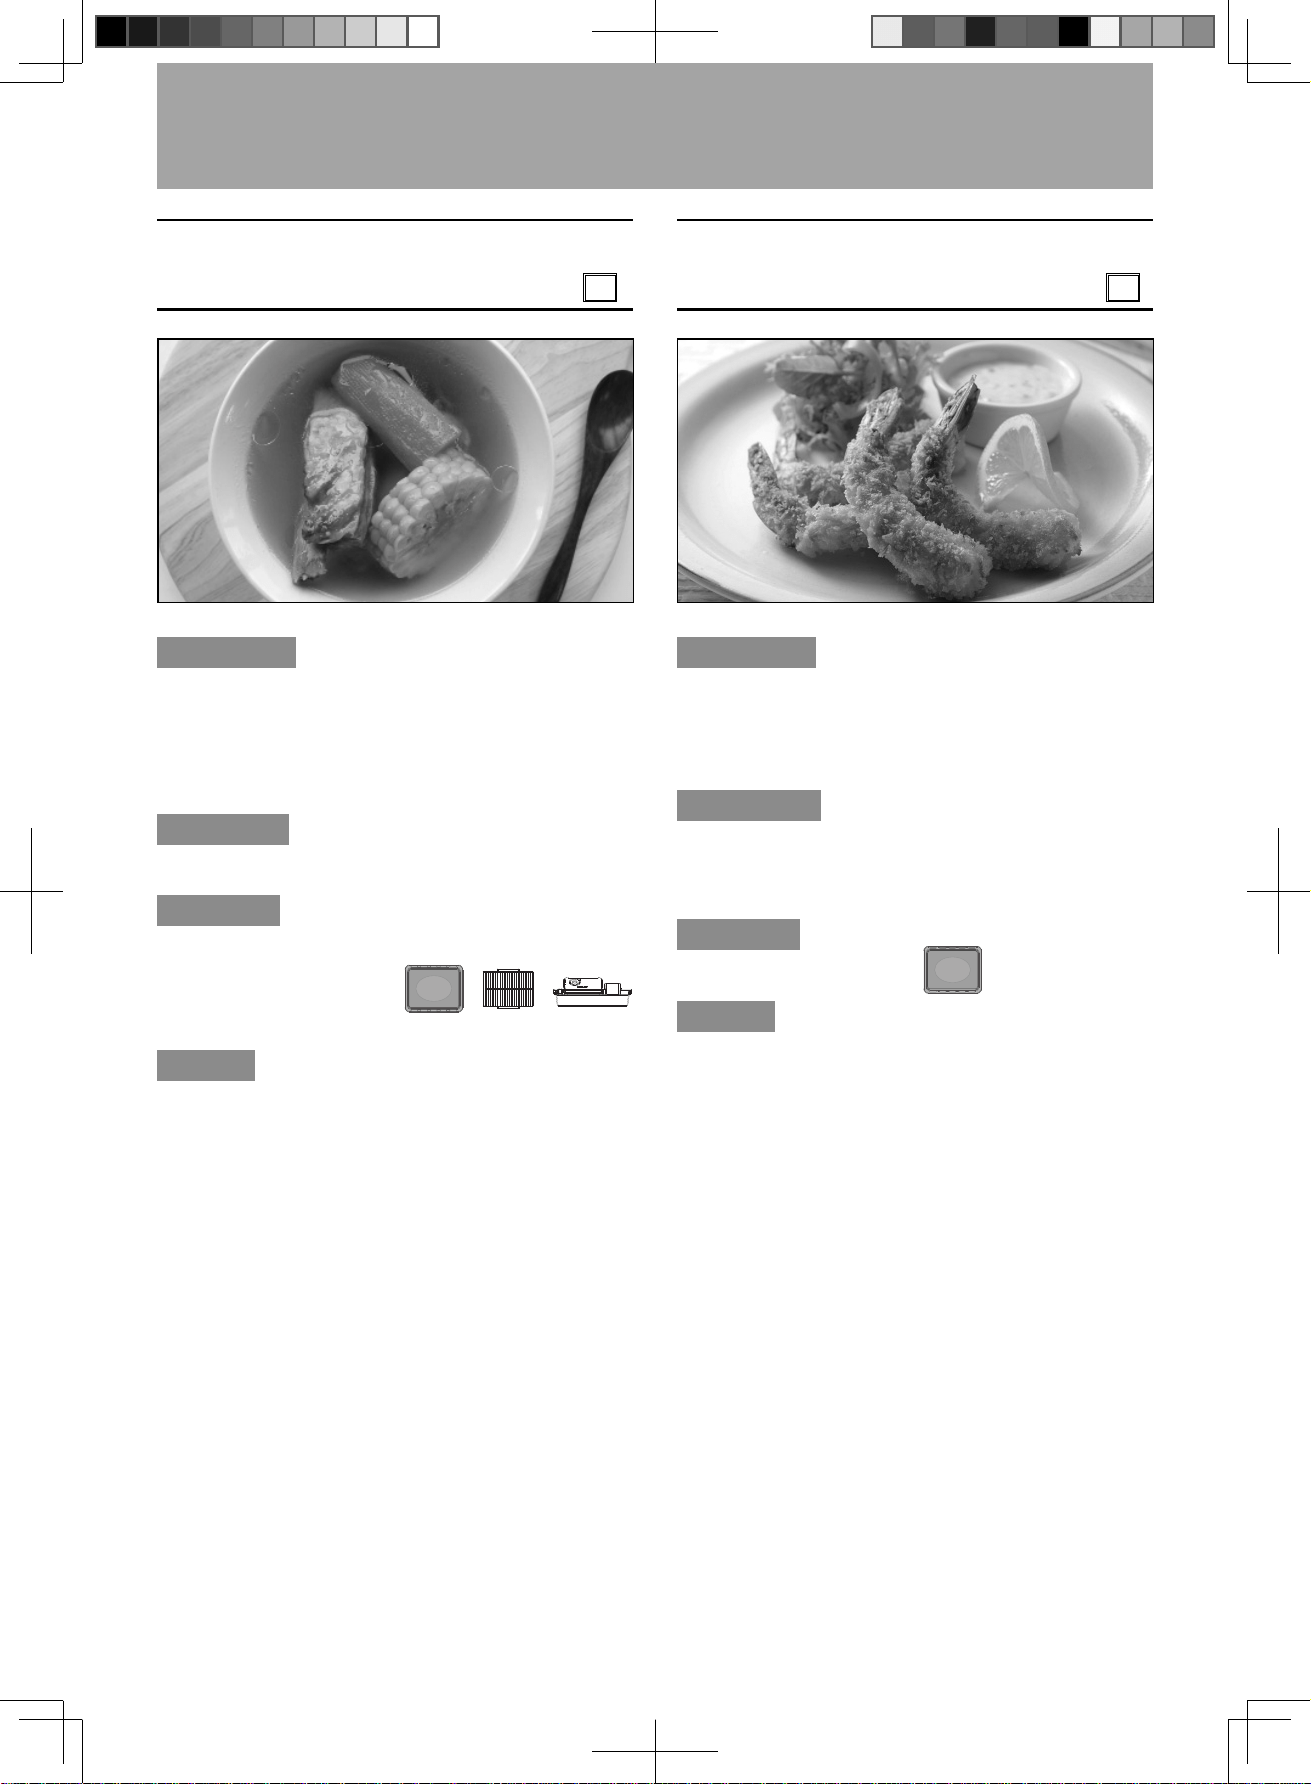
Stewed Ribs Soup
(2-4 serves)
9
Ingredients
pork ribs ...........................12 oz (350 g)
carrot ............................... 4.5 oz (130 g)
sweet corn ....................... 4.5 oz (130 g)
dried mushroom ............... 4 pieces
water ................................ 3 cups (700 ml)
Seasoning
salt ................................... taste
Container
0.3 Quart stew pot
with lid×4,
metal tray,
wire rack (lower shelf),
integrated water tank
Method
1. Soak dried mushroom in water in advance, clean
and blanch pork ribs.
2. Cut carrot into big chunks without peel. Cut sweet
corn into about 1-inch (2 cm) slices.
3. Place wire rack on the metal tray. Place step 1 and
step 2 ingredients evenly in 4 stew pots respectively.
Add water covered and placed evenly on the wire
rack in the lower shelf position.
4. Fill water tank.
5. Select Auto Program No.9, then press Start to
cook.
6. After cooking, take food out and add salt.
Note:
The ingredients listed in this recipe are for 4 serves.
For multiple servings, calculate the material quantities
according to the proportion.
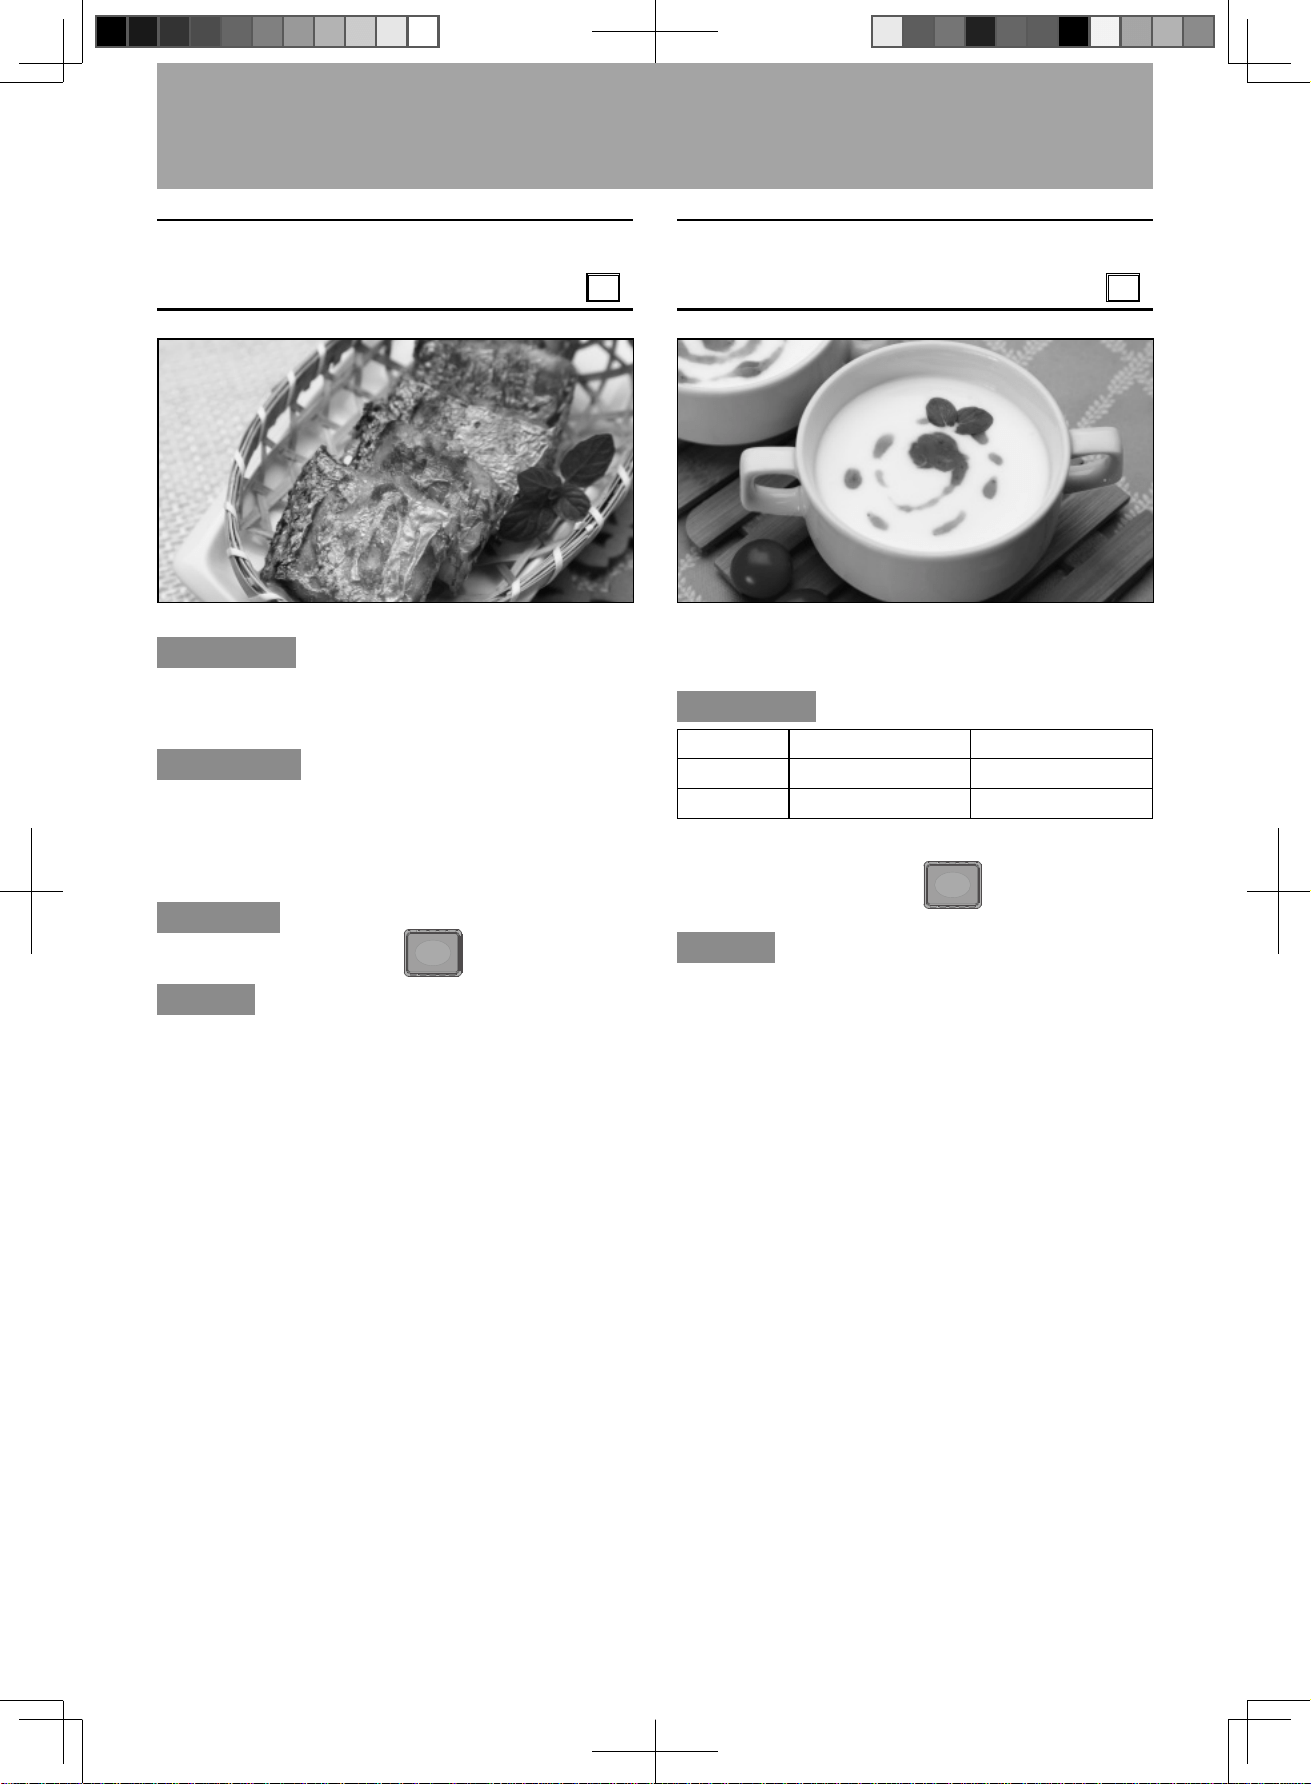
Fried Shrimp with Bread
Crumbs
(1 level / 2 levels)
10
Ingredients
shelled shrimps .....................14 oz (400 g) (about 16 pcs)
beaten egg ....................... 1 tbsp
bread crumbs ................... ³⁄ cup (40
g
)
shredded ginger ............... ¹⁄ tbsp
Seasonings
oil ..................................... 3 tbsps
salt ................................... taste
cooking wine .................... ¹⁄ tbsp
Container
Metal tray (lower shelf)
Method
1. Remove head, shells and devein shrimps. Only
leave the tail and the shell of the first joint. Add
shredded ginger, salt and cooking wine for
marinating.
2. Put bread crumbs and oil into a bowl, and stir
evenly.
3. Place baking paper on the metal tray. Coat shrimps
with beaten egg and bread crumbs after drying the
shrimps, and place them on the metal tray in 4×4
formation evenly.
4. Select Auto Program No.10 and level and press
Start to preheat. After preheating, place the metal
tray in the lower shelf position and press Start to
cook.
Note:
The ingredients listed in this recipe are for 14 oz (400 g)
fried shrimp (1 level). For 2 levels, calculate the material
quantities according to the proportion. Place metal tray in
the upper and lower shelf position and select “2 levels”.
(4 serves) (1 level, 16 pcs)
F0003CF00AP_EN_20220114.indd 32 2022/1/18 10:25:34
- Eng-33 -
Fried Fish Fillets
(1 level / 2 levels)
11
Ingredients
belt fish ......................................12 oz (350 g) (about 12 pieces)
corn starch .......................2 tbsps
Seasonings
cooking wine .................... 1 tbsp
salt ................................... taste
oil ..................................... 1¹⁄ tbsps
Container
Metal tray (lower shelf)
Method
1. Clean belt fish and cut into about 2 inches (5 cm) each.
2. Mix fish with cooking wine and salt and then
marinate for 30 minutes.
3. Place baking paper on the metal tray, drizzle with a
little oil on fish after coating with a thin layer of corn
starch, then arrange in 3×4 formation.
4. Select Auto Program No.11 and level, and press
Start to preheat. After preheating, put metal tray in
the lower shelf position and press Start to cook.
Notes:
1. The ingredients listed in this recipe are for 12 oz
(350
g
) fish fillet (1 level). For 2 levels, calculate the
material quantities according to the proportion. Place
metal tray in the upper and lower shelf position and
select “2 levels”.
2. If fish fillet is thick, add Conv. Bake time manually
according to the condition.
3. Thin fish fillet is recommend for getting a better color
performance.
Home-made Yoghurt
(4-8 cups)
12
Note:
This auto program will run for 5 hours.
Ingredients
weight 4 cups 8 cups
milk 2 cups (475 g) 4 cups (950 g)
yoghurt 2 oz (60 g) 4 oz (120 g)
0.2 Quart cup×4
Metal tray (lower shelf)
Method
1. Pour milk in a casserole and heat up to 110 °F (45 °C),
add yoghurt and mix well, then pour into a cup evenly
about 4.5 oz (130 g) per cup.
2. Cover each cup with plastic wrap, then put on the
metal tray in the lower shelf position.
3. Select Auto Program No.12 and press Start to cook.
Notes:
1. For multiple cups, calculate the material quantities
according to the proportion.
2. When the cavity overheats, “U50” will appear in the
display window. Please wait until the cavity cools
down, and start operation after “U50” disappears.
Auto Cook Setting and Menus
(continued)
(1 level, 12 oz (350
g
))
F0003CF00AP_EN_20220114.indd 33 2022/1/18 10:25:34
- Eng-34 -
Auto Cook Setting and Menus
(continued)
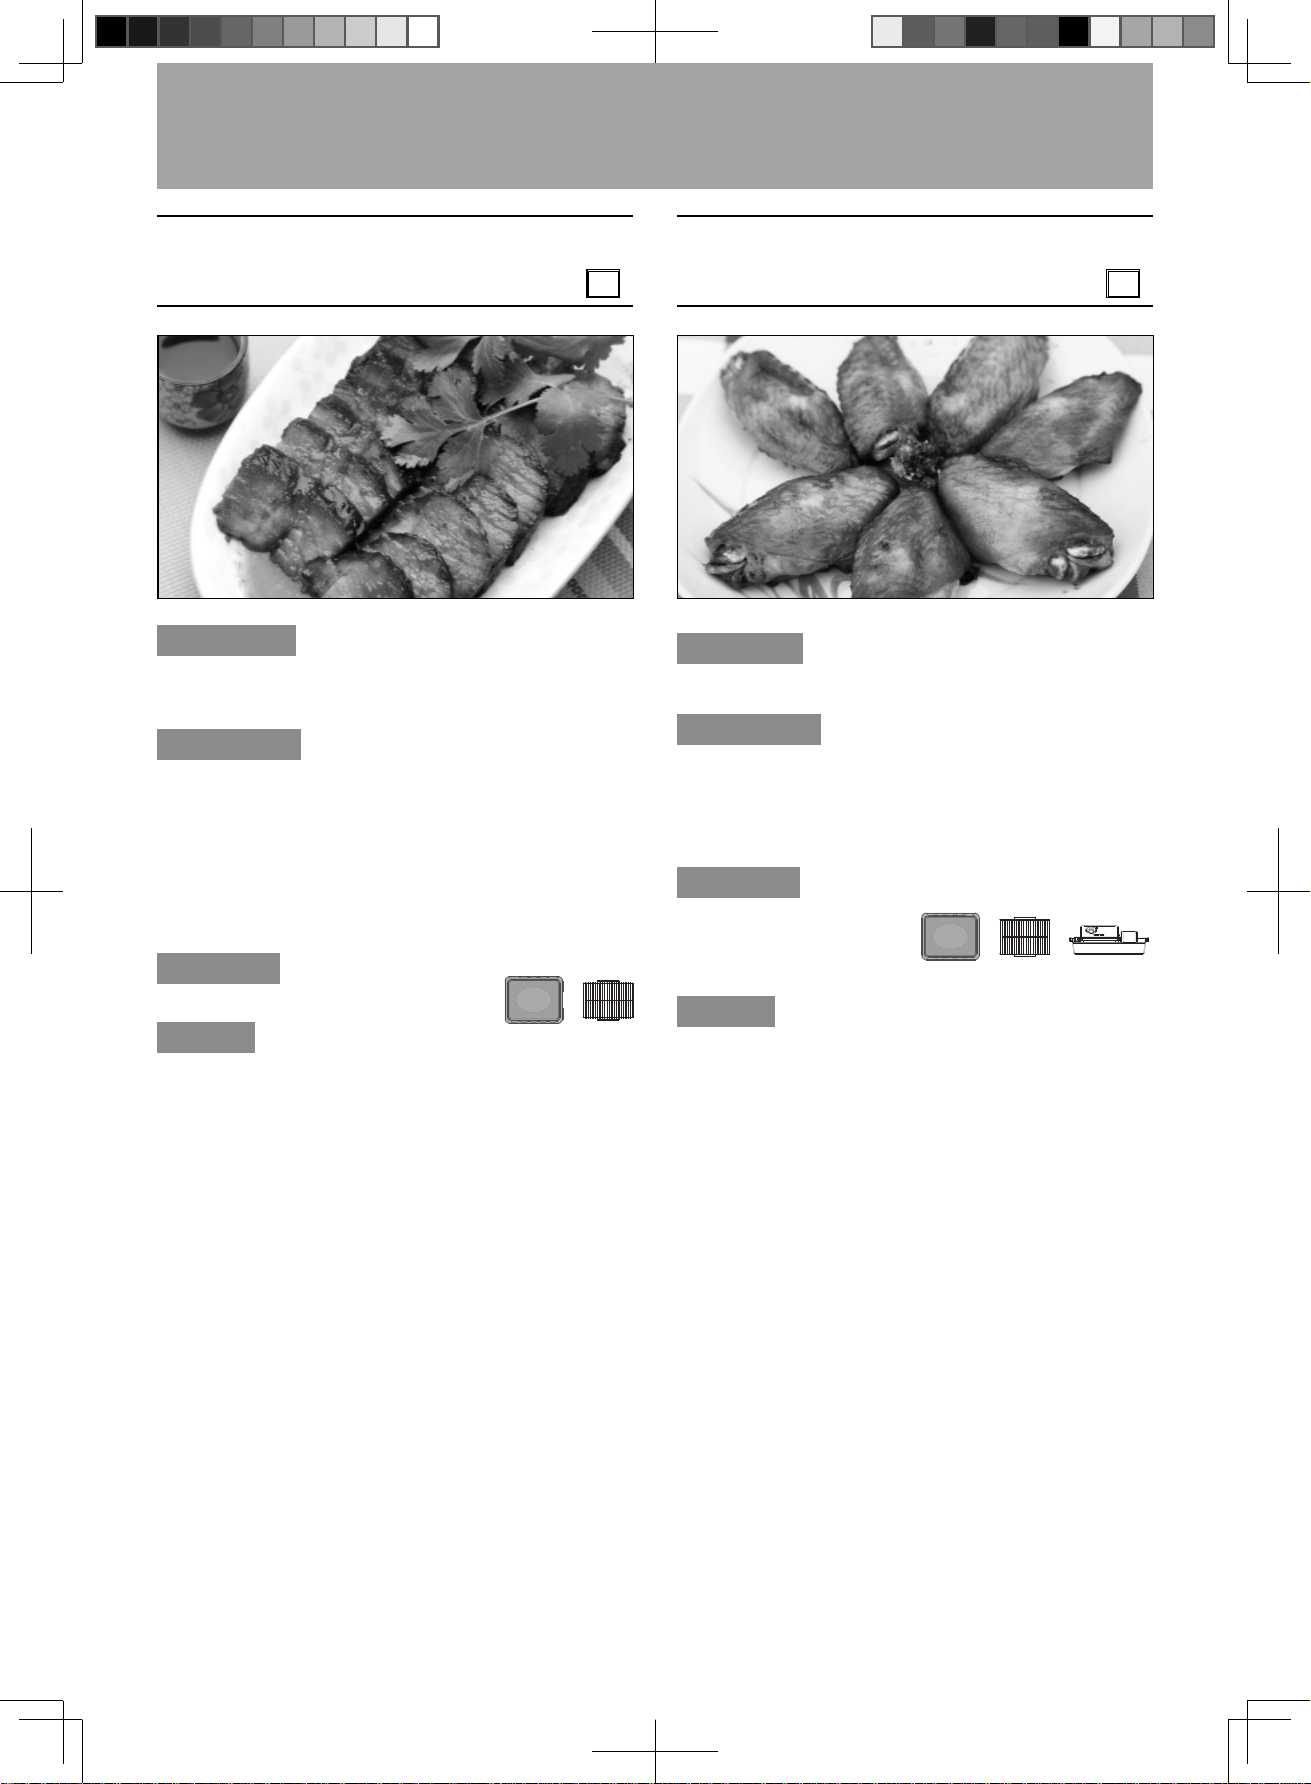
Barbecue Pork
14
/
22
/
28 oz (
400/600/800
g
)
13
Ingredients
pork shoulder (or pork belly) ......14 oz (400 g)
maltose (or honey) .....................1 oz (30 g)
water ..........................................2 tbsps
Seasonings
dark soy sauce ..........................1¹⁄ tbsps
light soy sauce ...........................2 tbsps
red preserved bean curd ...........4 tbsps
sugar ..........................................6 tbsps
five-spice powder .......................¹⁄ tbsp
smashed garlic ..........................1¹⁄ tbsps
oyster sauce ..............................2 tbsps
red vinasse and red
fermented bean curd juice .........3 tbsps
Container
Metal tray, wire rack (lower shelf)
Method
1. Pour all seasonings into bowl, stir evenly and
become honey-stewed B.B.Q pork sauce.
2.
Clean the pork shoulder and drain well, then cut into
long pieces about 1¹⁄ inches (4 cm) thickness. Lay pork
shoulder in a seal box, add enough pork sauce (cover
the pork). Marinate in refrigerator for 1 to 2 days.
3.
Drain marinated pork and placed on a wire rack, then
put wire rack on the metal tray with an aluminum foil.
4. Select Auto Program No.13 and weight, press Start
to preheat. After preheating, place the metal tray in
the lower shelf position, and press Start to cook.
5.
Mix maltose and water to sugar water. Take food
out when heard beeps, grease the surface of
barbecue pork with a brush dipped in sugar water
and turn it over then put it back to the oven. Press
Start to cook. (The oven will beep twice between
programmed stages.)
Notes:
1.
The ingredients listed in this recipe are for 14 oz (400
g
)
pork shoulder. For multiple weights, calculate the material
quantities according to the proportion.
2.
When cooking 28 oz (800
g
) barbecue pork, place 2 wire
racks on the 2 metal trays with 14 oz (400
g
) pork shoulder
respectively. Then put them in the upper and lower shelf
position and select “28 oz (800 g)”
3. Close oven door is recommended to keep cavity
temperature when greasing maltose water.
Teriyaki Chicken Wings
(1 level / 2 levels)
14
Ingredient
chicken wings .................. 14 oz (400
g
) (12 pcs)
Seasonings
light soy sauce ................. 3 tbsps
oyster sauce .................... 1¹⁄ tbsps
sugar ................................ ¹⁄ tbsp
sesame oil ....................... 1 tsp
Container
Metal tray, wire rack
(lower shelf),
integrated water tank
Method
1. Wash chicken wings and prick chicken surface
several times with fork or bamboo stick.
2. Mix chicken wings with all seasonings and
marinate for 30 minutes.
3.
Place marinated chicken wings skin side up on the
wire rack after drain well with 3×4 formation on the
metal tray with an aluminum foil.
4. Fill water tank.
5. Select Auto Program No.14 and level, press Start
to preheat. After preheating, place the metal tray in
the lower shelf position and press Start to cook.
Note:
The ingredients listed in this recipe are for 12 pieces
chicken wings. For 2 levels, calculate the material
quantities according to the proportion. Place metal tray in
the upper and lower shelf position and select “2 levels”.
(1 level, 12 pcs)
F0003CF00AP_EN_20220114.indd 34 2022/1/18 10:25:35
- Eng-35 -
Auto Cook Setting and Menus
(continued)
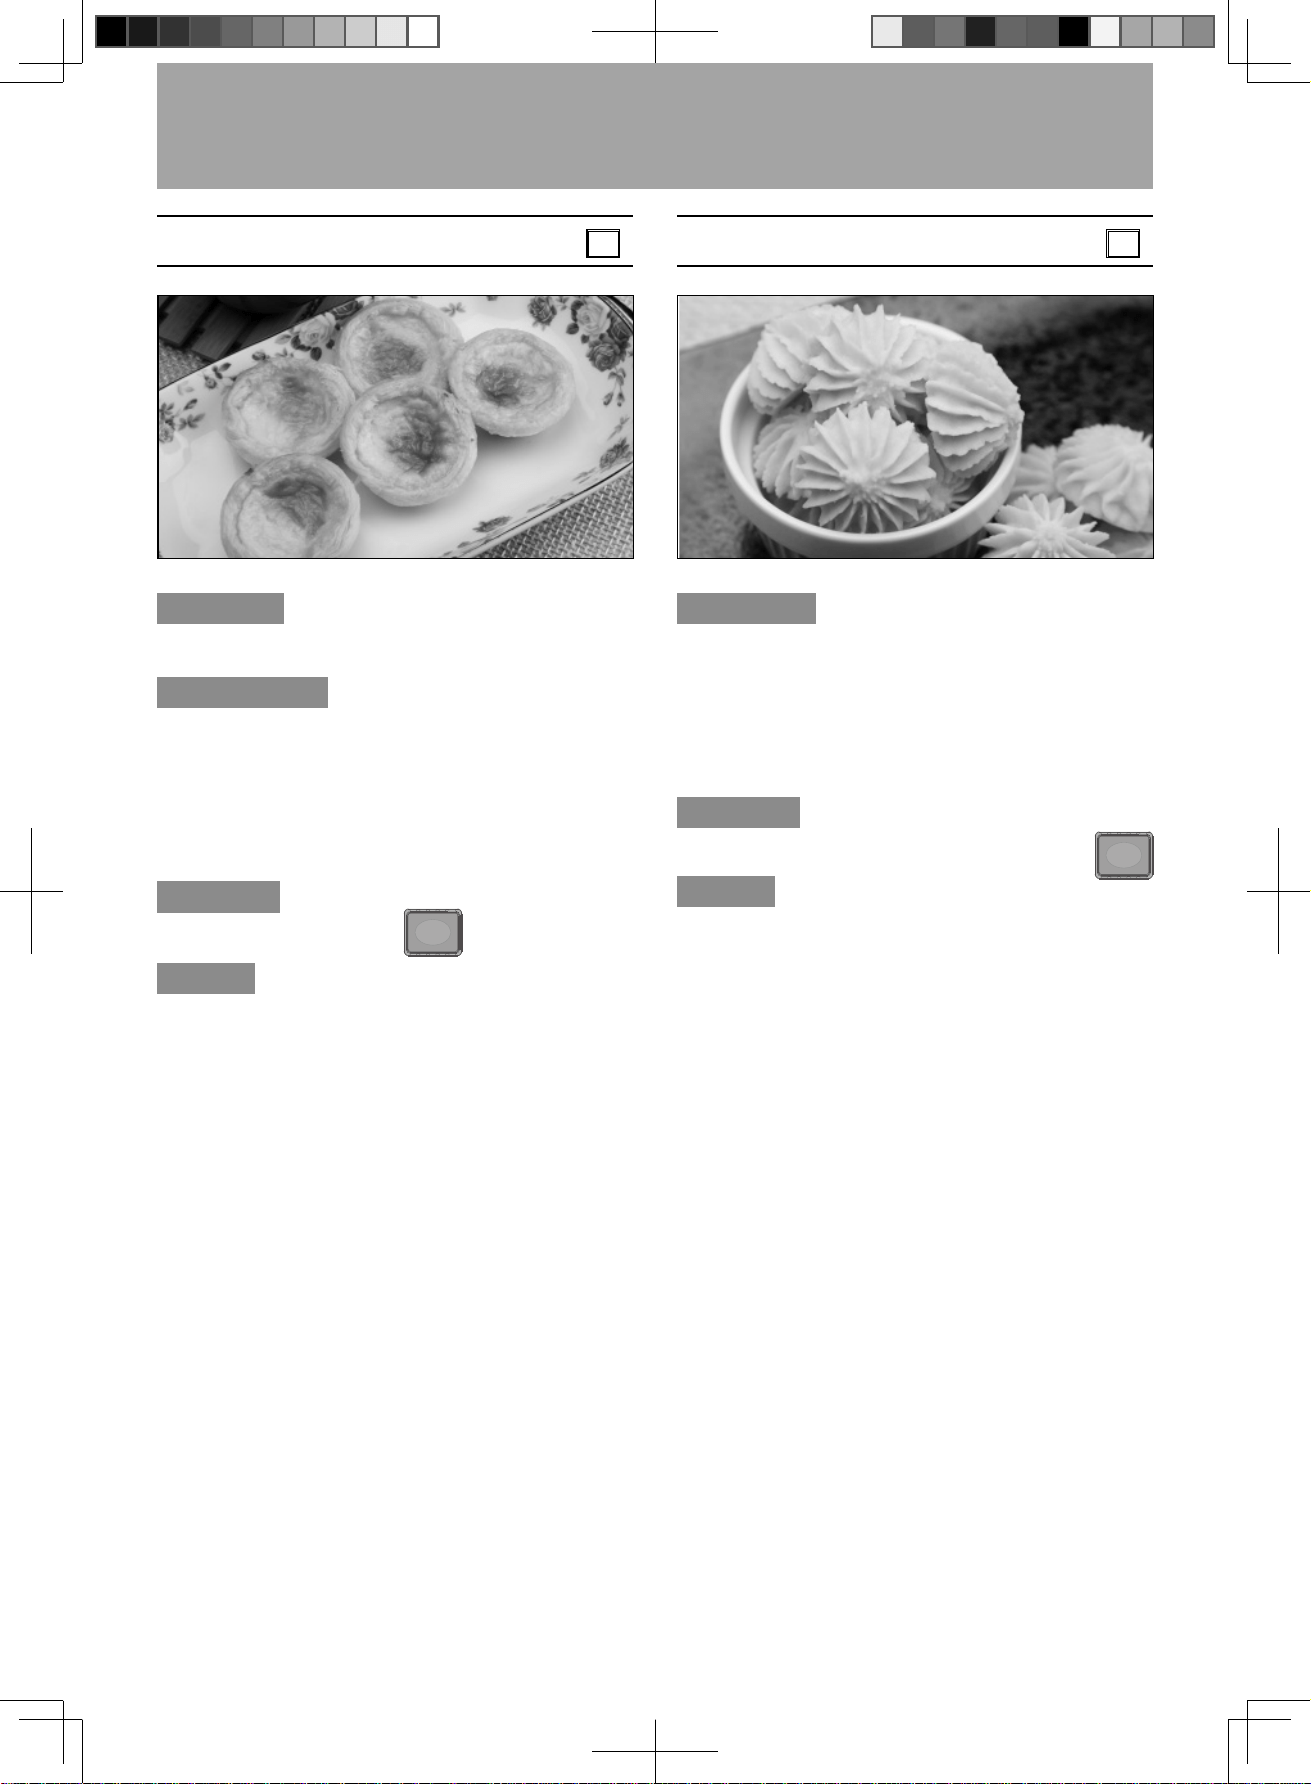
Egg Tarts
(1 level / 2 levels)
15
Ingredient
egg tart skin ..................... 9 pcs
Egg tart batter
whipping cream ............... 4 oz (105 g)
milk .................................. 3 oz (85 g)
cake flour ......................... 1 tbsp
sugar................................. 2 tbsps
egg yolk ........................... 2 pcs
condensed milk ................ 2 tsps
Container
Metal tray (lower shelf)
Method
1. Frozen egg tart skin can use when it defrost at
room temperature.
2. Mixture of whipping cream, milk, condensed milk
and sugar in a small pot are heated by low fire.
Heat and stir until sugar melt when cool down
(about 110 °F (45 °C)). Add egg yolk and cake flour
and stir well to egg tart batter.
3.
Pour egg tart batter into egg tart skin, 80% full.
4. Select Auto Program No.15 and level and press
Start to preheat.
5. Arrange egg tart with 3×3 formation on the metal
tray.
6. After preheating, place the metal tray in the lower
shelf position and press Start to cook.
Note:
The ingredients listed in this recipe are for 9 pieces egg
tarts on 1 level and calculate the material quantities
according to the proportion. Each level can put 9 pieces
when cooking 2 levels. Place the metal tray in the upper
and lower shelf positions and select “2 levels”.
(1 level, 9 pcs)
Cookies
(1 level / 2 levels)
16
Ingredients
unsalted butter ................. 6 oz (160 g)
cake flour .......................... 1 cup (155 g)
icing sugar ........................ 1.2 oz (35 g)
salt .................................... a pinch
corn starch ........................ 5 tbsps
milk powder ...................... 3¹⁄ tbsps
Container
Metal tray (upper and lower shelf)
Method
1. Take unsalted butter out in advance, soften it at
room temperature, add icing sugar and salt and stir
with eggbeater until it is fluffy.
2. Mix cornstarch, cake flour and milk powder and put
through a sieve. Mix evenly with rubber scraper to
batter for cooking.
3. Insert either a #8, or #12, decorating tip, and the
ingredients from Step 2 into the pastry bag.
4.
Place baking paper on the metal tray. Squeezing
pastry out with 1¹⁄ inches (3 cm) diameter
andabout 0.3 oz (8 g) weight and arrange 4×5
formation.
5. Select Auto Program No.16 and level and press
Start to preheat.
6. After preheating, place the metal tray in the upper
and lower shelf position and press Start to cook.
Note:
The ingredients listed in this recipe are for 2 levels of
cookies, and calculate the material quantities according
to the proportion when you cook 1 level. Place the metal
tray in the lower shelf position and select “1 level”.
(2 levels, 40 pcs)
F0003CF00AP_EN_20220114.indd 35 2022/1/18 10:25:35
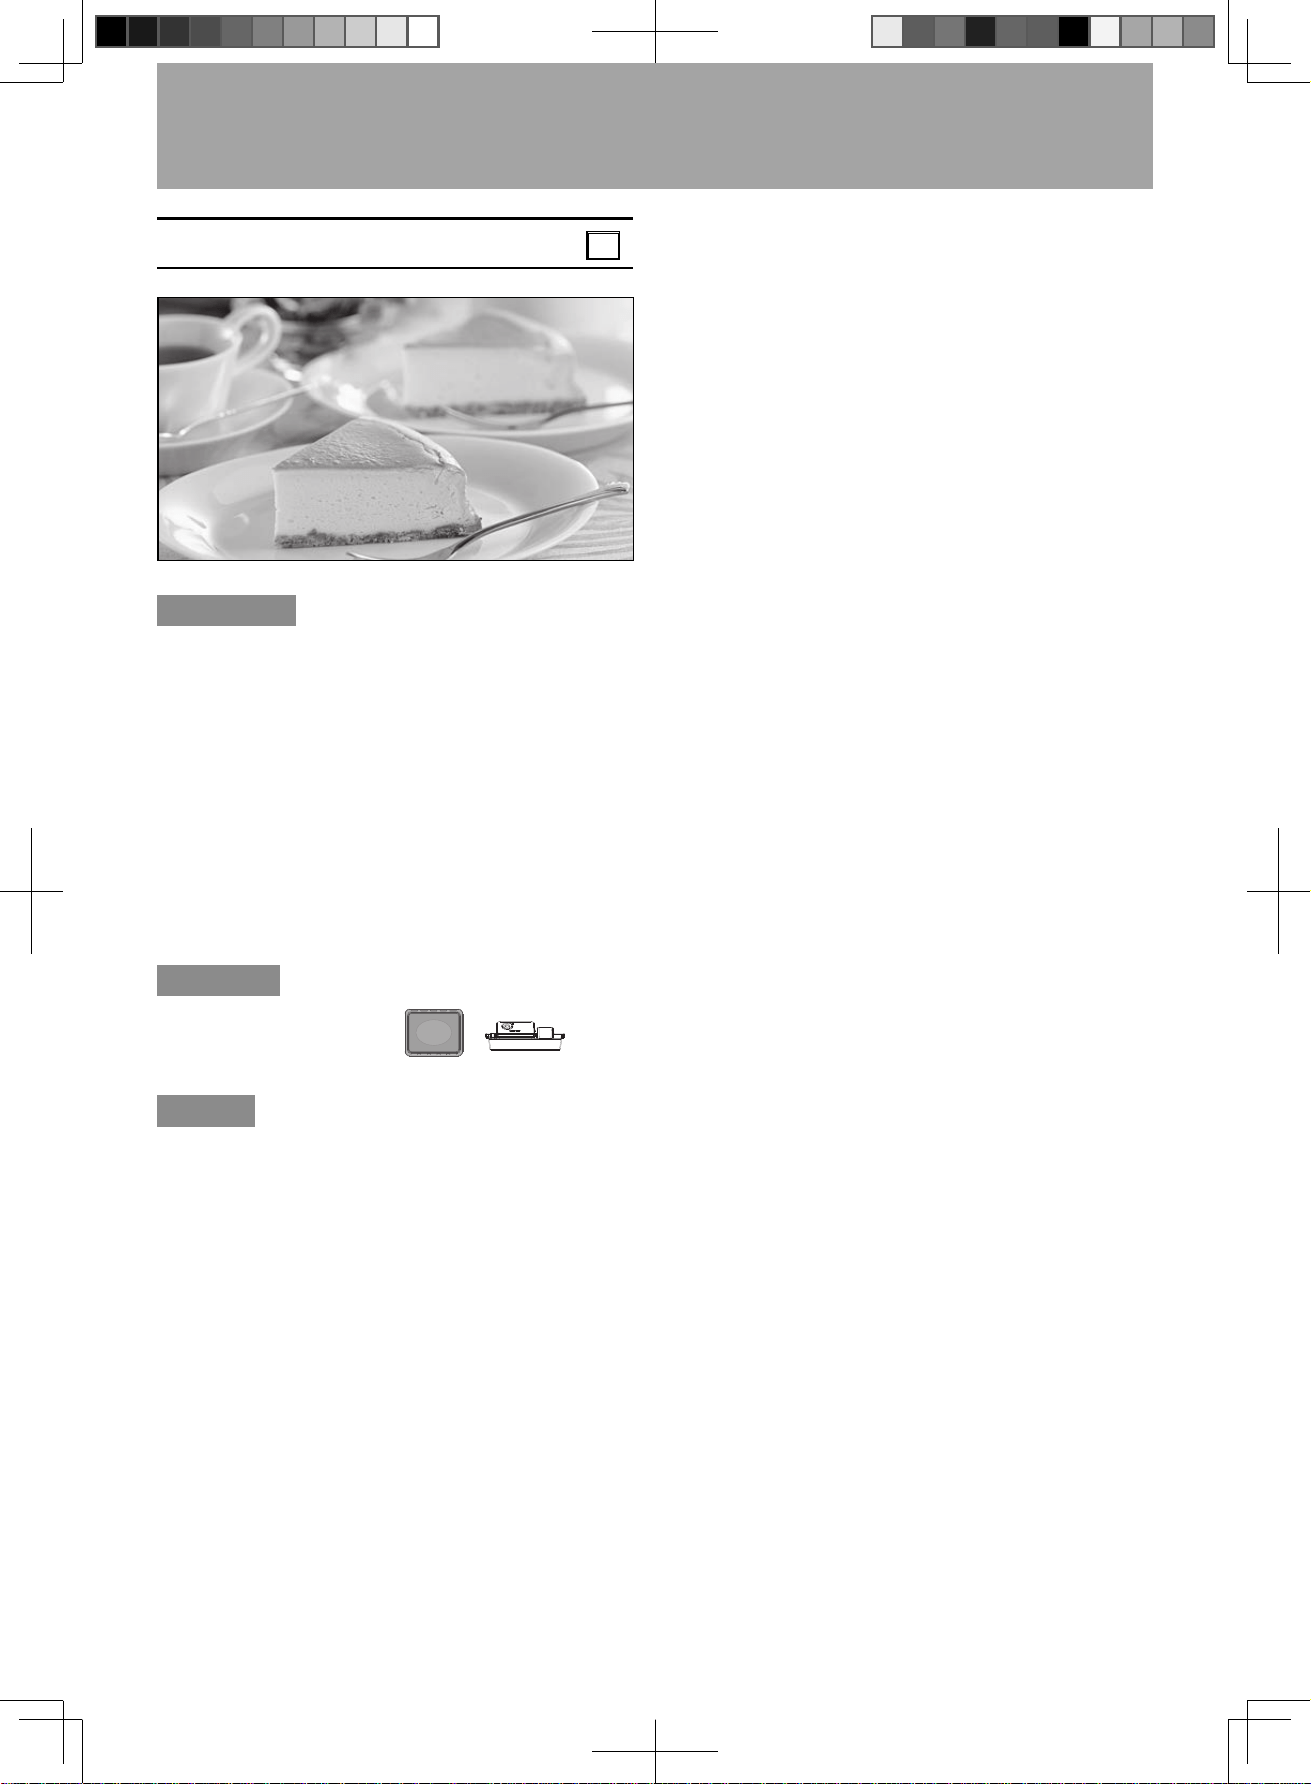
- Eng-36 -
Auto Cook Setting and Menus
(continued)
Cheese Cake
(7 inch)
17
Ingredients
Cake base:
graham cracker ................ 3.5 oz (100 g)
unsalted butter ................. 1.5 oz (40 g)
Cake batter:
cream cheese .................. 9 oz (250 g)
sugar ................................ 6 tbsps
sour cream ....................... 4.5 oz (130 g)
unsalted butter ................. 2¹⁄ tbsps
vanilla bean ..................... ¹⁄ piece
whole egg liquid ............... 3 oz (81 g)
egg yolk ........................... 1 oz (27 g)
corn starch .......................2 tbsps
Container
7-inch cake tin, metal tray
(lower shelf), integrated
water tank
Method
Cake base:
1. Smash graham cracker in a plastic food bag and
crush with rolling pin.
2. Melt unsalted butter completely and mix well with
graham cracker crumbs.
3. Pour the mixture into tin bottom and inside with
baking paper and press firmly and put the cake tin
in refrigerator to serve.
Cake batter:
1.
Cut cream cheese and unsalted butter into small
pieces and let stand naturally until soft. Open vanilla
bean and take vanilla seeds out for later use.
2. Stir together cream cheese, sugar, and vanilla
seed in a mixer then beat until the texture is
smooth.
3. Stir soften unsalted butter and sour cream well
after each addition.
4. Mix whole egg liquid and egg yolk with 3 times to
add in, stir thoroughly after each addition.
5. Add the sifted corn starch and stir quickly and
evenly with a hand-held whisk.
6. Fill water tank.
7. Select Auto Program No.17 and press Start to
preheat.
8. Take out cake tin from refrigerator, fill in the batter,
smooth the surface and use a bamboo stick to
remove bubbles from the surface.
9. After preheating, place cake tin on the metal tray in
the lower shelf position and press Start to cook.
10. Remove cake tin after cooking and let it cool
down, then put cake in refrigerator about 4 hours
and serve.
F0003CF00AP_EN_20220114.indd 36 2022/1/18 10:25:35
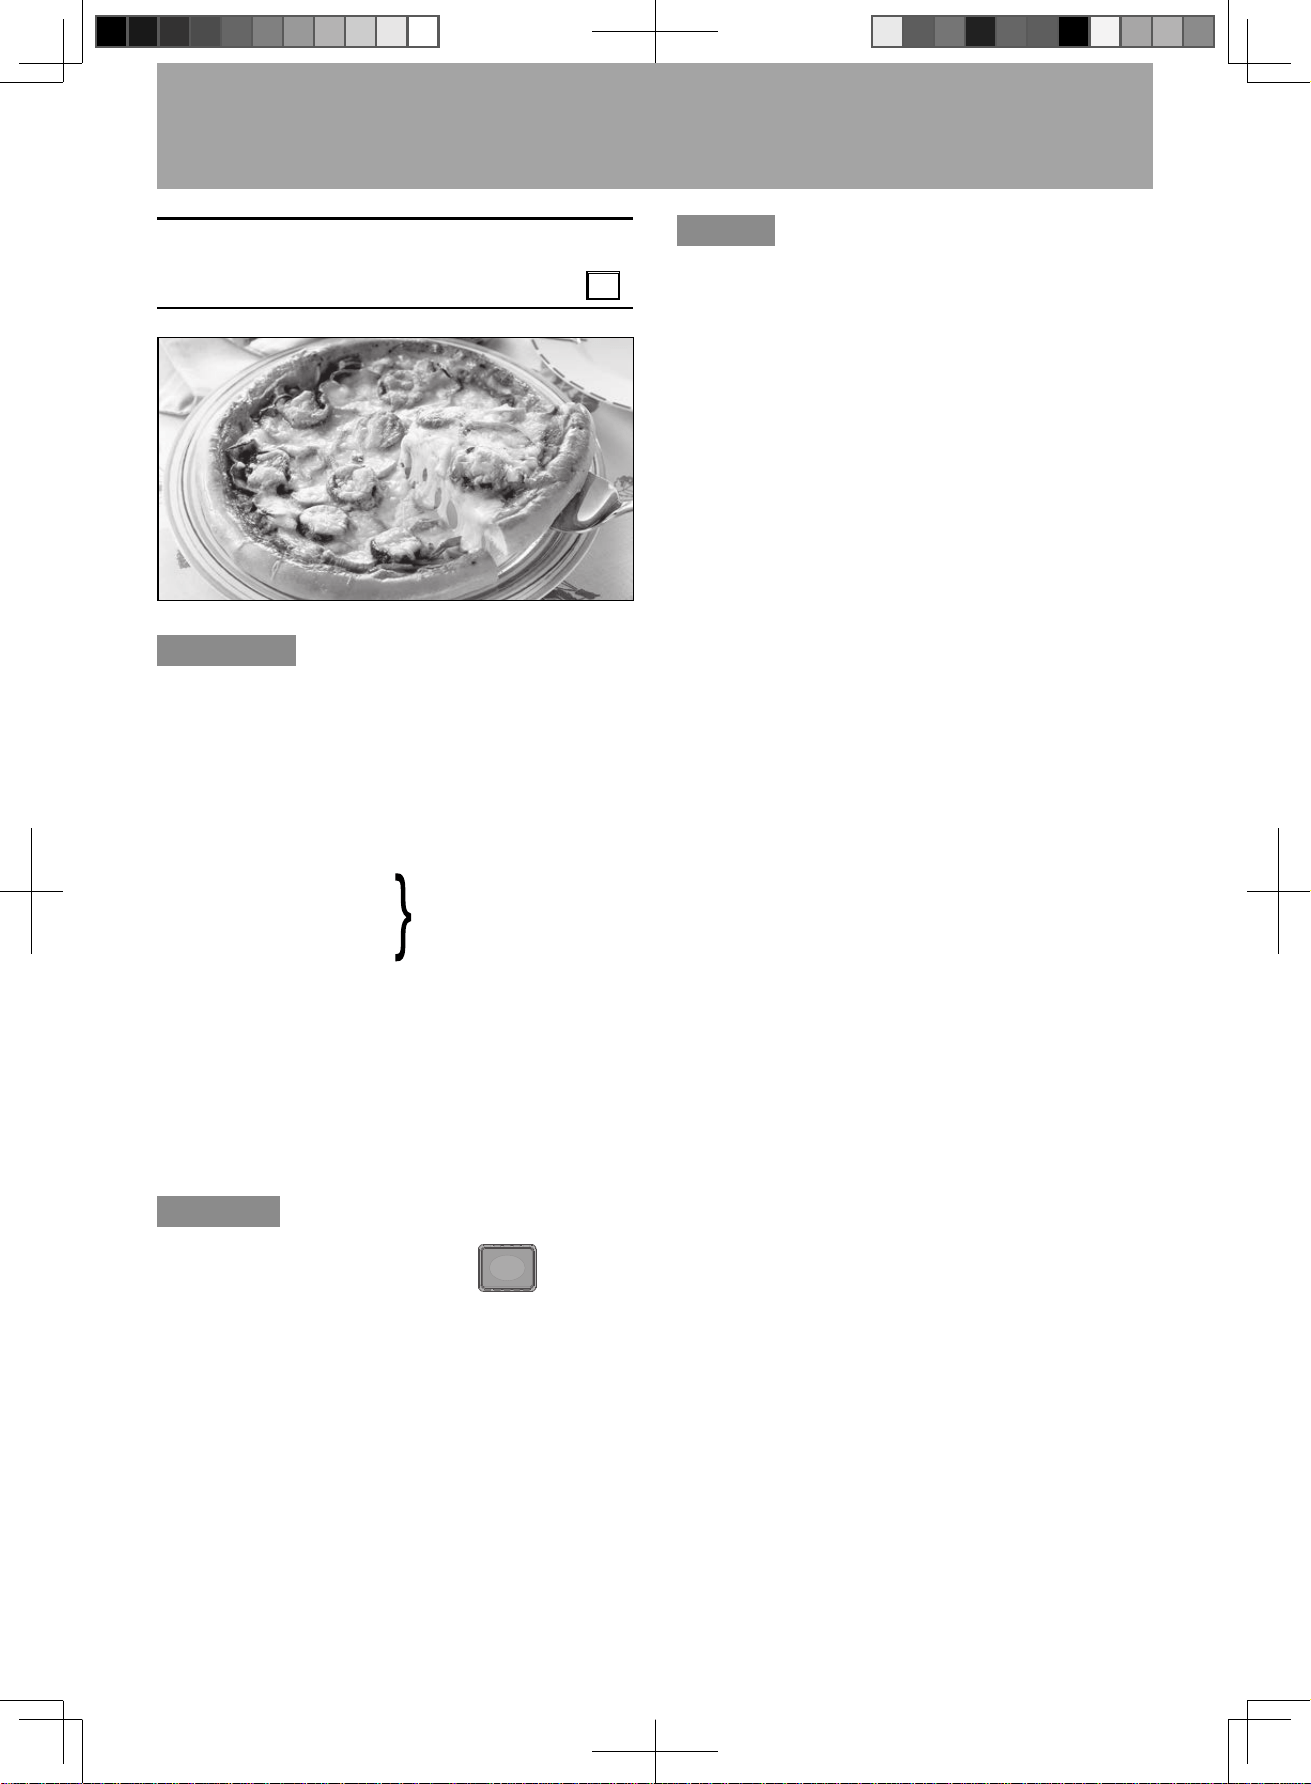
- Eng-37 -
Auto Cook Setting and Menus
(continued)
Home-made Pizza
(1 level / 2 levels)
18
Ingredients
Base ingredients:
cake flour ......................... 5 oz (130 g)
sugar ................................ 1 tbsp
unsalted butter ................. 1 tbsp
milk powder ..................... 1¹⁄ tbsps
salt ................................... ¹⁄ tsp
Fillings:
chopped onions ...............
sliced mushroom .............
sliced sausage .................
sliced green pepper .........
warm water (100 °F (40 °C)) ...4¹⁄ tbsps (70 ml)
yeast ................................ ¹⁄ tbsp
sugar ................................ a pinch
mozzarella cheese ........... 3 oz (80 g)
tomato paste .................... 2 tbsps
oil ..................................... taste (coating)
cake flour .......................... taste (anti-sticking)
Container
Heat-proof container,
metal tray (lower shelf)
Method
1. Stir yeast and sugar mixture in warm water and
wait for 5 minutes.
2. To make the dough by hand, in a large bowl,
add yeast water and stir together all the base
ingredients, grease oil in the heat-proof container,
spread out the dough in a container, cover loosely
with plastic wrap, place the container in the center
of metal tray and put metal tray in the lower shelf
position.
3. Select Auto Program No.18 and level and press
Start to ferment. It will remind you to take out the
metal tray and container with promoting beeps.
Then press Start to preheat.
4. Drizzle lightly cake flour on the work surface, then
flatten the dough with hands to allow inside air to
escape.
5. Place baking paper in the metal tray. Roll out the
dough in about 8 inches (20 cm) diameter round
and transfer to metal tray. Then lift the dough and
give it a quarter turn.
6. Prick the base and apply tomato paste, sprinkle
with half mozzarella cheese and the rest fillings,
then top with remaining cheese.
7. After preheating, place the metal tray in the lower
shelf position and press Start to cook.
Notes:
1. The ingredients listed in this recipe are for 1 home-
made pizza. For 2 pizzas, calculate the material
quantities according to the proportion. Place metal
tray in the upper and lower shelf position and select
“2 levels”.
2. When the cavity overheats, “U50” will appear in the
display window. Please wait until the cavity cools
down, and start operation after “U50” disappears.
3. Home-made pizza should be placed in the oven within
30 minutes when preheating is completed, if not, the
program will end automatically.
(1 level, 1 pc)
¹⁄ cup (90 g)
F0003CF00AP_EN_20220114.indd 37 2022/1/18 10:25:36
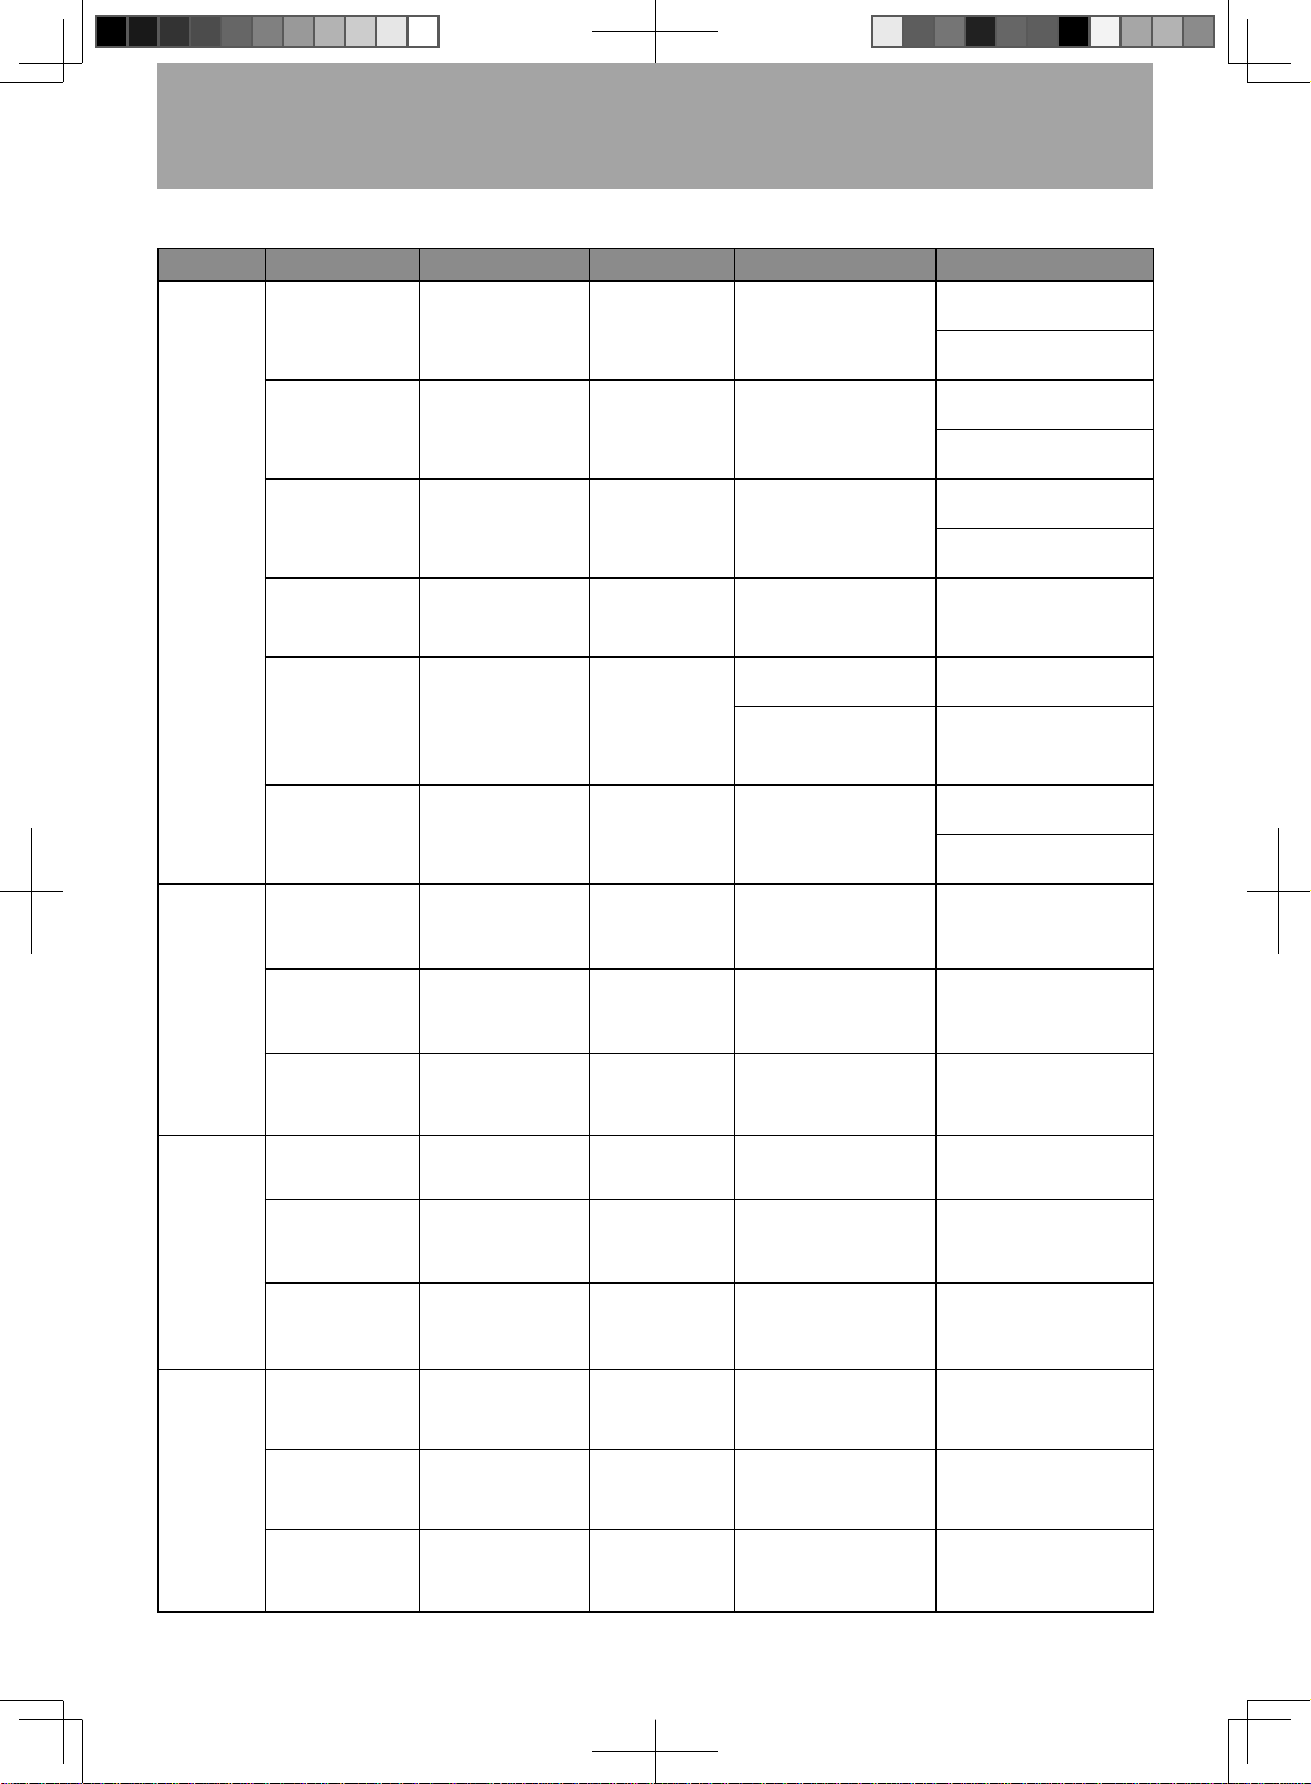
- Eng-38 -
Reheating Chart
Sorts Foods Weight Accessories Program Time
Chilled/
Frozen
Pastry
Shumai*
7 oz (200 g)
(9 pcs)
➁ / lower shelf
Steam-Med
chilled: about 10 to
11 minutes
frozen: about 12 to
13 minutes
Vermicelli Roll*
7 oz (200 g)
(5 pcs)
➁ / lower shelf
Steam-Med
chilled: about 8 to
9 minutes
frozen: about 11 to
12 minutes
Sticky Rice
Chicken*
5 oz - 11 oz
(160 g - 320 g)
(2 pcs - 4 pcs)
➁ / lower shelf
Steam-Med
chilled: about 16 to
18 minutes
frozen: about 23 to
24 minutes
Buns*
3.5 oz - 7 oz
(100 g - 200 g)
(4 pcs - 8 pcs)
➁ / lower shelf
Steam-Med
chilled: about 8 to
9 minutes
Rice*
7 oz - 10.5 oz
(200 g - 300 g)
(1 serve)
➁ / lower shelf
Steam-Med
chilled: about 14 to
16 minutes
375 °F (190 °C)
Steam Conv.
(without preheat)
frozen: about 20 to
22 minutes
Pizza
about 11 oz (320 g)
(1 pizza)
➀
/ lower shelf
445 °F (230 °C)
Conv. Bake
(with preheat)
chilled: about 11 to
12 minutes
frozen: about 15 to
16 minutes
Chilled
Dish
Baked Chicken
in Salt (pcs)*
7 oz - 14 oz
(200 g - 400 g)
(1 dish)
➁ / lower shelf
Steam-High about 9 to 10 minutes
Chicken Wings*
about 10.5 oz
(300 g)
(10 pcs)
➁ / lower shelf
375 °F (190 °C)
Steam Conv.
(without preheat)
about 11 to 12 minutes
Vegetable*
7 oz - 14 oz
(200 g - 400 g)
(1 dish)
➁ / lower shelf
Steam-Med about 7 to 9 minutes
Chilled
Beverage/
Porridge/
Soup
Milk*
1 cup - 2 cups
(250 ml - 500 ml)
➀
/
lower shelf
(aluminum foil)
Steam-Med about 7 to 8 minutes
Porridge*
7 oz - 9 oz
(200 g - 250 g)
(1 bowl)
➁ / lower shelf
(aluminum foil)
Steam-High about 16 to 17 minutes
Soup*
1 cup - 2 cups
(200 g - 400 g)
(1 bowl - 2 bowls)
➁ / lower shelf
Steam-Med about 15 to 16 minutes
Chilled
Bread
Croissant
1.5 oz - 6.5 oz
(45 g - 180 g)
(1 pc - 4 pcs)
➀ / lower shelf
325 °F (160 °C)
Conv. Bake
(without preheat)
about 6 to 7 minutes
Bread With
Cheese
about 6 oz (170 g)
(1 pc)
➀ / lower shelf
340 °F (170 °C)
Conv. Bake
(without preheat)
about 8 to 10 minutes
Sandwich
4 oz - 17 oz
(120 g - 480 g)
(1 pc - 4 pcs)
➀ / lower shelf
350 °F (180 °C)
Conv. Bake
(without preheat)
about 8 to 11 minutes
Note: In page 38 to 41, marking “➀” means that cooking by metal tray. Symbol “➁” means wire rack in metal tray.
F0003CF00AP_EN_20220114.indd 38 2022/1/18 10:25:36
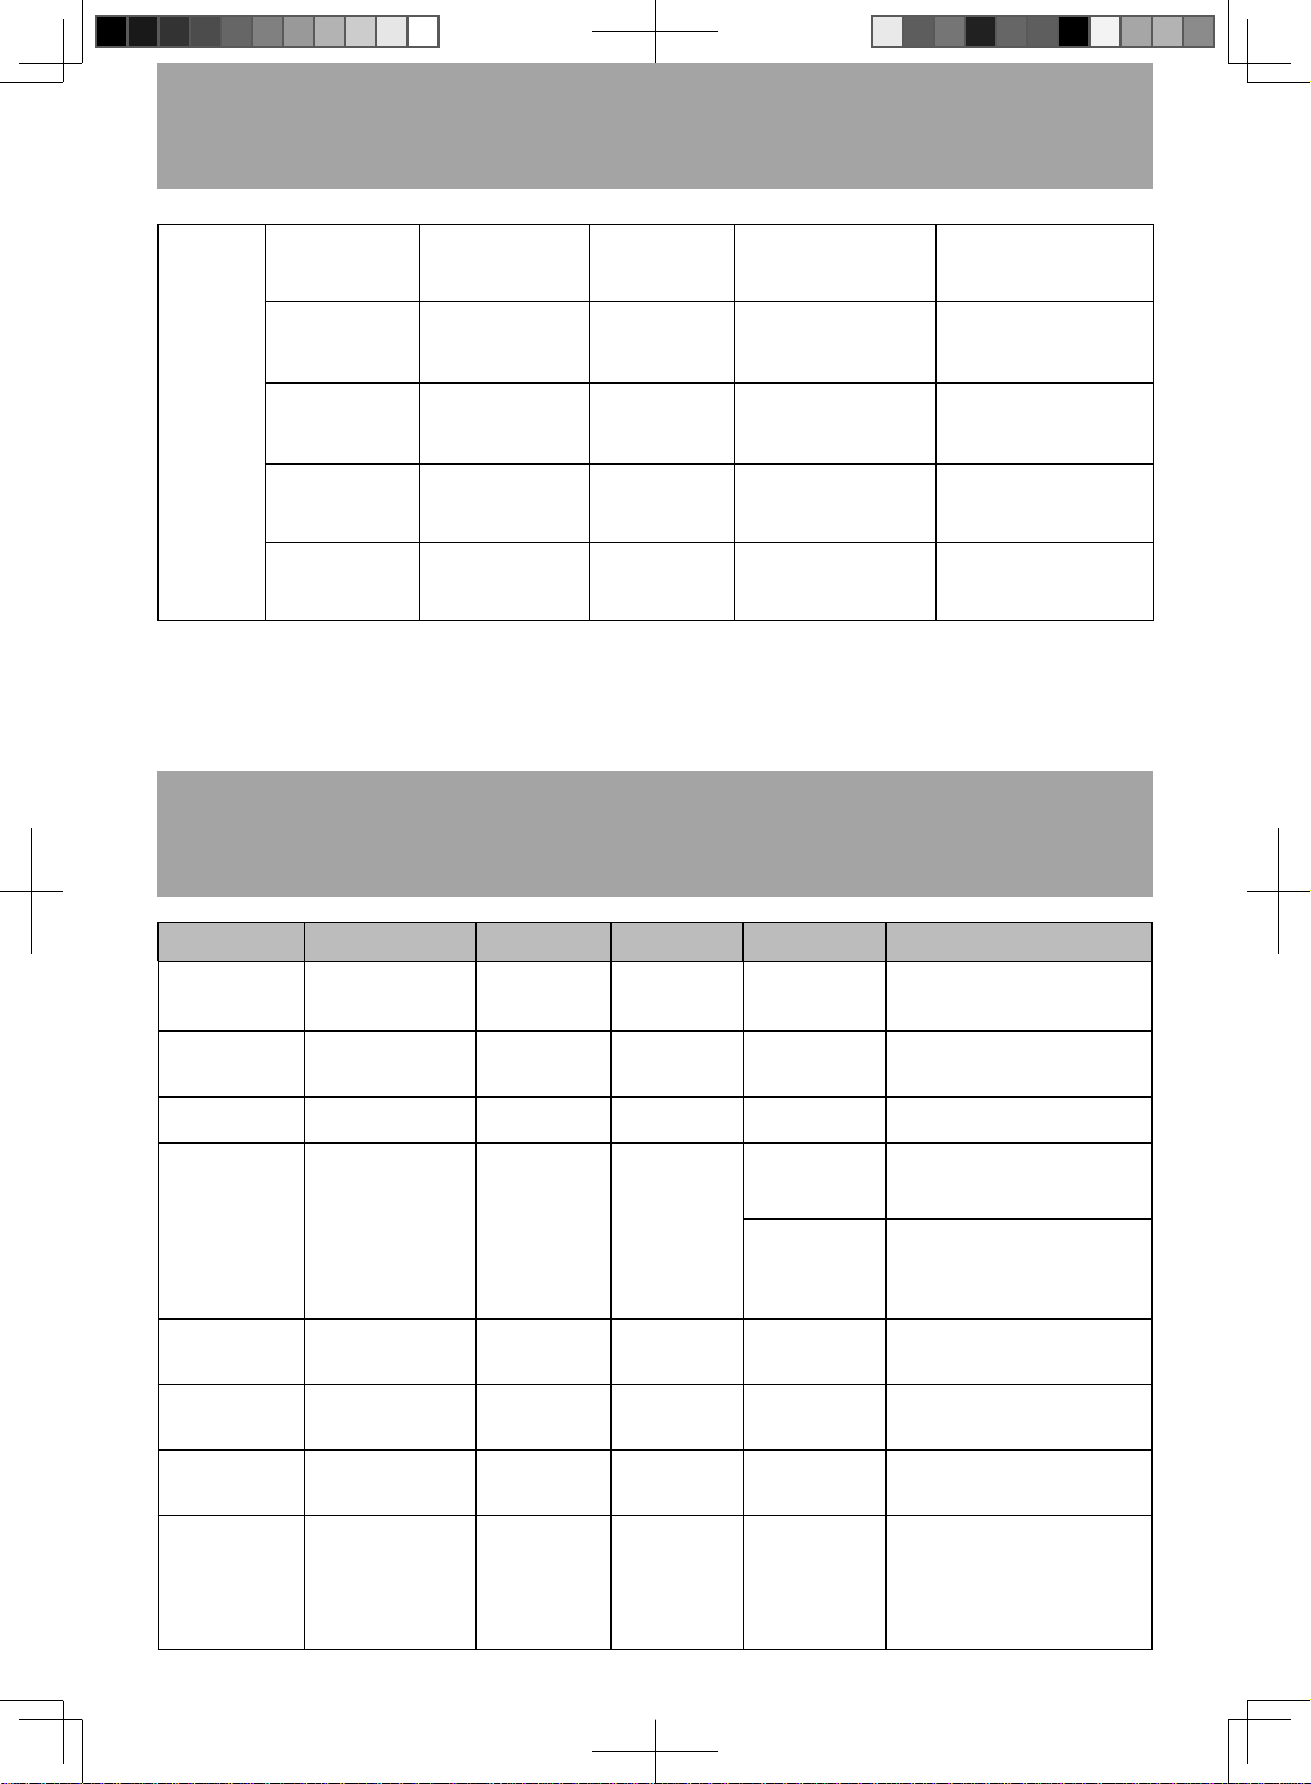
- Eng-39 -
Cooking Chart
Foods Weight Accessories Program Time Statement
Steamed Dazha
Crabs*
3 pairs (6 pcs)
about 3.5-5.5 oz
(100-150 g) each
➁ / lower shelf
Steam-High
about 18 to
20 minutes
Wash Dazha crabs, and place
on wire rack, belly up, along with
ginger slices.
Steamed
Salmon*
11 oz (300 g) (2 pcs)
➁ / lower shelf
Steam-Med
about 11 to
13 minutes
Clean and dry salmon. Sprinkle
some salt and fish sauce for 15
minutes marination.
Steamed Canned
food*
1 can
➀ / lower shelf
Steam-Med
about 15 minutes
All kinds of tins sold in the
market.
Steamed Eggs
with Clams*
3 serves
➁ / lower shelf
Steam-Med
about 10 to
11 minutes
Wash 9 oz (250 g) clam and
cooked until the clam begin to
open, then put them on the heat-
proof dish.
about 17 to
18 minutes
Break 3 eggs and add 11 oz
(300 g) pure water about 100 °F
(40 °C), seasoned, filtered and
pour over the dish with the clam
(cover plastic wrap).
Frozen Spring
Roll
8 pcs (about 9.5 oz
(260 g))
➁ / lower shelf
445 °F (230 °C)
Conv. Bake
(with preheat)
about 15 to
17 minutes
Sold in the market or homemade.
Coat oil on the surface.
Roast Beef
Skewers
8 skewers
(5.5 oz (160 g))
➁ / lower shelf
350 °F (180 °C)
Conv. Bake
(with preheat)
about 10 minutes
All kinds of frozen beef skewers
sold in the market. Grease oil on
the surface after defrosting.
Lamb Kebab
12 skewers
(9 oz (250 g))
➁ / lower shelf
350 °F (180 °C)
Conv. Bake
(with preheat)
about
12 minutes
All kinds of frozen kebabs sold in
the market. You need defrost first.
Roasted
Vegetables
12 oz (350 g)
➀ / lower shelf
425 °F (220 °C)
Conv. Bake
(with preheat)
about 14 to
16 minutes
Other root vegetables such as
eggplants, green peppers, carrots,
potatoes and asparagus should
wash and cut into appropriate
sizes. Add crushed black pepper,
soy sauce, and olive oil to
marinate for 10 minutes.
Reheating Chart
(continued)
Bread
Pineapple
Bread
2 oz - 3.5 oz
(50 g - 100 g)
(1 pc - 2 pcs)
➀ / lower shelf
350 °F (180 °C)
Conv. Bake
(without preheat)
about 6 to 7 minutes
Croissant
3 oz - 6 oz
(80 g - 170 g)
(1 pc - 2 pcs)
➀ / lower shelf
340 °F (170 °C)
Conv. Bake
(without preheat)
about 7 to 8 minutes
Cereal Bread
6 oz (170 g)
(1 pc)
➀ / lower shelf
350 °F (180 °C)
Conv. Bake
(without preheat)
about 8 to 9 minutes
Soft Bread
about 6 oz (170 g)
(1 pc)
➀ / lower shelf
350 °F (180 °C)
Conv. Bake
(without preheat)
about 6 to 7 minutes
Thick Toast
2 oz - 4 oz
(55 g - 110 g)
(1 pc - 2 pcs)
➁ / lower shelf
445 °F (230 °C)
Conv. Bake
(with preheat)
about 6 to 7 minutes
Notes:
1. The recipes marked with “*” require steam function. Be sure to fill the water tank before cooking.
2. Please use baking paper or aluminium foil and heat-proof utensils before cooking.
3. Frozen refers to storage temperature is under 32 °F (0 °C). Chilled refers to storage temperature in the
range of 32-37 °F (0-3 °C).
F0003CF00AP_EN_20220114.indd 39 2022/1/18 10:25:36
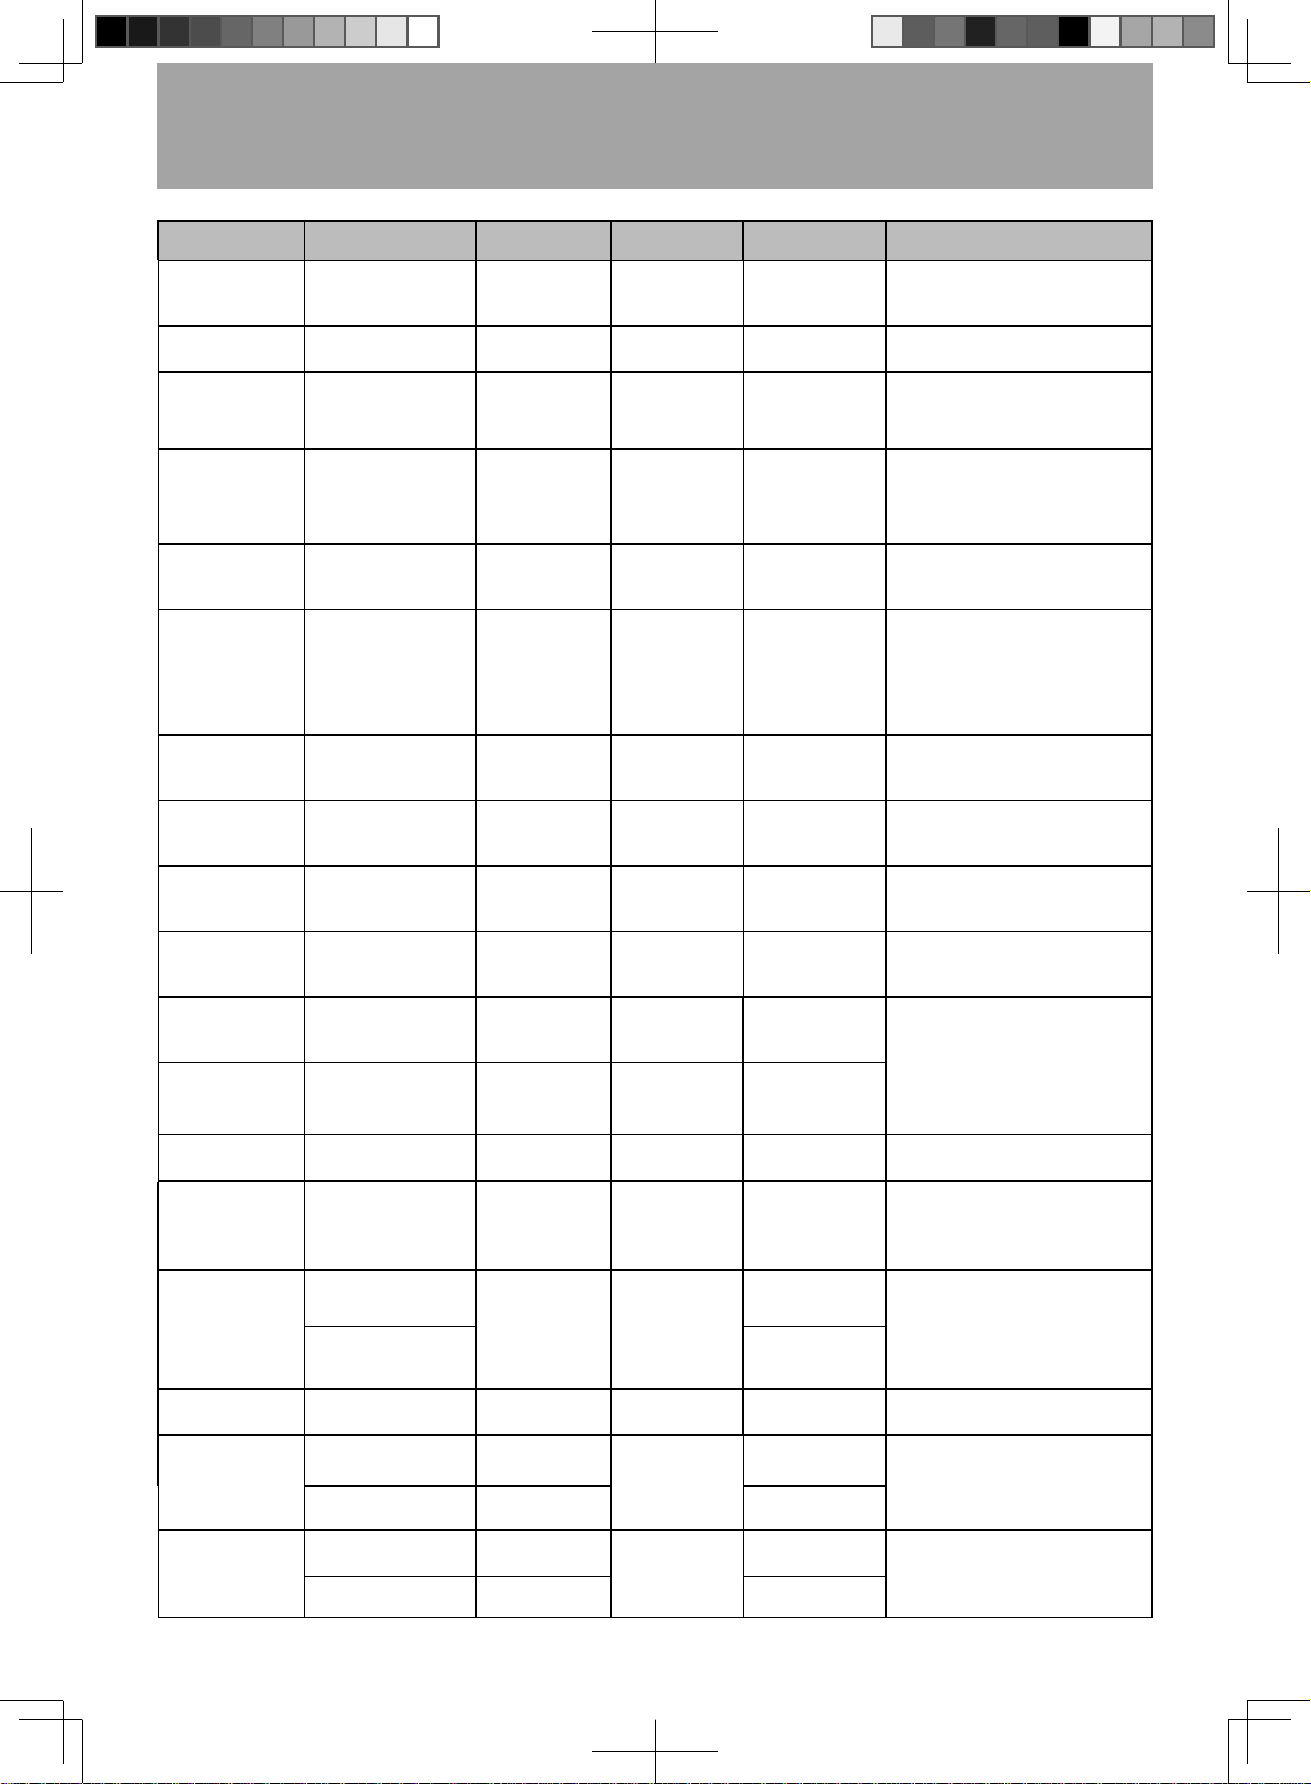
- Eng-40 -
Cooking Chart
(continued)
Foods Weight Accessories Program Time Statement
Chicken Wing
14 oz (400 g)
(6 pcs)
➁ / lower shelf
410 °F (210 °C)
Conv. Bake
(with preheat)
about 20 to
23 minutes
All kinds of chilled semi-finished
product sold in the market.
Steamed sweet
corn*
18 oz - 22 oz
(500 g - 600 g)
➁ / lower shelf
Steam-Med
about 35 to
40 minutes
Sweet corn. (sliced)
Steamed Rice* 7 oz (200 g)
➁ / lower shelf
Steam-Med
about 40 minutes
Mix 7 oz (200 g) rice and 7 oz
(200 g) water. After cooking,
cover with plastic wrap and wait
for 5 minutes.
Peach Gum
Sweet Soup
6 cups
(200 ml each)
➁ / lower shelf
Slow Cook about 3 hours
Wash 0.5 oz (15 g) peach gum,
after soaking for 10 hours,
place them evenly into 6 cups
respectively, add water and
covered with lid.
Soup*
4 cups
(300 ml each)
➁ / lower shelf
Slow Cook about 3 hours
Prepare 11 oz (300 g) rib and
chicken,etc. Cut pieces and pour
into water with cover.
Baked Quail
Eggs with Salt*
24 pcs
➀ / lower shelf
375 °F (190 °C)
Steam Conv.
(with preheat)
about 16 to
18 minutes
Take 2 packs of coarse salt and
stir-fried in the pan firstly. Spread
a thin layer of coarse salt inside
the tin foil and put quail egg on
it. Then cover the quail eggs
completely with coarse salt.
Roast Cashew
Nut
18 oz (500 g)
➀ / lower shelf
230 °F (110 °C)
Conv. Bake
(with preheat)
about 60 minutes
Sold in the market.
Chicken Skewers
11 oz (300 g)
(8 skewers)
➁ / lower shelf
375 °F (190 °C)
Conv. Bake
(with preheat)
about 12 to
15 minutes
Sold in the market and
defrosted.
Frozen Egg Tart
5.5 oz - 11 oz
(150 g - 300 g)
(4 pcs - 8 pcs)
➀ / lower shelf
400 °F (200 °C)
Conv. Bake
(with preheat)
about 16 to
18 minutes
All kinds of frozen egg tart sold
in the market.
Fried Short Rib
9 oz (250 g)
(3 pcs)
➁ / lower shelf
410 °F (210 °C)
Conv. Bake
(with preheat)
about 7 to
9 minutes
Dry short ribs, drizzle salt and
chop black pepper for marinate
a few moment.
Fried Frozen
Hash Browns
9 oz (250 g)
(4 pcs)
➁ / lower shelf
425 °F (220 °C)
Conv. Bake
(with preheat)
about 18 to
20 minutes
Cook directly without defrosting.
Different potatoes products need
different cooking time depends on
the pre-fried extent and thickness
conduction. Please adjust cooking
time according to the actual
condition.
French Fries 9 oz (250 g)
➀ / lower shelf
Airfry
(with preheat)
about 28 to
30 minutes
Fried Spare Ribs
with Spicy Salt
7 oz (200 g)
➀ / lower shelf
Airfry
(with preheat)
about 16 to
17 minutes
Sold in the market.
Fried Chicken
Nugget
12.5 oz (350 g)
➁ / lower shelf
Airfry
(with preheat)
about 19 to
21 minutes
Cut chicken thigh into about
1 oz (30 g) each pieces and
coat fried chicken powder. Then
marinate for 15-20 minutes.
Beef Steak with
Black Pepper
1 pc
(7 oz (200 g) each)
➁ / lower shelf
425 °F (220 °C)
Conv. Bake
(with preheat)
about 11 to
12 minutes
Dry steak and drizzle some salt
and chop black pepper to marinate
for 5-10 minutes. (After cooking,
take out steak quickly and pack
with aluminium foil. Standing for 3
minutes and serve.)
2 pcs
(7 oz (200 g) each)
about 13 to
14 minutes
Frozen Cod Fillet
13.5 oz (380 g)
(8 pcs)
➁ / lower shelf
Airfry
(with preheat)
about 29 to
30 minutes
Sold in the market and grease
oil on the surface.
Thin frozen fries
9 oz (250 g)
(1 level)
➁ / lower shelf
Airfry
(with preheat)
about 28 to
30 minutes
Stir at ²⁄ of total time
18 oz (500 g)
(2 levels)
➁ / upper&lower
shelf
about 30 to
35 minutes
Thick frozen
wedges
12.5 oz (350 g)
(1 level)
➁ / lower shelf
Airfry
(with preheat)
about 40 to
45 minutes
Turn over at ²⁄ of total time
25 oz (700 g)
(2 levels)
➁ / upper&lower
shelf
about 50 to
55 minutes
F0003CF00AP_EN_20220114.indd 40 2022/1/18 10:25:36
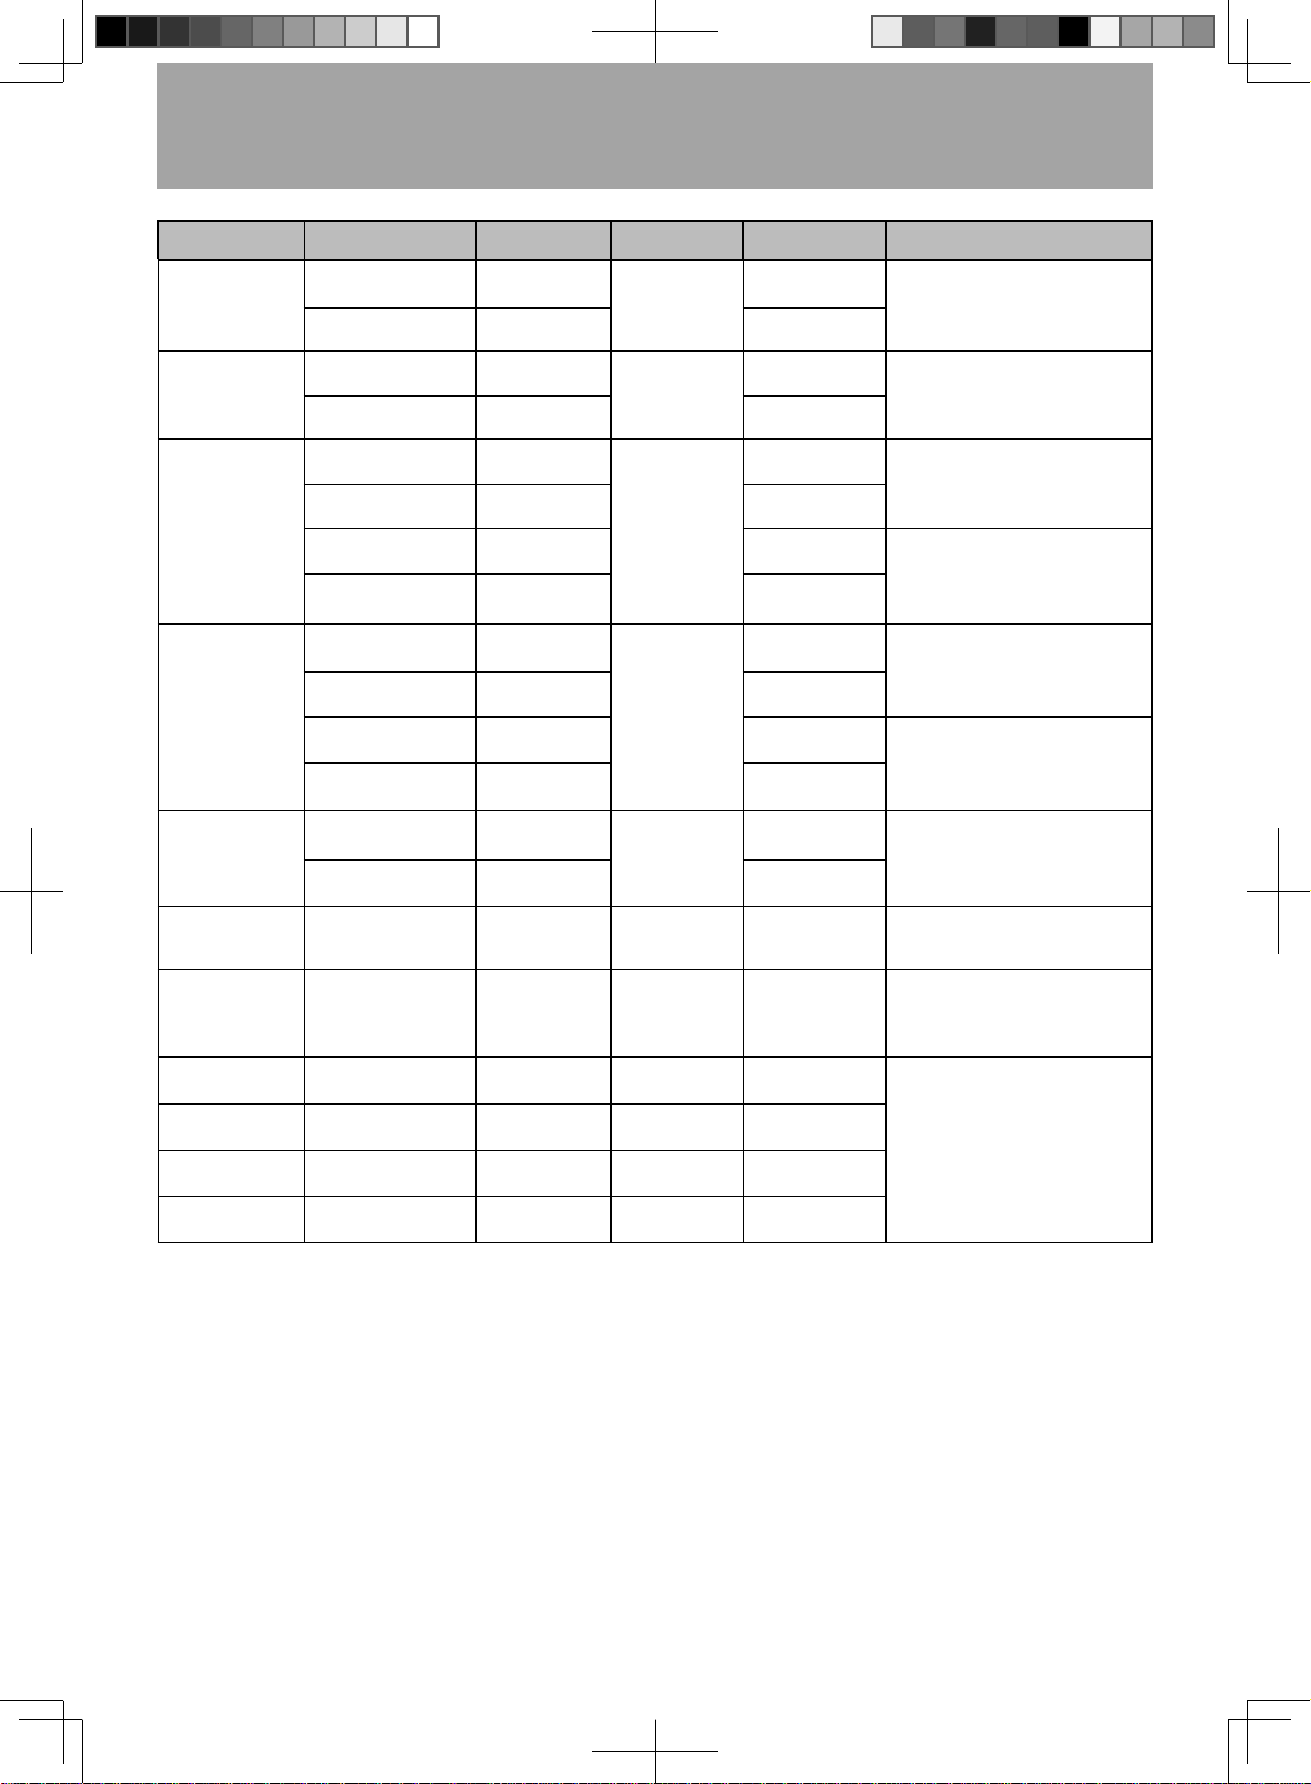
- Eng-41 -
Cooking Chart
(continued)
Foods Weight Accessories Program Time Statement
Frozen chicken
nuggets
16 oz (450 g)
(1 level)
➁ / lower shelf
Airfry
(with preheat)
about 40 to
45 minutes
Stir at ¹⁄ of total time
32 oz (900 g)
(2 levels)
➁ / upper&lower
shelf
about 45 to
50 minutes
Frozen fish sticks
14 oz (400 g)
(1 level)
➁ / lower shelf
Airfry
(with preheat)
about 40 to
45 minutes
Turn over at ²⁄ of total time
28 oz (800 g)
(2 levels)
➁ / upper&lower
shelf
about 45 to
50 minutes
Chicken wings
17.5 oz (500 g)
(1 level)
➁ / lower shelf
Airfry
(with preheat)
about 30 to
35 minutes
Marinate with fried powder.
Turn over at ¹⁄ of total time
35 oz (1000 g)
(2 levels)
➁ / upper&lower
shelf
about 35 to
40 minutes
17.5 oz (500 g)
(1 level)
➁ / lower shelf
about 25 to
28 minutes
Marinate with fried BBQ sauce.
Turn over at ¹⁄ of total time
35 oz (1000 g)
(2 levels)
➁ / upper&lower
shelf
about 30 to
35 minutes
Drumsticks
28 oz (800 g)
(1 level)
➁ / lower shelf
Airfry
(with preheat)
about 40 to
45 minutes
Marinate with fried powder.
Turn over at ²⁄ of total time
56 oz (1600 g)
(2 levels)
➁ / upper&lower
shelf
about 50 to
55 minutes
28 oz (800 g)
(1 level)
➁ / lower shelf
about 35 to
40 minutes
Marinate with fried BBQ sauce.
Turn over at ¹⁄ of total time
56 oz (1600 g)
(2 levels)
➁ / upper&lower
shelf
about 40 to
45 minutes
Fresh fish steaks
14 oz (400 g)
(1 level)
➁ / lower shelf
Airfry
(with preheat)
about 25 to
28 minutes
Turn over at ¹⁄ of total time
28 oz (800 g)
(2 levels)
➁ / upper&lower
shelf
about 30 to
35 minutes
Frozen Pizza 1 pc (11 oz (320 g))
➀ / lower shelf
445 °F (230 °C)
Conv. Bake
(with preheat)
about 15 to
16 minutes
All kinds of frozen pizza sold in
the market.
Baked Sausage 14 oz (400 g) (6 pcs)
➁ / lower shelf
375 °F (190 °C)
Conv. Bake
(with preheat)
about 14 to
16 minutes
Sold in the market. Grease bake
barbecue sauce or your favorite
sauce. (Cut with knife to avoid
bursting.)
Defrost Minced
Meat*
14 oz - 18 oz
(400 g - 500 g)
➀ / lower shelf
100 °F (40 °C)
Ferment
about 30 to
35 minutes
Remove food package and place
on heat-proof dish. Press Start
button for 2 seconds and press
again to add 2 minutes steam.
Turn over food when cooking to
half time. After cooking, wait for
5-10 minutes.
Defrost
Drumsticks*
18 oz (500 g)
➀ / lower shelf
100 °F (40 °C)
Ferment
about 40 minutes
Defrost Chicken
Wings*
14 oz - 18 oz
(400 g - 500 g)
➀ / lower shelf
100 °F (40 °C)
Ferment
about 40 minutes
Defrost Fish*
14 oz - 18 oz
(400 g - 500 g)
➀ / lower shelf
85 °F (30 °C)
Ferment
about 35 to
40 minutes
Notes:
1. The recipes marked with “*” require steam. Be sure to fill the water tank before cooking.
2. Frozen refers to storage temperature is under 32 °F (0 °C). Chilled refers to storage temperature in the
range of 32-37 °F (0-3 °C).
3. Please use baking paper or aluminium foil and heat-proof utensils before cooking.
4. When the cavity overheats, or room temperature is too high, “U50” maybe appear in the display
window. This is to avoid high temperature effecting the fermentation/defrosting. Please wait until the
cavity or room temperature cools down, and start fermenting/defrosting again after “U50” disappears.
F0003CF00AP_EN_20220114.indd 41 2022/1/18 10:25:36

- Eng-42 -
Sanitizing (Utensils)
Sanitizing (Utensils)
This function is suitable for all kinds of dish cleaning. (need 30 minutes)
➊
Place wire rack with utensils on the
metal tray in the lower shelf position.
Then select Auto Program by
pressing Select button.
➋
Press Set button to set Auto
Program.
➌
Press Select button until “19”
appear in the display window.
➍
Press Start button once.
Notes:
1. High temperature will occur when using steam to wash dishes. All dishes must be heat-proof (for over
270 °F (130 °C)) before using this function.
2. Fill the tank with water before using.
3. When the cavity overheats, “U50” will appear in the display window. Please wait until the cavity has
cooled down, and continue to clean the utensils after “U50” disappears.
F0003CF00AP_EN_20220114.indd 42 2022/1/18 10:25:36
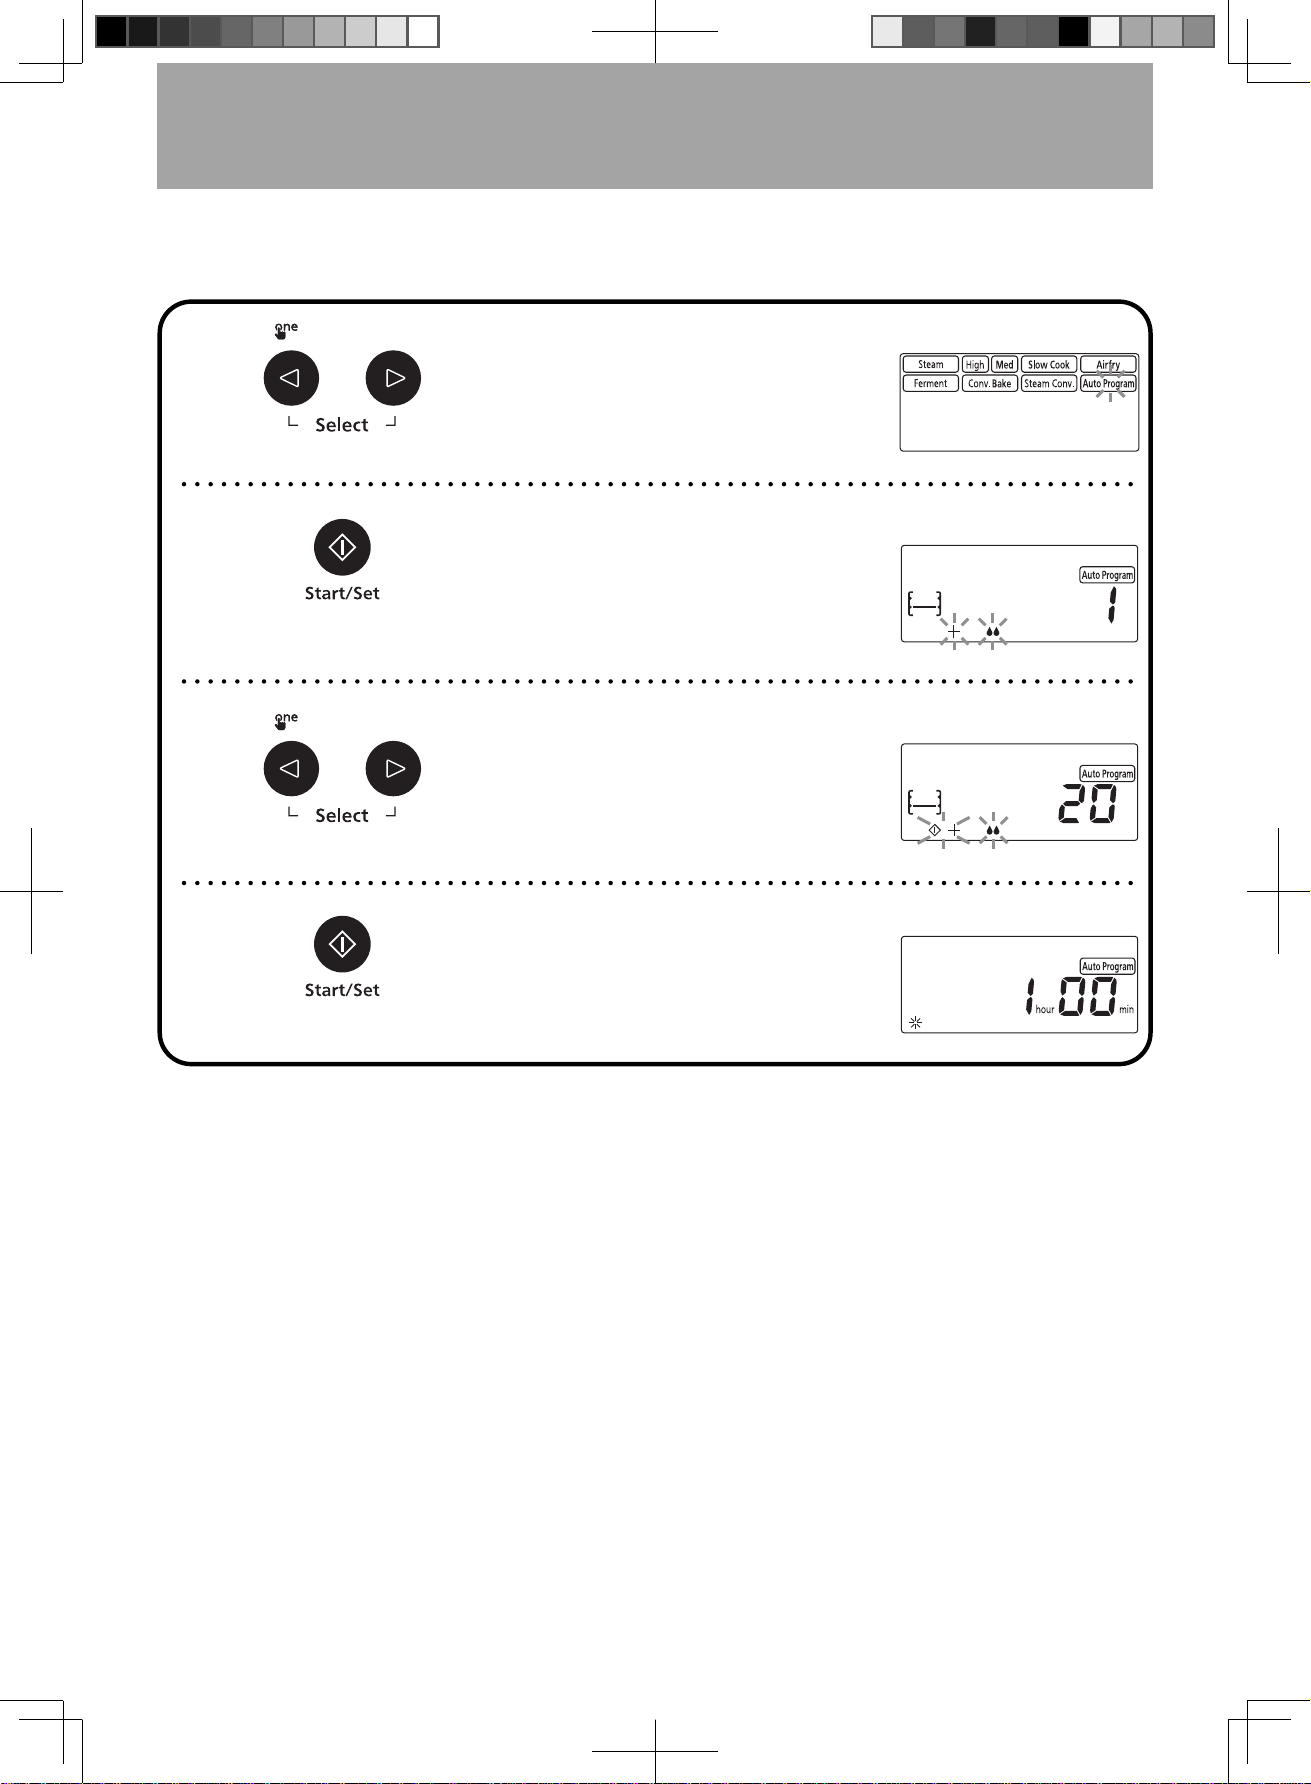
- Eng-43 -
Sanitizing (Baby Bottles)
Sanitizing (Baby Bottles)
This function is used for all kinds of feeding bottles.
➊
Place wire rack with feeding bottle
on the metal tray in the lower shelf
position. Then select Auto Program
by pressing Select button.
➋
Press Set button to set Auto
Program.
➌
Press Select button until “20”
appear in the display window.
➍
Press Start button once.
Notes:
1. High temperature will occur when using steam to wash feeding bottles. All bottles and accessories
must be heat-proof temperature over 230 °F (110 °C) before using this function.
2. Fill the tank with water before using.
3. When the cavity overheats, “U50” will appear in the display window. Please wait until the cavity has
cooled down, and continue to clean the feeding bottles after “U50” disappears.
4. After cleaning, you should take feeding bottle out quickly.
F0003CF00AP_EN_20220114.indd 43 2022/1/18 10:25:37
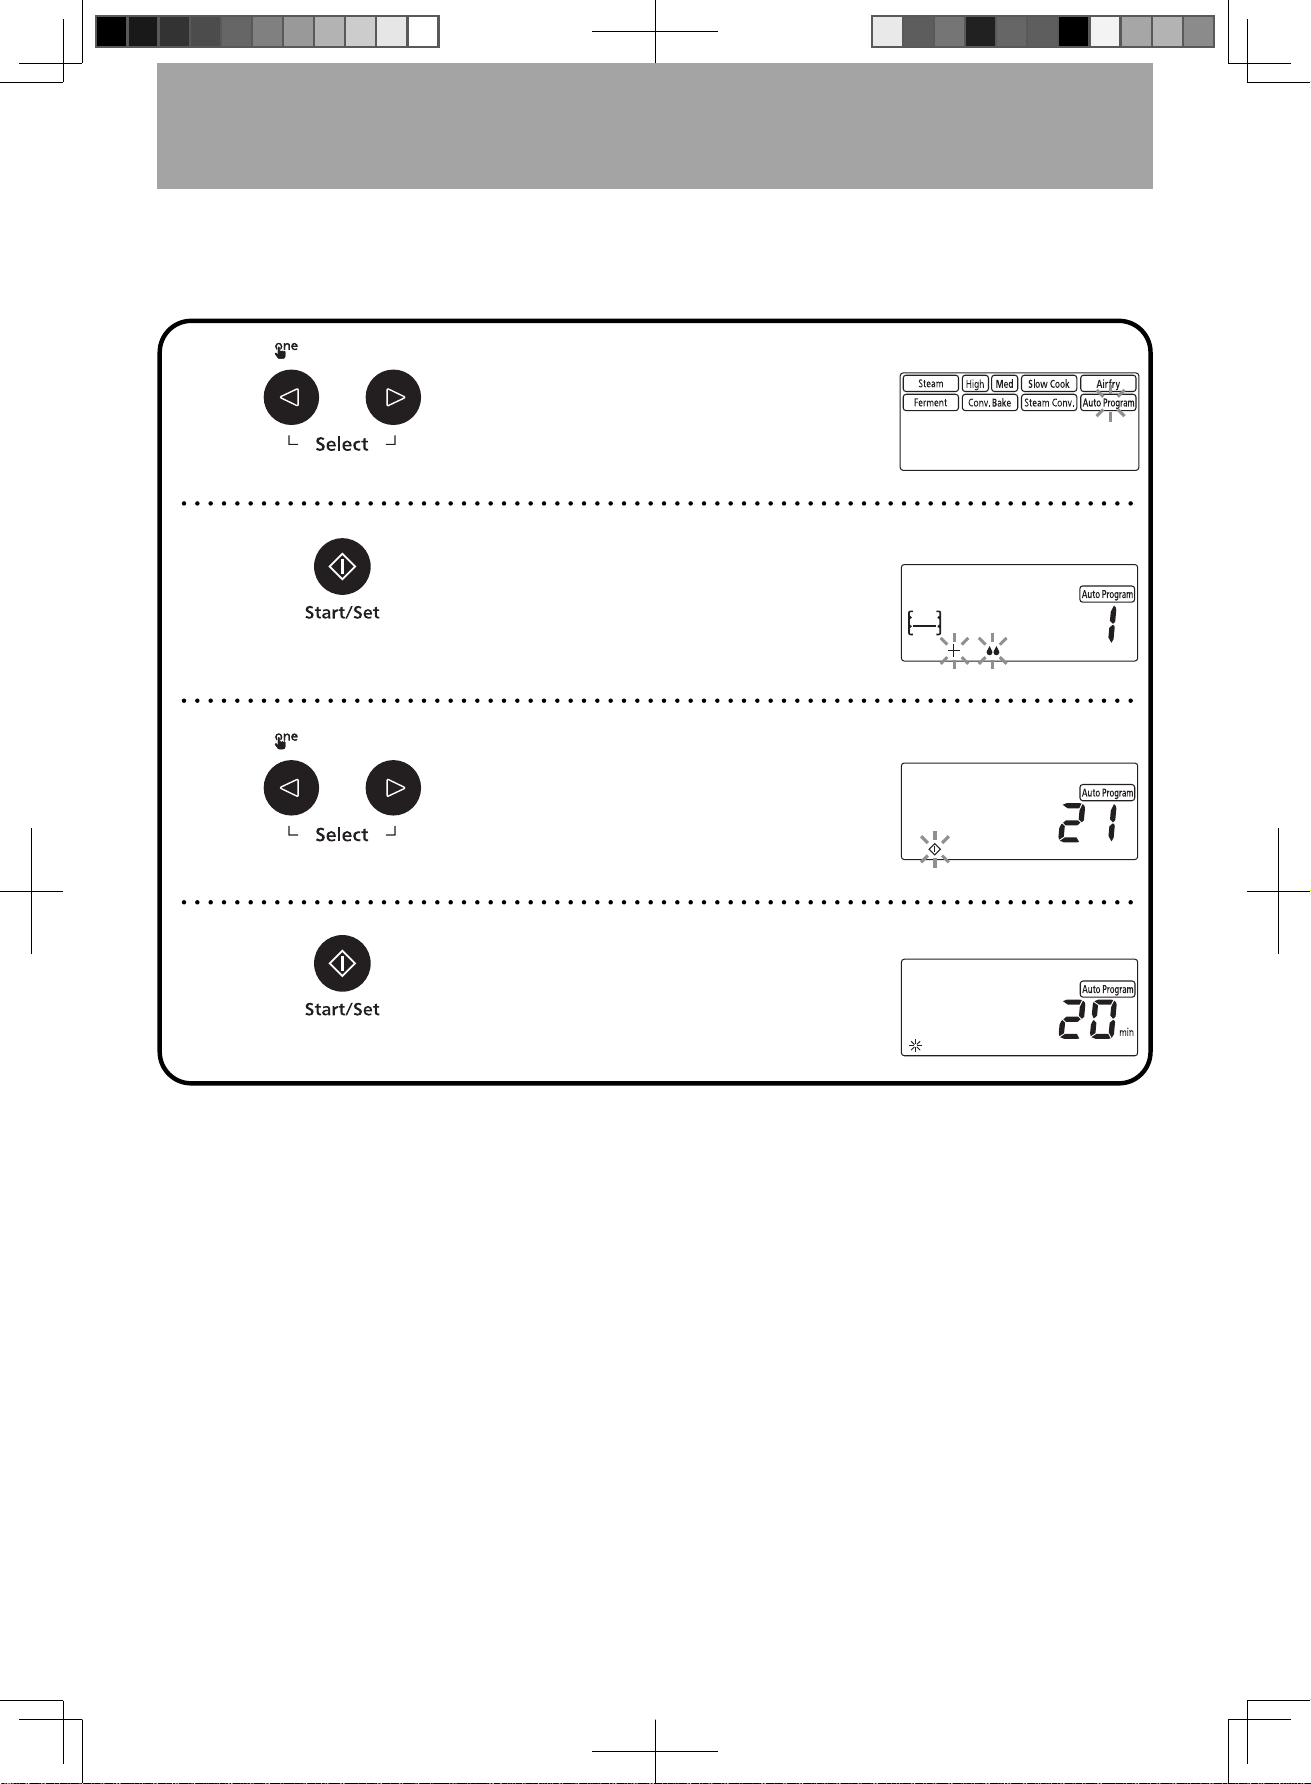
- Eng-44 -
Oven Cleaning Setting
Cleaning (Deodorization)
This function is suitable for ovens with odors (need 20 minutes). Before maintenance (cleaning the oven), please
empty the oven and wipe inside dirt.
➊
Select Auto Program by pressing
Select button.
➋
Press Set button to set Auto
Program.
➌
Press Select button until “21”
appear in the display window.
➍
Press Start button once.
F0003CF00AP_EN_20220114.indd 44 2022/1/18 10:25:37
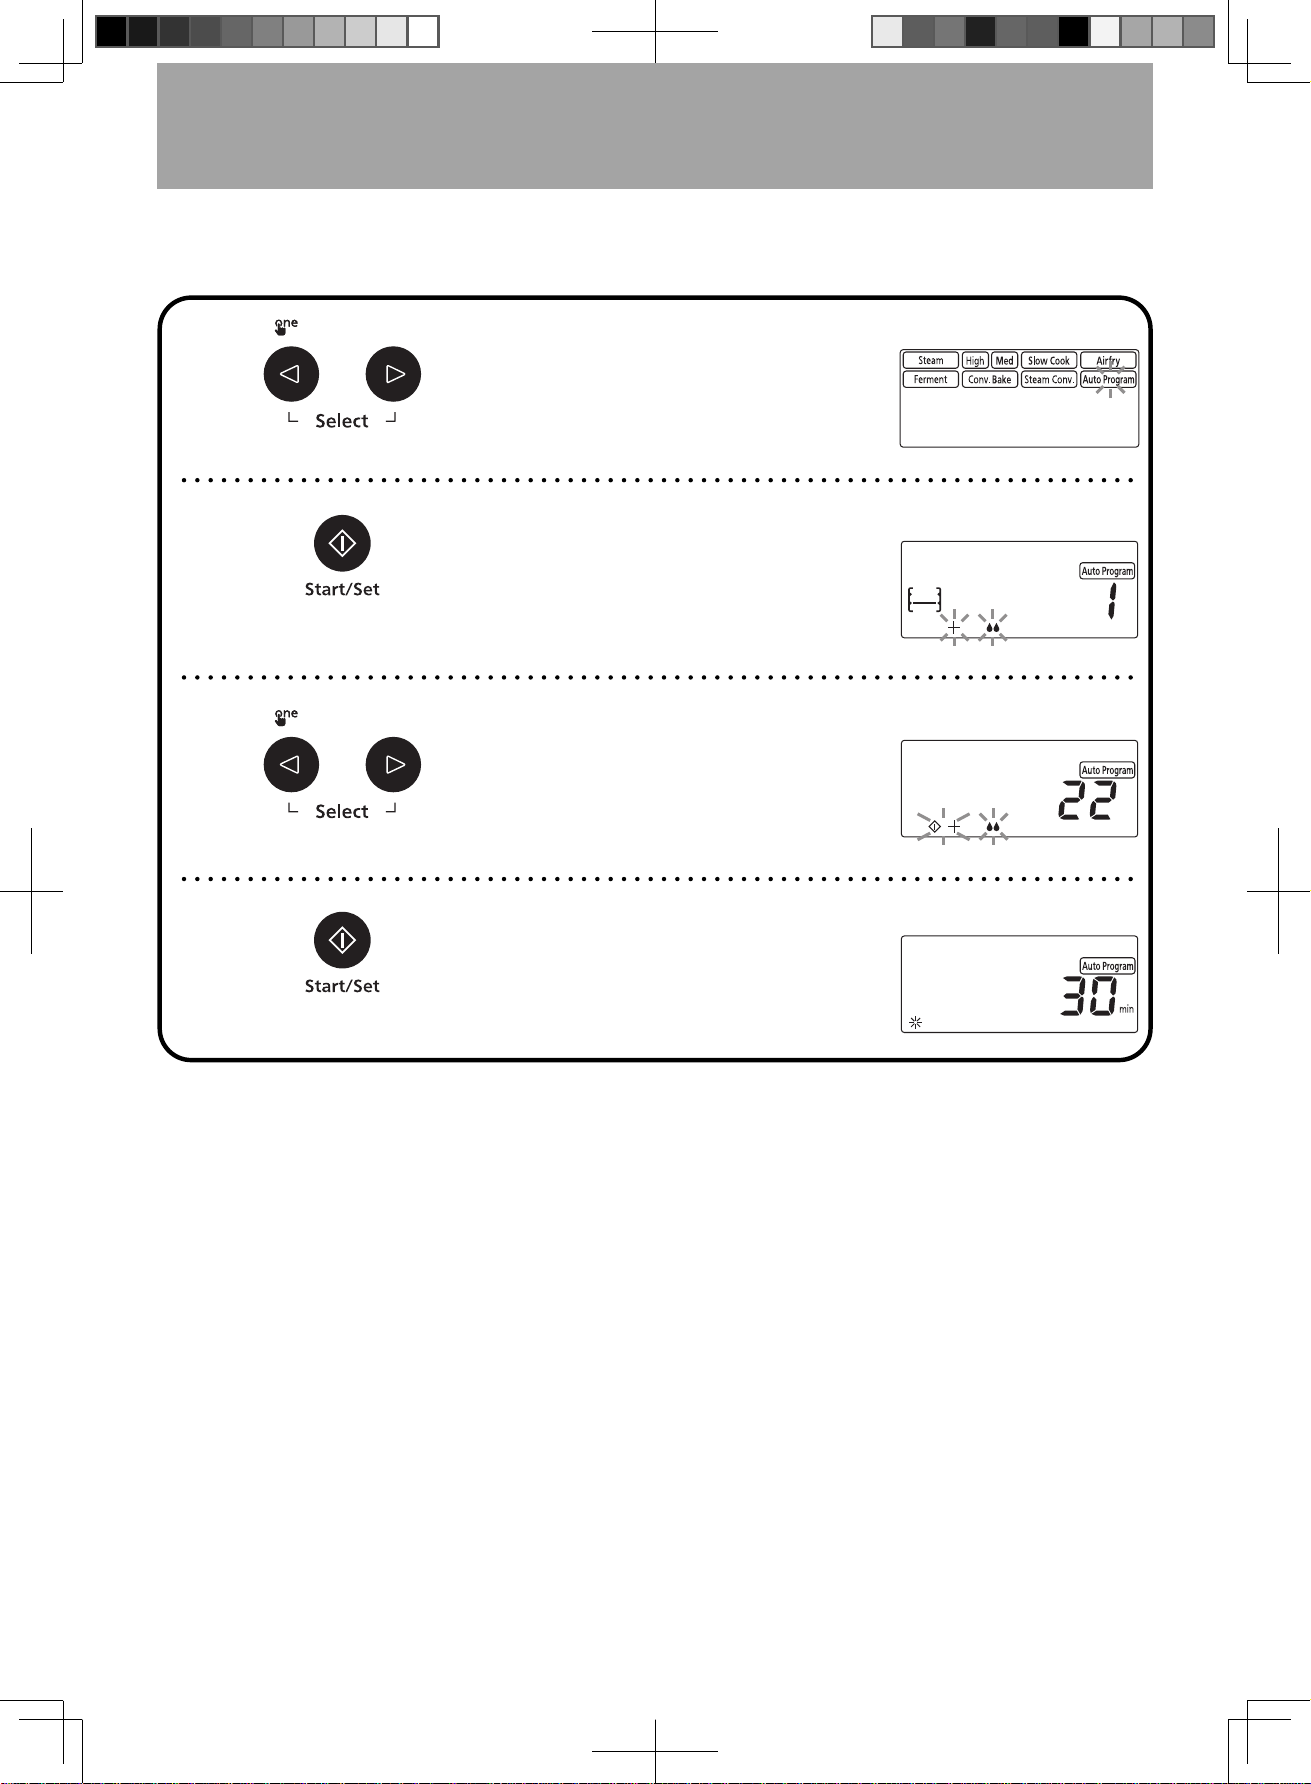
- Eng-45 -
Cleaning (Cavity)
This function is suitable for cleaning a dirty oven caused by oil (need 30 minutes).
➊
Select Auto Program by pressing
Select button.
➋
Press Set button to set Auto
Program.
➌
Press Select button until “22”
appear in the display window.
➍
Press Start button once.
Oven Cleaning Setting
(continued)
Notes:
1. Fill the tank with water before using.
2. After cleaning, open the door and wipe it clean with a damp cloth.
F0003CF00AP_EN_20220114.indd 45 2022/1/18 10:25:37

- Eng-46 -
Cleaning (System)
After using steam function, this function can make the water pump through the pipe to the drip tray.
➊
Select Auto Program by pressing
Select button.
Note: Fill water tank with ³⁄ cup (100 ml)
water before using and remove the water
from the drip tray.
➋
Press Set button to set Auto
Program.
➌
Press Select button until “23”
appear in the display window.
➍
Press Start button once.
Oven Cleaning Setting
(continued)
Notes:
1. Do not remove the integrated water tank when using this function.
2. Wash the drip tray clean after cleaning.
F0003CF00AP_EN_20220114.indd 46 2022/1/18 10:25:37
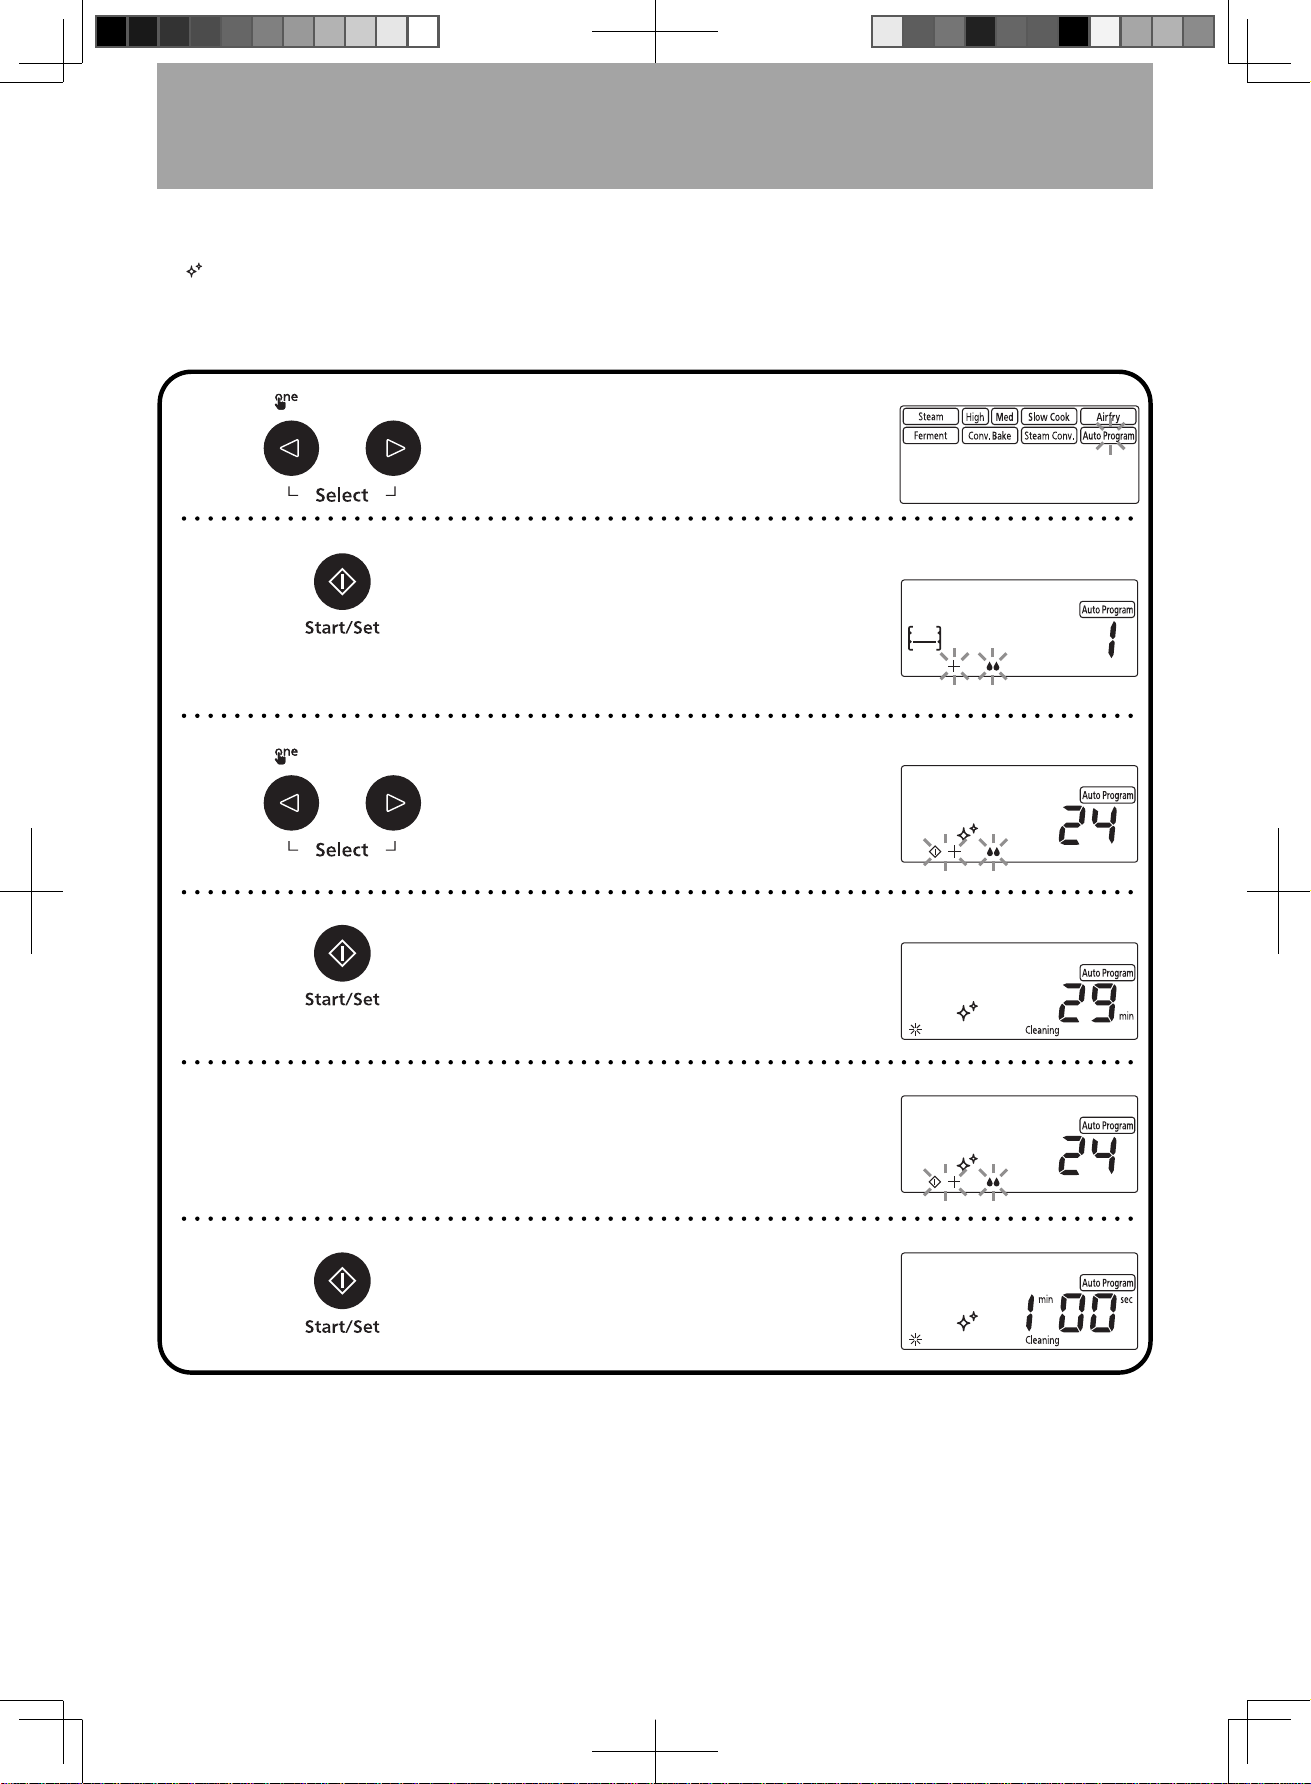
- Eng-47 -
Oven Cleaning Setting
(continued)
Cleaning (with Citric Acid)
If “ ” appears in the display window after cooking, you should use citric acid to clean the water-piping. After
using citric acid to clean, rinse with water again. Flush and clean water will drain into the drip tray. (need 30
minutes) Prepare detergent with approximately ⁵⁄ oz (20 g) of citric acid dissolved completely in 1 cup (250 ml)
of water, and pour the mixture into the integrated water tank of the oven directly.
➊
Select Auto Program by pressing
Select button.
➋
Press Set button to set Auto
Program.
Note: Empty the drip tray and check
prepared detergent in the water tank.
➌
Press Select button until “24”
appear in the display window.
➍
Press Start button once.
➎
After the program is automatically
paused, you can remove water in drip
tray and clean the water tank, then fill
the tank with water.
➏
Press Start button once. Program
will continue 1 minute.
Notes:
1. After cleaning, please wipe the residue in the water tank and wash the drip tray clean.
2. Do not remove the integrated water tank when using this function.
F0003CF00AP_EN_20220114.indd 47 2022/1/18 10:25:37
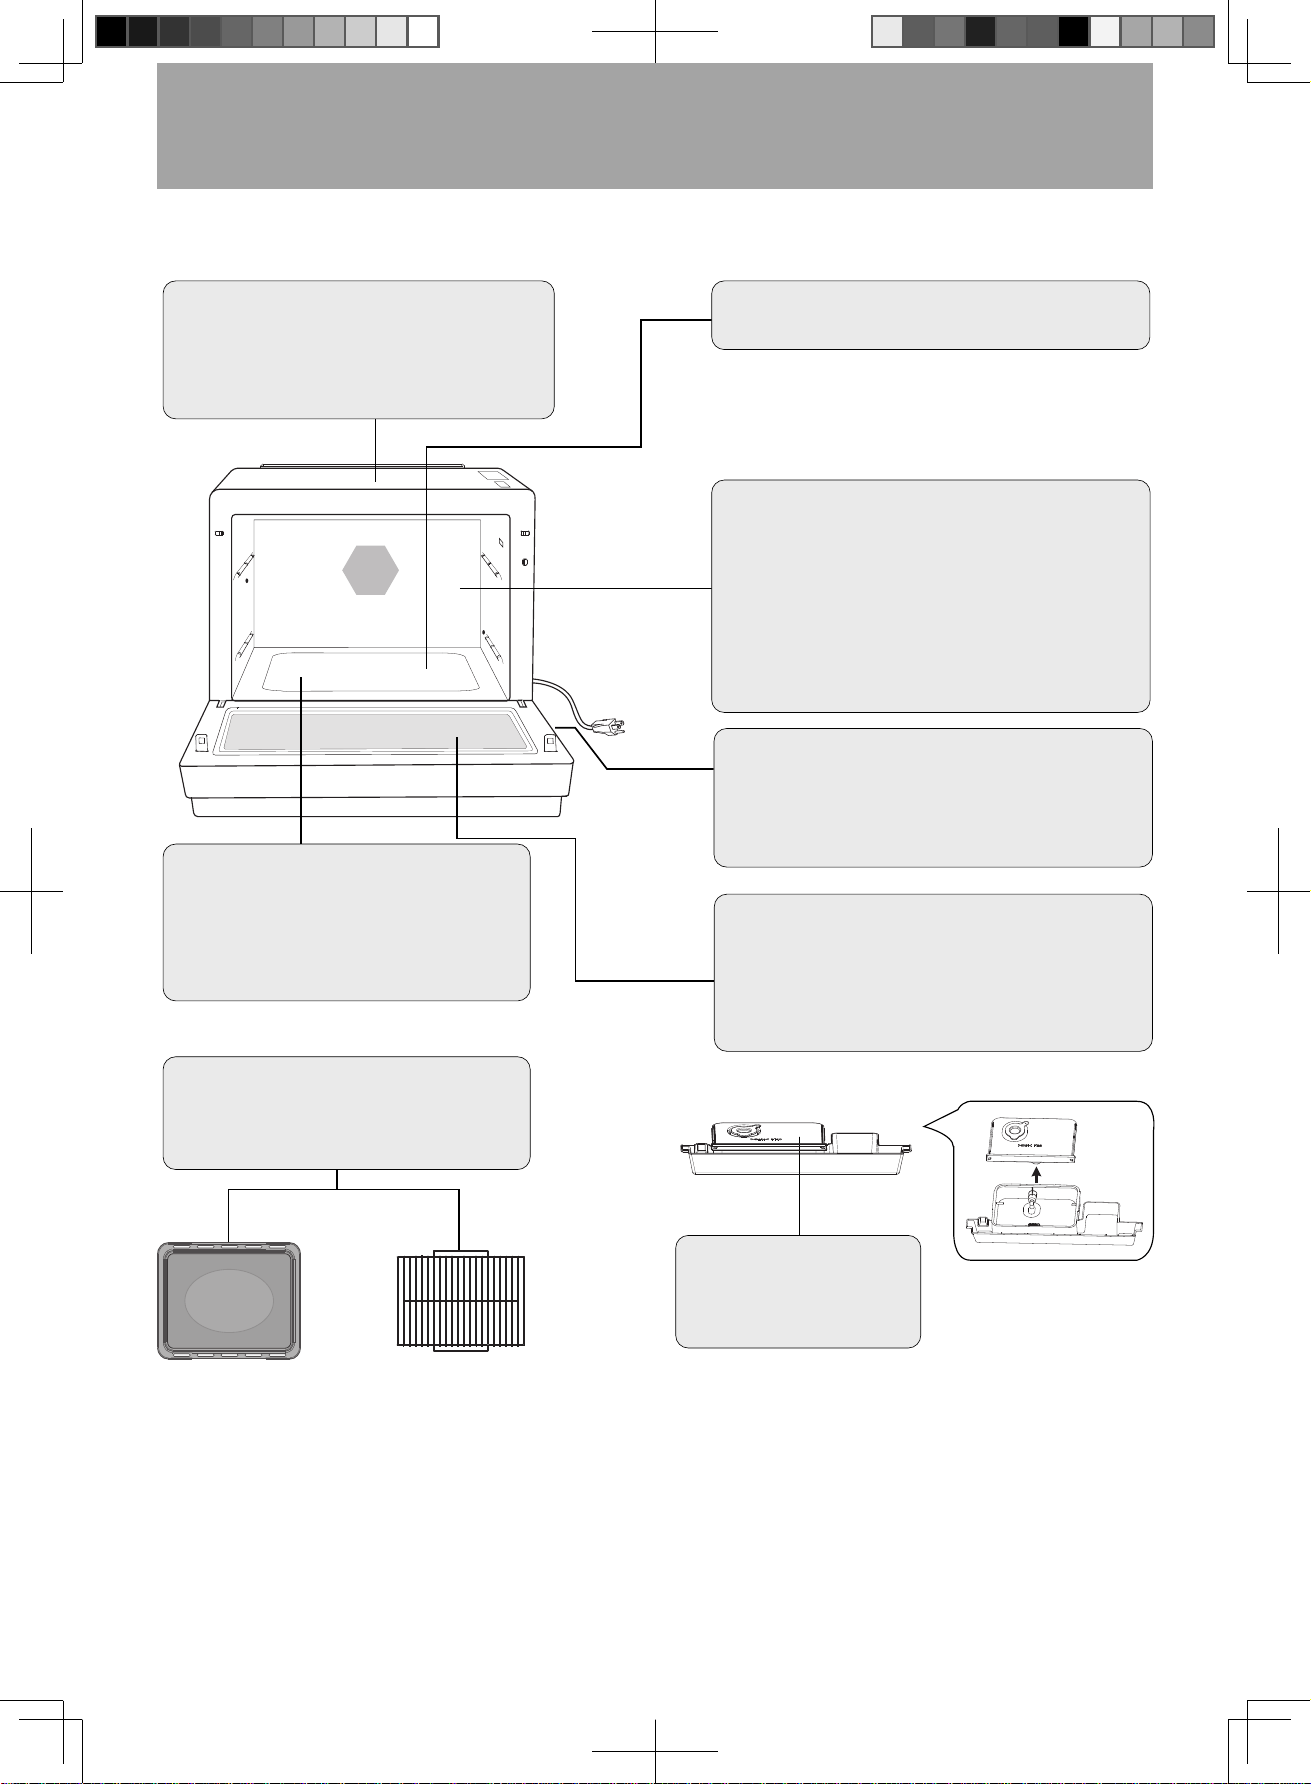
- Eng-48 -
Care of Your Oven
Be sure to clean and maintain the oven after it is completely cold. Turn the oven off and remove the power supply
plug from the wall socket before cleaning. A steam cleaner should not be used for cleaning.
The outside oven surfaces should be
cleaned with a damp cloth. To prevent
damage to the operating parts inside the
oven, water should not be allowed to seep
into the ventilation openings and air outlet.
Always clean the bottom plate, after cooling
down, with a mild detergent and wipe to dry.
Keep the inside of the oven clean regularly.
When food splatters or spilled liquids adhere
to oven walls, wipe with a damp cloth. Mild
detergent may be used if the oven gets very
dirty. The use of harsh detergent or abrasives
is not recommended. Any fat and grease that
builds up on the roof and walls of the oven will
begin to smoke if not cleaned. Clean the oven
after it is completely cold.
Clean the door and oven window with a soft
and damp cloth. Mild detergent may be used if
the oven gets very dirty. Do not use harsh and
abrasive cleaners to clean the oven window,
since they can scratch the surface, which may
result in shattering of the glass.
If steam accumulates inside or around
the outside of the oven door, wipe with
a soft cloth. This may occur when the
oven is operated under high humidity
conditions and in no way indicates
malfunction of the unit.
After using, clean with a mild detergent
or dishwasher. Do not use abrasive
cleaners to clean the metal tray and
wire rack. (Such as steel wool, etc.)
Do not allow the Control Panel to become wet.
Clean with a soft and dry cloth. Do not use the
detergent of harsh or abrasives on the Control
Panel. After cleaning, press Stop/Reset button
to clear display window.
Always remove integrated
water tank after use and
clean it using a soft damp
sponge with water.
F0003CF00AP_EN_20220114.indd 48 2022/1/18 10:25:38

- Eng-49 -
Shop Accessories
PROBLEM POSSIBLE CAUSE REMEDY
No display on panel.
The oven is not plugged in securely.
Remove plug from outlet, wait 10 seconds
and re-insert.
Circuit breaker or fuse is tripped
or blown.
Reinstall the fuse or reset the circuit
breaker.
There is a problem with the outlet.
Plug another appliance into the outlet to
check if the outlet is working.
There is a problem with the oven.
Please contact the service center specified
by Panasonic.
Oven cannot start
operation.
The door is not closed completely.
Close the oven door securely.
Start/Set button was not
pressed after programming.
Press Start/Set button.
Another program has already
been entered into the oven.
Press Stop/Reset button to cancel the
previous program and program again.
The program has not been
entered correctly.
Program again according to the operating
instructions.
Stop/Reset button has been
pressed accidentally.
Program oven again.
Before Requesting Service
Purchase Parts, Accessories and Instruction Books online for all Panasonic Products by visiting our Web Site at:
shop.panasonic.com/support
Parts Available to Order
Owner’s Manual (this book) .............................................F0003CF00AP
Wire Rack ....................................................................... F0602CF00HP
Metal Tray ....................................................................... F0603CF00XP
F0003CF00AP_EN_20220114.indd 49 2022/1/18 10:25:38

- Eng-50 -
“U50” appears in the
display window.
“H00” appears in the
display window.
White powder found at
steam outlet, drip tray
and oven cavity.
If it seems there is a problem with the oven, contact an authorized Service Center by Panasonic.
The cavity temperature is
overheated.
Operate again after cavity temperature
cooling down and “U50” disappears.
There is a problem with the oven.
Please contact the service center specified
by Panasonic.
Before Requesting Service
(continued)
PROBLEM POSSIBLE CAUSE REMEDY
The white powder is mineral
crystal from evaporation of
water, it is natural substance
and harmless to human body.
You can use auto cleaning menu with
Auto Program 23&24 to clean the steam
system and water supply pipe to improve
condition. If crystal attached to the nozzle
or in the oven cavity, please wipe and
clean with a wring cloth. After using steam
function or cleaning, pour out the water
from the drip tray and wipe with a sponge.
No steam.
Check whether the water tank
has water.
Fully fill the water tank and properly install it.
Check whether the integrated water
tank is installed correctly in place.
“U14” appears in the
display window.
The water tank lacks water.
Even it is full of water, “U14” will
appears in the display window in
different conditions.
“U14” appears in the first two cooking
stages, you can refill water and press
Start/Set button to continue. It is not
available if “U14” appears in the third
time. Please fill the water tank with water
again. Replace to the oven and press
Stop/Reset to reset.
If it is not cleaned in time after “ ”
appears in the display window,
scale will accumulate around the
inner wall of the water-piping.
Please use the citric acid cleaning function
to clean the water-piping.
F0003CF00AP_EN_20220114.indd 50 2022/1/18 10:25:38
- Eng-51 -
Before Requesting Service
(continued)
ALL THESE THINGS ARE NORMAL:
Sounds will occur when
using the Steam function.
This is caused by air mixed when the water tank is working. It is
normal.
The sound of “Bar... Bar...”
may be emitted at the back
of the oven cavity during
and after the use of different
kinds of Convection function.
This is a cause of thermal expansion and contraction of the metal
material used in the product. It is normal.
Steam accumulates on
the oven door and warm
air comes from the air
outlet.
During cooking, steam and warm air are given off from the food.
Most of the steam and warm air are removed from the air outlet by
the air which circulates in the oven cavity. However, some steam will
condense on cooler surfaces such as inside or on the oven door.
It is normal.
Steam leaks out from all
four sides of the oven
door.
When a function related to steam is used, a lot of steam are
generated in the oven cavity during operation of the product. Some
steam may leak from all four sides of the oven door. It is normal.
I accidentally operated
my oven without any food
in it.
Operating the oven empty for a short time will not damage the oven,
however, it is not recommended.
The oven has an odor,
and generates smoke,
when using Conv. Bake
and Steam Conv. function.
It is essential that your oven is wiped out regularly, particularly after
cooking by Conv. Bake and Steam Conv.. Any fat and grease that
builds up on the roof and walls of the oven will begin to smoke if not
cleaned.
The fan motor continues
operating after cooking is
over.
After using the oven, the fan motor will operate for several minutes
to cool the oven and electric components. It is normal.
The rear side of the oven’s
color has yellowing.
Metal ions will generate yellow marks when heated. It is normal that
will not affect the use of the oven and harm to human health.
Door seal maybe
deformed.
The door seal may be distorted due to high temperature. It is
normal and will not affect the performance of use of the oven.
Some smoke and odor
will be given off from the
cavity when using different
kinds of Convection
functions for the first time.
It is caused by the excessive oil in the cavity used for rust
protection.
The part where the power
supply cord connects to
the product’s bottom plate
has loosened.
It is normal.
F0003CF00AP_EN_20220114.indd 51 2022/1/18 10:25:38

- Eng-52 -
Limited Warranty (Only for U.S.A.)
Panasonic Products Limited Warranty
Limited Warranty Coverage (For USA Only)
If your product does not work properly because of a defect in materials or workmanship, Panasonic Consumer
Electronics Corporation (referred to as “the warrantor”) will, for the length of the period indicated on the chart below,
which starts with the date of original purchase (“warranty period”), at its option either (a) repair your product with
new or refurbished parts, (b) replace it with a new or a refurbished equivalent value product, or (c) refund your
purchase price. The decision to repair, replace or refund will be made by the warrantor.
Product or Part Name Labor Parts
Convection Steam Oven 1 yr. 1 yr.
During the “Labor” warranty period there will be no charge for labor. During the “Parts” warranty period, there will
be no charge for parts.
This warranty only applies to products purchased and serviced in the United States. This warranty is extended only
to the original purchaser of a new product which was not sold “as is”.
Mail-In Service – Online Repair Request
Online Repair Request
To submit a new repair request, and for quick repair status visit our Web Site at: http://shop.panasonic.com/support
When shipping the unit, carefully pack and send it in the original (or supplied) carton. Include a letter detailing
the complaint along with the bill of sales and provide a daytime phone number where you can be reached.
A valid registered receipt is required under the Limited Warranty.
When shipping Lithium Ion batteries please visit our web site at http://shop.panasonic.com/support as
Panasonic is committed to providing the most up to date information.
IF REPAIR IS NEEDED DURING THE WARRANTY PERIOD, THE PURCHASER WILL BE REQUIRED TO
FURNISH A SALES RECEIPT/PROOF OF PURCHASE INDICATING DATE OF PURCHASE, AMOUNT PAID
AND PLACE OF PURCHASE. CUSTOMER WILL BE CHARGED FOR THE REPAIR OF ANY UNIT RECEIVED
WITHOUT SUCH PROOF OF PURCHASE.
Limited Warranty Limits And Exclusions
This warranty ONLY COVERS failures due to defects in materials or workmanship, and DOES NOT COVER glass,
plastic parts, temperature probes (if included) and normal wear and tear or cosmetic damage. The warranty ALSO
DOES NOT COVER damages which occurred in shipment, or failures which are caused by products not supplied
by the warrantor, or failures which result from accidents, misuse, abuse, neglect, bug infestation, mishandling,
misapplication, alteration, faulty installation, set-up adjustments, maladjustment of consumer controls, improper
maintenance, power line surge, lightning damage, modification, or commercial use (such as in a hotel, office,
restaurant, or other business), rental use of the product, service by anyone other than a Factory Service center or
other Authorized Servicer, or damage that is attributable to acts of God.
THERE ARE NO EXPRESS WARRANTIES EXCEPT AS LISTED UNDER “LIMITED WARRANTY COVERAGE”.
THE WARRANTOR IS NOT LIABLE FOR INCIDENTAL OR CONSEQUENTIAL DAMAGES RESULTING FROM
THE USE OF THIS PRODUCT, OR ARISING OUT OF ANY BREACH OF THIS WARRANTY.
(As examples, this excludes damages for lost time, travel to and from the servicer, loss of or damage to media
or images, data or other memory or recorded content. The items listed are not exclusive, but for illustration only.)
ALL EXPRESS AND IMPLIED WARRANTIES, INCLUDING THE WARRANTY OF MERCHANTABILITY, ARE
LIMITED TO THE PERIOD OF THE LIMITED WARRANTY.
F0003CF00AP_EN_20220114.indd 52 2022/1/18 10:25:38

- Eng-53 -
Limited Warranty (Only for U.S.A.)
(continued)
Some states do not allow the exclusion or limitation of incidental or consequential damages, or limitations on how
long an implied warranty lasts, so the exclusions may not apply to you.
This warranty gives you specific legal rights and you may also have other rights which vary from state to state. If
a problem with this product develops during or after the warranty period, you may contact your dealer or Service
Center. If the problem is not handled to your satisfaction, then write to:
Panasonic Corporation of North America
Consumer Affairs Department 8th Fl.
Two Riverfront Plaza
Newark NJ 07102-5490
PARTS AND SERVICE, WHICH ARE NOT COVERED BY THIS LIMITED WARRANTY, ARE YOUR
RESPONSIBILITY.
Product registration is not mandatory. Failure to complete the form does not affect the consumer' s warranty rights.
Shop
Accessories!
for all your Panasonic gear
Go to
http://shop.panasonic.com/support
Get everything you need to get the most out of your Panasonic products
Accessories & Parts for your Camera, Phone, A/V products, TV, Computers &
Networking, Personal Care, Home Appliances, Headphones, Batteries, Backup
Chargers & more…
Customer Services Directory
For Product Information, Operating Assistance, Parts, Owner’s Manuals, Dealer
and Service info
go to http://shop.panasonic.com/support
For the hearing or speech impaired TTY: 1-877-833-8855
As of November 2021
F0003CF00AP_EN_20220114.indd 53 2022/1/18 10:25:38
- Eng-54 -
Specifications
Model Number
NU-SC180B
Power Source 120 V, 60 Hz
Power Consumption
Steam 9.3 A 1130 W
Conv. Bake 10.2 A 1230 W
Steam Conv. 10.2 A 1230 W
Output Power
Steam 1100 W
Conv. Bake 1200 W
Steam Conv. 1200 W
Outside Dimensions (H × W × D)
14.8" x 15.9" x 15.9"
(376 mm × 404 mm × 404 mm)
Outside Dimensions (With handle) (H × W × D)
14.8" x 15.9" x 17.3"
(376 mm × 404 mm × 438 mm)
Oven Cavity Dimensions (H × W × D)
8.6" × 12.6" × 11"
(220 mm × 320 mm × 280 mm)
Cavity Volume 20 L
Weight 27.1 lbs (12.3 k
g
) (Without accessories)
Specifications subject to change without notice.
User’s Record
Scan this code for product registration
The serial number of this product may be found on the back side of the oven or on the left side
of the control panel. You should note the model number and the serial number of this oven in the
space provided and retain this book as a permanent record of your purchase for future reference.
Model No. ______________________________
Serial No. ______________________________
Date of Purchase ________________________
F0003CF00AP_EN_20220114.indd 54 2022/1/18 10:25:38

Panasonic Consumer Electronics Company,
Division of Panasonic Corporation of North America
Two Riverfront Plaza
Newark, New Jersey 07102
Panasonic Appliances Microwave Oven (Shanghai) Co., Ltd.
Website: http://shop.panasonic.com/support
F0003CF00AP_EN_20220114.indd 55 2022/1/18 10:25:38
