
SCULPTTRAINER MULTIPURPOSE ROMAN CHAIR
READY,
SET, PRO
USER MANUAL

HELLO THERE.
Joel and I are athletes who suffered from
severe ACL injuries a few months apart.
We purchased multiple pieces of exercise
equipment for our in-home rehab but were
left disappointed and frustrated by all that
fitness gear that made big promises but gave
no support, no well-thought-out plan to follow,
and no results. And that’s how Lifepro came
about, and why the Strength Training collection
was created—we’ve set out to change all of
that. It’s why every piece of equipment bearing
our name not only undergoes rigorous scrutiny
to make sure it delivers on power and efficacy,
but comes with built-in support from our
‘guiding angels’ and a built-in lifetime warranty
so that you’re never left hanging.
Welcome to Lifepro.
We’re in this together now.
A & Joel
Strength training
has enormous
benefits for your
body, brain, and
mental health.
2-3 strength
training sessions
per week are
recommended for
optimal health.
Not everyone can afford to hire a personal trainer or a team of professionals
to help them feel and look their best. But the good news is: you don’t have
to. Lifepro brings the gym to you.
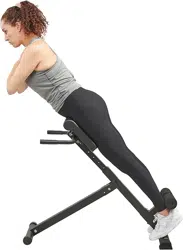
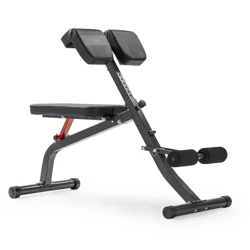
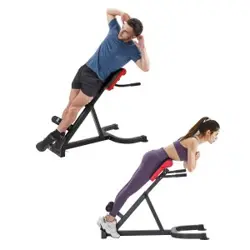
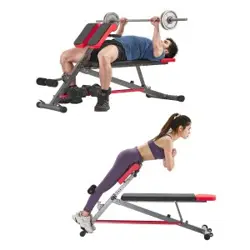
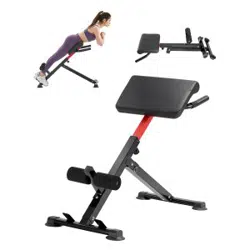
With the Lifepro SculptTrainer Multipurpose Roman Chair, there’s no need to
pay for an expensive gym membership or personal trainer. The SculptTrainer
provides an extremely versatile whole-body workout. Challenge your muscles
with a wide range of weightlifting and body-weight exercises. Sculpt your
upper body with preacher curls and dumbbell rows, blast your core with
crunches and side bends, tone your lower body with Bulgarian split squats,
lateral bench hops, and so much more! Get stronger, leaner, healthier: build
muscle and bone density, boost metabolism, improve heart health, reduce
stress, and lose weight—right from the comfort of your own home. Strength
training also helps manage chronic conditions such as high blood pressure,
back and joint pain, diabetes, and depression.
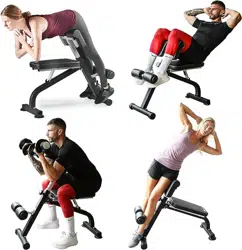
Whether you’re getting back into strength training after starting a family or
career, a die-hard gym enthusiast, or someone who has never lifted before,
the Lifepro SculptTrainer has everything you’ll need to build muscle and
stamina.
Redefine your workouts and experience the transformative
power of the Lifepro SculptTrainer:
Increase strength and flexibility: builds and tones muscle
Regulate weight: boosts your heart rate and burns calories
Boost your metabolism: encourages your body to burn fat faster
Decrease your stress: increases serotonin and decreases cortisol
Reduce lower back pain: improves core strength and posture
Develop stronger bones: increases bone density
Improve stability: improves core strength and posture
Check out the information in this manual for ways to get started using your
SculptTrainer Multipurpose Roman Chair. Next, be sure to visit our website
sculpttrainer.lifeprofitness.com to access to our FREE library of workout
videos which demonstrate how to easily incorporate the SculptTrainer into
your fitness routine.
Strength Training Collection 5
Not everyone can afford to hire a personal trainer or a team of professionals
to help them feel and look their best. But the good news is: you don’t have
to. Lifepro brings the gym to you.
With the Lifepro SculptTrainer Multipurpose Roman Chair, there’s no need to
pay for an expensive gym membership or personal trainer. The SculptTrainer
provides an extremely versatile whole-body workout. Challenge your muscles
with a wide range of weightlifting and body-weight exercises. Sculpt your
upper body with preacher curls and dumbbell rows, blast your core with
crunches and side bends, tone your lower body with Bulgarian split squats,
lateral bench hops, and so much more! Get stronger, leaner, healthier: build
muscle and bone density, boost metabolism, improve heart health, reduce
stress, and lose weight—right from the comfort of your own home. Strength
training also helps manage chronic conditions such as high blood pressure,
back and joint pain, diabetes, and depression.
Whether you’re getting back into strength training after starting a family or
career, a die-hard gym enthusiast, or someone who has never lifted before,
the Lifepro SculptTrainer has everything you’ll need to build muscle and
stamina.
Redefine your workouts and experience the transformative
power of the Lifepro SculptTrainer:
Increase strength and flexibility: builds and tones muscle
Regulate weight: boosts your heart rate and burns calories
Boost your metabolism: encourages your body to burn fat faster
Decrease your stress: increases serotonin and decreases cortisol
Reduce lower back pain: improves core strength and posture
Develop stronger bones: increases bone density
Improve stability: improves core strength and posture
Check out the information in this manual for ways to get started using your
SculptTrainer Multipurpose Roman Chair. Next, be sure to visit our website
sculpttrainer.lifeprofitness.com to access to our FREE library of workout
videos which demonstrate how to easily incorporate the SculptTrainer into
your fitness routine.
Strength Training Collection 5
Strength Training Collection 7
FIRST STEPS
UNPACKING THE COMPONENTS
1. Remove the hardware and components from the shipping box and
inspect all items for shipping damage.
2. Compare the parts and hardware to the items listed in WHAT’S
IN THE BOX on the next page.
3. Read carefully through this user manual and all safety
instructions before assembling and using the SculptTrainer.
4. Follow the steps in the 10-MINUTE ASSEMBLY GUIDE on
page 9 to begin assembling your roman chair.
5. Go to sculpttrainer.lifeprofitness.com and register your product
within 14 days of purchase to activate your lifetime warranty.
CUSTOMER SUPPORT
If you have any questions about using your SculptTrainer Multipurpose
Roman Chair, we’re here to help. Call or email us and an experienced
customer support representative will be happy to assist you:
(800) 563-6604 or support@lifeprofitness.com.
SCULPTTRAINER
MULTIPURPOSE ROMAN CHAIR
STRENGTH TRAINING
6 SculptTrainer User Manual Lifepro
G
H
K
D
E
A B
J
I
F
C
×2 ×2
×2
L
M
N O
G
H
K
D
E
A B
J
I
F
C
×2 ×2
×2
L
M
N O
G
H
K
D
E
A B
J
I
F
C
×2 ×2
×2
L
M
N O
G
H
K
D
E
A B
J
I
F
C
×2 ×2
×2
L
M
N O
G
H
K
D
E
A B
J
I
F
C
×2 ×2
×2
L
M
N O
Main Frame
Front Stabilizer
Padded Rollers
M10×170mm Bolt +
Washers + Nut
Adjustment Knob
Rear Stabilizer
Padded Seat
Locking Pin
M10×75mm Carriage
Bolt + Washer + Nut
M10×65mm Bolt +
Washers + Nut
Front Column
Support Pads
Wrenches
M10×65mm Carriage
Bolt + Washer + Nut
M10×70mm Bolt +
Washers + Nut
WHAT’S IN THE BOX
Strength Training Collection 9 8 SculptTrainer User Manual Lifepro
PARTS OF THE SCULPTTRAINER
Adjustment
Knob (M)
Front
Column (C)
Support
Pads (F)
Padded
Seat (E)
Main
Frame (A)
Front
Stabilizer (D)
Rear Stabilizer (B)
Padded
Rollers (G)
Locking
Pin (N)
10-MINUTE ASSEMBLY GUIDE
ATTACH THE MAIN FRAME
TO THE REAR STABILIZER
1. Gather the main frame (A); rear stabilizer (B); two sets of M10×65mm
carriage bolts, washers, and nuts (H); and wrenches (O).
2. Remove the washer and nut from each bolt.
3. Align the two screw holes in the main frame with the holes in the rear
stabilizer.
4. Insert the bolts through both sets of screw holes from the BOTTOM.
See Figure 1.
a. Ensure the square neck of each bolt seats fully in the square bolt
hole in the bottom of the stabilizer.
5. Place a washer and nut onto the end of each bolt.
6. Use a wrench to fully tighten the nuts.
1
Figure 1
ASSEMBLY NOTES
• Assemble on a flat, sturdy floor.
• Ensure the space is free of obstructions.
A
H
B
FRONT
Strength Training Collection 11 10 SculptTrainer User Manual Lifepro
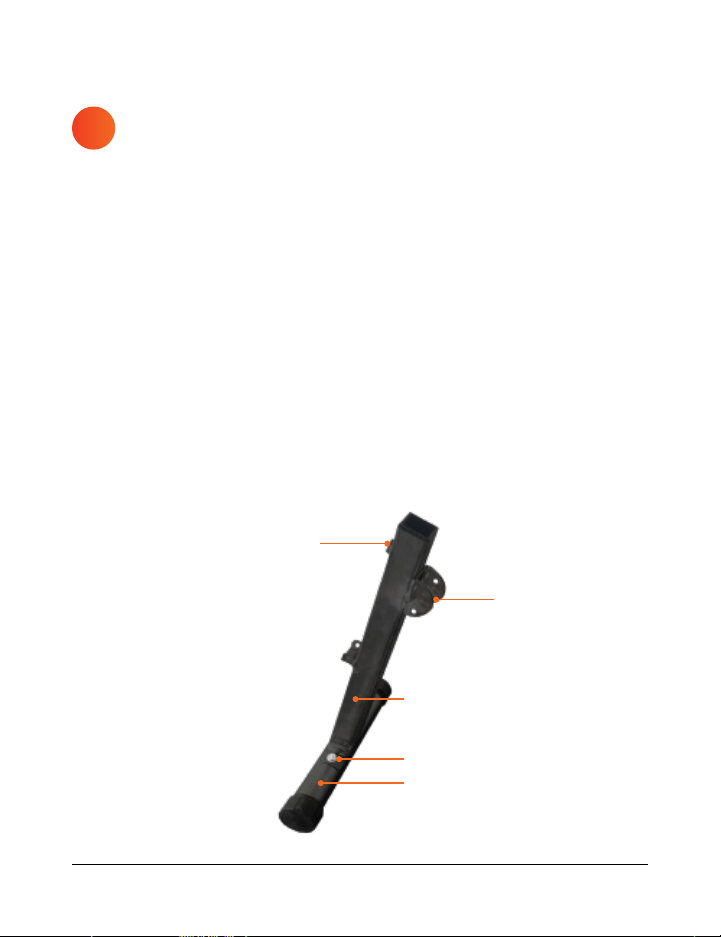
ATTACH THE FRONT COLUMN
TO THE FRONT STABILIZER
1. Gather the front column (C); front stabilizer (D); two sets of
M10×75mm carriage bolts, washers, and nuts (I); and wrenches (O).
2. Remove the washer and nut from each bolt.
3. Align the two screw holes in the base of the front column with the
holes in the front stabilizer.
a. The large threaded screw hole at the top of the front column faces
the FRONT and the two curved brackets face the BACK.
4. Insert the bolts through both sets of screw holes from the BOTTOM.
See Figure 2.
a. Ensure the square neck of each bolt seats fully in the square bolt
hole in the bottom of the stabilizer.
5. Place a washer and nut onto the end of each bolt.
6. Use a wrench to fully tighten the nuts.
ATTACH THE MAIN FRAME
TO THE FRONT COLUMN
1. Gather the M10×70mm bolt, two washers, and nut (J) and
wrenches (O).
2. Remove one washer and the nut from the bolt.
3. Align the two screw holes in the end of the main frame (A) with the
screw holes in the curved brackets at the top of the front column (C).
4. Insert the bolt/washer combination through the BOTTOM screw hole.
5. Place the second washer and the nut onto the end of the bolt. See
Figure 3.
6. Use a wrench to fully tighten the nut.
2 3
Figure 3Figure 2
A
Curved Brackets
Large Threaded
Screw Hole
D
I
C
FRONT
FRONT
J
C
Strength Training Collection 11 10 SculptTrainer User Manual Lifepro
ATTACH THE FRONT COLUMN
TO THE FRONT STABILIZER
1. Gather the front column (C); front stabilizer (D); two sets of
M10×75mm carriage bolts, washers, and nuts (I); and wrenches (O).
2. Remove the washer and nut from each bolt.
3. Align the two screw holes in the base of the front column with the
holes in the front stabilizer.
a. The large threaded screw hole at the top of the front column faces
the FRONT and the two curved brackets face the BACK.
4. Insert the bolts through both sets of screw holes from the BOTTOM.
See Figure 2.
a. Ensure the square neck of each bolt seats fully in the square bolt
hole in the bottom of the stabilizer.
5. Place a washer and nut onto the end of each bolt.
6. Use a wrench to fully tighten the nuts.
ATTACH THE MAIN FRAME
TO THE FRONT COLUMN
1. Gather the M10×70mm bolt, two washers, and nut (J) and
wrenches (O).
2. Remove one washer and the nut from the bolt.
3. Align the two screw holes in the end of the main frame (A) with the
screw holes in the curved brackets at the top of the front column (C).
4. Insert the bolt/washer combination through the BOTTOM screw hole.
5. Place the second washer and the nut onto the end of the bolt. See
Figure 3.
6. Use a wrench to fully tighten the nut.
2 3
Figure 3Figure 2
A
Curved Brackets
Large Threaded
Screw Hole
D
I
C
FRONT
FRONT
J
C
Strength Training Collection 13 12 SculptTrainer User Manual Lifepro
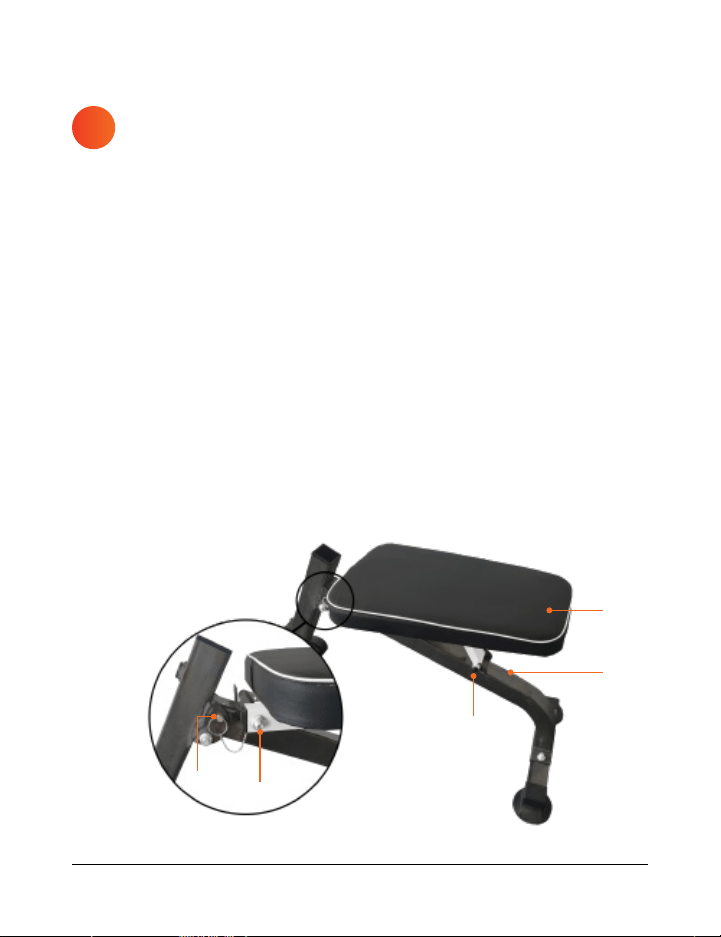
ATTACH THE PADDED SEAT
TO THE MAIN FRAME
1. Gather the seat (E); M10×170mm bolt, two washers, and nut (K);
locking pin (N); and wrenches (O).
2. Remove one washer and the nut from the bolt.
3. Slide the ring chained to the locking pin onto one end of the metal tube
at the top of the main frame (A).
4. Align the through-holes in the two posts at the base of the seat with
the metal tube.
5. Insert the bolt/washer combination through the posts and metal tube
to secure the seat to the frame. See Figure 4.
6. Place the second washer and the nut onto the end of the bolt.
7. Use a wrench to fully tighten the nut.
8. Locate the leg at the back of the seat. Slide the leg into the notch
created by the two metal hooks at the top of the frame.
9. Insert the locking pin through the set of through-holes at the top
curved brackets.
4
Figure 4
N
K
E
A
Leg
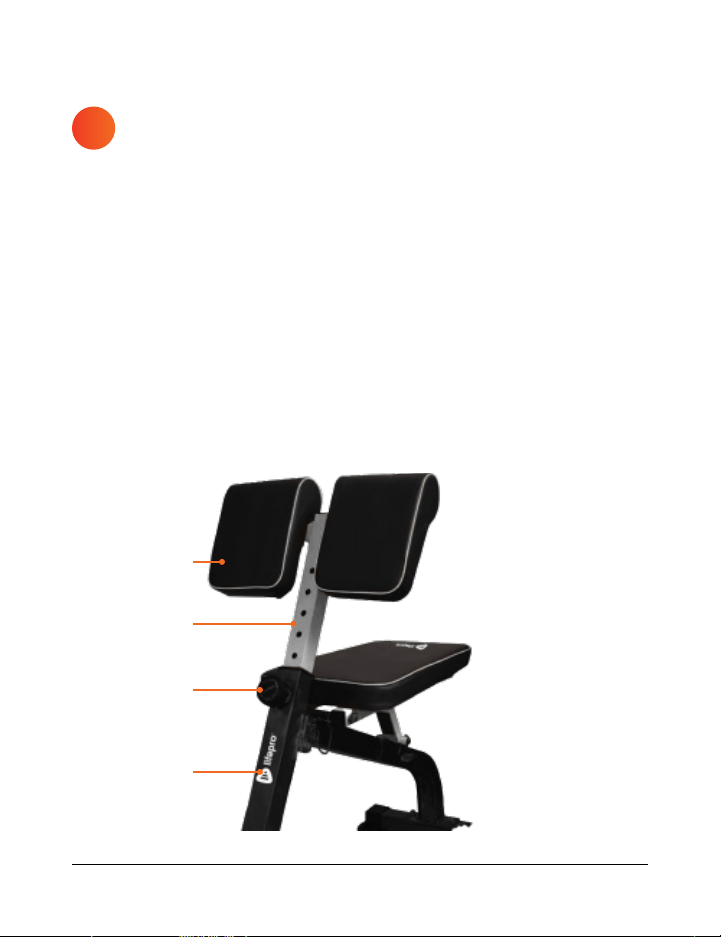
ATTACH THE SUPPORT PADS
TO THE FRONT COLUMN
1. Gather the support pads (F) and adjustment knob (M).
2. Insert the post of the support pads into the opening at the top of the
front column (C).
3. Screw the knob clockwise into the large threaded hole in the front
column. See Figure 5.
4. When the knob is partially screwed in, pull the knob head out and slide
the post up or down until you hear a “click” indicating that the post is
locked in position. There are 10 height-adjustment holes on the post.
5. Turn the knob clockwise to tighten it and secure the upper pad.
5
Figure 5
F
Post
M
C
Strength Training Collection 13 12 SculptTrainer User Manual Lifepro
ATTACH THE PADDED SEAT
TO THE MAIN FRAME
1. Gather the seat (E); M10×170mm bolt, two washers, and nut (K);
locking pin (N); and wrenches (O).
2. Remove one washer and the nut from the bolt.
3. Slide the ring chained to the locking pin onto one end of the metal tube
at the top of the main frame (A).
4. Align the through-holes in the two posts at the base of the seat with
the metal tube.
5. Insert the bolt/washer combination through the posts and metal tube
to secure the seat to the frame. See Figure 4.
6. Place the second washer and the nut onto the end of the bolt.
7. Use a wrench to fully tighten the nut.
8. Locate the leg at the back of the seat. Slide the leg into the notch
created by the two metal hooks at the top of the frame.
9. Insert the locking pin through the set of through-holes at the top
curved brackets.
4
Figure 4
N
K
E
A
Leg
ATTACH THE SUPPORT PADS
TO THE FRONT COLUMN
1. Gather the support pads (F) and adjustment knob (M).
2. Insert the post of the support pads into the opening at the top of the
front column (C).
3. Screw the knob clockwise into the large threaded hole in the front
column. See Figure 5.
4. When the knob is partially screwed in, pull the knob head out and slide
the post up or down until you hear a “click” indicating that the post is
locked in position. There are 10 height-adjustment holes on the post.
5. Turn the knob clockwise to tighten it and secure the upper pad.
5
Figure 5
F
Post
M
C
Strength Training Collection 15 14 SculptTrainer User Manual Lifepro
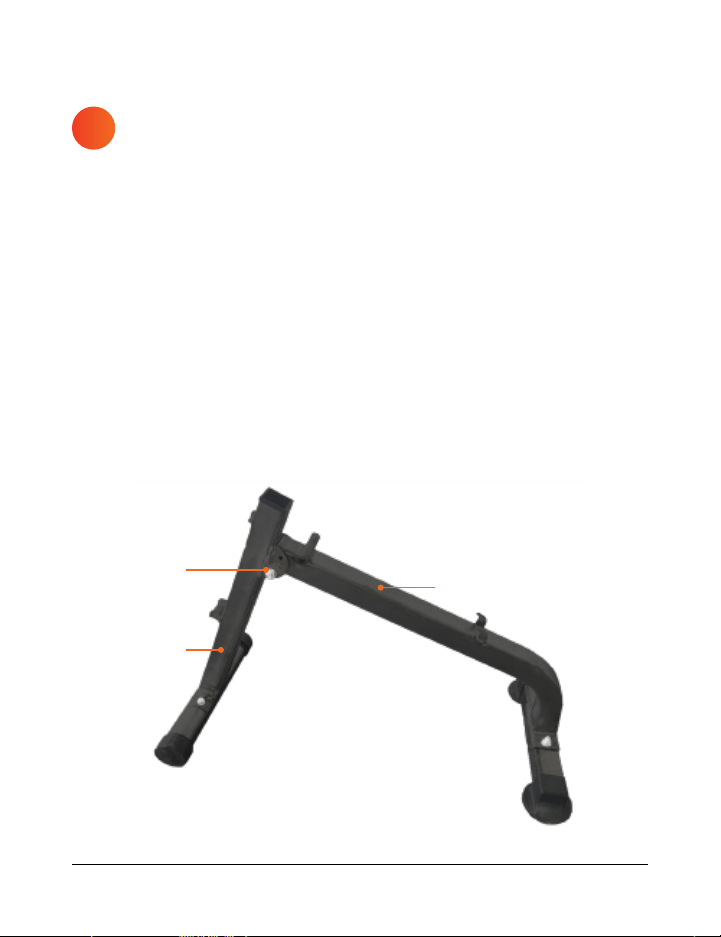
ATTACH THE PADDED ROLLERS
TO THE FRONT COLUMN
1. Gather the padded rollers (G); M10×65mm bolt, two washers, and
nut (L); and wrenches (O).
2. Remove one washer and the nut from the bolt.
3. Align the screw holes in the post of the padded rollers with the screw
holes in the small curved brackets on the FRONT side of the front
column (C). See Figure 6.
4. Insert the bolt/washer combination through the screw holes.
5. Place the second washer and the nut onto the end of the bolt.
6. Use a wrench to fully tighten the nut.
6
Figure 6
Figure 7
L
G
C
N
E
Leg
FOLDING THE SCULPTTRAINER
The SculptTrainer may be folded flat for storage and transport. To fold:
1. Pull the seat (E) up and forward to remove the leg from the two metal
hooks at the top of the frame. See Figure 7.
2. Rest the seat flat against the frame.
3. Remove the locking pin (N).
a. Be sure to hold on to the SculptTrainer with one hand as you
remove the locking pin, so it does not collapse suddenly.
3. Carefully lower the frame to the floor.

Strength Training Collection 15 14 SculptTrainer User Manual Lifepro
ATTACH THE PADDED ROLLERS
TO THE FRONT COLUMN
1. Gather the padded rollers (G); M10×65mm bolt, two washers, and
nut (L); and wrenches (O).
2. Remove one washer and the nut from the bolt.
3. Align the screw holes in the post of the padded rollers with the screw
holes in the small curved brackets on the FRONT side of the front
column (C). See Figure 6.
4. Insert the bolt/washer combination through the screw holes.
5. Place the second washer and the nut onto the end of the bolt.
6. Use a wrench to fully tighten the nut.
6
Figure 6
Figure 7
L
G
C
N
E
Leg
FOLDING THE SCULPTTRAINER
The SculptTrainer may be folded flat for storage and transport. To fold:
1. Pull the seat (E) up and forward to remove the leg from the two metal
hooks at the top of the frame. See Figure 7.
2. Rest the seat flat against the frame.
3. Remove the locking pin (N).
a. Be sure to hold on to the SculptTrainer with one hand as you
remove the locking pin, so it does not collapse suddenly.
3. Carefully lower the frame to the floor.

Strength Training Collection 17 16 SculptTrainer User Manual Lifepro
EXERCISE SAFETY AND TIPS
EXERCISE SAFETY
• Consult with your physician before beginning a new exercise program.
• Incorrect or excessive exercise or overexertion can be damaging to your
health. Always exercise within the heart-beat intensity level and time limits
recommended by your doctor.
• Stop exercising immediately and consult your doctor if you begin to feel
faint, dizzy, nauseous, or experience pain, irregular heartbeat, or shortness
of breath.
• Never use the equipment while under the influence of drugs or alcohol. Do
not use during or immediately after eating or when you feel tired. Do not
use if injured, ill, or if you have a fever.
• Do not perform other activities while using the equipment to avoid
accidents or injury.
• Always inspect the equipment for damaged, worn, or loose bolts/nuts/
knobs before each use. Tighten any loose bolts/nuts/knobs before use. Do
not use if damaged, worn, rusty, malfunctioning, or missing bolts. Do not
use equipment again until the problem has been fixed.
• Remove items, especially sharp objects, from your pockets before using.
Do not wear jewelry, belts, or other accessories that could get snagged and
cause injury or falling.
• Ensure you have adequate clear space around you (at least seven feet on all
sides).
• Use the equipment only on a flat, sturdy, non-slip floor.
• To prevent back injury when performing back extensions, do not bring your
torso past parallel with your hips (hyperextension).
• Do not jump onto or off of the SculptTrainer.
• Do not add weights/resistance to the body weight workouts until you have
become accustomed to the equipment.
EXERCISE TIPS
• Use proper form. Focus on only working the muscle groups intended for the
exercise you are performing. Maintain control through the entire range of
motion.
• Drink plenty of water before and after exercise.
• Make sure to adjust the height of the support pads according to your
height and the exercise you will be doing.
• Always maintain control and move slowly through exercises to avoid injury.
• Be careful of doing exercises with explosive movements so that you do not
knock over the SculptTrainer.
• Start slow and easy with shorter workouts. Work your way up to longer,
more challenging workouts over a period of several weeks.
• Breathe naturally during exercise. Never hold your breath. Exhale during
exertion and inhale after exertion. For example, during a push-up, inhale as
you lower your body to the floor, exhale as you push yourself up.
• Spend at least five minutes warming up, including stretching, before
exercise and at least five minutes cooling down after exercise to prevent
pulled muscles and other sports injuries.
• Make sure to take sufficient breaks between exercises. Also, take
sufficient time off between workout sessions.
• Always wear appropriate athletic clothing and shoes. Appropriate clothing
should be comfortable, loose, and allow you to move freely.
WHAT EXERCISES CAN I DO?
You can do a wide variety of exercises with the SculptTrainer, both body-
weight and weight-lifting, including:
• Crunch
• Incline / decline push-up
• Plyo bench plank hold
• Incline / decline mountain climber
• Glute bridge
• Back extension (AKA glute-ham
raise)
• Incline / decline plank
• Tricep dumbbell kickback
• Elevated hip thrust
• Bulgarian split squat
• Seated preacher curl
• Incline / decline side plank
• Tricep dip
• Twist
• Lateral bench hop
• Incline plank shoulder tap
• Side bend
• Seated shoulder press
• Single-leg squat to bench
• Bench pull-ups
• Single arm dumbbell row
• Copenhagen plank
Strength Training Collection 17 16 SculptTrainer User Manual Lifepro

Strength Training Collection 17 16 SculptTrainer User Manual Lifepro
EXERCISE SAFETY AND TIPS
EXERCISE SAFETY
• Consult with your physician before beginning a new exercise program.
• Incorrect or excessive exercise or overexertion can be damaging to your
health. Always exercise within the heart-beat intensity level and time limits
recommended by your doctor.
• Stop exercising immediately and consult your doctor if you begin to feel
faint, dizzy, nauseous, or experience pain, irregular heartbeat, or shortness
of breath.
• Never use the equipment while under the influence of drugs or alcohol. Do
not use during or immediately after eating or when you feel tired. Do not
use if injured, ill, or if you have a fever.
• Do not perform other activities while using the equipment to avoid
accidents or injury.
• Always inspect the equipment for damaged, worn, or loose bolts/nuts/
knobs before each use. Tighten any loose bolts/nuts/knobs before use. Do
not use if damaged, worn, rusty, malfunctioning, or missing bolts. Do not
use equipment again until the problem has been fixed.
• Remove items, especially sharp objects, from your pockets before using.
Do not wear jewelry, belts, or other accessories that could get snagged and
cause injury or falling.
• Ensure you have adequate clear space around you (at least seven feet on all
sides).
• Use the equipment only on a flat, sturdy, non-slip floor.
• To prevent back injury when performing back extensions, do not bring your
torso past parallel with your hips (hyperextension).
• Do not jump onto or off of the SculptTrainer.
• Do not add weights/resistance to the body weight workouts until you have
become accustomed to the equipment.
EXERCISE TIPS
• Use proper form. Focus on only working the muscle groups intended for the
exercise you are performing. Maintain control through the entire range of
motion.
• Drink plenty of water before and after exercise.
• Make sure to adjust the height of the support pads according to your
height and the exercise you will be doing.
• Always maintain control and move slowly through exercises to avoid injury.
• Be careful of doing exercises with explosive movements so that you do not
knock over the SculptTrainer.
• Start slow and easy with shorter workouts. Work your way up to longer,
more challenging workouts over a period of several weeks.
• Breathe naturally during exercise. Never hold your breath. Exhale during
exertion and inhale after exertion. For example, during a push-up, inhale as
you lower your body to the floor, exhale as you push yourself up.
• Spend at least five minutes warming up, including stretching, before
exercise and at least five minutes cooling down after exercise to prevent
pulled muscles and other sports injuries.
• Make sure to take sufficient breaks between exercises. Also, take
sufficient time off between workout sessions.
• Always wear appropriate athletic clothing and shoes. Appropriate clothing
should be comfortable, loose, and allow you to move freely.
WHAT EXERCISES CAN I DO?
You can do a wide variety of exercises with the SculptTrainer, both body-
weight and weight-lifting, including:
• Crunch
• Incline / decline push-up
• Plyo bench plank hold
• Incline / decline mountain climber
• Glute bridge
• Back extension (AKA glute-ham
raise)
• Incline / decline plank
• Tricep dumbbell kickback
• Elevated hip thrust
• Bulgarian split squat
• Seated preacher curl
• Incline / decline side plank
• Tricep dip
• Twist
• Lateral bench hop
• Incline plank shoulder tap
• Side bend
• Seated shoulder press
• Single-leg squat to bench
• Bench pull-ups
• Single arm dumbbell row
• Copenhagen plank
Strength Training Collection 17 16 SculptTrainer User Manual Lifepro

SAFETY, CARE, AND MAINTENANCE
WARNING: To reduce injury to persons, or damage to equipment, read the
following warnings carefully.
DISCLAIMER
• The health benefits suggested or implied in this manual, other product literature,
and website are not certified or endorsed by any regulatory authority or medical
institute.
• The use of this equipment is entirely at the user’s discretion. Please read all
instructions and safety information carefully before using this product. We assume
no responsibility for personal injury or property damage sustained by or through
using this product.
SAFETY INSTRUCTIONS
• Use the equipment only as instructed in this manual.
• Always inspect the equipment for damaged, worn, or loose bolts/nuts/knobs before
each use. Tighten any loose bolts/nuts/knobs before use. Do not use if damaged,
worn, rusty, malfunctioning, or missing screws. Do not use equipment again until
the problem has been fixed.
• This product is for adult-use only. Do not allow children to use; this equipment is
not a toy. Keep children and pets away from the equipment at all times.
• Adult assembly required. Children should not assemble, disassemble, fold, or move
the equipment.
• This equipment is not intended for use by people with reduced physical, sensory or
mental capabilities, unless supervised by a responsible adult.
• Do not allow more than one person to use the equipment at a time.
• Do not exceed the maximum weight-load capacity of 330 lbs.
• Never use the equipment while under the influence of drugs or alcohol. Do not use
during or immediately after eating or when you feel tired. Do not use if injured, ill,
or if you have a fever.
• It is the responsibility of the owner to ensure that all users of the equipment are
adequately informed of all warnings and precautions.
• This unit is not a medical device and is not recommended for medical use. The
equipment is intended for in-home and indoor-use only. Do not use the equipment in
any commercial, rental, institutional, or therapeutic setting.
• Dispose of the unit and all parts according to local and federal regulations.
EXERCISE SAFETY
• Users should consult with a medical professional before beginning a new exercise
program. Your physician should assist you in determining the heart rate zone that is
appropriate for your age and physical condition. Your physician can help determine
if you have physical limitations that could create a health risk or prevent you
from properly using this equipment; some exercise programs or types of fitness
equipment may not be appropriate for all people. This is especially important for
those who are or may be pregnant; those over the age 35 or with pre-existing
health problems; those who experience dizziness or balance impairments or taking
drugs that affect balance; those with heart conditions, hypertension, blood clots,
or taking medication that affects heart rate; those with a pacemaker, artificial
heart, or similar implant; those who have recently had surgery; those with cancer or
malignant tumors; those with orthopedic conditions, spinal injuries, osteoporosis,
fractures, herniated or slipped discs, chronic back pain, sciatica, or other conditions
or disorders affecting the back or spinal column.
• Incorrect or excessive exercise or overexertion can be damaging to your health.
Always exercise within intensity and time limits recommended by your doctor.
• Stop exercising immediately and consult your doctor if you begin to feel faint, dizzy,
nauseous, or experience pain, irregular heartbeat, or shortness of breath.
• Ensure you have adequate clear space around you (at least seven feet on all sides).
• Always maintain control and move slowly through exercises to avoid injury.
• Always place the equipment on a flat, sturdy floor. Place in a location away from
traffic where it will not create a tripping hazard.
• Do not perform other activities while using the equipment to avoid accidents or
injury.
• Make sure to adjust the height of the support pad according to your height and the
exercise you will be doing.
• To prevent back injury when performing back extensions, do not bring your torso
past parallel with your hips (hyperextension).
• Do not add weights or resistance to the body weight workouts until you have
become accustomed to the equipment.
• Always wear appropriate athletic clothing. Appropriate clothing should be loose,
comfortable, and allow you to move freely.
• Warm up before exercise and cool down after exercise to prevent sports injury.
• Keep hair, fingers, and clothing away from moving parts to avoid pinching.
MAINTENANCE AND CLEANING
• Use a slightly damp cloth to wipe any dirt or moisture from the equipment after
each use. You may use mild soap, if necessary, to clean. Do not use solvents; or
chemical or abrasive cleaners.
• Store equipment in a cool, dry location.
• Do not use or store in direct sunlight, in a high-temperature or high-moisture
environment, or near heat sources.
Strength Training Collection 19 18 SculptTrainer User Manual Lifepro Strength Training Collection 19 18 SculptTrainer User Manual Lifepro
20 SculptTrainer User Manual Lifepro Strength Training Collection 21
LIFETIME WARRANTY
Lifepro creates quality, durable exercise
products and we stand by that quality with
a lifetime warranty on all of our products. If
your product ever breaks (and we doubt it
will), we’ll send you replacement parts and
show you how to repair it. If your product
cannot be repaired, we’ll replace it—free
of charge. Register your SculptTrainer
at sculpttrainer.lifeprofitness.com to
activate your warranty within 14 days
of purchase.
PRODUCT
SPECIFICATIONS
MADE IN CHINA
UNIT SPECS
Dimensions: 35.4” × 16.5” × 28.0” × 39.8”
Net Weight: 20.9 lbs.
Maximum Weight Load: 330 lbs.
Frame: 50 × 50×1.2mm, powder-coated,
square-steel tubing
SCULPTTRAINER
MULTIPURPOSE ROMAN CHAIR
STRENGTH TRAINING

FROM OUR SPORTS RECOVERY COLLECTION
Strength Training Collection 23 22 SculptTrainer User Manual Lifepro
Enjoy all of the benefits of foam
rolling and vibration technology
together with the Surger Vibrating
Foam Roller. Use the Surger before
or after your workout as part of
your warm-up or recovery routine
to gain more flexibility and to help
prevent soreness and injuries.
Deep compression of muscle
fibers and tissues (self-myofascial
release) combined with the
Surger’s vibration technology
breaks up muscle knots and relaxes
tight muscles and fascia. Choose
from 4 vibration speed levels
to apply the perfect amount of
intensity every time.
SURGER
VIBRATING FOAM ROLLER
SURGER BENEFITS
• Increase workout
effectiveness
• Reduce soreness
• Speed up recovery
• Prevent injury
• Boost circulation
• Improve muscle flexibility
and performance
• Decrease pain and
inflammation
• Loosen knots, trigger
points, and tightness in your
muscles and fascia.
The Agility vibrating massage ball is designed to target small muscle
groups. The Agility Ball is small enough to fit in the palm of your hand and
gives you a wide range of massage motions: circular, up-and-down, and
side-to-side.
The Agility Ball’s silicone exterior is durable and easy-to-grip, but soft
enough to use on sensitive areas like your neck, hands, and feet.
AGILITY
VIBRATING MASSAGE BALL
AGILITY BALL BENEFITS
• Increase circulation
• Improve muscle flexibility and
performance
• Relax tight muscles and fascia
• Reduce muscle pain and inflammation
• Boost blood flow

Access Lifepro TV, our library of free
personal training videos on the web at
sculpttrainer.lifeprofitness.com to learn
how to get the most out of your Lifepro®
SculptTrainer and achieve the results you
want.
GROW
SOME
WINGS
Lifeprousa Lifeprousa support@lifeprofitness.com