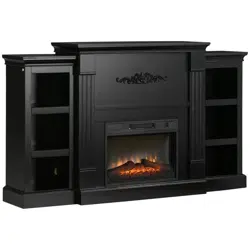
EN_IMPORTANT, RETAIN FOR FUTURE REFERENCE: READ CAREFULLY.
FR_IMPORTANT:A LIRE ATTENTIVEMENT ET À CONSERVER POUR CONSULTATION
ULTÉRIEURE.
ES_IMPORTANTE, LEA Y GUARDE PARA FUTURAS REFERENCIAS.
DE_WICHTIG! SORGFÄLTIG LESEN UND FÜR SPÄTER NACHSCHLAGEN AUFBEWAHREN.
IT _ IMPORTANTE! CONSERVARE IL PRESENTE MANUALE PER FUTURO RIFERIMENTO E
LEGGERLO ATTENTAMENTE.
INcje033_US
INcje033_US_820-290V80

1
22
23
25
2 6
2 7
14
15
2
3
8
9
11
12
17
1 8
1 9
21
1
13
7
16
10
5
2 0
4
6
PACKING DETALS:TOTAL 2 BOXES
BOX
1-2
BOX
2-2
BOX
2-2
24
①
1
②
1
③
1
④
4
⑤
2
⑥
2
⑦
1
⑨
4
⑧
2
⑩
2 4
2
1
1
1
1
1
1
1
1
1
1
1
1
1
1
1

2

3

4
A
83
B
83
G
1
N
4
J
8
4*30
K
12
6*25
2 2
C
82
2
D
33
2
E
16
1
F
8
6*28
L
36
3*12

5

6
02
01

7
04
03

8
06
05

9
08
07

10
10
09

11
12
11

12
14
13

13
16
15

14
18
17

15
20
19

16
22
21

17
24
23

18
25
26

19
28
27

20
30
29

21
32
31
Done

22
IMPORTANT SAFETY INFORMATION
PLEASE READ ALL INSTRUCTIONS IN THIS MANUAL, INCLUDING ALL SAFETY,
OPERATING AND MAINTENANCE INFORMATION. TO AVOID THE POTENTIAL
RISK OF FIRE, ELECTRIC SHOCK OR INJURY TO PERSONS, USERS MUST
FOLLOW THE WARNINGS IN THIS MANUAL.
1. Read all instructions before using this heater.
2. Do not use this heater outdoors.
3. Never use this heater in bathrooms, laundry areas or similar areas. Keep
away from bathtubs and other water containers.
4. Do not run the power cord under carpeting or cover with throw rugs, runners
or furniture. Keep the power cord away from congested areas, where it cannot be
tripped over.
5. When unplugging, ensure the heater is switched off.
6. Plug in to properly grounded outlets only. Always plug directly into a wall
outlet/receptacle. Never use an extension cord or relocatable power tap
(outlet/power strip).
7. To prevent a possible fire, do not block air intakes or the exhaust. Do not use
on soft surfaces, such as beds, where openings could be blocked.
8. There is a thermostat limit inside the heater. When the inner temperature
exceeds the limit, the protective device will activate, switching off the heater
automatically, avoiding the risk of fire or damages to the product.
9.Use the heater only as described in this manual. Any other use, which is not
recommended by the manufacturer, could cause a fire, electric shock or injury to
persons.

23
SAVE THESE INSTRUCTIONS
! WARNING: There are no user serviceable parts inside this product. If the unit
appears to malfunction, switch off the heater and unplug immediately. Contact
customer service.
! WARNING: This heater is hot when in use. To avoid burns, do not touch the
surfaces. If provided, use handles when moving the heater. Keep flammable
materials, such as furniture, pillows, bedding, paper, clothes and curtains at least
three feet (0.9m) from the front, sides and rear of the heater.
! WARNING: Extreme caution is necessary when using the heater near small
children or vulnerable persons. When operating, never leave the heater
unattended.
!WARNING: Always unplug the heater when not in use.
WARNING: If the cord, plug or unit is damaged in any way, do not use. Return the
heater to the manufacturer for inspection or repairs.
WARNING: Do not insert objects into the ventilation or exhaust opening – this can
cause an electric shock, fire or damages to the heater.
WARNING: A heater has hot and arching parts inside. Do not use in areas where
gasoline, paint or flammable items are present.
CAUTION: When in use, the centre gets very hot – do not touch to avoid burns.
Small children must be supervised when near the heater.
Do not cover the heater with clothes, towels or other fabrics to avoid a fire hazard.

24
GROUNDING INSTRUCTIONS
! DANGER: Plugging into an improper grounded outlet can result in electric shock.
If you have any doubts whether the product is properly grounded, check with a
qualified electrician or serviceperson.
Do not modify the plug.
If it does not fit into the outlet, have a proper outlet installed by a qualified
electrician.
The product must be grounded. If there is a malfunction, the grounding provides a
path of minimum resistance for an electric current, reducing the risk of an electric
shock. This product has a cord, an equipment-grounding conductor and grounding
plug. It must be plugged into an appropriate outlet, which is properly installed and
grounded in accordance with local laws and regulations.
This heater uses 120-volt circuits and has a grounded plug. An adapter is available
from your local store, which connects three-blade plugs to two-blade plugs.
The green grounding lug extending from the adapter, must be connected to a
permanent ground, such a properly grounded outlet box. If there is a three-slot
grounded socket available, do not use an adapter.

25

26
STEP 1
Put the EVA cushion gasket in (as shown below), which softens the impact between
the wood cabinet and fireplace.
STEP 2
Remove the unit from its packaging, laying out all spare parts on the floor. Ensure
there are no items left in the packaging.
STEP 3
Carefully install the unit from the back of the mantel, using the opening in the
centre.
Check the alignments, then attach the unit by inserting screws through the drilled
holes, which is on the trim of the mantel.
Note: Do not attempt to install the unit from the front of the mantel. It will not fit.

27
-Identifying the control panel
-The control panel is on the top right corner of the unit.
-Control panel contains the display (1), function indicator (2), timer (3), heater
control (4), flames control (5) and main power (6).
The display (1) shows information about the flame level, timer and current
temperature.
-Understanding the function indicator
- The function indicator (2) has three LEDS – red, green and blue. The red LED is
for the Fahrenheit heating function, the green LED is for Celsius and the blue LED
indicates the timer is active.
The infrared receiver, which communicates with the remote control, is at the
bottom of the three LEDS.

28
-Using the timer
This function (3) lets you choose how long you would like the unit to run. The timer
can be used for the flames and heater. If the heater is on when the timer is set, then
the timer will control the heater. If the flames are on when the timer is set, then the
timer will control the flames. If both are on when setting the timer, it will control
both. Pressing the button in sequence will set time you want. There is no clock
function for tuning the heater or flames on/off at a specific time.
-Using the heater control
The heater button (4) turns the heater on or off. There is no speed setting. If you put
the heater on standby, it will remember the previous settings. When turned back on,
it will resume with the same settings.
-When the heating function turns on, hold the heater button (4) for five seconds to
adjust the temperature – the LED will be red. When adjusting, the display (1)
flashes.
There are 22 levels for the Fahrenheit temperature.
Once set, the display (1) flashes five times.
If idle for 10 seconds, the display will turn off.
-When the heater is on, gently hold the main power button for five seconds to
convert the temperature. The red LED flashes five times, then changes to green.
When converting, the display (1) flashes. Hold the heater button (4) for five seconds
to adjust the temperature. There are 12 levels for the Celsius temperature.
Once set, the display (1) flashes five times. If idle for 10 seconds, the display turns
off.
Repeat the same process to convert from Celsius to Fahrenheit.

29
-Using the flame control
Press the flame button (5) to set the height of flames. The levels are shown in the
display. The flames are shown in the display (1). The flame settings are as follows:
-Regardless of the previous flame setting, when switched off by the main power
button, the flames will come on at L3 (high) when turned back on.
When the heating function is on, the flame will cycle between the three different
levels continuously.
-Using the main power button
Press the power button (6) to turn the unit on and off.

30
-Using the remote control
-You can use either the remote control or panel to operate this unit.
NOTE: The remote control cannot be used to switch between Fahrenheit and
Celsius.
-Install the battery
Use AAA batteries.
Press down and slide the back cover off the battery compartment.
Insert the two provided AAA batteries into the compartment, ensuring the negative
symbols (-) are against the springs.
Place the battery compartment cover, ensuring it snaps into position,
WARNING: Do not ingest batteries.
1. Do not charge non-rechargeable batteries.
2. Ensure batteries are inserted with the correct
polarity.
3. Remove dead batteries from the product.
4. Always purchase the correct size and grade of
battery.
5. Replace sets of batteries at the same time – do
not mix old and new.
6. Before inserting, ensure the contacts and
device are clean.
7.If not in use for a long time, remove the batteries.

31
! WARNING Always switch off and unplug the unit before cleaning.
WARNING: If any parts have contacted water, do not use this unit. Immediately call
a qualified technician, so they can inspect and replace any water-damaged parts.
The blower and flame motor are pre-lubricated, so it is durable and built to last – no
further lubrication or maintenance is needed. To remove dust and debris, use a soft
brush to clean the grills.
-Use a soft, clean cloth, so the surface is not scratched when cleaning.
-Use a soft cloth, which is dampened with warm water, to clean the surface. DO
NOT use household or abrasive cleaners – these could damage the surface.
-When cleaning the screen, use a non-abrasive damp cloth with a liquid cleaner. Do
not use cleaning powders or abrasive cleaners – these substances will scratch the
glass.
-Under no circumstances should this product be used with a broken or chipped
glass panel.
-Do not strike or slam the glass.
-If the appliance is damaged or stained, do not use – it should be fixed by a
professional.
-When not in use, unplug the unit.

32
Problem
Solution
The unit does not turn on. Ensure the unit is properly plugged into a
standard 120 V outlet.
Press the power button on the control panel.
The unit is on, but there is no flame. Open the back panels, so you can check if the
flame spindle has fallen off from the motor.
The flame is on, but the heater does not blow
warm air, even after repeatedly turning on the
heater.
Press the heater button several times, ensuring
it is in the ‘on’ position.
The heater does not work, even if the heater
switches are on.
Turn all switches off, then unplug the unit for
five minutes.
After five minutes, plug the unit in and operate
as normal.
Ensure the air vents on the top and front are
not blocked.
Remote control does not work. Change the remote batteries.
Operate the remote transmitter at a slow pace.
Gently press the remote control buttons.
Repeatedly pressing the buttons can damage
the transmitter.
Make sure objects are not blocking the control
or transmitter.
