COPYRIGHT © Hangzhou EZVIZ Software Co., Ltd. ALL RIGHTS RESERVED.
Any and all information, including, among others, wordings, pictures, graphs are the properties of Hangzhou EZVIZ Software Co.,
Ltd. (hereinafter referred to as “EZVIZ”). This user manual (hereinafter referred to as “the Manual”) cannot be reproduced, changed,
translated, or distributed, partially or wholly, by any means, without the prior written permission of EZVIZ. Unless otherwise
stipulated, EZVIZ does not make any warranties, guarantees or representations, express or implied, regarding to the Manual.
About this Manual
The Manual includes instructions for using and managing the product. Pictures, charts, images and all other information
hereinafter are for description and explanation only. The information contained in the Manual is subject to change, without notice,
due to rmware updates or other reasons. Please nd the latest version in the ™ website (http://www.ezvizlife.com).
Revision Record
New release – January, 2021
Trademarks Acknowledgement
™, ™, and other EZVIZ’s trademarks and logos are the properties of EZVIZ in various jurisdictions. Other trademarks and
logos mentioned below are the properties of their respective owners.
Legal Disclaimer
TO THE MAXIMUM EXTENT PERMITTED BY APPLICABLE LAW, THE PRODUCT DESCRIBED, WITH ITS HARDWARE, SOFTWARE AND
FIRMWARE, IS PROVIDED “AS IS”, WITH ALL FAULTS AND ERRORS, AND EZVIZ MAKES NO WARRANTIES, EXPRESS OR IMPLIED,
INCLUDING WITHOUT LIMITATION, MERCHANTABILITY, SATISFACTORY QUALITY, FITNESS FOR A PARTICULAR PURPOSE, AND
NON-INFRINGEMENT OF THIRD PARTY. IN NO EVENT WILL EZVIZ, ITS DIRECTORS, OFFICERS, EMPLOYEES, OR AGENTS BE LIABLE
TO YOU FOR ANY SPECIAL, CONSEQUENTIAL, INCIDENTAL, OR INDIRECT DAMAGES, INCLUDING, AMONG OTHERS, DAMAGES
FOR LOSS OF BUSINESS PROFITS, BUSINESS INTERRUPTION, OR LOSS OF DATA OR DOCUMENTATION, IN CONNECTION WITH
THE USE OF THIS PRODUCT, EVEN IF EZVIZ HAS BEEN ADVISED OF THE POSSIBILITY OF SUCH DAMAGES.
TO THE MAXIMUM EXTENT PERMITTED BY APPLICABLE LAW, IN NO EVENT SHALL EZVIZ’S TOTAL LIABILITY FOR ALL DAMAGES
EXCEED THE ORIGINAL PURCHASE PRICE OF THE PRODUCT.
EZVIZ DOES NOT UNDERTAKE ANY LIABILITY FOR PERSONAL INJURY OR PROPERTY DAMAGE AS THE RESULT OF PRODUCT
INTERRUPTION OR SERVICE TERMINATION CAUSED BY: A) IMPROPER INSTALLATION OR USAGE OTHER THAN AS REQUESTED;
B) THE PROTECTION OF NATIONAL OR PUBLIC INTERESTS; C) FORCE MAJEURE; D) YOURSELF OR THE THIRD PARTY, INCLUDING
WITHOUT LIMITATION, USING ANY THIRD PARTY’S PRODUCTS, SOFTWARE, APPLICATIONS, AND AMONG OTHERS.
REGARDING TO THE PRODUCT WITH INTERNET ACCESS, THE USE OF PRODUCT SHALL BE WHOLLY AT YOUR OWN RISKS.
EZVIZ SHALL NOT TAKE ANY RESPONSIBILITES FOR ABNORMAL OPERATION, PRIVACY LEAKAGE OR OTHER DAMAGES
RESULTING FROM CYBER ATTACK, HACKER ATTACK, VIRUS INSPECTION, OR OTHER INTERNET SECURITY RISKS; HOWEVER,
EZVIZ WILL PROVIDE TIMELY TECHNICAL SUPPORT IF REQUIRED. SURVEILLANCE LAWS AND DATA PROTECTION LAWS VARY
BY JURISDICTION. PLEASE CHECK ALL RELEVANT LAWS IN YOUR JURISDICTION BEFORE USING THIS PRODUCT IN ORDER
TO ENSURE THAT YOUR USE CONFORMS TO THE APPLICABLE LAW. EZVIZ SHALL NOT BE LIABLE IN THE EVENT THAT THIS
PRODUCT IS USED WITH ILLEGITIMATE PURPOSES.
IN THE EVENT OF ANY CONFLICTS BETWEEN THE ABOVE AND THE APPLICABLE LAW, THE LATTER PREVAILS.

Table of Contents
Attention...................................................................................................1
Box Content...............................................................................................1
Overview....................................................................................................1
1. Panel.............................................................................................................................................................1
2. Camera..........................................................................................................................................................2
3. Mounting Base...............................................................................................................................................2
Get the EZVIZ App......................................................................................2
Setup.........................................................................................................2
Installation.................................................................................................3
1. Micro SD Card Installation (Optional).............................................................................................................3
2. Installation the peephole................................................................................................................................3
Power on...................................................................................................4
Add to EZVIZ App......................................................................................4
Charge the Panel.......................................................................................5
Restore to Factory Settings.......................................................................5
Live View...................................................................................................6
Settings.....................................................................................................7
EZVIZ Connect..........................................................................................8
1. Use Amazon Alexa..........................................................................................................................................8
2. Use Google Assistant.....................................................................................................................................8

1
Attention
• Do not expose the camera to the harsh environment like high temperature, humid, salt mist or rain, otherwise, the device may
be damaged.
• Do not press the sensor or lens of the camera, otherwise, the device may be damaged.
• Do not pull the wire of the camera hard, and protect yourself from being cut by the wire. Damage to the wire due to inappropriate
operation is not included in the warranty.
• Use the exclusively power adapter to charge the panel, otherwise, the system may be damaged.
Box Content
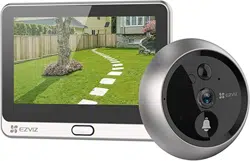
Camera (x1) Panel (x1) Mounting Base (x1)
Screws (x6)
Power cable (x1)
Regulatory Information (x1) Quick Start Guide (x1)
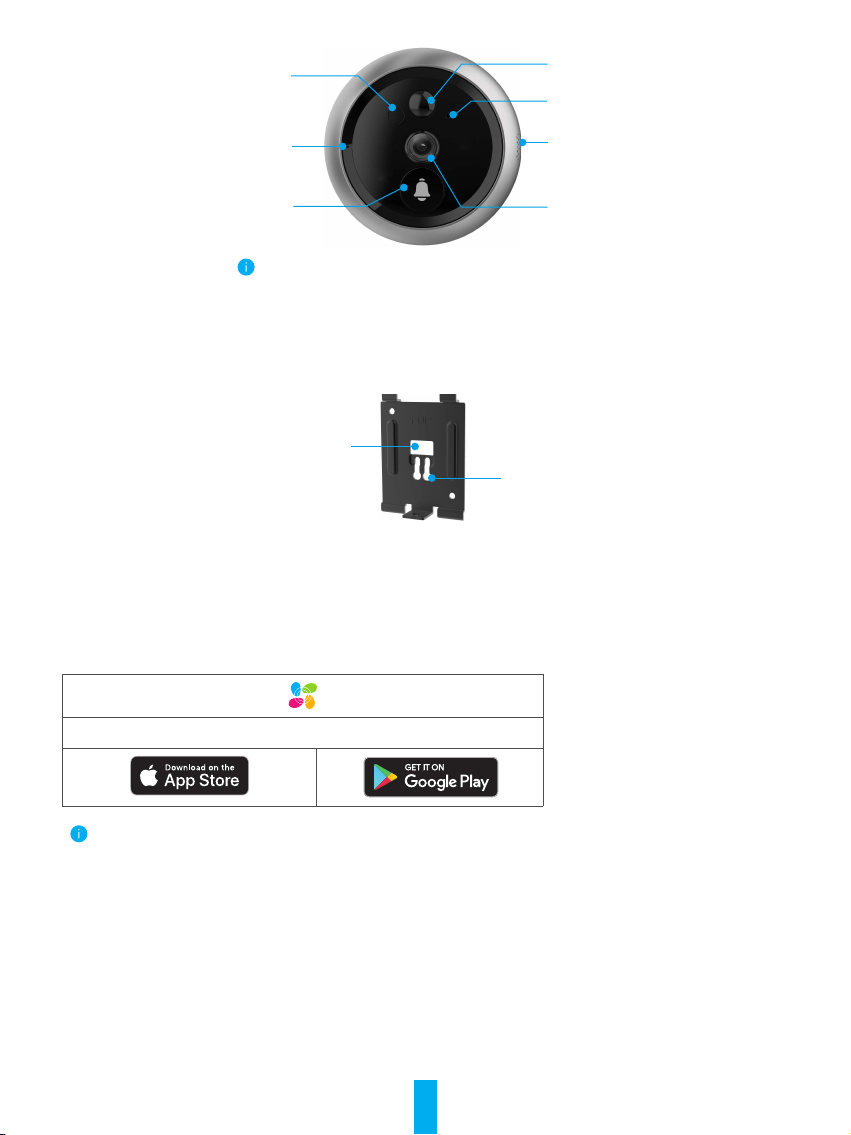
Overview
Panel
Power Button
Micro SD Card Slot
Home Button
Power Port
Display Screen
LoudspeakerDismantle Button
Data Interface
2
Camera
Sensor
Bell
Sensor
Sensor
Loudspeaker
Lens
Microphone
Do not block the sensors.
Mounting Base
Data Wire Hole
Mounting Hole
Get the EZVIZ App
- Connect your mobile phone to Wi-Fi using your 2.4GHz network (suggested).
- Download and install the EZVIZ app by searching “EZVIZ” in the App Store or Google Play
TM
.
- Launch the app and register an EZVIZ user account.
EZVIZ App
If you have already used the app, please make sure that it is the latest version. To nd out if an update is available, go to the app
store and search for EZVIZ.
Setup
Follow the steps to set your peephole:
1. Install your peephole and power on.
2. Log in to your EZVIZ app user account.
3. Connect your peephole to the Internet.
4. Add your peephole to your EZVIZ account.
3
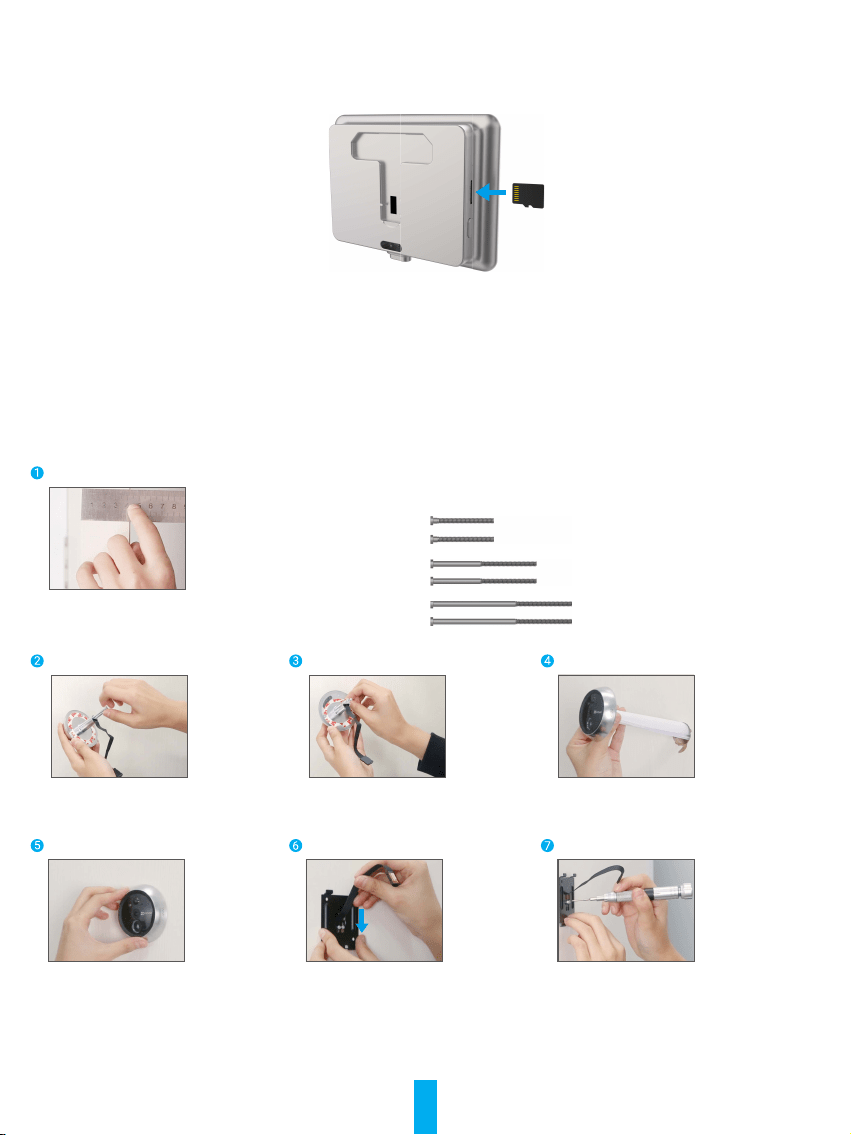
Installation
1. Install the Micro SD Card (Optional)
- Insert the micro SD card (sold separately) into the card slot as shown in the gure below.
- In the EZVIZ app, tap the Storage Status in the Device Settings interface to check the SD card status.
- If the memory card status displays as Uninitialized, tap to initialize it. The status will then change to Normal and it can
store videos.
2. Install the peephole
If you already have a peephole, install the device in the same place. If not, please drill a hole of diameter about 16.5mm (no
more than 45mm) and about 145cm distance from the ground to have a good viewing effect.
Measure the door's thickness and select the appropriate screws.
Thickness Screw
35 to 60mm
60 to 85mm
85 to 105mm
Turn the screws into the back of
camera.
Tear off the release paper. Pass screws and wire through the
door. You can roll up the paper to help.
Adjust camera's position and push
it close to the door gently.
Pass screws and wire through the
mounting base.
Adjust the mounting base's position
and tighten the screw.
4
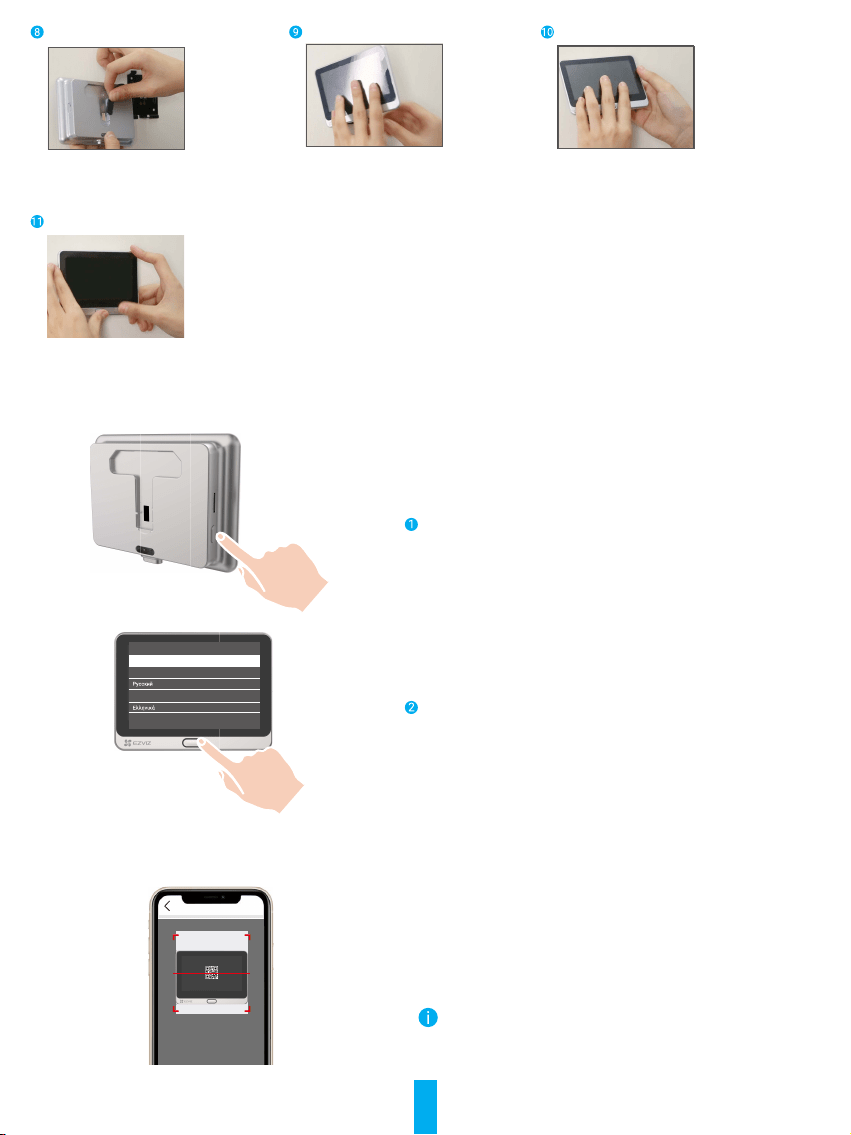
Connect the panel with the camera's
wire.
Put the panel into the mounting
base.
Hold the dismantle button until the
panel is well buckled.
Installation complete.
Power on
Hold the power button for 3 seconds to power on the panel.
Language Choose
简体中文
Magyar
English
Tap the Home button below to next stop,
tap the Power button left to confirm
Tap the Home button to choose your language and press
the Power button to conrm.
Add to EZVIZ App
- Log in the EZVIZ app.
- On the Home screen, tap “+” on the upper-right corner to go to
the scan QR code page.
- Scan the QR code.
- Follow the EZVIZ app wizard to nish Wi-Fi conguration.
If you failed to get the QR code or want to recongure Wi-Fi,
please hold the Home button for 5 seconds to reset and repeat
the steps above.
5
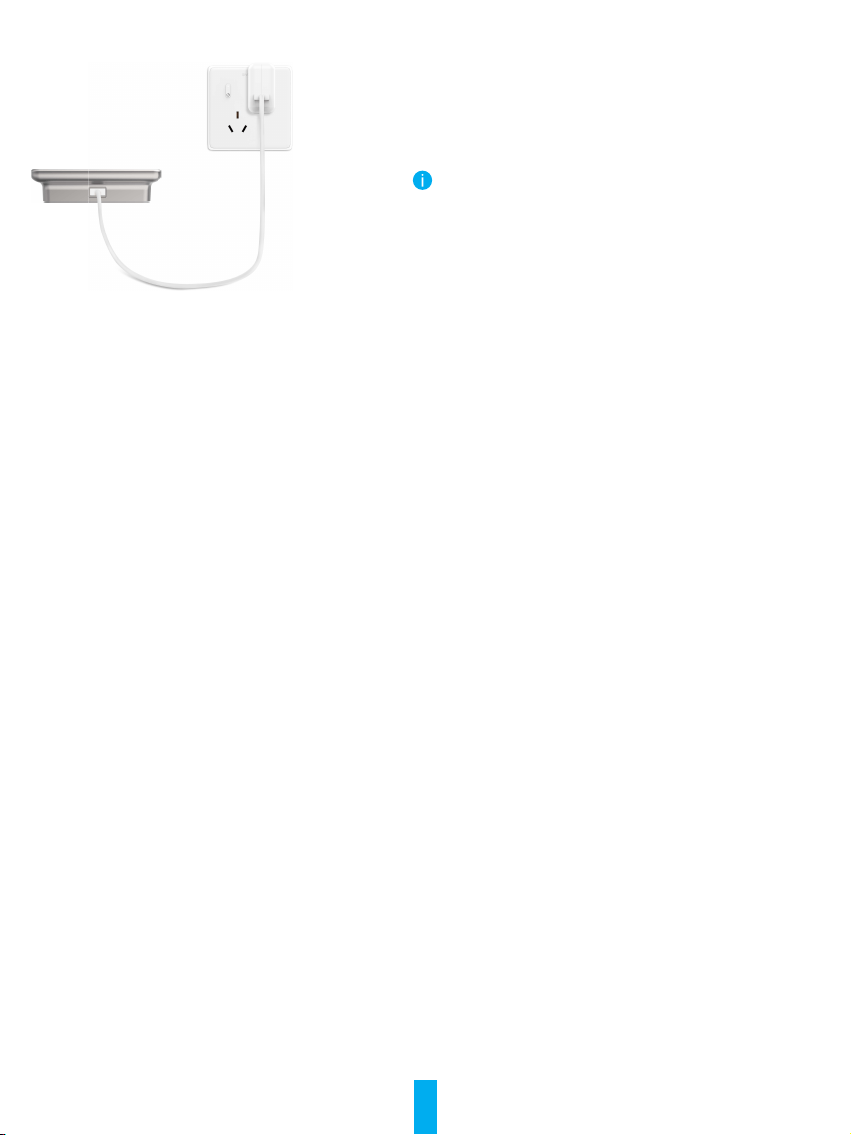
Charge the Panel
Power Outlet
Power Adapter
Connect the panel with the power outlet via power adapter (5V
2A, sold separately).
You can also take off the panel to charge by holding the dismantle
button to remove it from the mounting base. Please disconnect
the wire carefully.
Restore to Factory Settings
When the device is normally running, press the Home button for 5 seconds and corm to restore the device to factory settings.
6
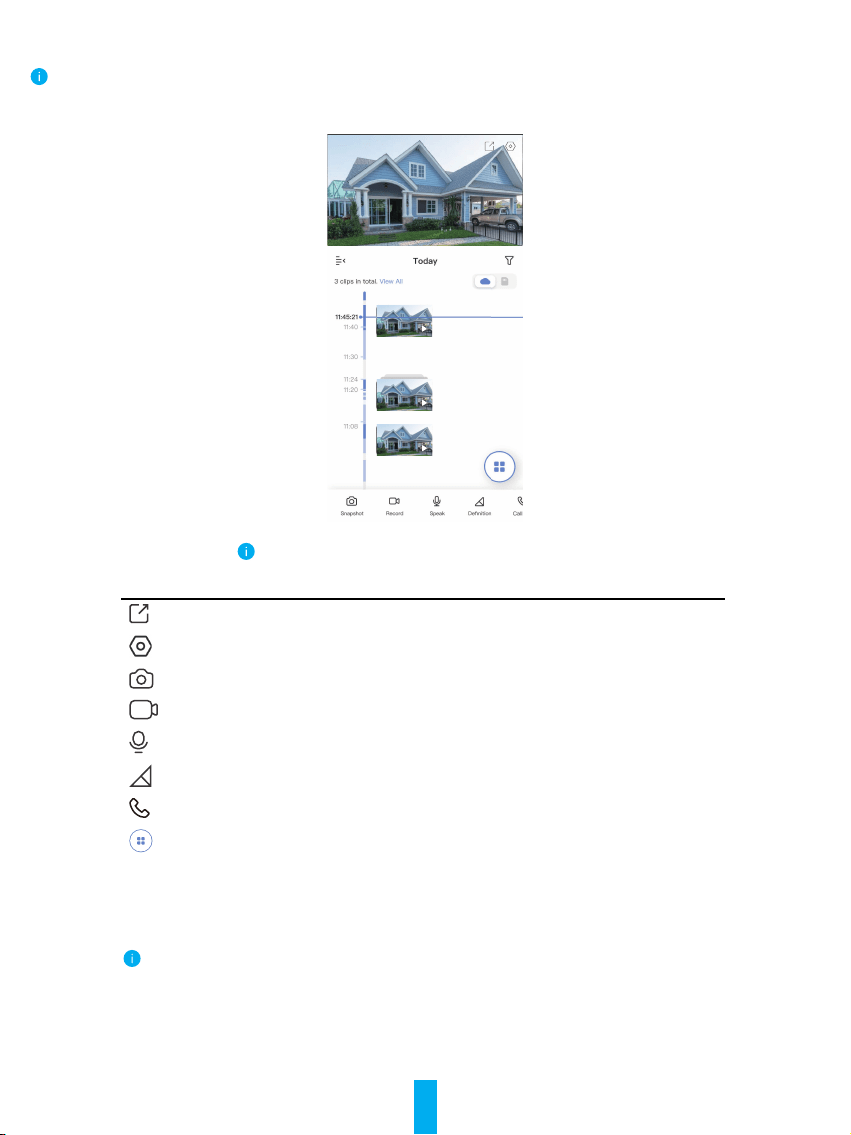
Live View
The app interface may be different due to version update, and the interface of the app you installed on your phone shall prevail.
Launch the EZVIZ app, tap Live View botton, you can view and listen to a live feed, take snapshots, record videos, and choose
video denition as needed.
Swipe left and right across the screen to see more icons.
Icon Description
Share. Share your device.
Settings. View or change the device settings.
Snapshot. Take a snapshot.
Record. Manually start/stop recording.
Speak. Start using talk and listen.
Denition. Select video resolution from Ultra HD, Hi-Def or Standard.
Call Log. View call logs.
Multi-screen Live. Tap to select live view window layout.
Please refer to the actual interface for specic information.

7
Settings
In the settings page, you can set the parameters of the device.
Parameter Description
Name Customize the name of your device.
Working Mode
• User Mode: Customize parameters like detection sensitivity and loitering duration
• Performance Mode: Under this mode, the device performance will be improved, but the
power consumption will be increased.
• Power Saving Mode: Adjust the sensitivity and other parameters to extend battery life.
• Super Power-saving: Sleep Mode is on. Active live view can wake up the camera.
• Congure Working Mode: Customize the working mode in different periods.
Intelligent Detection
You can customize the detection notication by changing the value of detection
sensitivity. The higher sensitivity is, the easier people farther to the device can be
detected.
• Basic Detection(Required)
• PIR Infrared Detection: Higer sensitivity, farther detectable distance.
• Advanced Detection
• Loitering detection: when enabled, if people keep loitering around the doorway for
longer than the period you have set up, alarms will be triggered. This function is
used to avoid loitering.
Devices will alert based on the selected mode, including device-side alerts and App-side message
notications.
Notication You can set the notication from the device-side and app-side.
Audio When disabled, both live view and record videos will not have audio.
Image
• Auto(Recommended): Auto-Switch Day/Night Mode.
• Day and Night Switch Sensitivity.
• Enforcing Day Mode: IR mode stays off
• Enforcing Night Node: IR mode stays on, with clear images in dark environment.
Light When disabled, the doorbell indicator will be off.
Battery You can see the battery capacity.
Cloud Storage You can subscribe and manage the cloud storage.
Record List You can see the device storage status, include cloud storage and memory card.
Security Settings
• Video Encryption: When enabled, your videos will be encrypted.
• Change Encryption Password: You can change your password.
Network
• You can see the Wi-Fi that the device has connected to, and you can tap to change to
another Wi-Fi.
• Static DNS: If enabled, you can customize the DNS address.
• Wi-Fi Sleep Mode: You can choose the Wi-Fi Sleep mode.
• Low Power Mode
• Ultra-Low Power Mode
Device Information You can see the device information here.
Share the Device
Enter an email address or phone number to invite and grant device permissions to a family
member or guest.
Delete Device Tap to delete the camera from your EZVIZ account.

8
EZVIZ Connect
1. Use Amazon Alexa
These instructions will enable you to control your EZVIZ devices with Amazon Alexa. If you run into any diculties during the
process, please refer to Troubleshooting.
Before you start, make sure that:
1. EZVIZ devices are connected to the EZVIZ app.
2. In the EZVIZ app, turn off the "Image Encryption" in the Device Settings page.
3. You have an Alexa-enabled device (i.e Echo Spot, Echo-Show, All-new Echo-Show, Fire TV (all generations), Fire TV stick
(second generation only), or Fire TV Edition smart TVs).
4. The Amazon Alexa app is already installed on your smart device, and you have created an account.
To Control EZVIZ devices with Amazon Alexa:
1. Open the Alexa app and select "Skills and Games" from the menu.
2. On the Skills and Games screen, search for "EZVIZ", and you will nd "EZVIZ" skills.
3. Select your EZVIZ device's skill, then tap ENABLE TO USE.
4. Enter your EZVIZ username and password, and tap Sign in.
5. Tap the Authorize button to authorize Alexa to access your EZVIZ account, so that Alexa can control your EZVIZ devices.
6. You will see "EZVIZ has been successfully linked", then tap DISCOVER DEVICES to allow Alexa to discover all your EZVIZ
devices.
7. Go back to Alexa app menu and select "Devices", and under devices you will see all your EZVIZ devices.
Voice Command
Discover a new smart device via the "Smart Home" menu in the Alexa app or the Alexa Voice Control function.
Once the device is found, you can control it with your voice. Speak simple commands to Alexa.
Your device's name for example: "show xxxx camera," can be changed in the EZVIZ app. Each time you change the name of the device, you
will need to discover the device again to update the name.
Troubleshooting
What should I do if Alexa fails to discover my device?
Check if there are any Internet connecting problems.
Try to restart the smart device and re-discover the device on Alexa.
Why the device's status is "Oine" on Alexa?
Your device might have been disconnected from the network. Restart the smart device and re-discover on Alexa.
Check if your router is connected to the Internet and try again.
For details about countries where Amazon Alexa is available, see Amazon Alexa's ocial website.
2. Use Google Assistant
With the Google Assistant, you can activate your EZVIZ device and watch live by speaking Google Assistant voice commands.
The following devices and apps are required:
1. A functional EZVIZ app.
2. In the EZVIZ app, turn off the "Image Encryption" and turn on the "Audio" in the Device Settings page.
3. A TV with functional Chromecast connecting to it.
4. The Google Assistant app on your phone.
To get started, follow the steps below:
1. Set up the EZVIZ device and make sure it works properly on the app.
2. Download the Google Home app from the App Store or Google Play Store
TM
and log into your Google account.
3. On the Myhome screen, tap “+” on the upper-left corner, and select "Set up device" from the menu list to go to the Set up
interface.

9
4. Tap Works with Google, and search for "EZVIZ", where you will nd "EZVIZ" skills.
5. Enter your EZVIZ username and password, and tap Sign in.
6. Tap the Authorize button to authorize Google to access your EZVIZ account, so that Google can control your EZVIZ devices.
7. Tap Return to app.
8. Follow the above steps to complete the authorization. When synchronization is completed, EZVIZ service will be listed
under your list of services. To see a list of compatible devices under your EZVIZ account, tap on the EZVIZ service icon.
9. Now try some commands. Use the name of the camera that you created when you set up the system.
Users can manage devices as a single entity or in a group. Adding devices to a room allows users to control a group of devices
at the same time using one command.
See the link for more information:
https://support.google.com/googlehome/answer/7029485?co=GENIE.Platform%3DAndroid&hl=en
For additional information about the device, please refer to www.ezviz.eu.
