
Loading ...
Loading ...
Loading ...
TASCAM US-16x08
5
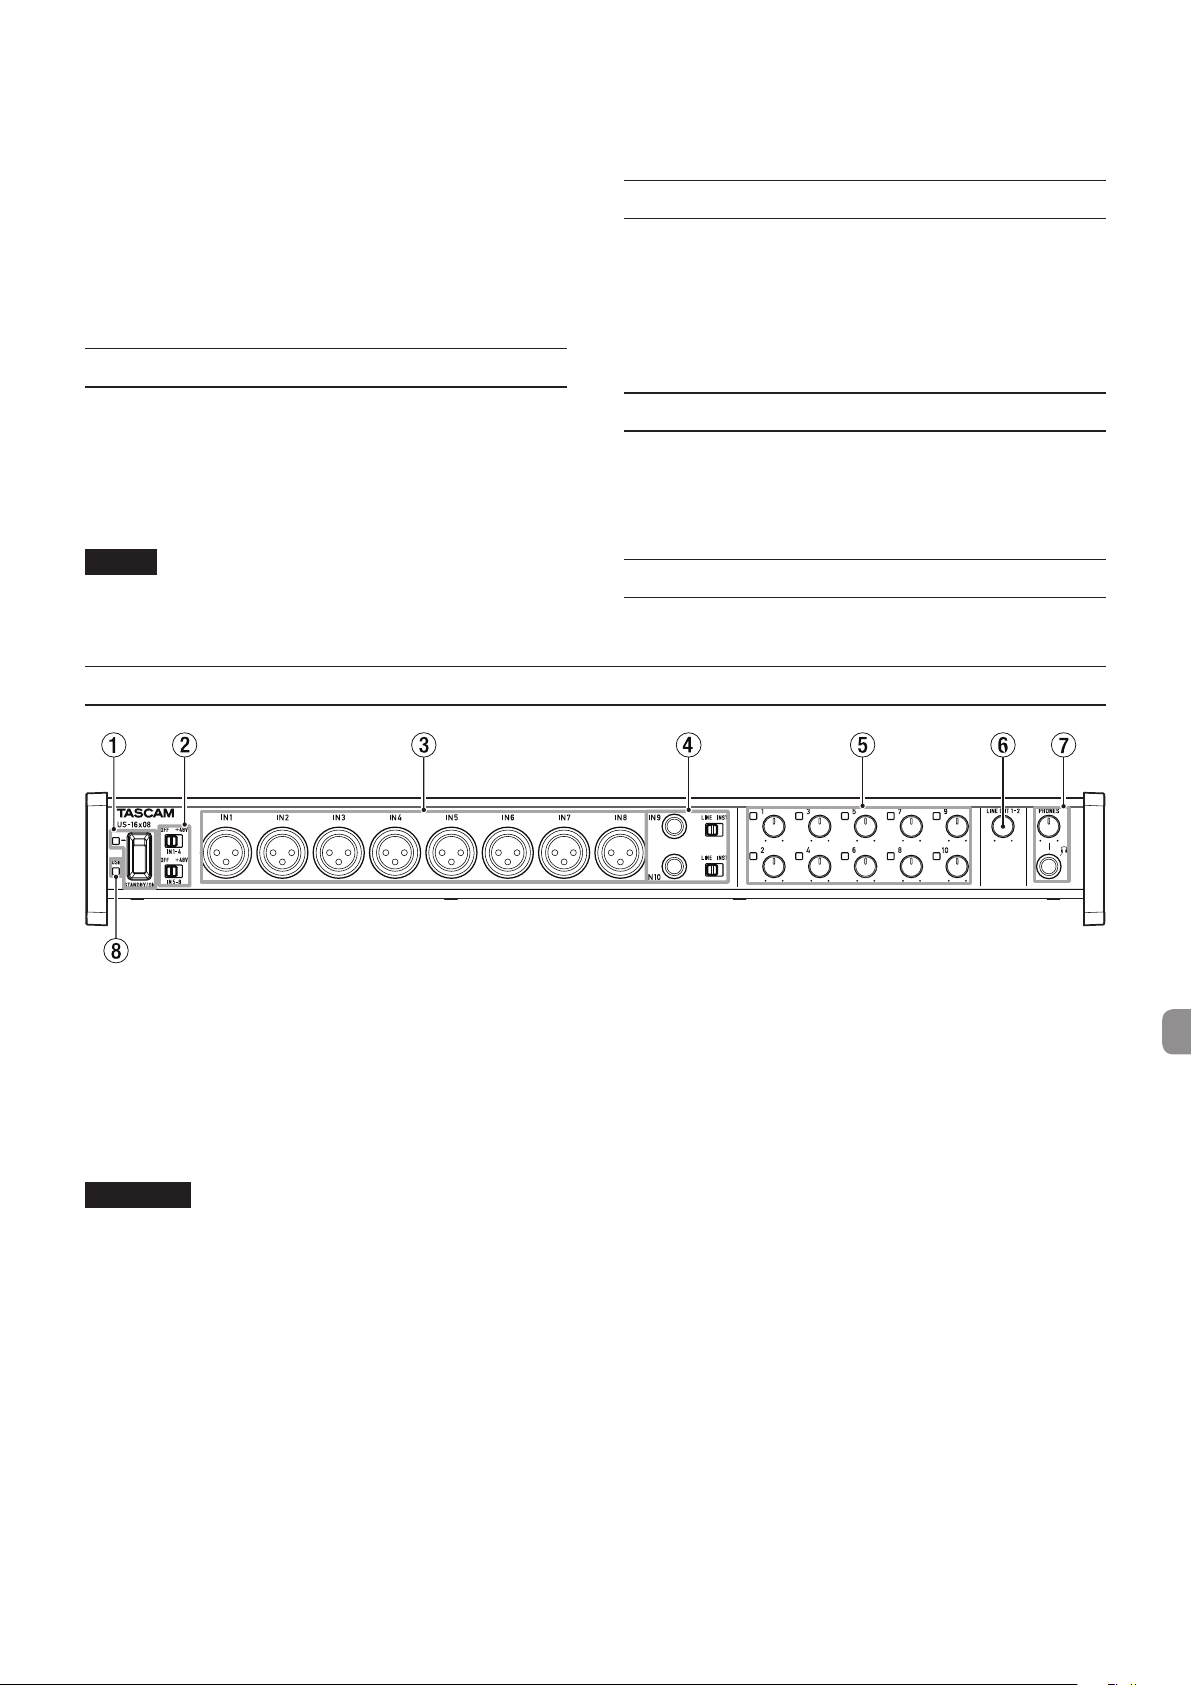
Front panel
1 STANDBY/ON switch, indicator
Use this switch to toggle between power ON and standby
modes. When on, the STANDBY/ON indicator lights green.
2 Phantom power switches
Use these switches to provide +48V phantom power to the
IN1-4 and IN5-8 jacks.
Switching is possible in groups of four channels. Phantom
power is supplied when the switch is set to +48.
CAUTION
•
Before switching between +48/OFF, lower the device's
output volume with the PHONES and LINE OUT1-2 knobs.
Failure to do so could cause a loud noise that might damage
other devices or cause injury.
•
Do not connect or disconnect mics when this switch is set to
+48.
•
Do not supply phantom power to an unbalanced dynamic
mic.
•
Supplying phantom power to some types of ribbon mics
could damage them. Do not supply phantom power to a
ribbon mic if you are in doubt.
3 IN1-8 (BALANCED) jacks
These analog inputs are XLR jacks. Use the gain knobs to set
the input gains.
(1: GND, 2: HOT, 3: COLD)
4 IN9-10 (BALANCED/UNBALANCED) jacks, LINE/INST
switch
IN9-10 jacks are standard TRS analog input jacks.
With the LINE/INST switches, both line input (audio
equipment, keyboard, etc.) and high impedance input
(direct input of guitar and other instruments) can be
supported.
Use the gain knobs to set the input gains.
(Tip: HOT, Ring: COLD, Sleeve: GND)
5 Gain knobs, overload indicators
Use the gain knobs 1-10 to adjust each of the IN1-10 gains
separately.
The overload indicator above and to the left of each gain
knob 1-10 lights just before the input would distort (when
−1 dBFS is exceeded).
6 LINE OUT1-2 knob
Use to adjust the output level of the LINE OUT1-2 jacks on
the rear panel.
7 PHONES jack/knob
Use this standard stereo jack to connect stereo headphones.
This jack outputs the same signal as the LINE OUT1-2 jacks.
Use the PHONES knob to adjust the headphone output
level.
Near windows or other places exposed to direct sunlight
Near heating equipment or in other locations that
become very hot
Extremely cold places
Very humid or poorly ventilated locations
Very dusty locations
• To enable good heat dissipation, do not place anything on
top of the unit.
• Do not place this unit on top of a power amplifier or other
device that generates heat.
Using the TEAC Global Site
You can download the Owner’s Manual necessary for this unit
from the TEAC Global Site (http://teac-global.com/).
1. Open the TEAC Global Site (http://teac-global.com/).
2. In the TASCAM Downloads section, click the desired
language to open the Downloads website page for that
language.
NOTE
If the desired language does not appear, click Other
Languages.
3. Click the product name in the “Search by Model Name”
section to open the Downloads page for that product.
4. Select and download the Owner’s Manual that are needed.
Beware of condensation
Condensation could occur if the unit is moved from a cold place
to a warm place, it is used immediately after a cold room has
been heated or it is otherwise exposed to a sudden temperature
change.
To prevent this, or if this occurs, let the unit sit for one or two
hours at the new room temperature before using it.
Cleaning the unit
To clean the unit, wipe it gently with a soft dry cloth. Do not
wipe with chemical cleaning cloths, benzene, thinner, alcohol or
other chemical agents. Doing so could damage the surface or
cause discoloration.
User registration
Customers in the USA, please visit the TASCAM website (http://
tascam.com/) to register as a user online.
Loading ...
Loading ...
Loading ...