the possibilities
Thank you for purchasing this Samsung product.
To receive more complete service.
D ease register your Product at
www.samsung.com/register
,f
etyInfolrlnq ion
TOREDUCETHERISKOFELECTRICSHOOK,DONOTREMOVETHECOVER(ORBACK).
NOUSER-SERVICEABLEPARTSAREINSIDE.REFERSERVICINGTOQUALIFIEDSERVICEPERSONNEL.
ThelightingflashandArrowheadwithin
TriangleIsawarningsign@erringyouof
dangerousvoltageInsidetheproduct.
CAUTION :TOREDUCETHERISKOFELECTRIC
SHOCK,DONOTREMOVECOVER(ORBACK)NO
USERSERVICEABLEPARTSINSIDE,REFER
SERVICINGTOQUALIFIEDSERVICEPERSONNEL,
Theexplanationpointwithinthetriangleis
awarningsignalertingyou ofimportant
instructionsaccompanyingtheproduct.
WARNING
To reduce therisk of fireorelectric shock, do not
expose thisappliance to rainor moisture.
CAUTION
Apparatusshallnotbe exposedto drippingorsplashingand
no objectsfilledwithliquids,suchasvases,sh@lbe placedon
theapparatus.
TheMainsplugisusedasadisconnectdeviceandshallstay
readilyoperableat anytime.
DANGER
CLASS 1 LASER PRODUCT
• This product isclassified asaCLASS 1LASER
product.
Use of controls, adjustments orperformance of
procedures other than those specified herein mayresult
in hazardous radiation exposure.
Complies with 21CFR 1040.10 except for deviations
pursuant to Laser Notice No.50, dated ,June24,2007.
VISIBLEAND INVISIBLELASERRADIATIONWHENOPEN.
AVOIDDIRECTEXPOSURETOBEAM.(FDA21 CFR)
CAUTION
CLASS3BVISIBLEAND INVISIBLELASERRADIATION
WHENOPEN.AVOIDEXPOSURETOTHEBEAM(lEO
60825-1)
THIS PRODUCTUTILIZESA LASER.USEOFCONTROLS
ORADJUSTMENTSORPERFORMANCEOFPROCEDURES
OTHERTHANTHOSESPECIFIEDHEREINMAYRESULTIN
HAZARDOUSRADIATIONEXPOSURE.DONOTOPEN
COVERAND DONOTREPAIRYOURSELF.REFER
SERVICINGTOQUALIFIEDPERSONNEL.
This product satisfies FCCregulations when shielded cables and connectors are used to connect theunit to other
equipment. To prevent electromagnetic interference with electricappliances, such as radios and televisions, use shielded
cables and connectors forconnections.
FCC NOTE (for U.S.A)
This equipment hasbeen tested and foundto comply with the limitsfor aClass B digital device, pursuant to Part 15 of the
FCCRules. These limits are designed to provide reasonable protection against harmfulinterference in aresidential
installation.
This equipment generates, uses and can radiate radiofrequency energy and, ifnotinstalled and used inaccordance with the
instructions, may cause harmfulinterference to radiocommunications. However, there isno guarantee that interference will
not occur in aparticular installation.
Ifthis equipment does cause harmful interference to radio ortelevision reception, which can be determined byturning the
equipment off and on, the user isencouraged to try tocorrect the interference byone ormore of the following measures:
Reorient or relocatethe receivingantenna.
Increase the separation between theequipment and receiver.
Connect the equipment into an outlet on a circuit different from that to which the receiverisconnected.
Consult the dealeror an experienced radio/TV technician forhelp.
CAUTION :FCC regulations state that any unauthorized changes or modifications to this equipment may void the user's
authority to operate it.
2 English
RF Radiation Exposure Statement
This equipment complies with FCC RF Radiation Exposure limits setforth for an uncontrolled environment.
This equipment should be installed and operated with aminimum distance of 20cm between the radiator and your body.
Thistransmitter must not be coqocated oroperating in coniunction with any other antenna ortransmitter.
This device complies with part 15 of the FCC Rules. Operation issubject to the following two conditions:
(1)This device may not cause harmful interference, and
(2)this device must accept any interference received, including interference that may cause undesired operation.
Changes or modifications not expressly approved by the party responsible for compliance could void the user's
authority to operate the equipment.
To comply with the FCC RF exposure compliance requirements, this device and its antenna must not be co-
located or operated in conjunction
Thefinal device into which this transmitter module is installed must be labeled with thefollowing statement:
"This device contains TX FCC ID: A3LDNUBS1 ." Ifthis transmitter will be configured asapc peripheral, it willbe the
OEM's responsibility to obtain authorization as such (either through Certification of Declaration of Conformity) prior to
marketing of the device.
Readthese operatinginstructionscarefullybeforeusingthe
unit.Followallthe safetyinstructionslistedbelow. Keepthese
operating instructionshandyfor futurereference.
1)Readthese instructions.
2)Keepthese Instructions.
3)Heedallwarnings.
4)Followallinstructions.
5)Do notusethisapparatusnear water.
6)Clean only with drycloth.
7)Do netblock any ventilationopenings. Installin accordance
with themanufacturer's instructions.
8)De notinstallnear any heat sources such asradiators,
heat registers,stoves,or otherapparatus (including
amplifiers)that produce heat.
9)De notdefeatthe safetypurpose of thepolarizedor
grounding-type plug.A polarizedplughas two blades with
onewiderthan theother.A groundingtypeplug hastwo
blades and athird grounding prong.Thewide blade orthe
third prong areprovided for your safety. Iftheprodded plug
does notfit into youroutlet, consult an electricianfor
replacementof theobsoleteoutlet.
10) Protect thepowercord from beingwalkedon orpinched
particularlyatplugs, convenience receptaclee, and thepoint
wheretheyexitfrom theapparatus.
11)Onlyuse attachment/accessories specified bythe
manufacturer.
12) Useonlywith thecart,stand,tripod,
bracket,ortable specifiedbythe
manufacturer,orsold with the apparatus.
When acart isused, usecautionwhen
movingthecart/apparatuscombination to
avoidinjuryfrom tip-over.
13) Unplugthisapparatus duringlightningstorms orwhen
unused fer longperiods of time.
14) Referallservicingto qualifiedservicepersonnel.Servicing
isrequiredwhentheapparatus hasbeendamagedinany
way,such aspower supplycordor plugisdamaged, liquid
has beenspilledorobjects havefalleninto theapparatus,the
apparatus hasbeen exposed to rainormoisture,doesnot
operatenormally,orhas beendropped.
• EnsurethattheACpower supplyin yourhouse complies
with theidentificationstickerlocatedonthe back of your
product.
• Installyourproduct horizontally,onasuitablebase
(furniture),with enough spacearound itfor ventilation(3-4
inches).
• Donetplacetheproduct onamplifiersorotherequipment
which maybecomehot.
Make suretheventilationslotsare notcovered.
• Donotstackanythingon topof theproduct.
• Beforemovingtheproduct, ensurethe DiscinsertHoleis
empty.
• Inorderto disconnect theproduct completely from the
powersupply, removethemain plugfromthe wailoutlet,
especiallywhen leftunused foralongperiod oftime.
• Duringthunderstorms,disconnecttheACmainplugfrom
thewalloutlet.Voltagepeaks dueto lightningcould
damage theproduct.
• Donetexposetheproduct to directsunlightorother heat
sources. Thiscouldleadto overheatingand maJfuncfionof
theproduct.
• Protect theproduct frommoisture, and excessheator
equipmentcreatingstrong magneticorelectricfields (i.e.
speakers.).
• DisconnectthepowercablefromtheACsupplyif the
product malfunctions.
• Your product isnotintendedfor industria]use.Use ofthis
product isforpersonaluseonly.
• Condensationmayoccur ifyour product ordisc hasbeen
stored incoldtemperatures. Iftransporting theproduct
during thewinter,wait approximately2 hoursuntilthe
product hasreached room temperaturebefore using.
• Thebatteries usedwith thisproductcontainchemicals
that areharmful to theenvironment.
Do notdispose ofbatteriesinthegeneralhouseholdtrash.
English 3
,f
Inform ion
Small scratches on the disc may reduce sound
and picture quality or cause skipping.
Be especially careful not to scratch discs when
handling them.
Holding discs ...............................................................................................................
o Donottouchtheplaybacksideofthedisc.
Holdthediscbythe edgessothatfingerprintswill not
get on the surface.
Donot stickpaper ortape on the
disc.
Disc Storage
Do not keep in direct sunlight
Keep in a cool ventilated area
Keep in a clean Protection jacket.
Store vertically.
NOTE
_ Donot allowthediscsto becomecontaminatedwith
dirt.
_ Donot loadcrackedorscratcheddiscs.
Handling and Stor!ng Discs ...........................................
Ifyouget fingerprintsordirton the disc,cleanit with a
milddetergentdiluted inwaterand wipewith asoftcloth.
- When cleaning, wipe gently from the inside to
the outside ofthe disc
NOTE
_ Condensationmayformif warmair comesinto
contactwith cold parts insidethe product.When
condensationformsinsidetheproduct,it maynot
operatecorrectly.Ifthisoccurs, removethe disc
and letthe productstandfor1or2 hourswith the
poweron.
ThisproductiscoveredbyoneormoreofthefollowingU.S.patents:
5,060,2205,457,6695,561,6495,705,7626,043,9126,438,099
6,467,0616,556,5216,578,1636,697,3076,728,4746,771,891
6,894,9636,895,5936,937,8156,996,3277,009,9267,085,221
7,088,6497,092,3277,099,5667,123,5647,142,4937,142,495
7,145,8617,146,6247,151,7297,161,8797,164,6477,167,437
7,173,8917,177,2507,194,1877,203,8917,209,4237,210,067
7,228,0627,245,5667,245,5677,257,0657,263,0457,269,110
7,272,0867,272,1067,280,4607,283,7297,286,4547,304,938
Thisproductincorporatescopyrightprotediontechnologythatis
protectedbyU.S.patentsandotherintellectualpropertyrights.Useof
thiscopyrightprotectiontechnologymustbeauthorizedby
Macrovision,andisintendedforhomeandotherlimitedviewinguses
onlyunlessotherwiseauthorizedbyMacrovfsion.Reverseengineering
ordisassemblyfsprohibited.
ABOUTDIVXVIDEO:aivX®isadigitalvideoformat
createdbyDivX,lnc.ThisisanofficialDivXCertified
devicethatplaysaivXvideo.Visitwww.divx.comfor
moreinformationandsoftwaretoolstoconvertyour
filesintoaivXvideo.
ABOI£DIVXVIDEO-ON-DEMAND:ThisDivXCertified®devicemustbe
registeredinordertopJayDivX%eo-on-DemandOVOD)content.To
generatetheregistrationcode,locatetheDivXVODsectioninthe
devicesetupmenu.Gotovod.divx.comdththiscodetocompletethe
registrationprocessandlearnmoreaboutDivXVOD.
DivXCertifiedtoplayDivXvideouptoHalOBOp,includingpremium
content.
iPodisatrademarkofApple
Inc.,registeredintheU.S.and
othercountries.
iPhoneisa trademarkofAppleInc.
ManufacturedunderlicensefromDobyLaboratories.Doby,
ProLogicandthedouble-DsymbolaretrademarksofDolby
Laboratories.
ManufacturedunderlicenseunderU.S.Patent#'s:5,451,942;
5,956,67415,974,380;5,978,762;6,226,616;6,487,535;
7,212,872;7,333,929;7,392,195;7,272,567&otherU.S.
andworldwidepatentsissued& pending.
DTSandtheSymbolareregisteredtrademarks,&DTS-ND,
DTS-HDMasterAudio,andtheDTSIogosaretrademarksof
DTS,Inc.Productincludessoftware.©DTS,Inc.AllRights
Reserved.
<OpenSourceLicenseNotice>
Inthecaseofusingopensourcesoftware,OpenSource
Licensesareavailableontheproductmenu.
©2010SamsungElectronicsCo,,Ltd, All rights
reserved,
4' English
Colqt iqt
[[
2 Safety Warnings
3 important Safer/Instructions
3 Precautions
4 Cautions on Handling and Storing Discs
4 License
4 Copyright
7 Key features of your new Blu-ray Home Theater
8 Iconsthat will be used in manual
9 Disc Types and Characteristics
13 Accessories
14 Description
14 Front Panel
15 Rear Panel
16 Remote control
iiiiiiiiiiiiiiiiiiiiiiiiiiiiiiiiiiiiiiiiiiiiiiiiiiiiiiiiiiiiiiiiiiiiiiiiiiiiiiiiiiiiiii ! ! ! iiii ii ii ii ii ii i
18 Connecting the Speakers
20 Connecting the Optional Wireless Receiver Module
22 Connecting External Devices/your TVvia HDMI
24 Connecting the Video Out to your TV
25 ConnectingAudiofrom ExternalComponents
26 Connecting to the Network
27 Connecting the FM Antenna
28 Before Starting (Initial settings)
29 Setting the Menu
30 Display
30 TV Aspect
30 BDWise (Samsung Products only)
30 Resolution
32 HDMI Format
32 Movie Frame(24 Fs)
32 Progressive Mode
32 Still Mode
32 HDMI Deep Color
33 Audio
33 Speaker Setting
34 Musical Room Calibration
34 EQ Optimizer
34 HDMIAudio
35 Digital Output
36 Dynamic Range Control
36 AV Sync
36 System
36 initial Settings
36 Intemet@TV Screen Size
36 Anynet+(HDMl-OEC)
36 BD Data Management
37 Clock
37 DivX(R)Registration
37 DivX(R)Deactivation
38 Network Setup
38 Network Settings
41 Network Status
41 BD-LIVE Intemet Connection
41 Language
42 Security
42 Parental Rating
42 Change Password
English 5
Coi t i t
42 General
42 Background
42 Energy Saving
42 Front Display
42 Power On/Off Sound
42 Light Effect
43 Support
43 Software Upgrade
43 Contact Samsung
44 Playing aDisc
44 Usingthe Disc menu / Title menu / Popup menu
45 Usingthe Search and Skip Functions
46 Slow Motion Play/Step Motion Play
46 Repeat Playback
47 Usingthe TOOLS button
49 Listening to Music
51 Sound Mode
52 Playing back aPicture
53 Playing back aUSB Storage
53 Listening to Radio
54 Simple Playback to Intemet Radio(Pandora)
54 Usingan iPod
56 Using Internet@TV
60 BD-LIVETM
60 Software Upgrade Notification
60 Usingthe AlIShare Function
62 Troubleshooting
65 Index
66 Specifications
FiguresandillustrationsinthisUserManualareprovidedfoxreferer_ceon!yandmaydifferfromactualproductappearance.
6 English
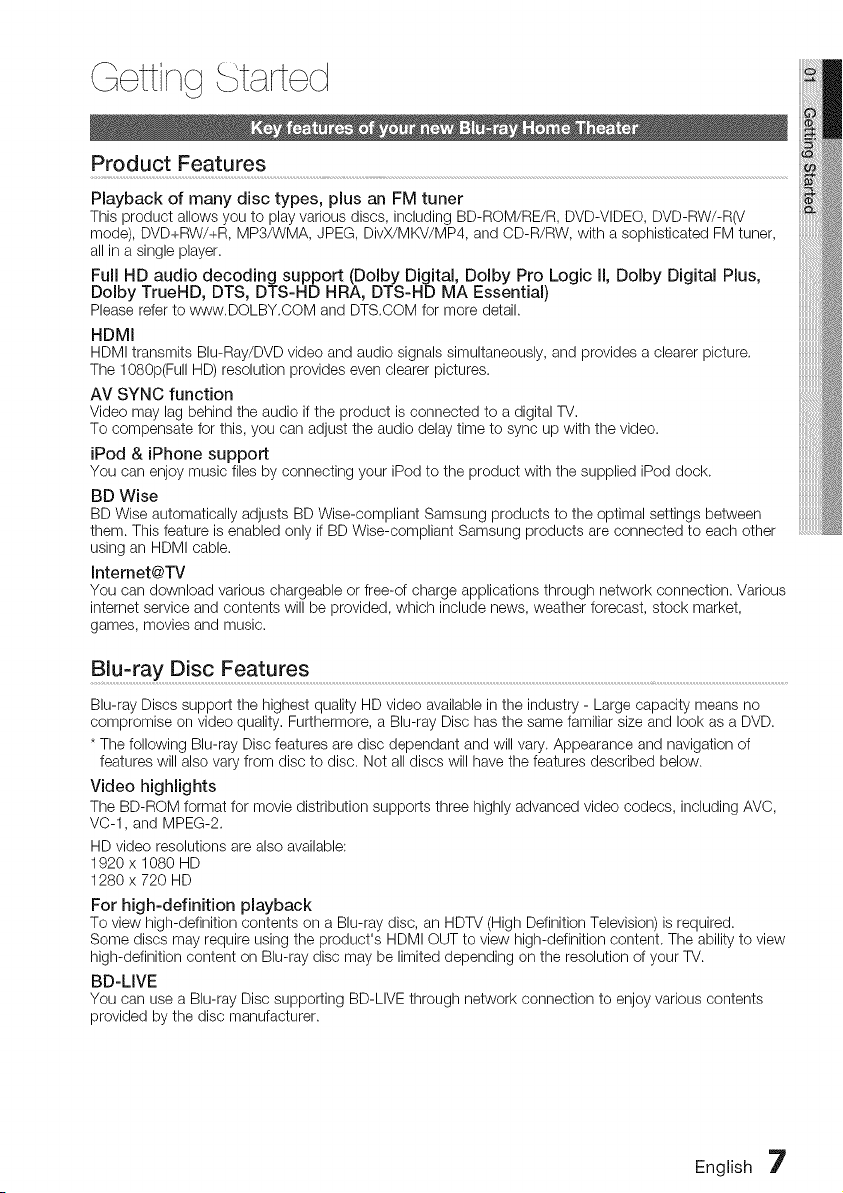
Product Features
Playback of many disc types, plus an FM tuner
This product allows you to play various discs, including BD-ROM/RE/R, DVD-VIDEO, DVD-RW/-R(V
mode), DVD+RW/+R, MP3/WMA, JPEG, DivX/MKV/MP4, and CD-R/RW, with a sophisticated FMtuner,
allin asingle player.
Full HD audio decoding support (Dolby Digital, Dolby Pro Logic II, Dolby Digital Plus,
Dolby TrueHD, DTS, DTS-HD HRA, DTS-HD MA Essential)
Please refer to www.DOLBY.COM and DTS.COM for more detail.
HDMI
HDMI transmits Blu-Ray/DVD video and audio signals simultaneously, and provides a clearer picture.
The 1080p(Full HD) resolution provides evenclearer pictures.
AV SYNC function
Video may lag behind the audio if the product isconnected to adigital TV.
To compensate for this, you can adjust the audio delay time to sync up with the video.
iPod & iPhone support
You can enjoy music files by connecting your iPodto the product with the supplied iPod dock.
BD Wise
BD Wise automatically adjusts BD Wise-compliant Samsung products to the optimal settings between
them. Thisfeature isenabled only if BD Wise-compliant Samsung products are connected to each other
using an HDMI cable.
Internet@TV
You can download various chargeable or free-of charge applications through network connection. Various
internet service and contents will be provided, which include news, weather forecast, stock market,
games, movies and music.
Blu-ray Disc Features ..............................................................................................................................................................................................................................................................................................................................................
Blu-ray Discssupport the highest quality HD video available in the industry - Large capacity means no
compromise on video quality. Furthermore, a Blu-ray Disc has the same familiar size and look as a DVD.
* The following Blu-ray Disc features are disc dependant and will vary. Appearance andnavigation of
features will also varyfrom disc to disc. Not alldiscs will have the features described below.
Video highlights
The BD-ROM format for movie distribution supports three highly advanced video codecs, including AVC,
VC-1, and MPEG-2.
HD video resolutions are also available:
1920 x 1080 HD
1280 x 720 HD
For high-definition playback
To view high-definition contents on aBlu-ray disc, an HDTV (High Definition Television) isrequired.
Some discs may require using the product's HDMI OUT to view high-definition content. The abilityto view
high-definition content on Blu-ray disc may be limited depending on the resolution of your TV.
BD-LIVE
You can use a Blu-ray Disc supporting BD-LIVE through network connection to enjoy various contents
provided by the disc manufacturer.
English 7
etting Started
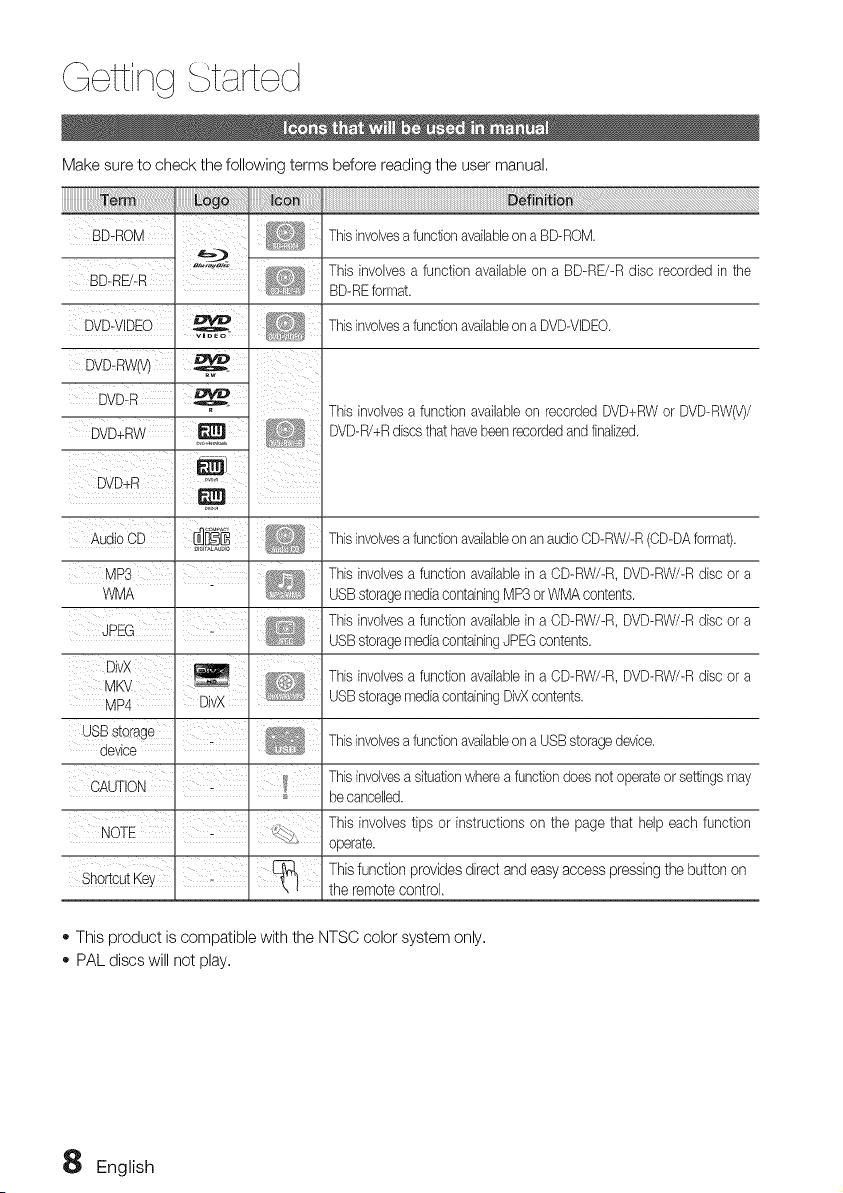
Make sure to check the following terms before reading the user manual.
ii ...................................................................................................
BD-ROM
BD nD'R!
i
DVD,VIDEO :
DvD;Rwu/
Thisinvolvesa functionavailableona BD-ROM.
Thisinvolvesa functionavailableon a BD-RE/-Rdisc recorded in the
BD-REformat.
Thisinvolvesa functionavailableona DVD-VIDEO.
DVD+RW' _
Thisinvolvesa functionavailableon recorded DVD+RWor DVD-RW(V)/
DVD-R/+Rdiscsthat havebeenrecordedandfinalized.
DVD+R .....
. _ .
Aud oOD
WMA
i
JPEG
Thisinvolvesa functionavailableonan audioCD-RW/-R(OD-DAforrnat).
Thisinvolvesa functionavailablein a CD-RW/-R,DVD-RW/-Rdisc or a
USBstoragemediacontainingMP3or WMAcontents.
Thisinvolvesa functionavailablein a CD-RW/-R,DVD-RW/-Rdisc or a
USBstoragernediacontainingJPEGcontents.
Thisinvolvesa functionavailablein a CD-RW/-R,DVD-RW/-Rdisc or a
USBstoragernediacontainingDivXcontents.
Thisinvolvesa functionavailableona USBstoragedevice.
Thisinvolvesa situationwhereafunctiondoesnot operateorsettingsrnay
becancelled.
Thisinvolvestips or instructionsonthe page that help eachfunction
operate.
Thisfunction provides directand easy access pressingthe buttonon
the remote control.
_,This product iscompatible with the NTSC color system only.
_,PAL discs will not play.
8 English
Logos of Discs that can be played
Blu-ray Disc Compatibility ......................................
Bb-ray isa new and evolvingformat, Accordingly,disc
cempatbi[ity issues arepossible,Netalldiscs are
compatibleand not everydisc will play back. For
additionalinformatbn,referto the DiscTypesand
Characteristicssectionof thisManual,Ifyouencounter
compatibilityproblems, pleasecontact the SAMSUNG
customercare center at 1-800 SAMSUNG.
NOTE
_ Playbackmaynotwork forsometypes of discs,or
when specificoperations,such asanglechange
and aspect ratioadjustment,arebeingperformed.
Informationaboutthe discsiswritten in detailon
the box.Pleasereferto thisif necessary,
_ Do net allowthe disctobecomedirtyorscratched,
Fingerprints,dirt, dust,scratchesordepositsof
cigarettesmokeon the recordingsurfacemay
makeit impossibleto usethe discforplayback,
_ WhenaBD-Javatitleisplayed, loadingmaytake
longerthan anormaltitle,orsomefunctionsmay
performslowly,
Discs that cannot be played
_,HD DVD Disc
- DVD-RAM
- 3,9 GB DVD-R Disc for Authoring,
_,DVD-RW(VR mode)
_,Super Audio CD(except CD layer)
_,DVD-ROM/PD/MV-Disc, etc CVD/CD-ROM/
CDV/CD-G/CD-I/LD
_,CDGs play audio only, not graphics,
NOTE
_ Somecommercialdiscsand DVDdiscspurchased
outsideyour regionmaynot beplayablewiththis
product.Whenthesediscsareplayed,either"No
disc."or"Pleasecheckthe regionalcodeof the
disc."will be displayed.
_ IfaDVD-R/-RWdischasnot been recorded
properlyinDVDvideoformat,it willnot bephyab[e.
English 9
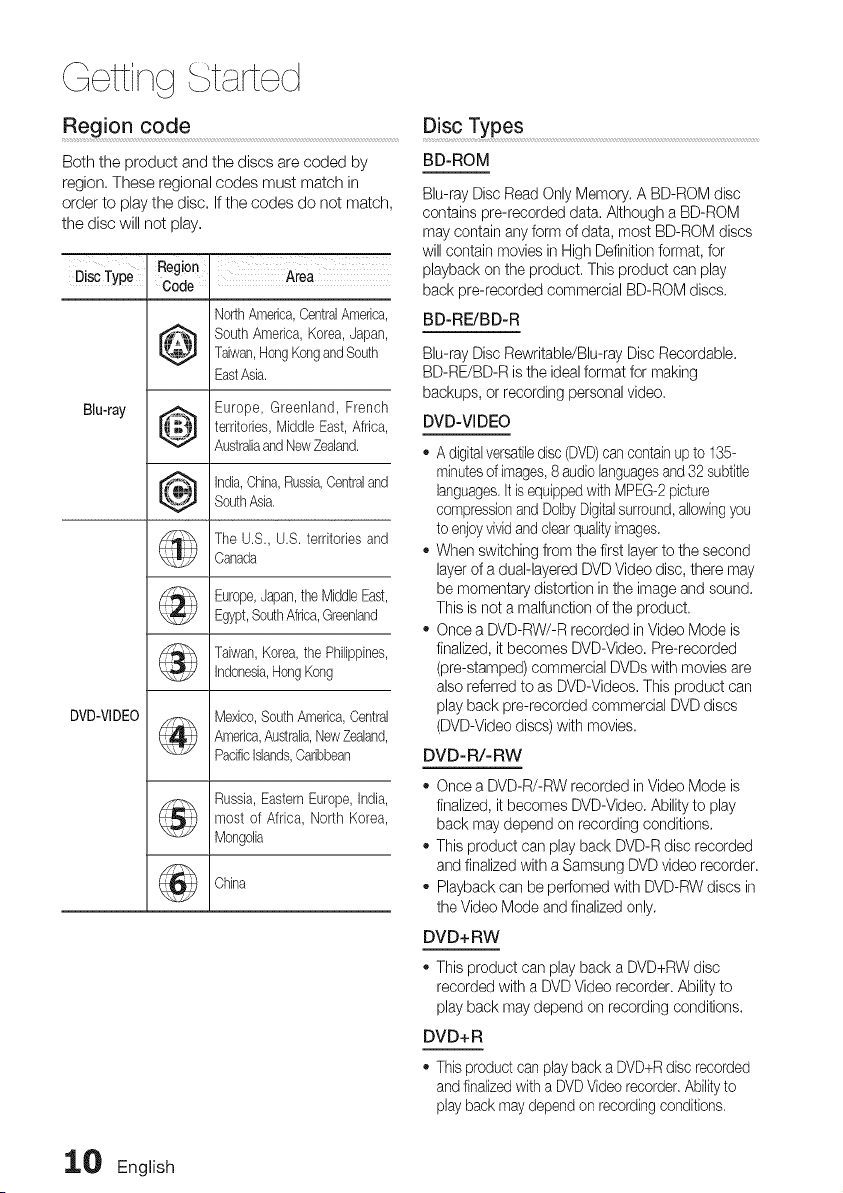
Region code
Both the product and the discs are coded by
region, These regional codes must match in
order to play the disc, Ifthe codes do not match,
the disc will not play,
Disc Type
Blu-ray
DVD-VIDEO
Region
Code
I!.@L,'I
Area
NorthAmerica,CentralAmerica,
SouthAmerica,Korea,Japan,
Taiwan,HongKongandSouth
EastAsia.
Europe, Greenland, French
territories,Middle East,Africa,
AustraliaandNewZealand.
india,China,Russia,Centraland
SouthAsia,
TheU.S., U.S. territoriesand
Canada
Europe,Japan,the MiddleEast,
Egypt,SouthAfrica,Greenland
Taiwan,Korea,the Philippines,
indonesia,HongKong
Mexico,SouthAmerica,Central
America,Australia,NewZealand,
Pacificislands,Caribbean
Russia,EasternEurope,india,
most ofAfrica, NorthKorea,
Mongolia
China
Disc Types ....................................................................................................................................................................
BD-ROM
Blu-ray Disc ReadOnly Memory. A BD-ROM disc
contains pre-recorded data. Although aBD-ROM
may contain anyform of data, most BD-ROM discs
will contain movies in High Definitionformat, for
playback onthe product. This product can play
back pre-recorded commercial BD-ROM discs.
BD-RE/BD-R
Blu-ray Disc Rewritable/Blu-ray Disc Recordable.
BD-RE/BD-R isthe idealformat formaking
backups, or recording personalvideo.
DVD-VIDEO
- A digitalversatiledisc(DVD)cancontain upto 135-
minutesof images,8audiolanguagesand 32 subtitle
languages,Itisequippedwith MPEG-2 picture
compressionand Doby Digitalsurround,allowingyou
toenjoyvividand clearqualityimages.
- When switching from the first layerto the second
layerofa dual-layered DVD Video disc, there may
be momentary distortion in the image and sound.
This isnet amalfunction ofthe product.
- Once a DVD-RW/-R recorded in Video Mode is
finalized, it becomes DVD-Video. Pre-recorded
(pre-stamped) commercial DVDswith moviesare
alsoreferred to as DVD-Videos. This product can
playback pre-recorded commercial DVD discs
(DVD-Video discs)with movies.
DVD-R/-RW
- Once a DVD-R/-RW recorded in Video Mode is
finalized, it becomes DVD-Video. Ability to play
back may depend on recording conditions.
- This product can playback DVD-Rdisc recorded
and finalized with aSamsung DVD videorecorder.
- Playback can beperfomed with DVD-RW discs in
the Video Mode and finalized only.
DVD+ RW
- This product can playback a DVD+RW disc
recorded with a DVDVideo recorder. Ability to
playback may depend on recording conditions.
DVD+ R
,, Thisproduct can play back a DVD+R disc recorded
and finalized withaDVDVideo recorder,Abilityto
playback maydepend on recording conditions.
_ English
Audio CD
o An audio disc on which 44.1 kHzPCM Audio is
recorded.
Thisproduct canplay back CD-DA format audio
OD-Rand CD-RW discs.
Theproduct maynot be abletoplay someCD-R or
CD-RWdiscsdue to the conditionofthe recording,
CD-R/-RW
,, Use a700MB(80minutes)CD-R/-RW disc,
if possible, do not use a 800MB(90minutes)orabove
disc, as the disc maynot play back,
if the CD-R/-RWdisc was not recordedasaclosed
session,youmay experiencedelayswhen playing
backthe beginningofthe disc orallrecordedfiles
maynotplay,
SomeCD-R/-RW discsmaynot be playablewith this
product,dependingon the device whichwasused to
burnthem, Forcontents recorded onCD-R/-RW
mediafromCDs foryour personal use,playability
mayvarydepending on contents and discs,
Disc Format
Using MP3 disc
CD-R/-RW, DVD-RW/-Rrecorded withUDF,
ISO9660or JOLIETformatcanbeplayed back,
OnlyMP3 fileswith the ".mp3" or ".MP3"extension
canbeplayed,
Playablebitraterangeisfrom 56 Kbps to 320 Kbps.
Playablesample-rateis32KHzto 48KHz.
Theproductcanhandleamaximumof 1500fliesand
foldersunderaparentfolder,ForMP3fliesrecordedwith
aVBR(VariabieBitRates),the soundmaycut inandout,
Using JPEG disc
CD-R/-RW, DVD-RW/-R recorded with UDF,
ISO9660 orJOLIETformat can be played back,
- OnlyJPEG files with the ",jpg", ".JPG", ".jpeg" or
"JPEG" extension can be displayed,
ProgressiveJPEG issupported,
DVD-RW/-R (V)
,, Thisisaformat thatisusedforrecordingdata on a
DVD-RW orDVD-Rdisc, Thedisc canbeplayed by
thisproductonce it hasbeenfinalized,
if adisc that has been recorded in VideoMode bya
differentmaker's recorderbut has not been finalized,
it cannotbe played by thisproduct,
DivX(Digital video express)
DivXisa video fileformat developed by Microsoft and is
basedonMPEG4compressiontechnology to provide
audioand video data over the Internet inreal-time,
MPEG4 isusedforvideo encoding and MP3 foraudio
encoding so that the userscanwatch a movie atnear
DVD-qualityvideo and audio.
Supported Formats(DivX)
Thisproduct onlysupports the followingmediaformats,
Ifboth video and audioformatsare not supported,the
user mayexperienceproblemssuch asbroken images
ornosound,
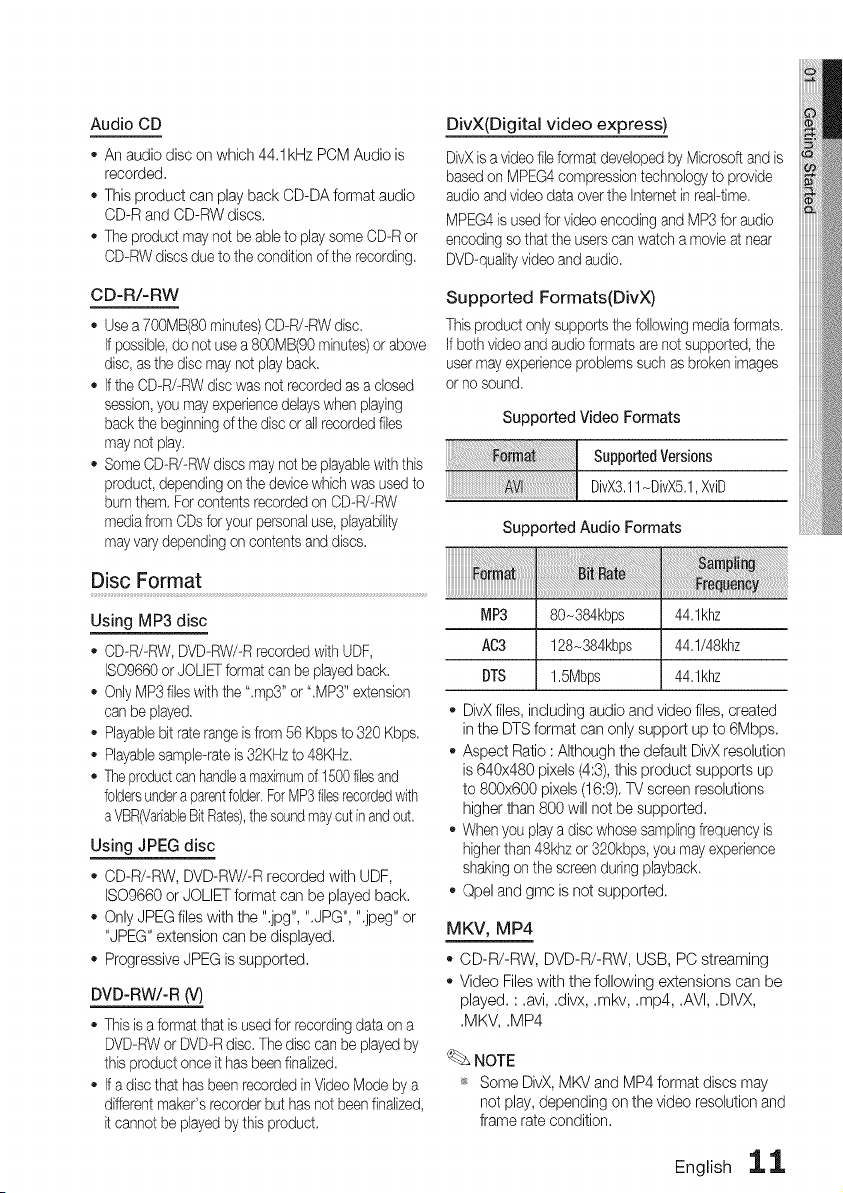
Supported Video Formats
SupportedVersions
DivX3,11-DivX5,1,XviD
Supported Audio Formats
MP3 80-384kbps 44,1khz
AC3 128_384kbps 44,1/48khz
DTS 1,5Mbps 44,1khz
DivXfiles, including audio and video files, created
in the DTSformat can only support up to 6Mbps.
Aspect Ratio :Although the default DivX resolution
is640x480 pixels (4:3),thisproduct supports up
to 800x600 pixels (16:9).TV screenresolutions
higher than 800 will not besupported.
Whenyou playa disc whosesamplingfrequency is
higher than 48khz or320kbps, you mayexperience
shakingonthe screenduringplayback,
Opel and gmc isnot supported.
MKV, MP4
CD-R/-RW, DVD-R/-RW, USB, PC streaming
Video Fileswith the following extensions can be
played, : ,avi, ,divx, ,mkv, ,mp4, ,AVI, ,DIVX,
,MKV, ,MP4
NOTE
_ Some DivX, MKV and MP4format discs may
not play, depending on thevideo resolution and
framerate condition,
English 1,1,
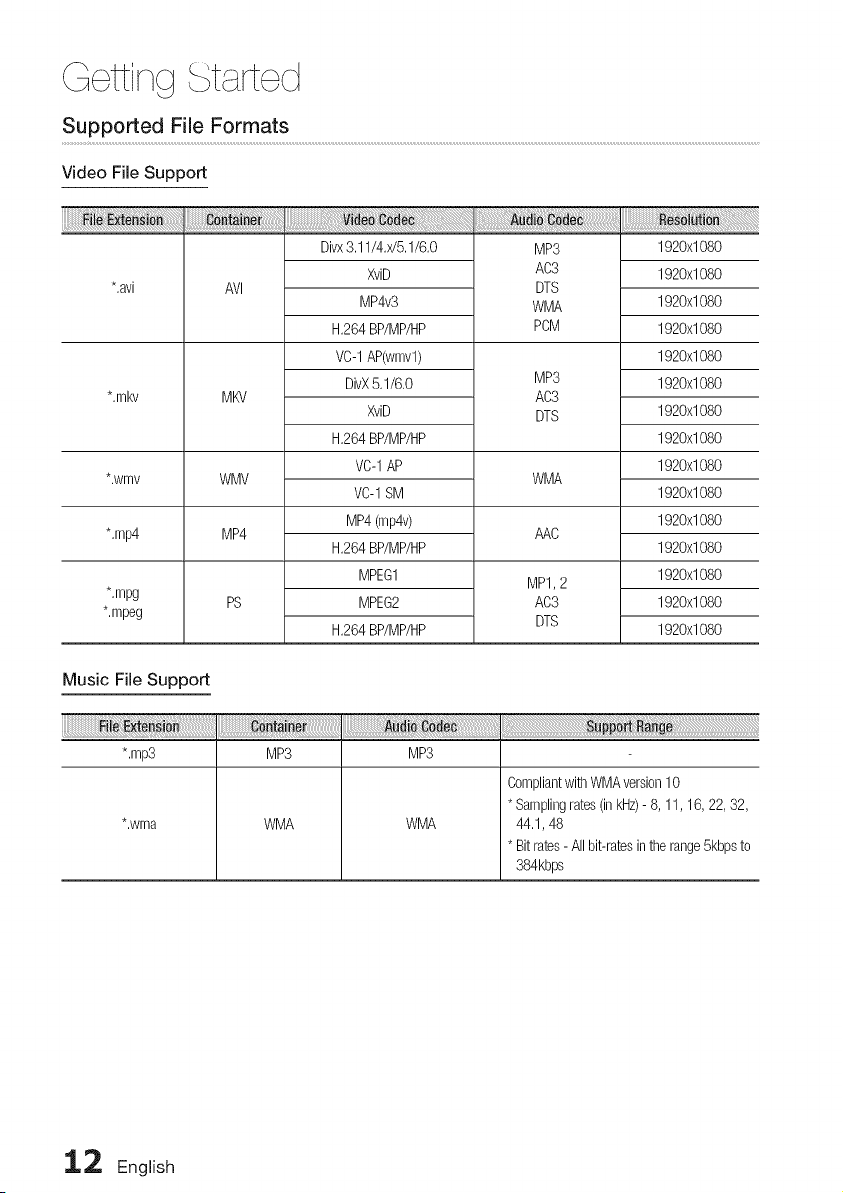
Supported File Formats
Video File Support
*,avi
*,mkv
*,wmv
*,mp4
*,mpg
*,mpeg
AVl
MKV
WMV
MP4
PS
a a
Divx3,11/4,x/5,1/6,0
XviD
MP4v3
H,264BP/MP/HP
VC-1AP(wmvl)
DivX5,1/6,0
XviD
H,264BP/MP/HP
VC-1AP
VC-1SM
MP4(mp4v)
H,264BP/MP/HP
MPEG1
MPEG2
H,264BP/MP/HP
MP3
AC3
DTS
WMA
PCM
MP3
AC3
DTS
WMA
AAC
MP1,2
AC3
DTS
1920x1080
1920x1080
1920x1080
1920x1080
1920x1080
1920x1080
1920x1080
1920x1080
1920x1080
1920x1080
1920x1080
1920x1080
1920x1080
1920x1080
1920x1080
Music File Support
*,mp3 MP3 MP3
*,wma
WMA
WMA
CompliantwithWMAversion10
* Samplingrates(inkHz)-8,11,16, 22, 32,
44,1,48
* Bitrates-All bit-ratesinthe range5kbpsto
384kbps
1.:2 English
USB Host Specification
USB Host Specification
• Supports USB 1,1 orUSB 2.0 compliant devices,
• Supports devices connected using the USB
A type cable.
• Supports UMS (USB Mass Storage Device)
V1.0 compliant devices.
• Supports FAT(FAT, FAT16, FAT32)file
system formatting.
Non-compliance
• Doesnot support adevice that requires installing
aseparate driver on the PC (Windows),
• Does not support connection to a USB hub.
• A USB device that is connected using an
USB extension cable may not be recognized.
Operational Limitations
• Ifthe connected device has multiple drives
(or partitions) installed, only one drive
(or partition) can be connected.
• A device supporting USB 1.1 alone may
cause a difference in the picture quality,
depending on the device.
Supported file Formats
ve
JPG MP3
JPG,JPEG ,MP3
- 80-384kbps
640x480
- 44,1kHz
- CBI (Control/Bulk/Interrupt) isnot supported.
o Digital Cameras that use PTP protocol or
require additional program installation when
connected to a PC are not supported.
A device using the NTFS file system isnot
supported. (Onlythe FAT 16/32 (File Allocation
Table 16/32) filesystem issupported.)
Does not operate with Janus enabled MTP
(Media Transfer Protocol) devices.
USB Devices that can be used with the
product
1, USBStorage Device
2, MP3 Player
3, DigitalCamera
4, RemovableHDD
RemovableHDDs equipped withless than 160
Gbytesaresupported,Removable HDDs
equippedwith 160Gbytes or moremaynot be
recognized,depending on thedevice,
Ifthe connected devicedoes not work dueto
insufficientpowersupply,youcan usea
separatepowercable to supplypowerso that it
canworkproperly,TheUSBcableconnector
maydiffer,depending on the manufacturerof
the USBdevice,
5, USBcard Reader: OneslotUSB card readerand
Multi-slotUSB card reader,
TheUSB card readermaynotbe supported,
depending on the manufacturer,
Ifyouinstal[multiplememorydevicesintoa
multi-card reader,you mayexperience
problems,
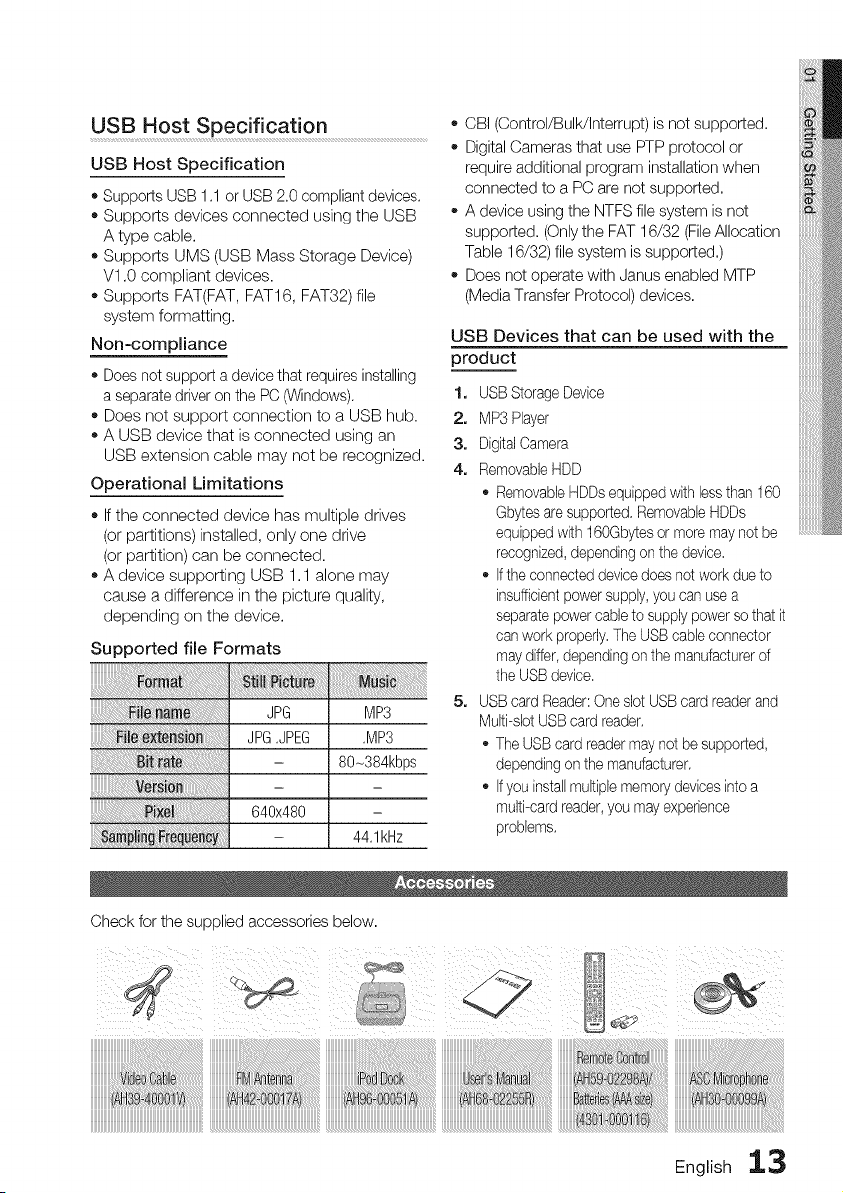
Check for the supplied accessories below.
English 13
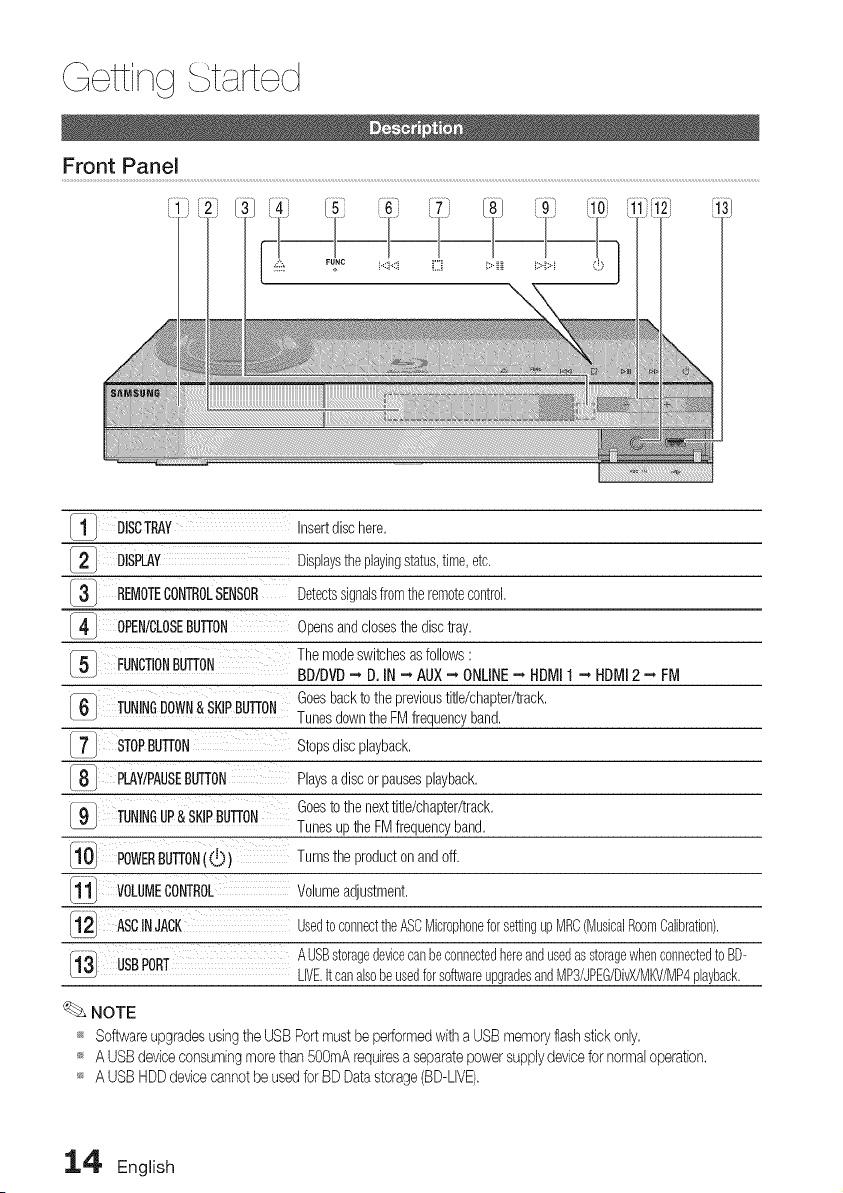
1" DISCTRAY Insertdischere,
I21 DISPLAY Displaystheplayingstatus,time,etc,
3 REMOTECONTROLSENSOR Detectssignalsfromtheremotecontrol,
I4-1 OPENICLOSEBUTTON Opensandclosesthedisctray,
51 FUNCTIONBUTTON Themodeswitchesasfollows:
BDIDVD-, D.IN -, AUX-, ONLINE-, HDMII -, HDMI2 -, FM
Goesbacktothe previoustitle/chapter/track,
161 TUNINGDOWN&SKIPBUTTON Tunesdownthe FMfrequencyband,
7 STOPBUTTON Stopsdiscplayback,
8" PLAY/PAUSEBUTTON Playsa discorpausesplayback,
Goestothe nexttitle/chapter/track,
9-- TUNINGUP& SKIPBUTTON Tunesupthe FMfrequencyband,
10 POWERBUTTON((.!)) Turnsthe productonandoff,
11 VOLUMECONTROL Volumeadjustment,
ASCINJACK UsedtoconnecttheASCMicrophoneforsettingupMRC(MusicalRoomCalibration).
13 USBPORT AUSBstoragedevicecanbeconnectedhereandusedasstoragewhenconnectedto BD-
LIVE.itcanalsobeusedforsoftwareupgradesandMP3/JPEG/DivX/MKV/MP4playback.
NOTE
_ Softwareupgradesusingthe USBPortmustbe erformedwithaUSBmemoryflashstickonly.
_ A USBdeviceconsumingmorethan 50OmArequiresaseparatepowersupplydevicefornormaloperation.
_ A USBHDDdevicecannotbe usedforBD Datastorage(BD-LIVE).
14' English
Rear Panel
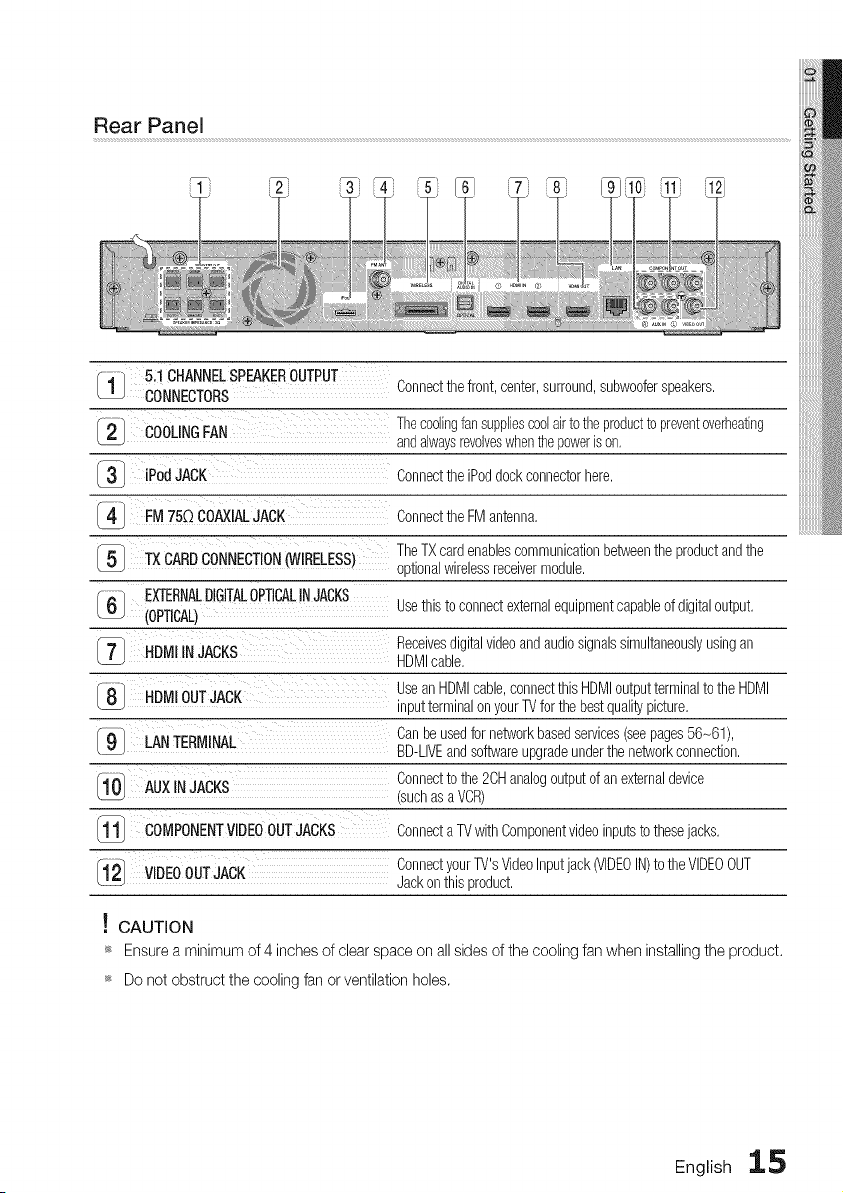
1 5.10HANNELSPEAKEROUTPUT
CONNECTORS
COOLINGFAN
3- iPodJACK
4 FM75_)COAXIALJACK
Connectthefront, center,surround,subwooferspeakers.
Thecoolingfansuppliescoolairto theproducttopreventoverheating
andalwaysrevolveswhenthepowerison.
ConnecttheiPoddock connectorhere.
ConnecttheFMantenna.
TheTXcardenablescommunicationbetweenthe productandthe
_51 TXCARDCONNECTION(WIRELESS) optionalwirelessreceivermodule,
EXTERNALDIGITALOPTICALINJACKS Usethis to connectexternalequipmentcapableof digitaloutput,
6 (OPTICAL)
7 HDMIINJACKS Receivesdigitalvideoand audiosignalssimultaneouslyusingan
HDMIcable,
8 HDMIOUTJACK
Usean HDMIcable,connectthis HDMIoutputterminalto the HDMI
inputterminalonyourTVforthe bestqualitypicture,
9 LANTERMINAL Canbe usedfornebvorkbasedservices(seepages56-61),
-- BD-LIVEandsoftwareupgradeunderthe networkconnection,
n4
Connecttothe 2CHanalogoutputofan externaldevice
AUXINJACKS
• v (suchasa VCR)
11 COMPONENTVIDEOOUTJACKS Connecta TVwith Componentvideoinputsto thesejacks,
-12 VIDEOOUTJACK ConnectyourTV'sVideoInputjack (VIDEOIN)tothe VIDEOOUT
- _ Jackonthis product.
! CAUTION
_ Ensurea minimum of 4 inches of clearspace on allsides of the cooling fan when installingtheproduct.
_ Do not obstruct the cooling fan or ventilation holes.
English 1,.5
ettin t rted
Tour of the Remote Control
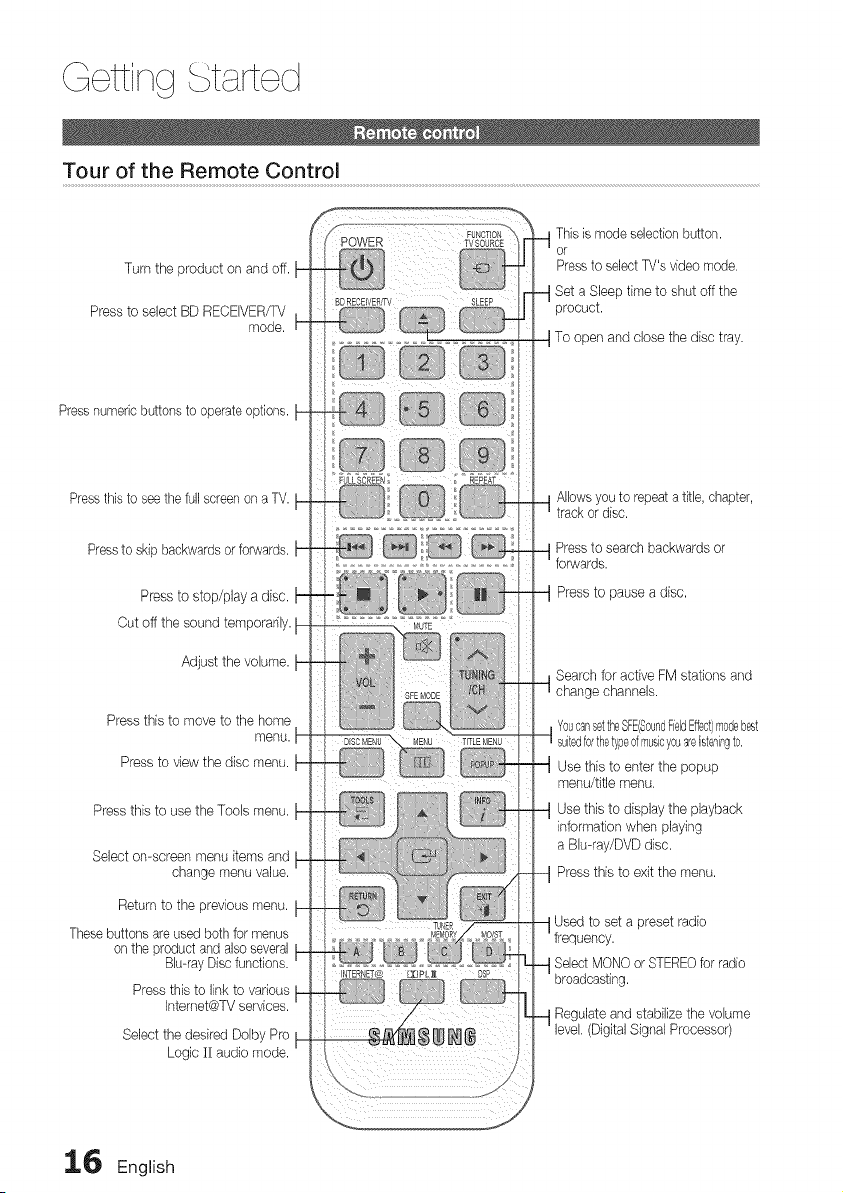
Turn the product on and off. t-
Press to select BD RECEIVER/TV
mode.
Pressnumeric buttons to operateoptions.
Pressthis to see thefull screen onaTV.
Pressto skip backwards orforwards.
Press to stop/play a disc.
Cut off the sound temporarily. I
Adjust the volume.
Press this to move to the home
menu. I
Press to view the disc menu.
Press this to use the Tools menu.
Select on-screen menu items and
change menu value.
Return to the previous menu.
These buttons areused both for menus
on the product and also several
Blu-ray Discfunctions.
Press this to link to various
Intemet@TV services.
Select the desired Dolby Pro
Logic II audio mode.
Allowsyouto repeatatitle,chapter,
trackordisc.
Pressto search backwards or
Pressto pausea disc,
Search for active FM stations and
change channels.
__ YoucansettheSFE(SoundFieldEffect)modebeet
suitedforthetypeofmusicyouarelisteningto,
UmSentthit_teOmeent#ur'the popup
Use this to display the playback
information when playing
a Blu-ray/DVD disc.
Press this to exit the menu.
Used to set apreset radio
;electMONO orSTEREOforradio
g.
Regulate and stabilize the volume
(Digital Signal Processor)
INTERNET@ IJqPL_ DSP
16 English
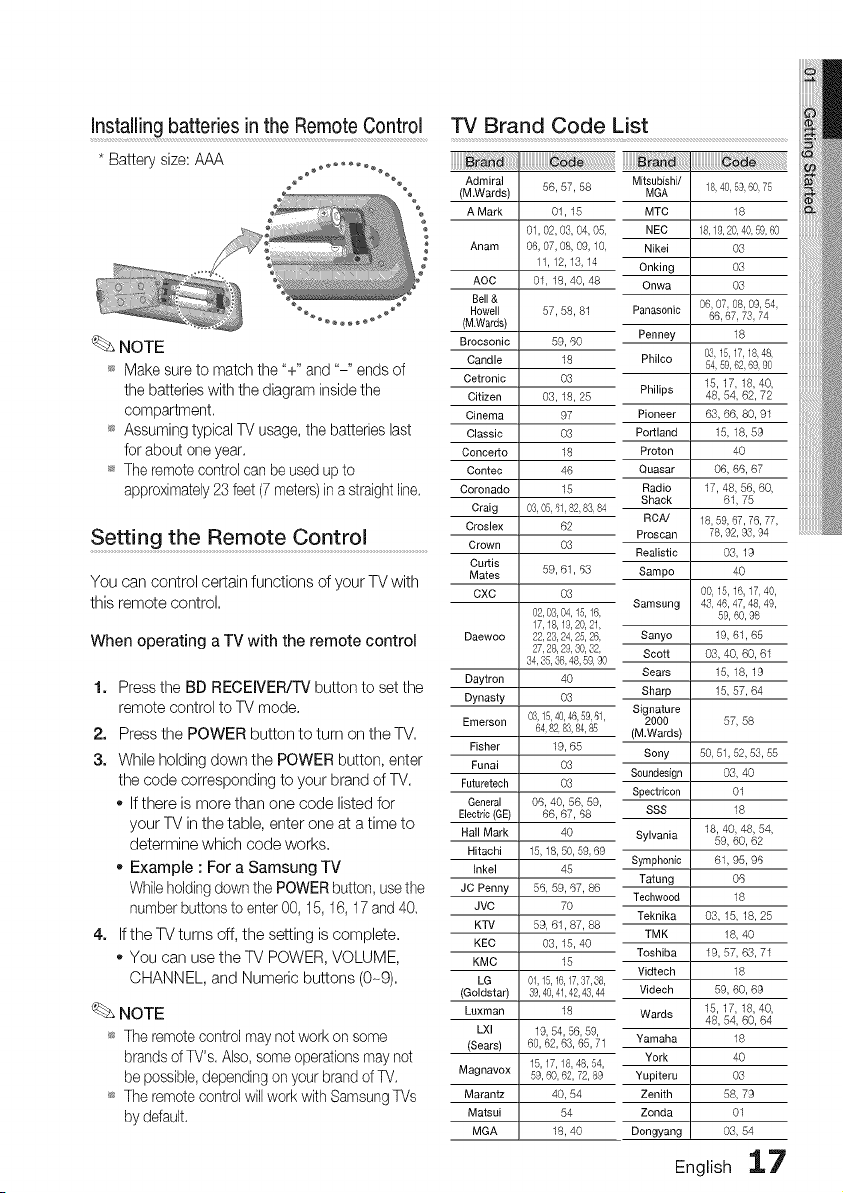
Installing batteries in theRemoteControl
* Battery size: AAA
NOTE
_ Make sure to match the "+" and "-" ends of
the batteries with the diagram insidethe
compartment.
_ Assuming typicalTV usage,the batteries last
forabout one year.
_ Theremote controlcan be usedupto
approximately 23 feet (7meters)inastraightline.
Setting the Remote Control ...........................................
You can control certain functions of your TVwith
this remotecontrol.
When operating a TV with the remote control
1. Pressthe BD RECEIVER/TV button to set the
remote control to TV mode.
2. Pressthe POWER button to turn on the TV.
3. While holding down the POWER button, enter
the code corresponding toyour brand of TV.
o Ifthere is more than one code listed for
your TV in the table, enter one at a time to
determine which code works.
Example :For a Samsung TV
While holding down thePOWERbutton, usethe
number buttonsto enter 00, 15, 16,17 and40.
4. Ifthe TVturns off, the setting iscomplete.
You can use the TV POWER, VOLUME,
CHANNEL, and Numeric buttons (0-9).
NOTE
_ The remote controlmaynot work onsome
brands of TV's, Also, someoperations may not
be possible, depending on your brandof TV,
_ The remote controlwill work with Samsung TVs
by default,
TV Brand Code List
iiiiiiiiiii_;_i_i_ililililiiiiiiiiiiiiiiiiiiiiiiiiii@i_i!_!_i!i!i!i!i!i!i!i!i!i!i!i!i!i!i!i!i!i!i!i!ii
Admiral
(M.Wards)
A Mark
Anam
AOC
Bell&
Howell
(M.Wards)
Brocsonic
Candle
Cetronic
Citizen
Cinema
Classic
Concerto
Contec
Coronado
Craig
Croslex
Crown
Curtis
Mates
CXC
Daewoo
Daytron
Dynasty
Emerson
Fisher
Funai
Futuretech
General
Electric(GE)
Hall Mark
Hitachi
Inkel
JC Penny
JVC
KTV
KEC
KMC
LG
(Goldstar)
Luxman
LXI
(Sears)
Magnavox
Marantz
Matsui
MGA
56, 57, 58
01, 16
01,02,03,04,05,
06,07,08,09,10,
11,12,13,14
01,18,40,48
57, 58, 81
59, 60
18
O3
03,18, 26
97
O3
18
46
16
03,05,61,82,83,84
62
O3
59,61,63
03
02,03,04,15,16,
17,18,19,20,21,
22,23,24,25,26,
27,28,29,30,32,
34,%,%,48,5g, 90
4O
O3
03,15,40,46,59,61,
64,82,83,84,85
19,66
O3
O3
06,40, 56,59,
66,67,68
40
15,18,50,59,69
46
66, 59,67,86
70
69,61,87,88
03,16,40
16
01,15,16,17,37,38,
39,40,41,42,43,44
18
19,54, 56,59,
60,62,63,65,71
15,17,18,48,54,
59,60,62,72,89
40, 54
54
18,40
Mitsubishi/
MGA
MTC
NEC
Nikei
Onking
Onwa
Panasonic
Penney
Philco
Philips
Pioneer
Portland
Proton
Quasar
Radio
Shack
RCA!
Proscan
Realistic
Sampo
Samsung
67, 68
Sanyo
Scott
Sears
Sharp
Signature
2000
(M.Wards)
Sony
Soundeeign
Spsctdcon
SSS
Sylvania
Symphonic
Tatung
Teehwood
Teknika
TMK
Toshiba
Vidtech
Videch
Wards
Yamaha
York
Yupiteru
Zenith
Zonda
Dongyang
18,40,59,60,75
18
18,19,20,40,59,60
03
03
03
06,07,08,09,54,
66,67,73,74
18
03,15,17,18,48,
54,59,62,69,90
15,17,18,40,
48,64,62,72
66, 66, 80, 91
15,18,69
40
06,66,67
17,48,66,60,
61, 75
18,59,67,76,77,
78,92,93,94
03, 19
40
00,15,16,17,40,
43,46,47,48,49,
59,60,98
19,61,65
03,40,60,61
15, 18, 19
15,67, 64
50,51,52,53,55
03, 40
01
18
18,40,48,54,
69, 60, 62
61,95,96
O6
18
03,15,18, 25
18, 40
19,67,63,71
18
69, 60, 69
15,17,18,40,
48,64,60,64
18
4O
03
68, 79
01
03, 54
English 17
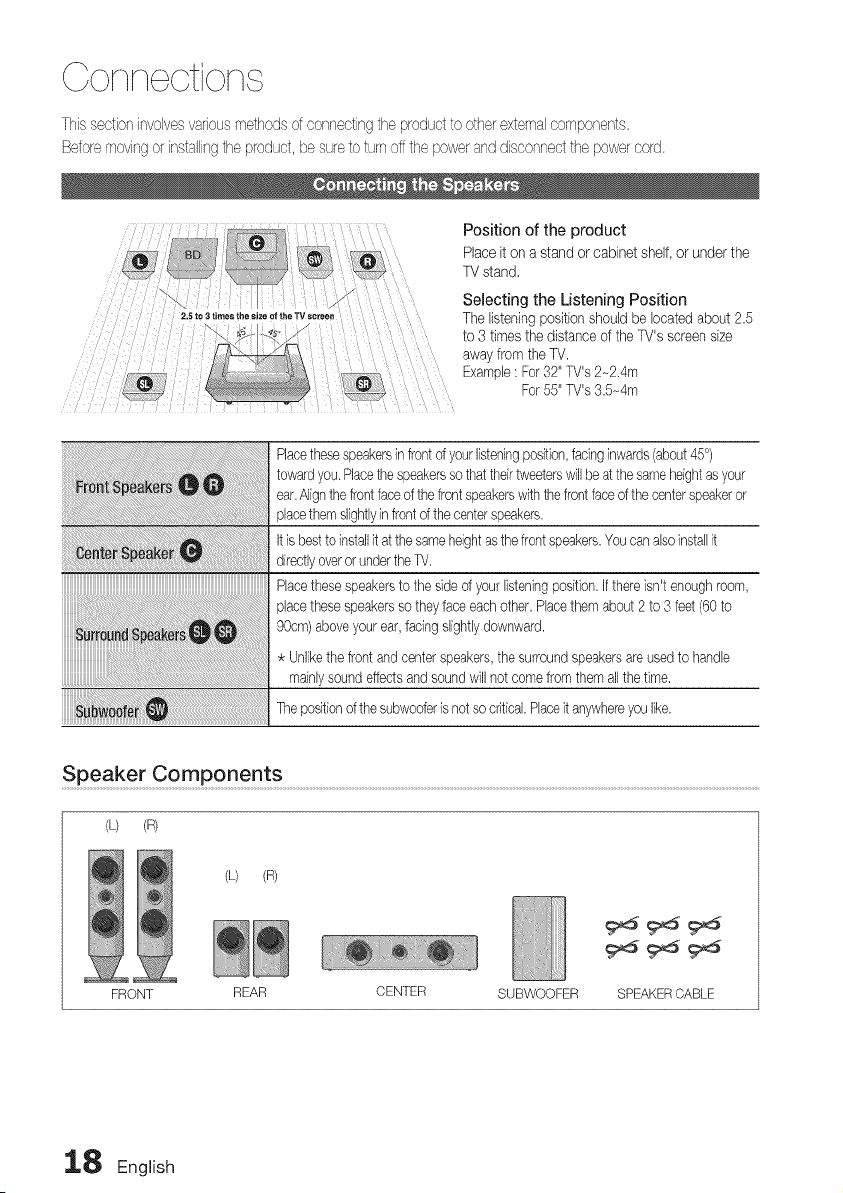
Thissectior"involvesvariousmethodsofconnectingtheproductto otherexternalcomponents,
Beforemovingorinstallingtheproduct,besuretoturnoffthepoweranddisconnectthepowercord,
,._ _ Position of the product
Bo _ _ ona standorcabinet shelf, orunderthe
TVstand,
5to3 tim tV sc een//_
• " r
Selecting the Listening Position
Thelisteningpositionshouldbe locatedabout 2.5
to3 timesthe distanceof the TV's screensize
awayfromtheTV.
Example:For32"TV's2-2.4m
For55"TV's3.5-4m
Placethesespeakersin frontofyourlisteningposition,facinginwards(about45°)
towardyou.Placethespeakerssothattheirtweeterswill beatthesameheightasyour
ear.Alignthefrontfaceofthefrontspeakerswiththe frontfaceofthe centerspeakeror
placethemslightlyin frontofthe centerspeakers.
it isbesttoinstallit atthe sameheightasthefrontspeakers.Youcanalsoinstallit
directlyoverorundertheTV.
Placethesespeakerstothe sideof yourlisteningposition,if thereisn'tenoughroom,
placethesespeakerssotheyfaceeachother,Placethemabout2 to 3 feet(60to
90cm)aboveyourear,facingslightlydownward.
Unlikethe frontandcenterspeakers,the surroundspeakersareusedto handle
mainlysoundeffectsandsoundwill not comefromthemallthe tlrne,
Thepositionofthe subwooferisnotsocritical.Placeit anywhereyoulike.
Speaker Components .........................................................................................................................................................................................................................................................................................................................................
(L) (m)
(L) (R)
FRONT REAR CENTER SUBWOOFER SPEAKERCABLE
18 English
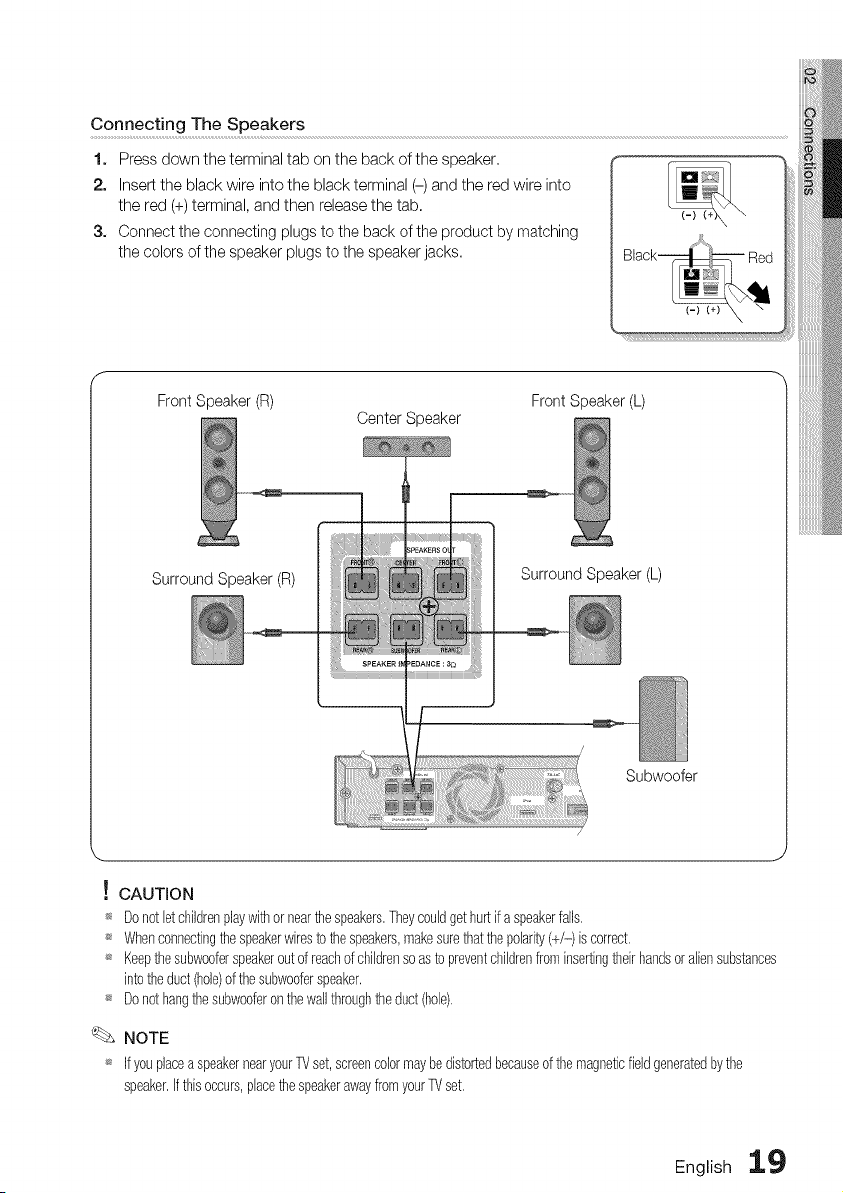
Connecting The Speakers
1. Pressdown the terminal tab on the back of the speaker.
2. Insert the black wire into the black terminal (-) and the redwire into
the red (+) terminal, and then release the tab.
3. Connect the connecting plugs to the back of the product by matching
the colors of the speaker plugs to the speaker jacks.
Front Speaker (R)
Center Speaker
Front Speaker (L)
Surround Speaker(R)
Surround Speaker (L)
/
Subwoofer
! CAUTION
_ Donotletchildrenplaywithornearthespeakers,Theycouldgethurtif aspeakerfalls,
_ Whenconnectingthe speakerwirestothespeakers,makesurethatthepolarity(+/-)iscorrect,
_ Keepthesubwooferspeakerout ofreachofchildrensoastopreventchildrenfrominsertingtheirhandsoraliensubstances
intotheduct(hole)of thesubwooferspeaker,
_ Donothangthesubwooferonthewallthroughtheduct(hole),
NOTE
_ IfyouplaceaspeakernearyourTVset,screencolormaybedistortedbecauseofthemagneticfieldgeneratedbythe
speaker,If thisoccurs,placethespeakerawayfromyourTVset,
English 19
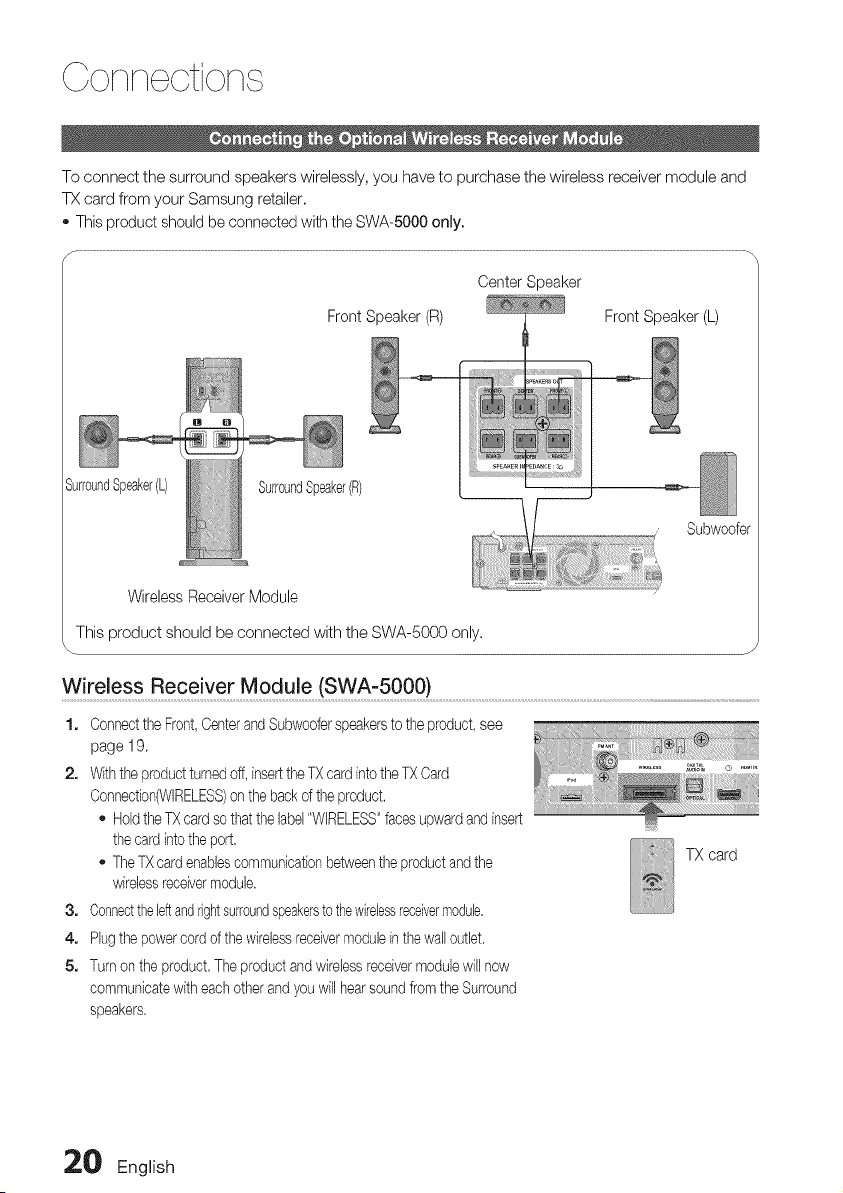
Golqlq otiolq
To connect the surround speakers wirelessly, you have to purchase the wireless receiver module and
TX card from your Samsung retailer.
oThis product should be connected with the SWA-5000 only.
Center Speaker
Front Speaker (R) Front Speaker (L)
Subwoofer
WirelessReceiverModule
This product should be connected with the SWA-5000 only,
Wireless Receiver Module (SWA-5000) ..................................................................................................................................................................................................
1. ConnecttheFront,Centerand Subwooferspeakerstothe product,see
page 19.
2. Withthe productturnedoff, inserttheTX card intotheTX Card
Connection(WIRELESS)on the backofthe product.
HoldtheTXcard sothatthe label"WIRELESS"facesupward and insert
the card intotheport.
- TheTXcard enablescommunicationbetweenthe productand the
wirelessreceivermodule.
3. Connecttheleftandrightsurroundspeakerstothewirelessreceivermodule,
4. Plugthe powercord of the wirelessreceivermoduleinthewailoutlet,
5. Turn on the product.Theproductandwirelessreceivermodulewill now
communicatewith eachother and youwillhearsoundfromthe Surround
speakers.
TX card
20 English
NOTE
_ Place the wireless receivermodule at the rear ofthe listening position, Ifthe wireless receiver module is
too close to the product, some sound interruption may be heard due to interference,
_ If you usea device such as a microwave oven, wireless LAN Card or any other device that uses
the same frequency (2,4/5,8GHz) near the product, some sound interruption may be heard due
to interference.
_ Thetransmission distance from the product to the wireless receiver module is about 33 feet (10m),
but may vary depending on your operating environment, Ifasteel-concrete wall or metallic wall is
between the product and the wireless receiver module, the system may not operate at all, because
the radio wave cannot penetrate metal.
_ If the product doesn't make wireless connection, the system needs ID Setting between the
product and wireless receiver module. With the product turned off, press the remote control's
number buttons "0"->"1 "->"3"->"5" and turn on the product. With the wireless receiver module
turned on, press "ID SET" button on the back ofthe wireless receiver module for 5seconds,
! CAUTION
_ Do not insert any other card except the TXcard dedicated to the product.
Ifa different TX card isused, the product may bedamaged or the card may not be removed
easily,
_ Do not insert the TX card upside down or in the reverse direction,
Insert the TX card when the product isturned off, Inserting the card when it isturned on may
cause a problem,
_ If the TX Card isinserted and wireless receiver module setting iscomplete, sound is not output
from the Surround Speaker connectors on the product.
_ The wireless receiving antenna isbuilt into the wireless receiver module, Keep it away from water
and moisture,
_ For optimal listening performance, make sure that the area around the wireless receiver module
location isclear of any obstructions,
_ If no sound is heard from the wireless surround speakers, switch the mode to DVD 5.1
channel or Dolby Pro Logic ][][.
_ In 2-CH mode, no sound will be heard from the wireless surround speakers,
English 21
Colqlq otiolq
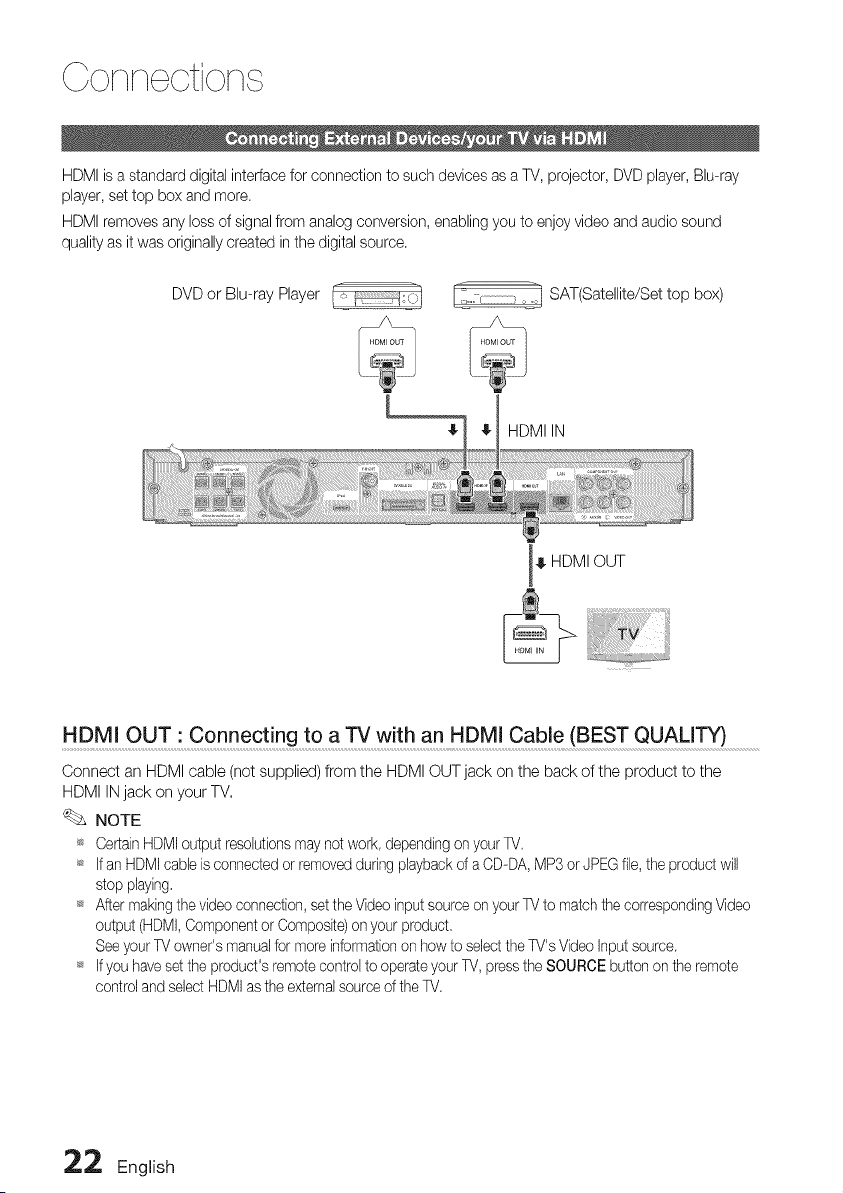
HDMIisa standard digital interface for connection to such devices as a TV, projector, DVD player, Blu-ray
player,set top box and more.
HDMIremoves anyloss ofsignalfrom analog conversion, enabling you toenjoy video and audio sound
qualityas it was originally created inthedigital source.
DVD or Blu-ray Player :::::::::::::::::::::::::::o_=jSAT(Satellite/Set top box)
HDMI IN
_. HDMI OUT
HDMI OUT i Connect!ng to a TV with an HDMI Cable (BEST QUALITY)
Connect an HDMI cable (notsupplied) from the HDMI OUT jack on the back of the product tothe
HDMI INjack on your TV.
NOTE
_s Certain HDMIoutput resolutionsmaynotwork, depending onyour TV,
_s Ifan HDMIcable isconnectedor removedduring playback ofa OD-DA, MP3 orJPEG file, the product will
stopplaying,
_s After making thevideo connection,settheVideo inputsourceon your TVto matchthe corresponding Video
output (HDMI,Componentor Composite)on your product,
Seeyour TVowner's manualformoreinformationonhow toselectthe TV's Video Input source,
_s Ifyouhavesettheproduct's remote controlto operate your TV, pressthe SOURCE button on theremote
controland selectHDMIastheexternalsource of the W.
22 English
HDMI IN • Connecting to an External Component with an HDMI Cable
1. Connect an HDMI cable (not supplied) from the HDMI INjack on the back of the product to the
HDMI OUT jack on your digital devices.
2. Pressthe FUNCTION button to select HDMI 1 or HDMI 2 input.
Themode switches asfollows : BD/DVD -* D. IN -* AUX -* ONLINE -* HDMI 1 -* HDMI 2 -* FM
HDMI Auto Detection Function
1. Using an HDMI cable, connect the HDMI OUT terminal on the rear of the player to the HDMI IN
terminal of your TV.
2. Turn on the player and TV.
For possible HDMI resolutions, see page 31.
- This function is not available if the HDMI cable does not support CEC.
- HDMI connection description
- HDMI outputs only a pure digital signal to the TV.
- If your TVdoes not support HDCP, random noise appears on the screen.
- What isthe HDCP?
HDCP(High-band width DigitalContent Protection)isa systemforpreventingBD/DVDcontentoutputtedvia
HDMIfrombeingcopied It providesasecuredigitallink betweenavideo source(PC,DVD etc)and adisplay
device_, projector etc). Content isencrypted atthe sourcedeviceto preventunauthorizedcopiesfrom being
made.
! CAUTION
_ The Anynet+functionis supportedonlywhenanHDMICableisconnectedto the HDMIOUTof the
product.
English 23
LAN
I
Red Blue Green
METHOD1
METHOD2
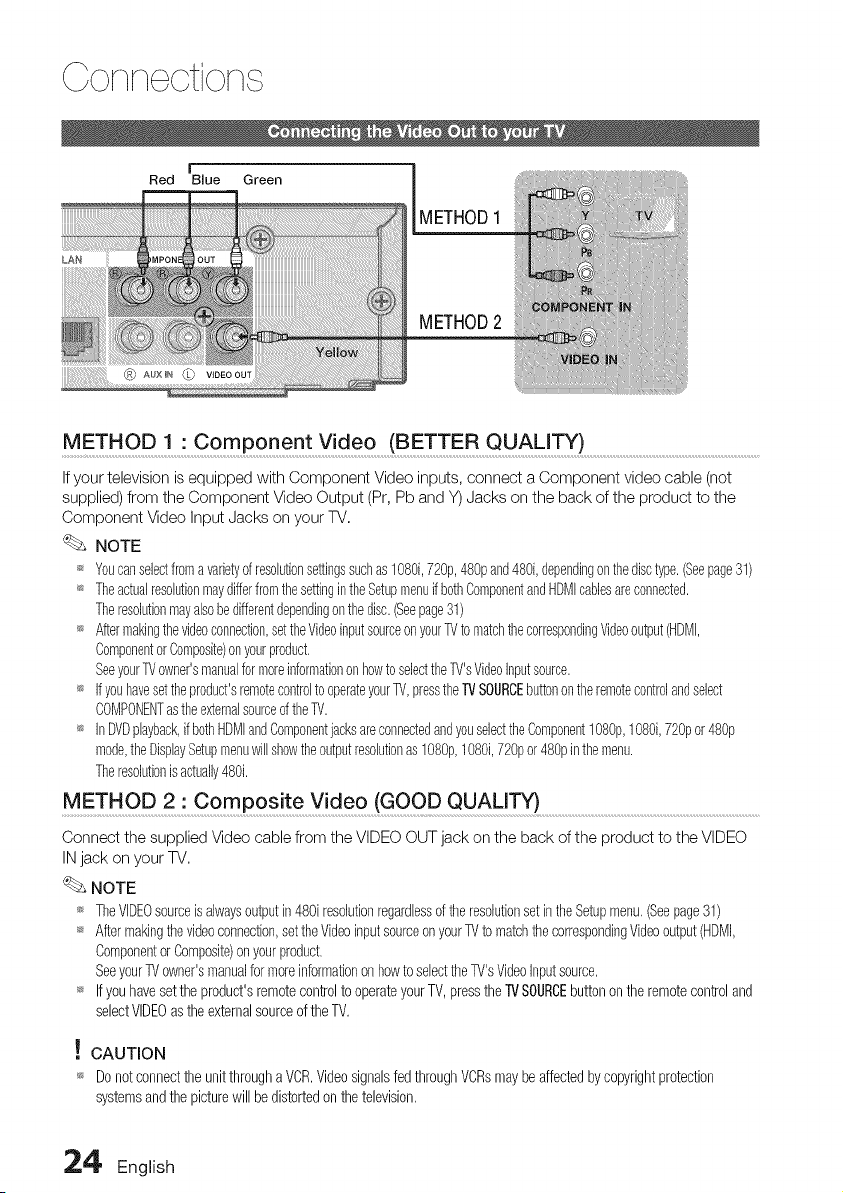
METHO D1;C ompc nent V!de o (BETTE R Q UALI_) ........................................................................................................................
Ifyour televisionis equippedwithComponent Video inputs,connect a Component videocable(not
supplied)fromthe ComponentVideo Output(Pr,Pb and Y)Jacks onthe backof the productto the
ComponentVideo InputJacks onyour TV,
NOTE
,_ Youcanselectfromavarietyofresolutionsettingssuchas1080i,720p,480pand480i,dependingonthedisctype.(Seepage31)
_ TheactualresohtionmaydifferfromthesettingintheSetupmenuifbothComponentandHDMIcablesareconnected.
Theresolutionmayalsobedifferentdependingonthedisc.(Seepage31)
_ Aftermakingthevideoconnection,settheVideoinputsourceonyourTVtomatchthecorrespondingVideooutput(HDMI,
ComponentorComposite)onyourproduct.
SeeyourTVowner'smanualformoreinformationonhowtoselectthe_'sVideoInputsource.
_ Ifyouhavesettheproduct'sremotecontroltooperateyourTV,presstheiVSOURCEbuttonontheremotecontrolandselect
COMPONENTastheexternalsourceofthe%/.
_ InDVDplayback,ifbothHDMIandComponentjacksareconnectedandyouselecttheComponent1080p,1O8Oi,72%or480p
mode,theDisplaySetupmenuwillshowtheoutputresolutionas1080p,1080i,72%or480pinthemenu.
Theresolutionisactually480i.
METHOD 2 1Composite Video (GOOD QUALITY) ..........................................................................................................................................................
ConnectthesuppliedVideo cablefromthe VIDEOOUTjack ontheback of theproducttotheVIDEO
INjack onyour TV,
NOTE
,_ TheVWDEOsourceisalwaysoutputin480iresohtionregardlessoftheresohtionsetintheSetupmenu,(Seepage31)
_ Aftermakhgthevideoconnection,settheVideoinputsourceonyourTVtomatchthecorrespondingVideooutput(HDMI,
ComponentorComposite)onyourproduct,
Seeyour_ owner'smanualformoreinformationonhowtosewedtheTV'sVideoInputsource,
_ Ifyouhavesettheproduct'sremotecontroltooperateyourTV,presstheTVSOURCEbuttonontheremotecontroland
selectVIDEOastheexternalsourceoftheTV,
! CAUTION
_ Donot connectthe unitthrougha VCR,Videosignalsfed throughVCRsmaybeaffectedbycopyrightprotection
systemsandthe picturewill bedistortedon thetelevision,
24, English
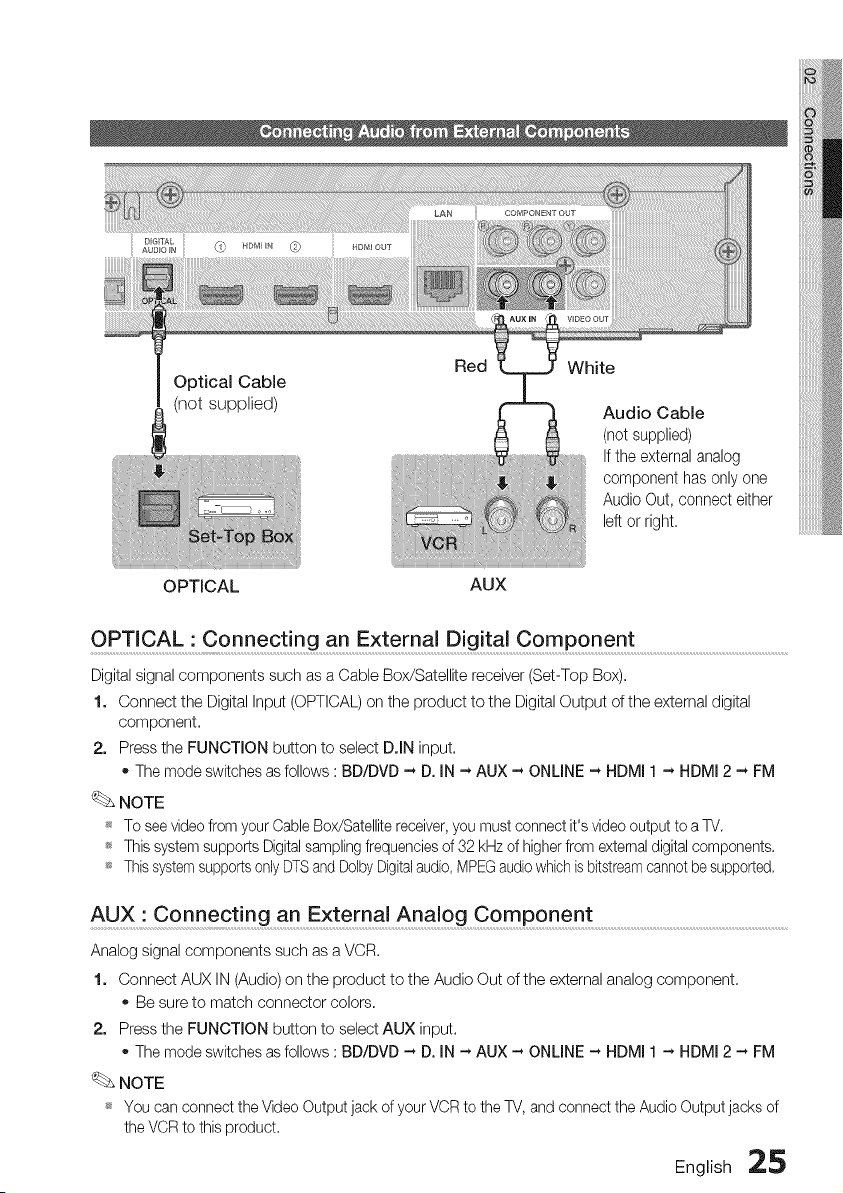
OpticalCable
(notsupplied)
Red White
AudioCable
(notsupplied)
Iftheexternalanalog
componenthasonlyone
AudioOut,connecteither
leftorright.
OPTICAL AUX
O PTICA L:C o nne ct inga n Exter na D ig it alCo mponent ...........................................................................................................
Digital signal components such as a Cable Box/Satellite receiver (Set-Top Box),
1. Connect the Digital Input (OPTICAL) on the product to the Digital Output of the external digital
component,
2. Pressthe FUNCTION button to select D.IN input,
oThe mode switches as follows :BD/DVD - D. IN - AUX - ONLINE - HDMI 1- HDMI 2 - FM
NOTE
_ To seevideofromyour CableBox/Satellite receiver,you mustconnect it's video output toa TV.
_ This systemsupports Digitalsamplingfrequencies of 32 kHzof higher from externaldigital components.
_ Thissystemsupports only DTSand Dolby Digitalaudio,MPEGaudiowhichisbitstreamcannot be supported.
AUX" Connect!ng an External Analog Component .........................................................................................................................................
Analog signal components such as a VCR,
1. Connect AUX IN (Audio) on the product to the Audio Out ofthe external analog component,
Be sure to match connector colors,
2. Pressthe FUNCTION button to select AUX input.
The mode switches as follows :BD/DVD - D. IN - AUX - ONLINE - HDMI 1 - HDMI 2 - FM
NOTE
_ You can connect the VideoOutput jack of your VCRto the TV,and connect the Audio Output jacks of
the VCR tothis product.
English 25
Conn otion
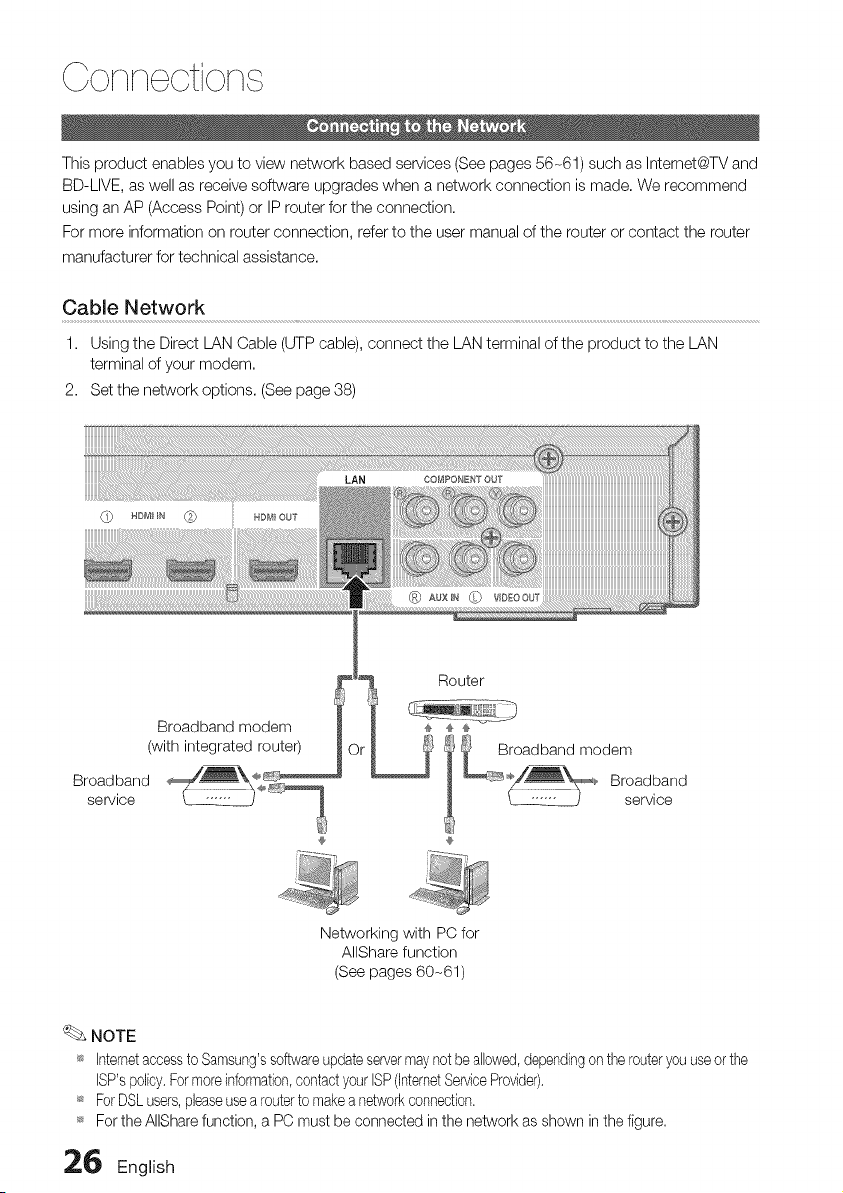
This product enables you to view network based services (See pages 56-61) such as Intemet@TV and
BD-LIVE, as well as receive software upgrades when a network connection ismade. We recommend
using an AP (Access Point) or IP router for the connection.
For more information on router connection, refer tothe user manual of the router or contact the router
manufacturer for technical assistance.
Cable Network
1. Using the Direct LAN Cable (UTP cable), connect the LAN terminal ofthe product to the LAN
terminal of your modem.
2. Set the network options. (Seepage 38)
©
Broadband modem
(with integrated router)
Broadband
service
Networking with PC for
AIIShare function
(See pages 60-61)
_Z_NOTE
_* Internetaccessto Samsung'ssoftwareupdateservermaynotbe allowed,dependingon the routeryouuseorthe
ISP'spolicy.Formoreinformation,contactyour ISP(InternetServiceProvider).
_* ForDSLusers,pleaseusea routerto makeanetworkconnection.
_* For the AIISharefunction, a PC must be connected in the network as shown inthefigure.
26 English
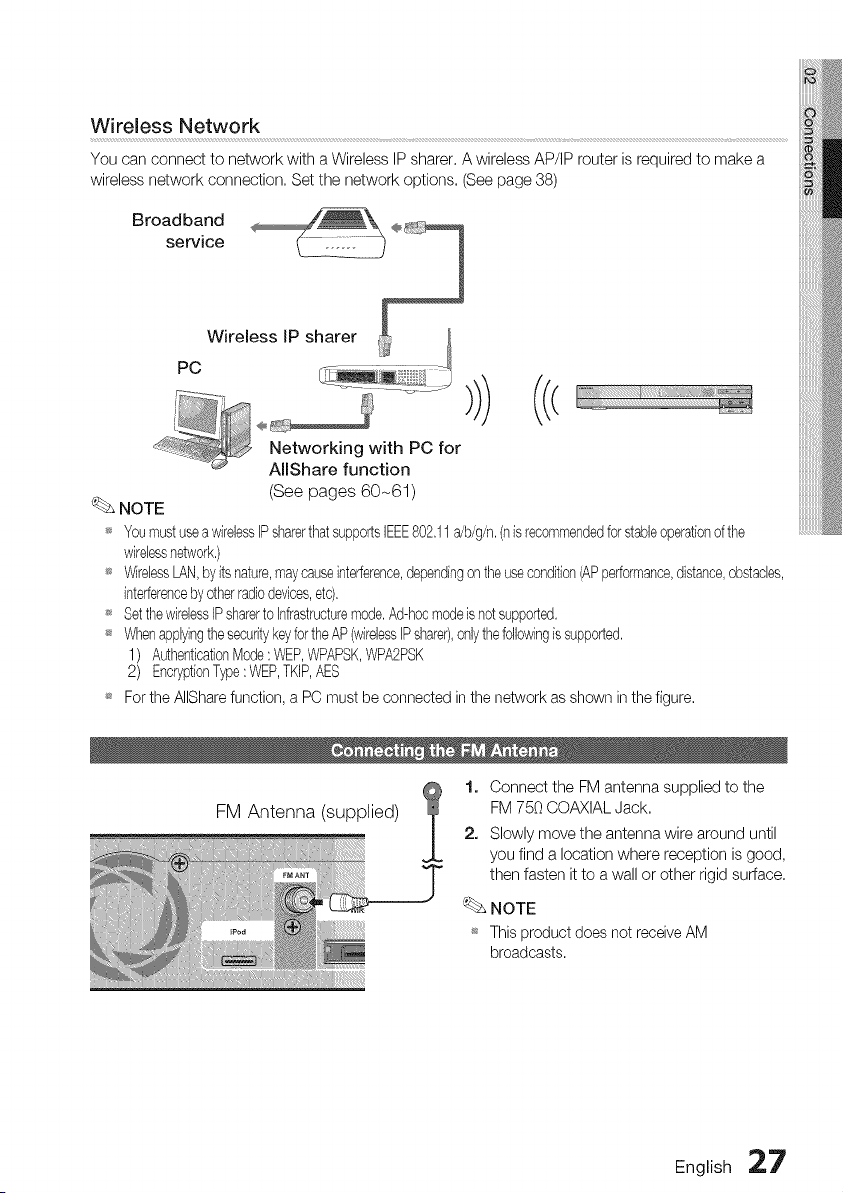
Wireless Network
You can connect to network with a Wireless IP sharer, A wireless AP/IP router isrequired to make a
wireless network connection. Set the network options. (Seepage 38)
Networking with PC for
AllShare function
(See pages 60-61)
NOTE
_ YoumustuseawirelessIPsharerthatsupportsIEEE802,11a/b/g/n,(nisrecommendedforstableoperationofthe
wirelessnetwork,)
_ WirelessLAN,byitsnature,maycauseinterference,dependingon theusecondition(APperformance,distance,obstacles,
interferencebyotherradiodevices,etc),
_ Setthe wirelessIPsharertoInfrastructuremode,Ad-hocmodeisnetsupported,
_ WhenapplyingthesecuritykeyfortheAP(wirelessIPshare&onlythefollowingissupported,
1) AuthenticationMode:WEP,WPAPSK,WPA2PSK
2) EncryptionType:WEP,TKIP,AES
_ FortheAIISharefunction, a PC must be connected in the network as shown in the figure.
FM Antenna (supplied)
1. Connect the FM antenna supplied to the
FM 750 COAXIAL Jack.
2. Slowly move the antenna wire around until
you find a location where reception isgood,
then fasten itto awall or other rigid surface.
NOTE
_ Thisproduct does net receive AM
broadcasts.
English 27

, ¢tup
1. Turn on yourTVafterconnecting the product
(Whenthe product isconnectedtoTVfor the first
time, product will turnonautomatically and the
InitialSettingsscreenwill bedisplayed.)
2. Pressthe 4 I_ buttons to the select the
desired Network Settings: Wired, Wireless or
PBC (WPS), then press the ENTER button.
(See pages 38-41)
The Network Test will start and Initial Settings
will be completed.
2. Pressthe J, T buttonsto selectthe desired
language, then pressthe ENTER button.
3. Pressthe ENTERbuttontoselectStartbutton.
8. Pressthe OK button.
The home menu will be displayed. (For more
information about home menu, please see
page 29)
• Home Menu
4. Pressthe A T buttonsto selectdesired TV
Aspect ratio,then presstheENTER button.
(Seepage 30)
Musical Room Calibration screenwill be displayed.
5. Plugthe ASCmicrophone intothe ASC INjack
onthe product. (Seepage 34)
6. Pressthe ENTERbuttontoselectStartbutton.
Settingthe Musical Room Calibrationfunction
takes about 3 minutes.
28 English
NOTE
_ When the product isconnected to TV forthe
firsttime, product will turn on automatically.
Do not confuse because this isnot
malfunction.
_ The home menu will not be displayed if you do
not configure the initialsettings.
t_ If you pressthe BLUE(B)button during the
Musical Room Calibration/Network setup, you
can access the home menu evenif the
network setup isnot completed yet.
_* When you return to home menu, the full
screen mode will be cancelled automatically.
_IfyouwanttodisplayInitialSettingsscreen
againinordertomakechanges,pressthe
STOP(n)buttononthefrontpanelofthe
productformorethan5secondswithnodisc
inserted.
_UsetheHDMIcabletoconnecttheproductto
anAnynet+(HDMI-CEC)-compliantSamsungTV.
IftheTVusesalanguagesupportedbythe
product,thatlanguagewillbesettoa
preferredlanguageautomatically.
However,theAnynet+(HDMl-CEC)feature
shouldbesettoOninbothTVandthe
product.
_Iftheproductisleftinthestopmodeformore
than5minuteswithoutbeingoperated,a
screensaverwillappearonyourTV.Ifthe
productisleftinthescreensavermodefor
morethan25minutes,thepowerwill
automaticallyturnoffexceptduringplayback
ofaCD-DA(AutomaticPower-OffFunction).
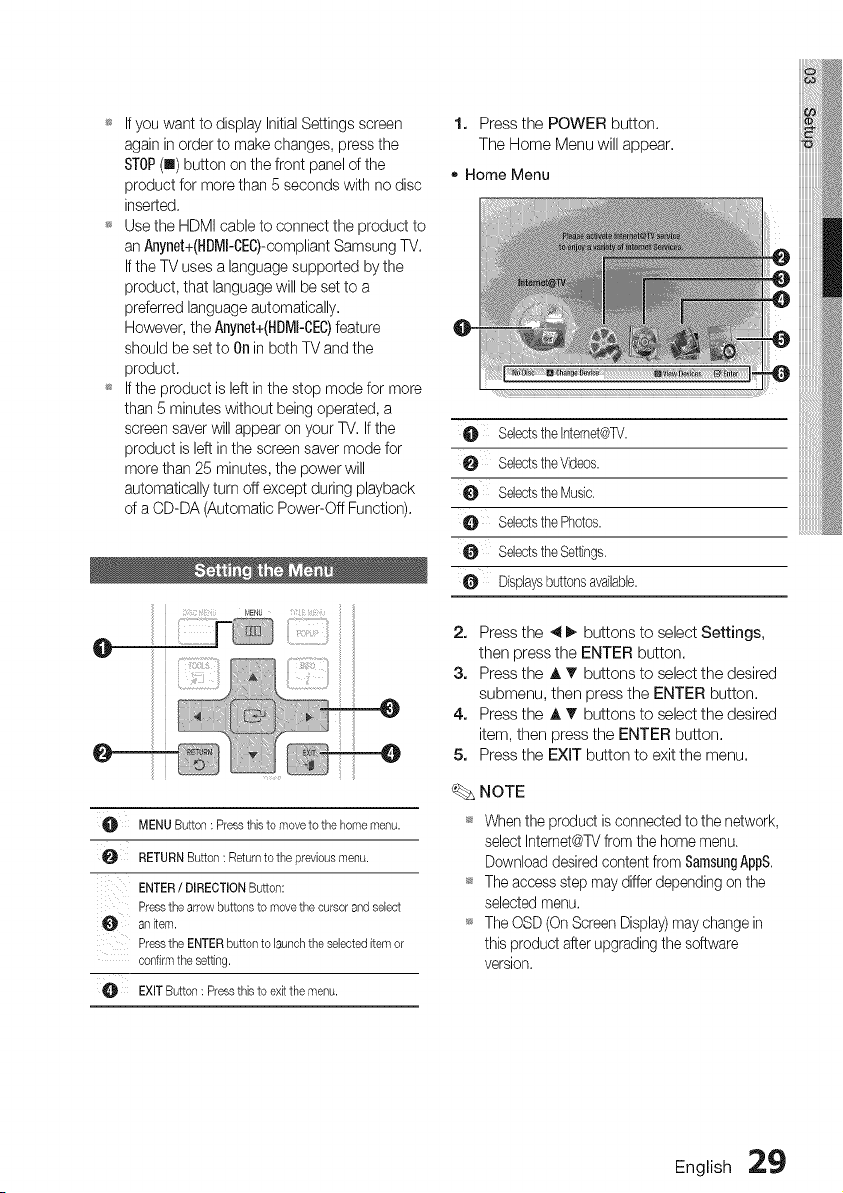
O MENUButton: Pressthistomovetothehomemenu.
RETURNButton: Returntothepreviousmenu.
ENTER/ DIRECTIONButton:
Pressthearrowbuttonsto movethecursorandselect
anitem.
PresstheENTERbuttonto launchtheselecteditemor
confirmthesetting.
EXITButton: Pressthisto exitthemenu.
1. Pressthe POWER button.
The Home Menu will appear.
• Home Menu
O SeledstheIntemet@TV.
0 SeledstheVideos.
0 SeledstheMusic.
SeledsthePhotos.
SeledstheSettings.
O Displaysbuttonsavailabb.
2.
3.
4.
5.
Pressthe 4 I_ buttons to select Settings,
then press the ENTER button.
Pressthe A _" buttons to select the desired
submenu, then press the ENTER button.
Pressthe ,t,T buttons to select the desired
item, then press the ENTER button.
Pressthe EXIT button to exitthe menu.
NOTE
Whentheproduct isconnected te thenetwork,
select Internet@TVfromthe home menu.
Download desiredcontent fromSamsungAppS.
Theaccess stepmay differ depending on the
selectedmenu.
TheOSD(OnScreenDisplay)maychangein
thisproduct afterupgradingthe software
version.
English :29
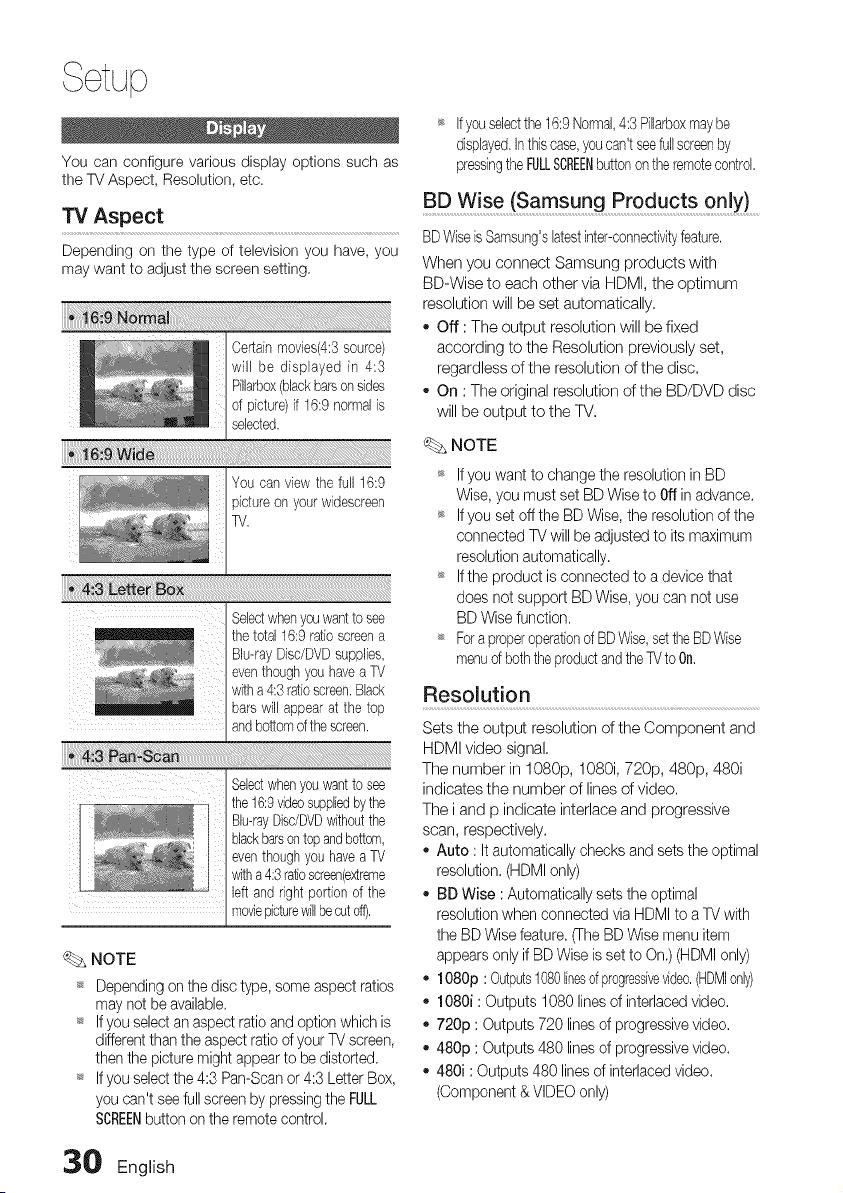
You can configure various display options such as
the TV Aspect, Resolution, etc.
TV Aspect
Depending on the type of television you have, you
maywant to adjust the screen setting,
You canviewthe full16:9
pictureonyour widesoreen
TV.
Selectwhenyouwantto see
the total16:9 ratioscreena
Blu-rayDisc/DVDsupplies,
eventhoughyouhaveaTV
witha 4:3ratioscreen.Black
barswill appearat the top
andbottomofthescreen.
Selectwhenyouwantto see
the 16:9videosuppliedbythe
Bu-rayDisdDVDwithoutthe
blackbarsontopandbottom,
eventhoughyouhaveaTV
witha 4:3ratioscreen(extreme
leftand right portionof the
moviepicturewillbecuteft),
NOTE
_* Dependingon the disc type,some aspect ratios
maynotbe available.
_* Ifyouselect an aspect ratio andoptionwhich is
differentthan theaspect ratio ofyour TVscreen,
then thepicturemight appearto bedistorted,
_ If youselect the 4:3 Pan-Scan or4:3 Letter Box,
youcan't seefullscreenby pressing the FULL
SCREENbutton on the remotecontrol.
_ If youselectthe16:9Normal,4:3 %arbox maybe
displayed,Inthiscase,youcan'tseefullscreenby
pressingthe FULLSCREENbuttonon theremotecontrol,
BD Wise (Samsung Products 0nlY) ........
BDWiseisSamsung'slatestinter-connectivityfeature,
When you connect Samsung products with
BD-Wise to each other via HDMI, the optimum
resolution will be set automatically,
- Off :The output resolution will be fixed
according to the Resolution previously set,
regardless of the resolution of the disc,
- On : The original resolution of the BD/DVD disc
will be output to the TV,
NOTE
_ Ifyou wantto changetheresolutioninBD
Wise,youmustset BDWisetoOffin advance.
_ Ifyou set off the BDWise,the resolutionofthe
connectedTVwillbe adjustedtoitsmaximum
resolutionautomatically.
_*Iftheproductis connectedto a devicethat
doesnotsupport BDWise,youcannotuse
BDWisefunction.
_ ForaproperoperationofBDWise,settheBDWise
menuofbeththeproductandtheTVtoOn,
Resolution
Sets the output resolution of the Component and
HDMI video signal,
The number in 1080p, 1080i, 720p, 480p, 480i
indicates the number of lines of video.
The i and p indicate interlace and progressive
scan, respectively.
- Auto :Itautomatically checks and setsthe optimal
resolution. (HDMIonly)
- BD Wise :Automatically sets the optimal
resolution when connected viaHDMI to aTVwith
the BD Wise feature. (The BD Wise menu item
appears only ifBDWise isset to On.) (HDMIonly)
- 1080p : Outputs1080linesofprogressive%eo,(HDMIonly)
- 1080i :Outputs 1080 lines of interlacedvideo.
- 720p : Outputs 720 lines of progressive video.
- 480p : Outputs 480 lines of progressive video,
- 480i :Outputs 480 lines of interlacedvideo,
(Component & VIDEO only)
30 English

Resolution according to the output mode
., Blu-ray Disc playback
Auto
1080p,MovieFrame(24Fs)Off
t080p/!080i,
MovieFrame(24Fs)on
1080i,MovieFrame(24Fs)off
720p
480p
480i
OptimalResolution 480i
1080p@60F 480i
1080p@24F 480i
1080i 480i 1080i 480i
720p 480i 720p 480i
480p 480i 480p 480i
480i 480i
- DVD playback
Auto
1080p
1080i
720p
480p
480i
OptimalResolution
1080p@60F
1080i
720p
480p
480i
480i
480i
480i
480i
iiiiiii!Jj!i i i iii i ! i !i !! !!! !!ii!ii!ii!ii!ii!ii i i i i iiiiiii i iiiiiiiiiiii ii i ! ii
480p 480i
480p 480i
480p 480i
480i 480i
NOTE
_ If the connected TVdoes not support Movie
Frameor the selected resolution, the message
"If no pictures areshown afterthe selection,
please wait for 15 seconds. And then, the
resolution will bereverted to the previous value
automatically. Would you like to make a
selection?" will bedisplayed.
Ifyou select Yes and the resolution isnot
supported, the TV's screen will beblank.
Please wait for 15 seconds and theresolution
will be revertedto the previous value
automatically.
_ If the screen isblank, press and hold the
STOP (In) button onthe front ofthe product
for more than 5 seconds (nodisc inserted).
All settings arerestored to the factory default.
Follow the steps on the previous page to
access each mode and select the Display
Setup that your TVwill support.
_ When the factory default settings arerestored,
allthe user data stored in the BD data will be
deleted.
_ The Blu-ray Disc must havethe 24 frame
feature in order to use the Movie Frame (24Fs)
mode.
_ If both HDMI and ©omponent jacks are
connected and you are currently viewing
component output, there isadifference
between resolution table and actual resolution
depending on your TV.
_ Ifthe HDMI Auto Detection feature does not
work, you can't select the 1080p resolution or
Movie Frame(24Fs).
English .31.
Setup
HDMI Format .............................................................................................................................................Progressive Mode .........................................................................................................
You can optimize the color setting from the HDMI
output. Select a connected device Type.
o "IV :Select ifconnected to aTV via HDMI.
Monitor :Select ifconnected to a Monitor via
HDMI.
NOTE
_* A TVor monitor hastobe connected to the
product before you select this option.
Set to improve picturequality when viewing DVDs.
Auto :Select this to have the product
automatically set the best picture for the DVD
you're watching.
Video :Select this for the best picture from
Concert or TV show DVDs.
Still Mode
Movie Frame (24 Fs)................................................................
Setting the Movie Frame (24Fs)feature to On
allows you to adjust the product's HDMI output to
24 frames per second for improved picture quality.
You can enjoy the Movie Frame (24Fs)feature only
on a TVsupporting this frame rate. This menu can
only be selected in 1080i or 1080p HDMI output
resolution modes.
- Off : Movie Frame (24Fs)functions will not
work.
- On : Movie Frame (24Fs)functions will work.
NOTE
_* Two types of frame rates maybe included,
depending on thedisc: Movie material(24
frame)andVideo material (30frame).When the
setting switches between Movie (24frame) and
Video (30frame),thescreen may blink fora
fewseconds.
_ If your TVdoes net support Movie Frame
(24Fs)function, the pop-up message will be
displayed.
Set the type of picture shown when you pause
DVD playback.
o Auto: Automatically set the best stillpicture
depending on the content.
Frame :Select when pausing a scene with a
little action.
Field :Select when pausing a scene with a lot
of action.
HDMI Deep Color
Set to output the picturefrom the HDMI OUTjack
with Deep Color or not. DeepColor allows more
accurate color reproduction with deeper colordepth.
- Auto: The picture will be output with Deep
Color to the connected TV which supports
HDMI Deep Color.
Off : The picture will be output without Deep
Color.
32 English
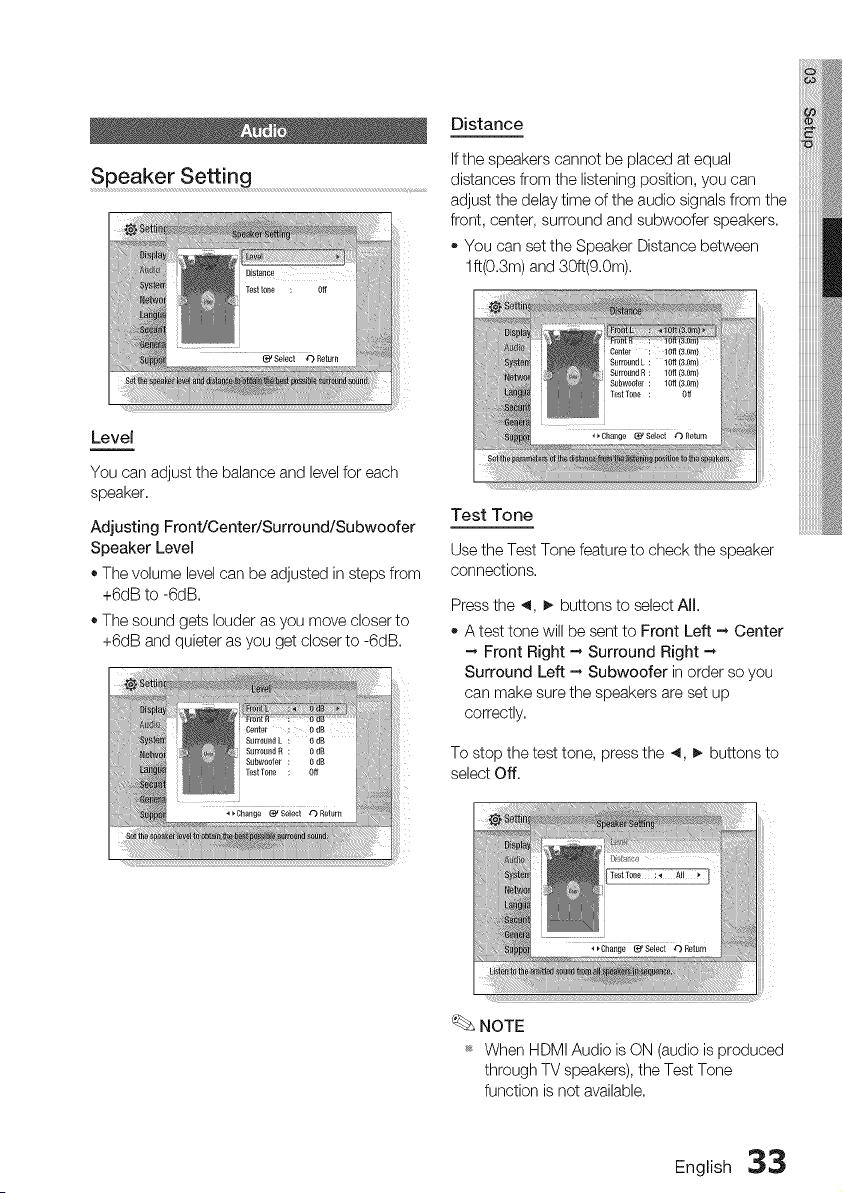
Speaker Setting
Distance
Ifthe speakers cannot be placed at equal
distances from the listening position, you can
adjust the delay time of the audio signals from the
front, center, surround and subwoofer speakers,
+ You can set the Speaker Distance between
lft(0,3m) and 30ft(9,0m),
Level
You can adjust the balance and levelfor each
speaker,
Adjusting Front/Center/Surround/Subwoofer
Speaker Level
+The volume level can be adjusted in steps from
+6dB to -6dB,
+The sound gets louder asyou move closer to
+6dB and quieter as you get closer to -6dB,
Test Tone
Usethe TestTonefeatureto checkthespeaker
connections,
Pressthe 4, _, buttons to select All,
+ A test tone will be sent to Front Left --, Center
-_ Front Right - Surround Right -_
Surround Left - Subwoofer in order so you
can make sure the speakers are set up
correctly,
To stopthetest tone, press the 4, _ buttonsto
selectOff,
NOTE
+ When HDMI Audio isON (audio isproduced
through TV speakers), the Test Tone
function is not available,
English 33
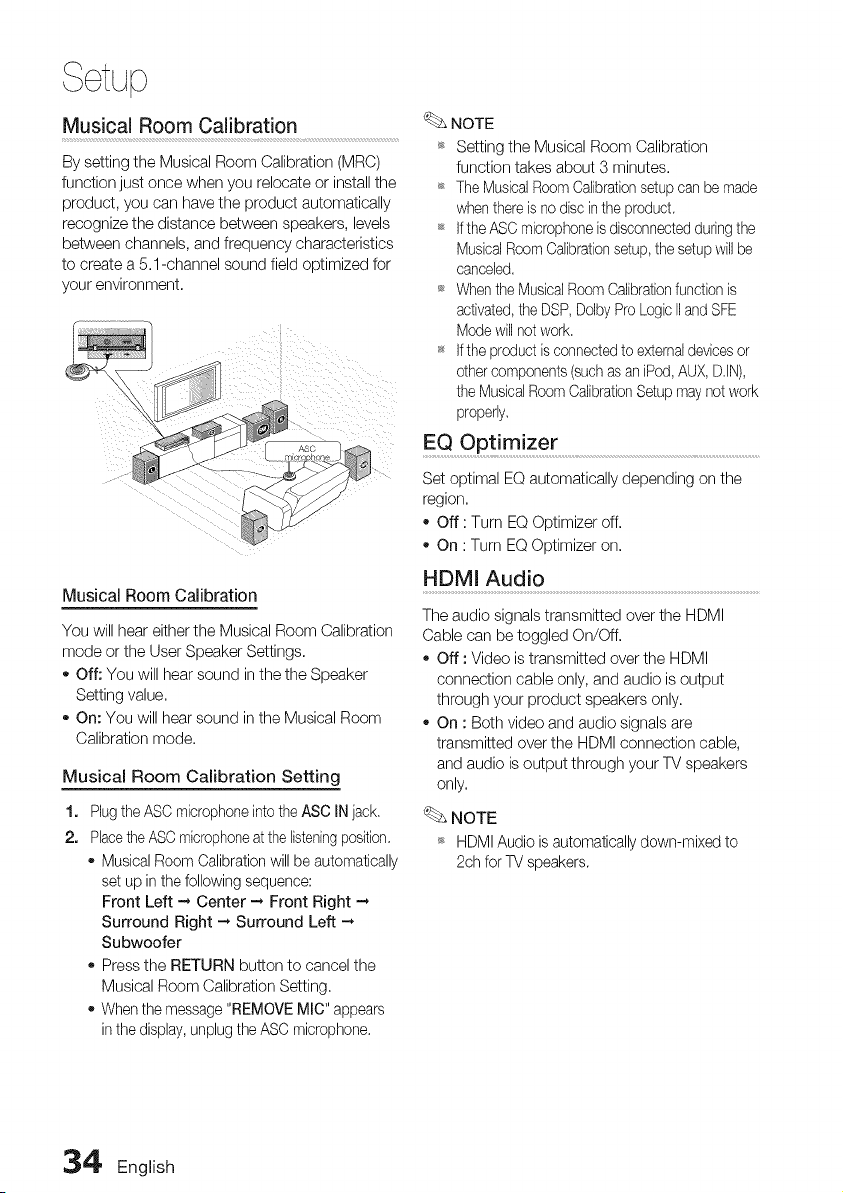
Musical Room Calibration
By setting the Musical Room Calibration (MRC)
function just once when you relocate or installthe
product, you can have the product automatically
recognize the distance between speakers, levels
between channels, and frequency characteristics
to create a 5.1-channel sound field optimized for
your environment.
NOTE
_* Setting the Musical Room Calibration
function takes about 3minutes.
_* TheMusicalRoom Calibrationsetupcanbemade
when thereisno disc intheproduct.
_* Ifthe ASO microphone isdisconnectedduringthe
Musical Room Calibrationsetup,the setupwill be
canceled.
_ Whenthe MusicalRoom Calibrationfunction is
activated,the DSP,DolbyProLogic IIand SFE
Mode will not work.
*_ Ifthe product isconnectedtoexternal devicesor
othercomponents(suchasaniPod,AUX,D.IN),
the MusicalRoom CalibrationSetupmay not work
properly.
Musical Room Calibration
You will hear either the Musical Room Calibration
mode or the User Speaker Settings.
o Off: You will hear sound in the the Speaker
Setting value.
On: You will hearsound in the Musical Room
Calibration mode.
Musical Room Calibration Setting
1,
2,
Plugthe ASC microphone intotheASC INjack.
Placethe ASCmicrophoneatthe listeningposition.
Musical Room Calibration will beautomatically
set up inthefollowing sequence:
Front Left -_ Center -* Front Right --*
Surround Right -* Surround Left -_
Subwoofer
Pressthe RETURN button to cancel the
Musical Room Calibration Setting.
Whenthemessage "REMOVE MIC" appears
inthe display, unplugthe ASC microphone.
Set optimal EQautomatically depending onthe
region.
Off :Turn EQ Optimizer off.
On :Turn EQOptimizer on.
HDMI Audio
The audio signals transmitted over the HDMI
Cable can be toggled On/Off.
Off :Video istransmitted over the HDMI
connection cable only, and audio isoutput
through your product speakers only.
On :Both video and audio signals are
transmitted over the HDMI connection cable,
and audio isoutput through your TV speakers
only.
_. NOTE
_ HDMIAudio isautomatically down-mixed to
2ch forTVspeakers.
,34' English
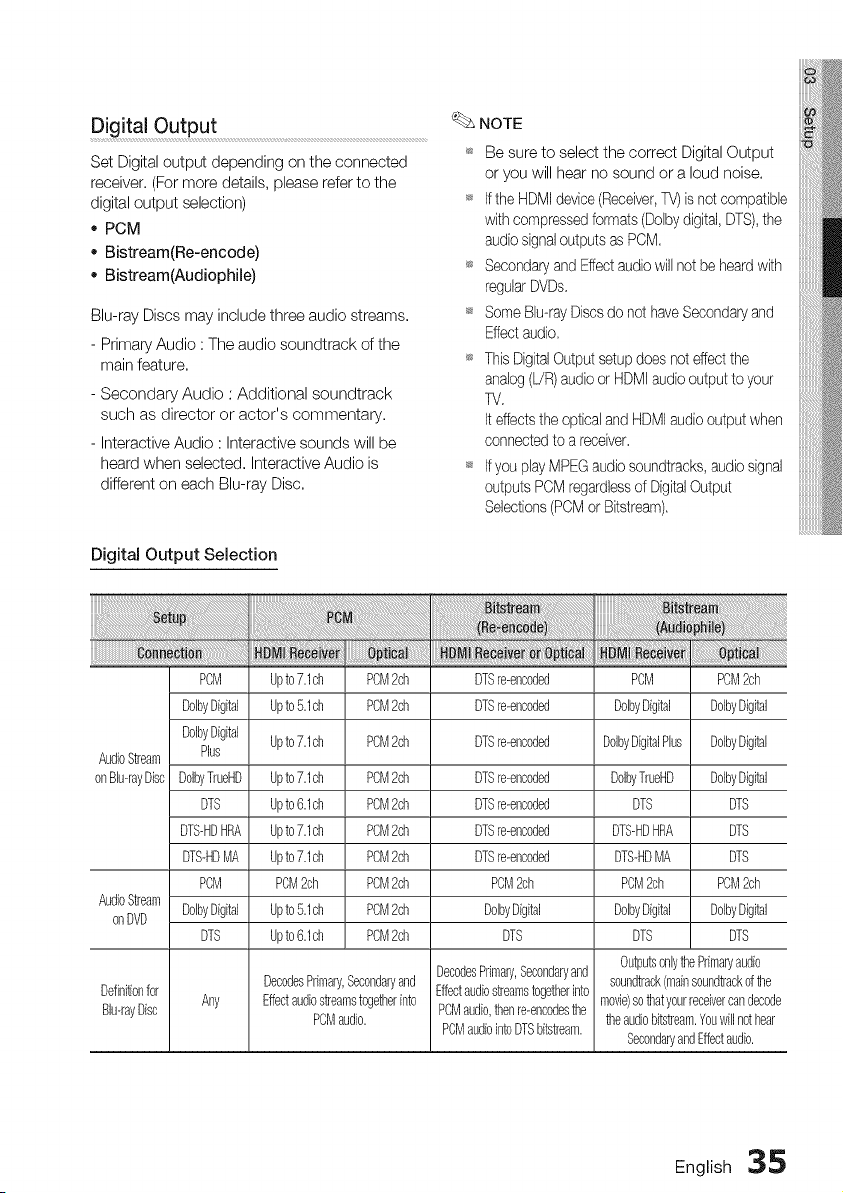
Digital Output
Set Digital output depending on the connected
receiver, (For more details, please refer to the
digital output selection)
- PCM
- Bistream(Re-encode)
- Bistream(Audiophile)
Blu-ray Discs may include three audio streams,
- Primary Audio : The audio soundtrack of the
main feature,
- Secondary Audio : Additional soundtrack
such as director or actor's commentary.
- Interactive Audio : Interactive sounds will be
heard when selected, Interactive Audio is
different on each Blu-ray Disc,
Digital Output Selection
NOTE
Be sure to select the correct Digital Output
or you will hear no sound or a loud noise.
_s Ifthe HDMIdevice(Receiver,TV)isnot compatible
with compressedformats (Dolbydigital, DTS),the
audiosignaloutputsas PCM,
_s Secondaryand Effect audiowill not be heardwith
regularDVDs.
_s SomeBID-rayDiscsdo not haveSecondaryand
Effectaudio.
_s ThisDigitalOutputsetupdoesnot effectthe
analog(L!R)audioorHDMIaudiooutputtoyour
TV.
Iteffectsthe opticaland HDMI audiooutput when
connectedtoareceiver.
_s IfyouplayMPEG audiosoundtracks, audiosignal
outputsPCM regardlessofDigitalOutput
Selections(POMorBitstream).
PCM Upto7.1ch PCM2ch DTSre-encoded PCM PCM2ch
Do[byDigital Upto5.1ch PCM2ch DTSre-encoded Do[byDigital DoibyDigital
Do[byDigital Upto7.1ch PCM2ch DTSre-encoded UoIbyDigitalPlus UoIbyDigital
AudioStream Plus
onBiD-rayDisc DolbyTrueHD Upto7.1ch PCM2ch DTSre-encoded DolbyTrueHD DolbyDigital
DTS Upto6.1ch PCM2ch DTSre-encoded DTS DTS
DTS-HDHRA Upto7.1ch PCM2ch DTSre-encoded DTS-HDHRA DTS
DTS-HDMR Upto7.1ch PCM2ch DTSre-encoded DTS-HDMR DTS
POM POM2ch PCM2ch POM2ch POM2ch PCM2ch
AudioStream
onDVD Do[byDigital Upto5.1ch PCM2ch Do[byDigital Do[byDigital DolbyDigital
DTS Upto6.1ch PCM2ch DTS DTS DTS
OutputsonlythePrimaryaudio
DecodesPrimary,Secondaryand DecodesPrimary,Secondaryand soundtrack(mainsoundtrackofthe
Definitionfor Any Effectaudiostreamstogetherinto Effectaudiostreamstogetherinto movie)sothatyourreceivercandecode
BID-rayDisc PCMaudio. PCMaudio,thenre-encodesthe theaudiobitstream.Youwillnothear
PCMaudiointoDTSbitstream.
SecondaryandEffectaudio.
English 35
Dynamic Range Control
You can listen at low volumes but stillhear dialog
clearly, This is only active when a Dolby Digital
signal isdetected,
o Off :You can enjoy the movie with the
standard Dynamic Range,
On :When Movie soundtracks areplayed at
low volume or from smaller speakers, the
system can apply appropriate compression to
make low-level content more intelligible and
prevent dramatic passages from getting too
loud,
AVSync................................................................................................................................................................................
Videomay lookslowerthantheaudiowhen the
product isconnected to adigitalTV. Ifthis occurs,
adjust the audio delay time to match the video.
You can set the audio delay time between
0 msec and 300 msec. Set it to the optimal
status,
Initial Settings .................................................................................................................
By using the Initial Settings, you can set
language, TVaspect, Musical Room Calibration
and Network setting, etc.
For more information onthe settings, refer to the
corresponding section in this user manual.
Intemet@TV Screen Size
Set the Intemet@TV Screen to the optimal size.
- Size 1 : Display smaller application icons, you
may see some black on sides of screen.
Size 2 : Display normal application icons,
image may be too large for your TVscreen.
Size 3 : Display larger application icons, image
may be too large for your TVscreen,
Anynet+(HDMl-CEC)
Anynet+ isaconvenient function that offers linked
operations with other Samsung products with the
Anynet+ feature,
To operate this function, connect this product to
aSamsung TVwith an HDMI cable.
You can operate this product using a Samsung
TVremote control and start disc playback simply
by pressing the PLAY (1_)button on the TV's
remote control,
For more information, please see the TV user
manual,
Off :Anynet+ function will not work,
On :Anynet+ functions will work,
NOTE
_* Thisfunction isnot available if the HDMI cable
does net support CEC.
_* Ifyour Samsung TVhas an fA_x,,_t÷logo, then
it supports the Anynet+ function.
_s Depending on your TV,certain HDMI output
resolutions may not work,
Please refer to the user manual of your TV.
_s TheAnynet+ function issupported only when
an HDMI Cable isconnected to the HDMI OUT
ofthe product,
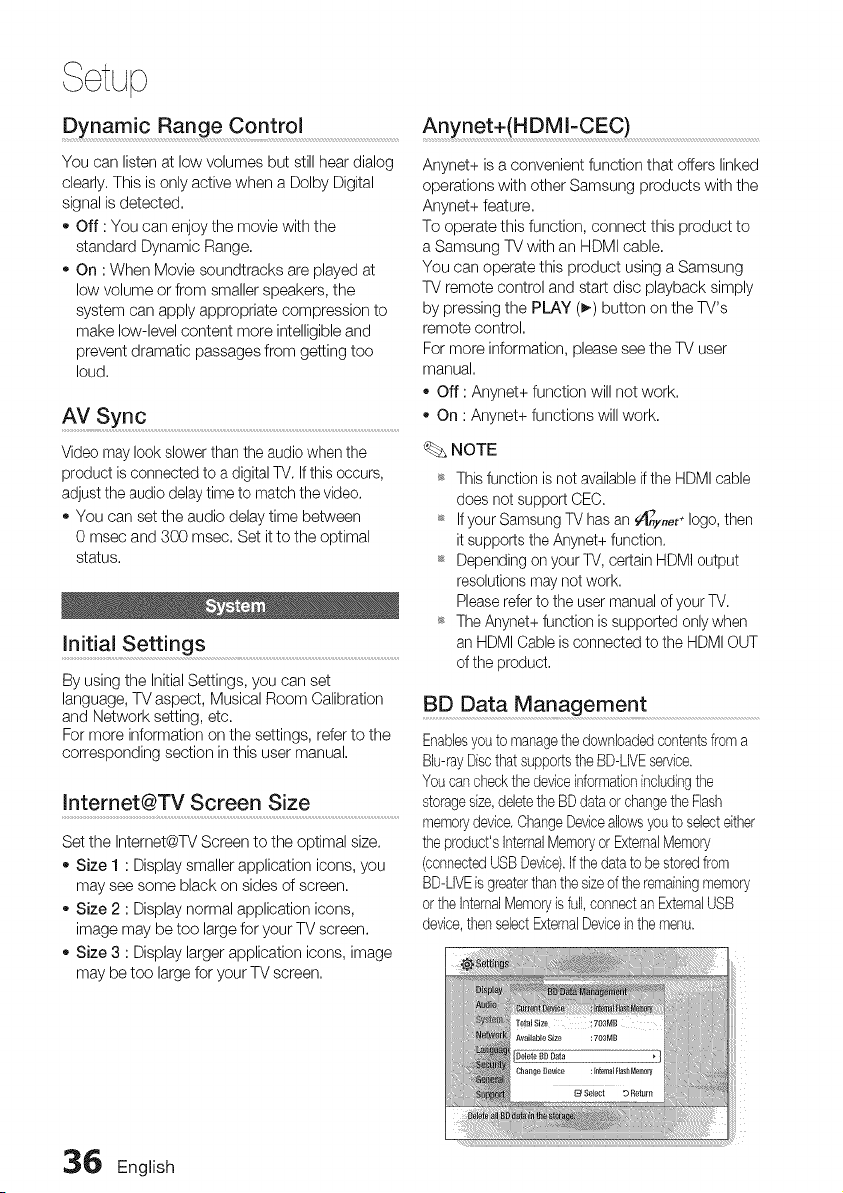
BD Data Management
Enablesyouto managethedownloadedcontentsfroma
Blu-rayDiscthat supportsthe BD-LIVEservice.
Youcancheckthe deviceinformationincludingthe
storagesize,deletetheBD dataorchangetheFlash
memorydevice.ChangeDeviceallowsyoutoselecteither
the product'sInternalMemoryorExternalMemory
(connectedUSBDevice).Ifthe data tobe storedfrom
BD-LIVEisgreaterthan the sizeofthe remainingmemory
orthe InternalMemoryisfull, connectan ExternalUSB
device,thenselectExternalDeviceinthe menu.
36 English
Description of Device(Storage) Information on
the Product
o Total Size :Totalsizeof the Device(Storage).
,, Available Size:Availablesizeofthe Device(Storage).
NOTE
_ In the externalmemory mode, disc playback
will be stopped if you disconnect the USB
device inthemiddle of the playback.
_ Onlythose USB devices formatted in FATfile
system (DOS 8.3 volume label)are supported,
and it isrecommended to use USB devices
that support USB 2.0 protocol, 4 MB/sec or
faster read/write speed.
_ A USB HDDdevice cannot be usedfor BD
Data storage (BD-LIVE).
_ The Resume Play function may not work after
formatting the storage device.
_ The total size of BD Data Management may
differ, depending on thesoftware version.
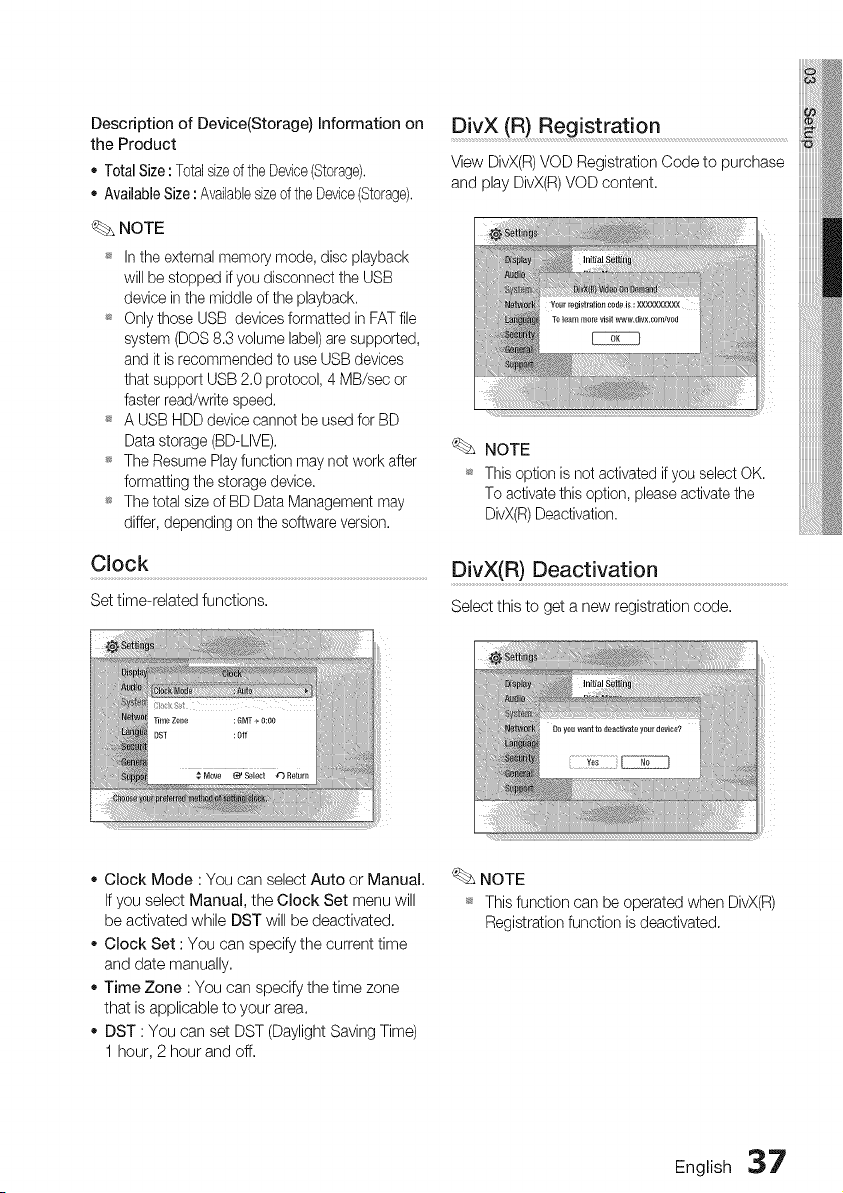
Clock
Set time-related functions.
DivX (R) Registration
View DivX(R) VOD Registration Code to purchase
and play DivX(R)VOD content,
NOTE
_ This option isnot activated if youselect OK.
To activatethis option, please activate the
DivX(R)Deactivation.
DivX(R) Deactivation
Select this to get a new registration code.
,, Clock Mode :You can select Auto or Manual.
Ifyou select Manual, the Clock Set menu will
be activated while DST will be deactivated.
,, Clock Set : You can specify the current time
and date manually.
,, Time Zone : You can specify the time zone
that isapplicable to your area.
,, DST :You can set DST (Daylight Saving Time)
1hour, 2 hour and off.
NOTE
_ Thisfunctioncanbeoperatedwhen DivX(R)
Registrationfunctionis deactivated.
English 37
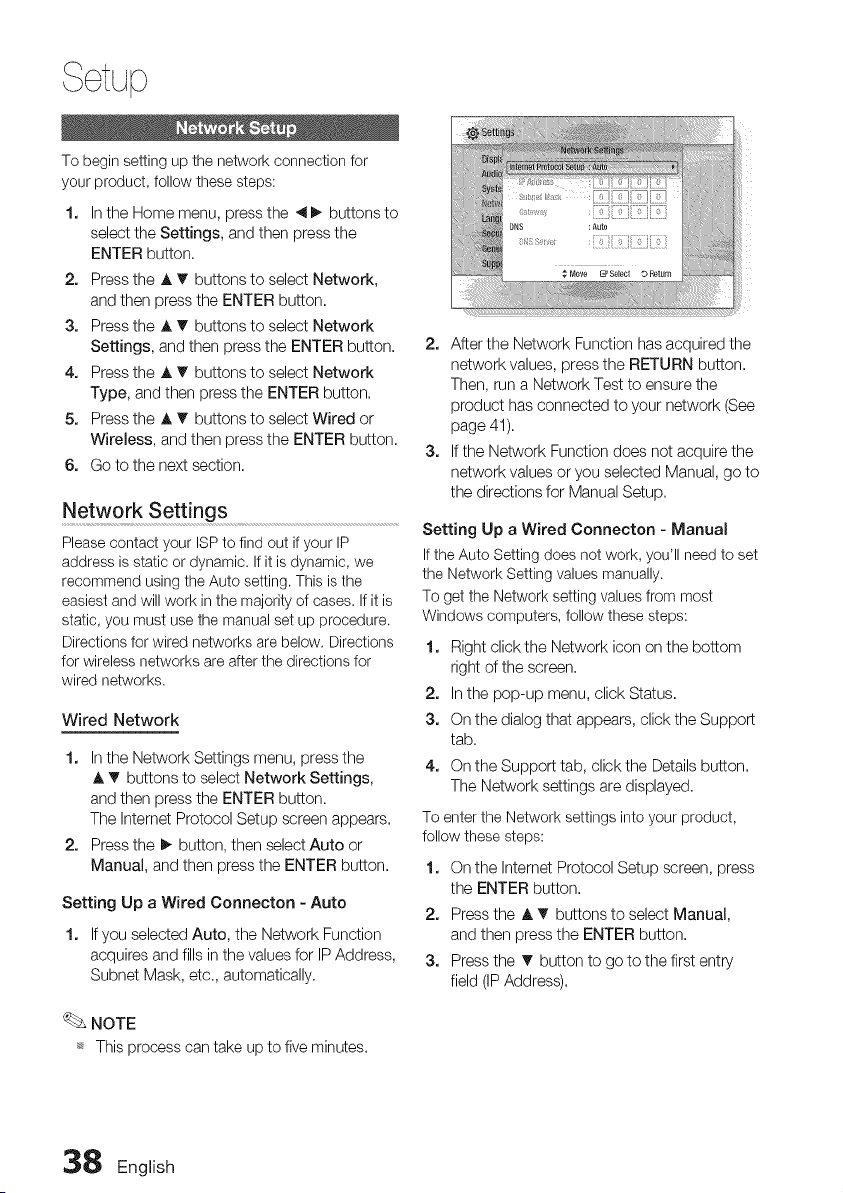
, ¢tup
To begin setting up the network connection for
your product, follow these steps:
1. Inthe Home menu, press the _1_. buttons to
select the Settings, and then press the
ENTER button.
2. Press the A _' buttons to select Network,
and then press the ENTER button.
3. Press the A T buttons to select Network
Settings, and then press the ENTER button.
4. Press the A T buttons to select Network
Type, and then press the ENTER button.
5. Press the A _' buttons to select Wired or
Wireless, and then press the ENTER button.
6. Go to the next section.
Network Settings
Please contact your ISP to find out ifyour IP
address isstatic or dynamic. If it isdynamic, we
recommend using the Auto setting. This isthe
easiestand will work in the majority of cases. If it is
static, you must usethe manual set up procedure.
Directions for wired networks arebelow. Directions
for wireless networks areafterthe directions for
wired networks.
Wired Network
1. Inthe Network Settings menu, press the
,& T buttons to select Network Settings,
and then press the ENTER button.
The Intemet Protocol Setup screen appears.
2. Press the _ button, then select Auto or
Manual, and then press the ENTER button.
Setting Up a Wired Connecton - Auto
1. Ifyou selected Auto, the Network Function
acquires and fillsin the values for IP Address,
Subnet Mask, etc. automatically.
NOTE
_*Thisprocesscan take upto five minutes.
2. After the Network Function has acquired the
network values, press the RETURN button.
Then, run a Network Test to ensure the
product has connected to your network (See
page 41).
3. Ifthe Network Function does not acquire the
network values or you selected Manual, go to
the directions for Manual Setup.
Setting Up a Wired Connecton - Manual
Ifthe Auto Setting does not work, you'll need to set
the Network Setting values manually.
To get the Network setting values from most
Windows computers, follow these steps:
1. Right click the Network icon on the bottom
right of the screen.
2. Inthe pop-up menu, click Status.
3. On the dialog that appears, click the Support
tab.
4. On the Support tab, click the Details button.
The Network settings aredisplayed.
To enterthe Network settings into your product,
follow these steps:
1. On the Internet Protocol Setup screen, press
the ENTER button.
2. Pressthe A T buttons to select Manual,
and then press the ENTER button.
3. Pressthe T button to go to the first entry
field (IPAddress).
38 English
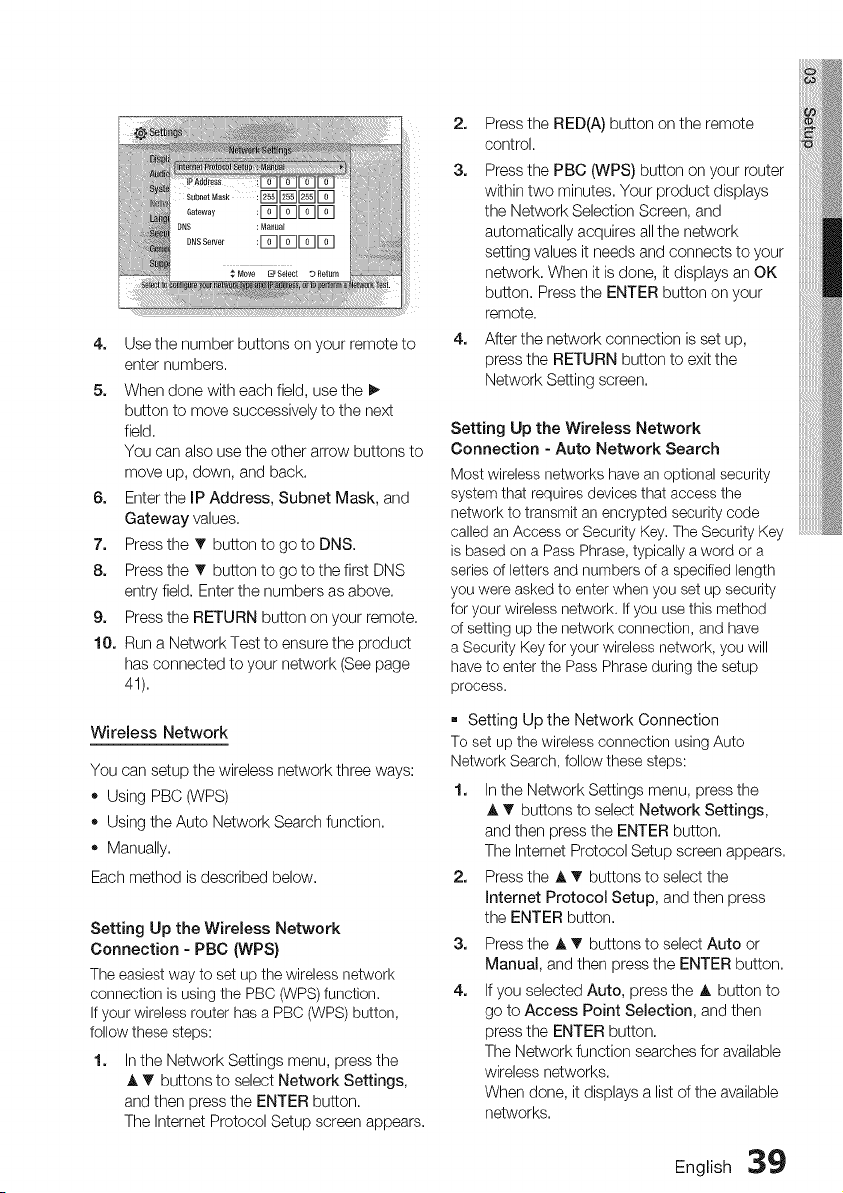
4. Use the number buttons on your remote to
enter numbers.
5. When done with each field, use the I_
button to move successively to the next
field.
You can also use the other arrow buttons to
move up, down, and back.
6. Enterthe IP Address, Subnet Mask, and
Gateway values.
7. Press the T button to go to DNS.
8. Press the T button to go to the first DNS
entry field. Enter the numbers as above.
9. Press the RETURN button on your remote.
10. Run a Network Test to ensure the product
has connected to your network (See page
41).
Wireless Network
You can setup the wireless network three ways:
• Using PBC (WPS)
• Using the Auto Network Search function.
• Manually.
Each method isdescribed below.
Setting Up the Wireless Network
Connection - PBC (WPS}
The easiest way to set up the wireless network
connection isusing the PBC (WPS) function.
Ifyour wireless router hasa PBC (WPS) button,
follow these steps:
1. In the Network Settings menu, press the
A T buttons to select Network Settings,
and then press the ENTER button.
The Internet Protocol Setup screen appears,
2. Pressthe RED(A) button on the remote
control.
3. Pressthe PBC (WPS) button on your router
within two minutes. Your product displays
the Network Selection Screen, and
automatically acquires allthe network
setting values it needs and connects to your
network. When it isdone, it displays an OK
button. Press the ENTER button on your
remote.
4. After the network connection isset up,
press the RETURN button to exit the
Network Setting screen.
Setting Up the Wireless Network
Connection - Auto Network Search
Most wireless networks have an optional security
system that requires devices that access the
network to transmit an encrypted security code
called an Access or Security Key.The Security Key
is based on aPass Phrase, typically aword or a
series of lettersand numbers ofa specified length
you were asked to enterwhen you set up security
for your wireless network. Ifyou usethis method
of setting up the network connection, and have
aSecurity Keyfor your wireless network, you will
have toenter the Pass Phraseduring the setup
process.
[] Setting Up the Network Connection
To set up the wireless connection using Auto
Network Search, follow these steps:
1. Inthe Network Settings menu, press the
A T buttons to select Network Settings,
and then press the ENTER button.
The Internet Protocol Setup screen appears.
2. Pressthe A _' buttons to select the
Internet Protocol Setup, and then press
the ENTER button.
3. Pressthe J,T buttons to select Auto or
Manual, and then press the ENTER button.
4. Ifyou selected Auto, press the A button to
go to Access Point Selection, and then
press the ENTER button.
The Network function searches for available
wireless networks.
When done, it displays a list ofthe available
networks.
English 39
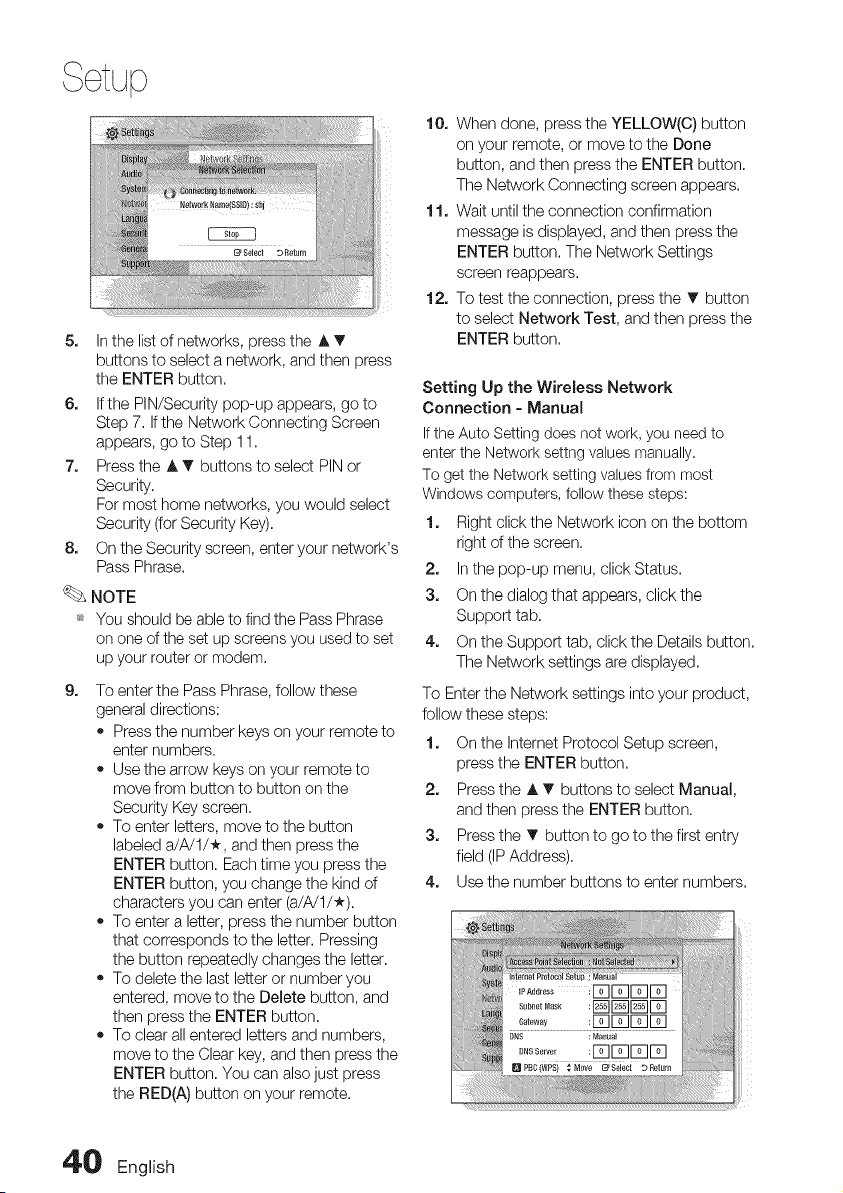
5. Inthe list of networks, press the A T
buttons to select anetwork, and then press
the ENTER button.
6. Ifthe PIN/Security pop-up appears, go to
Step 7. Ifthe Network Connecting Screen
appears, go to Step 11.
2. Press the _. T buttons to select PIN or
Security.
For most home networks, you would select
Security (for Security Key).
8. On the Security screen, enter your network's
Pass Phrase.
NOTE
_* You should be able to find the Pass Phrase
on one ofthe set up screens you used to set
up your router or modem.
9,
To enter the Pass Phrase, follow these
general directions:
• Press the number keys on your remote to
enter numbers.
• Use the arrow keys on your remote to
move from button to button on the
Security Key screen.
• To enter letters, move to the button
labeled a/A/U*, and then press the
ENTER button. Each time you press the
ENTER button, you change the kind of
characters you can enter (a/A/I/*).
• To enter a letter, press the number button
that corresponds to the letter. Pressing
the button repeatedly changes the letter.
• To delete the last letter or number you
entered, move to the Delete button, and
then press the ENTER button.
• To clear all entered letters and numbers,
move to the Clear key, and then press the
ENTER button. You can also just press
the RED(A) button on your remote.
10. When done, press the YELLOW(C) button
on your remote, or move to the Done
button, and then press the ENTER button.
The Network Connecting screen appears.
11. Wait until the connection confirmation
message is displayed, and then press the
ENTER button. The Network Settings
screen reappears.
12. To test the connection, press the T button
to select Network Test, and then press the
ENTER button.
Setting Up the Wireless Network
Connection - Manual
Ifthe Auto Setting does not work, you need to
enterthe Network settng values manually,
To get the Network setting values from most
Windows computers, follow these steps:
1. Right click the Network icon on the bottom
right ofthe screen.
2. In the pop-up menu, click Status.
3. On the dialog that appears, click the
Support tab.
4. On the Support tab, click the Details button.
The Network settings are displayed.
To Enter the Network settings into your product,
follow these steps:
1. On the Internet Protocol Setup screen,
press the ENTER button.
2. Press the A T buttons to select Manual,
and then press the ENTER button.
3. Press the T button to go to the first entry
field (IPAddress).
4. Use the number buttons to enter numbers.
4'0 English
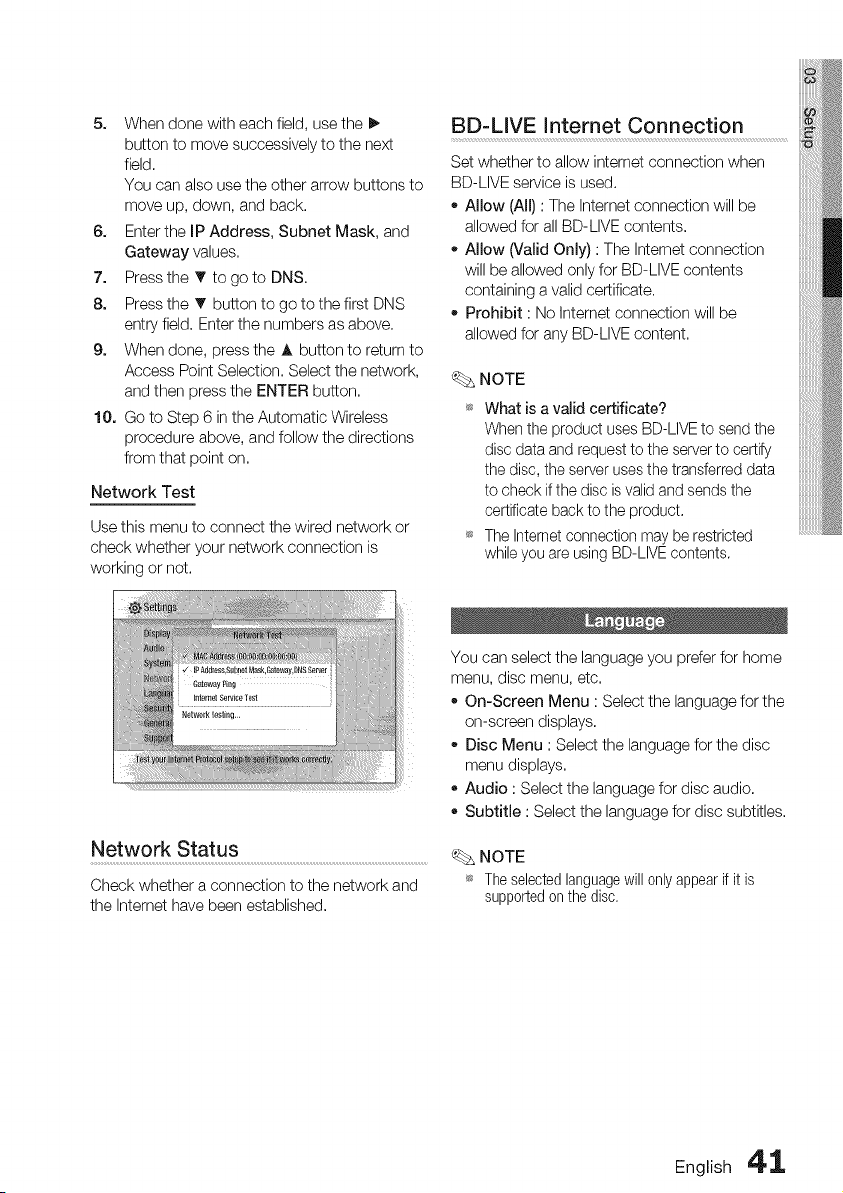
5. When done with each field, use the I_
button to move successively to the next
field.
You can also use the other arrow buttons to
move up, down, and back.
6. Enterthe IP Address, Subnet Mask, and
Gateway values.
7. Press the T to go to DNS.
8. Press the T button to go to the first DNS
entry field. Enter the numbers as above.
9. When done, press the A button to return to
Access PointSelection. Select the network,
and then press the ENTER button.
10. Go to Step 6 in the Automatic Wireless
procedure above, and follow the directions
from that point on.
Network Test
Use this menu to connect the wired network or
check whether your network connection is
working or not.
Network Status
Check whether a connection to the network and
the Intemet have been established,
BD-LIVE Intemet Connection
Set whether to allow internet connection when
BD-LIVE service is used.
- Allow (All) :The Internet connection will be
allowed for all BD-LIVE contents.
o Allow (Valid Only) :The Internet connection
will be allowed only for BD-LIVE contents
containing avalid certificate.
Prohibit :No Internet connection will be
allowed for any BD-LIVE content.
NOTE
What isa valid certificate?
When the product uses BD-LIVEto send the
disc data and request tothe server to certify
the disc, the server usesthe transferred data
to check ifthe disc isvalid and sends the
certificate back to the product.
The Internet connection may be restricted
whileyou are using BD-LIVEcontents.
You can select the language you prefer for home
menu, disc menu, etc.
• On-Screen Menu :Select the language for the
on-screen displays.
Disc Menu :Select the language for the disc
menu displays.
Audio : Select the language for disc audio.
Subtitle :Select the language for disc subtitles.
NOTE
_ Theselectedlanguagewill onlyappear if it is
supportedon the disc,
English 4' 1,
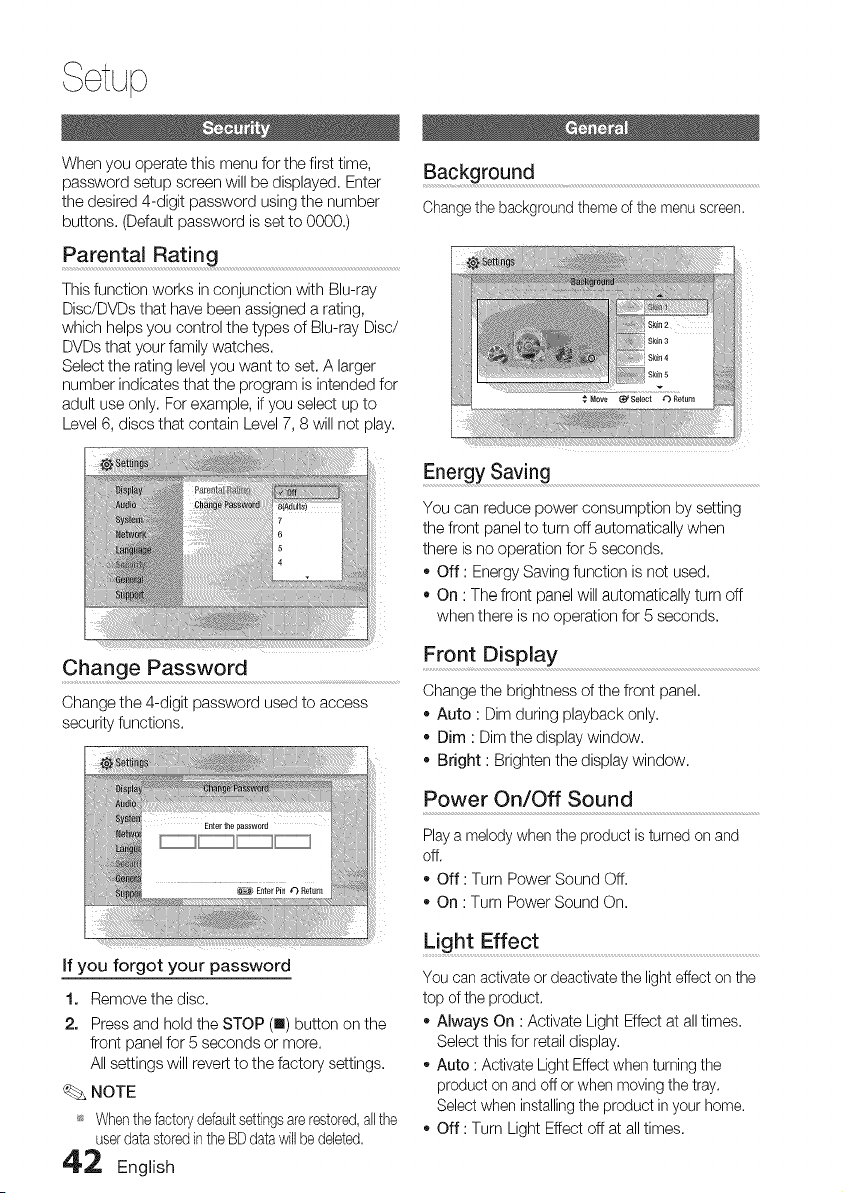
When you operate this menu for the first time,
password setup screen will be displayed. Enter
the desired 4-digit password using the number
buttons. (Default password isset to 0000.)
Parental Rating
This function works in conjunction with Blu-ray
Disc/DVDs that have been assigned arating,
which helps you control the types of Blu-ray Disc/
DVDs that your family watches.
Select the rating level you want to set. A larger
number indicates that the program isintended for
adult use only. For example, if you select up to
Level 6, discs that contain Level 7, 8 will not play.
Change Password
Change the 4-digit password used to access
security functions.
Background
Change the background theme ofthe menu screen.
Energy Saving
You can reduce power consumption by setting
the front panel to turn off automatically when
there isno operation for 5seconds,
* Off : Energy Saving function isnot used,
* On :The front panel will automatically turn off
when there is no operation for 5 seconds.
Front Display
Change the brightness of the front panel.
• Auto :Dim during playback only.
• Dim : Dim the display window.
• Bright : Brighten the display window.
Power On/Off Sound
Play amelody whenthe product isturned on and
off.
* Off : Turn Power Sound Off.
* On :Turn Power Sound On.
if you forgot your password
1. Remove the disc,
2. Press and hold the STOP (m) button on the
front panel for 5 seconds or more.
All settings will revert to the factory settings,
NOTE
_* Whenthe factorydefaultsettingsarerestored,allthe
userdatastoredin the BD datawill be deleted.
42 English
Light Effect ..........................................................................................................................................................
You can activate ordeactivate the light effect on the
top of the product,
* Always On : Activate Light Effect at alltimes,
Select this for retaildisplay,
* Auto :Activate LightEffectwhen turning the
product on andoff or when moving the tray.
Select when installingthe product in your home,
* Off : Turn Light Effect off at all times,
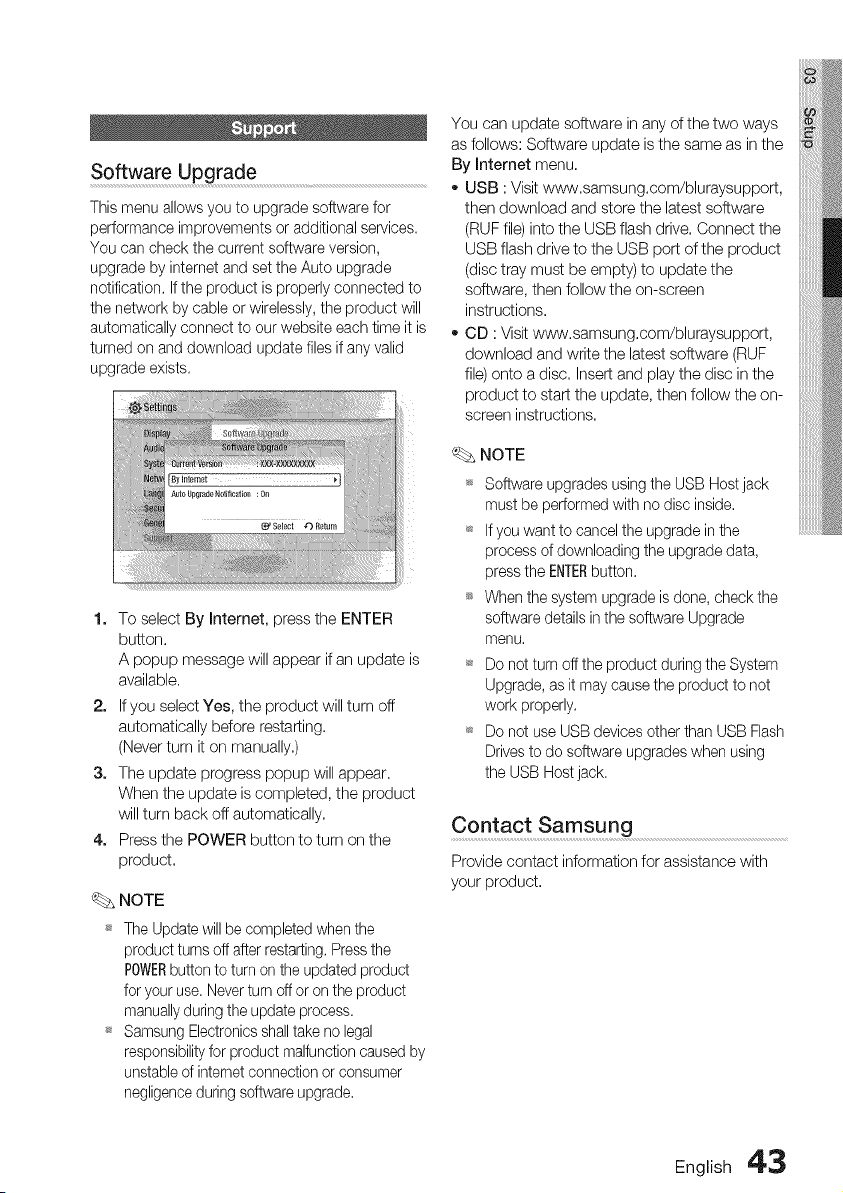
Software Upgrade
This menu allows you to upgrade software for
performance improvements oradditional services.
You can check the current software version,
upgrade by internet and set the Auto upgrade
notification. Ifthe product isproperly connected to
the network by cable orwirelessly, the product will
automatically connect to our website each time it is
turned on and download update files if any valid
upgrade exists.
1. To select By Internet, press the ENTER
button.
A popup message will appear if an update is
available.
2. Ifyou select Yes, the product will turn off
automatically before restarting.
(Never turn it on manually.)
3. The update progress popup will appear.
When the update iscompleted, the product
will turn back off automatically.
4. Pressthe POWER button to turn on the
product.
NOTE
_ The Updatewillbecompletedwhenthe
productturnsoff afterrestarting.Pressthe
POWERbuttontoturn onthe updatedproduct
for youruse,Neverturn offoron theproduct
manuallyduringtheupdateprocess,
_ SamsungElectronicsshalltakeno legal
responsibilityfor productmalfunctioncausedby
unstableofinternetconnectionorconsumer
negligenceduringsoftwareupgrade,
You can update software in any of the two ways
as follows: Software update isthe same as in the
By Internet menu.
o USB :Visit www.samsung.com/bluraysupport,
then download and store the latest software
(RUF file) into the USB flash drive. Connect the
USB flash drive to the USB port ofthe product
(disc tray must be empty) to update the
software, then follow the on-screen
instructions.
CD : Visit www.samsung.com/bluraysupport,
download and write the latest software (RUF
file) onto a disc. Insert and playthe disc in the
product to start the update, then follow the on-
screen instructions.
NOTE
Software upgrades using theUSB Host jack
must be performed with no disc inside.
_ If youwant to cancel the upgrade in the
process of downloading the upgrade data,
press the ENTERbutton.
When the system upgrade isdone, check the
software details in the software Upgrade
menu.
_ Do not turn off the product during the System
Upgrade, as it maycause the product to not
work properly.
_ Do not use USB devices other than USB Flash
Drivesto do software upgrades when using
the USB Hostjack.
Contact Samsung
Provide contact information for assistance with
your product.
English 4'3
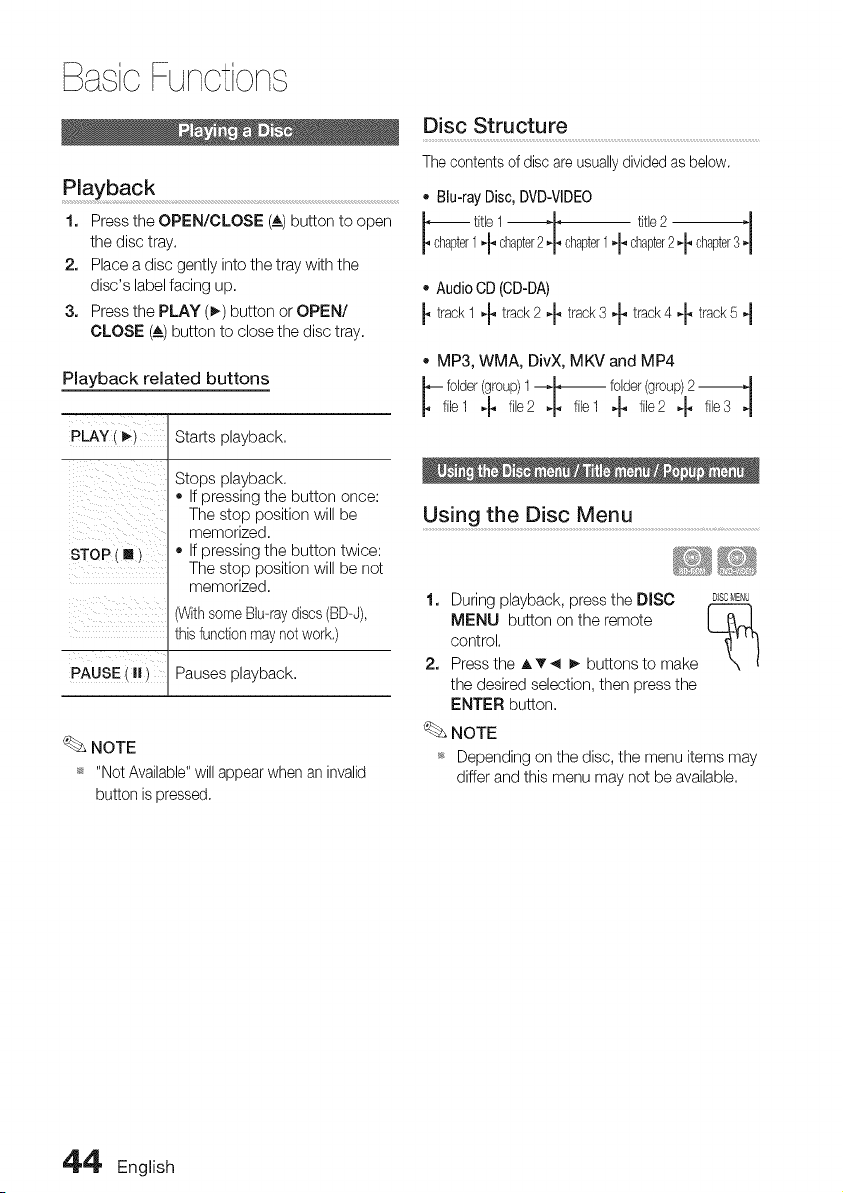
BasicFunctions
Playback
1. Press the OPEN/CLOSE (A_)button to open
the disc tray.
2. Place a disc gently into the tray with the
disc's label facing up.
3. Press the PLAY (_) button or OPEN/
CLOSE (A) button to close the disc tray.
Playback related buttons
P_Y( _i Starts playback.
i_ ii _i
i ix _
Stops playback.
• Ifpressing the button once:
The stop position will be
memorized.
• Ifpressing the button twice:
The stop position will be not
memorized.
(WithsomeBlu-raydiscs(BD-J),
thisfunction maynot work.)
PAusEi.i Pausesp,ayback
NOTE
_ "Not Available"will appearwhen an invalid
button ispressed.
Disc Structure ......................................................................................................................................
Thecontents ofdiscare usually dividedas below.
o Blu-rayDisc, DVD-VlDEO
_ tit,eI -_m- titb2 -_"1
1,-_chapter2,_ chapter1 't" chapter2,_. chapter3 "1
,, AudioCD(CD-DA)
trackI _ track2 -_ track3 + track4_. track5 4
MP3, WMA, DivX, MKV and MP4
-- folder(group)I _ folder(group)2
f,÷1 4. f,e24. f,÷1 4. file24. f,÷34
Using the Disc Menu ................................................................
1. During playback, press the DISC DJSOMENU
MENU button on the remote I _._
control.
2. Pressthe A'v _ _ buttons to make
the desired selection, then press the
ENTER button.
NOTE
_ Depending on the disc, the menu items may
differ and this menu may not be available.
4'4' English
Using the Title Menu
1. During playback, press the TITLE T_TLEMENU
MENU button on the remote I P_JPI
T1
control.
2. Pressthe A'v _ _. buttons to
make the desired selection, then
press the ENTER button,
NOTE
_ Depending on the disc, the menu items may
differ and this menu may not be available.
_ The TitleMenu willonly bedisplayed if there
areatleast two titles on thedisc.
Playing the Title List
1.
2.
During playback, press the DISC D_SCMENU
t_
MENU or TITLE MENU button, I J
Pressthe A v buttons to select an TITLEMENU
entry you want to play from Title I P0_bPI
List,then press the ENTER
button,
Using the Popup Menu ..........................................................................
1. During playback, press the POPUP T_TLE_E_U
button on the remote control, L_!J
2. Pressthe A v _ _- buttons or
ENTER button to select the desired
menu,
NOTE
_s Depending on the disc, the menu items may
differ and this menu may net be available.
During playback, you can search quickly through
a chapter or track, and use the skip function to
jump to the next selection,
Searching for a Des!red Scene .....................
' _ S_ _'_ _i_ _
" During playback, press the SEARCH (_ _)
button,
Eachtimeyou pressthe SEARCH (_ _)
button, the playback speed will change as
follows.
BD-ROM,
BD-RE/:R,
DVD-RW!:R,
DVD+RW!+R,
DVD-VIDEO
DivX,MKV,MP4
_1-_2_3
_ 1--__ 2--__ 3_
_4-_5_6_7
- To return tonormal speed playback, pressthe
PLAY (_) button,
NOTE
_ No sound isheardduring search mode.
Skipping Chapters
- During playback, press the SKIP (1_1)
button,
Ifyou press the SKIP (_,€>1)button, it moves to
the next chapter,
Ifyou press the SKIP (1_) button, it moves to
the beginning of the chapter. One more press
makes it move to the beginning of the previous
chapter,
English 4'_
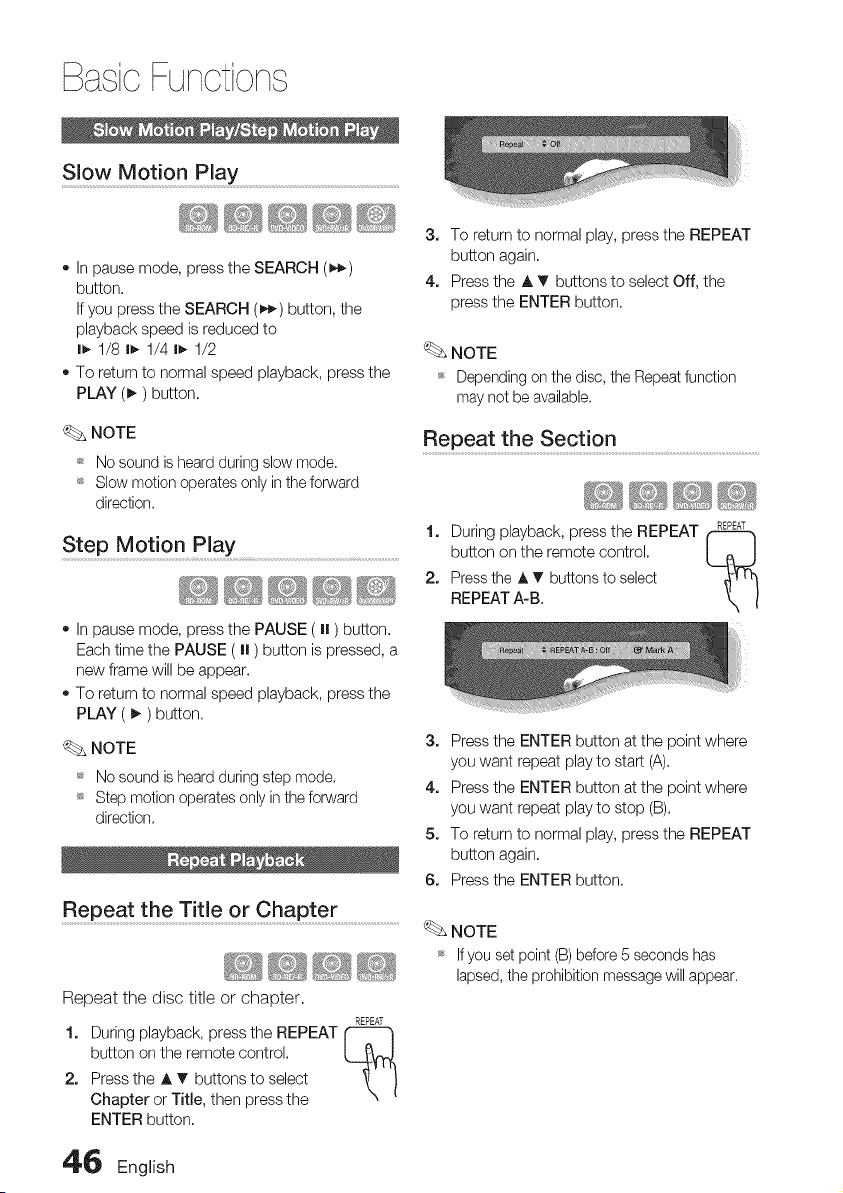
BasicFunctions
Slow Motion Play
- In pause mode, press the SEARCH (_)
button.
Ifyou press the SEARCH (_) button, the
playback speed isreduced to
I_, 1/8 I_, 1/4 I_, 1/2
oTo return to normal speed playback, press the
PLAY (_) button.
3. To return to normal play, press the REPEAT
button again.
4. Pressthe A T buttons to select Off, the
press the ENTER button.
NOTE
_s Depending on the disc, the Repeat function
may net beavailable.
NOTE
_ No sound isheard during slow mode.
_s Slow motion operates only in the forward
direction.
Step Motion Play .............................................
o Inpause mode, press the PAUSE (I| )button.
Each time the PAUSE ( I| )button ispressed, a
new frame will be appear.
To return to normal speed playback, press the
PLAY ( I_) button.
NOTE
_ No sound isheard during step mode.
_s Step motion operates only intheforward
direction.
Repeat the Title or Chapter
Repeat the disc title or chapter.
REPEAT
1. During playback, press the REPEAT
button on the remote control.
2. Press the A T buttons to select
Chapter or Title, then press the
ENTER button.
Repeat the Section .....................................................................................................
1. During playback, pressthe REPEAT _*T
button on the remote control. [ _ J
2. Pressthe A V buttons to select
REPEAT A-B.
3. Pressthe ENTER button at the point where
you want repeat play to start (A).
4. Pressthe ENTER button at the point where
you want repeat play to stop (B).
5. To return to normal play, press the REPEAT
button again.
6. Pressthe ENTER button.
NOTE
_ Ifyou set point(B)before5 secondshas
lapsed,theprohibitionmessagewillappear.
4'_ English

During playback, you can operate disc
menu by pressing the TOOLS button.
TOOLS Menu Screen
_ Information about the primary / secondary
mode will bealso displayed ifthe Blu-ray Disc
has a BONUSVIEW section.
Use the _ _ button to switch between
primary and secondary audio modes.
_ Thisfunction depends on what audio
languages areencoded on the disc and may
net be available.
_ A Blu-ray Disc can contain up to 32 audio
languages and a DVD up to 8.
_ Some Blu-rayDiscs may allow youto select
either the multi-channel LPCM orDolby digital
audio soundtrack in English.
NOTE
m Dependingonthedisc,the TOOLSmenumay
differ,
Moving to a Desired Scene D!rectly ......
1. During playback, press the TOOLS button.
2. Pressthe A _' buttons to select Title,
Chapter or Playing Time.
3. Enter the desired Title, Chapter or Playing
Time using the number buttons, then press
the ENTER button.
Selecting the Audio Language ......................................
1. During playback, press the TOOLS button.
2. Pressthe A T buttons to select Audio.
3. Pressthe _1_ buttons to select the desired
audio language.
_. NOTE
_ The 41_ indicator will not be displayed on the
screen if the BONUSVIEWsection does not
contain any BONUSVIEW audio settings.
Selectin gt he Su btitle Languag e..........
1. During playback, press the TOOLS button.
2. Pressthe A _' buttons to select Subtitle.
3. Pressthe _1i_ buttons to select the desired
subtitle language.
NOTE
Depending on the Blu-ray Disc / DVD, you may
be able to change the desired subtitle inthe
Disc Menu.
Pressthe DISCMENUbutton.
_ Thisfunction depends on what subtitles are
encoded on thedisc and may net be available
on allBlu-ray Discs/DVDs.
_ A Blu-ray Disc can contain up to 255 subtitle
languages and a DVD up to 32.
_ Information about the primary / secondary
mode will alsobe displayed ifthe Blu-ray Disc
has a BONUSVIEW section.
_ Thisfunction changes both the primaryand
secondary subtitles atthe sametime.
_ Thetotal number of subtitles isthe sum of the
primary and secondary ones.
English 4'_
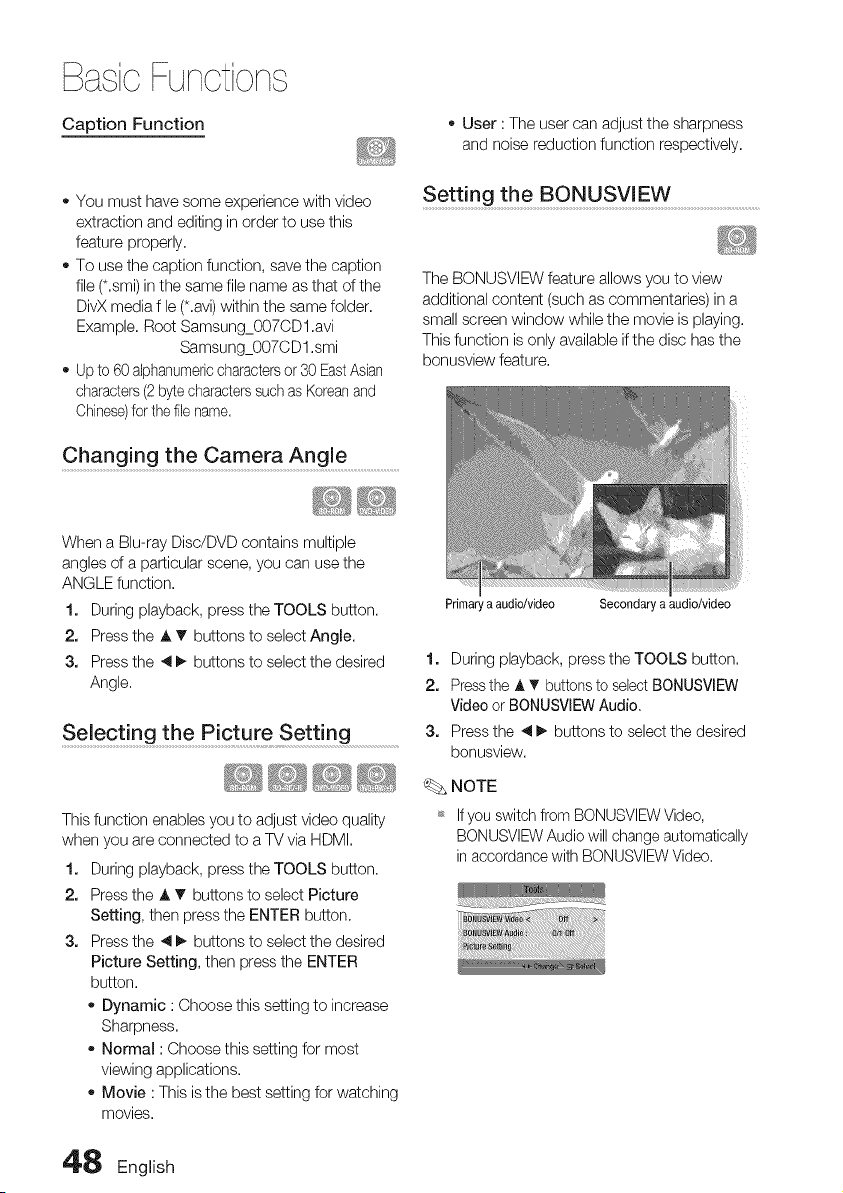
BasicFunctions
Caption Function
o User :The user can adjust the sharpness
and noise reduction function respectively.
You must have some experience with video
extraction and editing in order to use this
feature properly,
To use the caption function, save the caption
file (*,smi) inthe same file name as that of the
DivX media fle (*.avi)within the same folder,
Example, Root Samsung_007CDl,avi
Samsung_007CD1 .smi
Upto 60 alphanumericcharacters or30EastAsian
characters (2bytecharacterssuch asKoreanand
Chinese)forthefile name,
Chang! ng the Camera Angle .....................................
When a Blu-ray Disc/DVD contains multiple
angles of aparticular scene, you can use the
ANGLE function,
1, During playback, press the TOOLS button.
2, Press the A T buttons to select Angle.
3, Press the 4 _ buttons to select the desired
Angle.
Selecting the Picture S ettin g
This function enables you to adjust video quality
when you are connected to aTV via HDMI,
1, During playback, press the TOOLS button.
2. Press the A T buttons to select Picture
Setting, then press the ENTER button.
3. Press the _1_ buttons to select the desired
Picture Setting, then press the ENTER
button.
Dynamic :Choose this setting to increase
Sharpness,
Normal :Choose this setting for most
viewing applications,
Movie : This isthe best setting for watching
movies,
Setting the BONUSVIEW ...............................................................
The BONUSVIEW feature allows you to view
additional content (such as commentaries) in a
small screen window while the movie isplaying.
This function isonly available if the disc has the
bonusview feature.
Primaryaaudio/video Secondaryaaudio/video
1. During playback, press the TOOLS button,
2. Pressthe A T buttons to selectBONUSVIEW
Video orBONUSVIEWAudio,
3. Pressthe _1_ buttons to select the desired
bonusview.
NOTE
_ If you switch from BONUSVIEW Video,
BONUSVIEW Audio will changeautomatically
in accordance with BONUSVIEW Video,
4'8 English
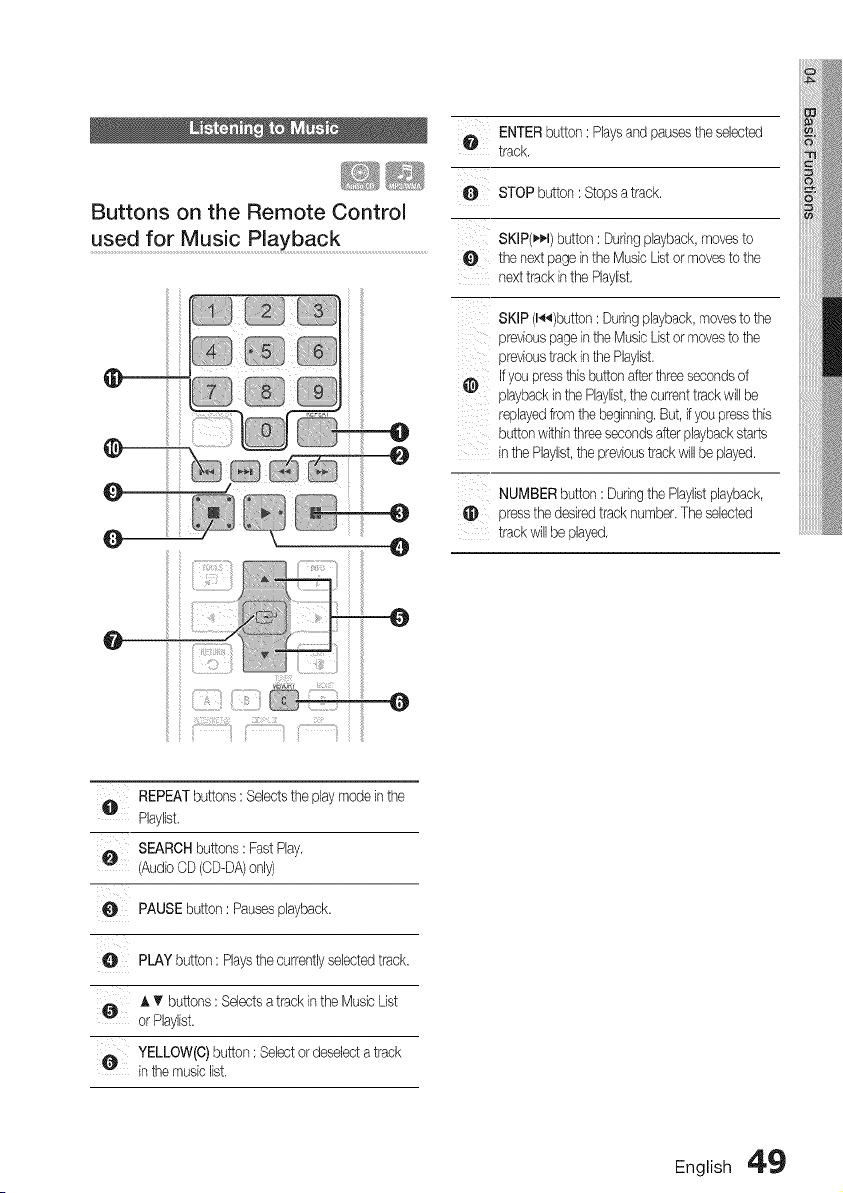
Buttons on the Remote Control
used for Music Playback
iilii
ill
iiiiii
0
ENTERbutton: Playsand pausesthe selected
track,
O STOPbutton: Stopsattack.
SKIP(_I) button: Duringplayback,movesto
O the nextpagein theMusicListormovesto the
nexttrackinthe Phylist,
SKIP(l_)button :Duringplayback,movesto the
previouspageinthe MusicListormovestothe
previoustrackinthe Phylist.
Ifyoupressthisbuttonafterthreesecondsof
playbackinthePhylist,thecurrenttrackwillbe
replayedfromthe beginning.But,ifyoupressthis
buttonwithinthreesecondsafterplaybackstarts
inthe Phylist,the previoustrackwillbe played.
NUMBERbutton: Duringthe Phylistplayback,
_) pressthe desiredtracknumber.Theselected
trackwillbe played,
@
REPEATbuttons:Selectsthe playmodeinthe
Phylist.
SEARCHbuttons:FastPlay,
(AudioCD(CD-DA)only)
PAUSEbutton:Pausesplayback.
e PLAYbutton:Playsthe currentlyselectedtrack.
AIr buttons:Selectsatrack,n the MusicUst
orPhylist.
¢ YELLOW(C)button: Selectordeselecta track
inthe musiclist.
English 49
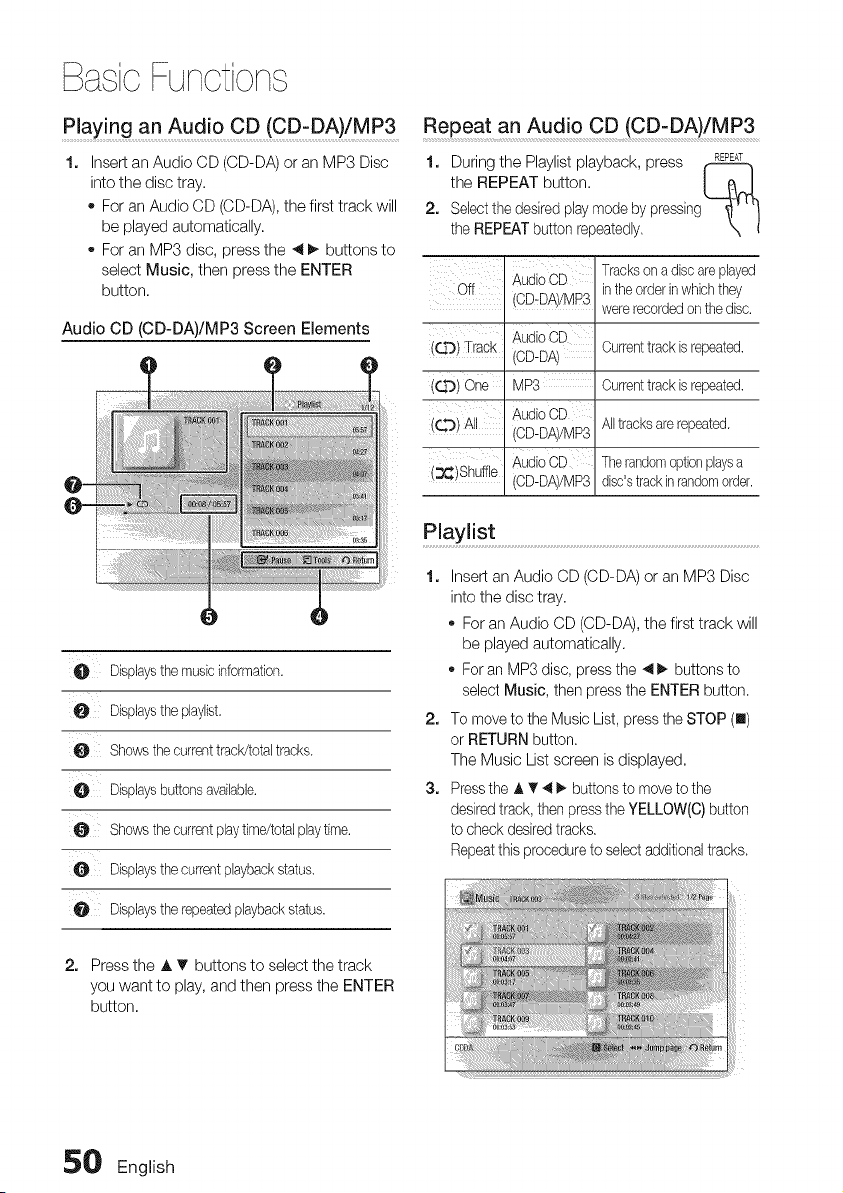
BasicFunctions
Playing an Audio CD (CD-DA)/MP3
1. Insert an Audio CD (CD-DA) oran MP3 Disc
into the disc tray.
o For anAudio CD (CD-DA), the first track will
be played automatically.
For an MP3 disc, press the _1_, buttons to
select Music, then press the ENTER
button.
Audio CD (CD-DA)/MP3 Screen Elements
O Displaysthemusicinformation.
O Displaysthepbylist,
0 Showsthecurrenttrack/totaltracks.
Dispbysbuttonsavaibbb.
O Showsthecurrentplaytime/totalplaytime.
0 Displaysthecurrentplaybackstatus.
0 Displaystherepeatedplaybackstatus.
2. Press the A T buttons to select the track
you want to play, and then press the ENTER
button,
Repeat an Audio CD (CD-DA)/MP3
1, During the Playlist playback, press REPEAT
the REPEAT button, I (_.J
2. Sebct the desiredplay mode by pressing
the REPEATbutton repeatedly.
Off
(QO) Track
QO)One
r_O)All
3_)Shuffle
AudioCE
/CD-DA//MP3
AudioCE
/CD-DA/
MP8
AudioCE
/CD-DA//MP3
AudioCE
/CD-DA//MP3
Tracksona discareplayed
inthe orderinwhich they
wererecordedon the disc.
Currenttrackisrepeated.
Currenttrackisrepeated.
Alltracksarerepeated.
Therandomoptionplaysa
disc'strackinrandomorder.
Playlist
1. Insert an Audio CD (CD-DA) or an MP3 Disc
into the disc tray,
_,For an Audio CD (CD-DA), the first track will
be played automatically.
_,For an MP3 disc, pressthe 4 _ buttons to
select Music, then pressthe ENTER button.
2. To movetothe Music List, presstheSTOP (n)
or RETURN button.
The Music Listscreen isdisplayed,
3. Pressthe A T' 4 _. buttonsto moveto the
desiredtrack,then pressthe YELLOW(C) button
tocheckdesiredtracks,
Repeat this procedureto selectadditionaltracks.
50 English
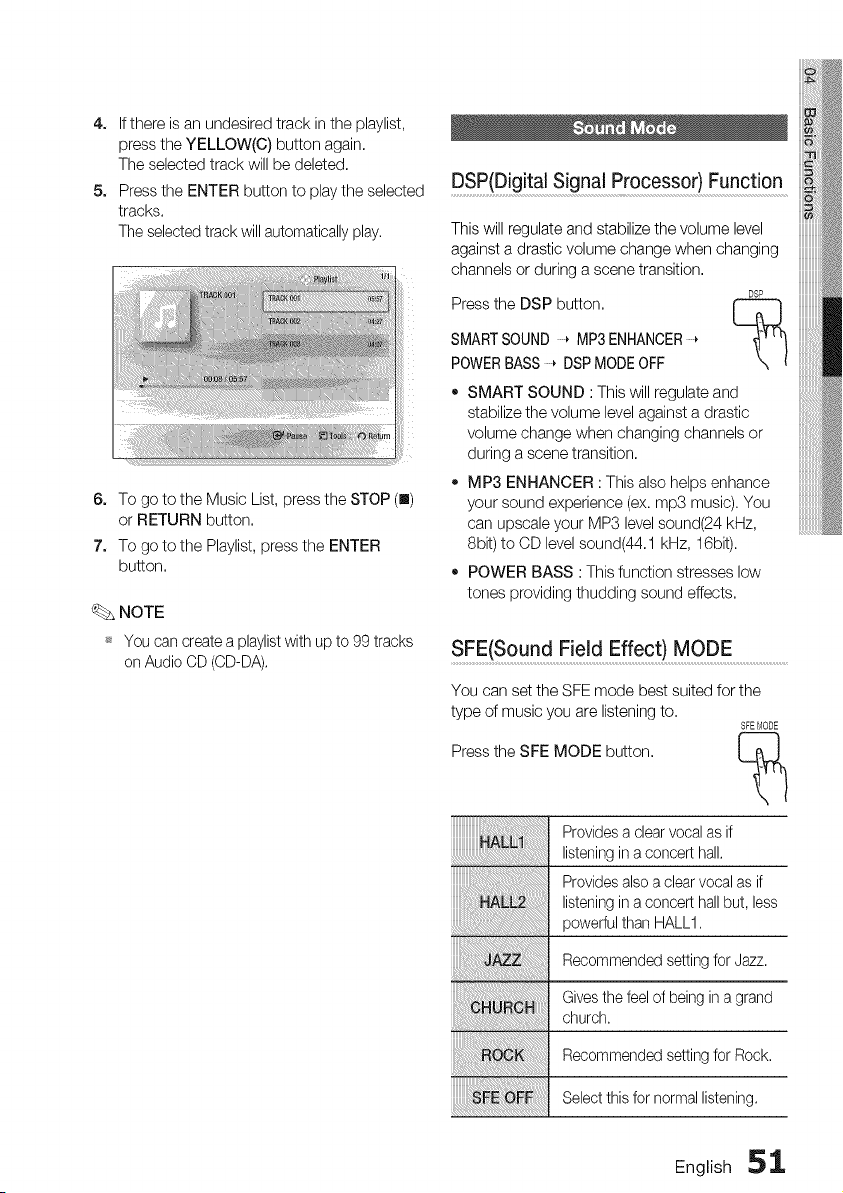
4. Ifthere is an undesired track in the playlist,
press the YELLOW(C) button again.
The selected track will be deleted.
5. Pressthe ENTER button to play the selected
tracks.
Theselected track will automatically play.
6. To go to the Music List,press the STOP (u)
or RETURN button.
7. To go to the Playlist, press the ENTER
button.
_. NOTE
_ You can create a playlistwith up to 99 tracks
on Audio CD(CD-DA).
DSP(Digital Signal Processor) Function
This will regulate and stabilize the volume level
against a drastic volume change when changing
channels or during a scene transition.
DSP
Pressthe DSP button. [_
SMARTSOUND _MP3ENHANCER
POWERBASS _ DSP MODEOFF
• SMART SOUND :This will regulate and
stabilize the volume level against a drastic
volume change when changing channels or
during a scene transition.
• MP3 ENHANCER : This also helps enhance
your sound experience (ex. mp3 music). You
can upscale your MP3 level sound(24 kHz,
8bit) to CD levelsound(44.1 kHz, 16bit).
• POWER BASS :This function stresses low
tones providing thudding sound effects.
SFE(Sound F!eld Effect) MODE........................................
You can set the SFE mode best suited for the
type of music you are listening to.
SFEMODE
Pressthe SFE MODE button. [_
Providesa clearvocalas if
listeningina concerthall.
Provides also aclearvocal as if
listening inaconcert hallbut, less
powerful than HALL1.
Recommended setting for Jazz.
Givesthe feel of beingin agrand
church.
Recommended setting for Rock.
Select thisfor normal listening.
English 51

BasicFunctions
Dolby Pro Logic II Mode
Using the TOOLS button
You can select the desired Dolby Pro _PLx
Logic II audio mode.
Press the I]['] PL II button.
During the slide show playback, you
can usevarious function by pressing
the TOOLS button.
Whenlisteningtomusic,youcanexperience
soundeffectsasif youarelisteningto the
actualperformance,
Addsrealismtothemoviesoundtrack.
Youwill experiencearealisticmultPchannel
effect,asifusingsixspeakers,whileusing
justthefrontleftandrightspeakers,
Youwillhearmultichannelsurroundsound,
Selectthistolistentosoundfromthefrontleft
andrightspeakersandthesubwoofer0nly,
NOTE
_s Whenselecting DolbyPro Logic II mode,
connect your external devicetothe AUDIO
INPUTjacks (Land R)on the product, If you
connect to onlyone ofthe inputs (LorR),you
cannotlistento surround sound,
_ Thismode isavailableonlywith 2 channel audio,
Playing a JPEG Disc
1. Insert a JPEG disc into the disc tray.
2. Press the 4 _ buttons to select the Photos,
and then press the ENTER button.
3. Press the A T 4 _. buttons to select the
folder you want to play, and then press the
ENTER button.
4. Press the A T _ _. buttons to select the
photo you want to play, and then press the
ENTER button.
o Start Slide Show :Select this if you want to
start the slide show.
Slide Show Speed :Select this if you want to
adjust the Slide Show speed.
Background Music :Select this if you want to
listen to music while viewing a picture.
Zoom : Select this if you want to enlarge the
current picture. (Enlarged up to 4 times)
Rotate :Select this if you to rotate the picture.
(This will rotate the picture either clockwise or
counter clockwise.)
Information :Shows the picture information
including the name and size, etc.
NOTE
_ To enabletheBackgroundMusicfunction,
both musicandMP3filesmustbecontainedin
thesamefolder.However,the soundquality
canbe affectedbythebit rateof the MP3file,
thesizeof thephotoand theencoding
method,
NOTE
_ You can't enlarge the subtitleand PGgraphic
in the full screen mode.
52 English
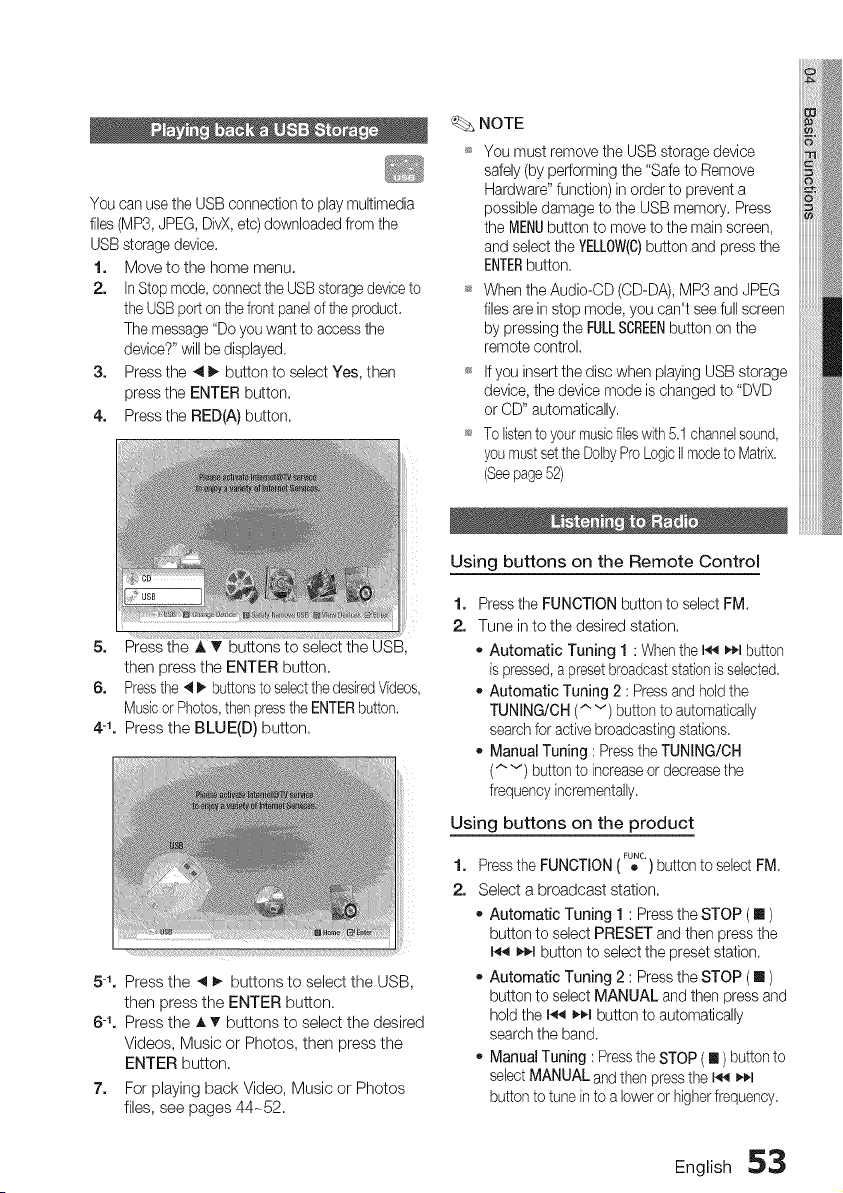
You can usethe USB connection to play multimedia
files (MP3, JPEG,DivX,etc) downloaded from the
USB storage device.
1. Movetothe home menu.
2. In Stop mode, connect the USBstoragedeviceto
the USBporton the frontpanelof the product.
The message"Do you want to access the
device?" will bedisplayed.
3. Press the 411_ button to select Yes, then
press the ENTER button.
4. Press the RED(A)button.
5.
Press the A T buttons to select the USB,
then press the ENTER button.
6. Pressthe 4 I_ buttonstoselectthedesiredVideos,
MusicorPhotos,then presstheENTERbutton.
4-1. Press the BLUE(D) button.
L
5-1, Press the 4 I_ buttons to select the USB,
then press the ENTER button.
6-1, Press the A T buttons to select the desired
Videos, Music or Photos, then press the
ENTER button.
7. For playing back Video, Music or Photos
files, see pages 44-52.
NOTE
You must remove the USB storage device
safely(byperforming the "Safeto Remove
Hardware" function) in order to prevent a
possible damage tothe USB memory. Press
the MENUbutton to moveto the main screen,
and select the YELLOW(C)button and pressthe
ENTERbutton.
When the Audio-OD (OD-DA),MP3 and JPEG
files arein stop mode, you can't seefullscreen
by pressing the FULLSCREENbutton on the
remote control.
Ifyou insertthe disc when playing USB storage
device, the device mode ischanged to "DVD
or CD" automatically.
Tolistento yourmusicfileswith5.1 channelsound,
youmustsetthe DolbyProLogicIImodeto Matrix.
(Seepage52)
Using buttons on the Remote Control
1.
2.
Pressthe FUNCTION button to select FM.
Tune in to the desired station.
oAutomatic Tuning 1 : Whenthe I_ I_q_lbutton
ispressed,a presetbroadcast stationisselected.
Automatic Tuning 2 :Press and holdthe
TUNING/OH (" v) button toautomatically
searchforactive broadcastingstations.
- Manual Tuning :Pressthe TUNING/OH
(,.,v) button to increaseordecrease the
frequency incrementafly.
Using buttons on the product
FUNC.
1. Pressthe FUNCTION( ,b )button toselectFM
2. Select a broadcast station.
Automatic Tuning 1 :Press the STOP ([] )
button to select PRESET and then pressthe
I_ _,¢-Ibutton to select the preset station.
Automatic Tuning 2 :Press the STOP ([] )
button to select MANUAL and then pressand
holdthe I_ _,¢-Ibutton to automatically
searchthe band.
ManualTuning :Press the STOP(III) button to
selectMANUAL and thenpressthe I_ _1
button totune into alower or higherfrequency.
English 53
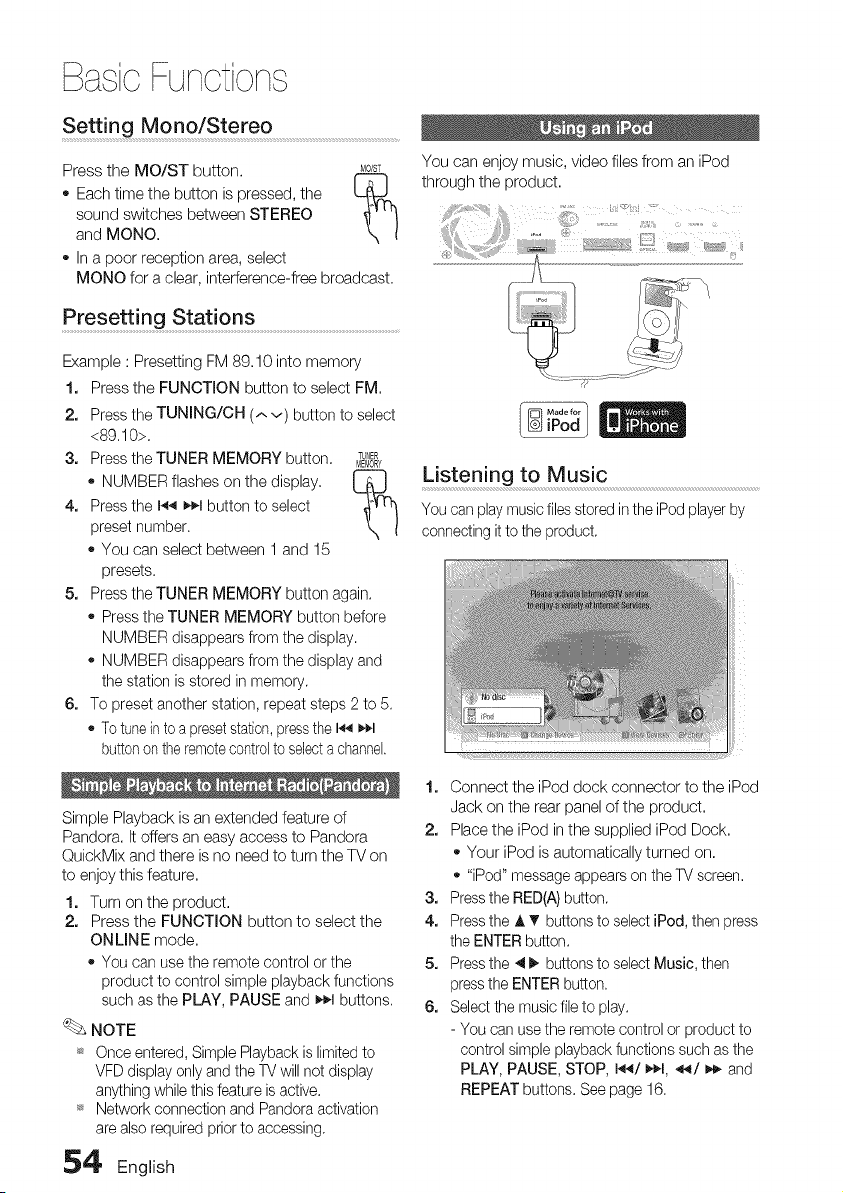
BasicFunctions
Setting Mono/Stereo
Press the MO/ST button. MO/ST
" Each time the button is pressed, the [-_
sound switches between STEREO
and MONO.
- In a poor reception area, select
MONO for a clear, interference-free broadcast.
You can enjoy music, video files from an iPod
through the product.
Presetting Stati ons ..................................................................................................
Example :Presetting FM 89.10 into memory
1. Press the FUNCTION button to select FM.
2. Pressthe TUNING/CH (^v) button to select
<89.10>,
3. Pressthe TUNER MEMORY button, TUNER
MEMORY
- NUMBER flashes on the display.
4. Pressthe I_ _1 button to select
preset number.
- You can select between 1 and 15
presets.
5. Pressthe TUNER MEMORY button agan.
- Press the TUNER MEMORY button before
NUMBER disappears from the display.
- NUMBER disappears from the display and
the station isstored inmemory.
6. To preset another station, repeat steps 2to 5.
- Totune intoa presetstation,pressthe 14_11_1
buttonon theremotecontrolto selecta channel.
Simple Playback isan extended feature of
Pandora. It offers an easy access to Pandora
QuickMix and there isno need to turn the TV on
to enjoy this feature.
1. Turn on the product.
2. Press the FUNCTION button to select the
ONLINE mode.
- You can use the remote control or the
product to control simple playback functions
such as the PLAY, PAUSE and _.1 buttons,
NOTE
_s Once entered, Simple Playback islimited to
VFDdisplay only and the TV will netdisplay
anything whilethis feature isactive.
_s Network connection and Pandora activation
arealsorequired priorto accessing,
Listening to Music
You can play musicfiles stored intheiPodplayerby
connectingittothe product,
1. Connect the iPod dock connector to the iPod
Jack on the rear panel of the product,
2. Place the iPod in the supplied iPod Dock,
- Your iPod isautomatically turned on.
- "iPod" message appears on the TVscreen,
3. Pressthe RED(A)button.
4. Pressthe _,V buttonsto select iPod, then press
the ENTER button.
5. Pressthe 41_ buttonsto select Music, then
pressthe ENTER button.
6. Select the music fileto play.
- You can usethe remote control or product to
control simple playback functions such asthe
PLAY, PAUSE, STOP, 144/_1, _/_,_ and
REPEAT buttons. See page 16.
,5_' English
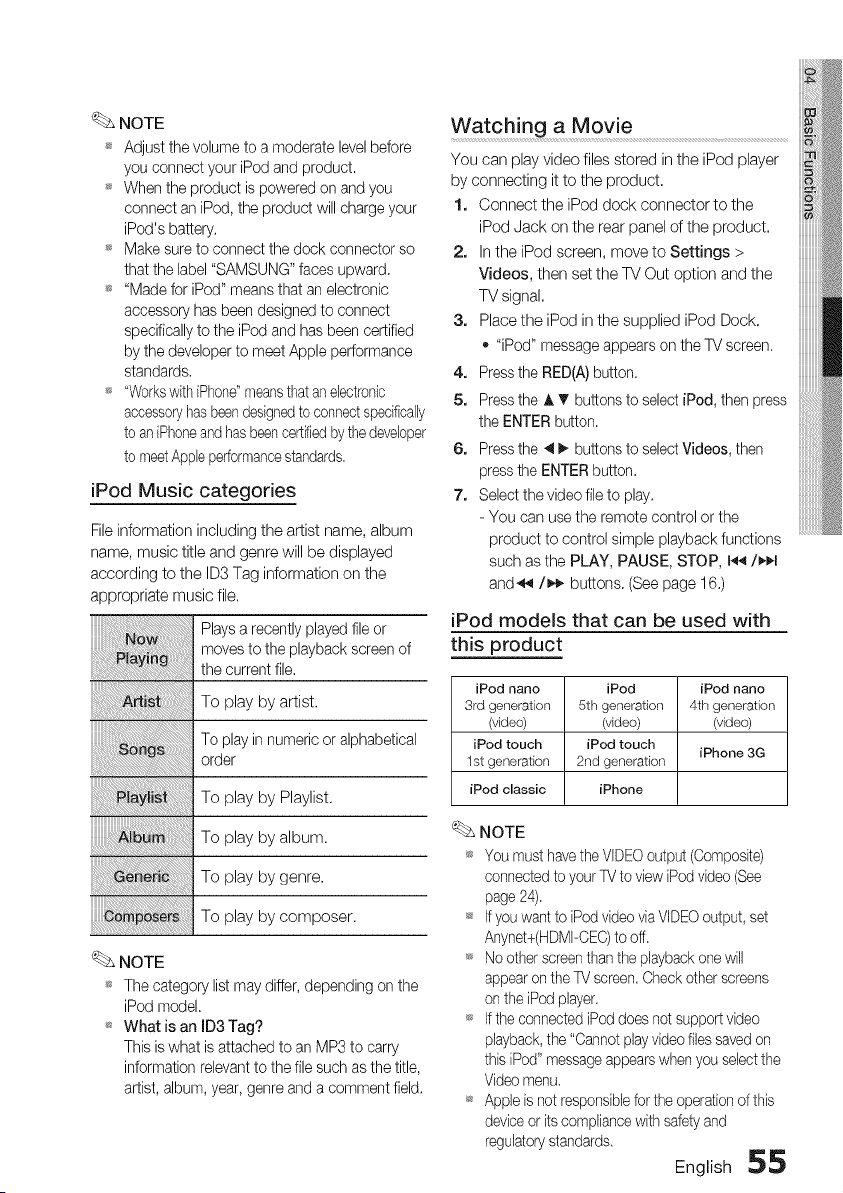
NOTE
_ Adjust the volume to a moderate levelbefore
you connect your iPodand product.
_ When the product ispowered on andyou
connect an iPod, the product will charge your
iPod's battery.
_ Make sure to connect the dock connector so
that the label "SAMSUNG" faces upward.
_ "Made for iPod" meansthat an electronic
accessory hasbeen designed to connect
specificallyto the iPodand has been certified
by the developer to meet Apple performance
standards.
_ "Workswith iPhone"meansthat an electronic
accessoryhasbeendesignedto connectspecifically
toan iPhoneand hasbeencertifiedbythedeveloper
tomeetAppleperformancestandards.
iPod Music categories
Fileinformation including the artist name, album
name, music title and genre will be displayed
according to the ID3Tag information on the
appropriate music file.
_. NOTE
Playsa recently played fileor
moves tothe playback screen of
the current file.
To play by artist.
To playinnumeric or alphabetical
order
To play by Playlist.
To play by album.
To play by genre.
To play by composer.
_ The category list maydiffer, depending on the
iPod model.
_ What is an ID3 Tag?
This iswhat isattached to an MP3to carry
information relevantto the filesuch as the title,
artist,album, year, genre and a comment field.
Watching a Movie
You can play video files stored in the iPod player
by connecting it to the product.
1. Connect the iPod dock connector to the
iPod Jack on the rear panel ofthe product.
2. Inthe iPod screen, move to Settings >
Videos, then set the TVOut option and the
TV signal.
3. Place the iPod inthe supplied iPod Dock.
- "iPod" message appears on theTV screen.
4. Pressthe RED(A)button.
5. Pressthe A V buttonsto selectJPod,then press
the ENTER button.
6. Pressthe 4 _, buttons to selectVideos, then
pressthe ENTER button.
7. Select thevideo fileto play.
- You can usethe remote control or the
product to control simple playback functions
such as the PLAY, PAUSE, STOP, 14,_/_1
and_'_/_,_ buttons. (See page 16.)
iPod models that can be used with
this product
iPod nano iPod iPod nano
3rd generalien 5th generation 4th generatien
(video) (video) (video)
iPod touch iPod touch
iPhone 3G
1st generation 2nd generation
iPod classic iPhone
NOTE
_ You must havetheVIDEOoutput (Composite)
connectedtoyour TVto viewiPodvideo (See
page 24).
_ Ifyouwantto iPodvideo viaVIDEOoutput, set
Anynet+(HDMI-CEC)to off.
_ Nootherscreenthan the playback one will
appearon theTV screen.Check otherscreens
on the iPodplayer.
_ Ifthe connected iPoddoesnotsupportvideo
playback, the "Cannotplayvideo filessaved on
thisiPod" messageappearswhen you selectthe
Videomenu.
_ Appleisnot responsible forthe operationof this
deviceor itscompliance with safety and
regulatorystandards.
English 55
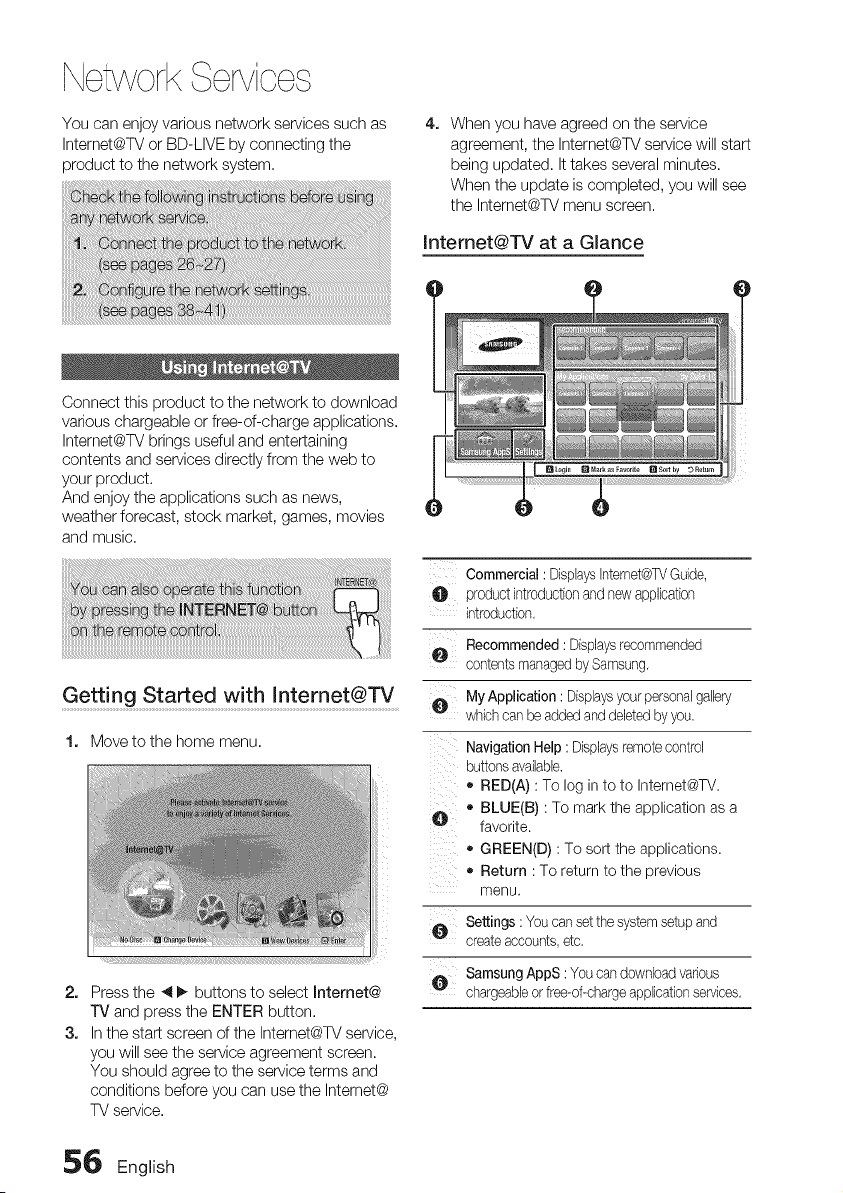
NetworkServices
You can enjoy various network services such as
Intemet@TV or BD-LIVE by connecting the
product to the network system.
4. When you have agreed on the service
agreement, the Intemet@TV service will start
being updated. It takes several minutes.
When the update is completed, you will see
the Intemet@TV menu screen.
Intemet@TV at a GJance
Connect this product to the network to download
various chargeable or free-of-charge applications.
Intemet@TV brings useful and entertaining
contents and services directly from the web to
your product.
And enjoy the applications such as news,
weather forecast, stock market, games, movies
and music.
Getting Started with Internet@TV
1. Move to the home menu.
2. Press the 4 _ buttons to select Internet@
TV and press the ENTER button.
3. Inthe start screen of the Intemet@TV service,
you will see the service agreement screen.
You should agree to the service terms and
conditions before you can use the Intemet@
TVservice.
Commercial: DisplaysInternet@TVGuide,
productintroductionand newapplication
introduction.
e
O
D
bii_iii
Recommended: Displaysrecommended
contentsmanagedbySamsung.
My Application:Displaysyourpersonalgaller
whichcanbe addedanddeletedbyyou.
NavigationHelp :Displaysremotecontrol
buttonsavailable.
o RED(A) :To log in to to Internet@TV.
• BLUE(B) : To mark the application as a
favorite.
o GREEN(D) :To sort the applications.
o Return : To return to the previous
menu.
Settings:Youcansetthesystemsetupand
createaccounts,etc.
0 SamsungAppS:Youcandownloadvarious
chargeableorfree-of-char%applicationservices.
56 English
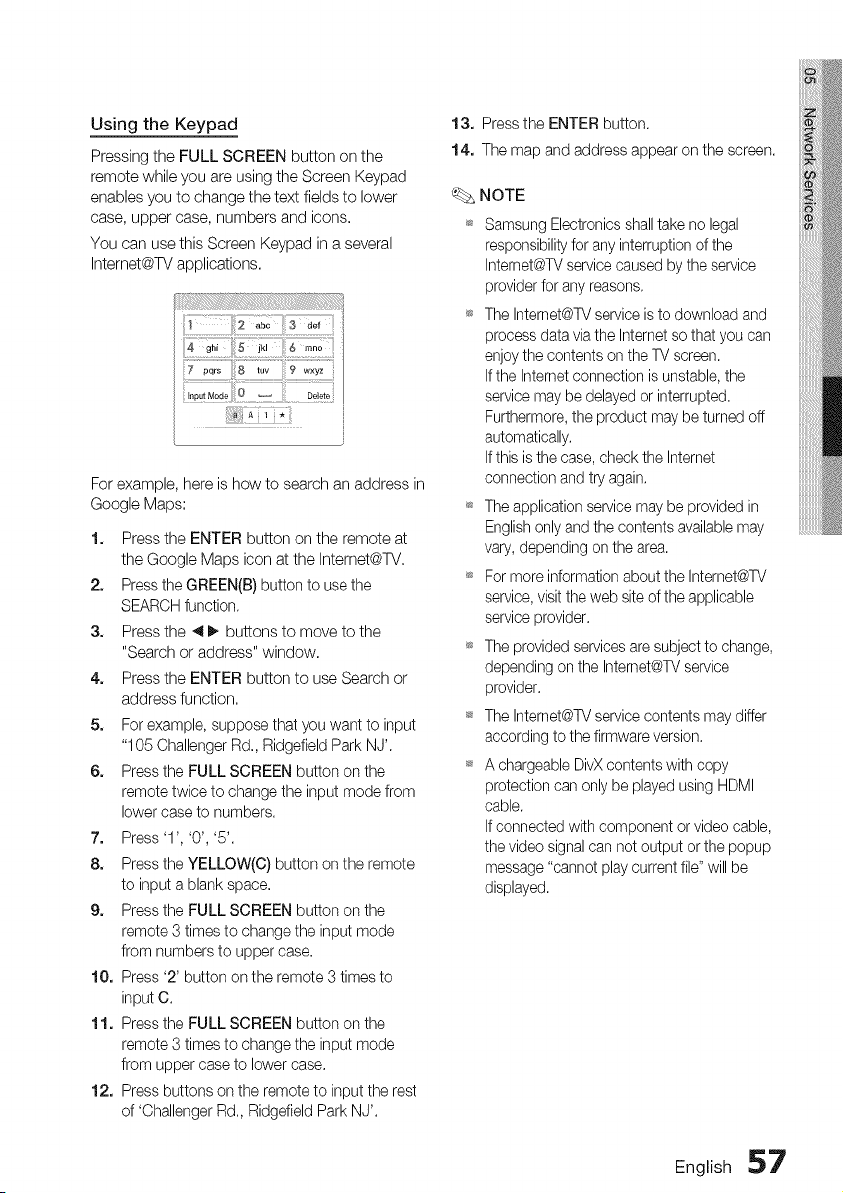
Using the Keypad
Pressing the FULL SCREEN button on the
remote while you are using the Screen Keypad
enables you to change the text fields to lower
case, upper case, numbers and icons.
You can use this Screen Keypad in a several
Intemet@TV applications.
Forexample,here ishow tosearchanaddress in
GoogleMaps:
1. Press the ENTER button on the remote at
the Google Maps icon atthe Intemet@TV.
2. Press the GREEN(B) button to usethe
SEARCH function.
3. Press the _1_. buttons to move to the
"Search or address" window.
4. Press the ENTER button to use Search or
address function.
5. For example, suppose that you want to input
"105 Challenger Rd., Ridgefield Park NJ'.
6. Press the FULL SCREEN button on the
remote twice to change the input mode from
lower case to numbers.
7. Press'l', '0', '5'.
8. Press the YELLOW(C) button on the remote
to input a blank space.
9. Press the FULL SCREEN button on the
remote 3 times tochange the input mode
from numbers to upper case.
10. Press '2' button on the remote 3 times to
input C.
11. Pressthe FULL SCREEN button on the
remote 3 times tochange the input mode
from upper case to lower case.
12. Pressbuttons on the remote to input the rest
of 'Challenger Rd., Ridgefield Park NJ'.
13. Press the ENTER button.
14. The map and address appear on the screen.
NOTE
Samsung Electronics shalltake no legal
responsibility for any interruption of the
Internet@TVservice caused by the service
provider for anyreasons.
_ The Internet@TVservice istodownload and
process data viathe Internet so that youcan
enjoy the contents on the TVscreen.
Ifthe Internet connection isunstable, the
service maybe delayed or interrupted.
Furthermore, the product may be turned off
automatically.
Ifthis isthe case, check the Internet
connection and tryagain.
_ Theapplication service maybe provided in
Englishonly and the contents available may
vary,depending on thearea.
_ For more information about the Internet@TV
service, visitthe web siteof the applicable
service provider.
_ The provided services aresubject to change,
depending on the Internet@TVservice
provider.
_ The Internet@TVservice contents maydiffer
according to the firmwareversion.
_ A chargeable DivX contents with copy
protection can only beplayed using HDMI
cable.
Ifconnected with component or video cable,
the video signalcan not output or the popup
message "cannot playcurrent file" will be
displayed.
English 57
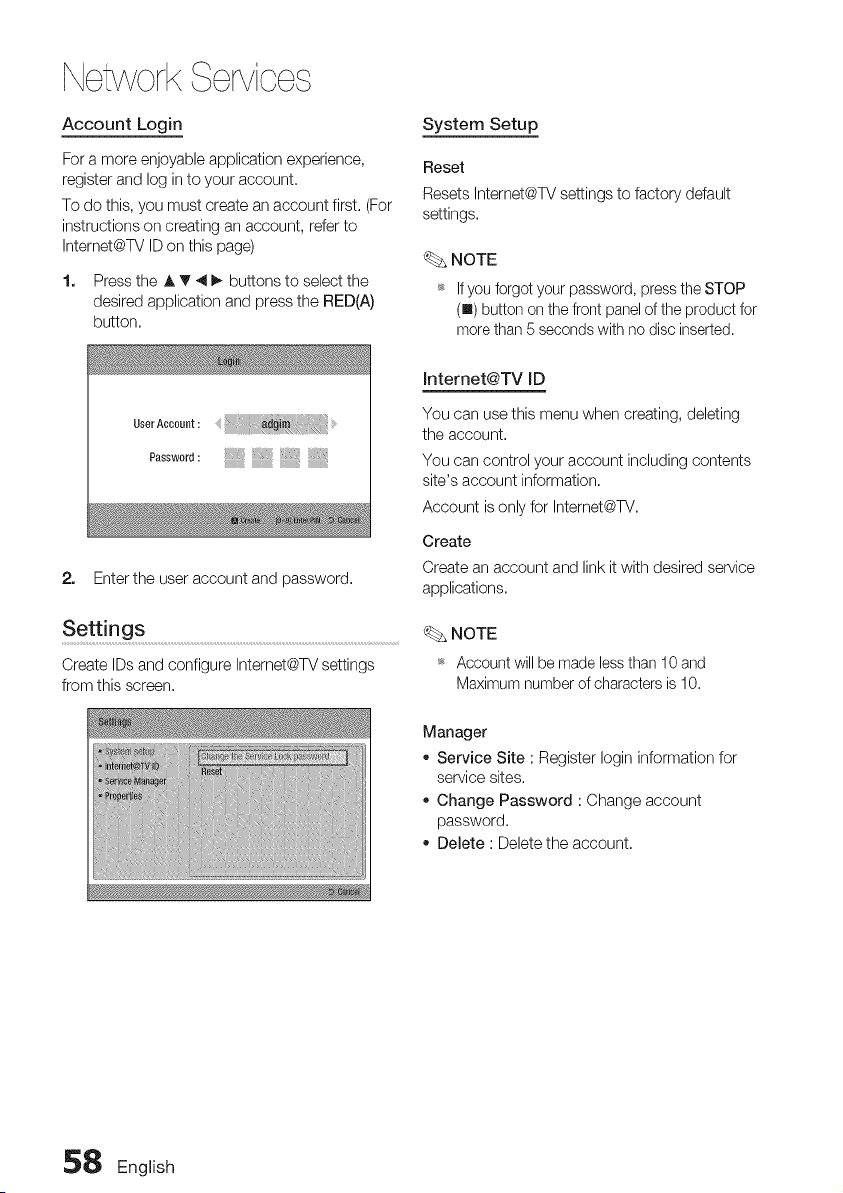
NetworkServices
Account Login
For amore enjoyable application experience,
register and log into your account.
To do this, you must create an account first. (For
instructions on creating an account, refer to
Intemet@TV ID on this page)
1. Press the A T 4 _. buttons to select the
desired application and press the RED(A)
button.
System Setup
Reset
Resets Intemet@TV settings to factory default
settings.
NOTE
_ Ifyou forgotyour password,presstheSTOP
(I) buttononthefrontpanelof theproduct for
morethan5 secondswithno disc inserted.
UserAccow_t:
P.sswer_:
2. Enter the user account and password.
Settings ...............................................................................................................................................................
Create IDs and configure Intemet@TV settings
from this screen.
Jnternet@TV JD
You can use this menu when creating, deleting
the account.
You can control your account including contents
site's account information.
Account isonly for Intemet@TV.
Create
Create an account and link it with desired service
applications.
NOTE
_ Account will be made lessthan 10 and
Maximum number of characters is10.
Manager
o Service Site : Register Iogin information for
service sites.
Change Password :Change account
password.
Delete : Delete the account.
58 English
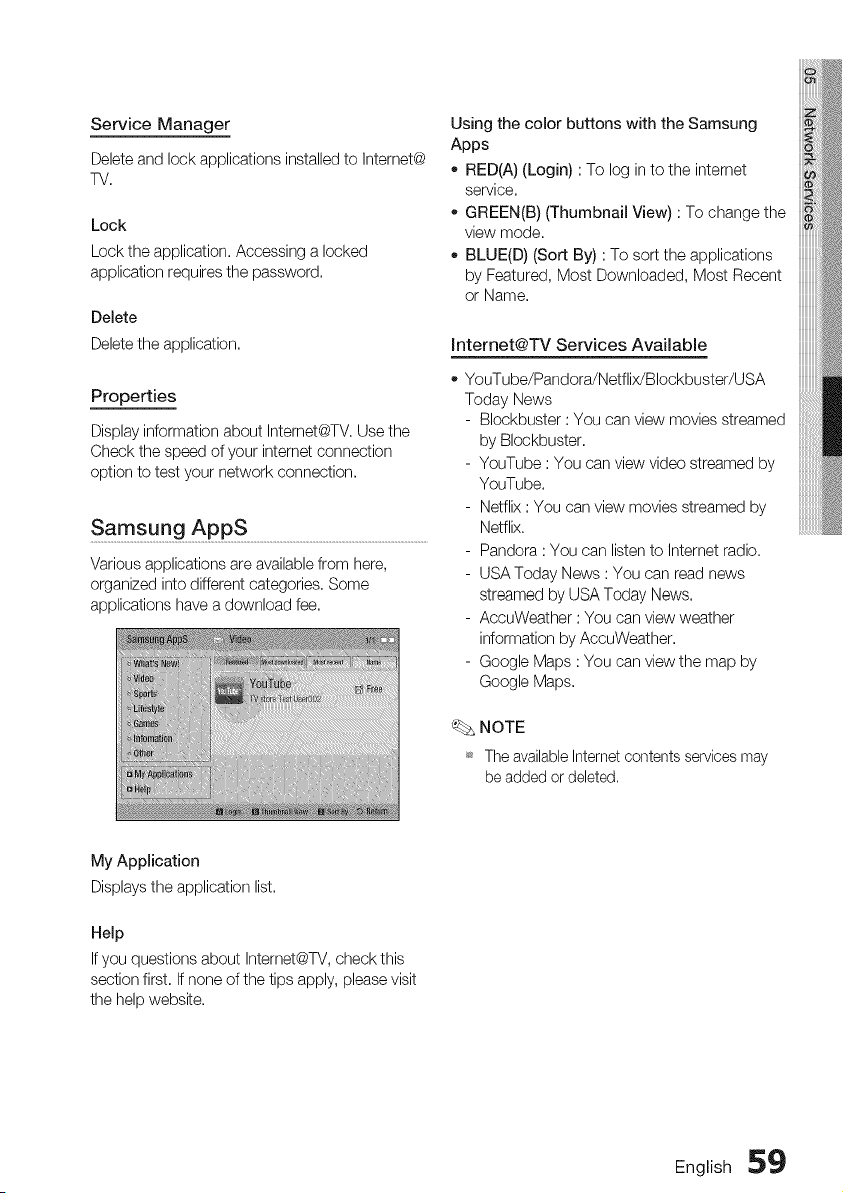
Service Manager
Delete and lock applications installed to Internet@
TV,
Lock
Lock the application, Accessing a locked
application requires the password,
Delete
Delete the application.
Properties
Display information about Internet@TV. Use the
Check the speed of your internet connection
option to test your network connection.
Samsung AppS ..............................................................................................................................
Various applications are available from here,
organized into different categories. Some
applications have a download fee.
Using the color buttons with the Samsung
Apps
- RED(A) (Login) :To log in to the internet
service.
o GREEN(B) (Thumbnail View) :To change the
view mode.
BLUE(D) (Sort By) :To sort the applications
by Featured, Most Downloaded, Most Recent
or Name.
Internet@TV Services Available
YouTube/Pandora/Netflix/Blockbuster/USA
Today News
- Blockbuster :You can view movies streamed
by Blockbuster.
- YouTube :You can view video streamed by
YouTube.
- Netflix :You can view movies streamed by
Netflix.
- Pandora : You can listento Internet radio.
- USA Today News :You can read news
streamed by USA Today News.
- AccuWeather :You can view weather
information by AccuWeather.
- Google Maps :You can view the map by
Google Maps.
NOTE
_ Theavailable Internetcontents services may
be added or deleted.
My Application
Displays the application list.
Help
Ifyou questions about Internet@TV, check this
section first. Ifnone of the tips apply, please visit
the help website.
English 59
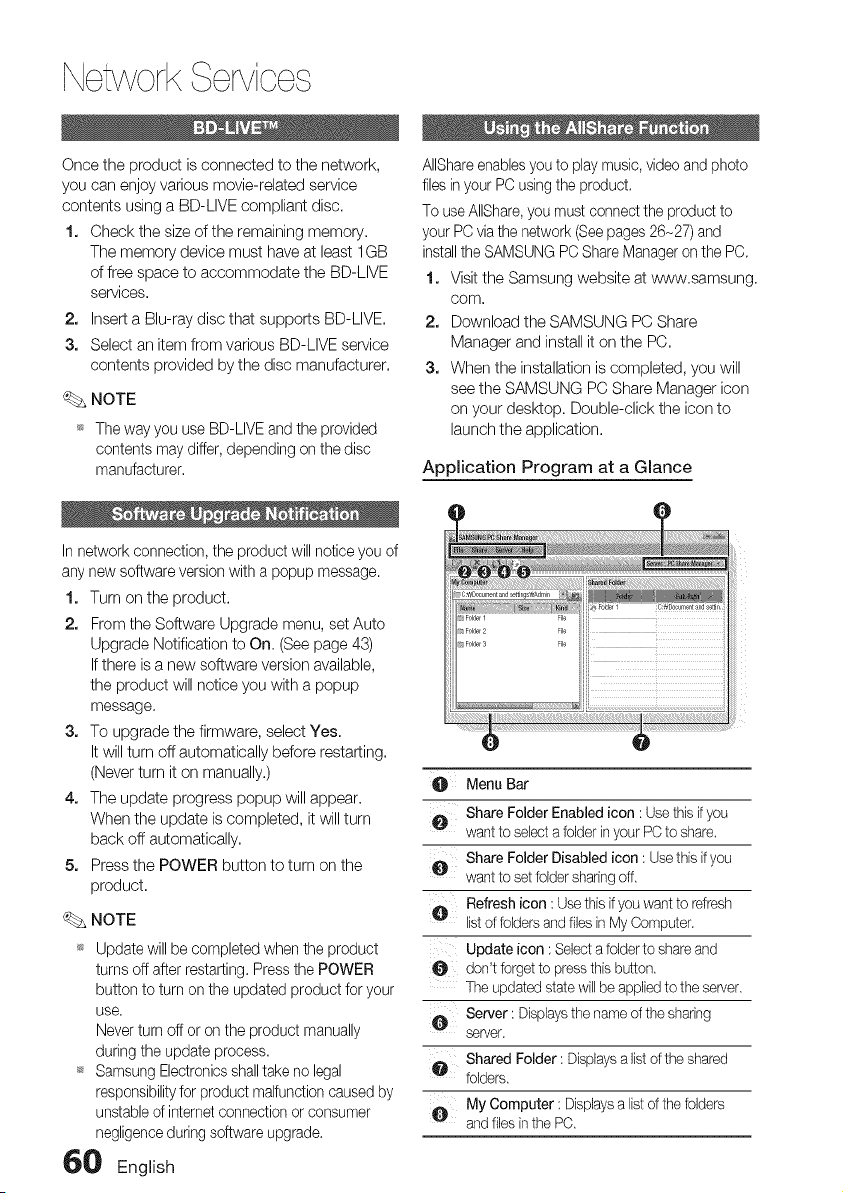
NetworkServices
Once the product isconnected to the network,
you can enjoy various movie-related service
contents using a BD-LIVE compliant disc.
1, Check the size of the remaining memory,
The memory device must have at least 1GB
offree space to accommodate the BD-LIVE
services,
2, Insert a Blu-ray disc that supports BD-LIVE,
3, Select an item from various BD-LIVE service
contents provided by the disc manufacturer,
_. NOTE
_ The way you useBD-LIVE and the provided
contents maydiffer, depending on the disc
manufacturer.
Innetwork connection, the product will notice you of
any new software version with a popup message.
1, Turn on the product.
2, From the Software Upgrade menu, set Auto
Upgrade Notification to On. (See page 43)
Ifthere isa new software version available,
the product will notice you with a popup
message.
3, To upgrade the firmware, select Yes.
Itwill turn off automatically before restarting,
(Never turn it on manually.)
4, The update progress popup will appear,
When the update iscompleted, it will turn
back off automatically,
5, Press the POWER button to turn on the
product,
_. NOTE
_ Update will be completed when the product
turns offafterrestarting. Pressthe POWER
button to turn on the updated product for your
use,
Never turn off or on the product manually
during the update process,
_ Samsung Electronicsshalltake no legal
responsibilityfor product malfunction caused by
unstable ofinternetconnectionor consumer
negligenceduring softwareupgrade.
60 English
AIIShareenablesyouto play music,video and photo
files in your PCusing the product.
Touse AIIShare,you mustconnect the product to
your PCviathe network (Seepages26-27) and
installthe SAMSUNG PCShare Manager onthe PC,
1, Visit the Samsung website atwww,samsung,
com,
2, Download the SAMSUNG PC Share
Manager and install it on the PC,
3. When the installation iscompleted, you will
see the SAMSUNG PC Share Manager icon
on your desktop. Double-click the icon to
launch the application.
Application Program at a Glance
Menu Bar
_,_ Share Folder Enabled icon :Usethis if you
wantto selecta folder inyour PCto share.
_,L_ Share Folder Disabled icon :Usethis ifyou
wantto setfolder sharingoff.
A Refresh icon :Usethisif youwant torefresh
listof foldersand files in MyComputer.
Update icon : Selectafoldertoshareand
O don'tforget to pressthisbutton,
Theupdatedstatewillbe appliedtothe server.
@ Server: Displaysthe nameofthe sharing
server.
Shared Folder:Displaysalist of the shared
folders.
My Computer :Displaysalist ofthe folders
and filesinthe PC.
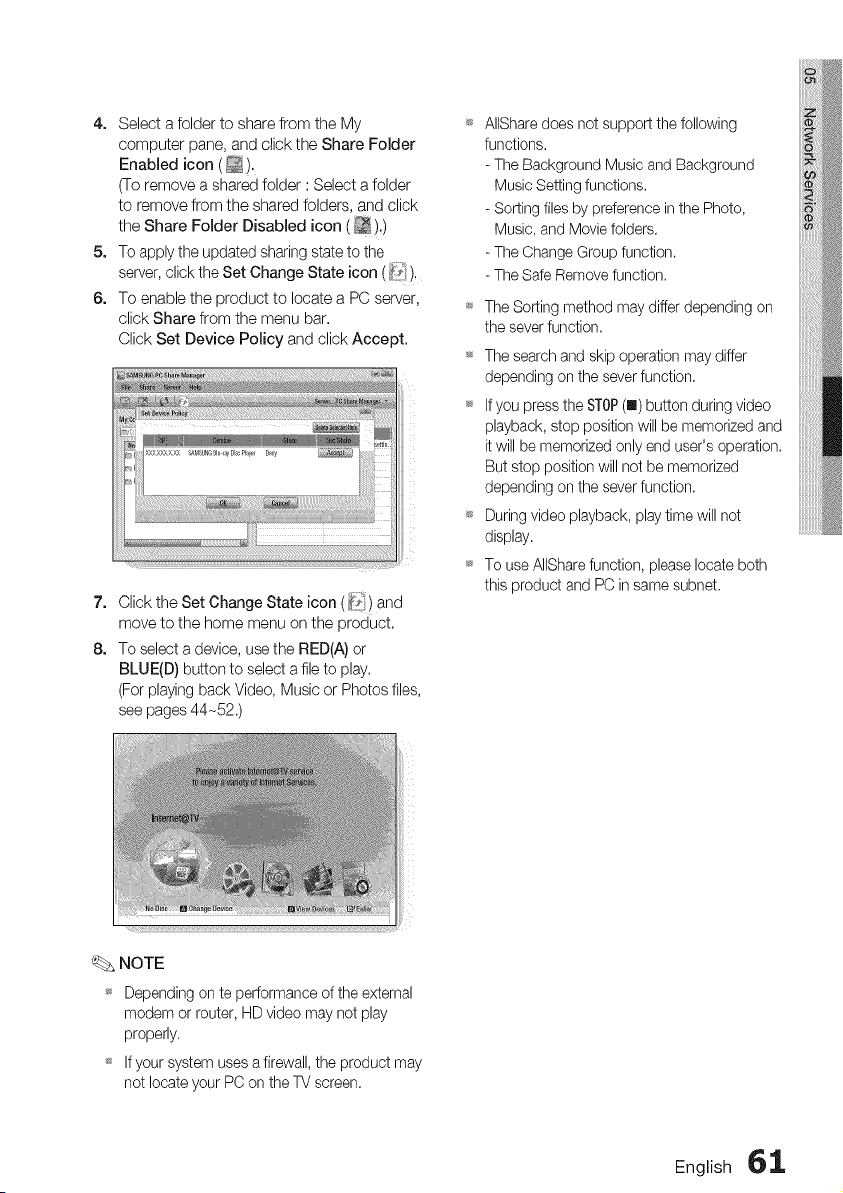
4. SelectafoldertosharefromtheMy
computerpane,andclicktheShareFolder
Enabledicon(_).
(Toremoveasharedfolder:Selectafolder
toremovefromthesharedfolders,andclick
theShareFolderDisabledicon(_):)
5. Toapplytheupdatedsharingstatetothe
server,clicktheSetChangeStateicon(_i*_),
6. ToenabletheproducttolocateaPCserver,
clickSharefromthemenubar.
ClickSetDevicePolicyandclickAccept.
7. ClicktheSetChangeStateicon(i_t_}and
movetothehomemenuontheproduct.
8. Toselectadevice,usetheRED(A)or
BLUE(D)buttontoselectafiletoplay.
(Forplayin9backVideo,MusicorPhotosfiles,
seepages44-52.)
AIISharedoesnotsupportthefollowing
functions.
-TheBackgroundMusicandBackground
MusicSettingfunctions.
-SortingfilesbypreferenceinthePhoto,
Music,andMoviefolders.
-TheChangeGroupfunction.
-TheSafeRemovefunction,
TheSortingmethodmaydifferdependingon
theseverfunction.
Thesearchandskipoperationmaydiffer
dependingontheseverfunction.
_IfyoupresstheSTOP(m)buttonduringvideo
playback,stoppositionwillbememorizedand
itwillbememorizedonlyenduser'soperation.
Butstoppositionwillnotbememorized
dependingontheseverfunction.
Duringvideoplayback,playtimewillnot
display.
'_TouseAIISharefunction,pleaselocateboth
thisproductandPCinsamesubnet.
NOTE
_Dependingonteperformanceoftheexternal
modemorrouter,HDvideomaynotplay
properly.
_sIfyoursystemusesafirewall,theproductmay
notlocateyourPContheTVscreen.
English 61
Otherinformation
Refer to the chart below when this product does not function properly. If the problem you are
experiencing is not listed below or if the instruction below does not help, turn off the product,
disconnect the power cord, and contact Samsung Electronics at 1-800-SAMSUNG.
I cannotejectthedisc.
Playbackdoesnotstart.
Playbackdoesnotstart
immediatelywhenthe
Play/Pausebuttonispressed.
Soundis notproduced,
Soundcan beheardonlyfroma
fewspeakersandnotall 6.
DolbyDigital5.1CHSurround
Soundis notproduced.
• Isthe powercordpluggedsecurelyintothe outlet?
• Turnoffthe powerandthenturnit backon.
• Checkthe regionnumberof theBD/DVD.
BD/DVDdiscspurchasedfromabroadmaynotbe playable.
• CD-ROMsandDVD-ROMscannotbeplayedon thisProduct.
• Makesurethat the ratingleveliscorrect.
• Areyouusingadeformeddiscoradiscwith scratcheson the surface?
• Wipethe discclean.
• Nosoundishearddudngfastplayback,slowplayback,andstepmotionplayback.
• Arethespeakersconnectedproperly?Isthespeakersetupcorrectlycustomized?
• Isthe discseverelydamaged?
• OncertainBD/DVDdiscs,soundisoutputfrom the frontspeakersonly.
• Checkifthe speakersareconnectedproperly.
• Adjustthe volume.
• Whenlisteningtoa CD,radioorTV,soundisoutputtothefrontspeakersonly.
Select"PROLOGICH" bypressingDDPL II(DolbyProLogicII)onthe remote
controltouseall sixspeakers.
•Isthere"DolbyDigital5.1CH"markonthedisc?DolbyDigital5.1OHSurroundSoundis
producedonlyifthediscisrecordedwith5.1channelsound.
• IstheaudiolanguagecorrectlysettoDolbyDigital5.1-0Hintheinformation
display?
Theremotecontroldoesnot work. • Istheremotecontrolbeingoperatedwithinitsoperationrangeofangleanddistance?
• Arethe batteriesdrained?
• Haveyouselectedthemode_/BD)fundionsoftheremotecontrol_ orBD)correctly?
,,Disc isrotating but no • Isthe TVpoweron?
pictureisproduced, • Arethe videocablesconnectedproperly?
,,Picture quality ispoorand • Isthediscdirtyordamaged?
pictureisshaking. • A poorlymanufactureddiscmaynot beplayable,
Audiolanguageand subtitlesdo • Audiolanguageandsubtitleswill notwork ifthe discdoesnotcontainthem.
not work.
Menu screendoesnot appear • Areyouusingadiscthat doesnotcontainmenus?
evenwhenthe menu function is
selected.
62 English
Aspect ratio cannotbe changed. • Youcanplay16:9 BD/DVDsin 16:9 Widemode,4:3LetterBoxmode,or4:3
Pan-Scanmode,but4:3 BD/DVDscanbeseenin4:3 ratioonly,Refertothe
Blu-rayDiscjacketandthen selectthe appropriatefunction,
•Theproductis notworking.
(Example:Thepowergoesout
ora strangenoiseis heard.)
,,TheProductisnotworking
normally.
Theratinglevelpasswordhas
beenforgotten.
• Turnoffthe power,and pressand holdtheSTOP( [] ) buttononthe product
forlongerthan5 seconds,
- Usingthe RESETfunctionwill eraseallstoredsettings,
Donotusethisunlessnecessary,
• Withno discinthe product,pressandholdtheproduct'sSTOP([] ) buttonfor
longerthan 5seconds,[NITappearsonthe displayandallsettingswill return
tothe defaultvalues,
Andthen pressthePOWERbutton,
- Usingthe RESETfunctionwill eraseallstoredsettings,
Donotusethisunlessnecessary,
Can'treceive radio broadcasts. • Isthe antennaconnectedproperly?
• Iftheantenna'sinputsignalisweak,installanexternalFMantennain anarea
with goodreception,
While listening to TVaudio • Ifthe OPEN/CLOSE(A_.)buttonispressedwhilelisteningtoTVaudiousingthe
through the Product.no soundis D,INorAUXfunctions,the BD/DVDfunctionsareturnedon andtheTVaudiois
heard, muted,
"NotAvailable"appearson
screen.
IftheHDM[outputissettoa
resolutionyourW cannotsupport
(forexample,1080p),youmaynot
seeapictureonyourTV.
• Thefeaturesoractioncannotbecompletedatthis timebecause:
1,TheBD/DVD'ssoftwarerestrictsit,
2,TheBD/DVD'ssoftwaredoesn'tsupportthefeature(e,g,,angles)
3,Thefeatureisnotavailableatthe moment,
4,You'verequestedatitleorchapternumberorsearchtimethatisoutofrange,
• PresstheSTOP([] ) button(onfrontpanel)formorethan 5 secondswith no
disc inside,All settingswill reverttothefactorysettings,
NoHDMIoutput. • Checkthe connectionbetweentheTVandtheHDMIjackofthe Product,
• CheckifyourTV supports480p/720p/1080i/1080pHDMIinputresolution,
AbnormalHDM[outputscreen. • Ifrandomnoiseappearson the screen,it meansthatTVdoesnotsupport
HDCP(High-bandwidthDigitalContentProtection),
IftheNDMIoutputissettoa resolution • PresstheSTOP(u) button(onfrontpanel)formorethan5secondswithno
your"IVcannotsupport(forexample, disc inside,All settingswill reverttothefactorysettings,
1080p),youmaynotseea pictureon • Whenthefactorydefaultsettingsarerestored,allthe userdatastoredinthe
yourW. BDdatawill bedeleted,
English 63
Otherinformation
Icanseefolderssharedthroughthe
PCShareManager,butIcannotsee
thefiles.
Videois playedintermittently.
AIIShareconnectionbetweenTV
and PCisunstable.
I cannotconnectto theBD-LIVE
server.
WhenusingtheBD-LIVEservice.
anerroroccurs.
• Sinceitshowsonlyfilescorrespondingto the Image,Music,andMovie
categories,filesthat do notcorrespondtothesecategoriesmaynotbe
displayed,
• Checkifthenetworkisstable,
• Checkif the networkcable is properlyconnectedand if the networkisnot
overloaded,
• Wirelessconnectionbetweenthe serverandthe productisunstable,
Checkthe connection,
• IP address under the samesubnetwork should be unique, otherwise IP
collisioncanresultsin sucha phenomenon,
• Checkifyou haveafirewall enabled,
Ifso,disablethefirewallfunction,
• Checkwhetherthe networkconnectionissuccessfulornotbyusingNetwork
Testmenu,(Seepage41)
• CheckwhethertheUSBmemorydeviceisconnectedwith productornot,
• Thememorydevicemusthaveat least1GBoffreespaceto accommodatethe
BD-LIVEservice,
YoucanchecktheavailablesizeinBDDataManagement,(Seepage36)
• PleasecheckwhethertheBD-LIVEInternetConnectionmenuissetto
Allow(All),
• Ifallabovefails,contactthecontentsproviderorupdatethe latestfirmware,
• Thememorydevicemusthaveatleast1GBoffreespacetoaccommodatethe
BD-LIVEservice,
YoucanchecktheavailablesizeinBDDataManagement,(Seepage36)
NOTE
_ Whenthefactorydefaultsettingsare restored,alltheuserdatastoredintheBDdatawillbedeleted,
64' English
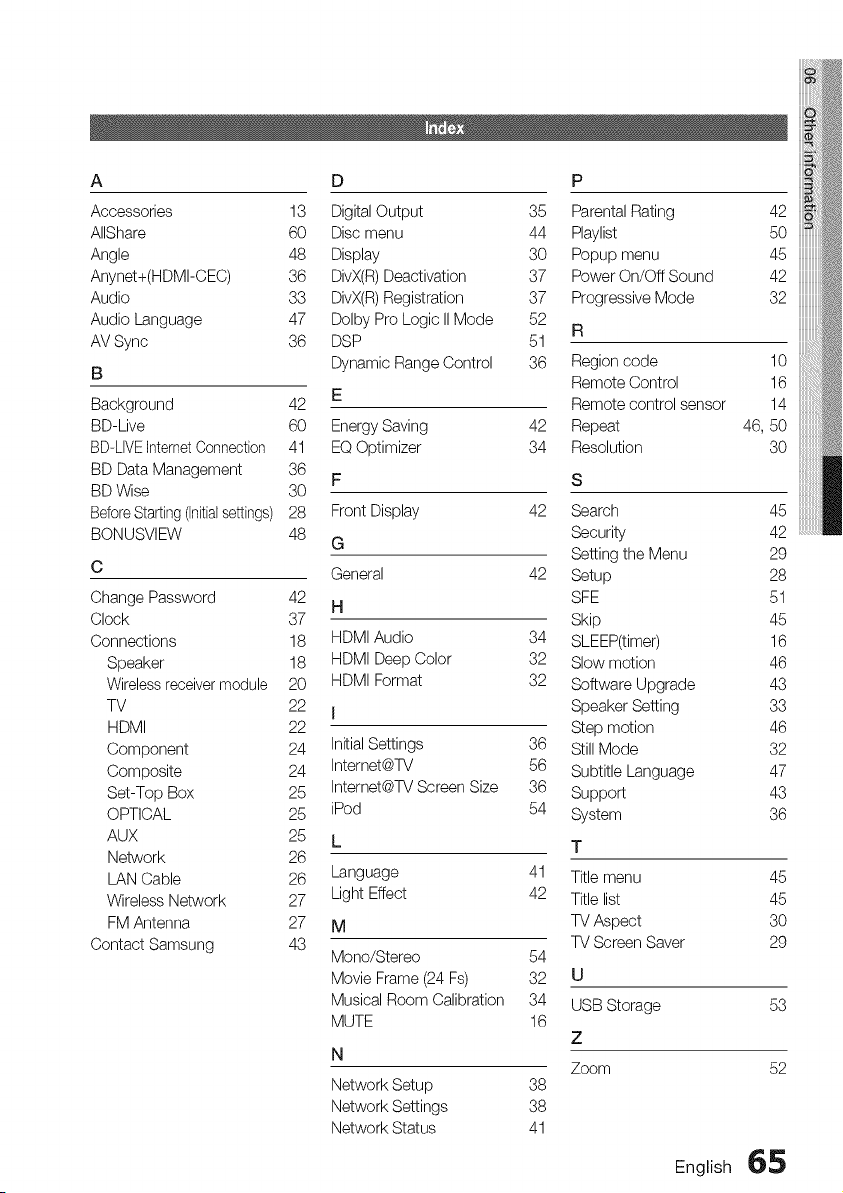
A D P
Accessories 13 Digital Output 35 Parental Rating 42
AIIShare 60 Disc menu 44 Playlist 50
Angle 48 Display 30 Popup menu 45
Anynet+(HDMI-CEC) 36 DivX(R)Deactivation 37 Power On/Oft Sound 42
Audio 33 DivX(R) Registration 37 Progressive Mode 32
Audio Language 47 Dolby Pro Logic IIMode 52
R
AV Sync 36 DSP 51
B Dynamic Range Control 36 Region code 10
Remote Control 16
Background 42 E Remote control sensor 14
BD-Live 60 Energy Saving 42 Repeat 46, 50
BD-LIVEIntemetConnection 41 EQOptimizer 34 Resolution 30
BD Data Management 36
F S
BD Wise 30
Before Starting(Initialsettings) 28 Front Display 42 Search 45
BONUSVIEW 48 G Security 42
Setting the Menu 29
C General 42 Setup 28
Change Password 42 H SFE 51
Clock 37 Skip 45
Connections 18 HDMI Audio 34 SLEEP(timer) 16
Speaker 18 HDMI Deep Color 32 Slow motion 46
Wirelessreceiver module 20 HDMI Format 32 Software Upgrade 43
TV 22 j Speaker Setting 33
HDMI 22 Step motion 46
Component 24 Initial Settings 36 Still Mode 32
Composite 24 Internet@TV 56 Subtitle Language 47
Set-Top Box 25 Internet@TV Screen Size 36 Support 43
OPTICAL 25 iPod 54 System 36
AUX 25 L T
Network 26
LAN Cable 26 Language 41 Title menu 45
Wireless Network 27 Light Effect 42 Title list 45
FMAntenna 27 M TVAspect 30
Contact Samsung 43 TV Screen Saver 29
Mono/Stereo 54
Movie Frame (24 Fs) 32 U
Musical Room Calibration 34 USB Storage 53
MUTE 16
Z
N
Zoom 52
Network Setup 38
Network Settings 38
Network Status 41
English 65

Otherinformation
PowerRequirements
PowerConsump[ion
Weign[
Dimensions
OperatingTemperatureRange
Signal/noisera_lo
usaole sensitiVity,
Totalharmonicdistortion
BD(Bid-rayDisc)
DVD(DigtalVersatileDisc
_is_ CD:5 inche_ _OMPACfDISC
CD:31/2 inchesCOMPACfDISC,
Compositevideo
Componenl:video
Vdeo/Aud9 HDM
Frontspeakeroutput 165Wx 2(30)
Centerspeakeroutput 170%30)
Surroundspeakeroutput 165Wx 2(30)
Subwooferspeakeroutput 170%30)
Analoginput
Frequencyresponse Digitalinput
S/NRatio 7OdD
Channelseparation 6OdD
(AUX)5OOmV
bp_a_u__y_._ Front
Impedance 3_)
Frequencyrange 140Hz-20kHz
Outputsoundpressurelevel 87dB/W/M
Ratedinput 165W
Maximuminput 330W
Dimensions(Wx Hx D)
Weights
AC120V,60Hz
75W
8.3 Ibs
16.9(W)x2.4(H)x 13.0(D)inches
+41°Fto+95°F
10%to75%
70dB
10dB
0.5%
ReadingSpeed:4.917m/sec
ReadingSpeed:3.49- 4.06 m/sec.
Approx.PlayTime(SingleSided,SingleLayerDisc): 135min.
ReadingSpeed:4.8 - 5.6m/sec.
MaximumPlayTime:74 min.
ReadingSpeed:4.8 _ 5.6m/sec.
Maximum_Time :20 min.
1channel:1.0 Vp-p(750 load)
Blu--rayDisc: 480i DVD:480i
Y:1.0Vp-p(750 load)
Pr:0.70Vp-p(750load)
Pb:0.70Vp-p(750load)
Blu-rayDisc: 1080i,720p,480p,480i DVD:480p,480i
1080p,1080i,720p,48%
PCMmultichannelaudio,Bitstreamaudio,PCMaudio
20Hz_2OkHz(:.,:3dB)
20Hz_44kHz(:s:3dB)
5.1ch speakersystem
Surround Center Subwoofer
3_) 30 30
140Hz-20kHz 140Hz-20kHz 40Hz- 160Hz
87dB/W/M 87dB/W/M 88dB/W/M
165W 170W 170W
330W 340W 340W
Front:3.54x13.17x2.7 inches(Standbase:4.29x3.86 inches)
Surround: 3.54x5.57x 2.7 inches
Center:14.17x2.93x 2.7 inches
Subwoofer:6.61x 13.78x11.61inches
Front:1.85Ibs,Surround:1.28Ibs
Center:1.28Ibs,Subwoofer:9.92Ibs
*: Nominal specification
- Samsung Electronics Co., Ltd reservesthe rightto change the specifications without notice.
- Weight and dimensions are approximate.
- Design and specifications aresubject to change without priornotice.
_ English

This SAMSUNGbrand product, assupplied and distributed bySamsung ElectronicsAmerica, inc.(SAMSUNG)and delivered
new, inthe originalcarton to the originalconsumer purchaser, iswarranted by SAMSUNGagainst manufacturing ddects in
ma}erials and workmanship for alimitedwarranty period of:
One (1) Year Parts and Labor*
(*90 Days Parts and Labor for Commercial Use)
This limitedwarranty begins on the odginaldate ofpurchase, and isvalidonly on products purchased and used in the United
States. To receivewarranty service, thepurchaser must contact SAMSUNGfor problem determination and service procedures.
Warrantyservice can only be performed byaSAMSUNG authorized service center.The odginaldated billof sale must be
presented upon request asproof of purchase to SAMSUNGor SAMSUNG's authorized servicecenter. Transportation of the
product to and from theservice center isthe responsibility of the purchaser.
SAMSUNGwillrepair orreplace thisproduct, at our option and at no charge asstipulated herein,with new or reconditioned
partsor products if found to bedefective during the limitedwarranty period specified above. All replaced parts and products
become theproperty of SAMSUNG and must be returnedto SAMSUNG. Replacement parts and products assume the
remainingodginalwarranty, or ninety (90)days, whichever islonger.
SAMSUNG'sobligationswithrespectto softwareproductsdistributed bySAMSUNGundertheSAMSUNGbrandnamearesetforthin
theapplicableend userlicenseagreement.Non-SAMSUNGhardwareandsoftwareproducts,if provided,are onan"ASIS" basis.
Non-SAMSUNGmanufacturers,suppliers,publishers,andserviceprovidersmayprovidetheir ownwarranties.
This limitedwarranty covers manufacturing defects in materialsand workmanship encountered in normal,and except to
theextent otherwise expresslyprovided for inthis statement, noncommercial use ofthisproduct, and shallnot applyto the
following, including, but notlimited to: damage which occurs inshipment; delivery and installation;applications and usesfor
whichthis product was not intended; alteredproduct orserialnumbers; cosmetic damage orexterior finish; accidents, abuse,
neglect, fire, water, lightningor other acts of nature; use of products, equipment, systems, utilities,sewices, parts, supplies,
accessories, applications, installations,repairs, externalwiringor connectors not supplied and authorized by SAMSUNG, or
which damage thisproduct or resultin service problems; incorrect electrical linevoltage, fluctuations and surges; customer
adjustments and failureto follow operating instructions, cleaning, maintenance and environmental instructionsthat arecovered
and prescribed in the instruction book; product removalor reinstallation;reception problems and distortion relatedto noise,
echo, interference orother signaltransmission and delivery problems. SAMSUNGdoes notwarrant uninterrupted orerror-flee
operation of the product.
THEREARENO EXPRESSWARRANTIESOTHER THANTHOSE LISTEDAND DESCRIBEDABOVE,AND NOWARRANTIES
WHETHEREXPRESSOR IMPLIED,iNCLUDiNG,BUT NOT LiMFED TO, ANY IMPLIEDWARRANTIESOFMERCHANTABILFY
OR FITNESSFORAPARTICULARPURPOSE, SHALL APPLYAFTERTHE EXPRESSWARRANTYPERIODSSTATED
ABOVE,AND NOOTHER EXPRESSWARRANTYORGUARANTY GIVEN BYANY PERSON, FiRMOR CORPORATIONWiTH
RESPECTTOTHIS PRODUCTSHALLBE BINDING ON SAMSUNG. SAMSUNGSHALL NOTBELIABLEFORLOSSOF
REVENUEOR PROFFS, FAILURETO REALIZESAVINGSOROTHER BENEFITS,OR ANYOTHERSPECIAL, INCIDENTAL
ORCONSEQUENTIALDAMAGES CAUSED BYTHE USE, MISUSEOR INABILITYTO USETHIS PRODUCT,REGARDLESS
OFTHE LEGALTHEORY ON WHICH THE CLAIMIS BASED,AND EVENIFSAMSUNG HASBEENADVISEDOFTHE
POSSIBILITYOFSUCH DAMAGES.NORSHALLRECOVERYOFANYKiNDAGAINSTSAMSUNG BE GREATERIN AMOUNT
THAN THE PURCHASEPRICEOFTHE PRODUCTSOLD BYSAMSUNG AND CAUSINGTHEALLEGED DAMAGE. WFHOUT
LIMITINGTHE FOREGOING,PURCHASERASSUMESALL RiSK AND LIABILITYFOR LOSS, DAMAGEOR iNJURYTO
PURCHASER AND PURCHASER'S PROPERTYAND TOOTHERSAND THEIR PROPERTYARISING OUT OFTHE USE,
MISUSEOR INABILITYTO USETHIS PRODUCTSOLD BYSAMSUNG NOTCAUSEDDIRECTLYBYTHE NEGLIGENCEOF
SAMSUNG. THIS LIMITEDWARRANTYSHALL NOT EXTENDTOANYONEOTHERTHAN THEORIGINAL PURCHASER OF
THIS PRODUCT,IS NONTRANSFERABLEAND STATESYOUREXCLUSIVEREMEDY.
Some states do not allow limitations on how longan implied warranty lasts, orthe exclusion or limitationofincidental or
consequential damages, sothe above limitationsor exclusions maynot applyto you. Thiswarranty givesyou specific legal
rights,and you may also haveother rights which varyfrom state to state.
To obtainwarranty hardware service, please contact SAMSUNGat:
Samsung ElectronicsAmerica, inc.
105 Challenger RoadRidgefield Park,NJ07660-0511
1-800-SAMSUNG (726-7864) and www.samsung.com/us
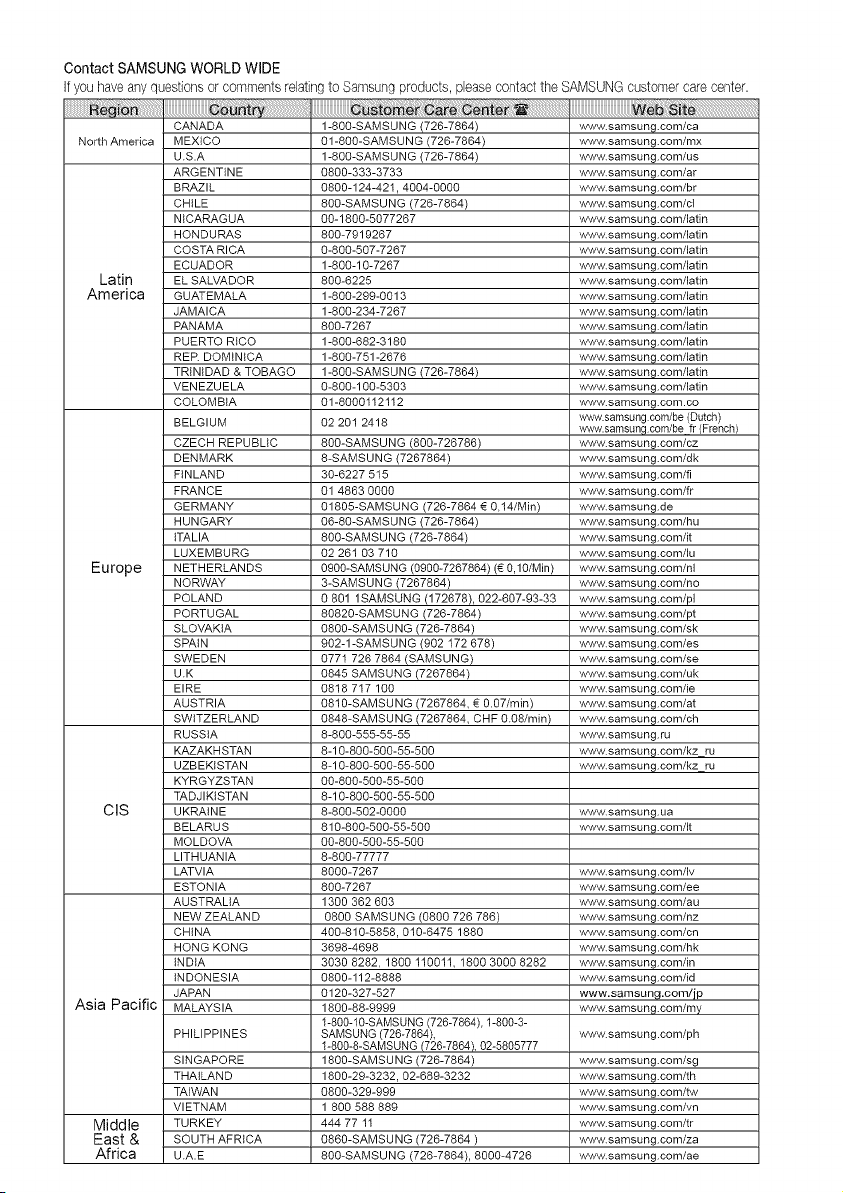
Contact SAMSUNGWORLDWIDE
IfyouhaveanyquestionsorcommentsrelatingtoSamsungproducts,pleasecontactthe SAMSUNGcustomercarecenter.
North America
Latin
America
Europe
CIS
Asia Pacific
Middle
East &
Africa
CANADA
MEXICO
U.S.A
ARGENTINE
BRAZIL
CHILE
NICARAGUA
HONDURAS
COSTA RICA
ECUADOR
EL SALVADOR
GUATEMALA
JAMAICA
PANAMA
PUERTO RICO
RER DOMtNICA
TRINIDAD & TOBAGO
VENEZUELA
COLOMBIA
BELGIUM
CZECH REPUBLIC
DENMARK
FINLAND
FRANCE
GERMANY
HUNGARY
ITALIA
LUXEMBURG
NETHERLANDS
NORWAY
POLAND
PORTUGAL
SLOVAKIA
SPAIN
SWEDEN
U.K
EIRE
AUSTRIA
SWITZERLAND
RUSSIA
KAZAKH STAN
UZBEKISTAN
KYRGYZSTAN
TADJIKISTAN
UKRAINE
BELARUS
MOLDOVA
LITHUANIA
LATVIA
ESTONIA
AUSTRALIA
NEW ZEALAND
CHINA
HONG KONG
INDIA
INDONESIA
JAPAN
MALAYSIA
PHILIPPINES
SINGAPORE
THAILAND
TAIWAN
VIETNAM
TURKEY
SOUTH AFRICA
U.A.E
1-800-SAMSUNG (726-7864)
01-800-SAMSUNG (726-7864)
1-800-SAMSUNG (726-7864)
0800-333-3733
0800-124-421,4004-0000
800-SAMSUNG (726-7864)
00-1800-5077267
800-7919267
0-800-507-7267
1-800-10-7267
800-6225
1-800-299-0013
1-800-234-7267
800-7267
1-800-682-3180
1-800-751-2676
1-800-SAMSUNG (726-7864)
0-800-100-5303
01-8000112112
02 201 2418
800-SAMSUNG (800-726786)
8-SAMSUNG (7267864)
30-6227 515
01 4863 0000
01805-SAMSUNG (726-7864 _ 0,14/Min)
06-80-SAMSUNG (726-7864)
800-SAMSUNG (726-7864)
02 261 03 710
0900-SAMSUNG (0900-7267864) (_0,10/Min)
3-SAMSUNG (7267864)
0 801 1SAMSUNG (172678), 022-607-93-33
80820-SAMSUNG (726-7864)
0800-SAMSU NG (726-7864)
902-1-SAMSUNG (902 172 678)
0771 726 7864 (SAMSUNG)
0845 SAMSUNG (7267864)
0818 717 100
0810-SAMSUNG (7267864, _ 0.07/min)
0848-SAMSUNG (7267864, CHF 0.08/min)
8-800-555-55-55
8-10-800-500-55-500
8-10-800-500-55-500
00-800-500-55-500
8-10-800-500-55-500
8-800-502-0000
810-800-500-55-500
00-800-500-55-500
8-800-77777
8000-7267
800-7267
1300 362 603
0800 SAMSUNG (0800 726 786)
400-810-5858, 010-6475 1880
3698-4698
3030 8282, 1800 110011, 1800 3000 8282
0800-112-8888
0120-327-527
1800-88-9999
1-800-10-SAMSUNG (726-7864), 1-800-3-
SAMSUNG (726-7864),
1-800-8-SAMSUNG (726-7864), 02-5805777
1800-SAMSU NG (726-7864)
1800-29-3232, 02-689-3232
0800-329-999
1800 588 889
444 77 11
0860-SAMSUNG (726-7864)
800-SAMSUNG (726-7864), 8000-4726
www.samsung.com/ca
www.samsung.com/mx
www.samsung.com/us
www.samsung.com/ar
www.samsung.com/br
www.samsung.com/c{
www.samsung.com/latin
www.samsung.com/latin
www.samsung.com/latin
www.samsung.com/latin
www.samsung.com/latin
www.samsung.com/latin
www.samsung.com/latin
www.samsung.com/latin
www.samsung.com/latin
www.samsung.com/latin
www.samsung.com/latin
www.samsung.com/latin
www.samsung.com.co
www.samsung corn/be (Dutch)
_vw.samsung corn/be fr (French)
www.samsung.com/cz
www.samsung.com/dk
www.samsung.com/fi
www.samsung.com/fr
www.samsung.de
www.samsung.com/hu
www.samsung.com/it
www.samsung.com/lu
www.samsung.com/nl
www.samsung.com/no
www.samsung.com/pl
www.samsung.com/pt
www.samsung.com/sk
www.samsung.com/es
www.samsung.com/se
www.samsung.com/uk
www.samsung.com/ie
www.samsung.com/at
www.samsung.com/ch
www.samsung.ru
www.samsung.com/kzju
www.samsung.com/kzju
www.samsung.ua
www.samsung.com/R
www.samsung.com/Iv
www.samsung.com/ee
www.samsung.com/au
www.samsung.com/nz
www.samsung.com/cn
www.samsung.com/hk
www.samsung.com/in
www.samsung.com/id
www.samsung.com/jp
www.samsung.com/my
www.samsung.com/ph
www.samsung.com/sg
www.samsung.com/th
www.samsung.com/tw
www.samsung.com/vn
www.samsung.com/tr
www.samsung.com/za
www.samsung.com/ae

QUESTIONS OR COMMENTS?
COUNTRY CALL OR ViSiT US ONLINE AT WRITE
1-800-SAMSUNG Samsung Electronics America, Inc.
IN THE US (7267864) www.samsung.com/us 105 Challenger Road Ridgefield Park,
NJ 07660-0511
Code No. AH68-02255R
